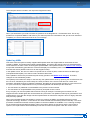
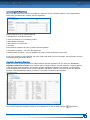
1
Compliance Data Exchange (CDX) Version 4.4 User Manual R E V I SI O N S Revision Date Description 1.0 Oct-04-2011 Initial Release 2.0 June-21-2012 Changes with CDX Release 2.0 included 3.0 May-16-2013 Changes with CDX Release 3.0 included 3.7 July-31-2014 Changes with CDX Release 3.7 included 4.1 Nov-18-2014 Changes with CDX Release 4.0 and 4.1 included 4.2 May-07-2015 Changes with CDX Release 4.2 included 4.3 July-15-2015 Changes with CDX Release 4.3 included 4.4 Nov-10-2015 Changes with CDX Release 4.4 included CDX USER MANUAL – VERSION 4.4 / NOVEMBER 2015 REVISIONS 2 C O NT E NT S Introduction ................................................................................................................................................................... 5 CDX – Getting started ................................................................................................................................................... 6 Basic Requirements .................................................................................................................................................. 6 Costs ......................................................................................................................................................................... 6 Company Registration .............................................................................................................................................. 6 System Access .......................................................................................................................................................10 Login .......................................................................................................................................................................10 User ID Forgotten / Request new password ...........................................................................................................11 Accept the Terms of Use ........................................................................................................................................12 Change Temporary Password ................................................................................................................................12 Review and Acknowledge Notifications ..................................................................................................................13 Navigating CDX ......................................................................................................................................................14 Create an MDS ...........................................................................................................................................................20 What is an MDS? ....................................................................................................................................................20 New MDS ................................................................................................................................................................20 Updating MDSs .......................................................................................................................................................47 Navigating the Tree ................................................................................................................................................48 Supplier Data Screen ..............................................................................................................................................49 Recipient Data Screen ............................................................................................................................................49 Check Procedure ....................................................................................................................................................52 Internally Release or Send / Propose an MDS .......................................................................................................53 MDS Analysis..........................................................................................................................................................55 Where-Used Analysis .............................................................................................................................................56 MDS Request..............................................................................................................................................................58 Parts of a Request ..................................................................................................................................................58 Request Terms: Recipient Versus Supplier ............................................................................................................58 MDS Attributes ........................................................................................................................................................58 Administrative Data .................................................................................................................................................59 MDS Request Statuses ..........................................................................................................................................59 Creating Requests ..................................................................................................................................................59 Rejecting a Request ...............................................................................................................................................62 Assign Existing MDS to Request ............................................................................................................................62 Completing the Request .........................................................................................................................................62 Create a CMD .............................................................................................................................................................63 What is a CMD? ......................................................................................................................................................63 New CMD................................................................................................................................................................63 Supplier Data Screen ..............................................................................................................................................71 Recipient Data Screen ............................................................................................................................................71 Smelter Overview in CMD Details ..........................................................................................................................73 Check Procedure ....................................................................................................................................................73 Propose a CMD ......................................................................................................................................................74 CMD Quality Reporting ...............................................................................................................................................75 Import / Export a CMD ................................................................................................................................................78 CMD Request .............................................................................................................................................................84 Parts of a Request ..................................................................................................................................................84 Administrative Data .................................................................................................................................................84 CMD Request Statuses ..........................................................................................................................................84 Creating Requests ..................................................................................................................................................85 Rejecting a Request ...............................................................................................................................................87 Assign Existing CMD to Request ............................................................................................................................87 Create CMD ............................................................................................................................................................87 Completing the Request .........................................................................................................................................87 CDX USER MANUAL – VERSION 4.4 / NOVEMBER 2015 CONTENTS 3 Deficiency Report .......................................................................................................................................................88 Create and Edit the Deficiency Report ...................................................................................................................89 Report Search .........................................................................................................................................................93 Report Settings .......................................................................................................................................................93 Outbox ........................................................................................................................................................................94 Inbox .........................................................................................................................................................................100 Search Tips ...............................................................................................................................................................101 Wild Card Search ..................................................................................................................................................101 Configure Search Results .....................................................................................................................................101 Component Search Fields ....................................................................................................................................101 Semicomponent Search Fields .............................................................................................................................102 Material Search Fields ..........................................................................................................................................102 Substance Search Fields ......................................................................................................................................103 Search Basic Substance Changes .......................................................................................................................104 Basic Substance Request: Requesting the addition of a basic substance ..........................................................104 CMD Search .........................................................................................................................................................105 CMD Template Search .........................................................................................................................................106 CMD Smelter Search ............................................................................................................................................107 SDoC Search ........................................................................................................................................................108 Company Search ..................................................................................................................................................109 Reporting ..................................................................................................................................................................110 Launch the MDS Report .......................................................................................................................................110 Launch the MD Report ..........................................................................................................................................110 Launch the SDoC Report ......................................................................................................................................111 Administration Menu .................................................................................................................................................113 Personal Settings ..................................................................................................................................................113 Password Change ................................................................................................................................................114 Notification ............................................................................................................................................................114 Company...............................................................................................................................................................115 User ......................................................................................................................................................................118 Org Unit Report .....................................................................................................................................................121 Trust User .............................................................................................................................................................121 MDS Admin ...........................................................................................................................................................122 CMD Admin...........................................................................................................................................................122 CDX Licenses .......................................................................................................................................................123 Company Specific Substance Lists ......................................................................................................................125 CMD Quality Profile Manager ...............................................................................................................................126 Deficiency Report Manager ..................................................................................................................................128 Statistics ................................................................................................................................................................129 CDX Usage Helpers .................................................................................................................................................130 MDS Explorer........................................................................................................................................................130 Clipboard...............................................................................................................................................................130 Tree Search ..........................................................................................................................................................131 Basic Substance Groups ......................................................................................................................................131 Tree Filters ............................................................................................................................................................131 Regulation Substance Overview...........................................................................................................................132 Export Search Results ..........................................................................................................................................133 Configure Search Results .....................................................................................................................................133 Company Specific Enhancements ............................................................................................................................134 CDX Security ............................................................................................................................................................136 CDX – Add-on Services ............................................................................................................................................137 CDX – Basic Information ..........................................................................................................................................138 Glossary ....................................................................................................................................................................141 Useful information .....................................................................................................................................................143 CDX USER MANUAL – VERSION 4.4 / NOVEMBER 2015 CONTENTS 4 I N T R OD UCT I O N Environmental protection plays an ever-increasing role in our world. More and more chemicals are coming under scrutiny with companies in all industries required to reduce the use of these hazardous substances in their products. Additionally, to avoid waste, companies are required to reduce the demand for resources – recovering the resources contained in waste and return them back into the product. With the increasing globalization of the economy and customer base, a company needs to go beyond observing only national or regional standards. They must also comply with international laws and regulations and implement the requirements into the design and production processes. Hewlett Packard Enterprise (HPE) – one of the pioneer companies in recycling and environmental management – provides with the Compliance Data Exchange (CDX),a solution that enables you to collect, maintain, analyze and archive information about your materials across all levels of your supply chain. With the help of the CDX system, you can provide information about the substances contained in your products or used during your production process at anytime from anywhere to your customers that require it, and you can analyze your data in terms of environmental compliance. In the CDX system, you collect data through the entire supply chain which allows participating companies to comply with legal requirements such as the Hong Kong Convention (HKC), REACH, SVHC, WEEE, Conflict Minerals and similar regulations. The CDX Conflict Minerals Declaration (CMD) Manager enables you to meet reporting requirements for the Dodd-Frank Wall Street Reform and Consumer Protection Act. Specifically, the CMD Manager assists in the declaration process and roll-up of information received from supplier companies, to give you full control over your company's supply chain. It provides the best solution to manage the CMDs of business partners working in CDX, and also exchanging CMDs with business partners not currently registered in CDX. CDX USER MANUAL – VERSION 4.4 / NOVEMBER 2015 INTRODUCTION 5 CDX – G ET T I N G ST ART E D Basic Requirements For accessing the CDX you need an internet connection and a browser. Due to the technical requirements, please use one of the browser versions supported by HPE (you find these versions on the CDX Information Pages, http://www.cdxsystem.com How To Start System Information) e.g. the Microsoft Internet Explorer Version 10.0 or Mozilla Firefox and Google Chrome in its current version. There may be other browsers and versions that will work with CDX but the helpdesk can only assist if you have issues with the supported browsers. In all cases, in the internet options of the browser, you must enable Java Scripting. If your browser does not have the correct options enabled, you will not be able to continue actions in the application. As with other web applications, when working in CDX, the browser keys and buttons (for example “Back”) do not have the desired effect. You will need to use the buttons and functions within CDX to navigate. Costs Any company can self-register and use CDX to create a datasheet and send to their customer at no cost. Each company is allowed to receive 10 datasheets at no cost. However, to receive the greatest benefit from the system, you need to use data from your suppliers. To be able to incorporate their data into your structures, you need to pay for each of your supplier's datasheets you want to use in your own structures. Please see CDX Information Pages > How To Start > Order Information > CDX Receiver Volume License for a description of our pricing schedule. The service fees include the CDX operations, system maintenance, web services and 1st level helpdesk support. To use the CDX Web Services, your company has to place minimum one order and the use of the standard interface is included in the datasheet price. However any support (e.g. consulting) regarding the connection of CDX to your in-house systems is not included and will need to be purchased separately. The charge to use the CMD Manager, and incorporate CMDs from your suppliers via CMD workflow or Excel upload, will be based on a fee per calendar year for each CDX company (please refer to the CDX Information Pages > How To Start > Order Information > CMD Manager License). Company Registration Note: Each company or company site is allowed one CDX registration. This is done to prevent confusion within your own company and between your company and your customers and suppliers. We ask that you check first with the CDX Service Desk before registering your company online. Once registered, any Company Administrator can create users and other Company Administrators. As people within a company frequently change jobs or leave the company, we strongly suggest a minimum of two (2) Company Administrators for each CDX company. A company can be registered on our homepage: CDX Information Pages CDX Login Registration Register your company. CDX USER MANUAL – VERSION 4.4 / NOVEMBER 2015 CDX – GETTING STARTED 6 The user can enter the company data and one Company Administrator at this time. All fields with a red * are required. When the form is submitted, the system will check to see if another company with the same name is already registered (meaning exact character string match). For those companies wanting to centralize their compliance operations, we have a “deny list” which rejects any submission that has the restricted character string. Since CDX has a reporting module for Conflict Minerals and a CM smelter is a special kind of company, you get an additional Tab "Smelter Facility", when you need to register your company as a smelter by selecting the checkbox "Is your company a CM smelter". Additional steps are required to activate your company if your company is a smelter. Detailed information for the smelter facility administration can be found in the section Administration Menu > Company. By default, for common company registrations, the checkbox is unselected and the "Smelter Facility" tab is invisible. Note: In contrast to common company registration, the “Smelter Facility“ tab is only available for smelter companies to input their facility data together with all information about the minerals created at this facility. A smelter can have more than one facility and each facility can produce more than one mineral. The “Company data“ Tab should be updated to include the Smelter Facility’s company headquarters information and the “Company Administrator“ Tab is used for information about the Company Administrator of smelter’s headquarters. HPE strongly recommends that the person registering the company be the initial Company Administrator as the system will e-mail the registration information, including a URL to the ID, to the Company Administrator. If the Company Administrator is not the one registering the company, they are likely to ignore or delete the message. Note: Please make sure, that the e-mail address field is filled with the correct address because this is where the confirmation mail is sent. User IDs are assigned to individuals and not to companies. The only authorized user of the ID also has the e-mail address associated with the ID. We strongly recommend that each person working in CDX have their own User ID. After completing the fields and clicking “Next”, you will receive a window asking if you want to register the company in CDX. After accepting in this window, you receive a screen with your CDX Credentials: User, ID, Password, Company ID, Company name. Please copy your CDX credentials and store them in a safe place. They will not be displayed again, so make sure you copy them correct. CDX USER MANUAL – VERSION 4.4 / NOVEMBER 2015 CDX – GETTING STARTED 7 After you confirm, that you have copied the CDX credentials, you will receive an e-mail containing a link to activate your new company in CDX. You will need to use this URL to activate the company before you can log into CDX. After that you can use your user ID and password to log in the CDX application. The following is an example of the e-mail the Company Administrator will receive after registering a company. Please note that the email is sent from the CDX system and you may have to work with your IT department to ensure delivery to your inbox. Sometimes these are blocked at the firewall level and sometimes they are routed to the junk or spam folder. As this email is sent from a computer, it cannot respond to a request to click on a link and enter a set of characters to allow the email to go through. Note: Some e-mail applications will insert a carriage return instead of wrapping the URL. If your URL doesn’t work, there will probably be a few random characters on the line below the URL. These are part of the key. Copy both lines into an application where you can remove the paragraph mark between the two lines to create a longer URL and click on it. When you access this URL, you get the possibility of activating or cancelling the registration with CDX. If you elect to cancel, you will not be able to return to the URL and accept. Note: You have 14 days time to access the URL sent to you. If the URL has not been visited for 14 days, the URL is no longer accessible. CDX USER MANUAL – VERSION 4.4 / NOVEMBER 2015 CDX – GETTING STARTED 8 The following figure shows a typical Company Activation page. By clicking “Activate” your CDX Company Registration is completed, and you can log in CDX by using the User ID and password you received during the registration. As a Company Administrator you are now allowed to and are responsible for: Creating users for (only) your own company Changing user profiles within your company Resetting passwords for your users Assigning contact persons for your company Deactivating users that have left the company Ensuring there is always a minimum of one Company Administrator available in your CDX company (including vacations and leaves of absence) Watching the MDS count, ordering more when the count is low and ensuring that the Purchase Order is created to pay for the order Accessing the MDS specific statistics for your CDX company Every time a new user is created, you see a window with the User ID and the associated e-mail address. A temporary password is generated and sent by e-mail to the user. This e-mail only contains the new password, not the User ID – so it is necessary that you inform the user about the CDX user ID. Each new user must read and accept the CDX Terms of Use at first login. Note: Each user has the capability and responsibility to maintain their e-mail and phone number. The Company Administrator can also maintain this data. For system security, each user should use their own ID. Password resets will only be communicated to the e-mail on the ID. CDX USER MANUAL – VERSION 4.4 / NOVEMBER 2015 CDX – GETTING STARTED 9 System Access The CDX system is accessed from the CDX Information web pages: www.cdxsystem.com. After navigating to the CDX Information Pages, you will find several tabs at the top of the page. Under CDX System Support, you will find our Frequently Asked Questions (FAQs) which presents answers to common questions. The following picture presents the CDX homepage. Login Once on the CDX Information Pages, click the button “CDX Login” to access the CDX system. The following figure depicts a typical view of the CDX login page. At this point, you enter your User ID and password. The User ID is not the same as the Company ID. User IDs follow a pattern comprised of information from the company name and user assigned to the ID. Company IDs are all numeric while User IDs consist of a set of lower case letters followed by a set of numbers. User IDs and passwords are case sensitive (meaning SPRING is not the same as spring). To avoid lockouts, we suggest at first login that you copy (<CTRL><C>) and paste (<CTRL><V>) from the e-mail. System generated passwords only contain lower case characters and numbers. They will not contain o, 0, l, or 1. User IDs usually contain 5 lower case letters followed by 3 numbers. CDX USER MANUAL – VERSION 4.4 / NOVEMBER 2015 CDX – GETTING STARTED 10 Prior to logging in, you may select the language that the prompts appear at this point: English, German, French, Spanish, Portuguese, Chinese, Japanese or Korean. It should be noted that although the field prompts are presented in different languages, all field entries must be made in English as that is the agreed up language of CDX. Additionally, CDX does not translate field entries from one language to another. User ID Forgotten / Request new password From time to time, you may forget the ID and/or password, especially if you do not enter the system frequently. CDX has built in functionality to assist users in retrieving their ID and resetting their password. However, the key to this lock is the e-mail address associated with the ID in the system. It is imperative that you keep your e-mail current in the system. If you forget your ID, you can easily retrieve your User ID(s) in the CDX Application login screen by using the User ID Forgotten link as shown below. When using the link, you will be asked to enter your e-mail address: And the system will sent you a list of all User IDs associated with your e-mail address. Once you have the ID, you can then use the Request new password link to reset the password. When you use the link, a window similar to the following will appear: CDX USER MANUAL – VERSION 4.4 / NOVEMBER 2015 CDX – GETTING STARTED 11 When you request a new password, the correct e-mail address for the ID needs to be entered. This e-mail address has to match the e-mail address already available in the system for this User ID in order to be able to set back the password. The system performs a check and, if it is allowed (e.g. the ID is not expired and you have had a successful login since the last password reset), a new password will be sent to the e-mail address associated with the ID in the system. We strongly suggest that since the password will be a random string of characters, you copy/paste from the e-mail into the password field. You will need to change the password at first login. If you get an error message, then either the ID is incorrect, you do not have the correct e-mail address for the ID, the ID is expired, or you have not had a successful login since the last password reset. This last check is to prevent you from constantly requesting a password reset when you cannot receive e-mails from the system. If you are having issues receiving e-mail from the CDX server, then please work with your IT department and the User ID Forgotten link to trace why you cannot receive e-mails from the system. If you cannot receive e-mails from the CDX system, you cannot use the system. Accept the Terms of Use At first login (using the temporary password received by e-mail), a user must accept the Terms of Use and change the temporary password in order to proceed. The following figure shows the typical Terms of Use screen. In some browsers or some screen resolutions, you may need to scroll to the right to view the Accept and Decline buttons. You will need to Accept after reading the Terms of Use to proceed. Decline takes you back to the CDX start page and you will not be able to use CDX. Change Temporary Password As a next step you will have to change your initial password. You may also change it through the Administration > Change Password option. For security reasons, you will need to change your password at least every 90 days or after a system password reset (either through the “Request new password” from the CDX login screen or by the CDX Service Desk). When changing the password, you will have to enter the old password and create a new password. The password must be a minimum of 8 characters and can be up to 20 characters. Passwords may only contain ASCII or Latin 1 (ISO-8859-1) characters and must contain at least one numeric character. CDX USER MANUAL – VERSION 4.4 / NOVEMBER 2015 CDX – GETTING STARTED 12 Review and Acknowledge Notifications If there are notifications, they will be displayed immediately after login and you can decide to either mark them as read or to be displayed again at next login. The notification screen may not appear if you had to change your password (will appear with the next login). You cannot ignore this screen. You MUST acknowledge that you have read the message in order to proceed. The following figure depicts typical notifications. Once you click <OK>, you get to the CDX main screen. The following figure presents the primary view of CDX. CDX USER MANUAL – VERSION 4.4 / NOVEMBER 2015 CDX – GETTING STARTED 13 Navigating CDX Once you enter CDX, you see a window that consists of several parts. The following figure illustrates the various parts. User Information Area / Log off In this area of the screen the user’s name and the company name and CDX ID are displayed. For signing out, a Log off button is available in the upper right corner ( ). There is also a “status indicator” next to it ( ). Main Menu and Buttons The Main Menu and Buttons present all options to which your user profile currently has access. This menu is interactive, which means the cursor highlights the chosen menu options. Upon clicking an option, the results will be displayed in the working area. Menu items which are not available at this are displayed in faded colour. The following section describes each of the menu items. MDS Menu/Toolbar Buttons These functions are available under the MDS menu item: New You can either use the MDS > New menu item or the button in the toolbar. The button will allow a menu to appear which has the same actions as the MDS > New option in the menu. From the button on the toolbar: Menu Item Description Component Create and opens a new Component MDS. Semicomponent Creates and opens a new Semicomponent MDS. Material Creates and opens a new Material MDS. MDS Request Creates and opens a new MDS request. Conflict Minerals Declaration Creates and opens a new CMD (Conflict Minerals Declaration). CMD Request Creates and opens a new CMD request. SDoC Creates and opens a new SDoC report. CDX USER MANUAL – VERSION 4.4 / NOVEMBER 2015 CDX – GETTING STARTED 14 Save Save can either be accessed from the MDS > Save menu item or by using the button in the toolbar. This button will not appear unless the page you are working on can be saved. This function saves the currently open data. Use this function for saving items such as MDSs, requests, organization units, users, and SDoCs. Save As The following table describes the function of each item under Save As: Menu Item Description New Version Only available when editing an MDS. Saves a changed MDS to a new version for the same MDS ID. The previously opened MDS is not modified. You cannot create a New Version of an MDS that was not created by your CDX company. New MDS Only available when editing an MDS. Saves a changed MDS to a new MDS ID. The previously opened MDS is not modified. Release internally This is only available when editing an MDS. It releases the MDS internally, so it can be used in other MDSs (referenced) created by your own company. Forward The following table describes the options available under Forward: Menu Item Description Forward Only available when viewing an accepted MDS for which the sender has permitted forwarding. Creates a forwarding copy of the MDS that can be sent to other recipients but cannot be modified in the ingredients tree. This function can be used only one time per accepted MDS. Forwarded MDS Only available when viewing an accepted MDS that has already been forwarded. Opens the forwarding copy of the MDS. Original MDS Only available when viewing a forwarding copy of an accepted MDS. Opens the original accepted MDS. Print You can either use MDS > Print or the button on the toolbar to access this function. If you use this button, a menu will appear that is the same as the menu under the MDS > Print option. CDX USER MANUAL – VERSION 4.4 / NOVEMBER 2015 CDX – GETTING STARTED 15 This menu item allows you to print different types of reports from the data of the MDS being viewed as shown in the following table: Menu Item Description MD Report Only available when viewing or editing an MDS or when viewing or editing an SDoC if the SDoC is owned by the user. Creates an MD Report for the MDS. The MD Report identifies whether specific Materials (prohibited or restricted) and specific chemical substances contained within the MDS are in accordance with the convention and guidelines defined by ship-building industry. MDS Report Only available when viewing or editing an MDS. Creates an MDS Report for the MDS. The MDS Report lists the Substances of Assemblies and Materials contained within the MDS. SDoC Only available when viewing or editing an SDoC. Creates an SDoC Report for all MDSs and its related MDs specified by the SDoC. The SDoC Report identifies who is responsible for the specified MDSs and its related MD, assures that they are conform to the law and is suitable for the management and control of the information on chemical substances contained. SDoC Report is defined by International Maritime Organization (IMO) for ship recycling. Check This function is only available when viewing or editing an MDS. It performs a check on the MDS and reports all found issues. The Check function may also be initiated by using the button in the toolbar. Accept This function is only available when viewing a received MDS that has not yet been accepted, rejected or cancelled. Brings the Accept/Reject buttons into view so the MDS can be accepted. Reject This function is only available when viewing a received MDS that has not yet been accepted, rejected or cancelled. Brings the Accept/Reject buttons into view so the MDS can be rejected. Delete This function deletes the currently viewed data. This might be an MDS, an MDS Request or an organization unit (only available for Company Administrators). This option is not available for received MDSs. Additionally, you cannot delete any data that does not belong to your company. Log Off This function logs you off CDX and opens the log in / news page. You may also Log Off by using the on the upper right of the window. CDX USER MANUAL – VERSION 4.4 / NOVEMBER 2015 button CDX – GETTING STARTED 16 Functions Menu/Buttons The Functions menu gives you a list of functions that can be used in CDX. Most of them also have a button on the toolbar. These functions are detailed in the following table: Menu Item Description Component Search Opens the search screen for Component MDSs (own, accepted and published). Semicomponent Search Opens the search screen for Semicomponent MDSs (own, accepted and published). Material Search Opens the search screen for Material MDSs (own, accepted and published). MDS Search Opens the search screen for all MDSs (own, accepted and published). MDS Explorer Opens the MDS Explorer. Inbox Opens the search screen for received MDSs, MDS Requests, CMDs and CMD Requests. Outbox Opens the search screen for sent MDSs, MDS Requests, CMDs and CMD Requests. Where-Used Analysis Opens the analysis screen allowing to find MDSs with specific contents. Substance Search Opens the search screen for Substances. Regulation Substance Overview Opens a separate independent window, where all common and company specific regulations can be looked up for their detail information. MDS Updates Opens the screen for updating MDSs. SDoC Search Opens the search screen for SDoCs. Clipboard Opens the Clipboard. Conflict Minerals Manager Includes the following functions for your Conflict Minerals Declaration (CMD) Management: New CMD Creates and opens a new CMD. New CMD Request Creates and opens a new CMD Request. CMD Search Opens the search screen for CMDs. CMD TemplateSearch Opens the search screen for CMD Templates. CMD Smelter Search Opens the search screen for CMD Smelters. CMD Inbox Opens the search screen for received CMDs. CMD Request Inbox Opens the search screen for received CMD Requests. CMD Outbox Opens the search screen for sent CMDs. CMD Request Outbox Opens the search screen for sent CMD Requests. CMD Quality Reporting Opens the screen for CMD Quality Reporting. Deficiency Report Opens the screen for CMD Deficiency Reporting. CDX USER MANUAL – VERSION 4.4 / NOVEMBER 2015 Toolbar Button CDX – GETTING STARTED 17 Administration Menu The Administration Menu contains options that are associated with Company Administration. Depending on the User Profile, not all options may be available. The following table explains what options are available this menu. Menu Item Description Personal Settings Shows all data of the user such as e-mail address and phone number and allows him to change his personal information. Password Change Allows users to change their password. Notification Shows all currently visible and not yet confirmed notifications. Company Only available to Company Administrators. Opens the search screen for organization units of the user’s company. User Only available for Company Administrators. Opens the search screen for users within the user’s company. Trust User Only available for Company Administrators. Opens the search screen for trusted and distrusted users in other companies. Allows the Company Administrator to trust or distrust them. MDS Admin Only available for Company Administrators. Opens the MDS Administration screen allowing the Company Administrator to move multiple MDSs from one organization unit to another. CMD Admin Only available for Company Administrators. Opens the CMD Administration screen, allowing the Company Administrator to move multiple CMDs from one organization unit to another. CDX Licenses Only available to Company Administrators. Shows the current account balance of the user’s company. Company Administrators can place an order for CDX Receiver Volume Licenses or CMD Manager Licenses. Company Specific Substance Lists Only available to Company Administrators. Opens the screen to search for and create new company specific substance lists for your company. CMD Quality Profile Manager Only available to Company Administrators. Opens the screen to search for and create new profiles for your Quality Reporting. Deficiency Report Manager Only available to Company Administrators. Opens the screen to create the Deficiency Report standard template. Org Unit Report Only available to Company Administrators. Shows all Org Units of the own company without having users assigned. Statistics Only available to Company Administrators. Shows MDS specific statistical data for your company. Help Menu The Help Menu items are described in the following table: Menu Item Description CDX User Manual Includes the User Manual (pdf file) in all available languages. Video Tutorial Includes videos on several CDX functions. Web Service Includes the Web Service Manuals and a zip file with all available and supported schemas for the Web Service (xsd files). Terms of Use Opens the CDX Terms of Use (pdf file) in a new window. Network Performance Index Can be used to measure CDX performance in relation to the own network / PC. About CDX Shows information about the current version of CDX. CDX USER MANUAL – VERSION 4.4 / NOVEMBER 2015 CDX – GETTING STARTED 18 Information/Details The Details area is where input is inserted or is shown. Action Area In this area the buttons Search, Cancel, Create etc. are located. Clicking on the buttons in this area produces result lists below this area or lists details of an MDS Request, MDS, CDX User etc. Shortcuts from the Search Results Windows In addition to all of the above-mentioned buttons and menu items, if you highlight an MDS in a Search Results screen and right-click, you will have available shortcuts to frequently used functions such as the menu below generated from a Component search. Alternatively, you can click on Menu to open the context menu. CDX USER MANUAL – VERSION 4.4 / NOVEMBER 2015 CDX – GETTING STARTED 19 C R EAT E A N MDS One of the first things you are need to do is to create a Material Data Sheet (MDS). Even if you are going to attach (reference) existing data to your structure, you still need to create the structure that you will send to your customer, or use to generate a report. What is an MDS? An MDS can be thought of as a container that has many parts, as shown in the following figure: MDS Structure of a Component or Material Composition (Substance; Substance Group) Receiver Data (DUNS, Address, Part No., etc.) Filter Information: SVHC, HKC, RoHS, etc. Sender Data (Contact, Part No., etc.) Norms and Standards Workflow- and Request-Information Additional Attributes as required per Industry Each of these areas will be discussed in the following sections. New MDS You can either use the MDS > New from the Menus or the button in the toolbar to get started. However, first you need to know whether you want to create a Component, Semicomponent or Material as you cannot change from one to another later on. MDS Types The following table describes the differences between a Component, Semicomponent and Material: MDS Type Description Can be attached to Can have child nodes Has weight field Material Represents a homogeneous structure – meaning if you took a vertical slice through the product, you would not see layers (exception being electric/electronic components). Materials, Semicomponents, Components Material, Substance No Semicomponent Similar to a Material, it represents a structure that will require further processing before it is assembled and given a final weight. Examples are a steel blank or a coated wire. Usage is by length, by volume, or by area. Semicomponents, Components Semicomponent, Material, Substance No CDX USER MANUAL – VERSION 4.4 / NOVEMBER 2015 CREATE AN MDS 20 MDS Type Description Can be attached to Can have child nodes Has weight field Component Used to represent an assembly Component that has a defined weight and is used in whole number quantities. Examples would an engine block, a seat, etc. The weight of a Component MDS is defined at creation and cannot be reduced in the structure. Components Component, Semicomponent, Material, Substance Yes To make the MDS handling easier for you we added the following symbols to the mentioned Material, Semicomponent and Component icons, which are visible in the tree structure as well as in the search results: The house symbolizes own MDS (Component, Semicomponent, Material). The globe symbolizes published MDS (Component, Semicomponent, Material). The envelope symbolizes received MDS (Component, Semicomponent, Material). The other structure in CDX is the Substance represented by . The Substance List is a validated list of substances that is controlled by an outside company. It is not in the Public Domain but we use it as part of the CDX system. Under 100% Disclosure, every path from the top of the tree structure must terminate in a substance. A substance can be either a chemical element (example: iron, copper) or a compound (example: acrylic resin, zinc oxide). Basic Substances are defined by either a specific Chemical Abstract Number (CAS#) or generically by function. Generally, they fit in three distinct categories: CAS-numbered Basic Substance – This is a Basic Substance with a CAS# assigned to it, meaning it is a clearly defined Substance, example: Iron (CAS# 7439-89-6). Pseudo-Substance – A pseudo-substance gives an accurate description of the substance or the substance group but does not have a CAS# assigned to it, example: "Acrylic resin". It is important to point out that these substances are accepted as real substances and are not considered as wildcards. Joker or Wildcard – These substances do not define a specific substance. There is only a very limited amount of wildcards available and all have “system” in the CAS# field. An examples is "Miscellaneous." It is not allowed to use a Joker or Wildcard in place of a substance that is declarable or prohibited. Another fact about an MDS is that the Ingredients page has a tree structure which includes a parent-child relationship. The following figure presents a tree structure. In it, the Test Component is the parent of JT CDX PUBLISH TEST and +AZ150 (hot-dip aluminium-zinc coated). Looking at it in reverse, JT CDX PUBLISH TEST and +AZ150 (hot-dip aluminium-zinc coated) are child nodes of Test Component. Additionally JT CDX PUBLISH TEST is the parent node of +AS150 (hot-dip aluminium-silicium coated). It will be important to correct errors, so you need to have the top of the tree in edit mode and you can usually only impact the child nodes. CDX USER MANUAL – VERSION 4.4 / NOVEMBER 2015 CREATE AN MDS 21 Declaration Scope You can decide (preferably according to prior agreement with your client) about the levels of your declaration. CDX supports the following: Full Declaration means, that the complete ingredients information is provided, including all weights and percent information of the tree nodes. The weight of all parts sum up to the weight of the product. The percent values add up to 100%. MDSs can be marked as full declaration (100% declaration checkbox) and the check routine will report errors if weights or percent values are missing. Partial Declaration is an incomplete full declaration. Only some of the ingredient information is provided and the sum of the weights do not result in the complete weight of the part. One Level Declaration is the minimum for a partial declaration. With this declaration, an MDS can be sent to customers, which does not contain any ingredient information (tree is empty/only one node). In such an empty MDS, the necessary information should be provided as an attachment. As long as an MDS is editable, the ingredients tree can be filled with nodes or references and the MDS will become a partial declaration and can also be extended up to a full declaration. For a new MDS, the default is partial declaration. Depending on the declaration type and the recipient company, different checks will be executed. Some companies maybe require specific information for e.g. one level declaration. You can find company specific requirements and system extensions in chapter “Company specific enhancements”. Let’s get started. The two most commonly created MDS types are Material and Component. Let us start with a New Material. Create a Material A Material is the lowest level of MDS a user can create. But since the CDX system is a material reporting system, your customer needs to know more than the name of the Material, they also need to know what is in the Material. Different industries have different requirements, so these instructions are for industries that want to know Material Classifications and other details about Material content. It should be noted that an MSDS (Material Safety Data Sheet) is not usually suitable for data because if you are going for full disclosure, you need to know what is in 100% of the Substances in the Material. When you issue a New > Material command, you get a screen similar to the following (in the example below all the areas on the right are expanded so we don’t have to do it later.). All mandatory fields are marked with *. CDX USER MANUAL – VERSION 4.4 / NOVEMBER 2015 CREATE AN MDS 22 Common Information Let’s take a closer look at the Common Information: The following table gives a description of each of the fields in this area: Field Name Description Required? Type System Generated – Type of MDS this is (Material, Semicomponent, Component). You cannot change from one type of MDS to another because different types of MDSs have different information requirements. Not Applicable ID / Version System Generated – The first set of numbers represents the ID of the MDS. As each new version is created, this number will not change but the second number (/0.01) will. In fact, when the MDS is “released” (more about that later), the version will become a whole number and indicate that no further edits can be made. Not Applicable Node ID System Generated – This refers to the actual location in the database where information about this MDS is stored. For the 0.01 version of the MDS, it will be the same as the ID. Not Applicable MDS Supplier System Generated – the CDX company name of the creating company. Not Applicable 100% declaration A check box indicating whether 100% of the MDS is being declared. By setting the checkbox "100% Declaration" you can declare the MDS as a full declaration and have to provide the complete information. If your parent node has this box checked and any child node does not, you will receive an error in the check and cannot proceed. Industry Dependent Name How your company refers to this MDS in their own terms. You must change from the default name, otherwise the check routine results in an error message. Each Industry may have their own naming requirements and conventions. Yes Internal Material No. How your company refers to this Material in numeric terms. You can add multiple numbers with the ; or remove an entry with . Optional Dates Sometimes it is very important to know when the MDS was created and the dates of the last change. The next section contains system generated information: The following table explains what these fields mean: Field Name Description Creation Date Date MDS was created based on server time (server is hosted in Germany) Release Date Date MDS was released (no more changes can be made) Check Date Date MDS was checked – useful in tracking under what requirements it was checked. CDX USER MANUAL – VERSION 4.4 / NOVEMBER 2015 CREATE AN MDS 23 Classifications The Material Classification is mandatory for Material type datasheets. The information is stored in this area. Requirements for this field are Industry Dependent. Clicking on the will open a menu where you can select which industry classifications to which you are reporting, as in the following: The IMDS classifications are the VDA Material Classifications. If IMDS is selected, after expanding all the classifications, you will get a list similar to the following: CDX USER MANUAL – VERSION 4.4 / NOVEMBER 2015 CREATE AN MDS 24 You would highlight the desired classification and click on . If you select ISO22628, you will get a menu with fewer options: You would highlight the desired classification and click on . It is possible to enter both IMDS Classifications and ISO classifications on the same MDS. If there is a classification in another classification list mapping to the selected one, the checkbox below the list is selected and the user can select the appropriate classification with "Next" and then “Apply”. CDX USER MANUAL – VERSION 4.4 / NOVEMBER 2015 CREATE AN MDS 25 Material Information In some industries, you must include the Standard Material information. Most Materials will have one or the other, but not both: Field Name Description Required? Standard Material No. Primarily for metals – this is usually a UNS or other numbering system that uniquely identifies the substance content of the Material. Many Norms and Standards refer to properties of the metal instead of the Material content. Industry and Classification dependent Symbol Primarily for polymeric materials, this is the ISO symbol for the Material. Industry and Classification dependent Norms / Standards Unlike the Standard Material number, Norms and Standards frequently refer to the properties of the Material and do not represent the 100% substance information. Whether this information is required is Industry and Classification dependent. If you need to add a Norm or Standard, the will activate a window similar to the following: After you select your norm, you return to the window where you can enter the specific code (mandatory): CDX USER MANUAL – VERSION 4.4 / NOVEMBER 2015 CREATE AN MDS 26 Remark Depending on your client’s requirements, here you can declare whether a Safety Data Sheet is required (e.g. when a substance/mixture like liquid, spray, lubricant or grease is contained in your Material). The Remark field itself is a free text area where you may want to include some information about the Material. An example, such as “this is only a guess and we do not stand behind this declaration” is not useful or wanted. This field is optional. Attachment Here you can add attachments and a short description to your MDS. The following file formats are allowed to be uploaded: xls, xlsx, doc, docx, pdf, zip. You can upload up to 5 documents with a size up to 10 MB per file. Use the buttons and to attach or remove a file. During the system upload the file will be virus-scanned. If virus is found, the user will be notified immediately. Add the Ingredients Once the basic information is given, you will need to add the ingredients. You have two options to create your tree structure: Use the “Add Material” or “Add a Substance reference” button on the upper right or Use the Regulation Wizard alongside (suggested for Bosch supplier companies) First option is preferred option and described below. The Regulation Wizard will be described later. Focusing in on the upper right, you will see that your only choices to add ingredients for a Material are other Materials and Substances as the others are greyed out. Referencing means that the MDS will be linked to another MDS or Substance which you attach by going through a Search. Node means that the structure is only available in this MDS and not available for attaching to other structures. Attaching Substances In this case, we’re going to add a Basic Substance . You can limit your search with several criterias, e.g. searching only for Substances included in a specific Substance Group or list. Here you can choose, if you want to search in a “Global Substance List” or a “Company Specific Substance List”. We have searched in the Global – Basic Polymer Group: CDX USER MANUAL – VERSION 4.4 / NOVEMBER 2015 CREATE AN MDS 27 When you find your Substance, highlight it and click on . You will notice the left side of the screen now highlights the added Basic Substance and the right site presents a screen similar to the following (expanded): The following table describes the information presented: Field Name Description Required? Type Type of Node: Basic Substance, Material, Semicomponent, Component NA Name(s) Presents the synonyms for this Substance – this is a view of the Basic Substance List. NA CAS No. Chemical Abstract Number for the Substance – this is a view of the Basic Substance List. NA Einecs-No. Einecs Number for the Substance – this is a view of the Basic Substance List. NA EU-Index EU-Index number for the Substance – this is a view of the Basic Substance List. NA Confidential Checking this box will limit visibility to the Substance to those with IDs in your CDX company and those you have given Trust User Status to. Optional CDX USER MANUAL – VERSION 4.4 / NOVEMBER 2015 CREATE AN MDS 28 Field Name Description Required? Portion / % Indicates whether you are going to be giving a “Fixed” amount, a “Range” (from – to) or letting the system calculate the % (Rest). It is highly recommended that you not use Rest on a joker/wildcard. Optional / Required for 100% declaration Basic Substance Lists Indicates what groups the Basic Substance is a member of. This is a view of the Basic Substance list. NA Process Chemical If this Substance is a Process Chemical, you would need to indicate that you are aware it is and indicate whether it is a Reaction Residue or Impurity. Dependent on the Substance Once you fill in the required information, click on the top of the tree – and in this case, we are adding a Material to be a sibling of our Substance (this is an example only and this structure is not recommended). Attaching Existing Materials (Reference) There are two ways to add a Material – Reference and Node. For all datasheets that you want to add, Reference and Node work the same. Reference means you are going to search out an MDS to attach. Node means you are going to create it in the tree and the structure only exists in the tree and cannot be used in other MDSs. In this case, we’ve searched on Published Materials. For more information on searching, please see the Search section in this manual. So we now have the results of our search, we’ve found our Material as in the following: And clicked on : CDX USER MANUAL – VERSION 4.4 / NOVEMBER 2015 CREATE AN MDS 29 Note how the tree changes on the left and the Material 100Cr2 is highlighted, so the right side of the screen is the data for the highlighted node on the left. Most of the fields on the right have been covered in a previous section. There is a new field, Recyclate. If you check the box: Does the Material contain recyclate?, the box changes and is editable: Another name for Recyclate is Recycled Content. In many areas of the world, there are requirements that a certain portion of the Material be from recycled content. In some other parts of the world, companies may get rebates by having a certain portion of recycled content. Post Industrial recyclate is recycled content from industry. Post consumer recyclate is recycled content from consumer waste. The definitions used for post-industrial and post consumer recyclate are from the ISO 14021 definitions that are commonly used in many industries. It is highly desirable that if you have recycled content, you enter it here. CDX USER MANUAL – VERSION 4.4 / NOVEMBER 2015 CREATE AN MDS 30 Add Material – Node We have gone back to the top of the tree and selected Add Material > Node. The right side of the screen has the same fields as discussed earlier so we will not discuss them further. The other tabs are the same for all MDSs so you can go to the Tree Controls section. Create a Component The next most popular MDS type is a Component. You can either use the MDS > New > Component or the button in the toolbar to create a Component. After you create the Component, you’ll get a screen similar to below. Please do not forget to change the default name to a meaningful name. Another mandatory field is the Measure weight for your Partial or Full Declaration. CDX USER MANUAL – VERSION 4.4 / NOVEMBER 2015 CREATE AN MDS 31 New Fields – Amounts and Weights / Parts Marking Most of the fields are the same as discussed earlier for Materials. The new fields are highlighted in the figure below: The definitions are listed in the table below Field Name Description Required? Measured weight per item This is the stated weight (drawing weight) for the Component – required for partial and full declaration. For One Level Declarations, the check routine will provide you with information that states weight information is missing and should be filled. Optional / Yes Tolerance +/- This is primarily used for correcting any math issues from the child nodes. Some people take this for the tolerance on the drawing and limit the value. However, that is not the intended purpose of this field. Optional Calculated weight per item System Generated. The sum of the measured weights of all child nodes of the parent node. This is direct child only – not the weight of the entire tree structure. NA Deviation System Generated – the percent difference between the Measured weight per item (stated weight) and the Calculated weight per item. NA Required by law This is a Yes/No flag indicating whether parts must be marked for recycling according to law. Industry Dependent Polymeric part(s) marked Should you answer Yes to Required by law, then this box will be available for entry. Industry Dependent Once you enter the data for the top node (remember if you mark the top node 100% Declared, anything you attach must also have 100% Declared or you will receive an error message in the check), it is time to attach the Ingredients. At this point, you will notice that all options are available. New Field – Regulations This field is only available for Component MDS and gives for every single Component node an overview about all ingredients in the tree, which are included in the specified regulation (REACH, RoHS, ELV, Batteries, Packaging or Others). In the “Confirmation” section you can state, if your Component complies to a regulation and if you’ve provided all relevant data. Since the confirmation will be given for the whole MDS, the drop down menu is only available on top node level. Usage of the “Regulations” field is mandatory for some suppliers (please see the chapter “Company specific enhancements”). For all other MDS providers it is suggested to use this field according to prior agreement with their clients. Without a child node in your Component, the regulation fields are empty. Let’s go adding ingredients and look into the Regulations area later again. CDX USER MANUAL – VERSION 4.4 / NOVEMBER 2015 CREATE AN MDS 32 Adding Ingredients In this section, we will discuss adding the various ingredients by type. Adding ingredients with the Regulation Wizard (suggested for Bosch supplier companies) is also possible, but will be discussed later. Attaching a Component – Reference When you click on the Component icon, you get two choices: We’ll first use Reference where we search out an existing Component. Remember, if you have checked 100% disclosure in the details on the right, all immediate child nodes will also have to have 100% disclosure checked. In this case, we have searched out and added an existing Component: Let’s look more closely at the right side: CDX USER MANUAL – VERSION 4.4 / NOVEMBER 2015 CREATE AN MDS 33 The data in the Common Information and Dates area has been discussed earlier, as has the Parts Marking and Remark area. What is new is the Amounts and Weights as well as the Requlations Area. The data in the Measured weight per item, Tolerance +/-, Calculated weight per item, and Deviation was discussed in an earlier section. What you have to do here is enter how many of these you are going to use in your assembly. CDX takes the Quantity and multiplies by the Measured weight per item to calculate a weight for this portion of the complete assembly. In this case, we entered 10 and each one of these weighs 800 g (0.8 kg) so, we have the following on the top node: Notice how the Deviation is -20% (Calculated weight/Measured weight). In the Regulations Area we see the following information for the added Component: CDX USER MANUAL – VERSION 4.4 / NOVEMBER 2015 CREATE AN MDS 34 For every Component node in your tree structure, all Substances relevant to the mentioned regulations are listed in the respective regulations area with some additional information such as Name, CAS No., D/P (declarable / prohibited), Limit value / Restriction conditions, Entry, Portion, Weight, Material in which it is included. For the top node Component the system provides by clicking the button complete overview in a separate window with the following information: in the Regulations area a Ingredients Tab: All regulation relevant Substances are listed for each relevant regulation. Batteries and Packaging Tab: All Substances with regard to batteries or packaging are listed. Confirmation: All complied regulations will be listed with the information, if all relevant data are provided. All information in these tabs can you also export to a MS Excel file. The detailed information is also available in the MDS Report you can create for every MDS. Now we’ll continue adding other ingredients. CDX USER MANUAL – VERSION 4.4 / NOVEMBER 2015 CREATE AN MDS 35 Attaching a Component – Node When you attach a Component through Node, the structure will exist only in the tree and not be available for other datasheets. The right side of the screen looks very similar to the right side of the top node: With the exception that you can add a Quantity and you do not have a Remark area. Once you have filled in the required information, you need to add child nodes of the desired type. Attaching a Semicomponent – Reference A Semicomponent is used to represent a product that is used by length, area, or volume (examples: wire, fabric or metal blank, paint). Similar to attaching a Component, you have two choices – Reference or Node. Let’s first use a Reference. We have searched out existing Semicomponents and applied, leaving us with a screen similar to the following: Looking more closely at the right hand side, we see fields that we have seen before: CDX USER MANUAL – VERSION 4.4 / NOVEMBER 2015 CREATE AN MDS 36 The only difference is the Weight area. With a Semicomponent, you have two choices for entering the weight: Enter the weight directly Use CDX to calculate the weight (only possible, if the specific weight has been entered) As with the Component, you can enter the weight and select the units (mg, g, kg, t). Regardless of the display, all weights are stored in grams. To use CDX to calculate the weight, click on the and a small window will open: As the Referenced Semicomponent had its specific weight defined in terms of length, you need to enter how many mm, cm, m, in or ft you are using. In this case, we are going to enter .00025 m and then the Calculate and at that point, CDX will calculate the weight of this child node. In looking at the top of the tree, the weight has increased, but is still less than the top node: Attaching a Semicomponent – Node When you add a Semicomponent by node, the right hand of the screen requires limited information: Since this Semicomponent is only going to exist in this tree, all you have to do is to change the name, enter the weight and select the appropriate measurement (mg, g, kg, t). Additionally you may add one or more Item or Material Number(s). CDX USER MANUAL – VERSION 4.4 / NOVEMBER 2015 CREATE AN MDS 37 Attaching a Material – Reference We have already looked at attaching a Material by Reference but since this is going on a Component, the right side is a little different: In this case, you have to enter the Material weight instead of a portion. Attaching a Material – Node Attaching a Material by Node to a Component is similar to Attaching a Node to a Material. The only difference is that you again have to enter a weight instead of a portion: And of course, you have to enter the structure of the Material. CDX USER MANUAL – VERSION 4.4 / NOVEMBER 2015 CREATE AN MDS 38 Attaching a Basic Substance You can only add a Basic Substance as a Reference. After adding, the right side will look similar to the following. Since this substance is added directly to a component, you will need to enter a weight here: After your ingredients are added, you can move on to the Tree Controls. Create a Semicomponent The third MDS type is a Semicomponent. A Semicomponent in some respects is similar to a Material in that it does not have a fixed weight until you attach it to a Component. When you create a Semicomponent either through the MDS > New > Semicomponent or through the CDX USER MANUAL – VERSION 4.4 / NOVEMBER 2015 : CREATE AN MDS 39 Looking more closely at the right side we see: Most of the fields are the same as we’ve seen before. The only one different is Amounts and Weights. The Specific Weight is the weight per unit for the product. It is not required but very useful if sending this to a customer or even for later use in your own organization as it makes it easy to calculate the weight when adding to a Component. Once you’ve given it a proper name (and optional Specific Weight), it is time to add ingredients through the . Attaching a Semicomponent – Reference Attaching a Semicomponent to a Semicomponent is similar to attaching a Semicomponent to a Component. The difference is that instead of needing a weight, you need a portion or percentage: CDX USER MANUAL – VERSION 4.4 / NOVEMBER 2015 CREATE AN MDS 40 Attaching a Semicomponent – Node When you attach a Semicomponent by Node, the information you have to supply as: Just as if you attach by reference, it is expected that you enter a portion or percentage of the Semicomponent this product represents. Additionally you can enter one or more Item or Material Number(s) and you have to change the name. Attaching a Material – Reference As discussed earlier, you can add a Material by reference and the right side will be similar to below: As with the Semicomponent, you need to add the Amounts and Weights-Portion. This is the percentage of the top node this Material represents. Additionally, if the Material contains recycled content, you can enter the information in the Recyclate area. CDX USER MANUAL – VERSION 4.4 / NOVEMBER 2015 CREATE AN MDS 41 Attaching a Material – Node When you attach a Material by Node you get a screen similar to the following: As with the Semicomponent, you need to add the Amounts and Weights-Portion. This is the percentage of the top node this Material represents. Additionally, if the Material contains recycled content, you need to enter the information in the Recyclate area. Attaching a Basic Substance You can only add a Basic Substance as a Reference. After adding, the right side will look similar to the following. You will need to enter a portion instead of a weight here: Create a Component or Material MDS with the Regulation Wizard Companies collect information about different regulations, which are relevant for their products. There are different regulations which, depending on the industry, product type, country, etc., regulate ingredients, i.e. prohibit them completely or only allow them in some circumstances. To comply with your client’s regulation requirements, you can use the Regulation Wizard to create your Component MDS and Material MDS with regulation relevant Substances. Using the Regulation Wizard is suggested for all companies supplying to Bosch. CDX USER MANUAL – VERSION 4.4 / NOVEMBER 2015 CREATE AN MDS 42 When you start the Regulation Wizard you have to select the company you want to submit your MDS to. The system shows you, what regulations you need to be compliant with especially for this recipient company and guides you through those regulations and the required information. In our example, the company requires information related to the commom ELV, GADSL and Packaging regulations: Clicking Substances: brings you to the details for the regulation ELV, where you can add (only) ELV relevant You can search for ELV relevant Substances using CAS No., Name/Synonym, EU-Index or Einecs-No. In the search screen you are able to export into a MS Excel file: either the search results by using the button or all Substances relevant to this regulation by using the button. Please select the needed Substance and click on . A new window opens with regulation details and information about the place in the tree structure, where the Substance should be included: CDX USER MANUAL – VERSION 4.4 / NOVEMBER 2015 CREATE AN MDS 43 Here you need to define/select the parent Component and Material node for your Substance. You can select existing nodes or create new nodes. You can leave the default names for the nodes or create new names. Additionally you have to enter the weight (for the Material and for a new Component) and the portion of the Substance in the Material. For our example we entered the following information: You can add more Substances and need to click , when you finished adding substances. The tree structure in the background has been adapted. Click to come to the next regulation. In our case, the regulation GADSL is shown – here you can add GADSL relevant Substances: When you select a Substance and click on , the wizard shows the tree structure details for this GADSL Substance – which you can leave or change as seen before: CDX USER MANUAL – VERSION 4.4 / NOVEMBER 2015 CREATE AN MDS 44 Since we created for the ELV Substance a new Component “Test_ELV_Lead” with a new Material “Test_ELV_Lead”, we can include our GADSL Substance now into the top node Component_1024849 or the Test_ELV_Lead or a new Component Please select or create the corresponding node and enter weight and portion, where required. Last, we search our Packaging Substance in the next window, give the required information and click then on . Our newly created Component is now structured as follows: The Regulations area for our first node “Test_ELV_Lead” shows the following information: CDX USER MANUAL – VERSION 4.4 / NOVEMBER 2015 CREATE AN MDS 45 A double click on a Substance in one of the Regulations tables on the right side, opens a new window with details about the used Substance with regarding to the affected regulation and their restrictions: Since we entered a portion of 10 % (0.3 g) for the Lead in our Test_ELV_Lead structure, and the RoHS regulations allows only a portion of 0.1, we should include an Exemption. By double clicking on the “unknown” in the Exemption table above you will get the following screen, where you can chose the appropriate exemption: CDX USER MANUAL – VERSION 4.4 / NOVEMBER 2015 CREATE AN MDS 46 The exemption will be included in the respective Regulations table: When you finished this you need to answer the questions in the Regulations > Confirmation area. This is only possible for Component MDSs in edit mode. If your client requires the confirmations and you have not answered completely, the check routine will result in an error message. Updating MDSs CDX users have the option to identify supplier MDS updates when the supplier MDS is used within the user company’s MDSs. This feature lists supplier-updated MDSs, and names the specific owned or published MDSs. These reference an older version of the supplier-updated MDS. This operates similar to a "Where-used" analysis, except CDX automatically generates this content and displays it immediately when a user enters this screen and executes this search (default: search for all new supplier entries). In the update screen, the user can search for specific IDs or names of parts, or filter the list for the MDS type (own/published/accepted). The search result is limited to 500 entries. Note: Updates to this list are processed asynchronously (similar to the Where-used analysis). Therefore, changes are not immediately visible. The update process takes two steps. In the first step, the update itself is done by replacing the old references with the new ones, followed by the second step: the check procedure. If the check result does not contain error messages, the MDS can then be released. Otherwise, the MDS can be processed manually to correct the errors. For your convenience, multiple MDSs can be processed (updated and released) at the same time. The old version for published or owned MDSs is the previous version number The old version for accepted MDSs is the previously accepted version number Every company can use the update search without running an analysis. Processing the list entries can be stopped and then started again later until all entries are processed. The update list will only be generated for new updates which occur after this design has been implemented. No retroactive analysis is done for legacy data that was previously updated. When using the MDS update functionality to create new versions of MDSs, the updated references will be replaced accordingly. However, a new version can still be created with the existing CDX functionality. The check procedure will determine whether relevant updates of referenced MDSs are available. If so, a warning message for the relevant referenced MDS will display. When the system detects an old version and the user wants to replace it, the replace button will automatically locate the old version and replace it with the current version. CDX USER MANUAL – VERSION 4.4 / NOVEMBER 2015 CREATE AN MDS 47 The MDS update screen is integrated into CDX in the Functions menu. After the user selects the Functions -> MDS updates menu option, the MDS Updates screen is shown, providing information about the old and new version of an MDS and in which MDS(s) it is referenced. As with other CDX screens from the update list, an MDS can be viewed and edited in different tabs. Multiple releases are possible. To update several MDSs at once, select several rows in the table by holding down the control or the shift key while selecting. This multiple selection is then relevant for the update, release and remove actions. For all other actions (View old own MDS, Edit updated own MDS, view new/old reference), only one entry should be selected. If more than one entry is selected, the first entry will be used for this action. Also, the old and new versions of the referenced MDS are displayed to allow user verification of the pending update. If the user decides that the change is not relevant and does not want to create a new version, it can be removed from the update list. Navigating the Tree At the top of the Ingredients screen you will see the following controls: Field Name Description Expand All This button expands the complete structure below the node that is highlighted when the button is activated. Collapse All This button collapses the structure below the node that is highlighted when the button is activated. Substance Lists You can use a Global Substance List or a Company Specific Substance List to filter the tree structure. Substance Filter This gives you more information about the Substances on your tree structure depending on the filter selected. Substances in the selected group will be displayed in a different color. View Substance List Details When a Substance Group/List is active in your Substance Filter you can use this button to see all available details for the choosen list. Tree Search This button activates the Tree Search function where you can search your tree for a Name, Number, or MDS ID. CDX USER MANUAL – VERSION 4.4 / NOVEMBER 2015 Icon CREATE AN MDS 48 Supplier Data Screen Regardless of which type of MDS you are going to send, all have the Supplier Data Screen. This screen gives your customer information regarding the contact outside of CDX should there be questions about the entry. Since every MDS must have a contact, the default is the first contact assigned to your company. The Supplier Data Screen looks similar to the following: This is NOT a text editable screen. All of the information is drawn from users flagged as Contact Persons by your Company Administrator. If there is missing or incorrect information, the Company Administrator must correct it on the Administration screens. You select the appropriate contact from the drop down list. The CDX system then goes to the Contact List for your company and displays the E-mail, Telephone, and Fax information stored in the system. If the information is incorrect, the individual can correct it on the Administration > Personal Settings function. Once you have made certain the correct contact is on this page, you can move onto the Recipient Data Screen. Recipient Data Screen A Recipient is which CDX company you’re going to send or propose this data. It cannot be your own company and if the recipient has Org Units, only one Org Unit of the company can appear in the Recipient list for an ID/Version combination. If more than one Org Unit requires submission, you would either Save As/new MDS or Save As/new version to create another MDS to send to them. The following table gives the definition of the Recipient Data Screen icons: Icon Action Name Description Add Recipient This button opens the company search screen where you can find your recipient. Only companies registered in CDX can be found in the company search screen. Assign MDS Request This button allows you to assign this MDS to an open MDS Request (see section on MDS Request). Remove Recipient / Request When a Recipient or Request is highlighted, this button will not be greyed out and you can use it to remove a Recipient or the MDS from a Request. Release Internally This button starts the Release process. When an MDS is released, no changes can be made to the Ingredients or Supplier Data page. Send If the MDS has not been released internally and there is only one recipient, this button will not be greyed out and begins the send process. If Send is used, changes can only be made in Recipient Data screen. Propose If there is at least one recipient in the Recipient list that has not received the MDS, this button will not be greyed out. This button initiates the Propose activity which includes internally releasing the MDS so no more changes can be made except to add Recipients. CDX USER MANUAL – VERSION 4.4 / NOVEMBER 2015 CREATE AN MDS 49 Adding a Recipient When you click on the Add Recipient button, a search will begin so you can find your CDX Recipient. After finding your recipient, you click on the button and the recipient will be added. After selecting a recipient and double-clicking on it, a screen similar to the following appears: Let’s take a closer look at the right side of the screen: Field Name Description Required? Company System generated from your recipient search selection. This displays the CDX company name and the CDX Company ID. N/A Organisation Unit System generated from your recipient search selection. If you have selected an Organisation Unit, the name of the Organisation Unit and the CDX number is displayed here. N/A Recipient Status The status of the MDS: Edit mode means it has not been sent and the recipient cannot view. Modified means that the MDS has been rejected and you are making corrections – you must either send or propose to get it back to your recipient. Not yet Browsed means your recipient has not yet seen it. Browsed means that your recipient has seen it but not yet accepted or rejected. Accepted means that your recipient has accepted your submission. Rejected means they have viewed and decided not to accept and there must be a reason on the page. N/A CDX USER MANUAL – VERSION 4.4 / NOVEMBER 2015 CREATE AN MDS 50 Field Name Description Required? Supplier Code This is how your supplier tracks your information in their system. Sometimes a DUNS number is used and sometimes they may have a special coding system. Recipient dependent Name This is the name under which your recipient purchases your product. It does not matter what the name of the product is on the Ingredients tab, this is the value they will see. Yes Part / Item / Material No. This is the number under which your recipient purchases your product. You can add one or more number(s) here. It does not matter what the number is on the Ingredients tab, this is the value the recipient will see. Optional Forwarding allowed For some companies, although technically they are a stop in the supply chain, they don’t do anything to the product and just want to forward received MDSs to their customer. A check in this box indicates they are allowed to do so. Optional Drawing No. The CAD drawing number associated with this product. Customer dependent Drawing dated The CAD drawing date associated with this product. Customer dependent Drawing Change Level The CAD drawing change level associated with this product. Customer dependent Purchase Order No. Purchase Order Number associated with this product. Customer dependent Bill of Delivery No. Bill of Delivery Number associated with this product. Customer dependent Report No. If this MDS is on a prototype part, the prototype report number. Customer dependent Date of Report If this MDS is on a prototype part, the date of the prototype part submission. Customer dependent Communication information: User System generated, information from the User ID of the user in the Recipient’s company that rejected the MDS – where to go if you have further questions on why the MDS was rejected N/A Date System generated, if the MDS has been sent/proposed and rejected, the date of the rejection. N/A Reason for Denial If the MDS has been sent/proposed and rejected, this information is entered by the user in the Recipient’s company. Required The recipient details are displayed similar to the ingredients tab or the Company Admin screen: On the left side, there is a list of attached recipients together with the status and the last change date of this status. When selecting a recipient, the details will be displayed on the right side of the screen. The recipient list includes an icon for the current status of the recipient. A traffic light system is used: Accepted MDSs have a green icon, rejected ones are red. All other (unseen, seen, in process at in-house system, etc.) are yellow. Additionally, each recipient has a symbol preceding it indicating if the recipient was added as an ordinary recipient or if it is an assigned request. Requests Besides the “Add new recipient” button, an “Assign request” button is created. By clicking it, a request lookup search is opened and the user can choose any open request. See the Request section. CDX USER MANUAL – VERSION 4.4 / NOVEMBER 2015 CREATE AN MDS 51 Check Procedure You can check your structure at any time by using the button in the toolbar or the Check function in the MDS menu, but it is also mandatory prior to a send or propose. It's a plausability check on various items in your tree structure, e.g. entered weights, quantity, tolerance, recyclate information, classification, valid status of ingredients, wrong structure, and missing data in supplier or recipient data screens. Displaying Check Results Check results can either be declared as “error” or as “information.” While errors prevent the user from sending, proposing or releasing the MDS, information check entries do not. Information entries are not to be totally ignored as they are an indication that something is out of the norm on that particular entry on the tree and requires further investigation to know whether the data is appropriate for the circumstances. If the check returns without any findings the user is informed by an appropriate message displayed in the table. In case the check returns findings they are displayed in the Check Results table. On the Ingredients tab, all nodes with a check issue are marked with an error ( ) and/or information ( ) icon. If a field can be assigned to a check issue, this field is also marked in the detail section with an appropriate icon. If you double click on the row or select the popup menu “Show” for a finding in the check result table, the corresponding tree entry is automatically selected and the node detail displayed. In case the node detail attribute is contained in a collapsed group, this group is automatically expanded. In case the corresponding fields are located on another tab, it will be opened automatically. When returning from a check execution the first check result table entry is selected and all erroneous objects are displayed and marked. The following table describes the fields in the Check Results table: Column Description No. Number of the finding. Type The type of the finding. Can be error or information and is indicated only by an icon. Tab The tab layer on which the finding is located. Can be Ingredients, Supplier data or Recipient data. Node / Recipient The node name and its associated icon if the finding is located on the tab layers Ingredients or Supplier data. The recipient company name in case the finding refers to the Recipient data tab layer. CDX USER MANUAL – VERSION 4.4 / NOVEMBER 2015 CREATE AN MDS 52 Column Description Message The error or information message that describes the problem. The message might contain parameters. Messages are multilingual, so it is displayed in the selected application language. Internally Release or Send / Propose an MDS You can do all the data entry in the world, but unless you Send or Propose the MDS to your customer, they will not see your entry. The following pictures explain how Internally Releasing, Sending and Proposing work: What to do with an MDS in Edit Mode? CDX USER MANUAL – VERSION 4.4 / NOVEMBER 2015 CREATE AN MDS 53 How Send/Receive Works How Propose/Receive Works Whether you decide to Internally Release, Send or Propose, CDX first checks the structure for errors and information. In the view below, we have already internally released so we are now Proposing to our selected Recipient: CDX USER MANUAL – VERSION 4.4 / NOVEMBER 2015 CREATE AN MDS 54 If you have any errors, you must correct them before the MDS can be released, sent or proposed. If you see pieces of information, you need to investigate each one to determine whether correction is needed. After reviewing the check results, you will need to complete the action – in this case by selecting from the bar just above the check results. MDS Analysis The Analysis function is a very powerful and valuable tool in CDX. It can determine whether an MDS has any substances that are on a restricted substance list, or to perform an analysis for a specific basic substance or MDS. The user may start the analysis for one MDS using the MDS/Module Search. The selected MDS can be analyzed for all substances, materials or classifications by clicking the Analysis tab, and the output is presented by either of two selected measuring units: percentage [%] or weight [g], based on the calculated weight. An MDS may reference MDSs without measured weights, therefore the measured weight cannot be the basis for calculations. The user can choose the desired analysis type in the select box: Material This option gives the user a breakdown by either weight or percentage of all the materials (by ID / Version) in an MDS. If the same ID is used more than one place in the tree, the values are summed so each ID appears only once. However, if the same material is represented by multiple IDs, they will be listed multiple times. CDX analyses by ID and not by name. CDX USER MANUAL – VERSION 4.4 / NOVEMBER 2015 CREATE AN MDS 55 Classification This option gives the user a breakdown by either weight or percentage of the material classifications used in an MDS. Different materials may have the same classification. The values are summed so each classification appears only once. Basic Substances This option gives the user a breakdown by either weight or percentage of the basic substances used in an MDS. The analysis is performed using the index of the basic substance, so several substances in the same family (for example several lead substances) may appear in the analysis and each is summed separately. Where-Used Analysis You may often want to know which parts have certain Materials or Substances in them. To find this out, you can use the Where-Used Analysis. This tool is activated either by the on the tool bar or through the Functions > Where-Used Analysis menu item. Select the Type of Analysis There are several types of analyses possible as illustrated in the following: The types of analyses are detailed in the following table: Analysis Type Description Classification Will find where a selected Material Classification is used in your visible MDS data MDS Will find where a specific MDS ID/version has been referenced in your visible data. Substance Will find where a specific Substance has been referenced in your visible data. Substance Group/List Will find where Substances in a selected Basic Substance Group/List have been referenced in your visible data. Confidential Substances Will find where Substances have been marked Confidential in your visible data. Company Specific Substance List Will find where Substances defined in your Company Specific Substance List have been referenced in your visible data. After selecting the type of analysis, use the to search out the Classification, MDS or Substance, or pulldown menu to choose a Substance Group or the proper Company Specific Substance List. Select the MDSs to be Analyzed Next you have to select the MDSs you want to analyse through the normal search screen: How to search is discussed within this manual. You can to search through all of your data. There is a 500 maximum on search results so you may have to perform several searches and analyses. CDX USER MANUAL – VERSION 4.4 / NOVEMBER 2015 CREATE AN MDS 56 Analyze Once you have the MDSs to analyse, click on the to perform the Analysis. And Repeat (if Desired) CDX provides a helpful feature that enables the user to perform repetitive analysis. You can use the results of one analysis as the source for the next analysis. You can clear one to all from the original source by right clicking on the source area and a window will appear similar to the following: First remove all MDSs, and then Add all MDSs from the result table. You can then select a new Analysis Type. CDX USER MANUAL – VERSION 4.4 / NOVEMBER 2015 CREATE AN MDS 57 MDS R E QU E ST The MDS Request function is a powerful one. Before using it, please communicate with your suppliers outside of CDX and agree that you are going to use this function to communicate requirements. You will need to know to which CDX company to send the Request. This section details how to use the MDS Request function. Parts of a Request A Request tells a supplier which attributes the MDS must have (mandatory), and the value of these attributes. The Request itself consists of three parts: A set of mandatory MDS attributes (base and recipient specific data) Requested values (optional) for the required MDS attributes (only recipient-specific data) Administrative data, which is Request-specific The following figure describes the workflow associated with the MDS Request: Request Terms: Recipient Versus Supplier An MDS Recipient creates a Request to an MDS Supplier. The MDS Recipient is the Request Owner and the MDS Supplier is the Request Recipient. To avoid any confusion, the terms MDS Recipient and MDS Supplier are used. MDS Attributes Requested attributes can be segmented into two types: Base Attributes and MDS Recipient Specific Attributes. In the request, the Requestor (MDS Recipient) indicates the data they are expecting. Most information is optional. However, the MDS attribute “Name” and the “Due Date” are required. CDX USER MANUAL – VERSION 4.4 / NOVEMBER 2015 MDS REQUEST 58 The following Base Attributes refer directly to the product and are the same for all MDS recipients: MDS type 100 % Declaration Various values depending on MDS type like Measured Weight and Parts Marking (Component), Specific Weight (Semicomponent), Symbol and Standard Material No. (Material), Substance Group/List The following MDS Recipient Specific Attributes are data items associated with the Recipient Data tab on the MDS: Supplier Code Name (mandatory) Part/Item Number Forwarding allowed Drawing with Number, Date, Change Level Purchase Order with Number and Bill of Delivery Number Report with Number and Date Requested values of attributes are automatically inserted into the assigned MDS data fields and cannot be overwritten. If they are empty, MDS suppliers have the option to enter their own values. Administrative Data Administrative data is data referring directly to the Request. This is data the Requestor (MDS Recipient) uses to manage the requests in their company, such as: 1. 2. 3. 4. 5. Status (system generated) Deadline Date, which is the date until the MDS Recipient expects to receive the requested MDS Supplier (the user can search for already in CDX registered companies or choose to send the request to a company not registered in CDX) Requester: Company / Org-Unit ID of MDS Recipient and Contact person (system-generated) Project, which is used to group requests. Projects are created by Company Administrators and are valid company wide (in MDS Recipient’s company).Comment, which is mandatory for a rejection MDS Request Statuses The Request status describes the following: A new Request (status "new") The request is sent to a MDS Supplier (status “sent”, “received” for MDS Supplier) The MDS Recipient answers a question and sends Request (status “sent”, “received” for MDS Supplier) The MDS Supplier has assigned an MDS but not sent it yet (status "attached") The MDS was sent (status "waiting for acceptance") The MDS has been accepted (status "completed") The Request receiver (MDS Supplier) rejected the request (status "rejected") The Request was cancelled (status "deleted"). Creating Requests If you use Projects, the first step is to create the project. For the purposes of this section, we will assume that either you are not using Projects (which is optional) or that your Projects are already created. Requests can be created by any User profile except Read-Only. You have two options to create requests: Create a single MDS request by using the function MDS > New > MDS Request or Create multiple MDS requests by using the provided MS Excel Template and upload the file into CDX The first option is described in the following section. A description for creating multiple MDS requests with the MS Excel file can you find in chapter “Outbox”, because it is only relevant for own MDS requests. CDX USER MANUAL – VERSION 4.4 / NOVEMBER 2015 MDS REQUEST 59 The Request attributes are as follows: Field Description MDS Request Status System generated – Request Status Deadline Date The date the response is due. This is a required field. Supplier The MDS supplier who will receive this request. Requester Company System generated – CDX name of company generating the request and where the supplier will send the response to the request. Requester MDS Contact System generated from User ID of person creating request. Project Project number the Request is assigned to. ID System generated – MDS Request ID Recipient Data Supplier Code Check the box if the supplier code is required. You may also enter the specific code. The supplier will not be able to change the code. Name The Name is required. You may also enter the specific name. The supplier will not be able to change the code. Part / Item No. Check the box if required. You may also enter a value (one or more Part/Item numbers). The supplier will not be able to change the code. Forwarding Allowed Check the box if you require forwarding to be allowed. Drawing No. Check the box if required. You may also enter a value. The supplier will not be able to change the code. Drawing Dated Check the box if required. You may also enter a value. The supplier will not be able to change the code. Drawing Change Level Check the box if required. You may also enter a value. The supplier will not be able to change the code. Purchase Order No. Check the box if required. You may also enter a value. The supplier will not be able to change the code. Bill of Delivery No. Check the box if required. You may also enter a value. The supplier will not be able to change the code. Report No. Check the box if required. You may also enter a value. The supplier will not be able to change the code. Date of Report Check the box if required. You may also enter a value. The supplier will not be able to change the code. MDS Type Choose the Type of expected MDS– Component, Semicomponent or Material 100% Declaration Check this box if Substance declaration is required and that the Substances on the parent node must equal to 100%. Measured Weight per Item Check this box if you require the value of Measured Weight per Item to be entered on all Components in the tree structure. Parts Marking Check this box if you require the Parts Marking question to be answered on all Components in the tree structure. Specific Weight Check this box if you require the Specific Weight to be given on all Semicomponents in the tree structure. Symbol Check this box if you require a Symbol on all Materials in the tree structure. Standard Material No. Check this box if you require a Standard Material Number on all Materials in the tree structure. Substance Group/List Choose a Substance Group/List to which the MDS request should refer. Here you can also choose your own Company Specific Substance List to give it to your client, including the Substances that should either be contained or not contained in the requested MDS. CDX USER MANUAL – VERSION 4.4 / NOVEMBER 2015 MDS REQUEST 60 Selecting the Supplier You can search for a company already registered in CDX by using the company search function or you can send your request to a company not already registered in CDX. When you activate the field “not in CDX registered”, additional fields appear in the lower area: Please fill in the required information for the company you want to send the MDS request (all fields with a red * are required). At the end of the window you can also include a note in the email that the system will send out. After saving and sending, the Company Administrator you entered will receive an email with an invitation to register in CDX and send the requested information for using the system: CDX USER MANUAL – VERSION 4.4 / NOVEMBER 2015 MDS REQUEST 61 Creating Projects Projects are grouping criteria for Requests and are valid company wide. Projects are created on the Create Request screen starting with clicking on the edit next to the Project field. A new window will pop up. To create a project, click on . A new window will pop up where you enter the Project name. To exit out of this window, click on Save and you’ll be brought back at your previous window. However, now your new project will be in the list at the bottom of the window. Click on it to highlight the project and then . You will be returned to your Request window. Completing the Request After you finish entering all of the data, use the icon on the toolbar and the system will perform a check. You need to click on the icon on the lower right of the screen to send your Request to your supplier. Rejecting a Request Anyone who can create a Request or MDS can reject a Request. When a received Request cannot be handled by the MDS supplier, it may be rejected and a comment added. it. It will get the status rejected for the MDS supplier and the MDS recipient. If the Request is rejected, a reject reason by the MDS supplier is mandatory. When you are Viewing the Request, in the lower right of the screen you will see three options: To reject the Request, click on the Reject button and enter your reason for rejecting. Click on your rejection. to send Assign Existing MDS to Request Two options are available to respond to a request: creating a new MDS or assigning an existing MDS. In this case, we will be assigning an existing MDS. Once you click on Assign, a window opens where you can search for an MDS of the requested type (Component, Semicomponent or Material). You will only be able to attach an existing MDS that was created by your CDX Company. When you assign an own MDS with already existing but different recipient data, you will be asked, if you want the data to be overwritten. If you click Yes, the data will be overwritten with the given data from the request. If you click No, no data will be changed, and the MDS will not be assigned to the request. With the button you can remove any assigned MDS from the request. After assigning, you can Send/Propose it to the requesting company. There it will be inserted automatically in the recipient data screen. Create MDS To create an MDS, you will get a message that the new MDS has been assigned to this request. The requested MDS recipient data is inserted automatically. You need to create the MDS as explained in the previous sections. Once the MDS is completed, go to the Recipient Data Screen and supply any other information and Send/Propose to the Recipient in the normal fashion. Completing the Request By sending the assigned MDS to the MDS recipient, the Request status changes to waiting for acceptance. If an assigned MDS is sent, a Request-specific test is done, whether all mandatory fields are filled. If the assigned MDS is rejected, the Request status changes back to working. If the assigned MDS is accepted, the Request status changes to completed. CDX USER MANUAL – VERSION 4.4 / NOVEMBER 2015 MDS REQUEST 62 C R EAT E A CMD One of the first things you are going to need to do is to create a CMD (Conflict Minerals Declaration). Even if you are going to attach (reference) existing data to your structure you are still going to need to create the structure that you will send to your customer. What is a CMD? Generall speaking, a CMD is the Information passed along the supply chain indicating where the conflict minerals (currently conflict minerals are defined to include: Tantalum (Ta), Tin (Sn), Tungsten (W) and Gold (Au) = 3TG and their compounds) used originated. A CMD can be thought of as a container that has many parts as shown in the following figure: Each of these areas will be discussed in the following sections. The other CDX structure used in CMD is the Smelter, represented by . A Smelter is a company that takes raw ore and creates a metal or a company that melts down recycled Materials and creates a metal or does both. The Smelter information on the Smelter list is controlled by the company that registers itself as a Conflict Minerals Smelter within CDX system during CDXCompany Registration Process. New CMD You can use the button in the toolbar or the New > Conflict Minerals Declaration function in the MDS menu to get started. You will be asked what EICC-GeSI CMRT template version you want to use for your CMD. Details The other thing you should know about a CMD is that the Details page has a tree structure which includes a parent-child relationship. The structure will always have the CMD name with smelters as the child nodes and is shown in alphabetical order by metal – smelter name. When adding CMDs from suppliers, only the smelters that are on the submission appear on the structure. The following figure presents a tree structure. CDX USER MANUAL – VERSION 4.4 / NOVEMBER 2015 CREATE A CMD 63 On the right side of the screen, you will find the following details: Common Information The following table gives a description of each of the fields in this area: Field Name Description Required? Type System generated – Type of CMD this is. Currently there is only one type defined for CMD: CMD Not Applicable Template Version System generated – based on your choice, which template version to use Not Applicable Declaration Scope You need to select the CMDs declaration scope here. Yes Description of Scope You can enter additional information regarding the scope of your CMD. No Supplier System Generated – the CDX company name of the creating company. Not Applicable Name How your company refers to this CMD in their own terms. You must change from the default name. Each Industry may have their own naming requirements and conventions. You may want to put your supplier code or DUNS number in this field. Yes Dates Sometimes it is necessaryto know when the CMD was created and the dates of the last change. The next section contains system generated information: The following table defines these fields: Field Name Description Creation Date Date CMD was created based on server time (server is hosted in Germany) Release Date Date CMD was released (no more changes can be made) Check Date Date CMD was checked – useful in tracking under what requirements it was checked. CDX USER MANUAL – VERSION 4.4 / NOVEMBER 2015 CREATE A CMD 64 Metals Identification The next section contains questions that must be answered about the usage of the metals. These questions are similar to the ones presented in the EICC-GeSI CMRT spreadsheet (and depend on the chosen template version). There are seven different questions about potentially use of each defined conflict mineral, the following table explains each question: Question Answer required? Comments required? 1. Is the 3TG intentionally added to your product? Yes (for each listed mineral) No 2. Is the 3TG necessary to the production of your company’s products and contained in the finished product that your company manufactures or contracts to manufacture? Yes (for each listed mineral) No 3. Do any of the smelters in your supply chain source the 3TG from the covered countries? Yes (for each listed mineral) No 4. Does 100 percent of the 3TG (necessary to the functionality or production of your products) originate from recycled or scrap sources? Yes (for each listed mineral) No 5. Have you received data/information for each 3TG from all relevant suppliers? Yes (for each listed mineral) No 6. Have you identified all of the smelters supplying the 3TG to your supply chain? Yes (for each listed mineral) No 7. Has all applicable smelter information received by your company been reported in this declaration? Yes (for each listed mineral) No Conflict Free Policy This section presents questions related to your company’s conflict free policy. These questions are similar to the ones presented in the EICC-GeSI CMRT spreadsheet (and depend on the chosen template version). CDX USER MANUAL – VERSION 4.4 / NOVEMBER 2015 CREATE A CMD 65 There are 10 different questions about company’s conflict-free policies regarding the use of conflict minerals. The following table explains each question: Question Answer required? Comments required? A. Do you have a policy in place that addresses conflict minerals sourcing? Yes No B. Is your conflict minerals sourcing policy publicly available on your website? (Note - If yes, the user shall specify the URL in the comment field.) Yes No C. Do you require your direct suppliers to be DRC conflict-free? Yes No D. Do you require your direct suppliers to source the 3TG from smelters whose due diligence practices have been validated by an independent third party audit program? Yes No E. Have you implemented due diligence measures for conflict-free sourcing? Yes No F. Do you collect conflict minerals due diligence informtion from your suppliers which is in conformance with the IPC-1755 Conflict Minerals Data Exchange standard [e.g., the CFSI Conflict Minerals Reporting Template]? Yes No G. Do you request smelter names from your suppliers? Yes No H. Do you review due diligence information received from your suppliers against your company's expectations? Yes No I. Does your review process include corrective action management? Yes No J. Are you subject to the SEC Conflict Minerals rule? Yes No Supplier CMDs If a company references a CMD from its direct supplier (the CMD from the direct supplier must be accepted before it can be referenced in the company’s own CMD), the supplier’s CMDs will be listed in the table: Attaching Existing Supplier’s CMDs (Reference) In this case, we’re going to add an accepted Supplier’s CMD Inbox: CDX USER MANUAL – VERSION 4.4 / NOVEMBER 2015 . We have searched in the CMD CREATE A CMD 66 When you find your Supplier’s CMD, highlight it and click on highlight all (using the control or shift key) and click on . . If you want to attach more than one CMD, You will notice the selected supplier’s CMD table is now added into the Supplier CMD table and the right site looks similar to the following (expanded): The following table describes the information presented: Field Name Description Name Name of the supplier’s CMD Company Name Supplier’s company name ID / Version ID and Version of the supplier’s CMD Node ID Node ID of the supplier’s CMD Release Date Release Date of the supplier’s CMD Template Version Template Version of the supplier’s CMD Product List When you defined the Declaration Scope as “Product (or List of Products)”, you must enter the products to which this declaration applies. You can enter several single products here (using the icon) or you can upload a txt file in CSV format with Product Number, Product Name and Comments. Attachment Here you can attach (up to five) files to your Conflict Minerals Declaration with additional information (e.g. norms, policies, special instructions) in the following formats: pdf, xls, xlsx, doc, and docx. Add the Details Once the basic information is given, you will need to add the details. Focusing in on the upper left, you will see that you have the choice to add an existing Smelter ( ) into the CMD or to add an alleged Smelter ( ). Attaching a Smelter To use a currently existing smelter in your CMD, click on over the top node of the CMD tree. A separate window will appear to allow you to search for specific smelters and then apply them to your own CMD by clicking the button. In this case, we’re going to add an existing Smelter CDX USER MANUAL – VERSION 4.4 / NOVEMBER 2015 . We have searched for Gold (Au)-Smelter: CREATE A CMD 67 When you find your Gold (Au)-Smelter, highlight it and click on (multiple selection is possible). The same process works for these three types of smelters: conflict-free smelters specified by EICC-GeSI, standard smelters defined in EICC-GeSI CMRT templates and registered smelter companies in CDX. You will notice the selected Smelter(s) is/are now added into the CMD and the left tree site presents something similar to the following: Currently there are five different smelter types defined in CDX, which will be shown using different colors: Conflict free smelters specified by EICC-GeSI Standard smelters defined in EICC-GeSI CMRT templates Registred smelter companies in CDX Alleged smelters defined by users in CDX Invalid smelters representing distributors or other suppliers not actually involved in smelting Smelter’s Supplemental Input By clicking on a smelter in your CMD tree stucture, the right area changes and you see details for the selected smelter. Here you can see and/or add supplemental input for the selected smelter, or you can export the existing supplemental input into MS Excel. CDX USER MANUAL – VERSION 4.4 / NOVEMBER 2015 CREATE A CMD 68 Add Alleged Smelters into CMD You may need to define and add a new smelter (alleged smelter) which does not exist in CDX. When intended only for your company’s usage, you and your company have full control over the information associated with these smelters (alleged smelters). To define and add a new alleged smelter in your CMD on the fly, click the Add Smelter icon above the top node of the CMD tree. A separate “Create Alleged Smelter” wizard will appear in a new window to guide you through the alleged smelter creation process. There are 3 steps to define a new alleged smelter. During the definition process you may switch back and forth between steps by clicking the Previous or Next buttons. Step 1: Enter the smelter company name. In the unlikely event you are identifying a new metal for an existing facility, choose the smelter from the drop-down list. To continue click the Next button at the bottom. Step 2: Enter the new facility name and location information, or if an existing smelter was selected in the previous step, verify the displayed information. Once the facility information is accurate and as complete as possible with at least all required fields entered, click on Next button to proceed. CDX USER MANUAL – VERSION 4.4 / NOVEMBER 2015 CREATE A CMD 69 Step 3: Metal identification. Select the metal processed at the smelter and enter any source information available. Select the Add button and the defined metal will be shown in the table at the bottom, and the entry fields at the top will be cleared to allow additional entries. There is no practical limit to the number of metal sources which may be recorded for a facility. In the example shown here, we have defined two different usages of gold for our smelter, which sources from different mine locations. To save the new alleged smelter and its information in your CMD, click the button. (The button is only available when all required fields for all three steps are complete and a metal source is defined in the table). Once the definition process is complete, the definition window will disappear and any new alleged smelters will be shown in your CMD. CDX USER MANUAL – VERSION 4.4 / NOVEMBER 2015 CREATE A CMD 70 Once an alleged smelter is defined, it can be reused as with any other existing smelters in your CMDs. The only difference is alleged smelters may only be found and referenced within your company’s CMDs. Alleged smelters have always the predefined smelter type Alleged. Supplier Data Screen This screen gives your customer information on who to contact outside of CDX should there be questions about the CMD. Since every CMD must have a contact, the default is the first contact assigned to your company. The Supplier Data Screen looks similar to the following: The CMD Contact information is NOT editable. All of the information is drawn from the information on the User list of your company. If there is missing or incorrect information, the Company Administrator must correct it on the Administration screens. You select the appropriate contact from the drop down list. The CDX system then goes to the Contact List for your company and displays the E-mail, Telephone, and Fax information stored on the Contact List. Additionally information about the authorizing person has to be entered. Once you have made certain the correct contact is on this page, you can move onto the Recipient Data Screen. Recipient Data Screen A Recipient is which CDX company you’re going to propose this CMD to. It cannot be your own company and if the recipient has Org Units, only one Org Unit of the company can appear in the Recipient list for an ID/Version combination. The following table gives the definition of the Recipient Data Screen icons: Icon Action Description Add Recipient This button opens the company search screen where you can find your recipient. Only companies registered in CDX can be found in the company search screen. Remove Recipient When a Recipient is highlighted, this button will not be greyed out and you can use it to remove a Recipient. Propose If there is at least one recipient in the Recipient list that has not received the CMD, this button will not be greyed out. This button initiates the Propose activity which includes internally releasing the CMD so no more changes can be made except to add Recipients. CDX USER MANUAL – VERSION 4.4 / NOVEMBER 2015 CREATE A CMD 71 Adding a Recipient When you click on the Add Recipient button, a search will begin so you can find your CDX Recipient. After finding your recipient, you click on the button and the recipient will be added. The recipient list includes an icon for the current status of the recipient. A traffic light system is used: Accepted CMDs have a green icon, rejected ones are red. All other (unseen, seen, etc.) are yellow. Additionally, each recipient has a symbol preceding it indicating if the recipient was added as an ordinary recipient. Looking at the recipient specific details on the right side you see the following information: You can change the Supplier Code (system generated from the DUNS number) and the Name for your CMD in accordance of agreed communications for the chosen recipient. Additionally you can assign MDSs to your CMD to declare conflict minerals for those MDSs to your supplier. You can create a txt file with valid part/item numbers to upload it (with Browse), or you can use the to add valid part/item numbers or search for the MDSs you want to assign. Only MDSs you’ve already sent to and were accepted by the chosen recipient are valid to be assigned here. Clicking the search button opens the MDS outbox where you can search for accepted MDSs, sent to the chosen recipient company. You are not able to change the status or the recipient company in this screen: Select the MDSs you want to assign (multiple selection with control / shift key) and click on results, please click on . To assign all . CDX USER MANUAL – VERSION 4.4 / NOVEMBER 2015 CREATE A CMD 72 Smelter Overview in CMD Details To get an overview of smelters included in your CMD tree structure, use the (Statistics) button above the structure, and you will see a separate window with graphical information about all smelters used Smelter Types Smelter Countries Smelter Metals Check Procedure Currently the CMD’s check procedure is mandatory prior to a proposal. To start the check procedure please use from the Toolbar or the Check function in MDS menu. You can also perform CMD Quality Reporting with pre-defined rules using the structure. button above the CMD tree Displaying Check Results Check results can either be declared as “error” or as “information”. While errors prevent the user from proposing the CMD, information check entries do not. Information entries are not to be totally ignored as they are an indication that something is out of the norm on that particular entry on the tree and requires further investigation to know whether the data is appropriate in the circumstances or not. If the check returns without any findings the user is informed by an appropriate message displayed in the table. If the check returns findings, they are displayed in the Check Results table. CDX USER MANUAL – VERSION 4.4 / NOVEMBER 2015 CREATE A CMD 73 On the Details tab, all nodes where there has been a check issue are marked with an error and/or information icon. If a field can be assigned to a check issue, this field is also marked in the detail section with an appropriate icon. If you double click on the row or select the popup menu “Show” for a finding in the check result table, the corresponding tree entry is automatically selected and the node detail displayed. In case the node detail attribute is contained in a collapsed group, this group is automatically expanded. In case the corresponding fields are located on another tab, it will be opened automatically. When returning from a check execution the first check result table entry is selected and all erroneous objects are displayed and marked. The following table describes the fields in the Check Results table: Column Description Type Type of the finding – can be an error or an information and is indicated only by an icon. Tab The tab layer on which the finding is located. Can be Ingredients, Supplier data or Recipient data. Node / Recipient The node name and its associated icon if the finding is located on the tab layers Ingredients or Supplier data. The recipient company name in case the finding refers to the Recipient data tab layer. Message The error or information message that describes the problem. The message might contain parameters. Messages are multilingual, so it is displayed in the selected application language. Propose a CMD Unless you Propose the CMD to your customer, they will not see your entry. The following pictures explain how Proposing works: CMD Edit Mode Propose - you may propose an CMD to one or more recipients-but only one recipient per „roof“ company. Propose Your customer then needs to perform a review of the CMD and either accept or reject. You may add addtional recipient at a later time. If the CMD was in edit mode when you propose, it is „Released“ at the time of Proposing. CDX USER MANUAL – VERSION 4.4 / NOVEMBER 2015 CREATE A CMD 74 CMD Q UA LI T Y R E P O RT I N G To improve your own CMD data quality, as well as your supplier’s data quality, you can use the CMD Quality Reporting function. It is available through the Conflict Minerals Manager menu in Functions, and is divided into two parts. The first part allows the user to select which Conflict Minerals Declarations should be included in the reporting. You can specify this by using the typical search parameters (such as CMD name, CMD-ID, template version). In addition, you can define the CMDs to consider by specifying their state: Reporting on all supplier CMDs (state: not seen, seen, accepted, rejected, cancelled) and/or Reporting on all user owned CMDs already sent to a recipient (state: not seen, seen, accepted, rejected, cancelled) and/or Reporting on all user owned CMDs (state: edit/released) In the second part of the Quality Reporting, a quality profile can be executed against all result CMDs of the first part. You can use pre-selected quality profiles, as well as your company’s own created profiles. This allows filtering to continue for CMDs for which the check lead to fatals, errors, warnings, information or combinations of those. You can also search through the content of the CMDs such as the different smelter types included or excluded or the metals processed in those smelters: Alongside the check results (such as fatal, error, etc.) a score and a percent value is determined for each result CMD and displayed in the result table. This score value indicates how well the CMD passed the checks contained in the quality profile. With the “Statistics” button above the result table you can see and print statistical graphs for all own CMDs and all supplier CMDs in the table to improve the data quality. CDX USER MANUAL – VERSION 4.4 / NOVEMBER 2015 CMD QUALITY REPORTING 75 To see detailed information from the Quality Reporting for one CMD, please double-click in the results table on the relevant CMD. You will see the CMD details screen with the Quality Reporting Check Results in the lower area of the screen: You can also perform the CMD Quality Reporting by using the button above the CMD structure. You will be asked which Quality Profile you want to use, and will see the same window as above with the CMD structure and details information and the CMD Quality Check Results below. The CMD Quality Check Results provide the following information: Profile Name, Profile ID, Profile Description. A double-click on the shown Profile Name opens a separate window with all details information for the selected profile. Furthermore, you will see a Profile Scoring Amount, the Result Scoring, and the Result Scoring by percent (%). Every check rule has a defined scoring amount based on violation class and severity. The total scoring amount of the checks included in the profile gives the Profile Scoring Amount. The Result Scoring amount is the total from all successful checks – the percentage indicates how successful the CMD passed the checks contained in the quality profile. CDX USER MANUAL – VERSION 4.4 / NOVEMBER 2015 CMD QUALITY REPORTING 76 The results table lists all violations, which are also shown by a symbol within the corresponding CMD details: Field Name Description Violation Class System’s level class of a violation. Valid results: Fatal, Error, Warning, Information. This can be changed for company rules by the Company Administrator. Tab Gives the information, where the violation can be found. Node / Recipient Name of the CMD Rule Name Describes the rule against which the CMD is checked. Rule Type Details regarding the type of condition supported: Is Required: Question must be answered. Pick List equals text: The option is a pick list, and specific selections in the list satisfy the rule. Cond. Required: The field is conditionally required based upon the answer to another question. Cond. Not Allowed: The field is not permitted based upon the answer to another question. Rule Group Indicates the section of the CMD (i.e. Declarations Page Part A, B, C and Smelters List Page), where the violation was found. Severity System’s level severity of a violation. Valid amounts are from 1 (low) to 9 (high). This can be changed for company rules by the Company Administrator. Violation Text Feedback message given when the rule is violated. CDX USER MANUAL – VERSION 4.4 / NOVEMBER 2015 CMD QUALITY REPORTING 77 I M P OR T / E XP OR T A CMD Beginning with CDX version 3, you can import a completed EICC-GeSI CMRT Template Excel workbook into CDX, or export an existing CDX CMD to an EICC-GeSI CMRT Template Excel workbook for later usage or sharing. Import a CMD Select Conflict Minerals Manager > CMD Search from the Function-menu. In the “CMD Search” screen, use the button in the right middle to get started. When you click the import button, a file selection dialog will be shown, which allows you to choose a completed EICC-GeSI CMRT Template Excel workbook for import. Currently, only files in Microsoft Excel .xls or .xlsx format are supported for CMD import. If you choose any format other than Excel, a dialog will inform you to select the correct format. Select the template file, and click Open. Select OK button the subsequent dialog, and the selected EICC-GeSI CMRT Template Excel workbook will be imported into CDX. A new CDX CMD will be created from the contents of the template, and the detail view of the newly created CMD will be displayed. An EICC-GeSI CMRT template may contain information for a user’s own company, or for another company which is a supplier to the user’s company. An imported CMD is treated as the user’s company’s CMD if the company name in the template is exactly the same as that of the user’s, and if a company unique identifier is entered in the template, this must match also with the user’s company’s information in CDX. Currently, the DUNS number is used as a company unique identifier. Otherwise, the imported CMD is treated as a third-party CMD from a supplier and you are not able to use it without accepting it. This step requires a CMD Manager License. From a process point of view, there is no difference between these two situations except a supplier CMD import displays an additional dialog to inform the user a supplier CMD has been imported. CDX USER MANUAL – VERSION 4.4 / NOVEMBER 2015 IMPORT / EXPORT A CMD 78 A validation check is performed upon the content of the template during the CMD import. Some errors prevent the CMD import. For those errors, you will receive information about the error(s) that must be corrected in the xls template before the import can be done. Other warning and error messages (not preventing the import) will be shown in the same window, but can be confirmed with OK, and the template will be imported. Any detected errors/warnings are shown in the check result pane at the bottom of the CMD detail view. If no errors are found, a successful check message will be displayed in this pane. CDX USER MANUAL – VERSION 4.4 / NOVEMBER 2015 IMPORT / EXPORT A CMD 79 By default, the name of the CMD template file is used to name the new CMD. For an imported CMD template received from a supplier, only the recipient specific data may be edited. To avoid inconsistent content between the original CMD Template and the CDX CMD, all other fields are read only. An imported CMD template can be sent to customers, copied to create a new editable CMD, or included within the user’s company’s CMDs via supplier CMD rollup (more on this later). Always remember to save all valid new CDX CMD created via CMD Template import, or via any other method. Export a CMD To export a CMD, display the CMD detail view and click the button above the CMD Tree top node. As with the CMD import process, a validation check will be executed in the background against the content of the CMD during the export process. Any errors will be displayed in the check result table at the bottom of the CMD detail view, and the export process will be stopped for correction. CDX USER MANUAL – VERSION 4.4 / NOVEMBER 2015 IMPORT / EXPORT A CMD 80 If the CMD has no errors or you confirm the above shown message with “Yes,” the CMD will be prepared for export to a CMD Template Excel file and the generated CMD will then be ready for download. Supplier CMD Rollup To include an imported supplier CMD within a user’s company’s CMDs, additional preparation is needed. After the supplier CMD is imported, the user must “Accept” the imported CMD. Go to the CMD Inbox by clicking the menu item “Conflict Minerals Declaration” within the Inbox Toolbar drop down menu or in the Functions > Inbox or the Conflict Minerals Manager menu. The user may set search parameters to limit the search results, such as setting the Only imported from Template option to Yes (default is No), or status to browsed. If you know the template version of the CMD, users may also select a specific version from the Template version drop down list. Note: For imported supplier CMDs, the initial status is always set to browsed, which means they have been viewed (during import) by a user within the company. Double click a CMD displayed within the search result. The detail view of the selected supplier CMD is shown. Review the CMD and if it appears valid, accept the supplier CMD by selecting from the MDS menu. CDX USER MANUAL – VERSION 4.4 / NOVEMBER 2015 IMPORT / EXPORT A CMD 81 A user must first create or open an “owned” CMD to add an accepted supplier CMD. From the detail screen, open the Supplier CMDs section on the right. Click the Search for accepted CMDs button. An accepted supplier CMD search window opens, from which the user may search for specific accepted CMDs from their direct suppliers. Once an accepted supplier CMD you would like to include in your own CMD is selected, click the button. Note: For multiple selections, please press the control or the shift key during the selection process and click on . Use the button only to include all CMDs from the result table in your CMD. CDX USER MANUAL – VERSION 4.4 / NOVEMBER 2015 IMPORT / EXPORT A CMD 82 The or button executes the rollup process and adds the supplier CMD(s) to the user’s company CMD. Smelters rollup is executed in the background. When complete, all smelters defined in the supplier CMD and in the user’s company’s CMD are merged, and a combined list of smelters used by your company and your accepted suppliers is generated and displayed under the top node of the CMD tree. Any particular smelter information from a specific source type will be displayed only once, but will be displayed more than once if from different source types, e.g. both known smelters and alleged smelters. To remove a supplier CMD and their smelters from an owned CMD, select the supplier CMD in the Supplier CMDs section and click . Only single selection is available for removal by design. You have to state, if you want to keep all smelters of the deleted supplier CMD in your own created CMD. If a smelter is identified more than once in a rollup CMD and a supplier CMD which included the smelter is removed, the smelter will remain in the rollup CMD unless and until all CMDs which included the smelter are removed. To view the details of supplier CMD included in your own CMD, double click the supplier CMD item or use the View button within the Supplier CMDs section. The details view of the preselected supplier CMD is shown in a separate window. Clicking the Previous or Next button within the supplier detail displays the previous or next supplier CMD included in the rollup CMD. Note: To protect supply chain information, the Supplier CMDs section is not available in supplier CMD detail view. CDX USER MANUAL – VERSION 4.4 / NOVEMBER 2015 IMPORT / EXPORT A CMD 83 CMD R E QU E ST Similar to the MDS Request function, you can send a CMD Request to your supplier – either to a company registered in CDX or to companies not already registered. However, prior to using it, you must work with your suppliers outside of CDX and agree that you are going to use CDX to communicate requirements. You will need to know in detail to which company to send the Requests. Parts of a Request A Request tells a supplier what CMD the Requester expects to receive. The Request consists of the following: Set of mandatory CMD attributes (base and recipient specific data) Administrative data, which is Request-specific In the request, the Requester indicates what data they are expecting. Both the Due Date and the Product/Item Number (when you request a CMD on Product Level) are required. All other information is optional. Please do not put guidance information in the Attributes when creating a request. Requested values inserted into the assigned CMD data fields cannot be overwritten. If they are empty, CMD suppliers have the option to enter their own values. Administrative Data Administrative data refers directly to the Request. This is data the Requester (CMD Recipient) uses to manage the requests in their company such as the following: Project, which is used to group requests. Projects are created by Company Administrators and are valid companywide (in the CMD Requester’s company). Company / Org-Unit ID and Contact person of CMD Requester Deadline Date, which is the deadline the CMD Requester expects to receive the requested CMD CMD Request Statuses The Request status describes one of the following: A new Request (status "new") The request is sent to a CMD Supplier (status “sent,” “received” for CMD Supplier) The CMD Requester answers a question and sends Request (status “sent”, “received” for CMD Supplier) The CMD Supplier has assigned a CMD but not sent it yet (status "attached") The CMD was sent (status "waiting for acceptance") The CMD has been accepted (status "completed") The Request receiver (CMD Supplier) rejected the request (status "rejected") The Request was cancelled (status "deleted") CDX USER MANUAL – VERSION 4.4 / NOVEMBER 2015 CMD REQUEST 84 Creating Requests If you use Projects, the first step is to create the project. For the purposes of this section, we will assume that either you are not currently using Projects (which is optional) or that your Projects are already created. Requests can be created by any User profile except Read-Only. You have two options to create requests: Create a single CMD request by using the Functions > Conflict Minerals Manager > New CMD Request or Create multiple CMD requests by using the provided MS Excel Template and upload the file into CDX The first option is described in the following section. A description for creating multiple CMD requests with the MS Excel file can you find in chapter “Outbox”, because it is only relevant for own CMD requests. The Request attributes are as follows: Field Description Recipient Data Company The CMD supplier who will receive this request. Supplier Code You may enter the specific supplier code. The supplier will not be able to change the code. Deadline Date The date the response is due. This is a required field. Status Request Status ID System generated – CMD Request ID Requester Data Company System generated – CDX name of company generating the request and where the supplier will send the response to the request. Organisation Unit Drop down list of possible Organisation Units to receive response. CMD Contact System generated from User ID of person creating request. Project Project name the Request is assigned to. CMD Request Template Version Drop down list of possible Template Versions the CMD should be based on. Declaration Scope Drop down list of possible Declaration Scope the CMD should cover. Product/Item Number Product/Item Number is only available for a declaration on Product Level. This is a required field. Declaration Period from … to … You may enter a value to request a Conflict Minerals Declaration for a specific Period. Selecting the Recipient Company You can search for a company registered in CDX by using the company search function or you can send your request to a company not already registered in CDX. When you activate the field “not in CDX registered”, additional fields appear in the lower area: CDX USER MANUAL – VERSION 4.4 / NOVEMBER 2015 CMD REQUEST 85 Please fill in the required information for the company you want to send the CMD request (all fields with a red * are required). At the end of the window you can also include a note in the email that the system will send out. After saving and sending, the Company Administrator you entered will receive an email with an invitation to register in CDX and send the requested information by using the system: CDX USER MANUAL – VERSION 4.4 / NOVEMBER 2015 CMD REQUEST 86 Creating Projects Projects are grouping criteria for Requests and are valid company-wide. Projects are created on the Create Request screen starting with clicking on the edit next to the Project field. A new window will pop up. Since you want to create a project, click on . A new window will pop up where you enter the Project name. To get out of this window, click on Save and you’ll be back at your previous window. However, now your new project will be in the list at the bottom of the window. Click on it to highlight the project and then . You will be returned to your Request window. Completing the Request After you finish entering all of the data, use the icon on the toolbar and the system will perform a check. After the Request has been successfully saved, you will find a to click on that to send your Request to your supplier. icon on the lower right of the screen. You need Rejecting a Request Anyone who can create a Request or MDS/CMD can reject a Request. When a received Request cannot be handled by the CMD supplier, the supplier may reject it and add a comment. It will show the status rejected for the CMD supplier and the CMD requester. If the Request is rejected, a reject reason by the CMD supplier is mandatory. When you are Viewing the Request, in the lower right of the screen you will see the following options. To reject the Request, click on the Reject button and enter your reason for rejecting. Assign Existing CMD to Request There are two ways to respond to a request: create a new CMD or assign an existing CMD. In this case, we will be assigning an existing CMD. Once you click on Assign CMD, a window opens where you can search for a certain CMD. You will only be able to attach an existing CMD that was created by your CDX Company. After assigning you can Send/Propose the CMD to the requesting company, which is then inserted automatically in the recipient data screen. Create CMD Should you elect to Create CMD, you will see that the new CMD has been assigned to this request. The requested CMD recipient data is inserted automatically. You need to create the CMD as explained in previous sections. Once the CMD is completed, go to the Recipient Data Screen and supply any other information and then Send/Propose to the Recipient in a normal fashion. Completing the Request By sending the assigned CMD to the CMD requester, the Request status changes to waiting for acceptance. If an assigned CMD is sent, a Request-specific test is done, regardless of whether all mandatory fields are filled. If the assigned CMD is rejected, the Request status changes back to working. If the assigned CMD is accepted, the Request status changes to completed. CDX USER MANUAL – VERSION 4.4 / NOVEMBER 2015 CMD REQUEST 87 D E F I CI E N CY R EP O RT You are now able to receive, process and respond to supplier CMDs. However, the process to show “due diligence” as required under the SEC ruling also consists of assessing and scoring the responses provided by suppliers in the CMDs. Reporting companies must show improvement in the information they report in a positive feedback loop. The Deficiency Report function supports these efforts by providing email feedback to suppliers when the CMDs submitted do not meet your data quality expectations. With the Deficiency Report function, every user can check the data quality of received CMDs and send an email with the results from the Deficiency Report to the CMD creator. To use the function properly, the CDX Company Administrator must define the check profile and prepare default messages in the email template which is used to send report results. This can be done in the Deficiency Report Manager, which is available in the Administration menu. With those profiles, each user can perform the Deficiency Report to find missing information in every CMD and then send an email to the CMD provider to indicate the incorrect information. The Deficiency Report uses nearly the same information as the Quality Reporting. The first part allows the user to select which Conflict Minerals Declarations should be included in the reporting. You can specify this by using the typical search parameters (such as CMD name, CMD-ID, template version). In the second part of the Deficiency Report, select a quality profile, which is already defined by the Company Administrator in the Deficiency Report Manager. This will be executed against all result CMDs from the first part, and allows filtering to continue for CMDs for which the check lead to fatals, errors, warnings, information or combinations of those. As already known from the CMD Quality Reporting alongside the check results (such as fatal, error, etc.), a score and a percent value is determined for each result CMD and displayed in the result table. This score value indicates how well the CMD passed the checks contained in the profile. CDX USER MANUAL – VERSION 4.4 / NOVEMBER 2015 DEFICIENCY REPORT 88 With the “Statistics” button above the result table, you can see and print statistical graphs for all listed CMDs: Create and Edit the Deficiency Report You can open one or more CMD(s) from the result table to create, update and send the Deficiency Report(s). Please mark all relevant CMD(s) in the table (for multiple selection please press the control key) and double click (right mouse click for multiple selection) to create the report for the selected CMD(s). You can also use the context menu to begin creation. For our example, we marked three CMDs and created the Deficiency Report. In the “Edit” tab, all of them will be shown with the corresponding information: When you go back to the results table and mark additional CMDs, they will be also included in this list on the lefthand side. If you want to work with those results later, you should save the already created Deficiency Reports. Otherwise you will lose them when you perform another function. Let’s look at the right side of the screen, where the following details for the selected CMD are displayed: Report Report Name System generated from the CMD Name – you can change this entry, if desired Report No. System generated number (not editable) Report Language Please select the report language here. The default entry can be set in the Deficiency Report Manager. Expected response date Please enter the date that you expect a response. The default entry is the report creation date, plus five days. CDX USER MANUAL – VERSION 4.4 / NOVEMBER 2015 DEFICIENCY REPORT 89 Send Information All information in this section can be changed. Currently, inserted texts are system-generated and can be overwritten. To Generated from the CMD supplier data – email address of the CMD creator Mail To Name Generated from the CMD supplier data – name of the CMD creator Reply To Generated from your user ID – email address of the Deficiency Report creator Reply To Name Generated from your user ID – name of the Deficiency Report creator Cc Here you enter the email address to whom you want to send a report copy. A default entry for this field can be defined in the Deficiency Report Manager. Subject Here you insert a meaningful subject for the Deficiency Report email (mandatory field). You can use placeholders (e.g. CMD Name, Company Name) which will be filled in from the system. A default entry for this field is defined in the Deficiency Report Manager. Introductory Header Based on the profile and the pre-defined send information, an email text is system-generated. This can be modified by the user to give the supplier as much information as possible, regarding what needs to be changed in the CMD to meet the quality requirements. Here you insert a meaningful description for the Deficiency Report email. You can use placeholders (e.g. CMD Name, Company Name) which will be filled from the system. A default entry for this field can be defined in the Deficiency Report Manager. Check Results Displays information about the amount of Fatals, Errors, Warnings, Information found in the CMD using the mentioned Profile (Name, ID, Description). Violations against the used check profile are displayed in the results table with detailed information regarding Violation Class, Tab, Rule Name, Rule Type, Rule Group, Severity, Description, and Custom Action. CDX USER MANUAL – VERSION 4.4 / NOVEMBER 2015 DEFICIENCY REPORT 90 The field “Custom Action” is editable. Here you can insert the corrective steps to be done by your supplier. A double click in the respective field opens a separate window, where you can “add” one or more actions to every violated rule: Please select the “Edit” tab and click on “Add”. Select a detail item from the drop down list and enter a description. You can choose whether the action is “only valid for selected rule.” Please Save your entries. These created entries are now “available actions” in the “Assign custom actions” tab, and you can add one or more available actions to the “selected actions” area to Assign custom actions (by clicking ) to your check results table. CDX USER MANUAL – VERSION 4.4 / NOVEMBER 2015 DEFICIENCY REPORT 91 Footer Text Please insert additional information, which will be placed at the end of the Deficiency Report email. You can use placeholders (e.g. CMD Name, Company Name) which will be filled from the system. A default entry for this field is defined in the Deficiency Report Manager. Attachment Please “Browse” to attach documents to your Deficiency Report email. All attached documents will be listed here with their Filename, Upload Date and Filesize. The following file formats can be uploaded: xls, xlsx, doc, docx, pdf. You can upload up to 5 documents with a size up to 5 MB per file. Please use the button to remove attachments. Send History Information about sent Deficiency Report emails with details about Date, To and Cc sent are only available for report emails that have already been sent. You can preview the generated report using the PREVIEW button above the CMD report list (left side). You can also remove one or more reports from your view. When all mandatory information (marked with an asterisk *) has been entered and the Deficiency Report has been saved, the SEND button is available: Multiple selection is possible and you can send all marked Deficiency Reports using the button above or the context menu of the result table. If a report cannot be sent due to missing information in a mandatory field, you will see the following error message: Please enter the missing information and try sending again. CDX USER MANUAL – VERSION 4.4 / NOVEMBER 2015 DEFICIENCY REPORT 92 Report Search You can search for all created and saved reports, as well as already sent Deficiency Reports in the “Report Search” Tab: You can use several parameters to refine your search. The result table displays an overview for all reports in the marked status (new and/or sent) with Report Number, Report Name, Used Profile, CMD ID / Version, Last sent date, Sent to email, Attachment, Scoring amount (also in %), and Amounts of Fatal/Error/Warnings. All reports can be sent (again) using the context menu: Report Settings To preview the settings selected by your Company Administrator, please go to the “Report Settings” Tab. The displayed information is not editable here. To change the settings, the Company Administrator has to use the Administration > Deficiency Report Manager menu. CDX USER MANUAL – VERSION 4.4 / NOVEMBER 2015 DEFICIENCY REPORT 93 O UT B OX The Outbox ( ) is where you can track the MDSs and CMDs that you have sent to recipients and their status as well as all own MDS and CMD Requests. For own MDS and CMD Requests, you can also download a template (xls format) in the respective screen, which allows you to create multiple requests outside of CDX. You can incorporate extracted data from your ERP, Supplier Management or any other inhouse system, and then upload the filled template into CDX. With this function, you have the option to bulk send MDS or CMD requests to multiple suppliers simultaneously. The search parameters and the search result table are combined in one screen for each of the selectable type. This screen is divided into a top area and a bottom area. The top area is used to show the search parameters and the bottom area is responsible to display the search result table. Search Parameters The following table gives a description of the Search Parameters: Field Description Sent MDSs / CMDs Name MDS / CMD name or description Internal Number Item/Material number – from your Ingredients page – NOT the Recipient Data page External / Part/Item Number Part/Item number – from your Recipient Data page MDS ID / CMD ID / Version MDS ID / CMD ID / Do you want to limit the results to only the Current Version or All versions Node ID System Generated – This refers to the actual location in the database where information about this MDS / CMD is stored. For the 0.01 version of the MDS / CMD, it will be the same as the ID Template Version Search CMDs with specified template version, only available for CMD search Date Transmitted Search by date range of transmission to recipient Date Last Status Change Search by date range of last status change Combined / All Find those transmitted in any status (default is “all” – to unmark all and select one or more status please click on “none”) Combined / Open MDSs / Open CMDs Find those transmitted and are “Open” MDSs / CMDs (anything but cancelled by sender and accepted) Status: not yet browsed Find those transmitted where the recipient has not looked at. Status: browsed Find those transmitted where the recipient has looked at but not made a decision on Status: accepted Find those transmitted where the recipient has accepted Status: rejected Find those transmitted that the recipient has rejected Status: modified Find those that are back in your company’s control for editing/corrections Status: cancelled by sender Find those that you have either deleted or deleted the recipient Only Forwarded Limit your search to those that are forwarded copies Org Unit Find those sent to a specific Org Unit (your ID must be assigned to that Org Unit) Enable Search by Recipient Check this box if you want to look by a specific recipient Recipient List of recipients that you wish to find results for (this box will be greyed out until you check the box Enable Search by Recipient) Include all Org Units Find MDSs / CMDs transmitted to the recipient companies regardless of Org Unit CDX USER MANUAL – VERSION 4.4 / NOVEMBER 2015 OUTBOX 94 Field Description Own MDS Requests Request ID MDS Request ID – system generated Request Group ID Group ID – system generated. Imported requests from one file would share the same ID. Only imported from Template Search sent MDS requests which were imported from MDS bulk request Excel sheet Type Type of MDS – Component, Semicomponent or Material Project Project name/number the Request is assigned to Deadline date from – to You may search on deadline dates. If so, "from" would be the earlist you would want to look at, and "to" is the last date in the window you want returns from. Status You may filter on the status of the request (new, sent, awaiting acceptance, completed, rejected). Only one status may be selected per search. Check the "open requests" box if you want to return all requests that have not been closed or cancelled. Enable Search by Company Check this box if you want to perform your search by customer. Recipient List of recipients that you wish to find results for (this box will be greyed out until you check the box Enable Search by Recipient). Requester Please select an Org.-Unit to search for all Requests from this Org.-Unit. Assigned MDS / Name / Number Find own Requests a certain MDS has been assigned to – by MDS selection, name or number. Statistics Shows the amount of all own and received MDS Requests in the respective status . Download Template Here you can download the xls template to create an MDS bulk request file. Import Here you can import your filled MDS bulk request file to create mass-requests.. Own CMD Requests Request ID CMD Request ID – system generated Request Group ID Group ID – system generated. Imported requests from one file would share the same ID. Only imported from Template Search sent CMD requests which were imported from CMD bulk request Excel sheet Project Project name/number to which the Request is assigned Enable Search by Recipient Check this box if you want to perform your search by customer. Recipient List of recipients that you wish to find results for (this box will be greyed out until you check the box Enable Search by Recipient). Supplier Code Search for CMD Requests with a certain Supplier Code. Deadline date from – to You may search on deadline dates. If so, "from" would be the earlist you would want to look at, and "to" is the last date in the window from which you want returns. Status You may filter on the status of the request (new, sent, awaiting acceptance, completed, rejected). Only one status may be selected per search. Check the "open requests" box if you want to return all requests that have not been closed or cancelled. CMD Template Version You may search for all CMD Requests you sent out for a certain Template Version. Declaration Scope You may search for all CMD Requests you sent out for a certain Declaration Scope. Product / Item Number You may search for all CMD Requests you sent out for a certain Product or Item Number. Assigned CMD Search for all CMD Requests you sent out and received a certain CMD assigned to it. Name Search for all CMD Requests you sent out and received a certain CMD with this Name. Node ID Search for all CMD Requests you sent out and received a certain CMD with this Node ID. Download Template Here you can download the xls template to create a CMD bulk request file. Import Here you can import your filled CMD bulk request file to create mass-requests.. CDX USER MANUAL – VERSION 4.4 / NOVEMBER 2015 OUTBOX 95 For selecting the Supplier / Recipients, a modal dialog appears, displaying the Company / Org.-Unit Search panel. You can turn off columns in the display and reorder the columns by using options in the View menu. To access any of the items, double click and you will be brought to the Ingredients tab of the submission. You can export the results to excel by using the higher versions you might get the following message: command. Please note that with MS Excel 2007 or If so, please click “Yes” to be able to open the file. Bulk Send for CMD and MDS Requests The bulk request option enhances the existing request capability by enabling you to send MDSs, as well as CMD requests to multiple suppliers simultaneously. It is available in the MDS Request Outbox respectively in the CMD Request Outbox (because this function is only related to own MDS or CMD requests). If it is not specifically mentioned, the processes are same for bulk send of CMD and MDS requests. The description below shows the CMD request options. In the respective Outbox Search screen you can download a template (xls format), where you can list all your MDS or CMD requests offline. You can also extract data from your ERP, Supplier Management or any other inhouse system to incorporate already available information in your request file, which you can import into CDX once it is prepared. CDX USER MANUAL – VERSION 4.4 / NOVEMBER 2015 OUTBOX 96 Please use the button to receive available master request template files downloaded from CDX. By clicking this button, all available master request template files would be shown in a separate dialog. There is currently only one master template file available for download (topical means the corresponding template is most currently used). By clicking the link in the “Name” column, the corresponding master template file will be downloaded and you can save it on your computer to create your own bulk requests. The new “Import” button ( ) in the Outbox Search screen is used to import the (offline) prepared CMD/MDS requests included in the downloaded request template file. By clicking this button, you have to choose the file to be imported in a separate dialog. The handling is the same as the CMD Import. By selecting the template file to import and clicking the “Ok”-button, all requests defined in the template will be imported. Once the import process is finished, a separate summary dialog with detailed information about the import process will be shown: CDX USER MANUAL – VERSION 4.4 / NOVEMBER 2015 OUTBOX 97 As the import process consists of two sub processes (parse the template file and persist the imported requests), the first table in the summary dialog shows the parsing result of the template file. The second table shows the result of request persisting process. If a request is successful imported, it would get a unique Request ID and a Request Group ID, if a request could not be persisted for any reason, none request or request group id would be given and the failure cause would be shown in the table for the related row given in the template file. The results shown in both tables could be exported to excel file by clicking the related button above the corresponding table. Clicking OK brings you back to the Outbox Search screen, and the imported requests will be shown in the result table below: All imported requests from one file will share the same “Request Group ID”. The Group ID is used to describe all related requests that belong to the same imported request template. It can be used later to find all related imported requests. All requests defined in the template will be imported. If any information in a request is missing, you can edit the respective request bydouble-clicking on the request, which opens the request details. The Outbox Search screen is also used to bulk send a set of requests: Select multiple requests in the CMD/MDS request outbox, right-click to open the context menu item and then “Send”. The “Send” menu item in the context menu is available only if at least one selected request is sendable. If all preselected requests are not sendable, the “Send” menu item would be disabled. By clicking the “Send” menu item, all preselected requests would be sent. If user confirmations are needed before requests can be sent, separate dialog will be shown for each of these requests (one by one for user conformation). CDX USER MANUAL – VERSION 4.4 / NOVEMBER 2015 OUTBOX 98 At the end, when all preselected requests are handled by the sending process, a separate summary dialog would show the bulk send results. The message shows the following information for every single request: Sendable: Whether a request could be sent. If a request is not sendable, please check, if all mandatory fields are filled. Send successful: Request was sent successfully– yes or no. Send canceled: Request was canceled by user (therefore was not sent) – yes or no. To export the summary into Excel file click the “Export” button above the table. CDX USER MANUAL – VERSION 4.4 / NOVEMBER 2015 OUTBOX 99 I N B OX The Inbox ( ) shows all MDSs, MDS Requests, CMDs and CMD Requests that are sent to your company. If your company uses Organisation Units, you must have that Org Unit assigned to your ID in order to view it. The search parameters are the same as for the Outbox as are the columns in the display. What is different about the Inbox is that you must view and accept the MDS before you can attach it to one of your structures. Accepting / Rejecting First select the MDS, MDS Request, CMD or CMD Request you want to review by double clicking on it to bring up the Ingredients/Details page. You can then explore all information as well as the structure (see Navigating the Tree) and review it according to your rules. You also need to go to the Recipient Data tab and review that information. After you have viewed the submission, go to the MDS menu and use the Accept. The CDX system will then run system checks to see if there are any issues. Your screen should look similar to the following: Then you can either Accept or Reject by clicking on the appropriate button: . Accepting the MDS If the MDS has passed all system checks and you click on , the status of the MDS will change to Accepted and the MDS can now be found in your search and attached to one of your structures. Rejecting the MDS If you decide to Reject the MDS, you will need to supply a reason for the rejection. This should be self explanatory or else your supplier will feel free to call you with questions. After you enter your reason for denial, click on the CDX USER MANUAL – VERSION 4.4 / NOVEMBER 2015 to change the status to rejected. INBOX 100 S E A RC H T I P S Searching in CDX is simple, easy and offers many options to narrow your results. The more filters you fill out, the less search results you will get. The Search menus are somewhat similar with slight differences as detailed in the following sections. All search results can be exported by using the versions you might get the following message: button. Please note that with MS Excel 2007 or higher If so, please click “Yes” to be able to open the file. Wild Card Search The asterisk (*) is a useful character when searching, especially since if you are not sure of the exact spelling or punctuation. If you want all lead compounds in the Basic Substance search, simply enter *lead* in the name field and all will be returned. If you are looking for a company and know there are several CDX registrations, you can enter *abcd* in the company name field and all companies containing that character string will be returned in the results. Configure Search Results Every Search Results allows you to turn off/on column displays and to sort or rearrange the columns through the item. Component Search Fields The following table lists the fields and definition of those fields available in the Component Search. Field Description Name, ID, Version, Date Name The name of the Component Part / Item Number The part or item number MDS ID / Version The MDS ID / Select current to limit your search to the most recent version(s). Select All to return all results. Note, if searching for a supplier’s data, it is a good idea to search on All as there may be higher versions from a system perspective that you do not have visibility to. Node ID System Generated – This refers to the actual location in the database where information about this MDS is stored. For the 0.01 version of the MDS, it will be the same as the ID Date: published / accepted / internally released Checking this box allows you to perform a date search based on when the MDS was released. Date: created Checking this box allows you to perform a date search based on when the own MDS was created. From / To Date range that you want to search through. Supplier MDSs Accepted MDSs Check the Accepted box if you want to search through supplier data that you have accepted. Supplier If the above box is checked, you will be able to search and select suppliers to which you want to limit your searches. Own MDSs Own MDSs Check this box if you want to search through your own company’s MDSs. CDX USER MANUAL – VERSION 4.4 / NOVEMBER 2015 SEARCH TIPS 101 Field Description Last edited by me Check this box if you want to limit your search to those that you were the last editor on. Assigned Org Unit If you want to limit your search to a single Org Unit, you can select it here whether or not the Org Unit is assigned to your User ID. Assigned Contact If you want to limit your search to a single supplier contact in your CDX company, you can select it here. Semicomponent Search Fields The following table lists the fields and definition of those fields available in the Semicomponent Search. Field Description Name, ID, Version, Date Name The name of the Semicomponent Item / Mat. No. The item or Material number MDS ID / Version The MDS ID / Select current to limit your search to the most recent version(s). Select All to return all results. Note, if searching for a supplier’s data, it is a good idea to search on All as there may be higher versions from a system perspective that you do not have visibility to. Node ID System Generated – This refers to the actual location in the database where information about this MDS is stored. For the 0.01 version of the MDS, it will be the same as the ID Date: published / accepted / internally released Checking this box allows you to perform a date search based on when the MDS was released. Date: created Checking this box allows you to perform a date search based on when the own MDS was created. From / To Date range that you want to search through. Supplier MDSs Accepted MDSs Check the Accepted box if you want to search through supplier data that you have accepted. Supplier If the above box is checked, you will be able to search and select suppliers that you want to limit your searches to. Own MDSs Own MDSs Check this box if you want to search through your own company’s MDSs. Last edited by me Check this box if you want to limit your search to those that you were the last editor on. Assigned Org Unit If you want to limit your search to a single Org Unit, you can select it here whether or not the Org Unit is assigned to your User ID. Assigned Contact If you want to limit your search to a single supplier contact in your CDX company, you can select it here. Material Search Fields The following table lists the fields and definition of those fields available in the Material Search. Field Description Name, ID, Version, Date Name The name of the Material Int. Mat. No. The Internal Material number – this is how your company refers to the Material. MDS ID / Version The MDS ID / Select current to limit your search to the most recent version(s). Select All to return all results. Note, if searching for a supplier’s data, it is a good idea to search on All as there may be higher versions from a system perspective that you do not have visibility to. CDX USER MANUAL – VERSION 4.4 / NOVEMBER 2015 SEARCH TIPS 102 Field Description Node ID System Generated – This refers to the actual location in the database where information about this MDS is stored. For the 0.01 version of the MDS, it will be the same as the ID Date: published / accepted / internally released Checking this box allows you to perform a date search based on when the MDS was released. Date: created Checking this box allows you to perform a date search based on when the own MDS was created. From / To Date range that you want to search through. Norm, Symbol, Classification Standard Material No. The Standard Material number of the Material. This usually is valid only for materials in certain metal classifications. Symbol The ISO symbol for this Material. This field is usually valid only for polymeric classifications. Norm You may elect to search on specific norms. You may search on only one norm at a time. You may wish to use a wild card search in the numeric portion of the norm to have a wider scope. Classification You may elect to search on specific Material Classifications. You may search on only one Classification at a time. Supplier MDSs Accepted / Standard MDSs Check the Accepted box if you want to search through supplier data that you have accepted. Check the Standard MDSs box if you want to search through standard Material data that is published by “CDX Standard Metals”. Supplier If the Accepted box is checked, you will be able to search and select suppliers that you want to limit your searches to. Own MDSs Own MDSs Check this box if you want to search through your own company’s MDSs. Last edited by me Check this box if you want to limit your search to those that you were the last editor on. Assigned Org Unit If you want to limit your search to a single Org Unit, you can select it here whether or not the Org Unit is assigned to your User ID. Assigned Contact If you want to limit your search to a single supplier contact in your CDX company, you can select it here. Substance Search Fields The following table lists the fields and definition of those fields available in the Substance Search. Field Description CAS No. The preferred method of searching on Substances – no spelling or punctuation numbers. This is the Chemical Abstract Service Number. Not all Substances have a CAS number. If it does not, then this field contains -. If it is a system wildcard, the word “system” appears in this field. Name / Synonym The name or synonym of the Substance. If using this field, it is highly recommended that you use a wildcard search. EU-Index The EU-Index number assigned to the Substance. Not all Substances have an EU-Index number and this field is frequently blank. EINECS-No. The EINECS number assigned to the Substance. Not all Substances have an EINECS number and this field is frequently blank. Substance Group / List For some checks as to make analysis easier, many Substances have been assigned to a group. You can differentiate between Global Substance Lists and Company Specific Substance Lists to see which Substances (up to 500) are assigned to a group/list through using the pull down. CDX USER MANUAL – VERSION 4.4 / NOVEMBER 2015 SEARCH TIPS 103 Search Basic Substance Changes With the Function “Search Basic Substance Changes” you can search for changed as well as for hidden or inactive basic substances and view the change history. In the change history screen you may select a time period for which to review executed changes. The result list will contain change information, categorized as in the following: Details (name, synonym, CAS No., etc.) GADSL / REACH SVHC status (active, hidden, deleted) The user may obtain a detailed description of the change history by clicking any of the listed substances. Basic Substance Request: Requesting the addition of a basic substance Users may search the basic substances available in CDX with the above mentioned Substance Search. If a specific basic substance is not found, a user may submit a request to add the substance. Basic substance requests are accessed from the Basic Substance Request option on the Functions menu. Several actions are available from the resulting Basic Substance Request screen. Selecting the Search button displays all requests the user has created which meet the specified filters. The result list shows the name and CAS Number of each substance, the date the request was submitted and the state of the request (new, sent, enquiry, modified, closed). Existing requests may be modified and all past requests can be viewed. If a Basic Substance Search is unsuccessful, a button is provided to start the Basic Substance Request Workflow. You can also request a Basic Substance be added using the MDS > New > Basic Substance menu. The button starts a new Basic Substance Request. You must populate the appropriate fields in the request form. Above the form you can read General Information for requesting the addition of a basic substance. Once completed and saved, the request generates a notification email to the CDX Chemical Service. The requester and the CDX Chemical Service may view the request in the form as shown below: CDX USER MANUAL – VERSION 4.4 / NOVEMBER 2015 SEARCH TIPS 104 Should the Chemical Service need further information, the user will receive an e-mail request. Once processing is complete after a few working days (successful or not), the request is closed by the Chemical Service. When this occurs, the user receives a request closed notification. Closed requests cannot be edited. CMD Search The following table lists the fields and definition of those fields available in the CMD Search (launched from the Conflict Minerals Manager menu in Functions). Field Description Name, ID, Version, Date Name The name of the CMD CMD ID / Version The CMD ID / Select current to limit your search to the most recent version(s). Select All to return all results. Note, if searching for a supplier’s data, it is a good idea to search on All as there may be higher versions from a system perspective that you do not have visibility to. Node ID System Generated – This refers to the actual location in the database where information about this CMD is stored. For the 0.01 version of the CMD, it will be the same as the ID Template Version Search CMDs with specified template version Only imported from Template Search CMDs which were imported from EICC-GeSI CMRT excel sheet Part/Item No. Search CMDs which are created with regard to a specific MDS by using the respective part/item no. You may also use the asterisk (*) to perform a wild card search. Status: accepted / internally released Checking this box allows you to perform a date search based on when the CMD was accepted / released. Status: created Checking this box allows you to perform a date search based on when the own CMD was created. From / To Date range that you want to search through. Supplier CMDs Accepted CMDs Check the Accepted box if you want to search through supplier data that you have accepted. Supplier If the above box is checked, you will be able to search and select suppliers that you want to limit your searches to. CDX USER MANUAL – VERSION 4.4 / NOVEMBER 2015 SEARCH TIPS 105 Field Description Own CMDs Own CMDs Check this box if you want to search through your own company’s CMDs. Last edited by me Check this box if you want to limit your search to those that you were the last editor on. Assigned Org Unit If you want to limit your search to a single Org Unit, you can select it here whether or not the Org Unit is assigned to your User ID. Assigned Contact If you want to limit your search to a single supplier contact in your CDX company, you can select it here. CMD Template Search As of CDX version 3.0, multiple EICC-GeSI CMRT template versions are supported. Users may import, export, create, and validate CMDs based upon any template version published by EICC-GeSI. To the user, the differences between template versions are transparent. Currently available template versions supported by CDX include: 4.01b, 4.01a, 4.01, 4.0, 3.02, 3.01, 3.0, 2.03a, 2.03, 2.02, 2.01, 2.0 and 1.0. The following table lists the fields and definitions available in the CMD Template Search. Field Description Version The version of the EICC-GeSI CMRT template. From / To Date range for issue date of EICC-GeSI CMRT template from which to search. Status The status of the EICC-GeSI CMRT template: active or deactivated. Type The type of the EICC-GeSI CMRT template: master or company specific. Master templates are “unpopulated” EICC-GeSI CMRT templates which are used within CDX as the basis for importing or exporting CMD Template. A user might select this to serve as a starting point for a new CMD. Company specific templates are completed EICC-GeSI CMRT templates populated by a specific company. Conflict Minerals Declaration Specific CMD name to search. To view the content of a specific template click the template name in the search result table. The user is presented the option to open or save the specified template. CDX USER MANUAL – VERSION 4.4 / NOVEMBER 2015 SEARCH TIPS 106 In search results, the options available from the context menu ( or the mouse-right-click menu) vary based upon the CDX User profile and the template type displayed. For example, one list of options is shown to a CDX Company Administartor when a master template is displayed, while a different list is shown to a CDX User when a company-specific template is displayed. CMD Smelter Search The following table lists the fields and definitions for the Smelter Search. Field Description Smelter Name The Smelter company name or known alias. CDX requires an exact character string match, so it is suggested a wildcard search be performed if using this field. CSFI Smelter ID The ID assigned by CSFI for a certain smelter. CDX Smelter ID The preferred method of searching for a smelter company – this is a numeric field and less prone to errors as the CDX Smelter ID is a system generated number. DUNS Number The smelter company's DUNS number. Smelter Type The type of smelter. You can search for the following types: conflict free smelter defined by CSFI, standard smelter defined by CSFI, registered smelter company in CDX, alleged smelter defined by user in the CDX web application, invalid smelter. You can also search for “deactivated” smelters by marking the respective field. Zip Code The Zip or Postal Code where the smelter company is registered. City The City where the smelter company is registered. State / Province The State or Province where the smelter company is registered. Country The Country where the smelter company is registered. Metal The Conflict Mineral metal the smelter produces. Source or ore Source of the Conflict Mineral, either a mine or Scrap/recycled. By double-click on an item in the search result table, the smelter detail view shows the company, facility and conflict minerals related information. For Company Administrators, the history about defined conflict minerals by the smelter company in the past will be shown. In tab “Administration” details for alleged smelters can be edited or added. CDX USER MANUAL – VERSION 4.4 / NOVEMBER 2015 SEARCH TIPS 107 In the CMD Smelter Search the Company Administrator can also create new alleged smelters using the button . This can be done as already described in chapter “Add Alleged Smelters into CMD”. SDoC Search The SDoC Search is launched from the Function Menu. The following table lists the fields and definition of those fields available in the SDoC Search. Field Description SDoC ID The SDoC ID MDS ID The MDS ID the SDoC has been issued on. Owner Company System Generated – the CDX company name Include all Org Units Check this box if you want to search through all Org Units. State Status of the SDoC – Edit Mode or Internally Released. Date of Issue Date the SDoC was Issued. Last Name Last name on the User ID associated with the SDoC. First Name First name on the User ID associated with the SDoC. CDX USER MANUAL – VERSION 4.4 / NOVEMBER 2015 SEARCH TIPS 108 Company Search The following table lists the fields and definition of those fields available in the Company Search in Administration Menu. Field Description Company Name The CDX company name – since the system must have an exact character string match, it is suggested that a wildcard search be performed if using this field. Company ID The preferred method of searching for a company – this is a numeric field and less prone to errors as the Company ID is a system generated number. Org Unit The Org Unit name DUNS Number The Company's DUNS number. IMDS Company ID The Company ID for a company already registered in IMDS. With company registration in CDX, the companies can enter their IMDS company ID, but it’s not mandatory. Therefore it’s not guaranteed, that you will find the proper company. Zip Code The Zip or Postal Code where the company is registered in CDX. City The City where the Company is registered in CDX. State or Province The State or Province where the Company is registered in CDX. Country The Country where the Company is registered in CDX. User Name The last name of a User User ID The User ID of a User – It is highly recommended that people not share their User IDs so this field would be rarely used. Only Root Companies Marked by default – if you want to search also for Org Units, please unmark. Similar Companies Marked by default – if you want to search only for one specific company name only and you are sure it was inputted correctly, please unmark. CDX USER MANUAL – VERSION 4.4 / NOVEMBER 2015 SEARCH TIPS 109 R E P O RT I N G There are several types of Reports that CDX can generate: MD Report (Materials Declaration according to ISO 30005) MDS Report (Material Data Sheet Report with information about ingredients and Components in Materials) SDoC Report (Supplier’s Declaration of Conformity for Material Declaration Management) This section explains each of them. Launch the MDS Report The MD Report and the MDS Report require you to view an MDS before the print icon is available. You may also highlight an MDS in any Search result and select Print from the context menu options. You then need to select the desired type of report. The MDS Report can be shown in different views: your own company’s point of view or the MDS Recipient company’s point of view. You will be asked to select one of them. Additionally you can select the sort order for the regulation section printed in the MDS Report: The created report (pdf file) can be opened or saved and contains complete information about the MDS: Supplier Data, Product Identification, and Characterization of the Component as well as all affected regulations with detailed information about the respective ingredients and given confirmations. Launch the MD Report The MD Report is launched similarly to the MDS Report. The Materials Declaration (MD) report is a document that states whether there are any Substances in the product that fall into Table A Substances (prohibited or restricted) or Table B Bubstances (specific Chemical Substance). If so, the other values in the report are calculated and presented. These tables are designated in accordance with the Hong Kong Convention and Guidelines. CDX USER MANUAL – VERSION 4.4 / NOVEMBER 2015 REPORTING 110 Launch the SDoC Report The Supplier’s Declaration of Conformity (SDoC) is a document assuring that the product and its related MD conforms to the law and is suitable for the management and control of the information on the Chemical Substances contained in the product and who is responsible for the product and MD. The SDoC remains valid as long as the products are present onboard the ship. The Working Group within the International Maritime Organization (IMO) on Guidelines for Ship Recycling has published a draft-design for contents and formats of an SDoC. The following requirements are satisfied in SDoC: Unique identification of the declaration of conformity. Name and contact address of the issuer. Identification of the subject of the Declaration of Conformity (e.g., name, type, model number, and/or other relevant supplementary information). Statement of conformity. A complete and clear list of standards or other specified requirement, as well as the selected options, if any. Date and place of issue of the declaration of conformity. Signature (or equivalent sign of validation), name and function of the authorized person(s) acting on behalf of the issuer. The standard format of the SDoC is shown bellow as an example. CDX USER MANUAL – VERSION 4.4 / NOVEMBER 2015 REPORTING 111 The relationship between SDoC and MD is established by using the unique SDoC ID No. in both reports for SDoC and MD as shown below: The SDoC Detail screen in CDX looks as follows: CDX USER MANUAL – VERSION 4.4 / NOVEMBER 2015 REPORTING 112 A D M I NI S T R AT I ON M E N U The Administration Menu contains functions that concern User and CDX Company Administration as shown in the following figure. Some of the menu items are only visible for Company Administrators. Personal Settings CDX USER MANUAL – VERSION 4.4 / NOVEMBER 2015 ADMINISTRATION MENU 113 Password Change Every CDX user can change his/her current password with this menu. Notification This menu item will present you with current messages from the system. CDX USER MANUAL – VERSION 4.4 / NOVEMBER 2015 ADMINISTRATION MENU 114 Company This menu item is where you maintain the important information about your CDX company such as name and address, and DUNS number. You also create Org Units with this function. Org Units will not work unless you add the Org Unit to Users IDs after creating the Org Unit. Only users with a profile of Company Administrator will have access to this menu item. When you view the details of your company, the screen will look similar to the following: On the right side of the window is the company registration information. You cannot change the company Name or Company-ID. If you need to change the company name, you can send a request to the CDX Service Desk and if it meets certain criteria (such as uniqueness and length), a Service Desk Agent will change it for you. The Company ID is a unique number and cannot be reassigned. Additionally Bosch supplier companies see a “Bosch Supplier no.” and a “SupplyOn SPIN ID” in their screen. They are system generated and cannot be changed. Without those numbers you are not able to add Bosch as a recipient to your MDSs, CMDs or requests. All of the other information is for you to maintain. For "Expiry Range" you can choose time frame, how long a newly created user account will be valid. That means, every user you create will get an expiry date. You can choose, if this will be in 90, 180, 365, 730 days. In the middle of the screen, the Company Administrator can select, if suppliers has to provide information with regard to regulations and if their confirmation is required. Currently the following common regulations are available: REACH SVHC, RoHS, ELV, GADSL, Batteries, Packaging, IMO, REACH Annex XIV, REACH Annex XVII, RoHS Future. If your company requires company specific regulations to be considered, please send a request to the CDX Service Desk. At the bottom of the screen is a list of users that have access to your CDX company and their contact information. Additionally, if they are checked as a MDS Contact, they will show in the list of contacts on the Supplier Data Tab of the MDS. If they are checked as a Compliance Contact, they can be found in a search of Compliance contacts and customers will know who to direct their compliance inquiries to. It is recommended that you have at least one user identified as a Compliance contact. You can also export the user list in order to help you manage your users. The exported list contains such information as last login date. It is highly advisable for security purposes to inactivate users who do not need access to the system. As you can see from the above section on personal settings, users can change their own e-mail and if they do so, will have access to data in your CDX company after they leave the company. For instructions on how to inactivate a user, see the section on Administration – User. CDX USER MANUAL – VERSION 4.4 / NOVEMBER 2015 ADMINISTRATION MENU 115 Smelter Administration Once registered and activated, any Company Administrator can maintain information about company’s smelter facilities and conflict minerals produced by each of these facilities. To do that log into CDX as Company Administrator and go select Company on the Administation menu. Search for the smelter company and go to the details page by double-clicking the appropriate item in the search result table. Although you may have registered a facility with your online registration, you must “release” it for suppliers to find it in the search screen. Please see Releasing the Smelter Facility. If the company is registered as a smelter, the “Smelter Facility“ Tab will be shown (otherwise it is not visible). Besides the 3 buttons (add), (edit) and (delete) avaialable for facilities during the registration process there are now 2 new buttons: and . To add a new Smelter Facility press CDX USER MANUAL – VERSION 4.4 / NOVEMBER 2015 and enter the Smelter Facility's data. ADMINISTRATION MENU 116 To add conflict minerals to this smelter facility just press again the button By pressing the within the popup-window: button, the defined conflict mineral will be added to the preselected smelter facility. Giving other information needed for the smelter facility and press again the facility is shown in the Smelter Facility table: button, the new defined smelter To edit or delete a previous defined facility just click the appropriate facility item in the table and press or to remove. The same works also for edit /delete a previous defined conflict mineral in a facility. to edit In contrast to smelter registration, where the facility data will be automatically saved after successful registration, the updated facility data must be saved explicitly by pressing the . The same applies also for conflict minerals defined within a facility. Releasing the Smelter Facility Generally, for a new registered smelter company, its company address data are not released, means such data could still be updated. So that would make no sense to release the included mineral while the address is still editable. In that case, to release a defined mineral in the facility, the facility itself must first be released, with the release of the facility all defined conflict minerals in it would be automatically released. If a facility is already released before (contact person info is still editable), then a new defined mineral in it can be released individual. The button is used to release the facility or conflict mineral produced by this facility. Only released facilities/conflict minerals are visible to other companies within CDX and therefore could be referenced within other company's CMD structures. Once a facility is released, its address information such as street, city and country are no longer editable. Other smelter related information may be changed and conflict minerals can still be added/deleted into/from the facility. Other than the 2 modes: release and edit of smelter facilities, conflict minerals have an additional version attribute, initial version of a new defined conflict mineral has always the version “0.01.“ Once it is released, the version will be changed to “1.“ A conflict mineral in edit mode has always the version with decimal number whereas released version has always an integer number. By editing an already released conflict mineral its version will be automatically increased by ”0.01“. Only saved minerals in edit mode can be released (provided that the owner facility is already released), in other cases the release button is unavailable ( ). If there is already a released version of the same source metal, the old version will be deactivated and can not be used in the future (meaning it could no longer be seen by any other company in CDX). CDX USER MANUAL – VERSION 4.4 / NOVEMBER 2015 ADMINISTRATION MENU 117 Currently there are four defined conflict minerals: Tantalum, Tin, Tungsten and Gold. For each of them, depending on the kind of mineral source (unknown, mine, scrap, recycled) and whether the mineral is conflict free or not, the following applies: 1. Each mineral may have multiple sources and each source must be entered separately as different sources could co-exist within one facility. 2. The same mineral may have different sources with different answers to the Conflict Free question (yes, no, unknown). These are considered as different so that the same mineral with different conflict free status could co-exist within one facility. 3. Conflict minerals with same conflict free status and same mineral source as “Mine“ but different mine names and/or mine country are considered as different so that they could co-exist within one facility. Adding Organization Units On the left side of the screen, is the company structure. At this point, there are no sub units but that is easily remedied by right clicking on the Company name and selecting Add Org Unit. When you do, the right side of the screen changes. You will need to give it a meaningful name. Additionally, at this point there are no users in the Org Unit. That means that even if a supplier sent something to the Org Unit, no one would be able to see it. That means that when you are sending the MDS, you cannot place it in the Org Unit. To see how to assign Users to Org Units, please see the section on Administration – User. Deleting Organisation Units To delete an Organisation Unit, right click on the Org Unit to be deleted and select Delete from the menu. Note: if the Delete option does not appear, save the structure and then the Delete option should appear. User In this section we will talk about creating and managing users. This option is only available to users with a Company Administrator profile. To ensure adequate backup, we strongly advise a minimum of two (2) users with a Company Administrator profile. It is the responsibility of the Company Administrator to manage users and profiles, including password resets. To receive a complete user overview and make the user management easier, the Company Administrator is able to export the user list in the Administration > User menu by using the above the search result list. CDX USER MANUAL – VERSION 4.4 / NOVEMBER 2015 ADMINISTRATION MENU 118 User Profiles There are three (3) types of User profiles in CDX: Company Administrator, Standard User and Read-Only User. Company Administrator Company Administrators may, but do not have to be, data entry users – they support the user management process. It is their responsibility to create User IDs and contact persons, assign users to Org Units, and perform password resets. It is the responsibility of the Company Administrators to maintain the accuracy of the User and Contact Person e-mail and phone contact information. Company Administrators are company representatives and are listed by name. They have all the privileges to administer the MDSs, Org Units, users and contact persons of his own company in CDX. It is strongly recommended that each CDX company have a minimum of two (2) Company Administrators for backup purposes. While the CDX Service Desk will change Company Administrators for a CDX company, they will not do so without documentation signed by someone in high authority. Standard User A User ID with a Standard User profile does not have administrative rights. Users with this profile can create, and send or propose MDSs. Additionally, they can review and accept or reject MDSs sent to the company (provided the company is not a Web Service user). They can create Requests and respond to incoming Requests. Although they do not have access to administration tasks, each user has the capability to update their phone and e-mail on their ID through the Personal Settings option from the main menu. Read-Only User This profile can be given to special users by the Company Administrator. With this profile the user can view, but not change, datasheets created by their own company, view published data, and view datasheets received and accepted by their company. Additionally each user has the capability to update the phone and e-mail information on their ID. Create a User Each user must have their own ID, in their own name, to use the system. To create a user, click on the Create User button from the Search User screen. A window similar to the following will appear. Then you will need to fill out the appropriate information as shown in the following table: Field Description User ID System Generated – not assigned yet Company-ID System Generated Company Own company’s name and read-only Organisation Unit Organisation Unit assigned to ID Last Name The user’s Last Name (required) First Name The user’s First Name (required) Authorization Profile Use the pull down to select the appropriate profile (required). Telephone No. The User’s telephone number including all country and dialing codes (required) Fax No. The User’s fax number including all country and dialing codes (optional) CDX USER MANUAL – VERSION 4.4 / NOVEMBER 2015 ADMINISTRATION MENU 119 Field Description E-mail Address The user’s e-mail address (required) Valid as of: The start date when the user can use the ID. Valid until: The last date that the user can use the ID to access the system. Contact Person Check the box if this user should appear as a contact person on the Supplier Data Screen. Compliance Contact Check this box if this user should be listed as a Compliance contact. CMD Contact Check the box if this user should appear as a contact person on the CMD Supplier Data. Last Login Date System Generated – shows the date, the user last logged in. When complete, click on the save ( ) and the User ID will be created which you can see in the following screen: PLEASE WRITE DOWN THE USER ID! You will receive it in YOUR e-mail similar to the following; the user will get the same email, additionally containing the password for the ID: Please note that the e-mails do not contain the User ID. It is expected that you will pass on this information to your user. It is HIGHLY recommended that the user copy and paste the password from this. If you did not remember to save the ID generated, the user can use the ID Forgotten button and the e-mail to retrieve the User ID. CDX USER MANUAL – VERSION 4.4 / NOVEMBER 2015 ADMINISTRATION MENU 120 Assigning Org Unit to a User ID To see Requests and MDSs send to an Org Unit and to use the Org Unit on the Supplier Data tab, the Org Unit must be assigned to the User ID. When you click on the Modify in the company area of the User detail, a listing will appear of all Org Units in your CDX company. Check all Org Units that should be assigned to the User ID and select . Deactivating a User Once a user leaves a company or no longer requires access to CDX, their User ID should be deactivated. The following is the recommended process: 1. 2. 3. 4. Search out the User and view the Details. Set the Valid until date to be today’s date. Save. On the Search Screen, uncheck the box under Active. Resetting a Password The Company Administrator is responsible for resetting passwords for users in their company. To do so, find the user by Administration > User and view the details. There will be a Reset Password button in the lower right. Click on that and the system will send a Password to the user's e-mail address. Org Unit Report To successfully use Organization Units, each Organization Unit must have a user assigned. Only users with the Organisation Unit assigned can view, accept or reject MDSs sent to the Org Unit. The Org. Unit Report screen displays all organization units without assigned users, but containing created or received MDSs. The menu Administration > Org Unit Report is used to check the Organisation Units without assigned users. The Company Administrator needs to regularly check this report to assign unprocessed MDSs to Organisation Units. If a supplier sends an MDS to an Org. Unit without a user assigned, no one will know that it has been received. This is because only users with the Org Unit assigned to them can view the inbox of that Org Unit. If necessary, the report can be printed. Trust User Only Company Administrators have access to Trust User. There are two uses for Administration – Trust User. A trusted user is a user in another company (anywhere in the supply chain, not necessarily a direct customer) who you give specific permission to view all Substances on your tree structures – even those marked “confidential” no matter at what level the structure is attached. It is only that user and not the User’s company, and the information cannot be downloaded into a user’s system. We assume that you trust all of the users in your own CDX company so all users in your CDX company will be able to see the complete formulation of your Substances, even those marked “confidential.” This is for users in other CDX companies. You will not find users in your own CDX company in this search. CDX USER MANUAL – VERSION 4.4 / NOVEMBER 2015 ADMINISTRATION MENU 121 The second use for this function is to look up users in other companies. Once you activate Administration > Trust User, a screen similar to the following will appear: MDS Admin This option is only available to Company Administrators and allows you to move MDSs (both Own and Received) between Org Units. You might want to do this if a supplier has sent the MDS to the wrong Org Unit and no one can see it, or if one of your users has forgotten to put the MDS in an Org Unit. Additionally, you may need to do this if your company has experienced a sell-off and you have to re-organize your company. The MDS Admin screen will look similar to the following: If you click on Search for own MDSs, the typical search screen will open and you can search for Own but the accepted check boxes will be greyed out. Select the ones you want by clicking on them (multiple selections require that you hold down the CTRL key while clicking) and then click on . Your selections will appear at the top. Highlight the ones that you want to move. Then use the pull down beside Org Unit to select the Org Unit you want to move the MDSs to, then click Move. CMD Admin This option is only available to Company Administrators and allows you to move CMDs (both Own and Received) between Org Units. You may want to do this if a supplier has sent the CMD to the wrong Org Unit and no one can see it, or if one of your users has forgotten to put the CMD in an Org Unit. Additionally, you may need to do this if your company has experienced a sell-off and you have to re-organize your company. The CMD Admin screen will look similar to the following: CDX USER MANUAL – VERSION 4.4 / NOVEMBER 2015 ADMINISTRATION MENU 122 If you click on Search for own CMDs or Search for received CMDs, the typical search screen will open and you can search for Own or Received CMDs. Select the ones you want by clicking on them (multiple selections require that you hold down the CTRL key while clicking) and then click on . Your selections will appear at the top. Highlight the ones that you want to move. Then use the pull down beside Org Unit to select the Org Unit you want to move the MDSs to, then click Move. CDX Licenses Within CDX, certain actions are subject to payment. These actions might be of different pricing and prices / actions may vary over time. Pricing is expressed in “Credits”. When you register, you get 10 free credits. This allows small suppliers to use the system at no cost to them. Should you need more than 10 credits, you must purchase them. The CDX Licenses option is only available for users with a Company Administrator profile. Your account balance can be checked under Administration -> CDX Licenses. There are three sections to the CDX Licenses screen – CDX Licenses, Order, and the Order History tab: Within the CDX Licenses the first (Account) information is the company data along with information about your existing CDX MDS and CMD Manager Licenses, the license periods and how many credits you have left, along with graphical information about your CDX Usage. In the history information of your CDX Licenses you find detailed information regarding how your credits have already been used. Whenever a user executes an action that is subject to payment the appropriate number of credits will be deducted from the company’s stock of credits. CDX USER MANUAL – VERSION 4.4 / NOVEMBER 2015 ADMINISTRATION MENU 123 Purchasing credits is a process that will be executed whenever one of the following conditions is met: A user initiates credit purchase via Company Administration. A user executes an action liable to pay and the amount of available credits does not match the amount of required credits. The Order tab is the ordering window. Here you can chose the required package and send your order by clicking . You have to confirm your order request as well as the following information: All information about the further process steps will be sent to the Company Administrator’s e-mail address. Your order(s) and their state(s) will be shown in the Order History tab – a right click on an order shows the Order Details: CDX USER MANUAL – VERSION 4.4 / NOVEMBER 2015 ADMINISTRATION MENU 124 Company Specific Substance Lists In this screen, you can see all your Company Specific Substance Lists. Only users with the Company Administrator profile can create and update Company Specific Substance Lists. This feature is helpful while navigating the tree or analyzing MDSs. To create a new Company Specific Substance List, please use the corresponding function in the Administration menu and click on . Enter a name for your new “Company Specific Substance List”. You may also enter a Version number and/or Validity period from – to for your new list. The ID is system generated after saving the list. You can now Add Substance references to your own Substance List (multiple selection is possible). You will find your own Substance Lists in the Tree Filter in your MDS structure, as well as in the Where-UsedAnalysis to filter or analyze all MDSs for Substances with special importance for your company. In MDS Requests, you can add your Company Specific Substance List to give it to your client, including the Substances that should either be contained or not contained in the requested MDS. You can also grant another company access to your Substance List by simply releasing it. Please click on the button on the left hand side of the screen and “Add” the company to which you want to release your list. CDX USER MANUAL – VERSION 4.4 / NOVEMBER 2015 ADMINISTRATION MENU 125 When you save your newly created Company Specific Substance List, the added company has access to your list and can search for it in the Company Specific Substance List menu to see the Substance List Details or also use it in the MDS tree filter. To revoke the access, please delete the company from the list. Note: If a Company Specific Substance List is attached to a request and the access to this list is revoked, the list will be visible, but no longer accessible in the request. CMD Quality Profile Manager This option is only available to Company Administrators. Here you can search for and change (own) existing profiles for the CMD Quality Reporting or create your own profiles. The Profile Manager window looks similar to other windows with a Search tab and a Detail tab. The Search tab allows you to find existing Quality Reporting profiles that are visible to you (all system-owned profiles as well as your own company created profiles) and change them. The Detail tab allows you to view the details of these profiles. Company owned profiles can you change at this point by adding or deleting individual rules. You can search for profiles using the following parameters: Field Description Name You can enter a name of a profile if known. ID You can enter here the system-generated ID of a profile if known. Date from – to You can narrow down your search to a defined time period a profile was issued. Origin Please select if you want to see all or only system-owned or your own company’s profiles. Template Version Please select the template version you want to see in the corresponding profiles. Create a Profile To create an own profile and assign checks to it, please use the “Create Profile” button in the upper right of the screen: To define your profile, please insert the required information: Name of the profile (required), Description for your profile, Template Version of the profile upon which it should be based. All other information in the upper portion of this window is system-generated and not editable. CDX USER MANUAL – VERSION 4.4 / NOVEMBER 2015 ADMINISTRATION MENU 126 Now you can start adding the required checks for your new profile by using the button. A separate window opens, where you can select various rules which should be the content of your new Quality Reporting profile. If you search without any further selections, all available rules will be shown: You can also search for special rules by the following criteria: Field Description Name You can enter a name of a rule if known. ID You can enter here the system-generated ID of a rule if known. Type You can select the following conditions: Is required; Is not allowed; Conditional required; Conditional not allowed; Yes/No – Is yes; Yes/No – Is no; Pick List – Equals text; Pick List – Not equals text. Violation Class You can select the following classes to search only for rules that result in: Fatal, Error, Warning, Information messages. Severity You can select a number from 1 to 9 to search only for rules with a certain severity (1 = low; 9 = high). Group You can select a group for which the rules to search are specified: Declaration Page Part A, Part B, Part C, Cross-Tab, Smelter List Tab Origin System-generated information, where the rules are originated Template Version Please select the template version you want to see for the corresponding rules. Date from – to You can narrow down your search to find a defined time period a rule was issued. CDX USER MANUAL – VERSION 4.4 / NOVEMBER 2015 ADMINISTRATION MENU 127 A Quality Reporting profile can have as many checks as you want. Just continue highlighting the required rule(s) (multiple selection is possible) in the result table and click to add to the profile. When you click , all rules from the result table will be assigned to your profile. Should you choose to remove a rule, highlight the check in the CMD Quality Profile Manager’s details tab and use the context menu or the right-click on your mouse to “Remove” it from your profile. For all available checks with Violation Class “Warning”, the Company Administrator can change in the company own profiles the Violation Class as well as the Severity – depending on the company’s requirements. To do this, please double-click on a rule in the table or use either the context menu or the right-click on your mouse. A separate window opens with information about the selected rule, where the Violation Class and Severity can be changed: Deficiency Report Manager This option is available to Company Administrators only. Here you can set up a standard template for generating CMD Deficiency Reports to be sent out to your supplier(s). The Deficiency Report Manager window is divided into two parts. In the first part, “Select Deficiency Report,” you need to define at least one standard quality profile(s) for generating deficiency reports according to the CMD templates supported in your company. The selection can only be modified in the Deficiency Report Manager. In the second part, “Send Information,” you can pre-define send information such as: Default report language Email address to which the report should be sent in the “cc” Email address and name for the person to which the email should replied Subject (system generated information can be included as placeholders, e.g. CMD name, requester company …) Report language CDX USER MANUAL – VERSION 4.4 / NOVEMBER 2015 ADMINISTRATION MENU 128 Introductory Header (here you can also include placeholders, e.g. CMD name, requester company …) Footer Text The information provided in the “Send Information” area will be initially included in all deficiency reports. They can be edited in the deficiency report before sending. The given information can be viewed with the button at the bottom right of the window. Statistics In MDS specific statistics, as well as in CMD specific statistics within the Statistics menu, the Company Administrator can filter for different statistical dates, which are described in the following table: Field Description All Org Units Activate the Checkbox to search for MDS /CMD statistics in all Org Units of your CDX company. Org Unit If "All Org Units" is not checked, you can choose an Org Unit of your company to see statistical dates for this one Org Unit. Period / From – to You can narrow down your statistics to a defined time period. Source Choose if you want to see statistical dates for CMD or for CMD Requests. (only available in CMD specific statistics) Origin Please select if you want to see the statistical dates for received, sent or own MDSs / CMDs. The search result table will list the MDS / CMD amounts for all Org Units you request, in the following states: accepted, not yet browsed, modified, rejected and cancelled by sender. Information for CMD Requests will be shown for the following states: received, CMD attached, waiting for acceptance, completed, rejected, deleted, Requests sum, and Requests overdue. CDX USER MANUAL – VERSION 4.4 / NOVEMBER 2015 ADMINISTRATION MENU 129 CDX U S AG E H EL P E R S There are several tools available that will assist you in working in CDX. MDS Explorer The MDS Explorer ( ) is very helpful to organize MDSs and MDS Requests. Users can control their own directory structure. MDSs, MDS Requests and directories can be moved and copied from one directory to another. The total amount of contained MDSs and MDS Requests is displayed in brackets behind a directory’s name (this includes MDSs and MDS Requests in contained directories). A double click opens the MDS or MDS Request. Moving MDSs, MDS Requests and Directories is done by drag & drop. Users can hold “CTRL” on keyboard to create a copy instead of moving it. It is important to understand that creating a copy does not copy the MDS or MDS Request, but creates a second “link” to it in the other directory. MDSs (own and accepted) and MDS Requests (own and received) that have not yet been moved to a directory can be found in the always-present “not assigned” directory. Starting out, you need to add a directory. Right click on the top of the tree and select Add You can then navigate and move MDSs from the Unassigned into the appropriate folder similar to how you work on your PC. To select more than one item, hold down the <CTRL> key while clicking on the items. When done selecting, drag them to the appropriate directory. Clipboard The clipboard function can be used to hold Material datasheets, Basic Substances and Requests for easy access. For example, a Material often used can be kept in the clipboard for reuse in different Material datasheets in the session. If you login to CDX the first time, you can open the Clipboard using the menu Functions > Clipboard. It will be shown at the right hand side of your window: CDX USER MANUAL – VERSION 4.4 / NOVEMBER 2015 CDX USAGE HELPERS 130 Next time you login, the Clipboard will be still visible with all the information brought from your last login. So you can use your favorite data from the clipboard without searching for them again. If you don't need the Clipboard the entire time you are working in CDX, you can use the small arrow at the bottom left-hand corner of the clipboard screen to collapse it. To remove any entry from the Clipboard, please use the button. Tree Search This functionality allows you find nodes in a tree. It is activated by clicking on the following will open: . A window similar to the You can text search the tree (we suggest that you use a wildcard search if using a text search) or you can look for a Material number or symbol or MDS ID in the tree. This is very useful if the structure has several nodes. Basic Substance Groups Frequently, users need to know where certain Substances (e.g. RoHS, REACH or GADSL relevant) are reported in your products. While you could do a one by one search, this would be somewhat time-consuming. For that reason, CDX has implemented several Substance Groups. These Substance Groups are used in searching for Basic Substances, Tree Filters, and Where-Used Analysis. These groups are constantly being added. Here are some of the more commonly used groups: Conflict Minerals GADSL: Declarable GADSL: Prohibited HKC Relevant Rare Earth Elements and their Compounds REACH SVHC RoHS Tree Filters Tree filters allow you to find Substance in certain groups in your tree structure. For example, if you want to see all of the RoHS Substances in your tree structure: You first need to expand your entire tree structure and then select the group RoHS from Global Substance Lists (default). All the Substances that are in the group RoHS are displayed in red, as shown in the following example: CDX USER MANUAL – VERSION 4.4 / NOVEMBER 2015 CDX USAGE HELPERS 131 You may also use your own Company Specific Substance List or any specific list from companies that granted access to their list(s). You can find all possible Company Specific Substance Lists in the Tree Filter when you choose the filter “Company Specific Substance Lists” instead of the default “Global Substance Lists”. Regulation Substance Overview If you want to know, which Substances are relevant for a certain regulation (such as REACH, RoHS, ELV, GADSL), you can use the Functions > Regulation Substance Overview menu item. You can open this separate independent window anytime at any stage of your CDX work – opens the overview window will not close your current window. In this overview you can search for Common and Company specific Regulations: Use the drop down field to select a regulation. All regulation relevant Substances (in our example RoHS) will be listed with their Name, CAS No., EU-Index, Einecs-No., Node ID, Synonym, D/P (if declarable / prohibited) as well as the regulations Entry date, Limit Value and End Date: CDX USER MANUAL – VERSION 4.4 / NOVEMBER 2015 CDX USAGE HELPERS 132 As already mentioned, you can also export these results into a MS Excel file by using the button. Export Search Results The user can export any search result where the symbol appears. The exported data is represented in the same language (and sort order) as the view in the result table. Clicking on the icon will open a window similar to the following where you can determine your next action: Please note that with MS Excel 2007 or higher versions you might get the following message: If so, please click “Yes” to be able to open the file. Configure Search Results The user can configure any search result to meet their needs. Although not detailed here, all search-specific results work similarly. If click on View, you will be allowed to change what columns are in the results table and their order and sort by specific columns. To remove a field from the display, click on that field (to add back in, click on the field again). If you right click on a specific MDS in the search results screen, you will have another set of options, depending on the type of search you are performing. CDX USER MANUAL – VERSION 4.4 / NOVEMBER 2015 CDX USAGE HELPERS 133 C OM PA NY S P E CI F I C E N HA N C EM E N T S Bosch Group – Specific Extensions If your company delivers to the Bosch Group, the following enhancements should be noted: Bosch Supplier Registration Bosch supplier companies need to be registered in CDX through the SupplyOn portal. Only companies with a SupplyOn ID in CDX are able to add Bosch as a recipient to their submissions. Other companies will receive the following error message: Only registered suppliers of Bosch are allowed to send data to Bosch. If you are a supplier company to Bosch and don’t have a SupplyOn ID (shown in your company details available for Company Administrators in the Administration > Company menu), please contact Bosch. MDSs provided by customer To streamline the process, users in the Bosch Group are able to publish their own or accepted MDSs to their suppliers. The supplier companies can then use those MDSs “provided by customer” in their own MDSs. An additional field to search for such MDSs is available to all Bosch suppliers in the following search screens: MDS Search, Component, Semicomponent, and Material Search. One Level Declaration If you want to send a One Level Declaration MDS to the Bosch Group, you have to add minimum one document with further information in the attachment area of the MDS. If no document is attached, no sending/proposing is possible. Part / Item Number Suppliers to the Bosch Group can insert in the recipient specific Part / Item Number field not only single numbers, but also ranges of numbers, for example: > The entered number should be entered as 1-10 alphanumeric characters (must be identical for upper and lower limit) not allowing anything other than "a-z", "A-Z" and "0-9") followed by 3 numeric digits. The entered number ranges will be checked by the system. In case you enter wrong numbers, you get an error message. Regulations Bosch is asking their suppliers for compliance with specific regulations. The formerly used N2580 template information will be now requested in CDX. To create a Component or a Material MDS, suppliers to Bosch should use the “Regulation Wizard”, in which the user will be guided through the several regulations and the required information will be requested. CDX USER MANUAL – VERSION 4.4 / NOVEMBER 2015 COMPANY SPECIFIC ENHANCEMENTS 134 Company Specific Regulations When you add Bosch as a recipient to an MDS you will find a section “Company specific” in the recipient data, which has to be filled for the company specific regulations: Please select the Type of supplied Material: Remains in or on the Bosch product Does not remain in or on the Bosch product Merchandise automotive Merchandice non-automotive Unknown and answer the questions for each company specific regulation: Regulation complied? – Yes / No / Not Applicable Relevant data provided? – Yes / No obligation to declare / Other declaration format used If one of the questions is not answered, the check routine will result in an error message, which prevents you from sending/proposing the MDS to Bosch. Regulation Substance Overview Detail information regarding Substances related to Bosch specific regulations can you find in the Functions > Regulation Substance Overview menu. Please select “Company specific” and the respective company (Bosch). In the drop-down field “Regulation” are all Bosch specific regulations available to be selected. The result table shows all Substances relevant for the choosen regulation with Name, CAS No., EU-Index, Einecs-No. Node ID, Synonym, D/P (declarable/prohibited), and Entry, Limit Value, End date for this regulation: You can also export the displayed results for each regulation to an MS Excel file using the CDX USER MANUAL – VERSION 4.4 / NOVEMBER 2015 button. COMPANY SPECIFIC ENHANCEMENTS 135 CDX S EC URI T Y The following section describes the system’s protection from external tampering and the mechanisms within the application which allow authorised data access only. Physical Security CDX computers are kept in the HPE’s Service Management Centre (SMC). The HPE SMC ensures the servers’ physical safety and provides the appropriate infrastructure (network availability, protection against system failure, etc.). Only authorised persons (operating and system administrators) have access to these machines, making physical manipulation or impairment of the operating system extremely difficult and highly unlikely. Operating System Security The CDX system uses the UNIX operating system. Only HPE administrators are allowed to access at an operating system level. HPE standard procedures guarantee protection against external attempts to gain access to the system. Database Security The CDX system uses an Oracle database. Access to this database is only allowed to system and database administrators. All persons are subject to data secrecy as per §5 BDSG (German Data Privacy Act). Network Security Network security needs to be considered at three levels: Firewall Security, Data Transfer and Web Server. Firewall Security A firewall is a system or a group of systems controlling access between two networks. The firewall uses two mechanisms: one for rejecting data and another for enabling the data flow. Firewalls shield internal, non-public networks from public networks and, at the same time, serve as filters for authorised communication. In this case, the firewall also acts as the first buffer between possible infiltrators and the CDX system data requiring protection. All access to the CDX system is logged and can be analysed. Data Transfer The CDX system uses the encrypted HTTPS data transfer protocol. Safe transmission of data over the Internet can only be guaranteed when the data is appropriately encrypted. The HTTPS encryption has 3 effects: 1) remote authentication (verify that you really talk to www.cdxsystem.com); 2) it ensures that no one is able to read the data; 3) it makes sure that any data manipulation is noticed (using a hash code). Web Application Server The selected J2EE Server provides another means of securing the system by offering protective and availability features. Application Security Companies in CDX have to register their users with the system. The users get passwords which need to be changed every 90 days or after a system password reset. New passwords must be different from the previous one and contain between 8 and 20 characters (capital and lower cases) and include at least one numeric character. Passwords are case sensitive and are limited to ISO 8859-1 characters. As a base rule, access to CDX data resources is allowed for authorized users identified by unique user names and passwords. Access to specific web areas and/or data items is granted depending on the user’s data access profile and the ownership of the data item. Only users with a specific profile are allowed to execute certain actions on certain data in the application (see User Profiles). CDX USER MANUAL – VERSION 4.4 / NOVEMBER 2015 CDX SECURITY 136 CDX – A D D - O N S E R VI C E S In addition to providing the CDX system, HPE can assist you in implementing technology to support your Compliance efforts. More information on all additional services concerning the CDX can be found on our internet pages: www.cdxsystem.com Project Support HPE provides Integration and Consulting Services to support CDX users in the design and implementation of Best Practice processes and solutions surrounding data integration. HPE can help minimize the cost and effort involved with data preparation, entry and reporting when using the CDX system. CDX Web Service To use the CDX Web Service, companies need to place a minimum of one order. Please see CDX Information Pages > CDX System > Ordering for a description of our pricing schedule. The transfer protocol for the CDX Web Service will be HTTPS. Thus, Web Service Clients will send a HTTPSrequest to predefined URLs and expect a HTTPS-response. The basic communication format is XML. XSDs for message content formats are to be defined (available DTDs can be transformed to XSDs using an appropriate tool). The Web Service implementation technique is SOAP. The Web Service is basically separated into two categories: Download Services and Upload Services. Upload Services transfer a document from client to server and receive a response document containing the information about how the input has been processed (in positive case a confirmation and info about new created entities or in fault case the error description). With Download Services, the client solely specifies a document (this information can be transferred via URL) which is expected to be available on the server and obtains the requested document (in positive case) or receives an error message (in the case the requested document does not exist or cannot be transferred to the client for some reason). The User Manual for this service can be found and downloaded in CDX Help Web Service or in our CDX Information pages. Upload Uploads will be processed in batch manner. This means that the Upload will work as an asynchronous Web Service. After uploading a file to the server the client will receive a message about the file reaching the server (e.g. “Your job has been admitted.”). After the upload file has been processed the client will be able to go to the system and view a message regarding the processing of the file. Download There are several files associated with the Download that enable the user to work in an in-house system. The download files common to all companies (core data) will be created at fixed times, usually at midnight server time. Only the latest version of core data will be available at any time. Company specific files will be generated upon request. The time stamp of the last generation is stored in the company table and this will be the starting point for the next company download request. Depending on the amount of data that needs to go into the file, the file generation may be postponed until there are fewer users on the system (weekend). Generated files will remain on the system for thirty (30) days. CDX USER MANUAL – VERSION 4.4 / NOVEMBER 2015 CDX – ADD-ON SERVICES 137 CDX – B A SI C I NF O RM AT I O N The following section contains basic information about the CDX system. Automatic Log-Out after 60 Minutes Inactivity In order to guarantee system availability for all CDX users, users who have not initiated an activity in CDX for 60 minutes will be automatically logged out. Terms of Use for CDX To exclude any use of the CDX data for other activities (e.g. address data) every CDX user must accept the CDX Terms of Use at first log-on. The Terms of Use are also available from a link on the CDX login window. Browser Versions for CDX Use The following browsers have been tested and grant the full functionality of CDX. Versions not listed below, have not been tested sufficiently. Microsoft Internet Explorer Release 10.0 Firefox (current version) Google Chrome (current version) However, most of the functions in CDX should work with these browsers. Explicitly excluded from our support is Microsoft IE 6.0 or older versions. All browser versions supported by the CDX application can be found on the Information Pages (www.cdxsystem.com) under How To Start System Information Release Notes. Substances Substances cannot be created the same way as Components, Semicomponents or Materials. If you do not find the Substance you need, please use unique identifiers like the CAS number for searching the particular Substance. Should you require a Substance to be added to the list, please use the Basic Substance Request option in the Functions menu. Languages Languages for the application itself can be chosen: English, French, German, Portuguese, Spanish, Japanese, Korean and Chinese. All the labels, menus, buttons etc. will appear in this language. However, HPE assumes that all data entry is performed in English only. CDX does not translate the entries in the data fields. The Online help file is available in English. The language displayed depends on the language selected during logon. Popups need to be allowed in the Browser settings as the User Manual is displayed as a PDF document in the user’s browser. Faded Icons / Symbols If the symbol of nodes in the product structure is displayed in a faded colour, this referenced MDS or Substance was deleted. Selecting an Item Double click on an item brings up the Details of the item. You may also right-click and select the Show option. CDX USER MANUAL – VERSION 4.4 / NOVEMBER 2015 CDX – BASIC INFORMATION 138 Network Performance Index The PC internet access capacity for using the CDX is standardized to one ISDN capacity (64 Kbit/s). If the system appears to operate slowly, this can be due to several factors (e.g. the internet connection in your own company or the performance of the internet server of the internet service provider). To test the performance, CDX provides a self-test that you can perform in the system. In the analysis, you can also see comparison values. The Network Performance Test can be found in the CDX after log-on by clicking the “Network Performance Index,“ in the Help menu. The result browser window contains the Network performance for your PC. CDX USER MANUAL – VERSION 4.4 / NOVEMBER 2015 CDX – BASIC INFORMATION 139 CDX USER MANUAL – VERSION 4.4 / NOVEMBER 2015 CDX – BASIC INFORMATION 140 G L O S SA RY This section lists common terms in use in the CDX system. 100% Declaration Each MDS can be defined as a “100% declaration”, which means, every contained part of the MDS has to be defined by Substances. For a 100% declaration it is not allowed to have nodes and references on the same level that sum up to less than 100% or sum to a total weight less than the one of the containing node/MDS. CMD (Conflict Minerals Declaration) A CMD is the information passed along the supply chain indicating where the conflict minerals in the group come from. Currently conflict minerals are defined to include: Tantalum (Ta), Tin (Sn), Tungsten (W), and Gold (Au). CMD Request This function enables a CMD recipient to initiate a "Pull"-process with his suppliers. The CMD recipient specifies the expected characteristics, such as template version, declaration scope or a deadline date of the CMD in a CMD Request. The CMD supplier attaches a CMD matching the requested specifications. Component A Component may be thought of as an assembly or a piece part and has a defined weight. One Component can consist of several different Components, Semicomponents, Materials and Basic Substances. Hong Kong Convention (HKC, Hong Kong International Convention for the Safe and Environmentally Sound Recycling of Ship) The HKC is an international convention regulating the recycling of Ships. The HKC is meant to replace the Basel Convention, in regards to ships. Currently, Ships being dismantled are considered waste in the terms of the Basel convention. This leads to impracticable requirements related to the recycling of ships. Therefore, IMO held the Hong Kong Conference leading to the convention. It is thought to come into force in 2015. Part of the HKC is the requirement to document certain Substances of concern throughout the supply chain in order to achieve a certification that would allow the ships to operate and become subject of dismantling. CDX basically is a tool to allow the industry to comply with the requirements resulting from the HKC. (see also -> MD, SDoC) For further information, see http://www.imo.org/about/conventions/listofconventions/pages/the-hong-konginternational-convention-for-the-safe-and-environmentally-sound-recycling-of-ships.aspx and http://ec.europa.eu/environment/waste/ships/pdf/Convention.pdf. Material Not all users are required to enter Materials as they are best entered by users in companies that manufacture the Material who would know its contents. For Materials manufactured to a public norm or standard, standard MDSs are available. Not all Materials are manufactured to a public norm or standard, and not all public norms or standards describe a Material’s Substances to 100%. MD (Material Declaration) A Material Declaration is a special report of an MDS that is specific to the requirements of the Hong Kong Convention. CDX MDs are a direct adaptation of the format of the MD as proposed by the Germanischer Lloyd, resulting from the findings of the ERVESIS project. MDs therefore are a special report for the Ship Building Industry. (see -> SDoC) MDS (Material Datasheet) An MDS is a logical data unit and constitutes a complete information package for a product. An MDS consists of a top node and assigned information about its supplier and recipients. The top node may also contain different nodes or references to other MDSs and/or Substances. MDSs are subject to revision control. If there is a data change, a new MDS version needs to be generated. If a version has been sent and accepted or released, it is no longer possible to make changes to the MDS. CDX USER MANUAL – VERSION 4.4 / NOVEMBER 2015 GLOSSARY 141 MDS Request This function enables an MDS recipient to initiate a "Pull"-process with his suppliers. The MDS recipient specifies the expected characteristics, such as name, part number or a deadline date of the MDS in an MDS Request. The MDS supplier attaches an existing MDS or simply lets CDX create an MDS matching the requested specifications. Node A node is an element created within the tree structure of an MDS. It can only be used inside the containing MDS, but is handled as if it was a referenced MDS. Different from referenced MDSs, it is possible to modify the contents of a node. Passwords A computer connected to the Internet is easily located. And therefore, it is of great importance to protect your systems. CDX requires a minimum of eight characters and a maximum of 20 characters in your password and at least one of the characters must be numeric. It should also contain a mixture of letters, numbers and special characters. System generated temporary passwords are generated by the “new password” link. Passwords are sent only to the e-mail connected to the CDX ID so it is imperative that the user ensure that their contact information is always correct. REACH-SVHC (Substances of Very High Concern) In CDX, all Substances that are part of the SVHC candidate list are part of the “SVHC” Substance List. Using this list, the user can search the ingredients of an MDS for contained REACH-SVHC, is able to search for REACHSVHC or to analyze MDS for contained REACH-SVHC in the Where-Used Analysis window. Reference A reference is a link to an MDS that has been created elsewhere, published or received and accepted and then attached to the tree structure (either beneath the top node or beneath a sub node of the tree). SDoC (Suppliers Declaration of Conformity) This is a special report for the Ship Building Industry, based on the requirements of the Hong Kong Convention. Basically, an SDoC is a legal statement of a supplier, stating that either one, a number of, or all of his products comply to the requirements of the Hong Kong Convention. The SDoC refers to products; these should be accompanied by MD in order to document the compliancy state of the product. Semicomponent A Semicomponent is used by a unit of measure such as length, area or volume (where Components are used in unit quantities). Examples of this would be wire that is used by the meter or paint that is used by the gram. Severity Within the CMD Quality Reporting function this is the system level severity of a violation. Severity levels from 1 (low) to 9 (hight) are valid. This can be changed for company rules by the Company Administrator. Substance Substances are chemical elements or chemical combinations as they naturally occur or are produced. This includes all necessary agents in order to maintain its stability. This excludes solvents that can be separated from the material without reducing its stability or changing its make-up. If an MDS is defined as “100%-declared”, every path from the top of the tree structure must terminate in a Substance in order for the MDS to be released. Tree Structure The tree structure is the main part of each MDS. This is a structural view of the Components, Semicomponents, Materials and Substances contained in the product and is comprised of individual nodes and references. Violation Class Within the CMD Quality Reporting function, this is the system level class of a violation. The following classes are valid entries: Fatal, Error, Warning, and Information. Others than “Fatal” can be changed for company rules by the Company Administrator. CDX USER MANUAL – VERSION 4.4 / NOVEMBER 2015 GLOSSARY 142 U S E F U L I NF OR M AT I O N CDX Website and Additional Services and Tools www.cdxsystem.com Contact: CDX Service Desk e-mail: [email protected] C O NT AC T I NF O RM AT I O N Hewlett Packard Enterprise Hewlett-Packard GmbH CDX Team Hewlett-Packard-Str. 1 61352 Bad Homburg Germany www.hpe.com © Copyright 2015 Hewlett Packard Enterprise Development Company, L.P. The information contained herein is subject to change without notice. The only warranties for HPE products and services are set forth in the express warranty statements accompanying such products and services. Nothing herein should be construed as constituting an additional warranty. HPE shall not be liable for technical or editorial errors or omissions contained herein. A4-cdx_manual_en, November 2015 CDX USER MANUAL – VERSION 4.4 / NOVEMBER 2015 USEFUL INFORMATION 143