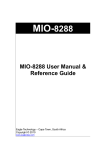
1
Rita-51
USER’S GUIDE
Version 1.0
May 2002
RIGEL CORPORATION
PO Box 90040, Gainesville, Florida 32607
(352) 373-4629, FAX (352) 373-1786
www.rigelcorp.com, [email protected]
Copyright (C) 2000 - 2002 by Rigel Corporation.
All rights reserved. No part of this document may be reproduced, stored in a retrieval system, or transmitted in
any form or by any means, electronic, mechanical, photocopying, recording, or otherwise, without the prior written
permission of Rigel Corporation.
The abbreviation PC used throughout this guide refers to the IBM Personal Computer or its compatibles. IBM PC
is a trademark of International Business Machines, Inc.
Rigel Corporation’s Software License Agreement
This Software License Agreement ("Agreement") covers all software products copyrighted to Rigel Corporation,
including but not limited to: Reads51, rLib51, RbHost, RitaBrowser, rP51, rFLASH, rChpSim, Reads166,
and rFLI.
This Agreement is between an individual user or a single entity and Rigel Corporation. It applies to all Rigel
Corporation software products. These Products ("Products") includes computer software and associated
electronic media or documentation "online" or otherwise.
Our software, help files, examples, and related text files may be used without fee by students, faculty and staff
of academic institutions and by individuals for non-commercial use. For distribution rights and all other
users, including corporate use, please contact:
Rigel Corporation, PO Box 90040, Gainesville, FL 32607
or e-mail [email protected]
Terms and Conditions of the Agreement
1.
These Products are protected by copyright laws, intellectual property laws, and international treaties.
Rigel Corporation owns the title, copyright, and all other intellectual property rights in these Products.
We grant you a personal, non-transferable, and non-exclusive license to use the Products. These
Products are not transferred to you, given away to you or sold to you.
Non-commercial use: These Products are licensed to you free of charge.
Commercial use: You must contact Rigel Corporation to find out if a licensing fee applies before using
these Products.
2.
You may install and use an unlimited number of copies of these Products.
3.
You may store copies of these Products on a storage device or a network for your own use.
4.
You may not reproduce and distribute these Products to other parties by electronic means or over
computer or communication networks. You may not transfer these Products to a third party. You may not
rent, lease, or lend these Products.
5.
You may not modify, disassemble, reverse engineer, or translate these Products.
6.
These Products are provided by Rigel Corporation "as is" with all faults.
7.
In no event shall Rigel Corporation be liable for any damages whatsoever (including, without limitation,
damages for loss of business profits, business interruption, loss of business information, or other
pecuniary loss) arising out of the use of or inability to use the Product, even if Rigel Corporation has been
advised of the possibility of such damages. Because some states do not allow the exclusion or limitations
of consequential or incidental damages, the above limitations may not apply to you.
8.
Rigel Corporation makes no claims as to the applicability or suitability of these Products to your particular
use, application, or implementation.
9.
Rigel Corporation reserves all rights not expressly granted to you in this Agreement.
10
If you do not abide by or violate the terms and conditions of this Agreement, without prejudice to any other
rights, Rigel Corporation may cancel this Agreement. If Rigel Corporation cancels this Agreement; you
must remove and destroy all copies of these Products.
11.
If you acquired this Product in the United States of America, this Agreement is governed by the laws of
the Great State of Florida. If this Product was acquired outside the United States of America all pertinent
international treaties apply.
HARDWARE WARRANTY
Limited Warranty. Rigel Corporation warrants, for a period of sixty (60) days from your receipt, that READS
software, RROS, hardware assembled boards and hardware unassembled components shall be free of
substantial errors or defects in material and workmanship which will materially interfere with the proper operation
of the items purchased. If you believe such an error or defect exists, please call Rigel Corporation at (352) 3734629 to see whether such error or defect may be corrected, prior to returning items to Rigel Corporation. Rigel
Corporation will repair or replace, at its sole discretion, any defective items, at no cost to you, and the foregoing
shall constitute your sole and exclusive remedy in the event of any defects in material or workmanship. Although
Rigel Corporation warranty covers 60 days, Rigel shall not be responsible for malfunctions due to customer
errors, this includes but is not limited to, errors in connecting the board to power or external circuitry.
THE LIMITED WARRANTIES SET FORTH HEREIN ARE IN LIEU OF ALL OTHER WARRANTIES,
EXPRESSED OR IMPLIED, INCLUDING, BUT NOT LIMITED TO, THE IMPLIED WARRANTIES OF
MERCHANTABILITY AND FITNESS FOR A PARTICULAR PURPOSE.
YOU ASSUME ALL RISKS AND LIABILITY FROM OPERATION OF ITEMS PURCHASED AND RIGEL
CORPORATION SHALL IN NO EVENT BE LIABLE FOR DAMAGES CAUSED BY USE OR PERFORMANCE,
FOR LOSS PROFITS, PERSONAL INJURY OR FOR ANY OTHER INCIDENTAL OR CONSEQUENTIAL
DAMAGES. RIGEL CORPORATION'S LIABILITY SHALL NOT EXCEED THE COST OF REPAIR OR
REPLACEMENT OF DEFECTIVE ITEMS.
IF THE FOREGOING LIMITATIONS ON LIABILITY ARE UNACCEPTABLE TO YOU, YOU SHOULD RETURN
ALL ITEMS PURCHASED TO RIGEL CORPORATION PRIOR TO USE.
Return Policy. This policy applies only when product purchased directly from Rigel Corporation. If you are not
satisfied with the items purchased, prior to usage, you may return them to Rigel Corporation within thirty (30) days
of your receipt of same and receive a full refund from Rigel Corporation. You will be responsible for shipping
costs. Please call (352) 373-4629 prior to shipping.
Repair Policy. If you encounter problems with your board or software after the 60 day warranty period, please
call Rigel Corporation at (352) 373-4629 or email [email protected] for advice and instruction.
Rigel Corporation will test and attempt to repair any board. You will be responsible for shipping costs and repair
fees. If you send a detailed report of the problems you encountered while operating the board, Rigel Corporation
will inspect and test your board to determine what the problem is free of charge. Rigel Corporation will then
contact you with an estimated repair bill. You will have the choice of having the board fixed or returned to you as
is. Rigel Corporation charges repair fees based on an hourly rate of $50.00. Any parts that need to be replaced
will be charged as separate items. Although Rigel Corporation will test and repair any board, it shall not be
responsible for malfunctions due to customer errors, this includes but is not limited to, errors in connecting the
board to power or external circuitry.
Board Kit. If you are purchasing a board kit, you are assumed to have the skill and knowledge necessary to
properly assemble same. Please inspect all components and review accompanying instructions. If instructions
are unclear, please return the kit unassembled for a full refund or, if you prefer, Rigel Corporation will send you an
assembled and tested board and bill you the price difference. You shall be responsible for shipping costs. The
foregoing shall apply only where the kit is unassembled. In the event the kit is partially assembled, a refund will
not be available, however, Rigel Corporation can, upon request, complete assembly for a fee based on an hourly
rate of $50.00. Although Rigel Corporation will replace any defective parts, it shall not be responsible for
malfunctions due to errors in assembly. If you encounter problems with assembly, please call Rigel Corporation
at (352) 373-4629 for advice and instruction. In the event a problem cannot be resolved by telephone, Rigel
Corporation will perform repair work, upon request, at the foregoing rate of $50.00 per hour.
Governing Law. This agreement and all rights of the respective parties shall be governed by the laws of the
State of Florida.
Table of Contents
INTRODUCTION................................................................................................................................................1
1.1
Overview.................................................................................................................................................1
1.2
Hardware Overview ................................................................................................................................1
1.3
Software Overview .................................................................................................................................2
1.3.1 Reads51..............................................................................................................................................2
1.3.2 Rita-51 Utility Software .......................................................................................................................2
1.3.3 RitaBrowser ........................................................................................................................................2
1.3.4 Example Software...............................................................................................................................2
1.4
Package List ...........................................................................................................................................2
2 SOFTWARE.......................................................................................................................................................3
2.1
System Requirements ............................................................................................................................3
2.2
Software Installation ...............................................................................................................................3
2.3
Reads51 .................................................................................................................................................3
2.3.1 Rita-51 Start-Up With Reads51 ..........................................................................................................3
2.3.2 Verifying that the Monitor is Loaded ...................................................................................................3
2.3.3 Downloading and Running an Assembly Program.............................................................................4
2.3.4 Downloading and Running a C Program ............................................................................................4
2.3.4 Programming On-Board FLASH with Reads51 ..................................................................................5
2.4
Rita-51 Utility Software ...........................................................................................................................5
2.5
RitaBrowser ............................................................................................................................................5
2.5.1 Configuring RitaBrowser.....................................................................................................................5
2.5.2 Communicating With a Rita Node.......................................................................................................6
3 OPERATING NOTES ........................................................................................................................................7
3.1
Overview.................................................................................................................................................7
3.2
J1, Power Input......................................................................................................................................7
3.3
Serial Ports, P1 and P2 ..........................................................................................................................7
3.4
J2, The Ethernet Port .............................................................................................................................8
3.5
Push Buttons ..........................................................................................................................................8
3.6
Slide Switch ............................................................................................................................................8
3.7
LEDs .......................................................................................................................................................8
3.7.1 Power LED..........................................................................................................................................8
3.7.2 Status LEDs ........................................................................................................................................8
3.7.3 User LEDs...........................................................................................................................................8
4 OPERATING MODES........................................................................................................................................9
4.1
Operating Mode......................................................................................................................................9
4.2
Memory Map...........................................................................................................................................9
4.3
Interfacing the Rita-51 ............................................................................................................................9
5 HEADERS........................................................................................................................................................10
5.1
J3A and J3B .........................................................................................................................................10
5.2
J4, JTAG...............................................................................................................................................10
5.3
J5 and J6, Serial Headers ....................................................................................................................10
5.4
J7 and J8 ..............................................................................................................................................10
5.5
J9, I/O Header ......................................................................................................................................10
5.6
J10, System Header .............................................................................................................................11
6 CPLD EQUATIONS .........................................................................................................................................12
7 RITA-51 BILL OF MATERIALS ......................................................................................................................14
8 TOP OVERLAY ...............................................................................................................................................15
9 CIRCUIT DIAGRAM ..........................................................................................................................................1
APPENDIX ............................................................................................................................................................... 1
USING THE RITA-51 BOARD ........................................................................................................................2
A
A.1
Overview.................................................................................................................................................2
A.2
Experiments............................................................................................................................................2
A.2.1
Sniff Experiments ............................................................................................................................2
A.2.2
Ping Experiment ..............................................................................................................................2
A.2.3
RitaPorts Experiment ......................................................................................................................2
1
A.3
Programmers View .................................................................................................................................3
A.3.1
Network Initialization .......................................................................................................................3
A.3.2
Message Reception ........................................................................................................................4
A.3.3
Message Transmission ...................................................................................................................5
A.3.4
Frame Access .................................................................................................................................5
A.3.5
Serial I/O Function...........................................................................................................................6
1
INTRODUCTION
1.1
Overview
RITA (Rigel's Internet Technology Architecture) is a set of hardware and software components to facilitate placing
very low cost controller nodes on the Internet or a private network, such as a company intranet or a personal
home network. RITA is a flexible and extensible open architecture. RITA is an outgrowth of custom Internet
controllers built by Rigel Corporation for industrial OEM customers, now being offered to the public as commercial
off-the-shelf (COTS) units. Refer to the
article “The RITA Philosophy” at
www.rigelcorp.com for more information
about RITA.
1.2
Hardware Overview
Rita-51 is the first board in Rigel
Corporation's new line of RITA
controllers. Rita-51 is a six-layer board
with separate VCC and Ground planes
intended for Internet and intranet
applications. The board may be
populated with a wide range of highspeed 8051 microcontrollers in the TQFP
package. The board uses the CS8900A
to directly connect to a 10Base-T
network using an RJ-45 connector. The
MCS-51 / CS8900A combination takes
advantage of readily available hardware
and software tools as well as the wealth
of publicly available applications source
code.
The Rita-51 has one RS-232 serial port
(two when populated with the DS87C520.) The board comes with 128K RAM and 128K 5-volt FLASH ROM. The
Rita-51 Utility Software used to program the FLASH ROM is free with the board.
Rita-51's small size makes it suitable for OEM applications. Its low cost and open architecture makes it a good
choice for classroom instruction and hobbyists. It contains large memory to facilitate embedded TCP/IP
applications. In addition, Rita-51 contains a prototyping area, 4 user's buttons and 4 indicators, which make it an
ideal test and development platform.
• Uses any 8051 in the TQFP package
• 128K of SRAM
• 128K 5-volt FLASH ROM
• 1 full-duplex serial port on board (2 with the DS87C520)
• 12 general purpose digital input / output bits
• Demultiplexed processor Address and Data lines
• All system signals are available on a 40-pin header
• Prototyping area for additional circuitry
• Shielded RJ-45 connector with LAN and LINK indicators
• Prototyping area
• 4 Indicators and 4 User's buttons
• Board operates on +5 volts
• Power supplied to the board by way of a 2 position terminal block
• Power on LED
• Operating temperature 0 to 70C, extended temp available
• Machine screw sockets under all through-hole
• 6 layer 3" x 4" board
• 4 mounting holes ion the board
1.3
Software Overview
The Rita-51 comes with four free software packages.
1.3.1
Reads51
Reads51 is an Integrated Development Environment (IDE) to write application programs for the Rita-51 boards. It
contains a C compiler, an assembler, a linker and a chip simulator. Any third party software development tools
may be used for the Rita-51. Reads51 comes free with Rigel’s MCS-51 hardware products. Refer to the
Reads51 User’s Manual for more information.
1.3.2
Rita-51 Utility Software
The Rita-51 Utility Software from Rigel Corporation is a Windows program. It is an alternate means, from the
Reads51 software, to manage the on-board FLASH.
1.3.3
RitaBrowser
The RitaBrowser is a simple Windows socket (winsock) application to send and receive UDP messages.
RitaHost maintains a list of RITA nodes (e.g., Rita-51 boards). You may connect to the boards and communicate
with them by typing in the edit window. Refer to the RitaBrowser manual for more information.
1.3.4
Example Software
There are many example projects given with the Reads51 IDE that introduce the user to typical industrial
applications of microcontrollers. These applications include timers, counters, serial communications, interrupt
programming, analog-to-digital conversion, digital-to-analog conversion, stepper motors, LCDs, keypads, etc. A
detailed exposure to microcontroller programming and applications may be found in textbooks published by Rigel
Press (see www.rigelcorp.com/rigelpress.htm).
In addition, preliminary code is provided to experiment with the networking capabilities of the Rita-51 board. Most
importantly, a library of network support functions, NetApi51, is provided. NetApi51 functions allow the user to
quickly develop network applications for the Rita-51 in C or assembly. The NetApi51 functions currently support
a subset of the standard TCP/IP stack, namely, ARP, ICMP, IP and UDP. This subset is sufficient to program the
Rita-51 as an Internet (or a private intranet) node, which communicates through UDP messages.
Users are encouraged to modify the circuit diagrams and example software in developing their own specific
applications. The source code of the user-accessible systems calls, as well as all examples on the distribution
disk may be used or incorporated into applications by the registered buyer without any royalties, fees, or
limitations. Rigel Corporation is not responsible for the suitability or correctness of the example software. Refer
to warranty for additional information.
1.4
Package List
Your Rita-51 / READS package includes the following:
• Rita-51 populated with 128K RAM, 128K FLASH PROM
• Software, data sheets, and user's guide on CD ROM.
• RJ-45 Cable supplied
A serial modem cable with a male DB9 connector and a regulated 5 Volt 500mA power source are to be supplied
by the user.
2
2
SOFTWARE
2.1
System Requirements
All of Rigel’s software products are designed to work with an IBM PC or compatible, Pentium 120MHz or better,
running Windows 95, 98, 2000, PE, or Windows NT. The newest version of the software is always available to
download off our web site, www.rigelcorp.com. We encourage you to check our web site often to keep up-todate.
2.2
Software Installation
If you receive a CD from Rigel, follow these steps:
1. Place the CD-ROM in your drive.
2. Go to the Rigel Products | 8051 Software and click on the software file you wish to install. The program
will then install in your system.
3. Follow the standard install directions.
If you download the software from the web, (www.rigelcorp.com)
1. Click on the .exe file. The program will then install in your system.
2. Follow the standard install directions.
2.3
Reads51
Reads51 is an Integrated Development Environment (IDE) used to write application programs for the Rita-51
boards. It contains a C compiler, an assembler, a linker and a chip simulator. Any third party software
development tools may be used for the Rita-51. The following sections are designed to help get you started with
the Reads51 and Rita-51. For detailed information about the Reads51 software refer to the Reads51 User’s
Manual.
2.3.1
1.
2.
3.
4.
5.
6.
7.
8.
9.
2.3.2
Rita-51 Start-Up With Reads51
Check to make sure a jumper is in the EA# header.
Check to make sure the slide switch is in the MON
position.
Connect Rita-51 to the PC host via a modem cable.
Connect Rita-51 to a well-regulated 5-Volt supply. The
red LED should light up when power is connected.
Run the Reads51 IDE by selecting Start | Programs |
Reads51. You may also start Reads51 by double
clicking on the Reads51 short cut icon if installed.
Specify the serial port (COMM Port) that is connected to
the board by opening the Options | TTY Options
window.
Select the Toolchain and Target platform by selecting
Options | Toolchain/Target and selecting Reads51
Toolchain v4 and the target RROS.
Open the TTY window using the menu command View |
TTY Window.
Press RESET on the embedded controller board and hit
the space bar on the computer you are using, observe
the prompt in the TTY window.
Verifying that the Monitor is Loaded
Make sure the TTY window is active, clicking the mouse inside
the TTY window to activate it if necessary. Then type the letter
‘H’ (case insensitive) to verify that the monitor program is
responding. The ‘H’ command displays the available single-letter commands the monitor will recognize.
The READS monitors use single-letter commands to execute basic functions. Port configurations and data, as
well as memory inspection and modifications may be accomplished by the monitor. Most of the single-letter
commands are followed by 4 hexadecimal digit addresses or 2 hexadecimal digit data bytes.
The list of monitor commands is displayed with the H command while the monitor program is in effect. The H
command displays the following table.
3
B xxxx
C xxxx-xxxx
D xx-xx
D xx=nn
D xx-xx=nn
G xxxx
H
K
L
Px
P x=nn
R
S
S xx-xx
S xx=nn
S xx-xx=nn
X xxxx-xxxx
X xxxx=nn
X xxxx-xxxx=nn
sets Break point at address xxxx
displays Code memory
displays internal Data ram
modifies internal Data ram
fills a block of internal Data ram
Go - starts executing at address xxxx
Help - displays monitor commands
Kills (removes) break point
down Loads Intel hex file into memory
displays data on Port x
modifies data on Port x to nn
displays the contents of the Registers
displays Special function register addresses
displays Special function registers
modifies Special function registers
fills Special function registers
displays eXternal memory
modifies eXternal memory
fills eXternal memory
A single-letter command may be followed by up to 3 parameters. The parameters must be entered as hexadecimal numbers. Each 'x' above represents a hexadecimal digit (characters 0..9, A..F). Intermediate spaces are ignored. Alphabetic characters are converted to upper case. The length of the command string must be 16
characters or less. The command syntax is:
Letter [address][-address][=data]<CR>.
2.3.3
1.
2.
3.
4.
5.
Downloading and Running an Assembly Program
Use the use the Project |
Open Project command to
open the project
"AbsoluteAssembly01".
Assemble the program using
the Compile | Build
command.
Use the Compile | Toggle
Mode command to switch to
the Run/Debug Mode.
Click on the Compile | Run
command and specify the
starting address 8000 (hex).
Again the Compile | Toggle
Mode command to revert
back to the Build Mode.
2.3.4 Downloading and
Running a C Program
1.
2.
3.
Use the Project | Open
Project command to open the
project "Hello".
Compile the program and download it to the board using the Compile | Build and Download command.
The project will be compiled and the resultant HEX code will be downloaded to the target board.
Press and hold the RESET button on the board. While the RESET button is pressed, flip the MON / RUN
switch to the RUN position. This swaps the memory map on the board so that RAM occupies low
memory. The HEX code downloaded to RAM executes when you release the RESET button.
4
2.3.4
Programming On-Board FLASH with Reads51
Reads51 may be used to manage the on-board FLASH of the Rita-51. In the Options | Toolchain/Target dialog,
select either the RROS or the RRM target. Also select an available port and a suitable Baud rate (i.e. 9600) in
the Options | TTY Options dialog. Open the TTY window. Make sure that the Rita-51 is in the PGM mode
(slide switch towards the red LED). Press RESET and then hit the space bar. The Baud rate is detected and
used by the Rita-51.
In order to erase the FLASH, simply type the letter ‘e’ (case sensitive). Once erased, the FLASH may be
programmed. Use the Compile | Download HEX… menu to select a HEX file. The download progress is
reported in the status bar.
2.4
Rita-51 Utility Software
The Rita-51 Utility Software from Rigel Corporation is a Windows program. It is an alternate means, from the
Reads51 software, to manage the on-board FLASH.
Select the COMM port and a Baud rate. The Rita-51 Utility detects the Baud rate from the board. The set of
acceptable Baud rates depends on the crystal frequency. Typically, 9600 works with all frequencies. The
standard 11.0592 MHz
frequency often used with
8051 microcontroller allow
almost all Baud rates up to
57600. With a 24 MHz
crystal, the highest Baud rate
is 11520. Higher
frequencies do not
necessarily allow higher
Baud rates. The crystal
frequency must be an even
multiple of the Baud rate, or
at least within a few percent
of the ideal value. Move the
slide switch on the Rita-51 to
the PGM (program) position,
press the reset push button
and press the space bar to
see the Rita-51 monitor
prompt.
The Rita-51 Utility has two buttons. The “Erase” button erases the FLASH ROM. The “Download” button asks for
a program file in the Intel hex format. It opens and downloads the file to the board. Once you download your
program, move the slide switch to the RUN position and press the reset push button. You code in FLASH ROM
now constitutes the 8051 code memory. The RAM is mapped into the 8051 external data (XDATA) memory.
2.5
RitaBrowser
RitaBrowser monitors and controls Internet applicances built with Rigel Corporation's Rita family of control
boards. The Rita nodes may be on the Internet or on a private network such as a personal network or a company
intranet.
2.5.1
Configuring RitaBrowser
Click the “Configure” button. Use the tab “This PC” to specify the IP address of your computer. If you are using a
dial-up service, you can obtain the IP address by the “ARP” utility. Open a DOS box and type “arp –a” to see
your assigned IP address. If your PC is set to participate in a LAN, use the “Settings / Control Panel /Network”
dialog to view your IP address.
5
If you would like to automatically launch programs on your PC when a keyword is received from a Rita node,
enter the (case sensitive) keyword and select the program to be activated. Note that the parameters received
from the Rita node
following the
keyword are
passed on to the
launched program
as command line
parameters.
The “Ping timeout”
is currently not
used. The “Port”
address
determines the
UDP part your PC
uses to
communicate with
the Rita node.
Unless you are
using this value in
the Rita program,
you may click the
“Auto” box.
The “Rita Nodes”
tab in the configuration dialog lists the current nodes. You may add, modify, or remove nodes from the list. When
adding new nodes, you will be asked to provide a name along with the IP address and port number for the Rita
node. The name is used by the RitaBrowser to identify the node. This is like the “bookmark” or a “favorite” entry
in a web browser. The default Rita port number is 8192 (0x2000). You may change this number, especially if you
intend to use it to identify among various services at the Rita node.
Advanced Configuration
You may save the list of Rita nodes to a file as a backup or to load onto another PC. When loading a Rita nodes
list, you will be asked if you would like to append the new list to the existing one or to replace the existing list with
the new list. In the former case, you will also be notified if there are duplications or conflicts.
2.5.2
Communicating With a Rita Node
A list of currently known Rita nodes appears in a drop-down list box. Select the node you would like to
communicate with and click the “Connect” button. RitaBrowser opens a socket to communicate with the Rita
node. If the socket cannot be opened, it usually means that you have not correctly specified your PC’s IP
address. Once a socket is successfully opened, you may type in the edit window and communicate with the Rita
node. Note that the communication depends on the specific program running on the Rita node. Being an open
architecture, you are free to program the Rita node any way you wish. For instance, you may use restrict the
node to answer only to specific IP addresses, or use the port numbers to invoke different behaviors. Refer to the
Rita hardware and programming manuals for further information and demo programs. It is recommended that a
Rita node responds with a short message, possibly a menu, when it receives an unknown command or the
question mark ( ‘?’).
6
3
OPERATING NOTES
3.1
Overview
R
T
G
R
T
G
Rita-51 uses the 8051 family of microcontrollers in the standard 44-pin TQFP package. These microcontrollers
use the MCS-51 instruction set. The Rita-51 uses external RAM during the development cycle. Once an
application program is developed, it may be permanently placed in FLASH. With an application-specific program
installed, the Rita-51 may be used as an embedded controller.
J5
P1
J1
J2
J6
P2
D1
C17
CS8900A
U7
U2
U6
PROG
RUN
RS232
J3B
J3A
9536
PB1
C24
J9
8051
J7
PB
J8
LEDs
AM29F010
U1
U5
VCC
U4
GND
PB5 PB4 PB3 PB2
62128
J10
Prototyping Area
U8
Figure 3.1 Top Board Overlay
The following are general guides to operating the board.
3.2
J1, Power Input
Power is brought to the Rita-51 board by a two-position screw-type terminal block, J1. A well-regulated (+/- 5%)
5V DC source is required. The (+) terminal is marked on the board. Note that a diode is placed across the input
in reverse. If the power is applied to the Rita-51 board in reverse polarity, the diode will short the power supply
attempting to prevent damage to the board.
3.3
Serial Ports, P1 and P2
The CPU serial port on the Rita-51 is accessed through an RS-232 level converter in U3. The microcontroller
supports transmit and receive signals. P1 of the Rita51 is a DB-9 female connector used to connect the
P1
P2
board to an IBM compatible PC. A minimal serial port
is constructed with just 3 lines: transmit, receive, and
ground, disregarding all hardware handshake signals.
A straight-through modem cable may be used. That is
a cable connecting pin 2 of the Rita-51 to pin 2 of the
host, and similarly pin 3 to pin 3, and pin 5 to pin 5. As
an alternitive to the DB9 connector, a header J5 may
be populated instead of the DB9. The 3 lines: transmit,
receive, and ground, are available on this header.
The second serial port P2, on the Rita-51 is optional and only avaliable when using the DS87C520 or a similar
8051, which supports 2 serial ports. The DB-9 connector P2 may be used to communicate with the PC host
7
during programming and debugging the board. As an alternitive to the DB9 connector, a header J6 may be
populated instead of the DB9. The 3 lines: transmit, receive, and ground, are available on this header.
If the second serial port is used, ports P1.2 and P1.3 are dedicated to the second serial port, and should not be
accessed on J9.
3.4
J2, The Ethernet Port
Socket J2 accepts 10Base-T signals terminating at an
RJ-45 connector. J2 is Rita-51’s primary means to
connct to a 10Mbit Ethernet network.
Reset Button
3.5
Power LED
Push Buttons
The Rita-51 has one reset button and four user
buttons. The reset button PB1 reset the board. The
four users buttons may be connected to external
circuitry byway of header J7. Typically these buttons
would be attached to the microcontroller ports and
used to debug your software.
3.6
Ethernet Port Status LEDs
Slide Switch
The slide switch changes the operating mode of the board. When the slide switch is in the Program (PGM) mode
you may download software to the FLASH ROM. The RUN position allows you to run your program from
ROM.The precise effect of the slide switch depends on the memory configuration (referred to as the memory
mode, or simply as the mode) selected by the jumpers. Please refer to Sections 2.1 and 2.2 for more information
about the memory modes.
3.7
LEDs
There are seven LEDs on the Rita-51. Two of the LEDs indicate the current operating mode of the board. A third
LED provides visual confirmation that power is applied. The other four may be used by the end user
3.7.1
Power LED
The RED LED, located next to the terminal block lights up when power is supplied to the board.
3.7.2
Status LEDs
The two LEDs next to the slide switch are used
as status indicators. The LEDs light up
depending on the operating mode, which in turn
is determined by the position of the slide switch.
The red LED is on while the board is in the
Program (PGM) mode. It is turned off when the
board enters the RUN mode. The green LED
turns on when the board is in the RUN mode.
3.7.3
J7
J8
User LEDs
User Push Buttons
User LEDs
There are four LEDs by the prototyping area,
which are designated as User LEDs. They may
be connected to external circuitry byway of
header J8. Typically these buttons would be
attached to the microcontroller ports and used to debug your software.
8
Prototyping Area
4
OPERATING MODES
4.1
Operating Mode
The operating modes, memory map, and bank switching options are determined by a complex programmable
logic device (CPLD). Many different implementations are possible. Most OEM users have their own modes
programmed into the CPLD at the factory. The CPLD programs may be modified in the field, provided that the
user has access to a Xilinx 9500-series JTAG programmer. Contact Rigel Corporation for further information
about custom operating modes.
The following modes refer to the COTS (commercial off-the-shelf) version of the Rita-51 board. There are two
operating modes: the PRG (program) mode and the RUN mode. The mode is determined by the position of the
slide switch. When switching between modes, move the slide switch and press the RESET push button. Note
that the mode is toggled when the RESET pushbutton is pressed, not when the slide switch is moved. More
specifically, the CPLD samples the state of the slide switch when a RESET event occurs. Two LEDs indicate the
current mode. Use the PRG mode to erase and program the FLASH ROM. Once the FLASH is programmed
with the application code, switch to the RUN mode.
Note that the MCS-51 can address up to 64K of code memory and 64K of external data memory. Bank switching
must be used if all 128K of ROM and 128K of RAM are to be used. Almost all professional software tools support
native bank switching capabilities. The Reads51 C compiler does not support bank switching. Most application
require less than 64K of code or data memory.
4.2
Memory Map
The memory map of Rita-51 depends on the mode. In the PRG (program) mode, the loader in internal ROM of
the 8051 is used. The FLASH ROM is mapped to external data memeory (XDATA). In the RUN mode, the
internal memory is typically removed from the map (jumper selectable). The FLASH ROM is mapped to code
memory and the RAM is mapped to external data (XDATA) memory. The basic COTS version does not
implement bank switching. Only 64K of the FLASH ROM and 64K of the RAM is used. In the RUN mode, the
microcontroller runs in the Harvard architecture with 64K of code memory (FLASH ROM) and a distinct 64K block
of external data (XDATA) memory (RAM). This fills the entire memory space of the 8051.
Mode
PGM (program)
RUN
Code Memory
Internal (8051)code
FLASH ROM
External Data Memory
FLASH ROM
RAM
In the PRG (program) mode, a loader program internal to the 8051 is used by Reads51 or by the Rita-51 Utility to
erase and download application programs to the FLASH ROM. In this mode, the RAM is not accessible. In the
RUN mode, the FLASH ROM is the code memory and the RAM is the external data memory
Note that, in the basic COTS modes, code memory and data memory do not overlap. Contact Rigel Corporation
if you would like to implement other configurations.
If the Rita-51 is used with a third-party software debugger, the monitor must be downloaded along with the
program. This arrangement is convenient in supporting a wide range of third-party software development tools.
4.3
Interfacing the Rita-51
The Rita-51 has connections to Port 1 and 4 bits of Port 3. Each port may be used as either an input or an output
port. The 8051 ports may be operated in the 8051 mode. That is, the ports contain open-drain transistors with
pull-up resistors. In this mode, when used as output ports, it is recommended that the ports sink current.
Similarly, when used as input ports, first write 1's to the ports and have the external signal drive the port low.
External Memory-mapped I/O may be attached to the Rita-51. All address, data and control signals for such
interfacing are available on header J10.
9
5
HEADERS
The Rita-51 board has eight headers: J9 the I/O (input/output) header, J10 the system header, two serial port
headers J5 and J6, and the two headers for the user pushbuttons J7, and LEDS J8. The header J4 is the JTAG
port for programming of the CPLD.
5.1
J3A and J3B
The Rita-51 uses a complex programmable logic device (CPLD) to
determine the operating modes, memory map, and bank switching
options. Many different implementations are possible. J3A and J3B are
the options headers for the CPLD. The CPLD may be programmed with
several different options that may be selected using J3A and J3B. The
J3A/J3B pinout is shown below.
J3B
J3A
P1.5 P1.6
P1.7 P3.4
AUX
0
2
1
3
EA#
GND GND GND GND GND
The first four pairs of the gang jumper J3A allow the four CPLD signals to be grounded. Each of these signals
has a pull-up resistor. Place the jumper to ground the respective signal, or remove the jumper to select logic level
high. Placing a jumper in the last pair of headers connects the microcontroller signal (EA#) to ground. Similarly,
a pull-up resistor keeps EA# at logic level high when the jumper is removed.
The COTS unit only implements signal AUX3. AUX3 is an output
J3B P1.5 P1.6 P1.7 P3.4
whose state depends on the slide switch, which determines the
operating mode. In the PRG mode, AUX3 is at logic level high, and in
AUX
the RUN mode, it is at logic level low. Connecting AUX3 to the EA#
0
1
2
3
EA#
post as shown below allows the microcontroller to execute from internal J3A
GND GND GND GND GND
CODE memory in the PGM mode, and execute code from the external
code memory (FLASH ROM) in the RUN mode. In order to implement
the standard COTS setup, one jumper is inserted into header J3A/J3B horizontally in the following position.
The CPLD programs are reprogrammable and may be customized by Rigel or the end user to accomadate a wide
range of operating and memory modes. If you wish a specific operating mode, please contact Rigel Corporation.
5.2
J4, JTAG
The Rita-51 board uses the Xilinx XC95C36 CPLD to decode memory maps. The header marked J4 on the
board is the JTAG header used for programming the CPLD.
5.3
J5 and J6, Serial Headers
J5 and J6 are the auxillary serial port headers. These are usually not available to the end user as they are
located under the DB9 connector. They are available for applications where the DB9 connector might be too
large or in the way for mounting the boards.
Pin #
1
2
3
5.4
Header
J5
RXD
TXD
GND
J6
RXD
TXD
GND
J7 and J8
Headers J7 and J8 are for the four user push buttons and LEDs. The push buttons and LEDs are typically
connected to the I/O ports or external circuitry built on the prototyping area.
5.5
J9, I/O Header
The I/O header is a two-row 20-pin header. The I/O header contains Port 1, and Port 3.2 to 3.5, an active-low
reset input, GND, VCC, and the transmit and receive signals for the serial ports. Note that two serial ports are
available only when the Rita-51 is populated with the DS87C520 microcntroller. In this case, ports P1.2 and P1.3
are dedicated to the second serial port, and should not be accessed on J9. Individual signals of these jumpers
are listed below. Pin 1 may be identified as the post with the square pad on the printed circuit board.
10
Pin
1
3
5
7
9
11
13
15
17
19
Signal
VCC
P1.O
P1.1
P1.2
P1.3
P1.4
P1.5
P1.6
P1.7
RSTIN#
Pin
2
4
6
8
10
12
14
16
18
20
Signal
P3.2
P3.3
P3.4
P3.5
(not used)
TXD0
RXD0
TXD1
RXD1
GND
Notes:
1. The second serial port is available when the board is populated with the DS87C520
microcntroller.
2. Do not use P1.2 and P1.3 if the board is populated with a DS87C520 microcntroller with two
serial ports.
3. Pins 16 and 18 are available only if the board is populated with a DS87C520 microcntroller.
4. RSTIN# is an active-low input signal. It is inverted and used as a reset input to the
microcontroler and to the Ethernet driver.
5.6
J10, System Header
The system bus is available on a two-row 40-pin header marked J10. The pin assignments are given below. The
address and data lines of the microcontroller are de-multiplexed. The system bus facilitates interfacing the Rita51 to external memory-mapped input/output devices.
Pin
1
3
5
7
9
11
13
15
17
19
21
23
25
27
29
31
33
35
37
39
Signal
VCC
A0
A1
A2
A3
A4
A5
A6
A7
A8
A9
A10
A11
A12
A13
A14
A15
A16
A17
A18
Pin
2
4
6
8
10
12
14
16
18
20
22
24
26
28
30
32
34
36
38
40
11
Signal
(not used)
D0
D1
D2
D3
D4
D5
D6
D7
(not used)
RSTIN#
RSTOUT#
RSTOUT
XIOSEL#
RAMRD#
RAMWR#
(not used)
(not used)
(not used)
GND
6
CPLD EQUATIONS
module rita51
Title 'Rita51 -
single (top) ABEL file CPLD implementation'
rita51 device;
Declarations
// inputs
WRX
pin 40;
RDX
pin 41;
A6
pin 42;
A7
pin 43;
A8
pin 44;
A9
pin 1;
A10
pin 2;
A11
pin 3;
A12
pin 5;
A13
pin 6;
A14
pin 7;
A15
pin 8;
AUX0
pin 12;
AUX1
pin 13;
AUX2
pin 14;
AUX3
pin 16;
MONRUN pin 18;
RSTINX
PSENX
pin 34;
pin 36;
// outputs
MA16
pin 28 istype 'com';
MA17
pin 27 istype 'com';
MA18
pin 19 istype 'com';
ROMSELX
ROMRDX
ROMWRX
RAMSELX
RAMRDX
RAMWRX
LEDMONX
LEDRUNX
pin
pin
pin
pin
pin
pin
pin
pin
39
38
37
31
30
29
22
23
istype
istype
istype
istype
istype
istype
istype
istype
'com';
'com';
'com';
'com';
'com';
'com';
'com';
'com';
RSTOUT
RSTOUTX
XIOSELX
NETSEL
pin
pin
pin
pin
32
33
21
20
istype
istype
istype
istype
'com';
'com';
'com';
'com';
" --- COTS modes --"
code memory
"
----------" MONMODE=1: internal
" MONMODE=0 : internal+FLASH
MONMODE
data memory
----------FLASH ROM
RAM
NODE istype 'reg, buffer';
Equations
NETSEL
= ( A8 & !A9 & A10 & A11 & A12 & A13 & A14 & A15 );
[0xFD00..0xFDFF]
12
//
XIOSELX = !( !A8 & A9 & A10 & A11 & A12 & A13 & A14 & A15 );
[0xFE00..0xFEFF]
RSTOUT = !RSTINX;
RSTOUTX = RSTINX;
MA16
MA17
MA18
= 0;
= 0;
= 0;
MONMODE.ck = !RSTINX;
MONMODE
:= !MONRUN;
LEDMONX
= !MONMODE;
LEDRUNX
= MONMODE;
when(MONMODE) then
{
RAMSELX = 1;
RAMRDX = 1;
RAMWRX = 1;
ROMSELX = RDX & WRX;
ROMRDX = RDX;
ROMWRX = WRX;
}
else // RUN mode
{
ROMSELX = PSENX;
ROMRDX = PSENX;
ROMWRX = 1;
RAMSELX = (RDX & WRX) # !XIOSELX;
RAMRDX = RDX;
RAMWRX = WRX;
}
end rita51
13
//
7
RITA-51 BILL OF MATERIALS
The bill of materials given below lists all components by their reference as they appear on the board top overlay.
Revised: July 2001
List Of Materials
Item
26
27
28
29
30
31
32
33
Quantity
CAPACATORS
2
1
14
2
4
4
RESISTORS
2
1
1
1
1
2
DIODES
6
1
2
CONNECTORS
2
1
1
5
1
4
3
1
1
1
1
ICS
1
1
1
1
1
1
1
1
34
35
1
1
1
2
3
4
5
6
7
8
9
10
11
12
13
14
15
16
17
18
19
20
21
22
23
24
25
Part
Reference
22pF
560pF
10nF - 100nF
100nF
1uF
22uF - 47uF
C18, C20
C27
C1-C13, C24
C25, C26
C19-C23
C14-C17
10K Gang
4.7K
4.99K
680 Ohm 10Gang
100 Ohm
8 Ohm
R2, R3
R4
R5
R1
R6
R7, R8
Red LED
Green LED
1N4001
D2, D5, D7-D10
D2
D1
Description
Bypass Capacitors
Surface Mt Capacitors
Surface Mt Capacitors
Surface Mt Capacitors
Surface Mt Capacitors
Surface Mt Capacitors
Surface Mt Gang Resistor
Surface Mt Resistor
Surface Mt 1% Resistor
Gang Resistor
Surface Mt Resistor
Surface Mt Resistor
Diode
DB9 FEMALE
2 Position Small TB
RJ-45 Connector
Push Buttons
Slide Switch
1 X 3 Headers
1 X 4 Header
2 X 5 Header
1X
6 Header
2 X 10 Header
2X 20 Header
P1, P2
J1
J2
PB1-PB5
S1
J5, J6
J3B, J7, J8
J3A
J4
J9
J10
XC9536-15PC44C
74HC573
CS8900A
29F010
62128
8051
MAX232
DS1233-10
U6
U4
U2
U5
U6
U1
U3
U7
PLD
Octal latch
Internet Chip
128K FLASH ROM
128KK Static RAM
Microcontroller
RS-232 IC
Reset Chip
24 / 33 MHz Crystal
20 MHz Crystal
X1
X2
Microcontroller Crystal
CS8900A Crystal
14
DB9 Connectors
3.5mm Terminal block
6 mm Pushbutton
Slide Switch
.100 1 X 3 Headers
.100 1 X 4 Headers
.100 2 x 5 Header
.100 1 X 6 Headers
.100 2 X 10 Headers
.100 2 X 3 Headers
8
TOP OVERLAY
15
9
CIRCUIT DIAGRAM
APPENDIX
A
USING THE RITA-51 BOARD
This appendix is subject to change at any time. For the latest information, software, and examples please check
our website often.
A.1
Overview
The Rita51 board has all the necessary hardware to connect the 8051 microcontroller to an ethernet network.
With appropriate software, the board may be used as an internet node (host). A complete TCP/IP implementation
is beyond the scope of this document. The range of capabilities depends on the limited memory and processing
power of the 8-bit microcontroller. However, many TCP/IP applications are possible. Note that there are several
professional TCP/IP software vendors who support the 8051 architecture. (Refer to the website
www.rigelcorp.com for links.)
This document presents a few projects that may be used to verify the functionality of the Rita51 and its ethernet
connection. Please note that the software is currently under development. Many of the lower-level functions are
written in assembly and collected into the two libraries. The low-level source code is subject to change, and is
thus not yet released.
A.2
Experiments
You may conduct several experiments with the Rita51. These experiments assume that you connect the Rita51
to a network, and that your PC is connected to the same network. Note that your PC should also be connected to
the Rita51 through a serial port. This connection is used to download the programs into the Rita51. It is also
used in the experiments for the Rita51 to report its activity.
If your PC is not on a network, you may simply connect the Rita51 to the PC's ethernet port with a crossover
cable. The two devices (the PC and the Rita51) become the two (and only two) nodes on the network.
If you use an existing network, you need an IP (internet protocol) number for the Rita51. Select this number so
that it does not conflict with other hosts on the network.
The experiments assume the IP address of the Rita51 board to be 200.100.100.2. You may change this by
modifying the source and recompiling the project. Similarly, the board is assigned the ether MAC (media access
control) address 5.4.3.2.1.0. Again, this may be changed in the source and recompiled.
A.2.1 Sniff Experiments
Once the PC and the Rita51 is connected to the network, you may conduct several experiments. The two
projects Sniff_Ether and Sniff_IP run the Rita51 as a "sniffer." Here the Rita51 listens to the message traffic on
the network and reports the messages out its serial port. Your PC's serial port connection receives these reports.
A.2.2 Ping Experiment
The two experiments Sniff_Ether and Sniff_IP call the function NetServiceMsgs() to process the incoming
messages. A more detailed description of this function is given in Section A.3.2 below. Sniff_Ether() passes the
argument FALSE (zero) to NetServiceMsgs(). Sniff_IP, on the other hand, passes a nonzero argument (TRUE).
This instructs NetServiceMsgs() to process ARP (address resolution protocol) and ICMP echo request/reply
(ping) messages. Run Sniff_IP on the Rita51. Then, from a DOS box on the PC, issue the command
ping 200.100.100.2
This invokes the Windows ping application and sends a data packet, expecting it to be echoed back. The ping
utility then reports the time it takes the echo to be received. Sniff_Ether does not process the echo request. IT
may be used to inspect the messages received from the ping utility.
A.2.3 RitaPorts Experiment
The experiment RitaPorts runs over UDP (user datagram protocol). It communicates with the PC over the
ethernet connection. You may use any software that is capable of sending and receiving UDP messages (such
as netcat). The Windows application RitaBrowser is written specifically for this purpose. You may download
RitaBrowser from the Rigel website www.rigelcorp.com. It is a simple "TTY-like" interface that sends the
keystrokes out as UDP messages, and displays the UDP messages received in its window. With RitaBrowser,
you may type in commands, which are sent over the ethernet connection from your PC through the network, and
2
finally to the Rita51. The responses travel from the Rita51, through the network, and arrive at your PC. Theses
responses are displayed in the window of the RitaBrowser. The simple application, RitaPorts, implements a
menu that runs on the Rita51. The user may read the port values of the Rita51 over the network as well as set
the port values.
A.3
Programmers View
Rita51 network connectivity software is comprised of two libraries. NetStack51 contains the low level routines
and hardware drivers. It also contains the code, written in low-level assembly, to perform ARP and ICMP echo
requests.
NetApi51 contains the higher-level routines, which are called by the application. NetApi51 has two modules.
Module "Network" uses C code. This is the module that may be customized for specific applications. Module
"NetworkLow" contains lower level routines, many of which are written in in-line assembly.
The application performs network communications by calls to NetApi51 routines. NetApi51 is UDP-oriented.
That is, there are many functions in the library to support transmitting and receiving UDP messages.
The Rita51 family of boards uses the CA8900A network driver chip. The CS8900A does not support interrupts in
the 8-bit mode. Thus, NetApi51 routines are polling oriented.
A.3.1 Network Initialization
void
NetSetEtherAddress(unsigned int u2, unsigned int u1, unsigned int u0);
Sets the six-byte ethernet address, also known as the hardware address or the IEEE address. For example,
NetSetEtherAddress(0x0504, 0x0302, 0x0100); sets the ethernet address to 0x050403020100. It is customary to
separate the individual bytes of the address by hyphens and write them in decimal, as 5-4-3-2-1-0.
void
NetSetIPAddress(unsigned int u1, unsigned int u0);
NetSetIPAddress() sets the four-byte logical internet protocol (IP) address. For example,
NetSetIPAddress(0xC864, 0x6402); sets the IP address to 0xC8646402. It is customary to separate the
individual bytes of the address by periods and write them in decimal. Here, 0xC8646402 is written as
"200.100.100.2".
int NetInitialize(int uMode);
NetInitialize() initializes the variables and the network driver chip. The network driver chip takes about 10
milliseconds after reset to complete its internal initialization. The function returns zero when initialization is
completed. Otherwise, it returns a non-zero busy code. The argument determines the type of messages to be
accepted. The following constants are defined:
IM_PROMISCUOUS
IM_BROADCAST
IM_INDIVIDUAL
allows all messages
allows messages with broadcast ethernet address
(e.g., FF-FF-FF-FF-FF-FF)
allows messages with an ethernet destination address equal
to the ethernet address of this node (set previously by a
call to NetSetEtherAddress().
Any combination of the constants may be specified by combining them with the logical "or" operation. Typically
an application calls the initialization routine with its argument set to (IM_BROADCAST | IM_INDIVIDUAL). Note
that broadcast messages must be allowed for the node to respond to ARP messages. IM_PROMISCUOUS
should be set to sniff all message traffic. However, this may overwhelm the node, missing some of the
messages.
3
A.3.2 Message Reception
A few steps are involved in receiving messages. First the network driver is polled to see if a message is pending
at the network driver chip. Pending messages are copied from the network driver chip to external RAM and
processed. Flags in external RAM are used to specify the results of polling and of the state of reception. There
are three primary flags: E_MSGRDY, IPIN_MSGRDY, and UDPIN_MSGRDY.
The function NetServiceMsgs() clears the UDPIN_MSGRDY flag and polls the network driver. E_MSGRDY is set
if a raw (ethernet) message is pending (in the local memory of the network driver chip). NetServiceMsgs() takes
a Boolean argument. If zero (FALSE), the function returns with the state of reception reflected in E_MSGRDY. If
the argument is non-zero (TRUE), the function further processes the message. First, it is copied from the local
memory of the network driver chip to external RAM. Then the two flags IPIN_MSGRDY and UDPIN_MSGRDY
are cleared. The message is inspected. If the message is an ARP message (LLC=0806), it is automatically
serviced. If the message is an IP message (LLC=0800) the flag IPIN_MSGRDY is set and the message is further
inspected. If the message is an ICMP echo request, it is automatically serviced. If the message contains a UDP
frame, the flag UDPIN_MSGRDY is set. In any case, message information such as source and destination
addresses, message header and data length, etc. are written to variables stored in external RAM to be accessible
to the application.
As stated, NetApi51 is UDP oriented. Typically the application is interested only in the data portion of a UDP
message. The function NetGetUdpMsg() is provided for this purpose. The function receives a pointer to a
character buffer, to which it copies the message. The size of the message is returned by the function. Note that if
the UDPIN_MSGRDY flag is set and the function NetGetUdpMsg() returns zero, it means that a UDP message
with no data was received. Similarly, if the function is called when no UDP message is ready (UDPIN_MSGRDY
flag zero), the function simply returns zero.
Once the UDP message is retrieved, the application may obtain information about the message by several
NetApi51 functions. Of course, the message is now copied into internal RAM, and the application may find the
frame contents by inspecting the message, but it is more convenient to call the provided functions.
NetGetUdpInSrcEthernAddress(char *pcSrcEther) copies the sender's ether address to the
character array pcSrcEther.
NetGetUdpInSrcIpAddress(char *pcSrcIP) copies the sender's IP address (source IP) to the
character array pcSrcIP.
NetGetUdpInSrcPort() returns the source UDP port.
NetGetUdpInDestPort() returns destination UDP port
If the application requires other information, such as IP flags, or IDs, it must inspect the message frame now
copied into external RAM. Please refer to the section titled "Frame Access" below for more information.
A few steps are involved in receiving messages. First the network driver is polled to see if a message is pending
at the network driver chip. Pending messages are copied from the network driver chip to external RAM and
processed. Flags in external RAM are used to specify the results of polling and of the state of reception. There
are three primary flags: E_MSGRDY, IPIN_MSGRDY, and UDPIN_MSGRDY.
The function NetServiceMsgs() clears the UDPIN_MSGRDY flag and polls the network driver. E_MSGRDY is set
if a raw (ethernet) message is pending (in the local memory of the network driver chip). NetServiceMsgs() takes
a Boolean argument. If zero (FALSE), the function returns with the state of reception reflected in E_MSGRDY. If
the argument is non-zero (TRUE), the function further processes the message. First, it is copied from the local
memory of the network driver chip to external RAM. Then the two flags IPIN_MSGRDY and UDPIN_MSGRDY
are cleared. The message is inspected. If the message is an ARP message (LLC=0806), it is automatically
serviced. If the message is an IP message (LLC=0800) the flag IPIN_MSGRDY is set and the message is further
inspected. If the message is an ICMP echo request, it is automatically serviced. If the message contains a UDP
frame, the flag UDPIN_MSGRDY is set. In any case, message information such as source and destination
addresses, message header and data length, etc. are written to variables stored in external RAM to be accessible
to the application.
4
As stated, NetApi51 is UDP oriented. Typically the application is interested only in the data portion of a UDP
message. The function NetGetUdpMsg() is provided for this purpose. The function receives a pointer to a
character buffer, to which it copies the message. The size of the message is returned by the function. Note that if
the UDPIN_MSGRDY flag is set and the function NetGetUdpMsg() returns zero, it means that a UDP message
with no data was received. Similarly, if the function is called when no UDP message is ready (UDPIN_MSGRDY
flag zero), the function simply returns zero.
Once the UDP message is retrieved, the application may obtain information about the message by several
NetApi51 functions. Of course, the message is now copied into internal RAM, and the application may find the
frame contents by inspecting the message, but it is more convenient to call the provided functions.
NetGetUdpInSrcEthernAddress(char *pcSrcEther) copies the sender's ether address to the
character array pcSrcEther.
NetGetUdpInSrcIpAddress(char *pcSrcIP) copies the sender's IP address (source IP) to the
character array pcSrcIP.
NetGetUdpInSrcPort() returns the source UDP port.
NetGetUdpInDestPort() returns destination UDP port
If the application requires other information, such as IP flags, or IDs, it must inspect the message frame now
copied into external RAM. Please refer to the section titled "Frame Access" below for more information.
A.3.3 Message Transmission
Frames to be transmitted are composed in external RAM. The low-level view of a transmit operation consists of
two steps. First, the network driver chip is informed of a transmit request, along with the size of the frame. The
network driver chip uses local memory to store frames to be transmitted. The chip grants the request only when
there is enough room in its local memory to hold the frame. Then, the frame is copied from external RAM to the
local memory of the driver chip. The driver chip transmits the message, which may require waiting for the
medium to be available, or even retransmitting it if collision occurs. The driver chip is polled to see if the frame
has successfully been transmitted.
Again, being UDP-oriented, NetApi51 provides a straightforward means of transmitting UDP messages. The
function NetSendUdpMsg() takes two arguments. The first is a pointer to the character buffer holding the
message. The second is the number of characters (bytes) to transmit. It composes the frame, computes the
checksums, asks the driver chip for permission to transmit, copies the frame to the driver chip, and finally waits
for the transmission to be completed. It returns an error code, zero if successful, non-zero if there were errors in
transmission.
Before NetSendUdpMsg() is called, several parameters of the UDP message must be set. Namely, the
destination ether address and IP address, and the source and destination ports. The source ether and IP
addresses previously specified during initialization are used. The following functions set the parameters of the
UDP message to be transmitted.
NetSetUdpOutDestEthernAddress(char *cEther)
NetSetUdpOutDestIpAddress(char *cIP)
NetSetUdpOutSrcPort(int nDestPort)
NetSetUdpOutDestPort(int nSrcPort)
Both cEther and cIP are pointers to character arrays holding the ethernet and IP address of the destination.
A.3.4 Frame Access
Low-level frame access is available as the incoming messages are placed in a buffer. This buffer, referred to as
the receive buffer, is kept in external data memory. A pointer to this memory may be declared and the buffer
contents be accessed as array elements. Note that the buffer is an external variable to the C code. Similarly, the
5
external variable E_MSGRDY is nonzero when an ethernet message is placed in the receive buffer. Its size is
stored by the external variable EIN_SIZE. The following code portions illustrate the use of these variables.
extern int E_MSGRDY, EIN_SIZE, RX_BUFFER;
char c, *RxBuffer;
// check incoming IP messages
if(!E_MSGRDY) continue;
RxBuffer=&RX_BUFFER;
c=RxBuffer[12];
// get the 12-th byte of the message
Alternatively, the receive buffer elements may be accessed as two-byte integers. The function SwapEndian()
interchanges the two bytes of its integer argument. It is convenient in translating network integers (with high byte
first) to C integers (with low byte first).
int n, *RxBuffer;
RxBuffer=&RX_BUFFER;
n=RxBuffer[12];
// get the 12-th integer (bytes 24 and 25)
n=SwapEndian(RxBuffer[12]);
A.3.5 Serial I/O Function
The serial input/output functions are collected in the library xSio51.lib. Its source code is available. It is a
generalization of the Sio51, cSio51, and csSio libraries. The library contains the usual functions putc(), getc(),
and peekc().
The functions puts() and cputs() transmit the strings given by their arguments. The function puts() assumes that
the string is in external data memory, while cputs() assumes that the string is in code memory.
The same applies to the functions printf() and cprintf(). The latter assumes the format string is in code memory,
while the former assumes it is in external data memory.
Stream support is provided by the two functions sprintf() and csprintf(). Here, the first argument is the stream
(character buffer) into which the formatted strings are written. In ether case, the stream is assumed to be in
external data memory (it is not possible to write to the MCS-51 code memory). Again, sprintf() assumes that the
format string is in external data memory, while csprintf() assumes that the format string is in code memory.
The library contains the initialization function InitSerialPort0(int nMode). The function
unsigned int GetCodeWord(unsigned int uAddress);
is used by the code-memory-versions of the functions to read the MCS-51 code memory. The argument is the
address in code memory.
6