1
Version
3.0 Euro
THE CROSBY GROUP
QUIC-CHECK® Plus Electronic Tagging & Identification
System
User Manual
User Manual
1
QUIC-CHECK® PLUS ELECTRONIC TAGGING & IDENTIFICATION SYSTEM
User Manual
The Crosby Group LLC
2801 Dawson Road • Tulsa, OK • 74110
Phone 918-834-4611 • Fax 918-832-0940
The QUIC-CHECK® Plus software
is protected by
U.S. Patent 7,825,770
Table of Contents
®
WHAT’S NEW IN QUIC-CHECK PLUS 3.0? ............................................................................................................................... 4
IMPROVED POCKET QUIC-CHECK® ............................................................................................................................................ 4
IMPROVED SYNCHRONIZATION ................................................................................................................................................... 4
IMPROVED SUPPORT FOR LARGE DATABASES ................................................................................................................................. 4
BLUETOOTH RFID PEN W/DESKTOP APPLICATION........................................................................................................................... 4
®
CROSBY QUIC-CHECK PLUS INSPECTION & IDENTIFICATION SYSTEM OVERVIEW .................................................................. 5
PURPOSE OF THE SYSTEM .......................................................................................................................................................... 5
BENEFITS OF THE SYSTEM .......................................................................................................................................................... 5
SYSTEM COMPONENTS ............................................................................................................................................................. 5
PROCESS DESCRIPTION ............................................................................................................................................................. 5
SYSTEM REQUIREMENTS........................................................................................................................................................ 6
DESKTOP OR LAPTOP APPLICATION .............................................................................................................................................. 6
MOBILE DEVICE ...................................................................................................................................................................... 7
DATABASE SERVER .................................................................................................................................................................. 7
DESKTOP SOFTWARE INSTALLATION AND SETUP................................................................................................................... 9
INSTALLING QUIC-CHECK PLUS ................................................................................................................................................... 9
CREATING A NEW DATABASE ................................................................................................................................................... 11
UPGRADING AN EXISTING DATABASE ......................................................................................................................................... 17
Local Database............................................................................................................................................................. 17
Network Database ....................................................................................................................................................... 17
SOFTWARE UPDATES ............................................................................................................................................................. 18
Automatic Updates ...................................................................................................................................................... 18
Turning off Automatic Updates..................................................................................................................................... 20
Updating QUIC-CHECK® Plus Without Internet Access .................................................................................................... 21
MOBILE DEVICE SOFTWARE & HARDWARE INSTALLATION ............................................................................................................... 23
RFID PEN ........................................................................................................................................................................... 30
Connecting to the RFID Pen via USB .............................................................................................................................. 30
Connecting to the RFID Pen via Bluetooth ..................................................................................................................... 31
Enabling QUIC-CHECK® Plus to Use the RFID Pen ........................................................................................................... 33
USING CROSBY QUIC-CHECK® PLUS DESKTOP SOFTWARE..................................................................................................... 36
HOME ................................................................................................................................................................................ 36
Managing Products ...................................................................................................................................................... 36
Managing Product Types .............................................................................................................................................. 49
Managing the Distributor ............................................................................................................................................. 65
Managing End Users .................................................................................................................................................... 66
Managing Manufacturers............................................................................................................................................. 67
Managing Inspectors .................................................................................................................................................... 68
Reading and Writing Tags With the RFID Pen ................................................................................................................ 69
Entering Product Inspection Results .............................................................................................................................. 73
REPORTING ......................................................................................................................................................................... 78
®
Printing Reports Using QUIC-CHECK Plus ..................................................................................................................... 78
Exporting a Report to a CSV File .................................................................................................................................... 83
MOBILE .............................................................................................................................................................................. 85
Standard Data Synchronization .................................................................................................................................... 85
Advanced Data Synchronization ................................................................................................................................... 89
Recovering Data Lost During a Sync .............................................................................................................................. 93
QUIC-CHECK MENU............................................................................................................................................................ 95
Create New Database................................................................................................................................................... 96
1
Open Existing Database................................................................................................................................................ 96
Backup or Save As ........................................................................................................................................................ 97
Recent Databases......................................................................................................................................................... 98
QUIC-CHECK Plus Options ............................................................................................................................................. 98
MERGE DATABASE .............................................................................................................................................................. 105
HOW DO I…? .................................................................................................................................................................... 106
How do I Combine End Users, Inspectors and Manufacturers? ..................................................................................... 106
How Do I Access Extra Filtering Options? .................................................................................................................... 118
How Do I Create a Backup of My QUIC-CHECK® Plus Data? .......................................................................................... 119
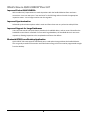
How do I get Technical Support for QUIC-CHECK® questions or problems? ................................................................... 121
®
How to Contact Technical Support within the QUIC-CHECK Plus Software................................................................... 121
®
USING THE POCKET QUIC-CHECK TAG READER SOFTWARE ............................................................................................... 123
STARTING THE MOBILE DEVICE SOFTWARE ................................................................................................................................ 123
RFID TAG READER .............................................................................................................................................................. 125
INSPECT/BUILD PRODUCTS MENU........................................................................................................................................... 129
Inspect Product .......................................................................................................................................................... 129
View/Edit Product ...................................................................................................................................................... 129
New Product .............................................................................................................................................................. 129
New End User............................................................................................................................................................. 129
Search for a Serial No…............................................................................................................................................... 130
Scan a RFID Tag.......................................................................................................................................................... 130
Show Deactivated Products ........................................................................................................................................ 130
Do Not Write Back To Tag .......................................................................................................................................... 130
Hide First Inspection Screen ........................................................................................................................................ 130
Do Not Auto-Refresh Grid ........................................................................................................................................... 130
Extend End User Dropdown ........................................................................................................................................ 131
FINDING YOUR PRODUCTS WITH POCKET QUIC-CHECK® ............................................................................................................. 132
Find Products by End User .......................................................................................................................................... 132
Find Products by Projected Inspection Date................................................................................................................. 134
Find Products by Serial Number .................................................................................................................................. 136
Find Products by RFID tag ........................................................................................................................................... 137
BUILDING A PRODUCT WITH POCKET QUIC-CHECK®................................................................................................................... 140
INSPECTING PRODUCTS WITH POCKET QUIC-CHECK® ................................................................................................................. 145
REPAIRING PRODUCTS .......................................................................................................................................................... 161
MAINTAIN DATABASE .......................................................................................................................................................... 163
CLEAR RECENT ITEMS LIST ..................................................................................................................................................... 163
ABOUT… .......................................................................................................................................................................... 164
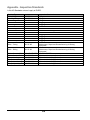
APPENDIX - SELECTED MENU OPTIONS .............................................................................................................................. 165
APPENDIX – ACCESS LEVELS ............................................................................................................................................... 174
APPENDIX - INSPECTION STANDARDS ................................................................................................................................ 175
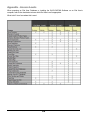
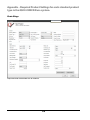
APPENDIX – REQUIRED PRODUCT SETTINGS FOR EACH STANDARD PRODUCT TYPE IN THE QUIC-CHECK EURO SYSTEM. .. 176
CHAIN SLINGS .................................................................................................................................................................... 176
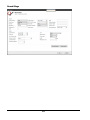
ROUND SLINGS ................................................................................................................................................................... 177
WEB SLINGS ...................................................................................................................................................................... 178
WIRE ROPE SLINGS – 1 LEG ................................................................................................................................................... 179
WIRE ROPE SLINGS – MULTI-LEG ........................................................................................................................................... 180
WIRE ROPE SLINGS – SINGLE LENGTH OF ROPE .......................................................................................................................... 181
USER-DEFINED BLOCKS ........................................................................................................................................................ 182
BRIDGE CRANE BLOCKS ........................................................................................................................................................ 183
CONSTRUCTION BLOCKS ....................................................................................................................................................... 184
DERRICK HOIST BLOCKS ........................................................................................................................................................ 185
DRILLING BLOCKS ................................................................................................................................................................ 186
2
GENERAL OILFIELD BLOCKS .................................................................................................................................................... 187
MOBILE CRANE BLOCK ......................................................................................................................................................... 188
OVERHAUL BALL ................................................................................................................................................................. 189
SCRAP YARD BLOCKS............................................................................................................................................................ 190
SNATCH BLOCKS ................................................................................................................................................................. 191
TILT-UP BLOCKS ................................................................................................................................................................. 192
TUBING BLOCKS .................................................................................................................................................................. 193
HOIST RINGS...................................................................................................................................................................... 194
USER-DEFINED HOIST RINGS ................................................................................................................................................. 195
PLATE CLAMPS ................................................................................................................................................................... 196
LOCKING CLAMPS................................................................................................................................................................ 197
NON-LOCKING CLAMPS ........................................................................................................................................................ 198
NON-MARRING CLAMPS....................................................................................................................................................... 199
SPECIALTY CLAMP ............................................................................................................................................................... 200
SHACKLES.......................................................................................................................................................................... 201
USER-DEFINED SHACKLES...................................................................................................................................................... 202
SLING SAVER SHACKLES ........................................................................................................................................................ 203
APPENDIX - DESKTOP TROUBLESHOOTING FAQ ................................................................................................................. 204
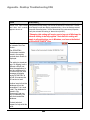
APPENDIX - MOBILE DEVICE TROUBLESHOOTING TIPS....................................................................................................... 205
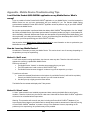
I CAN’T FIND THE POCKET QUIC-CHECK® APPLICATION ON MY MOBILE DEVICE. WHAT’S WRONG ? ........................................................ 205
HOW DO I RESET MY MOBILE DEVICE? ..................................................................................................................................... 205
Method 1: “Soft” reset................................................................................................................................................ 205
Method 2: “Clean” reset ............................................................................................................................................. 205
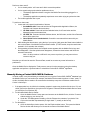
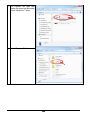
MANUALLY MOVING A POCKET QUIC-CHECK® DATABASE........................................................................................................... 206
MANUALLY REMOVE APPLICATION FILES .................................................................................................................................... 207
TROUBLESHOOTING MOBILE DEVICE SYNCHRONIZATION ............................................................................................................... 209
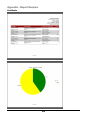
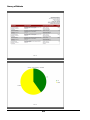
APPENDIX – REPORT SAMPLES........................................................................................................................................... 212
CERTIFICATE ...................................................................................................................................................................... 212
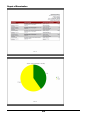
SURVEY OF DEFECTS ............................................................................................................................................................ 213
REPORT OF EXAMINATION ..................................................................................................................................................... 214
INSPECTIONS ...................................................................................................................................................................... 215
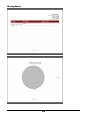
MISSING REPORT ................................................................................................................................................................ 216
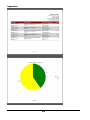
DAMAGED ......................................................................................................................................................................... 217
HISTORY ........................................................................................................................................................................... 218
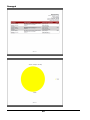
PRE-INSPECTION ................................................................................................................................................................. 219
PRODUCTS ........................................................................................................................................................................ 220
INDEX................................................................................................................................................................................. 221
3
What’s New in QUIC-CHECK® Plus 3.0?
Improved Pocket QUIC-CHECK®
We’ve made many improvements to make inspections with the handheld device faster and more
convenient. Users can now opt to “scan and write” to the RFID tag and mark it with the appropriate
inspection status. You no longer need to scan the tag twice.
Improved Synchronization
Advanced synchronization options make it easier and faster than ever to synchronize multiple PDAs.
Improved Support for Large Databases
Users can now control how much data is placed on the handheld device, and can control how often the
handheld’s screen data is refreshed. For users with large databases, the handheld device is now more
responsive, allowing inspections to be completed much faster than before.
Bluetooth RFID Pen w/Desktop Application
QUIC-CHECK® Plus now supports a Bluetooth pen to read and write tags without the handheld device.
This can greatly streamline the creation and initialization of tags, which can now be programmed straight
from the desktop.
4
Crosby QUIC-CHECK® Plus Inspection & Identification System
Overview
Purpose of the System
The Crosby QUIC-CHECK® Plus Inspection & Identification System has been designed to provide a
more accurate and efficient means of inspecting slings (chain, wire rope, and high performance
synthetic), hoist rings, plate clamps, blocks, and 25T and larger shackles. This system also allows you to
store and run reports for other items that you inspect on a regular basis. This is accomplished by
combining an electronic inspection software program developed by The Crosby Group with RFID (Radio
Frequency Identification) technology.
Benefits of the System
Reduces total inspection process time up to 65%.
Reduces cost of the overall inspection process.
Enhances data accuracy – Eliminates errors introduced
when
handwriting reports and transcribing those handwritten
reports into typed reports.
Printed/formatted reports are available immediately after the inspection is complete and the
handheld unit is docked and synchronized with the desktop PC.
History reports are available for each product tracked.
Ability to quickly reference support materials designed to facilitate the inspection process.
Supports a central database server, allowing multiple users to share the same database.
System Components
13.5MHz RFID-enabled tags and products (optional; system can still be used without these tags)
Handheld device with plug-in RFID transceiver
Desktop (or laptop) computer
RFID read/write device (optional)
Crosby QUIC-CHECK® Plus Inspection Software
Process Description
Sling or product is entered into the system using the handheld device (or using the desktop or
laptop computer with the RFID read/write device).
Handheld device is docked with the desktop computer and data is synchronized.
When it’s time to conduct a field inspection, handheld device is used for recording results.
Handheld device is again synchronized with the desktop computer.
Required reports are generated by the desktop software and can be emailed to your customer.
5
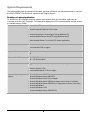
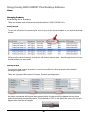
System Requirements
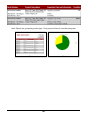
The following table lists the prerequisite software, minimum hardware, and OS requirements for running
the QUIC-CHECK® Plus Electronic Inspection and Tagging System.
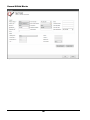
Desktop or Laptop Application
To determine if the computer meets the system requirements, from the Start Menu, right-click My
Computer, and then click Properties. The General tab displays the CPU type and speed, and the amount
of installed memory (RAM).
Prerequisite software
Microsoft® .NET Framework 4.0
Microsoft Internet Explorer® 8.0 or later
Microsoft ActiveSync® technology (if using Windows XP)
Windows Mobile Device Center (if using Windows Vista)
Adobe Acrobat Reader® or similar PDF viewer application
RAM
Minimum: 1GB
Recommended: 2GB or higher
Supported Architectures
x86
x64
Minimum Hard Disk space
x86 - 600 MB free space
x64 – 1.5 GB free space
Processor
1 gigahertz (GHz) or faster 32-bit (x86) or 64-bit (x64) processor
Minimum Speed: 1 GHz
Recommended Speed: 2 GHz or higher
Supported Operating
Systems
Microsoft Windows® XP SP3
Microsoft Windows Server 2003 SP2
Microsoft Windows Vista™ SP1 or higher
Microsoft Windows Server 2008 (not supported on Server Core Role)
Microsoft Windows Server 2008 R2 (not supported on Server Core Role)
Microsoft Windows 7
Microsoft Windows 7 SP1
Microsoft Windows Server 2008 R2 SP1
6
Mobile Device
The mobile device is optional but is required for use with reading and writing the RFID tags. The current
configuration requires a specific RFID hardware component that is provided by the Crosby Group.
Prerequisite software
Microsoft® .NET Compact Framework 3.5
Memory (Built-In)
Minimum: 64 MB
Recommended: 128 MB or higher
Expansion Slots
Secure Digital slot (required, for RFID transceiver)
CompactFlash slot (optional, for additional storage card)
Storage Card (optional)
Type: CompactFlash®
Minimum: 1 GB
Recommended: 2 GB or higher
Operating System
Microsoft Windows Mobile® 5.0
Microsoft Windows Mobile® 6.0
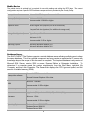
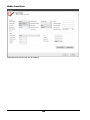
Database Server
The QUIC-CHECK® Plus System supports a central database server allowing multiple users to share
the same database. This is an optional component and may require an experienced IT person with
knowledge beyond the scope of this document to complete. The required database is any version of
Microsoft SQL Server, version 2005 or newer, Express Edition or Enterprise Installation. To
determine if a computer meets the system requirements, from the Start Menu, right-click My
Computer, and then click Properties. The General tab displays the CPU type and speed, and the
amount of installed memory (RAM).
Microsoft .NET Framework 4.0
Prerequisite software
Microsoft Internet Explorer 8.0 or later
Minimum: 1 GB MB
RAM
Recommended: 2 GB or higher
Hard Disk space
600 MB free space
1 gigahertz (GHz) or faster 32-bit (x86) or 64-bit (x64) processor
Processor
Minimum: 1 GHz
Recommended: 2 GHz or higher
Operating System
Windows Server 2008 R2 SP1
Windows Server 2008 R2
Windows Server 2008
7
Windows Server 2003 SP1
Windows Server 2003 Enterprise Edition SP1
Windows Server 2003 Datacenter Edition SP1
Windows Small Business Server 2003 Standard Edition SP1
Windows Small Business Server 2003 Premium Edition SP1
Windows XP Professional SP2
Windows XP Home Edition SP2
Windows XP Tablet Edition SP2
Windows XP Media Edition SP2
Windows 2000 Professional Edition SP4
Windows 2000 Server Edition SP4
Windows 2000 Advanced Edition SP4
Windows 2000 Datacenter Server Edition SP4
8
Desktop Software Installation and Setup
Installing Quic-Check Plus
1) Register at http://qcplus.thecrosbygroup.com/Account/Registration to obtain a serial number.
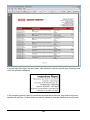
2) Download the Crosby QUIC-CHECK® Plus installation package from the "Downloads" tab at
http://qcplus.thecrosbygroup.com and run the setup file.
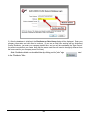
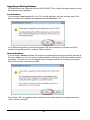
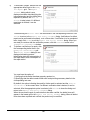
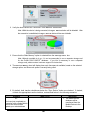
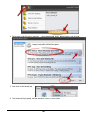
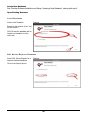
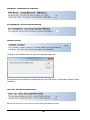
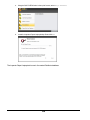
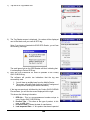
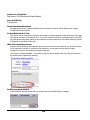
The setup process will first check for an Internet connection
If an Internet connection is not found you will be prompted to check your settings and the setup process
will stop after you click OK.
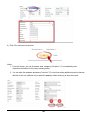
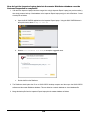
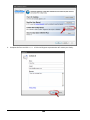
If the setup process successfully found an Internet connection you will then enter your unique serial
number when prompted.
9
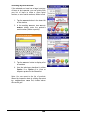
3) The Installation Wizard will download any required files for QUIC-CHECK® Plus and then walk you
through the install steps. You can click Next on all of the dialog boxes to accept the installation defaults,
or you can change the installation destination location on your computer, if you choose the "Custom"
installation option.
4) The process of downloading and installing prerequisite software libraries may take several minutes.
Please be patient while all components are properly installed.
5) Restart your computer if instructed to do so.
6) Double click the Crosby QUIC-CHECK® Plus icon on the computer desktop to launch the application.
10
Creating a New Database
If you are updating a Version 2.5 database, skip these steps and refer to the
directions shown in the next section, Upgrading an Existing Database.
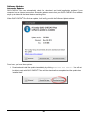
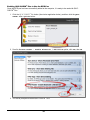
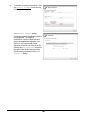
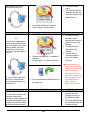
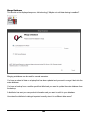
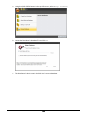
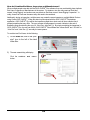
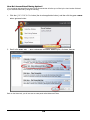
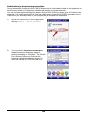
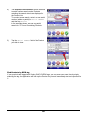
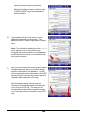
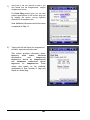
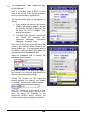
1) If you are using QUIC-CHECK® Plus for the first time, you will be presented with a Welcome dialog.
Click the recommended action "Create New Database..."
11
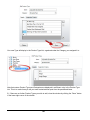
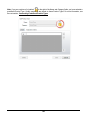
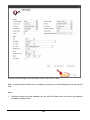
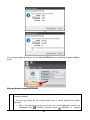
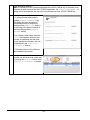
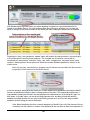
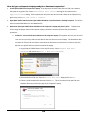
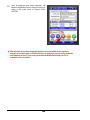
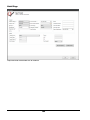
2) By default, a new database will be created in your Documents folder. You can change the name of
your database file by modifying the highlighted text, or just click Next >> to use the default name.
The default location is in your “My Documents” folder. If you
are the only user this is a good location. If other users are
going to log onto this computer then you will need to create
the database in a location accessible to all users.
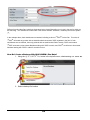
You can also create a new database by connecting to an instance of Microsoft SQL Server, version
2005 or newer, Express Edition or Enterprise Installation. While you must know the name of the Server
\ Instance for SQL Server, you may specify the name of the database.
12
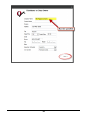
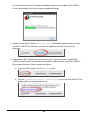
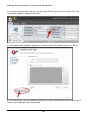
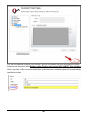
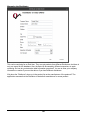
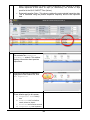
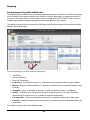
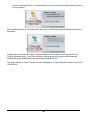
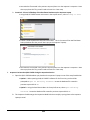
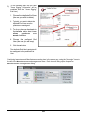
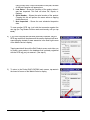
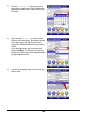
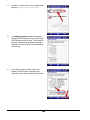
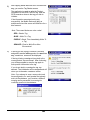
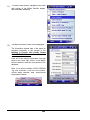
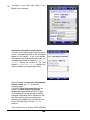
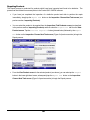
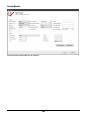
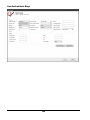
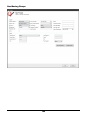
3) After the database is initialized, the Distributor or Data Owner dialog will be displayed. Enter your
company information and click Next to continue. (If you are an End User working with an Authorized
Crosby Distributor, just enter your company details here, and you will be considered the "Data Owner"
for product records that you create Note that the name used here will need to be slightly different from
the name used for your company as an End User.)
Note: Distributor details can be edited later by clicking on the "plus" sign
to the "Distributor" filter:
13
next
14
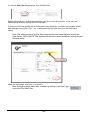
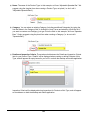
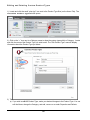
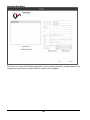
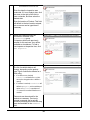
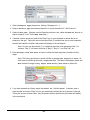
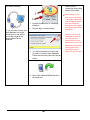
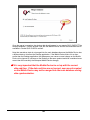
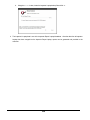
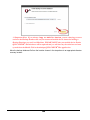
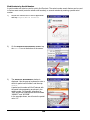
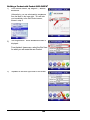
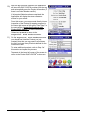
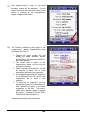
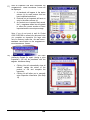
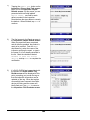
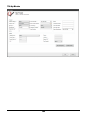
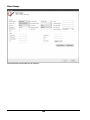
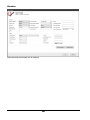
4) After the End User dialog displays, click Add End User.
Enter the information for an End User and either click Next to save and continue, or you may add
additional End Users by clicking Add End User again.
If you are an End User working with an Authorized Crosby Distributor, just enter your company details
here (perhaps leaving off the "Inc.", etc., to differentiate the End User name from the Data Owner
name.)
Note: The name you use as an End User cannot be the same name that was used for the
Data Owner. QUIC-CHECK® Plus requires that these two names be different, even if they are
the same entity.
When you are finished, click Next >> to continue.
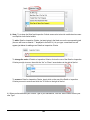
Note: End users can be added later, or edited, by clicking on the "plus" sign
next to the "End User" filter:
15
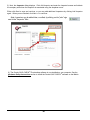
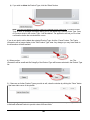
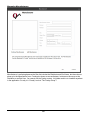
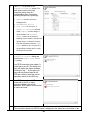
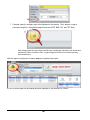
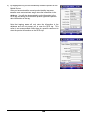
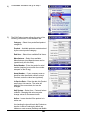
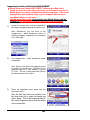
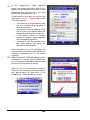
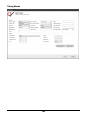
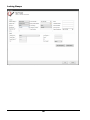
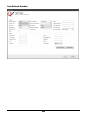
5) Next, the Inspector dialog displays. Click Add Inspector and enter the Inspector's name and indicate
the company with whom the Inspector is associated using the dropdown menu.
Either click Next to save and continue, or you may add additional Inspectors by clicking Add Inspector
again. When you are finished, click Next >> to continue.
Note: Inspectors can be added later, or edited, by clicking on the "plus" sign
next to the "Inspector" filter:
6) The Crosby QUIC-CHECK® Plus desktop software is now installed on your computer. See the
Hardware Setup Instructions section to install the Pocket QUIC-CHECK® software on the Mobile
Device.
16
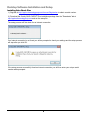
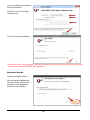
Upgrading an Existing Database
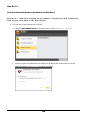
If you have been using a previous version of QUIC-CHECK® Plus, a dialog will appear alerting you that
the database must be upgraded.
Local Database
If you are using a local database file, click "Ok", and the application will make a backup copy of the
previous version of the database and upgrade the existing database to 3.0.
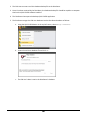
You will have an opportunity to cancel the upgrade even after the backup is complete, and will be
alerted if the upgrade process to version 3.0 was successful.
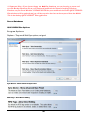
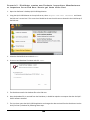
Network Database
If you are using a network database, the program on the desktop computer cannot initiate a backup of
the server database, so you will receive a recommendation to backup the SQL Server database before
proceeding. Of course, you can still upgrade without creating a backup, but we strongly recommend
taking every measure to preserve your data.
Upon clicking "OK", the upgrade process will begin and you will be alerted if the upgrade process to
version 3.0 was successful.
17
Software Updates
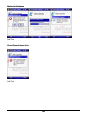
Automatic Updates
QUIC-CHECK® Plus can automatically check for, download, and install application updates if your
computer has an Internet connection. Automatic updates ensure that your QUIC-CHECK® Plus software
stays up-to-date with the latest features and bug fixes.
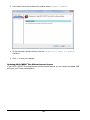
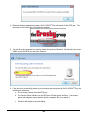
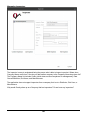
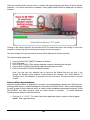
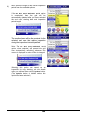
When QUIC-CHECK® Plus finds an update, it will notify you with the Software Update window:
From here, you have three options:
1. Download and install the update immediately by clicking Download and Install. You will not
be able to work with QUIC-CHECK® Plus until the download has completed and the update has
installed itself:
18
You will be kept informed of the update's download progress. Once complete, QUIC-CHECK®
Plus will automatically close and the update installation will begin.
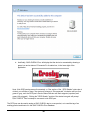
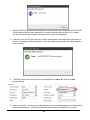
2. Update at a later time by clicking Remind Me Later. The Software Update window will close
and QUIC-CHECK® Plus will remind you about the update the next time you launch the
application:
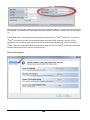
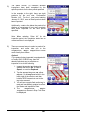
3. Download an “offline” installer that you can save to your computer and use to update QUICCHECK® Plus at any time. You can also use the offline installer to update other QUIC-CHECK®
Plus computers that do not have Internet connections.
a. To get the offline installer, click the Advanced arrow:
b. Click the Download the offline installer link to go to the QUIC-CHECK® Plus
website where you can download the file:
19
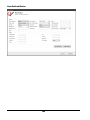
Turning off Automatic Updates
You may work in an environment where automatic updates are not desirable:
Some or all QUIC-CHECK® Plus users do not have administrative privileges on their computers.
Some or all of the QUIC-CHECK® Plus computers have limited or no Internet access.
Software installation and updating is done only by your Information Technology department.
You have many computers running QUIC-CHECK® Plus and would rather update them with the
offline installer (one download instead of many).
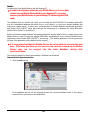
Whatever your reason, the QUIC-CHECK® Plus automatic update feature can be turned off:
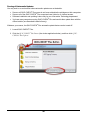
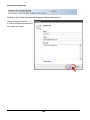
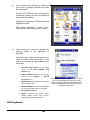
1. Launch QUIC-CHECK® Plus.
2. Click the QUIC-CHECK® Plus Button (the circular application button), and then click QUICCHECK® Plus Options:
20
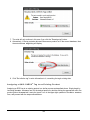
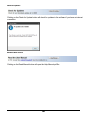
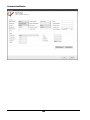
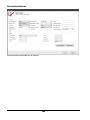
3. In the option list on the left side of the window, select Automatic Updates:
4. On the Automatic Updates screen, clear the Automatically check for updates
checkbox.
5. Click OK to save your changes.
Updating QUIC-CHECK® Plus Without Internet Access
If your QUIC-CHECK® Plus computers do not have Internet access, you can request an update USB
drive from your Crosby representative.
21
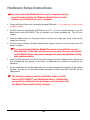
Hardware Setup Instructions
Do not connect the Mobile Device to your computer until you
have finished installing the Windows Mobile Device Center
software (or ActiveSync) on your computer.
1. Charge the Mobile Device with the supplied charging/USB cable. It can take up to 4 hours to fully
charge the battery.
2. Do NOT insert the SocketMobile CD-ROM into your PC. All of the required software to use the
Mobile Device with QUIC-CHECK® Plus is contained in the Crosby installation file. The CD is not
needed.
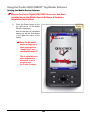
3. Power the Mobile Device on. The power button is located in the upper right corner of the unit (as
viewed from the front).
4. Set up the device. When the Windows Mobile screen displays, follow the on-screen instructions until
setup is complete.
It is very important that the Mobile Device be set up with the correct
date and time. If the date and time are not correct, new records created
on the Mobile Device may not be merged into the main database during
data synchronization.
5. Insert the RFID transceiver into the SD Card Slot located on top of the Mobile Device. Dismiss any
error message that may appear on the device; no additional driver software is required for the
transceiver.
6. Set the mobile device and USB cable aside until you have completed the installation of the desktop
software. Note that you will need Administrator privileges to install Pocket QUIC-CHECK® onto the
mobile device.
The desktop software must be installed in order to install
Pocket QUIC-CHECK® onto the Mobile Device. Additionally,
you must have Administrator privileges on the desktop, and
the Mobile Device must be fully charged.
22
Mobile Device Software & Hardware Installation
The desktop software must be installed in order to install
Pocket QUIC-CHECK® onto the Mobile Device. Additionally,
you must have Administrator privileges on the desktop, and
the Mobile Device must be fully charged.
Normally, the Mobile Device will be shipped with the Pocket QUIC-CHECK® software already installed.
However, if you must perform a "clean" reset to your Mobile Device (see Appendix - Mobile Device
Troubleshooting Tips), follow the instructions below to reload your Mobile Device with all of the
required software components.
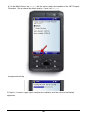
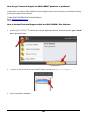
1) Launch the Crosby QUIC-CHECK® Plus application software by double-clicking the icon on your
computer’s desktop. You will see the Home tab:
2) Ensure your Mobile Device is connected to your computer via the supplied USB cable, and that
Mobile Device Center (on Windows Vista, or Windows 7) or ActiveSync (on Windows XP) is running. If
your Mobile Device was not connected before, allow Mobile Device Center / ActiveSync to complete its
synchronization before continuing below.
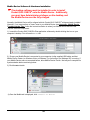
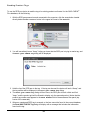
3) Click the Mobile tab.
4) Once the Mobile tab is displayed, click: Install on Device:
23
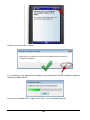
5) Mobile Device Center (or Microsoft ActiveSync) will ask for confirmation to install Pocket QUICCHECK®. Click Yes to proceed.
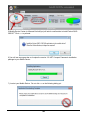
6) You will see a progress bar as it copies the version 3.5 .NET Compact Framework installation
package to your Mobile Device.
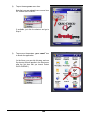
7) Look at your Mobile Device. Do not click OK on the following dialog yet:
24
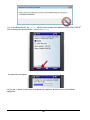
8) On the Mobile Device, tap Install with the stylus to begin the installation of the .NET Compact
Framework. (Do not change the default location. Leave it as Device.)
A progress bar will display:
9) Tap the OK button in upper right to complete the installation, and then return to the Desktop
application,
25
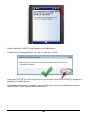
10) Now you may click the OK button.
11) Immediately, a new progress bar will display as the Pocket QUIC-CHECK® installation program is
copied to the Mobile Device.
12) Look at your Mobile Device. Again, do not click OK on the following dialog yet:
26
13) On the Mobile Device, tap Install with the stylus to begin the installation Pocket QUIC-CHECK®.
(Do not change the default location. Leave it as Device.)
A progress bar will display:
14) Tap the OK button in upper right to complete the installation, and then return to the Desktop
application,
27
Crosby Pocket QUIC-CHECK® is now installed on your Mobile Device.
15) Back on the Desktop application, you may now click the OK button.
Crosby QUIC-CHECK® Plus will now synchronize your data with Pocket QUIC-CHECK® by copying your
database to the Mobile Device.
16) After the synchronization is complete, insert the RFID transceiver into the Mobile Device’s Secure
Digital (SD) slot. This is located at the top of the device.
28
You will need to pull back a protective flap to access the SD slot. Consult the mobile device’s instruction
manual for more information.
29
RFID Pen
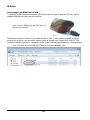
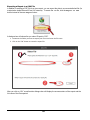
Connecting to the RFID Pen via USB
To establish a USB connection between the RFID pen and the computer, plug the RFID pen into the
supplied USB cable and then into the computer.
Note: The mini-USB port for the RFID pen is in
the rear of the device.
Windows will search for a driver to try to make the device work. If your machine is unable to find the
driver (which is typical), you will need to specify the driver located in the Crosby QUIC-CHECK® Plus
installation directory (typically C:\Program Files (x86)\Crosby\QuicCheck for a 64-bit machine).
Note: The driver file for the IDBLUE.HF device is named idbluehf.inf.
30
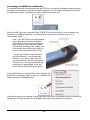
Connecting to the RFID Pen via Bluetooth
To establish a Bluetooth connection between the RFID pen the computer, a Bluetooth transceiver must
be present in the computer, either as an internal component or as an external USB attachment. When
the transceiver is active, a Bluetooth icon will be visible in the system tray.
Before the RFID pen can be used with QUIC-CHECK® Plus for the first time, it must be added to the
computer’s list of Bluetooth devices. To accomplish this, power on the RFID pen and put it in
"discoverable" mode.
Note: To put the RFID pen into discoverable
mode, press and release the small black
Power Button once to power on the device.
After you hear a "beep" the Device Status
LED will blink according to the "charge" level
of the device, which will be green when the
device is fully charged and ready for use.
To enter "discoverable" mode, hold down
the Power Button for 1 second and then
release it. If you hear a "beep" then you
may have held down too long and powered
off the device. If you have successfully put
the device into "discoverable" mode, the
Device Status LED will flash blue, rapidly.
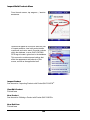
Once the RFID pen is in "discoverable" mode, right-click the
Bluetooth icon and select “Add a Device”. Windows will
begin searching for available devices.
When the device is found, respond to the prompt and confirm that it is indeed the device to be added by
selecting the RFID pen device and clicking Next. Windows will now proceed to configure it.
31
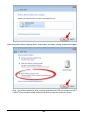
When prompted to select a pairing option, choose Pair without using code and click Next.
Note: You will be prompted to enter a pairing code when the RFID pen connects to QUICCHECK® Plus, but when initially setting up the device, follow the instruction above.
32
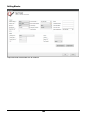
Enabling QUIC-CHECK® Plus to Use the RFID Pen
Once the RFID pen has been successfully added to the computer, it is ready to be used with QUICCHECK® Plus.
1. Click the QUIC-CHECK® Plus button (the circular application button), and then click the QUICCHECK® Plus Options button:
2. Scroll to the RFID Reader - Enable Bluetooth / USB Device option, click Yes, then OK.
3. You will be prompted to restart QUIC-CHECK® Plus.
33
®
4. When the desktop application restarts, QUIC-CHECK Plus will search for the RFID pen. The
status bar in the lower right will indicate this attempt:
5.
You will likely be prompted for a pairing code at this point by Windows. Should this occur, enter
"0000" to pair the RFID pen with your machine.
®
6. If the device is successfully paired to your machine and recognized by QUIC-CHECK Plus, the
following will all be true:
a. You will hear a "beep" from the RFID pen.
b. The Device Status Indicator on the RFID pen will flash green and blue. (Conversely,
green and magenta means that the device is charged, but is not paired.)
c. Windows will display a success dialog:
34
d. And finally, QUIC-CHECK® Plus will display that the device is connected by showing a
green icon and a status of "Connected" in its status bar, in the lower right of the
application.
Note: If the RFID pen becomes disconnected, or if the section of the “RFID Reader” status bar is
clicked, you will hear a "beep," the status will change to “Disconnected”, the button will turn from
green to gray, and the RFID pen's Device Status Indicator will flash magenta (unpaired) and
green (fully charged). Clicking the "RFID Reader" section of the status bar again will prompt
QUIC-CHECK® Plus to attempt to reconnect to the RFID pen.
The RFID pen can be used to assign a QUIC-CHECK® tag to a new product, or to read the tag of an
existing product and locate it in the QUIC-CHECK® Plus database.
35
Using Crosby QUIC-CHECK® Plus Desktop Software
Home
Managing Products
Searching for a Product
There are multiple ways to find previously built products in QUIC-CHECK® Plus.
Sorting the Grid
To sort the columns of the product grid, click on any of the column headers to sort by that particular
column.
Clicking on the column header a second time will reverse the sort order. Scroll through the list until you
find the product you want to edit.
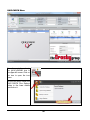
Filtering the Grid
If you have a large number of products, it can be more efficient to filter the product list instead of
scrolling through the list.
There are 3 groups of filter options: Contacts, Products and Inspections.
As values are selected within these three groups, the list of products will be updated with only those
products that match the specified criteria. If Auto Refresh is "ON" (in the Status Bar, lower left), this will
happen after each filter is changed.
36
If Auto Refresh is "OFF" you'll be notified when a grid update is pending, and prompted to update the
grid.
To toggle Auto Refresh "OFF" or "ON", just click on the word "Auto Refresh" in the status bar.
Note: It is useful to turn Auto Refresh "OFF" when you have a large number of items in your database,
as it avoids unnecessary refreshes when using multiple filters
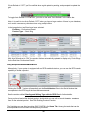
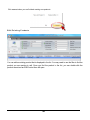
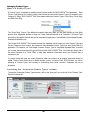
In the image below, two filters have been selected:
End User – Professional Rental
Product Type – Chain Sling
With Auto Refresh set to "ON", the product list has automatically updated to display only Chain Slings
for the End User Professional Rental.
Using the Optional RFID Read/Write Device
Alternatively, if your system is equipped with an RFID read/write device, you can use the RFID search
capability to locate a product.
Clicking the "Scan..." button will essentially set the Serial Number filter to the Serial Number that
corresponds to the RFID tag of the item that was scanned.
See the section entitled Reading and Writing Tags with the RFID Pen for further details.
Once you have located the desired product, double click any row cell to launch the Edit Product
form for the selected product. See “Edit Existing Products” section.
The first thing you see after launching QUIC-CHECK is the Home Tab. Among the tasks that can be
accomplished from this screen are two primary functions:
37
Build a new Product
Edit existing Products
We will first look at how to build a new Product, and then move on to how to edit an existing Product.
38
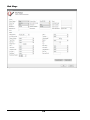
Bu i ld a Ne w P r oduc t
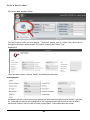
Click on the New Product button:
The New Product screen will be displayed. The default product type is a Chain Sling, which can be
changed by selecting a different option for Product Category and Product Type.
Replace this
There are three sections: General, Details, and Additional Information:
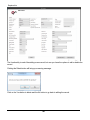
General Section
Shown above is the General section that displays the same fields no matter what the Product Type may
be. Fields with an asterisk (and highlighted) in the image above are fields that do not have a default,
and that will require a value in order to create a new product. Some notes about this screen:
39
1. Manufacturer: This field will default to the data owner's information entered in the Setup
section. This value can be changed to reflect products built by someone else, or for products
being built for another distributor.
2. Serial Number: Product serial numbers must be unique for the same End User. Only a few
non-alphanumeric characters are permissible in the serial number ("-", "/", or "_").
3. Active: (Read only) – This field indicates whether the product has been set as active or
inactive. Notes:
Only active products may be inspected.
Reports will only reflect active products (History report will include inactive products).
By default, the main filter grid will only display active products (unless the "Active Status" filter
is changed).
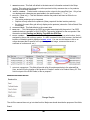
4. Created Date: This field defaults to the current date.
5. RFID No.: This field displays the RFID tag number associated with the product. If an RFID
read/write device is available, a QUIC-CHECK® Tag can be initialized for the new product. See
the section entitled Reading and Writing Tags With the RFID Pen.
6. Asset Number: Typically, this field holds a unique number, similar to a serial number, that is
assigned by the on-site inventory system. If a URL is entered in this field, however, the label will
become a clickable hyperlink displayed as Web Link. You can use this feature to link to an
online document that is specific to the product (a product image, a scanned document, a
certificate of conformance, etc.)
7. Initial Location: This field will provide a list of locations particular to the selected End
User, and will fill in the location of this product’s “Creation" record in its Product History.!!!!! This
field is not part of the EURO fields, is this on purpose?
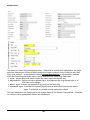
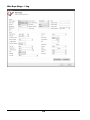
Additional Information Section
Replace this
Change Graphic
The old Euro manual does not go into detail on this. Maybe we should describe the purpose of the fields.
Brand
40
Certificate Number
Order No (Seller)
Order No (User)
Date of Manufacture
41
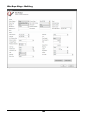
Details Section
The details of a Chain Sling are displayed above. Fields with an asterisk (and highlighted) in the image
above are fields that do not have a default, and that will require a value in order to create a new Chain
Sling. (See section 3.1 of the Appendix entitled Selected Menu Options to see the options available
within the Chain Sling drop-down menus.) Some notes about the Chain Sling Detail fields:
1. Size: Use the drop down menu to select the chain's nominal dimension size.
2. Adjustable?: Options include no adjuster leg(s), short adjuster legs, long adjuster legs, or an
Eliminator as an adjuster.
3. Basic Type: Indicates the hardware (if any) built into the chain sling.
4. Standard Type: If checked, this field will populate with an abbreviation based on the Basic
Type. If unchecked, a user-defined sling type can be entered.
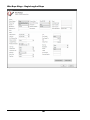
The items displayed in the Details section will change, based on the Product Type selected. A Shackle,
for instance, has an appropriately different set of properties:
42
4) Click OK to save the new product.
Notes:
1. From this screen, you can click Save and Inspect (Circled as "1") to immediately enter
inspection information for the newly created product.
2. You can also click Create Another (Circled as "2") to continue adding additional products that are
identical to this one (different only in Serial Number) without returning to the main screen.
43
Click Cancel when you are finished creating new products.
Edit Existing Produc ts
You can edit an existing product that is displayed in the list. You may need to use the filter to find the
product you are wanting to edit. Once you find the product in the list, you can double-click the
product record and an Edit Product form will open.
44
Replace this
The functionality is much like adding a new record, but now you have the options to edit or delete the
record.
Clicking the Delete button will bring up a warning message:
Click on the Yes button to delete and the No button to go back to editing the record.
45
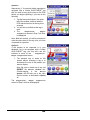
Repair in g a Product
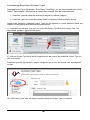
Continuing from the last step of “Entering Product Inspection Results”.
1)
Click the Repair Now button on the
Inspect Product dialog, or the
Continue button on the Inspection
information screen to begin the product
repair and verification process. You will
now see the Repair and Verify
Product dialog.
2)
If you become aware of a defect that
was overlooked in the initial inspection,
you can add it by clicking the Add New
link. This will return you to the
Inspection dialog where you can
add the missed defect and advance
again through the steps described in
“Entering Product Inspection Results”
above.
The Repair and Verify Product dialog is divided into three grids: Ready for
Repair, Ready for Verification, and Verified. The defects which were
noted in the initial inspection dialog appear in the Ready for Repair grid. By doubleclicking one of the defect items, you open the Repair Product dialog.
In the progression from repair to verification – and ultimately certification, product defect
items move from grid to grid. By double-clicking a defect item in one of the Ready… grids,
you open the corresponding dialog for repair or verification.
46
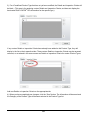
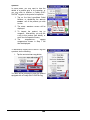
3)
4)
To document a repair, double-click the
appropriate defect item in the Ready
for Repair grid. The Repair
Product dialog which is now
displayed contains data identifying the
inspected product and the defect being
repaired. By default, the Date of
Action is today’s date. If a different
repair date is desired, it can be
selected.
Text describing the Action Taken can be entered in the corresponding text area. Click
Finish to return to the Repair and Verify Product dialog. Verification of a defect
repair can be performed immediately, or at a future date. If verification is to be completed
later, simply click Close to exit the Repair and Verify Product dialog. When you
are ready to continue with the verification process, click the Continue button in the
Inspection Information window.
To perform verification of a repair, click
the corresponding defect item in the
Ready for Verification grid.
The Verify Product dialog is now
displayed containing product
identification data and a description of
the repair defect, and a description of
the repair action.
You now have the option of
1) Verifying that the defect has been properly repaired, or
2) Specifying that the defect needs further work and providing necessary details in the
corresponding text area.
By default, the option indicating the need for further work is selected and the Date of
Verification is the current date. If a different verification date is desired, it can be
selected. After the appropriate option is selected, click Finish to close the dialog and
return to the Repair and Verify Product dialog.
When the successful repair of product defects has been verified, the defect items will
appear in the lowest grid in the Repair and Verify Product dialog. When all defect
items have been repaired and verified, the product may be certified.
47
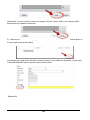
5)
To perform a product certification, click
the Certify Product link at the top
of the Verified grid.
The Certify Product dialog
containing product identification data is
now displayed. To complete
certification, click the check box and
select the appropriate inspector from
the list. If you need to add a new
inspector to the list, you may do so by
clicking the Add Inspector button to
the right of the list box and providing
the necessary information in the Add
Inspector dialog.
48
Managing Product Types
What is a Product Type ?
A Product Type is a template for creating actual Products within the QUIC-CHECK® Plus application. Each
Product Type belongs to a Product Category that consists of other similar Product Types. For example, in the
Category of Slings, QUIC-CHECK® Plus is pre-loaded with three Product Types: Chain Sling, Round Sling,
and Wire Rope Sling:
The “Chain Sling” Product Type defines the specific data entry fields you see when building a Chain Sling
product: Size, Adjustable, Number of Legs, etc. These fields are referred to as “Properties.” A Product Type
also defines the specific Defects that can be noted during Inspections: Cracks/Breaks, Worn/Nicked/Gouged,
Stretched Links/Hooks, etc.
The Crosby QUIC-CHECK® Plus System provides the capability to both create your own Product Types and
Product Categories from scratch, and customize the predefined Product Types that are included with the
application. For instance, you could create a custom Product Type for “Adjustable Spreader Bars” to enable
you to track, inspect and report this type of Product within QUIC-CHECK® Plus. You could also simply add a
few extra Properties to a “Chain Sling” to help store additional information about your Products that is
important to you.
It is worth noting that there are certain Properties which are common to all product types and cannot be
edited. These include fields such as Serial Number, Active, In-Service Date, RFID Number, etc. When
speaking of Product Types, and creating or customizing them, these “common” Properties will not be
discussed.
Launching the “Cu sto mize Product T ype s” windo w
To open the Customize Product Types window, click on the "plus sign" icon to the left of the "Product Type"
filter on the Home tab:
49
The “Customize Product Types” window
The “Customize Product Types” window provides the tools with which you can create and customize Product
Types. Notice it is divided into two main sections:
1) Product Type List (left): Displays a list of both predefined and custom Product Types (represented as
“pages”), organized into Categories (represented as "folders"). If you have used Microsoft Windows before, this
style of list should look familiar. To show the contents of a folder, click the small “+” icon to the left of the folder
name. To close the folder, click the “-“ icon. To select a Product Type, click on the Type’s name.
2) "Edit Product Type" Area (right): When you have made a selection in the Product Type list, the Type’s
information is displayed in the "Edit Product Type" area. It allows you to edit and save the information. This is
also where you enter information about new Product Types.
50
51
Ad d ing Cu sto m P ro duc t T ype s a nd C a te gor ie s
1) Locate and click the small “plus sign” icon next to the Product Type filter (on the Home Tab). The
Customize Product Types window opens.
2) Click the Add New Product Type button, located just below the Product Type List on the left.
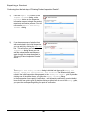
3) The "Edit Product Type" area enables, allowing you to enter information about your Product Type. A
Product Type is defined by the following fields:
52
a) Name: The name of the Product Type. In this example, we’ll use “Adjustable Spreader Bar.” We
suggest using the singular form when naming a Product Type, not plural (i.e. don’t call it
"Adjustable Spreader Bars").
b) Category: You can select an existing Category (including predefined Categories) by typing the
first few letters in the Category field, or clicking the “down” arrow and selecting it from the list. If
you want to create a new Category, just type it into the field. In this example, we’ll use “Spreader
Bars.” Crosby suggests using the plural form when creating a Category (i.e. do not call it
"Spreader Bar").
c) Details and Inspection Criteria: These tabs switch between the Details and Inspection Criteria
lists for your Product Type. “Details” will be displayed when creating or editing Products of this
Type, and will appear as empty boxes for you to fill in on both the desktop and mobile application.
Inspection Criteria will be displayed during Inspections for Products of this Type, and will appear
as checkboxes on both the desktop and mobile application.
53
d) Note: Try to keep the Detail and Inspection Criteria names short since the mobile device screen
and Reports have limited widths.
To add a Detail or Inspection Criteria, just start typing in the blank row on the corresponding tab
(the row will have an asterisk “*” displayed to the left of it). As you type, a new blank row will
appear just below for adding more Details or Inspection Criteria.
To change the order of Details or Inspection Criteria, click on the row of the Detail or Inspection
Criteria you wish to move, then click the “Up” or “Down” arrow buttons to the right of the list.
To remove a Detail or Inspection Criteria, simply click on the row of the Detail or Inspection
Criteria you want to remove and click the “X” button to the right of the list.
4) When you have defined your Product Type to your satisfaction, click the “Save” button to save your
new Type.
54
Your new Type will display in the Product Type List, organized under the Category you assigned it to.
Note that custom Product Types and Categories are displayed in a different color in the Product Type
List. This is to make it easy to tell your own customizations apart from the predefined items.
5) If there are no further Product Types you wish to add, close the window by clicking the “Done” button
in the lower right corner of the window.
55
You can now add new Products of the Product Type you just created (for more information on adding
Products, see the section titled Building a New Product with Crosby QUIC-CHECK® Plus Software).
Note: If you place a URL in a custom Details field, its label becomes a clickable hyperlink to the web address
specified in the field.
56
Editing and Deleting C usto m Prod uct T ype s
1) Locate and click the small “plus sign” icon next to the Product Type filter (on the Home Tab). The
Customize Product Types window opens.
2) Click on the “+” icon next to a Category name to show the custom types within a Category. Locate
and click the name of the Product Type you wish to edit. The "Edit Product Type" area will display
information about the Product Type you select.
3) Take one of the following actions:
a) If you wish to edit the Product Type, make your desired changes to the Product Type. You can
edit the Name, change the Category, and add, remove or re-order Properties and Defects.
57
b) If you wish to delete the Product Type, click the “Delete” button.
Note: You can only delete a Product Type if no Products of that Type exist. If Products of that
Type do exist, a message will display asking you to first delete any Products of that Type. Once
no Products exist for the custom Type, it can be deleted. The application will ask you for a final
confirmation before the actual deletion occurs.
If you do not wish to edit or delete the selected Product Type, click the “Cancel” button. The Type's
information will no longer display in the "Edit Product Type" area. Any changes you may have made to
the information will be discarded.
4) When you have completed your changes and wish to save them, click the “Save” button. The
information will be saved and the Category of the Product Type will become selected in the Product Type
list.
5) If there are no further Product Types you wish to edit, close the window by clicking the “Done” button
in the lower right corner of the window.
Any changes you made will be reflected in existing Products. If you added new Properties, you will need
to edit each affected Product to provide values for these fields.
58
Note: If you see a picture of a “padlock”
to the right of the Name and Category fields, you have selected a
predefined Product Type. Certain restrictions are placed on these Product Types. For more information, see
the next section, Customizing Predefined Product Types.
59
Custo miz in g Predefined Prod uct T yp e s
Predefined Product Types (for example, “Chain Slings,” “Hoist Rings,” etc.) are those included with the QUICCHECK® Plus application. While they can be customized to a degree, there are certain restrictions:
Predefined Types can neither be renamed nor assigned to a different Category.
Predefined Types cannot have their existing Details or Inspection Criteria modified in any way.
Despite these restrictions, predefined Product Types can be expanded to include additional Details and
Inspection Criteria beyond those that have been preconfigured.
1) Locate and click the small “plus sign” icon next to the Product Type filter (on the Home Tab). The
Customize Product Types window opens.
2) Using the Product Type list on the left, locate and click the name of the predefined Product Type you
wish to customize.
Predefined types are represented by “pages” that appear gray in color with a small “lock” superimposed
on them.
The "Edit Product Type" area will display information about the Product Type you selected.
60
3) For a Predefined Product Type that has not yet been modified, the Details and Inspection Criteria will
be blank. (This area is for assigning custom Details and Inspection Criteria, and does not display the
hard-coded QUIC-CHECK® Plus information for the specific type.)
If any custom Details or Inspection Criteria have already been added to this Product Type, they will
display in the list on their respective tabs. These custom Details or Inspection Criteria may be renamed,
removed, or re-ordered in the same manner as Details or Inspection Criteria for custom Product Types.
Add new Details or Inspection Criteria on the appropriate tab.
4) When you have completed your changes, click the “Save” button. The information will be saved and
the Category of the Product Type will become selected in the Product Type list.
61
Alternatively, if you do not wish to save your changes, click the “Cancel” button; your changes will be
discarded and no updates will be made.
5) If there are no further Product Types you wish to edit, close the window by clicking the Done button in
the lower right corner of the window.
Any changes you made will be reflected in existing Products. If you added new Properties, you will need
to edit each affected Product to provide values for these fields.
Replace this
62
After the desired changes have been made, click the OK button to save.
Note: If required product details are not completed, a warning icon will be displayed next to the required
field.
Notes:
1. To delete a product from your database, you can click the Delete button in the lower right quadrant
of the Edit Product form.
63
2. Clicking the Cancel button will cancel editing the product and return its details to their initial values.
When a product has been edited, the results grid must refresh its data to appropriately reflect any
changes. After the refresh, the results grid will attempt to scroll back the edited product (or its
approximate location if deleted, or made "Inactive", etc.). This behavior occurs by default with the results
grid, however, clicking the Clear All Filters button will bypass this behavior, and ignore the line
that was last selected before the refresh. After the Clear All Filters button is pressed, the first
line of the results grid will be selected.
64
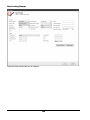
Managing the Distributor
This can be confusing for an End User. They can get products from different Distributors, but there is
only one record for the database. Also, the data can be owned by different companies, so again
confusing. So how do you determine what information goes here? You are to enter your company
information no matter if you own the data or if you have different distributors.
Why does the “Distributor” show up in the product list as the manufacturer of the products? The
application assumes that the Distributor is the default manufacturer for a new product.
65
Managing End Users
End User is not a user of the software application, but the company that will be using the product. The
company also should have a contact name for a person at the company.
66
Managing Manufacturers
Manufacturer is confusing because the filter list includes the Distributor and End Users, but those do not
show up in the Manufacture form. Crosby also shows as a manufacturer, but does not show up as the
Distributor or an End User. You cannot edit the Crosby contact, it is hidden and is not viewable anywhere
in the application. So why is it “Crosby” and not “The Crosby Group”?
67
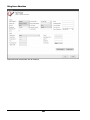
Managing Inspectors
The Inspector is easy to understand being the person who is able to inspect a product. Where does
Company Name come from? How do you add another company to the Company Name drop down list?
The Company Name list includes Crosby (which does not show anywhere for management), Data
Owner/Distributor, End Users, and Manufacturers.
The application does not support Inspectors from a company that is not a Distributor, End User, or
Manufacturer.
Why would Crosby show up as a Company that has inspectors? Do we have any inspectors?
68
Reading and Writing Tags With the RFID Pen
The QUIC-CHECK® Plus desktop application supports the reading and writing of QUIC-CHECK® tags
when used with the optional RFID read/write device (hereafter referred to as the RFID pen).
Note: The RFID read/write device currently supported by the QUIC-CHECK® Plus desktop application
has been enhanced to clearly read RFID chips embedded in metal, as is common with lifting equipment.
A copy of the user's guide for the device, plus additional support documents for installing the USB driver
and for pairing the RFID pen as a Bluetooth device, can be found in the QUIC-CHECK® Plus installation
folder in the subfolder entitled "RFID Pen" (typically C:\Program Files
(x86)\Crosby\QuicCheck\RFID Pen for a 64-bit machine).
The RFID pen can be connected to the computer on which the application is running by USB cable or
Bluetooth connection. Note that you must specifically tell QUIC-CHECK® Plus that an RFID Pen is
connected to the computer, otherwise it will not check for the device (see instructions below).
As s i gn i ng a Q UIC -C HE C K® T a g to a Ne w P rod uc t
To create a new product tag when adding a product to the database, follow these steps:
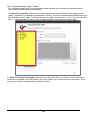
1. With the New Product window open and the RFID pen powered on and connected, click the
“pencil” icon to the right of the RFID No. field in the upper right corner of the window.
Replace This Image
2. Hold the tip of the RFID pen to the QUIC-CHECK® tag. The Update QUIC-CHECK Tag dialog
will display, indicating that the device is searching for the tag.
69
3. When the RFID tag is successfully detected, the RFID pen will emit a "beep" and QUIC-CHECK®
Plus will quickly read the tag to determine if it can be initialized without conflict, or if it already
contains information that is valid for another product in the current database.
4. If the tag is new, the RFID pen will emit a "beep" and proceed to write the product information to
the tag. A message window informing you of the successful write operation will display and then
close on its own.
5.
The RFID number from the tag will then be inserted into the RFID No. field of the New
Product dialog.
6. If there is a conflict ─ the tag you are attempting to write to is already assigned to another product
in the current database ─ you will be presented with a warning and asked how to proceed.
70
7. The write will only continue in this case if you click the "Reassign tag" button.
8. Alternatively, if the tag contains data and references a product not in the current database, then
the Initialize Tag dialog will display.
9. Click "Re-initialize tag" to write information to it, overwriting the tag's existing data.
As s i gn i ng a Q UIC -C HE C K® T a g to a n E x is t ing P ro duc t
Assigning an RFID tag to an existing product is a similar process as described above. Simply begin by
launching the Edit Product form for the desired product by double-clicking the appropriate row in the
product grid on the Home tab. Locate the “pencil” icon in the upper right quadrant of the Edit Product
form, and proceed with the steps outlined above.
71
Readin g Product T ags
To use the RFID pen device to read the tag of an existing product and locate it in the QUIC-CHECK®
Plus database, do the following:
1. With the RFID pen powered on and connected to the computer, click the Scan button located
directly below the New Product button in the upper left corner of the Home tab.
2. You will immediately hear a "beep," letting you know that the RFID pen is trying to read a tag, and
the Read QUIC-CHECK Tag dialog will be displayed.
3. Hold the tip of the RFID pen to the tag. If the tag can be read, the device will emit a "beep," and
the tag number will be displayed in the Read QUIC-CHECK Tag dialog.
4. The Read QUIC-CHECK Tag dialog will then close, the RFID pen will emit a third and final
"beep," and the product grid will be filtered to display only the scanned product. Notice that the
product tag number now appears in the RFID Number field of the Products filter panel (top
center of the Home tab).
5. When an unassigned RFID tag is scanned, or the item cannot be found in the current database,
the Read QUIC-CHECK Tag dialog will display with a message that includes the information
found on the tag.
72
or
To once again display all products, click the Clear All Filters button, located directly below the Scan
button.
Entering Product Inspection Results
1)
Launch the Crosby QUIC-CHECK application software by double-clicking the icon on your
computer’s desktop.
In the main grid, there are two columns which help to identify products that require
inspection:
Alert – This column may contain one of two icons. A red highlighted line with a red
exclamation mark
indicates a product whose
inspection is overdue,
73
while a yellow highlighted line with a yellow exclamation mark indicates a product
whose inspection is due within 30 days (or, alternatively, the number of days
®
specified in the QUIC-CHECK Plus Options).
Projected Inspection Date – This column contains the next projected inspection date.
This is calculated using the product inspection frequency and the last inspection
date.
2)
The bottom right corner of the Home
Tab contains the Inspection
Information window. This window
displays information about previous
inspections.
3)
Once the Product to be inspected is
highlighted in the Product List, click
New Inspection.
4)
You now see the Inspection window
These defaults apply to this screen:
a. Inspection Date: Today’s
date
b. Condition: OK if no Defects
noted; otherwise, Repair
c. Location: Last Location entered
d. Inspected By: Last Inspectors
Replace this?? “There is First examination after assembly”
74
associated with this End User
Enter the date the Inspection was
conducted. If it is not today’s date, click
the arrow to the right of this field to
view a calendar, and then select the
desired date.
Enter the location of Product. This field
will default to the last Location entered,
but a new one can be typed here if
necessary.
Replace this?? “There is First examination after assembly”
5)
Select the inspectors using the
checkboxes available in the
Inspected By group.
If inspectors have been previously
entered for this end user, they will be
available as checkboxes. To add a
new inspector at inspection time, click
Add Inspector.
6)
Noted Defects:
Replace this?? “There is First examination after assembly”
The list of available defects will
change, depending on the product
type. Figure 6 shows the defects for a
chain sling.
If no defects are checked,
Condition will default to OK (this
cannot be changed unless a defect is
noted).
If a defect is marked, Condition will
default to Repair, with an additional
option of Replace. A condition of
OK cannot be recorded if defects are
marked.
Comments can be entered for the
product as necessary. Previouslyentered comments can be quickly
reused by selecting them from the drop
down box available in the Comments
field.
75
7)
Click Next to proceed to the
Inspection Defects screen. For
each defect noted in the initial
Inspection dialog, there is a
corresponding row in this screen
providing the options of specifying
1. Urgency level due to human
endangerment
2. Recommended Action
3. Time Limit for the repair. If
Danger to Persons is selected
under Urgency, and the danger is
not immediate, the Eventual
Danger option can be selected,
enabling input of a date in the edit box
directly below, or selection of a date
from the drop-down calendar. Time
Limit defaults to 0; if a time limit is
not specified, the date due for repair
will be the current date.
8)
Clicking the Finish button closes the
Inspection Defects dialog and
launches the Update QUIC-CHECK
Tag dialog.
If an RFID transceiver (pen reader) is
connected to your PC, the dialog now
open will display the status message,
“Looking for tag…”. At this point you
may scan the product tag with the
RFID pen reader to write the current
inspection results to the RFID tag.
If an RFID pen reader is NOT
connected to the PC, a status
message indicating this will be
displayed: “RFID reader not connected
or cannot be found.”
If a reader is available, it may be connected at this time and the QUIC-CHECK tag scanned.
(The connection status of the RFID reader is displayed in the status bar at the bottom of the
76
main application window.)
Note: If a product has not yet been associated with a QUIC-CHECK tag, or if product’s tag
data has not been read into the QUIC-CHECK application, the Update QUIC-CHECK Tag
dialog will not be displayed; the user will not be prompted to scan a QUIC-CHECK tag.
9)
Upon closing the Update QUIC-CHECK
Tag dialog, another dialog opens
entitled Inspect Product. From
this dialog you have the option of
proceeding directly to the product
repair process (Repair Now button)
or returning to the product window to
inspect another product (Inspect
Another button).
If you choose neither option and click
Close, the inspection portion of the
process is completed, and the most
recent inspection information will now
be displayed in the Inspection
Information window.
!!! Talk about Remove From Service,
this is added to the screen
The product repair and verification
process can be resumed at a later time
by clicking the Continue button in the
Inspection Information window
77
Reporting
Printing Reports Using QUIC-CHECK® Plus
The Reporting tab provides access to several pre-generated reports, and allows you to filter the products
that will display on the report by product type, end user, location, date range, or even serial number (in
the case of the History report). You can also provide an image file for QUIC-CHECK® Plus to use as a
company logo, and this image will be printed on the header portion of your reports.
The results in the grid take into account all of the filters, and provide a preview of the results that will be
shown in the finished report.
From the Reporting tab, you have access to these Reports:
Certificate –
Survey of Defects –
Report of Examination Inspections - Full inspection report (i.e. products that were inspected within a range of dates).
Missing - Report of missing products (i.e. products on file that were not inspected during a range
of dates).
Damaged - Report of damaged products (i.e. products marked as "Repair" or "Replace").
History – Complete report of inspection history for a specific product or a subset of products
determined by the active filters (i.e. includes all inspections and states).
Pre-Inspection – Report of products that are due for an inspection within a given date range.
Products – Report listing all products in the system or a subset of products as determined by the
active filters.
To configure a report, perform the following steps:
78
1. Select the Report Type (Inspections, Missing, Damaged, etc …).
2. Select a Product Type from the drop-down list, or leave the default of "<All Products>".
3. Select an End User. (Reports must be filtered by end user, and, unlike the Home tab, there is no
option to specify "<All>" for the End User filter.)
4. If desired, enter a Location, and hit the "Enter" key on your keyboard to refresh the list of
products in the grid. Taking into account all other filters, if a product has one or more inspection
records that match the location, that product will display in the results grid.
Note: You can use the asterisk (*) as a wildcard character in the Location field. For
instance, "Bay 2*" will match locations of "Bay 2", "Bay 21", and "Bay 244", etc.
5. Enter the Begin Date, End Date, or both to indicate the date range that you desire for this
report.
Note: The History and Product reports will filter by Projected Inspection Date; all
other reports will filter by the Last Inspected date. The labels of the Begin Date and
End Date will change to Proj Begin Date and Proj End Date to reflect this.
6. If you have selected the History report, the Serial No. field will appear. If desired, enter a
serial number and hit the "Enter" key on your keyboard to refresh the list of products in the grid.
Taking into account all other filters, only the product with the specified serial number will display
in the results grid.
79
7. If desired, specify a company logo to be displayed on the reports. Click Select Logo to
choose an image file. (Acceptable image formats are JPEG, BMP, GIF, and TIFF files.)
Note: Images used for report logos should have a landscape orientation and should be a
maximum of 460 x 60 pixels in size. Larger images will have to be resized and may
become distorted.
After the report is configured, click Run Report to generate the report.
A PDF file of the report will be created and then displayed in your default PDF viewer.
80
In the top right of the report, the report name, date, distributor, end user, product type, inspectors, and
other filter criteria are displayed:
In the example Inspection report, the results are summarized for the chain sling products that were
specified via the filters. Product details and specific inspection notes are displayed for each Product.
81
Note: Reports are grouped by product type. Each group will have its own table and graph.
82
Exporting a Report to a CSV File
In addition to creating a PDF file for a given report, you can export the data to a comma-delimited file (for
manipulation inside Microsoft Excel, for instance). To create the .csv file, click the Export to CSV
button instead of the Run Report button.
A dialogue box will show after you select “Export to CSV”.
1. Browse to the folder you want to export your file to and enter the file name.
2. Click on the “OK” button to create the export file.
After you click on “OK” a confirmation dialogue box will display the success status of the export and the
full name of the file exported.
83
84
Mobile
Synchronizing Your Mobile Device with the Desktop PC
In order to load product data onto your Mobile Device, or to move data
created on your Mobile Device back to your desktop PC, you must
connect your Mobile Device to your desktop PC via the supplied USB
cable.
The database that you interact with when you are using the QUIC-CHECK® Plus desktop application
may be a standalone database that exists only on your machine, or it may be a shared database that
exists on a network server. In either case, synchronization of the data between the desktop application
and Pocket QUIC-CHECK® takes place through the transferring of a database file, using Microsoft's
Mobile Device Center (or ActiveSync).
Before synchronizing data between the desktop application and the Mobile Device, always connect the
Mobile Device to your PC using the supplied USB cable, and always be sure to close the Mobile Device
application so that Pocket QUIC-CHECK® is not running. (The desktop application will not synchronize
any data if the application on the Mobile Device is open.)
It is very important that the Mobile Device be set up with the correct date and
time. If the date and time are not correct, new records created on the Mobile
Device may not be merged into the main database during data
synchronization.
There are two options for data synchronization: Standard and Advanced.
Standard Data Synchronization
1. Click the Mobile tab.
On the Mobile tab you will see information about the connected Mobile Device (it may take a
moment for the connection to be established).
85
2. Verify the device shows as “Connected” in the Device Status box.
Note: While the device is being connected, the Sync Device button will be disabled. After
the connection is established, the Sync Device button will become clickable.
3. Ensure that the “Main Memory” option is selected from the Storage menu. box.
Note: Although possible to do so, it is not recommended to use a separate storage card
for the Pocket QUIC-CHECK® database. If you find it necessary to use a separate
storage card, please contact customer support for instructions.
4. The Device Memory chart will display how much free space is available, based on the selected
storage option, and how much space is currently being used.
5. By default, both transfer checkboxes below the "Sync Device" button are checked. If desired,
uncheck the appropriate transfer checkbox, as described below in the following scenarios:
Scenario
#1:
What To Do
You have just completed an
inspection with a single Mobile
Device and need to both
update your main database
86
The Result
1. The Mobile Device
database will be
transferred from the
Mobile Device to the
Desktop.
and prepare your Mobile
Device for its next use.
2. A merge will take
place.
3. The updated Desktop
database will then be
transferred back to the
Mobile Device.
1. Leave both checkboxes checked.
2. Click the Sync Device button
#2:
You have just completed an
inspection that utilized more
than one Mobile Device and
need to update your main
database with the data on
each of the separate Mobile
Devices.
1. Uncheck the Desktop >> Mobile
checkbox.
2. Click the Sync to Desktop button
Or, you just want to pull the
data from a single Mobile
Device without pushing any
data back to it.
Scenario
3. Sync each additional Mobile Device in
the same way.
What To Do
#3:
You are about to perform an
inspection and need to
transfer your main database to
more than one Mobile Device
(possibly as a result of using
the technique above to sync
87
1. The Mobile Device
database will be
transferred from each
Mobile Device to the
Desktop.
2. A merge will take
place after each
transfer.
3. No data will be
transferred back to
any of the Mobile
Devices.
This technique saves
time by not transferring
"half-synced" databases
back to any Mobile
Devices, however, you
will need to transfer your
main database back to
each Mobile Device
before using it to
perform an inspection.
The Result
1. No data will be
transferred to the
Desktop from any of
the Mobile Devices.
2. The main database will
be transferred from the
Desktop to each
your Mobile Devices).
Mobile Device,
overwriting the existing
Mobile Device data.
1. Uncheck the Mobile >> Desktop
checkbox.
2. Click the Sync Device button
Or, you just want to push your
main database to a single
Mobile Device, and wish to
ignore and overwrite the
current Mobile Device
database.
3. You will be prompted to confirm that
you wish to overwrite each database.
Follow the instructions and click the OK
button.
4. Sync each additional Mobile Device in
the same way.
88
This technique saves
time by not transferring
"out-of-date" databases
from the Mobile Devices
(and also avoids the
subsequent meaningless
sync process that would
take place).
However, you must be
absolutely sure that no
new data has been
collected by any of the
Mobile Devices, for each
Mobile Device database
will be ignored and
overwritten with no
chance for data recovery.
When the synchronization process occurs, a window will appear displaying the status of the file transfer
operation. If an internet connection is available, Crosby product data will also be displayed in a scrolling
marquee.
Clicking on the yellow hyperlinks will download a PDF file with product data, and clicking on one of the
navigation circles to the right will advance the marquee to the next product.
The various steps of the synchronization process will be displayed in the status window.
The synchronization phases are:
1.
2.
3.
4.
5.
Copying Pocket QUIC-CHECK® database to desktop
Sync in process
Sync to QUIC-CHECK® Plus desktop database complete; refreshing the data grid
Copying QUIC-CHECK® Plus desktop application data back to mobile
Sync to Pocket QUIC-CHECK® database complete.
Note: One, and only one, database can be stored on the Mobile Device at one time. If you
change the Storage option between synchronizations (for example, from “Main Memory” to
“Storage Card”), the database is removed from the old location and synchronized to the new
location.
Advanced Data Synchronization
Advanced synchronization is designed for users with very large databases (greater than 1000 products),
allowing partial (and thus, smaller) databases to be used on the Mobile Device. With a smaller database,
the sync process is faster (because the file is smaller) and the database searches performed by Pocket
QUIC-CHECK® are faster (because there are fewer records to examine). To enable Advanced
Synchronization, follow the instructions below:
1. Click the QUIC-CHECK® Plus button (the circular application button), and then click the QUICCHECK® Plus Options button:
89
2. Select Yes under the Sync Device - Show Advanced Sync Panel option, and click OK.
3. Now click on the Mobile tab.
4. The Advanced Sync panel, entitled Partial Data, is now visible.
90
With Standard Data Synchronization, the entire database is copied into a special database file for
transfer to the Mobile Device. But with Advanced Data Synchronization enabled, you now have the
option of using only the products visible in the results grid when creating the Mobile Device database.
Selecting the "Only the products shown" option will transfer all products shown in the results grid
to the mobile device (and only those products). The complete set of inspection records will be
transferred with each product, unless the "Only the last inspection records" option is also
checked. Selecting both of these options will create the smallest database possible for transfer to the
mobile device.
Note: Any end user, manufacturer,or inspector records that are not associated with the records in
the grid will not be transferred to the Mobile Device.
In fact, the Partial Data panel also allows you to create Mobile Device databases even when the Mobile
Device is unavailable (for instance, when it is being used out in the field). This is especially helpful when a
large database needs to be reduced in size and transferred to multiple devices. By choosing the "Sync to
and from a folder" option, you can do the filtering process once, and then just push the resulting
database to multiple devices; you only "pay" for the filtering process once, and if you are using a network
database, the time savings is even more dramatic.
Note: When transferring data from a network database to a Mobile Device, all of the data must first be
transferred over the network to create a local database file that can then be filtered and prepared for
91
transfer to the Mobile Device. For large databases, the time to transfer the data and build the local file
can be significant.
When transferring data from the Desktop to a Folder, the icon and label will change to indicate the direction of
the transfer.
Similarly, the icon and label will change to indicate the direction of the transfer when copying data from a
Folder to the Mobile Device. In this case, the items in the results grid will be ignored, and the prepared
database file can be selected and quickly transferred to the Mobile Device.
The default location for these "Transfer to Folder" databases is "C:\Users\Public\Documents\Crosby QUICCHECK® Plus."
92
Recovering Data Lost During a Sync
Connectivity issues during the sync of a Mobile Device with the desktop or laptop PC can result in what
appears to be a successful sync — but is actually an incomplete sync process, resulting in the loss of data.
Should this occur, the lost data can be recovered by performing the following steps.
1. Locate the backup copy of your mobile database:
a. In the Documents\MyDocuments (Windows 7), Documents (Vista), or My Documents (XP)
folder on your desktop PC, you will find the nested folder: "Crosby\US\backups\mobile."
b. In the mobile folder, locate the file with a Date-Time corresponding to the time of the sync.
This is the backup copy of your mobile database. (Tip: change the folder view in Windows
Explorer to display Details in order to more easily see the file Date-Time stamp.)
c. Rename the file, removing only the last four characters (“.bak”). Right-click the file and
choose Rename, then delete the final four characters (“.bak”) of the file name.
2. Recover the missing data:
a. Open the QUIC-CHECK® Plus desktop application, and make sure it is pointing to your
main database (not the mobile backup file).
b. Using the QUIC-CHECK® Plus button, select Merge Database from the menu.
c. Using the Browse… button, locate the desired mobile database backup file, and click OK.
93
Once the merge is complete, the missing data should appear in your master QUIC-CHECK® Plus
desktop database. Perform another sync with the Mobile Device, and the recovered data will be
available in Pocket QUIC-CHECK® as well.
Note that sometimes, data is not merged into the main database because the Mobile Device has
a different date or time than the Desktop application. If the Mobile Device thinks it is an hour
earlier than the Desktop application, that discrepancy can cause a recent change on the Mobile
Device to be ignored (if a change on the Desktop to the same product would be considered more
recent than the incorrectly time-stamped Mobile Device change).
It is very important that the Mobile Device be set up with the correct
date and time. If the date and time are not correct, new records created
on the Mobile Device may not be merged into the main database during
data synchronization.
94
QUIC-CHECK Menu
From the main form locate
the QUIC-CHECK® icon in
the upper left corner. Click on
the icon to open the icon
menu.
On the icon menu locate the
QUIC-CHECK Plus Options
button in the lower middle
and click on it.
95
Create New Database
See “Desktop Software Installation and Setup, Creating a New Database”, starting with step 2.
Open Existing Database
Local Da tabase
Select Local Database
Replace
Browse to the location of the *.sdf
file and select it.
Click OK and the database will be
loaded and viewable from the
Home tab.
SQL Server/Express Database
Select SQL Server/Express for a
Network Installed database.
Replace
Click on the Specify button.
96
Enter your database location and
security information.
Click OK to return to the Open
Database form
Click OK to open the database.
** Important Note: Once you open a database that database will be the default database loaded the next
time you open the QUIC-CHECK® Plus application.
Backup or Save As
Select a backup file location.
Move the backup database file
from the location chosen in the
step above to an appropriate
disaster recovery location.
97
** Important Note: If you choose Copy to Mobile Device, you are choosing to create and
save the Backup Database file on your connected mobile device instead of making a Backup
Database on your Local Machine. PLEASE NOTE that your mobile device Pocket QUIC-CHECK®
Plus database will be replaced and you will lose any data that has not been synced from the Mobile
Tab in the desktop QUIC-CHECK® Plus application.
Recent Databases
QUIC-CHECK Plus Options
Program Op tion s
Replace – They are all Web Sync options, not good
Sync Device – Show Advanced Sync Panel
RFID Tags – Allow Direct Editing
98
RFID Reader – Enable Bluetooth / USB Device
Row Highlighting – Upcoming Inspection Warning
Undelete a Contact
Clicking on the Undelete button will open the following dialogue box.
Enter the name of the contact to undelete and click on the OK button. If the contact is found it will be
undeleted.
Home Tab – Show Advanced Filters Panel
Back on the Home tab, you will now see an extra panel called Advanced Filters:
99
Different from the other filters, which use drop-down boxes, these filters allow you to type in the text for which you
are searching. The checkboxes to either side of the text box indicate "wildcards", commonly seen as the symbol
"*".
In the example above, both checkboxes are checked, indicating a value of "*SSG*" for the filter. This value of
"*SSG*" will match any product with an Asset Number that contains "SSG" anywhere in the field. If both
checkboxes were unchecked, then only products with an Asset Number field of exactly "SSG" would match.
"*SSG" would have to have Asset Numbers ending with "SSG" to match, and "SSG*" would have to have Asset
Numbers starting with "SSG" in order for a match to occur.
He lp a n d S uppor t
100
Check for Updates
Clicking on the Check for Update button will check for updates to the software if you have an internet
connection.
Read the User manual
Clicking on the Read Manual button will open the Help Manual pdf file.
101
Contact The Crosby Group
Clicking on the Contact Us button will display the following dialogue box.
Complete the form and click Send.
A Technical Support representative
will contact you shortly.
102
About Croxby QUIC-CHECK Plus
Clicking on the About button will display the following dialogue box.
103
Au to ma t ic Upda te s
See section “Desktop Software Installation and Setup”, “Software Updates”
104
Merge Database
This should not be displayed anymore, old technology? Maybe not until data sharing is enabled?
Merging a database can be used for several scenarios.
You have a subset of data on a laptop that has been updated and you want to merge it back into the
main database.
You have a backup from a mobile synch that failed and you want to update the main database from
the backup.
A distributor has sent you new product information and you want to add it to your database.
How does the distributor’s data get imported correctly since it is a different data owner?
105
How Do I…?
How do I share Data between Distributor and End User?
Scenario 1: End User creates ne w P roducts, In spection s and Inspector s:
How to g ive th is data to the D istr ibu tor
1. The End User creates a backup file as follows:
a. Using the QUIC-CHECK button in the top left corner, select Backup or Save As.
b. Choose a location and filename for the backup file. By default the location will be in the My
Documents folder. Click Next>> to complete the backup.
106
2. The End User can now e-mail this database backup file to the Distributor.
3. Once it has been received by the Distributor, the database backup file should be copied to a computer
that has the QUIC-CHECK software installed.
4. The Distributor then opens the desktop QUIC-CHECK application.
5. The Distributor merges the End User database into the Distributor database as follows:
a. Using the QUIC-CHECK button in the top left corner, select Merge Database.
b. Locate the end User database file and click OK.
c. The End User’s data is now in the Distributor’s database.
107
S c e na r io 2 : Di str i but or c r e a te s ne w P r oduc t s, In spe c t ion s, Ma n ufa c tur e r s
or Inspector s for an End User: How to get the se to the User
1. Open the distributor’s desktop QUIC-CHECK application.
2. Using the QUIC-CHECK button in the top left corner, select Prepare End User Database and choose
the End User’s access level. This access level should be the same level that was selected in the Initial Setup of
the End User.
3. Select the desired End User and click Next.
4. Choose a Local Database File Name and click Next.
5. The Distributor emails this database file to the End User.
6. Once the database file is received from the Distributor, it should be copied to a computer that has the QUICCHECK software installed.
7. The User then opens the QUIC-CHECK application and merges the data received from the Distributor into the
local (End User’s) database by following these steps:
108
a. Using the QUIC-CHECK button in the top left corner, select Merge Database.
b. Locate the Distributor’s database file and click OK.
c. The Distributor’s data is now in the End User’s current database.
109
How do I get an Inspector-Laptop ready for a Customer Inspection?
1. Install QUIC-CHECK on the inspector’s laptop. If the Inspector will have more than one End User’s data on
the laptop at any given time, select Distributor Full Install when given the option on the
Application Mode dialog. If the Inspector will only ever have one End User’s data on the laptop at any
given time, select End User Level 2 Install.
2. Open QUIC-CHECK and the master QUIC-CHECK database on the distributor’s desktop computer. This will be
either a network database or a local database file.
3. Determine what QUIC-CHECK data should be on the Inspector’s laptop and place it there. To determine
how to copy the proper data to the Inspector Laptop, choose the scenario that best fits your business
operations.
a. Scenario 1: Place an End User Database on the Inspector Laptop The Inspector will only visit one End
User at a time and only needs to have data for that one End User on the laptop. The Distributor does
not want all of their End User data to travel with the Inspector to an End User’s location so only the
data for one specific End User will be copied to the laptop.
Using the QUIC-CHECK Button in the top left corner, select Prepare End User
Database and choose the Level 2 End User Database.
Select the desired End User from the Select End User dialog and click Next.
Choose a Local Database File Name and click Next. This is the name of the new End User
database file that you will later copy to the Inspector’s laptop.
110
Now take the file created in the previous step and place it on the Inspector’s computer. Note
where you place this file; you will need to locate it in a later step.
b. Scenario 2: Place a Full Backup of the Distributor Database on the Inspector Laptop
Using the QUIC-CHECK button main menu in the top left corner, select Backup or Save
As.
Choose a Local Database File Name and click ‘Next’. This is the name of the new Distributor
backup database file that you will later copy to the Inspector’s laptop.
Now take the file created in the previous step and place it on the Inspector’s computer. Note
where you place this file; you will need to locate it in a later step.
4. Inspector Can Now Use QUIC-CHECK during the Inspection Session
a. Open the QUIC-CHECK database you placed on the Inspector’s laptop in one of the ways listed below.
Option 1: When opening the QUIC-CHECK® software for the first time, you should be
prompted to Open an Existing Database. Locate the database file created in
previous steps and click OK.
Option 2: Using the Pearl Button Menu in the top left corner, select Open Existing
Database. Locate the database file created in previous steps and click OK.
b. The Inspector should now get the Inspection Mobile Devices ready by syncing them to the Inspector
Laptop as usual.
111
How do I combine data from several Inspector Laptops during a Customer Inspection so
I can do onsite Reporting?
One Inspector Laptop should be selected to generate reports. This will be referred to as the ‘Inspector Report
Laptop’. This laptop will take backup files from every other inspector laptop and merge the data so that reports can
be generated on the full set of inspection data. Steps are as follows:
1. Every other Inspector Laptop needs to create a backup file and place it on the Inspector Report Laptop. For
each Inspector Laptop (excluding the Inspector Report Laptop), create a backup file as follows:
a. Using the QUIC-CHECK button in the top left corner, select Backup
or
Save
As.
b. Select a Local Database File Name.
2. Copy the database backup file to the Inspector Report Laptop.
3. Perform the following steps for each Inspector Laptop backup file to merge the data into the Inspector Report
Laptop.
a. Open the QUIC-CHECK application on the Inspector Report Laptop, and using the QUIC-CHECK button
in the top left corner, select Merge Data.
112
b. Using the Browse button, locate the Inspector Laptop backup file and lick OK.
4. The Inspector’s Laptop data is now in the Inspector Report Laptop’s database. Once the data from all Inspector
Laptops has been merged into the Inspector Report Laptop, reports can be generated and provided to the
customer.
113
How do I get the Inspector Laptop data into the master Distributor database once the
Customer Inspection is completed?
1. If all data from Inspector Laptops has been merged into a single Inspector Report Laptop (see previous section),
then simply create a backup of the database on the Inspector Report Laptop and give it to the Distributor. Create
a backup file as follows:
a. Open the QUIC-CHECK application on the Inspector Report Laptop. Using the QUIC-CHECK button in
the top left corner, select Backup or Save As.
b. Select a Local Database File Name, or accept the suggested name.
c.
Provide this file to the Distributor.
2. The Distributor should place the file on a QUIC-CHECK desktop computer and then open the QUIC-CHECK
software and the master Distributor database. This can either be a network database or a local database file.
3. Merge the backup file from the Inspector Report Laptop into the master database as follows:
114
a. Using the QUIC-CHECK button in the top left corner, select Merge Database.
b. Locate the Inspector Report Laptop backup file and click OK.
The Inspector Report Laptop data is now in the master Distributor database.
115
How do I Combine End Users, Inspectors and Manufacturers?
When multiple people enter data into the QUIC-CHECK® Plus software, they may accidentally place duplicate
End Users, Inspectors or Manufacturers in the system. For instance, one user may create an End User
named “Jones Rigging” and another user may create an End User named “Jones Rigging Corporation”. In
reality, these End Users are the same entity and need to be combined.
Additionally, during an inspection, multiple users may create the same inspector on multiple Mobile Devices
using Pocket QUIC-CHECK®. When this data is synchronized with the QUIC-CHECK® Plus desktop
application, QUIC-CHECK® Plus will list the inspector multiple times since each will have a distinct set of
general properties that may differ. The sync process will also append a numeric indicator to the end of
duplicate names found during the sync (i.e. John Doe, John Doe (1)). By simply combining the Inspectors in
QUIC-CHECK® Plus, the user can tell the QUIC-CHECK® Plus software that “James Smith” and “JJ Smith” or
“John Doe” and “John Doe (1)” are really the same person.
To combine two End Users, do the following:
1) On the Home tab, click on the "plus
sign" icon to the left of the End
User filter.
2) The End User dialog will display.
Click the Combine
button.
End
Users
116
3)
(In the following step, the End User
"Jones Rigging Corporation" will be
combined with the "Jones Rigging"
End User.)
1. Choose the duplicate End User
(the one you wish to delete).
2. Typically, you want to delete the
duplicate End User once the
products are reassigned.
3. To do so, place a checkmark in
the Delete this End User
after
products
are
moved checkbox.
4. Choose the preferred End
User (the one you will keep).
5. Click the OK button.
The duplicate End User’s products will
be reassigned to the preferred End
User.
Combining Inspectors and Manufacturers can be done in the same way, using the "plus sign" icons to
the left of the Manufacturer and Inspector filters. Each icon will bring up the respective
Manufacturer or Inspector dialog.
117
How Do I Access Extra Filtering Options?
You can add an advanced filtering panel to the Home tab that will allow you to filter by the Last Location field and
by the Asset Number field by doing the following:
1. Click the QUIC-CHECK® Plus button (the circular application button), and then click the QUIC-CHECK®
Plus Options button:
2. Scroll to the Home Tab - Show Advanced Filters Panel option, click Yes, then OK.
Back on the Home tab, you will now see an extra panel called Advanced Filters:
118
Different from the other filters, which use drop-down boxes, these filters allow you to type in the text for which you
are searching. The checkboxes to either side of the text box indicate "wildcards", commonly seen as the symbol
"*".
In the example above, both checkboxes are checked, indicating a value of "*SSG*" for the filter. This value of
"*SSG*" will match any product with an Asset Number that contains "SSG" anywhere in the field. If both
checkboxes were unchecked, then only products with an Asset Number field of exactly "SSG" would match.
"*SSG" would have to have Asset Numbers ending with "SSG" to match, and "SSG *" would have to have Asset
Numbers starting with "SSG" in order for a match to occur.
How Do I Create a Backup of My QUIC-CHECK® Plus Data?
1. Using the QUIC-CHECK® Plus button in the top left corner, select Backup or Save As.
2. Select a backup file location
119
** Important Note: If you choose Copy to Mobile Device, you are choosing to create
and save the Backup Database file on your connected mobile device instead of making a
Backup Database on your Local Machine. PLEASE NOTE that your mobile device Pocket
QUIC-CHECK® Plus database will be replaced and you will lose any data that has not been
synced from the Mobile Tab in the desktop QUIC-CHECK® Plus application.
Move the backup database file from the location chosen in the step above to an appropriate disaster
recovery location.
120
How do I get Technical Support for QUIC-CHECK® questions or problems?
Crosby offers a full range of QUIC-CHECK® Technical Support Services that can assist you with software training,
quick tips and system issue resolution.
Crosby QUIC-CHECK® Plus Technical Support
Email: [email protected]
Phone: (918) 832-5240
How to Contact Technical Support within the QUIC-CHECK® Plus Software
1. Click the QUIC-CHECK® Plus button (the circular application button), and then click the QUIC-CHECK®
Plus Options button:
2.
In the list on the left side of the QUIC-CHECK® Options window, click Help and Support.
3. Click the Contact Us button.
121
4. Complete the form and click Send. A Technical Support representative will contact you shortly.
122
Using the Pocket QUIC-CHECK® Tag Reader Software
Starting the Mobile Device Software
Ensure the Secure Digital (SD) RFID transceiver has been
installed as per the Mobile Device Software & Hardware
Installation instructions.
1)
Press the Power button on the
top right corner of the Mobile
Device’s front panel.
After the device has completed
starting up, tap the Start button
in the upper left corner of the
screen.
Note: On the mobile
device, a single tap is
often equivalent to a
"double click" on a
standard Windows PC.
This is especially true
when tapping on a
document, or on a
program icon
(as in step 3, below).
123
2)
Tap on the Programs menu item.
Note that you may already have a menu item
for "Pocket QUIC-CHECK".
If available, just click the shortcut and go to
Step 4.
3)
Tap once on the Pocket QUIC-CHECK® icon
to launch the application.
(In the future, you can skip this step, and use
the shortcut that will appear in the Start menu
after the first time that you launch Pocket
QUIC-CHECK®.)
124
4)
When Pocket QUIC-CHECK® is starting up,
you will see a progress indicator that looks
like "beach ball."
Pocket QUIC-CHECK® must run through an
initialization process, and does not display its
start screen immediately.
Normally, it can take up to 30 seconds for the
application to start.
With larger databases, Pocket QUICCHECK® may take even longer to initialize.
5)
After Pocket QUIC-CHECK® initializes, the
opening screen of the application is
displayed.
From this screen, there are two options from
which to choose on the main screen. Other
options are available by tapping Menu in the
lower right:
1. Scan RFID Tag Navigates to the same
screen as the QUIC-CHECK® Tag
Reader icon.
2. Inspect Products Navigates to the same
screen as the Inspect / Build
Products icon.
3. Build Products Immediately launches the
Build Product screen.
4. Maintain Database Checks the database
for errors and compresses it, if possible.
5. Clear Recent Items List
6. About… Displays the Pocket QUICCHECK® About screen with version,
copyright and patent information.
RFID Tag Reader
125
Note: An additional option: "Clear Recent Items
List" is also available from this menu, which
clears the shortcuts that accumulate in the Start
Menu of the Mobile Device, and requires an
immediate "Soft Reset".
1)
Tap the RFID Tag Reader icon.
d
2)
The Tag Reader screen is displayed. No values will be displayed
next to the labels until you scan an RFID tag.
Note, if you have not inserted the SDiD RFID Reader, you will see
the following message:
3)
The small green light on the SDiD Reader will blink, indicating that
it is attempting to find an RFID tag.
Hold the RFID transceiver as close as possible to the Crosby
QUIC-CHECK® tag.
The software will provide two indications that the tag was
successfully read:
1. You will hear an audible beep from the Mobile Device.
2. The screen will briefly flash solid red (useful if background
noise prevents hearing the audible indication).
If the tag was previously initialized by the Crosby QUIC-CHECK®
Plus software, you will see the screen displayed on the right.
This shows the following information:
1. RFID No – This is a pre-programmed number unique to
every Crosby QUIC-CHECK® tag.
2. Product Type – This refers to the type of product; in this
case, a chain sling.
3. In Service Date – Shows the date of manufacture.
4. Last Inspected Date – If this product has been inspected
126
using Crosby QUIC-CHECK® software in the past, the date
of this last inspection will appear here.
5. Last Status – Shows the condition of the product when it
was last inspected. This field will show OK, Repair, or
Replace.
6. Serial Number – Shows the serial number of the product
(Tapping this link will perform the same action as tapping
View Details)
7. Next Inspection – Shows the next scheduled inspection
date.
To scan another RFID tag, just hold the transceiver against the
new tag (the Tag Reader function reads continuously until you tap
Back).
4)
If you scan a tag that has not been previously initialized, only the
RFID tag number will be shown and the screen displayed will have
a Build option instead of View Details in the lower right corner
of the Mobile Device’s display.
Tapping Build will launch the Edit Product screen, and allow you
to create a new product in the database that is already registered
with the RFID tag you just scanned. (See step 6.)
5)
To return to the Pocket QUIC-CHECK® main screen, tap Back in
the lower left corner of the Mobile Device’s display.
127
6)
By tapping Build, you can immediately create the product on the
Mobile Device.
After you have entered the correct product details, tap Save
Record and Initialize Tag to store the information in the
database. You will also be prompted to write information to the
RFID tag, and doing so will store the product type and inspection
date information on the tag.
Note that tapping Save will only store the information in the
database and will not prompt you to scan the RFID tag. This
action is not recommended unless there is a specific reason not to
store the product information on the RFID chip.
128
Inspect/Build Products Menu
From the main screen, tap Inspect / Build
Products.
Options that appear on this menu allow the user
to inspect products, view / edit product details,
create new end users, search for serial numbers
within the database, or scan QUIC-CHECK®
RFID tags to locate a given item in the database.
This menu also contains several settings that
affect the appearance and behavior of this
screen, as well as the application itself.
Inspect Product
See the section “Inspecting Products with Pocket QUIC-CHECK®”
View/Edit Product
Put text here
New Product
See the section “Building a Product with Pocket QUIC-CHECK®”
New End User
Put text here
129
Search for a Serial No…
See section “Find Products by Serial Number”
Scan a RFID Tag
Put text here
Show Deactivated Products
By toggling this option, products that have been marked as inactive will be displayed in the grid
results with active products.
Do Not Write Back To Tag
This option can be turned on to avoid the extra step of writing inspection information back to the tag.
This option is always off by default, but if you do not intend to write any information back to the RFID
tag, this option can greatly speed up the inspection process (rather than continually having to cancel
the prompt to write back to the tag).
Hide First Inspection Screen
Another way to speed up the inspection process is to hide the screen on which you specify the date
of the inspection and who is conducting the inspection, since these normally stay the same
throughout the use of the program during an inspection.
(This option is initially disabled. The option to skip the screen appears the first time you encounter
the screen when inspecting a product.)
Do Not Auto-Refresh Grid
When selected, the grid results will only refresh when the Update button is tapped.
130
Extend End User Dropdown
This is generally only used when different End Users start with identical characters, and you require
more viewable characters to differentiate them.
131
Finding Your Products with Pocket QUIC-CHECK®
You have several options for finding Products using the Pocket QUIC-CHECK software; some will return
a group of Products based on some criteria you define, others will return a single, specific Product.
Find Products by End User
The simplest method for locating a Product requires no work at all. When you view the Inspection: Find
Products screen, all available Products are displayed in the Product List. However, if there are many
Products assigned to the End User, then you may need to scroll through a long list to find the item you’re
looking for.
1)
Launch the Pocket QUIC-CHECK application
and tap View Products.
132
2)
On the Inspection: Find Products screen, you
will see all available Products in the Product
List.
Tap once on the Serial Number field of the
Product you wish to view.
133
Find Products by Projected Inspection Date
One of the benefits of using the QUIC-CHECK System is that it calculates the date of next inspection for
each Product, based on its inspection schedule and the date it was last inspected.
You can use these projected inspection dates in Pocket QUIC-CHECK to create a list of Products to be
inspected. You simply choose an End User and a date range; Pocket QUIC-CHECK generates a list of
Products for you, and keeps track of your progress as you complete the inspections.
1)
Launch the Pocket QUIC-CHECK application
and tap Inspect / Build Products.
2)
You now see the Inspection: Find Products
screen showing the inspection status for
products belonging to “JohnShort.” The Product
List is filtered to show only Products with
inspections scheduled between January 30,
2014 and January 30, 2015 (one year out).
134
3)
Use the Starting from field to select the
beginning of a date range. Only Products with
inspections scheduled on or after this date will
be shown.
4)
Next, use the For the next field to select
the size of the date range. This defines the end
of the date range, and only Products with
inspections scheduled within this range will be
shown.
In the example shown, we narrow the date
range to 60 Days. The Product List now only
shows one Product that needs inspection within
the specified time period.
5)
Tap the Serial Number field of the Product you
wish to view.
135
Find Products by Serial Number
A serial number can also be used to quickly find Products. The serial number search feature can be used
to find an exact match (enter the whole serial number), or several matches by entering a partial serial
number.
1)
Launch the Pocket QUIC-CHECK application
and tap Inspect/Build Products.
2)
On the Inspection: Find Products screen, tap
the Search icon at the bottom of the screen
3)
The Search for Serial Number window is
displayed. Use the pop-up keyboard to enter a
whole or partial serial number, and then tap
Search.
A partial serial number will find Products with
the partial value appearing anywhere in the
serial number. For example, searching for
“123” would find Products with serial numbers
“1234567” and “9876123”.
In the example shown, we will enter the partial
value “12”.
136
4)
The Inspection: Find Products screen switches
to serial number search mode. Products
matching the search criteria are displayed in
the Product List.
To conduct a new search, enter in a new serial
number (whole or partial) in Serial Number
and then tap Search.
In the example shown, we see our partial
search for “12” found 2 matching Products.
5)
Tap the Serial Number field of the Product
you wish to view.
Find Products by RFID tag
If your products are tagged with Crosby QUIC-CHECK tags, you can save even more time by simply
scanning the tag; the application will look up the Product for you and immediately start an Inspection for
it.
137
1)
Launch the Pocket QUIC-CHECK application
and tap Inspect/Build Products.
2)
The RFID Tag Reader screen is displayed.
Hold the RFID transceiver close to the QUICCHECK tag you wish to scan. The Pocket PC
will emit a sound, and the screen will briefly
flash red to notify you that it has successfully
read the tag.
3)
If the tag you scanned was found in the
system, the information scanned will be
displayed on the screen. Select View Details.
.
138
4)
View Product screen will show the details of the
product selected.
139
Building a Product with Pocket QUIC-CHECK®
1) From the main screen, tap Inspect / Build
Products.
(Alternatively, you can select Build Products
from the Menu in the lower right. This will take
you immediately to the Edit Product screen,
shown in step 4.
2)
The Inspection: Find Products screen is
displayed.
From the End User menu, select the End User
for which you will create the new Product.
3)
Tap Menu in the lower right corner of the screen.
140
4)
Choose New Product and go to Step 5.
5)
The Edit Product screen allows the entry of the
following information on the General tab:
Category – Select from pre-defined product
categories.
Product – Available products are determined
by the current product category.
End User – Select from available End Users.
Manufacturer – Select from available
Manufacturers (new Manufacturers can be
typed directly into this field).
Serial Number - Enter the product’s serial
number (required; must match the number
stamped on the ID tag).
Asset Number – If your company uses an
identifier other than serial number to track
Products, enter the value here (optional).
In Service Date – Enter the date this Product
was first put into service. The value will
default to the current date, but can be
changed.
Unit System – Select from Feet and Inches
or Metric. Changing this value may also
change values on the Details tab.
Active – Leave checked if the product is in
active use.
Un-checking the box will mark the Product as
inactive. Inactive Products by default are
hidden on most screens (Desktop and Mobile
141
Device), unless you specify otherwise.
Marking a Product as inactive will also allow
its QUIC-CHECK® tag to be reassigned to
another Product.
6)
Tap the Details tab of the screen to enter
additional information for the product. The
Details tab for a Chain Sling product is shown
here.
Note: The information displayed on the Details
tab is specific to the current product type.
Changing the product selection on the General
tab will result in the entries on the Details tab
being reset to blanks.
7)
After you have entered the correct product details,
tap Save Record and Initialize Tag to
store the information in the database. You will
also be prompted to write information to the RFID
tag, and doing so will store the product type and
inspection date information on the tag.
Note that tapping Save will only store the
information in the database and will not prompt
you to scan the RFID tag. This action is not
recommended unless there is a specific reason
not to store the product information on the RFID
chip.
142
8)
After tapping Save Record and Initialize
Tag, you see the Tag Reader screen.
The application is ready to write the Product
information to the QUIC-CHECK® tag. Hold the
RFID transceiver close to the tag you wish to
initialize.
If the information was stored on the tag
successfully, the Mobile Device will play an
audible sound and the screen will flash blue for a
brief moment.
Note: The screen flashes are color coded:
RED = Read a Tag
BLUE = Write To a Tag
PURPLE = Read, Then Immediately Write To
a Tag
ORANGE = Read or Write Error Was
Encountered
9)
If the tag you are trying to initialize is currently
assigned to another active product, the Resolve
Tag Conflict screen will be displayed.
If the tag is being re-assigned (recycled) to the
current product, tap Continue. After continuing,
you will be prompted to scan the tag again to
write product information to the tag.
If you do not wish to re-assign the tag, tap
Cancel. The initialization will be stopped and will
return you to the Edit Product screen.
Note: If you attempt to save a new product and
have assigned to it a serial number that already
exists in the database, you'll receive a different
warning and be prevented from saving the
conflicting product to the database:
143
10) After the tag has been initialized, the Application
will store the QUIC-CHECK® number from the tag
and automatically save the Product information (if
there is no Serial Number conflict).
If all required fields have been completed, the
Application will display the View Product
screen for your review.
From this screen, you can proceed directly into an
Inspection of the Product by tapping Inspect in
the lower right corner of the screen. See Step 7 in
the next section, Inspecting Products with
Pocket QUIC-CHECK® for more information.
Otherwise, tap Back to return to the
Inspection: Find Products screen.
11) On the Inspection: Find Products screen
you should see listed the Product you just
created. Note that you may need to scroll down
the list if you have many Products defined for the
current End User.
To enter additional products, refer to Step 3 of
this section and repeat the process.
Tap Back in the lower left corner of the screen to
return to the Pocket QUIC-CHECK® main menu.
144
Inspecting Products with Pocket QUIC-CHECK®
Before using your Pocket QUIC-CHECK® software at an End User’s
facility for an on-site chain sling inspection, you will need to ensure your
Mobile Device is properly synchronized with your computer. If this is not
accomplished you may have slings on your computer that are not on
your Mobile Device or vice versa.
See the instructions in the Synchronizing Your Mobile Device with the
Desktop PC for directions on how to perform this synchronization.
1)
Launch the Pocket QUIC-CHECK® application
and tap the Inspect/Build Products icon.
Note: Alternatively, you can arrive at the
Inspection: Find Products screen by
selecting Inspect Products from the Menu
in the lower right.
2)
The Inspection: Find Products screen
is displayed.
Note: Shown to the right is the inspection status
for products for the end user, "JohnShort" for an
inspection period of 1 year starting on January
30, 2014. The use of these drop-down lists will
be discussed later in this section.
3)
Select the appropriate End User from the
drop down menu.
After the End User has been selected, use
the drop down list to select the Starting
from date. This is the beginning date for
the current inspection period, and will default
to the current date.
145
4)
Next, select the length of the current inspection
period from the available options.
If the Do Not Auto-Refresh Grid option
is unselected, then the grid will be
automatically updated after you have selected
the end user, starting date and inspection
period length.
The results shown will be the products for the
selected end user that require inspection
during the inspection interval specified.
Note: The Do Not Auto-Refresh Grid
option, when selected, will prevent the grid
from automatically refreshing whenever this
screen is displayed or when a filter is changed.
Selecting this option can speed up an
inspection by only showing you the results
when you request them via the Update button.
(The Update button is hidden unless this
option has been selected.)
146
5)
The status column (C) indicates whether
inspections have been completed for the
specific products for the time period specified.
In the example to the right, there are eight
products for the end user, Professional
Rentals, LLC. For the 1 year period starting
January 21, 2013, none of these products have
been inspected.
Additionally, a status line below the product list
displays a percentage of how many products
have been inspected for the time period
specified.
Note: When selecting “Show All” for the
inspection period, the completion status has no
context and thus is not displayed.
6)
There are several ways to select a product for
inspection, and some take you to the
Inspection: Begin Inspection screen
more directly than others.
Option1:
If the product being inspected is equipped with
a Crosby QUIC-CHECK® tag, then the
absolute quickest way to complete an
inspection is to do the following:
1. Inspect the product and determine
whether the item is Ok, in need of
Repair, or must be Replaced.
2. Tap the appropriate green OK, yellow
Repair, or red Replace button in the
lower right of the window, and then
hold the RFID transceiver next to the
tag to be scanned.
3. You will see a purple flash as the tag is
read and immediately updated to reflect
the Status and Inspection Date.
4. The
Inspection:
Begin
Inspection screen in Step 7 will then
be displayed.
147
Option 2:
Alternatively, if the product being inspected is
equipped with a Crosby QUIC-CHECK® tag
and you wish to bring up the item on the PDA
before you begin inspecting it, you can do the
following:
1. Tap the blue Scan button in the lower
left of the window, and then hold the
RFID transceiver next to the tag to be
scanned.
2. You will see a red flash as the tag is
read.
3. The
Inspection:
Begin
Inspection screen in Step 7 will then
be displayed.
Note: With this method, you will be prompted to
write the status back to the tag once you have
completed its inspection.
Option 3:
If the product to be inspected is in your
database, but is not equipped with a Crosby
QUIC-CHECK® tag, you may also use the
interface to arrive at the
Inspection:
Begin Inspection screen.
1. The quickest way to arrive at this
screen without scanning a tag is to
double-tap the row of the product you
want to inspect.
Note: Be sure to double tap in any cell
EXCEPT the Serial Number cell.
(Double-tapping
in
the
Serial
Number cell will take you to the View
Product screen, as described in Option
4.)
The Inspection: Begin Inspection
screen in Step 7 will then be displayed.
148
Option 4:
In some cases, you may want to view the
details of a product prior to its inspection, or
you may wish to initialize a Crosby QUICCHECK® tag prior to the product's inspection.
1. Tap on the blue hyperlinked Serial
Number, or double-tap the Serial
Number cell of the product you wish
to view.
2. The View Product screen will be
displayed.
3. To inspect the product, tap on
Inspect. Alternatively, you may link
a tag to this product (see below), or
even view its inspection history.
4. The
Inspection:
Begin
Inspection screen in Step 7 will
then be displayed.
To associate a Crosby QUIC-CHECK® tag with
a product, do the following:
1. Tap the Initialize Tag button.
You then will be prompted to scan the product
equipped with a Crosby QUIC-CHECK® tag.
149
Searching By Serial Number:
If the selected end user has a large inventory
of items to be inspected, you can quickly filter
your list of items to make a given serial
number, or set of serial numbers, easier to find.
1. Tap the Search button in the lower left
of the window.
2. In the resulting Search for Serial
Number dialog, enter the product's
serial number (whole or partial).
3. Tap the Search button to display a list
of matches.
4. Use the technique described in either
Option 3 or Option 4 to View or
Inspect a product in the filtered list.
Note: You can revert to the list of products
filtered by inspection date by clicking the Find
by Inspection Date link, located above
the results grid.
150
7)
Using one of the four options in Step 6, you
now should see the Inspection: Begin
Inspection screen.
For Chain Sling product types, you can view
product specifications for the current sling size
by tapping the Chain Sling hyperlink
displayed in the Product field.
Note: Additional information about this screen
is explained in Step 14.
8)
Tapping the field will display the Inspection:
Product Specification screen.
This screen provides information about:
Working
Load
Limit,
Minimum
Thickness,
and
Temporary
Reduction while at Temperature
and Permanent Reduction after
Exposure to Temperature. These
values vary based on the particular
combination of Size, Number of Legs and
Grade of a chain sling.
151
9)
Shown to the right is the Temporary
Reduction While at Temperature table.
Clicking the Temp After tab will display the
Permanent Reduction after Exposure
table for the selected chain sling:
You may return to the inspection screen by
tapping Back.
10) Should it be necessary to inspect products that
are not on your Mobile Device, you can create
the product from the mobile device and then
perform the inspection, as described in Steps
11, 12 and 13.
Before creating it, if you suspect that the
product might be in your database but is not
displaying for some reason, you may want to
select the Show Deactivated Products
from the Menu option, just to be sure that you
are not creating a duplicate product.
Deactivated products will display with a dash "" in the far left column when this option is
selected.
152
11) To create a new product, tap Menu in the lower
right section of the Mobile Device’s display,
and select New Product.
12) The Edit Product screen will be displayed.
The information entered here is the same as
explained previously in this manual in the
Building A Product with Crosby Pocket
QUIC-CHECK® Software section.
Enter all of the required information, then tap
Save in the lower right corner of the Mobile
Device's screen to save the new product to the
database.
Note: If you want to initialize a QUIC-CHECK®
Tag and associate it with the new product,
choose Save Record and Initialize
Tag instead of Save.
153
13) After tapping Save in Step 12, the View
Product screen will be displayed. Tap the
Inspect button on the lower right corner of the
screen to proceed to the Inspection:
Begin Inspection screen.
14) The following additional notes apply to the
Inspection: Begin Inspection screen
(continued from Step 7):
1. Tapping the serial number link will
display the View Product screen,
allowing you to review product details for
the current product.
2. The current date is shown for the
Inspection Date, but this may be
changed as required.
3. When performing an inspection, you will
be required to select one or more
Inspector(s) performing the inspection.
4. If the inspector performing the inspection
is not displayed in the list, tap the new
Inspector link to enter a new
inspector.
5. To speed up an inspection, you can
bypass this screen if the information you
have selected will apply to all further
inspections for the day. Tap Don't
show this screen again to bypass
this screen. (Restarting Pocket QUICCHECK® will reset this option.)
Tap Next to proceed to the next screen.
154
15) The Inspection: Note Defects screen
will be displayed.
Note: If a standard, such as B30.9, is being
used as the source of the inspection defects,
then it will be indicated in parentheses.
The following notes apply to the selection of
defects:
1. If any defects are selected, the Status
condition will default to Repair, but can
be manually changed to Replace. The
OK status will not be available if any
defects are selected.
2. If no defects are selected, Status will
only contain the conditions: OK,
Location
Changed,
Custodian
Changed, and Note Only.
Note: Use the scroll bar on the right side of the
screen to view additional defects defined for the
current product type. If an appropriate defect is
not defined, select the defect titled Other and
type the specifics in the Comments field.
While the Comments field is optional, the
Location field is required:
Enter the Location of the product by typing a
new location or by using the drop-down list to
select a previously entered location.
Clicking the Location link will toggle the
location between the product's last location
("Last Loc"), and the current default location:
Note: For consistency in the names of your
locations, it is recommended that the dropdown list always be inspected for the
appropriate location before entering the
location with the dynamic keyboard and stylus
155
16) Tap Save in the lower right corner of the
Mobile Device’s display.
Inspection: Recommend Actions screen.
For each of the defects noted on the previous
screen, corresponding fields to be completed
appear on this screen. If any of the defects
noted present the potential for bodily harm, the
corresponding checkbox labeled Danger to
persons should be marked. In the field
labeled Recommended Action, describe the
steps necessary for remedying the defect
After completing the Inspection: Recommend
Actions screen, tap Save to save the
inspection data.
If a QUIC-CHECK tag is associated with the
product, the QUIC-CHECK Tag Reader
screen will be displayed at this point (Figure
8), prompting you to scan the tag so that the
inspection information can be recorded on the
tag. When the tag has successfully been
scanned, the mobile device will chime and the
screen will briefly flash red. Tap Done to
continue.
If the product has a Crosby QUIC-CHECK®
156
Tag, you will be prompted to scan the tag to
write the inspection data to the tag.
Note: You will not be prompted to write the
inspection data to the tag if you selected the Do
Not Write Back To Tag option on the
Inspection: Find Products screen:
At this point you are taken to the Inspection:
Choose Next Task screen. Here you are
presented with two options: 1) perform a
Repair of the product just inspected, or 2)
return to the Find Products screen. For a
step-by-step description of the Repair process,
see the next section entitled Repairing
Products.
157
17) After an inspection has been completed, the
Inspection: Find Products screen will
be displayed.
1. A checkmark will appear in the status
column (C) for each product that has
been inspected and saved.
2. Products not yet inspected will have no
entry in the status column (C).
3. As products are inspected and saved,
the % complete status line will update
to reflect the correct number of items
inspected and the correct percentage.
Note: If you do not want to wait for Pocket
QUIC-CHECK® to refresh this data each time
you complete an inspection (for large data
sets, for instance), select the Do Not AutoRefresh Grid option on the Inspection:
Find Products screen:
18) If you inspect a product that had been
previously flagged for repair (during a prior
inspection), you will be presented with the
Repair Product dialog.
Clicking Yes will automatically clear all
defects, update the status of the
product to OK and complete the
inspection.
Clicking No will allow you to manually
enter inspection information (See Step
19)
158
the Inspection: Note Defects
screen, any defects previously noted for the
Repair will be indicated by icons with a yellow
exclamation mark and the text of the noted
defect(s) will be highlighted in red.
19) On
In the example to the right, you can see that
there was a Cracks / Breaks defect noted
in the last inspection.
20)
If the defect is no longer present, leave
the box unchecked and tap Save to
save the inspection.
If the defect is not yet repaired, check
the box next to the defect (which will
change the product status to Repair).
If the product should be replaced
instead of repaired, select Replace
from the Status drop down.
Tap Save to save the inspection once
the noted defects and status are
accurate for this inspection.
Note: The warning icons and highlighted text
will only display if the defects were noted in the
inspection immediately prior to the current
inspection.
When Pocket QUIC-CHECK® attempts to write
information to a Crosby QUIC-CHECK® Tag,
you can tap Done in the Mobile Device’s lower
left corner to forego writing to the tag.
Note: You will not be prompted to write the
inspection data to the tag if you selected the Do
Not Write Back To Tag option on the
Inspection: Find Products screen:
159
21) After all products have been inspected, tap
Back in the Mobile Device’s lower left corner to
return to the main menu of Pocket QUICCHECK®.
After all products have been inspected, the data is not yet available for any reports or
analysis, as it resides solely on the Mobile Device. In order to run reports and/or update the
main database on the PC, you must synchronize the Mobile Device with your PC as
explained in the next section.
160
Repairing Products
The Repair process is conducted for products which have been inspected and found to be defective. The
process can be initiated from several points in the Pocket QUIC-CHECK software.
If you have just completed the inspection of a defective product and wish to perform the repair
immediately, simply tap the Repair Now button on the Inspection: Choose Next Task screen (see
previous section, Inspecting Products).
You can select the product to be repaired from the Inspection: Find Products screen (as described
in the previous section, Inspecting Products) and then select the Inspections tab from the View
Product screen. Tap the Continue Inspection button (pictured below) followed by the Repair
Now button on the Inspection: Choose Next Task screen (Figure 9 of previous section) to begin the
Repair process.
From the View Product screen for the selected product (see above), you can also tap the Inspect
button in the lower right-hand corner; subsequently tap the Repair Now button on the Inspection:
Choose Next Task screen (Figure 9 of previous section) to begin the Repair process.
161
1)
Tapping the Repair Now button on the
Inspection: Choose Next Task screen
takes you to the Inspection: Repair
Defects screen. On this screen you are
presented with text fields labeled
Action Taken, one field for each
defect recorded in the inspection.
Describe here the steps taken to remedy
the defects. When finished, tap Next to
continue.
2)
The final screen in the Repair process is
the Inspection: Repair Defects screen.
When the repair has been completed
and all defects remedied, the product is
ready to be certified. From the Name
drop-down list, select the name of the
inspector certifying the repair, or type in
the name if it is not already contained in
the list. Mark the checkbox labeled
Product is safe for active
service, and tap Save to complete the
certification.
3)
If a QUIC-CHECK tag is associated with
the product, the QUIC-CHECK Tag
Reader screen will be displayed at this
point, prompting you to scan the tag so
that the inspection information can be
updated on the tag. When the tag has
successfully been scanned, the mobile
device will chime and the screen will
briefly flash red. Tap Done to return to
the Inspection: Find Products screen.
162
Maintain Database
Add Text
Clear Recent Items List
Add Text
163
About…
Add Text
164
Appendix - Selected Menu Options
New Product Menu Options:
1. Product Category
1. Slings
2. Shackles
3. Hoist Rings
4. Plate Clamps
5. Blocks
2. Product Type
1. Slings
a. Chain Sling
b. Wire Rope Sling
c. Round Sling
2. Shackles
a. Shackle
b. Sling Saver Shackle
c. Shackle (User-defined)
3. Hoist Rings
a. Hoist Ring
b. Hoist Ring (User-defined)
4. Plate Clamps
a. Locking Clamp
b. Non-Locking Clamp
c. Non-Marring Clamp
d. Specialty Clamp
e. Clamp (User-defined)
5. Blocks
a. Mobile Crane Block
b. Bridge Crane Block
c. Scrap Yard Block
d. Snatch Block
e. Derrick Hoist Block
f. Construction Block
g. Tilt-Up Block
h. Tubing Block
i. Drilling Block
j. General Oilfield Block
k. Overhaul Ball
l. Block (User-defined)
m.
3. Slings
1. Chain Slings
Size
a. 7/32"
b. 9/32"
c. 5/16"
d. 3/8"
e. 1/2"
f. 5/8"
g. 3/4"
h. 7/8"
i. 1"
j. 1-1/4"
k. 1-1/2"
l. 1-3/4"
m. 2"
165
Adjustable?
a. No adjuster
b. Style A (Short adjuster length)
c. Style B (One foot or greater adjuster length)
d. Crosby Eliminator
No. of
a.
b.
c.
d.
Legs
Single
Double
Triple
Quad
Basic Type
1. Single Leg
a. CO (SOO)
b. SPP
c. SRR
d. SGG
e. SGS
f. SOG
g. SPG
h. SRG
i. SOF
j. SPF
k. SRF
l. SOL
m. SPL
n. SRL
o. SOS
p. SPS
q. SRS
r. SSS
s. SOX (Undefined)
t. SPX (Undefined)
u. SRX (Undefined)
v. SX (Special)
w. EN
2. Double Leg
a. DOG
b. DPG
c. DRG
d. DOL
e. DPL
f. DRL
g. DOF
h. DPF
i. DRF
j. DOS
k. DPS
l. DRS
m. DOX (Undefined)
n. DPX (Undefined)
o. DRX (Undefined)
p. DX (Special)
q. DEN
Single-Oblong-Oblong
Single-Pear-Pear
Single-Ring-Ring
Single-Grab-Grab
Single-Grab-Sling
Single-Oblong-Grab
Single-Pear-Grab
Single-Ring-Grab
Single-Oblong-Foundry
Single-Pear-Foundry
Single-Ring-Foundry
Single-Oblong-Shur-Loc
Single-Pear-Shur-Loc
Single-Ring-Shur-Loc
Single-Oblong-Sling
Single-Pear-Sling
Single-Ring-Sling
Single-Sling-Sling
Single-Oblong-(Special)
Single-Pear-(Special)
Single-Ring-(Special)
Single-(Special)
Single-Endless
Double-Oblong-Grab
Double-Pear-Grab
Double-Ring-Grab
Double-Oblong-Shur-Loc
Double-Pear-Shur-Loc
Double-Ring-Shur-Loc
Double-Oblong-Foundry
Double-Pear-Foundry
Double-Ring-Foundry
Double-Oblong-Sling
Double-Pear-Sling
Double-Ring-Sling
Double-Oblong-(Special)
Double-Pear-(Special)
Double-Ring-(Special)
Double-(Special)
Double-Endless
3. Triple Leg
166
3 & 4 leg chain slings are the same as double except for the first letter of the
abbreviation
a.
b.
c.
d.
e.
f.
g.
h.
i.
j.
k.
l.
m.
n.
o.
p.
q.
r.
Grade
a.
b.
c.
d.
e.
TOG
TPG
TRG
TOL
TPL
TRL
TOF
TPF
TRF
TOS
TPS
TRS
TOX (Undefined)
TPX (Undefined)
TRX (Undefined)
TX (Special)
TEN
Magnet Chain
Triple-Oblong-Grab
Triple-Pear-Grab
Triple-Ring-Grab
Triple-Oblong-Shur-Loc
Triple-Pear-Shur-Loc
Triple-Ring-Shur-Loc
Triple-Oblong-Foundry
Triple-Pear-Foundry
Triple-Ring-Foundry
Triple-Oblong-Sling
Triple-Pear-Sling
Triple-Ring-Sling
Triple-Oblong-(Special)
Triple-Pear-(Special)
Triple-Ring-(Special)
Triple-(Special)
Triple-Endless
Magnet Chain
4. Four Leg
a. QOG
b. QPG
c. QRG
d. QOL
e. QPL
f. QRL
g. QOF
h. QPF
i. QRF
j. QOS
k. QPS
l. QRS
m. QOX (Undefined)
n. QPX (Undefined)
o. QRX (Undefined)
p. QX (Special)
q. QEN
Quad-Oblong-Grab
Quad-Pear-Grab
Quad-Ring-Grab
Quad-Oblong-Shur-Loc
Quad-Pear-Shur-Loc
Quad-Ring-Shur-Loc
Quad-Oblong-Foundry
Quad-Pear-Foundry
Quad-Ring-Foundry
Quad-Oblong-Sling
Quad-Pear-Sling
Quad-Ring-Sling
Quad-Oblong-(Special)
Quad-Pear-(Special)
Quad-Ring-(Special)
Quad-(Special)
Quad-Endless
63
80
100
120
Carbon
Construction Type
a. Mechanical
b. Welded
Proof Tested
b. Round Slings
Type
a.
b.
c.
d.
Endless
Bridle - Adjustable
Bridle - Non-Adjustable
Bridle - Single
167
e.
f.
g.
h.
i.
Bridle - Double
Bridle - Triple
Bridle - Quad
Eye and Eye
Other (Specify)
Rated Capacity
a. 2600
b. 5300
c. 8400
d. 10000
e. 10600
f. 13200
g. 15000
h. 16800
i. 20000
j. 21200
k. 25000
l. 30000
m. 31000
n. 40000
o. 50000
p. 53000
q. 60000
r. 66000
s. 70000
t. 85000
u. 90000
v. 100000
w. 125000
x. 150000
y. 175000
z. 200000
aa. 250000
bb. 275000
cc. 300000
dd. 400000
ee. 500000
ff. Other (Specify)
Type
Proof Tested
Manufacturer Code
c.
Wire Rope Slings
Core Type
a. IWRC
b. Fibre
Construction Type
a. 6 x 19
b. 6 x 37
c. 8 x 19
d. 7 x 6 x 19 (cable laid)
e. 7 x 6 x 36 (cable laid)
f. 7 x 7 x 7 (cable laid)
g. 7 x 7 x 19 (cable laid)
h. Multi-part: 3 part
i. Multi-part: 4 part
168
j.
k.
l.
m.
n.
Multi-part: 5 part
Multi-part: 6 part
Multi-part: 7 part
Multi-part: 8 part
Multi-part: 9 part
Splice Type
a. Hand Spliced
b. Hand Spliced - Flemish
c. Mechanical Spliced
d. Duplex Sleeve
Rope Size
a. 1/4
b. 5/16
c. 3/8
d. 7/16
e. 1/2
f. 9/16
g. 5/8
h. 3/4
i. 7/8
j. 1
k. 1-1/8
l. 1-1/4
m. 1-3/8
n. 1-1/2
o. 1-5/8
p. 1-3/4
q. 1-7/8
r. 2
s. 2-1/8
t. 2-1/4
u. 2-3/8
v. 2-1/2
w. 2-5/8
x. 2-3/4
y. 2-7/8
z. 3
Sling Top
a. E (Eye)
b. Thimble Eye
c. Oblong Master w/ Thimble
d. Oblong Master no Thimble
e. Pear Master w/ Thimble
f. Pear Master no Thimble
g. Soft Eye
h. H (Hook)
i. S (Slip through thimble)
j. CR
k. X (Special)
Sling Bottom
a. E (Eye)
b. Thimble Eye
c. Oblong Master w/ Thimble
d. Oblong Master no Thimble
e. Pear Master w/ Thimble
169
f.
g.
h.
i.
j.
k.
Pear Master no Thimble
Soft Eye
H (Hook)
S (Slip through thimble)
CR
X (Special)
Number of Legs
a. Single Leg
b. Two Leg
c. Three Leg
d. Four Leg
e. Grommet Sling: Cable laid hand tucked grommet
f. Grommet Sling: Cable laid mechanical spliced grommet
g. Grommet Sling: Strand laid hand tucked grommet
h. Grommet Sling: Strand laid mechanical spliced grommet
i. Multi-Part Grommet
Length
Proof Tested
4. Blocks
a.
b.
c.
d.
e.
f.
g.
h.
i.
j.
k.
l.
Mobile Crane Block
Bridge Crane Block
Scrap Yard Block
Snatch Block
Derrick Hoist Block
Construction Block
Tilt-Up Block
Tubing Block
Drilling Block
General Oilfield Block
Overhaul Ball
Block (User-defined)
5. Hoist Rings
a. Hoist Ring
b. Hoist Ring (User-defined)
Catalog Code / Product Description
a.
b.
c.
d.
e.
f.
g.
h.
i.
j.
k.
l.
m.
R100
HR1000
HR1000M
HR100M
HR1200
HR1200M
HR125
HR125C
HR125M
HR125W
HR500
SS125
SS125M
Pivot Hoist Ring
Heavy Duty Hoist Ring
Metric Heavy Duty Hoist Ring
Metric Pivot Hoist Ring
Side Pull Hoist Ring
Metric Side Pull Hoist Ring
Engineered Hoist Ring
Hoist Ring For Chain
Metric Engineered Hoist Ring
Hoist Ring For Synthetics
Trench Cover Hoist Ring
Stainless Steel Hoist Ring
Metric Stainless Steel Engineered Hoist Ring
6. Plate Clamps
a. Locking Clamp
b. Non-Locking Clamp
c. Non-Marring Clamp
170
d. Specialty Clamp
e. Clamp (User-defined)
Catalog Code / Product Description
a. Locking Clamp
i.
IP10
Vertical Lifting Clamp -Straight Eye
ii.
IP10H
Vertical Lifting Clamp -Straight Eye For Hard Surfaces
iii.
IP10J
Vertical Lifting Clamp -Straight Eye w/Large Jaw Opening
iv.
IP10S
Vertical Lifting Clamp -Straight Eye For Stainless Steel Surfaces
v.
IPBHZ
Beam Clamp For Horizontal Transfer w/Pretension Lock
vi.
IPBKZ
Beam Clamp w/Hoisting Eye and Pretension Lock
vii.
IPBSNZ
Beam Clamp
viii.
IPHGUZ
Horizontal Lifting Clamp -Universal Eye w/Pretension Lock
ix.
IPHGZ
Horizontal Lifting Clamp -Straight Eye w/Pretension Lock
x.
IPU10
Vertical Lifting Clamp -Universal Eye
xi.
IPU10H
Vertical Lifting Clamp -Universal Eye For Hard Surfaces
xii.
IPU10J
Vertical Lifting Clamp -Universal Eye w/Large Jaw Opening
xiii.
IPU10S
Vertical Lifting Clamp -Universal Eye For Stainless Steel Surfaces
xiv.
IPVUZ
Beam Clamp For Vertical Lift & Transfer w/Pretension Lock
xv.
IPVZ
Vertical Lifting Clamp w/Straight Eye
b. Non-Locking Clamp
i.
IPBC
Beam Clamp For Horizontal Transfer w/Pretension Lock
ii.
IPH10
Horizontal Lifting Clamp -Straight Eye w/Spring
iii.
IPHOZ
Horizontal Lifting Clamp For Sagging Material
iv.
IPHSZ
Horizontal Lifting Clamp w/Large Jaw Opening
v.
IPHTONZ Horizontal Lifting Clamp w/Standard Jaw Opening
c.
Non-Marring Clamp
i.
IPHNM10 Horizontal Non-Marring Lifting Clamp w/Straight Eye
ii.
IPNM10
Non-Marring Vertical Lifting Clamp
iii.
IPNM10J Vertical Non-Marring Lifting Clamp
d. Specialty Clamp
i.
IPBUUZ
ii.
IPBUZ
iii.
IPDV
iv.
IPSC
v.
IPTK
vi.
IPTKW
vii.
IPVK
7.
Ship Building Clamp - Universal Eye
Ship Building Clamp - Straight Eye
Drum Clamp For Vertical Lift & Transfer
Positioning Clamp
Beam Clamp w/Hoisting Eye
Beam Clamp w/o Hoisting Eye
Drum Clamp For Vertical Lift & Transfer
Shackles
a. Shackle
b. Sling Saver Shackle
c. Shackle (User-defined)
d. Shackle
i. G209
ii. G209A
iii. G210
iv. G213
v. G2130
vi. G2130CT
vii. G2140
viii. G2140CT
ix. G215
x. G2150
xi. G2160
xii. S209
Screw Pin Anchor Shackle Maxtough®
Alloy Screw Pin Anchor Shackle
Screw Pin Chain Shackle Maxtough®
Round Pin Anchor Shackle Maxtough®
Bolt Type Anchor Shackle Maxtough®
COLD TUFF® Anchor Shackle
Alloy Bolt Type Anchor Shackle
Alloy COLD TUFF® Anchor Shackle
Round Pin Chain Shackle Maxtough®
Bolt Type Chain Shackle Maxtough®
"Wide Body" Anchor Shackle
Screw Pin Anchor Shackle Maxtough®
171
xiii.
xiv.
xv.
xvi.
xvii.
xviii.
xix.
xx.
S210
S213
S2130
S2131
S2140
S215
S2150
S2160
Screw Pin Chain Shackle Maxtough®
Round Pin Anchor Shackle Maxtough®
Bolt Type Anchor Shackle Maxtough®
Trawling Shackle
Alloy Bolt Type Anchor Shackle
Round Pin Chain Shackle Maxtough®
Bolt Type Chain Shackle Maxtough®
"Wide Body" Anchor Shackle
e. Sling Saver Shackle
i. S237
ii. S238
iii. S252
iv. S253
v. S280
vi. S281
vii. S282
High Performance Sling Connector
High Performance Sling to Sling Connector
Sling Saver Round Sling Bolt Type Sling Shackle
Sling Saver Screw Pin Shackle
Sling Saver Web Connector
Sling Saver Web Sling Shackle
Sling Saver Web / Chain Connector
Other Menu Options
1.
(General)
a. Create New Database – Allows creation of a new local or network database for a given
distributor.
b. Open Existing Database – Allows opening of an existing local or network database.
c. Backup/Save As – Allow backup/export of current distributor database.
d. Merge Database – Allows merging of a local or network database with the current distributor
database.
2. Reporting
a. Report Type
i.
Inspections
Shows Inspection records for Active products within the specified date range. A
Product Type may be specified, or <All> product types may be specified, in which
case a separate report will be created for each product type that has inspections.
Only scheduled inspections, or repair inspection, will be displayed on the
Inspection report. Inspection records of a product’s creation, deactivation or
reactivation will not appear on this report. Product property information and defect
criteria will be displayed on the report, and defects noted will be indicated on the
report. At the end of each Product Type report, a pie chart will be displayed,
indicating the ratio of Inspection records that are marked as having a status of Ok,
Replace, and Repair.
ii.
Missing
Shows items that do not have Inspection records within the specified date range
for the specified End User. A Product Type may be specified, or <All> product
types may be specified, in which case a separate report will be created for each
product type that does not have inspections in the given date range.
iii.
Damaged
Same report fields as the “Inspections” report, above, except only Inspection
records that are marked as having a status of Replace or Repair are present on the
report.
iv.
Repaired
172
Same report fields as the “Inspections” report, above, except only Inspection
records that are marked as having a state of Repaired are present on the report.
v.
History
Shows all Inspection records within the specified date range, including records of a
repair. Entering a serial number specifies the product or leaving serial number
empty, specifies that all products are to be included in the report. Product property
information and defect criteria will be displayed on the report, and defects noted
will be indicated on the report.
vi.
Pre-Inspection
Shows all Active products that are due for an inspection within the specified date
range. A subset of products can be reported by using the filter options for Next
Projected Inspection Date, Product Type and Location.
b. Select Logo
i.
JPG
ii.
BMP
iii.
GIF
iv.
TIFF
173
Appendix – Access Levels
When preparing an End User Database or Installing the QUIC-CHECK® Software on an End User’s
computer, refer to the chart below to know which End User Level is appropriate.
What is this? I don’t see where this is used.
174
Appendix - Inspection Standards
Is this US Standards or does it apply to EURO?
Product Type
Chain Sling
Wire Rope Sling
Round Sling
Shackle
Hoist Ring
Block - Mobile Crane
Block - Bridge Crane
Block - Scrap Yard
Block - Snatch
Block - Derrick Hoist
Block - Construction
Block - Tilt-Up
ASME B30.9
ASME B30.9
ASME B30.9
ASME B30.26
ASME B30.26
ASME B30.5
HST4
ASME B30.20
ASME B30.5
ASME B30.26
ASME B30.26
ASME B30.26
ASME B30.26
Block - Tubing
API RP 8B
Block - Drilling
API RP 8B
Block - General Oilfield
Block - Overhaul Ball
Clamp - Locking
Clamp - Non-Locking
Clamp - Non-Marring
Clamp - Specialty
MANUFACTURER
ASME B30.5
ASME B30.20
ASME B30.20
ASME B30.20
ASME B30.20
Inspection Standard
"Slings"
"Slings"
"Slings"
"Rigging Hardware"
"Rigging Hardware"
"Mobile and Locomotive Cranes"
"Performance Standard for Electric Overhead Wire Rope Hoist"
"Below the Hook Lifting Devices"
"Mobile and Locomotive Cranes"
"Rigging Hardware"
"Rigging Hardware"
"Rigging Hardware"
"Rigging Hardware"
"Recommended Practice for Procedures for Inspection,
Maintenance, Repair and Remanufacturing of Hoisting
Equipment"
"Recommended Practice for Procedures for Inspection,
Maintenance, Repair and Remanufacturing of Hoisting
Equipment"
MANUFACTURER
"Mobile and Locomotive Cranes"
"Below the Hook Lifting Devices"
"Below the Hook Lifting Devices"
"Below the Hook Lifting Devices"
"Below the Hook Lifting Devices"
175
Appendix – Required Product Settings for each standard product
type in the QUIC-CHECK Euro system.
Chain Slings
Required fields are denoted with an asterisk.
176
Round Slings
Required fields are denoted with an asterisk.
177
Web Slings
Required fields are denoted with an asterisk.
178
Wire Rope Slings – 1 Leg
Required fields are denoted with an asterisk.
179
Wire Rope Slings – Multi-Leg
Required fields are denoted with an asterisk.
180
Wire Rope Slings – Single Length of Rope
Required fields are denoted with an asterisk.
181
User-Defined Blocks
Required fields are denoted with an asterisk.
182
Bridge Crane Blocks
Required fields are denoted with an asterisk.
183
Construction Blocks
Required fields are denoted with an asterisk.
184
Derrick Hoist Blocks
Required fields are denoted with an asterisk.
185
Drilling Blocks
Required fields are denoted with an asterisk.
186
General Oilfield Blocks
Required fields are denoted with an asterisk.
187
Mobile Crane Block
Required fields are denoted with an asterisk.
188
Overhaul Ball
Required fields are denoted with an asterisk.
189
Scrap Yard Blocks
Required fields are denoted with an asterisk.
190
Snatch Blocks
Required fields are denoted with an asterisk.
191
Tilt-Up Blocks
Required fields are denoted with an asterisk.
192
Tubing Blocks
Required fields are denoted with an asterisk.
193
Hoist Rings
Required fields are denoted with an asterisk.
194
User-Defined Hoist Rings
Required fields are denoted with an asterisk.
195
Plate Clamps
Required fields are denoted with an asterisk.
196
Locking Clamps
Required fields are denoted with an asterisk.
197
Non-Locking Clamps
Required fields are denoted with an asterisk.
198
Non-Marring Clamps
Required fields are denoted with an asterisk.
199
Specialty Clamp
Required fields are denoted with an asterisk.
200
Shackles
Required fields are denoted with an asterisk.
201
User-Defined Shackles
Required fields are denoted with an asterisk.
202
Sling Saver Shackles
Required fields are denoted with an asterisk.
203
Appendix - Desktop Troubleshooting FAQ
Issue
Resolution
Throughout the program,
various text input boxes
(and other user controls)
appear to be cut off.
QUIC-CHECK® Plus supports the default Windows DPI setting of 96 DPI. To
verify/modify the dpi setting, first access the Windows Control Panel. Doubleclick Display to open the display properties dialog. Go to the Settings tab and
press the Advanced button. On the General tab of the Advanced properties,
verify the selected DPI setting is “Normal size (96 DPI)”.
*Changing this setting will require you to log out of Windows for
the new setting to be fully applied. Note that this setting will
apply to all applications run in Windows, and cannot be limited
only to QUIC-CHECK® Plus.
The US version comes
up instead of the Euro
version.
The QCINSTALL
Environment variable
stored in the registry
controls what version is
displayed.
The setting is stored per
user. So logging in as a
different user will not
allow the application to
see the variable set for
the other user. An error
message will display
saying QCINSTALL is
not set, this causes the
US version to load.
Another issue is that the
database will not be
accessible if it is a local
install. The database is
stored in “My
Documents” and can
only be loaded by the
user that created the
database.
Contact technical
support for help with this
issue.
204
Appendix - Mobile Device Troubleshooting Tips
I can’t find the Pocket QUIC-CHECK® application on my Mobile Device. What’s
wrong?
If you are unable to find the Pocket QUIC-CHECK® application on your Mobile Device, it could be because the
Mobile Device has not yet been synchronized with your desktop PC yet. The first-time Mobile Device
synchronization installs the Pocket QUIC-CHECK® application as well as places a copy of your QUIC-CHECK®
Plus data on the Mobile Device.
Be sure the synchronization is performed inside the desktop QUIC-CHECK® Plus application, from the “Mobile”
tab. While your Mobile Device may indicate synchronization is complete just after you plug it in to the desktop PC,
this is misleading. Microsoft Windows and Outlook are also capable of synchronizing with a Mobile Device, and
®
this may be what you’re being informed about. If you’re not synchronizing from the desktop QUIC-CHECK Plus
®
application, you’re not synchronizing your QUIC-CHECK Plus data.
See the section titled Mobile Device Software Instructions for more information on how to synchronize your
Mobile Device for the first time.
How do I reset my Mobile Device?
Sometimes it is necessary to reset your Mobile Device. This can be done in one of two ways, depending on
the problems you may be experiencing.
Method 1: “Soft” reset
A “soft” reset stops all running applications, but does not erase any data. Therefore it should be the first
approach to correcting a problematic Mobile Device.
Perform a soft reset if:
The Mobile Device “freezes” or otherwise stops responding to your input
The RFID reader won’t read or write to QUIC-CHECK® tags
The Mobile Device becomes “sluggish” or takes a long time to respond to your input
To perform a soft reset:
1. Locate the recessed Reset button on the bottom of your Mobile Device (it will look like a pinhole).
Consult your Mobile Device’s user manual if you can’t locate the button.
2. Use the stylus tip to lightly press the Reset button
The Mobile Device restarts and displays the Today screen.
Method 2: “Clean” reset
A “clean” reset erases all user-installed programs and data, returning the Mobile Device to its factory
condition. Therefore it should only be used as a last resort. Note that the Pocket QUIC-CHECK® application
will need to be re-installed after this procedure.
Warning: This procedure will erase all user data, including the Pocket QUIC-CHECK® database. If you
have unsynchronized data on your Mobile Device, attempt the procedure summarized in “Manually moving
a Pocket QUIC-CHECK® database” to preserve a copy of the database. However, depending on the
problems you’re experiencing, the procedure may not be possible.
205
Perform a clean reset if:
You’ve already tried a “soft” reset and it didn’t correct the problem
You’re experiencing synchronization problems such as:
o The desktop application doesn’t recognize the Mobile Device as being plugged in or
available
o The desktop application repeatedly experiences errors when trying to synchronize data
The mobile application won’t open
To perform a clean reset:
1. Locate and hold a special combination of buttons:
i. SocketMobile 650: Press and hold the Left Programmable Application Button, the
Calendar and Contacts shortcut buttons.
ii. HP iPAQ hx2490: Press and hold the Calendar button, the Power button and the
Messaging button at the same time.
iii. HP iPAQ 210: Press and hold the Windows button, the OK button, and the Voice Recorder
button at the same time.
iv. Other Mobile Device brands/models: Consult the user manual that came with your
Mobile Device.
2. While holding the three buttons, using the tip of your stylus, lightly press the Reset button inside the
hole on the bottom of the Mobile Device and then release. (For HP models, keep the reset button
pressed in for 2 seconds, then release.)
3. Keep pressing all three buttons until a splash screen appears with the Mobile Device logo and
then disappears. After the splash screen disappears, release the three buttons and follow the
onscreen instructions.
Note: As this procedure is difficult for one person to perform, you may want to have
someone help you.
Note that you will need to reset the Time and Date, as well as re-enter any owner information or
preferences.
Once the Mobile Device displays the Today screen, connect it to the computer running the desktop
application and perform a synchronization to reinstall the Pocket QUIC-CHECK® application.
Manually Moving a Pocket QUIC-CHECK® Database
In certain cases, it may be necessary to manually move or copy the Pocket QUIC-CHECK® database from
the Mobile Device to a new location (for example, the Mobile Device needs to perform a “clean” reset). To
do this, the Mobile Device needs to be connected to the desktop computer via Windows mobile Device
Center or ActiveSync
1. If the appropriate icon is visible in the desktop computer’s system tray, double-click the icon. If it’s not
visible, point to the Start Menu, then point to All Programs > Microsoft Windows Mobile Device Center
(or ActiveSync if on Windows XP).
2. For Windows Mobile Device Center:
a. Once the Mobile Device Center opens and connects to the Mobile Device, click the "Connect
without setting up your device" link.
b. Under the "File Management" heading, click the "Browse the contents of your device" link
c. Click on the hard disk represented by a single slash "\" (usually on the far left)
3. For ActiveSync:
a. Once the ActiveSync window opens, click the Explore toolbar button. This opens the Mobile
Device window and allows you to browse the contents of the Mobile Device.
206
4.
5.
6.
7.
b. In the Mobile Device window, locate the item named “My Windows Mobile-Based Device” and
double-click it.
Now double-click the folder named “Program Files,” then double-click the folder named “Pocket QUICCHECK”.
Locate the file named “quicheckdb.sdf.” This is the Pocket QUIC-CHECK® database.
Click and drag the “quicheckdb.sdf” file from the Mobile Device window to a location on the desktop
computer (a folder on the Desktop, for example). The database file will be copied to this location.
The copied database file can be merged on the desktop (“Merge Database…”) or copied back to the
Mobile Device at a later time.
Manually Remove Application Files
Sometimes after you uninstall the application from the mobile device the application files are still
there and can cause some issues. To remove the application files before reinstalling the application:
1) Go to Windows Mobile Device
Center and make sure your
mobile device is connected.
2) Select File Management –
Browse the contents of your
device.
207
3) File Explorer will open and
display the drives on the mobile
device. Select the “\” drive.
4) Select “Program Files”
208
5) Select folders that have “Pocket
QUIC-CHECK” and press the
Delete key.
6) A warning dialogue will display.
Click on the Yes button to
delete the folder.
You can now try installing the
application again from the
Desktop application.
Troubleshooting Mobile Device Synchronization
Synchronization between the QUIC-CHECK® Plus desktop application and Pocket QUIC-CHECK® on the
Mobile Device is dependent upon software from Microsoft called Windows Mobile Device Center (for
Windows 7 and Windows Vista) or ActiveSync (for Windows 2000 / XP). In many cases, troubleshooting
synchronization problems involves troubleshooting Microsoft’s software as well.
Option 1: Pocket QUIC-CHECK is closed, but the desktop application thinks it isn't
The desktop application checks a setting on the Mobile Device to see if Pocket QUIC-CHECK® is running.
If the battery on your Mobile Device was depleted of power while Pocket QUIC-CHECK® was still open,
®
then the flag will still indicate (incorrectly) that Pocket QUIC-CHECK is currently running.
In this case, the resolution is simple. Just open Pocket QUIC-CHECK® and close it again to set the flag
that will allow synchronization.
Option 2: Turning Off the Advanced Network Functionality
Often, a communication problem between the PC and the Mobile Device can be remedied by changing a
single setting on the Mobile Device. Following these instructions are images that demonstrate the steps
209
1. Go the Start menu of the Mobile Device and click
"Settings"
2. Click on the "Connections" tab
3.
3. Click on the icon labeled "USB to PC"
4.
4. Uncheck the "Enable advanced network functionality"
checkbox.
5.
Other Options:
1. Have you tried disconnecting the Mobile Device from its cable or cradle, and re-connecting?
2. Have you tried restarting Windows on the desktop PC?
3. Have you tried updating Windows Mobile Device Center or ActiveSync to the latest version? ActiveSync
is currently at version 4.5; Windows Mobile Device Center is at version 6.1. Both are available for free
download at Microsoft.com.
210
4. If using ActiveSync, have you tried recreating a partnership between the desktop computer and the
Mobile Device?
a. Disconnect the Mobile Device from the desktop computer.
b. Open ActiveSync, then point to File > Delete Mobile Device.
c. Answer “Yes” to the warning dialog that is displayed.
d. Reconnect the Mobile Device to the desktop computer.
e. The “Synchronization Setup Wizard” window is displayed. Click the “Next” button.
f. Choose the types of information you wish to synchronize. Crosby recommends that you uncheck
ALL checkboxes to prevent personal information from being stored on the Mobile Device.
g. Click the “Next” button.
h. Click the “Finish” button.
®
5. Have you tried uninstalling the Pocket QUIC-CHECK application and allowing the desktop application to
re-install it?
a. On the Mobile Device, tap the “Start” menu, and then tap “Settings.”
b. Tap the “System” tab at the bottom of the screen.
c. Locate the “Remove Programs” icon in the list, and tap it.
d. Tap the entry for “The Crosby Group LLC Pocket QUI...” to highlight it, and then click the
“Remove” button at the bottom of the screen.
e. Answer “Yes” to the warning message.
f. Tap the “ok” button in the top right corner of the screen. Then tap the “X” button in the top right
corner.
g. Sometimes the application is not completely removed and you will have to manually remove the
application. See “Manually remove application files”.
i. Go to the Windows Mobile Device Center and select File Management – Browse the contents of
your device
ii.
h. On the desktop computer, open the QUIC-CHECK® Plus application if it is not already running.
i. Click the “Mobile” tab, and then click the “Install on Device” button.
j. Follow the on-screen instructions to complete the re-installation of Pocket QUIC-CHECK®.
6. Have you tried performing a reset on the Mobile Device? See the section How do I reset my Mobile
Device?
7. Have you tried removing the RFID scanner and re-synchronizing?
211
Appendix – Report Samples
Certificate
212
Survey of Defects
213
Report of Examination
214
Inspections
215
Missing Report
216
Damaged
217
History
218
Pre-Inspection
219
Products
220
Index
Active status, 41, 133
Menu Options - New Product
Adding an inspector
Blocks, 162
During inspection (Desktop), 49, 76
Chain Slings, 157
Alert column (Desktop), 74
Hoist Rings, 162
Automatic Updates, 19
Plate Clamps, 162
Turn off, 21
Product Category, 157
Without Internet access, 18, 22
Product Type, 157
Building a Product
Round Slings, 159
Pocket PC, 121, 124, 132
Shackles, 163
Clear All Filters Button, 65, 74
Wire Rope Slings, 160
Combining
Menu Options - Reporting, 164
End Users, 108
Mobile Device, 7, 17, 23, 24, 25, 26, 27, 28, 29, 87, 88, 89, 90, 91, 93,
Inspectors, 109
94, 95, 96, 100, 108, 112, 115, 118, 119, 120, 133, 135,
Manufacturers, 109
137, 144, 145, 148, 151, 152, 197, 198, 199, 201, 202, 203
Conflict
Building a Product, 121, 124, 132
RFID Tag Conflict, 71
Inspecting Products, 121, 137
Database, 12, 18, 95, 100, 112, 164, 198, 199
Reset, 197
Creating, 12
Setup, 24
Creating a Backup, 111
Storage Card, 8, 88
Name, 13
Synchronization, 5, 87, 88, 89, 90, 91, 92, 93, 95, 201, 203
Network, 13
Synchronizing With PC, 87
Upgrading, 18
Troubleshooting, 201
Dialogs
New Product, 37, 40, 45, 53, 57, 70, 71, 73, 133, 145, 157
Distributor (Desktop), 14
Asset Number, 41
End User (Desktop), 16, 17
Creating, 40, 45
Inspection
Details section, 43
Begin Inspection (Pocket PC), 146, 147
Find Products (Pocket PC), 126
Product Specification (Pocket PC), 143
General section, 40
Inspection (Desktop), 76
Menu Options, 157
New Product (Desktop), 40
Required fields, 40
Resolve Tag Conflict (Pocket PC), 135
RFID No., 41
In Service Date, 41
Manufacturer, 41
Tag Reader (Pocket PC), 118
Serial Number, 41
Welcome (Desktop), 12
Options, 21, 34, 43, 75, 91, 110, 113, 157, 164, 202
Home tab, 37
Printing Reports, 80
Initialize
Product Type, 38, 40, 43, 50, 51, 53, 54, 55, 56, 57, 58, 59, 60, 61, 62,
RFID Tag, 72, 134, 135
63, 81, 118, 157, 164, 165, 167
Inspection, 6, 7, 54, 55, 61, 62, 74, 75, 80, 81, 83, 118, 122, 132, 136,
Custom, 51
137, 139, 140, 141, 142, 143, 146, 147, 148, 150, 151, 164,
Customizing Predefined, 61
165, 167
Definition, 50
Alert, 74
Editing, 58
Defects, 147
Predefined, 51
Entering on Desktop, 74
Product Types, 50
Entering on Mobile Device, 121, 137
"Customize Product Types" Window, 51
Projected Inspection Date, 75
Adding Custom, 53
Standards, 147, 167
Customizing Predefined, 61
Inspection Information window, 75
Editing and Deleting, 58
Products
Inspection Standards, 167
, 37, 50, 54, 57, 59, 63, 73, 80, 81, 117, 121, 122, 132, 133, 136,
Inspector
137, 144, 148, 150, 151
Adding, 17
Edit, 38
Edit, 17
Finding on Desktop, 37
Installation
Finding on Mobile Device, 137
Desktop Software, 10, 12
Searching For, 37
QUIC-CHECK® Tag Reader, 115
Pocket PC Software, 24
221
Status
Registration, 10
Repair Product
Active, 41
On Mobile Device, 150
Synchronizing
Repairing a Product
Advanced Data Synchronization, 91
Desktop, 47
Date and Time, 23, 87
Pocket PC, 150
Mobile Device with PC, 87
Reports, 41, 55, 80, 81, 82, 84, 85, 164
Phases, 91
Printing, 80
Recovering Lost Data, 95
Types, 80
Scenarios, 88
Resetting Pocket PC, 197
Standard Data Synchronization, 87
RFID
Troubleshooting, 201
Mobile Device Reader, 34, 36, 118
System
Pen, 5, 31, 32, 34, 38, 41, 70
Benefits, 6
QUIC-CHECK Tag, 70, 73
Components, 6
RFID No., 41, 70, 71
Prerequisites, 8
Tag Conflict, 71
Purpose, 6
RFID Pen
Requirements, 7
Tabs
Connecting via Bluetooth, 32
Connecting via USB, 31
Home, 24
Device Status LED, 32
Mobile, 24
Enabling the use of, 34
Reporting, 80
Pairing, 33
Tag
Power button, 32
Re-assigning (Recycling), 135
Reading and Writing Tags, 70
Technical Support
RFID Reader, 6, 29
Contacting Crosby, 113
No RFID Reader Error, 118
Updates, 19, 21, 22
RFID transceiver, 6, 23, 118, 139, 140
Automatic, 19
Scan
Installing, 19
RFID Tag, 38, 118, 119
Turning off, 21
Setup
Without internet access, 22
What’s New, 5
Hardware, 23
SQL Server Express, 8, 13
222