1
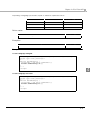
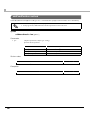
ePOS-Print API
User’s Manual
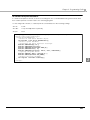
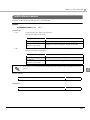
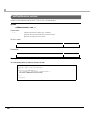
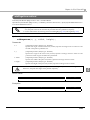
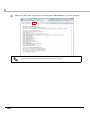
Overview
Describes the features and development environment.
Sample Program
Describes how to use the sample program and how to build a system.
Programming Guide
Describes how to write programs in Web application development.
ePOS-Print API
Describes the ePOS‐Print API.
ePOS-Print Canvas API
Describes the ePOS‐Print CanvasAPI.
ePOS-Print Editor
Describes the ePOS‐Print Editor.
Appendix
Describes the specifications for printers used for ePOS‐Print, how to use the rendering of images in HTML5 Canvas.
M00042109
Rev.J
Cautions
• No part of this document may be reproduced, stored in a retrieval system, or transmitted in any form
or by any means, electronic, mechanical, photocopying, recording, or otherwise, without the prior
written permission of Seiko Epson Corporation.
• The contents of this document are subject to change without notice. Please contact us for the latest
information.
• While every precaution has taken in the preparation of this document, Seiko Epson Corporation
assumes no responsibility for errors or omissions.
• Neither is any liability assumed for damages resulting from the use of the information contained
herein.
• Neither Seiko Epson Corporation nor its affiliates shall be liable to the purchaser of this product or third
parties for damages, losses, costs, or expenses incurred by the purchaser or third parties as a result of:
accident, misuse, or abuse of this product or unauthorized modifications, repairs, or alterations to this
product, or (excluding the U.S.) failure to strictly comply with Seiko Epson Corporation’s operating
and maintenance instructions.
• Seiko Epson Corporation shall not be liable against any damages or problems arising from the use of
any options or any consumable products other than those designated as Original EPSON Products or
EPSON Approved Products by Seiko Epson Corporation.
Trademarks
EPSON and ESC/POS are registered trademarks of Seiko Epson Corporation in the U.S. and other
countries.
Windows and Internet Explorer are either registered trademarks or trademarks of Microsoft Corporation in the United States and other countries.
SafariTM and TrueType are either registered trademarks or trademarks of Apple Inc. in the United States
and other countries.
AndroidTM and Google ChromeTM are either registered trademarks or trademarks of Google Inc. in the
United States and other countries.
Mozilla and Firefox are either registered trademarks or trademarks of Mozilla Foundation in the United
States and other countries.
IOS is registered trademarks or trademarks of Cisco in the United States and other countries.
ESC/POS® Command System
EPSON has been taking industry’s initiatives with its own POS printer command system (ESC/POS).
ESC/POS has a large number of commands including patented ones. Its high scalability enables users
to build versatile POS systems. The system is compatible with all types of EPSON POS printers (excluding
the TM-C100) and displays. Moreover, its flexibility makes it easy to upgrade the future. The functionality
and the user-friendliness is valued around the world.
Copyright © 2011-2013 Seiko Epson Corporation. All rights reserved.
2
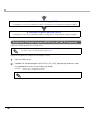
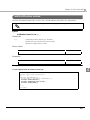
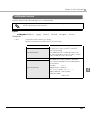
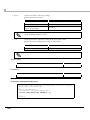
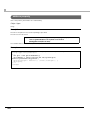
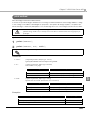
For Safety
Key to Symbols
The symbols in this manual are identified by their level of importance, as defined below. Read the
following carefully before handling the product.
Provides information that must be observed to avoid damage to your equipment or a
malfunction.
Provides important information and useful tips.
Restriction of Use
When this product is used for applications requiring high reliability/safety such as transportation devices
related to aviation, rail, marine, automotive etc.; disaster prevention devices; various safety devices
etc; or functional/precision devices etc, you should use this product only after giving consideration to
including fail-safes and redundancies into your design to maintain safety and total system reliability.
Because this product was not intended for use in applications requiring extremely high reliability/safety
such as aerospace equipment, main communication equipment, nuclear power control equipment, or
medical equipment related to direct medical care etc, please make your own judgment on this
product’s suitability after a full evaluation.
3
About this Manual
Aim of the Manual
This manual is intended to provide development engineers with all the information necessary for
building/designing an ePOS-Print API system or developing/designing an ePOS-Print printer application.
In this manual, "ePOS-Print supported printer" is a generic term for the TM-i series and TM printers that
support the ePOS-Print API.
The TM-i series in this manual is a generic term for the following printers.
TM-T88V-i
TM-T70-i
TM-L90-i
Manual Content
The manual is made up of the following sections:
Chapter 1
Overview
Chapter 2
Sample Program
Chapter 3
Programming Guide
Chapter 4
ePOS-Print API
Chapter 5
ePOS-Print Canvas API
Chapter 6
ePOS-Print Editor
Appendix
Printer specifications
Paper setting function of TM-L90
Rendering in HTML5 Canvas
Windows Store Apps
4
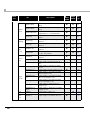
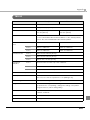
Contents
■ For Safety...............................................................................................................................3
Key to Symbols ....................................................................................................................................... 3
■ Restriction of Use ..................................................................................................................3
■ About this Manual ................................................................................................................4
Aim of the Manual................................................................................................................................. 4
Manual Content .................................................................................................................................... 4
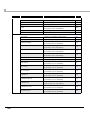
■ Contents ................................................................................................................................5
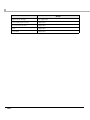
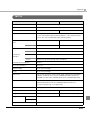
Overview ......................................................................................11
■ Overview of ePOS-Print ......................................................................................................11
Features ................................................................................................................................................ 12
Print Example........................................................................................................................................ 13
Print Flow ............................................................................................................................................... 15
Features ................................................................................................................................................ 16
■ Operating Environment ......................................................................................................17
Applications environment .................................................................................................................. 17
Terminal................................................................................................................................................. 17
ePOS-Print Supported TM printer........................................................................................................ 17
Printers That Can Be Controlled ......................................................................................................... 17
■ System Construction Example ..........................................................................................18
Registering a Web Application Into the Web Server....................................................................... 18
Registering a Web Application Into a TM-i ....................................................................................... 19
Registering a Web application to a cloud ....................................................................................... 20
■ Contents in the Package ...................................................................................................21
■ Version Information ............................................................................................................23
■ Restrictsions.........................................................................................................................24
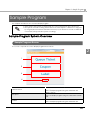
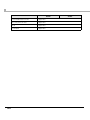
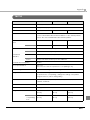
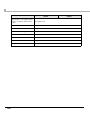
Sample Program ..........................................................................25
■ Sample Program System Overview ..................................................................................25
Sample Program Screen ..................................................................................................................... 25
Print Image ........................................................................................................................................... 27
Program Flow........................................................................................................................................ 28
■ Operating Environment ......................................................................................................31
TM-i ........................................................................................................................................................ 31
TM Printer (Wireless LAN Model) ......................................................................................................... 32
■ Environment Settings ..........................................................................................................33
Registration of Sample Program (ePOS-Print_API_UM_E_Sample.zip) ........................................... 34
5
Network Setting of ePOS-Print Supported TM printer .......................................................................35
Device ID Settings.................................................................................................................................37
Sample Program Settings ....................................................................................................................39
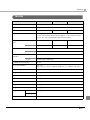
Programming Guide ....................................................................41
■ ePOS-Print API..................................................................................................................... 41
Print Mode.............................................................................................................................................41
Programming Flow ...............................................................................................................................42
Embedding of ePOS-Print API .............................................................................................................43
Print Document Creation ....................................................................................................................44
Transmission of Print Document ..........................................................................................................48
Reception of Print Result......................................................................................................................49
Reception of Status Event ...................................................................................................................51
■ ePOS-Print Canvas API....................................................................................................... 52
Embedding of ePOS-Print Canvas API ...............................................................................................53
Rendering in HTML5 Canvas ...............................................................................................................54
Prints an Canvas image.......................................................................................................................55
Reception of Print Result......................................................................................................................56
Reception of Status Event ...................................................................................................................58
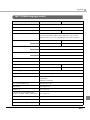
ePOS-Print API ..............................................................................59
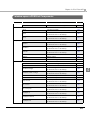
■ List of API functions............................................................................................................. 59
window.epson.ePOSBuilder Components.........................................................................................59
window.epson.ePOSPrint Components .............................................................................................63
■ ePOS-Print Builder Object.................................................................................................. 65
Constructor ...........................................................................................................................................65
addTextAlign method ..........................................................................................................................66
addTextLineSpace method ................................................................................................................67
addTextRotate method .......................................................................................................................68
addText method...................................................................................................................................69
addTextLang method ..........................................................................................................................70
addTextFont method ...........................................................................................................................73
addTextSmooth method .....................................................................................................................74
addTextDouble method ......................................................................................................................75
addTextSize method ............................................................................................................................77
addTextStyle method...........................................................................................................................78
addTextPosition method......................................................................................................................80
addTextVPosition method ...................................................................................................................81
addFeedUnit method ..........................................................................................................................82
addFeedLine method..........................................................................................................................83
addFeedPosition method....................................................................................................................84
addFeed method.................................................................................................................................86
addImage method ..............................................................................................................................87
addLogo method.................................................................................................................................89
addBarcode method ..........................................................................................................................90
6
addSymbol method ............................................................................................................................ 95
addHLine method ............................................................................................................................. 101
addVLineBegin method ................................................................................................................... 103
addVLineEnd method....................................................................................................................... 105
addPageBegin method.................................................................................................................... 107
addPageEnd method....................................................................................................................... 108
addPageArea method ..................................................................................................................... 109
addPageDirection method.............................................................................................................. 111
addPagePosition method ................................................................................................................ 113
addPageLine method ...................................................................................................................... 115
addPageRectangle method ........................................................................................................... 117
addCut method ................................................................................................................................ 119
addPulse method .............................................................................................................................. 121
addSound method............................................................................................................................ 123
addLayout method ........................................................................................................................... 125
addRecovery method ...................................................................................................................... 130
addReset method ............................................................................................................................. 131
addCommand method.................................................................................................................... 132
toString method ................................................................................................................................. 133
halftone property .............................................................................................................................. 134
brightness property............................................................................................................................ 135
force property .................................................................................................................................... 136
message property ............................................................................................................................. 137
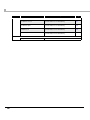
■ ePOS-Print Object.............................................................................................................138
Constructor......................................................................................................................................... 138
send method...................................................................................................................................... 139
open method..................................................................................................................................... 140
close method ..................................................................................................................................... 141
address property................................................................................................................................ 142
enabled property .............................................................................................................................. 143
interval property ................................................................................................................................ 144
status property ................................................................................................................................... 145
battery property ................................................................................................................................ 146
timeout property................................................................................................................................ 147
onreceive event ................................................................................................................................ 148
onerror event...................................................................................................................................... 151
onstatuschange event...................................................................................................................... 152
onbatterystatuschange event......................................................................................................... 153
ononline event ................................................................................................................................... 153
onoffline event ................................................................................................................................... 154
onpoweroff event .............................................................................................................................. 154
oncoverok event................................................................................................................................ 155
oncoveropen event .......................................................................................................................... 155
onpaperok event............................................................................................................................... 156
onpapernearend event.................................................................................................................... 156
onpaperend event............................................................................................................................ 157
ondrawerclosed event...................................................................................................................... 157
ondraweropen event ........................................................................................................................ 158
onbatteryok event............................................................................................................................. 158
onbatterylow event........................................................................................................................... 159
7
ePOS-Print Canvas API ..............................................................161
■ List of ePOS-Print Canvas API functions.......................................................................... 161
window.epson.CanvasPrint Components .......................................................................................161
■ ePOS-Print Canvas API Object........................................................................................ 164
Constructor .........................................................................................................................................164
print method .......................................................................................................................................165
open method .....................................................................................................................................167
close method......................................................................................................................................168
recover method .................................................................................................................................169
reset method ......................................................................................................................................169
address property ................................................................................................................................170
enabled property...............................................................................................................................171
interval property .................................................................................................................................172
status property ....................................................................................................................................173
battery property .................................................................................................................................174
timeout property ................................................................................................................................175
halftone property ...............................................................................................................................176
brightness property ............................................................................................................................177
cut property ........................................................................................................................................178
mode property ...................................................................................................................................179
align property .....................................................................................................................................180
color property .....................................................................................................................................181
feed property......................................................................................................................................182
paper property ...................................................................................................................................183
layout property ...................................................................................................................................184
onreceive event .................................................................................................................................189
onerror event ......................................................................................................................................192
onstatuschange event ......................................................................................................................193
onbatterystatuschange event .........................................................................................................194
onbatteryok event .............................................................................................................................195
onbatterylow event ...........................................................................................................................195
ononline event....................................................................................................................................196
onoffline event ....................................................................................................................................196
onpoweroff event...............................................................................................................................197
oncoverok event ................................................................................................................................197
oncoveropen event ...........................................................................................................................198
onpaperok event ...............................................................................................................................198
onpapernearend event ....................................................................................................................199
onpaperend event ............................................................................................................................199
ondrawerclosed event ......................................................................................................................200
ondraweropen event.........................................................................................................................200
ePOS-Print Editor ........................................................................201
■ ePOS-Print Editor Operating Environment ...................................................................... 201
■ Displaying ePOS-Print Editor............................................................................................ 202
8
■ Setting ................................................................................................................................203
■ Creating a Sample Code ................................................................................................204
Print...................................................................................................................................................... 207
Import.................................................................................................................................................. 208
Appendix....................................................................................209
■ Printer specifications ........................................................................................................209
TM-T88V-i ............................................................................................................................................. 209
TM-T88V ............................................................................................................................................... 211
TM-T88IV .............................................................................................................................................. 213
TM-T70-i................................................................................................................................................ 215
TM-T70-i (Multi-language model) ..................................................................................................... 217
TM-T70.................................................................................................................................................. 219
TM-T70 (Multi-language model) ....................................................................................................... 221
TM-L90-i ............................................................................................................................................... 223
TM-L90 ................................................................................................................................................. 225
TM-T90.................................................................................................................................................. 227
TM-P60II ............................................................................................................................................... 229
TM-P60II with Peeler ........................................................................................................................... 231
TM-P80 ................................................................................................................................................. 233
TM-T20.................................................................................................................................................. 235
TM-U220............................................................................................................................................... 237
■ Paper setting function of TM-L90 .....................................................................................239
Setting Paper Width........................................................................................................................... 239
Automatic setting of paper layout .................................................................................................. 239
■ Rendering in HTML5 Canvas ............................................................................................240
Rendering Text (canvas-print-text.html).......................................................................................... 241
Rendering Images (canvas-print-image.html) ............................................................................... 243
Rendering Graphics (canvas-print-graph.html)............................................................................. 245
Rendering Handwritten Images (canvas-print-hand.html) .......................................................... 247
Rendering Barcode (canvas-print-barcode.html) ........................................................................ 249
Rendering Label (canvas-print-label.html) .................................................................................... 251
■ Windows Store Apps .........................................................................................................253
Sample Program Screen ................................................................................................................... 253
Environment of Sample Program ..................................................................................................... 255
Sample Program Settings.................................................................................................................. 256
Printing ................................................................................................................................................ 257
9
10
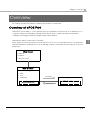
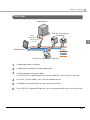
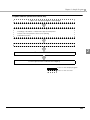
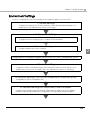
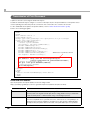
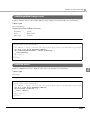
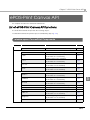
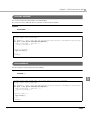
Chapter 1 Overview
Overview
This chapter describes the features of and the specifications for ePOS-Print.
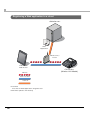
Overview of ePOS-Print
ePOS-Print is functionality to control POS printers in a multi-platform environment. From Web browser of
computer, smart phone and tablet, printing can be directly done on ePOS-Print supported TM printer.
In addition, print images rendered in HTML5 Canvas can be printed.
ePOS-Print provides the API for print commands.
When a print document (Request) is sent via HTTP from the host to the ePOS-Print Service of a ePOS-Print
supported TM printer, ePOS-Print processes the printing of that document and returns a response document
(Response).
Web Server
Internet
Intranet
TM-i web server
Web Browser
Web Page
HTML
CSS
(Request)
JavaScript
ePOS-Print supported TM printer
ePOS-Print Service
ePOS-Print API
(Response)
11
1
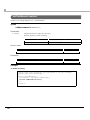
Features
❏ As long as it is in a network environment, a terminal with an HTML5-supported Web browser can perform
printing from anywhere.
❏ It supports Windows store apps (JavaScript).
❏ Installation of drivers and plug-ins is not required.
❏ No PCs or servers are required for printing.
❏ Allows printing from public and private clouds.
❏ Allows printing in languages supported in Web browsers.
❏ Automatically checks the status of the TM printer before printing. There is no need for checking the status
of the TM printer in advance. (Supported in firmware Ver.1.2 and later)
❏ Does not respond to a printer's function to automatically send its status (AutoStatusBack). Instead, capable of sending an empty print command and checking the status of the TM printer based on the result of
command transmission. (Supported in firmware Ver.1.2 and later)
❏ To change the printer settings, utility programs dedicated to each printer or other utility programs should
be used.
❏ In case of TM-i series, it can print to other TM printer via TM-i.
❏ Provides ePOS-Print API and ePOS-Print Canvas API.
<<ePOS-Print API>>
Allows device fonts to be used for printing.
Allows barcode printing.
<<ePOS-Print Canvas API>>
Allows printing of images rendered in HTML5 Canvas.
Allows TrueType fonts to be used for printing.
12
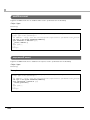
Chapter 1 Overview
Print Example
ePOS-Print API
Printing a Logo
Alignment: Center
Paper Feed
1
Paper Feed and Paper Cut
Printing a raster image
Your Number:
Printing text in the double-sized width style
Scale: x 6 (horizontal) and x 4 (vertical)
Alignment: Center
Printing a Barcode
13
ePOS-Print Canvas API
Monochrome or Grayscale
Monochrome
14
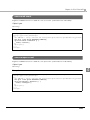
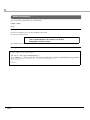
Chapter 1 Overview
Print Flow
<Web Server>
<Printers that can be
controlled>
Web
Application
Wireless LAN /
Router
1
<Web Browser>
Wireless
"
Device Control
Network
<ePOS-Print supported TM printer>
1
2
3
4
5
6
A Web application is placed.
A Web browser displays the Web application.
The Web browser sends print data.
For an ePOS-Print supported printer, the print data for the unit printer is printed.
For a TM-i, the print data is sent to a controllable printer.
The data is printed from printers that can be controlled.
The ePOS-Print supported TM printer returns a response document to the terminal.
15
Features
The installed functions vary depending on the model. For details, refer to Appendix, Printer Specifications. Printing functions of ePOS-Print API
❏ Print setting (alignment/line feed space/text rotation/page mode)
❏ Character data setting (language/font (device font)/double-sizing/scale/smoothing/print position)
❏ Character style setting (inversion of black and white/underline/bold)
❏ Paper feed setting (in dots/in lines)
❏ Image printing (raster image/NV graphics)
❏ Barcode printing
(For barcodes that can be printed by each model, refer to "Printer specifications" on page 209)
❏ Two dimensional symbol printing
(For two dimensional symbols that can be printed by each model, refer to "Printer specifications" on page
209.)
❏ Ruled line setting
❏ Control of label paper/black mark paper
❏ Drawer kick function
❏ Buzzer function
❏ ESC/POS command transmission
❏ Response document acquisition (print result/printer status/system error status)
❏ Paper layout setting
❏ Recovery from an error
❏ Reset
Printing functions of ePOS-Print Canvas API
❏ Printing of images (raster images) rendered in HTML5 Canvas
❏ Control of label paper/black mark paper
❏ Feed cut
❏ Response document acquisition (print result/printer status/system error status)
❏ Paper layout setting
❏ Recovery from an error
❏ Reset
16
Chapter 1 Overview
Operating Environment
Applications environment
❏ HTML5-supported Web browser
Windows Internet Explorer 9 or later
Mozilla Firefox 3.6 or later
Google Chrome 7 or later
Safari in iOS4.0 or later
Standard browser in Android 2.2 or later
1
❏ Windows Store apps
JavaScript project
Terminal
Terminal with an HTML5-supported Web browser
ePOS-Print Supported TM printer
TM-i Series
❏ TM-T88V-i
❏ TM-T70-i
❏ TM-L90-i
TM Printer
❏ TM-P60II
❏ TM-P60II with Peeler
❏ TM-P80
Unable to control other TM printer
Printers That Can Be Controlled
Refer to the "Technical Reference Guide" for the TM-i series.
17
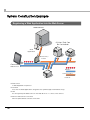
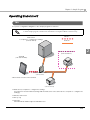
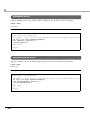
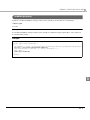
System Construction Example
Registering a Web Application Into the Web Server
<Web Server>
<Printers That Can
Be Controlled>
Web
Application
Wireless LAN /
Router
<Terminal>
Web Browser
"
Wireless
Device Control
<TM-i>
❏ Web Server
A Web application is placed.
❏ Terminal
Executes the Web application using a browser (HTML5-supported Web browser).
❏ TM-i
Receives/prints print data sent from the Web browser or controls other devices.
❏ Printers That Can Be Controlled
Print the print data received from the TM-i.
18
Network
Chapter 1 Overview
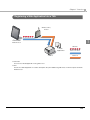
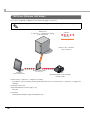
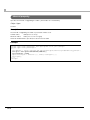
Registering a Web Application Into a TM-i
Wireless LAN /
Router
<Terminal>
1
Web Browser
Wireless
Web
Application
<TM-i>
Device Control
Network
❏ Terminal
Executes the Web application using a browser.
❏ TM-i
Mounts the Web application. Creates and prints the print data using transmission with the input terminal's
Web browser.
19
Registering a Web application to a cloud
<Web Server>
Web
Application
Wireless LAN /
Router
<Terminal>
Web Browser
Wireless
Device Control
Network
❏ Terminal
Executes the Web application using a browser.
❏ TM Printer (Wireless LAN Model)
20
<TM Printer>
(Wireless LAN Model)
Chapter 1 Overview
Contents in the Package
Manual
❏ ePOS-Print API User’s Manual (This Document)
❏ ePOS-Print XML User’s Manual
❏ TM-T88V-i Technical Reference Guide
❏ TM-T70-i Technical Reference Guide
❏ TM-L90-i Technical Reference Guide
❏ TM-P60II Technical Reference Guide
❏ TM-P80 Technical Reference Guide
1
SampleProgram
ePOS-Print_API_UM_E_Sample.zip
The following are included:
❏ epos-print-3.x.x.js (ePOS-Print JavaScript for embedding)
❏ sample/index.html (Sampleprogram)
❏ editor/index.html (ePOS-Print Editor)
❏ win8/ePOS-Print Demo.zip (Windows Store apps sample program)
❏ Rendering in HTML5 Canvas
canvas/canvas-print-text.html(Rendering text)
canvas/canvas-print-image.html(Rendering images)
canvas/canvas-print-graph.html(Rendering graphics)
canvas/canvas-print-hand.html(Rendering handwritten images)
canvas/canvas-print-barcode.html(Rendering barcode)
canvas/canvas-print-label.html(Rendering label)
21
Utility
❏ TM-i Series
Utility
TM-T88V-i
TM-T70-i
TM-L90-i
Model-Dedicated Utility
●
-
-
Memory Switch Setting Utility
-
-
●
TM Flash Logo Setup Utility
(TMFLogo)
-
●
●
TMNet WinConfig
(EpsonNet Config)
●
●
●
TM-P60II
TM-P80
Model-Dedicated Utility
●
●
Memor y Switch Setting
Utility
-
-
TM Flash Logo Setup Utility
(TMFLogo)
-
-
TMNet WinConfig
(EpsonNet Config)
●
●
❏ TM Printer (Wireless LAN Model)
Utility
22
Chapter 1 Overview
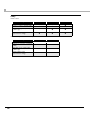
Version Information
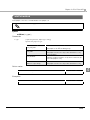
Version of ePOS-Print Service installed on a printer can be confirmed as follows.
Model
Confirmation Method
<TM-i Series>
ePOS-Print Version
<Example>
TM-T88V-i
Displayed on EPSON TMNet WebConfig
2.0xWW: Ver.2.0
TM-T70-i
Printed on the status sheet
2.1xWW: Ver.2.1
TM-L90-i
<TM Printer (Wireless LAN Model)>
TM-P60II
TM-P60II with Peeler
<Example>
Displayed on EpsonNet Config
(Web version)
2.2: Ver.2.2
TM-P80
If API of newly added ePOS‐Print Builder is used on unsupported models, schema error is returned and printing cannot be done. The latest version of ePOS‐Print API JavaScript is recommended regardless of ePOS‐Print Service version installed on a printer. ePOS‐Print API JavaScript. is bundled with the sample program.
For details, refer to ʺContents in the Packageʺ on page 21.
23
1
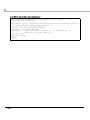
Restrictsions
❏ The drawer and the buzzer cannot be used together.
❏ The buzzer function cannot be used if the printer is not provided with the buzzer.
❏ Internet Explorer 9 does not allow printing to the printer to be performed from security-protected Web
pages (HTTPS).
❏ When multiple tones are set for raster images, intermitting printing may occur because the amount of
data to print increases and white stripes may appear in the print result. (in firmware Ver.1.2 and later)
❏ The scan quality of barcodes/two-dimensional symbols printed as multiple-tone raster images cannot be
guaranteed. Print them as two-tone images. (in firmware Ver.1.2 and later)
❏ If printing was cancelled, perform the following settings to clear the data left in the printer. (in Ver.3.0 and
later)
In the printer DIP switches (memory switches), configure the Busy condition only for the receive buffer
full.
Disable the command execution (offline). (TM-P60II, TM-P80)
24
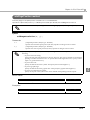
Chapter 2 Sample Program
Sample Program
This chapter describes how to use the sample program.
• In this chapter, descriptions are made based on a system configuration using a Web server.
• Descriptions are made assuming that the Web server in this chapter is a Web server configured by using IIS (Microsoft Internet Information Services). If your Web server is used in a different environment, interpret the descriptions accordingly.
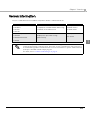
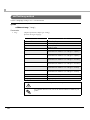
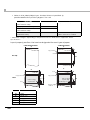
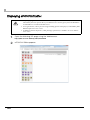
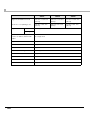
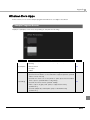
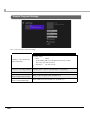
Sample Program System Overview
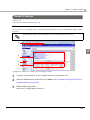
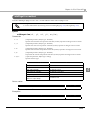
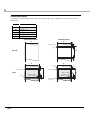
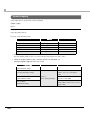
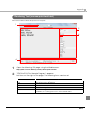
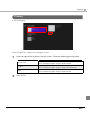
Sample Program Screen
The screen compositions for the sample program are as follows:
2
1
2
3
4
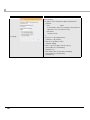
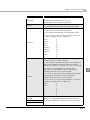
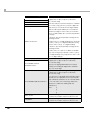
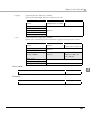
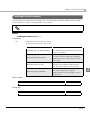
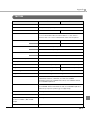
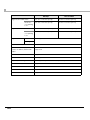
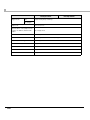
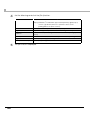
Item
1 Queue Ticket
Description
Prints queue ticket numbers.
This is a sample program using the ePOS-Print API.
Prints coupons.
2 Coupon
3 Label
This is a sample program using the ePOS-Print Canvas
API.
Prints labels.
This is a sample program using the ePOS-Print API.
25
Item
Description
Displays the "Settings" screen. The screen is used to set
the following:
IP adress of the ePOS-Print supported TM printer
(Default :
TM-i:
DHCP
(If an address fails to be assigned via DHCP, the
value becomes "192.168.192.168".)
TM Printer:
192.168.192.168
)
4 Settings
Device ID of the target printer
(Default : local_printer)
Print timeout( milliseconds )
(Default : 60000)
Prints coupons in gray scale (Coupon)
(in firmware Ver.1.2 and later)
(Default : No)
Prints labels with specified layout (Label)
(in firmware Ver.3.0 and later)
(Default: No)
26
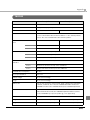
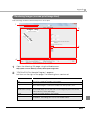
Chapter 2 Sample Program
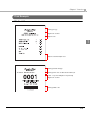
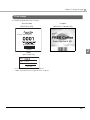
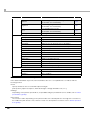
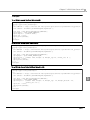
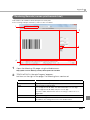
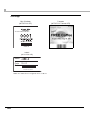
Print Image
The sample program prints the following:
Your Number
Coupon
(ePOS-Print API)
(ePOS-Print Canvas API)
Your Number:
2
Label*
(ePOS-Print API)
Name
Item A
Color
Red
Code
*2012001*
*:Die cut label: mount width 58mm or above
Label size: width 54 mm x height 25.4 mm or above
27
Program Flow
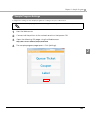
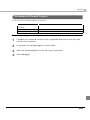
From its initial display state up to print job completion, the sample program flows as below.
Queue ticket number issuance (ePOS-Print API)
1. Open the sample program Web page
2. Settings
❏ Settings of IP address of ePOS-Print supported TM printer
❏ Device ID of the printer to be controlled
❏ Print timeout time
3. Click "Queue Ticket"
4. Creates print data (ePOS-Print Builder Object)
5. Prints (ePOS-Print Object)
Action on the sample program
Action on the customer
28
Chapter 2 Sample Program
Coupon issuance (ePOS-Print Canvas API)
1. Open the sample program Web page
2. Settings
❏ Settings of IP address of ePOS-Print supported TM printer
❏ Device ID of the printer to be used for printing
❏ Print timeout time
3. Click “Coupon”
2
4. Render in HTML5 Canvas
5. Prints (ePOS-Print Canvas API Object)
Action on the sample program
Action on the customer
29
Label issuance (ePOS-Print API)
1. Open the sample program Web page
2. Settings
❏ Settings of IP address of ePOS-Print supported TM printer
❏ Device ID of the printer to be controlled
❏ Print timeout time
❏ Settings of with or without layout specification in label printing of TM-P60II
3. Click "Label"
4. Creates print data (ePOS-Print Builder Object)
5. Prints (ePOS-Print Object)
Action on the sample program
Action on the customer
30
Chapter 2 Sample Program
Operating Environment
TM-i
The system configuration diagram for the sample programs is as below.
• The figure below also describes an example of IP address settings as network settings.
• In the sample program, ʺPrinter to be controlledʺ is not required. Refer to it if necessary.
Wireless
Web Server
Computer to configure the settings
[192.168.192.10]
Network
2
Printer to be controlled
[192.168.192.21]
Terminal
[192.168.192.XXX]*
Wireless LAN Router
[192.168.192.1]
*
:When DHCP is used for the terminal
TM-i
[192.168.192.20]
❏ Web server/computer to configure the settings
(Descriptions here are made assuming that the Web server is the same as the computer to configure the
settings.)
❏ Wireless LAN Router
❏ TM-i (1 set)
❏ Terminal
Terminal with an HTML5-supported Web browser
31
TM Printer (Wireless LAN Model)
The system configuration diagram for the sample programs is as below.
• The figure below also describes an example of IP address settings as network settings.
Web Server
Computer to configure the settings
[192.168.192.10]
Wireless
Network
Printer to be controlled
[192.168.192.21]
Wireless LAN Router
Terminal
[192.168.192.XXX]*
[192.168.192.1]
TM-P60II
<TM Printer(Wireless LAN Model)>
192.168.192.20
❏ Web server/computer to configure the settings
(Descriptions here are made assuming that the Web server is the same as the computer to configure the
settings.)
❏ Wireless LAN Router
❏ TM Printer(Wireless LAN Model) (1 set)
TM-P60II
❏ Terminal
Terminal with an HTML5-supported Web browser
32
Chapter 2 Sample Program
Environment Settings
A flow for configuring the environment settings for the sample program is shown as follows:
1. Router Settings
Configure the settings such as SSID, IP address, DHCP, and allocated IP address. For
details, refer to the manual for the device you are using.
2. Computer Settings
1. Network Settings
Configure the network settings for the computer such as IP address.
2. Web Server Configuration
Configure a Web server on the computer.
2
3.Registration of Sample Program (ePOS-Print_API_UM_E_Sample.zip) (p.34)
4. Terminal settings
Configure the wireless LAN (Wi-Fi) settings of the terminal to match the router settings so as to
enable network connection. For details, refer to the manual for the device you are using.
5. Network Setting of ePOS-Print Supported TM printer (p.35)
Configuration is done from a Web browser.
6. Network settings for the printer to be controlled
Configure these settings by using the network setting utility. For details, refer to the detailed
instruction manual for the printer (these settings are not required in this sample program).
33
7. Device ID Settings (p.37)
Configuration is done from a Web browser(these settings are not required in this sample program).
8. Sample Program Settings (p.39)
Configuration is done from a Web browser(these settings are not required in this sample program).
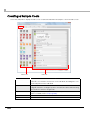
Registration of Sample Program (ePOS-Print_API_UM_E_Sample.zip)
Register the sample program into the Web server.
Download ePOS‐Print_API_UM_E_Sample.zip.
For details, refer to Contents in the package (p. 21).
Register the program according to the following procedure:
1
2
Start the Web server.
Explode the sample program (ePOS-Print_API_UM_E_Sample.zip) and then copy
the exploded contents into the following folder:
Example:
Web server configured by using IIS
System drive:\ Inetpub\wwwroot
Copy the sample program as a user with administrator authority.
34
Chapter 2 Sample Program
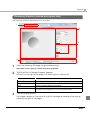
Network Setting of ePOS-Print Supported TM printer
❏ TM-i (p. 35)
❏ TM Printer for Wireless LAN Model (p. 36)
TM-i
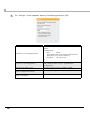
Use TMNet WebConfig to configure the network settings such as IP address for the printer.
2
4
3
2
Configure the settings according to the following procedure:
1
2
Connect the printer to the network and turn the power ON.
Start the Web browser and type the URL of the TM-i interface into the address bar.
Enter the password.
http://[IP address of the TM intelligent printer]/PrinterConfigurationPage/
The initial value for the IP address of the TM‐i is a DHCP‐assigned address number. (Firmware Ver.3.0 or later)
If an address fails to be assigned via DHCP, the value becomes ʺ192.168.192.168ʺ.
3
TMNet WebConfig starts.
Select as [Configuration] - [Wired / Wireless] - [TCP/IP].
4
The “TCP/IP Setting” screen appears.
Configure the network settings for the TM-i and click [Submit].
5
Print the status sheet using the TM-i to check that the IP address has been
updated.
35
TM Printer for Wireless LAN Model
1
2
3
4
5
6
36
Connect the printer to a PC via the USB cable.
Turn on the printer.
Start up EpsonNet Config.
Double-click on the printer.
Configure the [Network] settings and the [TCP/IP] settings.
Disconnect the USB cable, turn off the printer, and then turn it back on.
Chapter 2 Sample Program
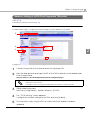
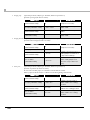
Device ID Settings
❏ TM-i (p. 37)
❏ TM Printer for Wireless LAN Model (p. 38)
TM-i
Set the Device ID of the printer to be controlled by ePOS-Print into the TM-i. Use TMNet WebConfig to set the
Device ID.
In the sample program, ʺDevice ID Settingsʺ are not required. Refer to it if necessary.
2
2
4
3
5
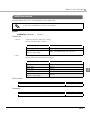
Configure the settings according to the following procedure:
1
2
3
Connect all the printers to the network and turn their power ON.
Start the Web browser and enter the IP address set in Network Setting of ePOS-Print
Supported TM printer (p.35).
TMNet WebConfig starts.
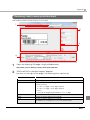
Select as [Configuration]-[Device ].
37
4
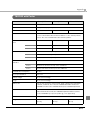
The "Device Settings" screen appears. Set the following and click [Register].
Item
5
Description
Device ID
Specifies the ID to identify the printer to be controlled by ePOS-Print.
Model
Specifies the model of the printer to be controlled.
IP Address
Specifies the IP address of the printer to be controlled.
Retry Interval (ms)
Specifies the interval of retry toward the printer to be controlled, in
milliseconds.
Information on the registered devices is displayed in [Device List].
Click [Test Print] for each registered printer to check that it operates correctly.
TM Printer for Wireless LAN Model
Configure the settings according to the following procedure:
1
2
3
4
38
Turn on the printer.
Start the Web browser and type the IP address of the TM printer into the address
bar.
EpsonNet Config (Web version) is launched. Select [Configuration]-[ePOS-Print].
Set device ID.
Chapter 2 Sample Program
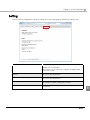
Sample Program Settings
Configure the settings for the sample program according to the procedure below.
In the sample program, ʺDevice ID Settingsʺ are not required. Refer to it if necessary.
1
2
3
4
Start the Web server.
Connect all the printers to the network and turn their power ON.
Open the following URL page using the Web browser.
http://Web server IP address/sample/index.html
The sample program page opens. Click [Settings].
2
39
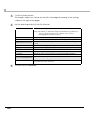
5
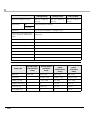
The “Settings” screen appears. Specify the following and click [OK].
Item
IP address of the intelligent printer
Description
Specifies the IP address of the ePOS-Print supported TM
printer.
(Default value:
TM-i:
DHCP
(If an address fails to be assigned via DHCP, the
value becomes "192.168.192.168".)
TM Printer:
192.168.192.168
)
40
Device ID of the target printer
Specifies the Device ID of the printer to print queue
ticket numbers and coupons. (Default value:
local_printer)
Print timeout (millisecond)
Specifies the timeout time. (default : 60000)
Print in grayscale (Coupon)
(Only for supported models)
Prints coupons in gray scale. (Default: No)
Set the paper layout (Label)
(Only for TM-P60II)
Prints labels with specified layout (Default: No)
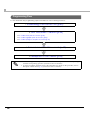
Chapter 3 Programming Guide
Programming Guide
This chapter describes how to write programs in the application development using ePOS-Print.
ePOS-Print API
Print Mode
There are two types of print modes: standard and page modes.
Standard mode
In standard mode, characters are printed line by line. The line feed space is adjusted based on the font size
and the height of images, barcodes, etc. This mode is suitable for the type of printing such as printing
receipts that requires the paper length to change according to the print space.
Page mode
In page mode, you set a print area, lay out data in it, and print the data in a batch operation. Characters,
images, and barcodes are laid out in the print positions (coordinates).
3
41
Programming Flow
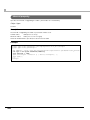
For the ePOS-Print API, programming is performed based on the following work flow:
1. Embedding of ePOS-Print API (p.43)
2. Print Document Creation (p.44)
❏ To create a text print document: (p.45)
❏ To create a graphic print document: (p.46)
❏ To create a page mode print document (p.47)
3. Transmission of Print Document (p.48)
4. Reception of Print Result (p.49)
• ePOS‐Print supported TM printer checks the status of the TM printer to be used for printing and then starts printing operation. (in firmware Ver.1.2 and later)
• A status event helps check the status of the TM printer. For details on the procedure, refer to Reception of Status Event (p. 51). (in firmware Ver.1.2 and later)
42
Chapter 3 Programming Guide
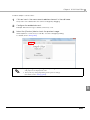
Embedding of ePOS-Print API
The ePOS-Print API is provided so that ePOS-Print can be used from the JavaScript on the client side.
It is provided as JavaScript, and its file name is “epos-print-3.x.x.js”.
The ePOS-Print API is used by embedding epos-print-3.x.x.js into applications.
Preparation
To use the ePOS-Print API, place epos-print-3.x.x.js on the Web server.
Embedding into Web pages
Embed the script into the Web page by using the HTML <script> tags.
<!DOCTYPE html>
<html>
<head>
Embed
<meta charset="utf-8" />
<title>TITLE</title>
<script type="text/javascript" src="epos-print-3.x.x.js"></script>
<script type="text/javascript">
function buildMessage() {
var builder = new epson.ePOSBuilder();
.
.
}
</script>
</head>
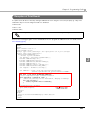
3
<body>
.
.
</body>
</html>
43
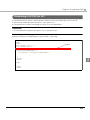
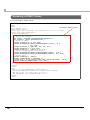
Print Document Creation
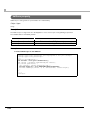
A print document is created using an ePOS-Print Builder object.
Create an ePOS-Print Builder object using the constructor for it; create a print document using the object's
methods; and then acquire that print document using the toString method. For details, refer to List of API
functions (p.59).
Refer to the following program for print document creation.
<!DOCTYPE html>
<html>
<head>
<meta charset="utf-8" />
<title>TITLE</title>
<script type="text/javascript" src="epos-print-3.x.x.js"></script>
<script type="text/javascript">
function buildMessage() {
//Create an ePOS-Print Builder object
var builder = new epson.ePOSBuilder();
//Create a print document
builder.addTextLang('en')
builder.addTextSmooth(true);
builder.addTextFont(builder.FONT_A);
Create a print document
builder.addTextSize(3, 3);
builder.addText('Hello,\tWorld!\n');
builder.addCut(builder.CUT_FEED);
//Acquire the print document
var request = builder.toString();
alert(request);
}
</script>
</head>
<body>
<button onclick=”buildMessage()”>Run</button>
</body>
</html>
44
Chapter 3 Programming Guide
To create a text print document:
To create a text print document, store the font settings into the command buffer using text methods and
then create a print document. Refer to the following program.
For the string "Hello World!", to create a print document based on the following settings:
❏ Font:
FontA
❏ Scale:
x 4 (horizontal) and x 4 (vertical)
❏ Style:
Bold
<script type="text/javascript" src="epos-print-3.x.x.js"></script>
<script type="text/javascript">
function buildMessage() {
//Create an ePOS-Print Builder object
var builder = new epson.ePOSBuilder();
//Create a print document
//<Configure the print character settings>
builder.addTextLang('en');
builder.addTextSmooth(true);
builder.addTextFont(builder.FONT_A);
builder.addTextSize(4, 4);
builder.addTextStyle(false, false, true, undefined);
//<Specify the print data>
builder.addText('Hello,\tWorld!\n');
builder.addCut(builder.CUT_FEED);
//Acquire the print document
var request = builder.toString();
}
</script>
3
45
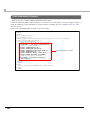
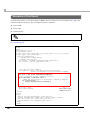
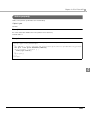
To create a graphic print document:
To create a graphic print document, store a raster image obtained by rendering an image in HTML5
Canvas into the command buffer using the addImage method. Refer to the following program.
To create a print document for the image file “logo.bmp”
<script type="text/javascript" src="epos-print-3.x.x.js"></script>
<script type="text/javascript">
function buildMessage() {
//Create an ePOS-Print Builder object
var builder = new epson.ePOSBuilder();
//Render an image in HTML5 Canvas
var canvas = document.getElementById('canvas');
var context = canvas.getContext('2d');
context.drawImage(document.getElementById('logo'), 0, 0, 200, 70);
//Create a print document
builder.addTextAlign(builder.ALIGN_CENTER);
builder.addImage(context, 0, 0, canvas.width, canvas.height, builder.COLOR_1);
builder.addCut(builder.CUT_FEED);
//Acquire the print document
var request = builder.toString();
}
</script>
This section describes how to print a raster image. In addition, there is also a method of printing graphics registered in the NV memory of the printer. For details, refer to addLogo method (p.89).
46
Chapter 3 Programming Guide
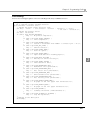
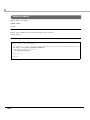
To create a page mode print document
When the addPageBegin method is stored in the command buffer, the page mode starts. Store the print
area (addPageArea method) and the print start position (addPagePosition method) into the command
buffer. Specify the print start position according to the print data. After that, store the methods into the
command buffer to create print data. For the end of page mode, store the PageEnd method into the
command buffer.
For the string "Hello World!", to create a print document based on the following settings:
<script type="text/javascript" src="epos-print-3.x.x.js"></script>
<script type="text/javascript">
function buildMessage() {
//Create an ePOS-Print Builder object
var builder = new epson.ePOSBuilder();
//Create a print document
//<The page mode starts>
builder.addPageBegin();
//<Specify the page mode print area>
builder.addPageArea(100, 50, 200, 100);
//<Specify the page mode print position>
builder.addPagePosition(0, 42);
//<Specify the print data>
builder.addTextLang('en');
builder.addTextFont(builder.FONT_A);
builder.addTextSize(4, 4);
builder.addTextStyle(false, false, true, undefined);
builder.addText('Hello,\tWorld!\n');
//<The page mode ends>
builder.addPageEnd();
builder.addCut(builder.CUT_FEED);
//Acquire the print document
var request = builder.toString();
}
</script>
3
47
Transmission of Print Document
A print document is sent using an ePOS-Print object.
Create an ePOS-Print object using the constructor and specify the end point address for the printer to be
used for printing as well as the print document into the send method to send the document.
For the details about the printer end point address, refer to Printer End Point Address (p.48).
Refer to the following program.
<!DOCTYPE html>
<html>
<head>
<meta charset="utf-8" />
<title>TITLE</title>
<script type="text/javascript" src="epos-print-3.x.x.js"></script>
<script type="text/javascript">
function buildMessage() {
//Create a print document
var builder = new epson.ePOSBuilder();
builder.addTextLang('en');
builder.addTextSmooth(true);
builder.addTextFont(builder.FONT_A);
builder.addTextSize(3, 3);
builder.addText('Hello,\tWorld!\n');
Transmission of print document
builder.addCut(builder.CUT_FEED);
var request = builder.toString();
//Set the end point address
var address = 'http://192.168.192.168/cgi-bin/epos/
service.cgi?devid=local_printer&timeout=10000';
//Create an ePOS-Print object
var epos = new epson.ePOSPrint(address);
//Send the print document
epos.send(request);
}
</script>
</head>
<body>
<button onclick=”buildMessage()”>Run</button>
</body>
</html>
Printer End Point Address
Specify the printer end point address in the following format:
http://[domain]/cgi-bin/epos/service.cgi?devid=[device ID]&timeout=[timeout time]
Items to specify
48
Description
Domain
Specify IP address or domain of ePOS-Print supported TM printer.
Device ID
Specifies the printer to be used for printing.
Specify device ID registered with EpsonNet Config (Web version) of ePOS-Print
supported TM printer or TMNet WebConfig of TM intelligent printer.
Timeout period
Specifies the time to abort the process in milliseconds.
The timeout parameter is optional; when it is omitted, 60 seconds (60000) is set.
When the timeout period elapses, the print job is canceled; the data already
interpreted by the printer before the start of the print abort process is printed.
Chapter 3 Programming Guide
Reception of Print Result
The print result can be received by setting a callback function using the onreceive property (p. 148) of the
ePOS-Print object. The following information is obtained:
❏ Print result
❏ Error code
❏ Printer status
The printer status can be obtained when communication with the printer is possible.
Refer to the following program. For the details about how to program a callback function in detail, refer to
Error handling (p.50).
<!DOCTYPE html>
<html>
<head>
<meta charset="utf-8" />
<title>TITLE</title>
<script type="text/javascript" src="epos-print-3.x.x.js"></script>
<script type="text/javascript">
function buildMessage() {
//Create a print document
var builder = new epson.ePOSBuilder();
builder.addTextLang('en');
builder.addTextSmooth(true);
builder.addTextFont(builder.FONT_A);
builder.addTextSize(3, 3);
builder.addText('Hello,\tWorld!\n');
builder.addCut(builder.CUT_FEED);
var request = builder.toString();
3
var address = 'http://192.168.192.168/cgi-bin/epos/
service.cgi?devid=local_printer&timeout=10000';
//Create an ePOS-Print object
var epos = new epson.ePOSPrint(address);
//Set a response receipt callback function
epos.onreceive = function (res) {
//When the printing is not successful, display a message
if (!res.success) {
alert('A print error occurred');
}
}
//Send the print document
epos.send(request);
Print result receipt
}
callback function
</script>
</head>
<body>
<button onclick=”buildMessage()”>Run</button>
</body>
</html>
49
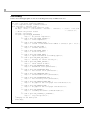
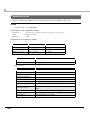
Error handling
Refer to the following program for the error handling method by a callback function.
//Create an ePOS-Print object
var epos = new epson.ePOSPrint(address);
// Set a response receipt callback function
epos.onreceive = function (res) {
// Obtain the print result and error code
var msg = 'Print' + (res.success ? 'Success' : 'Failure') + '\nCode:' + res.code
+ '\nStatus:\n';
// Obtain the printer status
var asb = res.status;
if (asb & epos.ASB_NO_RESPONSE) {
msg += ' No printer response\n';
}
if (asb & epos.ASB_PRINT_SUCCESS) {
msg += ' Print complete\n';
}
if (asb & epos.ASB_DRAWER_KICK) {
msg += ' Status of the drawer kick number 3 connector pin = "H"\n';
}
if (asb & epos.ASB_OFF_LINE) {
msg += ' Offline status\n';
}
if (asb & epos.ASB_COVER_OPEN) {
msg += ' Cover is open\n';
}
if (asb & epos.ASB_PAPER_FEED) {
msg += ' Paper feed switch is feeding paper\n';
}
if (asb & epos.ASB_WAIT_ON_LINE) {
msg += ' Waiting for online recovery\n';
}
if (asb & epos.ASB_PANEL_SWITCH) {
msg += ' Panel switch is ON\n';
}
if (asb & epos.ASB_MECHANICAL_ERR) {
msg += ' Mechanical error generated\n';
}
if (asb & epos.ASB_AUTOCUTTER_ERR) {
msg += ' Auto cutter error generated\n';
}
if (asb & epos.ASB_UNRECOVER_ERR) {
msg += ' Unrecoverable error generated\n';
}
if (asb & epos.ASB_AUTORECOVER_ERR) {
msg += ' Auto recovery error generated\n';
}
if (asb & epos.ASB_RECEIPT_NEAR_END) {
msg += ' No paper in the roll paper near end detector\n';
}
if (asb & epos.ASB_RECEIPT_END) {
msg += ' No paper in the roll paper end detector\n';
}
if (asb & epos.ASB_BUZZER) {
msg += ' Sounding the buzzer (limited model)\n';
}
if (asb & epos.ASB_SPOOLER_IS_STOPPED) {
msg += ' Stop the spooler\n';
}
//Display in the dialog box
alert(msg);
}
50
Chapter 3 Programming Guide
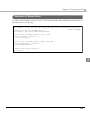
Reception of Status Event
The status event notification function is used to check the printer status without printing. (in firmware Ver.1.2
and later) Refer to the following:
//Set the end point address
var address = 'http://192.168.192.168/cgi-bin/epos/service.cgi?devid=local_printer
&timeout=10000';
//Create an ePOS-Print Builder object
var builder = new epson.ePOSBuilder(address);
//Set an event callback function (cover open)
epos.oncoveropen = function () {
alert('coveropen');
};
//Set an event callback function (paper near end)
epos.onpapernearend = function () {
alert('papernearend');
};
//Enable status event operation
epos.open();
3
51
ePOS-Print Canvas API
For the ePOS-Print Canvas API, programming is performed based on the following work flow:
1. Embedding of ePOS-Print Canvas API (p.53)
2. Rendering in HTML5 Canvas (p.54)
3. Prints an Canvas image (p.55)
4. Reception of Print Result (p.56)
• ePOS‐Print supported TM printer starts printing after checking the status of TM printer.
• A status event helps check the status of the TM printer. For details on the procedure, refer to Reception of Status Event (p. 51).
52
Chapter 3 Programming Guide
Embedding of ePOS-Print Canvas API
The ePOS-Print Canvas API is provided as JavaScript. And its file name is "epos-print-3.x.x.js".
It is used by embedding epos-print-3.x.x.js into applications.
Preparation
To use the ePOS-Print Canvas API, place epos-print-3.x.x.js on the Web server.
Embedding into Web pages
Embed the script into the Web page by using the HTML <script> tags.
<!DOCTYPE html>
<html>
Embed
<head>
<meta charset="utf-8" />
<title>TITLE</title>
<script type="text/javascript" src="epos-print-3.x.x.js"></script>
<script type="text/javascript">
function drawCanvas() {
.
.
}
</script>
</head>
3
<body>
.
.
</body>
</html>
53
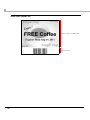
Rendering in HTML5 Canvas
Render an image in HTML5 Canvas.
<!DOCTYPE html>
<html>
<head>
Rendering in HTML5 Canvas
<meta charset="utf-8" />
<title>TITLE</title>
<script type="text/javascript" src="epos-print-3.x.x.js"></script>
<script type="text/javascript">
function drawCanvas() {
// Rendering in HTML5 Canvas
//<Obtain the context>
var canvas = document.getElementById('myCanvas');
var context = canvas.getContext('2d');
//<Render an image>
context.clearRect(0, 0, 512, 480);
context.drawImage(document.getElementById('coffee'), 0, 0
, 512, 384);
context.fillStyle = 'rgba(255, 255, 255, 0.5)';
context.fillRect(0, 0, 512, 480);
context.fillStyle = 'rgba(0, 0, 0, 1.0)';
//<Render a water mark for the image>
context.drawImage(document.getElementById('wmark'), 0, 0);
context.drawImage(document.getElementById('wmark'), 256, 324);
//<Render text>
context.textAlign = 'center';
context.textBaseline = 'alphabetic';
context.font = 'bold normal normal 48px "Times New Roman", serif';
context.fillText('FREE Coffee', 256, 224);
}
</script>
</head>
<body>
<button onclick="drawCanvas()">Run</button>
<canvas id="myCanvas" width="512" height="480"></canvas>
<img id="coffee" src="img/coffee.jpg" alt="">
<img id="wmark" src="img/wmark.png" alt="">
</body>
</html>
54
Chapter 3 Programming Guide
Prints an Canvas image
Content drawn in HTML5 Canvas is printed using the ePOS-Print Canvas API.
Create an ePOS-Print Canvas API object using the constructor; for the Print method, specify the end point
address for the printer to be used for printing as well as the canvas content and whether to select paper
cut; and then print a document. For the details about the printer end point address, refer to Printer End
Point Address (p.48).
Refer to the following program.
<!DOCTYPE html>
<html>
<head>
<meta charset="utf-8" />
<title>TITLE</title>
<script type="text/javascript" src="epos-print-3.x.x.js"></script>
<script type="text/javascript">
function drawCanvas() {
// Rendering in HTML5 Canvas
//<Obtain the context>
var canvas = document.getElementById('myCanvas');
var context = canvas.getContext('2d');
.
Transmission of print document
.
.
//Set the end point address
var address = 'http://192.168.192.168/cgi-bin/epos/
service.cgi?devid=local_printer&timeout=10000';
//Create an ePOS-Print Canvas API object
var epos = new epson.CanvasPrint(address);
//Print
epos.cut = true;
epos.print(canvas);
3
}
</script>
</head>
<body>
<button onclick="drawCanvas()">Run</button>
<canvas id="myCanvas" width="512" height="480"></canvas>
<img id="coffee" src="img/coffee.jpg" alt="">
<img id="wmark" src="img/wmark.png" alt="">
</body>
</html>
For the details about the printer end point address, refer to Printer End Point Address (p.48).
55
Reception of Print Result
The print result can be received by setting a callback function using the onreceive property (p. 148) of the
ePOS-Print Canvas API object. The following information is obtained:
❏ Print result
❏ Error code
❏ Printer Status
The printer status can be obtained when communication with the printer is possible.
Refer to the following program. For the details about how to program a callback function in detail, refer to
Error handling (p.50).
<!DOCTYPE html>
<html>
<head>
<meta charset="utf-8" />
<title>TITLE</title>
<script type="text/javascript" src="epos-print-3.x.x.js"></script>
<script type="text/javascript">
function drawCanvas() {
// Rendering in HTML5 Canvas
//<Obtain the context>
var canvas = document.getElementById('myCanvas');
var context = canvas.getContext('2d');
.
.
.
//Set the end point address
var address = 'http://192.168.192.168/cgi-bin/epos/
service.cgi?devid=local_printer&timeout=10000';
//Create an ePOS-Print Canvas API object
var epos = new epson.CanvasPrint(address);
//Set a response receipt callback function
epos.onreceive = function (res) {
//When the printing is not successful, display a message
if (!res.success) {
alert('A print error occurred');
}
}
//Print
epos.cut = true;
Print result receipt
epos.print(canvas);
callback function
}
</script>
</head>
<body>
<button onclick="drawCanvas()">Run</button>
<canvas id="myCanvas" width="512" height="480"></canvas>
<img id="coffee" src="img/coffee.jpg" alt="">
<img id="wmark" src="img/wmark.png" alt="">
</body>
</html>
56
Chapter 3 Programming Guide
Error handling
Refer to the following program for the error handling method by a callback function.
var epos = new epson.CanvasPrint(address);
// Set a response receipt callback function
epos.onreceive = function (res) {
// Obtain the print result and error code
var msg = ''Print ' + (res.success ? 'Success' : 'Failure') + '\nCode:'
+ res.code + '\nStatus:\n';
// Obtain the printer status
var asb = res.status;
if (asb & epos.ASB_NO_RESPONSE) {
msg += ' No printer response\n';
}
if (asb & epos.ASB_PRINT_SUCCESS) {
msg += ' Print complete\n';
}
if (asb & epos.ASB_DRAWER_KICK) {
msg += ' Status of the drawer kick number 3 connector pin = "H"\n';
}
if (asb & epos.ASB_OFF_LINE) {
msg += ' Offline status\n';
}
if (asb & epos.ASB_COVER_OPEN) {
msg += ' Cover is open\n';
}
if (asb & epos.ASB_PAPER_FEED) {
msg += ' Paper feed switch is feeding paper\n';
}
if (asb & epos.ASB_WAIT_ON_LINE) {
msg += ' Waiting for online recovery\n';
}
if (asb & epos.ASB_PANEL_SWITCH) {
msg += ' Panel switch is ON\n';
}
if (asb & epos.ASB_MECHANICAL_ERR) {
msg += ' Mechanical error generated\n';
}
if (asb & epos.ASB_AUTOCUTTER_ERR) {
msg += ' Auto cutter error generated\n';
}
if (asb & epos.ASB_UNRECOVER_ERR) {
msg += ' Unrecoverable error generated\n';
}
if (asb & epos.ASB_AUTORECOVER_ERR) {
msg += ' Auto recovery error generated\n';
}
if (asb & epos.ASB_RECEIPT_NEAR_END) {
msg += ' No paper in the roll paper near end detector\n';
}
if (asb & epos.ASB_RECEIPT_END) {
msg += ' No paper in the roll paper end detector\n';
}
if (asb & epos.ASB_BUZZER) {
msg += ' Sounding the buzzer (limited model)\n';
}
if (asb & epos.ASB_SPOOLER_IS_STOPPED) {
msg += ' Stop the spooler\n';
}
//Display in the dialog box
alert(msg);
}
57
3
Reception of Status Event
The status event notification function is used to check the printer status without printing. (in firmware Ver.1.2
and later) Refer to the following.
//Set the end point address
var address = 'http://192.168.192.168/cgi-bin/epos/service.cgi?devid=local_printer
&timeout=10000';
//Create an ePOS-Print Canvas API object
var epos = new epson.CanvasPrint(address);
//Set an event callback function (cover open)
epos.oncoveropen = function () {
alert('coveropen');
};
//Set an event callback function (paper near end)
epos.onpapernearend = function () {
alert('papernearend');
};
//Enable status event operation
epos.open();
58
Chapter 4 ePOS-Print API
ePOS-Print API
This chapter describes the ePOS-Print API.
List of API functions
ePOS-Print provides the following objects:
❏ ePOS-Print Builder (window.epson.ePOSBuilder) Object (p. 59)
❏ ePOS-Print (window.epson.ePOSPrint) Object (p. 63)
window.epson.ePOSBuilder Components
Element
Standard
mode
page
mode
Initializes an ePOS-Print XML Builder
object
●
●
65
addTextAlign
Adds a tag for the text alignment
setting.
●
-
66
addTextLineSpace
Adds a tag for the line feed space
setting.
●
●
67
addTextRotate
Adds a tag for the text rotation setting.
●
-
68
addText
Adds a tag for printing text.
●
●
69
addTextLang
Adds a tag for the target language
setting.
●
●
70
addTextFont
Adds a tag for the text font setting.
●
●
73
addTextSmooth
Adds a tag for the text smoothing
setting.
●
●
74
addTextDouble
Adds a tag for specifying the double-sized text setting.
●
●
75
addTextSize
Adds a tag for the text scale setting.
●
●
77
addTextStyle
Adds a tag for the text style setting.
●
●
78
addTextPosition
Adds a tag for specifying the print
position of text.
●
●
80
-
●
81
API
Description
Page
Constructor
ePOS Builder
Method
Text
addTextVPosition
Adds a tag for specifying the print
vertical position of text.
(in firmware Ver.3.0 and later)
59
4
Element
API
Description
Standard
mode
page
mode
Page
Method
addFeedUnit
Adds a tag for paper feeding (in
dots).
●
●
82
addFeedLine
Adds a tag for paper feeding (in
lines).
●
●
83
addFeedPosition
Adds control of label paper/black
mark paper to command buffer
●
-
84
addFeed
Adds a line feed to the command
buffer.
●
-
86
addImage
Adds a tag for a raster image to be
printed.
●
●
87
addLogo
Adds a tag for an NV logo to be
printed.
●
●
89
addBarcode
Adds a tag for a bar code to be
printed.
●
●
90
addSymbol
Adds a tag for a two-dimensional
code to be printed.
●
●
95
addHLine
Adds a tag for a horizontal line to be
printed.
●
-
101
addVLineBegin
Adds a tag for starting a vertical line.
●
-
103
addVLineEnd
Adds a tag for finishing a vertical
line.
●
-
105
addPageBegin
Adds a tag for switching to page
mode.
●
-
107
addPageEnd
Adds a tag for finishing page mode.
●
-
108
addPageArea
Adds a tag for specifying the print
area in page mode.
-
●
109
addPageDirection
Adds a tag for specifying the print
direction in page mode.
-
●
111
addPagePosition
Adds a tag for specifying the print
position in page mode.
-
●
113
addPageLine
Adds a tag for drawing a line in
page mode.
-
●
115
addPageRectangle
Adds a tag for drawing a rectangle
in page mode.
-
●
117
Cut
addCut
Adds a tag for paper cut.
-
●
119
Drawer
kickout
addPulse
Adds a tag for the drawer kick-out.
●
-
121
Paper
Feed
Graphic
Barcode
Ruled
line
Pagemode
60
Chapter 4 ePOS-Print API
Element
API
Description
Standard
mode
page
mode
Page
Method
Buzzer
addSound
Adds a tag for turning on the buzzer.
●
-
123
Layout
addLayout
Adds the paper layout setup to
command buffer
(in firmware Ver.2.2 and later)
●
-
125
Recovery
addRecovery
Adds a tag for recovering from an
error. (in firmware Ver.3.0 and later)
●
-
130
Reset
addReset
Adds a tag for resetting the printer.
(in firmware Ver.3.0 and later)
●
-
131
Send
Command
addCommand
Adds commands to the command
buffer. Sends ESC/POS commands.
●
●
132
Create
a Print
Document
toString
Obtains a print document generated by on ePOS-Print Builder
object.
●
-
133
● : Available, - : Not available
4
61
Element
API
Description
Page
Property
halftone
brightness
force
Raster image halftone processing method
(in firmware Ver.1.2 and later)
Raster image brightness correction value
(in firmware Ver.1.2 and later)
Forced transmission mode
(in firmware Ver.3.0 and later)
134
135
136
message
Message buffer
137
FONT_*
font
ALIGN_*
alignment
COLOR_*
color specification
HALFTONE_*
Halftone type (in firmware Ver.1.2 and later)
MODE_*
Color mode (in firmware Ver.1.2 and later)
BARCODE_*
bar code type
HRI_*
HRI position
SYMBOL_*
two-dimensional code type
LEVEL_*
error correction level
LINE_*
line style
DIRECTION_*
page mode print direction
CUT_*
paper cut type
DRAWER_*
drawer kick-out connector
PULSE_*
drawer kick-out pulse length
PATTERN_*
buzzer sound pattern
FEED_*
Paper feed position of label paper/black mark paper
LAYOUT_*
Type of papers
Constant
Constant
Numerical values to be set to parameters
In the ePOS-Print Builder object API, numerical values are set to some parameters. Set values with the
following in mind:
❏ Unit
Specify numbers in dots for units that represent length.
(Print position, paper feed space, width and height of images and barcodes, etc.)
❏ Range
Depending on the printer specifications, a specifiable range is predetermined. For details, refer to Printer
specifications (p.209).
❏ Resolution
The resolution varies depending on the printer. It affects the actual print size. The higher the resolution is,
the smaller the print size becomes, and vice versa. For each printer's resolution, refer to Printer specifications (p.209).
62
Chapter 4 ePOS-Print API
window.epson.ePOSPrint Components
Element
API
Description
Page
Constructor
ePOS-Print
Initializes an ePOS-Print object
138
send
Sends a message
139
Method
open
close
Enables status event operation
(in firmware Ver.1.2 and later)
Disables status event operation
(in firmware Ver.1.2 and later)
140
141
Property
address
URL of the printer
(in firmware Ver.1.2 and later)
142
enabled
Enabling/disabling of status event
(in firmware Ver.1.2 and later)
143
interval
Printer status update interval
(in firmware Ver.1.2 and later)
144
status
Status
145
battery
Battery status
146
timeout
The connecting was timeout.
147
onreceive
Response message receipt event
148
onerror
Communication error event
151
onstatuschange
Status change event
(in firmware Ver.1.2 and later)
152
onbatterystatuschange
Battery status chenge event
(in firmware Ver.2.2 and later)
153
ononline
Online event (in firmware Ver.1.2 and later)
153
onoffline
Offline event (in firmware Ver.1.2 and later)
154
onpoweroff
Non-response event
(in firmware Ver.1.2 and later)
154
oncoverok
Cover close event
(in firmware Ver.1.2 and later)
155
oncoveropen
Cover open event
(in firmware Ver.1.2 and later)
155
onpaperok
Paper remaining event
(in firmware Ver.1.2 and later)
156
onpapernearend
Paper near end event
(in firmware Ver.1.2 and later)
156
onpaperend
Paper end event
(in firmware Ver.1.2 and later)
157
Event
4
63
Element
API
Description
Page
Event
ondrawerclosed
Drawer close event
(in firmware Ver.1.2 and later)
157
ondraweropen
Drawer open event
(in firmware Ver.1.2 and later)
158
onbatteryok
Battery OK event
(in firmware Ver.2.2 and later)
158
onbatterylow
Battery low event
(in firmware Ver.2.2 and later)
159
ASB_*
Status
Constant
64
Chapter 4 ePOS-Print API
ePOS-Print Builder Object
This objects creates a print document for printer control commands that specify strings or graphics to be
printed, paper cut, etc.
Constructor
Constructor for an ePOS-Print Builder object.
Creates a new ePOS-Print Builder object and initializes it.
Syntax
ePOSBuilder();
Example
<script type="text/javascript" src="epos-print-3.x.x.js"></script>
<script type="text/javascript">
<!-function buildMessage() {
var builder = new epson.ePOSBuilder();
}
//-->
</script>
4
65
addTextAlign method
Adds the text alignment setting to the command buffer.
• This API setting is applied to raster image/NV logo/barcode/two‐dimensional symbol.
• When using the standard mode, specify addTextAlign in ʺPosition at the beginning of linesʺ.
• In the page mode, addTextAlign method specification cannot be used.
In the page mode, use the addTextPosition method to designate the horizontal print position.
• When the page mode is selected for the print mode, to set text rotation, use the addPageDirection method (p. 111) instead of this API function.
Syntax
addTextAlign(align);
Parameter
align :
( Required parameter, Object type : String)
Specifies the text alignment.
Constant(align)
Description
ALIGN_LEFT (default)
Alignment to the left
ALIGN_CENTER
Alignment to the center
ALIGN_RIGHT
Alignment to the right
Return value
Return value
ePOS-Print Builder Object
Object type
ePOS Builder
Exception
Exception
Parameter " ... " is invalid
Object type
Error
Example
To set alignment to the center:
<script type="text/javascript" src="epos-print-3.x.x.js"></script>
<script type="text/javascript">
<!-function buildMessage() {
var builder = new epson.ePOSBuilder();
builder.addTextAlign(builder.ALIGN_CENTER);
}
//-->
</script>
66
Chapter 4 ePOS-Print API
addTextLineSpace method
Adds the line feed space setting to the command buffer.
Syntax
addTextLineSpace(linespc);
Parameter
linespc :
( Required parameter, Object type : Number)
Specifies the line feed space (in dots). Specifies an integer from 0 to 255. Return value
Return value
ePOS-Print Builder Object
Object type
ePOS Builder
Exception
Exception
Parameter " ... " is invalid
Object type
Error
Example
To set the line feed space to 30 dots:
<script type="text/javascript" src="epos-print-3.x.x.js"></script>
<script type="text/javascript">
<!-function buildMessage() {
var builder = new epson.ePOSBuilder();
builder.addTextLineSpace(30);
}
//-->
</script>
4
67
addTextRotate method
Adds the text rotation setting to the command buffer.
•
•
•
•
This API setting also applies to barcodes/two dimensional symbols.
When using the standard mode, specify addTextAlign in ʺPosition at the beginning of linesʺ.
In the page mode, addTextAlign method specification cannot be used.
When the page mode is selected for the print mode, to set text rotation, use the addPageDirection method (p.111) instead of this API function.
Syntax
addTextRotate(rotate);
Parameter
rotate :
( Required parameter, Object type : Boolean)
Specifies whether to rotate text.
Setting
Description
true or 11
Specifies rotated printing of text.
false or 0 (default)
Cancels rotated printing of text.
Return value
Return value
ePOS-Print Builder Object
Object type
ePOS Builder
Exception
Exception
Parameter " ... " is invalid
Object type
Error
Example
To set text rotation:
<script type="text/javascript" src="epos-print-3.x.x.js"></script>
<script type="text/javascript">
<!-function buildMessage() {
var builder = new epson.ePOSBuilder();
builder.addTextRotate(true);
}
//-->
</script>
68
Chapter 4 ePOS-Print API
addText method
Adds the printing of text to the command buffer.
• After printing text, to print content other than text, execute line feed or paper feed.
• In page mode, characters are laid out in the current print position with the reference point being the character baseline dot (Printer specifications (p.209).
Syntax
addText(data);
Parameter
data :
( Required parameter, Object type : String)
Specify a character string to be printed.
For the horizontal tab/line feed, use the following escape sequences: String
Description
\t
Horizontal tab(HT)
\n
Line feed (LF)
\\
Carriage return
Return valueReturn value
Return value
ePOS-Print Builder Object
Object type
ePOS Builder
Exception
Exception
Parameter " ... " is invalid
4
Object type
Error
Example
To add character strings:
<script type="text/javascript" src="epos-print-3.x.x.js"></script>
<script type="text/javascript">
<!-function buildMessage() {
var builder = new epson.ePOSBuilder();
builder.addText('Hello,\t').addText('World\n');
}
//-->
</script>
69
addTextLang method
Adds the language setting to the command buffer.
Syntax
addTextLang(lang);
Parameter
lang :
( Required parameter, Object type : String)
Specifies the target language.
Setting
Language
en(default)
English(ANK)
de
German (ANK)
fr
French (ANK)
it
Italian (ANK)
es
Spanish (ANK)
ja
Japanese
(International character set changes to Japan.)
ja-jp
Japanese
(International character set changes to Japan.)
ko
Korean
(International character set changes to Korean.)
ko-kr
Korean
(International character set changes to Korean.)
zh-hans
Simplified Chinese(in firmware Ver.2.2 and later)
(International character set changes to China.)
zh-cn
Simplified Chinese
(International character set changes to China.)
zh-hant
Traditional Chinese(in firmware Ver.2.2 and later)
zh-tw
Traditional Chinese
Language code besides above
English(ANK)
Characters not installed in a printer cannot be printed.
For printable character code, refer to the Technical Reference Guide of your printer.
70
Chapter 4 ePOS-Print API
Depending on language specification, a part of characters is printed as follows.
Language
Characters $(U+0024)
Characters \(U+005C)
Japanese
$
¥
Korean
$
₩
Simplified Chinese
¥
\
Traditional Chinese
$
\
Return value
Return value
ePOS-Print Builder Object
Object type
ePOS Builder
Exception
Exception
Parameter " ... " is invalid
Object type
Error
Example
To set the language as English:
<script type="text/javascript" src="epos-print-3.x.x.js"></script>
<script type="text/javascript">
<!-function buildMessage() {
var builder = new epson.ePOSBuilder();
builder.addTextLang('en');
}
//-->
</script>
4
To set the language as Korean:
<script type="text/javascript" src="epos-print-3.x.x.js"></script>
<script type="text/javascript">
<!-function buildMessage() {
var builder = new epson.ePOSBuilder();
builder.addTextLang('ko');
}
//-->
</script>
71
To set the language as Simplified Chinese:
<script type="text/javascript" src="epos-print-3.x.x.js"></script>
<script type="text/javascript">
<!-function buildMessage() {
var builder = new epson.ePOSBuilder();
builder.addTextLang('zh-hans');
}
//-->
</script>
To set the language as Traditional Chinese:
<script type="text/javascript" src="epos-print-3.x.x.js"></script>
<script type="text/javascript">
<!-function buildMessage() {
var builder = new epson.ePOSBuilder();
builder.addTextLang('zh-hant');
}
//-->
</script>
72
Chapter 4 ePOS-Print API
addTextFont method
Adds the text font setting to the command buffer.
Syntax
addTextFont(font);
Parameter
font :
( Required parameter, Object type : String)
Specifies the font.
Constant (font)
Language
FONT_A (default)
Font A
FONT_B
Font B
FONT_C
Font C
Return value
Return value
ePOS-Print Builder Object
Object type
ePOS Builder
Exception
Exception
Parameter " ... " is invalid
Object type
Error
Example
4
To set the font B:
<script type="text/javascript" src="epos-print-3.x.x.js"></script>
<script type="text/javascript">
<!-function buildMessage() {
var builder = new epson.ePOSBuilder();
builder.addTextFont(builder.FONT_B);
}
//-->
</script>
73
addTextSmooth method
Adds the smoothing setting to the command buffer.
Syntax
addTextSmooth(smooth);
Parameter
smooth :
( Required parameter, Object type : Boolean)
Specifies whether to enable smoothing.
Setting
Description
true or 1
Specifies smoothing.
false or 0 (default)
Cancels smoothing
Return value
Return value
ePOS-Print Builder Object
Object type
ePOS Builder
Exception
Exception
Parameter " ... " is invalid
Object type
Error
Example
To enable smoothing:
<script type="text/javascript" src="epos-print-3.x.x.js"></script>
<script type="text/javascript">
<!-function buildMessage() {
var builder = new epson.ePOSBuilder();
builder.addTextSmooth(true);
}
//-->
</script>
74
Chapter 4 ePOS-Print API
addTextDouble method
Adds the double-sized text setting to the command buffer.
Syntax
addTextDouble(dw, dh);
Parameter
dw :
( Optional parameter, Object type : Boolean)
Specifies the double‐sized width.
Setting
true or 1
Specifies the double-sized width.
false or 0 (default)
Cancels the double-sized width
undefined
(When not specified)
dh :
Description
Retains the current setting for double-sized width.
( Optional parameter, Object type : Boolean)
Specifies the double‐sized height.
Setting
Description
true or 1
Specifies the double-sized height
false or 0 (default)
Cancels the double-sized height
undefined
(When not specified)
Retains the current setting for double-sized height
When true or 1 is set for both the dw and dh parameters, double width and height characters are printed. Return value
Return value
ePOS-Print Builder Object
Object type
ePOS Builder
Exception
Exception
Parameter " ... " is invalid
Object type
Error
75
4
Example
To set the size as double width and height:
<script type="text/javascript" src="epos-print-3.x.x.js"></script>
<script type="text/javascript">
<!-function buildMessage() {
var builder = new epson.ePOSBuilder();
builder.addTextDouble(true, true);
}
//-->
</script>
76
Chapter 4 ePOS-Print API
addTextSize method
Adds the text scale setting to the command buffer.
Syntax
addTextSize(width, height);
Parameter
width :
( Optional parameter, Object type : Number)
Specifies the horizontal scale of text.
Setting
Integer from 1 to 8
undefined
(When not specified)
height :
Description
Horizontal scale (default : 1)
Retains the current setting for the horizontal scale.
( Optional parameter, Object type : Number)
Specifies the vertical scale of text.
Setting
Integer from 1 to 8
undefined
(When not specified)
Description
Vertical scale (default : 1)
Retains the current setting for the vertical scale.
Return value
Return value
ePOS-Print Builder Object
Object type
ePOS Builder
4
Exception
Exception
Parameter " ... " is invalid
Object type
Error
Example
To set a horizontal scale of x 4 and a vertical scale of x 4:
<script type="text/javascript" src="epos-print-3.x.x.js"></script>
<script type="text/javascript">
<!-function buildMessage() {
var builder = new epson.ePOSBuilder();
builder.addTextSize(4, 4);
}
//-->
</script>
77
addTextStyle method
Adds the text style setting to the command buffer.
Syntax
addTextStyle(reverse, ul, em, color);
Parameter
reverse :
( Optional parameter, Object type : Boolean)
Specifies inversion of black and white for text.
Setting
true or 1
Specifies the inversion of black and white parts
of characters.
false or 0 (default)
Cancels the inversion of black and white parts
of characters.
undefined
(When not specified)
ul :
Description
Retains the current setting for inversion of black
and white.
( Optional parameter, Object type : Boolean)
Specifies the underline style.
Setting
true or 1
Specifies underlining.
false or 0 (default)
Cancels underlining.
undefined
(When not specified)
em :
Retains the current underlining setting.
( Optional parameter, Object type : Boolean)
Specifies the bold style.
Setting
Description
true or 1
Specifies emphasized printing of characters.
false or 0 (default)
Cancels emphasized printing of characters.
undefined
Retains the current setting for emphasized printing.
(When not specified)
78
Description
Chapter 4 ePOS-Print API
color :
( Optional parameter, Object type : String)
Specifies the color.
Setting
Description
COLOR_NONE
Characters are not printed.
COLOR_1 (default)
First color
COLOR_2
Second color
COLOR_3
Third color
COLOR_4
Fourth color
undefined
(When not specified)
Retains the current color setting
Return value
Return value
ePOS-Print Builder Object
Object type
ePOS Builder
Exception
Exception
Parameter " ... " is invalid
Object type
Error
Example
To set the underline style:
<script type="text/javascript" src="epos-print-3.x.x.js"></script>
<script type="text/javascript">
<!-function buildMessage() {
var builder = new epson.ePOSBuilder();
builder.addTextStyle(undefined, true);
}
//-->
</script>
4
79
addTextPosition method
Adds the horizontal print start position of text to the command buffer.
Syntax
addTextPosition(x);
Parameter
x :
( Required parameter, Object type : Number)
Specifies the horizontal print start position (in dots).
Specifies an integer from 0 to 65535. Return value
Return value
ePOS-Print Builder Object
Object type
ePOS Builder
Exception
Exception
Parameter " ... " is invalid
Object type
Error
Example
To set the print position at 120 dots from the left end:
<script type="text/javascript" src="epos-print-3.x.x.js"></script>
<script type="text/javascript">
<!-function buildMessage() {
var builder = new epson.ePOSBuilder();
builder.addTextPosition(120);
}
//-->
</script>
80
Chapter 4 ePOS-Print API
addTextVPosition method
Adds the vertical print start position of text to the command buffer. (in firmware Ver.3.0 and later)
Use this API function by inserting it between addPageBegin to addPageEnd.
Syntax
addTextVPosition(y);
Parameter
y :
( Required parameter, Object type : Number)
Specifies the vertical print start position (in dots).
Specifies an integer from 0 to 65535. Return value
Return value
ePOS-Print Builder Object
Object type
ePOS Builder
Exception
Exception
Parameter " ... " is invalid
Object type
Error
Example
4
To set the print position at 120 dots from the top:
<script type="text/javascript" src="epos-print-3.x.x.js"></script>
<script type="text/javascript">
<!-function buildMessage() {
var builder = new epson.ePOSBuilder();
builder.addPageBegin();
builder.addTextVPosition(120);
builder.addPageEnd();
}
//-->
</script>
81
addFeedUnit method
Adds paper feeding in dots to the command buffer.
Syntax
addFeedUnit(unit);
Parameter
unit :
( Required parameter, Object type : Number)
Specifies the paper feed space (in dots). Specifies an integer from 0 to 255. Return value
Return value
ePOS-Print Builder Object
Object type
ePOS Builder
Exception
Exception
Parameter " ... " is invalid
Object type
Error
Example
To feed paper by 30 dots:
<script type="text/javascript" src="epos-print-3.x.x.js"></script>
<script type="text/javascript">
<!-function buildMessage() {
var builder = new epson.ePOSBuilder();
builder.addFeedUnit(30);
}
//-->
</script>
82
Chapter 4 ePOS-Print API
addFeedLine method
Adds paper feeding in lines to the command buffer.
Syntax
addFeedLine(line);
Parameter
line :
( Required parameter, Object type : Number)
Specifies the paper feed space (in lines). Specifies an integer from 0 to 255.
Return value
Return value
ePOS-Print Builder Object
Object type
ePOS Builder
Exception
Exception
Parameter " ... " is invalid
Object type
Error
Example
To feed paper by 3 lines:
<script type="text/javascript" src="epos-print-3.x.x.js"></script>
<script type="text/javascript">
<!-function buildMessage() {
var builder = new epson.ePOSBuilder();
builder.addFeedLine(3);
}
//-->
</script>
4
83
addFeedPosition method
Adds label/black mark paper feeding to the command buffer. (Supported in firmware Ver.2.1 and later)
• Control of label paper/black mark paper must be done in the standard mode.
• In the page mode, addFeedPosition method specification cannot be used.
Syntax
addFeedPosition(pos);
Parameter
pos :
( Required parameter, Object type : String)
Specifies the feed position.
Setting
Description
FEED_PEELING
Feeds to the peeling position.
FEED_CUTTING
Feeds to the cutting position.
FEED_CURRENT_TOF
Feeds to the top of the current label.
FEED_NEXT_TOF
Feeds to the top of the next label.
Return value
Return value
ePOS-Print Builder Object
Object type
ePOS Builder
Exception
Exception
Parameter " ... " is invalid
84
Object type
Error
Chapter 4 ePOS-Print API
Example
To print while peeling the label one by one
<script type="text/javascript" src="epos-print-3.x.x.js"></script>
<script type="text/javascript">
<!-function buildMessage() {
var builder = new epson.ePOSBuilder();
builder.addFeedPosition(builder.FEED_CURRENT_TOF);
builder.addBarcode('0001', builder.BARCODE_CODE39, builder.HRI_BELOW);
builder.addFeedPosition(builder.FEED_PEELING);
}
//-->
</script>
To print labels consecutively
<script type="text/javascript" src="epos-print-3.x.x.js"></script>
<script type="text/javascript">
<!-function buildMessage() {
var builder = new epson.ePOSBuilder();
builder.addFeedPosition(builder.FEED_CURRENT_TOF);
builder.addBarcode('0001', builder.BARCODE_CODE39, builder.HRI_BELOW);
builder.addFeedPosition(builder.NEXT_TOF);
builder.addBarcode('0002', builder.BARCODE_CODE39, builder.HRI_BELOW);
builder.addFeedPosition(builder.NEXT_TOF);
builder.addBarcode('0003', builder.BARCODE_CODE39, builder.HRI_BELOW);
builder.addFeedPosition(builder.NEXT_TOF);
}
//-->
</script>
4
To print tickets with black mark paper
<script type="text/javascript" src="epos-print-3.x.x.js"></script>
<script type="text/javascript">
<!-function buildMessage() {
var builder = new epson.ePOSBuilder();
builder.addFeedPosition(builder.FEED_CURRENT_TOF);
builder.addBarcode('0001', builder.BARCODE_CODE39, builder.HRI_BELOW);
builder.addFeedPosition(builder.FEED_CUTTING);
builder.addCut(builder.CUT_NO_FEED);
}
//-->
</script>
85
addFeed method
Adds a line feed to the command buffer.
Syntax
addFeed();
Return value
Return value
ePOS-Print Builder Object
Object type
ePOS Builder
Example
To start a new line after printing a character string:
<script type="text/javascript" src="epos-print-3.x.x.js"></script>
<script type="text/javascript">
<!-function buildMessage() {
var builder = new epson.ePOSBuilder();
builder.addText(“Hello”).addFeed();
builder.addText(“World”).addFeed();
}
//-->
</script>
86
Chapter 4 ePOS-Print API
addImage method
Adds raster image printing to the command buffer.
Prints graphics rendered in HTML5 Canvas.
Converts the specified range in a RGBA full-color image of HTML5 Canvas into raster image data according
to the settings of the halftone and brightness properties. One pixel in an image equals to one printer dot.
When an image contains any transparent color, the background color of the image is assumed to be white.
If an HTML5 Canvas image contains images downloaded from different domains, you cannot print the image. In this case, a security error occurs due to violation of the same origin policy of JavaScript.
• To print a raster image at high speed, specify ALIGN_LEFT for the addTextAlign method (p. 66), and specify a multiple of 8 not exceeding the printerʹs paper width for the width parameter of this API.
• In page mode, a raster image is laid out in the current print position with the reference point being its bottom left dot. The print position will not move. • Multiple tone printing is not supported in Page Mode. Multiple tone graphic printing is supported in Standard Mode only.
Syntax
addImage(context, x, y, width, height, color, mode);
Parameter
context :
( Required parameter, Object type : Context)
Specifies the 2D context of HTML5 Canvas.
x :
( Required parameter, Object type : Number)
Specifies the horizontal start position in the print area. Specifies an integer from 0 to 65535.
y :
( Required parameter, Object type : Number)
Specifies the vertical start position in the print area. Specifies an integer from 0 to 65535.
width :
( Required parameter, Object type : Number)
Specifies the width of the print area. Specifies an integer from 0 to 65535.
height :
( Required parameter, Object type : Number)
Specifies the height of the print area. Specifies an integer from 0 to 65535.
color :
( Optional parameter, Object type : String)
Specifies the color.
Setting
Description
COLOR_NONE
Characters are not printed.
COLOR_1 (default)
First color
COLOR_2
Second color
COLOR_3
Third color
COLOR_4
Fourth color
undefined
(When not specified)
4
First color
87
mode :
( Optional parameter, Object type : String)
Specifies the color mode. (in firmware Ver.1.2 and later)
Setting
Description
MODE_MONO
Monochrome (two-tone)
MODE_GRAY16
Gray scale (16-tone)
undefined
(When not specified)
Monochrome (two-tone)
Return value
Return value
ePOS-Print Builder Object
Object type
ePOS Builder
Exception
Exception
Parameter " ... " is invalid
Object type
Error
Example
<script type="text/javascript" src="epos-print-3.x.x.js"></script>
<script type="text/javascript">
<!-function buildMessage() {
var builder = new epson.ePOSBuilder();
var canvas = document.getElementById('canvas');
if (canvas.getContext) {
var context = canvas.getContext('2d');
builder.addImage(context, 0, 0, canvas.width, canvas.height);
}
}
//-->
</script>
To print an image 300 dots wide and 300 dots high in page mode:
var canvas = document.getElementById('myCanvas');
var context = canvas.getContext('2d');
var builder = new epson.ePOSBuilder();
builder.addPageBegin();
builder.addPageArea(0, 0, 300, 300);
builder.addPagePosition(0, 299);
builder.addImage(context, 0, 0, 300, 300);
builder.addPageEnd();
88
Chapter 4 ePOS-Print API
addLogo method
Adds NV logo printing to the command buffer.
Prints a logo registered in the NV memory of the printer.
• Using model‐dedicated utility or logo registration utility (TMFLogo), register a logo in the printer in advance.
• In page mode, a logo is laid out in the current print position with the reference point being its bottom left dot.
• Multiple tone printing is not supported in Page Mode. Multiple tone graphic printing is supported in Standard Mode only.
Syntax
addLogo(key1, key2);
Parameter
key1 :
( Required parameter, Object type : Number)
Specifies the key code 1 of an NV logo. Specifies an integer from 0 to 255.
key2 :
( Required parameter, Object type : Number)
Specifies the key code 2 of an NV logo. Specifies an integer from 0 to 255.
Return value
Return value
ePOS-Print Builder Object
Object type
ePOS Builder
Exception
Exception
Parameter " ... " is invalid
4
Object type
Error
Example
<script type="text/javascript" src="epos-print-3.x.x.js"></script>
<script type="text/javascript">
<!-function buildMessage() {
var builder = new epson.ePOSBuilder();
builder.addLogo(48, 48);
}
//-->
</script>
89
addBarcode method
Adds barcode printing to the command buffer.
In page mode, a barcode is laid out in the current print position with the reference point being its bottom left dot (except for HRI).
Syntax
addBarcode(data, type, hri, font, width, height);
Parameter
data :
( Required parameter, Object type : String)
Specifies the barcode data as a string.
Barcode type
Description
When an 11-digit number is specified, a check digit is
automatically added.
UPC-A
When a 12-digit number is specified, the 12th digit is processed as a check digit but the check digit is not validated.
Specify 0 as the first digit.
Specify the manufacturer code in the digits 2 to 6.
UPC-E
Specify (right-align) the item code in the digits 7 to 11.
The number of item code digits varies depending on the
manufacturer code. Specify 0s in empty digits.
When an 11-digit number is specified, a check digit is
automatically added.
When a 12-digit number is specified, the 12th digit is processed as a check digit but the check digit is not validated.
EAN13
JAN13
EAN8
JAN8
CODE39
ITF
90
When an 12-digit number is specified, a check digit is
automatically added.
When a 13-digit number is specified, the 12th digit is processed as a check digit but the check digit is not validated.
When a 7-digit number is specified, a check digit is automatically added.
When an 8-digit number is specified, the 8th digit is processed as a check digit but the check digit is not validated.
When the first character is *, the character is processed as
the start character. In other cases, a start character is
automatically added.
Start and stop codes are automatically added.
Check digits are not added or validated.
Chapter 4 ePOS-Print API
Barcode type
Description
Specify a start character (A to D, a to d).
CODABAR
Specify a stop character (A to D, a to d).
Check digits are not added or validated.
CODE93
Start and stop characters are automatically added.
A check digit is automatically calculated and added.
Specify a start character (CODE A, CODE B, CODE C).
A stop character is automatically added.
A check digit is automatically calculated and added.
To encode each of the following characters, specify two
characters starting with the character "{":
CODE128
FNC1:
{1
FNC2:
{2
FNC3:
{3
FNC4:
{4
CODE A:
{A
CODE B:
{B
CODE C:
{C
SHIFT:
{S
{:
{{
A start character, FNC1, a check digit, and a stop
character are automatically added.
To automatically calculate and add a check digit for an
application identifier (AI) and the subsequent data,
specify the character "*" in the position of the check digit.
You can enclose an application identifier (AI) in
parentheses. The parentheses are used as HRI print
characters and are not encoded as data.
GS1-128
4
You can insert spaces between an application identifier
(AI) and data. The spaces are used as HRI print
characters and are not encoded as data.
To encode each of the following characters, specify two
characters starting with the character "{":
GS1 DataBar Omnidirectional
GS1 DataBar Truncated
FNC1:
{1
FNC3:
{3
(:
{(
):
{)
*:
{*
{:
{{
Specify a 13-digit global trade item number (GTIN) not
including an application identifier (AI) or a check digit.
GS1 DataBar Limited
91
Barcode type
Description
You can enclose an application identifier (AI) in
parentheses. The parentheses are used as HRI print
characters and are not encoded as data.
BARCODE_GS1_
DATABAR_EXPANDED
To encode each of the following characters, specify two
characters starting with the character "{":
FNC1:
{1
(:
{(
):
{)
To specify binary data that cannot be represented by character strings, use the following escape sequences.
String
type :
Description
\xnn
Control code
\\
Back slash
( Required parameter, Object type : String)
Specifies the barcode type.
Constant (type)
92
Barcode type
BARCODE_UPC_A
UPC-A
BARCODE_UPC_E
UPC-E
BARCODE_EAN13
EAN13
BARCODE_JAN13
JAN13
BARCODE_EAN8
EAN8
BARCODE_JAN8
JAN8
BARCODE_CODE39
CODE39
BARCODE_ITF
ITF
BARCODE_CODABAR
CODABAR
BARCODE_CODE93
CODE93
BARCODE_CODE128
CODE128
BARCODE_GS1_128
GS1-128
BARCODE_GS1_DATABAR_OMNIDIRECTIONAL
GS1 DataBar Omnidirectional
BARCODE_GS1_DATABAR_TRUNCATED
GS1 DataBar Truncated
BARCODE_GS1_DATABAR_LIMITED
GS1 DataBar Limited
BARCODE_GS1_DATABAR_EXPANDED
GS1 Databar Expanded
Chapter 4 ePOS-Print API
hri :
( Optional parameter, Object type : String)
Specifies the HRI position.
Constant (hri)
font :
Description
HRI_NONE (default)
HRI not printed
HRI_ABOVE
Above the bar code
HRI_BELOW
Below the bar code
HRI_BOTH
Both above and below the bar code
( Optional parameter, Object type : String)
Specifies the HRI font.
Constant (font)
width :
Language
FONT_A(default)
Font A
FONT_B
Font B
FONT_C
Font C
( Optional parameter, Object type : Number)
Specifies the width of each module in dots. Specifies an integer from 2 to 6.
height :
( Optional parameter, Object type : Number)
Specifies the barcode height in dots. Specifies an integer from 1 to 255.
Return value
Return value
ePOS-Print Builder Object
Object type
ePOS Builder
Exception
Exception
Parameter " ... " is invalid
Object type
4
Error
93
Example
To print barcodes:
<script type="text/javascript" src="epos-print-3.x.x.js"></script>
<script type="text/javascript">
<!-function buildMessage() {
var builder = new epson.ePOSBuilder();
builder.addBarcode('01234567890', builder.BAROCDE_UPC_A,
builder.HRI_BELOW, undefined, 2, 64);
builder.addBarcode('01234500005', builder.BAROCDE_UPC_E);
builder.addBarcode('201234567890', builder.BAROCDE_EAN13);
builder.addBarcode('201234567890', builder.BAROCDE_JAN13);
builder.addBarcode('2012345', builder.BAROCDE_EAN8);
builder.addBarcode('2012345', builder.BAROCDE_JAN8);
builder.addBarcode('ABCDE', builder.BAROCDE_CODE39);
builder.addBarcode('012345', builder.BAROCDE_ITF);
builder.addBarcode('A012345A', builder.BAROCDE_CODABAR);
builder.addBarcode('ABCDE', builder.BAROCDE_CODE93);
builder.addBarcode('{Babcde', builder.BAROCDE_CODE128);
builder.addBarcode('(01)201234567890*', builder.BAROCDE_GS1_128);
builder.addBarcode('0201234567890',
builder.BAROCDE_GS1_DATABAR_OMNIDIRECTIONAL);
builder.addBarcode('0201234567890',
builder.BAROCDE_GS1_DATABAR_TRUNCATED);
builder.addBarcode('0201234567890',
builder.BAROCDE_GS1_DATABAR_LIMITED);
builder.addBarcode('(01)2012345678903',
builder.BAROCDE_GS1_DATABAR_EXPANDED);
}
//-->
</script>
94
Chapter 4 ePOS-Print API
addSymbol method
Adds two-dimensional symbol printing to the command buffer.
In page mode, a two‐dimensional symbol is laid out in the current print position with the reference point being its bottom left dot. Syntax
addSymbol(data, type, level, width, height, size);
Parameter
data :
( Required parameter, Object type : String)
Specifies two‐dimensional symbol data as a character string.
2D-Code type
Description
Standard PDF417
Convert the character string to the string in UTF8, apply the escape sequence, and then
encode the string.
Truncated PDF417
The data area can contain up to 928 code
words in a maximum of 90 rows, each of which
can contain up to 30 code words.
QR Code Model 1
Convert the character string to the string in ShiftJIS, apply the escape sequence, and then
encode the string based on the data type as
shown below.
Number:
QR Code Model 2
0 to 9
Alphanumeric character:
0 to 9, A to Z, space, $, %, *, +, -, ., /, :
4
Kanji character: Shift-JIS value
8-bit, byte data:
0x00 to 0xff
95
2D-Code type
MaxiCode Mode 2
MaxiCode Mode 3
MaxiCode Mode 4
MaxiCode Mode 5
Description
Convert the character string to the string in UTF8, apply the escape sequence, and then
encode the string.
In Modes 2 and 3, when the first piece of data is
[)>\ x1e01\x1dyy (where yy is a two-digit number), this is processed as the message header,
and the subsequent data is processed as the
primary message. In other cases, from the first
piece of data, data is processed as the primary
message.
In Mode 2, specify the primary message in the
following format:
MaxiCode Mode 6
Postal code (1- to 9-digit number) GS:(\x1d) ISO
country code (1- to 3-digit number) GS:(\x1d)
Service class code (1- to 3-digit number)
In Mode 3, specify the primary message in the
following format:
Postal code (1 to 6 pieces of data convertible
by Code Set A) GS:(\x1d) ISO country code (1to 3-digit number) GS:(\x1d) Service class code
(1- to 3-digit number)
GS1 DataBar Stacked
GS1 DataBar Stacked
Omnidirectional
Convert the character string to the string in UTF8, apply the escape sequence, and then
encode the string.
Specify a 13-digit global trade item number
(GTIN) not including an application identifier
(AI) or a check digit.
Convert the character string to the string in UTF8, apply the escape sequence, and then
encode the string.
You can enclose an application identifier (AI) in
parentheses. The parentheses are used as HRI
print characters and are not encoded as data.
GS1 DataBar Expanded Stacked
96
To encode each of the following characters,
specify two characters starting with the
character "{":
FNC1:
{1
(:
{(
):
{)
Aztec Code
After converting the character string to UTF-8,
conduct the escape sequence and encode.
DataMatrix
After converting the character string to UTF-8,
conduct the escape sequence and encode.
Chapter 4 ePOS-Print API
To specify binary data that cannot be represented by character strings, use the following escape sequences.
String
type :
Description
\xnn
Control code
\\
Back slash
( Required parameter, Object type : String)
Specifies the two‐dimensional symbol type.
Constant (type)
2D-Code type
SYMBOL_PDF417_STANDARD
Standard PDF417
SYMBOL_PDF417_TRUNCATED
Truncated PDF417
SYMBOL_QRCODE_MODEL_1
QR Code Model 1
SYMBOL_QRCODE_MODEL_2
QR Code Model 2
SYMBOL_MAXICODE_MODE_2
MaxiCode Mode 2
SYMBOL_MAXICODE_MODE_3
MaxiCode Mode 3
SYMBOL_MAXICODE_MODE_4
MaxiCode Mode 4
SYMBOL_MAXICODE_MODE_5
MaxiCode Mode 5
SYMBOL_MAXICODE_MODE_6
MaxiCode Mode 6
SYMBOL_GS1_DATABAR_STACKED
GS1 DataBar Stacked
SYMBOL_GS1_DATABAR_STACKED_
OMNIDIRECTIONAL
GS1 DataBar Stacked
Omnidirectional
SYMBOL_GS1_DATABAR_EXPANDED_STACKED
GS1 DataBar Expanded Stacked
SYMBOL_AZTECCODE_FULLRANGE
Aztec Code Full-Range mode
(in firmware Ver.2.2 and later)
SYMBOL_AZTECCODE_COMPACT
Aztec Code Compact mode
(in firmware Ver.2.2 and later)
SYMBOL_DATAMATRIX_SQUARE
DataMatrix ECC200 square
(in firmware Ver.2.2 and later)
SYMBOL_DATAMATRIX_RECTANGLE_8
DataMatrix ECC200 rectangle,
8 lines
(in firmware Ver.2.2 and later)
SYMBOL_DATAMATRIX_RECTANGLE_12
DataMatrix ECC200 rectangle,
12 lines
(in firmware Ver.2.2 and later)
SYMBOL_DATAMATRIX_RECTANGLE_16
DataMatrix ECC200 rectangle,
16 lines
(in firmware Ver.2.2 and later)
4
97
level :
( Optional parameter, Object type : String)
Specifies the error correction level.
Constant (level)
Description
LEVEL_0
PDF417 error correction level 0
LEVEL_1
PDF417 error correction level 1
LEVEL_2
PDF417 error correction level 2
LEVEL_3
PDF417 error correction level 3
LEVEL_4
PDF417 error correction level 4
LEVEL_5
PDF417 error correction level 5
LEVEL_6
PDF417 error correction level 6
LEVEL_7
PDF417 error correction level 7
LEVEL_8
PDF417 error correction level 8
LEVEL_L
QR Code error correction level L
LEVEL_M
QR Code error correction level M
LEVEL_Q
QR Code error correction level Q
LEVEL_H
QR Code error correction level H
LEVEL_DEFAULT
Default level
Integer from 5 to 95
Aztec Code error correction level (Default: 23)
(in firmware Ver.2.2 and later)
• Select the level according to the two‐dimensional symbol type. • For MaxiCode and two‐dimensional GS1 DataBar, select LEVEL_DEFAULT.
width :
( Optional parameter, Object type : Number)
Specifies the module width. Specifies an integer from 0 to 255.
2D-Code type
98
Valid value range
Default value
PDF417
2 to 8
3
QR Code
1 to 16
3
MaxiCode
Ignored
2D GS1 Databar
2 to 8
2
Aztec Code
2 to 16
3
DataMatrix
2 to 16
3
Chapter 4 ePOS-Print API
height :
( Optional parameter, Object type : Number)
Specifies the module height. Specifies an integer from 0 to 255.
2D-Code type
Valid value range
2 to 8
(Magnification for width)
PDF417
Default value
3
QR Code
MaxiCode
2D GS1 Databar
Ignored
Aztec Code
DataMatrix
size :
( Optional parameter, Object type : Number)
Specifies the two‐dimensional symbol maximum size. Specifies an integer from 0 to 65535.
2D-Code type
PDF417
Default value
0 (Auto)
QR Code
Description
Specifies the number of
code words for each row
Ignored
MaxiCode
2D GS1 Databar
0 (Auto)
Specifies the maximum
width for the barcode
(106 or above)
Aztec Code
Ignored
DataMatrix
Ignored
(Others)
Return value
Return value
ePOS-Print Builder Object
4
Object type
ePOS Builder
Exception
Exception
Parameter " ... " is invalid
Object type
Error
99
Example
To print two-dimensional symbols:
<script type="text/javascript" src="epos-print-3.x.x.js"></script>
<script type="text/javascript">
<!-function buildMessage() {
var builder = new epson.ePOSBuilder();
builder.addSymbol('ABCDE', builder.SYMBOL_PDF417_STANDARD);
builder.addSymbol('ABCDE', builder.SYMBOL_QRCODE_MODEL_2,
builder.LEVEL_Q);
builder.addSymbol('908063840\x1d850\x1d001\x1d\x04',
builder.SYMBOL_MAXICODE_MODE_2);
builder.addSymbol('0201234567890', builder.SYMBOL_
GS1_DATABAR_STACKED);
builder.addSymbol('0201234567890',
builder.SYMBOL_GS1_DATABAR_STACKED_OMNIDIRECTIONAL);
builder.addSymbol('(01)02012345678903',
builder.SYMBOL_GS1_DATABAR_EXPANDED_STACKED);
builder.addSymbol('ABCDE', builder.SYMBOL_AZTECCODE_FULLRANGE, 23);
builder.addSymbol('ABCDE', builder.SYMBOL_DATAMATRIX_SQUARE);
}
//-->
</script>
100
Chapter 4 ePOS-Print API
addHLine method
Adds horizontal line printing to the command buffer.
Draws horizontal lines.
Not available in page mode.
Syntax
addHLine(x1, x2, style);
Parameter
x 1:
( Required parameter, Object type : Number)
Specifies the start position of the horizontal line (in dots). Specifies an integer from 0 to 65535.
x2 :
( Required parameter, Object type : Number)
Specifies the end position of the horizontal line (in dots). Specifies an integer from 0 to 65535.
style :
( Optional parameter, Object type : String)
Specifies the line type.
Constant (style)
LINE_THIN
Description
Solid line: Thin
LINE_MEDIUM
Solid line: Medium
LINE_THICK
Solid line: Thick
LINE_THIN_DOUBLE
Double line: Thin
LINE_MEDIUM_DOUBLE
Double line: Medium
LINE_THICK_DOUBLE
Double line: Thick
undefined (When not specified)
Solid line: Thin
4
Return value
Return value
ePOS-Print Builder Object
Object type
ePOS Builder
Exception
Exception
Parameter " ... " is invalid
Object type
Error
101
Example
To draw double horizontal lines in the following positions:
Between 100 dots and 200 dots from the left end
Between 400 dots and 500 dots from the left end
<script type="text/javascript" src="epos-print-3.x.x.js"></script>
<script type="text/javascript">
<!-function buildMessage() {
var builder = new epson.ePOSBuilder();
builder.addHLine(100, 200, builder.LINE_THIN_DOUBLE);
builder.addHLine(400, 500, builder.LINE_THIN_DOUBLE);
}
//-->
</script>
102
Chapter 4 ePOS-Print API
addVLineBegin method
Adds the beginning of vertical line to the command buffer. Starts to draw vertical lines.
• Not available in page mode.
• Vertical lines are drawn until their end is specified by addVLineEnd (p. 105). Use this API function with addVLineEnd.
Syntax
addVLineBegin(x, style);
Parameter
x :
( Required parameter, Object type : Number)
Specifies the start position of the vertical line (in dots). Specifies an integer from 0 to 65535.
style :
( Optional parameter, Object type : String)
Specifies the line type.
Constant (style)
Description
LINE_THIN
Solid line: Thin
LINE_MEDIUM
Solid line: Medium
LINE_THICK
Solid line: Thick
LINE_THIN_DOUBLE
Double line: Thin
LINE_MEDIUM_DOUBLE
Double line: Medium
LINE_THICK_DOUBLE
Double line: Thick
undefined (When not specified)
Solid line: Thin
Return value
Return value
ePOS-Print Builder Object
4
Object type
ePOS Builder
Exception
Exception
Parameter " ... " is invalid
Object type
Error
103
Example
To draw thin vertical lines at 100 dots and 200 dots from the left end:
<script type="text/javascript" src="epos-print-3.x.x.js"></script>
<script type="text/javascript">
<!-function buildMessage() {
var builder = new epson.ePOSBuilder();
builder.addVLineBegin(100).addVLineBegin(200);
builder.addFeedUnit(100);
builder.addVLineEnd(100).addVLineEnd(200);
}
//-->
</script>
104
Chapter 4 ePOS-Print API
addVLineEnd method
Adds the end of vertical line to the command buffer. Finishes drawing vertical lines.
• Not available in page mode.
• Use this API function with addVLineBegin (p. 103).
Syntax
addVLineEnd(x, style);
Parameter
x :
( Required parameter, Object type : Number)
Specifies the end position of the vertical line (in dots). Specifies an integer from 0 to 65535.
style :
( Optional parameter, Object type : String)
Specifies the type of the line you want to finish drawing.
Constant (style)
Description
LINE_THIN
Solid line: Thin
LINE_MEDIUM
Solid line: Medium
LINE_THICK
Solid line: Thick
LINE_THIN_DOUBLE
Double line: Thin
LINE_MEDIUM_DOUBLE
Double line: Medium
LINE_THICK_DOUBLE
Double line: Thick
undefined (When not specified)
Solid line: Thin
Return value
Return value
ePOS-Print Builder Object
4
Object type
ePOS Builder
Exception
Exception
Parameter " ... " is invalid
Object type
Error
105
Example
To draw thin vertical lines at 100 dots and 200 dots from the left end:
<script type="text/javascript" src="epos-print-3.x.x.js"></script>
<script type="text/javascript">
<!-function buildMessage() {
var builder = new epson.ePOSBuilder();
builder.addVLineBegin(100).addVLineBegin(200);
builder.addFeedUnit(100);
builder.addVLineEnd(100).addVLineEnd(200);
}
//-->
</script>
106
Chapter 4 ePOS-Print API
addPageBegin method
Adds the switching to page mode to the command buffer. The page mode process starts.
Vertical lines are processed in page mode until their end is specified by PageEnd (p. 108). Use this API function with PageEnd.
Syntax
addPageBegin();
Return value
Return value
ePOS-Print Builder Object
Object type
ePOS Builder
Example
To print the characters "ABCDE" in page mode:
<script type="text/javascript" src="epos-print-3.x.x.js"></script>
<script type="text/javascript">
<!-function buildMessage() {
var builder = new epson.ePOSBuilder();
builder.addPageBegin();
builder.addText('ABCDE');
builder.addPageEnd();
}
//-->
</script>
4
107
addPageEnd method
Adds the end of page mode to the command buffer. The page mode process ends.
Use this API function with addPageBegin (p. 107).
Syntax
addPageEnd();
Return value
Return value
ePOS-Print Builder Object
Object type
ePOS Builder
Example
To print the characters "ABCDE" in page mode:
<script type="text/javascript" src="epos-print-3.x.x.js"></script>
<script type="text/javascript">
<!-function buildMessage() {
var builder = new epson.ePOSBuilder();
builder.addPageBegin();
builder.addText('ABCDE');
builder.addPageEnd();
}
//-->
</script>
108
Chapter 4 ePOS-Print API
addPageArea method
Adds the print area in page mode to the command buffer.
Specifies the print area in page mode (coordinates). After this API function, specify a print data API function
such as the addText method.
• Specify a print area to cover the content to be printed. If the print data extends beyond the print area, the print result will be such that the print data has been printed incompletely.
• Use this API function by inserting it between addPageBegin (p. 107) and PageEnd (p. 108).
Syntax
addPageArea(x, y, width, height);
Parameter
x :
( Required parameter, Object type : Number)
Specifies the origin of the horizontal axis (in dots). Specifies an integer from 0 to 65535. 0 is the left end of the printerʹs printable area.
y :
( Required parameter, Object type : Number)
Specifies the origin of the vertical axis (in dots). Specifies an integer from 0 to 65535. 0 is the position in which no paper feed has been performed.
width :
height :
( Required parameter, Object type : Number)
Specifies the width of the print area (in dots). Specifies an integer from 0 to 65535.
( Required parameter, Object type : Number)
Specifies the height of the print area (in dots). Specifies an integer from 0 to 65535.
Determine the width and height of the print area according to the print direction setting. Otherwise, the print data might not be printed completely.
4
Return value
Return value
ePOS-Print Builder Object
Object type
ePOS Builder
Exception
Exception
Parameter " ... " is invalid
Object type
Error
109
Example
To specify the print area with the origin (100, 50), a width of 200 dots, and a height of 30 dots and print
the characters "ABCDE":
<script type="text/javascript" src="epos-print-3.x.x.js"></script>
<script type="text/javascript">
<!-function buildMessage() {
var builder = new epson.ePOSBuilder();
builder.addPageBegin();
builder.addPageArea(100, 50, 200, 30);
builder.addText('ABCDE');
builder.addPageEnd();
}
//-->
</script>
110
Chapter 4 ePOS-Print API
addPageDirection method
Adds the page mode print direction setting to the command buffer. Specifies the print direction in page
mode. This function can be omitted if rotation is not required.
Use this API function by inserting it between addPageBegin (p. 107) and PageEnd (p. 108).
Syntax
addPageDirection(dir);
Parameter
dir :
( Required parameter, Object type : String)
Specifies the print direction in page mode.
Constant (dir)
Description
Left to right
DIRECTION_LEFT_TO_RIGHT(default)
(No rotation.Data is printed from the top left
corner to the right.)
Bottom to top
DIRECTION_BOTTOM_TO_TOP
(Counterclockwise rotation by 90 degrees.
Data is printed from the bottom left corner
to the top.)
Right to left
DIRECTION_RIGHT_TO_LEFT
(Rotation by 180 degrees.Data is printed
from the bottom right corner to the left.)
Top to bottom
DIRECTION_TOP_TO_BOTTOM
(Clockwise rotation by 90 degrees.
Data is printed from the top right corner to
the bottom.)
Return value
Return value
ePOS-Print Builder Object
Object type
ePOS Builder
Exception
Exception
Parameter " ... " is invalid
Object type
Error
111
4
Example
To print the characters "ABCDE" by rotating them 90 degrees clockwise:
<script type="text/javascript" src="epos-print-3.x.x.js"></script>
<script type="text/javascript">
<!-function buildMessage() {
var builder = new epson.ePOSBuilder();
builder.addPageBegin();
builder.addPageArea(100, 50, 30, 200);
builder.addPageDirection(builder.DIRECTION_TOP_TO_BOTTOM);
builder.addText('ABCDE');
builder.addPageEnd();
}
//-->
</script>
112
Chapter 4 ePOS-Print API
addPagePosition method
Adds the page mode print-position-set area to the command buffer.
Specifies the print start position (coordinates) in the area specified by the addPageArea method.
Use this API function by inserting it between addPageBegin (p. 107) and PageEnd (p. 108).
Syntax
addPagePosition(x, y);
Parameter
x :
( Required parameter, Object type : Number)
Specifies the horizontal print position (in dots). Specifies an integer from 0 to 65535.
y :
( Required parameter, Object type : Number)
Specifies the vertical print position (in dots). Specifies an integer from 0 to 65535.
Specify the print start position (coordinates) according to the content to be printed. Refer to the following.
To print a character string:
Specify the left end of the baseline for the first character. This can be omitted for left‐aligned printing of standard‐sized characters. To print double‐sized height characters, specify a value equal to or greater than 42 for y.
To print a barcode:
Specify the bottom left of the symbol. And specify the barcode height for y.
To print a graphic/logo:
Specify the bottom left of the graphic data. And specify the graphic data height for y.
To print a two‐dimensional symbol:
Specify the top left of the symbol. This can be omitted when printing from the top left.
Return value
Return value
ePOS-Print Builder Object
Object type
ePOS Builder
Exception
Exception
Parameter " ... " is invalid
Object type
Error
113
4
Example
To specify (50,30) for the print start position in the area specified by the addPageArea method and
print the characters "ABCDE":
<script type="text/javascript" src="epos-print-3.x.x.js"></script>
<script type="text/javascript">
<!-function buildMessage() {
var builder = new epson.ePOSBuilder();
builder.addPageBegin();
builder.addPageArea(100, 50, 200, 100);
builder.addPagePosition(50, 30);
builder.addText('ABCDE');
builder.addPageEnd();
}
//-->
</script>
114
Chapter 4 ePOS-Print API
addPageLine method
Adds line drawing in page mode to the command buffer. Draws a line in page mode.
• Diagonal lines cannot be drawn.
• Use this API function by inserting it between addPageBegin (p. 107) and PageEnd (p. 108).
Syntax
addPageLine(x1, y1, x2, y2, style);
Parameter
x 1:
( Required parameter, Object type : Number)
Specifies the horizontal start position of the line (in dots). Specifies an integer from 0 to 65535.
y 1:
( Required parameter, Object type : Number)
Specifies the vertical start position of the line (in dots). Specifies an integer from 0 to 65535.
x2 :
( Required parameter, Object type : Number)
Specifies the horizontal end position of the line (in dots). Specifies an integer from 0 to 65535.
y2 :
( Required parameter, Object type : Number)
ècSpecifies the vertical end position of the line (in dots). Specifies an integer from 0 to 65535.
style :
( Optional parameter, Object type : String)
Specifies the line type.
Constant (style)
Description
LINE_THIN
Solid line: Thin
LINE_MEDIUM
Solid line: Medium
LINE_THICK
Solid line: Thick
LINE_THIN_DOUBLE
Double line: Thin
LINE_MEDIUM_DOUBLE
Double line: Medium
LINE_THICK_DOUBLE
Double line: Thick
undefined
(When not specified)
4
Solid line: Thin
Return value
Return value
ePOS-Print Builder Object
Object type
ePOS Builder
Exception
Exception
Parameter " ... " is invalid
Object type
Error
115
Example
To draw a thin solid line between the start position (100, 0) and the end position (500, 0):
<script type="text/javascript" src="epos-print-3.x.x.js"></script>
<script type="text/javascript">
<!-function buildMessage() {
var builder = new epson.ePOSBuilder();
builder.addPageBegin();
builder.addPageLine(100, 0, 500, 0, builder.LINE_THIN);
builder.addPageEnd();
}
//-->
</script>
116
Chapter 4 ePOS-Print API
addPageRectangle method
Adds rectangle drawing in page mode to the command buffer. Draws a rectangle in page mode.
Use this API function by inserting it between addPageBegin (p. 107) and PageEnd (p. 108).
Syntax
addPageRectangle(x1, y1, x2, y2, style);
Parameter
x 1:
( Required parameter, Object type : Number)
Specifies the horizontal start position of the line (in dots). Specifies an integer from 0 to 65535.
y 1:
( Required parameter, Object type : Number)
Specifies the vertical start position of the line (in dots). Specifies an integer from 0 to 65535.
x2 :
( Required parameter, Object type : Number)
Specifies the horizontal end position of the line (in dots). Specifies an integer from 0 to 65535.
y2 :
( Required parameter, Object type : Number)
ècSpecifies the vertical end position of the line (in dots). Specifies an integer from 0 to 65535.
style :
( Optional parameter, Object type : String)
Specifies the line type.
Constant (style)
Description
LINE_THIN
Solid line: Thin
LINE_MEDIUM
Solid line: Medium
LINE_THICK
Solid line: Thick
LINE_THIN_DOUBLE
Double line: Thin
LINE_MEDIUM_DOUBLE
Double line: Medium
LINE_THICK_DOUBLE
Double line: Thick
undefined (When not specified)
Solid line: Thin
4
Return value
Return value
ePOS-Print Builder Object
Object type
ePOS Builder
Exception
Exception
Parameter " ... " is invalid
Object type
Error
117
Example
To draw a rectangle with a thin double line, with the start position (100, 0) and the end position (500,
200) as its vertexes:
<script type="text/javascript" src="epos-print-3.x.x.js"></script>
<script type="text/javascript">
<!-function buildMessage() {
var builder = new epson.ePOSBuilder();
builder.addPageBegin();
builder.addPageLine(100, 0, 500, 200, builder.LINE_THIN_DOUBLE);
builder.addPageEnd();
}
//-->
</script>
118
Chapter 4 ePOS-Print API
addCut method
Adds paper cut to the command buffer. Sets paper cut.
Not available in page mode.
Syntax
addCut(type);
Parameter
type :
( Optional parameter, Object type : String)
Specifies the paper cut type.
Setting
Description
Cut without feeding
CUT_NO_FEED
(The paper is cut without being fed.)
Feed cut
CUT_FEED
(The paper is fed to the cut position and then is cut.)
Cut reservation
CUT_RESERVE
(Printing continues until the cut position is reached, at
which the paper is cut.)
undefined
Feed cut
(When not specified)
(The paper is fed to the cut position and then is cut.)
Return value
Return value
ePOS-Print Builder Object
4
Object type
ePOS Builder
Exception
Exception
Parameter " ... " is invalid
Object type
Error
119
Example
To perform feed cut operation:
<script type="text/javascript" src="epos-print-3.x.x.js"></script>
<script type="text/javascript">
<!-function buildMessage() {
var builder = new epson.ePOSBuilder();
builder.addCut(builder.CUT_FEED);
}
//-->
</script>
120
Chapter 4 ePOS-Print API
addPulse method
Adds the drawer kick to the command buffer. Sets the drawer kick.
• Not available in page mode.
• The drawer and the buzzer cannot be used together.
Syntax
addPulse(drawer, time);
Parameter
drawer :
( Optional parameter, Object type : String)
Specifies the drawer kick connector.
Setting
DRAWER_1
Pin 2 of the drawer kick-out connector
DRAWER_2
Pin 5 of the drawer kick-out connector
undefined
(When not specified)
time :
Description
Pin 2 of the drawer kick-out connector
( Optional parameter, Object type : String)
Specifies the ON time of the drawer kick signal.
Setting
Description
PULSE_100
100 ms
PULSE_200
200 ms
PULSE_300
300 ms
PULSE_400
400 ms
PULSE_500
500 ms
undefined
(When not specified)
4
100 ms
Return value
Return value
ePOS-Print Builder Object
Object type
ePOS Builder
Exception
Exception
Parameter " ... " is invalid
Object type
Error
121
Example
To send a 100msec pulse signal to the pin 2 of the drawer kick connector:
<script type="text/javascript" src="epos-print-3.x.x.js"></script>
<script type="text/javascript">
<!-function buildMessage() {
var builder = new epson.ePOSBuilder();
builder.addPulse(builder.DRAWER_1, builder.PULSE_100);
}
//-->
</script>
122
Chapter 4 ePOS-Print API
addSound method
Adds the turning on of the buzzer to the command buffer. Sets the buzzer.
• Not available in page mode.
• The buzzer function and the drawer cannot be used together.
• This API function cannot be used if the printer is not provided with the buzzer.
Syntax
addSound(pattern, repeat, cycle);
Parameter
pattern :
( Optional parameter, Object type : String)
Specifies the buzzer pattern.
Setting
PATTERN_NONE
Description
Stop
PATTERN_A
Pattern A
PATTERN_B
Pattern B
PATTERN_C
Pattern C
PATTERN_D
Pattern D
PATTERN_E
Pattern E
PATTERN_ERROR
Error sound pattern
PATTERN_PAPER_END
Pattern when there is no paper
PATERN_1
Pattern 1 (in firmware Ver.2.2 and later)
PATERN_2
Pattern 2 (in firmware Ver.2.2 and later)
PATERN_3
Pattern 3 (in firmware Ver.2.2 and later)
PATERN_4
Pattern 4 (in firmware Ver.2.2 and later)
PATERN_5
Pattern 5 (in firmware Ver.2.2 and later)
PATERN_6
Pattern 6 (in firmware Ver.2.2 and later)
PATERN_7
Pattern 7 (in firmware Ver.2.2 and later)
PATERN_8
Pattern 8 (in firmware Ver.2.2 and later)
PATERN_9
Pattern 9 (in firmware Ver.2.2 and later)
PATERN_10
Pattern 10 (in firmware Ver.2.2 and later)
undefined
(When not specified)
4
Pattern A
123
repeat :
( Optional parameter, Object type : String)
Specifies the number of repeats.
Setting
Description
0
The buzzer does not stop.
1 to 255
Number of repeats
undefined
(When not specified)
One time
After “0” is specified for repeat, if you want to stop the buzzer, execute this API function and specify PATTERN_NONE for pattern.
cycle :
( Optional parameter, Object type : String, When not specified : 1000)
Specifies the buzzer sounding cycle (in units of milliseconds)
Setting
Description
1000 to 25500
1000 to 25500 milliseconds
undefined
1000 milliseconds
PATTERN_A to PATTERN_E/PATTERN_ERROR/PATTERN_PAPER_END is disregarded.
Return value
Return value
ePOS-Print Builder Object
Object type
ePOS Builder
Exception
Exception
Parameter " ... " is invalid
Object type
Error
Example
To repeat the sound pattern A three times:
<script type="text/javascript" src="epos-print-3.x.x.js"></script>
<script type="text/javascript">
<!-function buildMessage() {
var builder = new epson.ePOSBuilder();
builder.addSound(builder.PATTERN_A, 3);
}
//-->
</script>
124
Chapter 4 ePOS-Print API
addLayout method
Adds paper layout information to the command buffer.
Setting of page layout must be done in the standard mode. In the page mode, addLayout cannot be specified.
Syntax
addLayout(type, width, height, margin_top,
margin_bottom, offset_cut, offset_label);
Parameter
type :
( Required parameter, Object type : String)
Specifies the paper type.
Constant (type)
width :
height :
Description
LAYOUT_RECEIPT
Receipt (without black mark)
LAYOUT_RECEIPT_BM
Receipt (with black mark)
LAYOUT_LABEL
Die-cut label (without black mark)
LAYOUT_LABEL_BM
Die-cut label (with black mark)
( Optional parameter, Object type : Number, When not specified : 580)
Specifies paper width (in units of 0.1mm). Specifies an integer from 290 to 600. *
( Optional parameter, Object type : Number, When not specified : 0)
Specifies paper height (in units of 0.1mm).
Paper Type
Receipt
(without black mark)
Valid value range
0
Die-cut label
(with black mark)
4
Setup not necessary
Distance from the top of
black mark to the top of
next black mark
Receipt (with black mark)
Die-cut label
(without black mark)
Description
0 (Auto)
284 to 1550 (Manual) *
Distance from the top of
label to the top of next label
Distance from the bottom of
black mark to the bottom of
next black mark.
125
margin_top :
( Optional parameter, Object type : Number, When not specified : 0)
Specifies top margin (in units of 0.1mm).
Paper Type
Valid value range
Description
Receipt
(without black mark)
0
Setup not necessary
Receipt (with black mark)
-150 to 1500 *
Distance from the top of
black mark
Die-cut label
(without black mark)
0 to 1500 *
Distance from the top of
label
Die-cut label
(with black mark)
-15 to 1500 *
Distance from the bottom of
black mark
margin_bottom :( Optional parameter, Object type : Number, When not specified : 0)
Specifies bottom margin (in units of 0.1mm).
Paper Type
Receipt
(without black mark)
0
Receipt (with black mark)
0
Die-cut label
(without black mark)
Die-cut label
(with black mark)
offset_cut :
Valid value range
Description
Setup not necessary
-15 to 0 *
Distance from the bottom of
label (paper feed direction
is a positive number)
-15 to 15 *
Distance from the top of
black mark (paper feed
direction is a positive number)
( Optional parameter, Object type : Number, When not specified : 0)
Specifies cut position (in units of 0.1mm).
In case of die cut label paper, it is a distance from the bottom of label.
When a paper has black mark, it is a distance from the beginning of black mark.
Paper Type
Receipt
(without black mark)
126
Valid value range
Description
0
Setup not necessary
Receipt (with black mark)
-290 to 50 *
Distance from the top of
black mark to the cutting
position
Die-cut label
(without black mark)
0 to 50 *
Distance from the bottom of
label to the cutting position
Die-cut label
(with black mark)
0 to 50 *
Distance from the top of
black mark to the cutting
position
Chapter 4 ePOS-Print API
offset_label* :
( Optional parameter, Object type : Number, When not specified : 0)
Specifies label bottom position (sd) per 0.1mm unit.
Paper Type
Valid value range
Receipt
(without black mark)
0
Receipt (with black mark)
0
Die-cut label
(without black mark)
0
Die-cut label
(with black mark)
0 to 15 *
Description
Setup not necessary
Distance from the top of
black mark to the bottom of
label
*: Valid value of range is depending on the printer model. For detail, refer to “Appendix ‐ Printer Specifications”.
Return value
Return value
ePOS-Print Builder Object
Object type
ePOS Builder
Exception
Exception
Parameter " ... " is invalid
Object type
Error
4
127
Detailed description
See below for the parameters that can be specified for each type of paper, and the positions for those
parameters.
Mark
Parameter
sf
width
sa
height
sb
margin_top
se
margin_bottom
sc
offset_cut
sd
offset_label
<without Black Mark>
sf
<with Black Mark>
sf
sb
sc
Top position
Cut
Receipt
sa
sc
sf
sf
Cut
sb
Top position
Top position
Label
Cut
Bottom edge
of print area
se
sa
sc
128
sb
Bottom edge
of print area
Standard eject
Bottom edge
of label
sa
se
sd
sc
Chapter 4 ePOS-Print API
Example
To set 58mm receipt (without black mark):
<script type="text/javascript" src="epos-print-3.x.x.js"></script>
<script type="text/javascript">
<!-function buildMessage() {
var builder = new epson.ePOSBuilder();
builder.addLayout(builder.LAYOUT_RECEIPT, 580);
}
//-->
</script>
To set 58mm receipt (with black mark):
<script type="text/javascript" src="epos-print-3.x.x.js"></script>
<script type="text/javascript">
<!-function buildMessage() {
var builder = new epson.ePOSBuilder();
builder.addLayout(builder.LAYOUT_RECEIPT_BM, 580, 0, 15, 0);
}
//-->
</script>
To set 58mm die-cut label (without black mark):
<script type="text/javascript" src="epos-print-3.x.x.js"></script>
<script type="text/javascript">
<!-function buildMessage() {
var builder = new epson.ePOSBuilder();
builder.addLayout(builder.LAYOUT_LABEL, 580, 0, 15, -15, 25);
}
//-->
</script>
4
To set 58mm die-cut label (with black mark):
<script type="text/javascript" src="epos-print-3.x.x.js"></script>
<script type="text/javascript">
<!-function buildMessage() {
var builder = new epson.ePOSBuilder();
builder.addLayout(builder.LAYOUT_LABEL_BM, 580, 0, 15, -15, 25, 15);
}
//-->
</script>
129
addRecovery method
Adds the recovery from errors to the command buffer. (in firmware Ver.3.0 and later)
Enable forced transmission mode to use this API. The printer recovers from errors that can be recovered from and clears the buffer.
Syntax
addRecovery();
Return value
Return value
ePOS-Print Builder Object
Object type
ePOS Builder
Exception
Exception
Parameter " ... " is invalid
Object type
Error
Example
Recovers from errors that can be recovered from and clears the buffer:
<script type="text/javascript" src="epos-print-3.x.x.js"></script>
<script type="text/javascript">
<!-function buildMessage() {
var builder = new epson.ePOSBuilder();
builder.force = true;
builder.addRecovery();
}
//-->
</script>
130
Chapter 4 ePOS-Print API
addReset method
Adds the printer reset to the command buffer. (in firmware Ver.3.0 and later)
Other printing commands in the print document are ignored.
Syntax
addReset();
Return value
Return value
ePOS-Print Builder Object
Object type
ePOS Builder
Exception
Exception
Parameter " ... " is invalid
Object type
Error
Example
Resets the printer:
<script type="text/javascript" src="epos-print-3.x.x.js"></script>
<script type="text/javascript">
<!-function buildMessage() {
var builder = new epson.ePOSBuilder();
builder.addReset();
}
//-->
</script>
4
131
addCommand method
Adds commands to the command buffer. Sends ESC/POS commands.
ESC/POS commands are not made public. For details, contact the dealer.
Syntax
addCommand(data);
Parameter
data :
(Optional parameter, Object type : String)
Specifies ESC/POS command as a character string. Return value
Return value
ePOS-Print Builder Object
Object type
ePOS Builder
Exception
Exception
Parameter " ... " is invalid
Object type
Error
Example
<script type="text/javascript" src="epos-print-3.x.x.js"></script>
<script type="text/javascript">
<!-function buildMessage() {
var builder = new epson.ePOSBuilder();
var doc = builder.addCommand('ABC\x44\x45\x0a');
}
//-->
</script>
132
Chapter 4 ePOS-Print API
toString method
Obtains a print document generated by an ePOS-Print Builder object.
Syntax
toString();
Return value
Return value
Document to be printed
Object type
String
Example
<script type="text/javascript" src="epos-print-3.x.x.js"></script>
<script type="text/javascript">
<!-function buildMessage() {
var builder = new epson.ePOSBuilder();
var doc = builder.toString();
}
//-->
</script>
4
133
halftone property
Halftone processing method. (in firmware Ver.1.2 and later)
Object type
String
Description
The halftone processing method to be applied to monochrome (two-tone) printing is specified.
The default value is HALFTONE_DITHER.
Constant
HALFTONE_DITHER (default)
Description
Dithering, suitable for printing graphics only.
HALFTONE_ERROR_DIFFUSION
Error diffusion, suitable for printing text and graphics together.
HALFTONE_THRESHOLD
Threshold, suitable for printing text only.
Example
To set the halftone type as error diffusion:
<script type="text/javascript" src="epos-print-3.x.x.js"></script>
<script type="text/javascript">
<!-function buildMessage() {
var builder = new epson.ePOSBuilder();
var canvas = document.getElementById('canvas');
if (canvas.getContext) {
var context = canvas.getContext('2d');
builder.halftone = epos.HALFTONE_ERROR_DIFFUSION;
builder.addImage(context, 0, 0, canvas.width, canvas.height);
}
}
//-->
</script>
134
Chapter 4 ePOS-Print API
brightness property
Brightness correction value. (in firmware Ver.1.2 and later)
Object type
Number
Description
A gamma value in the range 0.1-10.0 is specified for the brightness correction value.
The default value is 1.0.
Example
To set brightness as 2.2:
<script type="text/javascript" src="epos-print-3.x.x.js"></script>
<script type="text/javascript">
<!-function buildMessage() {
var builder = new epson.ePOSBuilder();
var canvas = document.getElementById('canvas');
if (canvas.getContext) {
var context = canvas.getContext('2d');
builder.brightness = 2.2;
builder.addImage(context, 0, 0, canvas.width, canvas.height);
}
}
//-->
</script>
4
135
force property
This is the forced transmission mode. (in firmware Ver.3.0 and later)
Object type
Boolean
Description
If you enable forced transmission mode, print commands are forcibly sent to the printer.
• Use forced transmission mode when the printer is offline. It will result in an error if the printer is online.
• The following functions are enabled in forced transmission mode.
Drawer kick‐out (addPulse method (p.121))
Stopping the buzzer (addSound method (p.123))
Recovery from errors that can be recovered from (addRecovery method (p.130))
Reset (addReset method (p.131))
Sending commands in real time (addCommand method (p.132))
Example
Performs a drawer kick-out when the paper is at the end:
<script type="text/javascript" src="epos-print-3.x.x.js"></script>
<script type="text/javascript">
<!-function buildMessage() {
var builder = new epson.ePOSBuilder();
builder.force = true;
builder.addPulse();
}
//-->
</script>
136
Chapter 4 ePOS-Print API
message property
Command buffer.
Object type
String
Description
Commands, which are usually added by methods of the ePOS-Print Builder object, can be operated
directly from this property for addition or deletion.
Example
To clear the command and reset it to the initial state:
<script type="text/javascript" src="epos-print-3.x.x.js"></script>
<script type="text/javascript">
<!-function buildMessage() {
var builder = new epson.ePOSBuilder();
builder.addText('ABCDE');
builder.message = '';
}
//-->
</script>
4
137
ePOS-Print Object
Sends a print document created using an ePOS-Print Builder object to control the printer and monitor the
transmission result or the communication status.
Constructor
Constructor for an ePOS-Print object. Creates a new ePOS-Print object and initializes it.
Syntax
ePOSPrint(address);
Parameter
address :
( Optional parameter, Object type : String)
Specifies the URL of the printer to send a print document to. (in firmware Ver.1.2 and later)
The URL is as follows:
http://[IP address of ePOS-Print supported TM printer]/cgi-bin/epos/
service.cgi?devid=[device ID of printer to be used for
printing]&timeout=[timeout time]
Example
<script type="text/javascript" src="epos-print-3.x.x.js"></script>
<script type="text/javascript">
<!-function sendMessage() {
var address = 'http://192.168.192.168/cgi-bin/epos/
service.cgi?devid=local_printer';
var epos = new epson.ePOSPrint(address);
}
//-->
</script>
138
Chapter 4 ePOS-Print API
send method
Sends a print document created using an ePOS-Print Builder object.
A print document is obtained by executing the toString method (p. 133) of the ePOS‐Print Builder object. Syntax
send(request);
Parameter
request :
(Required parameter, Object type : String)
Specifies the print document.
Exception
Exception
Object type
Parameter " ... " is invalid
Error
XMLHttpRequest is not supported
Error
Example
<script type="text/javascript" src="epos-print-3.x.x.js"></script>
<script type="text/javascript">
<!-function printHellowWorld() {
var builder = new epson.ePOSBuilder();
builder.addText('Hello, World!\n');
builder.addCut();
var request = builder.toString();
4
var address = 'http://192.168.192.168/cgi-bin/epos/service.cgi?devid=local_printer';
var epos = new epson.ePOSPrint(address);
epos.onreceive = function (res) { alert(res.success); };
epos.onerror = function (err) { alert(err.status); };
epos.send(request);
}
//-->
</script>
139
open method
Enables status event operation. (in firmware Ver.1.2 and later)
Sends the status of the printer specified by the address property using an event.
Updates the status at the interval specified by the interval property.
Syntax
open();
Example
<script type="text/javascript" src="epos-print-3.x.x.js"></script>
<script type="text/javascript">
<!-var address = 'http://192.168.192.168/cgi-bin/epos/service.cgi?devid=local_printer'
var epos = new epson.ePOSPrint(address);
epos.oncoveropen = function () {
alert('coveropen');
};
function startMonitor() {
epos.open();
}
function stopMonitor() {
epos.close();
}
//-->
</script>
140
Chapter 4 ePOS-Print API
close method
Disables status event operation. (in firmware Ver.1.2 and later)
Syntax
close();
Example
<script type="text/javascript" src="epos-print-3.x.x.js"></script>
<script type="text/javascript">
<!-var address = 'http://192.168.192.168/cgi-bin/epos/service.cgi?devid=local_printer'
var epos = new epson.ePOSPrint(address);
epos.oncoveropen = function () {
alert('coveropen');
};
function startMonitor() {
epos.open();
}
function stopMonitor() {
epos.close();
}
//-->
</script>
4
141
address property
URL of the printer. (in firmware Ver.1.2 and later)
Object type
String
Description
The URL of the printer to be used for printing is specified.
The URL is shown as follows:
http://[IP address of ePOS-Print supported TM printer]/cgi-bin/epos/
service.cgi?devid=[device ID of printer to be used for
printing]&timeout=[timeout time]
The default value is the address specified by the constructor.
Example
<script type="text/javascript" src="epos-print-3.x.x.js"></script>
<script type="text/javascript">
<!-var epos = new epson.ePOSPrint();
epos.address = 'http://192.168.192.168/cgi-bin/epos/
service.cgi?devid=local_printer';
epos.oncoveropen = function () { alert('coveropen'); };
epos.open();
//-->
</script>
142
Chapter 4 ePOS-Print API
enabled property
Retains the enabled/disabled setting for status event operation. (in firmware Ver.1.2 and later)
Object type
Boolean
Description
The enabled/disabled setting for status event operation is retained using a logical value. This is read-only.
The default value is false.
Example
<script type="text/javascript" src="epos-print-3.x.x.js"></script>
<script type="text/javascript">
<!-var address = 'http://192.168.192.168/cgi-bin/epos/service.cgi?devid=local_printer';
var epos = new epson.ePOSPrint(address);
epos.oncoveropen = function () { alert('coveropen'); };
epos.open();
alert(epos.enabled);
//-->
</script>
4
143
interval property
Specifies the interval of upgrading the status. (in firmware Ver.1.2 and later)
Object type
Number
Description
The interval of upgrading the status is specified in milliseconds.
Default value:
3000 (three seconds)
Minimum value:
1000 (one second or longer)
When an invalid value is specified, it is assumed to be 3000.
Example
<script type="text/javascript" src="epos-print-3.x.x.js"></script>
<script type="text/javascript">
<!-var address = 'http://192.168.192.168/cgi-bin/epos/service.cgi?devid=local_printer';
var epos = new epson.ePOSPrint(address);
epos.interval = 1000;
epos.oncoveropen = function () { alert('coveropen'); };
epos.open();
//-->
</script>
144
Chapter 4 ePOS-Print API
status property
Status of the printer. (in firmware Ver.1.2 and later)
Object type
Number
Description
This is the status last obtained from the printer. This is read-only.
Default value: 0
Example
<script type="text/javascript" src="epos-print-3.x.x.js"></script>
<script type="text/javascript">
<!-var address = 'http://192.168.192.168/cgi-bin/epos/service.cgi?devid=local_printer';
var epos = new epson.ePOSPrint(address);
epos.onoffline = function () {
alert(epos.status);
};
epos.open();
//-->
</script>
4
145
battery property
Battery status of the printer.
Object type
Number
Description
Battery status obtained from the last printer status. This is read-only.
Default value: 0
Example
<script type="text/javascript" src="epos-print-3.x.x.js"></script>
<script type="text/javascript">
<!-var address = 'http://192.168.192.168/cgi-bin/epos/service.cgi?devid=local_printer';
var epos = new epson.ePOSPrint(address);
epos.onbatterylow = function () {
alert(epos.battery);
};
epos.open();
//-->
</script>
146
Chapter 4 ePOS-Print API
timeout property
Specifies connection timeout.
Object type
Number
Description
Specifies connection timeout with ePOS-Print supported printer in milliseconds. When the transmission of
print document by send method times out, onerror even is generated.
Default value: 300000 (5 minutes)
Example
<script type="text/javascript" src="epos-print-3.x.x.js"></script>
<script type="text/javascript">
<!-var builder = new epson.ePOSBuilder();
builder.addText('Hello, World!\n');
builder.addCut();
var request = builder.toString();
var address = 'http://192.168.192.168/cgi-bin/epos/service.cgi?devid=local_printer';
var epos = new epson.ePOSPrint(address);
epos.timeout = 60000;
epos.onreceive = function (res) { alert(res.success); };
epos.onerror = function (err) { alert(err.status); };
epos.send(request);
//-->
</script>
4
147
onreceive event
This property registers the callback function and obtains a response message receipt event.
Syntax
Function (response)
Parameter of the callback function
Parameters:
response (See “Properties of the response object” on page 148.)
Name:
Response message
Object type:
Object
Properties of the response object
Property
Name
Object type
success (p. 148)
Print result
Boolean
code (p. 148)
Error code
String
status (p. 149)
Status
Number
battery (p. 150)
Battery status
Number
Value of success
Value
Description
true or 1
Printing succeeded.
false or 0
Printing failed.
Value of code
Value
148
Description
'EPTR_AUTOMATICAL'
An automatically recoverable error occurred
'EPTR_COVER_OPEN'
A cover open error occurred
'EPTR_CUTTER'
An autocutter error occurred
'EPTR_MECHANICAL'
A mechanical error occurred
'EPTR_REC_EMPTY'
No paper in roll paper end sensor
'EPTR_UNRECOVERABLE'
An unrecoverable error occurred
'SchemaError'
The request document contains a syntax error
'DeviceNotFound'
The printer with the specified device ID does not
exist
'PrintSystemError'
An error occurred on the printing system
'EX_BADPORT'
An error was detected on the communication port
'EX_TIMEOUT'
A print timeout occurred
Chapter 4 ePOS-Print API
Value of status
Constant (status)
Description
ASB_NO_RESPONSE
No response from the TM printer
ASB_PRINT_SUCCESS
Printing is successfully completed
ASB_DRAWER_KICK
Status of the 3rd pin of the drawer kick-out connector = "H"
ASB_BATTERY_OFFLINE
Battery offline status
(only for applicable devices) (in firmware Ver.2.2 and later)
ASB_OFF_LINE
Offline
ASB_COVER_OPEN
The cover is open
ASB_PAPER_FEED
Paper is being fed by a paper feed switch operation
ASB_WAIT_ON_LINE
Waiting to be brought back online
ASB_PANEL_SWITCH
The paper feed switch is being pressed (ON)
ASB_MECHANICAL_ERR
A mechanical error occurred
ASB_AUTOCUTTER_ERR
An autocutter error occurred
ASB_UNRECOVER_ERR
An unrecoverable error occurred
ASB_AUTORECOVER_ERR
An automatically recoverable error occurred
ASB_RECEIPT_NEAR_END
No paper in roll paper near end sensor
ASB_RECEIPT_END
No paper in roll paper end sensor
ASB_BUZZER
A buzzer is on (only for applicable devices)
ASB_WAIT_REMOVE_LABEL
Waiting for label to be removed (only for applicable devices)
ASB_NO_LABEL
No paper in label peeling sensor (only for applicable devices)
ASB_SPOOLER_IS_STOPPED
The spooler has stopped (Not used)
4
149
Value of battery
Status of power
Value (battery)
Description
0x30XX
The AC adapter is connected
0x31XX
The AC adapter is connected
Remaining battery
Value (battery)
Description
0xXX36
Battery amount 6
0xXX35
Battery amount 5
0xXX34
Battery amount 4
0xXX33
Battery amount 3
0xXX32
Battery amount 2
0xXX31
Battery amount 1 (Near end)
0xXX30
Battery amount 0 (Real end)
0 is shown when the model doesnʹt have a battery installed.
Example
To create and send a print document.
To display the print result in a message box.
<script type="text/javascript" src="epos-print-3.x.x.js"></script>
<script type="text/javascript">
<!-function printHellowWorld() {
var builder = new epson.ePOSBuilder();
builder.addText('Hello, World!\n');
builder.addCut();
var request = builder.toString();
var address = 'http://192.168.192.168/cgi-bin/epos/service.cgi?devid=local_printer';
var epos = new epson.ePOSPrint(address);
epos.onreceive = function (res) {
var success = res.success;
var code = res.code;
var status = res.status;
alert(success);
}
epos.send(request);
}
//-->
</script>
150
Chapter 4 ePOS-Print API
onerror event
This property registers the callback function and obtains a communication error event.
Syntax
Function (error)
Parameter of the callback function
Parameters:
error (See “Properties of the error object” on page 151.)
Name:
Communication error information
Object type:
Object
Properties of the error object
Property
Name
Object type
status
HTTP Status
Number
responseText
Response text
String
Example
To create and send a print document.
To display the HTTP status code in a message box when a communication error occurs.
<script type="text/javascript" src=”epos-print-3.x.x.js"></script>
<script type="text/javascript">
<!-function printHellowWorld() {
var builder = new epson.ePOSBuilder();
builder.addText('Hello, World!\n');
builder.addCut();
var request = builder.toString();
4
var address = 'http://192.168.192.168/cgi-bin/epos/service.cgi?devid=local_printer';
var epos = new epson.ePOSPrint(address);
epos.onerror = function (err) {
var status = err.status;
var text = err.responseText;
alert(status);
}
epos.send(request);
}
//-->
</script>
151
onstatuschange event
Registers a callback function to obtain a status change event. (in firmware Ver.1.2 and later)
Syntax
Function (status)
Parameter of the callback function
Parameters:
status
Name:
Status
Object type:
Number
Example
<script type="text/javascript" src="epos-print-3.x.x.js"></script>
<script type="text/javascript">
<!-var address = 'http://192.168.192.168/cgi-bin/epos/service.cgi?devid=local_printer';
var epos = new epson.ePOSPrint(address);
epos.onstatuschange = function (status) {
alert(status);
};
epos.open();
//-->
</script>
152
Chapter 4 ePOS-Print API
onbatterystatuschange event
Registers call back function and obtains battery status change event. (in firmware Ver.2.2 and later)
Object type
Function (battery)
Parameter of the callback function
Parameters:
battery
Name:
Batterystatus
Object type:
Number
Example
<script type="text/javascript" src="epos-print-3.x.x.js"></script>
<script type="text/javascript">
<!-var address = 'http://192.168.192.168/cgi-bin/epos/service.cgi?devid=local_printer';
var epos = new epson.ePOSPrint(address);
epos.onbatterystatuschange = function (battery) {
alert(battery);
};
epos.open();
//-->
</script>
ononline event
4
Registers a callback function to obtain a online event. (in firmware Ver.1.2 and later)
Object type
Function ()
Example
<script type="text/javascript" src="epos-print-3.x.x.js"></script>
<script type="text/javascript">
<!-var address = 'http://192.168.192.168/cgi-bin/epos/service.cgi?devid=local_printer';
var epos = new epson.ePOSPrint(address);
epos.ononline = function () {
alert('online');
};
epos.open();
//-->
</script>
153
onoffline event
Registers a callback function to obtain a offline event. (in firmware Ver.1.2 and later)
Object type
Function ()
Example
<script type="text/javascript" src="epos-print-3.x.x.js"></script>
<script type="text/javascript">
<!-var address = 'http://192.168.192.168/cgi-bin/epos/service.cgi?devid=local_printer';
var epos = new epson.ePOSPrint(address);
epos.onoffline = function () {
alert('offline');
};
epos.open();
//-->
</script>
onpoweroff event
Registers a callback function to obtain a non-response event. (in firmware Ver.1.2 and later)
Object type
Function ()
Example
<script type="text/javascript" src="epos-print-3.x.x.js"></script>
<script type="text/javascript">
<!-var address = 'http://192.168.192.168/cgi-bin/epos/service.cgi?devid=local_printer';
var epos = new epson.ePOSPrint(address);
epos.onpoweroff = function () {
alert('poweroff');
};
epos.open();
//-->
</script>
154
Chapter 4 ePOS-Print API
oncoverok event
Registers a callback function to obtain a cover close event. (in firmware Ver.1.2 and later)
Object type
Function ()
Example
<script type="text/javascript" src="epos-print-3.x.x.js"></script>
<script type="text/javascript">
<!-var address = 'http://192.168.192.168/cgi-bin/epos/service.cgi?devid=local_printer';
var epos = new epson.ePOSPrint(address);
epos.oncoverok = function () {
alert('coverok');
};
epos.open();
//-->
</script>
oncoveropen event
Registers a callback function to obtain a cover open event. (in firmware Ver.1.2 and later)
Object type
Function ()
4
Example
<script type="text/javascript" src="epos-print-3.x.x.js"></script>
<script type="text/javascript">
<!-var address = 'http://192.168.192.168/cgi-bin/epos/service.cgi?devid=local_printer';
var epos = new epson.ePOSPrint(address);
epos.oncoveropen = function () {
alert('coveropen');
};
epos.open();
//-->
</script>
155
onpaperok event
Registers a callback function to obtain a paper remaining event. (in firmware Ver.1.2 and later)
Object type
Function ()
Example
<script type="text/javascript" src="epos-print-3.x.x.js"></script>
<script type="text/javascript">
<!-var address = 'http://192.168.192.168/cgi-bin/epos/service.cgi?devid=local_printer';
var epos = new epson.ePOSPrint(address);
epos.onpaperok = function () {
alert('paperok');
};
epos.open();
//-->
</script>
onpapernearend event
Registers a callback function to obtain a paper near end event. (in firmware Ver.1.2 and later)
Object type
Function ()
Example
<script type="text/javascript" src="epos-print-3.x.x.js"></script>
<script type="text/javascript">
<!-var address = 'http://192.168.192.168/cgi-bin/epos/service.cgi?devid=local_printer';
var epos = new epson.ePOSPrint(address);
epos.onpapernearend = function () {
alert('papernearend');
};
epos.open();
//-->
</script>
156
Chapter 4 ePOS-Print API
onpaperend event
Registers a callback function to obtain a paper end event. (in firmware Ver.1.2 and later)
Object type
Function ()
Example
<script type="text/javascript" src="epos-print-3.x.x.js"></script>
<script type="text/javascript">
<!-var address = 'http://192.168.192.168/cgi-bin/epos/service.cgi?devid=local_printer';
var epos = new epson.ePOSPrint(address);
epos.onpaperend = function () {
alert('paperend');
};
epos.open();
//-->
</script>
ondrawerclosed event
Registers a callback function to obtain a drawer close event. (in firmware Ver.1.2 and later)
Object type
Function ()
4
Example
<script type="text/javascript" src="epos-print-3.x.x.js"></script>
<script type="text/javascript">
<!-var address = 'http://192.168.192.168/cgi-bin/epos/service.cgi?devid=local_printer';
var epos = new epson.ePOSPrint(address);
epos.ondrawerclosed = function () {
alert('drawerclosed');
};
epos.open();
//-->
</script>
157
ondraweropen event
Registers a callback function to obtain a drawer open event. (in firmware Ver.1.2 and later)
Object type
Function ()
Example
<script type="text/javascript" src="epos-print-3.x.x.js"></script>
<script type="text/javascript">
<!-var address = 'http://192.168.192.168/cgi-bin/epos/service.cgi?devid=local_printer';
var epos = new epson.ePOSPrint(address);
epos.ondraweropen = function () {
alert('draweropen');
};
epos.open();
//-->
</script>
onbatteryok event
Registers call back function and obtains remaining battery event. (in firmware Ver.2.2 and later)
Object type
Function ()
Example
<script type="text/javascript" src="epos-print-3.x.x.js"></script>
<script type="text/javascript">
<!-var address = 'http://192.168.192.168/cgi-bin/epos/service.cgi?devid=local_printer';
var epos = new epson.ePOSPrint(address);
epos.onbatteryok = function () {
alert('batteryok');
};
epos.open();
//-->
</script>
158
Chapter 4 ePOS-Print API
onbatterylow event
Registers call back function and obtains no remaining battery event. (in firmware Ver.2.2 and later)
Object type
Function ()
Example
<script type="text/javascript" src="epos-print-3.x.x.js"></script>
<script type="text/javascript">
<!-var address = 'http://192.168.192.168/cgi-bin/epos/service.cgi?devid=local_printer';
var epos = new epson.ePOSPrint(address);
epos.onbatterylow = function () {
alert('batterylow');
};
epos.open();
//-->
</script>
4
159
160
Chapter 5 ePOS-Print Canvas API
ePOS-Print Canvas API
This chapter describes the ePOS-Print Canvas API.
List of ePOS-Print Canvas API functions
The ePOS-Print Canvas API provides the following object:
❏ ePOS-Print Canvas API (window.epson.CanvasPrint) object (p. 161)
window.epson.CanvasPrint Components
Element
API
Description
Page
Constructor
CanvasPrint
Initializes an ePOS-Print Canvas API object.
164
print
Prints an HTML5 Canvas image.
165
method
open
close
Enables status event operation
(in firmware Ver.1.2 and later)
Disables status event operation
(in firmware Ver.1.2 and later)
167
168
recover
Recovers from an error
(in firmware Ver.3.0 and later)
169
reset
Resets the printer
(in firmware Ver.3.0 and later)
169
address
URL of the printer
(in firmware Ver.1.2 and later)
170
enabled
Enabling/disabling of status event
(in firmware Ver.1.2 and later)
171
interval
Printer status update interval
(in firmware Ver.1.2 and later)
172
status
Status (in firmware Ver.1.2 and later)
173
battery
Battery status
174
timeout
Connection timeout
175
halftone
Raster image halftone processing method
(in firmware Ver.1.2 and later)
176
brightness
Raster image brightness correction value
(in firmware Ver.1.2 and later)
177
cut
Paper cut
178
Property
161
5
Element
API
Description
Page
Property
mode
Color mode (in firmware Ver.1.2 and later)
179
align
Position alignment
180
color
Printing color
181
feed
Control of label paper/black mark paper
(in firmware Ver.2.1 and later)
182
paper
Type of papers (in firmware Ver.2.1 and later)
183
layout
Paper layout (in firmware Ver.2.2 and later)
184
onreceive
Response message receipt event
189
onerror
Communication error event
192
onstatuschange
Status change event
(in firmware Ver.1.2 and later)
193
onbatterystatuschange
Battery status change event
(in firmware Ver.2.2 and later)
194
onbatteryok
Battery OK event
(in firmware Ver.2.2 and later)
195
onbatterylow
Battery low event
(in firmware Ver.2.2 and later)
195
ononline
Online event (in firmware Ver.1.2 and later)
196
onoffline
Offline event (in firmware Ver.1.2 and later)
196
onpoweroff
Non-response event
(in firmware Ver.1.2 and later)
197
oncoverok
Cover close event
(in firmware Ver.1.2 and later)
197
oncoveropen
Cover open event
(in firmware Ver.1.2 and later)
198
onpaperok
Paper remaining event
(in firmware Ver.1.2 and later)
198
onpapernearend
Paper near end event
(in firmware Ver.1.2 and later)
199
onpaperend
Paper end event
(in firmware Ver.1.2 and later)
199
ondrawerclosed
Drawer close event
(in firmware Ver.1.2 and later)
200
ondraweropen
Drawer open event
(in firmware Ver.1.2 and later)
200
Event
162
Chapter 5 ePOS-Print Canvas API
Element
API
Description
Page
Constant
ASB_*
Response document status
HALFTONE_*
Halftone type
MODE_*
Color mode
ALIGN_*
Position alignment
COLOR_*
Color specification
FEED_*
Paper feed position of label paper/black mark paper
PAPER_*
Type of papers
5
163
ePOS-Print Canvas API Object
Prints a print image rendered in HTML5 Canvas and monitors the print result or the communication status.
Constructor
Constructor for an ePOS-Print Canvas API object.
Creates a new ePOS-Print Canvas API object and initializes it.
Syntax
CanvasPrint(address);
Parameter
address :
( Optional parameter, Object type : String)
Specifies the address property (URL of printer to be used for printing).
The URL is as follows:
http://[ePOS-Print supported TM printer]/cgi-bin/epos/service.cgi?devid=[device
ID of printer to be used for printing]&timeout=[timeout time]
Example
<script type="text/javascript" src="epos-print-3.x.x.js"></script>
<script type="text/javascript">
<!-function printCanvas() {
var address = 'http://192.168.192.168/cgi-bin/epos/service.cgi?devid=local_printer';
var epos = new epson.CanvasPrint(address);
}
//-->
</script>
164
Chapter 5 ePOS-Print Canvas API
print method
Prints an image rendered in HTML5 Canvas.
Converts the specified range in a RGBA full-color image of HTML5 Canvas into raster image data according
to the settings of the halftone and brightness properties. One pixel in an image equals to one printer dot.
When an image contains any transparent color, the background color of the image is assumed to be white.
If an HTML5 Canvas image contains images downloaded from different domains, you cannot print the image. In this case, a security error occurs due to violation of the same origin policy of JavaScript.
Syntax
1
print(canvas);
2
print(canvas, cut, mode);
2 is the syntax of compatible version. It is recommended to use the syntax of 1.
Parameter
canvas :
( Required parameter, Object type : canvas)
Specify the HTML5 Canvas object to be printed.
cut :
( Optional parameter, Object type : Boolean)
Sets whether to cut paper.
Setting
mode :
Decription
true or 1
Cuts the paper after printing
false or 0
Does not cut the paper after printing
undefined
Does not cut the paper after printing
5
( Optional parameter, Object type : String)
Specifies the color mode. (in firmware Ver.1.2 and later)
Setting
Decription
MODE_MONO
Monochrome (two-tone)
MODE_GRAY16
Multiple tones (16-tone)
undefined
Monochrome (two-tone)
Exception
Exception
Object type
Parameter " ... " is invalid
Error
XMLHttpRequest is not supported
Error
Canvas is not supported
Error
165
Example
To print Canvas(ID=’myCanvas’):
<script type="text/javascript" src=”epos-print-3.x.x.js"></script>
<script type="text/javascript">
<!-function printCanvas() {
var address = 'http://192.168.192.168/cgi-bin/epos/service.cgi?devid=local_printer';
var canvas = document.getElementById('myCanvas');
var epos = new epson.CanvasPrint(address);
epos.onreceive = function (res) { alert(res.success); };
epos.onerror = function (err) { alert(err.status); };
epos.print(canvas);
}
//-->
</script>
166
Chapter 5 ePOS-Print Canvas API
open method
Enables status event operation. (in firmware Ver.1.2 and later)
Sends the status of the printer specified by the address property using an event.
Updates the status at the interval specified by the interval property.
Syntax
open();
Example
<script type="text/javascript" src="epos-print-3.x.x.js"></script>
<script type="text/javascript">
<!-var address = 'http://192.168.192.168/cgi-bin/epos/service.cgi?devid=local_printer';
var epos = new epson.CanvasPrint(address);
epos.oncoveropen = function () {
alert('coveropen');
};
function startMonitor() {
epos.open();
}
function stopMonitor() {
epos.close();
}
//-->
</script>
5
167
close method
Disables status event operation. (in firmware Ver.1.2 and later)
Syntax
close();
Example
<script type="text/javascript" src="epos-print-3.x.x.js"></script>
<script type="text/javascript">
<!-var address = 'http://192.168.192.168/cgi-bin/epos/service.cgi?devid=local_printer';
var epos = new epson.CanvasPrint(address);
epos.oncoveropen = function () {
alert('coveropen');
};
function startMonitor() {
epos.open();
}
function stopMonitor() {
epos.close();
}
//-->
</script>
168
Chapter 5 ePOS-Print Canvas API
recover method
Recovers from an error.(in firmware Ver.3.0 and later)
Recovers from errors that can be recovered from and clears the buffer.
Syntax
recover();
Example
<script type="text/javascript" src="epos-print-3.x.x.js"></script>
<script type="text/javascript">
<!-var address = 'http://192.168.192.168/cgi-bin/epos/service.cgi?devid=local_printer';
var epos = new epson.CanvasPrint(address);
epos.oncoveropen = function () {
alert('coveropen');
};
function recover() {
epos.recover();
}
//-->
</script>
reset method
Resets the printer. (in firmware Ver.3.0 and later)
Syntax
reset();
Example
<script type="text/javascript" src="epos-print-3.x.x.js"></script>
<script type="text/javascript">
<!-var address = 'http://192.168.192.168/cgi-bin/epos/service.cgi?devid=local_printer';
var epos = new epson.CanvasPrint(address);
epos.oncoveropen = function () {
alert('coveropen');
};
function reset() {
epos.reset();
}
//-->
</script>
169
5
address property
URL of the printer. (in firmware Ver.1.2 and later)
Object type
String
Description
The URL of the printer to be used for printing is specified.
The URL is shown as follows:
http://[IP address of ePOS-Print supported TM printer]/cgi-bin/epos/
service.cgi?devid=[device ID of printer to be used for
printing]&timeout=[timeout time]
The default value is the address specified by the constructor.
Example
<script type="text/javascript" src="epos-print-3.x.x.js"></script>
<script type="text/javascript">
<!-var epos = new epson.CanvasPrint();
epos.address = 'http://192.168.192.168/cgi-bin/epos/service.cgi?devid=local_printer';
epos.oncoveropen = function () { alert('coveropen'); };
epos.open();
//-->
</script>
170
Chapter 5 ePOS-Print Canvas API
enabled property
Retains the enabled/disabled setting for status event operation. (in firmware Ver.1.2 and later)
Object type
Boolean
Description
The enabled/disabled setting for status event operation is retained using a logical value. This is read-only.
The default value is false.
Example
<script type="text/javascript" src="epos-print-3.x.x.js"></script>
<script type="text/javascript">
<!-var address = 'http://192.168.192.168/cgi-bin/epos/service.cgi?devid=local_printer';
var epos = new epson.CanvasPrint(address);
epos.oncoveropen = function () { alert('coveropen'); };
epos.open();
alert(epos.enabled);
//-->
</script>
5
171
interval property
Specifies the interval of upgrading the status. (in firmware Ver.1.2 and later)
Object type
Number
Description
The interval of upgrading the status is specified in milliseconds.
Default value:
3000 (three seconds)
Minimum value:
1000 (one second or longer)
When an invalid value is specified, it is assumed to be 3000.
Example
<script type="text/javascript" src="epos-print-3.x.x.js"></script>
<script type="text/javascript">
<!-var address = 'http://192.168.192.168/cgi-bin/epos/service.cgi?devid=local_printer';
var epos = new epson.CanvasPrint(address);
epos.interval = 1000;
epos.oncoveropen = function () { alert('coveropen'); };
epos.open();
//-->
</script>
172
Chapter 5 ePOS-Print Canvas API
status property
Status of the printer. (in firmware Ver.1.2 and later)
Object type
Number
Description
This is the status last obtained from the printer. This is read-only.
Default value: 0
Example
<script type="text/javascript" src="epos-print-3.x.x.js"></script>
<script type="text/javascript">
<!-var address = 'http://192.168.192.168/cgi-bin/epos/service.cgi?devid=local_printer';
var epos = new epson.CanvasPrint(address);
epos.onoffline = function () {
alert(epos.status);
};
epos.open();
//-->
</script>
5
173
battery property
Battery status of the printer.
Object type
Number
Description
Battery status obtained from the last printer status. This is read-only.
Default value: 0
Example
<script type="text/javascript" src="epos-print-3.x.x.js"></script>
<script type="text/javascript">
<!-var address = 'http://192.168.192.168/cgi-bin/epos/service.cgi?devid=local_printer';
var epos = new epson.CanvasPrint(address);
epos.onbatterylow = function () {
alert(epos.battery);
};
epos.open();
//-->
</script>
174
Chapter 5 ePOS-Print Canvas API
timeout property
Specifies connection timeout.
Object type
Number
Description
Specifies connection timeout with ePOS-Print supported printer in milliseconds.
When the transmission of print document by print method times out, onerror even is generated.
Default value: 300000 (5 minutes)
Example
<script type="text/javascript" src="epos-print-3.x.x.js"></script>
<script type="text/javascript">
<!-var address = 'http://192.168.192.168/cgi-bin/epos/service.cgi?devid=local_printer';
var canvas = document.getElementById('myCanvas');
var epos = new epson.CanvasPrint(address);
epos.timeout = 60000;
epos.onreceive = function (res) { alert(res.success); };
epos.onerror = function (err) { alert(err.status); };
epos.print(canvas);
//-->
</script>
5
175
halftone property
Halftone processing method. (in firmware Ver.1.2 and later)
Object type
String
Description
The halftone processing method to be applied to monochrome (two-tone) printing is specified.
The default value is HALFTONE_DITHER.
Constant
HALFTONE_DITHER
Description
Dithering, suitable for printing graphics only.
HALFTONE_ERROR_DIFFUSION
Error diffusion, suitable for printing text and graphics together.
HALFTONE_THRESHOLD
Threshold, suitable for printing text only.
Example
To set the halftone type as error diffusion:
<script type="text/javascript" src="epos-print-3.x.x.js"></script>
<script type="text/javascript">
<!-var address = 'http://192.168.192.168/cgi-bin/epos/service.cgi?devid=local_printer';
var canvas = document.getElementById('myCanvas');
var epos = new epson.CanvasPrint(address);
epos.halftone = epos.HALFTONE_ERROR_DIFFUSION;
epos.print(canvas);
//-->
</script>
176
Chapter 5 ePOS-Print Canvas API
brightness property
Brightness correction value. (in firmware Ver.1.2 and later)
Object type
Number
Description
A gamma value in the range 0.1-10.0 is specified for the brightness correction value.
The default value is 1.0.
Example
To set brightness as 2.2:
<script type="text/javascript" src="epos-print-3.x.x.js"></script>
<script type="text/javascript">
<!-var address = 'http://192.168.192.168/cgi-bin/epos/service.cgi?devid=local_printer';
var canvas = document.getElementById('myCanvas');
var epos = new epson.CanvasPrint(address);
epos.brightness = 2.2;
epos.print(canvas);
//-->
</script>
5
177
cut property
It sets with or without paper cut.
Object type
Boolean
Description
It specifies with or without paper cut.
Value
Decription
true/1
Cut paper after printing
false/0 (Default)
Do not cut paper
Example
It sets paper cut after printing.
<script type="text/javascript" src="epos-print-3.x.x.js"></script>
<script type="text/javascript">
<!-var address = 'http://192.168.192.168/cgi-bin/epos/service.cgi?devid=local_printer';
var canvas = document.getElementById('myCanvas');
var epos = new epson.CanvasPrint(address);
epos.cut = true;
epos.print(canvas);
//-->
</script>
178
Chapter 5 ePOS-Print Canvas API
mode property
It sets the color mode.
Object type
String
Description
It specifies the color mode.
Value
Decription
MODE_MONO (Default)
Monochrome (2-tone)
MODE_GRAY16
Multiple tones (16-tone)
Example
Prints with multiple tones.
<script type="text/javascript" src="epos-print-3.x.x.js"></script>
<script type="text/javascript">
<!-var address = 'http://192.168.192.168/cgi-bin/epos/service.cgi?devid=local_printer';
var canvas = document.getElementById('myCanvas');
var epos = new epson.CanvasPrint(address);
epos.mode = epos.MODE_GRAY16;
epos.print(canvas);
//-->
</script>
5
179
align property
It sets the position alignment.
Object type
String
Description
It specifies the position alignment.
Value
Decription
ALIGN_LEFT (Default)
Alignment to the left
ALIGN_CENTER
Alignment to the center
ALIGN_RIGHT
Alignment to the right
Example
Prints with center alignment.
<script type="text/javascript" src="epos-print-3.x.x.js"></script>
<script type="text/javascript">
<!-var address = 'http://192.168.192.168/cgi-bin/epos/service.cgi?devid=local_printer';
var canvas = document.getElementById('myCanvas');
var epos = new epson.CanvasPrint(address);
epos.align = epos.ALIGN_CENTER;
epos.print(canvas);
//-->
</script>
180
Chapter 5 ePOS-Print Canvas API
color property
It sets printing color.
Object type
String
Description
It specifies printing color.
Value
Decription
COLOR_NONE
No printing
COLOR_1
1st color
COLOR_2
2nd color
COLOR_3
3rd color
COLOR_4
4th color
Example
Prints with the 2nd color.
<script type="text/javascript" src="epos-print-3.x.x.js"></script>
<script type="text/javascript">
<!-var address = 'http://192.168.192.168/cgi-bin/epos/service.cgi?devid=local_printer';
var canvas = document.getElementById('myCanvas');
var epos = new epson.CanvasPrint(address);
epos.color = epos.COLOR_2;
epos.print(canvas);
//-->
</script>
5
181
feed property
It sets paper feed of label paper/black mark paper. (in firmware Ver.2.1 and later)
Object type
String
Description
Paper feed position of label paper/black mark paper.
Value
Decription
FEED_PEELING
Feeds to the peeling position.
FEED_CUTTING
Feeds to the cutting position.
FEED_CURRENT_TOF (Default)
Feeds to the top of the current label.
FEED_NEXT_TOF
Feeds to the top of the next label.
Example
After printing a label, it feeds paper to the peeling position.
<script type="text/javascript" src="epos-print-3.x.x.js"></script>
<script type="text/javascript">
<!-var address = 'http://192.168.192.168/cgi-bin/epos/service.cgi?devid=local_printer';
var canvas = document.getElementById('myCanvas');
var epos = new epson.CanvasPrint(address);
epos.paper = epos.PAPER_LABEL;
epos.feed = epos.FEED_PEELING;
epos.print(canvas);
//-->
</script>
182
Chapter 5 ePOS-Print Canvas API
paper property
It sets paper type. (in firmware Ver.2.1 and later)
Object type
String
Description
It specifies paper type.
Value
Decription
PAPER_RECEIPT (Default)
Receipt (without black mark)
PAPER_RECEIPT_BM
Receipt (with black mark)
PAPER_LABEL
Die-cut label (without black mark)
PAPAER_LABEL_BM
Die-cut label (with black mark)
Example
Prints a label.
<script type="text/javascript" src="epos-print-3.x.x.js"></script>
<script type="text/javascript">
<!-var address = 'http://192.168.192.168/cgi-bin/epos/service.cgi?devid=local_printer';
var canvas = document.getElementById('myCanvas');
var epos = new epson.CanvasPrint(address);
epos.paper = epos.PAPER_LABEL;
epos.feed = epos.FEED_PEELING;
epos.print(canvas);
//-->
</script>
5
183
layout property
It sets paper layout. (in firmware Ver.2.2 and later)
Object type
Object
Description
It specifies paper layout.
Property of layout being setup
Property
Name
Object type
width
Paper width
Number
height
Paper height
Number
margin_top
Top margin
Number
margin_bottom
Bottom margin
Number
offset_cut
Cutting position
Number
offset_label
Bottom position of label
Number
Value of width (Object type : Number, When not specified : 580)
Specifies paper width (in units of 0.1mm). Specifies an integer from 290 to 600. *
Value of height (Object type : Number, When not specified : 0)
Specifies paper height (in units of 0.1mm).
Paper type
Receipt
(without black mark)
Valid value range
0
Die-cut label
(with black mark)
184
Setup not necessary
Distance from the top of black
mark to the top of next black
mark
Receipt (with black mark)
Die-cut label
(without black mark)
Description
0 (auto)
284 to 1550 (manual) *
Distance from the top of label to
the top of next label
Distance from the bottom of
black mark to the bottom of next
black mark
Chapter 5 ePOS-Print Canvas API
Value of margin_top (Object type : Number, When not specified : 0)
Specifies top margin (in units of 0.1mm).
Paper type
Receipt
(without black mark)
Valid value range
Description
0
Setup not necessary
-150 to 1500 *
Distance from the top of black
mark
Die-cut label
(without black mark)
0 to 1500 *
Distance from the top of label
Die-cut label
(with black mark)
-15 to 1500 *
Distance from the bottom of
black mark
Receipt (with black mark)
Value of margin_bottom (Object type : Number, When not specified : 0)
Specifies bottom margin (in units of 0.1mm).
Paper type
Valid value range
Description
Receipt
(without black mark)
0
Receipt (with black mark)
0
Die-cut label
(without black mark)
-15 to 0 *
Distance from the bottom of
label (paper feed direction is a
positive number)
-15 to 15 *
Distance from the top of black
mark (paper feed direction is a
positive number)
Die-cut label
(with black mark)
Setup not necessary
Value of offset_cut (Object type : Number, When not specified : 0)
Specifies cut position (in units of 0.1mm).
In case of die cut label paper, it is a distance from the bottom of label.
When a paper has black mark, it is a distance from the beginning of black mark.
Paper type
Receipt
(without black mark)
Valid value range
Description
0
Setup not necessary
-290 to 50 *
Distance from the top of black
mark to the top of next black
mark
Die-cut label
(without black mark)
0 to 50 *
Distance from the bottom of
label to the cutting position
Die-cut label
(with black mark)
0 to 50 *
Distance from the top of black
mark to the cutting position
Receipt (with black mark)
185
5
Value of offset_label (Object type : Number, When not specified : 0)
Specifies label bottom position (sd) per 0.1mm unit.
Paper type
Valid value range
Receipt
(without black mark)
0
Receipt (with black mark)
0
Die-cut label
(without black mark)
0
Die-cut label
(with black mark)
0 to 15 *
Description
Setup not necessary
Distance from the top of black
mark to the bottom of label
*: Valid value of range is depending on the printer model. For detail, refer to "Appendix - Printer
Specifications".
Layout property positions that can be designated for each type of paper
<without Black Mark>
sf
<with Black Mark>
sf
sb
sc
Top position
Cut
Receipt
sa
sc
sf
sf
Cut
sb
Top position
Top position
Label
Bottom edge
of print area
Cut
se
sa
sc
Mark
186
sb
Parameter
sf
width
sa
height
sb
margin_top
se
margin_bottom
sc
offset_cut
sd
offset_label
Bottom edge
of print area
Standard eject
Bottom edge
of label
sa
se
sd
sc
Chapter 5 ePOS-Print Canvas API
Example
To set 58mm receipt (without black mark):
<script type="text/javascript" src="epos-print-3.x.x.js"></script>
<script type="text/javascript">
<!-var address = 'http://192.168.192.168/cgi-bin/epos/service.cgi?devid=local_printer';
var canvas = document.getElementById('myCanvas');
var epos = new epson.CanvasPrint(address);
epos.paper = epos.PAPER_RECEIPT;
epos.layout = { width: 580 };
epos.cut = true;
epos.print(canvas);
//-->
</script>
To set 58mm receipt (with black mark):
<script type="text/javascript" src="epos-print-3.x.x.js"></script>
<script type="text/javascript">
<!-var address = 'http://192.168.192.168/cgi-bin/epos/service.cgi?devid=local_printer';
var canvas = document.getElementById('myCanvas');
var epos = new epson.CanvasPrint(address);
epos.paper = epos.PAPER_RECEIPT_BM;
epos.layout = { width: 580, height: 0, margin_top:15, offset_cut: 0 };
epos.cut = true;
epos.print(canvas);
//-->
</script>
To set 58mm die-cut label (without black mark):
<script type="text/javascript" src="epos-print-3.x.x.js"></script>
<script type="text/javascript">
<!-var address = 'http://192.168.192.168/cgi-bin/epos/service.cgi?devid=local_printer';
var canvas = document.getElementById('myCanvas');
5
var epos = new epson.CanvasPrint(address);
epos.paper = epos.PAPER_LABEL;
epos.layout = { width: 580, height: 0, margin_top: 15, margin_bottom: -15,
offset_cut: 25 };
epos.cut = true;
epos.print(canvas);
//-->
</script>
187
To set 58mm die-cut label (with black mark):
<script type="text/javascript" src="epos-print-3.x.x.js"></script>
<script type="text/javascript">
<!-var address = 'http://192.168.192.168/cgi-bin/epos/service.cgi?devid=local_printer';
var canvas = document.getElementById('myCanvas');
var epos = new epson.CanvasPrint(address);
epos.paper = epos.PAPER_LABEL_BM;
epos.layout = { width: 580, height: 0, margin_top: 15, margin_bottom: -15
offset_cut: 25, offset_label: 15 };
epos.cut = true;
epos.print(canvas);
//-->
</script>
188
Chapter 5 ePOS-Print Canvas API
onreceive event
This property registers the callback function and obtains a response message receipt event.
Syntax
Function (response)
Parameter of the callback function
Parameter:
response (See “Properties of the response object” on page 189.)
Name:
Response message
Object type:
Object
Properties of the response object
Parameter
success (p. 189)
Name
Print result
Object type
Boolean
code (p. 189)
Error code
String
status (p. 190)
Status
Number
battery (p. 190)
Battery status
Number
Value of success
Value
Decription
true or 1
Printing succeeded.
false or 0
Printing failed.
Value of code
Value
Decription
'EPTR_AUTOMATICAL'
An automatically recoverable error occurred
'EPTR_COVER_OPEN'
A cover open error occurred
'EPTR_CUTTER'
An autocutter error occurred
'EPTR_MECHANICAL'
A mechanical error occurred
'EPTR_REC_EMPTY'
No paper in roll paper end sensor
'EPTR_UNRECOVERABLE'
An unrecoverable error occurred
'SchemaError'
The request document contains a syntax error
'DeviceNotFound'
The printer with the specified device ID does not exist
'PrintSystemError'
An error occurred on the printing system
'EX_BADPORT'
An error was detected on the communication port
'EX_TIMEOUT'
A print timeout occurred
5
189
Value of satus
Constant (status)
Decription
ASB_NO_RESPONSE
No response from the TM printer
ASB_PRINT_SUCCESS
Printing is successfully completed
ASB_DRAWER_KICK
Status of the 3rd pin of the drawer kick-out connector = "H"
ASB_BATTERY_OFFLINE
Off line status from remaining battery
(only for applicable devices) (in firmware Ver.2.2 and later)
ASB_OFF_LINE
Offline
ASB_COVER_OPEN
The cover is open
ASB_PAPER_FEED
Paper is being fed by a paper feed switch operation
ASB_WAIT_ON_LINE
Waiting to be brought back online
ASB_PANEL_SWITCH
The paper feed switch is being pressed (ON)
ASB_MECHANICAL_ERR
A mechanical error occurred
ASB_AUTOCUTTER_ERR
An autocutter error occurred
ASB_UNRECOVER_ERR
An unrecoverable error occurred
ASB_AUTORECOVER_ERR
An automatically recoverable error occurred
ASB_RECEIPT_NEAR_END
No paper in roll paper near end sensor
ASB_RECEIPT_END
No paper in roll paper end sensor
ASB_BUZZER
A buzzer is on (only for applicable devices)
ASB_WAIT_REMOVE_LABEL
Waiting period for removal of label (only for applicable devices)
(in firmware Ver.2.1 and later)
ASB_NO_LABEL
No paper in label peeling sensor (only for applicable devices)
(in firmware Ver.2.1 and later)
ASB_SPOOLER_IS_STOPPED
The spooler has stopped (Not used)
Value of battery
0 is shown when the model doesn't have a battery installed.
Status of power
Value (battery)
Description
0x30XX
AC adapter is connected
0x31XX
AC adapter is not connected
Remaining battery
Value (battery)
190
Description
0xXX36
Remaining battery 6
0xXX35
Remaining battery 5
0xXX34
Remaining battery 4
0xXX33
Remaining battery 3
0xXX32
Remaining battery 2
0xXX31
Remaining battery 1 (Near end)
0xXX30
Remaining battery 0 (Real end)
Chapter 5 ePOS-Print Canvas API
Example
To print Canvas(ID=myCanvas):
To display the print result in a message box.
<script type="text/javascript" src="epos-print-3.x.x.js"></script>
<script type="text/javascript">
<!-function printCanvas() {
var address = 'http://192.168.192.168/cgi-bin/epos/service.cgi?devid=local_printer';
var canvas = document.getElementById('myCanvas');
var epos = new epson.CanvasPrint(address);
epos.onreceive = function (res) {
var success = res.success;
var code = res.code;
var status = res.status;
alert(success);
};
epos.print(canvas);
}
//-->
</script>
5
191
onerror event
This property registers the callback function and obtains a communication error event.
Syntax
Function (error)
Parameter of the callback function
Parameter:
error (See “Properties of the error object” on page 192.)
Name:
Communication error information
Object type:
Object
Properties of the error object
property
Name
Object type
status
HTTP status
Number
responseText
Responce text
String
Example
To print Canvas(ID=myCanvas):
To display the HTTP status code in a message box when a communication error occurs.
<script type="text/javascript" src="epos-print-3.x.x.js"></script>
<script type="text/javascript">
<!-function printCanvas() {
var address = 'http://192.168.192.168/cgi-bin/epos/service.cgi?devid=local_printer';
var canvas = document.getElementById('myCanvas');
var epos = new epson.CanvasPrint(address);
epos.onerror = function (err) {
var status = err.status;
var text = err.responseText;
alert(status);
};
epos.print(canvas);
}
//-->
</script>
192
Chapter 5 ePOS-Print Canvas API
onstatuschange event
Registers a callback function to obtain a status change event. (in firmware Ver.1.2 and later)
Syntax
Function (status)
Parameter of the callback function
Parameters:
status
Name:
Status
Object type:
Number
Example
<script type="text/javascript" src="epos-print-3.x.x.js"></script>
<script type="text/javascript">
<!-var address = 'http://192.168.192.168/cgi-bin/epos/service.cgi?devid=local_printer';
var epos = new epson.CanvasPrint(address);
epos.onstatuschange = function (status) {
alert(status);
};
epos.open();
//-->
</script>
5
193
onbatterystatuschange event
Registers call back function and obtains battery status change event. (in firmware Ver.2.2 and later)
Syntax
Function (battery)
Parameter of the callback function
Parameters:
battery
Name:
Battery status
Object type:
Number
Example
<script type="text/javascript" src="epos-print-3.x.x.js"></script>
<script type="text/javascript">
<!-var address = 'http://192.168.192.168/cgi-bin/epos/service.cgi?devid=local_printer';
var epos = new epson.CanvasPrint(address);
epos.onbatterystatuschange = function (battery) {
alert(battery);
};
epos.open();
//-->
</script>
194
Chapter 5 ePOS-Print Canvas API
onbatteryok event
Registers call back function and obtains remaining battery event. (in firmware Ver.2.2 and later)
Syntax
Function ()
Example
<script type="text/javascript" src="epos-print-3.x.x.js"></script>
<script type="text/javascript">
<!-var address = 'http://192.168.192.168/cgi-bin/epos/service.cgi?devid=local_printer';
var epos = new epson.CanvasPrint(address);
epos.onbatteryok = function () {
alert('batteryok’);
};
epos.open();
//-->
</script>
onbatterylow event
Registers call back function and obtains no remaining battery event. (in firmware Ver.2.2 and later)
Syntax
Function ()
Example
<script type="text/javascript" src="epos-print-3.x.x.js"></script>
<script type="text/javascript">
<!-var address = 'http://192.168.192.168/cgi-bin/epos/service.cgi?devid=local_printer';
var epos = new epson.CanvasPrint(address);
epos.onbatterylow = function () {
alert('batterylow’);
};
epos.open();
//-->
</script>
195
5
ononline event
Registers a callback function to obtain a online event. (in firmware Ver.1.2 and later)
Object type
Function ()
Example
<script type="text/javascript" src="epos-print-3.x.x.js"></script>
<script type="text/javascript">
<!-var address = 'http://192.168.192.168/cgi-bin/epos/service.cgi?devid=local_printer';
var epos = new epson.CanvasPrint(address);
epos.ononline = function () {
alert('online');
};
epos.open();
//-->
</script>
onoffline event
Registers a callback function to obtain a offline event. (in firmware Ver.1.2 and later)
Object type
Function ()
Example
<script type="text/javascript" src="epos-print-3.x.x.js"></script>
<script type="text/javascript">
<!-var address = 'http://192.168.192.168/cgi-bin/epos/service.cgi?devid=local_printer';
var epos = new epson.CanvasPrint(address);
epos.onoffline = function () {
alert('offline');
};
epos.open();
//-->
</script>
196
Chapter 5 ePOS-Print Canvas API
onpoweroff event
Registers a callback function to obtain a non-response event. (in firmware Ver.1.2 and later)
Object type
Function ()
Example
<script type="text/javascript" src="epos-print-3.x.x.js"></script>
<script type="text/javascript">
<!-var address = 'http://192.168.192.168/cgi-bin/epos/service.cgi?devid=local_printer';
var epos = new epson.CanvasPrint(address);
epos.onpoweroff = function () {
alert('poweroff');
};
epos.open();
//-->
</script>
oncoverok event
Registers a callback function to obtain a cover close event. (in firmware Ver.1.2 and later)
Object type
Function ()
Example
<script type="text/javascript" src="epos-print-3.x.x.js"></script>
<script type="text/javascript">
<!-var address = 'http://192.168.192.168/cgi-bin/epos/service.cgi?devid=local_printer';
var epos = new epson.CanvasPrint(address);
epos.oncoverok = function () {
alert('coverok');
};
epos.open();
//-->
</script>
197
5
oncoveropen event
Registers a callback function to obtain a cover open event. (in firmware Ver.1.2 and later)
Object type
Function ()
Example
<script type="text/javascript" src="epos-print-3.x.x.js"></script>
<script type="text/javascript">
<!-var address = 'http://192.168.192.168/cgi-bin/epos/service.cgi?devid=local_printer';
var epos = new epson.CanvasPrint(address);
epos.oncoveropen = function () {
alert('coveropen');
};
epos.open();
//-->
</script>
onpaperok event
Registers a callback function to obtain a paper remaining event. (in firmware Ver.1.2 and later)
Object type
Function ()
Example
<script type="text/javascript" src="epos-print-3.x.x.js"></script>
<script type="text/javascript">
<!-var address = 'http://192.168.192.168/cgi-bin/epos/service.cgi?devid=local_printer';
var epos = new epson.CanvasPrint(address);
epos.onpaperok = function () {
alert('paperok');
};
epos.open();
//-->
</script>
198
Chapter 5 ePOS-Print Canvas API
onpapernearend event
Registers a callback function to obtain a paper near end event. (in firmware Ver.1.2 and later)
Object type
Function ()
Example
<script type="text/javascript" src="epos-print-3.x.x.js"></script>
<script type="text/javascript">
<!-var address = 'http://192.168.192.168/cgi-bin/epos/service.cgi?devid=local_printer';
var epos = new epson.CanvasPrint(address);
epos.onpapernearend = function () {
alert('papernearend');
};
epos.open();
//-->
</script>
onpaperend event
Registers a callback function to obtain a paper end event. (in firmware Ver.1.2 and later)
Object type
Function ()
Example
<script type="text/javascript" src="epos-print-3.x.x.js"></script>
<script type="text/javascript">
<!-var address = 'http://192.168.192.168/cgi-bin/epos/service.cgi?devid=local_printer';
var epos = new epson.CanvasPrint(address);
epos.onpaperend = function () {
alert('paperend');
};
epos.open();
//-->
</script>
199
5
ondrawerclosed event
Registers a callback function to obtain a drawer close event. (in firmware Ver.1.2 and later)
Object type
Function ()
Example
<script type="text/javascript" src="epos-print-3.x.x.js"></script>
<script type="text/javascript">
<!-var address = 'http://192.168.192.168/cgi-bin/epos/service.cgi?devid=local_printer';
var epos = new epson.CanvasPrint(address);
epos.ondrawerclosed = function () {
alert('drawerclosed');
};
epos.open();
//-->
</script>
ondraweropen event
Registers a callback function to obtain a drawer open event. (in firmware Ver.1.2 and later)
Object type
Function ()
Example
<script type="text/javascript" src="epos-print-3.x.x.js"></script>
<script type="text/javascript">
<!-var address = 'http://192.168.192.168/cgi-bin/epos/service.cgi?devid=local_printer';
var epos = new epson.CanvasPrint(address);
epos.ondraweropen = function () {
alert('draweropen');
};
epos.open();
//-->
</script>
200
Chapter 6 ePOS-Print Editor
ePOS-Print Editor
This section describes how to use ePOS-Print Editor included in the contents in the package.
This tool allows you to create an ePOS-Print API (p. 59) sample code as you like. Use this tool for your Web
application development.
ePOS-Print Editor Operating Environment
❏ Web Browser
Windows Internet Explorer 9 or later
Mozilla Firefox 13 or later
Google Chrome 19 or later
Apple Safari 5.1.7 or later
iPad Safari in iOS 5.1 or later
6
201
Displaying ePOS-Print Editor
• If opening a page with ePOS‐Print Editorʹs HTML file placed on the local disk, some functionality does not operate due to your Web browserʹs security policy. Place the HTML file of ePOS Editor to a folder under Web server.
• In Google Chrome, when a preview image including pictures is displayed, a ʺSECURITY_ERR: DOM Exception 18ʺ error occurs. • In Windows Internet Explorer 9, when printing is performed, a ʺSCRIPT5: Access is denied.ʺ error occurs.
1
Open the following URL page using the Web browser.
2
ePOS-Print Editor appears.
202
http://[Web server IP address]/editor/index.html
Chapter 6 ePOS-Print Editor
Setting
Perform the print setting and the preview setting. Select the [Setting] tab to display the Setting screen.
Item
Description
Model, Paper width (Liner width)
Select printer model to be used and paper width (for label
paper, the mount width).
The Preview screen resizes according to the paper width
set to the model.
IP address of ePOS-Print supported TM
printer
Specify the IP address of the printer.
Be sure to specify this item.
Device ID of the target printer
Specify the device ID of the printer.
Be sure to specify this item.
Print timeout (milliseconds)
Specify the print timeout time in milliseconds.
The maximum value is 60000 (60 seconds).
Monitor the status
When this checkbox is checked, the printer's status is
monitored.
6
203
Creating a Sample Code
Select the [Edit] tab to display the Edit screen. Create an ePOS-Print API sample code in the Edit screen.
Menu area
Edit area
Item
204
Description
Menu area
Displays the available functions.
Click an icon to add it to the bottom of the edit area, and drag an icon to
insert it anywhere in the edit area.
Edit area
Displays the functions selected in the menu area.
Drag an element to change its position. An element can be deleted using
the x button located on its right side.
Import
Using ePOS-Print XML, ePOS-Print Editor can import XML data stored in the
past. For details, refer to Import (p.208).
Clear
Deletes the edited details.
Forced Transmission
Sets forced transmission mode.
Chapter 6 ePOS-Print Editor
Create a sample code as follows:
1
Click an icon in the menu area to add an element in the edit area.
2
Configure the added element.
3
Select the [Preview] tab to check the preview image.
The position of the added function can be changed by dragging.
Example: When the NV logo is added, set the key code.
When a printer is connected, you can also check the image by printing.
For details, refer to Print (p.207).
• Logo printing, barcode printing, 2D code printing, ESC command, buzzer sound, drawer kick, and paper cut are displayed as icons.
• The layout may change depending on the preview settings.
(For details, refer to Setting (p.203)). 6
205
4
Select the [API] tab. The ePOS-Print API sample code appears. Use it by copying.
The ePOS‐Print XML print document is used for importing. If necessary, select the XML tab and save the content of the ePOS‐Print XML print document by copying. 206
Chapter 6 ePOS-Print Editor
Print
Using the printer, print the print document according to the printer's settings to perform test printing..
(For details on the printer settings, refer to Setting (p.203)).
Item
Description
Data to be sent
(ePOS-Print XML)
The ePOS-Print XML document is displayed.
Send
Sends data to the printer and performs printing.
Information
Displays the print status.
Clear
Deletes the content in the [Information] box.
Perform printing as follows:
1
2
Select the [Print] tab.
Check the content in the [Data to be sent (ePOS-Print XML)] box and press the
[Send] button.
The ePOS-Print XML print document created using the [Edit] tab page is displayed in "Data to be sent
(ePOS-Print XML)".
3
The print document is printed to ePOS-Print supported TM printer. The acquired
status is displayed in the Information box.
207
6
Import
ePOS-Print Editor can import and re-edit the ePOS-Print XML print document once created.
Note that you cannot perform import operation using ePOS‐Print API source code. Perform import operation using ePOS‐Print XML print data. Item
Description
Data to be import
(ePOS-Print XML)
Paste and check the ePOS-Print XML print document to be imported.
Apply
Imports the ePOS-Print XML print document.
Information
Displays the import information.
Close
Closes the Import screen.
ePOS-PrintEditor can import an ePOS-Print XML print document as follows:
1
2
3
4
208
Select the [Edit] tab and click the [Import] button.
The "Import" screen appears. Paste the ePOS-Print XML print document in the
[Data to be import (ePOS-Print XML)] box.
Click the [Apply] button.
The "Confirmation" screen appears. Click the [Yes] button.
Appendix
Appendix
Printer specifications
TM-T88V-i
80mm
Interface
Ethernet, Wireless LAN
Resolution
180 dpi x 180 dpi (W x H)
Print Width
512 dots
Font
Font A, Font B
For more information about what character codes can be
printed, refer to the user's manual that came with the printer.
Characters in a Line
Character Size
Character Baseline
Font A
ANK: 42 characters
Font B
ANK: 56 characters
Font A
ANK: 12 dots x 24 dots (W x H)
Font B
ANK: 9 dots x 17 dots (W x H)
Font A
At the 21st dot from the top of the character
Font B
At the 16th dot from the top of the character
Default Line Feed Space
30 dots
Color Specification
First color
Page Mode Default Area
512 dots x 831 dots (W x H)
Page Mode Maximum Area
512 dots x 1662 dots (W x H)
Raster image
Monochrome image, two-color image
Logo
Monochrome image, two-color image
Bar Code
UPC-A, UPC-E, EAN13, JAN13, EAN8, JAN8, CODE39, ITF,
CODABAR, CODE93, CODE128, GS1-128,GS1 DataBar
Omnidirectional, GS1 DataBar Truncated, GS1 DataBar Limited,
GS1 Databar Expanded
Two-Dimensional Code
PDF417, QR Code, MaxiCode, GS1 DataBar Stacked,
GS1 DataBar Stacked Omnidirectional, GS1 DataBar Expanded
Stacked (Composite Symbology not supported)
209
80mm
210
Ruled Line
Not supported
Paper Cut
Cut, Feed cut
Specification of the paper feed
position for labels / black mark
paper
Not supported
Drawer Kick-Out
Supported
Buzzer
Optional (Pattern A ~ Pattern E, Error, No paper, Stop)
Paper Layout Settings
Not supported
Forced transmission mode
Supported
Recovery from an error
Supported
Reset
Supported
Command
Supported
Appendix
TM-T88V
80mm
58mm
Interface
Ethernet, Wireless LAN
Resolution
180 dpi x 180 dpi (W x H)
Print Width
512 dots
Font
Font A, Font B
For more information about what character codes can be
printed, refer to the user's manual that came with the printer.
Characters in a Line
Character Size
Character Baseline
360 dots
Font A
ANK: 42 characters
ANK: 30 characters
Font B
ANK: 56 characters
ANK: 40 characters
Font A
ANK: 12 dots x 24 dots (W x H)
Font B
ANK: 9 dots x 17 dots (W x H)
Font A
At the 21st dot from the top of the character
Font B
At the 16th dot from the top of the character
Default Line Feed Space
30 dots
Color Specification
First color
Page Mode Default Area
512 dots x 831 dots (W x H)
360 dots x 831 dots (W x H)
Page Mode Maximum Area
512 dots x 1662 dots (W x H)
360 dots x 1662 dots (W x H)
Raster image
Monochrome image, two-color image
Logo
Monochrome image, two-color image
Bar Code
UPC-A, UPC-E, EAN13, JAN13, EAN8, JAN8, CODE39, ITF,
CODABAR, CODE93, CODE128, GS1-128,GS1 DataBar
Omnidirectional, GS1 DataBar Truncated, GS1 DataBar Limited,
GS1 Databar Expanded
Two-Dimensional Code
PDF417, QR Code, MaxiCode, GS1 DataBar Stacked,
GS1 DataBar Stacked Omnidirectional, GS1 DataBar Expanded
Stacked (Composite Symbology not supported)
Ruled Line
Not supported
Paper Cut
Cut, Feed cut
Specification of the paper feed
position for labels / black mark
paper
Not supported
Drawer Kick-Out
Supported
211
80mm
212
58mm
Buzzer
Optional (Pattern A ~ Pattern E, Error, No paper, Stop)
Paper Layout Settings
Not supported
Forced transmission mode
Supported
Recovery from an error
Supported
Reset
Supported
Command
Supported
Appendix
TM-T88IV
80mm
58mm
Interface
Ethernet, Wireless LAN
Resolution
180 dpi x 180 dpi (W x H)
Print Width
512 dots
Font
Font A, Font B
For more information about what character codes can be
printed, refer to the user's manual that came with the printer.
Characters in a Line
Character Size
Character Baseline
360 dots
Font A
ANK: 42 characters
ANK: 30 characters
Font B
ANK: 56 characters
ANK: 40 characters
Font A
ANK: 12 dots x 24 dots (W x H)
Font B
ANK: 9 dots x 17 dots (W x H)
Font A
At the 21st dot from the top of the character
Font B
At the 16th dot from the top of the character
Default Line Feed Space
30 dots
Color Specification
First color
First color, Second color (when two-color printing is set)
Page Mode Default Area
512 dots x 831 dots (W x H)
360 dots x 831 dots (W x H)
512 dots x 415 dots (W x H)
360 dots x 415 dots (W x H)
512 dots x 1662 dots (W x H)
360 dots x 1662 dots (W x H)
512 dots x 831 dots (W x H)
360 dots x 831 dots (W x H)
when twocolor
printing is set
Page Mode Maximum Area
when twocolor
printing is set
Raster image
Monochrome image, two-color image
Logo
Monochrome image, two-color image
(To perform two-color printing, change the settings of the printer
using the memory switch setting utility.)
Bar Code
UPC-A, UPC-E, EAN13, JAN13, EAN8, JAN8, CODE39, ITF,
CODABAR, CODE93, CODE128, GS1-128
Two-Dimensional Code
PDF417, QR Code
Ruled Line
Not supported
Paper Cut
Cut, Feed cut
213
80mm
214
Specification of the paper feed
position for labels / black mark
paper
Not supported
Drawer Kick-Out
Supported
Buzzer
Not supported
Paper Layout Settings
Not supported
Forced transmission mode
Supported
Recovery from an error
Supported
Reset
Supported
Command
Supported
58mm
Appendix
TM-T70-i
80mm
Interface
Ethernet, Wireless LAN
Resolution
180 dpi x 180 dpi (W x H)
Print Width
512 dots
Font
Font A, Font B
For more information about what character codes can be
printed, refer to the user's manual that came with the printer.
Characters in a Line
Character Size
Character Baseline
Font A
ANK: 42 characters
Font B
ANK: 56 characters
Font A
ANK: 12 dots x 24 dots (W x H)
Font B
ANK: 9 dots x 17 dots (W x H)
Font A
At the 21st dot from the top of the character
Font B
At the 15th dot from the top of the character
Default Line Feed Space
30 dots
Color Specification
First color
Page Mode Default Area
512 dots x 1662 dots (W x H)
Page Mode Maximum Area
512 dots x 1662 dots (W x H)
Raster image
Monochrome image
Logo
Monochrome image
Bar Code
UPC-A, UPC-E, EAN13, JAN13, EAN8, JAN8, CODE39, ITF,
CODABAR, CODE93, CODE128
Two-Dimensional Code
PDF417, QR Code
Ruled Line
Not supported
Paper Cut
Cut, Feed cut
Specification of the paper feed
position for labels / black mark paper
Not supported
Drawer Kick-Out
Supported
Buzzer
Not supported
Paper Layout Settings
Not supported
215
80mm
216
Forced transmission mode
Supported
Recovery from an error
Supported
Reset
Supported
Command
Supported
Appendix
TM-T70-i (Multi-language model)
80mm
Interface
Ethernet, Wireless LAN
Resolution
203 dpi x 203 dpi (W x H)
Print Width
576 dots
Font
Font A, Font B
For more information about what character codes can be
printed, refer to the user's manual that came with the printer.
Characters in a Line
Character Size
Character Baseline
Font A
ANK: 48 characters
Font B
ANK: 64 characters
Font A
ANK: 12 dots x 24 dots (W x H)
Font B
ANK: 9 dots x 17 dots (W x H)
Font A
At the 21st dot from the top of the character
Font B
At the 15th dot from the top of the character
Default Line Feed Space
30 dots
Color Specification
First color
Page Mode Default Area
576 dots x 1662 dots (W x H)
Page Mode Maximum Area
576 dots x 1662 dots (W x H)
Raster image
Monochrome image
Logo
Monochrome image
Bar Code
UPC-A, UPC-E, EAN13, JAN13, EAN8, JAN8, CODE39, ITF,
CODABAR, CODE93, CODE128
Two-Dimensional Code
PDF417, QR Code
Ruled Line
Not supported
Paper Cut
Cut, Feed cut
Specification of the paper feed
position for labels / black mark paper
Not supported
Drawer Kick-Out
Supported
Buzzer
Not supported
Paper Layout Settings
Not supported
217
80mm
218
Forced transmission mode
Supported
Recovery from an error
Supported
Reset
Supported
Command
Supported
Appendix
TM-T70
80mm
Interface
Ethernet, Wireless LAN
Resolution
180 dpi x 180 dpi (W x H)
Print Width
512 dots
Font
Font A, Font B
For more information about what character codes can be
printed, refer to the user's manual that came with the printer.
Characters in a Line
Character Size
Character Baseline
Font A
ANK: 42 characters
Font B
ANK: 56 characters
Font A
ANK: 12 dots x 24 dots (W x H)
Font B
ANK: 9 dots x 17 dots (W x H)
Font A
At the 21st dot from the top of the character
Font B
At the 15th dot from the top of the character
Default Line Feed Space
30 dots
Color Specification
First color
Page Mode Default Area
512 dots x 1662 dots (W x H)
Page Mode Maximum Area
512 dots x 1662 dots (W x H)
Raster image
Monochrome image
Logo
Monochrome image
Bar Code
UPC-A, UPC-E, EAN13, JAN13, EAN8, JAN8, CODE39, ITF,
CODABAR,
CODE93, CODE128
Two-Dimensional Code
PDF417, QR Code
Ruled Line
Not supported
Paper Cut
Cut, Feed cut
Specification of the paper feed
position for labels / black mark paper
Not supported
Drawer Kick-Out
Supported
Buzzer
Not supported
219
80mm
220
Paper Layout Settings
Not supported
Forced transmission mode
Supported
Recovery from an error
Supported
Reset
Supported
Command
Supported
Appendix
TM-T70 (Multi-language model)
80mm
58mm
Interface
Ethernet, Wireless LAN
Resolution
203 dpi x 203 dpi (W x H)
Print Width
576 dots
Font
Font A, Font B
For more information about what character codes can be
printed, refer to the user's manual that came with the printer.
Characters in a Line
Character Size
Character Baseline
416 dots
Font A
ANK: 42 characters
ANK: 34 characters
Font B
ANK: 56 characters
ANK: 46 characters
Font A
ANK: 12 dots x 24 dots (W x H)
Font B
ANK: 9 dots x 17 dots (W x H)
Font A
At the 21st dot from the top of the character
Font B
At the 15th dot from the top of the character
Default Line Feed Space
30 dots
Color Specification
First color
Page Mode Default Area
576 dots x 1662 dots (W x H)
416 dots x 1662 dots (W x H)
Page Mode Maximum Area
576 dots x 1662 dots (W x H)
416 dots x 1662 dots (W x H)
Raster image
Monochrome image
Logo
Monochrome image
Bar Code
UPC-A, UPC-E, EAN13, JAN13, EAN8, JAN8, CODE39, ITF,
CODABAR,
CODE93, CODE128
Two-Dimensional Code
PDF417, QR Code
Ruled Line
Not supported
Paper Cut
Cut, Feed cut
Specification of the paper feed
position for labels / black mark paper
Not supported
Drawer Kick-Out
Supported
Buzzer
Not supported
Paper Layout Settings
Not supported
221
80mm
222
Forced transmission mode
Supported
Recovery from an error
Supported
Reset
Supported
Command
Supported
58mm
Appendix
TM-L90-i
Receipt
Die-cut label
Interface
Ethernet, Wireless LAN
Resolution
203 dpi x 203 dpi (W x H)
Print Width
256 dots (38mm) to
576 dots (80mm)
Font
Font A, Font B, Font C
For more information about what character codes can be printed,
refer to the user's manual that came with the printer.
Characters in a
Line
Character Size
Character
Baseline
224 dots (38mm) to
560 dots (80mm)
Font A
ANK: 48 characters,
ANK: 46 characters
Font B
ANK: 57 characters
ANK: 56 characters
Font C
ANK: 72 characters
ANK: 70 characters
Font A
ANK: 12 dots x 24 dots (W x H)
Font B
ANK: 10 dots x 24 dots (W x H)
Font C
ANK: 8 dots x 16 dots (W x H)
Font A
At the 21st dot from the top of the character
Font B
At the 21 st dot from the top of the character
Font C
At the 15 st dot from the top of the character
Default Line Feed Space
30 dots
Color Specification
First color
First color, Second color (when two-color printing is set)
Raster Image
Monochrome image, Two color image
Logo
Monochrome image, Two color image
(To perform two-color printing, change the settings of the printer
using the memory switch setting utility.)
Bar Code
UPC-A, UPC-E, EAN13, JAN13, EAN8, JAN8, CODE39, ITF, CODABAR,
CODE93, CODE128
Two-Dimensional Code
PDF417, QR Code, MaxiCode
Ruled Line
Not supported
223
Receipt
Page Mode Default Area
576 dots x 738 dots (W x H)
560 dots x 738 dots (W x H)
576 dots x 369 dots (W x H)
560 dots x 369 dots (W x H)
576 dots x 1476 dots (W x H)
560 dots x 1476 dots (W x H)
when twocolor printing
is set
576 dots x 738 dots (W x H)
560 dots x 738 dots (W x H)
Line
Not supported
when twocolor printing
is set
Page Mode Maximum Area
Page Mode
Die-cut label
Rectangle
224
Paper Cut
Cut, Feed cut
Specification of the paper feed
position for labels / black mark
paper
Supported
Drawer Kick-Out
Supported
Buzzer
Not supported
Paper Layout Settings
Not supported (With automatic setup mode)
Forced transmission mode
Supported
Recovery from an error
Supported
Reset
Supported
Command
Supported
Appendix
TM-L90
Receipt
Die-cut label
Interface
Ethernet, Wireless LAN
Resolution
203 dpi x 203 dpi (W x H)
Print Width
256 dots (38mm) to
576 dots (80mm)
Font
Font A, Font B, Font C
For more information about what character codes can be printed,
refer to the user's manual that came with the printer.
Characters in a
Line
Character Size
Character
Baseline
224 dots (38mm) to
560 dots (80mm)
Font A
ANK: 48 characters,
ANK: 46 characters
Font B
ANK: 57 characters
ANK: 56 characters
Font C
ANK: 72 characters
ANK: 70 characters
Font A
ANK: 12 dots x 24 dots (W x H)
Font B
ANK: 10 dots x 24 dots (W x H)
Font C
ANK: 8 dots x 16 dots (W x H)
Font A
At the 21st dot from the top of the character
Font B
At the 21 st dot from the top of the character
Font C
At the 15 st dot from the top of the character
Default Line Feed Space
30 dots
Color Specification
First color
First color, Second color (when two-color printing is set)
Raster Image
Monochrome image, Two color image
Logo
Monochrome image, Two color image
(To perform two-color printing, change the settings of the printer
using the memory switch setting utility.)
Bar Code
UPC-A, UPC-E, EAN13, JAN13, EAN8, JAN8, CODE39, ITF, CODABAR,
CODE93, CODE128
Two-Dimensional Code
PDF417, QR Code, MaxiCode
Ruled Line
Not supported
225
Receipt
Page Mode Default Area
576 dots x 738 dots (W x H)
560 dots x 738 dots (W x H)
576 dots x 369 dots (W x H)
560 dots x 369 dots (W x H)
576 dots x 1476 dots (W x H)
560 dots x 1476 dots (W x H)
when twocolor printing
is set
576 dots x 738 dots (W x H)
560 dots x 738 dots (W x H)
Line
Not supported
when twocolor printing
is set
Page Mode Maximum Area
Page Mode
Die-cut label
Rectangle
226
Paper Cut
Cut, Feed cut
Specification of the paper feed
position for labels / black mark
paper
Supported
Drawer Kick-Out
Supported
Buzzer
Not supported
Paper Layout Settings
Not supported (With automatic setup mode)
Forced transmission mode
Supported
Recovery from an error
Supported
Reset
Supported
Command
Supported
Appendix
TM-T90
58mm
60mm
80mm
Interface
Ethernet, Wireless LAN
Resolution
180 dpi x 180 dpi (W x H)
Print Width
360 dots
Font
Font A, Font B
For more information about what character codes can be printed,
refer to the user's manual that came with the printer.
Characters in a
Line
Character Size
Character
Baseline
384 dots
512 dots
Font A
ANK: 30 characters,
ANK: 32 characters
ANK: 42 characters
Font B
ANK: 40 characters
ANK: 42 characters
ANK: 56 characters
Font A
ANK: 12 dots x 24 dots (W x H)
Font B
ANK: 9 dots x 17 dots (W x H)
Font A
At the 21st dot from the top of the character
Font B
At the 16 th dot from the top of the character
Default Line Feed Space
30 dots
Color Specification
First color
First color, Second color (when two-color printing is set)
Raster Image
Monochrome image, Two color image
Logo
Monochrome image, Two color image
(To perform two-color printing, change the settings of the printer
using the memory switch setting utility.)
Bar Code
UPC-A, UPC-E, EAN13, JAN13, EAN8, JAN8, CODE39, ITF, CODABAR,
CODE93, CODE128
Two-Dimensional Code
PDF417
Ruled Line
Not supported
Page Mode Default Area
360 dots x 831 dots
(W x H)
384 dots x 831 dots
(W x H)
512 dots x 831 dots
(W x H)
360 dots x 415 dots
(W x H)
384 dots x 415 dots
(W x H)
512 dots x 415 dots
(W x H)
when twocolor printing
is set
227
58mm
60mm
80mm
Page Mode Maximum Area
360 dots x 1662 dots
(W x H)
384 dots x 1662 dots
(W x H)
512 dots x 1662 dots
(W x H)
when two-color printing is set
360 dots x 831 dots
(W x H)
384 dots x 831 dots
(W x H)
512 dots x 831 dots
(W x H)
Page Mode
Not supported
Line
Rectangle
228
Specification of the paper feed
position for labels / black mark
paper
Not supported
Paper Cut
Cut, Feed cut
Drawer Kick-Out
Supported
Buzzer
Supported via Drawer Kick-Out
Paper Layout Settings
Not supported
Forced transmission mode
Supported
Recovery from an error
Supported
Reset
Supported
Command
Supported
Appendix
TM-P60II
Receipt 58mm
Receipt 60mm
Interface
Wireless LAN
Resolution
203 dpi x 203 dpi (W x H)
Print Width
420 dots
Font
Font A, Font B, Font C
For more information about what character codes can be printed,
refer to the user's manual that came with the printer.
Characters in a
Line
Character Size
Character
Baseline
432 dots
Font A
ANK: 35 characters,
ANK: 36 characters
Font B
ANK: 42 characters
ANK: 43 characters
Font C
ANK: 52 characters
ANK: 54 characters
Font A
ANK: 12 dots x 24 dots (W x H)
Font B
ANK: 10 dots x 24 dots (W x H)
Font C
ANK: 8 dots x 16 dots (W x H)
Font A
At the 21st dot from the top of the character
Font B
At the 21 st dot from the top of the character
Font C
At the 15 th dot from the top of the character
Default Line Feed Space
30 dots
Color Specification
First color
Raster Image
Monochrome image
Logo
Monochrome image
Bar Code
UPC-A, UPC-E, EAN13, JAN13, EAN8, JAN8, CODE39, ITF, CODABAR,
CODE93, CODE128, GS1-128, GS1 DataBar Omnidirectional, GS1
DataBar Truncated, GS1 DataBar Limited, GS1 DataBar Expanded
Two-Dimensional Code
PDF417, QR Code, MaxiCode, GS1 DataBar Stacked, GS1 DataBar
Stacked Omnidirectional, GS1 DataBar Expanded Stacked, Aztec
Code, DataMatrix (Composit Symbology : Not supported)
Ruled Line
Not supported
Page Mode Default Area
420 dots x 1200 dots (W x H)
432 dots x 1200 dots (W x H)
Page Mode Maximum Area
420 dots x 1200 dots (W x H)
432 dots x 1200 dots (W x H)
229
Receipt 58mm
Page Mode
Line
Supported (Only solid line)
Rectangle
230
Paper Cut
Cut, Feed cut
Specification of the paper feed
position for labels / black mark
paper
Not supported
Drawer Kick-Out
Not supported
Buzzer
Support (Pattern1 ~ Pattern 10, Stop)
Paper Layout Settings
Not supported
Forced transmission mode
Supported
Recovery from an error
Supported
Reset
Supported
Command
Supported
Receipt 60mm
Appendix
TM-P60II with Peeler
Receipt 58mm
Receipt 60mm
Die-cut label
Interface
Wireless LAN
Resolution
203 dpi x 203 dpi (W x H)
Print Width
420 dots
Font
Font A, Font B, Font C
For more information about what character codes can be printed,
refer to the user's manual that came with the printer.
Characters in a
Line
Character Size
Character
Baseline
432 dots
160 dots ~ 400 dots
Font A
ANK: 35 characters,
ANK: 36 characters
ANK: 33 characters
Font B
ANK: 42 characters
ANK: 43 characters
ANK: 40 characters
Font C
ANK: 52 characters
ANK: 54 characters
ANK: 50 characters
Font A
ANK: 12 dots x 24 dots (W x H)
Font B
ANK: 10 dots x 24 dots (W x H)
Font C
ANK: 8 dots x 16 dots (W x H)
Font A
At the 21st dot from the top of the character
Font B
At the 21 st dot from the top of the character
Font C
At the 15 th dot from the top of the character
Default Line Feed Space
30 dots
Color Specification
First color
Raster Image
Monochrome image
Logo
Monochrome image
Bar Code
UPC-A, UPC-E, EAN13, JAN13, EAN8, JAN8, CODE39, ITF, CODABAR,
CODE93, CODE128, GS1-128, GS1 DataBar Omnidirectional, GS1
DataBar Truncated, GS1 DataBar Limited, GS1 DataBar Expanded
Two-Dimensional Code
PDF417, QR Code, MaxiCode, GS1 DataBar Stacked, GS1 DataBar
Stacked Omnidirectional, GS1 DataBar Expanded Stacked, Aztec
Code, DataMatrix (Composit Symbology : Not supported)
Ruled Line
Not supported
Page Mode Default Area
420 dots x 1200 dots
(W x H)
432 dots x 1200 dots
(W x H)
400 dots x 1200 dots
(W x H)
231
Receipt 58mm
Receipt 60mm
Page Mode Maximum Area
420 dots x 1200 dots
(W x H)
Page Mode
Supported (Only solid line)
Line
432 dots x 1200 dots
(W x H)
Die-cut label
400 dots x 1200 dots
(W x H)
Rectangle
Paper Cut
Feed cut (Feeds paper to cutting position)
Specification of the paper feed
position for labels / black mark
paper
Supported
Drawer Kick-Out
Not supported
Buzzer
Support (Pattern1 ~ Pattern 10, Stop)
Paper Layout Settings
Supported
Forced transmission mode
Supported
Recovery from an error
Supported
Reset
Supported
Command
Supported
Paper Layout
Receipt paper
(without black
mark)
Paper type
232
Die-cut label
paper
(without black
mark)
Receipt paper
(with black
mark)
Die-cut label
paper
(with black
mark)
width (sf)
290 to 600
290 to 600
290 to 600
290 to 600
height (sa)
0
0, 284 to 1550
0, 284 to 1550
0, 284 to 1550
margin_top (sb)
0
-130 to 1500
0 to 1500
-15 to 1500
margin_bottom (se)
0
0
-15 to 0
-15 to 15
offset_cut (sc)
0
-256 to 50
0 to 50
0 to 50
offset_label (sd)
0
0
0
0 to 15
Appendix
TM-P80
Receipt 80 mm
Interface
Wireless LAN
Resolution
203 dpi x 203 dpi (W x H)
Print Width
576 dots, 546 dots (42 column mode)
Font
Font A, Font B
For more information about what character codes can be printed,
refer to the user's manual that came with the printer.
Characters in a
Line
Character Size
Character
Baseline
Font A
ANK: 48 characters,
Font B
ANK: 64 characters
Font A
(42 column
mode)
ANK: 42 characters
Font B
(42 column
mode)
ANK: 60 characters
Font A
ANK: 12 dots x 24 dots (W x H)
Font B
ANK: 9 dots x 17 dots (W x H)
Font A
ANK: 13 dots x 24 dots (W x H)
Font B
ANK: 9 dots x 17 dots (W x H)
Font A
At the 21st dot from the top of the character
Font B
At the 15 th dot from the top of the character
Default Line Feed Space
3.75 mm {0.15”}
Color Specification
First color
Raster Image
Monochrome image
Logo
Monochrome image
Bar Code
UPC-A, UPC-E, EAN13, JAN13, EAN8, JAN8, CODE39, ITF, CODABAR,
CODE93, CODE128, GS1-128, GS1 DataBar Omnidirectional, GS1
DataBar Truncated, GS1 DataBar Limited, GS1 DataBar Expanded
233
Receipt 80 mm
Two-Dimensional Code
PDF417, QR Code, MaxiCode, GS1 DataBar Stacked, GS1 DataBar
Stacked Omnidirectional, GS1 DataBar Expanded Stacked, Aztec
Code, DataMatrix
Ruled Line
Not supported
Page Mode Default Area
576 dots x 1662 dots (W x H), 546 dots x 1662 dots (W x H) (42 column
mode)
Page Mode Maximum Area
576 dots x 1662 dots (W x H), 546 dots x 1662 dots (W x H) (42 column
mode)
Page Mode
Line
Supported (Only solid line)
Rectangle
Paper Cut
Feed cut (Feeds paper to cutting position)
Specification of the paper feed
position for labels / black mark
paper
Supported (Only for black mark paper)
Drawer Kick-Out
Not supported
Buzzer
Support (Pattern1 ~ Pattern 10, Stop)
Paper Layout Settings
Supported (Only for receipt paper)
Forced transmission mode
Supported
Recovery from an error
Supported
Reset
Supported
Command
Supported
Paper Layout
Paper type
234
Receipt paper
(without black mark)
Receipt paper
(with black mark)
width (sf)
800
800
height (sa)
0
0, 284 to 3100
margin_top (sb)
0
-98 to 3100
margin_bottom (se)
0
0
offset_cut (sc)
0
-173 to 50
offset_label (sd)
0
0
Appendix
TM-T20
58mm
80mm
Interface
Ethernet
Resolution
203 dpi x 203 dpi (W x H)
Print Width
420 dots
Font
Font A, Font B
For more information about what character codes can be printed,
refer to the user's manual that came with the printer.
Characters in a
Line
Character Size
Character
Baseline
576 dots
Font A
ANK: 35 characters,
ANK: 48 characters
Font B
ANK: 46 characters
ANK: 64 characters
Font A
ANK: 12 dots x 24 dots (W x H)
Font B
ANK: 9 dots x 17 dots (W x H)
Font A
At the 21st dot from the top of the character
Font B
At the 16 st dot from the top of the character
Default Line Feed Space
30 dots
Color Specification
First color
Raster Image
Monochrome image
Logo
Monochrome image
Bar Code
UPC-A, UPC-E, EAN13, JAN13, EAN8, JAN8, CODE39, ITF, CODABAR,
CODE93, CODE128, GS1-128, GS1 DataBar Omnidirectional, GS1
DataBar Truncated, GS1 DataBar Limited, GS1 DataBar Expanded
Two-Dimensional Code
PDF417, QR Code, MaxiCode, GS1 DataBar Stacked, GS1 DataBar
Stacked Omnidirectional, GS1 DataBar Expanded Stacked
(Composit Symbology : Not supported)
Ruled Line
Not supported
Page Mode Default Area
420 dots x 831 dots (W x H)
576 dots x 831 dots (W x H)
Page Mode Maximum Area
420 dots x 1662 dots (W x H)
576 dots x 1662 dots (W x H)
Page Mode
Not supported
Line
Rectangle
Paper Cut
Cut, Feed cut
235
58mm
236
80mm
Specification of the paper feed
position for labels / black mark
paper
Not supported
Drawer Kick-Out
Supported
Buzzer
Optional (Pattern A ~ Pattern E, Error, No paper, Stop)
Paper Layout Settings
Not supported
Forced transmission mode
Supported
Recovery from an error
Supported
Reset
Supported
Command
Supported
Appendix
TM-U220
76mm
70mm
58mm
Interface
Ethernet, Wireless LAN
Resolution
80 dpi x 72 dpi (W x H)
Print Width
200 dots
Font
Font A, Font B
For more information about what character codes can be printed,
refer to the user's manual that came with the printer.
Characters in a
Line
Character Size
Character
Baseline
180 dots
150 dots
Font A
ANK: 33 characters,
ANK: 30 characters
ANK: 25 characters
Font B
ANK: 40 characters
ANK: 36 characters
ANK: 30 characters
Font A
ANK: 4.5 dots x 9 dots (W x H)
Font B
ANK: 3.5 dots x 9 dots (W x H)
Font A
Bottom of the characters
Font B
Bottom of the characters
Default Line Feed Space
12 dots
Color Specification
First color
First color, Second color (When using a two-color ribbon cassette )
Raster Image
Monochrome image
Logo
Not supported
Bar Code
Not supported
Two-Dimensional Code
Not supported
Ruled Line
Not supported
Page Mode Default Area
Not supported
Page Mode Maximum Area
Not supported
Page Mode
Not supported
Line
Rectangle
Paper Cut
Cut, Feed cut
237
76mm
238
Specification of the paper feed
position for labels / black mark
paper
Not supported
Drawer Kick-Out
Supported
Buzzer
Not supported
Paper Layout Settings
Not supported
Forced transmission mode
Not supported
Recovery from an error
Not supported
Reset
Supported
Command
Supported
70mm
58mm
Appendix
Paper setting function of TM-L90
Setting Paper Width
It sets the paper width with memory switch setting mode.
1
2
3
4
Turn the printer's power off and set the receipt paper.
While the cover is opened, turn the power on while pressing the FEED button.
After confirming the ERROR LED lights up, press the FEED button twice and close
the cover.
Select the paper width according to the operation method to be printed.
Automatic setting of paper layout
1
2
3
Turn the printer's power off and set the paper.
While the cover is opened, turn the power on while pressing the FEED button.
After confirming the ERROR LED lights up, press the FEED button 6 times and close
the cover.
In case of TM‐L90‐i, keep pressing the FEED button after the ERROR LED gets turned off once and lights up again.
239
Rendering in HTML5 Canvas
This section describes how to use Web pages using the ePOS-Print Canvas API in the package.
You can try how to render images in HTML5 Canvas and see what images can be rendered.
The following Web pages are available:
•
Rendering Text (canvas‐print‐text.html) (p.241)
•
Rendering Images (canvas‐print‐image.html) (p.243)
•
Rendering Graphics (canvas‐print‐graph.html) (p.245)
•
Rendering Handwritten Images (canvas‐print‐hand.html) (p.247)
•
Rendering Barcode (canvas‐print‐barcode.html) (p.249)
•
Rendering Barcode (canvas‐print‐barcode.html) (p.249)
The Web pages introduced here are embedded into the sample program. For the details about how to place them, refer to Environment Settings (p.33).
240
Appendix
Rendering Text (canvas-print-text.html)
Print text in HTML5 Canvas and perform a test print.
1
2
3
4
1
Open the following URL page using the Web browser.
2
“EPSON ePOS-Print Sample Program” appears.
Set items on the right of the page. The following items can be set:
http://[Web server IP address]/canvas/canvas-print-text.html
Item
Dscription
Position
Specify the rendering coordinates
Text
Specify the text to be printed
Style
Specify the text style
Clear
Clears the image drawn in the Canvas
Reset
Clears the image drawn in the Canvas.
In addition, the settings are reset to their default values.
241
3
4
Click the [Enter] button.
The text is printed on Canvas on the left of the page according to the settings
made on the right of the page.
Set the following and click the [Print] button.
Item
5
242
Dscription
URL
Enter the following URL:
http://[IP address of ePOS-Print supported TM printer]/cgi-bin/epos/
service.cgi?devid=[device ID of printer to be used for
printing]&timeout=[timeout time]
Mode
Set the color mode (Monochrome, Grayscale).
Brightness
Adjust the brightness. (Gamma value in the range 0.1-10.0)
Halftone
Set the halftone processing method for monochrome printing (twotone).
Cut Paper
When this item is selected, feed cut is performed after printing.
Alignment
Specify the printing position alignment.
Color(Monochrome)
Specify the printing color in 2-tone.
The print result is displayed.
Appendix
Rendering Images (canvas-print-image.html)
Draw an image in HTML5 Canvas and perform a test print.
1
2
3
4
1
Open the following URL page using the Web browser.
2
“EPSON ePOS-Print Sample Program” appears.
Set items on the right of the page. The following items can be set:
http://[Web server IP address]/canvas/canvas-print-image.html
Item
Description
Position
Specify the rendering coordinates
Size
Specify the width and height of the image.
Angle
Specify the rotation angle of the image.
The rotation angle is counted clockwise from the top left corner.
Image File
(in the same server)
Specify the path to the image file.
In this Web page, specify the name of an image file placed under the
same directory as this Web page.
Clear
Clears the image drawn in the Canvas.
Reset
Clears the image drawn in the Canvas.
In addition, the settings are reset to their default values.
243
3
4
Click the [Draw] button.
The image is drawn on Canvas on the left of the page according to the settings
made on the right of the page.
Set the following and click the [Print] button.
Item
5
244
Description
URL
Enter the following URL:
http://[IP address of ePOS-Print supported TM printer]/cgi-bin/epos/
service.cgi?devid=[device ID of printer to be used for
printing]&timeout=[timeout time]
Mode
Set the color mode (Monochrome, Grayscale).
Brightness
Adjust the brightness. (Gamma value in the range 0.1-10.0)
Halftone
Set the halftone processing method for monochrome printing (twotone).
Cut Paper
When this item is selected, feed cut is performed after printing.
Alignment
Specify the printing position alignment.
Color(Monochrome)
Specify the printing color in 2-tone.
The print result is displayed.
Appendix
Rendering Graphics (canvas-print-graph.html)
Draw an image in HTML5 Canvas and perform a test print.
1
2
3
4
1
2
Open the following URL page using the Web browser.
http://[Web server IP address]/canvas/canvas-print-graph.html
"EPSON ePOS-Print Sample Program" appears.
Set items on the right of the page. The following items can be set:
Item
3
Desctiption
Fill Settings
Specify the fill type and color
Rectangle
Specify the start coordinates, width and height.
Circle
Specify the central coordinates and radius.
Clear
Clears the image drawn in the Canvas
Reset
Clears the image drawn in the Canvas.
In addition, the settings are reset to their default values.
Click the [Draw] button.
The image is drawn on Canvas on the left of the page according to the settings
made on the right of the page.
245
4
Set the following and click the [Print] button.
Item
5
246
Description
URL
Enter the following URL:
http://[IP address of ePOS-Print supported TM printer]/cgi-bin/epos/
service.cgi?devid=[device ID of printer to be used for
printing]&timeout=[timeout time]
Mode
Set the color mode (Monochrome, Grayscale).
Brightness
Adjust the brightness. (Gamma value in the range 0.1-10.0)
Halftone
Set the halftone processing method for monochrome printing (twotone).
Cut Paper
When this item is selected, feed cut is performed after printing.
Alignment
Specify the printing position alignment.
Color(Monochrome)
Specify the printing color in 2-tone.
The print result is displayed.0
Appendix
Rendering Handwritten Images (canvas-print-hand.html)
Draw a handwritten image and perform a test print.
1
2
3
4
1
Open the following URL page using the Web browser.
http://[Web server IP address]/canvas/canvas-print-hand.html
2
“EPSON ePOS-Print Sample Program” appears. Set the size of the pen on the right
of the page.
3
Draw a freehand line on Canvas on the left of the page. For the mouse, drag it to
draw a line; for the touch screen monitor, draw a line on the touch screen.
To erase the drawn image, click the [Clear] button.
247
4
Set the following and click the [Print] button.
Item
5
248
Description
URL
Enter the following URL:
http://[IP address of ePOS-Print supported TM printer]/cgi-bin/epos/
service.cgi?devid=[device ID of printer to be used for
printing]&timeout=[timeout time]
Mode
Set the color mode (Monochrome, Grayscale).
Brightness
Adjust the brightness. (Gamma value in the range 0.1-10.0)
Halftone
Set the halftone processing method for monochrome printing (twotone).
Cut Paper
When this item is selected, feed cut is performed after printing.
Alignment
Specify the printing position alignment.
Color(Monochrome)
Specify the printing color in 2-tone.
The print result is displayed.
Appendix
Rendering Barcode (canvas-print-barcode.html)
Draw a barcode in HTML5 Canvas and perform a test print.
In the following example, an EAN13, JAN13 or UPC-A is drawn.
1
2
3
4
1
2
Open the following URL page using the Web browser.
http://[Web server IP address]/canvas/canvas-print-barcode.html
"EPSON ePOS-Print Sample Program" appears.
Set items on the right of the page. The following items can be set:
Item
Description
Position
Specify the rendering coordinates.
Module Size
Specify the width and height of the bars.
Data
Specify EAN13 (JAN13) data.
For 12-digit numerical data, calculate and add the check digit.
For 13-digit numerical data, verify the check digit.
For UPC-A data, add 0 at the start of the string to make it 12-or 13digit data.
Clear
Clears the image drawn in the Canvas.
Reset
Clears the image drawn in the Canvas.
In addition, the settings are reset to their default values.
249
3
4
Click the [Draw] button.
The image is drawn on Canvas on the left of the page according to the settings
made on the right of the page.
Set the following and click the [Print] button.
Item
5
250
Description
URL
Enter the following URL:
http://[IP address of ePOS-Print supported TM printer]/cgi-bin/epos/
service.cgi?devid=[device ID of printer to be used for
printing]&timeout=[timeout time]
Mode
Set the color mode (Monochrome, Grayscale).
Brightness
Adjust the brightness. (Gamma value in the range 0.1-10.0)
Halftone
Set the halftone processing method for monochrome printing (twotone).
Cut Paper
When this item is selected, feed cut is performed after printing.
Alignment
Specify the printing position alignment.
Color(Monochrome)
Specify the printing color in 2-tone.
The print result is displayed.
Appendix
Rendering Label (canvas-print-label.html)
Draw a label in HTML5 Canvas and perform a test print.
1
2
3
4
1
2
Open the following URL page using the Web browser.
http://[Web server IP address]/canvas/canvas-print-label.html
"EPSON ePOS-Print Sample Program" appears.
Set items on the right of the page. The following items can be set:
Item
Name
Description
Specifies print data in the name field of label.
Description
Specifies print data in the description field of label.
Code
Prints barcode corresponding to the value.
EAN13(JAN13)
In case of 12 digits, check digit is added.
In case of 13 digits, check digit is added.
UPC-A
Add 0 at the beginning and adjust to 12 to 13 digits.
Price
Specifies print data in the price field of label.
Clear
Clears the image drawn in the Canvas.
Reset
Clears the image drawn in the Canvas.
In addition, the settings are reset to their default values.
251
3
4
Click the [Draw] button.
The image is drawn on Canvas on the left of the page according to the settings
made on the right of the page.
Set the following and click the [Print] button.
Item
5
252
Description
URL
Enter the following URL:
http://[IP address of ePOS-Print supported TM printer]/cgi-bin/epos/
service.cgi?devid=[device ID of printer to be used for
printing]&timeout=[timeout time]
Mode
Set the color mode (Monochrome, Grayscale).
Brightness
Adjust the brightness. (Gamma value in the range 0.1-10.0)
Halftone(Monochrome)
Set the halftone processing method for monochrome printing (twotone).
Alignment
Specify the printing position alignment.
Color(Monochrome)
Specify the printing color in 2-tone.
Paper
Specifie the paper type.
Feed to
Specify the paper feeding position.
Cut Paper
When this item is selected, feed cut is performed after printing.
Set the paper layout
(only for TM-P60II/TM-P80)
Check when printing labels with paper layout specified.
Layout
Specify the label paper layout. Setting become effective when [Set
the paper layout] is checked.
The print result is displayed.
Appendix
Windows Store Apps
In this section, how to use the sample program with Windows store apps is described.
Sample Program Screen
Display the [Sample] screen. Executes printing. It can print the following.
[1]
[2]
Item
Description
Page
Display the [Sample] screen. Executes printing. It can print the
following.
[1]Samples
Queue Ticket
255
Coupon
Label
Display the [Settings] screen. Set up the following.
Specifies the IP address of the ePOS-Print supported printer. (Default
value: 192.168.192.168)
[2]Settings
Specifies the Device ID of the printer to print queue ticket numbers
and coupons. (Default value: local_printer)
Specifies the timeout time. (default : 60000)
256
Prints coupons in gray scale. (Only for supported models)
(Default: No)
Specifies paper layout and print. (Only for TM-P60II Peeler)
(Default: No)
253
Print Image
Your Number
Coupon
(ePOS-Print API)
(ePOS-Print Canvas API)
Your Number:
Label*
(ePOS-Print API)
Name
Item A
Color
Red
Code
*2012001*
*: Die cut label: mount width 58mm or above
Label size: width 54 mm x height 25.4 mm or above
254
Appendix
Environment of Sample Program
The environment of sample program is shown below.
Item
Description
Development environment
(example)
Microsoft Visual Studio 2012
Required than
Windows 8
Sample program file name
win8/ePOS-Print Demo.zip
Environment setting Procedure
1
2
3
4
Configure your computer and ePOS-Print supported TM printer so that they can
connect to the network.
Uncompress the sample program into any folder.
Open the sample program solution file using Visual Studio.
Start debugging.
255
Sample Program Settings
The screen is used to set the following:
Item
256
Description
IP address of the ePOS-Print
supported printer
Specifies the IP address of the ePOS-Print supported printer.
(Default value:
TM-i:
DHCP
(If an address fails to be assigned via DHCP, the value
becomes "192.168.192.168".)
TM Printer:
192.168.192.168
)
Device ID of the target printer
Specifies the Device ID of the printer to print queue ticket
numbers and coupons. (Default value: local_printer)
Print timeout (milliseconds)
Specifies the timeout time. (default : 60000)
Print in grayscale (Coupon)
(Only for supported models)
Prints coupons in gray scale. (Default: No)
Set the paper layout (Label)
(Only for TM-P60II/TM-P80)
Prints a label in a specified layout. (Default: No)
Appendix
Printing
It executes printing.
Run the program according to the following procedure:
1
Select a type of printing from the left screen. There are following printing types.
Item
2
Description
Queue Ticket
Prints queue ticket numbers.
This is a sample program using the ePOS-Print API.
Coupon
Prints coupons.
This is a sample program using the ePOS-Print Canvas API.
Label
Prints labels.
This is a sample program using the ePOS-Print API.
Press [Print].
257
258