1
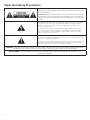
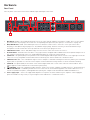
Saffire PRO 26
User Guide
1
FFFA001036-01
Important Safety Instructions
1. Read these instructions
2. Keep these instructions
3. Heed all warnings
4. Follow all instructions
5. Do not use this apparatus near water
6. Clean only with dry cloth
7. Do not install near any heat sources such as radiators, heat registers, stoves, or other apparatus (including amplifiers) that
produce heat
8. Do not defeat the safety purpose of the polarized or grounding-type plug. A polarized plug has two blades with one wider than the
other. A grounding type plug has two blades and a third grounding prong. The wide blade or the third prong are provided for your
safety. If the provided plug does not fit into your outlet, consult an electrician for replacement of the obsolete outlet
9. Protect the power cord from being walked on or pinched particularly at plugs, convenience receptacles, and the point where they
exit from the apparatus
10. The socket-outlet shall be installed near the equipment and shall be easily accessible
11. Only use attachments/accessories specified by the manufacturer
12. Use only with the cart, stand, tripod, bracket, or table specified by the manufacturer, or sold with the apparatus When a
cart is used, use caution when moving the cart/apparatus combination to avoid injury from tip-over
13. Unplug this apparatus during lightning storms or when unused for long periods of time
14. Refer all servicing to qualified service personnel. Servicing is required when the apparatus has been damaged in any way, such
as power-supply cord or plug is damaged, liquid has been spilled or objects have fallen into the apparatus, the apparatus has
been exposed to rain or moisture, does not operate normally, or has been dropped
15. No naked flames, such as lighted candles, should be placed on the apparatus
WARNING: excessive sound pressure levels from earphones and headphones can cause hearing loss
Instructions de sécurité importantes
1.
2.
3.
4.
5.
6.
7.
8.
Lisez ces instructions
Conservez ces instructions
Tenez compte de tous les avertissements
Suivez toutes les instructions
N’utilisez pas cet appareil avec de l’eau à proximité
Nettoyez-le uniquement avec un chiffon doux
Ne bloquez aucune ouverture de ventilation. Installez-le conformément aux instructions du fabricant
Ne l’installez pas près d’une source de chaleur de type radiateur, bouche de chaleur, poêle ou autre appareil (dont des
amplificateurs) qui produit de la chaleur
9. Ne supprimez pas le dispositif de sécurité que représente la fiche polarisée ou de terre. Une fiche polarisée a deux lames dont
une plus large que l’autre. Une fiche de terre a deux bornes et une troisième pour la terre. La lame large ou la borne de terre
servent à votre sécurité. Si la fiche fournie ne rentre pas dans votre prise, consultez un électricien pour le remplacement de la
prise obsolète
10.Évitez que le cordon d’alimentation ne soit piétiné ou pincé, particulièrement au niveau des fiches, des multiprises et de la sortie
de l’appareil
11. N’utilisez que des fixations/accessoires spécifiés par le fabricant
12.
N’utilisez qu’un chariot, stand, trépied, fixation ou table spécifié par le fabricant, ou vendu avec l’appareil. Si vous
utilisez un chariot, prenez garde lors du déplacement de l’ensemble chariot/appareil à ne pas être blessé par un
renversement
13.Débranchez cet appareil durant les orages ou en cas de non utilisation prolongée
14.Confiez toute réparation à un personnel de maintenance qualifié. Une réparation est nécessaire si l’appareil a été endommagé
de quelque façon que ce soit, notamment si le cordon d’alimentation ou sa fiche sont endommagés, si du liquide a été renversé
sur l’appareil ou si des objets sont tombés à l’intérieur, si l’appareil est exposé à la pluie ou à l’humidité, ne fonctionne pas
normalement ou est tombé
AVERTISSEMENT: des niveaux de pression sonore excessifs au casque et dans des écouteurs peuvent entraîner une perte auditive
2
Important Safety Precautions
CAUTION: TO REDUCE THE RISK OF ELECTRIC SHOCK, DO NOT REMOVE COVER (OR
BACK). NO USER-SERVICEABLE PARTS INSIDE. REFER SERVICING TO QUALIFIED
SERVICE PERSONNEL.
ATTENTION: POUR RÉDUIRE LE RISQUE DE CHOC ÉLECTRIQUE, NE RETIREZ PAS
LE CAPOT (NI LE DOS). AUCUNE PIÈCE N’EST RÉPARABLE PAR L’UTILISATEUR À
L’INTÉRIEUR. CONFIEZ TOUTE RÉPARATION À DU PERSONNEL DE MAINTENANCE
QUALIFIÉ.
The lightning flash with arrowhead symbol, within equilateral triangle, is intended
to alert the user to the presence of uninsulated “dangerous voltage” within the
product’s enclosure that may be of sufficient magnitude to constitute a risk of
electric shock to persons.
Le symbole d’éclair à pointe de flèche dans un triangle équilatéral est destiné à
alerter l’utilisateur de la présence d’une “tension dangereuse” non isolée dans
l’enceinte du produit, tension d’amplitude suffisante pour constituer un risque
d’électrocution pour les personnes.
The exclamation point within an equilateral triangle is intended to alert the user to
the presence of important operating and maintenance (servicing) instructions in the
literature accompanying the appliance.
Le point d’exclamation dans un triangle équilatéral est destiné à alerter l’utilisateur
de la présence d’instructions importantes de fonctionnement et de maintenance
(réparation) dans la documentation accompagnant l’appareil.
WARNING: TO REDUCE THE RISK OF FIRE OR ELECTRIC SHOCK, DO NOT EXPOSE THIS APPLICANCE TO RAIN OR MOISTURE
AND OBJECTS FILLED WITH LIQUIDS, SUCH AS VASES, SHOULD NOT BE PLACED ON THIS APPARATUS.
AVERTISSEMENT : POUR PRÉVENIR TOUT DANGER D’INCENDIE OU DE CHOC, N’EXPOSEZ PAS CET APPAREIL À LA
PLUIE NI À L’HUMIDITÉ.
3
Environmental Declaration
Compliance Information Statement: Declaration of Compliance procedure
Product Identification:
Responsible party:
Address:
Telephone:
Focusrite Saffire Pro26
American Music and Sound
4325 Executive Drive
Suite 300
Southaven
MS 38672
800-431-2609
This device complies with part 15 of the FCC Rules. Operation is subject to the following two conditions: (1) This device may not
cause harmful interference, and (2) this device must accept any interference received, including interference that may cause
undesired operation.
For USA - to the User:
1. Do not modify this unit! This product, when installed as indicated in the instructions contained in this manual, meets FCC
requirements. Modifications not expressly approved by Focusrite may void your authority, granted by the FCC, to use this
product.
2. Important: This product satisfies FCC regulations when high quality shielded cables are used to connect with other equipment.
Failure to use high quality shielded cables or to follow the installation instructions within this manual may cause magnetic
interference with appliances such as radios and televisions and void your FCC authorization to use this product in the USA.
3. Note: This equipment has been tested and found to comply with the limits for a Class B digital device, pursuant to part 15 of the
FCC Rules. These limits are designed to provide reasonable protection against harmful interference in a residential installation.
This equipment generates, uses and can radiate radio frequency energy and, if not installed and used in accordance with the
instructions, may cause harmful interference to radio communications. However, there is no guarantee that interference will not
occur in a particular installation. If this equipment does cause harmful interference to radio or television reception, which can be
determined by turning the equipment off and on, the user is encouraged to try to correct the interference by one or more of the
following measures:
•
Reorient or relocate the receiving antenna
•
Increase the separation between the equipment and receiver
•
Connect the equipment into an outlet on a circuit different from that to which the receiver is connected
•
Consult the dealer or an experienced radio/TV technician for help
For Canada - to the User:
This Class B digital apparatus complies with Canadian ICES-003
Cet appareil numérique de la classe B est conforme à la norme NMB-003 du Canada.
RoHS Notice
Focusrite Audio Engineering Limited has conformed and this product conforms, where applicable, to the European Union’s
Directive 2011/65/EU on Restrictions of Hazardous Substances (RoHS) as well as the following sections of California law which
refer to RoHS, namely sections 25214.10, 25214.10.2, and 58012, Health and Safety Code; Section 42475.2, Public Resources Code.
4
Contents
Important Safety Instructions................................................................................... 2
Instructions de sécurité importantes........................................................................ 2
Important Safety Precautions................................................................................... 3
Environmental Declaration....................................................................................... 4
Compliance Information Statement: Declaration of Compliance procedure............. 4
Introduction ............................................................................................................. 6
Basics ...................................................................................................................... 6
Box Contents ............................................................................................................ 6
System requirements ............................................................................................... 7
Mac OS .............................................................................................................. 7
Windows ........................................................................................................... 7
Getting Started.......................................................................................................... 7
Software installation........................................................................................ 8
Hardware................................................................................................................... 9
Rear Panel ................................................................................................................ 9
Front Panel...................................................................................................... 10
Installation...............................................................................................................11
Audio set-up in your DAW.................................................................................11
Example of Usage ....................................................................................................13
Recording from microphones and instruments................................................13
Connecting Saffire PRO 26 to loudspeakers.................................................... 14
Using the ADAT connection ............................................................................. 15
Using the Saffire PRO 26 in stand-alone mode.................................................16
Saffire MixControl....................................................................................................17
1. Mixer............................................................................................................ 18
2. Mixer Tab..................................................................................................... 18
3. Mixer Input Channel.....................................................................................19
4. Mixer Output Channel.................................................................................. 21
5. Routing Section........................................................................................... 22
6. Monitor Section........................................................................................... 25
7. Device Status Section................................................................................... 28
Saffire PRO 26 Specifications.................................................................................. 32
Troubleshooting.............................................................................................. 33
5
Introduction
Thank you for purchasing this Saffire PRO 26, one of the Focusrite family of professional, multi-channel FireWire interfaces
incorporating high quality Focusrite analogue pre-amplifiers. You now have a complete solution for routing high quality audio to and
from your computer. You can also use the Saffire PRO 26 as a “stand-alone” interface to any other type of recording device, once you
have configured it using Saffire MixControl software.
This Guide provides a detailed explanation of both the hardware and its accompanying Saffire MixControl software to help you
achieve a thorough understanding of the product’s operational features. We recommend that both users who are new to computer
recording, as well as more experienced users, take the time to read through the user guide so that you are fully aware of all the
possibilities that the Saffire PRO 26 and accompanying software has to offer.
If the main User Guide sections do not provide the information you need, be sure to consult http://www.focusrite.com/answerbase,
which contains a comprehensive list of common technical support queries regarding the product to date.
Basics
The Saffire PRO 26 hardware interface provides the means for connecting microphones, musical instruments, line level signals and
digital audio signals to your computer via FireWire, which are then routed to your audio recording software/digital audio workstation
(referred to throughout this user guide as the “DAW”) at up to 24-bit, 96 kHz resolution.
All audio signals connected to the inputs, plus the audio output from your DAW and other audio software applications can be
routed to the Saffire PRO 26’s physical outputs, for you to connect to an amplifier and speakers, or powered monitors, headphones,
analogue or digital mixer, and any other studio equipment that you wish to use.
The Saffire PRO 26 is also fitted with MIDI connectors; this lets you use it as a MIDI “hub” between your computer’s FireWire port
and other items of MIDI equipment in your system.
The accompanying software application, Saffire MixControl provides an extensive set of recording, routing and monitoring options,
as well as allowing global hardware setup options such as sample rate and synchronisation source. Saffire MixControl provides
mixing and routing to and from the DAW, allowing control over how the signals from each track are routed to the physical outputs.
All the inputs on the Saffire PRO 26 are routed directly to your DAW software for recording, but Saffire MixControl also allows you to
route these signals to your monitors so that you can listen to the audio you’re recording with near-zero latency - before it arrives at
your DAW.
Box Contents
Along with your Saffire PRO 26 you should have:
• 12 V AC adaptor (PSU)
• 1.6 m 6-pin to 9-pin FireWire cable (also known as a IEEE1394 cable)
• A5 Getting Started booklet
• Important Safety Information document
• Product Registration card, allowing download of the following software:
• Saffire MixControl
• Ableton Live Lite
• Novation Bass Station Plug-in
• Focusrite Scarlett Plug-in Suite
• 1GB of Loopmasters Sample Content
6
System requirements
Mac OS
Apple Macintosh with a high-speed FireWire or Thunderbolt™ port. (Macs using a Thunderbolt™ port will require a FireWire to
Thunderbolt adaptor.)
OS: Mac OSX 10.8 (Mountain Lion), OSX10.9 (Mavericks), or later.
Windows
Windows compatible computer with a high-speed FireWire or Thunderbolt™ port.
OS: Windows 7 (all versions) or Windows 8 (excluding Windows 8 RT).
Getting Started
Before you connect the Saffire PRO 26 to your computer, please download the latest version of Saffire MixControl from our website.
The Saffire PRO 26 has a 6-pin FireWire port on the rear panel, and will work with any of the current FireWire speed and connectivity
standards: FireWire 400 (6 pin or 4 pin connector), or FireWire 800 (9-pin connector). It is also compatible with the older 4-pin
FireWire 400 standard, but see below re DC power.
Power to the Saffire PRO 26 will generally be supplied via the FireWire connection, but in some circumstances (see below) the
supplied external AC adaptor may be required.
The Saffire PRO 26 is supplied with a 6-pin to 9-pin FireWire cable (FireWire 400-800). If your computer has a 6-pin FireWire 400
connector, you will need to purchase a 6-pin to 6-pin FireWire 400 cable. On some PC laptops the FireWire port may be a 4-pin
connector; if this is the case, you will need to purchase a 6-pin to 4-pin cable. If your computer has a 4-pin FireWire 400 connector,
note that these do not supply DC power to external devices, and the AC adaptor must be used to power the Saffire PRO 26.
Recent Apple® Mac computers will be fitted with a Thunderbolt port. In this case, you will need to obtain an Apple FireWire-toThunderbolt adaptor. This can be used with the cable supplied.
FireWire considerations
Most computers will generally have a single internal FireWire bus. You may have multiple FireWire ports (connectors) on your
computer, but these will all be connected to the same physical chip which controls the bus.
The FireWire chip has a data bandwidth limitation, so the more FireWire devices there are connected, the more data the bus
needs to handle, and there is a greater chance of data overload. The Saffire PRO 26 should be able to work alongside other devices
connected to the same FireWire bus. However, this can depend on what other FireWire devices are connected, and what they are
doing. For example, a FireWire disk used for backup, or a digital camera should not cause any problems; but a FireWire hard disk
continuously streaming audio may generate more data than the FireWire chip can handle. This can result in audio drop-outs, or
reduced performance in either the Saffire PRO 26 or the other connected FireWire devices.
We therefore recommend that you use a separate FireWire bus for each FireWire device. This can be provided by a PCI/PCIe card (in
a desktop computer), or a PCMCIA or Express card (in a Laptop).
Note on FireWire Connection and Disconnection
All Saffire units adhere to the IEEE1394 (FireWire) standard, however it may be the case that the FireWire port on your computer
motherboard or FireWire card does not. Device connection and disconnection from a FireWire port that is not compliant to the
IEEE1394 standard may result in permanent damage to both the Saffire and your computer.
7
To prevent permanent damage, we recommend that the sequence below is always followed:
Connecting your unit(s):
• Ensure that your computer is turned OFF
• Connect the Saffire to your computer
• Attach the power supply if necessary
• Turn ON your Saffire
• Turn ON your computer
• Turn ON your monitor speakers
Disconnecting your unit(s):
• Shut down Saffire MixControl
• Turn OFF your monitor speakers
• Turn OFF your computer
Software installation
All software required by the Saffire PRO 26 - and several powerful and useful extras - are available for download from the Focusrite
website (www.focusrite.com/register). The Software Activation card provided with your Saffire PRO 26 contains a registration code
which you will need to enter at the above web address. This procedure ensures that you will have the most up-to-date software
version.
Can’t get started?
If you have any trouble with this product
do not go back to the place of purchase.
Contact our support team on:
US:
1-855-24-FOCUS (1-855-243-6287)
Support available Monday - Friday 8am – 6pm (PST)
UK &
+44 1494 462246
International: Support available Monday - Friday 9:30am – 6pm (GMT/BST)
Online:
www.focusrite.com/support
www.novationmusic.com/support
PLACE SERIAL NUMBER STICKER HERE
FA0736-01
1. Using your usual browser, go to www.focusrite.com/register.
2. Follow the on-screen instructions, entering the “Product Bundle Code” into the form where prompted. Your “Product Bundle
Code” can be found on the Software Download Card packed with the unit.
3. You will then be able to access the “My Products” page, where the software products to which your registration entitles you are
available for download, complete with activation codes where applicable.
4. Download and install Saffire MixControl. Follow all on-screen instructions.
5. When the installation is complete, shut down your computer, and connect your Saffire PRO 26, carefully following the
instructions above - Connecting your unit(s).
8
Hardware
Rear Panel
The rear panel carries most of the Saffire PRO26’s input and output connections
5
10
9
8
4
6
3
2
1
7
1. MIC INPUTS 1 and 2 – two standard 3-pin XLR sockets for connecting microphones to Channels 1 and 2. These sockets will be
operational when no jack plug is inserted in the corresponding front panel Line/Inst input (see “Front Panel” on page 10).
2. MIC/LINE INPUTS 3 and 4 - two Combo input sockets for Channels 3 and 4. These connectors can accept either a male
XLR plug, ¼” TRS (balanced) jack plugs or ¼” TS (unbalanced) jack plugs. Channel sensitivity is switched automatically to
microphone level when an XLR is inserted, and to line level when a jack plug is inserted.
3. LINE INPUTS 5 and 6 – two ¼” TRS (balanced) jack sockets for the connection of line level sources.
4. OPTICAL INPUT - TOSLINK connector able to carry eight channels of digital audio in ADAT format at 44.1/48 kHz sample rate or
four channels at 88.2/96 kHz. These are simply additional inputs (11 to 18) to the Saffire PRO 26.
5. S/PDIF OUT – this phono (RCA) socket provides a two-channel digital audio output from the interface. The signal present at this
connector is freely assignable in Saffire MixControl to follow any two-channel audio source within the mixer.
6. LINE OUTPUTS 1 to 6 – six ¼” TRS (balanced) jack sockets. Outputs 1 and 2 will normally be used as the primary stereo monitor
outputs, but it is possible to re-allocate all the outputs in Saffire MixControl in any manner to suit the method of working.
7. S/PDIF IN – this phono (RCA) socket allows a two-channel digital audio source to be connected to the Saffire PRO 26. These
signals appear to Saffire MixControl as two further inputs (7 & 8).
8.
FIREWIRE – IEEE 1394-compliant FireWire 400 port. Connect this to your computer’s FireWire port (see “Getting Started”).
9. MIDI IN and MIDI OUT – standard 5-pin DIN sockets for connection of external MIDI equipment. The Saffire PRO 26 acts as a
“Break-out (and Break-in) Box”, allowing MIDI data to/from your computer to be distributed to additional MIDI devices.
10. Power supply input – connect the supplied AC adaptor here to power the Saffire PRO 26 if your computer cannot supply DC
power via FireWire for any reason, or if you using the Saffire PRO 26 as a “stand-alone” device.
9
Front Panel
1
3
5
2
1.
2.
3.
4.
5.
6.
7.
8.
9.
10.
10
4
2
4
6
8
9
10
7
Line/Inst INPUTs 1 and 2 – two ¼” TRS (balanced) jack sockets for the connection of instruments or line level sources.
The inputs can accept either balanced (TRS) or unbalanced (TS) jacks. Inserting a jack into these sockets overrides the
corresponding MIC INPUT XLR on the rear panel (see [1] on page 9).
Inst – separate switches for Channels 1 and 2; when pressed optimise the sensitivity and impedance of the Line/Inst inputs
for use with electric instruments. Use this setting when you plug a guitar into either of the front panel inputs. When not
pressed, the inputs are suitable for line level signals. The switches each have associated LEDs which illuminate when
Instrument mode is selected.
MIC 48V - two switches enabling 48 V phantom power at the rear panel XLR MIC INPUTS for Channels 1 and 2 (1-2) and the
XLR contacts (mic inputs) of the Combo connectors for Channels 3 and 4 (3-4). The switches each have associated LEDs
which illuminate when phantom power is selected.
Pad – separate pad switches for Channels 1 and 2; when pressed, the input signal is reduced by 8 dB. The pad increases the
headroom of the input stage, and should be used to reduce signal levels that are ‘too hot’. The associated LEDs illuminate
when Pad is selected. The pad may be used with all types of input – Mic, Line or Instrument.
GAIN 1 to 4 – use these controls to adjust the input signal level in Channels 1 to 4 respectively.
Meters – six five-segment LED bargraph meters monitoring the six analogue Line Inputs (1 -6). Levels should always be
adjusted such that the highest (0 dB) LED NEVER illuminates – if it does, digital clipping is occurring, which can sound very
unpleasant.
FW and LKD LEDs – these two LEDs monitor the status of the FireWire connection: FW illuminates when the Saffire PRO 26
is correctly connected to a FireWire port on your computer, and LKD Indicates that the hardware is locked to a digital clock
source. When in normal use with a computer, both LEDs should be on.
Volume MONITOR, Dim and Mute – the Volume control sets the level at the Line Outputs that have been assigned to the
Monitoring section in Saffire MixControl. Default setting is for Line Outputs 1 and 2 (normal stereo monitoring). Monitor
Dim and Mute buttons are also provided, which act on the assigned outputs. Dim reduces the monitor level by 18 dB. Each
button has an associated LED.
HEADPHONES and Volume – the Saffire PRO 26 provides two front panel stereo headphone outputs; by default
HEADPHONES 1 follows Outputs 3 & 4 and HEADPHONES 2 follows Outputs 5 & 6, but the sources are re-assignable from
Saffire MixControl.
Power switch and LED – the switch turns the unit on and off. It is operational regardless of the method of powering. The
LED confirms power is applied to the unit, and also illuminates regardless of the source of DC power.
Installation
Once the software installation has been completed as described on page 8, your computer’s Operating System should
automatically select its default audio outputs to be routed via the Saffire PRO 26. To confirm that this is the case:
On Windows 7, go to Start > Control Panel > Sound;
set Default Playback and Recording to Saffire Audio.
On Windows 8, go to Start > Control Panel > Sound;
set Default Playback and Recording to Saffire Audio.
On Mac OS X, go to System Preferences > Sound ;
set the input and output to Saffire.
NOTE: For more detailed setup options on a Mac, go to Applications > Utilities > Audio Midi Set-up.
Audio set-up in your DAW
The Saffire PRO 26 is compatible with any DAW that uses ASIO drivers on Windows PCs, and any DAW that uses Core Audio on Mac.
Your DAW software may not automatically select the Saffire PRO 26 as the input/output device. Check that it is selected as the ASIO
driver (Windows) or Core Audio (Mac) driver on your DAW’s audio set-up page*. Please refer to your DAW’s documentation if you are
unsure where to select the ASIO/Core Audio driver.
Ableton Live Lite:
To allow you to get started if you do not already have a DAW application installed on your computer, Ableton Live Lite is available
to you as a free download once you’ve registered your Saffire PRO 26 on-line. To install Ableton Live Lite, download and save the
Ableton installer file from your registered Focusrite “My Products” page as described in the section “Software Installation”, and
then run it, following all on-screen instructions.
Operating instructions for Ableton Live Lite are beyond the scope of this User Guide, but the application includes a full set of Help
files.
The screenshot below shows how Ableton Live Lite’s Preferences page (Mac version shown) should be configured to work correctly
with the Saffire PRO 26.
*Typical name. Terminology may differ slightly between DAWs.
11
Once the Saffire PRO 26 is set as the preferred Audio Device* in your DAW, all 18 inputs and 8 outputs will appear in your DAW’s
Audio I/O preferences. Depending on your DAW, you may need to enable certain inputs or outputs before use. The two examples
below show two inputs and two outputs enabled in Ableton Live Lite Audio Preferences.
The table below summarises the relationship between the Saffire PRO 26’s various inputs and your DAW’s inputs.
DAW INPUT
SAFFIRE PRO 26 INPUT
1
Analogue Input 1 (Mic/Line/Inst)
2
Analogue Input 2 (Mic/Line/Inst)
3
Analogue Input 3 (Mic/Line)
4
Analogue Input 4 (Mic/Line)
5
Analogue Input 5 (Line)
6
Analogue Input 6 (Line)
7
S/PDIF Input Ch A
8
S/PDIF Input Ch B
9
Loop Back Input 1 (Virtual i/p)
10
Loop Back Input 2 (Virtual i/p)
11
ADAT Input Ch 1
12
ADAT Input Ch 2
13
ADAT Input Ch 3
14
ADAT Input Ch 4
15
ADAT Input Ch 5
16
ADAT Input Ch 6
17
ADAT Input Ch 7
18
ADAT Input Ch 8
*Typical name. Terminology may differ slightly between DAWs.
12
Example of Usage
The Saffire PRO 26 may be used in several different recording and monitoring applications. Some typical configurations are
shown below.
Recording from microphones and instruments
Guitar
Bass Guitar
Musician’s individual
foldback mixes
Microphones
Mono Keys
This setup illustrates a configuration for recording a group of musicians with DAW software on Mac or PC. In this case, Channels
1 and 2 are used for two guitars (via the front panel sockets), while Inputs 3 and 4 (rear panel) are used for vocals. Two mono
keyboards (one might be running a drum pattern) are connected to inputs 5 and 6, also at the rear. These sources will all be
recorded on separate tracks of the DAW. During recording, the playback from the DAW can be monitored on the loudspeakers,
and Saffire MixControl will provide each vocalist with their own headphone mix of themselves, the other singer, the guitars and
keyboards, plus any other DAW tracks that may have already been recorded.
The front panel input sockets accept instruments directly when the Inst buttons are pressed. Inputs 3 and 4 are Combo XLR type,
which accept either an XLR male connector (you will probably have one on the end of your microphone cable) or a ¼” (6.35 mm) jack
plug. Note the Saffire PRO 26 has no “Mic/line” switches – on Channels 3 and 4 the Focusrite preamplifier stages are automatically
configured for a microphone when you plug an XLR in, and for a line level signal when you connect a jack plug.
If you are using capacitor (condenser) microphones, press the MIC 48V 3-4 button (in this example) to supply phantom power to
the mics.
NOTE: While the vast majority of modern dynamic mics will ignore phantom power and work
normally, we do recommend that you don’t turn phantom power on if you’re using a ribbon mic.
13
Channels 1 and 2 of the Saffire PRO 26 have a PAD switch; switching the Pad into circuit reduces the input sensitivity by 8 dB. You
may find this useful if you are feeding the input from a line-level source with a particularly “hot” output.
Connecting Saffire PRO 26 to loudspeakers
Any or all of the ¼” LINE OUTPUT jacks on the rear panel can be used to drive monitoring speakers. Saffire MixControl will configure
LINE OUTPUTS 1 and 2 to feed the left and right channels of a normal stereo monitoring set-up.
Self-powered monitors (e.g., active reference monitors) incorporate internal amplifiers, and may be connected directly.
Passive loudspeakers will require a separate stereo amplifier; in this case, the rear panel outputs should be connected to the
amplifier’s inputs.
POWERED MONITORS
AMPLIFIER
All the line output connectors are 3-pole (TRS) ¼” (6.35 mm) jack sockets, and are electronically balanced. Typical consumer (hi-fi)
amplifiers and small powered monitors will have unbalanced inputs, either on phono (RCA) sockets, or via a 3.5 mm 3-pole jack plug
intended for direct connection to a computer. In either case, use a suitable connecting cable with jack plugs at one end.
Professional power amplifiers will generally have balanced inputs.
NOTE: You run the risk of creating an audio feedback loop if loudspeakers are active at the same time as a microphone! We
recommend that you always turn off (or turn down) monitoring loudspeakers while recording, and use headphones when
overdubbing.
14
Using the ADAT connection
Up to 12 Mic/Line Sources + 2 Line Sources
In addition to the six analogue inputs and the two-channel S/PDIF input, the Saffire PRO 26 has an optical ADAT input port which can
provide an additional eight audio inputs at 44.1/48 kHz sample rate or four at 88.2/96 kHz. Using a separate 8-channel microphone
preamplifier equipped with an ADAT output – such as the Focusrite OctoPre MkII – provides a simple and excellent method of
expanding the Saffire PRO 26’s input capability.
Inputs 1 & 2 on front panel
OctoPre MkII
Optical ADAT connection (TOSLINK)
Saffire PRO 26
Computer
running DAW
and Saffire
Mix Control
Inputs 1 & 2 (Line/Inst) on front panel
The OctoPre MkII’s ADAT output is connected to the Saffire PRO 26’s ADAT input with a single TOSLINK optical cable. To synchronise
the word clocks of the two devices, set the word clock source of the OctoPre MkII to “Internal” and that of the Saffire PRO 26 to
“ADAT”.
TIP: When interconnecting two digital devices by any method, always ensure that both are set to the same sample rate.
The additional inputs realised by use of the ADAT port may be routed using Saffire MixControl in exactly the same manner as the
other inputs. The additional inputs can form part of any musician’s headphone mix, as required.
15
Using the Saffire PRO 26 in stand-alone mode
The Saffire PRO 26 has the ability to store a mix configuration defined in Saffire MixControl within the hardware. This feature lets
you configure it – for example, as an on-stage keyboard mixer – using your computer, and then upload the configuration to the device
itself. Then you can use the Saffire PRO 26 as a simple local mixer as part of your keyboard rig to control the overall mix of multiple
keyboards.
To FOH Mixer
In the example illustrated, three stereo keyboards are connected to the inputs of the Saffire PRO 26; Line Outputs 1 and 2 go to the
main PA system. The performer can adjust the volume of two of the keyboards against the third from the front panel; he/she can
also adjust the overall level of the keyboard mix.
Greater flexibility of on-stage mixing could be achieved by connecting an OctoPre MkII via the optical ADAT port, as in the previous
example; all keyboard sources could be connected to the OctoPre MkII, providing full pre-input level control.
Additional information about using the Saffire PRO 26 in stand-alone mode is available from www.focusrite.com/saffirepro26.
16
Saffire MixControl
The Saffire MixControl software application allows flexible mixing and routing of all audio signals to the physical audio outputs, as
well as control of output monitor levels. All sample rate selection, digital sync selection and buffer size settings (Windows only) are
also available from the software.
To open Saffire MixControl:
Windows:
Select Start > Programs > Focusrite > Saffire MixControl.
Mac:
Open Finder > Applications > Saffire MixControl.
This is how the Saffire MixControl Graphical User Interface will appear on your computer (Mac version illustrated):
Mixer
Mixer
Tab
Mixer
Input
Channel
Mixer
Output
Channel
Monitor
Section
Routing Section
17
Device Status Section
1. Mixer
Saffire MixControl includes a total of 8 mixes, each with a maximum of 18 channels in the mix. Up to 8 mono mixes or 4 stereo mixes,
(or any combination of mono and stereo mixes) are available, making up a total of 8 mix channels.
Each separate Mix may be created from any of the 16 possible physical inputs plus up to eight DAW tracks, and each can be sent to
any number of outputs.
Each mix shares the same source inputs, but all other mixer controls are independent within each mix.
The Mixer Section is used to create mixes for monitoring purposes. The mixes you create do not affect how the audio inputs are
routed to the DAW, nor does it affect the audio level of the signal to be recorded. What you set up in the mixer section of Saffire
MixControl only affects what is heard from the outputs. The DAW’s Input recording levels are always set on the front panel Gain
controls.
An example of the mixer’s use is to record multiple artists simultaneously. For example, imagine a guitarist and a vocalist are
performing together, and you wish to provide each of them with a backing track, and a feed of each other’s input signal. The guitarist
needs to hear mainly the backing track, her own guitar, and some vocals. The vocalist needs to hear the backing track, a little of the
guitar and his vocal at a good level. A separate mix can be created for each artist with the exact levels that he/she needs. Each has
his/her own mix, created on different mix tabs within Saffire MixControl.
2. Mixer Tab
Each mix can be named on the corresponding mixer tab.
18
3. Mixer Input Channel
The various components of an Input Channel are described below:
Audio source select
The area at the very top of the channel (below the mix tab) displays the source currently
assigned to the channel. When no input is assigned, it displays Off.
Clicking on the area brings up a list of all inputs available to the channel, divided into
physical inputs (Inputs) and DAW tracks (DAW). All analogue (labelled Anlg In) and
digital (labelled SPDIF or ADAT In) inputs are available.
Note that channels may be mono, or in pairs for stereo operation. Stereo operation
“borrows” an adjacent channel and lets you control both left and right legs of the stereo
signal with a single fader. See “Stereo” on page 20 for details of mono/stereo channel
definition.
When a pair of channels have been defined as stereo, the odd-numbered channel of the
pair is the left channel, the even channel is the right.
Note that an input can only be assigned to one channel in each mix. If it has already been
assigned, it will be greyed-out on other channels.
To include previously-recorded DAW tracks in the mix, select the relevant DAW tracks
as channel inputs; if the tracks are stereo pairs (typically DAW 1 and DAW 2, but this will
depend how the outputs of the DAW or other computer application are routed), configure a
pair of channels as stereo.
Pan Slider
A Pan Slider is used to position the audio signal anywhere between the left and right channels of a stereo mix.
Moving the slider from left to right will move the audio signal from left to right within the stereo field, i.e., the
signal is panned between the two audio outputs to which the mix has been assigned.
On a stereo channel, only the left channel is heard when the slider is fully left, and vice-versa.
19
Fader
Use the fader to set the level of the audio signal in the currently-selected mix.
Click the fader with your mouse or drag the knob to any position. Double click on the fader to set it to 0 (unity gain).
Fader range is from -∞ to +6 dB; a numerical indication of the current position is displayed below the fader slot.
Meter
The meter adjacent to the fader shows the signal level in the channel. A ‘peak hold’ display in the box below shows the
maximum signal level reached. Clicking on the box resets the display.
The meter source is pre-fade, thus the level of the signal at the input is displayed, and the fader position does not
affect the level.
The meter incorporates a Clip indicator. If the red portion at the top of the fader illuminates and the word Clip
appears in the maximum signal level box, the signal level is too high. You will need to turn it down by adjusting the
gain controls on the front panel in the case of the analogue inputs, lowering the output level of external devices in the
case of the digital inputs, or adjusting the output levels in your DAW.
Once the gains are lowered, click on the red portion to reset the clip indications.
Mute
Clicking this button mutes the channel; it illuminates red when Mute is active.
Solo
Clicking this button solos the signal; all other channels in the current mix are muted. The channel fader remains
active. The button illuminates yellow when Solo is active.
PFL (Pre-fade listen)
Clicking this button performs a “non-destructive” solo; the signal in the channel is routed to Outputs 1 and 2. The
soloed signal is pre-fade (i.e., its level will not be affected by the fader). PFL is purely a monitoring function and all
other channels remain active with all signals still routed. The button illuminates green when PFL is active.
Stereo
Pressing this button combines two (adjacent) mono channels into a single stereo channel. A stereo channel always
uses an odd-even pair, with the odd-numbered channel for left and the even-numbered for right.
Track Name
By default, each track has a number. Double-click the label area to rename the channel to something more
meaningful, e.g., Vocal Mic or Drums.
20
4. Mixer Output Channel
The signals in the mixer’s input channels are summed (mixed together) and routed to the mix’s output channel. The output channel
lets you control the overall level of the entire mix.
An output channel can be either mono or stereo, as selected by the Stereo button. When the channel is configured as stereo, note
that the tab for the mix doubles in size, because the stereo version takes up two channels of the available total output channel count.
Note that when selecting Solo on an output channel, the whole mix is soloed
and routed to Outputs 1 and 2. This is a “non-latching” button.
You can route the mix to any or all of the Saffire PRO 26’s physical hardware outputs; if a single output is selected this is displayed at
the top of the output channel. If multiple outputs are selected, Many… will be displayed.
If the mix is not routed to any outputs, Sel… will be displayed. Click on Sel… to choose the output destination of that mix.
The current mix can be renamed by entering the desired name in the text field below the output channel. You
will see the name appear in the mix tab. For example, Mix 1 could be renamed Monitor Mix, and Mix 5
renamed Headphone 1 Mix.
You can copy the current mix to another output channel: click on Copy Mix To... and select the
“destination” mix – the one you want to copy to. Note that you can only copy a stereo mix to another stereo
output channel, and a mono mix to another mono output channel. Therefore you must make sure that you
have correctly set up the output channels to before copying the mix.
21
5. Routing Section
The routing section allows you to set up how the various audio sources in the mixer are to be routed to the outputs.
The routing section displays all the Saffire PRO 26’s physical outputs plus the two “Loop Back” outputs (see “Using Loop Back”
below), and a list of the audio sources which can be routed to each is listed for selection in the drop down menu.
The available sources include:
•
Any input signal
•
Any DAW track
•
ny of the mixes created in the mixer. (If you have renamed the mix, this name is displayed as the
A
mix source name.)
Note that the routing section is linked to the selection made for the output channel destination set-up in the mixer. If you assigned
outputs when you created the mix, you will see the routing selections are already set up. Similarly, if you change the output
destination from the routing section, the output of the mix will change automatically.
Headphones 1 is a copy of line outputs 3 and 4.
Headphones 2 is a copy of line outputs 5 and 6.
NOTE: When working at sample rates of 88.2 kHz or 96 kHz, the number of ADAT channels available is reduced to four (ADAT SMUX
standard). At these sample rates, ADAT channels 5-8 are greyed out.
Using Loop Back
Saffire MixControl’s Loop Back feature lets you record other audio sources from within your computer (e.g., the sound output from
a web browser). Loop Back uses the Saffire PRO 26’s “virtual” inputs 9 and 10 (see table on page 12). These have no physical
connectors on the interface itself, but may be selected within the DAW as signal sources for recording in the same way as any
other. Thus by selecting Inputs 9 and 10 as the recording sources on a stereo DAW track, you can record from another software
application. Note that your computer will assign DAW1 and DAW 2 as the default sound output channels.
TIP: You can quickly select configure Loop Back by selecting the Loopback option from the Routing Presets menu (see page 25).
An example of configuring Loop Back in MixControl is given below:
22
1. Select DAW 1 for Loop Back 1, and DAW 2 for Loop Back 2.
2. In your DAW, ensure that inputs 9 – 10 are enabled for recording. (Screenshots below are from Ableton Live Lite 9.) Note that
inputs 1 & 2 are also shown enabled in this example.
3. Create a new audio track.
23
4. Important! - MUTE THE DAW CHANNEL. If
you are routing the output of the channel you are
recording to back to DAW 1 & 2, a feedback loop
will be created, potentially damaging for your
speakers, or worse – your ears.
5. Then select input 9 – 10 as
your input source.
6. Set the channel to record
enable.
7. Now, any audio playing on your computer, such as from the DAW itself, a separate application or from an internet browser, will be
routed into your DAW ready for recording. Hit record in your DAW to capture the audio
24
Routing Presets
A set of Routing Presets is provided as a starting point for you to create your own routing and mixer set-ups. These enable you to
quickly set up the mixer’s routing for:
recording (monitoring your inputs);
mixing (sending signals out to outboard processors or an external mixer);
internal looping (routing audio between software applications without leaving the computer).
The options are:
Clear
This cancels all output routings. It can be used to reset the mixer when you need to start a new task, and avoids having to manually
de-assign everything first.
DAW Tracking
This preset is used for the initial recording process. It automatically routes DAW Tracks 1 and 2 to all six Line outputs, and hence
your main monitors (1+2) and Headphone Outputs 1 and 2. All input channels must be monitored from within the DAW application.
Ultra Low Latency Tracking
Ultra Low Latency Tracking is used for the recording process. It automatically routes Mixes 1 and 2 to all the Line outputs,
and hence to the main monitors (1+2), and the Headphone Outputs 1 and 2. Line inputs and DAW outputs must be set up in Mix 1
so that you are able to monitor these sources with near-zero latency. You must also ensure that you are not monitoring the same
signals within the DAW as well, otherwise you will hear the same signal twice (once direct from Saffire MixControl AND a second
time, delayed, through the DAW).
Mixing
Select Mixing when you are ready to start the mixing process. When routing signals out to an external mixer or processing
hardware, the hardware outputs are typically set in the same order as they are in the DAW software. DAW outputs route directly to
the line output of the same number. (DAW outputs 1-6 to Line outputs 1-6, DAW outputs 7 & 8 to the S/PDIF output.)
Loopback
Use this preset when recording entirely within your computer, i.e., from one software application to another. (For example, to record
audio from your internet browser into the DAW, or to record from one DAW to another.)
To prevent audio feedback, make sure that the DAW you are recording into is not set to monitor its inputs.
Alternatively, set the outputs of the DAW into which you are recording to 3 and 4;
this allows you to monitor the inputs without feeding the signal back into the record stream.
6. Monitor Section
The output levels at the line outputs for monitoring purposes are set up in the Monitor Section. You can set up your Saffire PRO 26
so that the front panel Monitor control will adjust the level at the selected outputs, feeding your stereo monitors or your surround
sound system.
Alternatively, the hardware Monitor control may be deactivated for specific outputs. This is useful when the hardware volume
control is required for a pair of monitor speakers, but not for other outputs feeding external equipment (e.g., a hardware
compressor).
Additional controls such as mute, dim and mono are available.
25
Monitor control enable buttons (1 to 6)
The Monitor control enable buttons select which outputs are controlled by the mixer’s monitor section, immediately below.
The Saffire PRO 26 can be set up so that you have hands-on control of volume levels, and depending on your monitoring setup, you
can control no speakers, just a single pair of speakers, or up to 6 speakers simultaneously.
Note that the S/PDIF digital output level is unaffected by Saffire MixControl. Use the output level controls in the DAW to control
signals sent to this output.
Each button can be set to 1 of 3 possible states:
Blue - this output is controlled by the Saffire MixControl monitor section.
Red - this output is muted and not controlled by the Saffire MixControl monitor section.
Grey - this output is fixed at full level, and is not controlled by the Saffire MixControl monitor section. To set a button to this
state, use SHIFT + Click.
WARNING: When a Monitor control button is set to ‘Grey’, the signal routed to that output will be played
back at full level. This may potentially result in a very loud level being reproduced by your monitor
speakers, headphones or other equipment. Be cautious when setting your levels (in your DAW or the
Saffire MixControl Mixer) before setting the monitor button to Grey.
Monitor Presets
These presets allow quick selection of typical monitoring set-ups.
Note that for the monitor presets to work correctly, you must have your speakers connected to the line outputs as shown below.
26
Monitoring for Mono, Stereo, Quad, 2.1 and 5.1
1 Left
2 Right
3 Centre
L
1
C
3
R
2
LFE
4
4 Subwoofer
5 Rear Left
6 Rear Right
RL
5
RR
6
Loudspeaker Set-up: Main, Medium, Small
1 Left Main
2 Right Main
7 Left Medium
8 Right Medium
Left Main
1
L
Mid
7
L
Mini
9
Right Main
2
R
Mini
10
R
Mid
8
9 Left Small
10 Right Small
Off - no Monitor control buttons enabled, therefore all analogue outputs are muted.
Mono – Only Line Output 3 is active. All other channels are muted.
Stereo – Line Outputs 1 and 2 are active for feeding Left and Right speakers respectively. All other channels are muted.
Quad – As Stereo, but Line Outputs 5 and 6 are also active, for feeding Left Rear and Right Rear speakers respectively. All other
channels are muted.
2.1 Surround – As Stereo, but Line Output 4 is active as an LFE (Low Frequency Effects) channel, for feeding a subwoofer.
5.1 Surround – All Line Outputs are active for feeding the speakers in a 5.1 Surround configuration. As Quad, but with the addition of
Line Outputs 3 and 4, feeding the Centre speaker and the subwoofer respectively. All other channels are muted.
Mid + Phones 1 – use this mode if you when working in stereo, but using more than one pair of monitors. Connect your secondary
(‘mid-field’) monitors to Outputs 3 and 4. Selecting Mid + Phones 1 will mute the main monitors and activate the mid-fields.
Mini – This works in the same manner as Mid + Phones 1, but routes stereo to Outputs 5 & 6 only. Thus a third pair of speakers
(‘near-field’ or ‘Mini’) can be connected to these outputs.
Monitor Section Controls
The Monitor section controls will affect only the channels selected for monitoring (indicated with a blue button, see page 26).
27
Monitor level control
Set the level of all assigned outputs (see ‘Blue’ on page 26) with this rotary control. Note that the physical MONITOR control on
the Saffire PRO 26’s front panel must also be “turned up” for audio to be heard from Line Outputs 1 & 2; the hardware and software
monitor volume controls are effectively “in series” for these outputs. The dB display below shows the current level to which the
monitor knob is set.
Dim
Left Mute
Attenuates the monitor level(s) by 18dB.
Mute
Mutes the left output.
Right Mute
Mutes the monitor output(s).
Mutes the right output.
Remember that the Dim and Mute buttons only affect the outputs selected for control (i.e., ‘Blue’) in the monitor control section.
7. Device Status Section
The Device Status section displays the current sample rate, synchronisation source and sync and driver statuses of the Saffire
PRO 26. Sample rate and external synchronisation source can also be set, permitting the Saffire PRO 26 to be used with other
digital devices.
Sample rate
This displays the sample rate currently set for the Saffire PRO 26. To change the sample rate, click on the red sample rate value and
select from the available options: 44.1kHz, 48kHz, 88.2kHz, or 96kHz.
Note: it is advisable to quit your DAW application BEFORE you make sample rate changes to prevent any undesirable audible sideeffects!
Sync Source
Displays the currently selected sync source. To change the sync source, click on the red sync source value and select from the
available options: Internal, ADAT, S/PDIF.
28
Sync Status
This displays Locked when the Saffire PRO 26 has successfully locked to the specified Sync Source.
If No Lock is displayed, it indicates that the unit has been unable to lock to either an external ADAT or S/PDIF signal. In this case,
check that the digital cables are secure in their input sockets, and that the external digital devices have been configured to be sync
masters.
Firewire Driver status
This should display Connected at all times when the Saffire PRO 26 is connected to the computer via FireWire. If it shows
Disconnected, please check all FireWire connections, that the unit is switched on, etc. If it still shows Disconnected, try
restarting the computer and then power-cycle the Saffire PRO 26 (but we recommend that you turn your monitor speakers down or
off while doing so to avoid any unpleasant thumps!)
If other Audio Applications are open and using the Focusrite FireWire driver, the FireWire Driver Status will show In Use.
Various settings will be unavailable until the Audio applications have been closed and the FireWire Driver Status has reverted to
Connected.
Unit Name
This is an editable text field which allows the Saffire PRO 26 to be named. Double-click in the field and enter the name. Press Enter
(return) on your computer keyboard to complete the edit.
Settings Menu
Clicking the Settings... button opens a drop-down list of some other global settings.
Note that the Mac and Windows menus differ slightly.
Use ADAT inputs as Optical SPDIF
If you are not using the Saffire PRO 26’s optical ADAT input to connect another multichannel ADAT device (such as the OctoPre MkII),
you can reassign it as a second S/PDIF input. This allows you to use a TOSLink connection to an external digital audio device which
is equipped with an optical output. Doing so does not prevent the use of the ‘normal’ phono S/PDIF input ([7] on page 9), and both
may be used simultaneously if wished.
When this option is selected, S/PDIF 3 and S/PDIF 4 will become available as mixer input channel sources (these are otherwise
greyed-out).
SPDIF AC3 Mode
This option allows you to route a Dolby AC3 bitstream from an application in your computer through the S/PDIF output on the Saffire
PRO 26. (AC3 is a method of encoding 5.1 surround sound, e.g., from a DVD player, in a two-channel format. This can be carried by
an optical or phono (RCA) S/PDIF connection to an external 5.1 decoder).
Please note: The Saffire PRO 26 is not an AC3 encoder/decoder and the
signal must be sourced from your audio software as an encoded AC3
signal, to be decoded by an AC3 receiver.
29
Firewire Driver Latency
The Saffire PRO 26’s latency performance will be dictated by the Core Audio buffer size specified in your DAW (Mac), or as set in the
ASIO buffer size (Windows; see below).
The Firewire Driver Latency setting has an effect on the performance of the Core Audio or ASIO buffers. If you are experiencing
clicks and pops or audio dropouts, this may be due to hardware in your computer affecting the performance of FireWire-connected
audio devices. Rather than removing and replacing hardware (e.g., your graphics card or wireless internet card), changing the
Firewire Driver Latency to a longer setting may solve the problem.
ASIO Buffer Size
This option is only available on the Windows version of Saffire MixControl.
This option lets you set the buffer size of your ASIO driver. A small buffer size will in result in lower latency, but at the expense of
increased CPU usage. A high buffer size will result in higher latency, but lower CPU usage.
If you are using lots of virtual instruments and effects processing in your DAW project, and the CPU usage is high, then increase the
buffer size.
File Menu
The File menus differ slightly between Mac and Windows versions of Saffire MixControl.
Open - opens a File Open dialogue box, allowing selection of any previously saved Saffire MixControl mix data.
Save - opens a File Save dialogue box, allowing selection of a location to which your Saffire MixControl mix data can be saved.
Subsequent Saves overwrite the original file.
Save As - opens a File Save As dialogue box. Use this option if you want to keep your original saved mix data but save the current mix
data under a different filename.
30
Restore Factory Defaults - resets the Saffire PRO 26 to its original default factory state. This can be used to globally reset all mixer,
routing, and monitor settings, allowing creation of a new set-up from scratch. The default state is as follows:
• Channels 1 to 6 are sourced from Analogue Inputs 1 to 6 respectively
• The inputs to Channels 7 to 16 are de-selected
• Channels 17 and 18 are configured as a stereo pair and sourced from DAW 1 and DAW 2 respectively.
• In the Monitor section, Outputs 1 and 2 are assigned to the Monitor Volume Control (Blue state) and Outputs 3 to 6 to fulllevel (Grey state).
Clear All Settings - clears all MixControl routings by setting all input sources and output routing options to OFF. This is a quick way
of configuring MixControl from scratch without having to manually de-assign all input/routing options.
Save to Hardware - This saves the current Saffire MixControl set-up to the Saffire PRO 26 hardware. If you are moving the Saffire
PRO 26 from one computer to another and want to retain the set-up, or want to use it in “stand-alone” mode, select this option.
Load From Hardware – this performs the opposite action to Save to Hardware; the current mixer settings within the Saffire PRO 26
are downloaded to Saffire MixControl.
Exit (Windows only) – closes Saffire MixControl.
As with nearly all other software applications, Open, Save and Save As all have standard keyboard shortcuts.
31
Saffire PRO 26 Specifications
MIC
•
Frequency Response: 20 Hz to 20 kHz +/- 0.1 dB (at min. gain)
•
THD+N: -98 dB (rel -1 dBFS input, min. gain, 20 kHz bandwidth)
•
Noise: EIN <-124 dBu (max. gain with 150 ohm termination, CCIR-RMS weighting)
LINE
•
Frequency Response: 20 Hz to 20 kHz +/- 0.1 dB (at min. gain)
•
THD+N: -88 dB (rel -1 dBFS input, min. gain, 20 kHz bandwidth)
•
Noise: EIN <-83 dBu (Chs 1 & 2); EIN <-94 dBu (Chs 3-6) (max. gain, 50 ohm termination, CCIR-RMS weighted)
INSTRUMENT
• Frequency Response: 20 Hz to 20 kHz +/- 0.02 dB (at min. gain)
•
THD+N: -92 dB (rel -1 dBFS input, min. gain, 20 kHz bandwidth)
•
Noise: EIN <-97 dBu (max. gain with 600 ohm termination, CCIR-RMS weighting)
DIGITAL PERFORMANCE
• Clock Sources:
•
•
•
•
Internal clock.
Sync to word clock on S/PDIF (coaxial input)
Sync to word clock on ADAT input
Sync to word clock on optical S/PDIF input (when enabled)
•
JetPLL™ PLL technology providing superb jitter reduction, for class-leading converter performance
•
Sample rate clock accuracy: 4.5 ppm
•
Sample rates: 44.1 to 96 kHz
•
18 input channels to computer: Analogue (6), S/PDIF (2), ADAT (8) and Mix Loop-back (2)
•
8 output channels from computer: Analogue (6) and S/PDIF (2)
•
Fully assignable 18 input, 6 output mixer
WEIGHT and DIMS
• 3 kg
•
35 cm x 4.5 cm x 26.5 cm
ANALOGUE INPUTS
• Chs 1 & 2: Mic (rear XLR) or Line/Instrument (front TRS)
32
•
Chs 3 & 4: Mic/Line inputs on rear Combo connectors, auto-switching between XLR and TRS
•
Chs 5 & 6: Line inputs (rear TRS)
•
Mic gain range: 50 dB
•
Line 1-6 gain range: -50 dB
•
Instrument gain range: 50 dB
•
Input Pad on inputs 1 & 2: 8 dB
•
Phantom power switched in 2 channel groups on Mic. 1-4
•
Mic and instrument maximum input level: +8.5 dBu (+16.6 dBu (mic)/+12.8 dBu (inst) with pad on inputs 1 and 2)
•
Line maximum input level: >+28 dBu
ANALOGUE OUTPUTS
• Line level 6 x ¼” TRS jacks (Outputs 1 to 6)
•
Nominal output level: 0 dBFS = 16 dBu, balanced
•
Frequency Response: 20 Hz to 20 kHz +/- 0.7dB
•
THD+N: <0.0010% (-95 dB) (measured with -1 dBFS input, 20 kHz bandwidth)
•
Hardware and Software controlled Digital Volume control for all outputs (assignable in software)
•
Hardware and Software controlled Digital Dim and Mute controls for all outputs (assignable in software)
•
All outputs are usable as monitor outputs
DIGITAL I/O
• S/PDIF input (Chs 7 & 8) and output (Outputs 7 & 8): RCA phono on rear panel, 24-bit, 44.1 - 96 kHz.
Output transformer isolated
•
ADAT Input (Chs. 11 to 18): 8 channels (44.1/48 kHz), 4 channels S-MUX (88.2/96 kHz)
MIDI I/O
• Input and output (5-pin DIN) on rear panel
FIREWIRE
• 1 x S400 port
POWER
• 12 V DC. External AC adaptor supplied
HEADPHONE MONITORING
• 2 x ¼” TRS jacks on front panel
•
Output level: 13.2 dBu into 150 ohms
FRONT PANEL INDICATORS
• Metering of analogue inputs (1-6); 5 segment, 3-colour bargraphs (-42, -18, -6, -3 and 0 dBFS).
•
Lock status LED
•
FireWire Active LED
•
Monitor MUTE switch and LED
•
Monitor DIM switch and LED
•
2 x 48 V switches and LEDs
•
2 x Instrument switches and LEDs
•
2 x Pad switches and LEDs
•
Power switch and LED
Troubleshooting
For all troubleshooting queries, please visit the Focusrite Answerbase where there are articles covering numerous troubleshooting
examples: www.focusrite.com/answerbase.
33
34