1
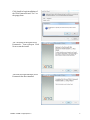
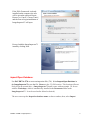
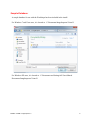
ImageInspector™ 1.1 ReadMe
February 2013
Table of Contents:
System Requirements.......................................................................................................... 1
Installation........................................................................................................................... 1
Import/Open Database: ....................................................................................................... 3
Open Run: ........................................................................................................................... 5
Sample Database: ................................................................................................................ 6
System Requirements
It is highly recommended that the computer being used for ImageInspector™ have at least
2GB of RAM. This is due to working with images.
Installation
The install should start from the CD.
If it does not start, navigate to the
“setup” file on the CD and doubleclick it.
Note: there is a folder called
"ISSetupPrerequisites" on the CD.
The user need not access it. If files
are needed the install will access
them automatically.
ImageInspector™ requires the
installation of Microsoft XNA
Framework Redistributable 3.1. The
framework is included with the
ImageInspector™ install and will be
installed or updated before
ImageInspector™ installs.
ReadMe – PAVER™ ImageInspector™
1
Click Install to begin installation of
the XNA Framework and “Yes” on
the popup form.
The “Welcome to Microsoft XNA
Framework...” form will open. Click
Next to start the install.
This form will open when the XNA
Framework has been installed.
ReadMe – PAVER™ ImageInspector™
2
If the XNA Framework is already
installed on the computer, the user
will be given the option to Repair,
Remove, or Cancel. Choose Cancel
and the form to begin installation of
ImageInspector™ will open.
Proceed with the ImageInspector™
install by clicking Next.
Import/Open Database:
Use PAVER™ 6.5/7.0 to create an inspection file (.i70). Select Import/Open Database in
the ImageInspector™ to use the file. Browse to the .i70 file location. This location will most
likely be on an external drive. (ImageInspector™ install comes with one sample .i70 for use
with the Workshops, which is automatically installed in the Documents folder under
ImageInspector™. It can be used and/or deleted as desired.)
The user can accept the Inspection database name or choose another; then, select Import.
ReadMe – PAVER™ ImageInspector™
3
Browse to
.i70 file
location
Select Import
The imported inspection will appear in the available database list and can now be opened by
highlighting it and selecting Open or double-clicking on the file name.
Select the
database
Open
Once the database has been imported, ImageInspector™ will keep it in the list of available
databases so it will not have to be re-imported.
*Note: Work history and inventory items cannot be edited in ImageInspector™.
ReadMe – PAVER™ ImageInspector™
4
Open Run:
Select Open Run to be able to access the images you want for assignment and inspection. Use
the Browse button to navigate to the directory containing the images and select Open. The
directory will contain a file called ImageInspector.DATA.mdb, but it is the directory name
that must be highlighted. Until a run is opened, all options except Import/Open Database and
Open Run will be grayed out and inoperative on the ImageInspector™ Button Bar.
Once you have opened a run, ImageInspector™ will keep it in the list of available runs.
Please note that since image files are large and may be on external devices, the device will
need to be connected and the path unchanged for ImageInspector™ to access a previously
opened run from the list. If the path is changed, the user will need to browse to the directory in
its new location.
ReadMe – PAVER™ ImageInspector™
5
Sample Database:
A sample database for use with the Workshops has been included in the install.
For Windows 7 and Vista users, it is located at: C:\Documents\ImageInspector\Victor II.
For Windows XP users, it is located at: C:\Documents and Settings\All Users\Shared
Documents\ImageInspector\Victor II.
ReadMe – PAVER™ ImageInspector™
6