1
USER'S GUIDE
pilea_
read the_
_fety
precautions
carefully
before using the, product.
Precautions in installing the Product
Warning
[] Keep awarf from Iheatsources |ike el_trica|
- E_dri_
shock, fire, maffu_bn or d_o_at_
heater&
may _r.
[] Keep t_ _king
anti-m_i_re
material or viny| _king
out of _e reach of chitd_,
oAnti-moisture _teda[ _ _ful
ff swal_wed. If swa_wed by mistake, force the _tient to vom_ and visit the
_are_ _l.
A_i_o_iy,
vit_ylp_ing _ ca_
_..at_.
K_p it _t of _ reach of chi_ren.
I Do not put hea_y objects on t_ _d_t
_ sff upon it.
- if the p_
col_pses or _. dropped, you may _ inju_. C_ldren m_
pay _rt_ar
a_
! Do not |e_e _e poweror sign_ ca_e unatten_d on t_ pat_ay.
- The _sse_y canfalter, which _n _
e_cal s_k, fire, p,r_ct bre.akd_wnor inj_,
[] In_ll _e p_du_ in a neat and d_ p|_e,
=Dust or mois.t_e c_ cause ,elec_al _k,
fire _ p_u_
damage,
I If you can smel| smoke or o_er od_ or hear a s_
_nd unplug _e p_er cordand con_
s_ice cen_r,
- if y_ contin_ to _.,e wight takJ_ proof _a_res, eiec_ _k
or fi_ can occur,
t_
II If yOU dmpp_
the product or t_ _e
is broken, t_rn off the product and _n_ug the power co_,
- ff y_ contin_ b _
_t_
_r_
prope4
_ _asu_.,
e_n_J
s_k
or fire can _r.
Conta_ the _e
center.
I _ not d_ metallico_ects s_h as _ins, hair pins, chopsticksor wt_ into the pr_uc_ or lnf|am_ble
obj_
_ch as p_r and m_hes, Childrenmu_ pay pa_cular attent_,
E_ctricaJshock, fire or injury_n _ur, ff a foreign_ct isdropped i_o the prodS, unpl_ the _er c_ and
contact _ _rvice cer_er.
Cauti on
=,,Make sure the product ven_l_
than loom from the wail)
- ff y_ in_J[ the pr_
too, c[_
i Do not _k
- The p_
h_le is r._t bilked.
Insta|l the product in a sui_bly wide place (more
to the wall, _ may _ _d
or fire can break out d_ to intema_ _at.
the v_lation
hole of t_ p_duct by _ tabl_!_h
_cu_n.
_n _ _fon_ed orfire can break out d_ to c¢,e_J_
i_e
the p_d_,
I Install the product on _ _at ar_ _ble _e
that has no risk of dropping the product,
- If _ prod_ _ dropped, you may be inj_ed or _ pr_u_ may be broken,
[] In_ll
the p_duct wh_
ao i EMI _urs.
[] Keep the p_ed_t away from direct sunlig_.
- The pr_t
c_ _ _m_.
Electrical Power Related Precautions
I M_e sure to c_ct
You may _ e_led
I U_ the t_
-_
_ud
me powercab|eto the groun,ded cu_nt.
_ injured.
v_ta_ _ly,
_n be _3ma_d,
or you may _ ele_-_c_ed.
I During a thunder or ligh_ng storm, unplug me pow_ _ble
oYou may _ _oc_ed
_ a fire can break o_.
or sign,a| cable,
= Do not conn,e_ _eml e_e_l_
_s,
electrical ap_|ar_es or e|_r|ca! heste_ to a sin,g|eoutleL Usea
power _t with a g_un,ding _min_ designedfor exclusi_ u_ with the,computer.
oA fire _n, bre_ _ due to oveff_eating_
[]DO,not _h
me p_er _ug with wet han,ds,Additto_Hy, ff me cord pin,Is w_,tor cove,r_ with dust, dw
the power p_ugcomp_tely orwi_ dust _.
You may I_ elec_oc_ed _ toe×ce_ m_ture,
• ff you d_'t 'inte_ to use the p_uct for'a long time, unp|ug the p_er ca_e from the prod_t
- Coved_ d_t _n c_
a fire, or insul_on _tedorat_
can _e
e_ec_ leakage, e_ctdc _k
or fire.
• Fix t_ power cable com_e_ly,
- ff the _er _3b_ is _: fixed c_p_ete_y,a fire canbreak out.
• Ho|d _e p|ug _en _llin,g _the po_r _ble, Do not bend_e power co_ with exce_ive rome or put
heaw o_s
_ _e power cord.
TI_ _er _i_ _n be d_ma_d_ _h
may _u_ e_ectr_c
_k
_ fire
• Do not in_e_ a con,ductor(like a metalch_stlck) Into on,eend of _e powercable whl_e,
me other er'._is
con,nected_ me in,putt_i_|
_ _e wa|L Addttiiona|_y,
do not touchthe powercab|e _ght after
/p_u_g_n,g
_ntot_ wal__nput_rm_nal,
You may _ e_
• T_ power su_ly cord _sus_ as the main,dtsconnectJon de_ce, Ensur__
._ce_ible after tn,_|lat}_,
Caution
• Do=not _n_ugl t_ power cord whi|e the product is in _,
- El_l
st-_k can _m_e
the p_,
Precautions
•
_e
sure
to
in Moving the Product
t_m _ the produ_.
- You may _ electrocuted or _
pr_uct
can _ _._.
• _e
_re to remove all cables before moving the product,
- You may _ _oc_ed
or _ p_uc_ _ _ _ma_.
the s_t-out_et
is e_ily
Caution
I _ not sho_ the ptod_
when m_ing &
- You may be electrocutedor the prod_ can _ damaged
m Do not dis_
t_
p_-p_kJng
box. Use itw_n
you _ve,
a Make the pa_l face forward and hold _ with b_ hands to move.
- if you drop _ IP_,
the darr_
prod_ can _u_ ei_c
_k
repair_
or fire C_ct
with the _P#_e _nter for
Precautions in Using the Product
Warning
[] _ not disa_mb|e_
- Fire or e_c
sl-_k
=_ct
_e _n_e
repair ,or modify t_
a_i_nt
_n occur.
prod_
at your _n
di_retion,,
_r_er for c_ck, calibrat_n or _pair.
=..Do not: spr_, w_r o,nt_ prod_t or scab with an infl_e
e_e_nc sh_k _ide_
can _cur
substance(thinner or _nze_),
Fireor
I Keep t_ p_'oductaway from water.
- Fire or e_x_c _'_
a_nt
_ occur.
Caution
m Do not _t or sto_ inflammab_ sub.noes
near the product.
- The_ _ a danger of expb_
orfire due to careless }_r_ling _ the inflam_b,_
_bstanc_s,
When cleaning the _wn
_
surface, unplug the _tc_d
a_ scrub with soft cloth _ prever_
s_tching.
Do not c_ean with ,aw_ cloth.
- The water can sink into _ product, which can cau_ elect_ shock or _ous
ma_u_k_n,
[] TaRe a _
from time to time to protect your vision.
[] Keep t_ _odu_
c_ean at all _s.
[] TaRe a comfo_ble
[] Take
a
_lar
i
_d
natural _i_on
break when _ing
[] _ not p_ss str_gly
s_tch
on it.
upon t_
_en
w_ng
with a p_
_nel
with a _nd
for a long time.
or sh_
[] Keep proper distance from the product.
-_
v_ion _y be impaired if y_ _
at the p_uct
[] Set the appro_
-Yo_ v_ion _
[] Use auth_
- PredL_t _
reso_
b_ imp_.
and cl_k
deterge_ only w_n
be deformed.
with a produ_ to relax the mus_es.
I_ refuting
object s_h
a_snail, pencil or pen, ot _ke
too d_.
to. the User's Manual
cleanin_ the product
(Doi not use _nzene,
thinner or _coh_.)
On Disposal
I,, _
fluo_
lamp u_d in this p_
[] Do _ dispose of this pr_
wi_ _r_
Disp_
of th_ p_:
must _ ca:_d
o_ins
a small amount of mercury.
_
waste.
o_ in a_a_
to the reg_
of y_r local a_b/.
a
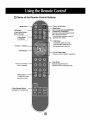
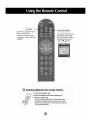
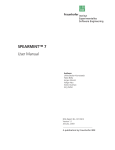
Name of the Remote Control Buttons
• M_u Button
,,ExffButton
° Vo|ume < I_ Button
* Ch_k
Button
* ARC button
To se[e_ the image
size of the _reen.
* AV 8_on
* Input Select Bu_on
Each time you press the Input
b_on it wiff change to
If you press the button or_e,
the following Input Sig_I
Window wHIIappear. _lect
the signal type you want
using the y A button.
AV_
Compo_ntl
Component2 _
RGB_
HDMI/DV]
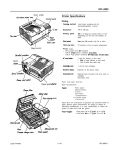
Inse ing ba ries
into remote control.
1, Take out the battery cap,
2, insert the batteries with correct polar_
3, Close the battery cap.
You can u_ a _mote _t
(+/-).
7 meter distar_
and
,30 degree (left/nght) within _e receiving funit s_pe.
Disp_
of used 10arteriesin the recycle bin to prevent
en_/ironme_a] _[]ution_
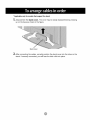
* Ap_icable only for models th_ su_o_
the stand
]., Disassemble the stand cover. The cover may be easily disassembled
by pressing
up on the base as shown in the figure
_° After connecting the cables, correctly position the stand cover into the holes on the
stand.. If securely connected, you w[]_ hear the latch click into place.
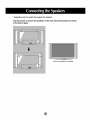
* Applica_e only for models that sup_rt the speakers
U_ the screws to secure the speakers on the rear side of the pr_uct
in the below figure.
......
as shown
!L....
When the speaker is instaiied.
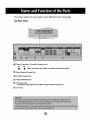
* The product image in the, user's guide could _
different from the actual image,
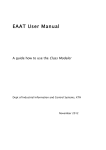
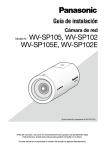
Rear View
@ Power
Connector
I_
@ Wir_
: Connect the power cord
Power conn_tor
Remote Co_rol
R_232C
and image may differ according to mo_l.
Pod
Serial Pods
RGB, HDMI/DVI Po_s
PC Sound Jack
: _nn_
the audio cable to the *LINE OUT j_k
O
AV Pods
of the PC _nd
card.
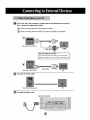
First of all,
see if the computer, pr_u_
Then, cermet the signal input cable.
When connecting ,_
_When
and the peripherals are turn_
off.
the D-Sub signaJtinput cable,
o3nnectJng ;with the HDMI to DV] signa_ input cable (not i_3_ude_.
R_r side of the product.
=.
Uc_ 1he sl_ld_d
M_atosh
_®ter
since _ ii_compa_ib_
I ,_dapler
dmosh
_er
(not
is ava_lab_ain
t_ |r_;l_)
m_*_et (Ditte_e_t sign_ir_9 system) 1
Rear side elfthe product.
@
Cermet
the Audio cable.
Rear side of the product,
Connect
the power cord.,
_r
s_ _ t_ _ct.
Q
Turn on power by pressing 'the power button on the
pr_u_i.
Power b_on
_Tum
on t_ PC,
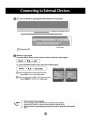
Use this function wh_
displaying ANALOG RGB inputs of a PC to the other product.
• To use different products connoted
to e_h, other
Connect one end of the signal inp_ cab]e(15-pin D-Sub Signal Cable) to the RGB OUT
connector d product I and connect the other end to, the RGB IN connector of other
products_
15_in
D-Sub Signa! Cable,
Product 1
Produd 2
Product 3
Product: 4
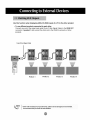
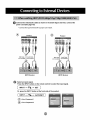
_nneot
the vi,d_ cable, as shown in the bel_
_rd (See page A9).
When conn_ing
with a BNC cable.
• Connect the, input termina_ with a
proper color match.
figure and then conn,_t the p_er
When c,onneoting with a S-Vid_ cable.
• Connect to the S-Video input terminal to
watch high image quality movies,
Produ_
Product
_R/DVD
VCR/DVD R_e_v_
R_iver
Sele_ an inpL:_signa!.
Press the I!NPUT buRon on the remote control to seI,_t the input signal.
Or, press the INPUT button at the front side of the pr_uot.
_When
¢onnedi_ w_h an BNC cable.
• Select AM,
When _n_r_
• _lect AM,
with an S_Vi_
cabS,
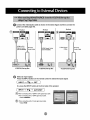
Connect the vid_audio
cable as shown in the _low
power _d
(_
page Ag).
- _nnect
the input te_inal
figure and then, conne_
with a p_per color match,
Product
Produd
HDW R_eiv_
HDW
R_6_r
Se,l_ an input signal.
Press the INPUT buffon on the remote control to select the input signal.
Or, wess the iNPUT bu_on _ the front si_
of the pr_uct
the
Conn_t
Me vi_audio
_b.le as shown in,the _low
power cord (See page A9).
Product
figure and then conn_
Product
Product
Cabie,
Se!_ an input signal,
Press the INPUT bu_on on the remote control to select the input signal
Or, p_ss the INPUT buRon _ the front side of the pr_ucL
con_drgj
w_ a HDMI to DVI signal inpL__b_,
When conr_edJ_ wi_ a HDMI _g_J inp_ _b_.
•_
HDMVDVI
_)W_n
•_
_nnectir_
RGB
with a D-_b
skjna_ input cabfe
RCA-_
A_io Cable
_Sub Signal
Cable
VCRA)VD/_4_J
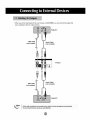
_When
the
_x
• When you set t_ input sigir_:_ _ the main screen as 'AV (CVBS),', you can transm_ Me signa_ that
you're watching to the AV output te_inal,
Video[gV
_C Cab_
(not included)
Audio Cable
(not include)
Product
ii!Xii
BNC Cable
(not _ncl_)
Vid_/TV
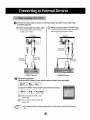
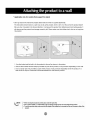
* Applic_b,le _ly
for m_els
* Set it up dose to the wall so t_
thiat suppo_ the stand
product _sn't
Tf'_ instructions shown below is a _fer
fail over when it is p_hed
backwards.
way to set up the product, which is to fix it _
fall over when it is pulled in the forward direc_ion_ _twill prevent the prod_t
the wall so t_
from fa!iing fo_ard
product d_snff
and hudi_
_ol31e_ It
will also prevent the product from damage caused by fall Please make sure th_ children dont c_imb on _ hang from
the produ_,,
1. Use the braker and the bo_ to fix _e product to the wall as shown in _e
2. Secure the bracket w_h _e bolt(not provided
as pa_
of _e produ_,
picture.,
must pt_rchase separately)
3 Use a _urdy rope (not provi_d
as parts o# the product, must purchase separately)
safer to tie the rope so _ _.comes horizonta_ between the wall and the product,
r a c_net _at is _ ar_ _g
enoch f_
P_U_ saf_ irn_e sure_t _e _
_ _ brae _
on the waiL
to tie, _e product,
It is
s_e andweight_tl-_ _u_0
_ !m_Jn_ o_ _ wail JSsame_ that _
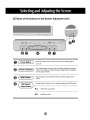
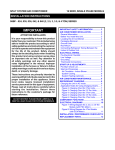
Name of the Bu_ons in the Screen Adjustment Unit
• Press this b_
to turn on the power, Press his bul_
again to
turn it ot,
_i_ ower
indi
....
caio
D
ffthedisplay
isinsleep
(EnergySaving)mode,
indicator
• mode)
This indicator
iig_s ,up
grin when
the dis,p_ayoperates this
no_aly(o_
colorchanges to amber
, Use this button to, show/hide the OSD (On Screen Display) menu
screen.
• Use this buion to select an _on or adius,t _e sett_
V _
_
• Adjust he up and dow_
,,Adj_he
volu_.
in he OSD screen,
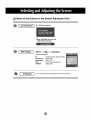
Name of the Buttons in the Screen Adjustment Unit
(_ Ab_O/SET BL_on )
[ForPCAnalogsignall
[When XGA Mode is ac_ve and
13,60 X768 is _l_t_]
INPUT _
,' Se_
V A _
AUTO/SET
t_ in_¢ _gn_
AV
C_p_ent
RG8
HDMI_VI
I
Com_ite
Vi_,
_p_ate Vi_
HD_, DVD
HDTV', DVD
15_pin D_b
ar_log _gna_
D_i_l s_nal
• The unff that re_ives
the signal from the remote cont_l,,
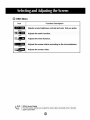
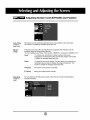
OSD Menu
Function
Adjusts _reen
brigh_ess,
S_ND
Adjusts the timer function.
Adjusts
_NE_
the _r_n
vide.
Description
_ntrast
and color that you prefer.
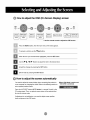
How to adjust t_ OSD (On ,Scr_n Display) scr_
• Use the remote control to adj ust the OSD screen.
Press the MENU B_ton, then the main menu of _e OSD appears.
When the i_n 'you want becomes highlighted,
U_ the V A
_11 _
Accept the chang_
press the S_
Button.
Buttons to adjust the item to the desired level.
by pressing the S_
Button.
Exit the OSD by pressir_ the EXIT' Bu_ton,
How to,adjust the scan
automatically
You need to adiust the screen display when connecting the product to
a new computer or changing the mode. Refer to the following section to
set an optimal product screen.
Press the AUTO/SET bu_on (AUTO button in a remote Contro_) in the
PC anal_ s.igna] Then, an _timal scr_n status wiB be _le_ed that
fits iratethe cu_ent mode,
If adjusfment is not s_isfact_,
c!_k
and pha_
you n_d
in the OSD menu,
to adjust screen _sition,
_hen XGA Mode is a_ive and
1360 X768 is selected]
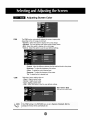
Adjusting S,cr n
PSM
Color
The PSM fu_lion automatically adjusts Me, screen image quality
de_nding
on the AV u_3ge e_ironment.
o Dynamic : _lect this option to display with a sh_p image,,
* Standard : De most _neraJ a_t_ r_tur'al screen display status.
- Milld : Select this,opti_ to di_lay with a mild image.
* Userl_2 : _lect this _tion to u_ t_ _eP_fined
se_[ngs.
Contrast : Adjust the d_erence betw_n
tt'_ light a_ dark levels in Me #stare.
Brightness : To adiu_ the br_htness of the _reen.
Colour : To adiust the color to _sired
_ev_.
Sharpness : To adju_ the deam_s of the screen.
Tint :To adiust the _nt to desired level,
CSM
_lect[ng a factory _ing
color set.
• Warm : Slightly r_dish white.
• Norma_ "Slightly Ibluish white.
° Cooi_ : Slightiy Ipurp}ish white,
° User : Select this opti_ to u_ the, user-defined set_ng&
Red t Gre_ t Blue
Set your own color levels,
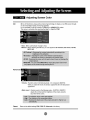
Adjusting Screen Color
XD
×D is LG Ele_roni_
unique Ipi_um improvi_ techr#_ogy to display a ma_ HD' _rce
an advanced digital signaJ processing algodthm_
It's not available to use this function in RGB-.PC or HDMI/DV_ PC m_es_
This menu is activated after selecting the Use_
or User2 of PSM
* Auto : XD is automaticaJ_y chan_ to Auto.
o Manual : When _ecting the Man_
you can adjust the XD Contrast,
MPEG NR.
XID _lour,
Advanced
• Cinema'
(Function works in the following m@ o AV, Com_nent
When you w_tch the movie, this function adjus_ the _
appearance.
.4_i/576i)
to the best picture.
, IBlack Level "(Fun_ion _As in the following m_ - AV(N%SC), HDM]_VI
_iusts the con#ast and the brigAness of the scr_n using the
Nack level of the _r,een,.
Reset
Return to the d_au_ _ttings
through
PSM, CSM, XD, Advanced at:the. factory.,
XID NR,
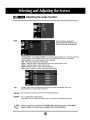
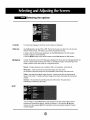
,J,,,,,Adjusting the audio function
SSM
T_ _
_
v_o_
_
a_lf_'y
_ne q_
wilt be
de_g
tP_ty_'m c_y
_
the
wat_i_.
• Surround MAX : Set the Surround MAX on, This function _ays back _e mono or stereo _und
w_h the _:/nam_ surround effects, it will provide rich and profound _und to_ ff you _t the
Surround MAX _, user audio setfJng c_ not be adjusted.
,' Flat : The mo_ _mma_ir@ and r_tura! audb.
• Music : sele_ this opti_ to enjoy the original _und when _iste.ningto the. music,
• Movie : _Le_this option to enjoy subiime _u_.
• S_rts: Select this o_n
to watch s_s
broadcasting.
• User : Select this: o_n to use the u_r=defin_ a_io settJr_s.,
AVL
To adiu_ uneven sound volumes across all channe_ or s_nals automatically to the most
appropriate _vel To use this feature, sel_ On._
Balance
U_ this fonc5on to b,ala_e sound from the I_ and r_ht speaker,
You _n adjust internal spe_akerstatus,
IIfyou want to u_ your e×temaf hFfi _ereo _stem,, turn _ the internal speakers of the _t.
_e
Movie
When _cted
or S_rts; _they_}r
a_a!_N
c_puterme_s
anda_
_e _l_ce,
SSM' _ AV Lin
_ _ Surround
_ud_ m!_uMAX:
is one of R_, M_si¢,
input
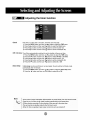
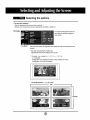
Adjusting the timer function
Cl_k
ff the time is on t}'_ clock is incorrect,
1) Press t_ MENU button _d then
2) P_ss the _ button and t}-_n u_
3) Press the _ button ar_ then use
4) Press ttr_ _ butt_ _d then use
r_et the c_ock manually.
use T & button to _[_t t_ TIME menu.
T _1,button to _l_
the Cl_k menu.
T A button _ set the hour(_-23).
T A b_on to _ the minutes(00~59)..
Off / On time The off time automatically switches, the set to standby at t_ pre-set time,
1)
2)
3)
4)
5)
Auto, sleep
Note
Press. the MENU b_on
Pre_ t}-_ I_ butt_ and
Pre_ t_ _ butt_ and
Pre_ t_ I_ button and
Pre_ t_ I_ butt_ and
ff Auto sleep
automaticaJ[y
1) Pre:_ t_
2) Pre_ t_
and then
then use
then use
then use
then use
use T A button to sel_t the TIME menu
T A b_on to sel_ Off time or On time,
T A button to set the hour(0t ~23)
T A button to set the minutes(00~59),
_!'A button to select On or Off,
is active and there is _ inp_ signal _e set switc}-_s to Stubby mode
after 10 minutes.
MENU button and then use T A button to select the Auto s_p menu.
I1_ button and t}'_n u_ T A bu_on to select On or _.
, In the event of power ir[te_uption (discon_ction or power failure), t_ dock must be reset.
• Once the on or off time is _t these functions o_rate dai_y at the preset time.
• Off time ifunc_on overrides On time _un_ion ff they a_ _et to the _me
, T_ _t must be in ._tar_by mode for t_ On time to woA
• When On time is operated,
time.
input _creen is lured on _s iitwas turned off.
pi,
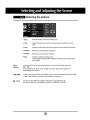
,,,-Selectmg
the options
Language
To choose the la_uage
Child I_k
U_ t_ T A buttons to select On .orOff. The Set can be set up so th_ it can only be u_d
w_ t_ remote, control This feature can prevent unauthorized viewing.
in which t_
control r_mes are, displayed.
In order to lock the OSD screen ad}ustment, set the Child Jock tab to the 'On' position.
_n order _ unlock it, do the following :
* Push the MENU button _ t_ remote control and se_ Child lock to t_ °_' position.
iSM Method
A irozen of stil_ picture from a PC/Video game displayed on the _reen for prolonged pedods wIH
result in a ghost ima_ remainir_ even w_n you change the imam. Avoid allowi_ a fixed
ima_ to remain on the sets screen for a long peri_ of time,
Normal : If ima_ s_cking is _ver
a problem, ISM is not _cessary
-set to No_aL
White wash : wh_e wash removes pe_a_nt
images from t}-_ screen.
(An excessive pe_anent
image may be imp_ib_e to clear entirely w_h wh_e wash.
Orbiter : may he_p prevent ghost images. However, _ is _st not to allow _y fixed image to
remain on the screen. To avoid a p_anent
image on the screen, the screen will move every 2
minute.
invasion : This is fun_on to inve_ the _nel co,or of the screen. The panel co,or is
autom_aHy inverted every 30 minutes.
ID
You can a_ign a uniq_ _t lID NO (name as_gnme_) to each product when severa_
prod_s are connected for display. Specify the number (1 ~99) using tl_ I1t _ button
and exff. U_ the assigned _t ID to individ_Hy _ntro_ each product using the Product
Co_rol Program.
Selecting the options
• To use this function
- Mu_ _
Must _
displayed with vario_ o_er produ_s,_
in a fu_ion
that can be contacted to RS-2_C
or RG80_
Tilie m_e
it is used to enlarge the scre_ and
aim us_ wih several products to
ViM
• Tile Mode
TiLemode and choose Tile alignment a_
screen,
set the ID of the current produ_ to
Only after pressing he SF b_on the
adiustments made to he settings wil! Ibe saved_
- Tile m_
: row x column ( r = 1, 2, 3, 4 c = 1,2, 3, 4)
- 4 x 4 available..
- _nfiguratJon of an integration _reen is a_o availaNe as well as
c_figuratJon of One by one Display.
ri_e mode (product i _ 4) : r(2) x c(2)
tOW
_llumn
'°7""""""":
................................
ZZ....................................................................................
ZZ.............................
""_""""""""_:
l
Selecting the options
Tile rn_e
'i
(product 1 ~ 9) : r(3) x c(3)
rOW
Tt_emode (product I _ 2) : r(2) x c(1)
tow
column
- Tile mode (product _ -16) : _4) x c(4)
row
I Selecting the options
• Tile ID
_I_
• H Size
Adiust the horizon_l size of the scre_
bezel
• V Size
Adiu_ the ve_ica_ size of the screen taking into, account the. size of the bezel
• H-_s_tion
Movi_
the _reen
• V_P_,iUon
Movi_
the screen position ve_ically.
Res_
Pow_
Ilndicato,r
the location of the Tile by setting an ID.
taking into account the size of the
position horiz_taJly.
Function to initialize and release Tile,
All Ti_e se_ing are released when s_ecting Tile fecal a_ the screen returns
to FuBscreen
Use this func_o,n to set the power indicator on the front side of the product to
On or _,
ff you set Off, it wiB _ off, ff you set On at any time, the power indicator will
automatically be turned on,
L_
Ught
Use _is function to set the Logo Display Lamp on the front si_
or Off. if you set On, the iamp will automaticallly
XD
Demo
Use it to see the difference
between
of the product to On
be turned on.
XD demo on and XD Demo off.
(XD Demo function is not avaBaMe in RGB PC/HDMI/DW
IPC mo_.)
I
ri
.
.
A,,,tl, ,,_tl
n
Screen O/OO PHASE
Auto-config,
RGB PC
nput only)
]'his b_en is for tl-_ automatic a,djus_ent o,f the scr_n
This funclion is suitable f_ analogue signal input only
Manualconfig,
If tihe pidum isn't clear after auto adjustment and e_ecially tt-_t characlem are stil!
tremblir_j, adjust the pi_ure phase manually.
It's n_ available to _e Phase, Cl_k functio_ in RGB DTV, Comported, HDMVDVl IDTV.)
XGA Mode
(RGB-PC
only).
p_ition,
and Position
clock _d
phase.
Clock
To minimize any ve_icat bars or stdpes visible on the screen
background, The h_izontal _reen size will al_ change, This function
is suitable for ar_logue signal inp_ only
Phase
To adjust the f_us of the display, This item allows y® to remove any
hotizo_al noise and clear or sharpen the image of character,
This.
fundion is suable f_ anal_ue _gnal input only.
H-Posffion
M_ing
V-PosiSon
Moving t_
the screen _ion
For more improved o_ _er
compeer resolution°
I_.rlzo_alllyo
screen posLdon vertically,
picture qualify,, select the same m_e
correspo_ing
to
Adjusting Screen CLOCFJP'HASE and Position,
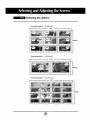
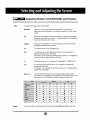
ARC
To select the image size of the screen.
When your AV receives Me, wide screen signal, it will lead you to
adjust the picture horiz_l_y,
in a nonlinear pr_odion, to fill the entire
screen,
Full
When your AV receives _e wide screen signal, it will lead you to adj_t
the picture horizo_lty
or vedicaily, in a linear prop_ion, to fiil the entire
screen tully. (Europe vereion on_y)
Original
When your AV receives fine wide screen signal,, it will be automaticaBy
c_anged to picture to.at
to be sent.
4:3
This picture format is 4 to 3 of _neral
!'6:9
You can enjoy the cinema (_e picture
format_ 16:9) _ _nera] TV
programme thorough the 16:9 mo_.
The screen !6:9 is viewed j_t like t_3t b_ the screen 4:3 is magnified to
the _efl and rigH so that _e screen 16:9 is fulll.
i:i
This ip_c#Jreform_ is i to 1 of genoa{ AV. (only RGB PC, HDM{/DV_ PC)
1,4:9
You can enjoy the picture tormat of 14:9 or general AV programme
through the 14:9 mode.
The _r_n
14:9 is viewed j_t like t_t the _reen 4:3 is magnffiod _ t_
upper/l_er
and left!right,
Zoo,ml, 2
You c_ enjoy' tlb_ cinema in a vast _reen thro_h the Z_m me@,
The _reen 4:3 is, magnified to the uppedlower and Je_right sides so that
_reen 16:9 is fuji., The bosom and t_ oJ the picture may be lost,
X
Rester
.
X
•
AV
X
X
X
_
X
•
X
•
X
•
•
X
X
X
X
X
•
•
•
X
•
X
U_ this func4Jon to reset the producl to the tacto_
.
X
.
X
X
defiau_t.(Manual eonfigl, manu only)
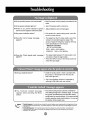
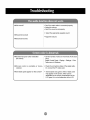
@ Is the prod_
@ Is _
_wer
cord connected?
power indicator light on?
, _e
@ Power is on, pow_ indicator is green
but the _reen appears e×treme_y _rko
@ the p_e_
i_icator
See if the _wer cord is properiy _nnected to the,
outlet.
am_r?
if the power sw_tch is _m_
on.
• Adiust brightness and _ntrast a_in.
If _e product is in p_er saving m_e,
_use or press _y key,
@ D_s
the 'Out of range' message
@ D_s
the 'Check signal ca_e'
mess_e
_ve
the
_e signaFfrom _e PC (_deo card) is out tithe
ve_ical or hodzont_ frequen_ range of the
product, Adjust the frequency range by referring
to the _ecff_tions
in this manual.
* M_imum resoluOon
- 32 / 37 / 42 inch m_el
RGB : 1600 x 1200 @60Hz
HDMiiDV_ : 1280 x 1024 @60Hz
between PC and product is not
° _e signa__le
_nnected, Check the signal cable,
0
Press the 'INPUT' menu in the remote _ntrol to
check the inl_Jtsignal
@ DM yoa install the _iver?
• Install the p,rodu_ driver, which is provided with
the product, or down[_d it from the web site,
(http://www J_._m)
• See if the pl_&play function is supposed by
referri_ to the video card user manual,.
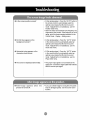
@ The 'Cont:ro[s
appears when
Locked'
pressing
message
the Menu
,,
The control loc_j_fu_on prevents unintentb_[
OSD se_ c_e
due to _re_ss usa_, To unl_k
_ntro_s, simdta_us_y press the k_nu bu_t_
a_ I_ button f_ seve_ _ds.
(You cannot set this
fu_
using t_ rem_e control buttons, You can set
• is f_ction in the product one..)
@_s_he_r'_n portion wrong?
• DSub _'_alog signal- Press the "AUTO' b_on
the remote _ntro_ to a_omatJcaHy seled the
optimal _reen status that Ks into the current
m_e, If adjustment is not satisfactoPj use the
Posi_on OSD menu.
in
• See ff the video _rd re_l_on a_ frequency are
sup_rted by the produd, if the frequency is oN of
r_ge. set to,the rec_me_3_
resoluti® in the
Control Panel- Display- .Settingmenu_
@ Do thin lines appear on the
DSub analog signal- Press the "AUTO" button
in the remote control to automati_lly se_e_
optimal _reeo status that fits into the current
mc_e. If adju_ent
is not _tisfactoPj, use the
Qock OSD menu,,
@ Horizonta! noise appears ot me
charades
Io_ blurrY.
D-Sub _a[og signal- Press the "A_O" button
in the remote _,ntrol to autom_ically se[e_ an
optimal screen status that fits into the _rrent
m_e, If adjustment is not satisfacto_, use the
_ase OSD menu.
@ The screen is d[sp[_ed
The proper input sigr@ is not _nnected to the
sign@ ipo_. C®nect the signal c_le that matches
@th the source input signal,,
abno_aHy.
@ No sound?
° See ff the audio cable is connected proper_y.
° Adju_ the volume.
• See ff the sound is set proper_y.
• S_e_ the appropriate _u_ize
sound.
• Adjust the volume
@ Screen has poor _lor
re_ufl_
"Sie_
the number of colors to more th_
24 bks (true
corot)
Sel_ Cont_l Panel- DisplayTable menu in Widows,
@ Screen co, or is unstable
colored.
or monoo
@ Do Hack spots appear on the screen?
Settings - _or
• Check the connection _us d the signaJ cable
Or, re-insert the PC video card.
• Severa_ pixels (red, green, white or b_ackcoloO
may appear on the _reen, which can be
_dbutable to the unique c_racteHstJcs of the.
LCD panel It is not a maJNn_ion of the LCD.
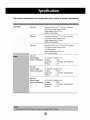
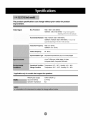
The product specifications can change without prior notice for product improvement.
LCD Panel
[32 inch]
32 inches (80.04 cm) TF
(Thin Film TransistoO
LCD (Liquid Cr_,stal Display) Panel
Visible diag_al size: 80.04 cm
0.5025 mm (Pkel Pitch)
[37 inch]
37 inches (94,03 cm) TF
LCD (Liquid Crys_
(Thin Film TransistoO
Display} Panel
VisiMe diag_a_ size: 94.03 cm
0._0
[42 inch]
mm (Pkel Pitch)
42 inches (106,73 cm) TFT (Thin Film TmnsistoO
LCD (Liquid Crysta_ Display) Panel
Anti-,Glare coating
VisiMe diag_al
0.61
[32 inch]
Rated Vo_ge
size: 106.73 cm
mm (PixeJP_ch)
AC 100o2_V ~ 50/60Hz 1.5A
On Mode
S_eep M_e
Off Mode
145W
<_1W (RGB) / 4W (HDMVDVI)
_ 1W
[37 inch]
Rated Vo|tage
[42 inch]
Rated Voltage
AC 100-2_3V~ 50/60Hz 2.0A
On Mode
: 180W
Sleep M_e
Off Mode
: _ 1W (RGB)t 4W(HDMI/DVl)
: _ lW
AC 100-240V ~ 50160Hz 2.5A
On Mode
2_W
Sleep M_e
Off Mode
_<1W (RGB)/4W(HDMI/DVI)
_ lW
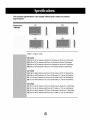
De
pr_uct
specifications
can change without prior notice for pr_uct
[11
[21
W
.........................................
[3]
[4]
Width x Height x Depth
[32 inch]
[1] 80._ _ (31.61 i_es)
x 54._
80._ _ (31.61 ir@es) x 49,,_ _
(21._ inct'_) x 18._ _
(19.4 inches) x 9._cm
(7.09 in_es)
(3._ ir_es)
[3] 96._ cm (37,_ i_es)
x _.OOcm (21._ Jnc_) x 18._ cm (7.09 in_es)
[4] 96,_ _ (37._ i_es)
x 49.30 _
(19.4 inches) x 9_99_ (3._ i_es)
[37 inch]
[1] 9&_ _ (36,_ ir_es) x 61.90 _
(24.3_ i_t-_}
x _.77 _
[2] 92_
a'n (36,_ i_es)
x 57.12 _
(8,_ i_es)
(22,49 inc_}
x 11,_ cm (4._ inches)
[3] 112.9 cm (44,45 i_es)
x 61 ._ cm (24.37 inc_}
x _.TF crn (8._ inches)
[4] 112.9 _ (44,45 i_es)
x 57.12 _
(22.49 i_}
x 11,_ _
(4.53 inches)
x 70.20 _
(27.64 i_)
x _.4,5 _
(11._, inc_)
[42 inch]
[1] 1_.7 c_n(41.61 i_es)
1_.7 _ (41.61 ir_es) x 65.30 _
(25.7t inct-_} x 11.91_
(4.69 inches)
(27.64 inc_)
_
(11._ ir_:_)
[4] 1_.9 _ (49.57 ir_hes) x 65._ cm (25.71 inches) x 11.91_
(4.69 ir@es)
[3] 1_.9 _ (49.57 i_es)
x 7&20 _
x _._
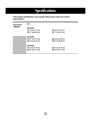
The product s_ifications
can change, w_houl prior' notice for product
Net
[32 inch]
[1]19.4 kg (42.1/_)
[2] 16.0 kg (35.27 _bs)
[3] 21,1 kg (_.,52 Ibs)
[4] 17.7 kg (39.02 _)
[37 inch]
E3]
,30,5
_ (6724Ibs)
[4] 2&7 kg (56,_ _)
[42 inch]
[1] 352 kg _7,_ _)
[3] _,0 kg (_.77 Ibs)
[2] _,8 kg (67_ _)
[4] 33.6 kg _4.,07 _bs)
The pr_uct
Vi_
specifications
can change without prior notice for pr_u_
Max, Res_ut_on
Signal
RGB : 1600 X 12_
HDMI/DV] ' I_0
@_Hz
X 1024 @_Hz -It maynot L_sup_rt_
_F_di_
! i¸
i
:
Re_mm_
R_lu_n
RG8" WSXGA 17_0 X 768 @60Hz
HDMVDV] "WSXGA i_
su_ded
Horizon_| Frequency
on_e OSor vid_ _t
d_nding
X 768 @6_z
,,,,_,
I__y not
on #le OS or vi_o c_d ly_
RGB" 30 - _ kHz
HDMVDV] : 30 - 72 kJ4z
56 _85 Hz
Option|
C_dition
Sk)rage CondW_
* Applica_e
only for models that sup_rt
Temperature: 10_'C~ 35'C, Hum_ffy: 10% ~ _%
Tem_ra_re:
-20_C ~ 60°,C, Humidity: 5% _ _%
the slp_kers
iRMS Audio Output
ilnp_ Sensitivity
10W+10W(R+L)
0.7Vrms
Speaker impedance
8_2
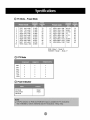
b/pe
PC Mode - Preset Mode
VGA
640x350
VGA
720x400
VGA
640x480
VESA 640 x 480
VESA 640 x 480
VESA 800 x _0
VESA 800 x _0
VESA 800 x _0
MAC
832x624
VESA 1024 x 768
31_469
3!,468
31,469
37_500
,4&269
37,879
,4&875
5&674
,49,725
4&363
70
70
60
75
85
60
75
85,
75
60
VESA 1024 x 768
VESA 1024 x 768
VESA 12_ x 720
VESA I280 x 768
VESA 1360 x 768
VESA I3_ x 768
VESA12:80 x 1024
VESA1280 x 1024
VESA1600 x 1200,
6&!23
6&68
44,772
47
47,72
47
6&981
7&98
75,00
RG B : Mode 1 ~ Mode 19
HDM_/DVI " Mode 1 ~ Mode 17
@ DW M_e
o
x
x
0
X
X
0
0
O
o
o
o
,0
0
O
0
0
O
@ Power Indicator'
On Mode,
Green
S_eep Mode
_f Mode
Am_r
75
85
60
60
6O
60
6O
75
60
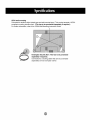
VESA wall m_nting
Connect_ to another obiect (stand type and wall-mounted _pe,) This product accepts a VESA_mpliant mounting inte#ace pad_= (This has to _ purchased separately if required.)
For fu_her information, refer to the VESA Wall Mounting Instruction Guide,
t
Ke_ingt_
Secunty S_ot- (This has to _ purchased
separately if required.)
Connected to a Uocking cable that can be purchased
separately at most computer stores