1
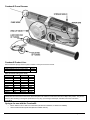
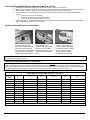
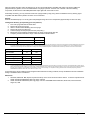
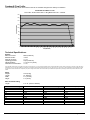
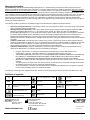
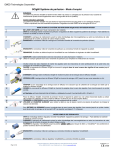
Introduction: The Freedom60® Syringe Infusion System is portable and easy to use requiring no batteries or electric. There are only two operating knobs and special precision tubing sets are used to control the flow rate. The Freedom60 operates at a constant safe pressure of 13.5psi. The constant pressure developed in the Freedom60 automatically decreases the flow rate if there is an increase in resistance during the delivery. The system will find equilibrium between the increasing resistance and flow rate. This new “Dynamic Equilibrium” technology results in a fast and safe infusion with minimal patient complications. It provides constant flow which tends to inhibit clots, and holds full pressure after an infusion is complete to prevent blood or drug backflow. The Freedom60 also eliminates concerns of a bolus, overflow, overdose or runaway infusion. For SCIg, the advantage of dynamic equilibrium is the system’s ability to decrease the flow for any pressure increases caused by tissue saturation, improper needle placement (e.g., over a muscle, in scar tissue, needle not deep enough, needles too close together) etc… Indications for Use: The Freedom60 Syringe Infusion System is indicated for intravenous, intra-arterial, enteral, subcutaneous and epidural infusion of medications or fluids requiring continuous delivery at controlled infusion rates. The Freedom60 is also intended to provide continuous infusion of a local anesthetic directly into the intraoperative site for postoperative pain management. Contraindications: The Freedom60 is not intended for the delivery of whole blood, critical or life sustaining medications, or for the infusion of insulin. Caution: Use the Freedom60 Syringe Infusion System only for the patient in which the device is prescribed and only for its intended use. Use only Freedom60 tubing sets manufactured by RMS Medical Products. Use of any other tubing set will cause the syringe to eject from the pump and eventually cause internal damage to the pump. Use of any other tubing set may also cause over delivery of fluids or medication to the patient. Use only recommended 60ml syringes with the Freedom60. Do not use Terumo® syringes. Do not use syringes smaller than 60ml. The use of a smaller syringe may cause high pressures unsafe for the patient. Before use, carefully inspect the tubing set package. Do not use the tubing set if the package is opened or damaged. Do not re-sterilize tubing sets. Over use of the slide clamp or storing tubing sets where the slide clamp has been engaged for long periods of time may damage the tubing and affect the infusion rate. The black tab that pushes on the syringe plunger operates under high force. Do not place fingers on the black tab or inside the syringe shield at any time. Do not attempt to interfere with the movement of the black tab at any time. Carefully inspect the Freedom60 Syringe Infusion Pump before use. Verify its condition and test. If repeated testing indicates the pump is not operating properly or at the appropriate rate of flow, immediately discontinue use. Do not attempt to open the pump housing or remove the syringe shield. Do not operate if the syringe shield has been removed. Do not attempt to remove the syringe or disconnect the tubing set without first turning the pump OFF and fully winding the large knob clockwise until the black tab has reached the end of its track. Discontinue use of a pump that has been damaged, exposed to severe impact, or which has failed to test properly. Discontinue use of a pump that has been submerged in fluid. If any fluid is allowed to enter the pump, it should be replaced immediately. Do not autoclave the Freedom60. It will melt the ABS plastic and damage the pump. Federal law (USA) restricts this device to sale by or on order of a physician. English 1 of 8 Freedom60 Pump Diagram: Freedom60 Product Line: Each Freedom60 Syringe Infusion System includes a travel pouch and user manual. Product FREEDOM60® Syringe Infusion Pump Travel Pouch Rate Controlled Tubing (case of 50) Flow Rate Part # Flow Rate 0.5ml/hr F0.5 30ml/hr 1ml/hr F1 45ml/hr 2ml/hr F2 60ml/hr 3ml/hr F3 120ml/hr 3.8ml/hr F3.8 180ml/hr 5ml/hr F5 275ml/hr 8ml/hr F8 600ml/hr 10ml/hr F10 900ml/hr 15ml/hr F15 1200ml/hr 20ml/hr F20 2400ml/hr Part # F10050 F10090 Part # F30 F45 F60 F120 F180 F275 F600 F900 F1200 F2400 Note: Colors have been added to certain flow rates in order to identify those most commonly used for antibiotics. They are used only to identify them as most common and can be used to help aid in the selection of rates when there are multiple rates present. They do not bear any other meaning or change the performance in any way. (F15=Orange, F20=Purple, F30=Red, F45=Teal, F60=Green, F120=Blue) Syringes for use with the Freedom60: Becton Dickinson & Co. BD® Luer-Lok® 60ml (US Reference #309653; EU Reference #300865) Sherwood Medical Monoject® 60ml (Reference #8881-560125) English 2 of 8 Testing the Freedom60 Syringe Infusion Pump Prior to Use: 1. 2. 3. 4. Examine the inside of the syringe shield and ensure it is free of debris or contamination. Make sure that the pump’s on/off switch is in the OFF position and that the black tab within the syringe shield is at the end of its track. If the black tab is not at the end of its track, fully wind the large knob clockwise. Turn the pump ON (–) and watch that the tab moves smoothly the full length of its track; listen for the following sounds: a “click” as the pump is turned ON (–), a “whirling” sound as the black tab moves forward, a “click” as the tab reaches the end of its travel. Test to make sure the syringe tension-tab (the one-inch long, tab located at the entry of the syringe shield) operates freely by adjusting it up and down with your finger. Syringe Load and Remove Instructions: Step 1 Step 2 Step 3 Make sure that the pump’s on/off switch is in the OFF position and that the black tab within the syringe shield is at the end of its track. If the black tab is not at the end of its track, wind the large knob clockwise. Load the prefilled syringe; tubing attached, with gradations facing up, plunger first into the syringe shield. Make sure the tubing luer disc is fully seated in the pump’s nose. After the infusion is complete, turn the pump OFF and wind the large knob clockwise until the black tab is at the end of its track. Remove the empty syringe by gently pushing it back and up out of the pump. Note: You will never need to use force to load or remove a syringe. If you’re having trouble loading or removing, stop and make sure the black tab is at the end of its track. Administering Intravenous (IV) Antibiotics: Note: The chart below is intended for antibiotics and drug with low viscosity. DO NOT use this chart for IgG, desferal or other viscous fluids. Drugs with greater viscosity will flow significantly slower and can be compensated for by using a faster flow rate tubing set. To assist you in determining what flow rate tubing set is to be used with these drugs, we provide special computer calculators that give you the ability to perform these calculations. Again, the chart below is for antibiotics and drugs with low viscosity only. Freedom60® Rate Controlled Tubing Sterile Water for Infusion (SWFI) Flow Rate – Time Chart Syringe Volume F1 F2 F30 F45 F60 F120 2 min. 30 sec. 5 5 hrs. 2 hrs. 30 min. 10 min. 6 min. 42 sec. 5 min. 10 10 hrs. 5 hrs. 20 min. 13 min. 18 sec. 10 min. 5 min. 15 15 hrs. 7 hrs. 30 min. 30 min. 20 min. 15 min. 7 min. 30 sec. 20 20 hrs. 10 hrs. 40 min. 26 min. 42 sec. 20 min. 10 min. 25 25 hrs. 12 hrs. 30 min. 50 min. 33 min. 18 sec. 25 min. 12 min. 30 sec. 30 30 hrs. 15 hrs. 60 min. 40 min. 30 min. 15 min. 35 35 hrs. 17 hrs. 30 min. 70 min. 46 min. 42 sec. 35 min. 17 min. 30 sec. 40 40 hrs. 20 hrs. 80 min. 53 min. 18 sec. 40 min. 20 min. 45 45 hrs. 22 hrs. 30 min. 90 min. 60 min. 45 min. 22 min. 30 sec. 50 50 hrs. 25 hrs. 100 min. 66 min. 42 sec. 50 min. 25 min. 55 55 hrs. 27 hrs. 30 min. 110 min. 73 min. 18 sec. 55 min. 27 min. 30 sec. 60 60 hrs. 30 hrs. 120 min. 80 min. 60 min. 30 min. *Custom tubing sets available upon request. English 3 of 8 Starting the Infusion Before loading the syringe verify the following: Make sure that the pump’s on/off switch is in the OFF position. Make sure that the black tab inside the syringe shield is at the end of its track. If the black tab is not at the end of its track, wind the large knob clockwise. Verify that you have the correct rate controlled tubing set. 1. Using sterile technique, remove the sterile cap from the luer disc end of the rate controlled tubing set and connect to the pre-filled syringe. 2. With syringe gradations facing up, insert the syringe, plunger first into the syringe shield. Make sure the luer disc is fully seated in the pump’s nose. Note: You will never need to use force to load or remove a syringe. If you are having trouble loading/removing make sure the pump is in the OFF position and that the black tab is at the end of its track. If the black tab is not at the end of its track, fully wind the large knob clockwise. 3. Using sterile technique, prime the tubing with the pump by loosening the cap on the male end and turning the pump ON (–). You will immediately hear a “whirling” sound as the black tab searches for the syringe plunger. When the tab finds the plunger it will “click” indicating that that the tab is now applying pressure onto the plunger. Medication is now being pumped through the tubing set. When all air and air bubbles are gone and medication starts to drip, tighten the cap. 4. Remove the cap from the male end of the tubing and connect the tubing to the patients indwelling catheter. 5. Turn the pump on to begin the infusion. Note: Once the black tab finds the syringe plunger and the “click” sound is heard, the pump will then be totally silent for the entire infusion. Checking Infusion Progress Periodically check infusion progress by taking note of the time the infusion started and checking movement of the syringe plunger. The approximate rate for antibiotics or other non-viscous solutions can be found on the waterproof label attached to the tubing. (i.e. F60 will flow at 60ml/hr; F30 will flow at 30ml/hr etc.) End of Infusion 1. Confirm that the syringe is empty. 2. Turn the pump OFF and wind the large knob clockwise until the black tab is at the end of its track. 3. Disconnect the tubing from the patients indwelling catheter. 4. Gently lift the syringe back and up out of the pump. Note: If the dose is greater than 60ml and an additional syringe is required, load the additional syringe by repeating section titled, “Starting the Infusion.” Administering Subcutaneous Immunoglobulin (SCIg): Note: You MUST use the Freedom60 IgG Calculator to select the appropriate rate controlled tubing set needed to perform the infusion in the time desired for each IgG patient. Failure to use the calculator will result in extremely long infusion times. The labeled flow rate on each tubing set is true only for antibiotics and solutions with low viscosity. This calculator can be downloaded through our website at www.rmsmedicalproducts.com or www.freedom60.com. Before loading the syringe verify the following: Make sure that the pump’s on/off switch is in the OFF position. Make sure that the black tab inside the syringe shield is at the end of its track. If the black tab is not at the end of its track, wind the large knob clockwise. Verify that you are using the correct rate controlled tubing set calculated by the Freedom60 IgG calculator. 1. Using sterile technique, remove the sterile cap from the luer disc end of the rate controlled tubing set and connect to the pre-filled syringe. 2. Remove the sterile cap from the end of the sub-q needle set and attach it to the male end of the rate controlled tubing set. 3. With syringe gradations facing up, insert the syringe, plunger first into the syringe shield. Make sure the luer disc is fully seated in the pump’s nose. Note: You will never need to use force to load or remove a syringe. If you are having trouble loading/removing make sure the pump is in the OFF position and that the black tab is at the end of its track. If the black tab is not at the end of its track, fully wind the large knob clockwise. 4. Turn the pump ON (–) to prime the tubing but try not to let the drug drip out of the needles. To minimize site pain reactions, it is recommended to insert the needles dry. To stop flow to the needles, turn the pump OFF and wind the large knob clockwise until the black tab is away from the syringe plunger. This will release pressure on the plunger. 5. Select your sites and cleanse with alcohol. Once dry, pinch the skin and insert each needle subcutaneously. Secure with adhesive dressing. 6. To check for blood backflow, remove the syringe by gently lifting it back and up out of the pump. English 4 of 8 7. With the syringe out of the pump, gently pull back on the plunger. Make sure no red or pink exists in the tubing. If blood backflow does exist, clamp the flow to that site and use the IgG calculator to determine if the dose can be run using the remaining sites. If so, continue. If not, remove all needles, attach a new needle set and start again from step 2. 8. Insert the syringe back into the pump and turn the pump ON (–) to begin the infusion. 9. Once the infusion is complete turn the pump OFF and remove all needles. 10. Wind the large knob until the black tab is at the end of its track and remove the syringe. Troubleshooting: If the suggestions in this section do not solve your problem, or if problems persist, discontinue use and consult our office and/or your medical provider. Syringe will not load or remove from pump You will never need to use force to load or remove a syringe. Make sure the pump is in the OFF position and that the black tab is at the end of its track. If the black tab is not at the end of its track, fully wind the large knob clockwise and try again. Syringe will not stay inside in the pump Make sure you are using the proprietary Freedom60 rate controlled tubing sets with the luer disc. Make sure the luer disc end of the tubing has been connected to a 60ml syringe and that it is seated properly in the nose of the pump. If you are using the pump for a sub-q infusion, make sure you have not attached the syringe directly to a sub-q needle set. No flow Assure that the pump is in the ON (–) position. Make sure the slide clamp is unclamped, or has not been used for an extensive period of time. If the slide clamp is overused it can damage the tubing. Test the tubing: While the pump is in the ON (–) position, use sterile procedures to disconnect the rate controlled tubing set from the indwelling catheter (IV) or needle set (sub-q); check for medication drip. If medication does not drip, replace the tubing as it may be blocked or damaged. If medication does drip from the rate controlled tubing, then it’s most likely a problem with the indwelling catheter or needle set. Slow flow Intravenous: If a slide clamp is used for an extensive period of time, it can damage the tubing and affect the flow rate. Try using another tubing set and measure the flow. For 60ml/hr tubing, the syringe plunger should move 10mls in 10 minutes (1ml per minute). For 120ml/hr tubing, the plunger should move 10mls in 5 minutes (2mls per minute). Subcutaneous: Administration may be slow based on how well the patient’s tissue absorbs medication. If this is the patient’s first time with SCIg it may take longer than expected because the body may need to create space in the subcutaneous layers in order to absorb in the time desired. If you believe the rate is too slow, you should check the needle sites. It is best to avoid areas of scar tissue, or on top of muscle. It is also possible you may need more sites, longer needles or a faster flow rate tubing set. Continuous flow even when the pump is turned OFF This is a normal function of the pump. The pump is designed to maintain pressure during and after the infusion to prevent blood/drug backflow. To stop the flow turn the pump OFF and wind the large knob clockwise so the black tab moves away from the syringe. This will release pressure on the plunger. You can also use the slide clamp. We recommend only using the slide clamp to immediately stop the flow in the case of an emergency. Overuse can damage the tubing. Medication (5ml or less) left in the syringe Verify that you are using the proper BD or Monoject brand 60ml syringe. Do not use Terumo syringes. Subcutaneous swelling, pain or redness at the site Try to insert subcutaneous needles dry. IgG tends to irritate the skin. Assure that the needles are long enough to reach the sub-q layers. Assure that the needles aren’t too long, as they may be in muscle. Try using a slower flow rated tubing set as the rate may be too fast. Think about site location. If you have been rotating sites and found locations that do not cause pain, it may be preferable to return to the sites that work best. Care and Maintenance: The Freedom60 does not require any preventative maintenance. The Freedom60 works as a system, which means the tubing determines the flow rate, not the pump; therefore our pump needs no calibration. If you choose the correct tubing set the proper flow rate will be achieved. Our tubing sets are statistically verified during manufacture and will deliver the appropriate flow rate under controlled conditions. Cleaning: Clean only those areas that are exposed and external. No attempt should be made to clean any part of the pump that is not easily accessible. Discontinue use of a pump that has been internally exposed to or immersed in fluid. English 5 of 8 Wipe the surface with warm water and detergent or use any surface disinfectant compatible with acetyl-butyl-styrene (ABS) and polycarbonate (PC) plastics, such as household bleach or hydrogen peroxide. Avoid the use of alcohol or alcohol containing compounds, as these tend to make ABS plastic brittle. Wipe again with clean water to rinse. If absolutely necessary, you may clean the inside of the syringe shield by using a long swab or bottlebrush and any cleaning agent compatible with ABS and PC plastics. Alcohol is not recommended. Storage: Store the Freedom60 pump in a cool dry place and packaged tubing sets at room temperature (approximately 16-30C or 61-86F). Testing Flow Accuracy (if required by your local protocol): 1. Fill a new syringe with 60ml of sterile water 2. Remove all air from the syringe 3. Attach a sterile Freedom60 tubing set to the syringe 4. Remove all air from the tubing set 5. Load the syringe into the pump and turn the pump ON (–) 6. Monitor the syringe readings and elapsed time to derive an approximate flow rate 7. Compare your test results to the range of test rates listed in the table below: Labeled Flow Rate Bench-Rated Flow Rate (1) Test Range (2) 60ml/hr 72ml/hr 60-84ml/hr 120ml/hr 132ml/hr 115-153ml/hr 1. The Freedom60 Infusion Pump design accounts for the effects of standard clinical conditions on flow rate performance. Under bench test conditions, a 60ml/hr labeled tubing set is designed to generate a nominal infusion rate of 72 milliliters per hour. A 120ml/hr labeled tubing set will generate a nominal bench test rate of 132 milliliters per hour. The Freedom60 generates nominal bench test rates higher than the labeled rate accounting for the following standardized application criteria that affects actual delivery rates under normal clinical circumstances. 60ml/hr Tubing 120ml/hr Tubing Best Test Rate 72 132 Less Clinical Effects Catheter Gauge (20G PICC) -7 -8 Fluid Viscosity (D5W) -2 -3 Venous Pressure -3 -3 Label Flow Rate 60 120 2. To assure consistent test results, keep pump and tubing at the same approximate horizontal plane and monitor flow for a minimum of 20 minutes. The Freedom60 System is factory rated to deliver infusions under strict test conditions over a large number of pumps tested within 7% of nominal with a 95% statistical confidence interval. Under varying bench test and fluid conditions this range can be expected to vary approximately 15% of nominal. For more accurate monitoring, use a stopwatch and finely graduated burette. Freedom60 pump testing is based on ANSI/AAMI National Standard, ID 26-1992, Infusion Devices, August 24, 1992. If test results in the range indicated cannot be approximated under bench testing conditions, factory refurbishment and full certification testing is available from the manufacturer. References: 1. Stuhmeier, Mainzer B. MD; Aspects of pressure build-up in the use of electronic infusion devices. II. Need for a pressure limit. Anasth Intensivther Notfallmed (1987 Aug.) 22(4): 185-190. 2. Anasth Intensivther Notfallmed (1987 Aug.) 22(4): 181-184. ANSI/AAMI National Standard, ID 26-1992, Infusion Devices, August 24, 1992. English 6 of 8 Freedom60 Flow Profile: The Freedom60 flow profile shows that the flow rate is consistent throughout the delivery of medication. Freedom60 Flow Rate vs. Time Freedom60 Flow Profiles Fluid: H2O • Fluid Volume: 60ml • Tubing Measured: F120 – 120ml/hr 180 160 140 Flow Rate (ml/hr) 120 100 80 60 40 20 30 29 28 26 25 24 23 21 20 19 18 16 15 14 13 11 9 10 8 6 5 4 3 1 0 0 Time (Minutes) Technical Specifications: System: Reservoir volume: Residual volume: Flow rate accuracy: Operating pressure: Height sensitivity: Constant force mechanism: 60ml (maximum) <0.4ml +/- 7%* 15psi (maximum) +/- 3% per 12” (30cm) +/- 3% *Flow rate data recorded at 22°C using 60ml of 0.9% NS. An overall accuracy of +/-7% is expected at these values. At higher temperatures, which results in a decrease in viscosity, a higher flow rate is anticipated to occur. The flow rate variation due to changes in temperature is approximately linear and would vary from -20% at 14°C to +20% at 30°C. Fluids considerably more viscous than 0.9% NS are expected to slow the flow rate and consequently may result in longer infusion times. More viscous fluids may be tested before patient use by following the bench test procedures described in this manual. Pump: Weight: Length: Width: Height: 14oz (0.4kg) 12” (304mm) 4.5” (114mm) 1.6” (41mm) Rate Controlled Tubing Length: 6” to 72” (152mm-1829mm) Rate Controlled Tubing F0.5 F1 F2 F3 F3.8 F5 F8 F10 F15 F20 Residual Volume (cc’s) 0.012 0.018 0.025 0.030 0.033 0.039 0.039 0.031 0.066 0.028 Rate Controlled Tubing F30 F45 F60 F120 F180 F275 F600 F900 F1200 F2400 Residual Volume (cc’s) 0.046 0.056 0.067 0.091 0.067 0.044 0.020 0.013 0.010 0.075 English 7 of 8 Warranty Information: Limited Warranty: RMS Medical Products/Repro-Med Systems, Inc. (“Manufacturer”) warrants the infusion pump to be free from defects in materials and workmanship under normal use, if used in accordance with device operating instructions. Warranty is limited to Original Purchaser for one year from date of purchase. The “Original Purchaser” is the person purchasing the infusion pump from the Manufacturer or Manufacturers Representative. Warranty does not extend to subsequent purchasers. Subject to the conditions of and upon compliance with the procedures set forth in this limited warranty, the Manufacturer will repair or replace, at its option, any infusion pump, or part thereof, which has been actually received by the Manufacturer or Manufacturers Representative within the one year warranty period, and which examination discloses, to the Manufacturer’s satisfaction, that the product is defective. Replacement product and parts are warranted only for the remaining portion of the original one-year warranty period. This warranty does not apply to accessories and disposable items. The following conditions, procedures, and limitations apply to the Manufacturer’s obligations under this warranty: Parties Covered by this Warranty: This warranty extends only to the Original Purchaser of the infusion pump. This warranty does not extend to subsequent purchasers. Warranty Performance Procedure: Notice of the defect must be made in writing to Customer Support Department, RMS Medical Products/Repro-Med Systems, Inc., 24 Carpenter Road, Chester, NY 10918, USA. Notice to RMS Medical Products/Repro-Med Systems, Inc. must include the model and serial number, date of purchase, and description of the defect in sufficient detail to facilitate repairs. Authorization must be obtained by the Original Purchaser from the Manufacturer or Manufacturers Representative prior to returning the product to the Manufacturer. The defective pump must be properly packaged and returned to the Manufacturer, postage-prepaid. Any loss or damage during shipment is at the risk of the Original Purchaser. Conditions of Warranty: This warranty does not apply to any product, or part thereof, which has been repaired or altered outside of the Manufacturer’s facility in a way so as, in Manufacturer’s judgment, to affect its stability or reliability, or which has been subjected to misuse, negligence or accident. Misuse includes, but is not limited to, use without compliance with the device operating instructions or use with non-approved accessories or disposable items. Limitations and Exclusions: Repair or replacement of an infusion pump or component part is the EXCLUSIVE remedy offered by the Manufacturer. The following exclusions and limitations shall apply: o o o o o No agent, representative, or employee of the Manufacturer has authority to bind the Manufacturer to any representation or warranty, expressed or implied, or to change this limited warranty in any way. THIS LIMITED WARRANTY IS IN LIEU OF ALL OTHER WARRANTIES, EXPRESS OR IMPLIED, INCLUDING, BUT NOT LIMITED TO, WARRANTIES OF MERCHANTABILITY AND FITNESS FOR A PARTICULAR PURPOSE. THERE ARE NO WARRANTIES THAT EXTEND BEYOND THE DESCRIPTION ON THE FACE HEREOF. Manufacturer’s liability under this Limited Warranty Agreement shall not exceed to special, indirect, or consequential damages. The infusion pump can only be used under the supervision of medical personnel whose skill and judgment determine the suitability of the infusion pump for a particular medical treatment. All recommendations, information, and descriptive literature supplied by the Manufacturer or its agents are believed to be accurate and reliable, but do not constitute warranties. This warranty and the rights and obligations hereunder, shall be construed under and governed by the laws of the State of NY, USA. Definition of symbols: – On Use by YYYY-MM-DD or YYYY-MM Do not reuse OFF Off Batch code Serial number Caution, consult accompanying documents Manufacturer Sterilized using irradiation Consult instructions for use Quantity Authorized representative in the European Community Catalog number RMS UK Ltd, 28 Trinity Rd, Nailsea, Somerset BS48 4NU, UK RMS Medical Products 24 Carpenter Rd. Chester, NY 10918 USA Ph. 800-624-9600 • 845-469-2042 www.rmsmedicalproducts.com Patent No. 398,053 WWW.FREEDOM60.COM 337125 Rev C English 8 of 8