1
HelpAndManual_unregistered_evaluation_copy
GEMS Home User Manual
Produced On: 05/10/2015
Document Number: 4104
I
GEMS Home User Guide
Table of Contents
Part I Welcome to GEMS Home
1
Part II Navigating GEMS Home
1
Part III Manage Users
3
1 Create ...................................................................................................................................
User
4
..........................................................................................................................................................
5
The User Inform
ation Form
..........................................................................................................................................................
7
Em ail Verification
2 List and
...................................................................................................................................
Edit Users
8
Part IV Manage Data
9
1 List HR
...................................................................................................................................
Recordings
10
.......................................................................................................................................................... 11
View HR Report
Diary Entry .......................................................................................................................................................... 12
2 Import...................................................................................................................................
HR Recordings
13
Part V SMART Monitoring Review
15
1 Request
...................................................................................................................................
SMART Monitoring Review
16
2 Show...................................................................................................................................
Review Statuses
18
20
ECG Analysis..........................................................................................................................................................
Report
.......................................................................................................................................................... 21
ECG Triage Report
Part VI Device Authentication
23
Part VII Unlocking Waveform Display
23
Part VIII Notification
24
Part IX Preferences
25
Part X Note to Users of the HeartCheck Handheld
ECG Monitor
27
Part XI Contact Information
28
Part XII Regulatory Notices
29
© 2015
Welcome to GEMS Home
1
1
Welcome to GEMS Home
Welcome to GEMS Home!
GEMS Home is a software package that has been provided to you as part of your UNREGISTERED
EVALUATION VERSION purchase. GEMS Home lets you manage your heart information and import
heart rhythm ("HR") recordings to your computer from a UNREGISTERED EVALUATION VERSION.
GEMS Home also provides the ability to request a SMART Monitoring Review of your HR recordings and
receive a report.
Get the latest GEMS Home help and support information online. Visit http://
www.theheartcheck.com/.
This help file was created with an unregistered evaluation copy of Help & Manual. © EC Software. All
rights reserved. This message will not appear if you compile this help file with the registered version of
Help & Manual.
2
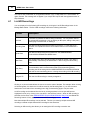
Navigating GEMS Home
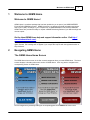
The GEMS Home Home Screen
The GEMS Home home screen is the first screen that appears when you start GEMS Home. The home
screens displays information about each section of GEMS Home. Click any panel to navigate to the
corresponding section in GEMS Home.
You can navigate to any section by clicking the corresponding panel on the GEMS Hom e hom e screen.
© 2015
2
GEMS Home User Guide
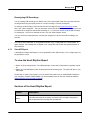
The main display of GEMS Home
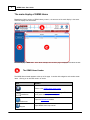
Regardless of which section of GEMS Home you are in, the structure of the main display is the same.
The main display has three areas:
The m ain display of GEMS Hom e. In the above exam ple, the List Users page is displayed in the m ain w indow .
The GEMS Home Header
The GEMS Home header appears at the top of the page. It assists with navigation and contains seven
items. Clicking on an item will result in an action:
Item
Action
Return to the GEMS Home home screen.
Notification
Navigate to the Show Review Statuses page. This icon
turns green when a report is ready.
Open the Preferences window.
Preferences
Open GEMS Home help manual.
Support
© 2015
Navigating GEMS Home
Item
Action
Manage Users
Navigate to the Manage Users section.
Manage Data
Navigate to the Manage Data section.
SMART Monitoring Review
Navigate to the SMART Monitoring Review section.
3
The appearance of the GEMS Home header remains the same no matter which section is chosen.
The Navigation Sidebar
The navigation sidebar appears on the left and contains buttons which display various pages in the main
window. The currently displayed page is indicated by black font. Clicking another button will display
that page in the main window. The appearance of the navigation sidebar will change according to the
section. The sections of GEMS Home are color-coded (Manage Users is blue, Manage Data is grey,
SMART Monitoring Review is red).
The Main Window
The main window displays the page selected from the sidebar. Information is displayed and managed
within the main window. The appearance of the main window will change according to the page
selected.
This help file was created with an unregistered evaluation copy of Help & Manual. © EC Software. All
rights reserved. This message will not appear if you compile this help file with the registered version of
Help & Manual.
3
Manage Users
The Manage Users section of GEMS Home lets you:
Create Users
Allows for the creation of new users.
List and Edit Users
© 2015
4
GEMS Home User Guide
Displays a list of all existing users and lets you edit or delete existing users.
Note: When you open GEMS Home, if your version of the application is not the
most recent version, a New Version Available link is displayed at the bottom of the
navigation sidebar. Click the link and follow the instructions on the website for
downloading the newest version of GEMS Home.
This help file was created with an unregistered evaluation copy of Help & Manual. © EC Software. All
rights reserved. This message will not appear if you compile this help file with the registered version of
Help & Manual.
3.1
Create User
You can create a user by clicking the Create User button in the Manage Users sidebar.
You must create a user in order to use GEMS Home. If no user exists, you will be prompted to create a
user when you start GEMS Home.
Please note there is a user limit in GEMS Home. Until you authenticate your device online, only one
user can exist. After you authenticate your device, up to five users can exist at once. If you have
multiple devices, the user limit will increase by five for each device you authenticate. See Device
Authentication for more details.
It is recommended that you create a separate user in GEMS Home for each individual using the
UNREGISTERED EVALUATION VERSION.
Sections of the Create User Page
The User Information Form
If you are under the user limit, clicking the Create User button will display the user information form in
the main window. You can enter the user's personal information here.
Email Verification
Although you can create a user without entering an email address, you must have a verified email
address to request a UNREGISTERED EVALUATION VERSION and receive a report. Therefore it is
recommended to enter and verify the user email address when you create the user. Verifying your email
© 2015
Manage Users
5
will also allow you to receive email notification when a new report is ready to view. You can also choose
to attach the report to the email notification.
This help file was created with an unregistered evaluation copy of Help & Manual. © EC Software. All
rights reserved. This message will not appear if you compile this help file with the registered version of
Help & Manual.
3.1.1
The User Information Form
The user information form allows you to add and edit information about GEMS Home users.
You can access the user information form by clicking Create User from the Manage Users sidebar, or by
clicking the Edit User button from the List Users page.
A first name and last name are required to save a user in GEMS Home. A verified email address is
required to request a SMART Monitoring Review and receive a report. However, it is recommended that
all information is entered where applicable. This information can be viewed by the Physician or
Technician and help them perform the SMART Monitoring Review
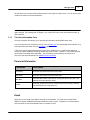
Personal Information
Field Name
Description
First Name
Enter the first name of the user into this field.
Last Name
Enter the last name of the user into this field.
Birth Date
Enter the date of birth of the user by clicking the arrow to the right of the
field and using the calendar control.
Gender
Enter the gender of the user by clicking the arrow to the right of the field
and selecting from the drop-down list.
Email
Although you can create a user without entering an email address, you must have a verified email
address to request a SMART Monitoring Review and receive a report. Therefore it is recommended to
enter and verify the user email address when you create the user.
© 2015
6
GEMS Home User Guide
Item
Description
Email Address
Enter in the user's valid email address.
Verify button
After entering the user's valid email address, click this button to begin the
Email Verification process.
Check for Verified Email
button
After verifying your email, click this button to complete the Email
Verification process.
Attach Report To Email
Notification checkbox
If checked, the report will be attached to the email notification.
Verify Status
Indicates the status of the Email Verification process.
Telephone Contact Information
SMART Monitoring can phone certain users in the event of finding an arrhythmia of concern. This option
is available to North American users only. To enable this option, check 'I authorize SMART Monitoring
to phone me in the event of finding an arrhythmia of concern' and enter a valid North American phone
number prior to requesting a review. If this checkbox is not checked or if a valid North American phone
number is not entered, SMART Monitoring will not be able to contact the user and therefore assume the
user has chosen to opt out.
Item
Description
Primary Telephone
If you have authorized SMART Monitoring to phone you in the event of
finding an arrhythmia of concern, enter your primary phone number here.
From the drop-down list, select the type, e.g. home, mobile, or work.
Secondary Telephone
If you have authorized SMART Monitoring to phone you in the event of
finding an arrhythmia of concern, enter your secondary phone number
here. From the drop-down list, select the type, e.g. home, mobile, or
work.
Pre-Existing Conditions
Item
Description
Pre-Existing Conditions
Check all pre-existing conditions that apply to the user. This information
can assist the reviewer of your HR recording.
© 2015
Manage Users
7
To save your changes, click the Save button. To save your changes and return to the List Users page,
click the Done button. To return to the List Users page without saving your changes, click the Cancel
button.
This help file was created with an unregistered evaluation copy of Help & Manual. © EC Software. All
rights reserved. This message will not appear if you compile this help file with the registered version of
Help & Manual.
3.1.2
Email Verification
Although you can create a user without entering an email address, you must have a verified email
address to request a report. Therefore it is recommended to enter and verify the user email address
when you create the user.
Users who enter and verify their email address can receive an email notification when a new report is
ready. You can also choose to attach the report directly to the email notification.
Email verification is done by uploading your email address to the HeartCheck™ website.
Step-by-Step Process to Verify Email
Step 1: Enter your email address and click the Verify button.
When an email address is first entered into the Email Address field of the user information form,
a red "X" sign will appear beside the Verify button. This indicates that the email address still needs to
be verified.
To help ensure that you receive email from the HeartCheck™, please add '[email protected]' to your Safe Senders List. If you do not receive an
email, please check your Spam or Junk folder.
To start the verification process, enter your email address and click the Verify button to the right of the
red X sign. If the email is valid, a new window will open titled "Email Verification". Click the OK button
at the bottom of this window.
A progress bar will be displayed at the bottom of the window to indicate the email upload progress.
When complete, a message will appear above the progress bar stating "Upload Complete. Email
Verification has been sent. Please check your email". Click OK to close this window when complete.
An internet connection is required.
Step 2: Check your email and follow the provided link.
© 2015
8
GEMS Home User Guide
After completing the previous verification step, a yellow triangle sign will replace the red "X" sign.
If the email address was entered correctly, an email will arrive at the address with instructions and a
link to complete the verification process.
Please follow the instructions contained within the email and click the provided link.
Once clicked a new window should appear with a message to confirm the verification:
Step 3: In GEMS Home, click the Check for Verified Email button.
Within GEMS Home, on the user information form, click the Check for Verified Email button. A new
window with a progress bar will display and will let you know once verification is complete.
Step 4: Set email options.
Once verified, a green check mark sign will replace the yellow triangle.
You now have the option to use the "Receive Email Notification" checkbox and the "Attach Report to
Email Notification" checkbox.
If the "Receive Email Notification" checkbox is checked, an email will be sent to your verified email
address to notify you when a SMART Monitoring Review is complete and a report is ready.
If the "Attach Report to Email Notification" checkbox is checked, the report will be attached to the
notification email in PDF format.
This help file was created with an unregistered evaluation copy of Help & Manual. © EC Software. All
rights reserved. This message will not appear if you compile this help file with the registered version of
Help & Manual.
3.2
List and Edit Users
List Users
You can display a list of all existing users by clicking the List Users button in the Manage Users
© 2015
Manage Users
9
sidebar. If multiple users exist, you can sort the order by clicking any of the list headers (i.e. Name,
Birth Date, Gender). The list will be sorted by the header you click. Click once to sort the list in
ascending order. Click again to sort the list in descending order.
Edit User
To edit information of an existing user, first select the user by clicking on the user in the list. The row
will become highlighted to indicate the user has been selected. Next click the Edit User button in the
top-right corner of the main window. You can also edit a user's information by double-clicking on the
user. The user information form will be displayed, and you can edit any of the fields. From the Edit User
page, you can also delete a user by selecting the user from the list and clicking the Delete button in the
top-right corner. For details, see the User Information Form.
This help file was created with an unregistered evaluation copy of Help & Manual. © EC Software. All
rights reserved. This message will not appear if you compile this help file with the registered version of
Help & Manual.
4
Manage Data
The Manage Data section of GEMS Home lets you:
List HR Recordings
The List HR Recordings page lists all HR recordings that have been imported into GEMS Home. From
this page, you can also view an HR report, UNREGISTERED EVALUATION VERSION, reassign HR
recordings, and delete HR recordings.
UNREGISTERED EVALUATION VERSION
When the HeartCheck™ device is connected to a computer via the supplied USB cable, HR recordings
stored on the device can be imported to the computer.
Note: When you open GEMS Home, if your version of the application is not the
most recent version, a New Version Available link is displayed at the bottom of the
navigation sidebar. Click the link and follow the instructions on the website for
downloading the newest version of GEMS Home.
© 2015
10
GEMS Home User Guide
This help file was created with an unregistered evaluation copy of Help & Manual. © EC Software. All
rights reserved. This message will not appear if you compile this help file with the registered version of
Help & Manual.
4.1
List HR Recordings
You can display a list of all existing HR recordings by clicking the List HR Recordings button in the
Manage Data sidebar. The list of HR recordings contains the following information:
Column
Description
Selected
If checked, it indicates the HR recording is selected. You can perform actions
on selected HR recording(s), such as viewing an HR report, adding a diary entry,
reassigning to another user, or deleting it.
Recording Date
The date the HR recording was recorded on the device. For this date to be
accurate, it's important to set the correct date and time on the HeartCheck™
device.
Import Date
The date the HR recording was imported from the UNREGISTERED
EVALUATION VERSION into GEMS Home.
Heart Rate
The average heart rate of the HR recording in beats per minute. This value is
automatically calculated by the HeartCheck™ device using the HR recording
data.
Diary Entry
A note or comment added by the user regarding the HR recording. It's
recommended to add a comment about what the user was doing prior to
recording the HR recording with the UNREGISTERED EVALUATION VERSION
and how the user was feeling prior to or during the recording of the HR recording.
Assigned To
The user the HR recording is currently assigned to.
Clicking on a column header allows the user to re-sort the order of the data. For example: When clicking
on Recording Date, the data in the list will be sorted by the Recording Date. If you click the same
header twice it will switch from ascending (low to high) to descending (high to low) sort order.
An HR recording can be selected from the list by clicking anywhere in its row (row will become
highlighted in blue) or by clicking in the checkbox in the 'Selected' column. When an HR recording is
selected, the functions of the UNREGISTERED EVALUATION VERSION, Diary Entry and Delete HR
Recording buttons will only apply to the selected HR recording(s).
Note that multiple HR recordings can be selected. This lets you reassign multiple selected HR
recordings or delete multiple selected HR recordings at the same time.
Selecting an HR recording also allows you to reassign the HR recording to another user.
© 2015
Manage Data
11
Reassigning HR Recordings
You can reassign HR recordings to a different user. This can be helpful if the wrong user was selected
for assignment during the import process or if an HR recording is currently unassigned.
To reassign an HR recording, select at least one HR recording from the List HR Recordings screen.
Next, click "Select Assignee". This is a drop-down menu listing all GEMS Home users. Select the user
you would like to assign the selected HR recordings to. You can also choose to set the HR recordings
to 'Unassigned'. Once you've selected the user, click the "Save Changes" button.
You can confirm the reassignment by checking the 'Assigned To' column of the HR recording(s) you
selected.
This help file was created with an unregistered evaluation copy of Help & Manual. © EC Software. All
rights reserved. This message will not appear if you compile this help file with the registered version of
Help & Manual.
4.1.1
View HR Report
A Heart Rhythm Report ("HR Report") can be generated for each HR recording. Only a single report can
be generated at a time.
To view the Heart Rhythm Report
Select an HR recording from the "List HR Recordings" screen that you would like to generate a report
for.
Select the "View HR Report" button located above the HR recordings list. The report will open in your
PDF reader.
Please Note: In order to view reports, you must have a PDF reader such as Adobe Reader installed on
your computer. If needed, Adobe Reader may be downloaded online for free from the Adobe website (
UNREGISTERED EVALUATION VERSION).
Sections of the Heart Rhythm Report
© 2015
Section
Description
Header
Information about the HR recording, the user the HR recording is assigned to,
and the device the HR recording was recorded with.
12
GEMS Home User Guide
The heart rhythm waveform display recorded by the HeartCheck™ device.
NOTE
HR Recording
Waveform Display
HR recording waveform display is
locked by default.
See UNREGISTERED
EVALUATION VERSION for details.
Information entered by the user, including Pre-Existing Conditions, Symptom,
Information entered
Activity, Blood Pressure, and the Diary Entry comment. See Diary Entry for
by the user
details.
This help file was created with an unregistered evaluation copy of Help & Manual. © EC Software. All
rights reserved. This message will not appear if you compile this help file with the registered version of
Help & Manual.
4.1.2
Diary Entry
The Diary Entry page lets you add information about a specific HR recording. This information can
assist the user in managing their HR recordings, and it can also be viewed by the UNREGISTERED
EVALUATION VERSION or Technician and help them perform the SMART Monitoring Review. It is
recommended that the user enter the Symptom and Activity fields for each HR recording.
To access the Diary Entry page of an HR recording
Select a single HR recording from the List HR Recordings page and click the Diary Entry button.
Input fields of the Diary Entry page
Input field
Description
Symptom
From the drop-down list, please select the symptom the user was experiencing
at the time the HR recording was recorded.
Activity
From the drop-down list, please select the activity the user was engaged in at
the time the HR recording was recorded.
Blood Pressure
If known, please enter the user's blood pressure (in mmHg) at the time the HR
recording was recorded. Enter systolic blood pressure in the field labeled SBP
and diastolic blood pressure in the field labeled DBP.
© 2015
Manage Data
13
Input field
Description
Diary Entry
Enter a comment specific to the selected HR recording, such as what the user
was doing prior to recording the HR recording with the HeartCheck™ device and
how the user was feeling prior to or during the recording of the HR recording.
For example: "I have been feeling tired for a few days."
Press Save to accept the entry and return to the List HR Recordings page. If you wish to cancel your
changes and return to the List HR Recordings page, click the Cancel button.
HR Recording Waveform Display
The heart rhythm waveform recorded by the device is displayed here.
NOTE
HR recording waveform display is locked by
default. See Unlocking Waveform Display for
details.
This help file was created with an unregistered evaluation copy of Help & Manual. © EC Software. All
rights reserved. This message will not appear if you compile this help file with the registered version of
Help & Manual.
4.2
Import HR Recordings
When the HeartCheck™ device is connected to a Personal Computer (PC) via the supplied USB cable,
HR recordings stored on the device can be imported into GEMS Home and assigned to a GEMS Home
user.
Step-by-Step Process to Import HR Recordings
Step 1: Connect the HeartCheck™ device to your computer using the supplied
USB Cable.
Please note that you may need to wait for your computer to recognize and connect to the HeartCheck™
device before it can be used.
© 2015
14
GEMS Home User Guide
Step 2: Ensure the HeartCheck™ device is turned on.
If not already turned on, press and hold the power button until the device turns on. Please note that the
device will automatically turn off if unused for a short time.
Step 3: Navigate to the Import HR Recordings screen.
Click the Import HR Recordings button in the Manage Data sidebar.
Step 4: Set your import preferences.**
When you import HR recordings you can either keep the original recordings on the device or delete them
all from the device.
Select either "Keep on device" or "Delete All".
"Keep on device" will keep the original HR recordings on the device and also create a copy in GEMS
Home.
"Delete All" will delete all HR recordings from the device and transfer them into GEMS Home. The HR
recordings will no longer be available on the device, only in GEMS Home. Please note that if you
choose to delete HR recordings from the device, it cannot be undone.
Select which user you would like the HR recordings to be assigned to once imported. Please note that
you can reassign an HR recording later.
** NOTE: HeartCheck™ PEN device only. Records must be manually deleted from the HeartCheck™
Handheld ECG Monitor.
Step 5: Click the "Import" button.
Click the "Import" button to begin the import process. The main window will display the List HR
Recordings page. GEMS Home will begin communicating with your device and the HR recordings will
be imported into the GEMS Home software. A progress bar is displayed below the header along with
status messages about the import process.
Note: If your device hasn't been authenticated yet, you will be prompted to authenticate your device. If
you don't authenticate your device, you won't be able to import HR recordings. For details, see Device
Authentication.
This help file was created with an unregistered evaluation copy of Help & Manual. © EC Software. All
rights reserved. This message will not appear if you compile this help file with the registered version of
Help & Manual.
© 2015
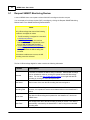
SMART Monitoring Review
5
15
SMART Monitoring Review
The SMART Monitoring Review section of GEMS Home lets you:
Request SMART Monitoring Review
Any user of GEMS Home can request a review of their heart rhythm ("HR") recordings.
In order to have the HR recording reviewed, the user will need to upload the HR recording from the
SMART Monitoring Review section of GEMS Home and agree to have the HR recording data reviewed.
Once reviewed, the user will receive a report that will include any specific information about the HR
recording.
The first time you request a SMART Monitoring Review, only the Interpretation report is available. Once
you complete an initial request for an Interpretation report and receive and view the results, additional
report options are made available.
UNREGISTERED EVALUATION VERSION
Once an HR recording has been uploaded for the SMART Monitoring Review process, it can be tracked
by the user. The Show Review Statuses section shows the current status of the reviews requested. It
also includes the date the request was uploaded and the user associated to the HR recording.
Note: When you open GEMS Home, if your version of the application is not the
most recent version, a New Version Available link is displayed at the bottom of the
navigation sidebar. Click the link and follow the instructions on the website for
downloading the newest version of GEMS Home.
This help file was created with an unregistered evaluation copy of Help & Manual. © EC Software. All
rights reserved. This message will not appear if you compile this help file with the registered version of
Help & Manual.
© 2015
16
5.1
GEMS Home User Guide
Request SMART Monitoring Review
A user of GEMS Home can request a review of their HR recordings and receive a report.
You can display a list of heart rhythm ("HR") recordings by clicking the Request SMART Monitoring
Review button in the SMART Monitoring Review sidebar.
NOTE
Only HR recordings that meet all the following
conditions are eligible for review:
1. The HR recording is assigned to a user with
a verified email address;
2. On the Diary Entry page, the user has
indicated the symptom experienced at the
time the HR recording was recorded;
3. On the UNREGISTERED EVALUATION
VERSION page, the user has indicated their
activity at the time the HR recording was
recorded.
If the above conditions are not met, the HR
recording cannot be selected.
The list of HR recordings eligible for review contains the following information:
Column
Description
Selected
If checked, it indicates the HR recording is selected. Selected HR recordings
can be uploaded for review by clicking the Upload Selected HR Recordings
button. You can also view a Heart Rhythm Report for a single selected HR
recording by clicking the View HR Report button.
User Name
The full name of the user the HR recording has been assigned to.
Recording Date
The date the HR recording was recorded on the device. For this date to be
accurate, it's important to set the correct date and time on the HeartCheck™
device.
Import Date
The date the HR recording was imported from the HeartCheck™ device into
GEMS Home.
Heart Rate
The average heart rate of the HR recording in beats per minute. This value is
automatically calculated by the HeartCheck™ device using the recorded HR
recording data.
© 2015
SMART Monitoring Review
Column
Description
Last Uploaded
Date
The date the HR recording was last uploaded from GEMS Home for a
UNREGISTERED EVALUATION VERSION.
17
Step-by-Step Process to Request a SMART Monitoring Review
Step 1: Navigate to the Request SMART Monitoring Review screen
Click the Request SMART Monitoring Review button in the SMART Monitoring Review sidebar. A list of
all assigned HR recordings will be displayed. If no HR recordings appear, make sure you've imported at
least one HR recording into GEMS Home and assigned it to a user.
Step 2: Select the HR recordings you wish to upload for SMART Monitoring
Review
Select the eligible HR recordings that you would like to have reviewed by placing a check mark into the
checkbox beside the desired HR recording or clicking anywhere in the row to select it. A window
appears asking you to select a reporting option. Select the type of report you want by clicking it and
then clicking the Continue button. You may upload multiple HR recordings at the same time.
Note that an HR recording cannot be selected unless the conditions to be eligible for review have been
met (see Note above).
Step 3: Click the Upload Selected HR Recordings button
Click the Upload Selected HR Recordings button to begin the upload process. Note an internet
connection is required. Please read the disclaimer that appears. To accept, click "OK".
A progress bar will display the upload progress beside the Upload Selected HR Recordings button.
Step 4: Complete the transaction
When the upload is complete, a PayPal window may open to allow you to make payment before
transferring your HR recording(s). Note that certain requests may be eligible for a free review. For more
information, visit http://www.theheartcheck.com/. If the request is not eligible for a free review, please
follow the instructions on the PayPal screen to complete the transaction. You do not need a PayPal
account in order to make a payment.
When the transaction has completed, GEMS Home will display the Show Review Statuses screen.
© 2015
18
GEMS Home User Guide
What happens next?
Once your HR recording(s) have been reviewed, the applicable report is sent back to your GEMS Home
application (one report per HR recording). For details of the report, see HeartCheck™ ECG Analysis
Report or ECG Triage Report. You may also set GEMS Home to automatically send you an email
notification with the report attached (see Email Verification). For information on how to check for new
reports, see Show Review Statuses.
This help file was created with an unregistered evaluation copy of Help & Manual. © EC Software. All
rights reserved. This message will not appear if you compile this help file with the registered version of
Help & Manual.
5.2
Show Review Statuses
Once an HR recording has been uploaded for the SMART Monitoring Review process, it can be tracked
by the user.
The Show Review Statuses section shows the current status of the reviews requested:
Column
Description
User Name
The full name of the user the HR recording has been assigned to.
Recording Date
The date the HR recording was recorded on the device. For this date to be
accurate, it's important to set the correct date and time on the HeartCheck™
device.
Import Date
The date the HR recording was imported from the HeartCheck™ device into
GEMS Home.
Upload Date
The date the review was requested by uploading the HR recording.
Status
The current status of the request. See the table below for a list of statuses.
List of Statuses
© 2015
SMART Monitoring Review
Status
Request
Incomplete
19
Meaning
The user has requested a review. Payment was required but has not been
confirmed yet.
Note that canceled requests may temporarily remain in this state before
changing to Canceled.
Review Requested
The user has requested a review and the payment has been confirmed (or no
payment was required).
Report Ready
The HR recording has been reviewed. The report has been received in GEMS
Home but the user has not yet viewed it.
Completed
The report has been received and the user has viewed it.
Canceled
The user uploaded the HR recording but canceled the request during the
payment process.
Check for Reports
Click the "Check for Reports" button to check if any reports have been completed and are ready for
download. A progress bar indicates that the search is in progress. If you need to cancel the check for
reports, click the red "X" symbol beside the Check for Reports button. Note an internet connection is
required.
If no reports are ready, the message beside the progress bar will say "There are no new reports ready".
If there are reports ready, the reports will be downloaded to GEMS Home. The status of those requests
will change from 'Review Requested' to 'Report Ready'. They will be displayed in bold font and move to
the top of the list in the main window.
Delete
Allows the deletion of a SMART Monitoring Review. The Review in any status can be deleted. If a
Review is deleted prior to receiving the report, the report will not be accessible in GEMS Home.
View Report
To view a report, select a record with status 'Report Ready' or 'Completed' from the list and click the
© 2015
20
GEMS Home User Guide
"View Report" button. Alternatively, double-click the record. The report will open in PDF format. Note a
PDF reader such as Adobe Reader must be installed. For details, see HeartCheck™ ECG Analysis
Report or UNREGISTERED EVALUATION VERSION.
Options Menu
A user can change the status of certain requests. With the row selected, select the option from the
Options drop-down menu.
Option
Description
Changes the status of a review request to Review Requested (only applies if the
Request New Copy status is 'Report Ready' or 'Completed'). The next time GEMS Home checks for
reports, the report will be downloaded again.
The Show Cancelled option toggles whether cancelled requests are shown or not. A check mark
indicates that cancelled requests are shown. This option applies to the entire list of review requests.
The "Notification" icon is used by the SMART Monitoring Review process and is designed to
automatically let a user know when there is a report complete and ready for the user to view. For
details, see Notification.
This help file was created with an unregistered evaluation copy of Help & Manual. © EC Software. All
rights reserved. This message will not appear if you compile this help file with the registered version of
Help & Manual.
5.2.1
ECG Analysis Report
Users can receive a HeartCheck™ ECG Analysis Report from a Physician by requesting a SMART
Monitoring Review (follow link for step-by-step process).
Warning! The HeartCheck™ ECG Analysis Report is not a replacement for
professional medical attention. If you are having an emergency or need a
doctor immediately call the emergency telephone number for your area or seek
medical attention.
© 2015
SMART Monitoring Review
21
To view the HeartCheck™ ECG Analysis Report
Go to the Show Review Statuses page. You can view the report for any review with a status of
"Completed" or "Report Ready" by selecting the review and clicking the View Report button.
The report will open in your PDF reader. Note you must have a PDF reader installed, e.g. Adobe
Reader.
Sections of the HeartCheck™ ECG Analysis Report
Section
Description
Header
Information about the HR recording, the user the HR recording is assigned to,
and the device the HR recording was recorded with.
ECG Analysis
The Physician's recommendation and interpretation, and ECG measurements.
Physician
Information
UNREGISTERED EVALUATION VERSION name and the date the review was
completed on.
ECG Waveform
Display
The heart rhythm waveform display recorded by the device.
Information entered by the user, such as user's Pre-Existing Conditions, and
Information entered
Symptom, Activity, Blood Pressure, and Diary Comment associated with the HR
by user
recording.
Note: The grid's scale (speed and gain) are displayed accurately on the report.
When printing the report, ensure that you select the "Actual Size" radio button
in the Print window. If you leave "Shrink oversized pages" selected, the
waveform display may be distorted in the printed report.
This help file was created with an unregistered evaluation copy of Help & Manual. © EC Software. All
rights reserved. This message will not appear if you compile this help file with the registered version of
Help & Manual.
5.2.2
ECG Triage Report
Users can receive a HeartCheck™ ECG Triage Report from a Technician by UNREGISTERED
EVALUATION VERSION (follow link for step-by-step process).
Warning! The HeartCheck™ ECG Triage Report is not a replacement for
© 2015
22
GEMS Home User Guide
professional medical attention. If you are having an emergency or need a doctor
immediately call the emergency telephone number for your area or seek medical
attention.
To view the UNREGISTERED EVALUATION VERSION
Go to the Show Review Statuses page. You can view the report for any review with a status of
"Completed" or "Report Ready" by selecting the review and clicking the View Report button.
The report will open in your PDF reader. Note you must have a PDF reader installed, e.g. Adobe
Reader.
Sections of the HeartCheck™ ECG Triage Report
Section
Description
Header
Information about the HR recording, the user the HR recording is assigned to,
and the device the HR recording was recorded with.
Rhythm Review
The Technician's review and ECG measurements.
ECG Waveform
Display
The heart rhythm waveform display recorded by the device.
Information entered by the user, such as user's Pre-Existing Conditions, and
Information entered
Symptom, Activity, Blood Pressure, and Diary Comment associated with the HR
by user
recording.
Note: The grid's scale (speed and gain) are displayed accurately on the report.
When printing the report, ensure that you select the "Actual Size" radio button in the
Print window. If you leave "Shrink oversized pages" selected, the waveform display
may be distorted in the printed report.
This help file was created with an unregistered evaluation copy of Help & Manual. © EC Software. All
rights reserved. This message will not appear if you compile this help file with the registered version of
Help & Manual.
© 2015
Device Authentication
6
23
Device Authentication
GEMS Home is designed to communicate with authentic HeartCheck™ devices only. To ensure only
authentic HeartCheck™ devices are used with GEMS Home, you must authenticate your device. This is
a free procedure which is performed online from within the GEMS Home software.
Why authenticate your device?
To import HR recordings into GEMS Home. If you don't authenticate your device, you won't be able to
import HR recordings. Once the HR recording data has been imported into GEMS Home, it's possible
to UNREGISTERED EVALUATION VERSION and UNREGISTERED EVALUATION VERSION.
After you authenticate your device, up to five users can exist at once. If you have multiple devices, the
user limit will increase by five for each device you authenticate.
Process
The first time you UNREGISTERED EVALUATION VERSION from your device into GEMS Home, a
Device Authentication window will appear.
To authenticate your device, follow the instructions in the Device Authentication window. GEMS Home
will verify the device is an authentic HeartCheck™ device. Note that an internet connection is required
for this process.
It's also possible to perform device authentication from the Device Authentication tab in the Preferences
menu (for details, see the Device Authentication section).
This help file was created with an unregistered evaluation copy of Help & Manual. © EC Software. All
rights reserved. This message will not appear if you compile this help file with the registered version of
Help & Manual.
7
Unlocking Waveform Display
GEMS Home has the ability to display the heart rhythm waveform display of imported HR recordings on
the Diary Entry page and Heart Rhythm Report. By default, however, the display is locked (i.e. hidden).
Unlock GEMS Home Display
© 2015
24
GEMS Home User Guide
In order to view heart rhythm waveforms in GEMS Home, the user must first establish a relationship with
a UNREGISTERED EVALUATION VERSION. A relationship with a Physician is established when a
user receives and views a HeartCheck™ ECG Analysis Report from the Physician. For more information
on how to request a report, see the UNREGISTERED EVALUATION VERSION section.
Once the relationship with a UNREGISTERED EVALUATION VERSION has been established, any HR
recordings originating from the same HeartCheck™ device (i.e. the device that recorded the HR
recording for which the Physician generated a report) will be "unlocked", meaning the heart rhythm
waveform will be visible on the UNREGISTERED EVALUATION VERSION and Heart Rhythm Report.
If HR recordings are imported from a different device which has never been unlocked, the steps to
establish a relationship with a Physician must be repeated in order to view the waveform display.
However, if GEMS Home waveform display was previously unlocked using a different install of GEMS
Home, you can unlock GEMS Home waveform display simply by authenticating the device from the
Device Authentication tab in the Preferences menu.
Unlock Device Display
After unlocking waveform display in GEMS Home, the waveform display on the HeartCheck™ device will
automatically be unlocked the next time you import HR recordings into GEMS Home from the device
that recorded the HR recording for which the Physician generated a HeartCheck™ ECG Analysis
Report.
Note also that a new "Unlock Device Display" button will appear in the sidebar of the Manage Data page.
To unlock waveform display on the device without importing HR recordings, connect the device and
power it on, then click the "Unlock Device Display" button. A new window will appear to indicate the
progress. Do not disconnect the device during this time. Once the unlocking procedure is complete
(can take 20-30 seconds), a confirmation message will appear in the window.
This help file was created with an unregistered evaluation copy of Help & Manual. © EC Software. All
rights reserved. This message will not appear if you compile this help file with the registered version of
Help & Manual.
8
Notification
The Notification icon is displayed in the header section of GEMS Home near the top right side.
"Notification" is used by the UNREGISTERED EVALUATION VERSION process and is designed to let a
user know when there is a report complete and ready for the user to view.
The Notification icon remains white if there are no new reports for the user.
The Notification icon turns green when a report is ready.
When the Notification icon is clicked, the Show Review Statuses screen in the SMART Monitoring
Review section is displayed regardless of which section of GEMS Home you are in at the time it is
© 2015
Notification
25
pressed, and the Check for Reports button is activated automatically to download any new reports.
Once the report has been downloaded, the Notification icon turns from green to white.
This help file was created with an unregistered evaluation copy of Help & Manual. © EC Software. All
rights reserved. This message will not appear if you compile this help file with the registered version of
Help & Manual.
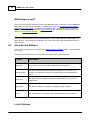
9
Preferences
"Preferences" is where the user can set their own user preferences to customize GEMS Home. Within
"Preferences", a user is also able to authenticate new HeartCheck™ devices and backup the data within
GEMS Home.
Click on the Preferences icon
in the GEMS Home header to open the preferences window where
the options can be changed and saved.
The GEMS Home Preferences window consists of four tabbed sections. You can change which section
you are viewing by clicking the title of the desired tab.
General
The General tab consists of a checkbox titled "Show home screen on startup".
When "Show home screen on startup" is selected, each time GEMS Home is opened, the GEMS Home
home screen will display. This option is selected by default.
If this is not selected, then GEMS Home will display the List Users page on startup.
Reports
The Reports tab provides one option for checking for new reports. Note that GEMS Home will only
check for reports when a report has been requested but not yet received.
While GEMS Home is running and a report has been requested but not yet received, it can periodically
check if there are any complete reports waiting for download. For example: If the "Report check interval
(minutes)" is set to 5, then every 5 minutes GEMS Home will check to see if there are any complete
reports waiting for download. By default it is set to check for reports every 5 minutes. This can be
changed by using the drop-down menu located beside "Report check interval (minutes)". Checking for
reports too frequently may cause computer performance issues depending on the user's internet speed.
If you don't want GEMS Home to periodically check for reports, set the "Report check interval" to 0.
© 2015
26
GEMS Home User Guide
If you change the interval, you must close and restart GEMS Home in order for the change to take place.
If GEMS Home checks for reports and finds there is a report waiting for download, the Notification icon in
the GEMS Home header will turn green.
Database
The Database tab provides a way to backup and restore your data in GEMS Home.
Clicking the Backup Data button will create a backup of your GEMS Home data . Note if you have
previously backed up your data, the new backup will overwrite the previous backup.
A message below the Restore Data button displays when the last backup was made. To restore your
data from the backup, click the Restore Data button.
Note: Be very careful when restoring data! Any changes made since the last
backup will be lost. The data will only be restored to the point at which the last backup
was performed.
If no backup has been performed no data can be recovered. The above data backup functions can be
used if your data somehow becomes corrupt or if some data is lost.
Device Authentication
The Device Authentication tab provides basic device management capabilities. There are four parts to
this tab:
1. A table appears at the top of the window and lists all devices that have been connected to GEMS
Home. The table has the following columns:
Column
Description
Serial Number
Identifies the device.
Device
Identifies the device.
User Limit
Indicates the increase to the total number of GEMS Home users allowed by the
device. Note the total number of GEMS Home users allowed is cumulative; for
example, if the list shows three devices with a user limit of 5, the total number of
GEMS Home users allowed is 15.
© 2015
Preferences
27
Column
Description
Authenticated
Indicates whether or not the device has been authenticated yet. A check mark
indicates the device has been authenticated. For details, see Device
Authentication.
2. The Search for New Device button allows a user to manually add a new device to the table. With the
device connected to the computer via the supplied USB cable and powered on, press the "Search for
New Device" button. If found, the device will appear in the table.
3. The Authenticate Device button allows a user to authenticate an unauthenticated device for use with
their GEMS Home install. Select the device in the table and click Authenticate Device. The Device
Authentication window will appear. For details, see Device Authentication. Please note that device
authentication can also be performed when Importing HR Recordings.
4. The status message area appears at the bottom of the window and displays status messages when
communication occurs between the device and GEMS Home.
Once the desired changes have been made within GEMS Home Preferences, click the "Apply" button to
save the changes.
Click the "OK" button to close the GEMS Home Preferences window.
This help file was created with an unregistered evaluation copy of Help & Manual. © EC Software. All
rights reserved. This message will not appear if you compile this help file with the registered version of
Help & Manual.
10
Note to Users of the HeartCheck Handheld ECG Monitor
NOTE
This page applies to users of the HeartCheck™
Handheld ECG Monitor only.
Device Authentication
To complete UNREGISTERED EVALUATION VERSION, users of the HeartCheck™ Handheld ECG
Monitor ("Handheld") must complete an additional step.
The authentication process will begin the same as described in the Device Authentication process.
However, after clicking the OK button in the Device Authentication window, a prompt for manual
authentication will appear.
© 2015
28
GEMS Home User Guide
Input field
Description
Select an email address from the drop-down list of verified email addresses. If no
email address has been verified yet, you will be redirected to complete the Email
Verification process.
Email
If this is the first time authenticating, note that the selected email address will
become associated with the device and will be required to complete any future
device authentication (for example, on a different computer).
If the device has previously been authenticated and you wish to re-authenticate,
authentication can only be completed if you select the same email address that
was selected during the initial device authentication.
Serial Number
Enter the serial number (SN) printed on the label on the back of the device.
Activation Code
Enter the activation code printed and enclosed with the device documentation.
When all fields are entered correctly, click the Authenticate Device button to complete the process.
Handheld users are allowed one GEMS Home user per device.
This help file was created with an unregistered evaluation copy of Help & Manual. © EC Software. All
rights reserved. This message will not appear if you compile this help file with the registered version of
Help & Manual.
11
Contact Information
For more information regarding your HeartCheck™ device please visit our website at:
http://www.theheartcheck.com/
For assistance with your GEMS Home software please contact:
CardioComm Solutions, Inc.
Address:
203 - 919 Fort St.
Victoria, BC, Canada
V8V 3K3
Email:
[email protected]
© 2015
Contact Information
29
Website:
www.cardiocommsolutions.com
Customer Support:
Toll free: 1-877-744-1122. For the Help Desk press 4.
This help file was created with an unregistered evaluation copy of Help & Manual. © EC Software. All
rights reserved. This message will not appear if you compile this help file with the registered version of
Help & Manual.
12
Regulatory Notices
Notice (European Union)
Marking by the CE symbol indicates compliance to Medical Devices Directive 93/42/EEC.
A "Declaration of Conformity" in accordance with the directives has been made and is on file with the
Authorized Representative:
RMS - UK Limited
28 Trinity Road
Nailsea, Somerset, BS484NU
England
This help file was created with an unregistered evaluation copy of Help & Manual. © EC Software. All
rights reserved. This message will not appear if you compile this help file with the registered version of
Help & Manual.
© 2015