1
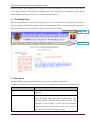
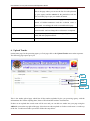
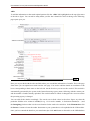
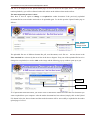
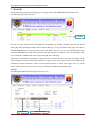
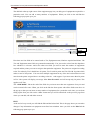
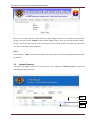
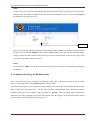
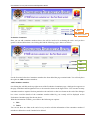
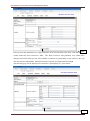
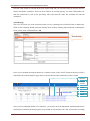
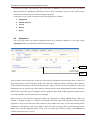
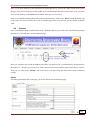
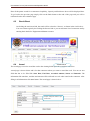
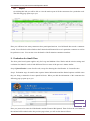
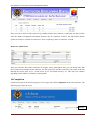
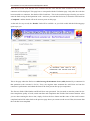
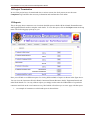
User Manual: e-tool; Construction Development Board
User Manual
FOR
Online Tender Evaluation Tool (e-tool)
Construction Development Board
Ministry of Works and Human Settlement
1
User Manual: e-tool; Construction Development Board
Table of Contents
1.
Summary of the Procuring Agency/ Focal Person task. .............................................................................. 3
2.
Accessing the eTool. .................................................................................................................................... 4
3.
eTool Log In. ............................................................................................................................................... 4
4.
eTool Home Page. ........................................................................................................................................ 5
5.
Main menu. .................................................................................................................................................. 5
6.
Upload Tender ............................................................................................................................................. 6
7.
Work ID ..................................................................................................................................................... 10
7.1
Equipment .......................................................................................................................................... 11
7.2
Human Resource ................................................................................................................................ 13
Evaluation .................................................................................................................................................. 15
8.
8.1
Add ..................................................................................................................................................... 17
8.2
Equipment .......................................................................................................................................... 20
8.3
Human Resource ................................................................................................................................ 21
8.4
Process ............................................................................................................................................... 22
8.5
Result Reset........................................................................................................................................ 23
8.6
Award ................................................................................................................................................. 23
8.7
Report ................................................................................................................................................ 24
9.
Evaluation for Small Class ......................................................................................................................... 24
10.
Completion............................................................................................................................................. 25
11.
Project Termination ............................................................................................................................... 27
12.
Reports ................................................................................................................................................... 27
13.
Log Out .................................................................................................................................................. 29
2
User Manual: e-tool; Construction Development Board
1. Summary of the Procuring Agency/ Focal Person task.
E-tool is a web based online tender evaluation tool developed based on new Point based system as per the
ABSD initiative by the CDB Secretariat. E-tool is developed to facilitate and make the work of evaluator
easier and less time consuming. The procuring agencies (RGOB funded) are parties or end users of this tool.
Each identified focal person nominated by the Procuring Agency’s are provided with a login Name and
Password which can be used to access into the e-Tool.
The focal person nominated by your agency/department shall be responsible for feeding in information on etool on timely basis as and when required.
The focal person is expected to use the system judiciously and honestly as instructed/mandated by the tender
committee of your agency.
In case of misuse or fiddling of information on e-tool the focal person will be held accountable. Official
concern should surrender the password when ever transferred from the current organization or in case of
resignation. In order to prevent miss use of your user account you are recommend to change your password
frequently.
The e-tool has different stages or modules as per the tendering process which are : 1. NIT advertisement, 2.
Setting Criteria, 3. Evaluation of Bids,4.Completion report and finally 5. Reports. These five modules will be
explained step by step accordingly. One of the main responsibility of the focal person is to feed the
Information correctly and on timely basis other wise the whole purpose of the e-tool will be defeated.
3
User Manual: e-tool; Construction Development Board
2. Accessing the eTool.
In order for the procuring agency to upload a tender, the procuring agency first needs to open the CDB web
site by typing on the internet explorer or any browser the url: www.cdb.gov.bt. Or agencies with
Thimphu- WAN(TWAN) connection can access the site with this address: http://172.20.60.3/etool.
e-Tool
Here in this home page we can clearly see the e-Tool menu on the top corner of the web site. You can click on
this menu to reach the e-Tool login page.
3. eTool Log In.
On clicking the eTool menu you will be redirected to the following login page.
Here you can type in the correct user name and password to gain access to the eTool home page. Once the
user name and password provided to you by the CDB is entered in the right field just click on the ‘Login’
4
User Manual: e-tool; Construction Development Board
button to proceed. We recommend you to change your password frequently and not to share with others.In
case of the focal person is transferred or resigned from the office ,the offical concerned and the agency should
inform CDB to deactivate the user to prevent it from unlawful practices.
4. eTool Home Page.
When the login button is clicked on the Login page you are forwarded to the home page of the eTool for
procuring agency. This homepage displays the latest Notification and News of a particular Procuring Agency
and also the menu for various interfaces is shown at the top menu of the page.
Change pwd
MAIN MENU
5. Main menu.
The main menu on the top displays the links to actions you can perform on the eTool.
The following Table gives the insight to the actions corresponding to the links displayed on main menu.
Main Menu Link
Home
Action
Redirects to the home page where Notice and News can be
displayed.
Upload Tender
This is the page from where you can advertise your NIT
details and upload Tender documents on CDB website. This
will help agencies attracting more bidders and also help
contratcors as one window for NITs and even download
tenders documents without having to move from place to
place. Here the Work Id is also being created.
5
User Manual: e-tool; Construction Development Board
WorkId
For every work the system will generate a unique work ID.
This is the page where you can see the list of works uploaded
by your Agency and the criteria for the particular works are
also set in this page as per your tender document.
Evaluation
The actual evaluation is done on this page. Here you add the
details of bidders/contractors and the evalution result is
genereated. Accordingly the work is awarded on this page.
Completion
Can see only the list of Contractors to whom the work has
been awarded. And can change the work status to completed.
Report
Can view the reports of any contractor regarding the work in
hand, HR and equipment details.
LogOut
Button to log out from this secure section
6. Upload Tender
On the home page for the procuring agency’s eTool page click on the Upload Tender menu at the top menu.
The following page opens up to you.
AD
D
VIEW
EDIT
REMOVE
This is the tender upload page which lists all the tenders uploaded by the you procuring agency with the
informations like Tender Opening Date, Name of Work and the last date of submission.
If there are no uploads the record count will be zero and you can add new tender into your page using the
ADD link seen on the top right of the page. Since there are three uploads so far the record count is 3 at the top
of the list. To add a new tender you need to follow the steps below:
6
User Manual: e-tool; Construction Development Board
ADD
To add the information on the tender upload portion click the ‘ADD’ link hightlighted on the top right corner
of the above figure. You can add as many tender you like but it should be valid. On doing so the following
page opens up to you.
ADD
Here you are provided with the relevant fields where you can add the information of a tender. This is the page
from where you can upload new tender into the web page. You need to add the details in accordance to the
boxes corresponding to their name on the left side. On the first box you can see the work id. This workid is
automatically generated by the system in the format Procuring Agency name, following with the current year
and the number of tenders already uploaded. The workid cannot be edited or changed with a new one unless
the procuring agency is changed.
You can add all the details accordingly. The words seen in Red colour in the above figure says that the
particular field has to be written in months(For eg: 12 for twelve months, 13 for thirteen months,etc…) and
the Dzongkhag list shows that it is the exact location for the work to be carried on. In the Filename box click
the Browse.. button to locate the tender documents at your system that is to be uploaded in the CDB website.
Once you have entered the details to your satisfaction just click Add button to forward it to the CDB database
7
User Manual: e-tool; Construction Development Board
and also to be displayed on the upload tender page of eTool as shown in the figure above. This particular
tender uploaded by you will be reflected on the cdb website at the sidebar where tender reflects.
The most important part here is that :
Here there is also an option to change or re-upload the tender document if the previously uploaded
document/file has some mistake and needs to be uploaded again. To do this open the Upload Tender page as
follows :
Click here to
change the file
The uploaded files are of different formats like pdf, word document, excel files etc.. and are shown in the
Files Attached line as shown by the arrow line in the above diagram. If any one of the uploaded file has to be
changed or re-uploaded, we need to click on the image and the following pop up window opens up to you.
Browse
Upload File
To re-upload the tender document, you need to click on the Browse button and select the new document you
want to upload from your computer. After the tender document has been selected, simply click on the Upload
File button below the browse button and the tender document will be successfully re-uploaded in the tender
upload page of e-Tool.
8
User Manual: e-tool; Construction Development Board
For each tender uploads you will find four following links:
1. WorkId
2. View
3. Edit
4. Remove
Work Id
As soon as you add tender (tender published in the CDB website), you will be provided with this link. This
link is the most important link in this eTool system. After the tender is being uploaded you should click this
link(Note:- This is necessary).
On clicking the WorkId link all the details available on the page will be pushed into the database of the CDB
and once the information gets inserted to the database the workid link will disappear from this page. So if the
link disappears, you are sure that the information of the tender has been inserted to the database.
This workid gets generated when you add a tender and only after clicking this link you will be able to proceed
further with other necessary things to be done(like evaluation and setting criteria for that particular work).
View
This is the link to download the tender uploaded by you and to view the details of the tender. This is optional.
You can download the tender whenever you are in need.
Edit
To edit the information of the tender click on the Edit link between the view link and the remove link. You
can edit the tender details in case of re-tender or to make necessary correction to the tender. In case where you
need to re-tender the previously tendered work, you can always use this edit link to edit the informations and
re-tender.
The details of a particular work will be displayed here in their respective boxes. You can edit any of the
information whichever you feel is relevant for changes. After you are done editing you just need to click on
the ‘Save’ button below shown with an arrow and you will be taken back to the upload tender page. You can
change this information whenever needed.
Remove
If you want to remove the tender from the data base click on the remove link on the bottom right corner of the
figure. You will be notified with a message whether you are sure to delete the record or not. If you click ‘OK’
it will be deleted, otherwise you can cancel it. Once the entry is removed it will no longer be displayed at the
tender list.
9
User Manual: e-tool; Construction Development Board
7. Work ID
On the home page for the procuring agency’s eTool page click on the Work Id menu at the top menu.
The following page opens up to you.
CRITERIA
The list of all the works that has been pushed to the database by clicking “WorkId” link from the upload
tender page after uploading the tender will be listed on this page. Every work listed in this page will contain a
different work id and of course the name of the work differs. Here you can see only limited details of the
work like work id, name of the work, duration, class and category of contractors who can participate. After
every record the “Criteria” link can be seen on the right side of the page.
If the work is mentioned for contractors A and B class, this criteria link can be seen since you need to set the
criteria for those contractors. But if the contractor is of type C, then criteria option will not be available as the
evaluation for those contractors is done as lowest quoted bid basis as shown in the figure above. To set the
criteria click on the Criteria at the end of every work details and follow the following steps.
Criteria
On clicking this link the following page opens up to you.
EQUIPMENT
HUMAN RESOURCE
10
User Manual: e-tool; Construction Development Board
On the top of the page the detailed information of the work is being listed. Below the Work details the
following buttons shown with the arrow in the above diagram will be available.
1. Equipment
2. Human Resource
This is the page where you set the criteria for Equipment and Human Resource for that particular work listed
at the top of the page. With these criteria set, than only Contractors can participate or bid for a work if they
are eligible.
7.1
Equipment
The criteria for equipment are being set here. This page will be loaded automatically with the details of
the Equipment criteria if already set. If no equipment details has been inserted the page remains blank.
But if you want to add equipment details than click on the Equipment button and the following page opens
up to you.
For the first time the page will be blank and after adding some data into the page it will be displayed as
the following page.
ADD
DELETE
EDIT
The list of equipment required for the above work is displayed here. The equipments are listed according
to their tier of importance as seen in the diagram above. You have the following three options available as
follows:
1. Add
2. Edit
3. Delete
11
User Manual: e-tool; Construction Development Board
ADD
The add link at the top right corner of the equipment page lets you add types of equipments required for a
particular work. You can add as many numbers of equipments. When you click on the add link the
following pop up opens up to you.
ADD
MORE
SAVE
Here there are four fields to be entered such as Tier, Equipment name, Numbers required and Points. The
Tier and Equipment name fields are generated automatically. You just need to select from the dropdown
box whichever is relevant. And in the other two fields you need to enter the number of equipments
required and the points you want to assign to that particular equipment. The points are assigned according
to the Tier whereby Tier I should have 50 points, Tier II with 30 points and Tier III with 20 points which
makes a total of 100 points. You can select multiple equipments in any of the tier but should not exceed
more than the points assigned above according to the tier. And suppose if you insert more than 50 points
in Tier I the system will display a message “Tier Point Exceeded” and will accept only 50 points. This
applies to all Tiers.
The “ADD MORE” link at the end of the fields let you insert more than one equipment of any tier and
can be inserted all at once. When you click on the link the form repeats with all the fields seen above in
the pop up so that you can insert as many number of equipments for a particular work. Once you are done
filling up the form just click on the “Save” button and you will be taken back to the previous page from
where you can add, edit and delete records.
EDIT
At the end of every record you will find the Edit and the Delete link. This is the page where you can make
changes if any information on equipment record has been mistaken. Once you click on the Edit link the
following page opens up to you.
12
User Manual: e-tool; Construction Development Board
Here you will see the respective field and need to make changes whichever is mistaken and at the end of
the page you will find the “Submit” button and the “Reset” button. Once you are done making changes,
simply click on the submit button at the end and you will be redirected back to the previous page where
you will see the details of the equipment.
Delete
On clicking the “Delete” link at the end of the each record, the records will be permanently deleted from
the database.
7.2
Human Resource
The criteria for human resource are being set here. On clicking the “Human Resource” button the
following page opens up to you.
ADD
DELETE
EDIT
13
User Manual: e-tool; Construction Development Board
The list of human resource required for the above work is displayed here. The lists of human resource are
being listed according to their tier of importance as seen in the diagram above. You have the following
three options available as follows:
1. Add
2. Edit
3. Delete
ADD
The add link at the top right corner of the human resource box lets you add number of human resource
required for a particular work. You can add as many numbers of human resources. When you click on the
add link the following pop up opens up to you.
ADD MORE
SAVE
Here there are four fields to be entered such as Tier, HR name, Qualification and Points. The Tier and HR
name fields are generated automatically. You just need to select from the dropdown box whichever you
want. And in the other two fields you need to enter the qualification of that particular person selected from
the dropdown box and the number of points you want to assign to that particular human resource. The
points are assigned according to the Tier whereby Tier I should have 50 points, Tier II with 30 points and
Tier III with 20 points which makes a total of 100 points.
The “ADD MORE” link at the end of the field lets you insert more than one human resource of any tier
and can be inserted all at once. When you click on the link the form repeats with all the fields seen above
in the pop up so that you can insert as many number of human resource for a particular work. Once you
are done filling up the form just click on the “Save” button and you will be taken back to the previous
page from where you can add, edit and delete records.
14
User Manual: e-tool; Construction Development Board
EDIT
At the end of every record you will find the Edit and the Delete link. This is the page where you can make
changes if any information on human resource record has been mistaken. Once you click on the Edit link
the following page opens up to you.
SUBMIT
Here you will see the respective fields and need to make changes whichever is mistaken and at the end of
the page you will find the “Submit” button and the “Reset” button. Once you are done making changes,
simply click on the submit button at the end and you will be redirected back to the previous page where
you will see the details of human resource.
Delete
On clicking the “Delete” link at the end of the each record, the records will be permanently deleted from
the database.
8. Evaluation for Large & Medium works
This is the actual page where evaluation of contractors takes place. On the home page for the procuring
agency’s eTool page click on the Evaluation menu at the top menu.
On this evaluation page, you see all the list of works added by you with some of their information like workid,
name of work, class and category etc… All the works will have a different work id. For the first time before
evaluation takes place, the awarded to line will remain as “Process”. This will change after evaluation has
taken place. So after evaluation, you will be able to know from this page to whom that particular work has
been awarded to. The following page opens up to you.
15
User Manual: e-tool; Construction Development Board
DETAILS
Evaluation Committee
Evaluation Committee
Here you can add committee members those who will be involved in evaluating the work. And you have
option to edit and delete them. On clicking this link the following page is shown as follows.
Add
Edit
Delete
For the first time before the Committee members has been added the page remains blank. You will only have
the option to ADD committee members.
Add Committee members
On clicking the Add link at the top right corner of the Evaluation Committee page, a dialogue box appears on
the page with Name and Designation boxes to be entered as shown in the figure above. You can enter as many
committee members required for that particular work and click on the Save button at the end of the dialogue
box. Once saved the details of the committee member added by you recently will be displayed on the
Evaluation Committee page like the one above.
With this information available, you will have the following two options:
1. Edit
2. Delete
You can use these two links at the end of every record to edit the information of the committee member if
mistaken or delete the record if needed to be deleted.
16
User Manual: e-tool; Construction Development Board
Details of the Work
After adding the details of the committee members you go back to the evaluation page. On the evaluation
page, at the end of every work, the ‘Details’ link will be available next to the Evaluation Committee link. On
clicking the details link the following page opens up to you:
ADD
PROCESS
RESULT
RESET
REPORT
This is the page where you can view the list of all the contractors those who have participated for a particular
work. And you can also add the details of the contractors participating for that particular work. You have the
following options available in this page:
1. Add
2. Process
3. Result Reset
4. Report
8.1
Add
This is the place where you insert the details of a contractor. When you click on the ‘Add’ link the
following page opens up to you. Note that when you add a contractor there are two methods of entering
according to the joint venture. If he/she is not participating as a joint venture you enter the details of a
single contractor but if they are participating as a joint venture then you need to enter the details of both
the contractors.
The following diagram shows the page for a single contractor where he is not a joint venture. You need to
choose the joint venture field from the diagram below.
17
User Manual: e-tool; Construction Development Board
SAVE
Here you enter the information of a single contractor on the relevant fields seen above .Note that the joint
venture button has been selected as “NO”. The Work id field is auto-generated. You cannot make
changes on this field. Then you can select whether a contractor is participating as joint venture or not, you
also enter his/her CDB number, financial bid quoted, capacity and organizational strength.
The following page will be displayed if a contractor is participating as a joint venture.
SAVE
18
User Manual: e-tool; Construction Development Board
Here the “Yes” button is selected on the joint venture field and you will notice that you need to enter the
details of both the contractors. There are more fields to be entered whereby you enter CDB number for
both the contractors as well as the percentage stake and enter the credit line available for both the
contractors.
Alert Message
The e-tool will warn you if the contractor which you are evaluating has been black listed or debarred by
CDB. So the evaluators should watch out and take notice of those warning and refrain from evaluating the
bid or get the status confirmed from CDB.
Alert Message
Once you are finished entering the details of a contractor click on the “SAVE” button at the end. It will be
redirected back to the Evaluation page and you can see the list of the contractors you have added.
EQUIPMENT
HUMAN
RESOURCE
DETAILS
AWARD
DELETE
Once you have added the details of a contractor, you need to enter the Equipment and Human Resource
details that a particular procuring agency has provided for a particular work. This will be done according
19
User Manual: e-tool; Construction Development Board
the criteria set before. The result here also will remain as ‘Process’ for the first time since you haven’t
added the details for Equipment and Human resource. Once everything is done you will be able to know
to whom the work has been awarded by looking at the result.
At the end of every record of contractors the following links are available:
1. Equipment
2. Human Resource
3. Award
4. Details
5. Delete
8.2
Equipment
This is the page where you add the equipment details for a particular contractor. As you click on the
“Equipment” link you will be directed to the following page:
SAVE
CHECK
There are three parts on this page. On the top of the page the Equipment Criteria that has been set before by
the procuring agency will be displayed. Below the criteria, the equipment details provided by that contractor
will be displayed according to the Tier and the last part is where you insert the list of equipment. On the Add
Equipment part you select the type either Owned or Hired, then you enter the Registration number and on the
third field you select the type of equipment. On the equipment name field, all the equipments that have been
set will be available. You just need to select accordingly.
Before saving you can check the registration number for equipment by clicking “Check” button. When you
click on it, a popup message (i.e., CDB No. and WorkID) will show only if the registration number for that
equipment is being used under some other contractor, that’s under work. Once you are done entering all the
information of equipments, click on the “Save” button at the end of the page and it will be displayed on the
middle level with the equipment points scored. You can delete the record by clicking on the Delete link
available at the end of every record.
20
User Manual: e-tool; Construction Development Board
Once you are finished entering the details of the equipment, click on the “Back” button on the left side of the
page. You will be taken back to the Evaluation page where you need to now enter the details of human
resource for that contractor.
8.3
Human Resource
This is the page where you add the human resource details for a particular contractor. As you click on the
“Human Resource” link you will be directed to the following page:
DELETE
SAVE
It is similar to the equipment page. On the top of the page the Human Resource Criteria that has been set
before will be displayed. Below the criteria, the Human Resource details provided by that contractor will be
displayed according to the Tier and the last part is where you insert the list of Human Resource. On the insert
part you need to first enter the ID card number as a proof, then select the HR Name, Tier and the Qualification
set earlier will be displayed accordingly on the qualification field. On the Human Resource name field, all the
Human Resources that have been set will be available. You just need to select accordingly and his/her
qualification will also be displayed respectively.
Note: It is necessary that you select the HR Name or either click once on the HR Name dropdown box for
the qualification to appear for that particular person that has been set earlier.
Before saving you can check ID Card Number by clicking “Check” button. When you click, popup message
(i.e., CDB No. and WorkID) will show only if ID Card Number is being used under some other contractor,
that’s under work (Sample below).
21
User Manual: e-tool; Construction Development Board
Once you are done entering all the information of Human Resources, click on the “Save” button at the end of
the page and it will be displayed on the middle level with the Human Resource points scored. You can delete
the record by clicking on the Delete link available at the end of every record.
Once you are finished entering the details of the Human Resource, click on the “Back” button on the left side
of the page. You will be taken back to the Evaluation page where you can now view the details of his/her
work.
8.4
Process
Once everything has been completed click on the “Process” link to process the result. The following changes
denoted by a circle take place on the evaluation page.
Here you can know who scored the highest point and it is denoted by H1, second highest by H2 and third by
H3 and so on. And also you can see how many contractors was Not Qualified (Scored less than 65 points).
Now you can click on the “Details” link at the end to view how the points have been scored in technical
scoring.
Details
On clicking the Details link on the page, you will be directed to the following page;
BACK
22
User Manual: e-tool; Construction Development Board
Here all the points scored for a contractors Capability, Capacity and Preference Score will be displayed here.
To go back to the previous page simply click on the Back button at the end of the page and you will be
redirected back to the evaluation page.
8.5
Result Reset
On clicking the result reset link, the result will be set back to “Process” as shown in the circle below:
You can evaluate again by the clicking the Process link or you can add more list of contractors and by
entering their details for Equipment and human resource.
Award Button
The award page is used to award the work to the winning bidder upon the committee’s decision
8.6
Award
Award page is shown below and is for that contractor whom you want to award the work. You can see text
field that has to be filled like Start Date, End Date, Awarded Amount, Status and Remarks. The
information like start date, end date and amount will be reflected in work order issued to the contractor. After
filling in all information click save button. The award page is shown below:
Project start/end dated as per
work order.
23
User Manual: e-tool; Construction Development Board
8.7
Report
On clicking this link you will be able to view the entire report of all the contractors for a particular work.
The following page opens up to you:
Here you will know how many contractors have participated and can view full details how much a contractor
scored. You will also be able to find out the Technical and Financial Score of a particular contractor as well as
his preference score. You can also view the details of the Evaluation committee members.
9. Evaluation for Small Class
The New point based system applies only for Large and Medium Class Works and the criteria settings and
evaluation for SMALL works is little different. However most of the process is almost similar.
Step1. Upload Tender is same for all works, except for choosing the classification ‘S’ for small works.
Step 2. Evaluation stage for small works requires limited information and has limited options available since
they are being evaluated in lowest quoted bid basis. When you add the information of this contractor the
following pop up opens up to you:
Quoted amount
SAVE
Here you just need to enter the CDB Number and the Financial Bid Quoted. Then click on the save button at
the end and will be taken back to the previous page where you will see the data as follows:
24
User Manual: e-tool; Construction Development Board
Here you will see the list of the contractors you added similar to the Contractor A and B but you don’t need to
enter the details of Equipment and Human Resource like for contractor A and B. The Edit and the Delete
options will only be available for contractor C. Rest everything is same as contractor A and B.
Report for Small Works
Here you will know how many contractors of category S have participated. Here you will clearly know that
the work has been awarded to the contractor who has quoted low and this is known by the status at the end
denoted the lowest quote by L1, second lowest by L2 and Third lowest by L3. This loop will continue
depending on the number of contractor’s participation.
10.Completion
On the home page for the procuring agency’s eTool page click on the Completion menu at the top menu. The
following page opens up to you.
DETAILS
25
User Manual: e-tool; Construction Development Board
Here the list of the work that has been evaluated and the work that has been awarded to any one of the
contractor will be displayed. This page has to correspond with the Evaluation page. Only after the work has
been awarded to a contractor, the details will be listed here. This is the conclusion page whereby you need to
enter the final scoring for that particular work. And once you enter the final score, it means the work has been
“Completed” and the details will not be seen any more on this page.
At the end of every record, the “Details” link will be available. As you click on this link the following page
opens up to you:
To terminate work feed in the
information and remarks and click
save Button
This is the page where the final score called Average Performance Score (APS) obtained by a contractor for
that particular work executed is fed in. Every site engineer must maintain the APS Form and rate the
contractor’s performance and submit the form to the focal person after project completion.
The first two fields CDB Number and Work Id are auto-generated. You just need to enter the points for Ontime completion, quality of work, actual start date and completion date and the final contract amount. After
you are done entering the above data, simply click on the Save button and the status of the work becomes
completed and will be taken back to the previous page where you cannot see the record. Thus, this means that
the work has been completed.
26
User Manual: e-tool; Construction Development Board
11.Project Termination
In case if the project has to be terminated due to various reasons, the focal person can use the same
Completion Page and fill in the necessary information and terminate the work online.
12.Reports
This is the page where contractors can view their detailed report on his/her Work in hand, Human Resource
and Equipment details and his complete work details. To view this report, click on the Report menu at the top
menu. The following page opens up to you:
Here you will find seven different reports for viewing different kinds of reports as shown in the figure above.
You can view the Contractors Work in Hand, Contractors Human Resource details, Equipment Details and
other Work Details. To view any of these reports you simply need to enter the CDB number of a particular
contractor and click on the view button on every label which will redirect you to a new page with the report.
1. An example of contractors work in hand report is shown below:
27
User Manual: e-tool; Construction Development Board
2. An example of contractors key personnel report is shown below:
3. An example of contractors Equipment report is shown below:
4. An example of contractors Equipment report is shown below:
28
User Manual: e-tool; Construction Development Board
13.Log Out
In order to log out from the e-Tool system click on the Log Out menu at the top right corner of the web page.
On clicking the same you will be directed out of the web secure section.
29