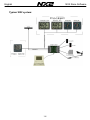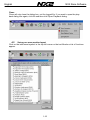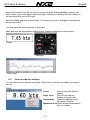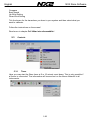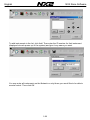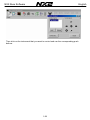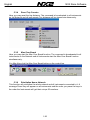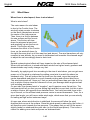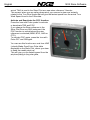
1
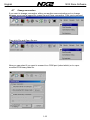
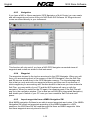
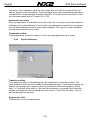
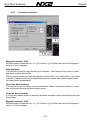
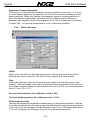
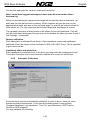
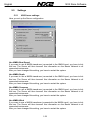
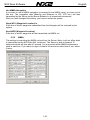
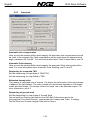
performance by NEXUS NETWORK
NX2 Race Software
Instruction manual
English
NX2 Race Software
English
1-1
English
NX2 Race Software
1
2
3
Introduction.......................................................................................................4
Installation.........................................................................................................7
Installation of the NX2 Race Software.............................................................7
3.1.1
General ...................................................................................................7
3.1.2
Installing the Software.............................................................................7
3.1.3
Register...................................................................................................7
3.1.4
Use the NX2 Race SW with a FDX Server..............................................8
3.1.5
Connect to a pre-recorded FDX binary file ..............................................8
4
Use the NX2 Race SW.......................................................................................9
4.1
How to use the NX2 Race SW..........................................................................9
4.1.1
Monitoring ...............................................................................................9
4.2
Setup your own monitor layout .......................................................................10
4.3
Set-up the Monitor displays ............................................................................11
4.4
Display Polar Diagram ....................................................................................13
4.5
Save a layout..................................................................................................14
4.6
Load a layout ..................................................................................................14
4.6.1
Setup options ........................................................................................15
4.7
Change connection.........................................................................................16
4.8
Enable secondary connection.........................................................................17
4.8.1
Allow NMEA Navigation Data input .......................................................17
4.8.2
Autoconnect at startup ..........................................................................17
4.8.3
Navigation .............................................................................................18
4.8.4
Waypoint ...............................................................................................18
4.8.5
Import waypoints from a NMEA Navigation SW ....................................18
5
Tools ................................................................................................................21
5.1
Calibration ......................................................................................................21
5.2
Manual calibration ..........................................................................................21
5.2.1
Log calibration.......................................................................................21
5.2.2
Depth calibration ...................................................................................22
5.2.3
Compass calibration..............................................................................23
5.2.4
Wind calibration ....................................................................................24
5.2.5
Automatic Calibration ............................................................................25
5.3
Controls ..........................................................................................................26
5.3.1
Timer.....................................................................................................26
5.3.2
Steer Pilot .............................................................................................27
5.3.3
Trim.......................................................................................................27
5.3.4
Reset Trip Counter................................................................................30
5.3.5
Man Over Board....................................................................................30
5.3.6
Reinitialize Nexus Network....................................................................30
5.4
Polar table ......................................................................................................31
5.5
Settings ..........................................................................................................32
5.5.1
NX2 Server settings ..............................................................................32
5.5.2
NMEA....................................................................................................33
5.5.3
Advanced ..............................................................................................34
6
Automatic Calibration.....................................................................................36
6.1
The NX2 Race SW calibration process:..........................................................36
6.2
The 3-step calibration process........................................................................36
1-2
NX2 Race Software
6.3
6.4
6.5
6.6
6.7
English
Correction of the wind-speed, down-wind....................................................... 38
The "TRUE" process ...................................................................................... 38
Wind Sheer .................................................................................................... 40
Polar and Target Boat Speed......................................................................... 41
Steer Pilot and Polar data .............................................................................. 41
1-3
English
1
NX2 Race Software
Introduction
The NX2 Race SW is a PC Software developed for Windows XP and 2000. It will have
limited functionality on other operating systems like Windows 95 and 98.
The NX2 Race SW will enable to communicate at network speed with your NX2
instrument system. That will give you the possibility to monitor all data at network
speed, log all data to a file for post race analyze, Set-up the system and calibrate it.
The NX2 Race Software will only work together with a FDX Server. A FDX Server has
the following label on the cover:
The Nx2 Race software supplied on this CD is a fully functional version. However, you
need to register at www.silva.se in order to use the Software without limitations.
Up-dated versions of NX2 Race SW is always available for download at www.silva.se
Even if you do not have a NX2 FDX Server you are able to test and evaluate this NX2
Race Software. A logged file from a Race in Sweden is supplied on this CD and the
NX2 Race SW will automatically start to display data from that file. However, you are
not able to calibrate data and make changes to settings etc without a Server.
NMEA
The NX2 Race SW is utilizing the FDX protocol between the Server and the PC. In
order to be able to run your favourite Navigation Software simultaneously, the NX2
Race SW creates a virtual port within the PC which sends and receives NMEA data
from that. The virtual port may have different number on different PC’s depending on
the configuration. When playing back a logged file, the information is also send out on
this virtual port, enabling you to monitor your race on a cart in your Navigation Software.
1-4
NX2 Race Software
English
Welcome aboard the Nexus Network!
Through this manual we would like to help you install, operate and understand your
new NX2 Race SW.
The Server is the ”heart” of your Nexus Network, to which transducers for speed,
depth, heading, wind and navigation (GPS) are connected.
From the Server the single Nexus Network cable transmits power and data to the
instruments, which repeat the information, sent from the Server, or other NX2
transducers.
The Nexus Network is designed with the industry standard RS 485 data bus, which
allows you to connect up to 32 Nexus instrument units on the single Nexus Network
cable, thereby allowing you the flexibility to easily develop your system. The Nexus
Network is capable of carrying data 10 times faster than NMEA 0183.
The connection system, with a single 5 mm (1/5") cable and 4-pole jack plugs with
cable protectors, makes the installation easy. No need to drill big holes and the cable
can be cut to exact lengths. The connections at the Server are colour coded and
marked with a number for easy reference.
NX2 Multi Control is a multi function instrument that displays a main and a sub-function
together. You can easily”customise” your favourite combination of functions, by using
the unique method to move, copy and lock a sub-function.
The instruments large display gives you very good viewing possibilities from any angle,
even in bright sunlight. The display and the five push-buttons have red back lighting
which you can set to three different lighting levels.
A large selection of optional analogue repeaters and accessories are available. The
analogue steer pilot instrument particularly offers unique functions. When used
together with the steer reference function (AWA), you can actually steer after the wind
and ”expand” the tacking or down wind angle.
These Nexus instruments carry a two year warranty, which gives you as our customer,
confidence to trust Nexus and our commitment to quality.
The Server has a built in PC port for RS-232 Serial data but also
comes with a Serial to USB converter.
Good luck and happy boating!
1-5
English
NX2 Race Software
Typical NX2 system:
1-6
NX2 Race Software
2
3
English
Installation
Installation of the NX2 Race Software
3.1.1
General
The NX2 Race Software is a shareware that only fully works together with a FDX Server
after registration at www.silva.se.
3.1.2
•
•
•
•
•
Installing the Software
Insert the CD to your computer
Open Run Software
Brows to your CD (normally D:) and click on NX2 Race SW
Click on Setup
Follow the instructions on your screen
Now run the NX2 Race Software.
3.1.3
Register
The NX2 Race software requires a registration at www.silva.se for full functionality.
When you enter our homepage and register, you have to enter your name, e-mail
address and a username. After registration, an e-mail will be send to the address you
stated with you entry code. At first start of the NX2 Race SW, enter your User name
and Code.
If you do not enter the code, NX2 Race SW will be switched off after 20min.
1-7
English
NX2 Race Software
3.1.4
Use the NX2 Race SW with a FDX Server
Note navigation from a PC NMEA SW is only possible for Servers of version 5.3
or later
Click on the connector symbol in the top left corner
Select the Communication port where the cable to the Server is connected
Click OK
A green light will be turned on in the top right corner when communication is
established.’
3.1.5
Connect to a pre-recorded FDX binary file
Instead of connecting the NX2 Race SW to a hardware communication port, you may
connect to a previously recorded file (an example of a pre-recorded file is found under
NX2 Race/data/recorded)
The software may then be used in the same way as if it was connected to the Server.
However, it is not possible to edit waypoints, change calibration values etc.
The virtual NMEA port (see 4.8) will be fully functioning even when connected to a prerecorded file. That means you can output your data to a Navigation NMEA SW while
checking your data. The NX2 Race SW will output all data that was available during the
logging. The NMEA Navigation SW will get data such as position, speed, course etc.
1-8
NX2 Race Software
4
English
Use the NX2 Race SW
4.1 How to use the NX2 Race SW
When the Software is started and connected to the supplied previously logged file, you
can start to use the Software:
4.1.1
Monitoring
A pre-selected layout will appear on the screen (you may customize 5 layouts)
In the bottom right corner the play-back dialog box will be displayed (if connected to a
pre-recorded file).
Rate
Rate is the speed of which you want to play-back the recorded file. You may select with
1/2, 1/1, double speed or Turbo. The up-date rate in Turbo mode depends on the
performance of your PC and what other Software’s you are running simultaneously.
Note it is not the speed of the boat you are changing only the speed of data rate.
Position in File
By moving the bar, you can jump to other positions in the recorded file.
Wrap around
If the tick box, wrap around is ticked, the file starts over from the beginning when it
comes to its end.
Previous Mark
When data is logged to a file, you may record a comment at any time. As an example,
you may want to make a note of when you changed sails or made other interesting
changes. A click on Previous Mark will jump to the previous comment.
Next Mark
A click on Next Mark will jump to the next comment
1-9
English
NX2 Race Software
Close
Close will only close the dialog box, not the logged file. If you want to open the playback dialog box again, click file and then click Open Playback dialog.
4.2 Setup your own monitor layout
Click on the instrument symbol in the top left corner or the text Monitor a list of functions
appear.
1-10
NX2 Race Software
English
Select the function from the list. Some functions may be displayed digital, analog or as
Strip Charts, some only digital. Select the type of display you want by double clicking on
the corresponding icon to the right.
Now the display appears on the screen. You may now move or change the window with
the mouse control.
You may open as many windows as you want.
Most data may be displayed as Digital boxes, Analog instruments or strip-charts.
Digital
Analogue
Strip Chart
4.3 Set-up the Monitor displays
You may Set-up each Monitor as follows. Right click on the Monitor display you want to
set-up.
Digital:
Close:
click to close this Monitor
display
Night view:
Will turn this Monitor
Display into night view
Dampening: Select the dampening of
this Monitor Display
Measured Unit:Select which measurement
unit you require.
1-11
English
NX2 Race Software
Analogue:
Close:
Dampening:
click to close this Monitor
display
Select the dampening of
this Monitor Display
Analogue:
Close:
Night view:
Timespan:
Average:
Grid:
click to close this Monitor display
Will turn this Monitor Display into night view
Select the time span for this strip
Will display the average both numerical and
as a line in the strip
Will add a grid to the strip chart
1-12
NX2 Race Software
English
4.4
Display Polar Diagram
For how to enter your Polar table, see 5.4.
To view the actual Polar Diagram, click on Monitor and select Polar Diagram. Now you
have to load the Polar Table, click on Tools, Control, Load polar Diagram and brows to
the Polar table file (filename.nxp) and select.
The NX2 Race SW will continuously update the Polar Diagram with regards to wind
angle, Wind Speed, Boat Speed and TBS (Target Boat Speed)
To switch the polar table calculations on/off. Click
The Polar Diagram
The yellow line represents the optimum speed for the corresponding wind angle. The
white line is representing the current Boat speed and wind angle. The length of the line
is the speed. If the boat speed exceeds the TBS, it will turn red.
1-13
English
NX2 Race Software
4.5
Save a layout
When you have created a new layout that you want to save for later use, click on tools
and the Save layout.
Click on the first “empty” layout or on any other if you want to overwrite an existing
layout. Up to five personal layouts may be stored
4.6
Load a layout
If you want to load an existing layout, click on Tools and then on Load Layout. Select
the layout you want to load and press load.
1-14
NX2 Race Software
English
4.6.1
Setup options
Under tools and options, you may set-up the Software.
Autoconnect
If the Autoconnect tick box is ticked, the NX2 Race SW will automatically connect to the
port or file it was connected to last time it was run.
Record automatically to file
If this box is ticked the NX2 Race SW will automatically start to log data in to a file.
Note, when you start the NX2 Race SW you must enter a new file name.
Auto-hide
If the Auto-hide is ticked, the top-bar will be hidden after the number of seconds
selected in the box to the right. Note, it is only the top-bar that will be hidden, the
monitors will still be displayed. To get back the top-bar, move the mouse cursor at the
top of the screen.
Keep always on top
If this box is ticked, The NX2 Race SW will always be on top of other applications on
the screen. This is very useful if you want to run the NX2 Race SW together with a
Navigation Software. You may have the chart and the Monitors shown at the same
time.
To hide NX2 Race SW you simply click the minimize button at the top right corner.
1-15
English
NX2 Race Software
4.7 Change connection
If you want to change connection, either use another communication port or change
between a port and a logged file, press file and Close connection. Click yes to proceed.
Then click File and Open Source:
Now you can select if you want to connect to a COM port (select which) or to a prerecorded FDX binary data file.
1-16
NX2 Race Software
English
4.8
Enable secondary connection
Tick the box Enable secondary connection and select on which port you want to write
and read NMEA data. This port is a virtual port within the PC and is no Hardware port.
Now you can open up any other NMEA application and connect that to the same port.
All data that are available on the FDX input port or stored in the pre-recorded file will be
send out on the virtual port.
Note: The virtual port will only run on Windows 2000 or Windows XP.
4.8.1
Allow NMEA Navigation Data input
You may choose if you want to navigate from your NX2 GPA Navigator or if you want
your PC Navigation software to navigate. If the PC software is navigating, the data such
as Bearing and distance to Waypoint, XTE, TTG etc. will be send from the PC Software
via NMEA into the NX2 Race SW who converts the data into FDX and sends it out on
the Nexus Network. All instruments on the Network may then display all
Navigation Data. The drawback of this is that the PC has to powered all the time.
The other solution is to just transfer Waypoints from the PC Navigation software and
then create your own Sailplans and routes in the NX2 GPS Navigator. Then you may
switch of the PC at any time and the NX2 GPS Navigator will carry on with the
Navigation.
4.8.2
Autoconnect at startup
If this box is ticked, the SW will connect to the same com-port or file as it was
connected to last time.
1-17
English
NX2 Race Software
4.8.3
Navigation
If you have a NX2 or Nexus navigator (GPS Navigator or Multi Center) you can create
and edit waypoints and routes from your NX2 Race SW Software. All Waypoints and
routes are stored directly in your instrument.
This function will only work if you have a NX2 GPS Navigator connected since all
waypoints and routes are stored in that instrument.
4.8.4
Waypoint
The waypoints showed in the top box are stored in the GPS Navigator. When you edit
them, you are working direct in the memory of the GPS Navigator. Also the Sail Plan
and Routes are stored direct in the GPS Navigator memory. The big advantage with
this is that you only work with one waypoint memory and there are no confusions of
which waypoints you are working with. Another benefit is that once you have entered a
Sail Plan, you may switch of your PC and the NX2 system will carry on with the
navigation. When you switch on the PC again, the remaining part of the Sail Plan will
pop up in the navigation window. This is what we call NIN (Non Interrupted Navigation)
and enable you to switch of your PC once you have created a Sail Plan and save
power.
4.8.5
Import waypoints from a NMEA Navigation SW
Most NMEA navigation Software’s are able to export waypoints and routes. If the NMEA
Navigation SW sends out waypoints according to the NMEA standard in a WPL
sentence, the NX2 Race SW will read them and list them as NMEA waypoints. Note
that these waypoints are only stored in the PC.
1-18
NX2 Race Software
English
Waypoints received via NMEA will get the pre-fix NMEA. To convert them into NX2
waypoints (and store them in the NX2 GPS Navigator) right click on a waypoint and edit
it. You may now give the waypoint a new number and name.
You may also select all waypoints and select edit. The waypoints will then be given
numbers in sequence order starting from the number you give the first waypoint.
Example:
In this example, the NMEA Navigation SW SeaClear is used (most software’s work in a
similar way)
Create a route in the NMEA Navigation SW, close the editor and go to: File, Route,
export NMEA
In this example a route consisting of 7 waypoints where exported. These waypoints will
appear in the waypoint editor as NMEA waypoints. Mark all 7 waypoints and right click
(or click the editor icon).
Give the first waypoint the number you want to start with.
1-19
English
NX2 Race Software
In this example we mark the 7 waypoints and give the first no 301.
Then press OK
The NMEA Waypoint 1-7 will now become NX2 Waypoint 301-307.
If you want to create this route in the NX2 GPS Navigator, mark all 7 waypoints, drag
and drop them into the Sailplan.
1-20
NX2 Race Software
English
This Sailplan is now active in your GPS Navigator and you may switch off the PC and
carry on the navigation.
Hint: Use the waypoints over 300 as route waypoints. Every time you want to import a
route, make sure all waypoints above 300 are deleted. Then use waypoints above 300
as temporary waypoints.
Note: If you want to store the Sailplan as a Route for use in the future, you have to
store it before you start. The waypoints in the
5
Tools
5.1
Calibration
The Calibration only works when the PC is connected to the FDX Server. All calibration
values are stored in the Server.
The calibration may be done manually or automatic. In order to achieve an automatic
calibration some minimum system requirements has to be fulfilled (see more under
automatic calibration)
5.2
Manual calibration
5.2.1
Log calibration
Offset
Offset is the start value for the log and it could be described as slip or friction. Normally
this value is about 0.4 knots and it will be constant at all speeds.
Correction
1-21
English
NX2 Race Software
Correction is the calibration value for the log and has to do with the shape of the hull
and the position of the transducer. The percentage is the value measured speed will be
increased with. As an example: measured speed is 10 knots and the Correction is 30%,
the corrected speed will be 13 knots (10 x 1.30)
Advanced corrections
If the log transducer is mounted on one side of the hull, it is likely you will have different
readings on port and starboard. If you tick the use advanced correction box, the system
will use these calibration values for port and starboard. This require a wind transducer
to determine on which tack you are.
Temperature offset
If the temperature is read too high or too low, you may adjust that up or down.
5.2.2
Depth calibration
Transducer offset
The transducer offset is the distance from the transducer to the water surface. The
value entered in this box will be added to the measured depth. If you want to display the
depth from the keel, set a negative value for the distance from the transducer to the
keel. I.e. if the draft of the boat is 1.6m and the transducer is mounted 0,4m below the
surface, the distance from the transducer to the keel is 1,2m Enter the value -1,2m to
get the reading from the keel.
Suppression filter
This function is not yet implemented.
1-22
NX2 Race Software
5.2.3
English
Compass calibration
Magnetic variation, VAR
Set the deviation direction first, i.e. [+] for East or [-] for West, then enter the magnetic
value in 1/10 of a degree.
Auto deviation
This function is used to auto deviate your Compass. Take the boat into a turn, in calm
sea, when steady, press start.
When you have taken the boat through the minimum 360° turn, press Stop. If you want
to pause (if waves comes up during deviation) press Pause and continue again when
the waves have disappeared.
Check the Auto deviation
This function is used to check your Auto deviation. Make a new Auto deviation in calm
sea (during the evening) as described in above.
Clear the Auto deviation
If you by any reason prefer to reset the deviation created by the Auto deviation function,
press Clear
Magnetic variation, VAR
Set the deviation direction first, i.e. [+] for East or [-] for West, then enter the magnetic
value in 1/10 of a degree.
1-23
English
NX2 Race Software
Adjust the Compass alignment
This function is used when the Compass is giving a constant course error, i.e. it is not
mounted exactly aligned as the boat (there is no need to mount the transducer at the
boats centreline). Make sure that the local magnetic variation is entered before you
make the alignment adjustment. Otherwise you are unable to see the difference
between local magnetic variation and alignment error. The Compass may be installed
reversed 180° , but never at perpendicular, or 90° relative the centreline.
5.2.4
Wind calibration
Offset
Offset is the start value for the wind speed and it could be described as the friction.
Normally this value is about 0.5 m/s and it will be constant at all wind speeds.
Gain
Gain is the calibration value for the wind speed and has to do with the shape of the
propeller. The percentage is the value the measured wind speed will increase with. As
an example: measured speed is 10m/s and the Correction is 70%, the corrected speed
will be 17 m/s (10 x 1.70)
For two blade propellers, the calibration value is 50%
For three blade propellers, the calibration value is 70%
Down wind correction
Normally the apparent wind speed increases when you are sailing downwind. That has
to do with the fact that the wind has to pass the sails which the wind see as an obstacle.
If you enter 15% the wind speed will be decreased with 15% at 180 degree and half of it
(7.5%) at 135 degree. At 90 degree there will be no downwind correction.
1-24
NX2 Race Software
English
Tick the box and enter the value for down wind correction.
Note: a mast head rigged boat requires more down wind correction than a
fractional rig.
When you are tacking the apparent wind angle will be distorted due to mast twist, upwash and the fact that the boat is heeling. All this together will give an error on the
apparent wind angle and also on the true wind angle. In order to get correct values for
Polar tables etc. it is very important that the wind angle and wind speed is correct.
The up-wash correction in these boxes is the values for port and starboard. They will
only be used when tacking and the you may set the window for when you want to use it
(see Settings – Advanced)
Factory calibration
Each transducer is calibrated from factory. Each transducer comes with calibration
certificate. Enter the values on the certificate for 000, 045, 090,135 etc. This is essential
to get correct values.
Installation offset and wind shear
If the transducer is mounted of-set to the boat, you may enter the misalignment here.
This is also the value used in the automatic calibration to correct for wind share.
5.2.5
Automatic Calibration
Some functions may be automatically calibrated. In order to do so, there are some
minimum system requirements. If you have the following parts in your system:
Compass transducer, Log transducer, “Twin Fin” wind transducer, GPS Position
(Antenna) GPS navigator.
You may calibrate the following:
1-25
English
NX2 Race Software
Compass
Boat Speed
Up-Wind Sailing
Down Wind Sailing
Tick the boxes for the transducer you have in your system and then select what you
want to calibrate.
Follow the instructions on the screen!
Reed more in chapter Fel! Hittar inte referenskälla.!
5.3
Controls
5.3.1
Timer
Here you may start the Race timer at 5 or 10 minuet count down. This is only possible if
a Server is connected. The information will be send out on the Nexus Network to all
instruments.
1-26
NX2 Race Software
English
5.3.2
Steer Pilot
Here you may select the reference and the value for the Steer Pilot to refer to.
5.3.3
Trim
Here you may select the reference and the value for the Speed trim instrument to refer
to.
This is to set the reference, to trim the speed trim instrument, click the trim icon on the
control bar.
Remote control
All digital instruments connected to the Nexus Network may be remotely controlled from
the NX2 Race SW.
1-27
English
NX2 Race Software
To add instruments in the list, click Add. Then enter the ID number for that instrument
(displayed at each power up of the system) and give it any name you want.
You may enter all instruments on the Network or only those you would like to be able to
remote control. Then click OK
1-28
NX2 Race Software
English
Then click on the instrument that you want to control and use the corresponding push
buttons
1-29
English
NX2 Race Software
5.3.4
Reset Trip Counter
Here you may reset the trip distance. The command is broadcasted to all instruments
on the Network and all instruments Trip distance will be cleared simultaneously.
5.3.5
Man Over Board
Here you may start the Man Over Board function. The command is broadcasted to all
instruments on the Network and all instruments start the Man Over Board function
simultaneously.
You May Also click the Man Over Board button on the control bar
5.3.6
Reinitialize Nexus Network
This function will reinitialize the whole network and all instruments connected to it. A
message Press Key will appear on all instruments and the order you press the keys is
the order the Instruments will get their unique ID-numbers.
1-30
NX2 Race Software
English
5.4
Polar table
The NX2 system together with the NX2 Race SW is able to calculate target Boat Speed
from a Polar Table. The polar tables looks different for different boats.
The polar table is a tab- or comma-separated-values text file containing target
boat speeds for specific true wind angles and speeds.
Every row represents data for a specific true wind speed (except first row,
Which contains the headings of the table and is ignored)?
First column contains true wind speeds in knots, then, the following columns
are pairs of target boat-speeds for a specific true-wind angle.
The first and last pair of TBS-TWA columns are the best case up-wind and
down-wind, respectively, and these columns are used to compute optimum
course up- or down-wind, respectively.
NX2 Race SW interpolates and extrapolates the data to give continuous
TBS and steering course. To achieve that, the file must contain a minimum of
5 column-pairs of TBS-TWA, but no more than 20, and a minimum of 3 data lines,
but no more than 20.
So, including the column with wind speeds, the polar table should have a
total of minimum 11 columns, but not more than 41.
The format of a polar table is:
TWS
WS1
TBS1
BS11
TWA1
WA11
TBSn
BS1n
TWAn
WA1n
<-- 1st row for table headings (no data here!)
<-- 2ns row for a wind speed of WS1[kts]
WSm
BSm1
WAm1
BSmn
WAmn
<-- mth row for a wind speed of WSm[kts]
last column-pair is best case down-wind
other column-pairs TBS-TWA
first column-pair is best case up-wind
1st column contains wind speeds in [kts]
In the above representation, WS1-WSm are (m) true wind speed values in [kts],
BS11-BSmn are (m x n) target boat speed values in [kts], and WA11-WAmn are
(m x n) true wind angle values in degrees, where:
3 <= m <= 20 , and
5 <= n <= 20
Wind angles must have the same value on a given column, excepting the first
and the last wind-angle columns, which are a special optimum case.
There must be no empty rows in the file, except for one row at the beginning
(the heading row), which is ignored (and therefore put no values in there).
All values must be separated with either tabs or commas (not spaces) and all
rows must contain the same number of values (i.e. if row2 has 13 values, all
other rows should have the same number of values).
1-31
English
5.5
NX2 Race Software
Settings
5.5.1
NX2 Server settings
Here you set up the Server configuration
Use NMEA Boat Speed
If you want to use a NMEA transducer (connected to the NMEA input, you have to tick
this box. The Server will then transmit this information on the Nexus Network to all
connected instruments.
After you have changed this setting, you have to restart the system
Use NMEA Depth
If you want to use a NMEA transducer (connected to the NMEA input, you have to tick
this box. The Server will then transmit this information on the Nexus Network to all
connected instruments.
After you have changed this setting, you have to restart the system
Use NMEA Compass
If you want to use a NMEA transducer (connected to the NMEA input, you have to tick
this box. The Server will then transmit this information on the Nexus Network to all
connected instruments.
After you have changed this setting, you have to restart the system
Use NMEA Wind
If you want to use a NMEA transducer (connected to the NMEA input), you have to tick
this box. The Server will then transmit this information on the Nexus Network to all
connected instruments.
After you have changed this setting, you have to restart the system
1-32
NX2 Race Software
English
Use NMEA Navigation
If you want to use a NMEA navigation (connected to the NMEA input), you have to tick
this box. The navigation data (Bearing and Distance to WP, XTE etc.) will then
transmitted by the Server on the Nexus Network to all connected instruments.
After you have changed this setting, you have to restart the system
Allow WPL (Waypoint Location) in
If this box is ticked, waypoints transmitted from the Navigator will be received by the
system
Send WPR (Waypoint Location)
If this box is ticked, waypoints will be transmitted via NMEA out
5.5.2
NMEA
This setting is controlling the NMEA out-put from the Server. Note, it will not affect what
is transmitted on the NX2 Race SW virtual port. The Server is able to transmit 16
sentences which will take about 2 second. You may select which NMEA sentences to
send in each box. If you want one type of data to be send more often than 2 sec, select
it twice.
1-33
English
NX2 Race Software
5.5.3
Advanced
Automatic tack compensation
Here you set the window (within which angles) the automatic tack compensation should
be used. In the example, the Tack compensation will be used when the Apparent wind
angle is between 30° and 40°. For more information about Tack Compensation, see 6.4
Automatic Polar steering
Here you set the window (within which angles) the automatic Polar steering should be
used. For more information about Automatic Polar Steering, see 6.6 and 0
Dampening for computed TBS
Set the dampening for input data of TWA/TWS
Set the dampening for output data of TBS
Estimated leeway index
The Leeway is estimated form a formula. The higher the index value is the more leeway
is added to the calculations. The index number you should use depends on hull-shape,
rudder and keel shape. The Leeway index to be used, has to be detected empiric. For
more information, see 6.2
Dampening of ground wind
Set the dampening for output data of Ground Wind
Ground wind is a function calculated in the NX2 Sail Performance and is the
Geographical True Wind Direction, compensated for Leeway and Tides. To display
Ground Wind, see Custom Angular Data sent to Nexus
1-34
NX2 Race Software
English
Custom Angular Data sent to Nexus
NX2 Multi Control and Multi XL instruments are able to display Custom Angular Data. In
the NX2 Sail Race SW, you may select if that data should be Ground Wind ore the
Leeway in degrees.
Set-up the Multi Control and Multi XL to display CAD
To access sub-function [CAD], select NAVIGATE page and the ”empty” sub-function.
Then press PAGE and SET together, followed by PLUS and MINUS together.
Do not show Nexus messages
1-35
English
6
NX2 Race Software
Automatic Calibration
6.1
The NX2 Race SW calibration process:
There are 3 basic transducer calibrations that must be done before the instruments
can provide you with accurate data, and they are;
-The Compass auto-deviation procedure.
-The water-speed calibration procedure.
-The water-speed (advanced) calibration for port and starboard procedure.
Calibrate when any of the following conditions occur:
•
•
•
•
•
•
6.2
After a new installation.
At the beginning of a season.
After a log transducer check.
If the compass has been moved.
If the mast or rig is serviced in such a way that the wind transducer might be
offset.
On a regular basis depending on any other condition that might influence the
measurement.
The 3-step calibration process
Start with either the compass (1) or the water speed (2) calibration.
1.
COMPASS
Enter the local magnetic variation in the compass calibration setup, or on the
NX2 instruments. The Auto deviation of the compass must be made in calm
water with small waves, preferably late evenings. The Auto-deviation can be
made in current water and you may do it clockwise or counter clockwise. After
the Auto deviation, also run the Auto-check in the reverse direction.
You may control that the HDT course is equal with COG by motoring the boat in
different directions where there is no current water. If there is current water, you
may only check that HDT = COG by going with the current, then turn 180
degrees and check again by going in the opposite direction. If there is a
misalignment, enter the offset value in the compass calibration dialogue box.
Watch up for placing magnetic parts close to the sensor, put up a warning sign!
2.
WATER SPEED Basic.
Make the water-speed calibration
by motoring at a normal speed.
Make two runs, out and back for at
least 1 minute each at a fairly
constant speed. The basic water
speed calibration will later be used
to determine the port and starboard
calibration in step 3.
Avoid this calibration if you are in a
particularly strong tide.
1-36
NX2 Race Software
3.
English
WATER SPEED Advanced.
Do not run the advanced Port
and Starboard water speed
calibration before you have
completed step 1 and 2!
Prepare for the up wind sailing.
Use the Auto measurement
(default) with the proposed sail
time of 1 minute (settable), or use
the manual option where you
advance to next step manually.
Sail up-wind on the first tack (starboard or port), when boat-speed and sail trim is
ok.
Press Next in the Auto-calibration dialogue box.
When the starboard (or port) tack is done, make the tack and trim to speed.
The NX2 Race will automatically detect your tack and then wait 1 minute (pre-set
time) before it starts to measure.
When the second leg is done, turn the boat for a down wind sailing without
spinnaker.
The measurement for down wind will start when the AWA has reached 180
degree at one occasion (the trigger condition).
Try then to sail safely with the wind as flat (180 degree wind) as possible. When
measurements are done (1 minute), NX2 Race will show you the result in the
dialogue box.
If calibration is accepted, press Apply.
To abort the calibration, press Cancel.
NOTE;
CDOP (Calibration Dilution Of Precision) in the calibration-result dialogue box is
a measure of reliability of the calibration process where 1.00 represents the
highest reliability. There are small errors from several sources that can be hard
to adjust for, but you may try to adjust the leeway index for your boat. The index
represents mainly the efficiency of the boats keel. The leeway is constantly
calculated from a model where wind speed, boat speed and wind angles are
variables.
Leeway index 0 = "no leeway" and index 10 is "maximum leeway"
Leeway is preset to 5, but it can be changed according to a tuning trial to reduce
CDOP.
1-37
English
6.3
NX2 Race Software
Correction of the wind-speed, down-wind
When sailing down wind with spinnaker, the wind will accelerate over the mast top
and give a higher indicated wind-speed than it actually is. This "over-reading" can be
set through the NX2 Race SW in the Server. This calibration must however be
adjusted manually since there are some considerations to include in the decision to
change this WS correction.
1.
2.
3.
This over-reading down wind is not
linear, so in light winds, with a
forward pointing wind transducer,
the over reading will be low. With
increased wind speed, the
difference between air speed and
boat speed will increase and also
the over reading.
The magnitude of the over-reading
is higher on a mast head rig
relative to a fractional rig. This
over-reading can mean a reduction
of up to 15% of measured wind
speed.
When the 1m Twin Fin Racing transducer is used, the over-reading effect is
mainly eliminated.
This over reading compensation is also gradually reduced relative the actual AWA.
When you have a 90 degree AWA, the WS reduction is 0% and at 180 degree AWA
the WS correction is 100% of the maximum compensation. As an example, if 15%
was set, the WS correction at 135 degree AWA would be 7.5%.
The magnitude of the WS correction must be individually corrected for the boat, rig
and sail settings depending on the above conditions. The NX2 Server must be turned
off and on again to activate the new correction value.
6.4
The "TRUE" process
T.R.U.E is short for "Temporary Reference-Update Estimation"
When the 3-step calibration is done, the T.R.U.E. up-wind sailing procedure can be
made to correct wind angles and measure wind shear. The Temporary ReferenceUpdate will include errors created by the heel angle, mast twist and change in upwash due to either stronger winds or when re-calibrating from a strong to a weaker
wind condition. The weather conditions will change and wind shear will be different,
so each T.R.U.E. process must be considered as a "temporary" reference for the day
or during a race.
That is why it is easy to recalibrate by use of the T.R.U.E. process!
1-38
NX2 Race Software
English
The T.R.U.E. process can be done during the race. If the 1-3 calibration has been
properly carried out, you may use the T.R.U.E. process even during steady current
water.
Avoid the T.R.U.E. process if the answer is No on one of the following questions:
•
Is there free wind during the complete up-wind calibration?
Avoid close competitors, obstacles or influence from land during the calibration
process.
•
Is the wind condition steady enough for a calibration?
Very large variation in wind speed and direction might degrade the calibration
efficiency.
•
Is the up-wind sailing going through an area where the current will vary?
It is recommended to avoid calibration where current appears inconsistent from
one leg to another.
Activate the T.R.U.E. process when you are sailing steady on port or starboard. The
minimum measure time is 1 minute, then, whenever you are ready, tack!
The T.R.U.E. process will then wait 1 minute before it start to measure again. When
the minimum 1 minute measurement has been completed, you must apply the result
found in the dialogue box. You have two options, either include or exclude the wind
shear offset from the tick box.
If you choose to add wind shear and offset, you will get equal AWA and TWA wind
angles on port and starboard.
Or, you may choose to avoid adding this offset to the wind angle, and instead take
advantage of it as information on the wind instrument.
Read the section about Wind Shear and make your decision.
1-39
English
6.5
NX2 Race Software
Wind Sheer
When there is wind-speed, there is wind shear!
What is wind shear?
The main reason for wind shear
is due to the Coriolis force. The
wind will rotate counter clockwise
on the North Hemisphere around
the centre of the low pressure.
Then, there is a friction between
the sea surface and the free air
above. This friction will slow
down the airspeed at sea level
and gradually up into the free air
above. This friction will also
decrease the effect of the Coriolis
force, so the wind will shear (to
the right) from sea level up to the mast top (and above). The wind transducer will only
measure at one altitude, so you need to understand and consider this sheared angle
to adjust the sail accordingly down to deck level.
Note!
Several meteorological effects will have impact on the size of the sheared wind.
When cold and warm air is mixed with faster winds from higher levels, gradients and
sheared winds may locally change very fast.
Generally, by applying sail trim according to the size of wind shear, you can get more
power out of the wind on starboard by adding more twist to match the shear (on
starboard only). This will reduce the top force from the wind, move the pressure
centre downwards and allow for a more forward pointing and efficient wind force.
The wind instrument will "show you" that you are sailing lower than port side, but it is
only a relative illusion since the reference is from your average attack angle and sail
trim including wind shear.
On port side, the sheared wind is "negative", and it requires more flat sail trim. The
instruments will tell you that you are sailing high and fast on port tack, but this is also
a relative illusion, but opposite from starboard tack. You have less wind force in the
top of the sail, so the efficient wind pressure centre is moved downwards. Then, for a
given heel angle, you will have a wider wind angle, which mean that you are actually
not sailing as high as the instrument says!
At open sea, where wind direction is stabilized, the waves will follow the wind
direction that occurs at the surface. Since this wind-speed is reduced by the friction, it
will therefore point towards the low pressure. This means that you will hit the waves
slightly harder on starboard then port side (on the North hemisphere). This is also a
reason for adding more twist and power on starboard tack!
1-40
NX2 Race Software
English
Use the T.R.U.E. process in the NX2 Race software to calibrate the wind angle
difference between port and starboard tack. This represents the actual wind shear as
an offset angle relative to the sail pressure centre.
Note; The wind shear angle will include a possible mechanical installation offset on
the Twin Fin transducer. This offset can be noted by running the boat at a time when
there is no wind!
This offset is added in the wind calibration dialogue box (see the manual).
By using the knowledge of wind shear when trimming the sail asymmetrically, you will
be able to use the force in the wind more efficiently on port and starboard tack, reach
and down-wind.
Also, remember that the Ground Wind will be referenced either with or without the
wind shear and only at the top of the mast. This will also mean that you will have
different lay line angles on port and starboard.
Asymmetric Sailing is faster for those who know and understand this principle too.
6.6
Polar and Target Boat Speed
The NX2 Race SW integrates polar data with the NX2 instrument system. The
enclosed polar data table is for an X332 boat, but you may create your own data from
IMS to be used in the NX2 Race SW. If you have data for your boat, please send it to
Silva support and it will be available for other users.
How to activate:
Activate the Polar by pressing the Polar symbol. First time you are asked to load the
polar table file. Enclosed is the X332.nxp Polar, but you may create your own.
The TBS (Target Boat Speed) is sent to the Multi Control and Multi XL instrument,
(see manual).
Create your own IMS specific Polar Data and place in the Polar File. Read the
readme.txt file under NX2 Race folder. Use a text editor like Notepad.
To open your new Polar data, go to Tools, Control, Load Polar table (select
your polar data file).
6.7
Steer Pilot and Polar data
This unique function can be used both up wind and
down wind, but the best use and efficiency is mainly
when sailing down wind.
This is how it works:
The true wind-speed and true-wind angle are
calculated and updated 3 times/s. This data are then
used to calculate TBS (Target Boat Speed) and
POC (Predicted Optimum Course) from the polar
data.
The POC (Compass heading to steer relative the
1-41
English
NX2 Race Software
actual TWA) is sent to the Steer Pilot as a new steer reference 3 times/s.
This means, when you are sailing down wind, your course to steer are instantly
related to the True Wind Angle that will give the fastest speed from the actual True
Wind Speed found in the Polar data.
Activate and Deactivate the POC function.
Press the Icon with Polar symbol to activate
or deactivate TBS and POC.
If you change the Steer reference to the
Steer Pilot from any NX2 instrument, the
POC function is cancelled and the new
reference is activated (MEM, BTW, AWA or
CTS).
To activate POC again, press the Icon with
Polar OFF and ON again.
You can see this function as a real time VMG
(velocity Made Good) from Polar table
displayed on the Steer Pilot, where you steer
to keep the needle strait up!
This will give you the fastest speed from the
wind according to the polar data,
independent on wind speed!
Can it be easier?
1-42
NX2 Race Software
English
1-43
NX2 Race Software
Copyright ©:
Silva Sweden AB
Kuskvägen 4, 191 62 Sollentuna, Sweden
Tel: +46 -(0) 8 - 623 43 00. Fax: +46 -(0) 8 - 92 76 01
www.silva.se
1-44
22547-1 Edition 4
English