1
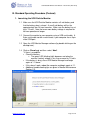
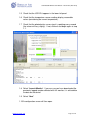
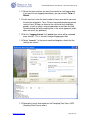
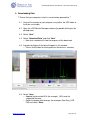
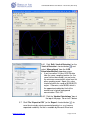
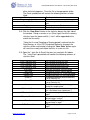
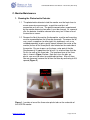
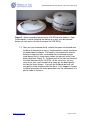
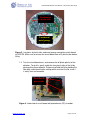
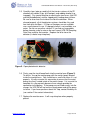
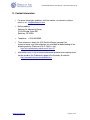
UCB Particle Monitor User Manual – Version 8.0 (Dec 2010) UCB Particle Monitor User Manual Version 8.0 (December 2010) Berkeley Air Monitoring Group and Indoor Air Pollution Team School of Public Health, University of California, Berkeley USA Contents A. Preparation (Before Using the Monitor) .........................................................2 1. Equipment Requirements...................................................................................2 2. Installing the Software........................................................................................2 3. Computer Clock Setting ......................................................................................3 B. Standard Operating Procedure (Protocol)......................................................4 1. Launching the UCB Particle Monitor ..................................................................4 2. Zeroing the Monitor.............................................................................................7 3. Placing and Retrieving the Monitor .....................................................................8 4. Downloading Data..............................................................................................9 5. Processing and Saving the Data Files .............................................................11 6. Storing Data Files ............................................................................................15 C. Monitor Maintenance......................................................................................16 1. Cleaning the Photoelectric Detector.................................................................16 2. Storing the Monitor...........................................................................................20 3. Troubleshooting ...............................................................................................20 D. Contact Information .......................................................................................21 www.berkeleyair.com Page 1 of 21 UCB Particle Monitor User Manual – Version 8.0 (Dec 2010) A. Preparation (Before Using the Monitor) 1. Equipment Requirements 1.1. UCB Particle Monitor, including: • UCB Particle Monitor software (Version 2.5) • 9-volt batteries. One 9-volt battery will last approximately four 24hour launches. • Ziploc bags for zeroing the monitor (1 liter size) 1.2. Computer • Windows 2000 or later • Pentium 90 or faster processor (minimum 66 MHz) • At least 24 MB of RAM • At least one free USB port or one free male 9-pin COM port 1.3. USB serial cable or 9-pin serial cable (to connect the monitor to the computer) * Note that the following USB cables are known to work: o Keyspan "High Speed" USB Serial Adapter (#USA-19HS) http://www.tripplite.com/en/products/model.cfm?txtModelID=3914 o Keyspan USB PDA Adapter o Parallax FTDI US232B USB to Serial Adapter 1.4. Sampling Data Forms (UCB Particle Monitor Sampling Data Form or other) 2. Installing the Software * The UCB Particle Monitor software is provided on a CD-ROM disk. 2.1. Place the CD in your computer. Copy the files onto your computer. 2.2. Install the Microsoft Windows dotnetfx protocol by double clicking on the file: dotnetfx (Application). 2.3. Install the software by double clicking on the file: UCB software v2.5_Installer.msi (Windows Installer Package). 2.4. You should now see two new icons on your desktop: UCB Data Browser 2.5 and UCB Monitor Manager 2.5 ** If you have Windows 7 or Vista operating system, the UCB programs must be run as an “Administrator”. To do so: www.berkeleyair.com Page 2 of 21 UCB Particle Monitor User Manual – Version 8.0 (Dec 2010) a. Open the following folder: C:\Computer\Program Files\UC Berkeley\UCB Particle Monitor 2.5 b. Right click on the file Data Browser.exe and select “Properties” c. Click on the “Compatibility” tab and check the box to “Run this program as an administrator” d. Click “OK” e. Repeat steps b-d above for the file Monitor Manager.exe f. You will now be able to open the programs normally from the desktop shortcuts or from the “Start” menu 3. Computer Clock Setting • • • The monitor utilizes the clock on your computer. Therefore, you must ensure that your computer’s clock is correct, so that the UCB Monitor reflects real time. o An easy approach is to use atomic clock time to set the time on your computer. This is available for download on the internet at http://www.atomtime.com/ o The correct time can also be found on the internet at http://www.timeanddate.com/worldclock/ o If an internet connection is not available, another reliable time source, such as a radio, can be used. The computer clock time should be checked at the start of every launching and downloading session. www.berkeleyair.com Page 3 of 21 UCB Particle Monitor User Manual – Version 8.0 (Dec 2010) B. Standard Operating Procedure (Protocol) 1. Launching the UCB Particle Monitor 1.1 Make sure the UCB Particle Monitor contains a 9-volt battery and that the battery door is closed. A new 9-volt battery will last for approximately four 24-hour launches. Make sure the battery has at least 7.5 volts. Note that even more battery voltage is required for 48-hour operation or longer. 1.2 Connect the monitor to your computer using a USB serial cable. A 9-pin serial cable can be used instead, if your computer has a 9-pin male COM port. 1.3 Open the UCB Monitor Manager software (by double clicking on the desktop icon). 1.4 Click on ‘Show Log’ and then select “Next”. * If there is a problem: • Check the battery. The green LED (blinking light) becomes red when the monitor’s battery voltage is less than or equal to 7.5 volts. • If the battery is okay, close UCB Monitor Manager and begin again at 1.1 above. • If this doesn’t work, reboot the computer and begin again at 1.1. • Additional troubleshooting tips are given in Monitor Maintenance Section C.3. www.berkeleyair.com Page 4 of 21 UCB Particle Monitor User Manual – Version 8.0 (Dec 2010) 1.5 Check that the UCB ID # appears in the lower left panel. 1.6 Check that the temperature sensor readings display reasonable values (considering the current temperature). 1.7 Check that the photoelectric sensor signal is updating every second (the values will vary slightly). If not, click exit and begin again at step 1.1. 1.8 Select “Launch Monitor”. If you are sure you have downloaded the previously logged sample collected with this monitor, it is ok to delete the data on the device. 1.9 Select “Next” 1.10 A configuration screen will then open. www.berkeleyair.com Page 5 of 21 UCB Particle Monitor User Manual – Version 8.0 (Dec 2010) 1.11 Select the date and time you want the monitor to start logging data. If you want to start logging immediately, you can click on “Now +1 Minute”. 1.12 In the next cell, enter the total number of hours over which you want the monitor to log data. For a 24-hour household monitoring period, select at least 30 hours to allow for the initial and final calibration periods, as well as delays and transportation to and from the field. Overestimating the total sampling time is the safest approach (and it does not cause any problems). 1.13 Set the ‘Logging Interval’ to 1 minute (one value will be recorded every minute). This is the most frequent logging possible. 1.14 Select “Launch.” In the launch confirm dialog box, check that the settings are correct. 1.15 Record the launch information on the Sampling Data Form (UCB Sampling Data Form or other). www.berkeleyair.com Page 6 of 21 UCB Particle Monitor User Manual – Version 8.0 (Dec 2010) 2. Zeroing the Monitor 2.1 Locate a clean environment for the zeroing period (for example, the office or a clean area of a lab). If such a location is not available, perform the zeroing in the field location (in a household). Do not attempt to zero the monitor in the presence of large amounts of smoke or dust in the air. 2.2 Place the launched UCB Particle Monitor in a 1-liter Ziploc bag (or, if available, a particle-free bag). Make sure the bag does not have any holes. Seal the Ziploc bag and place it in a location where the monitor will not be moved or disturbed. 2.3 Record this initial (pre-sampling) zeroing start time on the UCB PM Sampling Data Form. 2.4 After a period of at least 20-30 minutes, record this initial (presampling) zeroing end time on the sampling form; this completes the pre-sampling zeroing period. * Note that it is essential to record the initial (pre-sampling) zeroing times on the sampling form, as these times are required for data processing. 2.5 Leave the monitor in the Ziploc bag until you are ready to install it in the actual sampling location. www.berkeleyair.com Page 7 of 21 UCB Particle Monitor User Manual – Version 8.0 (Dec 2010) 3. Placing and Retrieving the Monitor (from the field location) * Note: Before going to the field each day, all wristwatches should be synchronized to the time on the computer that was used to launch the UCB Particle Monitors. Doing so will ensure that the field sampling times and cooking events can be properly related to the UCB PM data. 3.1 Remove the monitor from the bag and place it in the sampling location according to the placement protocol. This begins the sampling period. * See the protocol entitled “Installing Indoor Air Pollution Instruments in a Home” for monitor placement instructions. This protocol is also available on the Berkeley Air website: http://www.berkeleyair.com/images/stories/publications/guidelines for instrument placement.pdf 3.2 Record the sampling start time on the sampling form. 3.3 After the sampling period in the test household is complete, remove the monitor from the wall and record this sampling end time on the sampling form. * Note that it is essential to record the actual sampling times on the sampling form, as these times are required for data processing. 3.4 If possible, place the monitor in a Ziploc bag to begin a final (postsampling) zeroing period, leaving the monitor in the bag for at least 20 minutes. Record the final (post-sampling) zeroing start and end times on the Sampling Data Form. 3.5 The monitor is now ready for downloading. www.berkeleyair.com Page 8 of 21 UCB Particle Monitor User Manual – Version 8.0 (Dec 2010) 4. Downloading Data ** Ensure that your computer’s clock is correct before proceeding. ** 4.1 Connect the monitor to your computer using either the USB cable or the 9-pin serial cable. 4.2 Open the UCB Monitor Manager software (by double clicking on the desktop icon). 4.3 Select “Next” 4.4 Select “Download Data” and click “Next.” o Note that a window will show the progress of the download. 4.5 A graphical display of the data will appear in the window. o Ensure that the box for leaving data on the device is selected. 4.6 Select “Save.” o Append the household ID # (for example, _001) onto the suggested filename. o Select the proper data directory (for example, New Data_UCB PM) and select “Save”. www.berkeleyair.com Page 9 of 21 UCB Particle Monitor User Manual – Version 8.0 (Dec 2010) o A window will appear confirming that the data has been saved, the filename under which it has been saved, and the settings for the measurement period. 4.7 Select “Exit”. 4.8 Open the file in the UCB Data Browser, and check that the graph appears ok: o The period of logging should begin and end at the correct times, according to your sampling form o The graph should show a “typical” pattern of peaks and valleys (it should not simply be a straight horizontal line or a mass of vertical lines) 4.8.1 If the graph appears ok, check the “Yes” box on the sampling form labeled “Graph ok?” 4.8.2 If the graph does not appear ok, it may be due to a lowvoltage battery (lower than 7.5 volts) or a circuit board that is not properly snapped into the monitor base (see Section C.1, Cleaning the Photoelectric Chamber). If the problem persists, do not use this monitor. www.berkeleyair.com Page 10 of 21 UCB Particle Monitor User Manual – Version 8.0 (Dec 2010) 5. Processing and Saving the Data Files 5.1 Open the UCB Data Browser software (version 2.5). Then open ( ) the *.ucbpm file (the UCB Particle Monitor data file) of interest. 5.2 The Data Browser will display a ‘Choose Zeroing Type and Period’ box. 5.3 Ensure that “Initial” is selected in the ‘Zeroing Period Type’ menu; if not, select it now. 5.4 Input the Start and End times for the ‘Initial (pre-sampling) Zeroing Period’. These values should be recorded on the UCB PM Sampling Data Form (the sampling form). 5.5 Enter the Start and End times for the ‘Sample Period’ in the test household (this does not include transportation or zeroing periods). These times are also shown on the sampling form. Then press ‘OK’. The graph will then display the particle concentrations in mg/m3. 5.6 Check that the minimum particle concentration (in mg/m3) is reasonable (the typical range is greater than or equal to 0.030 mg/m3 and less than or equal to 0.075 mg/m3 (0.030 ≤ min ≤ 0.075). This minimum concentration is labeled “min” and shown in the column of statistics on the right side of the window. If the minimum concentration is in this range, proceed to 5.7. If it is not, continue to 5.6.1 below. www.berkeleyair.com Page 11 of 21 UCB Particle Monitor User Manual – Version 8.0 (Dec 2010) 5.6.1 Click ‘Edit / Limit of Detection’ (or the ‘Limit of Detection’ shortcut button ) and select “Manual input” from the ‘LOD Calculation Method’ drop-down menu. • If you have other 24-hour UCB PM data from the same sampling location (i.e. the same kitchen/household), you can enter the minimum concentration value from this other sampling event. Again, this value should be within the range of 0.030-0.075 mg/m3. Otherwise, enter 0.050, which is the approximate detection limit of the monitor and a typical background concentration. Click ‘OK’. 5.6.2 Click the “Update Calculations” box at the top of the page. Go on to 5.7 below. 5.7 Click ‘File / Export to CSV’ (or the ‘Export’ shortcut button ) to save the minute by minute concentration data in a .csv (comma separated variables) file that is readable by Microsoft Excel and www.berkeleyair.com Page 12 of 21 UCB Particle Monitor User Manual – Version 8.0 (Dec 2010) other statistical programs. Save the file in the appropriate folder. The Excel spreadsheet will contain the following columns of data titled: Timestamp Photo mass (mg / m^3) Photo-Electric Temperature Battery The time and date of each data point The particle mass concentration in mg/m3 The raw output of the monitor in millivolts (mv) The temperature in Celsius The battery voltage in volts 5.8 Click the “Save Stats” button in the statistics box on the right side of the window. Doing so creates a csv (Excel type) file of the summary statistics from this processed file (“-stats” will be appended to the end of the file name). * Note that if a new Sampling or Zeroing period is entered into the Data Browser, or if the LOD Calculation Method is changed, the statistics will be recalculated; clicking the “Save Stats” button again will save these newly-calculated statistics in a new csv file. 5.9 Open the *-stats file (in Excel) that was just created in 5.8 above. The *-stats Excel spreadsheet will contain the following columns of statistics titled: Initial Calibration Start Initial Calibration End Final Calibration Start Final Calibration End Stats Begin Stats End Sample Start Sample End Photo PC Photo TC N records P Arithmetic Mean P Geometric Mean P Standard Deviation P median P 75th Percentile www.berkeleyair.com Pre-sampling zeroing start time Pre-sampling zeroing end time Post-sampling zeroing start time Post-sampling zeroing end time Start time for chosen statistics period End time for chosen statistics period Sampling start time (i.e. In the household) Sampling end time (i.e. In the household) Photoelectric detector particle coefficient (set by Berkeley Air) Photoelectric detector particle coefficient (set by Berkeley Air) The total number of data points logged during the sampling time Average particle concentration in mg/m3 (* this is the data of most importance *) Geometric mean particle concentration in mg/m3 Standard deviation of the particle concentrations in mg/m3 Median (50th percentile) particle concentration in mg/m3 75th percentile particle concentration in mg/m3 Page 13 of 21 UCB Particle Monitor User Manual – Version 8.0 (Dec 2010) P 95th Percentile P Minimum P Maximum P Highest P 2nd Highest P 3rd Highest Temp Arithmetic Mean Temp Geometric Mean Temp Standard Deviation Temp Median Temp 75th Percentile Temp 95th Percentile Temp Minimum Temp Maximum Temp Highest Temp 2nd Highest Temp 3rd Highest Percentile particle concentration in mg/m3 Minimum particle concentration in mg/m3 Maximum particle concentration in mg/m3 Highest 15-minute average particle concentration in mg/m3 Second highest 15-minute average particle concentration in mg/m3 Third highest 15-minute average particle concentration in mg/m3 Average temperature in Celsius Geometric mean temperature in Celsius Standard deviation of the temperatures in Celsius Median (50th percentile) temperature in Celsius 75th percentile temperature in Celsius 95th percentile temperature in Celsius Minimum temperature in Celsius Maximum temperature in Celsius Highest 15-minute average temperature in Celsius Second highest 15-minute average temperature in Celsius Third highest 15-minute average temperature in Celsius * Note that the statistics of most importance are the following twelve: Sample Start Sample End N records P Arithmetic Mean P 75th Percentile P 95th Percentile P Minimum P Maximum P Highest P 2nd Highest P 3rd Highest Temp Arithmetic Mean Sampling start time (i.e. In the household) Sampling end time (i.e. In the household) The total number of data points logged during the sampling time Average particle concentration in mg/m3 (* this is the data of most importance *) 75th percentile particle concentration in mg/m3 Percentile particle concentration in mg/m3 Minimum particle concentration in mg/m3 Maximum particle concentration in mg/m3 Highest 15-minute average particle concentration in mg/m3 Second highest 15-minute average particle concentration in mg/m3 Third highest 15-minute average particle concentration in mg/m3 Average temperature in Celsius 5.10. You may want to copy the statistics of interest (such as the twelve shown above) into a separate Excel spreadsheet of IAP results. www.berkeleyair.com Page 14 of 21 UCB Particle Monitor User Manual – Version 8.0 (Dec 2010) 6. Storing Data Files New UCB Particle Monitor data files stored on your computer should be backed up (copied onto another storage medium) at least once a week. Each sample from a monitor will produce three files: the ucbpm file (approximately 50 KB for a 24 hour sample), its corresponding commaseparated variable (csv) file (~120 KB), and the stats file (~2 KB). 6.1 Back up the files onto an external hard drive, CD, or USB flash drive. 6.2 Additionally, you may want to email your UCB PM data files to a designated person as a second method of data backup. www.berkeleyair.com Page 15 of 21 UCB Particle Monitor User Manual – Version 8.0 (Dec 2010) C. Monitor Maintenance 1. Cleaning the Photoelectric Detector 1.1 The photoelectric detector inside the monitor must be kept clean to ensure accurate measurements, as particles and dust will accumulate on it with use. The particle concentrations experienced by the monitor determine how often it must be cleaned. As a general rule, the detector should be cleaned after every ten 24-hour uses of the monitor or sooner. 1.2 Remove the lid of the monitor (the baseplate, used for wall mounting, must be removed before the lid can be removed). To remove the lid, use a small screwdriver (or other rigid, thin implement such as an unfolded paperclip) to press gently inward (towards the center of the monitor) on one of the three plastic tabs located on the underside of the monitor. Be sure to press on the lower, outer part of the tab. Simultaneously lift upward on the lid until it is released from that tab. Do this for each of the three tabs. The location of one of the three tabs is shown in Figure 1 below. Note that since the tabs are plastic, care must be taken to avoid breaking them. After all three tabs are loosened, remove the lid from the base by continuing to lift it upward (Figure 2). Outer plastic tab Figure 1. Location of one of the three outer plastic tabs on the underside of the UCB PM monitor. www.berkeleyair.com Page 16 of 21 UCB Particle Monitor User Manual – Version 8.0 (Dec 2010) Figure 2. Space created by loosening the UCB PM lid from the base. Note – the baseplate, used for mounting the monitor on a wall, must be removed before you can access the tabs to remove the UCB PM lid. 1.3 After you have removed the lid, remove the green circuit board from the base of the monitor to access the photoelectric sensor located on the underside of the board. The board is connected to the monitor base by three plastic tabs surrounding the circuit board and two metal prongs that sit inside metal clamps that connect to the 9-volt battery terminals (Figure 3). Pull back each of the tabs and slowly lift the circuit board out of the UCB PM. At the same time, you may want to use your small screwdriver to slowly pry the board prongs out from the metal clamps. If you pull on the board too hard, you may pull the metal clamp out from the base. If this happens, remove the metal clamp from the metal prong and insert the clamp back in its plastic holder in the base. www.berkeleyair.com Page 17 of 21 UCB Particle Monitor User Manual – Version 8.0 (Dec 2010) Locations of plastic tabs Location of metal prongs Figure 3. Locations of plastic tabs and metal prongs connecting circuit board to UCB PM. Make sure to release the circuit board from all 3 plastic tabs before lifting. 1.4 Turn the circuit board over, and remove the lid (black plastic) of the detector. To do this, gently unclip the four plastic tabs of the lid by gently pulling them outward. Remove and hold the lid by holding the tabs only; avoid touching the netting which encircles the lid, since it is easily torn and removed. Locations of plastic tabs Figure 4. Underside of circuit board with photoelectric (PE) chamber. www.berkeleyair.com Page 18 of 21 UCB Particle Monitor User Manual – Version 8.0 (Dec 2010) 1.5 Carefully clean (wipe or swab) all of the interior surfaces of the PE chamber with cotton Q-tips (or Kimwipes) and rubbing alcohol (e.g. isopropyl). Pay special attention to cleaning the two lenses (the LED and the photodetector) and the sloped paths leading down to them. Be sure to also clean the inside of the lid of the detector. When cleaned properly, all of the detector surfaces should be shiny and free from dust and fibers. If Q-tips or Kimwipes are not available, use a small piece of tissue. If isopropyl alcohol is not available, use water. Do not use any other solvents. If you find any large debris before cleaning, make a note on the most recent UCB PM Sampling Data Form used for that monitor. Replace the lid to close the detector (it should snap into place). Lenses Figure 5. Open photoelectric detector. 1.6 Firmly snap the circuit board back into the monitor base (Figure 3). To do this, line up the metal prongs with the metal clamps located inside the monitor base. You should hear a small click when it is set properly. Visually examine this connection to ensure that the metal prongs are firmly seated inside of the metal clamps. It is essential to complete this step correctly because these clamps provide the connection to the battery. If the prongs are not fitted exactly into the clamps, the UCB PM will not receive steady power and will be prone to failure. If you have questions about this step, contact Berkeley Air (see section D for contact information). 1.7 Replace the monitor cover. It will snap into place when properly placed. www.berkeleyair.com Page 19 of 21 UCB Particle Monitor User Manual – Version 8.0 (Dec 2010) 2. Storing the Monitor When not in use, all UCB Particle Monitors should be stored in sealed Ziploc (or other airtight) bags. Ideally, the bagged monitors should be placed in boxes and stored in a safe location, such as a shelf or secure cabinet. Storing monitors in this fashion will help prevent dust from accumulating inside the instrument and, of course, prevent the instruments from being bumped or dropped. 3. Troubleshooting 3.1 • • The LED (blinking light) on the top of the monitor (just under the lid) can indicate several things, depending on the monitor status: When the monitor is detached from the computer: o Blinking green 1 per second: monitor is logging data, battery okay o Blinking red 1 per second: logging data, battery low (less than 7.5 volts) o Not blinking at all, either: The monitor is not launched The monitor is not yet or no longer within the logging time period (before or after) –or The monitor’s battery is dead (less than 5 volts) When the monitor is attached to the computer and activated by the UCB Monitor Manager: o Green: battery voltage is greater than 7.5 volts o Red: battery voltage is equal to or less than 7.5 volts The LED does not indicate any other information, such as date/time device errors, signal out of range, etc. 3.2 If you get a “Device Error” message when connecting the monitor to the UCB Monitor Manager software, the first step is to check the battery voltage. If the voltage is less then 7.5 volts (cold climate) or 7.0 volts (temperate climate), change the battery. * Note: If you notice difficulty collecting data when using the minimum voltage of 7.0 volts, increase your minimum battery voltage requirement to 7.5 volts. 3.3 If the problem persists, close out of the UCB Monitor Manager software, re-open the software, and try again. www.berkeleyair.com Page 20 of 21 UCB Particle Monitor User Manual – Version 8.0 (Dec 2010) D. Contact Information • For more information, problems with the monitor, or comments, please email us at: [email protected] • Mailing address: Berkeley Air Monitoring Group 2124 Kittredge Street #57 Berkeley, CA 94704 • Telephone: +1 510 649 9355 • Three references about the UCB Particle Monitor (concept, lab characterization, and field validation) are available for downloading at the following website (Professor Kirk R. Smith’s site): http://ehs.sph.berkeley.edu/krsmith/?cat=22 • Information such as the instrument placement protocol and sampling forms can be found on the Publications page of the Berkeley Air website: http://www.berkeleyair.com/publications www.berkeleyair.com Page 21 of 21