1
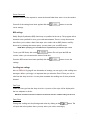
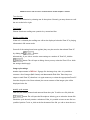
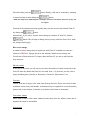
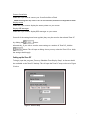
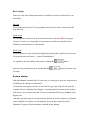
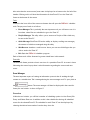
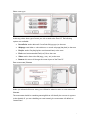
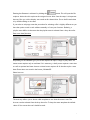
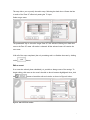
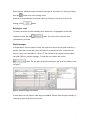
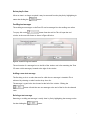
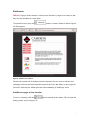
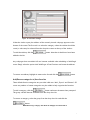
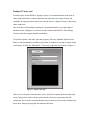
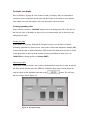
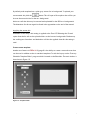
Freeway Signage 8 USER MANUAL Welcome Thank you for choosing FREEWAY Signage 8 from Cameron Communications. We have built upon the success of our last version to give you an improved experience with more flexibility than ever whilst maintaining the ease of use that makes FREEWAY Signage so popular. Without further a do, let us introduce you to some of the new features. More Control When you send an event to a channel, you have more control over various settings such as the screen layout, audio settings and play time. Smoother Interface The scheduler interface is cleaner providing an excellent overview of each channel. Improved TV Tuner Quality We have improved the quality of the TV tuner window so your live TV feed will be sharper and cleaner than before. Improved Quick Messaging It is now possible to send individual scrolling text messages to each channel. In addition to this you are no longer limited in the number of messages that you may send. More Flexibility Make your display unique by choosing the display font style, the channel background image, RSS news source. Furthermore you can now construct your own channel template using the FREEWAY Template Editor. Now that we’ve given you an idea of some of the improvements, let’s begin. If you are using FREEWAY Signage for the first time you have nothing to worry about, the following manual will go through every aspect of the software from start to finish. -2- Contents SYSTEM OVERVIEW -4- INSTALLATION -4- SETUP YOUR SYSTEM -4- SETTING UP THE SCHEDULER SERVER SETTINGS RSS SETTINGS SCROLLING TEXT SETTINGS IMAGE CYCLE SETTINGS MISC. ZONE SETTINGS SETTING UP THE ZONE PC BASIC SETTINGS -5-5-6-6-7-8- 10 - 11 - SYSTEM STARTUP - 11 - FREEWAY SCHEDULER - 12 - SCHEDULER OVERVIEW EVENT MANAGER OVERVIEW SCHEDULE A NEW EVENT EDIT AN EVENT DELETING AN EVENT PLAYLIST MANAGER EDIT PLAYLIST NAME ADD FILES TO THE PLAYLIST INSERT FILES TO THE PLAYLIST EDIT PLAYLIST FILE DELETE PLAYLIST ITEM SCROLLING TEXT MESSAGES ADDING A NEW TEXT MESSAGE DELETING A TEXT MESSAGE WEB BROWSER ADD/REMOVE PAGE TO/FROM FAVORITES ADD/REMOVE CATEGORIES TO/FROM FAVORITES CONFIGURE TV TUNER CARD CUSTOMIZE YOUR DISPLAY CREATING/UPLOADING SKINS CREATE CUSTOM TEMPLATE - 12 - 13 - 13 - 14 - 17 - 18 - 18 - 19 - 19 - 19 - 19 - 20 - 20 - 20 - 20 - 21 - 21 - 22 - 23 - 24 - 24 - 25 - -3- System overview The system requires a minimum of two units. One is used as a scheduler which sets play times, channel information etc. whereas the other is required to playback this information. Throughout this manual you will see the former referred to as the Scheduler and the latter referred to as the Zone Playback Channel or Zone PC. A visual impression can be seen below in Figure 1. Figure 1 - Overview of system Installation On the installation CD you are provided with two setup programs. The first, ‘Freeway Scheduler v8 Setup.exe’ should be installed on to the Scheduler and the second, ‘Freeway Zone Display v8 Setup.exe’ installed on each Zone PC. This will load all of the necessary components on to the respective machines. All of the program shortcuts will be placed on to each machine desktop. Setup your system Once the software has been installed, the next step is to set-up both the Scheduler and each Zone PC. -4- Setting up the Scheduler To begin, open the program, ‘Freeway Scheduler 8 Setup’. A shortcut should be available on the Scheduler desktop. A login screen will then appear. When it does, enter the Username: admin and Password: freeway. This will open the Scheduler setup as shown in Figure 2. Figure 2 - Freeway Scheduler Setup Server settings Server Drive This corresponds to the letter of the network drive used to host the FREEWAY Signage software. In order to run successfully, this drive must be visible and accessible to the Scheduler and each Zone PC on the network. Server Path You are required to enter the Universal Naming Convention (UNC) path in to the text box. This typically takes the form of, ‘\\HostPC\SharedFolder\’. -5- Server Password Should a password be required to access the shared folder then enter it in to the textbox. Once all of the settings have been applied click the button to save the server settings. RSS settings Really Simple Syndication (RSS) feeds may be specified in the set up. The program allows channels to be specified for news, sport and entertainment. There is a drop down menu that allows you to select a feed from major news outlets such as BBC, Reuters and Sky. However by selecting the custom option, you may enter your own RSS source. NOTE: When specifying your own RSS feed it is important that you reference your source To test your RSS feeds, click on the button. This will open the RSS test window where you can monitor the status of each link. Once the RSS sources have been specified, click the button to save the settings. Scrolling text settings New to FREEWAY Signage 8 are the number of settings you can apply to the scrolling text messages. Before you begin, it is important that you select the Zone PC that you wish to edit from the drop down list. You may then customize the scrolling text for that particular channel. Font Type Select the font type from the drop down list. A preview of the style will be displayed in the box adjacent to the list. NOTE: The selected font must be installed on the Zone PC otherwise a default setting will be used Font Colour Change the scrolling text font/background colour by clicking on the button. This will open the colour palate where you may select your colour accordingly. -6- NOTE: The colours will not come in to effect until the Custom template is selected Text direction Choose a text direction by selecting one of the options. Currently you may choose to scroll the text to the left or right. Text Speed Choose from three scrolling text speeds: slow, normal and fast Display scrolling text When ‘no’ is selected, the scrolling text will not be displayed when the Zone PC is playing information in full screen mode. Once all of the settings have been applied, they may be saved to the selected Zone PC by clicking the button. Alternatively, if you wish to save the same settings to a number of Zone PCs, click the button. This will open a dialog where you may select the Zone PCs to which the settings should apply. Image cycle settings Another improvement in FREEWAY Signage 8 is the image loop. Now it is possible to construct a list of images (BMP format) and Macromedia Flash files. These loops are unique to each Zone PC; therefore it is again necessary to select the appropriate Zone PC from the drop down list. Once selected, the current contents of the image cycle will be displayed in the list. Modify cycle contents Files may be added, inserted and removed from the cycle. To add a new file, click the button. This will open the file explorer allowing you to select the chosen file. Should the cycle already contain a selection of files, it is possible to insert a new file in a specified position. To do so, click on the list the name of the file you wish to insert the new -7- file before then press the button. Finally, a file can be removed by selecting its name from the list and clicking the button. NOTE: The image area is 248x276 pixels. All images should not exceed these dimensions or they will be cropped Once all of the settings have been applied, they may be saved to the selected Zone PC by clicking the button. Alternatively, if you wish to save the same settings to a number of Zone PCs, click the button. This will open a dialog where you may select the Zone PCs to which the settings should apply. Misc. zone settings A number of other settings may be applied to each Zone PC. Included are some new features to FREEWAY Signage 8 such as skin selection, default screen settings and PowerPoint to Flash conversion. To begin, select the Zone PC you wish to edit from the drop down list. Edit zone name At the top of the frame you will notice a text box, the contents of which correspond to the Zone PC name. By default the Zone PCs are name Zone 1-10, however you may wish to apply something more relevant i.e. ‘Reception’, ‘Cafeteria’, ‘Department 1’ etc. Zone skin Choose which skin to apply to the zone from the drop down list. There are a total of three available: classic, fancy and metallic. A custom skin may be applied. For more information, please refer to the chapter, ‘Customize your display’ found later in the manual. Zone colour scheme Select either a blue or silver colour scheme from the drop down list. When a custom skin is applied, this option is unavailable. Upload skins -8- The setup program contains a facility to upload custom made skins for use on the Zone PC. This will be covered in more detail in the chapter, ‘Customize your display’. Default settings As a result of the new feature in FREEWAY Signage 8 where end times can be attached to zone events, it is necessary to provide the Zone PC with some default event information which it may revert to once an event expires. Default browser Select the default browser from the drop down list. There are a total of six browsers available and an additional custom browser. More information on the custom browser is available in the chapter, ‘Customize your display’, found later in the manual. To preview the system browsers, click the button. This will open a window providing details of each available template. Default file There is a text box which contains the path of the default file. This may be edited by clicking the button. This will open the file explorer from which the file may be selected. It is also possible to select a playlist as the default file by making a selection from the drop down button. NOTE: Playlists will be discussed later in this manual Audio setting Note the check box labeled, ‘Mute TV/DVD’. When selected, the TV input will be muted when the default event is loaded. TV/Webstream settings Individual TV/Webstream settings may be applied to each zone. You will notice that there are two options marked: TV and Stream. Select whatever one applies to the zone currently being edited. When a stream is selected, it is necessary to provide the Webstream path in the text box above. Other settings There is a selection of other settings that may be applied to the zone. -9- Convert PowerPoint Select this if you want to convert your PowerPoint files to Flash. NOTE: Converting files may result in a loss of some transitions/animations. See Appendix for details Display mouse Select this if you want to display the mouse pointer on your screen. Display RSS messages Select this if you want to display RSS messages on your screen. Once all of the settings have been applied, they may be saved to the selected Zone PC button. by clicking the Alternatively, if you wish to save the same settings to a number of Zone PCs, click the button. This will open a dialog where you may select the Zone PCs to which the settings should apply. Setting up the Zone PC To begin, open the program, ‘Freeway Scheduler Zone Display Setup’. A shortcut should be available on the Zone PC desktop. This will open the Zone PC setup as shown in Figure 3 below. Figure 3 - Zone PC Setup - 10 - Basic settings There are a few basic settings that have to be applied in order for the Zone PC to run successfully. Zone No You may allocate the Zone PC a zone number from one to ten. This is selected from the drop down list. Server Drive This corresponds to the letter of the network drive used to host the FREEWAY Signage software. In order to run successfully, this drive must be visible and accessible to the Scheduler and each Zone PC on the network. Server Path You are required to enter the Universal Naming Convention (UNC) path in to the text box. This typically takes the form of, ‘\\HostPC\SharedFolder\’. It is possible to test the validity of this path by clicking the Once all of the settings have been applied click the button. button to save the Zone PC setup. System startup With the Scheduler and each Zone PC now setup, we can begin to open our programs that will display and schedule our information. To launch the zone display software on the Zone PCs, go to the Zone PCs and open the program ‘Freeway Scheduler Zone Display’. A shortcut should be located on the desktop; otherwise it can be found in the path: ‘C:\Freeway Scheduler 8\Freeway Scheduler Zone Display.exe’. With the program running, it can effectively be ignored as all the operation in performed on the Scheduler. To begin, go to the Scheduler and open the program ‘Freeway Scheduler 8’. Again a shortcut should be available on the desktop. - 11 - Freeway scheduler Launching the FREEWAY scheduler software will display the main control screen as shown in Figure 4. It is from here where all the information is sent to the Zone PCs. Date Time Timeline Zone Info Tools Figure 4 - Freeway scheduler main control Scheduler overview The scheduler contains a small number of elements that provide you facilitate you in controlling your Zone PCs. Date/Time Located at the top of the screen is the days/date and present time. Timeline In the main upper half of the screen is the FREEWAY timeline. This is split in to ten rows from top to bottom corresponding to zones one to ten. At the bottom is the current time, and within each row is an indication of forthcoming events (events are discussed shortly). To navigate through the timeline; use the ‘<’ key to go left, and the ‘>’ key to go right. - 12 - Also notice that the current event/zone name is displayed on a button at the far left of the timeline. Clicking on this will load the information for that Zone PC in to the Zone Info frame at the bottom of the screen. Tools Located to the lower left of the screen are buttons that will open the FREEWAY scheduler tools. The purpose of each is as follows: Event Manager: This is probably the most important tool you will learn to use. It is from here where files are scheduled to go to the Zone PC Playlist Manager: This utility allows you to construct a Playlist of files which may be sent to the Zone PC Quick Message: Each Zone PC has the ability to display scrolling text messages, the contents of which are managed using this utility Web Browser: Launches a web browser where you can save WebPages that you wish to send to the Zone PC Exit: Quits the FREEWAY scheduler program Each of these tools will be discussed in greater detail later in this manual. Zone info The zone info frame provides a basic overview of a particular Zone PC. A screen is shown illustrating the screen layout, there is also information regarding the current and next event. Event Manager The most important aspect of running an information system is that of sending the right content at a suitable time. This is managed using the event manager tool. To open, click on the button. The event manager will then be displayed in the zone info frame; the tool window is shown in Figure 5. Overview Within the tool window you will find a number of scheduling options i.e. New Event, Edit Event, and Delete Event etc. In addition to this is the schedule list showing all scheduled events for the selected Zone PC. The schedule for each Zone PC can be displayed by selecting the desired zone number from the drop down list. - 13 - Figure 5 - Event manager tool window Schedule a new event When we want to change the Zone PC output, we have to send a new event to the channel. An event can be sending a new file, changing the screen layout or both. To begin the procedure, click the button. This will launch the new event wizard. Each step of the wizard is outlined below: Select schedule type Choose the time frame in which your information is sent to the Zone PC. The options are: Schedule instantly: the event will be sent to the Zone PC immediately Schedule daily: the event will be sent daily at a time specified by the user Schedule on date: the event will be sent on a specific day at a time specified by the user Select one of these option and then move on to the next stage. The buttons at the bottom of the wizard allow you to navigate through the steps throughout the event setup. - 14 - Select event type In this step, select what type of event you wish to send to the Zone PC. The following options are available: PowerPoint: send a Microsoft PowerPoint file(.ppt,.pps) to the zone Webpage: send either a web address or a saved webpage(.htm,.html) to the zone Playlist: send a Playlist(playlists are discussed later) to the zone Flash: send a Macromedia Flash(.swf) file to the zone Video: send a data video file(.mpg, .wmv, .avi) to the zone Browser: this event will change the screen layout of the Zone PC Enter event name/filename Unless you selected a Browser event, you will then be asked to enter an event name and filename. The event name should be something meaningful that will identify the event as it appears in the schedule. If you are scheduling an event instantly, the event name will default to ‘Instant Event’. - 15 - Entering the filename is achieved by clicking the button. This will open the file explorer. Notice how this explores the assigned server drive from the setup. It is important that any files you wish to display are stored on this shared drive. Go to the file and select it by double-clicking on its name. If you select a webpage event the procedure for selecting a file is slightly different as you have the option to add a web address manually or from your favorites. Similarly, a playlist event differs in the sense that the playlist name is selected from a drop down list. Enter start date/duration Depending on the schedule type you will be required to input a range of play times. An instant event requires only an end time if it is necessary, a daily event requires a start time as well an optional end time whereas a dated event requires all of the above plus a start date. Event times are stored in the format, ‘HH:MM:SS’. Select browser The next step allows you to choose which template to use when the event is sent. The browser can be selected from the drop down list. To keep the same template the default value of ‘Use current browser’ should be used. - 16 - This step allows you to specify the audio setup. Selecting the check box will mute the line in audio of the Zone PC effectively muting the TV input. Select target zones The penultimate step is where the target Zone PCs are selected. Clicking on a check box next to the Zone PC name will render it selected. All the selected zones will receive the new event. With all of the steps completed, the only remaining task is to finalize the event by clicking on the button. Edit an event If an event has already been scheduled, it is possible to change some of the settings. To begin editing, click event on the zone’s schedule so that it becomes highlighted. Next, click the button to launch the edit tool window as shown in Figure 6 below. Figure 6 - Edit event tool window - 17 - Notice that the editable values are listed on the right of the window. To edit any of these, click the button next to the existing value. Once all of the parameters have been edited as required, close the tool window by clicking on the button. Deleting an event To remove an event from the schedule, firstly make sure it is highlighted on the zone schedule list, then click the button. The event will be removed once confirmation is provided. Playlist manager In circumstances where a number of files are required to be played in quick succession, a playlist event may be the best option. A playlist is essentially just a list of files that will play in a loop once scheduled to a Zone PC. The contents of the playlists can be edited using the FREEWAY playlist manager. To open the tool window click on the button. This will open the playlist manager in the zone info frame as seen in Figure 7. Figure 7 - Playlist manager tool window In total there are five playlists which may be modified. Choose which playlist to modify by selecting its name from the drop down list. - 18 - Edit playlist name By default the five playlists are called Playlist 1, Playlist 2 … etc. It is recommended however that you use a name which is more meaningful. To edit the playlist name click on the button next to the existing name; this will then allow a new name to be entered. Add files to the playlist To the right of the window there is a file explorer allowing you to search the server drive for various file types including video, PowerPoint, Flash and webpage documents. Once the desired file has been located, you may drag and drop it on to the playlist. Alternatively, choose ‘Selected file’ from the drop down menu. New to FREEWAY Signage 8 is the ability to add a web address to a playlist. This time select webpage from the menu, and choose whether to enter the URL manually or select a webpage from your favorites. Once a file is added to the list, you will be prompted to enter duration as well as whether or not to mute the TV input. Remember that times are stored in ‘HH:MM:SS’ format. Insert files to the playlist When adding a file to the playlist, it will take its place at the end of the list. In circumstances where a file is required to be added in a certain position, the ‘Insert’ file would be the most appropriate option. The first step is to highlight the file on the playlist you wish to position the new file before. Then select your file as before except this time add it to the playlist using the drop down menu. Edit playlist file To edit a playlist file, highlight it from the list and click the button. This will allow you to edit the duration and audio settings for the selected file. - 19 - Delete playlist item When an item is no longer required it may be removed from the playlist by highlighting its name then clicking the button. Scrolling text messages The scrolling text messages on the Zone PC can be managed via the scrolling text editor. To open, click on the button from the tool list. This will open the tool window in the zone info frame as shown in Figure 8 below. Figure 8 - Quick message tool window The tool consists of a message box to the left of the window and a list containing the Zone PC name with its messages; located to the right of the window Adding a new text message The first thing to do is to select the zone for which the new message is intended. This is achieved by selecting a value from the drop down list. The message is typed in the box located at the left of the window. Clicking the button will add the new text message to the end of the list for the selected zone. Deleting a text message Removing a scrolling text message is easily done by firstly highlighting the message on the list then clicking the button. - 20 - Web browser FREEWAY Signage 8 also contains a web browser that allows pages to be stored so that they may be scheduled at a later date. To open the browser press the button. A window similar to that in Figure 9 will then appear. Figure 9 - Web browser window The browser contains all of the basic controls required to browse various websites and webpages. However the most important aspect of this tool is the ability to store pages as ‘favorites’ which may be called upon later when scheduling a ‘WebPage’ event. Add/Remove page to/from favorites To store a webpage, click the button located on the toolbar. This will open the dialog window shown in Figure 10. - 21 - Figure 10 - Favorites manager When the window opens, the address of the currently viewed webpage appears at the bottom of the screen. The first task is to select the category where the address should be saved; a value may be selected from the drop down menu at the top of the window. To add the address, click the button. Note that it should now have been added to the list. Any webpages that are added will now become available when scheduling a ‘WebPage’ event. Simply select the option: Add WebPage->From Favorites and locate the address. To remove an address, highlight its name on the list and click the button. Add/Remove categories to/from favorites Three default favorite categories are provided which are: ‘Misc’, ‘Sports’ and ‘Science’. Of course any number of custom categories may be added to help organize the favorites. To add a category, click the button and enter the name when prompted. This group will then become available from the drop down list. To remove a category, select the group from the drop down list and click the button. NOTE: Removing a category will delete all webpages associated with it - 22 - Configure TV tuner card To make full use of the FREEWAY Signage system, it is recommended that some form of video capture hardware is utilized. Basically this means that the system will have the capability of playing back an input from a device such as: a digital TV tuner, DVD player, video camera etc. Part of the Zone PC installation package is a program that allows any video capture hardware to be configured. If you have already installed the FREEWAY Zone Display software, then this program should be available. To open the capture card setup, open the program, ‘Freeway Scheduler Capture Card Setup’. A shortcut should be available on the Zone PC desktop. If not then it can be found in the folder: ‘C:\Freeway Scheduler 8\’. The setup program is shown below in Figure 11. Figure 11 - Capture card setup There are two drop down lists that allow you to specify the capture device and the input source. The preview window can be used to monitor the input to guarantee that the settings are correct. More advanced features may be accessed via the input settings drop down menu. Closing the program will memorize the setup. - 23 - Customize your display New in FREEWAY Signage 8 is the extent to which your display may be customized to provide a more environment specific look and feel. Some of the features were touched upon earlier, however this chapter will cover the subject with more detail. Creating/uploading skins Every zone browser has a 1024x768 image fixed in the background. This is the ‘skin’ of the browser. New is the ability to import your own custom made ‘skin’ to be used in the background of each. Create your skins In the folder: ‘C:\Freeway Scheduler 8\Template Layouts’ you will find two folders containing guidelines for each browser. One folder will have the template in bitmap (BMP) format and the other in Adobe Photoshop (PSD) format. The dimensions can also be found in the appendices at the end of this manual. Use these guidelines to make your own 1024x768 skin, saving the file as a bitmap (BMP). Upload your skins Firstly make sure that the skins are saved on the shared network drive. In order to upload the files, the skin upload tool in the FREEWAY Scheduler Setup must be used. Open the setup program on the Scheduler and click on the button. This will open the tool window seen in Figure 12. Figure 12 - Skin upload utility - 24 - By default, each template has a plain grey canvas for its background. To upload your custom made skin, click the button. This will open a file explorer that will let you browse the network drive for the new background. Notice as well that skins may be created and uploaded for the RSS news backgrounds. The dimensions for this can again be found in the appendices at the end of the manual. Applying the custom skin Remember in the setup a skin setting is applied to the Zone PC? Selecting the ‘Custom’ option from the list will use the uploaded skins as the browser backgrounds. Furthermore, the scrolling text forecolour and backcolour will also be applied when this skin setting is used. Create custom template Another new feature in FREEWAY Signage 8 is the ability to create a custom browser that can be used in addition to the six standard templates. To edit the layout, use the ‘Freeway Scheduler Template Editor’ program which is located on the Scheduler. The main window is shown here in Figure 13. Figure 13 - Template editor - 25 - The screen is split in to two areas. To the left is the control panel and on the right is the template preview. Each browser element is contained in the drop down list at the top left of the tool window. The elements contained are as follows: Data window: This plays back the file types associated with the FREEWAY Scheduler i.e. PowerPoint, video, Flash and webpages TV window: This area is dedicated to playing back the input of the TV capture card Logo frame: This area plays the image cycle, it has a fixed size Scrolling text: This area is where the scrolling text messages will appear, it has a fixed size RSS feeds: The RSS messages will be displayed in this frame, it also has a fixed size When an element is selected from the drop down list, it will act as the item being edited. Select whether or not the item should be displayed by selecting one of the ‘Visible’ options. The position and size may also be set using the appropriate controls to the left of the screen Once the layout is complete, you may save the settings by clicking the button. To use this template, select the ‘Custom’ browser from any of the browser selection drop down lists. - 26 - Appendix 1 – Zone PC system settings A number of settings need to be applied to the Zone PC in order for it to run effectively. Taskbar settings Right click on the taskbar and then click ‘Properties’. The following settings should be used: Figure 14 - Zone PC taskbar settings Display settings Right click on the desktop and click ‘Properties’ on the menu. The following setting should be used. In the display properties, make the following changes: Disable the screensaver Adjust the power settings so that the monitor does not power off Sound settings Disable the system sounds by going: Start Menu->Control Panel->Sounds and Audio Devices Select the sounds tab and set the sound scheme to ‘No sounds’ from the drop down list. - 27 - Appendix 2 – PowerPoint to Flash conversion The following tables contain information on the available transitions and animations when converting PowerPoint to Flash. Entrance Animations Animations Supported Appear Blinds Box Checkerboard Circle Crawl in Diamond Dissolve in Flash Once Fly in Peek in Plus Random Bars Random Effects Split Strips Wedge Wheel Wipe Expand Fade Fade Zoom Faded Swirl Ascend Center Revolve Color Typewriter Compress Descend Ease In Grow &Turn Rise Up Spinner Stretch Unfold Zoom Boomerang Bounce Credits Curve Up Flip Yes Substitution Yes Yes Yes Yes Yes Yes Yes Yes Yes Yes Yes Yes Yes Fade Yes Yes Yes Yes Yes Yes Yes Yes Yes Yes Yes Yes Yes Yes Yes Yes Yes Yes Yes Yes Yes Yes Yes Yes Yes Yes Fade - 28 - Float Fold Glide Light Speed Magnify Pinwheel Sling Spiral In Swish Swivel Thread Whip Yes Yes Yes Yes Yes Yes Yes Yes Yes Yes Yes NO Emphasis Animations Animations Supported Change Fill Color Change Font Change Font Color Change Font Size Change Font Style Change Line Color Grow / Shrink Spin Transparency Bold Flash Brush on Color Brush on Underline Color Blend Color Wave Complementary Color Complementary Color2 Contrasting Color Darken De-saturate Darken Flash Bulb Lighten Vertical Highlight Flicker Grow w/ Color Shimmer Teeter Blast Blink Bold Reveal Style Emphasis Wave Yes Substitution NO NO NO NO NO yes yes yes NO NO NO NO NO NO NO NO NO NO yes NO yes NO NO NO NO yes NO NO NO yes - 29 - Exit Animations Animations Supported Blinds Box Checkerboard Circle Crawl Out Diamond Disappear Dissolve Out Flash Once Fly Out Peek Out Plus Random Bars Random Effects Split Strips Wedge Wheel Wipe Contract Fade Faded Swivel Faded Zoom Ascend Center Revolve Collapse Color Typewriter Descend Ease Out Grow & Turn Sink Down Spinner Stretchy Unfold Zoom Boomerang Bounce Credits Curve Down Flip Float Fold Glide yes Substitution yes yes yes yes yes yes yes yes yes yes yes yes yes yes yes yes yes yes yes yes yes yes yes yes yes yes yes yes yes yes yes yes yes yes yes yes yes yes Yes Fade yes yes yes - 30 - Light Speed Magnify Pinwheel Sling Spiral out Swish Swivel Thread Whip yes yes yes yes yes yes yes yes Fade Yes Motion Paths Animations Supported 4 Point Star 5 Point Star 6 Point Star 8 Point Star Circle Crescent Moon Diamond Equal Triangle Football Heart Hexagon octagon Parallelogram Pentagon Right Triangle Square Teardrop Trapezoid Arc down Arc Left Arc Right Arc Up Bounce Left Bounce Right Curvy Left, Curvy Right Decaying Wave Diagonal Down Right Diagonal Up Right Down Funnel Heartbeat Left Right S Curve 1 yes Substitution yes yes yes yes yes yes yes yes yes yes yes yes yes yes yes yes yes yes yes yes yes yes yes yes yes yes yes yes yes yes yes yes yes - 31 - S Curve 2 Sine Wave Spiral Left Spring Stairs Down Turn Down Turn Down Right Turn Up Turn Up right Up Wave Zigzag Bean Buzz Saw Curved Square Curved X Curvy Star Figure 8 Four Horizontal Figure 8 Inverted Square Inverted Triangle Loop de Loop Neutron Peanut Plus Pointy Star Swoosh Vertical Figure 8 Draw Custom Path yes yes yes yes yes yes yes yes yes yes yes yes yes yes yes yes yes yes yes yes yes yes yes yes yes yes yes yes Transitions Blinds Horizontal Blinds Vertical Box In Box Out Checkerboard Across Checkerboard Down Dissolve Fade Smoothly Random Bars Horizontal Random Bars Vertical Shape Circle Shape Diamond Shape Plus Split Horizontal In Split Horizontal Out Strip Right-Up Strip Left-Down Strip Right-Down Wedge Wheel Clockwise, 1 Spoke Wheel Clockwise, 2 Spokes Wheel Clockwise, 3 Spokes Wheel Clockwise, 4 Spokes Wheel Clockwise, 8 Spokes Wipe Left Wipe Right Wipe Down Wipe Up Uncover Left-Down Uncover Left-Up - 32 - Split Vertical In Split Vertical Out Strip Left-Up Uncover Right-Down Uncover Right-Up Appendix 3 – Template dimensions Listed below are the positions of each element for each browser. These can be used when constructing your own skins. The measurements for each element are as follows: Height: The height of the browser item measured in pixels Width: The width of the browser item measured in pixels Top: The distance from the top of the screen to the top of the browser item measured in pixels Left: The distance from the left of the screen to the left of the browser item measured in pixels Browsers 1 + 2 (1024x768 pixels) - 33 - Browsers 3 + 4 (1024x768 pixels) Browsers 5 + 6 (1024x768 pixels) - 34 - - 35 -