1
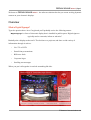
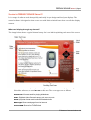
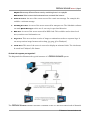
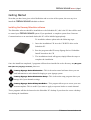
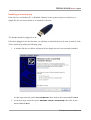
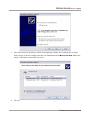
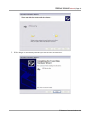
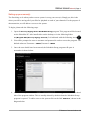
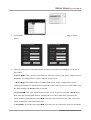
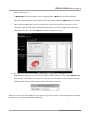
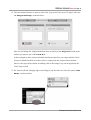
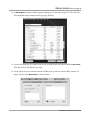
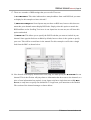
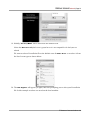
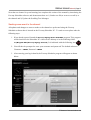
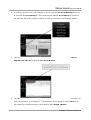
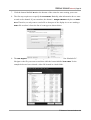
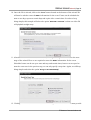
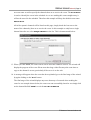
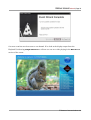
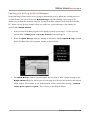
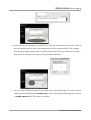
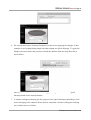
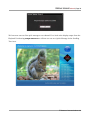
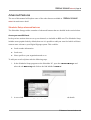
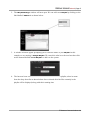
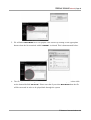
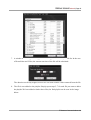
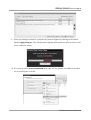
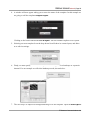
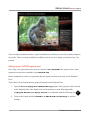
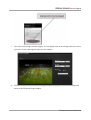
FREEWAY SIGNAGE
series 9
user manual
FREEWAY SIGNAGE series 9 | Page 2
Table of Contents
Overview...........................................................................................................3
What is Digital Signage?.......................................................................................................3
So what is FREEWAY SIGNAGE Series 9?.................................................................................4
What can I display through my channel?..................................................................................................................................................4
So how is the system put together?.........................................................................................................................................................5
Getting Started..................................................................................................7
Installing the Freeway Scheduler software............................................................................7
Installing your security key...................................................................................................8
Setting up your server(s).....................................................................................................11
Setting up your playback channel(s)...................................................................................14
Installing the Freeway Playback software............................................................................24
Setting up your playback channel ......................................................................................24
Sending a new event to the channel...................................................................................27
Updating your scrolling text(Quick Messages).....................................................................33
In summary........................................................................................................................37
Advanced Features...........................................................................................38
Scheduler Setup advanced features....................................................................................38
Create your own RSS feeds....................................................................................................................................................................38
Create your own Web Streams...............................................................................................................................................................41
Manage users in the system..................................................................................................................................................................43
Scheduler advanced features..............................................................................................46
Creating and managing your playlists....................................................................................................................................................46
Building a list of favourite web pages....................................................................................................................................................51
Creating custom templates.................................................................................................54
Setting up you TV/DVD capture card...................................................................................61
In conclusion....................................................................................................63
© Cameron Communications Ltd.
FREEWAY SIGNAGE series 9 | Page 3
Welcome to FREEWAY SIGNAGE series 9 - the software solution that lets you create exciting, dynamic
content on your electronic displays.
Overview
What is Digital Signage?
Type the question above in to Google and you'll probably receive the following answer:
“Digital signage is a form of electronic display that is installed in public spaces. Digital signs are
typically used to entertain, inform or advertise”
Basically take a display such as an LCD television or a projector, and show a wide variety of
information through it such as:
•
Live TV or DVD
•
PowerPoint presentations
•
RSS news feeds
•
Corporate logos
•
Scrolling text messages
When you put it all together it can look something like this:
© Cameron Communications Ltd.
FREEWAY SIGNAGE series 9 | Page 4
So what is FREEWAY SIGNAGE Series 9?
It is a range of software tools that quickly and easily let you design and load your displays. The
control software is designed so that even a user with little technical know-how can edit the display
content.
What can I display through my channel?
The image below shows a typical channel setup. On it are labels explaining each area of the screen:
●
Data Area: This is the primary area through which information is displayed. Using the
Scheduler software, we send Events to this area. The event types are as follows
PowerPoint: A format used for playing slideshows
Video: Digitised video files such as mpg, avi, wmv, mov etc.
Flash: A popular format used to show animated media
Web Pages: Show a web page from the internet
Live TV/DVD: Show a live TV/DVD feed
© Cameron Communications Ltd.
FREEWAY SIGNAGE series 9 | Page 5
Playlist: Show many different files at once by combining them in to a playlist
Web Stream: Video content that is streamed over a network/the internet
●
Static Text Area: An area of the screen reserved for a static text message. For example, this
could be a welcome message
●
Scrolling Text Area: An area of the screen reserved for marquee text. The Scheduler software
can send Quick Messages to this area. It can vary in speed and direction
●
RSS Area: An area of the screen reserved for RSS feeds. This could be used to show local
news, weather travel information etc.
●
Logo Area: This area can show a series of images or animations such as a corporate logo. It
can accept various image formats such as bmp, jpg, png, gif or Flash(swf)
●
Clock Area: This area of the screen is reserved to display an animated clock. The clock must
be saved in a Flash(swf) file fromat
So how is the system put together?
The diagram below illustrates the typical structure of a FREEWAY SIGNAGE system:
The FREEWAY SIGNAGE scheduler software is installed on the PC that will control each of channels.
© Cameron Communications Ltd.
FREEWAY SIGNAGE series 9 | Page 6
The system is centrally managed so it is from this PC that all content will be sent to the playback
channels. Throughout this manual this PC will be referred to as the Scheduler PC.
The Scheduler PC is then connected to any number of servers that are used to store all of the
playback information. For example you might have a server on your Local Area Network , or if your
system spans many remote sites, you may choose to connect to a remote Web Server.
Next, any number of FREEWAY SIGNAGE Playback Channels can be connected to any of the servers
in your system. These host the Playback Software that will read information from the server and
update each channel accordingly. Any number and any type of displays can be connected to the
output of the Playback Channel.
So as you can see the scope of a FREEWAY SIGNAGE system is very varied indeed, be it a small single
channel system operated and shown locally, or a wide system spread across multiple sites
incorporating a variety of Playback Channels each showing its own exclusive content.
© Cameron Communications Ltd.
FREEWAY SIGNAGE series 9 | Page 7
Getting Started
Now that you have been given a brief definition and overview of the system, the next step is to
install the FREEWAY SIGNAGE scheduler software.
Installing the Freeway Scheduler software
The Scheduler software should be installed on to the Scheduler PC, this is the PC that will be used
to control your FREEWAY SIGNAGE system. If you purchased a complete system from Cameron
Communications or an associated dealer, this PC will be labelled appropriately.
To install the software please take the following steps:
1. Insert the installation CD in to the CD/DVD drive on the
Scheduler PC
2. Run the program called 'Freeway Signage Series 9 Scheduler
Install' located on the CD
3. The installation wizard will appear, simply follow the steps to
complete the installation
Once the install has completed, 3 programs will have been installed in to the directory: 'C:\Program
Files\Freeway Signage Series 9\', these are:
Freeway Signage Series 9 Scheduler – This is the main control software where you can
send information to each channel belonging to your signage system
Freeway Signage Series 9 Scheduler Setup – This is the main setup program where you
manage all of your channels settings
Freeway Signage Series 9 Template Editor – This program allows you to create your own
custom templates. This is useful if you want to apply a corporate look to a certain channel
These programs will also be located on the Scheduler PC desktop if you elected to create a desktop
icon during the installation.
© Cameron Communications Ltd.
FREEWAY SIGNAGE series 9 | Page 8
Installing your security key
Each unit, be it a Scheduler PC or Playback Channel, in the system requires a security key or
dongle like the one shown below to be attached to the unit.
The dongle should be plugged in to the USB port on the PC.
If has been plugged in for the first time, you will have to install the drivers in order to make it work.
This is achieved by taking the following steps:
1. A window like the one below will appear if the dongle has not been previously installed
At this stage select the option 'No, not this time' then click on the button labelled ' Next'
2. At the next stage, select the option 'Install the software automatically' then click on the
button labelled ' Next'
© Cameron Communications Ltd.
FREEWAY SIGNAGE series 9 | Page 9
3. The driver will now attempt to install. You might get another screen asking you to select
from a range of drivers, simply select the one manufactured by MicroCosm Ltd. Make sure
that it is the latest version that you select
4. The drivers should now install, this is shown in the image below:
© Cameron Communications Ltd.
FREEWAY SIGNAGE series 9 | Page 10
5. If the dongle is successfully installed you will see the screen below:
© Cameron Communications Ltd.
FREEWAY SIGNAGE series 9 | Page 11
Setting up your server(s)
The first thing to do when you have a new system is set up your server(s). Simply put, this is the
where you will be storing all of your files for playback on each of your channels. For the purpose of
demonstration, we will add two servers to the system.
To begin, please take the following steps:
1. Open the Freeway Signage Series 9 Scheduler Setup program. This program will be located
on the Scheduler PC after install either on the desktop or in the following folder:
'C:\Program Files\Freeway Signage Series 9\'. It is indicated with the following icon
2. You will be prompted to enter a username and password in order to access the program. The
default values are Username = admin, Password = admin
3. Once the user details have been entered, the Scheduler Setup program will open. A
screenshot is shown below:
4. Make sure that you have clicked the button labelled Server Settings located to the left hand
side of the program window. This is actually selected by default when the Scheduler Setup
program is opened. To add a server to the system click on the link 'Add New', shown in the
diagram below:
© Cameron Communications Ltd.
FREEWAY SIGNAGE series 9 | Page 12
5. You will then be prompted to enter the details for the new server. The prompt is shown
below:
6. There are five pieces of information that you have to provide when adding a new server to
the system.
i) Server Name: This is a short name that you will use to refer to your server. Think of it as a
nickname, for example above we have entered 'Local Server'
ii) Server Type: This can be either a L ocal or Web server. In the example above we are
entering the details of a shared network path that will be used as a server. As this folder is on
the local network, the Local option is selected
iii) Server Path: This is the actual location of the server. If you have selected a Local server
then enter the network path like the example above or a drive letter that represents the
server location. If you had selected a Web server then you would enter the URL of the web
server for instance, www.camcomms.com
iv) Username: If you have selected a Web server then you are required to enter the username
© Cameron Communications Ltd.
FREEWAY SIGNAGE series 9 | Page 13
used to connect to it
v) Password: Like the username, this is required when a Web server has been selected
Once all of the details have been entered, click the button labelled 'Add Server' to continue
7. Once you have added the server, it is selected in your server list. Here you can see if it is
connected, and all of the files currently located on the server. The image below shows the
information for the server ' Local Server' which we added in step 6
8. For each server you wish to add in your system, repeat steps 4 through to 6. For
demonstration purposes, a second server has been added which we have called 'Web Server'.
This will use our website as a web server. You can view the status of each of your servers by
clicking on the Server Name you provided in the drop down list:
That's two server now been added to our system. To get the system up and running, the next thing
we want to do is setup our playback channel(s).
© Cameron Communications Ltd.
FREEWAY SIGNAGE series 9 | Page 14
Setting up your playback channel(s)
To keep things simple in this manual, we are only going to set up a single channel. Always bear in
mind that there is no limit to the number of channels you can control from a single Scheduler PC.
The procedures listed below for creating a playback channel apply each time you add a channel to
your system.
1. We add/edit our channels via the Scheduler Setup software using the Channel Manager.
Select this tool by clicking on the button labelled ' Channel Manager' located on the left
hand side of the program window. The screenshot below shows the Scheduler Setup
program with the Channel Manager selected:
2. To begin with, no channels will have been added to the system. To add a channel click on
the link labelled ' Add New'
© Cameron Communications Ltd.
FREEWAY SIGNAGE series 9 | Page 15
3. After step 2 you will be asked to enter a channel name. We will create a channel called
'Sample Channel' and use it throughout this manual
4. You can see above where we have entered the channel name. Clicking on the button labelled
'Create Channel' will add it to our system
5. Once a channel has been created, you can then begin to edit all of its settings. To edit a
channel, select its name from the drop down list contained within My Channels. This can
be seen in the image below:
6. The first thing required when setting up a channel is adding the server(s) that will host the
channel. Click on the button shown below to list all of the servers, select its name from the
list to add it to the channels server list:
© Cameron Communications Ltd.
FREEWAY SIGNAGE series 9 | Page 16
7. We will add 'Local Server' and 'Web Server' for this channel. This means that any playback
unit that can connect to either of these servers can playback the information sent to this
channel
8. Next, you have to specify how the channel will look, and what features it will include. Select
the tab 'Display Setup' to make adjustments to the channel's appearance:
9. The image above shows all of the display options that you can edit for the channel. These
include:
i) Orientation: This specifies whether the channel is displayed in portrait or landscape
mode. For portrait mode you must design a custom template. This will be covered later in
the manual. For this example, we have selected landscape
ii) Skin Used: This specifies the style of the channel's skin, which is basically the image used
in the background. There are several default skins for you to use. Alternatively, you may use
your own custom design,more on this later. In this example, we have selected the default skin
called Waves
iii) Layout Used: With each default skin there are set layouts that you can use. Each layout
provides different options in terms of what types of information you want to display through
your channel. In this example we have selected Layout 1 which will display: Data Area 1(this
can be PowerPoint, Video, WebPages, Flash, Live TV/DVD etc.), Static Text Message,
Scrolling Text Messages, Clock, Logo, RSS Feeds
© Cameron Communications Ltd.
FREEWAY SIGNAGE series 9 | Page 17
iv) Colour Scheme: This selects what colour scheme you want your channel to adopt. There
are several colour schemes available, however for this example we have selected Blue
10. Next we want to specify the text settings for the channel. This allows us to change settings
such as the Font Type used for each area of text, the Static Text Message etc. To edit these
settings select the tab 'Text Setup' as shown below:
11. Each of the 3 text area's settings can be edited.
You can edit the speed, direction and font for the Scrolling Text Area. In this example we
have selected a medium speed setting, with the text scrolling to the left. We have selected
Tahoma as the font. As we are using a default skin/layout, we cannot edit the font size
You can edit the message and font for the Static Text Area. In this example we have entered
'Welcome to Cameron Communications' as the message, and selected Tahoma as the font
used. As before, we cannot edit the font size as a default skin/layout is used
You can edit the font settings for the RSS text area. In this example we have selected
Tahoma and yet again the font size is fixed
Please not that the font selected must be installed on the Playback Channel unit otherwise
a default font will be used
© Cameron Communications Ltd.
FREEWAY SIGNAGE series 9 | Page 18
12. The next channel feature we want to edit is the Logo Area/Clock Area. To begin, select the
tab 'Image/Clock Setup' as shown below:
Here we can change the images/animations that are shown in the Logo Area as well as the
clock(s) you want to use in the Clock Area
In this example we have selected a default skin/layout, therefore you cannot edit the Clock
Loop as a default clock file is used in order to comply with the selected colour scheme.
However the steps shown below for adding a file to the Image Loop can be applied to the
Clock Loop as well
13. We want to add our company logo to the Image Loop, therefore we select the option 'Add
Picture' as shown below:
© Cameron Communications Ltd.
FREEWAY SIGNAGE series 9 | Page 19
14. A File Explorer window will then appear asking you to select the image file. This will filter
all compatible image formats such as jpg, png, gif, bmp
15. Locate the image file you want to add to the loop then click the button labelled ' Select File'.
This file will now be added to the loop
16. As the layout we have selected contains an RSS area, we want to edit the RSS settings. To
begin, select the tab 'RSS Setup' as shown below:
© Cameron Communications Ltd.
FREEWAY SIGNAGE series 9 | Page 20
17. There are a number of RSS settings that you can edit. These are:
i) No of Headlines: This value indicates how many headlines from each RSS feed you want
to display. In this example we have selected 5
ii) Show in Scrolling Text: Some layouts may not have an RSS area, however this does not
mean that your channel cannot display RSS feeds. Simply select this option to attach the
RSS headlines to the Scrolling Text Area. As our layout has its own area, we will leave this
option unchecked
iii) RSS Feeds: This allows you to specify the RSS Feeds that you want to include in your
channel. Some popular feeds are available by default, however there is the option to specify
your own. This will be covered later in the manual. For this example we will select a single
feed from the BBC as shown below:
18. Now that all of the display features have been setup, we must specify the Default File for our
channel. This is the file that will play when no information has been sent to the channel, or a
piece of sent information has expired. As our layout only has a single data area called Data
Area 1, we only have to specify one default file. To begin turn your attention to the Default
Files section of the channel manager as shown below:
© Cameron Communications Ltd.
FREEWAY SIGNAGE series 9 | Page 21
19. Initially, 'Live TV/DVD ' will be selected as the default event.
Notice that Data Area 2 default event is greyed out as it is not compatible with the layout we
selected.
We want to select a PowerPoint file as the default event for Data Area 1 so we select it from
the list of event types as shown below:
20. The File Explorer will appear yet again, this time prompting you to select your PowerPoint
file. In this example we select one saved on the local machine:
© Cameron Communications Ltd.
FREEWAY SIGNAGE series 9 | Page 22
21. When you select a PowerPoint file it goes through a conversion process so that it be played
in the channel. If the file has been used before you will be asked if you want to go through
the process again. In this example, this is the first time we have used the file so the
conversion process will appear like the image below:
22. Once the conversion has completed, we are ready to apply the channel settings. This will
save the setup and send the information to each of the channel's servers where the playback
channels can then read and display the channel information
To apply the settings click on the button labelled ' Save Channel Setup' as illustrated below:
© Cameron Communications Ltd.
FREEWAY SIGNAGE series 9 | Page 23
23. A window will then appear detailing the progress of the channel being uploaded to each
server. This is shown in the image below. Please note that large files will taken a significant
amount of time if the channel is uploaded to a web server. Please wait for the upload to
finish you will be notified with a on screen message when this occurs
The steps are now complete and we have setup our first channel. The next stage to get started is to
install the Playback Channel software, set it up to connect and run our channel.
© Cameron Communications Ltd.
FREEWAY SIGNAGE series 9 | Page 24
Installing the Freeway Playback software
The Playback software should be installed on to the Playback Channel units. If you purchased a
complete system from Cameron Communications or an associated dealer, this PC will be labelled
appropriately.
To install the Playback software please take the following steps:
1. Insert the installation CD in to the CD/DVD drive on the Playback unit
2. Run the program called 'Freeway Signage Series 9 Playback Install' located on the
installation CD
3. The installation wizard will appear, simply follow the steps to complete the installation
Once the install has completed, 2 programs will have been installed in to the directory: 'C:\Program
Files\Freeway Signage Series 9\', these are:
Freeway Signage Series 9 Playback – This is the program that plays all of the information
sent to a Playback Channel
Freeway Signage Series 9 Playback Setup – This program lets you specify the Playback
Units settings I.e. Server Path, Channel Name etc.
Setting up your playback channel
Please remember that you will have to attach and install your security key on each Playback
Channel. A description on how to do this can be found on Page 8.
Before you can run your Playback software, you have to set up the system so that it knows what
server to connect to and what channel it will be displaying. Let us take the following steps to set up
one of our Playback Units:
1. Open the Freeway Signage Series 9 Playback Setup program. This program will be located
on the Playback Unit after install either on the desktop or in the following folder:
'C:\Program Files\Freeway Signage Series 9\'. It is indicated with the following icon
2. You will be prompted to enter a username and password in order to access the program. The
default values are Username = freeway, Password = signage2009
3. Once the user details have been entered, the Playback Setup program will open. A
© Cameron Communications Ltd.
FREEWAY SIGNAGE series 9 | Page 25
screenshot is shown below:
4. Once the program has opened, the first thing to do is enter the path of the server to which
this channel connects. If you remember in the previous section we added two server to our
system. Lets assume that this Playback Unit is on the local network, therefore we will enter
our local network path that we are using to host the channel. If you were using a web server,
you would select the Remote Server option then enter the web server details
5. After entering the server details, click the button labelled ' Connect', this will list all of the
channels available on that server. This is shown below:
© Cameron Communications Ltd.
FREEWAY SIGNAGE series 9 | Page 26
If the server is connected then you will notice that the Server Status label will read
C O N NE C TED . The drop down list displays all of the channels uploaded to the server. In
the example above we have quite a few to choose from, however we want to select Sample
Channel, this was the channel we created in the previous section
6. We have now entered all of the Playback Channel's settings. The final thing to do is click
the button labelled 'Save Settings' then exit the setup program
Now that the Playback Channel setup is complete we can open the Playback software in order to
view the selected channel.
To open the Freeway Signage Series 9 Playback program either double click the Freeway Signage
Series 9 Playback icon located on the desktop or in the following folder: 'C:\Program
Files\Freeway Signage Series 9\'.
Sample Channel will now appear through the display:
© Cameron Communications Ltd.
FREEWAY SIGNAGE series 9 | Page 27
Now that our channel is up and running, lets complete this section of the manual by introducing the
Freeway Scheduler software, and demonstrate how we 1) Send a new file(or event as we call it) to
the channel and 2) Update the Scrolling Text Messages
Sending a new event to the channel
All updates and changes we want to make to the channel are performed using the Freeway
Scheduler software that is located on the Freeway Scheduler PC. To send an event please take the
following steps:
1. If not already opened, launch the Freeway Signage Series Scheduler program. This program
will be located on the Scheduler PC either on the desktop or in the following folder:
'C:\Program Files\Freeway Signage Series 9\'. It is indicated with the following icon
2. You will then be prompted to enter your username and password. The default values are
Username = admin, Password = admin
3. After entering your log in details, the Freeway Scheduler program will appear as shown
below:
© Cameron Communications Ltd.
FREEWAY SIGNAGE series 9 | Page 28
4. In order to send an event to the channel we need to use the New Event Wizard which can
be found in the Event Manager. Click on the button labelled 'Event Manager' located on
the left hand side of the program window in order to open the Event Manager window
5. Once the Event Manager has been selected, click on the button labelled ' Click Here to
Schedule a New Event' to open the New Event Wizard
6. The New Event Wizard will now appear. This tool takes you through the steps necessary to
send a new event to your channel(s). To demonstrate, we are going to send a Video file to
the channel we completed earlier in this manual called Sample Channel
© Cameron Communications Ltd.
FREEWAY SIGNAGE series 9 | Page 29
7. Click the button labelled 'Next' at the bottom of the wizard to start creating your event
8. The first step requires us to specify the Event Files. Basically, what information do we want
to send to the channel. If you remember, the channel – Sample Channel only has one Data
Area. Therefore, we only want to send a file to that part of the display. As we are sending a
Video file we select it from the list of event types as shown below:
9. The File Explorer will now appear listing all of the files available on the Scheduler PC.
Navigate to the file you want to send then click the button labelled ' Select File'. In the
example below we have selected a video file located in a local folder:
© Cameron Communications Ltd.
FREEWAY SIGNAGE series 9 | Page 30
10. Once the file is selected, click on the 'Next' button located at the bottom of the wizard. We
will now be asked to enter the Date information for the event. Events can be scheduled to
start on set days, repeat on certain days and expire after a certain time. In order to keep
things simple, this example will select the option 'Start the event now' so that our video file
will playback straight away:
11. After the Date information has been entered, clicking 'Next' again will take us to the next
stage of the wizard. Here we are required to enter the Time information for the event.
Scheduled events can be set up to start and stop and certain times, however as we opted to
start the event now in the previous step, we can only specify a stop time. Again, we will keep
things simple and select the option 'Loop event continuously'
12. Clicking the 'Next' button will take us to the final stage of the wizard. Here we must provide
© Cameron Communications Ltd.
FREEWAY SIGNAGE series 9 | Page 31
an event name as well as specify the channels that are to receive the event. The Event Name
is used to identify the event in the schedule. As we are sending this event straight away, it
will not be stored in the schedule. Therefore this example will keep the default event name
Instant Event.
All of the system's channels will be listed on this page, simply check the box next to the
name of the channel(s) that are to receive the event. In this example we only have a single
channel therefore we select Sample Channel on the list. This is demonstrated below:
13. When you click ' Next', the event will be sent to all of the channel's servers. The wizard will
display the progress of the event. Please note that large video files may take some time to
copy to the channel's servers, particularly if the server is on the web
14. A message will appear when the event has been uploaded, go to the final stage of the wizard
by again clicking on the 'Next' button.
The final stage of the wizard displays any errors that may of occurred when sending the
event. In our example shown below, the event was sent successfully, therefore we simply click
on the button labelled ' Finish' to exit the New Event Wizard
© Cameron Communications Ltd.
FREEWAY SIGNAGE series 9 | Page 32
Our new event has now been sent to our channel. If we look at the display output from the
Playback Unit hosting Sample Channel we will now see our new video playing in the Data Area 1
section of the screen:
© Cameron Communications Ltd.
FREEWAY SIGNAGE series 9 | Page 33
Updating your scrolling text(Quick Messages)
In the final stage of this section we are going to demonstrate how to update the scrolling text area
on your channel, we refer to this as our Quick Messages. Just like sending a new event to the
channel, we perform this function using the Freeway Scheduler software located on the Scheduler
PC. Below is a step by step example, where we send a new Quick Message to the channel we
created called Sample Channel:
1. If the Freeway Scheduler program is not already opened, repeat steps 1-3 of the previous
section titled: 'Sending a new event to the channel' located on Page 24
2. Select the Quick Message utility by clicking on the button labelled ' Quick Message' located
on the left hand side of the program window as shown below:
3. The Quick Message window will now appear. We are going to send a single message to our
Sample Channel. Begin by typing your new message in to the text box located at the bottom
of the window. For example, in our demonstration we have entered the message: ' Could all
visitors please report to reception'. This is shown in the diagram below:
© Cameron Communications Ltd.
FREEWAY SIGNAGE series 9 | Page 34
4. After entering your message, the next step is to select the channels that will receive it. This is
done by checking the box next to the channel name in the list shown below. This example
only shows the single channel that we created earlier, however bear in mind that if you have
more than one channel in your system, they will all be listed here:
5. Now we want to add the message to the channels list of Quick Messages. We achieve this by
clicking on the button labelled 'Send Message'. Notice how the Quick Message now appears
in Sample Channel's list. This can be seen below:
© Cameron Communications Ltd.
FREEWAY SIGNAGE series 9 | Page 35
6. We can add and remove as many messages as we like before applying the changes. In this
example we are keeping things simple and only sending one Quick Message. To apply the
changes you must ensure that you have selected the channel from the drop down list as
shown below:
Once selected, click on the button labelled 'Apply Changes' to send all of the Quick
Messages listed to the selected channel
7. A window will appear showing you the progress of the Quick Messages uploading to each
server belonging to the channel. When this has completed a window will appear notifying
you of either success or failure:
© Cameron Communications Ltd.
FREEWAY SIGNAGE series 9 | Page 36
We have now sent our first quick message to our channel. If we look at the display output from the
Playback Unit hosting Sample Channel we will now see our new Quick Message in the Scrolling
Text Area:
© Cameron Communications Ltd.
FREEWAY SIGNAGE series 9 | Page 37
In summary
We have now set up our first channel showing a wide variety of information. What has been
covered are all of the fundamental features of FREEWAY SIGNAGE series 9. Hopefully you have seen
enough to get you familiar with how to operate the system.
There are so many more options for you to try once you get comfortable using the software. Feel
free to experiment with different layouts and skins, if you're feeling brave you could even attempt to
make your own. Try sending different types of information to your Data Area. Why not send some
animation with Flash, create your own PowerPoint files, show Live TV, display Web Pages.
© Cameron Communications Ltd.
FREEWAY SIGNAGE series 9 | Page 38
Advanced Features
The rest of this manual will explore some of the other features available in FREEWAY SIGNAGE
series 9 in much more detail.
Scheduler Setup advanced features
The Scheduler Setup provides a number of advanced features that are detailed in the section below.
Create your own RSS feeds
In the previous section when we set up our channel, we included an RSS area. The Scheduler Setup
includes some popular feeds by default, however it is possible to add your own feed which will issue
content more relevant to your Digital Signage system. This could be:
●
Local weather information
●
Local news
●
News specific to your organisation and so on
To add your own feed please take the following steps:
1. In the Scheduler Setup program on the Scheduler PC, open the Channel Manager and
select the tab RSS Setup and click on the link labelled ' Add New'
2. A new window will then appear prompting you to enter all of the RSS feeds details
© Cameron Communications Ltd.
FREEWAY SIGNAGE series 9 | Page 39
There are three pieces of information you are required to provide when adding your own
RSS feed, these are:
i) Name: This is a name used to refer to the RSS feed. In our example we are going to call
our feed 'Sample Feed'
ii) Address: This is the actual address of the RSS feed, it could be saved at a network address
on your local server, or most likely on a web server. For our example we are going to enter
the imaginary address www.samplefeed.com/sample.xml
iii) Source: It is important that any third party feed used is fully referenced to avoid violation
of the terms of use. In this section enter the URL of the webpage where the RSS feed is
sourced. For example, we enter the address www.samplefeed.com/news
3. To save your new feed, click on the button labelled 'Add Feed'
4. A window will then appear confirming that the RSS feed has been added
© Cameron Communications Ltd.
FREEWAY SIGNAGE series 9 | Page 40
5. If we now go back and add a feed to a channels RSS list, notice that our new custom RSS
feed has been added to the list of available feeds:
© Cameron Communications Ltd.
FREEWAY SIGNAGE series 9 | Page 41
Create your own Web Streams
One of the event types that you can send to your channel is a Web Stream which is basically a video
signal streamed across a network. An example of this might be a IP camera, or a video stream that is
broadcast over the internet.
In order to send a Web Stream event, your feeds must already be set up. The following example will
demonstrate adding an imaginary Web Stream feed to your system.
1. In the Scheduler Setup program on the Scheduler PC, open the Channel Manager and
select the tab WebStream Setup and click on the link labelled ' Add New'
2. A new window will appear prompting you to enter the Web Streams details
© Cameron Communications Ltd.
FREEWAY SIGNAGE series 9 | Page 42
There are two fields that you are required to enter, these are:
i) Name: This is the name we will use to refer to this Web Stream. In our example we will
call it Sample Stream
ii) URL: This is the address of the Web Stream. You must remember to include to Port No
where we are streaming from, for example our example provides the address:
http://192.35.43.11:8080
3. Once all of the details have been entered, click on the button labelled 'Add Stream'. A new
window will appear confirming that the new Web Stream has been added to the system
4. Notice that if we load an event for Data Area 1 and move the mouse over the option
WebStream, the stream we just added is now available:
© Cameron Communications Ltd.
FREEWAY SIGNAGE series 9 | Page 43
Manage users in the system
One of the new features in FREEWAY SIGNAGE series 9 is the ability to add multiple users to the
system, each with their own level of access.
All of the user accounts are managed via the Scheduler Setup program. The following example will
demonstrate how to add a new user to the system, and provide them with limited access to the
system.
1. Open the User Settings page found in the Scheduler Setup program on the Scheduler PC.
This is done by clicking in the button labelled 'User Settings' located on the left hand side
of the program window
2. Add a new user by clicking on the link ' Add User' as shown below:
© Cameron Communications Ltd.
FREEWAY SIGNAGE series 9 | Page 44
3. A window will now appear prompting you to enter all of the users details:
There are pieces of information that are required, these are:
i) User Name: A unique name specific to a certain user
ii) Password: The users password they will use to login
iii) Re-Type Password: For security, re-enter the password value
iv) Password Hint: A short statement that a user can use to remind them of their password
v) User Access: Specify if the user has full or restricted access to the system and its features
4. In this example we have created a user with restricted access. We can now add the user to the
system by clicking on the button labelled 'Add User'
5. Notice that the user is now available to edit. To change the users settings, click on the
username in the list as shown below:
© Cameron Communications Ltd.
FREEWAY SIGNAGE series 9 | Page 45
6. We can now make changes to this user's settings. We want to restrict certain features, you
can see how we would set up the user's access in the image below:
7. To save the users details, click on the button labelled 'Save Details'. If you now log in to the
Scheduler using this users login information, you will notice that access has been restricted.
This feature makes it possible to have a number of users accessing the system without fear of any
changes being made to a channel inappropriately. There is no limit to the number of users you can
create.
© Cameron Communications Ltd.
FREEWAY SIGNAGE series 9 | Page 46
Scheduler advanced features
The fundamental features that one must master within the Scheduler are how to send new events to
your channel(s), and how to update your scrolling text messages by sending Quick Messages to your
channel(s).
In addition to this, there are a couple of other features that you may want to take advantage of
including:
●
Building playlists that can be sent to your channel(s)
●
Using the web browser to save favourite web addresses that can be sent as an event to each
channel
Creating and managing your playlists
On many occasions, you may want to send an event that will play many different files in sequence.
Of course you could schedule various events to start minutes apart, however this would be far more
time consuming than it has to be.
To avoid this, you can take advantage of the Playlist feature. With Playlists, you can combine
PowerPoint, Flash, Video and Web Pages to play in a set order. They can be placed in to an
individual playlist, which can then be sent as an event to your channel, saving you lots of time.
Let us provide an example where we will create a playlist called Sample Playlist. We will add a few
files, and then send it to our channel, Sample Channel.
1. Assuming that the Scheduler program is already open, open the Playlist Manager by
clicking on the button labelled 'Playlist Manager' located on the left hand side of the
program window
© Cameron Communications Ltd.
FREEWAY SIGNAGE series 9 | Page 47
2. The Playlist Manager window will now open. We can add a new Playlist by clicking on the
link labelled 'Add New' as shown below:
3. A window will now appear prompting you to enter the name of your Playlist. In this
example we are naming it Sample Playlist. We enter this value in to the text box then click
on the button labelled ' Create Playlist' to add it to the system
4. The has now been created, however it includes no files. To edit a playlist, select its name
from the drop down list as shown below. Once selected all of the files currently in the
playlist will be displayed, along with their running time
© Cameron Communications Ltd.
FREEWAY SIGNAGE series 9 | Page 48
5. We will add a PowerPoint file to our playlist. This is done by clicking on the appropriate
button when the list contained within 'Add File' is selected. This is demonstrated below:
6. The file explorer will now appear. Locate the file you want to add to the playlist then click
on the button labelled ' Select File'. Please note that if you select PowerPoint then the file
will be converted in order to be played back through the system
© Cameron Communications Ltd.
FREEWAY SIGNAGE series 9 | Page 49
7. A window will then appear asking you to how long you want to run your file for. In the case
of PowerPoint and Video, the current run time of the file will be calculated:
The duration can be any length, however we will stick with the value extracted from the file
8. The file is now added to the playlist. Simply repeat steps 5-7 for each file you want to add to
the playlist. We have added a further three files, the final playlist can be seen in the image
below:
© Cameron Communications Ltd.
FREEWAY SIGNAGE series 9 | Page 50
9. When any changes are made to a playlist, they must be applied by clicking on the button
labelled 'Apply Changes'. This will upload the playlist information and all of its files to each
server within the system
10. If we now go to the New Event Wizard notice that our new playlist is available to us when
we are selecting the event file
© Cameron Communications Ltd.
FREEWAY SIGNAGE series 9 | Page 51
We have now successfully created our first Playlist. At any time we can add/remove files, and
change the running order, duration of the playlist. There is no limit to the number you can create, so
experiment yourself and see how this feature can be of great benefit.
Building a list of favourite web pages
Another event type commonly used is WebPages. Here you can select a webpage to be displayed in
your playback channel. When sending the event, the Scheduler program will only list web pages that
you have specified in your list of favourites. To build this list you must use the Web Browser feature
contained within the Scheduler program.
The following example will demonstrate us opening the web browser, navigating to a page, saving it
to our list of favourites, then seeing where to select it when sending your event.
1. Assuming that the Scheduler program is already open, open the Web Browser by clicking on
the button labelled 'Web Browser' located on the left hand side of the program window
2. Enter your web address. In the example below we have selected the weather page from the
BBC. Clicking the return key or clicking the button next to the address box will then
navigate to that page
© Cameron Communications Ltd.
FREEWAY SIGNAGE series 9 | Page 52
3. Once the page has loaded, we add it to our favourites by clicking on the button marked with
a '+' character. This is shown in the image below:
4. If we open our drop down list labelled 'My Favorites' then you will notice that the web page
title has been added to the list. This confirms that it has been added to my favourites list
© Cameron Communications Ltd.
FREEWAY SIGNAGE series 9 | Page 53
5. If were now to go and attempt to send an web page to the channel with the New Event
Wizard then you will notice that the new web page is now available
We have now added our first favourite address. You can add as many as you like. They can also be
added in playlists, so you could effectively build a playlist that will navigate between different web
pages periodically.
© Cameron Communications Ltd.
FREEWAY SIGNAGE series 9 | Page 54
Creating custom templates
One of the features that has been improved dramatically in FREEWAY SIGNAGE series 9 is the
template editor. This tool lets you build your channel with a custom background, with a layout of
your choosing. Stamping your organisation's identity on your channels has never been easier. All you
need to get started is the bitmap image you want to use as your channels background.
We will provide a demonstration below showing all of the necessary steps required to make your
own template.
Please note that we recommend that you have a good understanding of the Scheduler Setup
program, before attempting to create custom templates.
1. The first thing we require is the image we are going to use as the templates background.
Please note at this stage that it is not a necessity as a template can have a solid colour in the
background, it just looks better. In keeping with the FREEWAY theme, here is the image we
will use below:
For a landscape template the recommended dimensions are 1024 pixels wide and 768 pixels
high
For a portrait template the recommended dimensions are 768 pixels wide and 1024 pixels
high
© Cameron Communications Ltd.
FREEWAY SIGNAGE series 9 | Page 55
2. To start creating our template we must open the Template Editor program. This program
will be located on the Scheduler PC after install either on the desktop or in the following
folder: 'C:\Program Files\Freeway Signage Series 9\'.
It is indicated with the following icon
After providing your Log-in information the Template Editor program should now be
open:
3. To add a new template, click on the label 'Add New' as shown below:
© Cameron Communications Ltd.
FREEWAY SIGNAGE series 9 | Page 56
4. A window will now appear asking you to enter the name of the template. In this example we
are going to call the template Sample Template
Clicking on the button labelled 'Create Template' will add a blank template to our system
5. Selecting our new template from the drop down list will show its current layout, and allow
us to edit its settings:
6. Firstly, we must specify whether this template will be designed for a landscape or a portrait
channel. For our example we will select landscape mode, shown below:
7. The next step is to import our background image in to the template. Open the File Explorer
© Cameron Communications Ltd.
FREEWAY SIGNAGE series 9 | Page 57
by clicking on the link 'load'
8. The File Explorer will now appear. Find the location on your system where the background
image has been saved, then click on the button labelled ' Select File'
© Cameron Communications Ltd.
FREEWAY SIGNAGE series 9 | Page 58
Notice that when we select the file that it will be displayed in the template preview as shown
below:
9. We now want to select each of the screen elements that are to be included in our template
layout. This example will demonstrate adding a scrolling text area to the template. Checking
Scrolling Text Area on the screen elements list will display it in the preview:
10. The Scrolling Text Area settings will now appear:
© Cameron Communications Ltd.
FREEWAY SIGNAGE series 9 | Page 59
Here we can adjust all of the screen elements properties that are available. These include:
i) Position: Adjust the x and y co-ordinates of the element on the screen
ii) Size: This setting determines the size of the screen element in pixels
iii) Colour: Adjust various colours including the colour of the text, the background colour of
the element and the border colour if it has been selected
Please note that not all elements will have the same properties.
Please note that you also adjust the size and position of each screen element by dragging and
sizing its block in the template preview
11. Repeat steps 9-10 and fine tune each element until your template has been built. Below is an
image of our template, we have added a Static Text Area, Clock Area, and a RSS Area
© Cameron Communications Ltd.
FREEWAY SIGNAGE series 9 | Page 60
12. The template can now be saved and uploaded to each server in the system by clicking on the
button labelled ' Apply Settings'
A window will appear detailing the progress of the template information and file(s) as it is
uploaded to each server
13. Once it has completed, we can exit the Template Editor and return to the Scheduler Setup
program.
Open the Channel Manager and select Sample Channel for editing
If we enter the Display Setup and edit the Skin Used property, notice that our new template
is now available:
14. If we save the channel setup and restart our Playback software on the Playback Unit for this
channel, you will notice that our new custom template has been loaded:
© Cameron Communications Ltd.
FREEWAY SIGNAGE series 9 | Page 61
That concludes our demonstration. Again it should be noted that you can create as many templates
as you like. There are many possibilities available, the best way is to design your skin and try it for
yourself.
Setting up you TV/DVD capture card
One of the event types that can be sent to a channel is Live TV/DVD. This requires that a video
capture device has been installed on your Playback Unit.
Before ending these events it is important that the capture card has been setup on the Playback
Unit.
This is done via the Playback Setup program located on the Playback Unit.
1. O pen the Freeway Signage Series 9 Playback Setup program. This program will be located
on the Playback Unit after install either on the desktop or in the following folder:
'C:\Program Files\Freeway Signage Series 9\'. It is indicated with the following icon
2. Click on the button labelled 'Click Here to Edit the Video Card Settings' to edit the
settings:
© Cameron Communications Ltd.
FREEWAY SIGNAGE series 9 | Page 62
3. The video card settings will then appear. You can adjust each of the settings until you receive
a preview of your video signal in the preview window
4. Click on the button labelled 'Save Settings and Quit' to apply the video card settings and
return to the Playback Setup window
© Cameron Communications Ltd.
FREEWAY SIGNAGE series 9 | Page 63
In conclusion
We have now reached the end of the manual.
Not every operation has been covered in detail, however hopefully now you have a grasp of the
system and how to get your information across in the style that best suits you.
For any queries check our website www.camcomms.com and head for the FREEWAY SIGNAGE series
9 section.
© Cameron Communications Ltd.