1
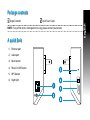
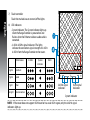
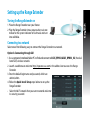
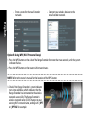
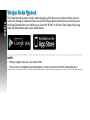
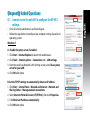
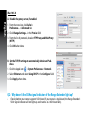
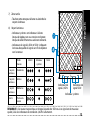
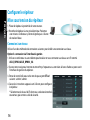
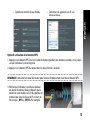
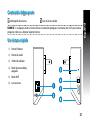
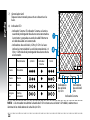
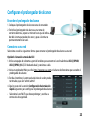
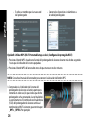
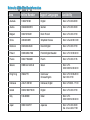
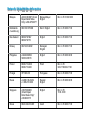
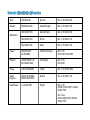
®
RP-N53
Dual Band Wireless-N600
Wall-Plug Range Extender
Quick Start Guide
English................................................................................................................................. 3
French.................................................................................................................................. 12
Spanish................................................................................................................................ 21
NA8288 / Second Edition / April 2013
Package contents
Quick Start Guide
NOTE: If any of the items is damaged or missing, please contact your retailer.
A quick look
1) Ethernet port
2) Audio port
3) Reset button
4) Power On/Off button
5) WPS button
6) Night light
English
Range Extender
7) Touch controller
Touch the marked area to turn on/off the lights.
English
8) LED indicators
• S ystem Indicator: The System Indicator lights up
when the Range Extender is powered on and
flashes when the Ethernet cable or audio cable is
conected.
• 2.4GHz & 5GHz signal indicators: The lights
indicate the connection signal strength of 2.4GHz
& 5GHz from the Range Extender to the router.
Performance
3 lights
Excellent
2 lights
Good
1 light
Poor
No light
No connection
2.4GHz
System
Indicator
5GHz
2.4GHz signal
indicators
5GHz signal
indicators
System Indicator
NOTE: If the router does not support 5GHz band or has weak 5GHz signal, only the 2.4GHz signal
indicators light up.
Setting up the Range Extender
1. Place the Range Extender near your Router.
2. Plug the Range Extender into a power outlet, wait one
minute for the system indicator to flash twice and turn
into solid blue.
Connecting to a network
Select one of the following ways to connect the Range Extender to a network.
Option A: Connecting through GUI
1. Use a computer/notebook/tablet PC to find and connect to ASUS_RPN53/ASUS_RPN53_5G (the dual
band SSID) wireless network.
2. Launch a web browser and enter http://repeater.asus.com in the address bar to access the Range
Extender.
3. Enter the default login name and password, which are
admin/admin.
4. Follow the Quick Install Setup steps below to set up the
Range Extender:
•Select the Wi-Fi network that you want to extend and enter
its security password.
English
Turning the Range Extender on
•Enter a name for the new Extender
network.
• Connect your wireless devices to the
new Extender network.
English
Option B: Using WPS (Wi-Fi Protected Setup)
1. Press the WPS button on the side of the Range Extender for more than two seconds, until the system
indicator flashes.
2. Press the WPS button on the router within two minutes.
NOTE: Refer to the router’s manual for the location of the WPS button.
3. Check if the Range Extender’s system indicator
turns into solid blue, which indicates that the
Range Extender has connected to the wireless
network successfully. The Range Extender’s
wireless network name (SSID) changes to your
existing Wi-Fi network name, ending with _RPT
or _RPT5G. For example:
Existing Wi-Fi network name: existing NetworkName
New Extender 2.4GHz network name: existing NetworkName_RPT
New Extender 5GHz network name: existing NetworkName_RPT5G
To connect an additional Wi-Fi device to your Extender network, use the same network password as that
of your existing wireless router.
Move the Range Extender
When the connection is complete, locate the Range Extender between the router and the wireless device to get
better performance.
NOTE: To get the best connection performance, ensure that at least two signal indicators light up.
Signal Indicators
• To get the best performance, place the Range Extender between your router and wireless device.
• The 2.4GHz & 5GHz signal indicators indicate the connection performance from the Range Extender to
the Router. Refer to the LED indicators in section A Quick Look.
• If the router does not support or has weak 5GHz signal, only the 2.4GHz signal indicators will light up.
• If no 2.4GHz signal indicator lights up, search the network again in Option A or make sure that your
router supports WPS in Option B.
NOTE: The 2.4GHz and 5GHz signal indicators may light up asymmetrically.
English
Wireless Media Playback
English
The Range Extender supports wireless media playback, which allows you to stream and play your network music through its audio port. You can use ASUS AiPlayer app to control the music streaming over
the Range Extender from your mobile device. Search for “RP-N53” or “AiPlayer” from Google Play or App
Store and download the app to your mobile device.
NOTES:
• AiPlayer supports mp3, wav., flac, and acc files.
• You can insert an earphone, powered speaker, or stereo system to the 3.5mm stereo audio port.
Q1: I cannot access the web GUI to configure the RP-N53
settings.
• Close all running web browsers and launch again.
• Follow the steps below to configure your computer settings based on its
operating system.
Windows 7
A. Disable the proxy server, if enabled.
1. Click Start > Internet Explorer to launch the web browser.
2. Click Tools > Internet options > Connections tab > LAN settings.
3.From the Local Area Network (LAN) Settings screen, untick Use a proxy
server for your LAN.
4. Click OK when done.
B. Set the TCP/IP settings to automatically obtain an IP address.
1. Click Start > Control Panel > Network and Internet > Network and
Sharing Center > Manage network connections.
2. Select Internet Protocol Version 4 (TCP/IPv4), then click Properties.
3. Tick Obtain an IP address automatically.
4. Click OK when done.
English
Frequently Asked Questions
Mac 10.5.8
A. Disable the proxy server, if enabled.
English
1.From the menu bar, click Safari >
Preferences... > Advanced tab.
2. Click Change Settings... in the Proxies field.
3. From the list of protocols, deselect FTP Proxy and Web Proxy
(HTTP).
4. Click OK when done.
B. Set the TCP/IP settings to automatically obtain an IP address.
> System Preferences > Network.
1. Click the Apple icon
2. Select Ethernet and select Using DHCP in the Configure field.
3. Click Apply when done.
Q2: Why doesn’t the 5GHz signal indicator of the Range Extender light up?
•Check whether your router supports 5GHz band. If your router is single band, the Range Extender’s
5GHz Signal Indicator will not light up and it works at 2.4GHz band only.
•The Range Extender cannot check whether the WEP passphrase is correct or not. When entered a
wrong passphrase, your wireless device cannot get the correct IP address from the Range Extender.
Please reset the Range Extender to its factory defaults to get the IP address back.
Q4: Why doesn’t the touch controller work?
•Ensure that you touch the area correctly. Refer to A Quick Look for the location of the touch area.
EEE Yönetmeliğine Uygundur.
English
Q3: M
y router security is WEP, and I entered a wrong passphrase or security key on
the extender. Now I cannot access the Extender any more. What can I do?
Contenu de la boîte
Français
Range Extender
Guide de démarrage rapide
REMARQUE : Contactez votre revendeur si l’un des éléments est manquant ou endommagé.
Aperçu rapide
1) Port Ethernet
2) Port audio
3) Bouton de réinitialisation
4) Bouton Marche/Arrêt
5) Bouton WPS
6) Voyants lumineux
12
7) Zone tactile
• Touchez cette zone pour allumer ou éteindre les
voyants lumineux.
Français
8) Voyant lumineux
• I ndicateur système : cet indicateur s’allume
lorsque le répéteur est sous tension et clignote
lorsque le câble Ethernet ou audio est connecté.
• Indicateurs de signal 2,4GHz et 5GHz : indiquent
le niveau de qualité du signal sans fil du répéteur
vers le routeur.
Performances
3 voyants
lumineux
Excellentes
2 voyants
lumineux
bonnes
1 voyant
lumineux
Médiocres
Éteints
Pas de connexion
2.4GHz
Indicateur
système
5GHz
Indicateurs de
signal 2,4GHz
Indicateurs de
signal 5GHz
Indicateur système
REMARQUE : si le routeur ne prend pas en charge la bande des 5GHz ou si ce signal est de mauvaise
qualité, seuls les indicateurs de connexion 2,4GHz s’allumeront.
13
Français
Configurer le répéteur
Mise sous tension du répéteur
1. Placez le répéteur à proximité de votre routeur.
2. Branchez le répéteur à une prise électrique. Patientez
une minute. L’indicateur système clignote puis s’allume
de couleur bleue.
Connexion à un réseau
Utilisez l’une des méthodes de connexion suivantes pour établir une connexion au réseau.
Option A : connexion via l’interface de gestion
1. Utilisez un ordinateur ou une tablette pour localiser et vous connecter au réseau sans fil nommé
ASUS_RPN53/ASUS_RPN53_5G
2. Ouvrez votre navigateur Internet et entrez http://repeater.asus.com dans la barre d’adresse pour ouvrir
l’interface de gestion du répéteur.
3. Entrez le nom d’utilisateur et le mot de passe par défaut
suivants : admin / admin.
4. Suivez les instructions apparaissant à l’écran pour configurer
le répéteur.
* Sélectionnez le réseau Wi-Fi dont vous souhaitez étendre la
couverture, puis entrez sa clé de sécurité.
14
• Connectez vos appareils sans fil à se
nouveau réseau.
Français
•Spécifiez le nom du réseau étendu.
Option B : utilisation de la fonction WPS
1. Appuyez sur le bouton WPS situé sur le côté du répéteur pendant plus de deux secondes, et ce jusqu’à
ce que l’indicateur système clignote.
2. Appuyez sur le bouton WPS du routeur dans les deux minutes suivantes.
REMARQUE : consultez le manuel du routeur pour localiser l’emplacement exact de son bouton WPS.
3. Vérifiez que l’indicateur système du répéteur
est allumé de couleur bleue, indiquant que la
connexion a été établie. Le SSID du répéteur est
remplacé par celui du réseau Wi-Fi existant, et
finissant par _RPT ou _RPT5G. Par exemple :
15
Nom (SSID) du réseau sans fil Wi-Fi existant : “mon réseau Wi-Fi”
Nouveau nom (SSID) du réseau sans fil 2,4GHz : “mon réseau Wi-Fi_RPT”
Nouveau nom (SSID) du réseau sans fil 5GHz : “mon réseau Wi-Fi_RPT5G”
Français
Pour connecter un appareil sans fil additionnel au réseau du répéteur, utilisez le même mot de passe que
celui normalement utilisé lors de la connexion au routeur.
Déplacement du répéteur
Une fois la connexion établie, placez le répéteur entre le
routeur et les appareils connectés pour obtenir de meilleures performances.
REMARQUE : pour garantir une bonne couverture sans fil,
assurez-vous qu’au moins deux des voyants lumineux dédiés à la qualité du signal sans fil sont allumés.
Voyants lumineux dédiés à la qualité du signal sans fil
• Placez le répéteur entre le routeur et les appareils connectés pour obtenir de meilleures performances.
• Les voyants lumineux dédiés à la qualité du signal 2,4GHz et 5GHz permettent de jauger la qualité de
la couverture du signal sans fil. Consultez la section relative aux indicateurs lumineux du répéteur pour
plus de détails.
• Si le routeur ne prend pas en charge la bande des 5GHz ou si ce signal est de mauvaise qualité, seuls
les indicateurs de connexion 2,4GHz s’allumeront.
• Si aucun des voyants lumineux dédiés au signal sans fil 2,4GHz n’est allumé, reconsultez les instructions de la section Option A ou essayez plutôt d’utiliser la méthode de connexion WPS décrite la
section Option B.
REMARQUE : les voyants lumineux dédiés aux signaux 2,4GHz et 5GHz peuvent s’allumer de manière
asymétrique.
16
Le répéteur prend en charge la lecture sans fil de contenu, vous permettant de diffuser et de lire votre
musique par le biais de son port audio. Vous pouvez utiliser l’application ASUS AiPlayer pour contrôler
le flux audio diffusé entre le répéteur et un appareil mobile. Entrez le mot clé “RP-N53” ou “AiPlayer” sur
Google Play ou l’App Store pour télécharger l’application sur votre appareil mobile.
REMARQUES :
• AiPlayer est compatible avec les fichiers mp3, wav, flac et acc.
• Vous pouvez connecter un casque audio, un système d’enceintes ou une chaîne stéréo au port audio
3.5mm du répéteur.
17
Français
Lecture audio sans fil
FAQ
Français
Q1 : Je ne parviens pas à accéder au Gestionnaire de
configuration Web pour régler les paramètres de
mon RP-N53.
• Redémarrez votre explorateur Internet.
• Suivez les étapes suivantes pour configurer votre ordinateur en fonction
du système d’exploitation utilisé.
Windows 7
A. Désactivez le serveur proxy si celui-ci est activé.
1. Cliquez sur Démarrer > Internet Explorer pour lancer le navigateur.
2. Cliquez sur Outils > Options Internet > onglet Connexions > Paramètres
réseau.
3.À partir de l’écran Paramètres du réseau local, décochez l’option Utiliser un
serveur proxy pour votre réseau local.
4. Cliquez sur OK une fois terminé.
B. Configurez les paramètres TCP/IP pour l’obtention automatique d’une
adresse IP.
1. Cliquez sur Démarrer > Panneau de configuration > Réseau et Internet
> Centre réseau et partage > Gérer les connexions réseau.
2. Sélectionnez Protocole Internet version 4 (TCP/IPv4), puis cliquez sur
Propriétés.
3. Cochez l’option Obtenir une adresse IP automatiquement.
4. Cliquez sur OK une fois terminé.
18
Mac 10.5.8
Français
A. Désactivez le serveur proxy si celui-ci est activé.
1.Dans la barre des menus, cliquez sur Safari > Préférences... >
onglet Avancées.
2. Cliquez sur Modifier les réglages... dans le champ Proxies.
3. Dans la liste des protocoles, décochez les options Proxy FTP et
Proxy web sécurisé (HTTPS).
4. Cliquez sur OK une fois terminé.
B. Configurez les paramètres TCP/IP pour l’obtention
automatique d’une adresse IP.
> Préférences Système > Réseau.
1. Cliquez sur la Pomme
2. Sélectionnez Ethernet puis Via DHCP dans le champ
Configurer.
3. Cliquez sur Appliquer une fois terminé.
Q2: P
ourquoi les voyants lumineux dédiés à la qualité du signal 5GHz du répéteur ne
s’allument-ils pas ?
•Vérifiez que votre routeur soit compatible avec la bande de fréquence des 5GHz. Si votre routeur ne
prend pas en charge ce type de signal sans fil, seuls les voyants 2,4GHz s’allument.
19
Q3: L a connexion sans fil de mon routeur utilise un chiffrement WEP. Après avoir
entré un mauvais mot de passe ou clé de sécurité lors d’une tentative de
connexion au répéteur, je ne peux plus accéder à ce dernier. Que faire ?
Français
•Le répéteur ne peut pas vérifier la validité des mots de passe ou clés de sécurité WEP. Lorsque ces
informations sont incorrectes, l’appareil sans fil tentant d’établir une connexion au répéteur ne
pourra pas obtenir d’adresse IP. Veuillez restaurer la configuration d’usine du répéteur pour résoudre
ce problème.
Q4: P
ourquoi la zone tactile ne fonctionne-t-elle pas ?
•Assurez-vous d’avoir bien localisé la zone tactile. Consultez la section A de ce guide pour localiser son
emplacement exact.
20
Contenido del paquete
Guía de inicio rápido
NONOTA: Si cualquiera de los artículos falta o está dañado, póngase en contacto con ASUS para realizar
preguntas técnicas u obtener soporte técnico.
Un vistazo rápido
1) Puerto Ethernet
2) Puerto de audio
3) Botón Restablecer
4)Botón de encendido y
apagado
5) Botón WPS
6) Luz nocturna
21
Español
prolongador de alcance
Español
7) Controlador táctil
Toque el área marcada para activar o desactivar las
luces.
8) Indicador LED
• I ndicador Sistema: El indicador Sistema se ilumina
cuando el prolongador de alcance está conectado a
la corriente y parpadea cuando el cable Ethernet o
el cable de audio está conectado.
• Indicadores de señal de 2,4 GHz y 5 GHz: las luces
indican la intensidad de la señal de conexión de 2,4
GHz y 5 GHz desde el prolongador de alcance hasta
el enrutador.
Rendimiento
3 luces
Excelente
2 luces
Bueno
1 luz
Malo
Ninguna
luz
No hay
conexión
2,4 GHz
Indicador
Sistema
5GHz
Indicadores
Indicadores
de señal de
de señal de 5
2,4 GHz
GHz
Indicador Sistema
NOTA: si el enrutador no admite la banda de 5 GHz o tiene una señal de 5 GHz débil, solamente se
iluminarán los indicadores de señal de 2,4 GHz.
22
Configurar el prolongador de alcance
Español
Encender el prolongador de alcance
1. Coloque el prolongador de alcance cerca de enrutador.
2. Enchufe el prolongador de alcance a una toma de
corriente eléctrica, espere un minuto hasta que el indicador del sistema parpadee dos veces y pase a iluminarse
permanentemente en azul.
Conectarse a una red
Seleccione una de las siguientes formas para conectar el prolongador de alcance a una red.
Opción A: Conexión a través de GUI
1. Utilice un equipo de sobremesa, portátil o tableta para encontrar la red inalámbrica ASUS_RPN53/
ASUS_RPN53_5G (SSID de banda dual) y conéctese a ella.
2. Inicie un explorador Web y escriba http://repeater.asus.com en la barra de direcciones para acceder al
prolongados de alcance.
3. Escriba el nombre y la contraseña de inicio de sesión predeterminados, que son “admin/admin”.
4. Siga los pasos de la sección Configuración de instalación
rápida siguientes para configurar el prolongado de alcance:
•Seleccione la red Wi-Fi que desee prolongar y escriba su
contraseña de seguridad.
23
•Escriba un nombre para la nueva red
del prolongador.
• Conecte los dispositivos inalámbricos a
la red del prolongador.
Español
Opción B: Utilizar WPS (Wi-Fi Protected Setup, es decir, Configuración protegida Wi-Fi)
1. Presione el botón WPS situado en el lateral del prolongador de alcance durante más de dos segundos
hasta que el indicador del sistema parpadee.
2. Presione el botón WPS del enrutador antes de que transcurran dos minutos.
NOTA: Consulte el manual del enrutador para conocer la ubicación del botón WPS.
3. Compruebe si el indicador del sistema del
prolongador de alcance se ilumina permanentemente en color azul, lo que indica que dicho
prolongador se ha conectado a la red inalámbrica correctamente. El nombre de red inalámbrica
(SSID) del prolongador de alcance cambia al
nombre de red Wi-Fi existente, que termina por
_RPT o _RPT5G. Por ejemplo:
24
Nombre de red Wi-Fi existente: Nombre_De_Red existente
Nuevo nombre de red de 2,4GHz del prolongador: Nombre_De_Red_RPT existente
Nuevo nombre de red de 5 GHz del prolongador: Nombre_De_Red_RPT5G existente
Para conectar un dispositivo Wi-Fi adicional a la red del prolongador, utilice la misma contraseña de red
que la del enrutador inalámbrico existente.
En trasladar el prolongador de alcance
Cuando la conexión se complete, coloque el prolongador
de alcance entre el enrutador y el dispositivo inalámbrico
para mejorar el rendimiento.
NOTA: para conseguir el mejor rendimiento de conexión, asegúrese de que hay al menos dos luces
encendidas.
Indicadores de señal
• Para obtener el mejor rendimiento, coloque el prolongador de alcance entre el enrutador y el dispositivo inalámbrico.
• Los indicadores de señal de 2,4 GHz y 5 GHz muestran el rendimiento de la conexión desde el prolongador de alcance hasta el enrutador. Consulte los indicadores LED en la sección Información rápida.
• Si el enrutador no admite la señal de 5 GHz o esta es débil, solamente se iluminarán los indicadores de
señal de 2,4 GHz.
• Si el indicador de señal de 2,4 GHz se ilumina, busque de nuevo la red en la Opción A o asegúrese de
que el enrutador admite WPS en la Opción B.
NOTA: Los indicadores de señal de 2,4 GHz y 5 GHz se pueden iluminar asimétricamente.
25
Español
Reproducción multimedia inalámbrica
Español
El ampliador de alcance admite reproducción multimedia inalámbrica, gracias a la cual puede transmitir
por secuencias y reproducir su música de red a través de su puerto de audio. Puede utilizar la aplicación
ASUS AiPlayer para controlar la transmisión por secuencias de música a través del ampliador de alcance
desde el dispositivo móvil. Busque “RP-N53” o “AiPlayer” en Google Play o App Store y descargue la aplicación a su dispositivo móvil.
NOTAS:
• AiPlayer admite los formatos de archivo mp3, wav, flac y acc.
• Puede insertar un auricular, un altavoz alimentado o un sistema estéreo al puerto de audio estéreo de
3,5 mm.
26
Solución de problemas
P1: No puedo acceder a la interfaz GUI web para
configurar los parámetros del router inalámbrico.
B. Establezca la configuración TCP/IP del equipo para que reciba una dirección IP
automáticamente.
1. Haga clic en Start (Inicio) > Control Panel (Panel de control) > Network and
Internet (Red e Internet) > Network and Sharing Center (Centro de redes
y de recursos compartidos) > Manage network connections (Administrar
conexiones de red).
2. Seleccione Internet Protocol Version 4 (TCP/IPv4) (Protocolo de Internet
versión 4 (TCP/IPv4)) y haga clic en Properties (Propiedades).
3. Active la opción Obtain an IP address automatically (Obtener una dirección
IP automáticamente).
4. Haga clic en OK (Aceptar) cuando haya terminado.
Español
• Cierre todos los exploradores web en ejecución e inicie de nuevo uno de ellos.
• Siga los pasos descritos a continuación para configurar el equipo según el
sistema operativo instalado.
Windows 7
A.Deshabilite el servidor proxy si se encuentra habilitado.
1. Haga clic en Start (Inicio) > Internet Explorer para iniciar el explorador web.
2. Haga clic en Tools (Herramientas) > Internet options (Opciones de Internet)
> ficha Connections (Conexiones) > LAN settings (Configuración de LAN).
3.En la pantalla Local Area Network (LAN) Settings (Configuración de la red de
área local (LAN)), desactive la opción Use a proxy server for your LAN (Usar
un servidor proxy para la LAN).
4. Haga clic en OK (Aceptar) cuando haya terminado.
27
Mac 10.5.8
Español
A.Deshabilite el servidor proxy si se encuentra habilitado.
1.En la barra de menús, haga clic en Safari > Preferences... (Preferencias...) > ficha Advanced (Avanzado).
2. En el campo Proxies, haga clic en Change Settings... (Cambiar
ajustes...).
3. En la lista de protocolos, anule la selección de los elementos
FTP Proxy (Proxy de FTP) y Web Proxy (HTTP) (Proxy de web
(HTTP).
4. Haga clic en OK (Aceptar) cuando haya terminado.
B.Establezca la configuración TCP/IP del equipo para que
reciba una dirección IP automáticamente.
1. Haga clic en el icono de Apple
> System Preferences (Preferencias del Sistema) > Network (Red).
2. Seleccione Ethernet y, a continuación, Using DHCP (Usar DHCP)
en el campo Configure (Configurar).
3. Haga clic en Apply (Aplicar) cuando haya terminado.
P2: ¿ Por qué se ilumina el indicador de señal de 5 GHz del prolongador de alcance?
•Compruebe si el enrutador admite la banda de 5 GHz. Si el enrutador es monobanda, el indicador de
señal de 5 GHz del prolongador de alcance no se iluminará y funcionará solamente en la banda de
2,4 GHz.
28
•El prolongador de alcance no puede comprobar si la frase de paso WEP es correcta o no. Cuando
se introduce una frase de paso errónea, el dispositivo inalámbrico no puede obtener la dirección IP
correcta del prolongador de alcance. Restablezca la configuración predeterminada de fábrica del
prolongador de alcance para recuperar la dirección IP.
P4: ¿ Por qué no funciona el controlador táctil?
•Asegúrese de que toca el área correctamente. Consulte la sección Información rápida para conocer
la ubicación del área táctil.
Manufacturer
ASUSTeK Computer Inc.
Tel: +886-2-2894-3447
Address: No. 150, LI-TE RD., PEITOU, TAIPEI 112, TAIWAN
Authorised representative in
Europe
ASUS Computer GmbH
Address: HARKORT STR. 21-23, 40880 RATINGEN, GERMANY
Authorised distributors in
Turkey
BOGAZICI BIL GISAYAR SAN. VE TIC. A.S.
Tel: +90 212 3311000
Address: AYAZAGA MAH. KEMERBURGAZ CAD. NO.10 AYAZAGA/ISTANBUL
CIZGI Elektronik San. Tic. Ltd. Sti.
Tel: +90 212 3567070
Address: CEMAL SURURI CD. HALIM MERIC IS MERKEZI
No: 15/C D:5-6 34394 MECIDIYEKOY/ ISTANBUL
KOYUNCU ELEKTRONiK BiLGi iSLEM SiST. SAN. VE DIS TIC. A.S.
Tel: +90 216 5288888
Address: EMEK MAH.ORDU CAD. NO:18, SARIGAZi, SANCAKTEPE ISTANBUL
29
Español
P3: L a seguridad de mi enrutador es WEP y escribí una frase de paso o clave
de seguridad errónea en el prolongador. Ahora ya no puedo acceder al
prolongador. ¿Qué puedo hacer?
Federal Communications Commission Statement
This device complies with Part 15 of the FCC Rules. Operation is subject to the following two conditions:
• This device may not cause harmful interference.
•This device must accept any interference received, including interference that may cause undesired
operation.
This equipment has been tested and found to comply with the limits for a class B digital device, pursuant
to part 15 of the FCC Rules. These limits are designed to provide reasonable protection against harmful
interference in a residential installation.
This equipment generates, uses and can radiate radio frequency energy and, if not installed and used in
accordance with the instructions, may cause harmful interference to radio communications. However, there is
no guarantee that interference will not occur in a particular installation. If this equipment does cause harmful
interference to radio or television reception, which can be determined by turning the equipment off and on, the
user is encouraged to try to correct the interference by one or more of the following measures:
• Reorient or relocate the receiving antenna.
• Increase the separation between the equipment and receiver.
•Connect the equipment into an outlet on a circuit different from that to which the receiver is connected.
• Consult the dealer or an experienced radio/TV technician for help.
Warning: Any changes or modifications not expressly approved by the party responsible for
compliance could void the user’s authority to operate the equipment.Prohibition of Co-locationThis
device and its antenna(s) must not be co-located or operating in conjunction with any other
antenna or transmitter.
FCC Mark Warning
This equipment must be installed and operated in accordance with provided instructions and the antenna(s)
used for this transmitter must be installed to provide a separation distance of at least 20cm from all persons
and must not be co-located or operated in conjunction with any other antennas or transmitters. End users
and installers must be provided with antenna installation instructions and transmitter operating conditions for
satisfying RF exposure compliance.
Prohibition of Co-location
This device and its antenna(s) must not be co-located or operating in conjunction with any other antenna or
transmitter.
IMPORTANT NOTE:
Radiation Exposure Statement: This equipment complies with FCC radiation exposure limits set forth
for an uncontrolled environment. End users must follow the specific operating instructions for satisfying RF
exposure compliance. To maintain compliance with FCC exposure compliance requirement, please follow
operation instruction as documented in this manual.
Declaration of Conformity for R&TTE directive 1999/5/EC
Essential requirements – Article 3
Protection requirements for health and safety – Article 3.1a
Testing for electric safety according to EN 60950-1 has been conducted. These are considered relevant and
sufficient.
Protection requirements for electromagnetic compatibility – Article 3.1b
Testing for electromagnetic compatibility according to EN 301 489-1 and EN 301 489-17 has been conducted.
These are considered relevant and sufficient.
Effective use of the radio spectrum – Article 3.2
Testing for radio test suites according to EN 300 328- 2 has been conducted. These are considered relevant
and sufficient.
CE Mark Warning
This is a Class B product, in a domestic environment, this product may cause radio interference, in which case
the user may be required to take adequate measures.Operation Channels: CH1~11 for N. America; Ch1~14
for Japan; CH1~13 for Europe (ETSI)
Canada, Industry Canada (IC) Notices
This Class B digital apparatus complies with Canadian ICES-003 and RSS-210.
Operation is subject to the following two conditions: (1) this device may not cause interference, and (2) This
device must accept any interference, including interference that may cause undesired operation of the device.
Radio Frequency (RF) Exposure Information
The radiated output power of the ASUS Wireless Device is below the Industry Canada (IC) radio frequency
exposure limits. The ASUS Wireless Device should be used in such a manner such that the potential for
human contact during normal operation is minimized.
This device has been evaluated for and shown compliant with the IC Specific Absorption Rate (“SAR”) limits
when installed in specific host products operated in portable exposure conditions (antennas are less than 20
centimeters of a person’s body).
This device has been certified for use in Canada. Status of the listing in the Industry Canada’s REL (Radio
Equipment List) can be found at the following web address: http://www.ic.gc.ca/app/sitt/reltel/srch/nwRdSrch.
do?lang=eng
Additional Canadian information on RF exposure also can be found at the following web address: http://www.
ic.gc.ca/eic/site/smt-gst.nsf/eng/sf08792.html
Canada, avis d’Industry Canada (IC)
Cet appareil numérique de classe B est conforme aux normes canadiennes ICES-003 et RSS-210.
Son fonctionnement est soumis aux deux conditions suivantes : (1) cet appareil ne doit pas causer d’
interférence et (2) cet appareil doit accepter toute interférence, notamment les interférences qui peuvent
affecter son fonctionnement.
Informations concernant l’exposition aux fréquences radio (RF)
La puissance de sortie émise par l’appareil de sans fil ASUS est inférieure à la limite d’exposition aux
fréquences radio d’Industry Canada (IC). Utilisez l’appareil de sans fil ASUS de façon à minimiser les contacts
humains lors du fonctionnement normal.
Ce périphérique a été évalué et démontré conforme aux limites SAR (Specific Absorption Rate – Taux d’
absorption spécifique) d’IC lorsqu’il est installé dans des produits hôtes particuliers qui fonctionnent dans des
conditions d’exposition à des appareils portables (les antennes se situent à moins de 20 centimètres du corps
d’une personne).
Ce périphérique est homologué pour l’utilisation au Canada. Pour consulter l’entrée
correspondant à l’appareil dans la liste d’équipement radio (REL - Radio Equipment List) d’
Industry Canada rendez-vous sur: http://www.ic.gc.ca/app/sitt/reltel/srch/nwRdSrch.do?lang=eng
Pour des informations supplémentaires concernant l’exposition aux RF au Canada rendez-vous
sur : http://www.ic.gc.ca/eic/site/smt-gst.nsf/eng/sf08792.html
Industry Canada Statement
This device complies with RSS-210 of the industry Canada Rules. Operation is subject to the following two
conditions:
• This device may not cause harmful interference.
•This device must accept any interference received, including interference that may cause undesired
operation.
IMPORTANT NOTE:
Radiation Exposure Statement: This equipment complies with IC radiation exposure limits set forth for an
uncontrolled environment. End users must follow the specific operating instructions for satisfying RF exposure
compliance. To maintain compliance with IC RF exposure compliance requirement, please follow operation
instruction as documented in this manual.
NCC 警語
經型式認證合格之低功率射頻電機,非經許可,公司、商號或使用者均不得擅自變更頻率、加大功率或
變更原設計之特性及功能。低功率射頻電機之使用不得影響飛航安全及干擾合法通信;經發現有干擾現
象時,應立即停用,並改善至無干擾時方得繼續使用。
前項合法通信,指依電信法規定作業之無線電通信。低功率射頻電機須忍受合法通信或工業、科學及醫
療用電波輻射性電機設備之干擾。
REACH
Complying with the REACH (Registration, Evaluation, Authorisation, and Restriction of Chemicals) regulatory
framework, we published the chemical substances in our products at ASUS REACH website at http://csr.asus.
com/english/REACH.htm
ASUS Recycling/Takeback Services
ASUS recycling and takeback programs come from our commitment to the highest standards for protecting
our environment. We believe in providing solutions for you to be able to responsibly recycle our products,
batteries, other components, as well as the packaging materials. Please go to http://csr.asus.com/english/
Takeback.htm for the detailed recycling information in different regions.
This equipment may be operated in AT, BE, CY, CZ, DK, EE, FI, FR, DE, GR, HU, IE, IT, LU, MT,
NL, PL, PT, SK, SL, ES, SE, GB, IS, IS, LI, NO, CH, BG, RO, TR.
Networks Global Hotline Information
Area
Hotline Number
Support Languages
Availability
Australia
1300-2787-88
English
Mon. to Fri.8:00-20:00
Austria
0043-820240513
German
Mon. to Fri.9:00-18:00
Belgium
0032-78150231
Dutch /French
Mon. to Fri.9:00-17:00
China
400-620-6655
Simplified Chinese
Mon. to Sun.9:00-18:00
Denmark
0045-3832-2943
Danish/English
Mon. to Fri.9:00-17:00
Finland
00358-9693-7969
Finnish/English/Swedish
Mon. to Fri.10:00-18:00
France
0033-170949400
French
Mon. to Fri.9:00-17:45
Greece
00800-44-14-20-44
Greek
Mon. to Fri.
9:00-13:00/14:00-18:00
Hong Kong
3582-4770
Cantonese/
Chinese/English
Mon. to Fri.10:00-20:00
Sat.10:00-17:00
Indonesia
+62-21-500128
Indonesia, English
Mon. to Fri9:30 - 17: 00
Ireland
0035-31890719918
English
Mon. to Fri.9:00-17:00
Italy
199-400089
Italian
Mon. to Fri.
9:00-13:00/14:00-18:00
Japan
0800-123-2787
Japanese
Mon. to Fri.9:00-18:00
Sat. to Sun.9:00-17:00
Networks Global Hotline Information
Malaysia
+603 2148 0827 (Check
Repair Detail Status
Only)/ +603-6279-5077
Bahasa Melayu/
English
Mon. to Fri.10:00-19:00
Netherlands
/ Luxembourg
0031-591-570290
Dutch / English
Mon. to Fri.9:00-17:00
New Zealand
0800-278-788/
0800-278-778
English
Mon. to Fri.9:00-17:00
Norway
0047-2316-2682
Norwegian
/English
Mon. to Fri.9:00-17:00
Philippines
+632-636 8504/
180014410573
English
Mon. to Fri.9:00-18:00
Poland
00225-718-033/
00225-718-040
Polish
Mon. to Fri.
9:00-17:008:30-17:30
Portugal
707-500-310
Portuguese
Mon. to Fri.9:00-17:00
Russia
+8-800-100-ASUS/
+7-495-231-1999
Russian/
English
Mon. to Fri.9:00-18:00
Singapore
+65-6720-3835
(Check Repair
Detail Status Only)/
+65-66221701
English
Mon. to Fri.
11:00-19:00
Slovak
00421-232-162-621
Czech
Mon. to Fri.8:00-17:00
Networks Global Hotline Information
Spain
902-88-96-88
Spanish
Mon. to Fri.9:00-18:00
Sweden
0046-8587-6940
Swedish/English
Mon. to Fri.9:00-17:00
0041-848111010
German/French
Mon. to Fri.9:00-18:00
0041-848111014
French
Mon. to Fri.9:00-17:45
0041-848111012
Italian
Mon. to Fri.9:00-17:00
Taiwan
0800-093-456/
02-81439000
Traditional Chinese
Mon. to Fri.
9:00-12:00/13:30-18:00
Thailand
+662-679-8367 -70/
001 800 852 5201
Thai/English
Mon. to Fri.
9:00-18:00
Turkey
+90-216-524-3000
Turkish
Mon. to Fri.09:00-18:00
United
Kingdom
0044-870-1208340/
0035-31890719918
English
Mon. to Fri.9:00-17:00
USA/Canada
1-812-282-2787
English
Mon. to Fri.
8:30am-12:00am EST (5:30am9:00pm PST)
Switzerland
Sat .to Sun.
9:00am-6:00pm EST (6:00am3:00pm PST)
MANUFACTURER
ASUSTeK Computer Inc.
Tel: +886-2-2894-3447
Address: 4F, No. 150, LI-TE RD., PEITOU, TAIPEI 112, TAIWAN
AUTHORISED REPRESENTATIVE IN EUROPE
ASUS Computer GmbH
Address: HARKORT STR. 21-23, 40880 RATINGEN, GERMANY
AUTHORISED DISTRIBUTORS IN TURKEY
BOGAZICI BIL GISAYAR SAN. VE TIC. A.S.
Tel: +90 212 3311000
Address: AYAZAGA MAH. KEMERBURGAZ CAD. NO.10 AYAZAGA/ISTANBUL
CIZGI Elektronik San. Tic. Ltd. Sti.
Tel: +90 212 3567070
Address: CEMAL SURURI CD. HALIM MERIC IS MERKEZI
No: 15/C D:5-6 34394 MECIDIYEKOY/ ISTANBUL
EEE Yönetmeliğine Uygundur.


![MC40 Regulatory Guide [English] (P/N 72-166942](http://vs1.manualzilla.com/store/data/006355558_1-b53cce277e35f96f7b0742696fce8bd1-150x150.png)