1
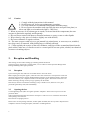
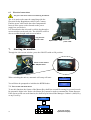
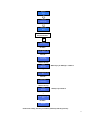
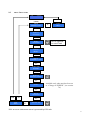
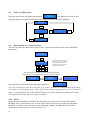
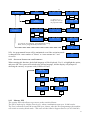
CashOne ZV / Alex
Token dispenser
Operator manual
Rev. 1.01
Token Dispenser
CashOne
Operator Manual
1
NOTA
This manual has been prepared with the utmost care. Nevertheless, it is not
possible to assure at any time the exact correspondence of the descriptiosn to the product features.
Alberici SpA shall not be held liable by the User for any damage, losses, or third party claims
arising from any uses of the manual or of the product .
2
SOMMARIO
1.
Package content............................................................................................................................ 4
2.
Product description ...................................................................................................................... 5
3.
Reception and Handling ............................................................................................................... 6
4.
Parts Denomination ...................................................................................................................... 7
5.
Dimensions................................................................................................................................... 9
6.
Installation .................................................................................................................................... 9
7.
Starting the machine................................................................................................................... 10
8.
Operation .................................................................................................................................... 13
9.
Configuration ............................................................................................................................. 16
10. Messaggi .................................................................................................................................... 22
11. Maintenance ............................................................................................................................... 23
12. Disposal of the product .............................................................................................................. 23
13. Terms of Guarantee ................................................................................................................... 23
14. Customer Service ....................................................................................................................... 24
Revisione n°
Creazione
Rev. 1.01
Data
16.01.13
05.03.13
STORICO REVISIONI
Modifica
Creazione
Introdotti: controllo livelli Max. e Min.; Refill manuale;
Apertura automatica cassa; Lingua Inglese;
Visualizzazione contabilità parziali
Note
3
Dear Customer,
we would like to thank you and congratulate for your choice. We trust that you will appreciate the
quality and performace of the CashOne token distributor.
This machine operates by cctalk protocol, the well-established serial communication mode that
provides security and precision.
Please read carefully this handbook, to obtain the most from your CashOne equipment
1.
Package content
The package contains:
1.
2.
3.
4.
5.
6.
CASHONE (Alex or ZioVito) Alberici Token Distributor
1 pair of keys (for opening the coin container cover)
Power cord (inside the token container)
Token cup
Five RFID keys: one black (Master), one white (Manager=Cashier 1), and three
User’s Manual (this one)
This product has been packed with the utmost care. If you receive it damaged or incomplete, please
notify immediately your findings to the Carrier, and collect it only under conditional signature.
If you have ordered the PC interface to download the account registrations from the Master (black) Key, you will find
it in a separate parcel.
By the PC interface and the relevant software (order code # K-P4N000007),
it is possible to transfer (*) to the PC the data existing on the Master Key, so
as to file them and work them out.
(*) text original format is downloadable as speadsheet (es. Excel).
4
USB Interface
for PC
K-P4N000007
2.
Product description
2.1
Intended use
The CashOne unit has been designed to dispense tokens (one value) or coins (one denomination).
The Operator enters the amount to be dispensed as he receives the payment by the Customer.
2.2
Available functions
All functions are accessible only through the RFID keys provided. Such keys are in colour and
customized according to the permitted functions; each Operator can control the functions allowed to
him only if his key has been introduced in the RFID Reader. Thanks to the personal keys, it is
possible to identify all dispensing operations carried out by each one of the 4 Operators: such data
are retrieved in the Accounts section by the Master Key.
- Enter and dispense the amounts to be dispensed (as tokens or coins).
- Control of Accounts on the display
- Set up of the Token value, and set up of eventual bonus pieces.
2.3
General Specs
Peso / Weight
Alimentazione / Voltage
Potenza nominale / Nominal power
Temperatura funzionamento / Operation temperature
Installazione / Installation
Capienza gettoni - monete / Token-coin capacity
Velocità di erogazione / Dispensing speed
Componentistica / Components :
Alimentatore / Power supply unit
Scheda controllo / Control board
Hopper erogatore / Dispensing hopper
Display lato Cliente / Rear display
19,70 Kg
230 Vac – 50/60 Hz
60 W max [Alex 2: 100 W]
0°C ÷ 50°C
a banco / desk-top
2400 (Φ24mm)
240 pcs/min.
Power Switching MWP 60VA
ChangeOne CMS Advanced ccTalk + display LCD
HopperOne S11 cctalk
DCS mini display LCD
Notice: the default currency is the Euro. If a different currency is requested, please ask before
placing your order.
2.4
Reference to Regulations
The whole process of design and manufacturing of this equipment has been carried out in
compliance with the following EC Directives and Regulations:
2004/108/CE
CEI EN 60335
CEI EN 55014
CEI EN 61000-3-2 e 3-3
Directive on EMC (and further modifications)
Regulations on the safety of Electrical equipments
Regulations on Immunity to Interferences
Regulations concerning Elecgtromagnetic Compatibility
5
2.5
Caution
1 - Comply with the instructions in this manual
2 - Switch power off before any maintenance operation
3 - Use only within the recommended temperature/humidity range
4 - Do not expose the machine (and especially the mote acceptor front plate) to
direct sun light or to incandescent light (> 3000 Lux)
5 - When in precence of car exhaust gas or smoke, clean and check the components (the note
acceptor in particular) regularly and frequently.
6 - Do not favour contact with dusts or chemical moisture or sprays, water or other liquids
8 - Wipe clean by a dry piece of cloth (or slightly wet with alcohol)
9 - Do not use thinners or organic solvents
10 - The note acceptor could reject (or get jammed by) stained notes, or worn out, wet, wrinkled,
torn, dog-eared, oil-smeared, with sticking tape or similarly affected.
11 - Clean regularly the sensors of the note validators, and wipe off the accumulated dust from the
pinch rollers; make use of a lint-free towel or a cotton pad. Do not use spirits, alcohol, nor chemical
sovents or scratching objects.
!
3.
Reception and Handling
After testing, the unit and its fittings get carefully packed and boxed.
The box(es) get(s) secured to a wooden pallet, so as to reduce to reduce possible damages from
loading/unloading and freight operations.
3.1
Reception
Upon receiving the unit, make use of a forklift truck to move the boxes.
Before signing the reception papers, check the outer state of the boxes. Then open the boxes and
check that the goods have not been damaged during transport. If any damage appears, inform the
forwarder and have your complaint written on the reception papers. Then write “with reserve of
further checking” and sign it. Keep a copy signed by the forwarder.
If the unit(s) must be stored before installing it, keep it inside its box, and store it in a place
protected against deep cold, heat and humidity.
3.2
Opening the box
Cut the tightening belts (take care against possible “whiplash”. Then remove nylon covers and
protection films.
Take out the fastening staples from the box and open it. Take care not to scratch the unit surfaces
while pulling it out of its box.
Place the unit in upright position.
Please notice: all the packing materials, wooden pallet included, must be recycled or disposed of in
compliance with the existing European, National or local Regulations.
6
4.
Parts Denomination
Refill compartment
for tokens
Lock for cover of
coin container
Display mini 2x16 for Customer
(rear side of the equipment)
Token collect (rear side of the
equipment)
RFID Reader for
Operators’ keys
Operator display 2x16
Pushbutton S+ (***)
Numerical keypad
Pushbutton STOP OK (**)
Pushbutton START S- (*)
IN OPERATION
IN CONFIGURATION
(*)
(**)
Pushbutton START SPushbutton STOP OK
Starts Token dispense
Stops dispensing
Surfs (backward
) the menu
Conferma voce o valore selezionata/o
(***)
Pushbutton S+
(No function)
Surfs (frontward
) the menu
Refill compartment
for tokens
Lock for cover of
coin container
Display mini 2x16 for Customer
(rear side of the equipment)
Token collect (rear side of the
equipment)
Operator display 2x16
Pushbutton STOP OK (**)
Pushbutton START RIGHT S- (*)
RFID Reader for Operators’ keys
Pushbutton START LEFT S+
(***)
IN OPERATION
IN CONFIGURATION
(*)
(**)
Pushbutton START SPushbutton STOP OK
Starts Token dispense
Stops dispensing
Surfs (backward
) the menu
Conferma voce o valore selezionata/o
(***)
Pushbutton S+
(No function)
Surfs (frontward
) the menu
7
POS. PART. #
DESCRIPTION
INSIDE VIEW
A
AE-0804
MWP PowerSwitching Box 60VA
B
SH-1B21
ChangeOne CCS ZV, + display 2x16
C
SH-3031000T
Display DCS mini 2x16
HP-ZA140010
HopperOneS11 ccTalk Rev.
E
AM-1509
Safety flat key lock, keyed different
F
PL-MD0T- 3 x RGB luminescent pushbutton,
000H
vandalproof, 12V
G
CH-BC00
ACS Reader for RFID keys
H1
H1
H1
H1
H1
CH-1C11
CH-1C12
CH-1C13
CH-1C14
CH-1C15
Master Key (black)
Manager= Cashier 1 Key (white)
Cashier 2 Key (red)
Cashier 3 Key (yellow)
Cashier 4 Key (green)
D
E
C
B
D
G
A
F
H1
H2
H4
+
+
P
P
R
O
G
PR
RO
OG
G
--
O
O
K
OK
K
BOARD CONNECTIONS
P
P
T
PT
T
S
S
T
P
ST
TP
P
Seen from behind
T
T
S
T
TS
ST
T
P
P
4
/
7
R
G
B
3
R
G
B
2
R
G
B
1
P4
4/
/7
7R
RG
GB
B3
3R
RG
GB
B2
2R
RG
GB
B1
1 S
S
P
SP
PIII
PWR IN
8
Pin 1. +24V
Pin 2. +12V
Pin 3. GND
C
C
C
1
2
CC
C1
12
2
C
C
C
T
CC
CT
T
2
2
4
24
4
P
P
W
R
PW
WR
R
O
O
U
T
OU
UT
T
P
P
W
R
PW
WR
R
IIIN
N
N
2
2
4
1
2
G
N
D
24
41
12
2G
GN
ND
D
R
R
E
G
RE
EG
G
[POWER]
24 12 GND
CC12
Pin 1. DATA
Pin 2. GND
Pin 3. NC
Pin 4. +12 V
CCT 24
Pin 1. DATI
Pin 4,8. GND
Pin 7,10. 24V
Pin 2,3,5,6,9. NC
PWR OUT
Pin 1. CCT
Pin 2. GND
Pin 3. +12V
Pin 4. +24 V
RGB 1,2,3
Pin 1. MICRO N.O.
Pin 2. LED R (rosso)
Pin 3. +12V
Pin 4. LED B (blu)
Pin 5. GND
Pin 6. LED G (verde)
STP
Pin 1. GND
Pin 2. RX
Pin 3. TX
Pin 4. +12V
[CUSTOMER DISPLAY]
[HOPPERONE S11]
[ACS READER FOR RFID KEYS (12V)]
RGB PUSHBUTTONS: RGB1 = OK; RGB2 = S -; RGB2 = S +]
[SIGNAL FOR TILL AUTOMATIC OPENING]
TX = +5V (length = 2 secondS)
5.
Dimensions
375 mm
455 mm
170 mm
500 mm
170 mm
6.
Installation
6.1
Cautions and dangers when installing
The unit must be installed by qualified technicians, skilled in handling, preparation and mounting,
electric connections, and start-up.
Handle the equipment safely. Make use of safety gloves and shoes. Take care of stability, to
prevent any risk of danger to people.
Even though power supply is 24Vac, keep it disconnected during installation and any further
maintenance or servicing.
Do not modify the circuits in the unit. Any change could impair the correct functioning of the
safety circuits.
The power line must comply with the Norm CEI 64-8/7.
In particolare il conduttore di messa a terra deve essere
inderogabilmente conforme alle prescrizioni, e comunque
avere sezione non inferiore ai limiti stabiliti dalla norma CEI 64-8/4.
Si raccomanda di porre la linea sotto la protezione di un interruttore differenziale da 10A , per
poter agevolmente togliere l’alimentazione caso di operazioni di manutenzione.
6.2
Mounting
IT IS ESSENTIAL THAT THE SUPPORTING SURFACE IS SOLID
ENOUGH TO SUSTAIN THE WEIGHT OF THE UNIT.
Prepare a flat and solid basement in the most convenient position for the equipment.
Rotate the locking key of the tokens compartment cover clockwise. Shift the cover towards the
Operator side until it gets out of its guide-rails. Remove the power cable.
Pour the tokens inside the container (hopper). Put back the cover of the compartment and lock it.
WARNING: always refill the unit when power is Off!
9
6.3
Electrical connections
The power line must be disconected during installation.
The 10 A main socket must be complying with the
Electrical Safety Regulations valid in your Country.
Find the power cable inside the token compartment.
Insert it in the preset socket located on the power
supply box (see below).
It is located under the unit, and is visible also through a
cut-out window on the unit side. The ON/OFF switch is
also accessible through such cut-out window.
Plug here the
power cable
Socket for
power cable
ON/OFF switch
7.
Starting the machine
Through the side cut-out window, press the ON/OFF swith to ON position.
Access cut-out window
to ON/OFF switch
When switching the unit on, automatic self-setup will start:
SET UP
IN PROGRESS …
You will then be prompted to initialize the RFID Reader:
INITIALIZE
CASHLESS
7.1 INITIALIZE THE RFID KEYS:
To use this function, the Owner of the Master Key shall first set and file among his secured records
his personal 6 digits code. Notice: the Master Key cannot be used to command the Token dispense.
If the Owner needs use such function, he shall keep for himself the Manager=Cashier1 (white) Key
or any User Key.
INITIALIZE
CASHLESS
OK
Enter Code:
0
10
Touch
S+
Touch
S+
Touch
S+
Touch
S+
Touch
S+
Touch
S+
Touch
OK
Touch
OK
Touch
OK
Touch
OK
Touch
OK
Touch
OK
Enter your code (6
alphanumeric digits)
Register
Code
CASHLESS
INITIALIZED!
INITIALIZE
KEYS
Introduce Master Key
and press button:
OK
INSERT
BLACK KEY
Pls wait….
DO NOT REMOVE THE
KEY
Pls wait….
BLACK KEY
INITIALIZED!
Remove the key
INSERT
WHITE KEY
White Key is for Manager = Cashier 1
….
DO NOT REMOVE THE
KEY
Pls wait….
WHITE KEY
INITIALIZED!
Remove the key
INSERT
RED KEY
Red Key is for Cashier 2
….
DO NOT REMOVE THE
KEY
Pls wait….
RED KEY
INITIALIZED!
Remove the red key, and carry on with the yellow key and the green key.
11
If the Cashless reader and the keys have not been initialized, it is not possible to use any of the unit
funtions. Once all the keys have been initialized, the unit will set to stand-by. The following
messages will be displayed::
11:59
16/01/2013
INSERT KEY TO
%
CASH ONE
%
ENABLE
DISABLED
The above messages will appear whenever the unit gets powered.
Introduce any of the white or coloured keys: the unit will be ready to operate..
If any fault occurs, error messages will be shown, as for instance:
CASH ONE
OUT OF SERVICE
HOPPER 1
%
IN ERROR
HOPPER 2
%
DISPLAY CCT 1 2
%
DISCONNECTED
CONNECTED
%
……
7.2 MANUAL REFILL:
To use this function, insert the Manager/Cashier1 Key (white).
Then surf the Menu (see Section 9) unbtil displaying :
Press button: OK
REFILL MANUALE
OK
MANUAL
REFILL
Amount to dispense:
0
S+
Amount to dispense:
10
S+
Whenever pressing the button
, the recorded quantity gets increased by 10 units. When
keeping the button pressed down, the displayed quantity will increase by 100 units per second, until
reaching - after 25 seconds - the maximum amount of 2500 tokens.
Set the exact quantity of tokens poured in: the display will show the sum up of the entered figure to
the value still held in its memory (of course such value will be nihil at the first start of the machine).
If a wrong number has been entered, press button
back to the previously recorded value.
12
S-
: the displayed calculation will be put
8.
Operation
Do not activate the unit if the token compartment cover is not locked in.
The CashOne Token Dispenser is controlled through the numeric keypad, the three pushbuttons,
and one RFID key reader that will enable operation only if one Cashier Key has been recognized.
8.1 RFID ELECTRONIC KEYS:
The Master Key (black) allows to display the Accounts Menu, and to cancel the registered totals
and partial amounts. When resetting the Accounts data, these ones get automatically loaded onto
the black key. The Master Key can contain up to 7 downloads, from the same unit of from different
units. By the ACS software and the PC-interface (K-P4N000017), the data contained in the key can be
retrieved on a PC where they can be filed and if necessary worked out.
Original .txt format is downloadable as speadsheet (es. Excel).
Notice: the Master Key cannot be used to command the Token dispense. If the Owner needs use such function,
he shall keep for himself the Manager=Cashier1 (white) Key or any User Key.
Cashier 1 (white) Key:
- Enables Tokens dispensing
- It permits to carry out the Refill operations (see Section 7.2).
- When pressing once OK button, the display shows the amount cashed in by the
Manager=Cashier 1 since the last reset of Accounts partial data. This is true only if the
Refill procedure has been correctly performed.
- When pressing twice OK button, it gives access to viewing and cancelling the recorded
partial data in the Accounts Menu.
Cashiers 2 (red), 3 (yellow), and 4 (green) Keys:
- Enable Tokens dispensing
- When pressing once OK button, the display shows the amount cashed in by the relevant
Cashier N since the last reset of Accounts partial data. This is true only if the Refill
procedure has been correctly performed.
An individual Machine Code can be matched to each unit, up to 255 units in all (see Section 9.7).
Such identifying number will also appear in the data retrieved by the Master Key, together with the
relevant identifying numbers of the Cashier Keys.
8.2 OPERATING BUTTONS:
8.2.1 FUNCTIONS:
:
a. if a Cashier Key has been inserted, it enables the dispensing of the
number of Tokens or of the cash value requested. At the same time, it
provides an output signal that can be used to open up a service till (see 8.2.2).
b. if the Master Key has been inserted, it allows Menu backsurf. It also
allows to decrease the values displayed by the checked functions.
Button STOP OK:
a. if a Cashier Key has been inserted, it stops the dispensing of the Tokens.
b. if no key is inserted, and the button is pressed for 5 seconds, the
dispensing mode gets changed from dispensing by number of Tokens to
dispensing by amount in Euro / GBP / SFR / $ / …. The programmed bonus
will be retained whichever dispensing mode has been set.
c. if the Master Key has been inserted, and the Menu is being worked out, it
confirms the function displayed, or the value modified by + or – buttons.
Button START S-
S-
OK
13
Button S + :
a. if the Master Key has been inserted, the button lits up in blue colour, and
allows to surf the whole Configuration Menu. It also allows to increase the
values displayed by the checked functions.
b. if the Manager/Cashier 1 (white) Key has been inserted, this button
allows to surf through the Partial Accounts and the Refill Menus. It also
allows to increase the values displayed by the Refill functions.
S+
When the consolle has been enabled through Cashier Key, the START S-, S+, and STOP OK buttons, lit up in blue
colour. When pressing the numeric keypad, the START S- button lits up according to the filling state of the Token
container, as per chart 8.2.3).
8.2.2 SIGNAL FOR AUTOMATIC OPENING OF SERVICE TILL :
When button S – activates dispensing of Tokens, the unit electronic board provides a signal (*) that
can be used to command an eventual circuit designed to open or release an external service till.
(*) between pins 3 and 1 (GND) of the STP socket: TTL signal, +5V, active high, length 2 seconds.
8.2.3 MESSAGES ABOUT FILLING STATE OF THE TOKEN CONTAINER:
When starting dispensing, the START S- button flashes in a colour that depends on the level
reached by the Tokens available.
STOP OK button lits steadily on in the same colour:
Pushbuttons:
START SSTOP OK
S+
When
enabled
blue
blue
blue
When touching the
keypad
green /yellow/red
blue
blue
Full state while
dispensing
Middle state
while dispensing
Almost Empty state
while dispensing
1500-2500 available
Tokens
50-1500 available
Tokens
0-50 available Tokens
flashing green
steady green
-
flashing yellow
steady yellow
-
flashing red
steady red
-
START S - green = 1500-2500 Tokens
START S - yellow = 50-1500 Tokens
START S - red = 0-50 Tokens
To DISPLAY THE AMOUNT OF TOKENS still contained in the unit, insert the Cashier Key
and press S- button (do not touch the keypad).
8.3 NUMERIC KEYPAD:
The numeric keypad makes it easier to digit the number of Tokens to dispense or the corresponding
amount in Euro / GBP / $ / … . In any of these two activation modes, the programmed bonus
settings will be kept in account.
The numeric keypad is not to be used while displaying the Configuration Menu.
14
8.4 USE OF THE UNIT:
According to the Menu setting, the unit can either dispense a selected number of Tokens (with or
without bonus), or the number of Tokens corresponding to the entered value in Euro / GBP / $ / ….
(with or without bonus), as per scheme below:
ACTIVATION MODE
TOK (SEE SECTION 8.2)
ACTIVATION MODE
£ (SEE SECTION 8.2)
TOK
€
€
TOK
Enter the number of Tokens requested
Enter the amount in £ requested
(the unit shall autmatically add the
corresponding bonus, if programmed)
(the unit shall autmatically add the corresponding
bonus, if programmed)
When powering the unit, the display will show.
11:59
16/01/2013
%
INSERT KEY TO
CASH ONE
%
ENABLE
DISABLED
The key Reader will lit up in blue colour. Insert a Cashier Key: the Reader will lit up in green
colour, and the Operator display will show:
TOK
£
or else:
£
(this means that the unit has been set to
dispense the number of TOKENS that will be
entered by the keypad, plus the possible bonus)
TOK
(this means that the unit has been set to dispense the
number of TOKENS corresponding to the amount in GBP
that will be entered by the keypad, plus the possible bonus)
To change the Activation Mode TOK / £ (or viceversa), remove the RFID Key from the Reader,
and keep the STOP OK button pressed for full 5 seconds: the new mode will be displayed:
ACTIVATION MODE:
£
or
8.4.1 TOKEN DISPENSE
ACTIVATION MODE:
TOKENS
. . Insert the Key back.
TOK
IN MODE “TOKENS”:
£
Enter the number of Tokens to be dispensed, for instance 10: the display will show the
corresponding value in £. Supposing that the Token value has been set as 2£, without bonus, the
following message will appear:
10
20.00
TOK
£
Press START button to begin
dispensing. The display shows:
10
20.00
TOK
£
1
2.00
where
N means
that the hopper
has been activated, and that N Tokens have been dispensed up to then.
This message gets displayed at the end:
PAYOUT COMPLETE
TOK.:
10
To stop the dispensing in progress, press STOP twice.
If you need only hold dispensing for a while, press STOP once; then press START to resume it.
15
£
8.4.2 TOKEN DISPENSE
IN MODE
“£”:
TOK
Enter the requested amount in £, for instance 10 £: the display will show the number of Tokens
corresponding to such amount. Supposing that the Token value has
10.00
£
been set as 2£, without bonus, the following message will appear:
5
TOK
Press START button to begin dispensing. The display will show:
where
N means that the hopper has been activated, and that
N Tokens have been dispensed up to then.
The following message gets displayed at the end :
10.00
£
5.00
TOK
2.00
1
PAYOUT COMPLETE
TOK.:
10
To stop the dispensing in progress, press STOP twice.
If you need only hold dispensing for a while, press STOP once; then press START to resume it.
If the entered amount does not correspond exactly to an integer number of Tokens, the display
will show the remaining credit R, corresponding to the backchange
15.00
£
R 1.00
that must be returned to the Customer. For instance, if 15£
7
TOK
have been entered, the following information will appear:
(N.B.: the remaining credit will not be recorded among the registered Accounts).
This is the case when it would be helpful to have connected the automatic opening circuit to an
external service till (see section 8.2.2): the small change will then be at hand.
8.4.3
BONUS CALCULATION:
if one or more levels of bonus have been set, the display will show the total
number of Tokens that will be dispensed. For instance, supposing that the Token 10.00 £
6
TOK
value has been set as 2£, and the bonus has been set to 1 Token when totalizing
10 £: as 10 is entered by the keypad, the following message appears:
ACTIVATION IN ‘TOKEN’ MODE:: if one or more levels of bonus have been set, and a non consistent
number of Tokens is eneterd, the display will warn the Operator by the symbol
5
??
TOK
“??”, and shows the actual number of Tokens that will be dispensed.
10.00
£
When pressing START, the unit will dispense the total number of Tokens,
including the bonus lot.
ACTIVATION IN ‘£’ MODE:
8.4.4 CUSTOMER DISPLAY :
During activation, the following messages get displayed:
TOK/£
TOK
£
Stand-by
During dispensing
DISPENSER
TOKENS
IN SERVICE
1
DISPENSER
£
IN SERVICE
2
9.
Configuration
9.1
SURF THE MENU
…
…
TOKENS
2
£
4
End of dispensing
……..
……..
TOKENS
5
TOKENS
10
Insert the Master Key in the Reader: it will lit up in green and the buttons as well. The
Manager/Cashier 1 Key can access only to Partial Accounts, by pressing twice the OK button.
To explore the Menu and change data, make use of buttons S+ and/or S-.
To confirm the desired option, press the OK button.
To exit the Menu(s), press repeatedly S+ or S- until EXIT shows up, then confirm by OK.
Remove the key then.
16
6
9.2
MENU STRUCTURE
11:59
16/01/2013
OK
Insert Master Key
(black)
SHOW
PERIFER. UNITS
EXIT
MENU
S-
S+
DISPLAY
ACCOUNTS
S+
RESET
ACCOUNTS
PIN is required
to reset Totals
S+
MANUAL
REFILL
S+
SET UP
PERIPHERAL UNITS
S+
EMPTY THE
HOPPERS
S+
RESET TO
DEFAULT CONFIG.
S+
BONUS
Available only when unit has been set
to “Change to TOKENS” (see section
7.6)
S+
SET UP
LANGUAGE
OK
EXIT
MENU
S+
S+
S+
CHANGE PIN
N.B.: access to some menu areas is protected by PIN code.
17
9. 3
SHOW PERIPHERAL UNITS
This menu allows to check the state of the PERIPHERAL UNITS, for instance:
SHOW PERIPHERAL
UNITS
9. 4
Touch
OK
HOPPER 1
EMPTY
Touch
S+
DISPLAY CCT1
CONNECTED
….
ecc. ecc.
DISPLAY ACCOUNTS
This section shows the partial amounts and the total amounts of the money cashed in (or better said,
the values entered by the numeric touchpad), as well as the dispensed values. It shows also the same
data relevant to each one of the 4 Cashiers.
SHOW
ACCOUNTS
RESET
Touch
S+
ACCOUNTS
Touch
OK
Touch
OK
Total in
00,00 €
Touch
S+
Touch
S+
Partials in
00,00 €
Touch
S+
Total out
00,00 €
Partials out
0,00 €
Touch
S+
Cashier N. 1
0,00 €
Total in
00,00 €
Touch
OK
Partials in
00,00 €
Touch
S+
Touch
S+
Touch
S+
Cashier N. 2
0,00 €
Touch
OK
Touch
S+
….
Partials in
00,00 €
Touch
S+
Partials out
0,00 €
Touch
S+
….
Total out
00,00 €
Touch
S+
Partials out
00,00 €
Touch
S+
Total in
00,00 €
….
Touch
S+
Exit
Cashier N. 3
0,00 €
Touch
S+
Touch
S+
Cashier N. 4
0,00 €
….
Uscite totali
Touch
S+
….
Partials out
00,00 €
Touch
OK
Touch
S+
Touch
S+
Total out
00,00 €
Touch
S+
NOTA: when resetting the Accounts data by the Master Key, this one
automatically retrieves all of them. The Master Key can contain up to 7
downloads, from the same unit of from different units. By the ACS software
and the PC-interface (K-P4N000007), the data contained in the key can be
retrieved on a PC where they can be filed and if necessary worked out.
Original .txt format is downloadable as speadsheet (es. Excel).
18
Partials in
00,00 €
Interfaccia
per PC
K-P4N000007
9. 5 RESET OF ACCOUNTS DATA
By this function all the Accounts records can be reset. You will be prompted for your PIN code
when you will try to reset the total amounts.
RESET
ACCOUNTS
Touch
OK
Exit
Touch
OK
Touch
OK
Delete
Total Amounts
Touch
S-
Touch
OK
Total amounts
deleted
Touch
S+
Touch
S+
Touch
S+
Touch
S+
Touch
OK
Touch
OK
Touch
OK
Touch
OK
Delete
Partial Amounts
Touch
S+
Touch
S+
Touch
OK
(*)
Enter PIN
(*) Increase value by S+ (or
decrease it by S-) to obtain
the wished amount, then
confirm by OK. Do not use
the numeric keypad.
Partial amounts
deleted
_
Exit
9. 6 MANUAL REFILL
This section allows to enter the number of Tokens that have been poured into the Token Dispenser,
so as to keep the Accounts data updated.
This permits as well to check the amount of Tokens available in the unit. To check it during normal
operation, just touch the S- button while the Cashier Key is inserted in the RFID reader.
MANUAL
REFILL
Refill Hopper 1
Touch
OK
Touch
OK
Tokens
poured in:
0
Touch
S+
Tokens
poured in:
Touch
S-
Touch
OK
10
Touch
S-
When touching the S+ button, quantity goes 10 units up; touch repeatedly until reaching the desired
figure (max. available is 2500 units). If the S+ button is mantained pressed, the count-up will be as
fast as 100 units/second (2500 units in 25 seconds).
The count-up starting point corresponds to the Tokens remaining from the latest dispensing.
9. 7 SET UP OF THE PERIPHERAL UNITS
It is possible to configurate by this menu the value of the Tokens, to initialize the Cashiers RFID
Keys, to attribute an identifying number to the equipment, and to set up time and date.
SET UP
PERIPH. UNITS
EMPTY THE
DISPENSERS
Touch
S-
(*) Increase value by steps of
0,05€, by touching S+ (or
decrease it by S-) to obtain
the wished amount, then
confirm by OK. Do not use
the numeric keypad.
Touch
OK
Set up
Dispense mode
(*)
Touch
OK
Set up Token
value : 1,00 €
Touch
OK
(**)
Set up
Machine Code
Touch
OK
Enter Code:
(0-250)
Touch
S+
Touch
OK
(**) Make use of S+ to find the
value, then validate by OK.
Touch
S+
Touch
S+
Take note of
Code
16 / 01 / 2013
Wed 12:41
Touch
OK
….
Touch
OK
Time and Date
Touch
OK
15 / 01 / 2013
Wed 12:41
Touch
S+
Touch
OK
Touch
OK
Exit
16 / 01 / 2013
Wed 12:41
Touch
OK
Touch
OK
16 / 01 / 2013
Wed 09:16
…
.
16 / 01 / 2013
Wed 12:41
19
9.8
EMPTY THE DISPENSER
Enter the menu by the OK button, the message
Empty the
Note Dispenser 1
will appear. Press OK to start
depleting, then press again OK after the total of dispensed pieces has been displayed.
EMPTY THE
DISPENSER
Touch
OK
Empty Hopper 1
Touch
S+
Touch
OK
Exit
Touch
OK
Touch
OK
9.9
Empty Hopper 1
Total:
xxxx,xx
RESTORE DEFAULT CONFIGURATION
The PIN code must be entered to be able to carry out this operation, that will restore all default
parameters:
RESTORE
DEFAULT CONFIG.
Touch
OK
(*) Increase value by S+ (or
decrease it by S-) to obtain
the wished amount, then
confirm by OK. Do not use
the numeric keypad.
(*)
Enter PIN
0
Touch
S+
Touch
S+
Touch
S+
Touch
S+
Touch
OK
Touch
OK
Touch
OK
Touch
OK
Once entered the PIN code, the following message will be
displayed, then the equipment goes back to stand-by condition.
Default Config.
restored
11:59
Exit Menu
in progress…
If wrong PIN is entered, the following warning appears:
16/01/2013
Wrong PIN
The User is allowed to enter the wrong PIN up to 4 times; after the 5th wrong attempt, the machine
will switch to security block mode. In this case call the Alberici Support Service (tel. 051 944300).
Notice: restoring DEFAULT CONFIGURATION resets the PIN code back to default value 0000.
The registered Accounts data will remain in memory.
9.10
BONUS
Bonus function is disabled by default. The unit allows up to 10 levels of bonus: the purchase
threshold value of each bonus level, as well as the value of the prize given when such purchase
threshold is reached, can be set up as per the following example, in which the Token value is
assumed as having been set as 1 € (see Section 7.6):
20
(*)
BONUS
Bonus
ENABLE?
Touch
OK
Touch
OK
LEV
<EURO> BONUS
0
1
1
Touch
S+
Touch
S+
(*) Touch S+ to
modify the value of
the pinpointed data
Bonus
DISABLE?
Touch
OK
LEV
0
<EURO> BONUS
2
2
Touch
S+
Touch
S+
LEV
<EURO> BONUS
(*)
0
3...4..5
5
Touch
OK
Bonus settings
In progress
LEV
<EURO> BONUS
2
5
6
Touch
S+
LEV
2
Touch
OK
LEV
Touch
OK
LEV
EURO <BONUS>
1
5
6
Touch
OK
LEV
Touc
h
S+
LEV
1
5
5
Touch
S+
<EURO> BONUS
6..7…10
6
2
EURO <BONUS>
10
12
2
EURO <BONUS>
10
13
Touch
OK
IN CASE OF ANY MISTAKE,
just confirm the wrong
data, and re-program them from the start.
Touch
OK
N.B.: the programmed bonus will be maintained even if the activation mode
is changed from “enter number of Tokens” to “enter amount in £” and
viceversa.
9.11
EURO <BONUS>
LEV <EURO> BONUS
3
10
12
TOK
£
SET UP OF LANGUAGE AND CURRENCY
When entering this function, the default language will be displayed. Use S+ to highlight the option,
and press OK. The system will switch to the chosen language, and the display will prompt for
choosing the currency to operate with (£ GBP or € Euro).
SET UP
LANGUAGE
Touch
OK
Select Language
ITALIANO
Touch
S+
Touch
OK
Set up currency:
EURO
Touch
OK
9.12
Select Language
ENGLISH
Touch
OK
Touch
S+
Set up currency:
GBP
Touch
OK
MODIFY PIN
The security PIN code allows to get access to the sensitive Menus.
The PIN is made up by 4 digits (from 0 to 9), whose combinations sum up to 10.000 results.
The User is allowed to enter the wrong PIN up to 4 times; after the 5th wrong attempt, the machine
will switch to security block mode. I this case call the Alberici Support Service (tel. 051 944300).
21
PAY ATTENTION: default PIN Nr. is 0000. Change it to your chosen one as soon as you can.
Your PIN code gives you access to the following Menus:
PIN MODIFICATION
-
RESET OF ACCOUNTS TOTAL AMOUNTS
DEFAULT CONFIGURATION
-
RESTORE
To modify the existing PIN, highlight the PIN icon and press OK: you will be prompted as follows:
To digit each digit of the PIN code, use keys S+ and S- to set the digit, then confirm it by OK. The
pointer will shift to the following digit.
Once the 4th figure has been confirmed, you will be prompted to enter your new PIN:
GESTIONE PIN
Touc
h
Touch
S+
Inserire PIN
0
Inserire PIN
*0
Touch
OK
Touch
S+
Nuovo PIN
0
Inserire PIN
*0
Touch
OK
Touch
S+
Touch
OK
Touch
S+
Touch
OK
…
.
Inserire PIN
***0
…
.
Inserire PIN
***0
Touch
S+
Touch
OK
Touch
S+
Touch
OK
use keys S+ and S- to set the digit, then confirm it by OK. The pointer will shift to the following
digit. Once the 4th figure has been confirmed, press OK to store it.
As every single figure gets confirmed, an asterisk takes its place, so preserving secrecy.
Once the new PIN has been recorded, the machine will return to the Configuration Menu.
Notice: restoring DEFAULT CONFIGURATION resets the PIN code back to default value 0000.
9.13
EXIT MENU
Press OK to set the machine back to stand-by mode.
11:59
Exit Menu
in progress
Touc
h
EXIT MENU
16/01/2013
10. Messages
If this warning appears
the state of the system gets also displayed, i.e.:
CASH ONE
OUT OF SERVICE
CASH ONE
OUT OF SERVICE
HOPPER 1
CONNECTED
HOPPER 1
disCONNECTED
22
%
HOPPER 1
CONNECTED
Hopper is connected
and correctly operating
Hopper has not
Been detected
%
HOPPER MONETE 2
diswCONNECTED
HOPPER 1
IN ERROR
HOPPER 1
EMPTY
%
DISPLAY CCT 1 2
CONNECTED
% …….
Hopper is connected
but operation is defective
Hopper is connected
but empty
11. Maintenance
It might be necessary to remove the dispensing hopper from its compartment, to carry out cleaning
or servicing.
b
Do as per instruction below:
c
a
1. Turn the security key (a) of the plexy
cover of the compartment.
2. Drag the plexy cover (b) out.
3. Put two fingers in the grabbing holes (c)
d
f lato
opposto
preset in the metal frame: lift up the
framework and remove it.
4. Move the hopper (d) towards the console side
for about 2 cm, until finding the release
e
position from the basement support (e)
then lift up the hopper and remove it.
5. Disconnect the two yellow-green wires (f)
Senso di slittamento hopper
To re-locate the hopper, follow backward the above instructions.
When the hopper is out of its compartment, all the remaining opearting parts of the equipement are
easily accessible and serviceable.
12. Disposal of the product
WARNING! DISPOSE OF ACCORDING TO THE GOVERNING LAW
IN YOUR COUNTRY!
This equipment may not be treated as household waste. Instead, it must be
handed over to the applicable collection point for the recycling of electric and
electronic equipment.
By ensuring that this product is dised of correctly, you will help to prevent
potential negative consequences for the environment and human health, which
could otherwise be caused by inappropriate waste handling of this product.
For more detailed information about recycling of this product, please contact the
Dealer where you purchased this product.
13. Terms of Guarantee
The manufacturer will fix malfunctions arising from production faults in this machine or parts of it within 12 months
from the date of sale.
All communications referring to guarantee repairs or replacements must be accompanied by the product serial number
and the copy of the sale invoice.
To obtain your guarantee repair, please send the part to the Dealer where you purchased the machine, together with the
following documents:
- copy of the sale invoice
- delivery note stating “returned for guarantee repair”
- detailed report of the problem found and the circumstances in which it occurs.
Before sending the product back, please get in touch with your Dealer or with Alberici S.p.a. (+39 051 944300); very
malfunctions can be fixed via a simple phone call, saving you costs and time.
Alberici S.p.a. will verify that warranty is applicable, i.e. that problem is not caused by:
23
- transport damages
- damages from incorrect installation or wrong configuration
- installation in premises or areas not complying with the prescribed safety requirements
- intentional or unwilled tampering
- wrong or careless use or maintenance
- non-compliance with precautions prescribed (see Chapter 4. Caution)
- natural disasters, vandalisms, intentional or unintentional damage
Guarantee is considered automatically expired if outer and inner labels are missing.
Transport costs of repaired products are at the Customer’s charge.
14. Customer Service
Alberici S.p.a. will be pleased to offer all the necessary information on use, ordinary maintenance and technical service.
Please call (+39) 051 944300 and specify if your request concerns information on use or technical support.
24
NOTA
La Alberici S.p.A. si riserva il diritto di apportare modifiche alle
specifiche tecniche dell’apparecchiatura descritta in qualunque momento e senza preavviso,
nell’ambito del perseguimento del miglioramento continuo del proprio prodotto.
25
®
Via Ca’ Bianca 421
40024 Castel San Pietro
Terme (BO) – ITALY
26
Progettazione e produzione di sistemi di pagamento, accessori per videogames e macchine vending
Design and manufacture of payment systems, accessories for videogames and vending machines
Tel. + 39 051 944 300
Fax. + 39 051 944 594
http://www.alberici.net
[email protected]


![BSC3取扱説明書[PDF:1.4MB]](http://vs1.manualzilla.com/store/data/006720589_3-75a4c2de445e4bfe085468716b2061ba-150x150.png)