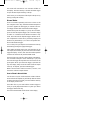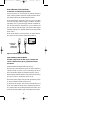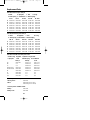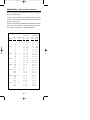
1
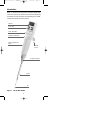
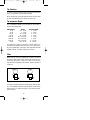
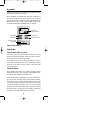
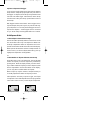
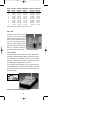
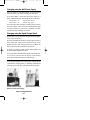
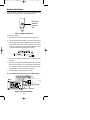
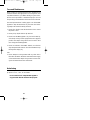
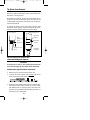
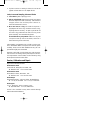
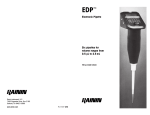
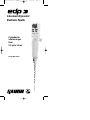
9920-235 Rev C GENERIC
9/13/00
3:16 PM
™
Advanced Ergonomic
Electronic Pipette
8 pipettes for
volume ranges
from
0.5 µL to 10 mL
200 µL EDP3 shown
Page 1
9920-235 Rev C GENERIC
9/13/00
3:16 PM
Page 2
TABLE OF CONTENTS
Introduction ...............................................................1
Unpacking.................................................................2
Set Up / Initial Charge ...............................................2
Rapid Charge Stand ..................................................2
Tip Selection ..............................................................3
Tip Immersion Depth ..................................................3
Filter .........................................................................3
Operation .................................................................4
Pipet Mode................................................................4
Multidispense Mode ...................................................5
Manual Mode............................................................6
Options.....................................................................8
Speed .......................................................................8
Pipet and Mix ............................................................9
Cycle Counter............................................................9
Charging using the Wall Power Supply .....................10
Charging using the Rapid Charge Stand....................10
Replacing the Battery................................................11
Care and Maintenance.............................................12
Autoclaving .............................................................12
Tip Ejector Arm Removal ..........................................13
Troubleshooting and Repairs.....................................13
Service, Calibration, and Repair ...............................14
Replacement Parts....................................................15
Specifications ..........................................................16
EC Declaration ..................................Inside Back Cover
Contacting Rainin........................................Back Cover
FIGURES
Figure 1
Figure 2
Figure 3
Figure 4
Figure 5
Figure 6
Figure 7
Figure 8
200 µL EDP3 Pipette ...................................1
Filter Orientation........................................3
EDP3 Interface ...........................................4
Measuring Unknown Volume ......................7
Charging Devices.....................................10
Battery Compartment................................11
Replacing the Battery................................11
Removing the Tip Ejector Arm ...................13
EDP3 is a trademark of Rainin Instrument Company, Inc.
©1999-2000, Rainin Instrument Company, Inc. All rights reserved. EDP3
Pipettes are manufactured under U.S. Patents. 4,671,123, 4,905,526,
5,187,990, and 5,614,153. Other U.S. and international patents pending.
9920-235 Rev C GENERIC
9/13/00
3:16 PM
Page 3
Introduction
EDP3 is a motorized microprocessor-controlled pipette with
advanced operational features that eliminate pipetting
inconsistencies and eliminates most pipetting forces. EDP3
controls and features are shown below.
DISPLAY
4-KEY PAD
DUAL TRIGGERS
TIP EJECTOR BUTTON
IMPACT-RESISTANT
BODY
FINGER
HOOK
TIP EJECTOR ARM
SHAFT
TIP
Figure 1
200 µL EDP3 Pipette
1
9920-235 Rev C GENERIC
9/13/00
3:16 PM
Page 4
Unpacking
The EDP3 package should contain:
1. EDP3 Electronic Pipette
2. Operator Manual
3. Quick Reference Guide
4. Performance Check
Report/Warranty Card
5. Sample Tips
If ordered, the Wall Power Supply or the Rapid Charge
Stand will be in a separate box.
Unpack and check the contents against this list. If anything is
missing, call Technical Service: 800-543-4030.
If any damage is evident, file a claim with the shipping
carrier, who is responsible for damage incurred in transit. Save the shipping packages if you file a claim.
Set Up / Initial Charge
EDP3 is shipped with the battery charged. However, the
pipette may have been stored before being delivered to you,
so you should charge it for about 15 minutes initially – you
can use EDP3 while it is being charged.
Connect the wall power supply to a power outlet matching
the line voltage printed on the label:
120VAC 60Hz US
240VAC 50Hz UK
220VAC 50Hz Europe
100VAC 50Hz Japan
Connect the other end of the cord to the power socket on the
back of EDP3. After 15 minutes the pipette will be charged
enough for a typical day’s pipetting, and fully charged after
approximately 60 minutes.
While the pipette is connected to the charger, the display
will show a “lightning” symbol in the top right corner. This
symbol will flash while charging.
Rapid Charge Stand
E3-RCS Rapid Charge Stand will charge three EDP3 pipettes,
one at a time, in sequence.
With only one EDP3 on the stand, charging will proceed as
if the wall power supply were connected directly to the
pipette. However, when charging more than one EDP3, the
first one placed on the stand will be charged first.
To charge a particular pipette, remove other pipettes and
place the desired pipette in the stand.
Refer to page 10 for more information.
2
9920-235 Rev C GENERIC
9/13/00
3:16 PM
Page 5
Tip Selection
To ensure proper, leak-free fit and conformance to specifications, use only Rainin tips with EDP3 pipettes.
When loading tips, press the EDP3 shaft into the end of the
tip with only sufficient force to make a positive seal.
Tip Immersion Depth
The recommended depth for tip insertion into the sample is
shown in the table below.
EDP3 Volume
10 µL
20 µL
100 µL
200 µL
1000 µL
2000 µL
5000 µL
10 mL
Range
0.5 - 10 µL
2 - 20 µL
10 - 100 µL
20 - 200 µL
100 - 1000 µL
200 - 2000 µL
500 - 5000 µL
1mL - 10 mL
Immersion Depth
1 - 2 mm
2 - 3 mm
2 - 3 mm
2 - 4 mm
2 - 4 mm
3 - 6 mm
6 - 10 mm
6 - 10 mm
Tip immersion depth is important. If these depths are
exceeded, the volume measured may be inaccurate, possibly out of specification. Tip angle is also important. Hold the
pipette vertically, or within 20 degrees of vertical.
Filter
EDP3 5000 µL and 10 mL pipettes use a filter in the end of
the shaft to help prevent liquid entering the shaft and contaminating the piston. Using such a filter is particularly
important when pipetting large volumes. Replace the filter if
it gets wet.
Figure 2 Filter Orientation
For 5000 µL pipettes insert the small diameter into the shaft,
for 10 mL pipettes insert the large diameter into the shaft.
Filter part nos. are: 6190-164 (pack of 100) and 6190-165
(pack of 1000).
3
9920-235 Rev C GENERIC
9/13/00
3:16 PM
Page 6
Operation
Before initial operation you should charge EDP3 for about
15 minutes as described on page 2.
Before pipetting for the first time, take time to familiarize
yourself with the key functions, and practice scrolling
through the modes and options. If this is the first time the
EDP3 pipette is used, it will default to PIPET mode. If not,
press the MODE button until PIPET shows on the LCD.
LCD (Liquid
Crystal Display)
MODE KEY
UP ARROW
RESET KEY
DOWN ARROW
DUAL-ACTION
TRIGGERS
Figure 3 EDP3 Interface
Pipet Mode:
Select Volume with Arrow Keys
The ARROW keys only operate when the piston is at zero
point ready to pick up sample. The DOWN ARROW reduces,
and the UP ARROW increases, the volume.
Touch either ARROW key to change volume by one increment. Press and hold the ARROW key: the volume changes
while you hold down the key, slowly at first then with
increasing speed.
Volume Scrolling
While pressing the ARROW key, note the changing volume
setting pauses at 75%, 50%, and 25% of the pipette’s nominal volume, then continues at the faster rate.
At maximum volume, pressing the UP ARROW causes the display to roll over and begin again at the minimum volume.
Pressing the DOWN ARROW at the minimum volume rolls
over to the maximum volume. This means you can rapidly
change the volume from high to low or vice versa without
having to scroll the entire volume range. If you are scrolling
through volumes, the display pauses briefly at either the
maximum or minimum volume before it rolls over.
4
9920-235 Rev C GENERIC
9/13/00
3:16 PM
Page 7
Aspirate or Dispense with Trigger
Once you have set the volume you wish to aspirate, immerse
the tip into the sample the proper depth and press either of
the triggers. To dispense, touch the tip end against the vessel
side wall. Press either trigger. After blowout, remove the tip
from the vessel. Then press the tip ejector button to discard
the used tip.
Both triggers have the same function. Press a trigger once to
aspirate sample, then press it again (or press the other trigger) to dispense. You can even press both triggers at once to
aspirate and dispense – use the trigger which is convenient
for you. Note: Always use the pipette within 20° of vertical.
Multidispense Mode:
1. Select Aliquot Volume with Arrow Keys
Press MODE button repeatedly until PICKUP MULTI shows on the
LCD. Press either ARROW key to set aliquot size. EDP3 automatically computes the number of aliquots that can be dispensed and shows the number in the lower left of the display.
EDP3 aspirates the maximum volume of sample needed. To
ensure accuracy on the last aliquot, EDP3 always picks up
slightly more sample than will be pipetted.
Or:
2. Select Number of Aliquots with RESET/ARROW Keys
Press either ARROW key to set aliquot size. Then set the total
number of aliquots you wish to dispense by momentarily
pressing RESET. When the display flashes, press the ARROW
key to set the number of aliquots you wish to dispense. (Note
that it is impossible to increase the number on the display,
you can only select a smaller number of aliquots).
EDP3 will pick up only the amount of sample necessary to
accurately dispense the number of aliquots you select.
After aspiration, each time you press a trigger, one aliquot
is dispensed. Touch off the droplets from each tip against the
vessel wall to ensure accuracy as each aliquot is dispensed.
Multidispense: Pickup
Multidispense: Dispense
5
9920-235 Rev C GENERIC
9/13/00
3:16 PM
Page 8
The counter will count down to zero and RESET will flash on
the display. Press the reset key or double-click either trigger
to expel the extra liquid remaining in the tip.
In this mode you can dispense all the liquid in the tip at any
time by pressing the reset key.
Manual Mode:
Press MODE button repeatedly until MANUAL shows on the
LCD. Using the ARROW keys, select the maximum sample size
you wish to pipette. The first trigger you actuate is the ASPIRATE trigger and the other becomes the DISPENSE trigger.
Immerse the tip into the sample. To pick up the set volume,
press and hold the aspirate trigger. This causes the display
to reset to “0” and then increase until the set volume is aspirated. Press and hold the dispense trigger until the set volume is dispensed. To blow out any remaining sample press
the RESET key momentarily or, if at the HOME position double-click the DISPENSE trigger.
You can also pick up or dispense one increment at a time by
momentarily pressing the appropriate trigger.
After setting maximum sample size and immersing the tip
into sample, the first time you press and release the ASPIRATE
trigger the display will zero, then show the smallest possible
increment of volume for the particular EDP3 model.
Then each time you press the ASPIRATE trigger momentarily,
one increment of sample is drawn into the tip: If you press
and hold the trigger the aspiration rate will increase to the
preset speed. When you release the trigger, aspiration will
stop. The display always reads the actual amount of sample
in the tip. To dispense, press the DISPENSE trigger.
EDP3’s manual mode is ideal for TITRATION, DILUTION, and
MEASURING unknown sample volumes.
How to Titrate in Manual Mode
Use the ARROW keys to set the maximum volume of titrant.
Press and hold the aspirate key to fill the tip with set volume
of titrate. When the tip is filled, press and hold the reset key
so the display resets to zero.
Then either click or press and hold the DISPENSE trigger to
slowly or rapidly dispense the titrant. Any time you release
the trigger, titration will stop.
The actual volume titrated will be shown on the display.
6
9920-235 Rev C GENERIC
9/13/00
3:16 PM
Page 9
How to Measure in Manual Mode
To determine an unknown liquid volume:
In MANUAL mode, you can MEASURE an unknown volume of
liquid. Set the pipette’s maximum volume with the ARROW
key. Immerse the tip the into the unknown volume.
Press either trigger: the display will set to zero and then
increase while you hold the trigger, and EDP3 will begin
aspirating. Click or press the trigger until the complete volume to be measured is inside the tip. If you overshoot and
pick up some air after the liquid, just click the other trigger
(DISPENSE) until the air is expelled and the liquid is level with
the tip orifice.
When all the liquid is in the tip with no air visible, the display shows the exact volume of the liquid picked up.
1. Pick up an
unknown
volume until
it is all in tip
2. Display shows
the volume
Figure 4 Measuring Unknown Volume
How to Dilute in Manual Mode
Example: Using E3-200 to dilute 20 µL of sample with
100 µL of diluent with 10 µL air gap between sample
and diluent.
Set the maximum volume with the ARROW keys.
Place the tip in the diluent and press one of the triggers to
aspirate 100 µL of liquid. If you accidentally pick up too
much use the other trigger to adjust the volume to 100 µL.
Remove the tip from the diluent and press the aspirate key to
pick up 10 µL of air. The display shows 110 µL.
Place the tip in the sample and press the aspirate key to pick
up 20 µL of sample. Display reads 130 µL.
To dispense the sample and diluent, momentarily press
RESET. The contents of the tip will be dispensed into the ves-
sel, and the piston will go through blowout and reset to zero
ready for the next sample pickup. The display reads 200 µL.
7
9920-235 Rev C GENERIC
9/13/00
3:16 PM
Page 10
Alternate Dilute method: with EDP3 showing each volume
Set the maximum volume with the ARROW keys.
Place the tip in the diluent and press one of the triggers to
aspirate 100 µL of liquid. If you accidentally pick up too
much use the other trigger to adjust the volume to 100 µL.
Press and hold RESET until the display reads 0 µL. Remove
the tip from the diluent and press the aspirate key to pick up
10 µL of air.
Press and hold RESET until the display reads 0 µL. Place the
tip in the sample and press the aspirate key to pick up 20 µL
of sample.
To dispense the sample and diluent, momentarily press
RESET. The contents of the tip will be dispensed into the ves-
sel, and the piston will go through blowout and reset to zero
ready for the next sample pickup. The display reads 200 µL.
Options
Options available for each mode:
PIPET:
SPEED, MIX, CYCLE COUNT
SPEED
MULTIDISPENSE:
MANUAL:
SPEED, CYCLE COUNT
Access the OPTION menu in any mode by pressing and holding the MODE key until the display changes (11⁄2 seconds).
The display shows the last option selected. To scroll through
the option menu press the MODE key momentarily.
Turn options on or off with the arrow keys. To lock options in
memory press RESET or a trigger. This action locks all options
in memory. Pressing a trigger starts the cycle as well.
SPEED:
Separate SPEED settings are available for each mode (see
chart on inside back cover). Select a speed between 1 and
10 using the arrow keys. High speeds (9 or 10) are best for
aqueous samples and slower speeds are useful for viscous,
foaming or shear-sensitive samples.
Speed option
8
9920-235 Rev C GENERIC
9/13/00
3:17 PM
Page 11
Speed Full-scale Full-scale Delay before Blowout Hold at end
Setting Pickup
Dispense Blowout
Duration (constant)
10
9
8
7
6
5
4
3
2
1
0.7 sec
1.0 sec
1.5 sec
1.9 sec
2.4 sec
2.8 sec
3.2 sec
3.8 sec
4.5 sec
5.3 sec
0.7 sec
1.0 sec
1.5 sec
1.9 sec
2.4 sec
2.8 sec
3.2 sec
3.8 sec
4.5 sec
5.3 sec
0.0 sec
0.4 sec
0.6 sec
0.8 sec
0.9 sec
1.1 sec
1.5 sec
1.7 sec
1.9 sec
2.5 sec
0.13 sec
0.22 sec
0.30 sec
0.38 sec
0.50 sec
0.32 sec
0.58sec
0.69 sec
0.80 sec
1.04 sec
1.0 sec
1.0 sec
1.0 sec
1.0 sec
1.0 sec
1.0 sec
1.0 sec
1.0 sec
1.0 sec
1.0 sec
Speed Setting Table applies to EDP3 in PIPET MODE.
PIPET
&
MIX:
Available in PIPET mode. Turn on
using ARROW keys. With sample
in the tip, immerse tip into the liquid you wish to mix with the sample. Press and hold the trigger.
Liquid is rapidly dispensed and
aspirated in and out of tip. When
mixing is complete, release trigger and remove tip from liquid.
Mixing two solutions
CYCLE COUNTER:
Available in PIPET mode and MANUAL mode. When on, the
last sample number pipetted appears in the lower left corner of the display. The display counts up to 99 and then
returns to 0. Reset the counter to 0 at anytime by pressing
and holding RESET until the display reads 0.
It is possible to start the display at any sample number. If
you momentarily press RESET the sample number will flash.
Then use the ARROW keys to set any sample number you
wish to start with.
Display shows last sample pipetted (in photo)
9
9920-235 Rev C GENERIC
9/13/00
3:17 PM
Page 12
Charging using the Wall Power Supply
The Li-Ion battery in the EDP3 pipette will provide about
3000 full-stroke cycles before needing to be recharged.
To recharge EDP3, connect the wall power supply to a
power outlet matching the line voltage printed on the label:
120VAC 60Hz US
240VAC 50Hz UK
220VAC 50Hz Europe
100VAC 50Hz Japan
and connect the other end of the cord to the power socket on
the back of EDP3. After 15 minutes the instrument will be
charged enough for a typical day’s pipetting, and fully
charged after approximately 60 minutes.
Charging using the Rapid Charge Stand
E3-RCS Rapid Charge Stand will charge three EDP3 pipettes,
one at a time, in sequence.
With only one EDP3 on the stand, charging will proceed as
if the wall power supply were connected directly to the
pipette. However, when charging more than one EDP3, the
first one placed on the stand will be charged first.
To charge a particular pipette, remove other pipettes and
place the desired pipette in the stand.
It is a good idea to store the EDP3 pipette on the stand when
it is not in use. This practice will provide a safe storage
place, and the EDP3 will always be fully charged.
Note: no charging takes place if the EDP3 pipette has
reached approximately 90% of its charging capacity. While
connected to a charging device, a “lightning” symbol shows
in the top right corner. This symbol flashes while charging.
E3-WPS Wall Power Supply
EDP3 can be used while charging
E3-RCS Rapid Charge Stand
Figure 5 Charging Devices
10
9920-235 Rev C GENERIC
9/13/00
3:17 PM
Page 13
Replacing the Battery
Open the battery compartment by pushing upward with your
thumb on the grooved area of the compartment door.
Push upward
with thumb
on grooved
area
Figure 6 Battery Compartment
To change the battery:
1. Disconnect the connector and take the old battery out.
2. Connect the replacement battery plug to the keyed socket
in the battery compartment of EDP3. A label in the battery
compartment shows the correct orientation of the plug
when connected properly. It is helpful to bend the wires
as shown below before making the connection.
3. You will hear the EDP3 set itself to zero as you plug in the
connector.
4. Place the new battery in position between the retaining
walls. Make sure the wires are not trapped under the battery; fold them between the battery and the end of the
compartment, as shown below in the diagram.
5. Slide the battery compartment door closed.
Lay wires between battery and this wall when installing battery
Battery
Connector
Red wire
Black wire
Figure 7 Replacing the Battery
11
9920-235 Rev C GENERIC
9/13/00
3:17 PM
Page 14
Care and Maintenance
EDP3 pipettes are sophisticated laboratory instruments and
should be treated with appropriate care. Designed to need
very little maintenance, your EDP3 should give years of trouble-free service provided it is treated with proper care and
the operating recommendations in this manual are followed.
The most important factor in taking proper care of the EDP3
pipette is to keep the mechanism dry and clean. The following simple rules should be strictly observed.
1. Never allow liquid to enter the shaft where it can contact
the piston or seal.
2. Never pick up liquid without a tip attached.
3. Never invert the EDP3 pipette or lay it on its side with liquid in the tip. Always hold it upright and store it upright if
possible. The Rapid Charge Stand can be used to hold
(and charge) three EDP3 pipettes.
4. Never use solvents to clean EDP3. Instead, use a lint-free
wipe dampened with water to clean the instrument. Keep
the keyboard display dry.
Also:
5. Never attempt to recharge EDP3 with any other device
than either the Rainin Model E3-WPS Wall Power Supply
or the Model E3-RCS Rapid Charge Stand. Severe damage to the internal electronics would result.
Autoclaving
Autoclavable parts of the Model EDP3 are the shaft and the
tip ejector: 121°C, 1 bar, 15-20 minutes.
Do not autoclave the complete EDP3 pipette or
any parts other than the shaft and the tip ejector.
12
9920-235 Rev C GENERIC
9/13/00
3:17 PM
Page 15
Tip Ejector Arm Removal
The tip ejector can be removed if necessary. Two types of tip
ejector are used and both types can be removed with minimum effort—do not use force.
For models up to 2000 µL, press in the quick-release tabs on
the ejector arm and pull the ejector down. For 5000 µL and
10 mL pipettes, grasp the top of the ejector arm and pull outward then downward.
To replace the ejector arm on all models, insert the shaft
through the large opening, align the top with the tip ejector
pushrod, and push until the ejector arm snaps in place.
Up to 2000 µL
5000 µL and 10 mL
Push
Ejector Arm
QuickRelease in
Pull Ejector Arm
down
Tip Ejector
Pushrod
Pull Ejector
Arm out
Pull Ejector
Arm down
Figure 8 Removing the Tip Ejector Arm
Troubleshooting and Repairs
WARNING:
On models from 10–200 µL , when removing the shaft from the
body, ensure the spring, seal and o-ring do not fall off the piston.
Sample Splash (liquid inside the mechanism)
1. Refer to Figure 8 to remove the tip ejector arm.
2. Unscrew the shaft coupling and carefully remove the
shaft. Note how the parts fit onto the piston.
(Note that the seal retainer is captive on 1000 µL and larger models)
3. Inspect the seal assembly and piston for contamination.
The piston should be shiny and free of corrosion. Clean
with distilled water or isopropyl alcohol. Dry with a lintfree tissue and reassemble after inspecting the interior of
the shaft for any contamination.
13
9920-235 Rev C GENERIC
9/13/00
3:17 PM
Page 16
4. If piston corrosion or staining is evident, do not use the
pipette. Call 800-662-7027 for Pipette Service.
Leaks, Inaccurate Sampling, Abnormal Stroke
1. Loose shaft. Tighten coupling by hand.
2. Split or cracked shaft. Remove the tip ejector and inspect
the shaft. Replace the shaft if necessary. If the shaft was
dropped, remove it to see if the piston is bent. If so,
return the instrument for service.
3. Worn seal and/or o-ring. All models incorporate a
polyethylene seal and o-ring. Check the seal and o-ring,
replacing them as necessary. To replace, pull off the old
seal and o-ring, position the new seal and o-ring on the
piston assembly, and reassemble the pipette.
Do not lubricate any components*. EDP3 has a dry seal
(*except for 5000 µL and 10 mL models, which use a
small amount of grease on the seal).
After pipetting concentrated acids or highly corrosive solutions, disassemble EDP3 and inspect and clean the piston
assembly, shaft, and seal with distilled water. Dry all components thoroughly and reassemble.
Extensive contact with corrosive fumes may result in premature seal wear and damage to the piston. Exposure of internal components to corrosive fumes can be reduced by using
Rainin tips with aerosol barrier filters.
Service, Calibration and Repair
Repair and Calibration facilities:
Rainin Service Center
5400 Hollis St., Emeryville, CA 94608, USA
Tel: 800-662-7027 Fax: 510-652-4403
Rainin Service Center
Rainin Road, Woburn, MA 01801, USA
Tel: 800-662-7027 Fax: 781-935-7631
Rainin Europe
Nieuwenhuizenweg 9, 2314 XP, Leiden, The Netherlands
Tel: + 31 (0) 71 5412668 Fax: + 31 (0) 71 5415390
Rainin Japan
4-1-11, Bunkyo-Ku, Tokyo 113-0033, Japan
Tel: (03) 5689-8311 Fax: (03) 5689-2670
Service is also available in many other countries through
authorized Rainin distributors.
14
9920-235 Rev C GENERIC
9/13/00
3:17 PM
Page 17
Replacement Parts
Parts for E3-Series 10 µL to 1000 µL:
A Shaft
E Stroke Spring
A
B
C
D
E
F
G
E3-10
6202-064
6202-071
6200-138
6200-139
6200-195
6200-196
6107-063
B Tip Ejector
F Seal Retainer
E3-20
6202-065
6202-071
6200-143
6200-170
6200-197
6200-198
6107-063
C Seal
D O-ring
G Shaft Coupling
E3-100
6202-066
6202-073
6200-150
6200-151
6200-197
6200-201
6107-063
E3-200
6202-067
6202-073
6200-154
6200-155
6200-199
6200-200
6107-063
E3-1000
6202-068
6202-074
6200-161
6200-162
6107-108
6107-106
6107-063
Parts for SE3-Series 10 µL to 1000 µL:
A Shaft
B Tip Ejector
C Seal
D O-ring
E Stroke Spring F Seal Retainer G Shaft Coupling
A
B
C
D
E
F
G
SE3-10
6200-140
6200-133
6200-138
6200-139
6200-195
6200-196
6107-063
SE3-20
6200-145
6200-144
6200-143
6200-170
6200-197
6200-198
6107-063
SE3-100
6200-147
6200-148
6200-150
6200-151
6200-197
6200-201
6107-063
SE3-200
6200-157
6200-156
6200-154
6200-155
6200-199
6200-200
6107-063
SE3-1000
6200-160
6200-163
6200-161
6200-162
6107-108
6107-106
6107-063
Parts for E3 and SE3 series 2000 µL to 10 mL:
A Piston o-ring B Cylinder C Cylinder O-ring D Shaft
E Tip Ejector
F Seal
G Stroke Spring H Seal Retainer
A
B
C
D E3 Series
D SE3 Series
E
F
G
H
2000 µL
6200-167
n/a
n/a
6202-214
6200-169
6200-168
6200-166
6107-109
6107-107
5000 µL
6107-112
6200-365
6200-364
6202-222
6200-362
6200-373
n/a
n/a
n/a
10 mL
6107-113
6200-371
6200-370
6202-223
6200-368
6200-374
n/a
n/a
n/a
Common parts for 5000 µL and 10 mL E3 and SE3 series:
Tube of grease:
6100-555
Filters:
6190-164 (pack of 100)
6190-165 (pack of 1000)
Common parts for all EDP3 models:
Battery:
6107-040
Battery Cover:
6107-085
15
9920-235 Rev C GENERIC
Specifications
9/13/00
3:17 PM
Page 18
subject to change without notice
Accuracy and precision specifications for EDP3 are defined
in this manual as follows:
Accuracy is the closeness of a measured volume to the true
volume as specified by the volume setting of the pipette. Also
known as “mean error”.
Precision is the scatter of individual measurements around the
mean of a large number of replicate measurements of the
same volume. Also known as “standard deviation”.
Accuracy
Precision
(mean error)
(repeatability)
EDP3 Specifications
Model
10 µL
Volume
µL
1
Increment
µL
0.05
200 µL
1000 µL
Abs SD
µL (±)
0.025
1.2
0.012
0.075
0.6
0.03
1.0
0.1
0.4
0.04
7.5
0.15
2.0
0.04
5
3.0
0.15
0.9
0.045
10
1.5
0.15
0.5
0.05
20
1.0
0.2
0.3
0.06
3.5
0.35
1.0
0.1
50
0.8
0.4
0.24
0.12
100
0.8
0.8
0.15
0.15
2.5
0.5
1.0
0.2
2
10
20
0.1
0.5
1
100
0.8
0.8
0.25
0.25
200
0.8
1.6
0.15
0.3
100
5
500
1000
2000 µL
Rel CV
% (≤)
2.5
10
100 µL
Abs
µL (±)
1.5
5
20 µL
Rel
% (≤)
3.0
3
0.6
0.6
0.8
4
0.2
1
1.5
0.8
8
0.15
3
6
0.6
1.2
1000
0.8
8
0.2
2
2000
0.8
16
0.12
2.4
3
3
5
8
200
10
5000 µL
500
1000
2500
5000
25
2.4
1.2
0.6
0.6
12
12
15
30
0.6
0.3
0.2
0.16
10 mL
1 mL
5 mL
10 mL
50
5
1
0.8
50
50
80
0.6
6
0.2 10
0.16 16
16
9920-235 Rev C GENERIC
9/13/00
3:17 PM
Page 19
EC Declaration of Conformity
according to ISO/IEC Guide 22 and EN45014
Manufacturer’s Name:
Rainin Instrument Co.
Manufacturer’s Address: 5400 Hollis St.
Emeryville CA 94608, U.S.A.
declares that the following product:
Product Name:
EDP3 Motorized Microliter Pipette
Model Number:
EDP3
Product Options:
E3-RCS Rapid Charge Stand
E3-WPS Wall Power Supply
conforms to the following Product Specifications:
Safety:
EN61010-1:1995
IEC1010:1990 + A1, A2
EMC:
EN55011:1998 Class A
(Electromagnetic Interference)
EN50082-1
pr EN61000-4-2:1995
(Electrostatic Discharge)
pr EN61000-4-3:1997
(Electromagnetic Immunity)
pr EN61000-4-4:1995
(Electrical Fast Transient)
pr EN61000-4-8:1994
(Magnetic Field Immunity)
Supplementary Information:
Responsible Signatory:
Date:
Jim Petrek, VP, Engineering
March 25, 1999
This Declaration of Conformity applies only to products which
have the CE mark attached.
WARNING:
This equipment generates and uses radio frequency energy and if not installed
and used properly, i.e. in strict accordance with the instruction manual, may
cause harmful interference to radio communications. It has been tested and
found to comply with the limits for a Class A computing device pursuant to Subpart J of Part 15 of FCC rules, which are designed to provide reasonable protection against such interference when operated in a commercial environment.
Operation of this equipment in a residential area is likely to cause interference,
in which case the user at his own expense will be required to take whatever
measures may be required to correct the interference.
9920-235 Rev C GENERIC
9/13/00
3:17 PM
Page 20
Limited Warranty
See the enclosed Limited Warranty and Limitations of Liability
Statement. Please complete and return the Warranty Registration Card on receipt of your pipette.
Rainin pipettes are calibrated with Rainin tips. To assure
excellent reproducibility and performance, use only Rainin
tips as recommended in this manual. Specified performance is
guaranteed only when Rainin tips are used.
Contacting Rainin
Technical Information:
Phone: 800-543-4030
Fax:
781-938-1152
E-mail: [email protected]
Pipette Service:
Phone:
Fax:
E-mail:
800-662-7027
781-935-7631
[email protected]
Direct Order Line:
Phone: 800-472-4646
Fax:
781-938-1152
E-mail: [email protected]
Web:
www.rainin.com
From outside the U.S.:
Massachusetts Office: 001-781-935-3050
California Office:
001-510-654-9142
Rainin Europe:
Phone:
Fax:
+31 (0) 71 541-2668
+31 (0) 71 541-5390
Rainin Japan:
Phone:
Fax:
(03) 5689-8311
(03) 5689-2670
E-mail:
[email protected] (from outside the U.S.)
Web:
www.rainin-global.com (from outside the U.S.)
5400 HOLLIS STREET, EMERYVILLE, CA 94608
RAININ ROAD, BOX 4026, WOBURN, MA 01888-4026
Specifications are subject to change without notice.
Copyright 1999-2000, Rainin Instrument Company, Inc.
9920-235 Rev C