1
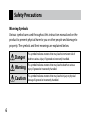
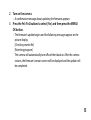
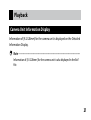
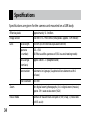
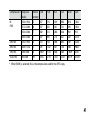
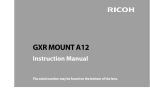
GR LENS A12 28mm F2.5 Instruction Manual The serial number may be found on the bottom of the lens. Package Contents Before using your Ricoh lens, confirm that the package contains the items listed below. Camera unit Lens cap The serial number may be found on the bottom. Comes attached to the camera unit. Instruction manual (this manual) Warranty Connector cap Comes attached to the camera unit. Soft case Introduction To use this lens, you need to attach it to a compatible camera body. Refer to the Camera Body User Guide for details about how to operate shooting and playback functions and change settings and to read important precautions for use. This instruction manual will explain functions and operating procedures that are available only when this camera unit is used with a compatible camera body. See also the GXR Camera Body User Guide. To make the best use of this product’s functions, read this manual thoroughly before use. Please keep this manual handy for ease of reference. Ricoh Co., Ltd. Safety precautions Test shots Copyright Exemption from liability Warranty Radio interference Read all safety precautions thoroughly to ensure safe use. Take test shots to ensure that the camera is working properly before taking photos on important occasions. Reproduction or alteration of copyrighted documents, magazines, and other materials, other than for personal, home, or other similarly limited purposes, without the consent of the copyright holder, is prohibited. Ricoh Co., Ltd. assumes no liability for failure to record or display images as a result of product malfunction. The warranty supplied with this product is only valid within the country of purchase. The manufacturer assumes no responsibility for servicing the product in other countries or bearing any expense thereby incurred. Operating this product in the vicinity of other electronic equipment may adversely affect both the camera and the other device. Interference is particularly likely if the camera is used in close proximity to a radio or television. This can be resolved by moving the camera as far as possible from the other device, reorienting the radio or television antenna, or plugging the radio or television into a different outlet. © 2010 RICOH CO., LTD. All rights reserved. This publication may not be reproduced in whole or in part without Ricoh’s express written permission. Ricoh reserves the right to change the contents of this document at any time without prior notice. Every effort has been made to ensure the accuracy of the information in this document. Should you nevertheless notice any errors or omissions, we would be grateful if you would notify us at the address listed on the back cover of this booklet. Safety Precautions Warning Symbols Various symbols are used throughout this instruction manual and on the product to prevent physical harm to you or other people and damage to property. The symbols and their meanings are explained below. Danger This symbol indicates matters that may lead to imminent risk of death or serious injury if ignored or incorrectly handled. Warning This symbol indicates matters that may lead to death or serious injury if ignored or incorrectly handled. Caution This symbol indicates matters that may lead to injury or physical damage if ignored or incorrectly handled. Sample Warnings The symbol alerts you to actions that must be performed. The symbol alerts you to prohibited actions. The symbol may be combined with other symbols to indicate that a specific action is prohibited. Examples = Do not touch = Do not disassemble Observe the following precautions to ensure safe use of this unit. Danger Do not attempt to disassemble, repair or alter the equipment yourself. The highvoltage circuitry in the equipment poses significant electrical hazard. Warning Keep the equipment out of the reach of children. Do not touch the internal components of the equipment if they become exposed as a result of being dropped or damaged. The high-voltage circuitry in the equipment could lead to an electric shock. Remove the battery as soon as possible, being careful to avoid electric shocks or burns. Take the equipment to your nearest dealer or service center if it is damaged. Do not use the equipment in wet areas as this could result in fire or electric shock. Do not use the equipment near flammable gases, gasoline, benzene, thinner or similar substances to avoid the risk of explosion, fire or burns. • Do not use the equipment in locations where usage is restricted or prohibited as this may lead to disasters or accidents. Caution Do not allow the equipment to get wet. In addition, do not operate it with wet hands. Both pose the risk of electric shock. Safety Precautions for Accessories When using optional products, carefully read the instructions provided with the product before using that product. Table of Contents Package Contents.................................................................................................................. 2 Introduction............................................................................................................................. 3 Safety Precautions................................................................................................................. 6 Parts of the Lens..................................................................................................13 Upgrading the Product......................................................................................14 Updating the camera’s firmware....................................................................................14 Shooting................................................................................................................17 Macro Functions..................................................................................................................17 Mode P: Program Shift.......................................................................................................18 Mode M: Manual Exposure...............................................................................................20 Playback................................................................................................................21 Camera Unit Information Display..................................................................................21 10 Settings.................................................................................................................22 [Picture Quality/Size] Setting (Shooting Menu).......................................................22 Photographs................................................................................................................23 Movies............................................................................................................................24 [Noise Reduction] Setting (Shooting Menu)..............................................................25 [ISO Setting] Setting (Shooting Menu)........................................................................26 [Enlrg Display] (Shooting Menu)....................................................................................27 [Reg. My Settings] (Key Custom Options)...................................................................28 [Shutter Button Confirmation] (Key Custom Settings Tab Menu)......................28 ADJ. Lever Settings (Key Custom Settings Tab Menu)............................................29 Fn1/Fn2 Buttons Settings (Key Custom Settings Tab Menu)...............................29 [Delete My Settings] (Key Custom Settings Tab Menu).........................................30 [Restore Defaults] (Key Custom Settings Tab Menu)..............................................30 [Digital Zoom Image] Setting (Setup Tab)..................................................................31 [Focus Ring Settings] (Setup Tab)..................................................................................32 11 [Spot AF Area Setting] (Setup Tab Menu)...................................................................33 Specifications.......................................................................................................34 Internal Memory/Memory Card Capacity...................................................................40 Appendices...........................................................................................................43 Optional Accessories..........................................................................................................43 Precautions for Use.............................................................................................................44 Equipment Care and Storage..........................................................................................46 Warranty and Servicing.....................................................................................................48 12 Parts of the Lens 1 1 Connector 2 Focus ring 3 Lens 2 3 13 Upgrading the Product Updating the camera’s firmware When you first attach the camera unit to the camera body, the version update function will start automatically if the firmware of the camera’s body need to be updated. In such case, update the firmware of the camera’s body using the following procedure. If the firmware’s version is already up to date, the version update function will not start and you can use the lens right away. 1 Check that the camera is turned off and attach the camera unit to the camera body. • For details about how to attach the camera unit, refer to the Camera Body User Guide. 14 2 Turn on the camera. • A confirmation message about updating the firmware appears. 3 Press the Fn1/Fn2 buttons to select [Yes] and then press the MENU/ OK button. • The firmware’s update begins and the following messages appear on the picture display. [Checking rewrite file] [Rewriting program] The camera will automatically turn off and then back on. After the camera restarts, the firmware’s version screen will be displayed and the update will be completed. 15 Note--------------------------------------------------------------------------------------• To confirm the firmware’s version, select [Firmware Version] in the setup menu. Alternatively, with the camera off, keep the 6 (Play) button pressed for more than 1 second while holding the – button pressed down. The firmware’s version will appear on the picture display for about 20 seconds. • For the latest information on firmware updates, see the Ricoh Web site (http://www.ricoh.com/r_dc/). You can download the latest firmware updates to upgrade your equipment. 16 Shooting Macro Functions The Macro Shooting, Macro Target, Auto Macro, and Minimum Shooting Distance Display during Macro Shooting functions are not available with the A12 28mm F2.5 lens. 17 Mode P: Program Shift The diagram on the following page gives estimates of the shift range for various combinations of aperture values and shutter speeds. The actual values may vary depending on EV (exposure value). In these examples, the flash mode is set to [Flash Off ], and the ISO setting is set to [ISO200]. 18 Ev8 Ev9 Ev10 Ev11 Ev12 Ev13 Ev14 Ev15 Ev16 Ev17 Ev18 Ev19 Ev20 Ev7 F22.0 F22 Ev6 F16 Ev5 F11 Ev4 F8.0 Ev3 F5.6 Ev2 F4.0 F2.8 Ev1 F2.5 Ev0 F2.0 Ev-1 F1.4 Ev-2 F1.0 Ev-3 2 1 1/2 1/4 1/8 1/15 1/30 1/60 1/125 1/250 1/500 1/1000 1/2000 1/4000 19 Mode M: Manual Exposure If [Auto] or [Auto-Hi] is selected for ISO Setting, ISO will be fixed at 200 while the camera is in manual exposure mode. 20 Playback Camera Unit Information Display Information of [A12 28mm] for the camera unit is displayed on the Detailed Information Display. Note--------------------------------------------------------------------------------------Information of [A12 28mm] for the camera unit is also displayed in the Exif file. 21 Settings [Picture Quality/Size] Setting (Shooting Menu) The following picture quality, image size and aspect ratio options are available for the [Picture Quality/Size] setting in the shooting menu. A photograph‘s file size will depend on the combination of picture quality and image size used. When recording movies, you can select the movie size. 22 Photographs Item RAW L (Large) M (Middle) Aspect ratio Compression Image size (pixels) 16:9 *2 FINE/NORMAL/VGA *1 4288 × 2416 4:3 FINE/NORMAL/VGA *1 3776 × 2832 3:2 *2 FINE/NORMAL/VGA *1 4288 × 2848 1:1 *3 FINE/NORMAL/VGA *1 2848 × 2848 16:9 *2 FINE/NORMAL 4288 × 2416 4:3 FINE/NORMAL 3776 × 2832 3:2 *2 FINE/NORMAL 4288 × 2848 1:1 *3 FINE/NORMAL 2848 × 2848 16:9 *2 FINE/NORMAL 3456 × 1944 4:3 FINE/NORMAL 3072 × 2304 3:2 *2 FINE/NORMAL 3456 × 2304 1:1 *3 FINE/NORMAL 2304 × 2304 23 Item Aspect ratio Compression Image size (pixels) 5M 4:3 FINE 2592 × 1944 3M 4:3 FINE 2048 × 1536 1M 4:3 FINE 1280 × 960 VGA 4:3 FINE 640 × 480 *1 When [RAW] is selected, this is the setting used for the JPEG copy. *2 Depending on the area photographed, black bands may appear on the top and bottom of the picture display. *3 Depending on the area photographed, black bands may appear at the right and left sides of the picture display. Movies Item 24 Movie size HD1280 1280 × 720 VGA640 640 × 480 QVGA320 320 × 240 [Noise Reduction] Setting (Shooting Menu) Perform noise reduction when taking photographs. Choose from [Off ], [Auto], [Weak], [Strong], or [MAX]. The time required to record images varies with the option selected. You cannot use this function when [Portrait], [Sports], or [Skew Correct Mode] is selected for the scene mode. 25 [ISO Setting] Setting (Shooting Menu) • When [Auto] is selected and the flash is used, the sensitivity used will gain up to ISO800 equivalent. • When [Auto] is selected and the flash is not used, the minimum and maximum values for the ISO sensitivity will be 200 and 400, respectively, regardless of the pixel size (pixels). 26 [Enlrg Display] (Shooting Menu) If you move the target with the direction keys (+/-/Fn1/Fn2) and press and hold down the MENU/OK button, the target position will be magnified, allowing you to check the focus. By pressing and holding down the MENU/ OK button again, you can return to the standard view from the enlarged view. By pressing and holding down the t (self-timer) button, or by selecting [Display Magnification Ratio] from the Settings Menu, you can set the display magnification. Select from [2 ×], [4 ×], or [8 ×] with the +/- button, and then press the MENU/OK button. Note--------------------------------------------------------------------------------------You can set the [Enlrg Display] function in [Fn1/Fn2 Button Settings] on the Key Custom Settings tab. 27 [Reg. My Settings] (Key Custom Options) In [Reg. My Settings], you can also set [Focus Ring Settings] and [Spot AF Area Setting] options in the setup menu. For other options available, refer to the “Camera Body User Guide”. [Shutter Button Confirmation] (Key Custom Settings Tab Menu) When [Shutter Button Confirmation] is set for [ADJ./DIRECT] on the Key Custom Settings tab, pressing the shutter release button halfway down will finalize settings in ADJ. mode and on the DIRECT screen, and you will be able to shoot pictures. When set for [ADJ.], the ADJ. mode settings will be finalized, enabling you to shoot pictures. When set for [DIRECT], the DIRECT screen settings will be finalized, enabling you to shoot pictures. After you finish shooting pictures, the system will return to the Monitoring screen. 28 ADJ. Lever Settings (Key Custom Settings Tab Menu) You can set the [Aspect Ratio] function in [ADJ. Lever Setting 1] to [ADJ. Lever Setting 4] on the Key Custom Settings tab. If you set the Aspect Ratio function, and press the ADJ. Lever button, will appear, allowing you to set the aspect ratio. For other available options, refer to the “Camera Body User Guide”. Fn1/Fn2 Buttons Settings (Key Custom Settings Tab Menu) You can set the [Enlrg Display] and [Aspect Ratio] functions in [Fn1 Button Settings] or [Fn2 Button Settings] on the Key Custom Settings tab. If you set the Aspect Ratio function and press the Fn1 or Fn2 button, you will be able to set the aspect ratio. For other available options, refer to the “Camera Body User Guide”. 29 [Delete My Settings] (Key Custom Settings Tab Menu) By selecting [Delete My Settings] on the Key Custom Settings tab, you can cancel the settings set in [Reg. My Settings] for [My Settings Box] and for [MY1], [MY2], and [MY3] on the mode dial. [Restore Defaults] (Key Custom Settings Tab Menu) If [Restore Defaults] is selected on the Key Custom Settings tab, the key custom settings will be reset. Note--------------------------------------------------------------------------------------Settings set in [Reg. My Settings] will not be reset. 30 [Digital Zoom Image] Setting (Setup Tab) The size of the recorded image varies depending on the auto resize zoom, as follows. Zoom ratio Image size (pixels) Zoom ratio Image size (pixels) Approx. 1.0 × L Approx. 1.8 × 3M Approx. 1.2 × M Approx. 3.0 × 1M Approx. 1.5 × 5M Approx. 5.9 × VGA 31 [Focus Ring Settings] (Setup Tab) In [Focus Ring Settings], you can set either a mode that enables functions for both autofocus and manual focus or a mode that enables functions for manual focus only. When [AF + MF] is selected, after the shutter button is pressed down halfway to set the focus, the focus can be fine tuned by turning the focus ring. Item AF + MF MF Only Note--------------------------------------------------------------------------------------If the shutter button is re-pressed after fine tuning, autofocus will activate and fine adjustment will be cancelled. 32 [Spot AF Area Setting] (Setup Tab Menu) You can select either [Normal] or [Pinpoint] for the AF area in the [Spot AF Area Setting] in the setup menu. When [Spot AF] is selected in [Focus] in the Shooting Menu, the focus will be set to the AF area mode selected in the [Spot AF Area Setting]. Note--------------------------------------------------------------------------------------When [Pinpoint] is selected, the AF Area frame will be smaller than that in [Normal] mode. 33 Specifications Specifications are given for the camera unit mounted on a GXR body. Effective pixels Approximately 12.3 million Image sensor 23.6 mm × 15.7 mm CMOS (total pixels: approx. 12.9 million) Lens 34 Focal length 18.3 mm (35-mm format equivalent: 28 mm) Aperture (f-number) f/2.5 – f/22 (ND filter used for apertures of f/22 in auto shooting mode) Focus range (from lens) Approx. 20 cm – ∞ (telephoto end) Construction 9 elements in 6 groups (2 aspherical lens elements with 2 surfaces) Filter diameter 40.5 mm Zoom 4.0 × digital zoom (photographs), 3.6 × digital zoom (movies); approx. 5.9 × auto resize zoom (VGA) Focus mode Contrast AF-based multi and spot AF; MF; Snap; ∞ (focus lock and AF-assist) Shutter speed Exposure control Photographs 1/3200 – 180 s (upper and lower limits vary according to shooting and flash mode) Movies 1/2000 – 1/30 s Metering TTL-CCD metering in multi (256-segment), center-weighted, and spot modes with autoexposure lock Mode Program AE, aperture priority AE, manual exposure, shutter priority AE, move target function Exposure compensation Manual (+4.0 to -4.0 EV in increments 1/3 EV or 1/2 EV), auto bracketing (-2 EV to +2 EV in increments 1/3 EV or 1/2 EV) Exposure link range (Auto shooting mode, Centerweighted light metering) 2.2 EV to 19.3 EV (link range for automatic ISO converted based on the EV for ISO100) • When shooting in surroundings with 6.0 EV or lower, for every 1.0 EV that the exposure link range decreases, the camera will shift the setting 0.25 EV toward the low brightness side. The maximum shift amount is 1.0 EV. ISO sensitivity Auto, Auto-Hi, ISO 200, ISO 400, ISO 800, ISO 1600, ISO 3200 (Standard Output Sensitivity) 35 White balance Auto, Multi-P AUTO, Outdoors, Cloudy, Incandescent Lamp1, Incandescent Lamp2, Fluorescent Lamp, Manual Settings, Detail; white balance bracketing Flash Approx. 20 cm – 3.0 m (ISO auto) (telephoto end) Range (built-in flash) Shooting mode Auto, program shift, aperture priority, shutter priority, manual, scene (movie, portrait, sports, landscape, nightscape, skew correction), “My Settings” Continuous Number of mode pictures shot in Continuous (Picture Size: RAW) Noise Reduction off or on (Weak): 4 pictures Noise Reduction on (Strong): 3 pictures Noise Reduction on MAX: 3 pictures Number of pictures shot in M-Cont Plus (1 set) HI (1280 × 856) : 30 pictures (24 Frames/Sec) LO (4228 × 2848) : 15 pictures (3 Frames/Sec) Compression *1 36 FINE, NORMAL, RAW (DNG) *2 Image size (pixels) Photographs Movies File size (approx.) RAW 4288 × 2416, 3776 × 2832, 4288 × 2848, 2848 × 2848, 3456 × 1944, 3072 × 2304, 3456 × 2304, 2304 × 2304, 2592 × 1944, 2048 × 1536, 1280 × 960, 640 × 480 1280 × 720, 640 × 480, 320 × 240 16:9 NORMAL: 17,800 KB/frame, FINE: 19,515 KB/frame, VGA: 15,587 KB/frame 4:3 NORMAL: 18,387 KB/frame, FINE: 20,157 KB/frame, VGA: 16,124 KB/frame 3:2 NORMAL: 20,946 KB/frame, FINE: 22,967 KB/frame, VGA: 18,337 KB/frame 1:1 NORMAL: 13,991 KB/frame, FINE: 15,333 KB/frame, VGA: 12,273 KB/frame 37 File size (approx.) L 16:9 NORMAL: 2,222 KB/frame, FINE: 3,816 KB/frame 4:3 NORMAL: 2,315 KB/frame, FINE: 3,960 KB/frame 3:2 NORMAL: 2,615 KB/frame, FINE: 4,493 KB/frame 1:1 NORMAL: 1,761 KB/frame, FINE: 3,009 KB/frame 16:9 NORMAL: 1,475 KB/frame, FINE: 2,509 KB/frame 4:3 NORMAL: 1,574 KB/frame, FINE: 2,662 KB/frame 3:2 NORMAL: 1,744 KB/frame, FINE: 2,968 KB/frame 1:1 NORMAL: 1,186 KB/frame, FINE: 2,003 KB/frame 5M 4:3 FINE: 2,287 KB/frame 3M 4:3 FINE: 1,474 KB/frame 1M 4:3 FINE: 812 KB/frame VGA 4:3 FINE: 197 KB/frame M 38 Battery life (based on CIPA standard) DB-90: approx. 320 shots *3 Dimensions (W × H × D) Camera unit only: 68.7 mm × 57.9 mm × 50.4 mm (Based on CIPA guide line) When mounted on the camera body: 113.9 mm × 70.2 mm × 55.6 mm (Based on CIPA guide line) Weight (approx.) Camera unit only: 210 g When mounted on the camera body: 410 g (Including the battery and SD memory card) Operating temperature 0 °C to 40 °C Operating humidity 90 % or less Storage temperature –20 °C to 60 °C *1 The options available vary with image size. *2 A JPEG file is also recorded (the JPEG file may be a FINE- or NORMAL-quality file with the dimensions as the RAW file or a VGA file 640 × 480 pixels in size). RAW files use the standard DNG format promoted by Adobe Systems, Inc. *3 For reference only; actual number of shots varies greatly according to how camera is used. We recommend that you carry spare batteries when in use for extended periods. 39 Internal Memory/Memory Card Capacity The following values are given as a reference of the storage capacity of the internal memory and memory cards of various sizes, by picture quality and image size, when using the FINE picture quality. Photographs Compression Image size (pixels) RAW * 4288 × 2416 FINE 3776 × 2832 4288 × 2848 2848 × 2848 4288 × 2416 L FINE 3776 × 2832 4288 × 2848 2848 × 2848 40 Internal memory 4 4 3 5 21 20 18 27 1 GB 2 GB 4 GB 8 GB 16 GB 32 GB 49 47 42 63 235 227 200 299 100 97 85 128 476 462 407 608 197 191 168 251 935 907 799 1195 404 391 343 513 1912 1854 1633 2442 810 784 688 1029 3830 3715 3272 4893 1625 1573 1380 2065 7684 7453 6565 9815 Compression Image size (pixels) 3456 × 1944 M FINE 3072 × 2304 3456 × 2304 2304 × 2304 5M/FINE 2592 × 1944 3M/FINE 2048 × 1536 1M/FINE 1280 × 960 VGA/FINE 640 × 480 Internal memory 32 30 27 41 34 53 96 395 1 GB 2 GB 4 GB 8 GB 16 GB 32 GB 357 337 302 447 373 581 1059 4316 724 683 614 903 758 1182 2118 8778 1419 1341 1206 1774 1490 2321 4160 17237 2902 2741 2466 3627 3045 4744 8505 35231 5814 5491 4941 7267 6101 9503 17039 70579 11662 11014 9913 14578 12238 19063 34181 141581 * When [RAW] is selected, this is the compression used for the JPEG copy. 41 Movies Image size (pixels) 1280 × 720 24 frames/second 640 × 480 24 frames/second 320 × 240 24 frames/second Internal memory 1 GB 21sec. 3min. 49sec. 1min. 11min. 2sec. 2min. 26min. 25sec. 24sec. 2 GB 7min. 46sec. 22min. 27sec. 53min. 43sec. 4 GB 15min. 58sec. 46min. 10sec. 110min. 27sec. 8 GB 31min. 10sec. 90min. 7sec. 215min. 35sec. 16 GB 62min. 26sec. 180min. 32sec. 431min. 52sec. 32 GB 125min. 15sec. 362min. 9sec. 866min. 19sec. Caution----------------------------------------------------------------------------------The maximum uninterrupted recording size for a single movie is 4 GB. The maximum recording time is around 15 minutes at 1280 × 720 size, around 46 minutes at 640 × 480 size, and around 90 minutes at 320 × 240 size. Note--------------------------------------------------------------------------------------When recording movies with the movie size set to 1280 × 720, using SD/ SDHC memory cards with a speed class of 6 or more is recommended. 42 Appendices Optional Accessories The RICOH LENS can be used with the items (sold separately) listed below. Lens Hood (LH-1) Note--------------------------------------------------------------------------------------• Before using an optional accessory, see the documentation that came with the product. • For the latest information on optional accessories, visit the Ricoh website (http://www.ricohpmmc.com/). 43 Precautions for Use • The warranty supplied with this product is only valid within the country of purchase. • Should the product fail or malfunction while out of the country, the manufacturer assumes no responsibility for servicing the product locally or bearing any expenditure incurred thereby. • Do not drop the equipment or subject it to physical shocks. • When carrying the equipment, be careful that it does not strike other objects. Particular care is required to protect the lens. • When attaching a filter or lens hood, be careful not to apply excessive force. • Abrupt changes in temperature may cause condensation, resulting in visible condensation inside the lens or malfunction of the equipment. This can be avoided by placing the equipment in a plastic bag to slow the temperature change, and removing it only after the air in the bag has reached the same temperature its surroundings. • Keep the equipment dry and avoid handling it with wet hands. Failure to observe these precautions could result in malfunction of the equipment or electric shock. • Keep the connector clean. 44 Tip: Avoiding Condensation--------------------------------------------------------Condensation is particularly likely to occur if you move to an area with a sharply different temperature, if humidity is high, in a cold room after the heater has come on, or where the camera is exposed to cold air from an air conditioner or other device. 45 Equipment Care and Storage Caring for the Equipment • Photographs can be affected by fingerprints and other foreign matter on the lens. Avoid touching the lens with your fingers. Remove dust or lint with a blower from a camera supply store, or gently clean the lens with a soft, dry cloth. Be especially careful around the barrel. • Clean the equipment thoroughly after using it at the beach or handling cosmetics. Do not expose the equipment to volatile substances such as thinner, benzene, or pesticides. Failure to observe this precaution could result in damage to the equipment or its finish. • In the unlikely event of malfunction, visit a Ricoh Repair Center. • This equipment is a high precision device. Do not disassemble. 46 Storage • Do not store the camera where it will be exposed to: extreme heat or humidity; large changes in temperature or humidity; dust, dirt, or sand; severe vibration; prolonged contact with chemicals, including mothballs and other insect repellent, or with vinyl or rubber products; strong magnetic fields (for example, in the vicinity of a monitor, transformer, or magnet). • When storing, place the product in a camera case, etc. that does not collect dirt or fluff to prevent dirt or dust from attaching itself to the camera. In addition, when carrying the camera, do not place the camera directly into a pocket, etc., in order to prevent dirt and dust from getting on the camera. 47 Warranty and Servicing 48 1.This product is backed by a limited warranty. During the warranty period mentioned in the Warranty supplied with your equipment, any defective parts will be repaired free of charge. In the event of equipment malfunction, contact the dealer from which you purchased the equipment or your nearest Ricoh Repair Center. Please note that you will not be reimbursed for the cost of bringing the equipment to the Ricoh Repair Center. 2.This warranty does not cover any damage resulting from: 1 failure to follow the instructions in the instruction manual; 2 repair, modification or overhaul not conducted by an authorized service center listed in the instruction manual; 3 fire, natural disaster, act of God, lightning, abnormal voltage, etc.; 4 improper storage (noted in the “Camera Body User Guide”), leaking of battery and other fluids, mold, or otherwise insufficient care of the equipment. 5 submergence in water (flooding), exposure to alcohol or other beverages, infiltration of sand or mud, physical shock, dropping of the equipment, or pressure on the equipment, and other unnatural causes. 3.After the warranty period has passed, you will be liable for all repair fees, including those incurred at an authorized service center. 4. You will be liable for all repair fees, even within the warranty period, if the warranty card is not attached or if the distributor’s name or the purchase date have been changed or are not indicated on the card. 5. Expenses for overhaul and thorough inspection by special request of the customer will be charged to the customer, whether or not they are incurred during the warranty period. 6. Any consequential damages arising from failure of the equipment, such as expenses incurred in taking pictures or loss of expected profit, will not be reimbursed whether they occur during the warranty period or not. 7. The warranty is only valid in the country in which the equipment was purchased. * The above provisions refer to repairs offered free of charge, and do not limit your legal rights. * The intention of the above provisions is also described in the warranty card provided with this equipment. 49 8.Parts essential to the servicing of the equipment (that is, components required to maintain the functions and quality of the equipment) will be available for a period of five years after the equipment is discontinued. 9.Please note that if the equipment is seriously damaged by flooding, submergence, infiltration of sand or mud, violent shocks or dropping, it may not be repairable, and restoration to its original condition may be impossible. Notes-------------------------------------------------------------------------------------• Before sending the camera in for repair, check the camera body and read the instruction manual again to ensure proper operation. • Some repairs require a significant amount of time to complete. • When sending the equipment to a service center, please include a note which describes the defective part and the problem as precisely as possible. • Remove all accessories not related to the problem before sending the camera to the service center. 50 If You Encounter a Problem with This Product Ricoh offices 3-2-3, Shin-Yokohama Kouhoku-ku, Yokohama City, Kanagawa 222-8530, Japan http://www.ricoh.com/r_dc 5 Dedrick Place, West Caldwell, New Jersey 07006, U.S.A. RICOH AMERICAS CORPORATION 1–800–22RICOH http://www.ricoh-usa.com/ Oberrather Str. 6, 40472 Düsseldorf, GERMANY (innerhalb Deutschlands) 06331 268 438 RICOH INTERNATIONAL B.V. (EPMMC) (außerhalb Deutschlands) +49 6331 268 438 http://www.ricohpmmc.com/ (from within the UK) 02073 656 580 RICOH UK LTD. (PMMC UK) (from outside of the UK) +44 2073 656 580 (à partir de la France) 0800 88 18 70 RICOH FRANCE S.A.S. (PMMC FRANCE) (en dehors de la France) +33 1 60 60 19 94 (desde España) 91 406 9148 RICOH ESPANA, S.A. (PMMC SPAIN) (desde fuera de España) +34 91 406 9148 (dall’Italia) 02 696 33 451 RICOH ITALIA S.p.A. (PMMC ITALY) (dall’estero) +39 02 696 33 451 RICOH COMPANY, LTD. 51 Ricoh offices RICOH ASIA PACIFIC OPERATIONS LIMITED 21/F, One Kowloon, 1 Wang Yuen Street, Kowloon Bay, Hong Kong Ricoh Company, Ltd. Ricoh Building, 8-13-1, Ginza, Chuo-ku, Tokyo 104-8222, Japan 2010 October EN USA GB Printed in China GB AE AE *L453 2971*