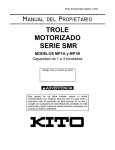
1
User’s Manual
Table of Contents
1.
Overview .................................................................................................................................. 2
1.1
2.
Features .................................................................................................................................................................. 2
Screen Layout ......................................................................................................................... 3
2.1
Status Icons............................................................................................................................................................. 3
2.2
Buttons ................................................................................................................................................................... 3
3.
Touch Panel Calibration......................................................................................................... 7
4.
AV In (Analog Video Live View) ............................................................................................. 9
4.1
Speed Dome Camera Live View ................................................................................................................... 10
4.1.1
Enable PTZ Control Function ................................................................................................... 10
4.1.2
Implementing PTZ Control........................................................................................................ 11
4.2
Fixed Camera Live View ................................................................................................................................... 12
4.3
AV Video Setup ................................................................................................................................................... 13
4.4
AV Dome Setup................................................................................................................................................... 15
5.
Cable Test (CAT5) ................................................................................................................. 17
6.
IP Camera Live View ............................................................................................................. 18
7.
8.
9.
6.1
Connect IP Camera (Direct Connection)................................................................................................... 18
6.2
Device Search ...................................................................................................................................................... 21
6.3
UPnP ...................................................................................................................................................................... 24
6.4
IP Camera Setup................................................................................................................................................. 27
6.4.1
Setup-IP Connection (Alter Camera Settings) .................................................................... 28
6.4.2
Setup-IP Camera (Load the Network Settings) ................................................................. 29
6.4.3
Setup- IP Script (IP Camera API Commands)...................................................................... 30
Power over Ethernet (PoE)................................................................................................... 31
7.1
Enable PoE .......................................................................................................................................................... 31
7.2
PoE Setup ............................................................................................................................................................ 32
Snapshot................................................................................................................................ 35
8.1
Implement Snapshot ....................................................................................................................................... 35
8.2
Snapshot Setup.................................................................................................................................................. 36
Video Recording ................................................................................................................... 38
9.1
Implement Video Recording ......................................................................................................................... 38
9.2
Video Playback.................................................................................................................................................... 40
10. System Setup ........................................................................................................................ 42
Appendix A: Technical Specification.......................................................................................... 46
Appendix B: Brand and Support Models .................................................................................... 48
Appendix C: Limited Warranty..................................................................................................... 49
1
User’s Manual
1.
Overview
The IP Camera Tester combines an analog video tester, PTZ camera controller,
and IP digital video tester into a single hand-held device, utilizing an ultra-bright,
high-resolution 3.5 Inch Color LCD Screen, which makes all camera
adjustments a snap.
IP Camera Tester benefits users by providing various network protocol
compatibilities. With customized built-in codec, IP Camera Tester is capable of
decoding video streaming simultaneously and allowing users to view and to
adjust focus on the monitor. The Tester also operates on both NTSC and PAL
TV system by standard BNC video input. Moreover, it has a phone-jack that
allows users to test for audio if available. Furthermore, IP Camera Tester runs
by a rechargeable battery that provides the Tester with up to three hours of
operating time.
Blending functionality and compatibility, IP Camera Tester is a versatile video
tester for both analog and IP applications.
1.1
Features
z
z
z
z
z
z
z
z
z
z
z
2
Built-in 3.5” LCD monitor with QVGA resolution
10/ 100Mbps Ethernet with RJ-45 connector
PTZ control/ command parse via Ethernet and RS-485 interface
Built-in touch panel/ keypad.
High capacity Lithium battery
UTP cable test
H.264 and MJPEG video compression
NTSC/PAL Video in/ Audio in/ Speaker out
PoE/ PoE+ function support
PoE voltage, current, and power consumption measurement
Local recording and playback
User’s Manual
2.
Screen Layout
Home Screen
The Home Screen of the IP Camera Tester is shown as follows:
2.1
Status Icons
Battery Status
Indicates the battery level and charging status.
When the Tester is connected to an IP Camera that is
PoE enabled with the Tester’s PoE function on, the PSE
PSE
button will be lightened up, and the Camera will drain
power from the Tester’s internal battery.
2.2
Buttons
Return to the Home Screen.
Home Screen
Click on this icon to go back to the previous page.
Return
Enter the submenu of a function or to save settings.
Enter/Save
View the video display on the LCD screen via the video
output of the BNC supported Camera.
3
User’s Manual
AV In
Directly connect to the IP Camera with one touch.
Connect
Ideal for testing multiple IP Cameras. Tap this icon to
find all the IP Cameras in the network. Then select a
Device
Search
IP Camera
specific IP Camera by IP or MAC from the address
list.
Users have to access “Setup> Setup-IP> Setup-IP
connection” for choosing Camera Type. And
relative IP Cameras will be filtered out.
Tap this icon to find all the IP Cameras with UPnP
names in the network. Then select a specific IP
Camera from the address list.
UPnP
Users have to access “Setup> Setup-IP> Setup-IP
connection” for choosing Camera Type. And
relative IP Cameras will be filtered out.
Detects the CAT5 Cable for wiring types (Straight/
Cross) or errors (Short/ Open/ Miswired).
Cable Test
Tap this icon to enable Power over Ethernet (PoE)
output for IP Cameras that are PoE/ PoE Plus enabled.
Power Over
Ethernet
And the Camera will drain power from the Tester’s
internal battery.
Select for PoE Setups including Power Level, Power over
PoE Setup
Ethernet
(PoE)
display,
Enable
measurement,
PoE
when
PoE
measurement
booting,
and
PoE
auto-shutdown time.
Various Setups for cameras and the IP Camera Tester
can be configured here. Each setup is shown in the
Setup
4
following section: Second Screen.
User’s Manual
Second Screen
Press the <Setup>
button in the Home Screen, and you will be
automatically directed to the Second Screen as shown below.
Adjust analog video’s brightness, contrast and
Setup- AV
sharpness.
Video
Configure the Speed Dome Camera’s protocol,
Setup-AV
Setup- AV
baud rate and ID address.
Dome
The IP Camera Tester’s IP address and the IP
Camera’s basic profile including IP address,
Setup-IP
camera type, user name, password and streaming
connection relevant information can all be altered here.
Configure the IP Camera’s network settings.
Setup-IP
Setup-IP
camera
Additionally, it is allowed to load the relevant
settings from an IP Camera to the Tester.
Adjust IP Camera video’s brightness, color level,
contrast and sharpness by editing the API
Setup-IP
script
commands. Additionally, it is allowed to import the
relevant API commands from other IP Camera to
the Tester.
5
User’s Manual
Preview and manage the snapshot files.
Setup-Snapshot
Setup the recording video file name, description, and
Video-Rec
saving path.
Setup
Setup-Video
Preview, playback and manage the video files.
VideoPlayback
The IP Camera Tester’s system settings include
volume,
LCD
brightness,
firmware
upgrade,
factory default reset and auto shutdown setup. The
Setup-System
6
MAC address of the Tester is also displayed on
this page for users’ reference.
User’s Manual
3.
Touch Panel Calibration
For initial access or after system reset, the system will enter the Touch Panel
Calibration mode (as shown below) before accessing to the Home Screen.
Step 1: Tap the flashing cross on the left top of the screen.
Step 2: Hit the other flashing cross located diagonally.
Step 3: Then touch each flashing box coming out as instructed.
7
User’s Manual
The screen mode will switch to Home Screen (as the figure below) after Touch
Panel Calibration is completed.
8
User’s Manual
4.
AV In (Analog Video Live View)
Users can view analog video through the BNC IN connector on top of the Tester
as shown below.
Connect the BNC cable from the video output connector of the Camera to the
BNC IN port on the Tester. Tap the <AV In>
button on the Home Screen,
and users can view live video on the LCD screen.
To view live video from an IP Camera which supports BNC via AV In
function, please make sure the IP Camera streaming is set as “BNC
Out”.
9
User’s Manual
4.1
Speed Dome Camera Live View
Users can implement a Speed Dome Camera’s PTZ control in the live view
mode.
NOTE: Make sure the Speed Dome Camera’s RS-485 lines are correctly
connected to the Tester’s RS-485 terminal block, or PTZ control cannot
be manipulated here. Please refer to the Tester’s Setup Guide for more
RS-485 information.
4.1.1
Enable PTZ Control Function
Step 1: Please tap the <Setup>
tap <AV In>
to enter it.
Step 2: Tap <Setup-AV Dome>
below.
10
button on the Home Screen and then
and enter its setting page as shown
User’s Manual
Step 3: Select <Enable> from the <Dome type> drop-down list.
Step 4: Tap <Enter/Save>
to save the setting, and system will
automatically direct to the previous screen.
Step 5: Tap <Return>
4.1.2
to return to the Second Screen.
Implementing PTZ Control
Step 1: Tap <AV In>
button in the Home Screen to enter the live view
mode. Meanwhile, there will be four arrow buttons displayed on the
screen as shown below.
Step 2: Tap the arrows on the screen to pan and tilt the camera. And press
the Up/Down Shift Keys (
zooming in/out.
) on the Tester’s button pad for
Users may adjust video brightness, contrast or sharpness for different
live viewing quality in the <Setup-AV Video> function, which can be
accessed by the following path: Setup> Setup-AV> Setup-AV Video.
For more detail, please refer to 4.3. AV Video Setup.
11
User’s Manual
4.2
Fixed Camera Live View
In the Fixed Camera’s live view mode, the TV System (NTSC/PAL) of the
Camera will be displayed on the left bottom of the screen as shown below.
Users may adjust video brightness, contrast or sharpness for different
live viewing quality in the <Setup-AV Video> function, which can be
accessed by the following path: Setup> Setup-AV> Setup-AV Video.
For more detail, please refer to 4.3. AV Video Setup .
12
User’s Manual
4.3
AV Video Setup
The <Setup-AV Video> can be accessed by the following path: Setup>
Setup-AV> Setup-AV Video. In the <Setup-AV Video>
menu, users can
adjust analog video’s brightness, contrast or sharpness for favorable video
display on the Tester’s LCD screen under different operating circumstances.
Access <Step- AV Video>
Step 1: Tap <Setup>
Screen.
on the Home Screen and enter the Second
Step 2: Tap <Setup-AV>
on the Second Screen to enter the AV Setup
Screen, and then tap <Setup-AV Video> to enter the setting page
as shown below.
In the <Setup-AV Video> setting page, the live video is displayed on the upper
screen.
13
User’s Manual
Adjust Brightness/Sharpness/Contrast Value
Move the slider bar by touching the screen or using the Tester’s Left/Right Shift
Keys (
).
Switch to another Item
icon next to the slider bar or press the Tester’s
Tap the <AV Mode>
Up/Down Shift Keys to switch among Brightness, Sharpness and Contrast
setting.
Tap <Enter/Save>
to save all the settings and you will then automatically
directed to the previous page. Or tap <Return>
to exit the setting page
without saving settings.
14
User’s Manual
4.4
AV Dome Setup
In the <Setup-AV DOME>
menu, users can enable/disable PTZ control and
configure the Speed Dome Camera’s protocol, baud rate and ID address.
Access <Step- AV Dome>
Step 1: Tap <Setup>
Screen.
on the Home Screen and enter the Second
Step 2: Tap <Setup- AV>
on the Second Screen to enter the AV Setup
Screen, and then tap <Setup-AV Dome> to enter the setting page
as shown below.
Set the Dome Type
Select <Enable> or <Disable> from the drop-down list of the <Dome Type>.
<Enable> means activating PTZ control on the IP Camera Tester, while
<Disable> indicates disabling PTZ control on the Tester.
15
User’s Manual
Set the Protocol
Select the protocol for the Speed Dome Camera from the drop-down list.
Set the Baud Rate
Select the baud rate for the Speed Dome Camera from the drop-down list.
Set the ID Address
Enter the three-digit ID address.
Tap <Enter/Save>
to save all the settings and you will then automatically
directed to the previous page. Or tap <Return>
to exit the setting page
without saving settings.
16
User’s Manual
5.
Cable Test (CAT5)
Users can check the RJ-45 cable wiring with the supplied UTP Terminal Block
Setup for Testing
Connect one end of the RJ-45 connector to the UTP Terminal Block and the
other end to the CAT5 port at the side of the Tester.
Cable Testing
Step 1: Tap the <CAT5>
Step 2: Tap <Test>
icon on the Home Screen.
and wait for wiring detection.
Step 3: Then the cable’s wire map will be displayed on the screen. Users can
check the RJ-45 cable for its wiring type (Straight/Crossover) and error
connection (Shorts/ Open/ Miswired).
Step 4: Tap <Return>
to return to the Home Screen.
17
User’s Manual
6.
IP Camera Live View
The IP Camera Tester can automatically detect and recognize the IP Camera
that is connected to it. Please connect the IP Camera to the Tester’s LAN port;
plug in the IP Camera if not using PoE. For further information about PoE,
please refer to 7. Power Over Ethernet (PoE).
Automatically Chang IP Camera Tester’s IP Address
After the IP Camera is powered on, the IP Camera Tester’s IP address will be
automatically detected and displayed on the screen.
Please refer to the following sections for connecting the IP Camera and viewing
live video in alternative ways.
6.1
Connect IP Camera (Direct Connection)
Setup for Direct Connecting
Tap the <IP Camera>
18
icon on the Home Screen to enter the submenu.
User’s Manual
Check the IP Camera Profile in the field under the <Connect>
icon as
shown below. The IP Camera’s profile details including IP address, camera type,
username, password, etc.
If there is any setting required to be altered, please go to <Setup-IP connection>
to change the related IP Camera settings. For more setup information, please
refer to 6.4.1 Alter Camera Settings (Setup-IP Connection).
Access the Camera
Tap the <Connect>
icon on the IP Camera Submenu, and wait for searching
to finish. Then the live video will be displayed on the LCD screen.
Digital PT Control (For Fixed Camera)
In the IP Camera’s live view mode, the text “ZOOM” will be displayed on the
right bottom of the screen. Tap the text “ZOOM”, and the video will switch to the
digital zoom mode (at maximum digital zoom ratio). Meanwhile, the text “P & T”
will be displayed on the left bottom of the screen as shown below.
19
User’s Manual
Press the Left/Right Shift Keys (
), and the image can be horizontally shifted
to the left/right with four steps respectively; Press the Up/Down Shift Keys
(
), and the image can be shifted upward/downward with four steps
respectively. To leave the Digital PT Control mode, simply tap “ZOOM.”
PTZ Control (For IP Speed Dome Camera)
In the IP Camera’s live view mode, the text “ZOOM” will be displayed on the
right bottom of the screen. Tap the text “ZOOM”, and the video will switch to the
PTZ control mode. Meanwhile, there will be four arrow buttons displayed on the
screen as shown below. Tap the arrows on the screen to pan and tilt the camera.
And press the Up/Down Shift Keys (
zooming in/out.
) on the Tester’s button pad for
Exit the Viewing Mode
Press the ESC Key
on the Tester’s button pad to exit the live view mode,
and return to the IP Camera Submenu.
20
User’s Manual
6.2
Device Search
If there are multiple IP Cameras in the network, utilize <Device Search> to find
all of the cameras. <Device Search>
can be accessed in IP Camera
Submenu.
Implement Device Search
Tap <Device Search>
icon, and wait for searching to finish. Then you will
enter the Device Search page as shown below.
Tap <IP/MAC> to switch the detected IP Camera displaying form between IP
address and MAC. Select the target IP Camera from the device finding list on
the left top of the screen. And setup the duration to wait until connecting to
devises. For a custom setting, select <Custom> from the drop-down and then
enter the value in the field at the bottom of the setup page. Then tap
<CONNECT> beneath the Password column to start connecting. The live view
video will be displayed on the screen.
21
User’s Manual
Digital PT Control (For Fixed Camera)
In the IP Camera’s live view mode, the text “ZOOM” will be displayed on the
right bottom of the screen. Tap the text “ZOOM”, and the video will switch to the
digital zoom mode (at maximum digital zoom ratio). Meanwhile, the text “P & T”
will be displayed on the left bottom of the screen as shown below.
Press the Left/Right Shift Keys (
), and the image can be horizontally shifted
to the left/right with four steps respectively; Press the Up/Down Shift Keys
(
), and the image can be shifted upward/downward with four steps
respectively. To leave the Digital PT Control mode, simply tap “ZOOM.”
PTZ Control (For IP Speed Dome Camera)
In the IP Camera’s live view mode, the text “ZOOM” will be displayed on the
right bottom of the screen. Tap the text “ZOOM”, and the video will switch to the
PTZ control mode. Meanwhile, there will be four arrow buttons displayed on the
screen as shown below. Tap the arrows on the screen to pan and tilt the camera.
And press the Up/Down Shift Keys (
zooming in/out.
22
) on the Tester’s button pad for
User’s Manual
Exit the Viewing Mode
Press the ESC Key
on the Tester’s button pad to exit the live view mode,
and return to the IP Camera Submenu.
23
User’s Manual
6.3
UPnP
Users can search all of the IP Cameras with UPnP names in the network via
<UPnP> . To access <UPnP> setup page, please tap <IP Camera>
the Home Screen and enter the IP Camera Submenu.
on
Implement UPnP
Tap <UPnP>
icon, and wait for searching to finish. Then you will enter the
UPnP page as shown below.
Select the target IP Camera from the device finding list on the left top of the
screen. Then setup the duration to wait until connecting to devises. For a
custom setting, select <Custom> from the drop-down and then enter the value
in the field at the bottom of the setup page. After setup, tap <CONNECT>
beneath the Password column to start connecting. The live view video will be
displayed on the screen.
24
User’s Manual
Digital PT Control (For Fixed Camera)
In the IP Camera’s live view mode, the text “ZOOM” will be displayed on the
right bottom of the screen. Tap the text “ZOOM”, and the video will switch to the
digital zoom mode (at maximum digital zoom ratio). Meanwhile, the text “P & T”
will be displayed on the left bottom of the screen as shown below.
Press the Left/Right Shift Keys (
), and the image can be horizontally shifted
to the left/right with four steps respectively; Press the Up/Down Shift Keys
(
), and the image can be shifted upward/downward with four steps
respectively. To leave the Digital PT Control mode, simply tap “ZOOM.”
PTZ Control (For IP Speed Dome Camera)
In the IP Camera’s live view mode, the text “ZOOM” will be displayed on the
right bottom of the screen. Tap the text “ZOOM”, and the video will switch to the
PTZ control mode. Meanwhile, there will be four arrow buttons displayed on the
screen as shown below. Tap the arrows on the screen to pan and tilt the camera.
And press the Up/Down Shift Keys (
zooming in/out.
) on the Tester’s button pad for
25
User’s Manual
Exit the Viewing Mode
Press the ESC Key
on the Tester’s button pad to exit the live view mode,
and return to the IP Camera Submenu.
26
User’s Manual
6.4
IP Camera Setup
Users can change the IP Camera’s setting, e.g. IP address, camera type, user
name, password, streaming format, network settings, in the Setup-IP
Submenus: <Setup-IP Connection>
and <Setup-IP Camera>
.
Access <Setup- IP Connection> and <Setup- IP camera>
Step 1: Tap the <Setup>
Screen.
icon on the Home Screen to enter the Second
Step 2: Tap <Setup-IP>
Setup Submenu.
on the Second Screen, and then enter the IP
27
User’s Manual
The <Setup-IP Connection>
the IP Setup Submenu.
6.4.1
icon are in
Setup-IP Connection (Alter Camera Settings)
Tap the <Setup-IP Connection>
below.
28
icon and <Setup-IP Camera>
icon and enter its setup page as shown
User’s Manual
Specify Camera Settings
Please specify the IP address, camera type, user name, password, HTTP Port,
streaming settings (Streaming port/ Format/ Protocol), etc. of the connected IP
Camera in each column by the stylus touch pen.
Add a Camera to List
To add a camera to the Camera Profile list, please enter its model name in the
on the right side of this column;
<Camera Profile> column and tap the icon
while canceling a camera, select the camera to be deleted, and then tap the
icon
. Up to 128 IP Cameras can be assigned for testing.
Tap <Enter/Save>
to save all the settings and you will then automatically
directed to the previous screen. Or tap <Return>
to exit the setting page
without saving settings.
6.4.2
Setup-IP Camera (Load the Network Settings)
For checking or altering the IP Camera’s network settings such as Subnet mask,
Default gateway, Primary DNS, Web server port, etc., users can go to the
<Setup-IP Camera>
page. Tap the <Setup-IP Camera>
icon and enter
its setup page as shown below.
Load Settings from the IP Camera
Please tap the <Load from Camera> button on the top of the menu and the IP
Camera’s network settings will be shown in the blank field.
NOTE: Make sure the target camera’s settings are correctly configured,
or the loading here will fail. For altering the camera settings, please go
29
User’s Manual
back up one level by tapping on <Return>
button. Then enter
<Setup-IP Connection> to change camera settings.
Reload the Settings to the IP Camera
After making network setting changes, users may tap the <Set to Camera>
button on the top of the setup page to reload the network settings to the camera.
Tap <Enter/Save>
to save all the settings and you will then automatically
directed to the previous screen. Or tap <Return>
to exit the setting page
without saving settings.
6.4.3
Setup- IP Script (IP Camera API Commands)
Tap the <Setup- IP Script>
icon and enter its setup page as shown below.
This script tool can be used to set any of the API commands supported by the IP
Camera. The unit is supplied with a default set of commands already loaded,
but these can be replaced or added to as required. It is also possible to
create/edit a script on a PC and then tap the <Import> button to load it via a
USB stick (name the file script.txt).
Tap <Save> button to save the settings, or tap <Enter/Save>
return to the previous screen. Tap <Return>
saving settings.
30
to save and
to exit the setting page without
User’s Manual
7.
Power over Ethernet (PoE)
The IP Camera Tester can function as the power sourcing equipment (PSE) and
provide power to IP Cameras that are PoE/ PoE Plus enabled.
7.1
Enable PoE
Step 1: Connect the Ethernet cable from the IP Camera to the LAN/PoE OUT
Port on the side of the Tester.
Step 2: Tap the <PoE ON>
icon on the Home Screen to enable the PSE,
then the PSE indicator light
will be on, which means the
Tester is now providing power to the IP Camera.
Step 3: The <PoE ON> icon will turn into <PoE OFF>
when the PoE is
enabled. Users may tap <PoE OFF>
to turn off the PoE
function.
31
User’s Manual
7.2
PoE Setup
Tap the <PoE Setup>
icon on the Home Screen to setup including Power
Level, Power over Ethernet (PoE) measurement, PoE measurement display,
Enable PoE when booting, and PoE auto-shutdown time, etc.
Power Level
The output Power Consumption Level range can be set according to different
needs. The options include <Very Low (~3W)>, <Low (3~5W)>, and Mid-High
(6~25W+EXT 12V)>.
NOTE: Please make sure the PoE function is off before Power Level
setting.
PoE Measurement
The information includes voltage (V), current (I) and power consumption (P) of
the Power over Ethernet (PoE) can be measured according to different Ethernet
circumstances. Select from the drop-down list of the <PoE Measurement> to fit
32
User’s Manual
your Ethernet condition to show the PoE Measurement information on the
screen while using PoE.
PoE Measurement Display
There are several combinations in <PoE Measurement Display>, select from
the drop-down list to show PoE Measurement information including Voltage (V),
Current (I), and Power Consumption (P) in different combination.
Enable PoE after Tester Bootup
For users who wish to enable PoE in the meantime while the Tester is booting
up, please select <ON> from the drop-down list of <Enable PoE when booting>.
And the Tester will provide electricity to the IP Camera right after system
startup.
33
User’s Manual
PoE Auto-shutdown
Select the PoE auto-shutdown interval between 20 seconds, 40 seconds and 60
seconds. The setup can aid conserving battery power when there is no IP
Camera or other device using the Tester as the PSE. The reminder of PoE
shutdown will pop out around 5 seconds in advance of shutting down.
Tap <Enter/Save>
to save all the settings and you will then automatically
directed to the Home Screen. Or tap <Return>
to exit the setting page
without saving settings.
34
User’s Manual
8.
Snapshot
The advanced Snapshot function facilitates saving images in the assigned path
when necessary.
8.1
Implement Snapshot
In the IP Camera’s live view mode, press the <Snapshot> key on the Tester’s
button pad. Then enter the Snapshot setup page as shown below.
Snapshot File Setup
Assign a storage location among the three options (Tester/ USB/ SD) located on
the very top of the snapshot setup page for the snapshot by tapping the round
button on the left side of the option. And then enter the file name and description
respectively for the snapshot.
Tap <Enter/Save>
or tap <Return>
to save all the settings and return to the live view mode,
to exit the setting page without saving settings.
Files in USB/SD
For files that are saved to the USB drive or Micro SD card will automatically be
in the created folder named “IMAGE-DATA”. Each snapshot’s description can
be found in the attached .txt file.
35
User’s Manual
8.2
Snapshot Setup
Users can preview, copy and delete the image on the <Setup-Snapshot> setup
page. Tap the <Setup>
<Setup-Snapshot>
below.
icon on the Home Screen and tap on
to enter the snapshot file managing page as shown
Image Preview
On the <Setup-Snapshot> page, select the snapshot storage path (Tester/
USB/SD) where the saved files are located. Then all the files will be listed in the
<File List> field. To view a snapshot, tap the file name in the list and the image
will appear in <Image Preview> as shown above.
Single File Copy
Tap the file name in the list to Copy, and then tap the <Copy> icon in <File
Manager> section below <Image Preview>. Select the location to copy the file
to in the pop out window, and then tap <Enter/Save>
.
All Files Copy
Tap the <Select All> con in <File Manager> section below <Image Preview> to
select all the files in <File List>. Then tap the <Copy> icon to copy all the files.
Select the location to copy the files to in the pop out window, and then tap
<Enter/Save>
36
.
User’s Manual
Single File Deletion
Tap the file name in the list to delete then tap the <Delete> icon in <File
Manager> section below <Image Preview>. Tap <OK> on the pop out window to
allow file deletion.
All Files Deletion
Tap the <Select All> icon in <File Manager> section below <Image Preview> to
select all the files in <File List>. Then tap the <Delete> icon to delete all the files.
Tap <OK> on the pop out window to allow all files deletion.
37
User’s Manual
9.
Video Recording
The Tester supports Video Recording, Video Setup, Video File Managing and
Video Playback function for IP Camera live views when necessary.
9.1
Implement Video Recording
In the IP Camera’s live view mode, tap the white text “REC” on the right top
corner of the live view screen to start Video Recording. During the recording
process, the text will be in red. Tap the text “RED” one more time to stop Video
Recording, and the text will be back in white again.
Video Recording Setup (Video- Rec Setup)
Step 1: Tap the <Setup>
icon on the Home Screen to enter the Second
Screen. Enter <Setup- Video> by tapping the icon.
38
User’s Manual
Step 2: Tap <Video- Rec Setup> on the Video Setup Screen to access video
recording setup page.
Assign a storage location among the three options (Tester/ USB/ SD) located on
the very top of the setup page to save the videos by tapping the round button on
left side of the option. And then enter the file name and description respectively
for the snapshot.
Tap <Enter/Save>
or tap <Return>
to save all the settings and return to the live view mode,
to exit the setting page without saving settings.
39
User’s Manual
9.2
Video Playback
Users can preview, copy and delete the video on the <Video- Playback> page.
Tap the <Setup>
icon on the Home Screen and tap on <Setup- Video>
to enter the Video Setup Screen. Then tap on <Video- Playback> to access
video play back page.
Video Playback
On the <Setup-Snapshot> page, select the recording video storage path
(Tester/ USB/SD). Then all the video files will be listed in the <File List> field. To
view a video, tap the file name in the list and tap the <Playback> button on the
bottom, the video will appear as full screen.
In the Video Playback mode, press the <ESC>
key on the Tester’s button
pad to stop playback and return to video playback page.
40
User’s Manual
Single File Copy
Tap the file name in the list to Copy, and then tap the < Copy> icon in <File
Manager> section below <Image Preview>. Select the location to copy the file
to in the pop out window, and then tap <Enter/Save>
.
All Files Copy
Tap the <Select All> icon in <File Manager> section below <Image Preview> to
select all the files in <File List>. Then tap the <Copy> icon to copy all the files.
Select the location to copy the files to in the pop out window, and then tap
<Enter/Save>
.
Single File Deletion
Tap the file name in the list to delete then tap the <Delete> icon in <File
Manager> section below <Image Preview>. Tap <OK> on the pop out window to
allow file deletion.
All Files Deletion
Tap the <Select All> icon in <File Manager> section below <Image Preview> to
select all the files in <File List>. Then tap the <Delete> icon to delete all the files.
Tap <OK> on the pop out window to allow all files deletion.
41
User’s Manual
10.
System Setup
On the system setup page, users can adjust the volume or the brightness of the
IP Camera Tester’s LCD screen, implement firmware upgrade, restore all the
system settings to factory default and auto shutdown time.
Access <Setup- System>
Step 1: Tap the <Setup>
icon on the Home Screen.
Step 2: Tap the <Setup-System>
icon on the Second Screen to enter
the Tester’s system setup page.
42
User’s Manual
Adjust Tester Volume
Move the slider bar of <Volume>. Greater volume represents louder sound.
Adjust Tester Screen Brightness (Backlight)
Move the slider bar of <Backlight>. Greater value represents higher brightness.
Tap the <Auto Control> tick box below the <Backlight> slider bar to lock the
level on the slider bar. Tap the <Auto Control> tick box again to cancel the
selection; then the slider bar above will become movable again.
Upgrade Firmware
Before implementing firmware upgrade, please make sure the firmware is
located in the path: “upgrade\upd_dt01s\” in your USB drive.
Step 1: Tap the <Upgrade> button, and the file selection dialogue will come
out.
43
User’s Manual
Step 2: Press the <USB> button, and the firmware in the USB drive shall be
found. The firmware details will be displayed in the blank field of the
file selection menu.
Step 3: Check the <Complete upgrade> tick box by tapping, and tap
<Enter/Save>
button to start upgrade. Then the notice of firmware
upgrade confirmation will pop up. Tap <OK> and the firmware upgrade
will proceed.
Reset to Factory Defaults
Users can restore the Tester system to factory defaults by implementing this
function.
Step 1: Tap the <Default> button. Then the notice of resetting to factory
default will pop up. Tap <OK> to continue.
Step 2: The pop-up message of stating successful reset with request for
system reboot will display on the screen. Tap <OK> and the Tester will
be shut down.
Step 3: Reboot the IP Camera Tester after system reset. You will be first
directed to the Touch Panel Calibration mode as shown below.
Step 4: Tap the flashing cross on the left top of the screen. And then hit the
other flashing cross located diagonally.
44
User’s Manual
Step 5: Then touch each flashing box coming out as instructed.
The screen mode will switch to Home Screen after Touch Panel Calibration is
completed.
Auto Shutdown
The system can be automatically shutdown after pre-determined time range
when idle. Select the specific time interval from the drop-down list for system
auto shutdown. To disable the <Auto Shutdown> function, please select <OFF>.
45
User’s Manual
Appendix A: Technical Specification
Features
Color LCD Field Display
3.5"/ 320x240
AV
Video Input
BNC x 1
PTZ Camera
PTZ Control
RS-485
RS-485 Ports
R+, R-, T+, T-
PTZ Camera Setting
Pan, Tilt, Zoom, Manual Focus, Auto Focus
DSCP, Pelco D, Pelco P, AD422, Panasonic_C, Panasonic_N, JVC,
Support Protocols
Fastrax 2, Dynacolor, Molynx, Optix, Sensormatic
IP Camera
LAN In
10/100 Mbps, 48VDC In, Power Bank In
LAN Out
10/100 Mbps, 802.3at standard
IP Camera Setting
IP Address setting, Image Setting
DynaColor, ACTi, A-MTK, Axis, Arecont Vision, Hunt, IQinVision, Luxon,
Support Brands
Planet, Pixord, Sanyo, Sony, Vivotek, ONVIF, ZAVIO, XVISION, eVidence,
Optix, SPECO, HikVision
CAT-5
CAT-5 Port
1
Operation
Weight
450 g (Battery included)
Battery Type
2 x 3.7 V Li-Ion, 2000mAh
Charge Cycles
> 300 @ 80% capacity
Charging Time
3.5 Hrs
Operating Time
3 Hrs
Network
IP Setting
DHCP, Static IP
Size
Dimension (LxWxH)
170x99x38 mm
General Specifications
Electronic
Video
Input Voltage
DC12V, 5A
Signal Format
NTSC / PAL
Video Level
PTZ Control
Data Communication
IP Camera
Connection
CAT-5 Cable Test Detects
USB
46
Type
1Vpp, 140IRE
RS-485
RJ-45
Straight/Cross Cables, Open, Short, Miswired
USB 2.0
User’s Manual
SD Card
Audio
POE
Type
SDHC supported
Input
Line In
Output
Bypass / Power Bank
Device
Built-In Speaker, Phone Jack Φ3.5
PoE/ PoE Plus LAN In
Internal Bettery
47
User’s Manual
Appendix B: Brand and Support Models
Brand
ACTi
ACD-2100, SCD-2200, ACM-4200, AEK-1001B, SED-2120, SED-2120B,
ACD-2200
A-MTK
AM9730M, AM9539, AM323M, AM3519, AM6121
Arecont Vision
AV1000 series, AV5000 series, AV 8000 series
autoIP
GV-NC-201B, GV-NC-201VO, GV-NC-102D, GV-NC-102DO
AXIS
205, 206, 207, 210, 211, 221, 231D, 232D, Q1755, P1311, P1344, P3344,
M3014, Q6034
D-link
DCS-6815, DCS-6817, DCS-6818, DCS-6615
DVTel
CF-3111, CM-3111, CM-4021
DynaColor
NH060, NH070, NH101, NH210, NH061, NH221, NH062, NH102, NH073,
Diva Protocol
V1, V2, V5, V6, VS201, W1, W2, W3, W5, W6
DynaColor
IP PTZ
DH510e, DH610e, DH701e, DH811+e, NH720, NH820
GE
TVC-MP1B-S, TVC-MP2B-S, TVD-MP1D-S, TVD-MP2D-S/E
IQinVision
IQ752, IQ511
Level One
FCS-3071, FCS-1131, FCS-1141
SIQURA
Siqura BC series, Siqura FD series
ONVIF
Panasonic
Planet
Sony
48
Support Models
ONVIF comformance device
(compatible with ONVIF Comformance Test v1.02.2)
DG-NP304
ICA-230, ICA-312, IVS-110, ICA-151, ICA-750, ICA-150W, ICA-M220,
ICA-107W, ICA-700, P400, ICA-HM131, ICA-HM126
SNC-CM120, SNC-CS20, SNC-DM110, SNC-DS10, SNC-DS60
SNC-DF85P, SNC-RX570P, SNC-DF40N/P, SNC-RZ25N/P
Sanyo
VCC-HD4000, VA-20LAN, VA-50LAN, VA-51LAN, VA-80LAN, VA-82LAN
ViVoTek
PT7135, IP7137(7000 series), IP 8161(8000 series)
User’s Manual
Appendix C: Limited Warranty
LIMITED ONE (1) YEAR WARRANTY AND EXCLUSIONS
Manufacturer warrants to the original consumer purchaser and not for the benefit of anyone else that this
product at the time of its sale by Manufacturer is free of defects in materials and workmanship under
normal and proper use for one (1) year from the purchase date. Manufacturer's only obligation is to
correct such defects by repair or replacement, at its option, if within such one (1) year period the product
is returned prepaid, with proof of purchase date, and a description of the problem. This warrant excludes
and there is disclaimed liability for labor for removal of this product or reinstallation. This warranty is void
if this product is installed improperly or in an improper environment, overloaded, misused, opened,
abused, or altered in any manner, or is not used under normal operating conditions or not in accordance
with any labels or instructions. There are no other implied warranties of any kind, including merchantability and fitness or a particular purpose, but if any implied warranty is required by the applicable jurisdiction,
the duration of any such implied warrant, including merchantability and fitness of or a particular purpose,
is limited to one (1) year. Manufacturer is not liable for incidental, indirect, special, or consequential
damages, including without limitation, damage to, or loss of use of, any equipment, loss sales or profits or
delay or failure to perform this warranty obligation. The remedies, provided therein are the exclusive
remedies under this warranty, whether based on contract, tort or otherwise.
49
CAUTION!!!
Failure to read this notice may result in damaging
the camera or device in which the warranty will be voided
due to installation error.
When using any type of RJ45 jack powered balun, a Cable Tester must be used to
ensure proper connection. Many individuals can make RJ45 connections easily,
however mistakes can be made. When making connections for powered baluns, make
sure to test the connectivity and ensure proper alignment on both sides.
Cable Tester
When using passive or active baluns, the alignment of the cable is imperative to the success of the operation.
Use a Cable Tester because it is a very simple, yet easy to find tool that can save a huge headache. For example,
if one of the video wires accidentally gets crimped into the power side, and the powered balun is then hooked
up to the camera, both the camera and the balun have just burned out. This is an extremely costly mistake, not
only in dollars but time as well. How long does it take to test the RJ45 using a Cable Tester? Less than one
minute.
The new terms and conditions state: When an RMA is requested and the product has been burned by bad
RJ45 connections, the product is NO LONGER covered under warranty.
Note: Whichever way the RJ45 is terminated on one end of the cable, IT MUST BE THE SAME ON THE OTHER SIDE
for either TIA/EIA 568A or TIA/EIA 568B. Below is an example of TIAEIA 568B.
12345678
Pair 3
Pair 2 Pair 1 Pair 4
1 2 3 4 5 6 7 8
Pin
Pair
Color
Character
1
2
Orange / White
Video +
2
2
Orange
Video –
3
3
Green / White
Power –
4
1
Blue
Power –
5
1
Blue / White
Power –
6
3
Green
Power +
7
4
Brown / White
Power +
8
4
Brown
Power +
TIA/EIA 568B
WRMA-3_R201211-V12