1
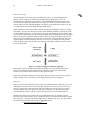
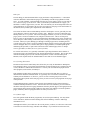
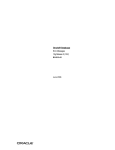
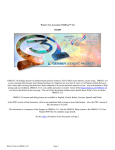
Markup User’s Manual
Table of Contents
1.
Introduction
86
2.
Things to know before you start
86
3.
Use of Markup
How to obtain Markup
How to start Markup
The mouse
The menu
The top row of menu symbols: freehand drawing
The second and third rows: line drawings
Text
Image areas
Erasing and inserting image areas
Images with dimensions
Retrieving from memory
Images and text
Changing the grid
Inversion and fast erasing
Rotation and scaling
Image files
Turning the page
Finishing
Camera input
87
87
87
87
87
88
88
89
89
90
90
90
91
91
91
92
92
93
93
93
4.
Markup Techniques
Disk space
Use of existing illustrations
Use of Draw output
For faster copying
Recovery from a full disk
93
94
94
94
95
95
86
MARKUP USER’S MANUAL
1. Introduction
Markup is an Alto program for document illustration. Its basic purpose is to permit you to add
illustrations to an existing formatted text document. It can also be used to prepare visual aids, and
to manipulate illustrations prepared with other illustration programs, such as Draw.
The purpose of this manual is to explain how to use Markup. Effective use of Markup involves
three different kinds of issues. In the first place, there are things you must know before you start to
use Markup; then there are the individual commands of Markup, and their effects, which you must
learn; finally, there are a great many "tricks" that you will find useful if you make extensive use of
Markup. This manual is concerned mainly with issues of the first two kinds, those that you will
need to understand in order to use Markup. The final section of this manual discusses some of the
"tricks" that fall into the third category.
2. Things to know before you start
Markup manipulates dots. The commands in Markup are almost all oriented towards helping you to
manipulate the dots that make up the picture on the screen. With enough patience and skill, you
could use Markup to build entire pictures out of individual dots, as if you were a Pointillist painter.
On the assumption that you don’t have the time for this, Markup gives you more powerful
commands for manipulating whole collections of dots. Thus you can with a single command lay
down a straight line of dots, or an entire rectangular area. Even after you have used one of these
commands, the picture remains a collection of dots, each of which can be modified individually.
Markup treats dots and text separately. Markup knows how to deal with text: it will accept
formatted text from Bravo and other such programs, or simple text strings placed with the mouse.
Text is, however, treated differently from dots. You use different commands to manipulate the two
different types of information.
Markup is for marking up documents. In other words, Markup expects you to provide the initial
document for marking up. If you don’t have anything with which to start, Markup will provide you
with something analogous to a single blank sheet of paper. If you do have a document from which
to start, Markup will let you add more pages to it. Basically, however, Markup expects you to
provide a document as a starting point.
Markup works with Press files. In the world of the Alto, there are many different sorts of file
formats: Bravo files, Sil files, Draw files and plain ordinary text files. Most of these are for use
with a specific programBravo files with Bravo, Sil files with Sil, and so on. Press format is rather
different: it is supposed to be suitable for all kinds of program, whether text editors, page
composition systems, printers, or illustrators. As time goes on, we expect more and more of our
programs to deal solely in terms of Press files. Markup is the first of these.
The implications of the use of Press files are as follows:
1. Any document to be illustrated with Markup must be converted to Press file format. You
can tell Bravo to produce a Press file by issuing the F
ile option of the H ardcopy command.
Draw, Sil, and some other programs are also capable of producing Press files.
2. Once in Press format, the document will be in the form of separate pages, each
corresponding to a page of the final printed document. It will no longer behave like a
continuous scroll, as in Bravo.
3. Any illustrated document generated with Markup will also be in Press format, and must be
printed by a process that accepts Press files. Examples of systems that will print Press files
are the Spruce program for the Dover and the Press program for the SLOT/3100.
MARKUP USER’S MANUAL
3. Use of Markup
This section of the manual starts by explaining how to get hold of a copy of the Markup program,
and how to get the program running. It then covers each of the commands of Markup, one by one.
How to obtain Markup
The program you need is called Markup.run, and is to be found on the <Alto> directory on Maxc
and on most IFS servers. A copy of Markup.run is usually included with the other programs on the
BASIC NON-PROGRAMMER’S DISK. If your disk does not include a copy, transfer it from your local
file server by means of the FTP program; for example:
>Ftp Maxc Ret <alto>markup.runCR
How to start Markup
. Markup will ask you for names of the input and output
Simply type "Markup", followed by CR
files. If you omit the input file name, and type only CR
, Markup will supply a one-page blank
Press file; if you omit the output file name, Markup will assume that you just want to play, and do
not want to generate any output for printing. For convenience, you may type both file names on
the command line:
.
>Markup InputFile OutputFileCR
Markup takes several seconds to get started. Eventually the display screen will go blank, the first
page of the input file will appear, and the cursor will change to a small cross. Markup is now ready
for your use.
If the input and output file names are the same, Markup will save the original input file on a backup file whose name is
the original file name followed by "$". This operation is performed at the time you "quit" from Markup.
The mouse
The mouse is the most important input device to Markup. Its three buttons are used throughout in
a consistent manner:
RED button (top or left-hand): use of this button generally results in the addition of
information to the document.
YELLOW button (middle): this button invariably controls the display of the command menu
that you use to select your next command.
button (bottom or right-hand): use of this button generally results in the removal of
information from the document.
BLUE
There are exceptions to these rules, which are noted below wherever they occur.
As a minor but important point, it should be understood that the so-called "ball mouse", with the
three large buttons arranged from left to right, is much less satisfactory for use with Markup than
the older-style mouse with three bar-shaped buttons, arranged from top to bottom. The old-style
mouse can be moved much more smoothly than the ball mouse, and this is essential for some of the
freehand drawing operations of Markup.
The menu
Whenever you press the YELLOW (middle) button, one row of the command menu appears. You
87
88
MARKUP USER’S MANUAL
may move the mouse around with this button held down, and select the menu symbol
corresponding to the command you wantthe cursor symbol will change as you move from one
menu symbol to the next. If you move up or down, more rows of the menu will appear. When
you have selected the command you want, release the button, and the menu will disappear.
damien
mouse
foo
image file menu
to leave Markup
1 2
4
5
+ quit
page turning
TIMESROMAN10
TIMESROMAN10I
ARROWS10
LOGO24
main menu
font menu
Figure 1. The Markup menu.
The complete menu is shown above. The four rows of six symbols constitute the principal
commands of Markup. Below these symbols are the names of the fonts available to you for adding
text to your illustrations (the choice of fonts depends on the fonts defined in the input Press file).
Above the menu are the names of other Press files containing images that you can add to your
illustrations. To the left and right are the numbers of the other pages in the document, and the
symbols "+" and "quit" for adding more pages and for leaving the Markup program when you are
finished.
The top row of menu symbols: freehand drawing
The top row of the menu contains six different "brushes" for freehand drawing. When you select
one of these six, you can "draw" by pressing down on the RED (top or left) button, and holding it
down as you move the mouse; dots will appear as long as you hold the button down. The pattern
of dots laid down matches the shape of the brush, except in the case of the two left-hand brushes in
the top row, which are surrounded by broken circles to make them easier to follow.
The BLUE (bottom or right) button is used for erasing, in an exactly analogous manner to the RED
button. As long as the BLUE button is held down, any black dots over which the cursor passes will
be changed to white.
The second and third rows: line drawings
The middle two rows of the menu are devoted mainly to line-drawing brushes. When these are
selected, use of the RED button dispenses black dots in straight line segments, and the BLUE button
does the same with white dots. The upper of the two rows is for use when only horizontal and
vertical lines are required; the lower row will also draw lines at 45 degrees. Four different line
thicknesses are provided, measuring 1, 2, 4 and 6 screen units across.
In contrast to the freehand drawing brushes, these brushes do not dispense dots in a continuous
stream. Instead, a short straight segment is laid down every time the cursor is moved to the next
intersection of an invisible grid. Thus if you press and release the RED button, nothing will happen;
MARKUP USER’S MANUAL
if you press, and then move the cursor about 1/4 inch, a line segment will appear. As you move the
mouse further, a connected sequence of line segments will be laid down, following the path of the
cursor as closely as the grid will allow. Note that as long as the button is held down, the corners of
connected lines are filled in neatly; if you lift the button between line segments, however, the
corners will look messy. To rectify this, you can redraw the line segments that meet at the corner
in question.
At the start, Markup sets the line drawing grid to 16x16 Alto screen dots. If you are a novice, you
will find this relatively large spacing convenient, but for many purposes it is too coarse8x8 is a
more useful setting. The command for changing the grid setting is described below.
Text
To add text to your picture, simply type it. You need not position the cursor before you type, for
Markup expects you to position the text afterwards. While you type, the text will appear wherever
the cursor happens to be. During type-in, ac or BS erases the most recent character typed, and DEL
or either the YELLOW or BLUE mouse button erase the whole string. When the text is complete,
position the cursor where the center of the text string should go, and press on the RED button. The
original text will disappear from the screen, and will reappear, centered about the cursor position.
Text is positioned in this way to the nearest half-grid unit. If you want to position it more
accurately than that, do not release the RED button immediately, but hold it down and move the
mouse in the direction you would like to move the text. You will have to move through a small
"dead zone", and then the text will begin to move, somewhat more slowly than the cursor. If you
move the mouse beyond a certain distance, the text will disappear altogether. This is useful, for it
allows you to change your mind about inserting the text.
Text may also be erased, using the BLUE button. To do this, you must first select the "text brush",
i.e. the T-shaped symbol in the lower right-hand corner of the menu. When you point at a string
of text and press on the BLUE button, the text will be erased. It may now be inserted elsewhere
with the RED button. Only the text brush and the text-and-image brush (see below) can be used to
remove text. It is not always possible to erase text created with other programs, such as Bravo or
Draw.
Markup "remembers" the text you erase, or type in and insert, and allows you to insert this text any
number of times. In between insertions, you may draw with the freehand and line-drawing brushes,
change fonts (see below), and move to other pages of the document.
You may add text in any of the fonts in the font portion of the menu. To select a font, press the
YELLOW button and move the mouse down until the font menu appears; lift up when the cursor is
within the appropriate font name. You may change the font of a piece of text in this way: erase it,
switch fonts, and insert it.
Image areas
Markup provides a number of commands for manipulating rectangular image areas on the screen.
You can erase an area, insert its contents somewhere else, rotate the image, make a mirror image,
and scale it up or down. You may read in images from files on your disk, and may scan images in
using a TV camera. You have the option, when erasing or moving an image area, of taking the text
within the area too.
In order to use all these commands, you must understand that Markup can "remember" image
areas, in much the same way that it "remembers" text. Thus when you erase an area, it doesn’t
vanish forever, but goes into Markup’s memory; when you give the command to insert an image, it
89
90
MARKUP USER’S MANUAL
is the image in this memory that gets inserted. The fact that you can’t see the image in Markup’s
memory is sometimes inconvenient; but there is only one display on the Alto, and Markup uses it
just to show you what’s on the page.
Erasing and inserting image areas
There is a small open square symbol in the bottom row of the menu: selection of this symbol allows
you to erase and insert image areas. To erase, you must indicate the rectangle to be erased, by
tracing out a diagonal of the rectangle. Position the center of the cursor at one corner of the
rectangular area, press down with the BLUE button, move to the opposite corner, and lift up. As
you move the mouse, the area you will erase is shown by inverting its contents, i.e. by turning black
dots white and white dots black. Note that the boundaries of the area are constrained to the nearest
grid lines.
If, during the erase operation, you change your mind or realize that you started in the wrong place,
simply retrace your steps until the black inverted area disappears; you can then lift up with no sideeffects. If you should lift up, and erase some priceless gem of an image, there is a special command
to put it back exactly where it was (see below, retrieving from memory).
To insert an image, select the image area symbol in the menu. Then press down with the RED
button, and whatever image is in Markup’s memory will be added to the displayed page. Thus an
image can be moved by selecting the image area command, erasing it and then inserting it in its
new position.
When you press the RED button to insert an image, Markup shows you the boundary of the
rectangle where the image will be added. You may keep the RED button down and move this
rectangle around until you are satisfied, and then lift up. If you decide you don’t want to add the
image at all, move the cursor to the edge of the screen, so that the rectangle disappears; you may
now release the button without causing insertion.
Markup includes a feature to help you position images exactly where you want themuntil this
feature was provided, it was very difficult to align parts of an image with the picture on the screen.
The feature allows you, before erasing an image area, to copy a small square region of the image
into the cursor; this is done by selecting the image area command, positioning the cursor over the
area of interest, and pressing the BLUE button down and up without moving the mouse. Now you
may erase the area. When you try to insert it with the RED button, the cursor will show you where
the area of interest will appear, and you can align it appropriately before lifting the RED button.
Images with dimensions
The third row of the menu includes a symbol made up from four arrow-heads: this symbol can be
selected for image manipulation with dimensions. The command operates in all respects exactly like
the image-area brush, except that dimensions are shown. During erasure, two numbers are displayed
near the cursor, indicating the size of the area selected for erasing. During insertion, the two
numbers show the displacement of the image from its original position when erased; this is useful
for bar charts, etc.
Retrieving from memory
The symbol at the right-hand end of the second row, depicting an arrow emerging from a bucket,
can be selected to retrieve the image, or string of text, from Markup’s memory. Whatever was last
erased, whether a text string or image area, will be replaced on the screen in its original position,
and will be expunged from Markup’s memory. This command is useful now and again: for
example, to copy an existing text string, you can erase it, insert it at the new position, and retrieve
MARKUP USER’S MANUAL
from memory to put back the original text.
Images and text
At the left-hand end of the bottom row is a symbol made up of the image area and text symbols
combined. If this symbol is selected, text and image areas can be manipulated together. This
command is very useful for moving entire illustrations.
The image-and-text command works in a similar fashion to the image area command: the BLUE
button is used to define the rectangular area to be picked up, and the RED button is used to insert
the image and text in the desired position. As in the image area command, a rectangle shows where
the information will be inserted; also the same cursor alignment feature is available. Images and
text may be moved between pages by erasing them, selecting another page, and inserting them; this
is useful for adding existing illustrations to a text document, and applies to pure images and pure
text as well as to combinations of the two.
The only unusual feature of this command is its criterion for picking up text. Any text strings
placed on the page with the aid of Markup will be picked up provided they lie within the boundary
of the overall enclosing rectangle. Formatted text from Bravo, however, is picked up only in units
of a paragraph at a timeit is not possible to pick up part of a paragraph and leave the rest. This
is sometimes useful, for it means that you can pick up an illustration without accidentally including
part of a nearby text paragraph.
Changing the grid
The symbol resembling a number-sign, next to the image-and-text symbol, can be selected in order
to change the grid spacing. This command uses the BLUE mouse button for size changes, and the
RED to change the grid alignment. Either button, if pressed, will cause lines of dots to appear on
the screen showing the horizontal and vertical grid spacing.
To change the grid spacing, press down on the BLUE button. Two numbers will appear near the
cursor, showing the horizontal and vertical spacing. As the mouse is moved, the spacing will
change. It can be adjusted to as high a value as you like, and to as low as 5 units in each direction,
independently in the two directions. Note that 45-degree lines cannot be drawn if the horizontal
and vertical spacings are different.
You may wish, after changing the grid spacing, to make sure that lines drawn with the new grid are
aligned with those drawn previously. To do this, you may have to change the grid alignment, using
the RED button. When the RED button is held down, two numbers show the coordinates of the grid
origin; you can think of these numbers as defining the position of the "squared paper" on which
the grid is drawn. With the aid of these numbers, plus the dots showing the grid itself, it is usually
possible to get things lined up.
Inversion and fast erasing
The bottom row includes a command symbol made up of a black box together with an open box.
This command provides two functions. With the RED button, image areas may be inverted, i.e.
black dots turned white and vice versa. With the BLUE button, fast erasing can be done, at the
expense of retrieval from mistakesonce the dots have gone, they can’t be retrieved or inserted
elsewhere. If you should ever need to erase a large area rapidly, you will find this command saves
you many seconds of waiting. This command operates only on dots, not on text.
91
92
MARKUP USER’S MANUAL
Rotation and scaling
Once an image has been erased and stored in Markup’s memory, it can be manipulated in a
number of ways, using the one remaining command symbol on the bottom row yet to be
describedthe one consisting of two open boxes. This command differs from all the others in its
use of the mouse buttons: both buttons cause the image to be inserted. The RED button is used to
scale the image, to rotate it through multiples of 90 degrees, and to make mirror images of it. The
BLUE button is used to rotate the image through arbitrary angles.
When you press down on the RED button, a double cross appears, marking the "origin" for scaling
and rotation. You may now choose between the various functions available, by moving the cursor
in various different directions. As shown below, the upper right quadrant is used for scaling, while
the two adjacent quadrants provide mirror-imaging, and the lower-left quadrant provides 180-degree
rotation. If the cursor is positioned directly above or below the origin, the image will be inserted
rotated 90 degrees anticlockwise, and if the cursor is positioned on the same horizontal line as the
origin, the image is rotated 90 degrees clockwise. In every case, a rectangle shows the position
where the image will be inserted; in the case of scaling, tick-marks are placed at intervals of half
the size of the original.
mirror about
vertical axis
scaling
90o anticlockwise
90o clockwise
180o rotation
mirror about
horizontal axis
Figure 2. Control of scaling and rotation by quadrant
Pressing down on the BLUE button also displays the double cross origin, and when the mouse
moves, three small dots show the positions of the other three corners of the rotated image.
Rotation is zero when the cursor is directly to the right of the origin.
In both cases, the image will appear when the mouse button is released. To prevent any insertion,
simply return the cursor to the vicinity of the displayed origin and release the button.
Image files
Images may be stored in Markup’s memory either by erasing them from the displayed picture, or by
reading them in from Press files stored on the disk. The names of the files that you can access in
this way are shown above the main menu, and you read them in by moving the cursor so that it
coincides with the name of the image you want; when you lift the YELLOW button, the image is
placed in Markup’s memory, whence it can be inserted, rotated or scaled as described above.
Markup selects images for inclusion in the menu at initialization time, by scanning your disk
directory for files with extension ".press", and then checking to see which of these include an image
on the first page. A maximum of 20 such images may be included in the menu. You may inhibit
the construction of the image file menu by invoking Markup thus:
>Markup/n InputFile OutputFileCR
MARKUP USER’S MANUAL
Turning the page
The numbers to the left and right of the main menu may be selected in order to turn to other pages
of the document. Markup’s memory is not affected by page turning. The "+" symbol creates a
fresh blank page. There is no command for erasing a page, but if all the text and dots on a page
are erased, Markup will delete the page from the document when it writes out the output file.
Finishing
When you have finished using Markup, select the word "quit" to the right of the page number
display in the menu. Markup will think for a while, and then return you to the Alto Executive.
Camera input
The menu contains a few blank spaces, including two on the third row. However, if you happen to
use an Alto with a TV camera attached, a special symbol will appear on this row, depicting a square
with a round hole in it. This symbol controls the use of the camera for scanning in images.
Before you select the camera command symbol, you should define a rectangular area of the screen
into which to scan the image; do this by erasing an area with the image-area or fast-erase brushes.
Then when you select the camera command, the normal screen picture will disappear, and you will
see instead the view through the camera lens, with an area of the required size highlighted within a
black border. You can move the border around until it encloses the desired image, and then press
the RED button to scan the image onto the page and return to the normal display. The mouse may
be moved while the RED button is held down, in order to make accurate adjustments to the position
of the border.
The camera hardware performs what is known as thresholding on the imagedark areas are made
black, and light areas white. The resulting image quality is not always perfect. To improve it, you
can adjust the threshold level while the camera image is visible, by pressing the BLUE button and
then moving the cursor up and down: upward movement will darken the image, and downward will
lighten it, at a rate proportional to the cursor’s horizontal position.
Use of the TV camera unfortunately involves learning how to switch it on, and how to adjust the
various knobs on the camera control box. This is best understood by watching someone else do it.
4. Markup Techniques
This section is for serious users of Markup, who want to learn how to produce good-quality
illustrated documents with the minimum of effort. The list of techniques described here is by no
means exhaustive. After all, Markup is really a "box of tools" for manipulating the image on the
screen, and there are no well-defined limits to the utility of these tools. Each tool has an explicit
purpose, like line-drawing or area manipulation, but there are generally several other useful things
you can do with each tool; for example, you can erase with the line-drawing brushes in order to
square off an irregular black area. The more you use Markup, the more techniques and strategies
for illustration you will learn.
This section deals with two sorts of technique: those for managing your document as a whole, and
those for creating the individual illustrations. Document management techniques are discussed first.
93
94
MARKUP USER’S MANUAL
Disk space
The first thing you must understand before trying to illustrate a large document (i.e. a document
with more than half a dozen illustrated pages) is that Markup consumes large quantities of disk
space. As a rule of thumb, you should make sure there are at least 100 free pages on your disk for
every illustrated page of the document. Thus if you intend to put illustrations on 12 pages, you
should have 1200 free pages before you start. The exact amount you will need depends on the size
of the illustrations: if you intend to put just a few tiny images on each page, in the same manner as
this manual, then your disk space requirements will be much less.
The reason for all this caution is that Markup cannot be relied upon to recover gracefully if it runs
out of disk space, unless it runs out after you have "quit". Whenever you turn to a different page,
Markup checks to see if you have 100 or more disk pages available; if you do not, it writes out the
pages you have created or modified so far, and quits to the Executive. This is not fool-proof,
however, and it is still possible for you to spend three hours illustrating twenty pages, and then run
out of disk space while working on the twenty-first, leaving you with no means of recovering your
lost work. When you "quit", Markup goes through a cleaning-up operation, combining the new
versions of the pages you have created or modified with the original versions of the pages that have
not been changed. This, too, consumes disk space in large quantities, but if Markup fills up the
disk during this operation, or quits when it finds fewer than 100 disk pages, there is a simple
recovery procedure (see below, Recovery from a full disk).
For reasons such as these, it is generally worthwhile to split large documents into a number of
separate Press files, and combine them only when all illustrations are complete. This is easily done
with the PressEdit program (see the Alto Non-Programmer’s Guide or the Alto Subsystems
Manual). Each separate Press file should include no more than six to ten illustrated pages.
Use of existing illustrations
Documents must often be edited many times before they are ready for distribution. Markup has
been designed to allow you to prepare the illustrations for such documents on a separate Press file
or files, and then to combine them with the text. You may also use illustrations prepared with
other programs, such as Draw, Sil and Flyer.
This technique amounts to the preparation of one or more Press files that form a portfolio of
illustrations for inclusion in the document. It is generally more convenient if each Press file page
contains just one illustration. If, however, you are sure that a certain group of two or more
illustrations will be placed on the same page, then you will save time by keeping them on one page
of the portfolio.
The PressEdit program is again the means whereby the formatted text file (in Press format) is
combined with the portfolio file or files. Once the files have been combined, you can commence
the rather tedious operation of copying illustrations from the portfolio pages to the appropriate text
pages using the image-and-text brush. Make sure that, at the end, nothing is left on the portfolio
pages, so that they will be expunged from the file when you write it out.
Use of Draw output
Press files generated with the Draw program may be used as input to Markup. You may define
curves with Draw, and then read the resulting Press file into Markup, in order to add image
information or text.
Although Draw allows you to add text to the curved pictures you draw, it is often more convenient
to omit the text at the Draw stage, and add it with Markup. If you include text in the Draw file,
MARKUP USER’S MANUAL
you will find the resulting picture very slow to edit with Markup, particularly if you mix several
fonts.
For faster copying
Markup uses a rather out-of-date method of copying image areas, which means that this operation is
sometimes rather slow. In particular, if the grid is not set to a horizontal spacing of 16, with the
origin at zero, then images will be inserted very slowly. Before you start copying illustrations from
the portfolio to the text pages, therefore, make sure that the horizontal spacing and grid origin are at
16 and zero. For ease of vertical alignment, however, you may set the vertical spacing to a smaller
value, such as 8, without affecting performance.
Recovery from a full disk
If Markup exhausts disk space during during a page turn or the "quit" operation, it prints a
message on the screen telling you what to do. In essence, Markup saves all the new and modified
pages of the document on a Press file called MARKUP.SCRATCH, and this allows you to reconstruct
the desired output file.
The most difficult part of this operation is to figure out which pages are included in
MARKUP.SCRATCH. You may use Markup itself to help you here, but with caution, for Markup
erases MARKUP.SCRATCH and creates a new version. Therefore you should copy MARKUP.SCRATCH
to a file with another name (such as FOO.SCRATCH), and look at this new file with Markup. When
you have figured out which pages this file contains, you can use PressEdit to put together the
required document out of this and the original file. Before doing all this, you must of course delete
some files from your disk, so as create more space.
95