1
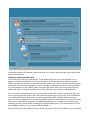
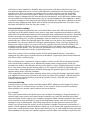
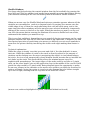
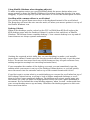
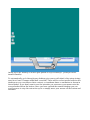
Plasma design concepts presented as a user manual.
By Dennis Pennekamp
Thursday, 2005-08-11
Sheets
Application windows and applet widgets can be placed on a panel or a sheet. Sheets can
be switched between being a desktop sheet or a work sheet.
Desktop sheets
A desktop sheet is like your real world desktop: A nice surface texture or picture placemat on which you place the objects you work with. As the virtual computer world does
not occupy any of your real world office space we took the liberty to replace your desk
with a big filling cabinet so you can pull out different desktops as if they are drawers.
This allows you to organize different tasks or projects onto different dedicated desks.
Tool sheets
A tool sheet analogy could be a big transparent plastic sheet on which you sketch notes
without messing up the original underneath. As the virtual computer world does not
have any weight you can stick all kinds of handy additional tools onto a work sheet,
which you can store away and place on top of the windows on your desktop when
needed without messing it up. And because in the virtual world we don't have to adhere
to the third dimension you can just as easily slide a work sheet with its tools in between
your desktop surface and its windows. A sheet can even contain a different and isolated
log-in session.
Panels
Besides sheets and their content there are special objects to control, store and access
your sheets and contents, called panels. In many respects they are similar to what you
find on other operating systems although here they can have many shapes, the most
recognizable configuration would be as a (button) bar at the bottom of the screen named
kicker and as an optional menu-bar at the top of the screen.
Kicker layout
This panel is named kicker because it uses much the same layout as the Kicker
application on previous incarnations of KDE, and is made available to ease the transition
of experienced KDE, Microsoft Windows and Apple Mac OS X users.
Hidden kicker
When kicker is hidden it will not annoyingly pop-up when you hit the bottom of the
screen. However it will tease you to let you know it is hidden down there by flipping up a
border near in the corner of the screen. This dog ear corner may be big enough to show
you a small preview of the clock.
When you scrape across the bottom of the screen towards the teasing dog-ear it will
unfold further. Mouse movement in any other direction will cause the dog-ear to retract.
This is called discoverability of a feature, a word which, according to OpenOffice, you
will not find in a vocabulary. When you discovered that you can make the dog-ear grow
by scrapping across the screen bottom you will soon have traveled the short required
distance for a full-pull which causes the entire kicker panel to snap onto the screen.
Accolades
Above kicker accolades will fade-in to describe each section of kicker. You can continue
to scrape across the bottom of the screen to your desired section without causing the
sections to pop-up any additional information. Once you move your mouse onto kicker
the accolades fade-away to keep any additional information popping up appear
uncluttered. The accolades will not reappear during this session of interaction with
kicker. You can no longer use the screen bottom to travel along and avoid interaction
with kicker content as it is now used to make it easy to hit items on kicker in accordance
with Fitt's law (small items are easy to hit if you can't overshoot them because when
extend to the screen border). To travel across kicker without invoking extenders you can
use the safety zone.
Safety zone
Above kicker there is a safety zone, sized as big or bigger then kicker, allowing you free
movement along kicker without additional information appearing. Once you move above
the safety zone kicker will start to recede slowly, the further you move away the faster it
recedes, when fully hidden this session of interaction with kicker has ended. However
moving back (down) towards kicker before it has become hidden will cause it to move up
into full view again, allowing you to change your mind and continue this session.
Extenders usually have a neck that crosses the safety zone, giving you easy access to
both the extender and the safety zone.
Undo session
When a session has ended and you made some mistakes you can undo most of them with
a single undo command 'undo changes made in kicker'. Items will be placed back in
their original order, started applications will be asked to stop and stopped applications
will be asked to start again. However documents saved and closed by those applications
will not be automatically reopened, most applications will have a list of recent
documents to help you out.
Visible kicker
When kicker is set to be permanently visible the accolades tease you with their
existence, without trying to grab full attention by quickly fading-in and out as your
mouse passes the border of kicker. To actually read them you have to start over and
keep your mouse on the top border of kicker, once you have moved onto the contents of
kicker they will not reappear again during this session.
To hide kicker (or any screen-border anchored panel) you must scrape in the reverse
direction (downwards or to the left) to make this functionality discoverable the panel
slowly drifts off screen when the mouse is left unattended while residing backed into the
screen-border. Roll-up buttons on the side of kicker are no longer necessary or
available. An extender appears when you mouse over the button, to make them easy to
hit you can also place the mouse at the screen bottom underneath. When a button allows
direct interaction without its extender, the extender will go away when you hold your
mouse still at the screen bottom.
Launch extender
In the lower left corner there is the familiar launch menu button which can be opened by
either clicking it or by making a single mouse gesture consisting simply of crossing
through the icon or screen corner and scraping the mouse upward along side the left
screen border. Once open you can either navigate its elegant new structure (I have not
seen it or thought of it yet:-) or just start typing keywords which will narrow down your
options. Even if your language is not installed you can launch KDE applications you
know by typing a 'perfect match'.
Quick-launch buttons
Next to the launch extender are quick-launch buttons, applications, menus and or
locations deemed popular enough to warrant direct access. When you move your mouse
over quick-launch buttons a diagonal representation extender appears. The name and
subtext of the item you are hovering is instantly highlighted. When you move your
mouse to an icon on the left or right the diagonal list scrolls smoothly along, up or down,
removing any jitter. The highlighting of the current icon name is however instant giving
you fast access and feedback when selecting an item by name.
(technical picture of diagonal representation, note mouse position and icon underneath
and its float above)
Diagonal representation fun
At first the big icons are translucent. From behind the first icon you moused over a
bigger version rises up like a float from behind a hill in an American balloon parade.
This to accentuate the direct link between the small icon on the icon-bar and its big text
enhanced version in the extender, it rises straight up through the neck of the extender
to its destination, in its trailing wake the other big icons also turn from translucent to
solid, this wake continues upwards even after the big icon reaches its destination.
It is even more fun when you move your mouse across the icon-bar before the big icon
has risen through the neck as this will cause for other big icons to rise from behind the
icon underneath your mouse also, creating something like a helium balloon release
party. (I advice organizers to use biodegradable balloons and finders to return the cards
and recycle the balloon contents by popping the balloon in a upside down bucket and
inhaling it with a straw while standing up straight and saying 'The chipmunks have left
the building, thank you very much and goodnight.' :-)
Please notice that the width of the neck will expand to allow all the floats to go 'through'
and that you are required to initially keep your mouse still above the first icon you
encountered and must move to one of the adjacent icons before the big rising icon has
left the neck. This is because eye-candy is nice to show of when you are bored but
should not clutter your work (s)pace when you are focusing on your job. While the
default theme is animated to be non-intrusively informative, note that other themes may
use incredibly beautiful and distracting svg or open-gl animations, for example to mimic
a realistic trailing air flow through icons which animate like flag fabric. (Based on homevideo footage filming actual fabric with a multicolored grid painted on. Not that I have
the time and skill for that but I'm just saying... :-)
Conveyor-belt scrolling
On the quick-launch button bar the scroll-wheel has a new and efficient function. By
scrolling up all the quick launch icons start a slow and continuous movement to the left,
effectively all quick-launch buttons will eventually pass underneath the mouse. Scrolling
further increases the speed stepwise. As a result the diagonal representation content,
the icon and labels list, scrolls up, making it easy to read lots of text labels at your
preferred pace. When the desired speed has been set your mouse has complete free
movement, the conveyor belt will continue uninterrupted. Once you have spotted the
button you want to select you can scroll in the opposite direction which will force the
scrolling to make a full stop. Now you can easily select the button by moving and
clicking with the mouse, or if you are still fascinated by scrolling icons you can make the
conveyor belt slowly move in the required direction.
Note that conveyor-belt scrolling scrolls all the quick-launch buttons, even those
separated by other types of panel buttons in between. Ungrouped quick-launch buttons
will follow after a relevant gap.
The scrolling is also continuous; objects make a virtual round, like an O shaped model
train track with an endless, as in Indian tail bitting snake, wagon setup. From the
second pass and on, the distance between the objects can be slightly increased to allow
for a very short pause by the leading object on its original location as following objects
eat into their increased distance without changing the general speed, like railroad
wagons using their collision cushions.
(Yes, sometimes I wonder about analogy usage but you do get strange questions when
you explain a feature not yet seen in action on any other OS, perhaps I should mention
the cushions are spring-loaded, greased and made of steel, truly the most manly of
cushions har har har:-)
Conveyor belt fun
Conveyor-belt scrolling can be used throughout KDE; whenever the length of a menubar is too short or on any button / tool bar. It can even be used at normal scrollbars;
when placing your mouse exactly above the arrow button.
For example:
Place your mouse above the down arrow on a window containing a large document or
website and rotate your scroll-wheel down (towards you) until the desired speed has
been achieved. Notice that if your computer supports alpha channel graphics the end of
the document or site will fade to gray as the beginning scrolls onto the screen again
making it easy to distinguish. Now move your mouse to the up-arrow and scroll the
wheel up to slow down the speed, scroll up further to make it stop and even further to
make it scroll upwards instead of down, when you scroll down (the opposite direction of
the arrow) it will instantly stop. Notice that when you try to stop while both the end and
the beginning of the page are shown together and the slider in scrollbar is split into two
it will either scroll back or forward until the slider is complete (at the top or the bottom)
depending on whether the end or the beginning of the document occupied the most
window-space when you tried to stop. (Now go to your local computer mega store, boot
KDE4, make it scroll through the illustrated manual page and unplug the USB cables;
promo time:-)
Moving into the extender
If you are unable or unwilling to click the tiny icons on the kicker panel, despite the fact
that they are effectively anchored to the screen border making it impossible to
overshoot them vertically, you don't have to make the bar bigger and less capable unless
you want to. You can just as easily move your mouse through the neck of the extender
and click the big icons instead.
Picture zooming
When above a big icon in the extender you can use the scroll-wheel to zoom in, similar
to moving towards an object in real life, simply by scrolling up (towards the picture). If
you keep your mouse near the detail you want to see up close, you can zoom all the way
until you see its single intersection, as the icons are vector based. Zooming also affects
the size and location of text within the extender border. By scrolling down you can zoom
out and see more icons and more text labels until they are too tiny to read. To get back
to the default zoom level you can click the mouse button underneath the scroll-wheel or
by reopening the extender.
Normal scrolling
When you move your mouse above the text labels you can scroll like on every modern
OS. Even though scrolling can cause an icon to come underneath your mouse it
continues to use scroll mode, to start zooming you first have to move off the icon picture
to unlock text scroll mode.
The extender closes by moving your mouse outside its outline. This is also the reason as
to why the extender has a neck, this clearly gives you plenty of space to close the
extender when you are interacting with the panel.
Notice that the extender tends to be pretty wide, not unlikely almost as wide as your
screen. This is required to allow straight predictable scrolling with long text labels
without dynamic readjustment of the outline, this gives a more peaceful experience. As
the icons move more closer to the right edge of the screen there is less room for text
labels which causes them to swap to the other side while the icons continue their
diagonal path down. Near the edge of the screen a few big icons can no longer be placed
diagonal, they will be placed straight above the last trouble free icon, they remain
straight above their icon on the bar but are just not centered above theirs.
Taskbar
With the left side of the kicker configured panel filled with quick-launch buttons the
right side will quickly fill up the same with buttons of all your currently active
interactive applications (programs) and open windows from all your desktops. They are
ordered by task, meaning that the windows spawned by an application are grouped
together and multiple launched instances of the same application are also grouped
despite that the windows may be positioned apart over different desktops. Applications
are listed in launching order and you can rearrange them by dragging. The extender
works much the same as with the quick-launch buttons.
With its tiny label-less icons the KDE 4 taskbar can contain more items then KDE 3.5
without having to stack them in rows and menus. This gives each item a static location
at the screen-border and as you can't overshoot the border they are very easy to access
(2 points made by Fitt's law). The extender immediately highlights the name of the item
you are hovering. As the smaller subtext can be much longer it can contain useful
information to help pick the window you wanted. For example it can quote the text line
on which the text cursor resides.
Even if you fill the taskbar beyond the capacity given by your screen size you can always
use the conveyor-belt to elegantly scroll through your stretch of icons. As you can
increase the speed and make an emergency break you can do it quite fast too, incredibly
fast even if you know where the wanted icon should approximately be located along the
line. Also note that you can start the conveyor-belt in reverse too, thereby letting the
latest launched applications and their windows pass by first.
In the middle of the Kicker layout
In between the taskbar and the quick-launch icons there are three plasma buttons to
navigate your application windows not grouped by task but by the order in which they
are stacked on your screen, meaning: from your point of view. First there is Alt-tab
giving you a list of names to pick from. For the more visual inclined there is Shuffle
Windows which lets you uncover the real windows you are looking at. Thirdly there is
the cabinet to switch desktops.
Alt-tab
When you mouse over the Alt-tab button an extender appears listing all the window
names from the top to the bottom and you can move your mouse straight up and click
the one you want. Alternatively you can press both the [Alt] and [Tab] key on the
keyboard to make the extender appear. Then hit [Tab] repeatedly (while holding down
[Alt]) until you selected the wanted window from the list and let go of both keys to make
it move to the top of your stack of windows.
If the wanted window does not appear in the list it may be located on another desktop;
keep holding down the [Tab] key and press [CTRL] repeatedly to select another desktop
from the swapped out list of desktops, then you can continue go through that list of
windows either by holding down [Tab] and repeatedly hitting [Alt] or by holding down
[Alt] and repeatedly hitting [Tab].
You can not only place obscured windows on top you can also give obscured windows
commands, the most famous being 'quit after letting go of all keys' by hitting [Q] when
at an unwanted window in the list. The application window (and all windows belonging
to that application) in the list will be marked with the same X as seen at the top right of
each window.
Advanced Alt-tab functions
Some of the default combinations should be familiar to Mac OS Lite Switch and Mac OS
X users. Continue to hold down [Alt] and press:
[q]
[1]
[w]
[i]
[s]
[a]
[c]
[v]
[`]
To
To
To
To
To
To
To
To
To
ask the application to quit after releasing [Alt].
move the window to desktop 1 after releasing [Alt].
hide (or else minimize) the window.
hide (or else minimize) all the other windows in the list.
ask the window to save its contents now.
ask the window to select all its content now.
ask the window to copy its content to the clipboard now.
ask the clipboard to paste its content into this window now.
tab to the window above (without pressing [shift]+[Tab])
The [Alt]+[`] combination can also be used invoke Alt-tab without an immediate switch
to one of the next windows, allowing you to quickly paste or copy to and from the
current window. As the location of [`] may be different depending on keyboard and
keyboard layout settings another key close to [Tab] may have have been set to have the
same functionality.
When using the mouse to access the Alt-tab extender most of the normal key commands
can also be passed onto the windows in the selector. Some commands are delayed (like
[Ctrl]+[Q]uit) others are first translated (like [CTRL]+[V] to paste onto a terminal
window) to make for a predictable and consistent desktop environment.
Shuffle Windows
For those who find selecting the wanted window from the list available by pressing the
keys [Alt] and [Tab] too abstract and prefer big as possible previews but without having
your windows rearranged all over the desktop KDE 4 introduces Shuffle Windows.
When you mouse over the Shuffle Windows button an extender appears wherein all the
windows are resembled as cards in a diagonal stack. By moving your mouse onto the
visible edge of any of them the cards obscuring that card will move away, and at the
same time the relative windows will also uncover your selected window by temporarily
sliding off the screen to the left or the right. When the window you want is on top you
can click the mouse button causing the windows off screen to shuffle back on screen,
underneath the window you wanted on top.
This is very fast and direct, depending on your speed of placing your mouse on the cards
multiple windows will slide off (or onto) the screen at the same time, if however you find
the required precision of positioning your mouse too difficult you can scroll upwards to
zoom into the picture thereby increasing the visible card edges making them easier to
hit.
Technical explanation
While the usage is simply 'see what you want and click it' the idea behind it is more
intricate. While the number of cards in the stack is directly related to the amount of
windows on the desktop once the user is navigating the stack it is (and should always
be) static; the icon of an unexpectedly closed window should become dim or invisible but
not shake up the stack. This predictability allows for minimal mouse travel for
sophisticated mouseketeers, the target edges of the cards could be as little as 3 pixels
wide, on the other hand if you set the application logo in the middle of the card at 16x16
pixels the edge would be 12 pixels wide. Being diagonal gives the opportunity to make
for an easy journey in the extender as the mouse-over surface can easily be stretched to
make a rectangle, giving the option to travel not only diagonal but also either straight
up or left to right, starting from the top card in the lower left corner:
(mouse-over surfaces highlighted in green, continued behind each card)
Three possible paths gives leeway for a different sightseeing tour. What if windows 3, 4
and 5 were not different windows but different tabs in one Konqueror window? Then you
could have different tours along the sides: left to right to view all the windows and their
tabs (ex-mdi windows) or straight up to only view the stand alone windows (and only the
tabs which are active):
(when traveling horizontally mouse-over surfaces give access to individual tabs inside
one window)
Using the scroll-wheel to auto uncover
If you don't know which window you are looking for you can look at them one by one at a
steady pace. Do not move your mouse into the extender but keep it on top or below the
Shuffle Windows icon and now give your scroll-wheel a big swing towards the screen to
fly in (swing must be at least 5 bumps within half a second).
The windows will start to uncover one by one to the left or the right by temporarily
moving off the screen. Once you have spotted the wanted window you can hit the break
by giving the scroll-wheel a single tug towards you.
If the wanted window has not passed by and you are left starring at an empty desktop it
may be located on another desktop. Give your scroll-wheel the same big swing towards
the screen and the desktop will slide up and away, into the virtual filling cabinet for
desktops, unveiling the lower numbered desktop and its windows below. After the first
pass beyond a desktop Shuffle Windows will go on a never ending cycle through all the
windows and desktops and each time it uncovers your original desktop it will even cycle
through all the work sheets to help you find that window you were looking for. Again,
once you do you can hit the break for a full stop by giving the scroll-wheel a single tug
towards you.
You can navigate window by window by simply rolling the scroll-wheel towards the
screen or yourself (up or down). Once you have the wanted window on top you can move
your mouse off the Shuffle Windows icon (but do not go into the extender) causing the
windows off screen to shuffle back on screen, underneath the window you wanted on
top.
Toggling
If you just wanted a short visit to a window and you have made all the changes you
wanted there, you can quickly go back to before the last time you used Shuffle Windows
by clicking the Shuffle Windows icon. The windows will shuffle back without any time
consuming animation. Click again to bring the window back on top again and toggle
between the two states. On top of the Shuffle Windows icon you can repeatedly use the
undo key-command [CTRL]+[Z] to go back to previous window arrangements.
Using Shuffle Windows when dragging object(s)
To make navigation easier you can stop holding down the mouse button when your
mouse pointer is above the Shuffle Windows icon without losing the object(s) you were
dragging. To paste the object(s) you will later have to click at the desired paste location.
Scrolling with a mouse without a scroll-wheel
You can use the up and down arrow keys on the keyboard instead of the scroll-wheel.
The Home key will start the auto uncover mode, all when your mouse pointer is on top of
the Shuffle Windows icon.
Desktop Cabinet
When all the desktops can be cached on the GPU in VRAM then KDE will replace the
KDE desktop pager with the Desktop Cabinet. It works as fast and direct as Shuffle
Windows. The bottom drawer contains desktop 1. Your current desktop is on top and all
lower drawers are always opened underneath.
(Lacking the required artistic skills (hey, no ones laughing) to make a cool metallic
paper-sheet cabinet, Dennis opted for an ugly wooden cabinet but only to get the point
across. The mouse can never reach any closed drawer as they all open on mouse-over,
making navigation as simple as traversing horizontal bars.)
If you remember the number of the desktop you want you can immediately type the
number while your mouse is on top of the Desktop Cabinet button, or you can quickly
move the mouse into the extender and on top of the wanted drawer and click it.
If you first want to review what is on each desktop you can use the scroll-wheel on top of
the Desktop Cabinet button, scroll-up to look at higher numbered desktops or scroll
down to look at lower numbered desktops. The desktops will retract up and away into
the cabinet (or come out when scrolling upward) one by one with a quick animation of
movement. Not far behind the actual desktop appears; when 'located ' underneath then
your current desktop moves up and away. Otherwise the desktop appears to slide onto
the screen from above:
(mock up of the 'desktop 2 drawer gets pulled on top of desktop 1' principle with a
metallic handle)
To automatically cycle through your desktops give your scroll-wheel a big swing (swing
must be at least 5 bumps within half a second). There will be a short pause between the
desktops so you can observe their content, a countdown timer or animation is shown in
the extender. If you don't want to see the extender you can move your mouse onto the
screen border below the button. Once you have spotted the wanted desktop you can
scroll reverse to stop the retraction cycle or simply move your mouse off the button and
extender.
In the right corner of the Kicker layout
Besides Alt-tab, Shuffle Windows and Desktop Cabinet there are other common
interactive status buttons:
Oops button
In the lower right corner you'll find the Oops button which is like an interactive version
of the Esc key and the Undo command combined. It grows and alerts you when you can
cancel or undo a command or operation. Whenever you panic and think you made a
mistake you can slam the mouse into the lower right corner and click on Oops. KDE will
then try to minimize the damage and gives you information from the help system, and
options to choose from to resolve the issue. If you have a support person or support
company contract one of the options is connecting to the helpdesk which will
automatically receive information about active applications and the task at hand so you
can more easily be helped.
Cancel drag operations
If you are dragging an object and you changed your mind you can drop it onto the oops
button to cancel.
Clock
The new plasma clock tells you what time it is, really it does.
Trashcan
You can quickly drag items into the trashcan, no questions asked.
When you normally place your mouse above the trashcan an extender appears, or after a
mouse click.
At the top of the extender you'll see the status of all the partitions containing trashed
objects; available space now and available space when you empty the trashcan. Each
partition has an Empty trashcan button.
In the middle of the extender all the objects scroll by, you can change the pace with your
scroll-wheel.
Most of the objects can be restored to their original location by clicking their restore
button.
Overwritten items must first be renamed.
At the bottom of the extender is the Empty all trashcans button, move your mouse
through the neck of the extender onto the button and click to delete (marks the space on
your disk to be freely overwritten).
To securely erase your files you should encrypt the contents of your partitions.
Next are other interactive status buttons in what looks like an inversion of the kicker
bar, praise those inventive graphic designers. Formally named system tray, a name
which would now be (or has always been) confusing. A panel section containing
(interactive) status buttons is more descriptive for the user.
Intro repeat
A tool sheet analogy could be a big transparent plastic sheet on which you sketch
notes without messing up the original underneath. As the virtual computer world
does not have any weight you can stick all kinds of handy additional tools onto a
work sheet. You can store away the sheet and place it on top of the tools on your
desktop when needed without messing it up. And because in the virtual world we
don't have to adhere to the third dimension you can just as easily slide a work
sheet with its tools in between your desktop surface and your tools. A sheet can
even contain a different and isolated log-in session.
Tool sheets
Between the taskbar and the plasma status buttons lies the tool sheet manager, or shed
in short, and it manages collections of items from both sides. Each sheet has its own
button which you can click.
By clicking on a tool sheet button you toggle between it and its windows, applets,
plasmoids being:
•
on top of the stack
•
on the bottom of the stack and above the desktop sheet
•
hidden
The sheet itself is fully transparent / invisible, all it does is contain the windows, applets,
plasmoids.
Each tool sheet button tells you if it's hidden or not on the current desktop by being
dimmed or not. As you mouse over a tool sheet button you'll soon notice a small
extender appearing containing a preview of all the tools it contains and its optional
name. When you move through the neck of the extender into the preview it will expand
to fit the entire screen. With its almost non translucent background color you can clearly
see which tools it contains.
When the contents of a tool sheet is visible (with or without the extender background)
you can position the plasmoids around as they are like normal windows. By dragging
them onto the (kicker, systray or menu-bar) extender you can turn them into a (live)
status button. You can also drag them on top of another tool sheet button and like with
normal drag and drop if you have not made your intention clear with modifier keys you
get a menu with the following options and results as soon as you drop it:
•
move
Move tool to its new location
•
copy
Duplicate the tool and its contents and settings into a new and independent
entity
•
link
Create a twin entity which always has the same contents but which may
have different (appearance) settings
As you drag an item onto another tool sheet button its extender appears and you can
drag it along the neck into the preview which will expand and you can position the tool
exactly where you want it, as soon as you drop it and have specified your choice the
extender shrinks and disappears again.
When no tool sheet is placed on top of your windows you can drag a plasma status
button from the (kicker) panel on top of the desktop a new sheet is created named as
and containing only that plasmoid.
Plasma is like a parent always placing coasters and place-mats under your stuff, so when
you want to clean up the mess you made you can just take it all away in one go.
When you drag contents from windows onto the desktop a new (object) sheet is created
which can contain files, text snippets and other draggable content from within windows,
such items are never directly added to an active work sheet. If you want to drag content
objects onto a tool sheet you have to drag them onto the tool sheet button on the panel.
There is no real difference between a object sheet and a tool sheet once the sheet
contains both an object and a (plasmoid) window. Because of their similarity tool sheet
buttons and object sheet buttons are intermingled in the manager.
The advantage of an object sheet is that you can use it as a tray to collect objects and
easily move or copy that content around. By dragging and dropping the button you can
empty the 'tray' into a folder or into the trashcan. The empty object sheet disappears by
itself for your convenience.
You could drag objects like text and pictures from websites simply outside the browser
window, switch to the desktop displaying your storage hierarchy, command the object
sheet to appear on top and move the objects onto a window below and into the folders.
To aid with this the contextual menu of an object sheet button has much the same
sorting options available as a file browser window.
Linked plasmoids
As different desktops allow for different window arrangements you may want the
plasmoid in a different location or different shape. Therefor you can link a plasmoid onto
another work sheet. Allowing you to use and adjust the same information in different
contexts.
By dragging a work sheet button along the panel you normally move it, but by applying
[CTRL]+[Shift] you can link all its plasmoids, allowing you to adjust there position for
different desktop layouts.
This may seem odd if you are thinking of plasmoids which stream the current weather.
And you would be right, you could simply have multiple instances of that plasmoid as
they all stream from the same website. But what if you are using a graphing calculator
plasmoid? Yes, then you could type in the numbers on the desktop displaying a research
website and read the enlarged graph from the same but different looking calculator on
another desktop containing your report with a single 'switch desktops' click. Over and
over again.
Sure not many users will ever need a feature like this, but this is where Old Europe (tm)
usualy had to start the Linux defensive by saying 'with a simple script...' but plasma
users are like the New Europe and say: nah nah nah you other Operating Systems, we
can just do it so bring it on.
Changing desktops into work sheets
If the windows on your desktop contain useful information (for example from a java or
ajax based website) you may want to turn them into a tool sheet so you can easily access
them on other desktops. At appropriate locations you will find these options in the
contextual menu. Individual windows can be turned into a sheet be calling up the
contextual menu with your mouse on top of its name bar.
Inner border
KDE has a magnetic border, when you place a window near the edge of the screen it will
automatically snap to perfectly align to the side. KDE 4 introduces an inner border
centered on the screen which not only snaps windows at their borders but also along
significant divide lines inside windows. When you are dragging a window onto an innerborder-snap-position, a translucent rectangle appears in the center of the screen, you
can now let go of the window to make it align. The inner border helps you organize your
windows and plasmoids so you can easily use them together in unforeseen ways without
constantly having to rearrange window positions.
Example:
You place a document window inside the inner border and click a work sheet button
containing a calculator, you enter the calculations and click the work sheet button again
to give you full view of your document. The calculator disappears behind the document
window except for its display which sticks out the top of the inner border. So with your
tools and windows arranged around the inner border you'll get more predictable
positions and are less likely in need to rearrange them. This advantage may not be
obvious to the maximizing (former) Microsoft Window users but as displays get bigger
and maximized windows start to look silly you may stumble across its advantage
eventually.
Pop-up extenders
It seems extenders described here should work like pop-ups on mouse over. Users
should be able to easily discover and access these pop-up extenders. And clicks are
already used to initiate the function of the button. There are some tricks which could be
used to not annoy easily distracted and irritated users.
For example the extender could have a very slow fade in on initial mouse-over (you see
it coming but you don't really see it yet, a subtle reminder that you can access the panel
in a special way to keep the popups from popping up when you know which button you
want to click and don't want any more feedback). The slow fade in:
1 gets accelerated when the users stops the mouse.
2 gets canceled when the mouse continues to move across the panel and makes a small
right to left scrape across the bottom of the screen.(*)
Advanced users know they can configure each partition (type) to behave as wanted:
1 require small right to left or downward scrape to cancel pop-up extender.
2 require small left to right or upward scrape to pop-up the extender.
(*) this small scrape will not make the (bottom) panel slide (down) off the screen. For
this you need a longer scrape and you'll get feedback on that as the panel starts to
recede, if you stop before the panel has fully receded, the computer knows you did not
want to hide the panel.
Phew, lots of different concepts, I hope it can all be grasped by description as I can't
program myself. Luckily the plasma project asked for idea's so that's alright. BTW.
Shuffle in Dutch is Couperen. (bureaubladen en werkbladen klinken ook leuk).