1
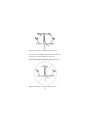
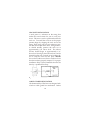
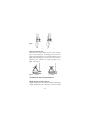
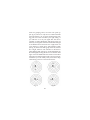
Compound Bow
Owner’s Manual
TABLE OF CONTENTS
1. Bow Owners Personal Record.......................2
2. Compound Bow Terminology........................3
3. Important Infomation......................................4
4. Compound Bow Maintenance Schedule
Strings and Cables..................................................6
Bow Lubrication.....................................................7
Bow Press Use.........................................................7
5. Initial Compound Bow Setup
Rest Selection..........................................................9
Nock Set Installation............................................10
Cable Guard Installation.....................................10
Tiller Adjustment..................................................13
Centershot..............................................................14
Fletch Clearance....................................................15
6. Compound Bow Adjustment
Draw Weight Adjustment...................................15
Draw Length Adjustment...................................16
Inner-Cam Adjustments (Two Cam).................16
Optimizing CommandCam Performance.........17
Inner-Cam Adjustments (One Cam).................18
VersaCam Draw Length Adjustment.................19
Aligning Dual Track Idler Wheel.......................19
7. Tuning Your Compound Bow......................20
8. Compound Bow Warranty............................22
INTRODUCTION
Welcome to the Hoyt USA family!
As a member of an elite team, you will be
pleased to know that you have purchased the
finest crafted, most dependable bow on the
market. Only the finest components go into
every Hoyt USA bow along with over 70 years of
experience in bow technology and manufacturing. With some basic maintenance your new
bow should provide you with years of pleasure
and dependable service.
543 North Neil Armstrong Road
Salt Lake City, Utah 84116-2887
(801) 363-2990 Phone
(801) 537-1470 Fax
www.hoytusa.com
1
BOW OWNER’S PERSONAL RECORD
Fill in the following Personal Bow Record for
your later reference.
Bow Serial Number
Hoyt USA Bow Model
Purchased From
Purchase Date
Draw Length
“ Draw Weight
Bowstring Length
“ Cables Length
Control Cable Length
#
“
“
Important Note:
Save your sales receipt. That receipt is your proof of
date-of-purchase. Proof of date-of-purchase will be
required should your bow ever need warranty service. The following space has been reserved for you to
staple or tape your sales receipt for safe and convenient keeping.
IMPORTANT!
Staple or tape your sales receipt
here for safekeeping.
2
COMPOUND BOW TERMINOLOGY
Axle
Cam / Idler (Single Cam)
Buss Cables
Limb
Limb Pocket
Limb Weight
Adjustment Bolt
Weight Locking Screw
Bow String
Sight Window
Cable Guard Bar
Riser
Grip
Cable Guard
Glide
Stabilizer Bushing
Limb Weight
Adjustment Bolt
Weight Locking Screw
Limb Pocket
Limb
Buss Cables
Cam
Axle
3
WARNING! YOU’RE RESPONSIBLE FOR
ARCHERY SAFETY
Please read the following safety information.
Disregarding these rules may cause serious
injury to yourself or property.
1. NEVER “DRY FIRE” YOUR BOW. Dry fire
means to draw and release the bowstring without an arrow. Firing a bow without an arrow to
absorb the energy can cause severe damage to
your bow and possible injury to the shooter or
others nearby.
2. NEVER EXPOSE YOUR BOW TO EXTREME
HEAT OR PROLONGED EXTREME DAMP.
Excessive heat, such as that experienced on a
sunny day inside a closed vehicle, could cause
limb failure. Prolonged storage in a hot dry attic
or damp basement could also be damaging.
3. CAREFULLY INSPECT YOUR BOW BEFORE
EACH USE. Carefully note the condition of the
bowstring, limbs and riser before you shoot.
Frayed bowstrings should be replaced.
Damaged or suspect limbs should be reported to
your local dealer for inspection or replacement.
4
4. BE SURE OF YOUR BACKSTOP. Make sure
that the backstop you use is large enough to
catch a stray arrow and that it is thick enough
that the arrow cannot completely penetrate it.
Make sure that it is positioned in a safe direction
away from dwellings and other people.
5. BE SURE OF YOUR TARGET. Make sure that
there are no persons, livestock, buildings or
other objects behind or near your target. Be
absolutely sure of your target in low light conditions.
6. INSPECT ALL ARROWS. Before shooting,
inspect your arrows for defects. Discard cracked
or dented shafts. Replace damaged or loose
fletching and nocks.
7. ALWAYS BE SAFE. Never shoot straight up.
Be careful around strings and cables when using
broadheads. Cutting strings and cables can
cause serious damage to your bow and possible
injury to you or others. Children must be supervised by an adult.
8. READ AND HEED ALL WARNINGS. Hoyt
USA cannot be held responsible for injuries suffered or caused by misuse, unsafe or improper
arrow and bow combinations. Hoyt USA can
5
not be held responsible for injuries sustained
when using an altered or modified Hoyt USA
bow.
WARNING
This bow is a deadly weapon.
Always abide by all saftey advisements.
Children must be supervised by an adult.
COMPOUND BOW MAINTENANCE
Your bow is a mechanical device and as such, is
subject to wear and need of periodic inspection,
adjustment and service. Hoyt USA recommends
that you take your bow to a Hoyt authorized pro
shop at least once a year for a yearly professional maintenance and inspection. Areas to be
inspected are axles, spacers, lubrication of axle
bushings, e-clips, strings, cables, limbs and riser.
The following information provides helpful
instruction on the proper care and maintenance
of your new Hoyt bow. Keep this manual as a
handy guide for future reference.
STRINGS AND CABLES
Apply a light coat of bowstring wax to your
bow’s cables and string on a regular basis. Hoyt
USA suggests once every two weeks during
peak use. Use a high quality bowstring wax
available at your local Hoyt Pro Shop.
6
This will keep your bow’s string and cables in
good condition. To assure best results replace D75 string and cables when wear is evident or
every two years under normal use conditions.
Insist that Hoyt USA string and cables be used
on your bow. Beware of lesser quality string and
cables as they may alter the performance of your
bow or cause damage to it.
ECCENTRIC LUBRICATION
A light, spot lubrication of the axles where they
pass through the eccentric should be done on a
regular basis (1,500- 2,000 shots). In adverse
hunting conditions where dirt, dust or moisture
are encountered, lubrication may be done on a
daily basis. Hoyt USA recommends you use a
silicone or Teflon based lubrication or any other
quality grease available at your local Hoyt USA
Pro Shop. It is not recommended that you use
“Penetrating Oils” such as WD-40, EZ-#7, Fast
Break, etc.
BOW PRESS USE
Never allow your bow to be put into a bow press
unless it is operated by a knowledgeable bow
technician. Hoyt USA recommends that all necessary adjustments requiring the use of a bow
press be done by an authorized Hoyt Pro Shop.
7
fig 1 (An Example of a Double Pull Bow Press)
Always use a double bow press like that shown
in figure 1 when working on your bow.
Never use a single pull bow press. (See fig 2)
fig 2 (An Example of a Single Pull Bow Press)
8
When putting your bow in a bow press, never
put pressure on the riser! Always position the
rollers at the base of the limbs (where the limbs
enter the limb pockets).
COMPOUND BOW SETUP
REST SELECTION
There are two basic types of arrow rests “Shoot
Through” and “Shoot Around” (See fig 3) Shoot
through rests are designed for release shooters
as arrows shot using a release bend vertically.
Shoot around rests are designed for finger shooters as arrows shot by fingers bend horizontally.
Hoyt USA recommends that you seek the advice
of a qualified Pro Shop for the proper rest selection for your style of shooting.
fig 3
Shoot Through
Shoot Around
9
NOCK SET INSTALLATION
A nock point is a reference on the string that
marks the exact location for you to nock your
arrow. The arrow’s nock is positioned under the
nock set. To install the nock set at the proper
position begin by slipping the nock set on the
string. Then, using your rest as a reference, position the nock set just above level. A finger shooter should initially position the nock set at
approximately 3/8” above level. The release
shooter should begin at approximately 1/4”
above level. (See fig 4) Once the nock set is at the
desired location use a special set of nocking pliers to crimp the nock set into place. NEVER
shoot a bow without a nock set or with a nock set
that has not been properly crimped. For proper
installation Hoyt USA recommends that this be
done by a qualified Pro Shop.
fig 4
CABLE GUARD INSTALLATION
All aluminum Hoyt USA bows are designed with
a built in cable guard bar attachment. Before
10
mounting the cable guard bar, you must remove
the nylon screws used only for shipping purposes. To insert the cable guard bar, simply slide the
bar through the two mounting holes on the riser
making sure that the bar is pushed completely
through and flush with the end of the front
Screws
Flush w/Front of Riser
fig 5
mounting hole. After the bar has been inserted
fasten with the 1/4-20 x 1/2” set screws provided. (See fig 5)
Hoyt USA’s magnesium bows are designed with
a high mount style
cable guard bar that
is mounted directly
to the side of the
10-24 SHCS
riser by two 10-24
Screws
screws.
(See fig
6)Prior to mounting
the cable guard bar,
you must remove the
nylon screws used
fig 6
11
only for shipping purposes. Warning! On some
shorter axle to axle models, adjustable cable
guard bars can be off-set too much causing the
cable to track off the cam. This can cause damage to the bow or personal injury. To prevent
this from happening, NEVER SET THE BAR AT
THE THREE O’ CLOCK POSITION.
CABLE GUARD GLIDE INSTALLATION
Hoyt USA uses a specially designed cable glide
that has off-set cable slots. To correctly install
the glide on all Hoyt models except the Excel
Cam, make sure that when the cables are inserted into the glide the shortest slot is to the rear
and the longer slot closest to the grip. For all
fig. 7
Excel Cam
Glide Position
Excel Cam model bows, make sure that the
longest slot is to the rear and the shorter slot is
closest to the grip. (See fig 7)
Note: If you have trouble pulling the cables back
far enough to get the glide over the end of the
cable guard bar, you will need to use a bow
12
press. Hoyt USA recommends that the cable
guard glide installation be done at a Pro Shop.
CAUTION: Do not pull bow back without
proper installation of cable guard bar and
glide.
TILLER ADJUSTMENT
Tiller is the difference in actual distance between
the upper limb to the string and lower limb to
the string measured from the base of the limbs
(where the limb and riser meet) at a 90 degree
angle. (See fig 8)
Tiller
Tiller
Tiller
Tiller
fig. 9
fig. 8
13
Redline cam models must be measured from a
reference line from axle to axle. (See fig 9)
The main function of tiller is to allow the archer to
more easily and comfortably aim during the draw
and release of the shot. Most bows will shoot best
with an even tiller which means the distance from
the string to the limb is the same on top and bottom. Tiller adjustments are made by adjusting
either limb weight adjustment bolt. (See draw
weight adjustment section pg. 15). Example: Too
much tiller on the bottom limb, decrease the
weight on the top limb or increase the weight on
the bottom. Hoyt USA recommends that you initially set tiller equal top and bottom.
CENTERSHOT
Centershot is the alignment of the arrow in the
power path of the string. This is accomplished
by moving the arrow rest left or right.
Release shooters should line the arrow up with
the power path of the string. (See fig 10) Finger
shooters should position the arrow so that the
tip is just to the outside of the power path of the
string. (See fig 10)
Centershot is critical to how accurate a bow will
perform. These are initial centershot settings, for
proper alignment Hoyt USA recommends this
be done by a qualified Pro Shop.
14
fig 10
Release Setting
Fingers Setting
FLETCH CLEARANCE
Fletch clearance is the ability of your vanes or fletchings to pass cleanly by or through your arrow rest
without impacting the rest so severely that the arrows
flight path is disrupted. It is necessary that you have
adequate vane clearance to achieve proper arrow
flight. (See fig 11)
fig. 11
Incorrect
Correct
COMPOUND BOW ADJUSTMENT
DRAW WEIGHT ADJUSTMENT
Weight adjustments can easily be made by turning the
weight adjustment bolt clockwise to increase weight
15
or counter clockwise to decrease
weight. Note: Always turn the
top and bottom adjustment bolts
in equal amounts. Some Hoyt
Pocket Locking Screw USA model bows are equipped
with a Dual Locking Pocket
System. Before draw weight adjustments are made on
these models you must first loosen the Pocket Locking
screws located on the side of the pocket. (See fig 12)
When adjustments are completed, re-tighten the Pocket
Locking screws.
fig 12
DRAW LENGTH ADJUSTMENT (INNERCAM
ADJUSTABLE MODULES)
Many Hoyt bows utilize the patented InnerCam
adjustable module for draw length adjustment. The
InnerCam can generally be adjusted without the aid
of a bow press.
TWO-CAM DRAW LENGTH ADJUSTMENT
To adjust the draw length on Hoyt’s two cam (innercam) model bows, use a standard allen key to loosen
the fastening screInner Cam
fig 13
wand remove the
Draw Length screw.
Rotating the innercam in the (+) direction will lengthen the
draw. Rotating the
inner-cam in the (-)
direction will shorten
the draw. Once the
Fastening Screw
Draw Length
Screw
16
inner-cam is in the desired location, reinstall and
tighten the Draw Length screw first and then the
Fastening Screw. Each position will provide approximately 1/2” longer/shorter draw than the previous
setting Note: You must make the same adjustments to
the top and the bottom inner-cams or the bow cannot
be properly tuned.
OPTIMIZING COMMAND CAM PERFORMANCE
In order to verify optimum performance of your
Command Cam bow you should examine the cam's
built in alignment marks. When viewing the module
side of the cam your bus cable should lie somewhere
between
the
alignment
marks as shown.
It is not necessary to have the
buss
cable Alignment
exactly centered Marks
between
the
marks. In fact,
String
Buss Cable
the
optimum
Buss Cable
Yoke
position may be
at either extreme
side of the timing marks for your particular combination. Exact cam alignment varies slightly with different limb and riser combinations. Your bow was
shipped new in the optimum postion. If your buss
cable lies outside the alignement marks we recommend you take it to your nearest Hoyt dealer for
adjustments.
17
VERSACAM DRAW LENGTH ADJUSTMENT
All VersaCams feature the patented InnerCam
adjustable draw length module system and adjustable
let-off. When adjusting the draw length on VersaCam
bows, both the module and draw-stop peg must be
adjusted. When the module is rotated to its furthest
position in the minus (-) direction, the module is in the
"A" setting (the shortest draw length position).
Rotating the module in the (+) direction to the next
hole available for the module screw is the "B" setting
which will provide approximately 1/2” longer draw
than the previous setting. Eight modules are available
for a total draw length range of 3-4”,
VersaCam
Draw Stop Peg
Inner Cam
fig 14
Draw Length Screw
Year 2002 Hoyt VersaCam draw stop holes are numbered 1 thru 8 on VC-2 & VC-3 and 1 thru 7 on VC-1.
Each InnerCam module position has a set of drawstop peg positions that will provide a useable range of
effective let-off values. The table to the right provides
the correct peg setting for 80% effective let-off and
65% AMO let-off for each InnerCam module position.
18
VERSACAM CHART
Inner-Cam
Module Position
A
B
C
D
E
F
G
H
Recommended Peg Position
80% Let-off*
65%Let-off**
1
1
2
3
4
5
6
7
8***
1
2
3
4
5
6
7
*Measured as Effective let-off which includes friction.
**65% AMO let-off is required for entry of trophies into the Pope &
Young Record Book.
***Remove the peg entirely on VersaCam #1
Moving the draw stop more than one position away
from those shown in the chart is not recommended.
Note: changing the draw-stop position independent of
the module to manipulate let-off will alter draw length
by approximately 3/16" for each draw-stop hole; draw
length will be shortened when changing to a lower letoff position and lengthened in higher let-off positions.
Slight variations in peak weight (up to two pounds) may
occur when changing the InnerCam position.
ALIGNING DUAL TRACK IDLER WHEEL
To ensure your dual track idler is functioning within
its intended rotational limit, periodically check the
idler’s built-in rotational alignment marks scribed on
the wheel as shown in the Figure on the next page. For
right-handed bows, the alignment marks should be at
the bottom of the idler on the side marked with an "S".
19
To check the idler
position,
sight
down the buss cable
yoke and verify that
it lies between the
alignment marks on
String
the idler. It is not
critical where the
buss-cable yoke lies
between the alignControl
Alignment
ment marks, but Cable
Marks
Buss Cable
simply that it is
within the marks.
Left handed bows require the same examination
except that their timing marks will lie on the bottom
of the idler on the side marked with an "L". In the
event that your buss cable yoke falls outside the alignment marks, you should take your bow to an authorized Hoyt dealer for adjustment prior to its next use.
String damage and poor arrow flight may result from
shooting improperly tuned equipment.
TUNING
To tune your bow have on hand three fletched arrows
and three bare shafts, all identical and straight. From
about 15 to 20 yards shoot your fletched arrows, making
necessary sight adjustments to hit the target at the same
spot each time. Once you have sighted in, shoot the
three bare shafts and note where the group of bare
shafts are compared to the fletched arrows.
If the bare shafts are grouping below the fletched
arrows, lower the nocking point. (See fig 14) If the bare
20
shafts are grouping above, move the nock point up.
(See fig 15) Be sure to only move in small increments
(never more than 1/16” at a time). Each time the nocking point is moved it will affect your sight setting, so
you will have to re set your sights after each move.
Continue to make adjustments until both groups are
relatively close together. If the bare shafts hit to the right
of the fletched arrows decrease bow weight, check for
vane clearance or check arrow spine stiffness (weak).
(See fig 16) If the bare shafts group to the left, increase
bow weight, check for vane clearance or check arrow
spine stiffness (stiff). (See fig 17). Some adjustments can
be made slightly moving the arrow rest to the left of the
right. Note: Left handed shooters need to reverse these
instructions for left and right results. Hoyt USA recommends that you work closely with your local Pro Shop
when tuning your bow to ensure best results.
fig 14
fig 15
fig 16
fig 17
21
TUNING WITH BROADHEADS
Most archers discover that they must make slight tuning adjustments when switching from practice points
to broadheads (even at the same weight). Broadheads
create a dramatic aerodynamic change in arrow flight.
For this reason, slight adjustments may need to be
made in nocking point height, rest position or bow
weight to achieve desired broadhead flight.
HOYT USA COMPOUND BOW WARRANTY
All Hoyt USA compound bows are warranted against
defects in materials or workmanship to the original
owner on aluminum risers, limbs, limb pockets, and
eccentrics for the life of the product.
ACCESSORIES
All Hoyt USA sights (excluding sight pins), arrow
rests, and bow quivers (excluding hood foam and
arrow gripper) are warranted 100% for the life of the
product to the original owner. Hoyt USA must perform warranty work.
You must have the following items in order to obtain
warranty work:
1. A dated proof of purchase (sales receipt).
2. Products must be purchased through a Hoyt USA
authorized dealer (no exceptions!)
3. All compound bows must have a serial number.
Hoyt USA, at its discretion, voids all warranty claims
either expressed or implied including but not limited
to evidence of abuse, modification to original design,
22
use of attachments or accessories that cause excessive
stress.
Hoyt USA reserves the right to make substitutions on
warranty coverage at Hoyt USA’s discretion for any
reason. Warranty is subject to available parts.
OBTAINING WARRANTY SERVICE
To obtain warranty service, you should return to the
Pro Shop where you purchased your Hoyt USA bow.
The dealer can help to determine if Hoyt USA factory
service is required or if the repair can be completed by
the Pro Shop. If the bow must be returned to the factory, the bow owner is responsible for the return
freight to Hoyt USA. Hoyt USA, in turn, will pay for
the same return freight of the repaired product.
Before any bow is returned a Return Authorization
number must be obtained through an authorized
Hoyt USA Pro Shop. Bows returned to the factory
without a Return Authorization number will be sent
back. Do not send accessories with bow unless otherwise instructed to.
Hoyt USA bows requiring factory service should be
sent to:
Hoyt USA
543 N. Neil Armstrong Road
Salt Lake City, UT 84116
23
There are no other warranties expressed or implied
that extend beyond those written here. No agent,
employee or representative of Hoyt USA or its dealers
has the authority to bind Hoyt USA to any agreement
not herein stated. Buyer agrees that the sole and
exclusive remedies for breach on any warranty concerning Hoyt USA bows shall be repair or replacement of defective parts. Hoyt USA shall not be liable
for injury or property other than the bows themselves.
Hoyt USA reserves the right to replace defective parts
according to availability with compatible replacement
parts.
NOTES
24
NOTES
WARRANTY REGISTRATION CARD
(Or register on-line at www.hoytusa.com)
Bow Model____________________________________
Bow Serial Number_____________________________
(Located in rest plate area)
Owner’s Name_________________________________
Address_______________________________________
City__________________ State____ Zip____________
E-Mail Address_________________________________
Place of purchase_________________Date__________
Age ___________
Gender
How many years have you shot? 0-5
Is this your first Hoyt bow?
M
F
5-10
10 +
YES
NO
How often do you purchase a new bow?__________
What type of archery do you participate in?
Bowhunting
3D
FITA
Will you hunt with this bow?
NFAA
YES
Traditional
NO
How many days a year do you hunt?
0 - 10
10 - 20
20 +
What are the top three Species of animals you
hunt?__________________________________________
543 North Neil Armstrong Road
Salt Lake City, UT. 84116
Place
Stamp
Here
543 North Neil Armstrong Road
Salt Lake City, UT. 84116
www.hoytusa.com