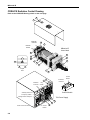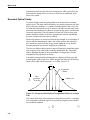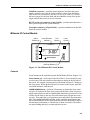
1
Millennia™ IR
Diode-pumped, cw Infrared Laser
User’s Manual
Spectra-Physics
Spectra-Physics Lasers
Millennia™ IR
Diode-pumped, cw Infrared Laser
User’s Manual
Spectra-Physics
Spectra-Physics Lasers, Inc.
1335 Terra Bella Avenue
Post Office Box 7013
Mountain View, CA 94039-7013
Part Number 0000-262A, Rev. A
November 1997
Preface
This manual contains information you need in order to safely install, align,
operate, maintain, and service your Millennia™ IR diode-pumped, continuous-wave, infrared laser. The system comprises three elements: the Millennia laser head, the T40 power supply and the control module. The latter
is a table-top controller that is provided with the system.
The “Introduction” contains a brief description of the Millennia IR laser
and its power supply, controller and chiller.
Following that section is an important chapter on safety. The Millennia IR
is a Class IV laser and, as such, emits laser radiation which can permanently damage eyes and skin. This section contains information about these
hazards and offers suggestions on how to safeguard against them. To minimize the risk of injury or expensive repairs, be sure to read this chapter—
then carefully follow these instructions.
“Laser Description” contains a short section on laser theory regarding the
Nd:YVO4 crystal that is used in the Millennia IR. It is followed by a more
detailed description of the Millennia IR laser system. The chapter concludes with system specifications.
The next few chapters describe the Millennia IR controls, then guide you
through its installation, alignment and operation. The last part of the manual covers maintenance and service and includes a replacement parts list
and a list of world-wide Spectra-Physics Lasers service centers you can call
if you need help.
Whereas the “Maintenance” section contains information you need to keep
your laser clean and operational on a day-to-day basis, “Service and
Repair” is intended to help you guide your Spectra-Physics Lasers field
service engineer to the source of any problems. Do not attempt repairs
yourself while the unit is still under warranty; instead, report all problems
to Spectra-Physics Lasers for warranty repair.
This product has been tested and found to conform to “Directive 89/336/
EEC for electromagnetic Compatibility.” Class A compliance was demonstrated for “EN 50081-2:1993 Emissions” and “EN 50082-1:1992 Immunity”
as listed in the official Journal of the European Communities. It also meets
the intent of “Directive 73/23/EEC for Low Voltage.” Class A compliance
was demonstrated for “EN 61010-1:1993 Safety Requirements for Electrical Equipment for Measurement, Control and Laboratory use” and “EN
60825-1:1992 Radiation Safety for Laser Products.” Refer to the “EC Declaration of Conformity” statements in Chapter 2.
iii
Millennia IR
Finally, if you encounter any difficulty with the content or style of this
manual, please let us know. The last page is a form to aid in bringing such
problems to our attention.
Thank you for your purchase of Spectra-Physics Lasers instruments.
iv
Table of Contents
Preface . . . . . . . . . . . . . . . . . . . . . . . . . . . . . . . . . . . . . . . . . . . . . . . . . . . . . . . . . . . . . . iii
Warnings. . . . . . . . . . . . . . . . . . . . . . . . . . . . . . . . . . . . . . . . . . . . . . . . . . . . . . . . . . . . . ix
Standard Units . . . . . . . . . . . . . . . . . . . . . . . . . . . . . . . . . . . . . . . . . . . . . . . . . . . . . . . . xi
Unpacking and Inspection . . . . . . . . . . . . . . . . . . . . . . . . . . . . . . . . . . . . . . . . . . . . . . xiii
Unpacking Your Laser . . . . . . . . . . . . . . . . . . . . . . . . . . . . . . . . . . . . . . . . . . . . . . . . . . . . . . . . . . . . . xiii
System Components. . . . . . . . . . . . . . . . . . . . . . . . . . . . . . . . . . . . . . . . . . . . . . . . . . . . . . . . . . . . . . . xiii
Accessory Kit . . . . . . . . . . . . . . . . . . . . . . . . . . . . . . . . . . . . . . . . . . . . . . . . . . . . . . . . . . . . . . . . . . . . xiii
Chapter 1: Introduction . . . . . . . . . . . . . . . . . . . . . . . . . . . . . . . . . . . . . . . . . . . . . . . . . 1-1
The Millennia™ IR Advantage . . . . . . . . . . . . . . . . . . . . . . . . . . . . . . . . . . . . . . . . . . . . . . . . . . . . . . . 1-1
The Laser System . . . . . . . . . . . . . . . . . . . . . . . . . . . . . . . . . . . . . . . . . . . . . . . . . . . . . . . . . . . . . . . . . 1-2
Laser Head . . . . . . . . . . . . . . . . . . . . . . . . . . . . . . . . . . . . . . . . . . . . . . . . . . . . . . . . . . . . . . . . . . . 1-2
Power Supply . . . . . . . . . . . . . . . . . . . . . . . . . . . . . . . . . . . . . . . . . . . . . . . . . . . . . . . . . . . . . . . . 1-2
Control Module . . . . . . . . . . . . . . . . . . . . . . . . . . . . . . . . . . . . . . . . . . . . . . . . . . . . . . . . . . . . . . . 1-3
Patents . . . . . . . . . . . . . . . . . . . . . . . . . . . . . . . . . . . . . . . . . . . . . . . . . . . . . . . . . . . . . . . . . . . . . . . . . 1-3
Chapter 2: Laser Safety. . . . . . . . . . . . . . . . . . . . . . . . . . . . . . . . . . . . . . . . . . . . . . . . . 2-1
Precautions For The Safe Operation Of Class IV High Power Lasers . . . . . . . . . . . . . . . . . . . . . . . . . 2-1
Maintenance Necessary to Keep this Laser Product in Compliance with
Center for Devices and Radiological Health (CDRH) Regulations . . . . . . . . . . . . . . . . . . . . . . . . 2-3
CDRH Requirements for Operation with the Control Module . . . . . . . . . . . . . . . . . . . . . . . . . . . . . . . . 2-4
Cover Safety Interlock. . . . . . . . . . . . . . . . . . . . . . . . . . . . . . . . . . . . . . . . . . . . . . . . . . . . . . . . . . . . . . 2-4
Laser Head . . . . . . . . . . . . . . . . . . . . . . . . . . . . . . . . . . . . . . . . . . . . . . . . . . . . . . . . . . . . . . . . . . 2-4
Power Supply . . . . . . . . . . . . . . . . . . . . . . . . . . . . . . . . . . . . . . . . . . . . . . . . . . . . . . . . . . . . . . . . 2-4
CDRH/CE Radiation Control Drawing . . . . . . . . . . . . . . . . . . . . . . . . . . . . . . . . . . . . . . . . . . . . . . . . . 2-6
CDRH/CE Warning Labels . . . . . . . . . . . . . . . . . . . . . . . . . . . . . . . . . . . . . . . . . . . . . . . . . . . . . . . . . . 2-7
EC Declaration of Conformity (Emissions) . . . . . . . . . . . . . . . . . . . . . . . . . . . . . . . . . . . . . . . . . . . . . . 2-8
EC Declaration of Conformity (Low Voltage) . . . . . . . . . . . . . . . . . . . . . . . . . . . . . . . . . . . . . . . . . . . . 2-9
Sources for Additional Information . . . . . . . . . . . . . . . . . . . . . . . . . . . . . . . . . . . . . . . . . . . . . . . . . . . . 2-10
Laser Safety Standards . . . . . . . . . . . . . . . . . . . . . . . . . . . . . . . . . . . . . . . . . . . . . . . . . . . . . . . . . 2-10
Equipment and Training . . . . . . . . . . . . . . . . . . . . . . . . . . . . . . . . . . . . . . . . . . . . . . . . . . . . . . . . . 2-10
Chapter 3: Laser Description . . . . . . . . . . . . . . . . . . . . . . . . . . . . . . . . . . . . . . . . . . . . 3-1
Emission and Absorption of Light . . . . . . . . . . . . . . . . . . . . . . . . . . . . . . . . . . . . . . . . . . . . . . . . . . . . . 3-1
Population Inversion . . . . . . . . . . . . . . . . . . . . . . . . . . . . . . . . . . . . . . . . . . . . . . . . . . . . . . . . . . . 3-2
Resonant Optical Cavity . . . . . . . . . . . . . . . . . . . . . . . . . . . . . . . . . . . . . . . . . . . . . . . . . . . . . . . . . . . . 3-4
Nd3+ as an Excitation Medium . . . . . . . . . . . . . . . . . . . . . . . . . . . . . . . . . . . . . . . . . . . . . . . . . . . . 3-5
Diode-pumped Laser Design . . . . . . . . . . . . . . . . . . . . . . . . . . . . . . . . . . . . . . . . . . . . . . . . . . . . . 3-6
The Millennia™ IR System . . . . . . . . . . . . . . . . . . . . . . . . . . . . . . . . . . . . . . . . . . . . . . . . . . . . . . . . . . 3-8
Overview . . . . . . . . . . . . . . . . . . . . . . . . . . . . . . . . . . . . . . . . . . . . . . . . . . . . . . . . . . . . . . . . . . . . 3-9
v
Millennia IR
The Millennia IR Laser Head . . . . . . . . . . . . . . . . . . . . . . . . . . . . . . . . . . . . . . . . . . . . . . . . . . . . . . . .3-10
The Z-head . . . . . . . . . . . . . . . . . . . . . . . . . . . . . . . . . . . . . . . . . . . . . . . . . . . . . . . . . . . . . . . . . . .3-10
The Beam Delivery Arm . . . . . . . . . . . . . . . . . . . . . . . . . . . . . . . . . . . . . . . . . . . . . . . . . . . . . . . . .3-11
The T40 Power Supply . . . . . . . . . . . . . . . . . . . . . . . . . . . . . . . . . . . . . . . . . . . . . . . . . . . . . . . . . . . . .3-11
FCbar . . . . . . . . . . . . . . . . . . . . . . . . . . . . . . . . . . . . . . . . . . . . . . . . . . . . . . . . . . . . . . . . . . . . . . .3-11
The FCbar System . . . . . . . . . . . . . . . . . . . . . . . . . . . . . . . . . . . . . . . . . . . . . . . . . . . . . . . . . . . . .3-11
Specifications . . . . . . . . . . . . . . . . . . . . . . . . . . . . . . . . . . . . . . . . . . . . . . . . . . . . . . . . . . . . . . . . . . . .3-12
Outline Drawings . . . . . . . . . . . . . . . . . . . . . . . . . . . . . . . . . . . . . . . . . . . . . . . . . . . . . . . . . . . . . . . . .3-14
Chapter 4: Controls, Indicators and Connections . . . . . . . . . . . . . . . . . . . . . . . . . . . 4-1
Introduction . . . . . . . . . . . . . . . . . . . . . . . . . . . . . . . . . . . . . . . . . . . . . . . . . . . . . . . . . . . . . . . . . . . . . .4-1
Laser Head Controls . . . . . . . . . . . . . . . . . . . . . . . . . . . . . . . . . . . . . . . . . . . . . . . . . . . . . . . . . . . . . . .4-1
External Controls. . . . . . . . . . . . . . . . . . . . . . . . . . . . . . . . . . . . . . . . . . . . . . . . . . . . . . . . . . . . . . .4-1
Internal Controls . . . . . . . . . . . . . . . . . . . . . . . . . . . . . . . . . . . . . . . . . . . . . . . . . . . . . . . . . . . . . . .4-2
Indicators . . . . . . . . . . . . . . . . . . . . . . . . . . . . . . . . . . . . . . . . . . . . . . . . . . . . . . . . . . . . . . . . . . . .4-2
Connections . . . . . . . . . . . . . . . . . . . . . . . . . . . . . . . . . . . . . . . . . . . . . . . . . . . . . . . . . . . . . . . . . .4-2
Millennia IR Control Module . . . . . . . . . . . . . . . . . . . . . . . . . . . . . . . . . . . . . . . . . . . . . . . . . . . . . . . . .4-3
Controls . . . . . . . . . . . . . . . . . . . . . . . . . . . . . . . . . . . . . . . . . . . . . . . . . . . . . . . . . . . . . . . . . . . . .4-3
Indicators . . . . . . . . . . . . . . . . . . . . . . . . . . . . . . . . . . . . . . . . . . . . . . . . . . . . . . . . . . . . . . . . . . . .4-4
Connections . . . . . . . . . . . . . . . . . . . . . . . . . . . . . . . . . . . . . . . . . . . . . . . . . . . . . . . . . . . . . . . . . .4-4
T40 Power Supply . . . . . . . . . . . . . . . . . . . . . . . . . . . . . . . . . . . . . . . . . . . . . . . . . . . . . . . . . . . . . . . . .4-4
Controls . . . . . . . . . . . . . . . . . . . . . . . . . . . . . . . . . . . . . . . . . . . . . . . . . . . . . . . . . . . . . . . . . . . . .4-4
Indicators . . . . . . . . . . . . . . . . . . . . . . . . . . . . . . . . . . . . . . . . . . . . . . . . . . . . . . . . . . . . . . . . . . . .4-6
Connections . . . . . . . . . . . . . . . . . . . . . . . . . . . . . . . . . . . . . . . . . . . . . . . . . . . . . . . . . . . . . . . . . .4-6
Chapter 5: Installation and Alignment. . . . . . . . . . . . . . . . . . . . . . . . . . . . . . . . . . . . . 5-1
Laser Installation . . . . . . . . . . . . . . . . . . . . . . . . . . . . . . . . . . . . . . . . . . . . . . . . . . . . . . . . . . . . . . . . .5-1
Installing the Laser Head . . . . . . . . . . . . . . . . . . . . . . . . . . . . . . . . . . . . . . . . . . . . . . . . . . . . . . . .5-1
Installing the Control Module. . . . . . . . . . . . . . . . . . . . . . . . . . . . . . . . . . . . . . . . . . . . . . . . . . . . . .5-2
Installing the Power Supply . . . . . . . . . . . . . . . . . . . . . . . . . . . . . . . . . . . . . . . . . . . . . . . . . . . . . .5-3
Alignment. . . . . . . . . . . . . . . . . . . . . . . . . . . . . . . . . . . . . . . . . . . . . . . . . . . . . . . . . . . . . . . . . . . . . . . .5-3
Chapter 6: Operation. . . . . . . . . . . . . . . . . . . . . . . . . . . . . . . . . . . . . . . . . . . . . . . . . . . 6-1
Using the Control Module . . . . . . . . . . . . . . . . . . . . . . . . . . . . . . . . . . . . . . . . . . . . . . . . . . . . . . . . . . .6-1
The Menu System . . . . . . . . . . . . . . . . . . . . . . . . . . . . . . . . . . . . . . . . . . . . . . . . . . . . . . . . . . . . . .6-2
The Main Menu . . . . . . . . . . . . . . . . . . . . . . . . . . . . . . . . . . . . . . . . . . . . . . . . . . . . . . . . . . . . . . .6-3
The Setup Menu . . . . . . . . . . . . . . . . . . . . . . . . . . . . . . . . . . . . . . . . . . . . . . . . . . . . . . . . . . . . . . .6-4
The Standby Menu . . . . . . . . . . . . . . . . . . . . . . . . . . . . . . . . . . . . . . . . . . . . . . . . . . . . . . . . . . . . .6-5
The Information Menu . . . . . . . . . . . . . . . . . . . . . . . . . . . . . . . . . . . . . . . . . . . . . . . . . . . . . . . . . . .6-5
System Start-up/Shut Down . . . . . . . . . . . . . . . . . . . . . . . . . . . . . . . . . . . . . . . . . . . . . . . . . . . . . . . . .6-6
Turning On the Laser, Cold Start . . . . . . . . . . . . . . . . . . . . . . . . . . . . . . . . . . . . . . . . . . . . . . . . . .6-6
Turning On the Laser, Warm Start . . . . . . . . . . . . . . . . . . . . . . . . . . . . . . . . . . . . . . . . . . . . . . . . .6-8
Optimizing Laser Output . . . . . . . . . . . . . . . . . . . . . . . . . . . . . . . . . . . . . . . . . . . . . . . . . . . . . . . . .6-9
Turning Off the Laser . . . . . . . . . . . . . . . . . . . . . . . . . . . . . . . . . . . . . . . . . . . . . . . . . . . . . . . . . . .6-9
The RS-232 Serial Port . . . . . . . . . . . . . . . . . . . . . . . . . . . . . . . . . . . . . . . . . . . . . . . . . . . . . . . . . . . . .6-10
Pinout/Wiring . . . . . . . . . . . . . . . . . . . . . . . . . . . . . . . . . . . . . . . . . . . . . . . . . . . . . . . . . . . . . . . . .6-10
Communications Parameters . . . . . . . . . . . . . . . . . . . . . . . . . . . . . . . . . . . . . . . . . . . . . . . . . . . . .6-10
Command/Query/Response Format . . . . . . . . . . . . . . . . . . . . . . . . . . . . . . . . . . . . . . . . . . . . . . . . . . .6-11
Commands . . . . . . . . . . . . . . . . . . . . . . . . . . . . . . . . . . . . . . . . . . . . . . . . . . . . . . . . . . . . . . . . . . .6-11
Queries . . . . . . . . . . . . . . . . . . . . . . . . . . . . . . . . . . . . . . . . . . . . . . . . . . . . . . . . . . . . . . . . . . . . . .6-12
vi
Table of Contents
Chapter 7: Maintenance . . . . . . . . . . . . . . . . . . . . . . . . . . . . . . . . . . . . . . . . . . . . . . . . 7-1
Preventive Maintenance . . . . . . . . . . . . . . . . . . . . . . . . . . . . . . . . . . . . . . . . . . . . . . . . . . . . . . . . . . . . 7-1
Equipment Required . . . . . . . . . . . . . . . . . . . . . . . . . . . . . . . . . . . . . . . . . . . . . . . . . . . . . . . . . . . 7-1
Cleaning Laser Optics and Optical Fibers . . . . . . . . . . . . . . . . . . . . . . . . . . . . . . . . . . . . . . . . . . . . . . 7-1
General Procedure for Cleaning Optics . . . . . . . . . . . . . . . . . . . . . . . . . . . . . . . . . . . . . . . . . . . . . 7-4
General Procedure for Cleaning the Fiber-optic Bundle . . . . . . . . . . . . . . . . . . . . . . . . . . . . . . . . 7-5
Chapter 8: Service and Repair . . . . . . . . . . . . . . . . . . . . . . . . . . . . . . . . . . . . . . . . . . . 8-1
Troubleshooting Guide . . . . . . . . . . . . . . . . . . . . . . . . . . . . . . . . . . . . . . . . . . . . . . . . . . . . . . . . . . . . . 8-1
Replacement Parts . . . . . . . . . . . . . . . . . . . . . . . . . . . . . . . . . . . . . . . . . . . . . . . . . . . . . . . . . . . . . . . . 8-3
Chapter 9: Customer Service . . . . . . . . . . . . . . . . . . . . . . . . . . . . . . . . . . . . . . . . . . . . 9-1
Customer Service . . . . . . . . . . . . . . . . . . . . . . . . . . . . . . . . . . . . . . . . . . . . . . . . . . . . . . . . . . . . . . . . . 9-1
Warranty . . . . . . . . . . . . . . . . . . . . . . . . . . . . . . . . . . . . . . . . . . . . . . . . . . . . . . . . . . . . . . . . . . . . . 9-1
Return of the Instrument for Repair . . . . . . . . . . . . . . . . . . . . . . . . . . . . . . . . . . . . . . . . . . . . . . . . 9-2
Service Centers . . . . . . . . . . . . . . . . . . . . . . . . . . . . . . . . . . . . . . . . . . . . . . . . . . . . . . . . . . . . . . . 9-3
Appendix A: Error Codes . . . . . . . . . . . . . . . . . . . . . . . . . . . . . . . . . . . . . . . . . . . . . . . A-1
Notes
Spectra-Physics Lasers User’s Manual—Problems and Solutions
vii
Millennia IR
List of Figures
Figure 1-1: The Millennia IR System . . . . . . . . . . . . . . . . . . . . . . . . . . . . . . . . . . . . . . . . . . . . . . . . . .1-1
Figure 2-1: These CE and CDRH standard safety warning labels would
be appropriate for use as entry warning signs (EN 60825-1, ANSI 4.3.10.1). . . . . . . . . . . . . . . . .2-2
Figure 2-2: Folded Metal Beam Target . . . . . . . . . . . . . . . . . . . . . . . . . . . . . . . . . . . . . . . . . . . . . . . . .2-2
Figure 2-3: The Power Supply Connector Panel . . . . . . . . . . . . . . . . . . . . . . . . . . . . . . . . . . . . . . . . . .2-3
Figure 2-4: Laser Head Emission Indicator, Shutter and
Safety Interlock Switch and Key Holder Location . . . . . . . . . . . . . . . . . . . . . . . . . . . . . . . . . . . . .2-5
Figure 3-1: Electrons occupy distinct orbitals that are defined by the probability
of finding an electron at a given position, the shape of the orbital being
determined by the radial and angular dependence of the probability. . . . . . . . . . . . . . . . . . . . . . .3-2
Figure 3-2: A Typical Four-level Transition Scheme . . . . . . . . . . . . . . . . . . . . . . . . . . . . . . . . . . . . . .3-3
Figure 3-3: Frequency Distribution of Longitudinal Modes for a Single Line . . . . . . . . . . . . . . . . . . . .3-4
Figure 3-4: Energy Level Scheme for the Nd3+ ion. . . . . . . . . . . . . . . . . . . . . . . . . . . . . . . . . . . . . . . .3-5
Figure 3-5: Nd3+ absorption spectra compared to emission spectra of a Black
Body Source (a), Krypton Arc Lamp (b) and Laser Pump Diode (c). . . . . . . . . . . . . . . . . . . . . . . .3-6
Figure 3-6: Mode Matching . . . . . . . . . . . . . . . . . . . . . . . . . . . . . . . . . . . . . . . . . . . . . . . . . . . . . . . . . .3-7
Figure 3-7: The Millennia IR System . . . . . . . . . . . . . . . . . . . . . . . . . . . . . . . . . . . . . . . . . . . . . . . . . .3-8
Figure 3-8: The Millennia IR Laser Head . . . . . . . . . . . . . . . . . . . . . . . . . . . . . . . . . . . . . . . . . . . . . . .3-9
Figure 3-9: Schematic of the Millennia II Laser Head . . . . . . . . . . . . . . . . . . . . . . . . . . . . . . . . . . . . . .3-9
Figure 3-10: The Z-Head (top view) . . . . . . . . . . . . . . . . . . . . . . . . . . . . . . . . . . . . . . . . . . . . . . . . . . .3-11
Figure 4-1: The Millennia IR Laser Head . . . . . . . . . . . . . . . . . . . . . . . . . . . . . . . . . . . . . . . . . . . . . . .4-1
Figure 4-2: The Millennia IR Laser Head Rear Panel . . . . . . . . . . . . . . . . . . . . . . . . . . . . . . . . . . . . . .4-2
Figure 4-3: The Millennia IR Control Module . . . . . . . . . . . . . . . . . . . . . . . . . . . . . . . . . . . . . . . . . . . .4-3
Figure 4-4: The T40 Power Supply Control Panel . . . . . . . . . . . . . . . . . . . . . . . . . . . . . . . . . . . . . . . .4-5
Figure 5-1: The Millennia IR Laser Head Rear Panel . . . . . . . . . . . . . . . . . . . . . . . . . . . . . . . . . . . . . .5-2
Figure 6-1: The Millennia IR Control Module Showing the Default Main Menu. . . . . . . . . . . . . . . . . . .6-1
Figure 6-2: The Millennia IR Menus . . . . . . . . . . . . . . . . . . . . . . . . . . . . . . . . . . . . . . . . . . . . . . . . . . .6-2
Figure 6-3: Laser head PC board showing the location of baud rate DIP switch S1. . . . . . . . . . . . . . .6-10
Figure 7-1: Lens Tissue Folded for Cleaning . . . . . . . . . . . . . . . . . . . . . . . . . . . . . . . . . . . . . . . . . . . .7-4
List of Tables
Table 3-1: Millennia IR Specifications . . . . . . . . . . . . . . . . . . . . . . . . . . . . . . . . . . . . . . . . . . . . . . . . . .3-12
Table 6-1: Query Errors. . . . . . . . . . . . . . . . . . . . . . . . . . . . . . . . . . . . . . . . . . . . . . . . . . . . . . . . . . . . .6-13
Table 6-2: Error Return List . . . . . . . . . . . . . . . . . . . . . . . . . . . . . . . . . . . . . . . . . . . . . . . . . . . . . . . . . .6-14
viii
Warnings
Warning Conventions
The following warnings are used throughout this manual to draw your
attention to situations or procedures that require extra attention. They warn
of hazards to your health, damage to equipment, sensitive procedures, and
exceptional circumstances. All messages are set apart by a thin line above
and below the text as shown here.
Danger!
Laser radiation is present.
Laser Radiation
Danger!
Conditions or action may present a hazard to personal safety.
Warning!
Condition or action may cause damage to equipment.
Caution!
Condition or action may cause poor performance or error.
Note
Text describes exceptional circumstances or makes a special reference.
Don't
Touch!
Do not touch.
Eyewear
Required
Appropriate laser safety eyewear should be worn during this operation.
ix
Standard Units
The following units, abbreviations, and prefixes are used in this SpectraPhysics Lasers manual:
Quantity
Unit
Abbreviation
mass
kilogram
kg
length
meter
m
second
s
hertz
Hz
newton
N
energy
joule
J
power
watt
W
electric current
ampere
A
electric charge
coulomb
C
electric potential
volt
V
resistance
ohm
Ω
inductance
henry
H
magnetic flux
weber
Wb
magnetic flux density
tesla
T
luminous intensity
candela
cd
temperature
celcius
C
pressure
pascal
Pa
capacitance
farad
F
angle
radian
rad
time
frequency
force
Prefixes
tera
giga
(1012)
9
(10 )
6
mega
(10 )
kilo
(103)
T
G
M
k
deci
centi
(10-1)
-2
(10 )
-3
d
c
mill
(10 )
m
micro
(10-6)
µ
nano
pico
(10-9)
n
-12
p
-15
(10 )
femto
(10 )
f
atto
(10-18)
a
xi
Unpacking and Inspection
Unpacking Your Laser
Your Millennia IR laser was packed with great care, and its container was
inspected prior to shipment—it left Spectra-Physics Lasers in good condition. Upon receiving your system, immediately inspect the outside of the
shipping containers. If there is any major damage (holes in the containers,
crushing, etc.), insist that a representative of the carrier be present when
you unpack the contents.
Carefully inspect your laser system as you unpack it. If any damage is evident, such as dents or scratches on the covers or broken knobs, etc., immediately notify the carrier and your Spectra-Physics Lasers sales representative.
Keep the shipping containers. If you file a damage claim, you may need
them to demonstrate that the damage occurred as a result of shipping. If
you need to return the system for service at a later date, the specially
designed container assures adequate protection.
System Components
The following components comprise the Millennia IR laser system:
•
•
•
Millennia IR Laser Head
T40 Power Supply
Control Module
Verify all three components are present. The laser head, power supply, and
controller are all shipped in one container.
Accessory Kit
Included with the laser system is this manual, a packing slip listing all the
parts shipped, and an accessory kit containing the following items:
•
•
•
•
•
•
1 US or European (German) power cord, 2 m
a 5/32 in. Allen (hex) driver for adjusting the feet (laser height)
table clamp kit: 4 clamps and hardware
plastic hemostat
lens tissue
tweezers
xiii
Millennia IR
•
•
•
•
•
xiv
2 keys for the power supply
Z-head output coupler
fiber endcaps
Z-head telescope endcaps
jumper plug for RS-232 only operation.
Chapter 1
Introduction
The Millennia™ IR Advantage
The Millennia IR is an all solid-state, high power, cw laser that provides
greater than 10 W of 1064 nm infrared output from a standard 110 or 220
Vac, single-phase outlet. It is a perfect high-power infrared source for
pumping infrared fiber lasers and other tunable infrared solid-state media.
The advantages of a diode-pumped front end are many—including ultralow optical noise, low utilities costs, reliability, and compact packaging.
For long-term, hands-off operation, the Millennia IR features a sealed Zhead cavity that requires no external adjustment. The system is completely
air-cooled and employs an advanced self-contained temperature stabilization loop to ensure the Nd:YVO4 gain medium is maintained at optimum
temperature for outstanding stability. All this performance is possible
through the integration of our patented, high-efficiency FCbar™ pump
diodes.
Figure 1-1: The Millennia IR System
1-1
Millennia IR
The Laser System
The Millennia IR system comprises three basic components:
•
•
•
Millennia IR laser head
T40 power supply
Control Module
Laser Head
The Millennia IR laser head houses the neodymium yttrium vanadate
(NdYVO4) gain medium, the diode laser fiber delivery and telescope focusing systems, and the cooling system. Externally, it resembles a very short,
standard small-frame ion laser head. Indeed, its dimensions (except length)
and output beam location make it a drop-in replacement for one.
Because the laser head contains a highly efficient, diode-pumped Nd:YVO4
laser crystal, it is not subjected to the large heat load of the high energy
plasma tube in an ion laser. Therefore, water cooling (and the subsequent
water jacket) is not required. Without the heavy magnet assembly or resonator, the Millennia IR laser head is shorter and weighs far less than an
equivalent ion laser head; it can be easily handled and moved by one person.
Cooling is provided by a fan beneath the Z-head that pulls air in through
the bottom plate and blows it against the heat webs on the bottom of the Zhead. The heated air is vented through the top of the unit. This system virtually eliminates the low-frequency optical noise that is a major problem
for water-cooled ion lasers.
The Millennia IR delivers beam pointing stability as good as that from an
actively stabilized ion laser. And to further improve stability and provide
long-term, hands-off operation, the intracavity beam path is totally
enclosed.
Power Supply
The T40 power supply houses the two fiber-coupled, 20 W diode laser bars
that pump the Millennia IR head. Each diode bar is operated at less than
75% of its rated power in order to maintain ideal operating conditions for
the diodes and, thus, ensure a long lifetime. The power supply also contains
the control logic and power modules for the system, as well as the refrigeration unit that cools the diodes.
The power supply is air cooled and requires no water or external cooling
connections. For electrical power, it simply requires a standard 110 or 220
Vac 10 A power source.
The power supply is small, about 31 x 41 x 64 cm (13 x 16 x 25 in.), and it
weighs about 50 kg (110 lb). Rubber casters are provided for mobility and
to permit easy stowage. It can also be rack-mounted.
1-2
Introduction
A single umbilical cable connects the supply to the laser head. It contains
the power and control cables and the fiber bundles.
Control Module
The Millennia IR controller provides easy control from virtually any point
in the laboratory. An 8-foot cable connects the controller to the laser head.
A simple, menu-driven control program that uses “soft” keys and clear,
large characters on a back-lit display provides an easy method of controlling and monitoring the system. The intuitive, layered menu structure provides operational options along with diagnostic information for fast,
efficient control of the unit.
For users that prefer to operate the laser remotely, either directly or via a
computer program, a standard serial link is provided on the laser head for
connection to a computer or terminal.
Remote Operation
The laser head incorporates a standard RS-232 serial port for remote operation. Command control is transferred to this port via the control module.
Patents
The Millennia IR system is manufactured under the following patents:
4,653,056
4,656,635
4,665,529
4,701,929
4,723,257
4,739,507
4.756.003
4,761,785
4,785,459
4,837,771
4,872,177
4,894,839
4,908,832
4,913,533
4,942,582
5,080,706
5,127,068
5,410,559
5,412,683
5,436,990
5,446,749
1-3
Millennia IR
1-4
Chapter 2
Laser Safety
The Spectra-Physics Lasers Millennia IR laser is a Class IV—High
Power Laser whose beam is, by definition, a safety and fire hazard. Take
precautions to prevent accidental exposure to both direct and reflected
beams. Diffuse as well as specular beam reflections can cause severe
eye or skin damage.
Danger!
Laser Radiation
Because the Millennia IR is designed for operation at 1064 nm and its
output is invisible, it is especially dangerous. Infrared radiation passes
easily through the cornea, which, when focussed on the retina, can cause
instantaneous and permanent damage.
Precautions For The Safe Operation
Of Class IV High Power Lasers
•
Eyewear
Required
•
•
•
•
•
•
•
•
•
Wear protective eyewear at all times; selection depends on the wavelength and intensity of the radiation, the conditions of use, and the
visual function required. Protective eyewear is available from suppliers
listed in the Laser Focus World, Lasers and Optronics, and Photonics
Spectra buyer’s guides. Consult the ANSI and ACGIH standards listed
at the end of this section for guidance.
Maintain a high ambient light level in the laser operation area so the
eye’s pupil remains constricted, reducing the possibility of damage.
To avoid unnecessary radiation exposure, keep the protective cover on
the laser head at all times.
Avoid looking at the output beam; even diffuse reflections are hazardous.
Avoid blocking the output beam or its reflections with any part of the
body.
Establish a controlled access area for laser operation. Limit access to
those trained in the principles of laser safety.
Post prominent warning signs near the laser operating area (Figure 2-1).
Set up experiments so the laser beam is either above or below eye
level.
Provide enclosures for beam paths whenever possible.
Set up shields to prevent any unnecessary specular reflections.
2-1
Millennia IR
•
Set up a beam dump to capture the laser beam and prevent accidental
exposure (Figure 2-2).
VISIBLE AND/OR INVISIBLE*
LASER RADIATION
DANGER
AVOID EYE OR SKIN EXPOSURE TO
DIRECT OR SCATTERED RADIATION
CLASS 4 LASER PRODUCT
GaAlAs/CW
MAXIMUM OUTPUT 40 W
*SEE MANUAL
VISIBLE & INVISIBLE
LASER RADIATION
0451-8170
AVOID EYE OR SKIN EXPOSURE TO
DIRECT OR SCATTERED RADIATION
40 W MAX./CW GaAlAs
40 W MAX./CW Nd:YVO 4 IR 1064 nm
CLASS IV LASER PRODUCT
Figure 2-1: These CE and CDRH standard safety warning labels would
be appropriate for use as entry warning signs (EN 60825-1, ANSI 4.3.10.1).
Figure 2-2: Folded Metal Beam Target
Caution!
Use of controls or adjustments, or performance of procedures other than
those specified herein may result in hazardous radiation exposure.
Operating this laser without due regard for these precautions or in a manner
that does not comply with recommended procedures may be dangerous. At
all times during installation, maintenance or service of your laser, avoid
unnecessary exposure to laser or collateral radiation* that exceeds the
accessible emission limits listed in “Performance Standards for Laser Products,” United States Code of Federal Regulations, 21CFR1040.10(d).
Follow the instructions contained in this manual to ensure proper installation and safe operation of your laser.
* Any electronic product radiation, except laser radiation, emitted by a laser product as a
result of or necessary for the operation of a laser incorporated into that product.
2-2
Laser Safety
Maintenance Necessary to Keep this
Laser Product in Compliance with
Center for Devices and Radiological Health
(CDRH) Regulations
This laser product complies with Title 21 of the United States Code of Federal Regulations, Chapter 1, subchapter J, parts 1040.10 and 1040.11, as
applicable. To maintain compliance with these regulations, once a year, or
whenever the product has been subjected to adverse environmental conditions (e.g., fire, flood, mechanical shock, spilled solvent, etc.), check to see
that all features of the product identified on the CDRH Radiation Control
Drawing (found later in this chapter) function properly. Also, make sure
that all warning labels remain firmly attached.
1.
Verify removing the auxiliary interlock (INTLK AUX) connector on the
power supply prevents laser operation.
Interlock
Connector
INTERLOCK
REMOTE
SERIAL COM
LASER HEAD
Figure 2-3: The Power Supply Connector Panel
2.
Verify the laser can only be turned on when the key switch is in the ON
position, and that the key can only be removed when the switch is in
the off position.
3.
Verify the emission indicator provides a visible signal when the laser
emits accessible laser radiation that exceeds the accessible emission
limits for Class I.*
4.
Verify the time delay between turn-on of the emission indicator and
starting of the laser; it must give enough warning to allow action to
avoid exposure to laser radiation.
5.
Verify the beam attenuator (shutter) actually blocks access to laser
radiation.
6.
Verify the safety interlock stops emission of laser or collateral radiation upon removal or displacement of the interlocked laser head cover.
7.
When the safety interlock is defeated, verify the defeat key is clearly
visible and that it prevents replacement of the cover.
* 0.39 µW for continuous-wave operation where output is limited to the 400 to 1400 nm
range.
2-3
Millennia IR
CDRH Requirements for operation with the
Control Module
The Millennia IR laser head and the T40 power supply comply with all
CDRH safety standards when operated with the Millennia IR control module. However, when the laser is operated through the serial interface (i.e.,
without the control module), you must provide the following in order to
satisfy CDRH regulations:
•
A key switch—that limits access to the laser and prevents it from being
turned on. It can be a real key lock, a removable computer disk, a password that limits access to computer control software, or a similar
“key” implementation. The laser must only operate when the “key” is
present and in the “on” position.
An emission indicator—that indicates laser energy is present or can be
accessed. It can be a “power-on” lamp, a computer display that flashes
a statement to this effect, or an indicator on the control equipment for
this purpose. It need not be marked as an emission indicator so long as
its function is obvious. Its presence is required on any control panel
that affects laser output.
•
Cover Safety Interlock
The Millennia IR system has a safety interlock for the laser head cover
only. Removing this cover turns off the laser diodes. The cover must be on,
or the interlock defeated, before the laser will operate.
Laser Head
Installing the safety interlock key in the laser head allows the laser to operate with its cover removed (refer to Figure 2-4).
Danger!
Laser Radiation
Collateral radiation! While the laser head cover is removed, be
extremely careful to avoid exposure to laser or collateral radiation.
The laser head cover cannot be replaced until the safety interlock key has
been removed. Shut off the laser before removing the interlock key and
replacing the cover.
Power Supply
Because there are no user-serviceable parts inside the power supply or
internal adjustments that can be made by the user, the Millennia IR T40
power supply requires no cover safety interlock switch.
2-4
Laser Safety
Emission
Indicator
Shutter
Interlock
Switch
Interlock
Key Holder
Fiberoptic
Cable
Laser
Output
End
Figure 2-4: Laser Head Emission Indicator, Shutter and Safety Interlock
2-5
Millennia IR
CDRH/CE Radiation Control Drawing
Refer to the CDRH/CE Warning Labels on the next page.
1
5
Emission
Indicator
1
2
Interlock
Switch
Millennia IR
Laser Head
5
11
3
4
6
2
10
2
15
13
Output
End
8
16
On/Off
Button
17
4
Emission
Indicator
Key
Switch
Emission
Indicator
WER
R PO
SE
LA
ON
ISSI
.00
R EM
SE
LA
tup
Se fo
In
|
|
|
5
W
5.00
t:
Se
|
s
ysic
Ph
traec
Sp
AD
R HE
LASE
M
L CO
RIA
SE
R
LASE
DE
DIO
TE
MO
RE
ON
R
LASEION
ISS
CK
LO
ER
EM
INT
AC
Auxiliary Interlock
Frequency Switch
ics
hys
a-P
ectr
Sp
50
Hz
100
110
120
Voltage Select Jumpers
127
200
220
60
LE
ISIB
N
R INV
TIO ren.
D/ODIAexposu
iatio Various
s
rad
E AN RA
gth l.
IBL ERor skined Laser.
elen nua
tter
VIS LAS
sca YLFd wav ma 93)
id eye
or
tion
Nd:
Avo ct
or infrare ruc -1 (19
dire
E
to
YAG orsult inst 825
AR
ble
IEC
, Nd:
HTB
visi. Con
4
ch
SIC
t per
YVO let,
.
Nd: avioemitted duc R UN G t dur
iden
ultr be
r pro
DE LUN
r Haume er. a
y
D/O AHode ver
ma 4 lase
Las tbar
e ng
ss
A UN STR
r sich ere
Cla
ARLASER AugahluNd:YLF
ode Näh g.
von
ustr
r
HTB
en, ltun
lungr Stre ode rottret anie
SIC
93)
trahode YAG , Infra
aus ngs
Beskte , Nd: lett-nen ienu -1 (19 ISIBLE
avio
dire
KönBed 825
4
INV
YVOne Ultren e
s.
Nd:iede lung sieh h IEC ET/OUil ou
diffu
sch trah en: 4 nac IBLEde l'oeou ission
ct
Ver ers tion sse
VIS e
.
Las rma Kla
ER eus dire . Em
uge
Info er
LAS ger ent YLFaro
Las ENT dan em Nd:infr n. 93)
ion onn ou ou latio
NEMositau ray YAG ble stal -1 (19
ONExp u
l d'In 825
, Nd: , visi
RAY
nue 4 IEC
la pea 4 lette
de Nd:YVO
avio le ma so
er r ultr er clas
Laslase sult r de
Con lase
ll a'
are
App
43
. 940
CA
w,
Vie
ysics
-Ph , Inc. untain
ectra ers , Mo
Sp cs Las nue
ysi lla Ave
ra-Ph
ra Be
S/N
Spect
0 Ter
ED
UR
133
CT
FA A
NU US
S
MA IN
-8S
T40
L
/F3 8G
DE
19
MO
F1/F2 UL
Hz
PE
3AG.
230
240
Control Module
E
LIN E
LTAG
VO
C
0 VAC
- 24
200 127 VA
100
T40 Power Supply
T,
TY
0A/3A
10A/15A/3A
15A/1
F3
F2
15
F1
R IN
WE
12
I
0
PO
9
Power Cord Connector
2-6
On/Off
Button
Laser Safety
CDRH/CE Warning Labels
LASER APERTURE
VISIBLE AND/OR
INVISIBLE LASER RADIATION
IS EMITTED FROM THIS APERTURE
LASERSTRAHLÖFFNUNG
*SEE MANUAL
OUVERTURE LASER
AVOID EXPOSURE
CDRH Aperture Label (1)
CE Aperture Label (2)
DANGER
DANGER
*SEE MANUAL
VISIBLE
AND/OR INVISIBLE
LASER RADIATION
AVOID DIRECT EXPOSURE TO BEAM
INVISIBLE*
LASER RADIATION
INVISIBLE*
LASER RADIATION
AVOID EYE OR SKIN EXPOSURE TO
DIRECT OR SCATTERED RADIATION
AVOID EYE OR SKIN EXPOSURE TO
DIRECT OR SCATTERED RADIATION
CLASS 4 LASER PRODUCT
GaAlAs/CW
MAXIMUM OUTPUT 40 W
CLASS 4 LASER PRODUCT
1064 NM
MAXIMUM OUTPUT 15 W
0451-8170
CW GaAlAs, IR
CONSULT INSTRUCTION MANUAL
CLASS IV LASER PRODUCT
SEE MANUAL
CDRH Danger Label
Fiber Cable, Side A (6)
CDRH Danger Label
Interlock Defeated (5)
*SEE MANUAL
DANGER
DO NOT REMOVE!
NON-INTERLOCKED
COUPLING
VISIBLE
AND
INVISIBLE
LASER RADIATION WHEN OPEN
AND INTERLOCK DEFEATED.
AVOID EYE OR SKIN EXPOSURE
TO DIRECT OR SCATTERED
RADIATION*
CE Certification
Label (4)
CE Aperture Label
Fiber-optic Cable(3)
CDRH Danger Label
Fiber Cable, Side B (6)
LINE
VOLTAGE
F1/F2/F3
3AG. TYPE T, UL198G
200 - 240 VAC
100 - 127 VAC
10A/10A/3A
15A/15A/3A
*SEE MANUAL
Fuse Label
Power Supply (9)
CE Danger Label
Laser Radiation (8)
CE Danger Label
Fiber Cable (7)
Spectra-Physics Lasers, Inc.
Spectra-Physics
1344 Terra Bella Avenue
Mountain View, California 94039
MANUFACTURED:
MODEL
NUMBER
MILLENNIA IR
YEAR
MODEL
S/N
SERIAL
NUMBER
MADE
IN U.S.A.
Spectra-Physics Lasers, Inc.
1330 Terra Bella Avenue, Mountain View, CA. 94043
THIS LASER PRODUCT COMPLIES
WITH 21 CFR 1040 AS APPLICABLE.
404-471
Resonator Model/Serial
Identification Label (10)
MADE IN U.S.A.
0420-7840
Laser Head Model/Serial
Identification Label (11)
DANGER - INVISIBLE LASER RADIATION
WHEN OPEN AND INTERLOCK DEFEATED.
AVOID EYE OR SKIN EXPOSURE TO
DIRECT OR SCATTERED RADIATION.
VORSICHT
UNSICHTBARE LASERSTRAHLUNG, WENN
ABDECKUNG GEOFFNET UND
SICHERHEITSVERRIEGELUNG UBERBRUCKT.
BESTRAHLUNG VON
AUGE ODER HAUT DURECH DIREKTE ODER
STREUSTRAHLUNG VERMEIDEN LASER
KLASSE 4
DANTER - RAYONNEMENT LASER INVISIBLE
DANGEREUX EN CAS D'OUVERTURE ET
LORSQUE LA SECURITE EST NEUTRALISEE
EXPOSITION DANGEREUSE DE L'OEIL
OU DE LA PEAU AU RAYONNEMENT
Spectra-Physics
Spectra-Physics
MONTH
MANUFACTURED
IN USA
MANUFACTURED
IN USA
MODEL T40-8SS
MODEL Z–106C–08
S/N
Class 4 laser product per IEC 825-1 (1993)
SICHTBARA UND/ODER UNSICHTBARE
LASERSTRAHLUNG
Bestrahlung von Auge oder Haut durch
direkte oder Streustrahlung vermeiden.
Nd:YVO4, Nd:YAG oder Nd:YLF Laser.
Verschiedene Ultraviolett-, Infrarot- oder sichtbara
Laserstrahlungen Können austreten, Nähere
Informationen: siehe Bedienungsanieltung.
Laser Klasse 4 nach IEC 825-1 (1993)
RAYONNEMENT LASER VISIBLE ET/OU INVISIBLE
Exposition dangereuse de l'oeil ou
de la peau au rayonnement direct ou diffus.
Laser Nd:YVO4, Nd:YAG ou Nd:YLF. Emission
laser ultraviolette, visible ou infrarouge.
Consulter le manuel d'Installation.
Apparell a' laser de classo 4 IEC 825-1 (1993)
S/N
THIS LASER PRODUCT COMPLIES WITH 21 CFR 1040 AS APPLICABLE
Power SupplyModel/Serial
Identification Label (12)
VISIBLE AND/OR INVISIBLE
LASER RADIATION
Avoid eye or skin exposure
to direct or scattered radiation.
Nd:YVO4, Nd:YAG or Nd:YLF Laser. Various
ultraviolet, visible or infrared wavelengths
may be emitted. Consult instruction manual.
Spectra-Physics Lasers, Inc.
1330 Terra Bella Avenue, Mountain View, CA. 94043
0129-2889 1
Z-Head Model/Serial
Identification Label (13)
Spectra Physics Lasers
POST OFFICE BOX 7013
MT. VIEW, CA 94039-7013
THIS PRODUCT IS
PROTECTED BY U.S.A.
PATENT NOS. 4,653,056,
4,656,635, 4,665,529,
4,701,929, 4,723,257,
4,756,003, 4,758,459,
4,837,771, 4,872,177,
4,894,839, 4,908,832,
5,127,068, 5,410,559,
5,412,683, 5,436,990,
5,446,749
0129-3285
THIS PRODUCT IS MANUFACTURED UNDER
ONE OR MOR OF THE FOLLOWING
PATENTS:
U.S. PATENT NUMBERS
4.653,056
4,872,177
4,656,635
4,913,533
4,665,529
4,785,459
4,701,929
4,837,771
4,723,257
4,908,832
4,756,003
4,894,839
4,761,786
5,080,706
5,127,068
4,942,582
4,739,507
5,410,559
5,412,683
5,436,990
5,446,749
0451-0040
CE Warning Label
Interlock Defeated (14)
CE Warning Label (15)
Patent Label
Laser Head (16)
Patent Label
Power Supply (17)
2-7
Millennia IR
EC Declaration of Conformity
We,
Spectra-Physics Lasers, Inc.
Industrial and Scientific Lasers
1330 Terra Bella Avenue
P.O. Box 7013
Mountain View, CA. 94039-7013
United States of America
declare under sole responsibility that the:
Millennia IR Diode Pumped Solid State Laser System with Model T40-8SS
power supply and control module,
Manufactured after December 31, 1996
meets the intent of “Directive 89/336/EEC for Electromagnetic Compatibility.”
Compliance was demonstrated (Class A) to the following specifications as listed
in the official Journal of the European Communities:
EN 50081-2:1993 Emissions:
EN55011 Class A Radiated
EN55011 Class A Conducted
EN 50082-1:1992 Immunity:
IEC 801-2 Electrostatic Discharge
IEC 801-3 RF Radiated
IEC 801-4 Fast Transients
I, the undersigned, hereby declare that the equipment specified above conforms
to the above Directives and Standards.
Steve Sheng
Vice President and General Manager
Spectra-Physics Lasers, Inc.
Industrial and Scientific Lasers
December 31, 1996
2-8
Laser Safety
EC Declaration of Conformity
We,
Spectra-Physics Lasers, Inc.
Industrial and Scientific Lasers
1330 Terra Bella Avenue
P.O. Box 7013
Mountain View, CA. 94039-7013
United States of America
declare under sole responsibility that the
Millennia IR Diode Pumped Solid State Laser System coupled with the
Model T40-8SS power supply and control module,
meets the intent of “Directive 73/23/EEC, the Low Voltage directive.”
Compliance was demonstrated to the following specifications as listed in the
official Journal of the European Communities:
EN 61010-1: 1993 Safety Requirements for Electrical Equipment for
Measurement, Control and Laboratory use:
EN 60825-1: 1993 Safety for Laser Products.
I, the undersigned, hereby declare that the equipment specified above conforms
to the above Directives and Standards.
Steve Sheng
Vice President and General Manager
Spectra-Physics Lasers, Inc.
Industrial and Scientific Lasers
February 21, 1997
2-9
Millennia IR
Sources for Additional Information
The following are some sources for additional information on laser safety
standards, safety equipment, and training.
Laser Safety Standards
Safe Use of Lasers (Z136.1)
American National Standards Institute (ANSI)
11 West 42nd Street
New York, NY 10036
Tel: (212) 642-4900
Occupational Safety and Health Administration (Publication 8.1-7)
U. S. Department of Labor
200 Constitution Avenue N. W., Room N3647
Washington, DC 20210
Tel: (202) 219-8151
A Guide for Control of Laser Hazards
American Conference of Governmental and
Industrial Hygienists (ACGIH)
1330 Kemper Meadow Drive
Cincinnati, OH 45240
Tel: (513) 742-2020
Laser Safety Guide
Laser Institute of America
12424 Research Parkway, Suite 125
Orlando, FL 32826
Tel: (407) 380-1553
Compliance Engineering (Publisher of Standards)
One Tech Drive
Andover, MA 01810-2452
Tel: (508) 681-6600 or (508) 681-6673
Equipment and Training
Laser Focus World Buyer's Guide
Laser Focus World
Penwell Publishing
10 Tara Blvd., 5th Floor
Nashua, NH 03062
Tel: (603) 891-0123
Lasers and Optronics Buyer's Guide
Lasers and Optronics
Gordon Publications
301 Gibraltar Drive
P.O. Box 650
Morris Plains, NJ 07950-0650
Tel: (201) 292-5100
2-10
Laser Safety
Photonics Spectra Buyer's Guide
Photonics Spectra
Laurin Publications
Berkshire Common
PO Box 4949
Pittsfield, MA 01202-4949
Tel: (413) 499-0514
2-11
Millennia IR
2-12
Chapter 3
Laser Description
A Brief Review of Laser Theory
Emission and Absorption of Light*
Laser is an acronym derived from Light Amplification by Stimulated Emission of Radiation. Thermal radiators, such as the sun, emit light in all directions, the individual photons having no definite relationship with one
another. But because the laser is an oscillating amplifier of light, and
because its output comprises photons that are identical in phase and direction, it is unique among light sources. Its output beam is singularly directional, monochromatic, and coherent.
Radiant emission and absorption take place within the atomic or molecular
structure of materials. The contemporary model of atomic structure
describes an electrically neutral system composed of a nucleus with one or
more electrons bound to it. Each electron occupies a distinct orbital that
represents the probability of finding the electron at a given position relative
to the nucleus. Each orbital has a characteristic shape that is defined by the
radial and angular dependence of that probability, e.g., all s orbitals are
spherically symmetrical, and all p orbitals surround the x, y, and z axes of
the nucleus in a double-lobed configuration (Figure 3-1). The energy of an
electron is determined by the orbital that it occupies, and the over-all
energy of an atom—its energy level—depends on the distribution of its
electrons throughout the available orbitals. Each atom has an array of
energy levels: the level with the lowest possible energy is called the ground
state, and higher energy levels are called excited states. If an atom is in its
ground state, it will stay there until it is excited by external forces.
Movement from one energy level to another—a transition—happens when
the atom either absorbs or emits energy. Upward transitions can be caused
by collision with a free electron or an excited atom, and transitions in both
directions can occur as a result of interaction with a photon of light. Consider a transition from a lower level whose energy content is E1 to a higher
one with energy E2. It will only occur if the energy of the incident photon
matches the energy difference between levels, i.e.,
hν = E2 – E1
[1]
where h is Planck’s constant, and ν is the frequency of the photon.
* “Light” will be used to describe the portion of the electromagnetic spectrum from
far infrared to ultraviolet.
3-1
Millennia IR
Figure 3-1: Electrons occupy distinct orbitals that are defined by the
probability of finding an electron at a given position, the shape of the
orbital being determined by the radial and angular dependence of the
probability.
Likewise, when an atom excited to E2 decays to E1, it loses energy equal to
E2 – E1. The atom may decay spontaneously, emitting a photon with energy
hν and frequency
E2 – E1
ν = -----------------h
[2]
Spontaneous decay can also occur without emission of a photon, the lost
energy taking another form, e.g., transfer of kinetic energy by collision
with another atom. An atom excited to E2 can also be stimulated to decay to
E1 by interacting with a photon of frequency ν, emitting energy in the form
of a pair of photons that are identical to the incident one in phase, frequency, and direction. This is known as stimulated emission. By contrast,
spontaneous emission produces photons that have no directional or phase
relationship with one another.
A laser is designed to take advantage of absorption, and both spontaneous
and stimulated emission phenomena, using them to create conditions favorable to light amplification. The following paragraphs describe these conditions.
Population Inversion
The net absorption at a given frequency is the difference between the rates
of emission and absorption at that frequency. It can be shown that the rate
of excitation from E1 to E2 is proportional to both the number of atoms in
the lower level (N1) and the transition probability. Similarly, the rate of
stimulated emission is proportional to the population of the upper level (N2)
and the transition probability. Moreover, the transition probability depends
on the flux of the incident wave and a characteristic of the transition called
its “cross section.” The absorption coefficient depends only on the difference between the populations involved, N1 and N2, and the flux of the incident wave.
3-2
Laser Description
When a material is at thermal equilibrium, there exists a Boltzmann distribution of its atoms over the array of available energy levels with most
atoms in the ground state. Since the rate of absorption of all frequencies
exceeds that of emission, the absorption coefficient at any frequency is positive.
If enough light of frequency ν is supplied, the populations can be shifted
until N1 = N2. Under these conditions the rates of absorption and stimulated
emission are equal, and the absorption coefficient at frequency ν is zero. If
the transition scheme is limited to two energy levels, it is impossible to
drive the populations involved beyond equality; that is, N2 can never exceed
N1 because every upward transition is matched by one in the opposite direction.
However, if three or more energy levels are employed, and if their relationship satisfies certain requirements described below, additional excitation
can create a population inversion where N2 > N1.
A model four-level laser transition scheme is depicted in Figure 3-2. A
photon of frequency ν1 excites—or “pumps”—an atom from E1 to E4. If the
E4 to E3 transition probability is greater than that of E4 to E1, and if the lifetime of an atom at E4 is short, the atom will decay almost immediately to E3.
If E3 is metastable, i.e., atoms that occupy it have a relatively long lifetime,
the population will grow rapidly as excited atoms cascade from above. The
E3 atom will eventually decay to E2, emitting a photon of frequency ν2.
Finally, if E2 is unstable, its atoms will rapidly return to the ground state, E1,
keeping the population of E2 small and reducing the rate of absorption of ν2.
In this way the population of E3 is kept large and that of E2 remains low,
thus establishing a population inversion between E3 and E2. Under these
conditions, the absorption coefficient at ν2 becomes negative. Light is
amplified as it passes through the material, which is now called an “active
medium.” The greater the population inversion, the greater the gain.
E4
E3
ν2
ν1
E2
E1
Figure 3-2: A Typical Four-level Transition Scheme
A four-level scheme has a distinct advantage over three-level systems,
where E1 is both the origin of the pumping transition and the terminus of
the lasing transition. Also, the first atom that is pumped contributes to the
3-3
Millennia IR
population inversion in the four-level arrangement, while over half of the
atoms must be pumped from E1 before an inversion is established in the
three-level system.
Resonant Optical Cavity
To sustain lasing action, the gain medium must be placed in a resonant
optical cavity. The latter can be defined by two mirrors which provide feedback to the active medium, i.e., photons emitted parallel to the cavity axis
are reflected back into the cavity to interact with other excited states. Stimulated emission produces two photons of equal energy, phase, and direction
from each interaction. The two photons become four, four become eight,
and the numbers continue to increase geometrically until an equilibrium
between excitation and emission is reached.
Both cavity mirrors are coated to reflect the wavelength, or wavelengths, of
interest while transmitting all others. One of the mirrors, the output coupler, transmits a fraction of the energy stored within the cavity, and the
escaping radiation becomes the output beam of the laser.
The laser oscillates within a narrow range of frequencies around the transition frequency. The width of the frequency distribution, the “linewidth,”
and its amplitude depend on the gain medium, its temperature, and the
magnitude of the population inversion.
Linewidth is determined by plotting gain as a function of frequency and
measuring the width of the curve where the gain has fallen to one half maximum (“full width at half maximum”, or FWHM, Figure 3-3).
C
2L
Gain
Longitudinal
Modes
Gain
Envelope
~
6-10 GHz
FWHM Point
Frequency (ν)
Figure 3-3: Frequency Distribution of Longitudinal Modes for a Single
Line
The output of the laser is discontinuous within this line profile. A standing
wave propagates within the optical cavity, and any frequency that satisfies
the resonance condition
mc
ν m = ------2L
3-4
[3]
Laser Description
will oscillate, where νm is the frequency, c is the speed of light, L is the optical cavity length, and m is an integer. Thus, the output of a given line is a set
of discrete frequencies, called “longitudinal modes,” that are spaced such
that
c
∆n = -----2L
[4]
Nd3+ as a Laser Medium
In commercial laser designs, the source of excitation energy for the gain
medium is usually optical or electrical. Arc lamps are often employed to
pump solid-state lasers, and the output of one laser can be used to pump
another, e.g., a Ti:sapphire laser can be pumped by an argon ion laser or a
diode laser can be used to pump a solid state laser. An electric discharge is
generally used to excite gaseous media like argon or krypton. The Millennia IR uses the output from a diode laser to pump Nd3+ ions doped in a
yttrium vanadate crystalline matrix (Nd:YVO4).
The properties of neodymium-doped matrices, such as yttrium aluminum
garnet (Nd:YAG) and yttrium lithium fluoride (Nd:YLF), are the most
widely studied and best understood of all solid-state laser media. The fourlevel Nd3+ ion scheme is shown in Figure 3-4. The active medium is triply
ionized neodymium which has principle absorption bands in the red and
near infrared. Excited electrons quickly drop to the 4F3 ⁄ 2 level, the upper
level of the lasing transition, where they remain for a relatively long time
(about 60 µs for Nd:YVO4).
Pump
Bands
20
18
16
4F
14
12
8
Laser 4F3/2
Transition
~6000 cm-1
4F3/2
~4000 cm-1
4I15/2
4
4I13/2
2
4I11/2
0
11502 cm-1 R2
11414 R1
Laser
Transition
4F3/2
10
6
3/2
4I9/2
4F3/2
4F3/2
Ground Level
2526
2473
2146
2111
2029
2001
848
311
197
134
0
Figure 3-4: Energy Level Scheme for the Nd3+ Ion.
3-5
Millennia IR
The most probable lasing transition is to the 4I1 ⁄ 2 state, where a photon at
1064 nm is emitted. Because electrons in that state quickly relax to the
ground state, its population remains low. Hence, it is easy to build a population inversion. At room temperature the emission cross section of this transition is high, so its lasing threshold is low. While there are competing
transitions from the same upper state, most notably at 1319, 1338, and 946
nm, all have lower gain and a higher threshold than the 1064 nm transition.
In normal operation, these factors and wavelength-selective optics limit
oscillation to 1064 nm.
Diode-pumped Laser Design
a
Nd3+ Absorption
Laser diodes combine very high brightness, high efficiency, monochromaticity and compact size in a near-ideal source for pumping solid-state
lasers. Figure 3-5 shows the monochromaticity of the emission spectra of a
laser diode compared to a krypton arc lamp and a black body source and
compares that with the absorption spectra of the Nd3+ ion. The near-perfect
overlap of the diode laser output with the Nd3+ absorption band ensures
that the pump light is efficiently coupled into the laser medium. It also
reduces thermal loading since any pump light not coupled into the medium
is ultimately removed as heat.
0.5
0.8
0.9
Black Body
Source (3000˚K)
Krypton Arc
Lamp
0.5
0.6
0.7
0.8
0.9
Wavelength (µm)
Emission Intensity
c
0.7
Wavelength (µm)
Emission Intensity
b
0.6
Laser Diode
Pump Wavelength
0.5
0.6
0.7
0.8
0.9
Wavelength (µm)
Figure 3-5: Nd3+ absorption spectra compared to emission spectra of a
Black Body Source (a), Krypton Arc Lamp (b) and a Laser Pump
Diode (c).
3-6
Laser Description
One of the key elements in optimizing the efficiency of a solid-state laser is
maximizing the overlap of the regions of the active medium excited by the
pumping source and the active medium occupied by the laser mode. The
maximization of this overlap is often called mode matching, and in most
applications, TEM00 is the laser mode that is most desired. A longitudinal
pumping geometry provides this sort of optimal mode-match.
Longitudinal pumping allows the diode output to be focused on a volume
in the active medium that best matches the radius of the TEM00 mode. In
general, the TEM00 mode radius is chosen to be as small as possible to minimize the solid-state laser threshold. Figure 3-6 shows a schematic of a
mode-matching design of this type.
Laser Diode Mode Volume
Gain Region
TEM00 Mode Volume
Lasing Medium
Figure 3-6: Mode Matching
For higher output power levels, a larger laser diode having a larger emission region is necessary. The diameter of the TEM00 mode volume must
also be expanded to effectively mode-match the volume of the extended
diode emission region. However, increasing the TEM00 mode volume raises
the solid-state laser threshold. This is undesirable when attempting to create an efficient laser diode design.
At Spectra-Physics Lasers, we use laser diode bars made from a single
monolithic piece of semiconductor material which typically contains ten to
twenty laser diodes. The bars are ideal as high power pump sources. These
devices have the same high efficiency as the discrete diode devices, yet
they allow for the manufacture of a much simpler and more reliable highpower pump laser design than is possible in a design incorporating an equal
number of discrete devices (for the same output power level). However, the
active emission area for these new devices is increased from the 200 µm
range found in low power diodes, to 1 cm: a “ribbon of light.” The use of
these bars has, therefore, been limited due to the difficulty of mode matching their outputs.
A number of attempts were recently made by some manufacturers to couple the output of a laser diode bar into a multimode optical fiber. The
results have been discouraging, so far, with coupling efficiencies on the
order of 60–70% with a numerical aperture of 0.4. This makes for an
expensive, inefficient pump source.
3-7
Millennia IR
At Spectra-Physics Lasers, we have developed and patented a vastly more
efficient method of fiber coupling the output of the laser diode bar. It is
called FCbar™. With this method, it is possible to achieve coupling efficiencies in excess of 90% with a numerical aperture of 0.1. With such high
coupling efficiency and brightness, high power diode-pumped laser designs
are readily achieved.
The Millennia™ IR System
The Millennia IR system comprises three basic components:
• Millennia IR laser head
• T40 power supply
• Control Module
The following sections will be confined to descriptions of the laser head
and power supply. The control module is fully described in Chapter 6,
“Operation.”
Figure 3-7: The Millennia IR System
3-8
Laser Description
Overview
Figure 3-8 shows the main components of the Millennia IR laser head. The
output from two high-power, fiber-coupled laser diode bars (FCbar) is
used to end-pump the laser gain medium, a neodymium yttrium vanadate
(Nd:YVO4) crystal (see Figure 3-9). The FCbar design allows the diode
bars to be placed in the power supply, which removes their heat load from
the laser head and facilitates their field replacement because realignment of
the Millennia IR cavity is not required.
Emission
Indicator
Shutter
Interlock
Switch
Light
Pickoff
Z-Head
Air
Dust Tubes
FCbar Fiber
Delivery Bundle
Fan
Figure 3-8: The Millennia IR Laser Head
Fiber
Bundle
Photodiode
Telescope
Output Coupler M4
1.064 µm
Beam Delivery Arm
Dichroic M3
Aperture
Beam
Splitter
Nd:YVO4 Gain Media
Z-Head
Dichroic M2
HR M1
Telescope
Fiber
Bundle
Figure 3-9: Schematic of the Millennia IR Laser Head
3-9
Millennia IR
Telescopes are used to focus the pump light through dichroic fold mirrors
M2 and M3 and into the laser crystal where 1064 nm infrared intracavity
light is generated. M2 and M3 are highly transmissive at the diode pump
wavelength and highly reflective at 1064 nm. High reflector mirror M1 and
output coupler M4 define the cavity. The aperture maintains the beam at a
size that is optimal for beam overlap in the Nd:YVO4 crystal, thus ensuring
efficient cavity light generation in the TEM00 mode. Virtually all the 1064
nm infrared light is transmitted by the output coupler and directed out of
the Z-head.
A beam splitter is used to sample the output and a photodiode provides
feedback to the pump diode drivers to provide a constant output in power
mode.
The Millennia IR Laser Head
The laser head is designed for maximum reliability with minimum complexity. A resonator is not required because the entire laser consists of the
Z-head itself. Both the high reflector and output coupler are part of the Zhead, thus the entire intracavity beam path is enclosed for maximum stability and prolonged hands-off operation. The inherent operation is so stable
and the output so quiet that no adjustments are needed for normal operation. Control of the entire system is provided via a simple, menu-driven
control module.
Two major components comprise the laser head (Figure 3-9):
•
•
Z-head
Beam delivery arm
The Z-head
The Z-head is a compact, fully enclosed module that is so named for the
beam path within it (see Figure 3-10). It contains the neodymium yttrium
vanadate (Nd:YVO4) laser crystal which is the “driving engine” of the Millennia IR laser. The crystal is end-pumped by two fiber-coupled diode bar
(FCbar) modules and provides a very high cw, small signal gain. It is capable of producing over 10 W of near diffraction-limited, 1064 nm infra-red
power with a conversion efficiency greater than 50%.
As shown in the figure, the outputs from the two pump diode modules in
the power supply are fiber-coupled into the Z-head and focused into each
end of the Nd:YVO4 laser crystal. The diode pump light is absorbed by the
crystal and emitted as output at 1064 nm. The 1064 nm output is resonated
in the Millennia IR cavity and amplified through stimulated emission.
3-10
Laser Description
FCbar fiber delivery bundle
Aperture
Output Coupler M4
Z-head Body
Focusing Lens
Assemblies
Nd:YVO4 gain media
Cavity fold dichroic mirrors
HR 1.064 µm, M2, M3
High Reflector M1
FCbar fiber delivery bundle
Figure 3-10: The Z-Head (top view)
The Beam Delivery Arm
Unlike other systems that require multiple feedback loops to maintain stable output, the Millennia IR is inherently stable within its operating range.
It requires only one simple feedback loop to maintain its exceptional performance and maintain constant output power. The pick-off consists of a
beam splitter and photodetector.
The T40 Power Supply
FCbar
The pump source for the Millennia IR laser head consists of two diode
laser bars, each module capable of producing 20 W. The two modules are
then coupled to optical fiber bundles that transport the diodes’ output to
each end of the laser crystal in the Z-head. This modular concept is called a
“fiber-coupled bar” or FCbar™.
The FCbar System
FCbar technology enables the high power levels available from the laser
diode bars to efficiently end-pump the Nd:YVO4 laser crystal. This is done
by first collimating the output of the bar with a cylindrical microlens of
high numerical aperture (the microlens is bonded to the diode bar in order
to reduce the fast-axis divergence of the diode bar). The highly asymmetric
light is then coupled into a fiber bundle, which in turn delivers exceptional
brightness to the crystal. To stabilize the output wavelength of the diodes,
the modules are mounted directly on a temperature regulated cold plate.
Because the coupling technology is so efficient, the 20 W diode modules
are typically derated 75% to increase their operating lifetime.
3-11
Millennia IR
The multimode optical fiber bundle is actually several fibers that are drawn
together in a round bundle where the output end is typically 1 to 1.5 mm in
diameter with a numerical aperture of about 0.1. Typically, 85 to 90 percent
of the diode light is transmitted by the bundle; thus, up to 13 W of usable
output is available from each derated laser diode bar at the output of the
fiber bundle.
The FCbar modules mate with the fiber bundle through precision connections that are assembled and aligned at the factory. The bundles are then
terminated at the Z-head with industry standard fiber-optic connectors.
This provides a precise and repeatable attachment of the bundle to the Zhead and allows the FCbar modules to be replaced in the field, if necessary, without requiring a major realignment.
Specifications
Table 3-1: Millennia IR Specifications
Laser Output Characteristics1
Power
> 10 W
Wavelength
Spatial Mode
1064 nm
2
TEM00
2
Beam diameter at 1/e points (nominal)
< 5 mrad
Polarization
>100:1, vertical
4
Beam Pointing Stability
Noise
2
3
4
5
6
3-12
0.3 mm
Beam divergence, full angle
Power Stability
1
3
6
±1%
5
<5 µrad/°C
<0.1% rms
Specifications subject to change without notice.
M2 <1.1; Beam ellipticity <10%.
±10% measured at the exit port.
Measured over a 2 hour period after a 2-hour warm-up, from standby mode.
Measured as far-field x and y positions, after a 2-hour warm-up, from standby mode.
Measured over a 10 Hz to 10 MHz bandwidth at the specified output power.
Laser Description
Power Requirements
Power Supply
110 Vac ±10% at <10 A, 60 Hz
220 Vac ±10% at <6 A, 50 Hz
Fuse Requirements
Voltage
200 – 240 Vac
100 – 127 Vac
Fuse (Type 3AG)
F1 / F2 / F3
10 A / 10 A / 3 A
15 A / 15 A / 3 A
Dimensions
Laser Head
Size
Weight
Umbilical Length
Power Supply
Size
Weight
Power Cable Length
Controller Size
Controller Cable Length
91.5 L x 15.2 W x 17.4 H cm
(36.0 L x 6.0 W x 6.8 H in.)
8.0 kg (17.5 lb)
3.35 m (11 ft)
17.3 H x 15.2 W x 44.5 L cm*
(6.8 H x 6.0 W x 17.5 L in.*)
50.1kg (110 lb)
2.44 m (8 ft)
8.26 H x 16.51 W x 4.45 L cm
(3.25 H x 6.50 W x 1.75 L in.)
2.44 m (8 ft)
* With casters, add 6.9 cm or 2.7 in.
3-13
Millennia IR
Outline Drawings
Beam Exit
Spectra-Physics
4.18
10.62
6.83
17.35
Millennia IR
2.56
6.50
12.39
31.47
3.88
9.86
6.00
15.24
17.51
44.48
Millennia IR Side View
1.06
2.69
5.83
14.81
1.00
2.54
Millennia IR Output End
16.00
40.64
INTERLOCK
REMOTE
SERIAL COM
6.50
16.51
LASER HEAD
LASER EMISSION
AC
LASER
EMISSION
ON
Setup |
Info
|
|
|
VISIBLE AND/OR INVISIBLE
LASER RADIATION
Avoid eye or skin exposure
to direct or scattered radiation.
Nd:YVO4, Nd:YAG or Nd:YLF Laser. Various
ultraviolet, visible or infrared wavelengths
may be emitted. Consult instruction manual.
50 Hz
SICHTBARA UND/ODER UNSICHTBARE
LASERSTRAHLUNG
Bestrahlung von Auge oder Haut durch
direkte oder Streustrahlung vermeiden.
Nd:YVO4, Nd:YAG oder Nd:YLF Laser.
Verschiedene Ultraviolett-, Infrarot- oder sichtbara
Laserstrahlungen Können austreten, Nähere
Informationen: siehe Bedienungsanieltung.
Laser Klasse 4 nach IEC 825-1 (1993)
110
127
10.18
25.86
RAYONNEMENT LASER VISIBLE ET/OU INVISIBLE
Exposition dangereuse de l'oeil ou
de la peau au rayonnement direct ou diffus.
Laser Nd:YVO4, Nd:YAG ou Nd:YLF. Emission
laser ultraviolette, visible ou infrarouge.
Consulter le manuel d'Installation.
Apparell a' laser de classo 4 IEC 825-1 (1993)
120
60 Hz
Spectra-Physics Lasers, Inc.
1330 Terra Bella Avenue, Mountain View, CA. 94043
220
MANUFACTURED
IN USA
MODEL
5.00W
Controller Top View
Spectra-Physics
200
3.25
8.26
5.00
Set:
Spectra-Physics
Class 4 laser product per IEC 825-1 (1993)
100
LASER POWER
LASER
DIODE
Spectra-Physics
S/N
230
240
LINE
VOLTAGE
200 - 240 VAC
100 - 127 VAC
10A/10A/3A
15A/15A/3A
F2
F3
1.75
4.45
I
0
POWER IN
F1
F1/F2/F3
3AG. TYPE T, UL198G
2.75
6.98
T40 Control Panel
2.65
6.73
Controller Side View
13.35
33.91
All dimensions in
25.25
64.14
12.93
32.84
T40 Side View
3-14
3.44
8.74
inches
(cm)
Chapter 4
Controls, Indicators and Connections
Introduction
This section defines the user controls, indicators and connections of the
Millennia™ IR laser system. It is divided into three sections: the Millennia
IR laser head, the Millennia IR control module and the T40 power supply.
Figure 4-1 shows the location of the various components in the Millennia
IR laser head.
Laser Head Controls
Emission
Indicator
Shutter
Interlock
Switch
Light
Pickoff
Z-Head
Air
Dust Tubes
FCbar Fiber
Delivery Bundle
Fan
Figure 4-1: The Millennia IR Laser Head
External Controls
Shutter—blocks the output beam when the lever is moved to the blocking
position (∅). The lever is located near the emission indicator on top of the
output bezel. It is accessible when the cover is on.
Cover clamping screws (2)—hold the cover securely in place. One screw
is located on top of the cover at each end of the laser. Use the Allen drivers
provided to fasten and unfasten the ¼ turn screws.
4-1
Millennia IR
Foot height adjustments (4)—provide a means to level the laser and to
adjust its height to match that of the target device. The legs are large screws
with swivel feet that can be screwed up and down from inside the laser
head using an Allen driver. Once the height adjustment has been made, a
jam nut on each leg is tightened up against the chassis to lock them in
place.
Internal Controls
There are no internal controls other than the interlock switch and, thus,
there are no adjustments in the laser head.
Interlock switch—shuts the laser off immediately when the cover is
removed. The switch is located behind the shutter near the output bezel. It
can be defeated using the yellow plastic “I”-shaped key that is clamped to
the vertical resonator plate near the switch. To defeat the switch, insert the
key in the slot and press the key down against the spring, then rotate it 90°
clockwise to lock it in place. To remove it, rotate it 90° counterclockwise
and lift it out.
While the key is in the defeat position, the cover cannot be installed.
Indicators
There is only one indicator on the laser head:
Emission indicator light—warns of present or imminent laser radiation.
This white-light CDRH indicator is located at the top center of the output
bezel. A built-in delay between the turn on of the lamp and actual emission
allows for evasive action in the event the system was started by mistake.
Connections
There are three connections on the Millennia IR rear panel (Figure 4-2): the
permanently attached umbilical cable from the power supply, the 9-pin RS232 serial port, and the 15-pin Millennia IR controller connector.
Spectra-Physics
1344 TERRA BELLA AVENUE
MT. VIEW, CALIFORNIA 94039
VISIBLE AND/OR INVISIBLE*
LASER RADIATION
AVOID EYE OR SKIN EXPOSURE TO
DIRECT OR SCATTERED RADIATION
CLASS 4 LASER PRODUCT
1064 NM
MAXIMUM OUTPUT 15 W
MANUFACTURED:
MONTH
YEAR
MODEL
S/N
THIS LASER PRODUCT COMPLIES
WITH 21 CFR 1040 AS APPLICABLE.
MADE IN U.S.A.
*SEE MANUAL
Spectra Physics Lasers
POST OFFICE BOX 7013
MT. VIEW, CA 94039-7013
THIS PRODUCT IS
PROTECTED BY U.S.A.
PATENT NOS. 4,653,056,
4,656,635, 4,665,529,
4,701,929, 4,723,257,
4,756,003, 4,758,459,
4,837,771, 4,872,177,
4,894,839, 4,908,832,
5,127,068, 5,410,559,
5,412,683, 5,436,990,
5,446,749
0451-0040
RS-232
Serial Port
Connector (9-pin)
Controller
Connector (15-pin)
Umbilical
Attachment
Figure 4-2: The Millennia IR Laser Head Rear Panel
4-2
Controls, Indicators and Connections
Umbilical connector—provides control signals to and from the power
supply, cooling water from the chiller, and laser output from the diodes.
This umbilical is permanently attached: do not try to remove it. To move
the laser system, set the laser head and the controller on top of the power
supply and roll the system to its new location.
RS-232 serial port connector (9-pin, D-Sub)—provides attachment for a
host system to operate the system remotely.
Controller connector (15-pin, D-Sub)—provides attachment for the Millennia IR control module.
Millennia IR Control Module
Select
Buttons (4)
Laser Emission
Indicator
LCD
Monitor
LASER EMISSION
Setup |
Info
|
|
|
Laser
On/Off
LASER POWER
5.00
Set:
5.00W
Spectra-Physics
Up/Down Buttons (2)
Figure 4-3: The Millennia IR Control Module
Controls
Seven buttons on the controller operate the Millennia IR laser (Figure 4-3).
Select buttons (4)—are located to the left of the LCD screen and are used
to select one of the four possible actions that are shown on the left side of
the screen. For example, pressing the top left button in Figure 4-3 brings up
the Setup menu. When up/down arrows are shown on the screen, press the
associated button to scroll the text.
button—performs 3 functions: (a) begins the laser warmup cycle, (b) turns on the laser and (c) turns off the laser. (Note: the power
supply must also be on and its LASER DIODE interlock keyswitch set to ON
in order for the laser to turn on). Press the button once to begin the warmup cycle. Then when the cycle completes, press and hold it in to turn on the
laser. The LASER EMISSION indicator on the controller panel flashes and
the emission indicator on the laser head turns on while the button is held in
and emission is imminent (a CDRH delay of about 6 seconds). The indicator stops flashing and stays on when emission occurs.
LASER POWER
4-3
Millennia IR
Up/down buttons—in the lower right corner of the panel, when pressed,
increase or decrease the value displayed on the screen (such as a power setpoint), or allow the operator to select a parameter from a list that is to be
changed or displayed.
Indicators
LCD monitor—provides feedback and control of the laser, depending on
which menu is displayed. Large digits always display actual output power.
Below output power, displayed in smaller text is the output power setpoint
(when power mode is selected), or the percentage of maximum current
(when current mode is selected), or “RS-232 Enabled” if the system is
being operated remotely via the RS-232 serial link.
LASER EMISSION indicator—flashes prior to laser emission, then stays on
when laser output is present.
Connections
There are no connectors on the control module. The 3 m control cable is
permanently attached. Do not try to remove it. The cable plugs into the 15pin controller connector on the rear panel of the laser head.
T40 Power Supply
All controls, indicators and connections on the power supply are made on
the front panel. Figure 4-4 shows the front panel.
Controls
Key switch—provides security to prevent unauthorized use of the laser.
When power is applied and the key is inserted and turned to the ON position, the LASER EMISSION indicator lights and emission occurs after about
a 6 second delay. Control then transfers to the Millennia IR controller or to
the host system (via the RS-232 link), depending on configuration.
Frequency switch—provides a means to set the system for 50 or 60 Hz
operation. Verify this switch is correctly set prior to turning on the system.
To set it, slide it to the position that matches the line frequency you are
using.
On/off switch—provides power to the laser system when set to the on (I)
position. When first turned on, the power supply performs an internal diagnostic check and the doubler oven in the laser head is allowed to warm up.
From a cold start, this takes about 30 minutes. It is therefore strongly recommended that this switch be left in the “on” position unless the system is
not to be used for an extended period of time. For safety, however, turn off
the LASER DIODE key and remove it to prevent unauthorized use of the
laser.
4-4
Controls, Indicators and Connections
LCD Display
AC Power
Indicator
Jumper
Connector
Interlock
Connector
INTERLOCK
Laser Emission Interlock
Indicator
On/Off Key
Laser Head Laser Head
Connector Connector
REMOTE
SERIAL COM
AC
Laser Diode 1
Cable
Laser Diode 2
Cable
LASER HEAD
LASER
EMISSION
LASER
DIODE
Spectra-Physics
ON
VISIBLE AND/OR INVISIBLE
LASER RADIATION
Avoid eye or skin exposure
to direct or scattered radiation.
Nd:YVO4, Nd:YAG or Nd:YLF Laser. Various
ultraviolet, visible or infrared wavelengths
may be emitted. Consult instruction manual.
50 Hz
Class 4 laser product per IEC 825-1 (1993)
100
SICHTBARA UND/ODER UNSICHTBARE
LASERSTRAHLUNG
Bestrahlung von Auge oder Haut durch
direkte oder Streustrahlung vermeiden.
Nd:YVO4, Nd:YAG oder Nd:YLF Laser.
Verschiedene Ultraviolett-, Infrarot- oder sichtbara
Laserstrahlungen Können austreten, Nähere
Informationen: siehe Bedienungsanieltung.
Laser Klasse 4 nach IEC 825-1 (1993)
110
RAYONNEMENT LASER VISIBLE ET/OU INVISIBLE
Exposition dangereuse de l'oeil ou
de la peau au rayonnement direct ou diffus.
Laser Nd:YVO4, Nd:YAG ou Nd:YLF. Emission
laser ultraviolette, visible ou infrarouge.
Consulter le manuel d'Installation.
Apparell a' laser de classo 4 IEC 825-1 (1993)
120
127
60 Hz
Spectra-Physics
200
Spectra-Physics Lasers, Inc.
1330 Terra Bella Avenue, Mountain View, CA. 94043
220
MANUFACTURED
IN USA
MODEL T40-8SS
S/N
230
240
F1/F2/F3
3AG. TYPE T, UL198G
200 - 240 VAC
100 - 127 VAC
10A/10A/3A
15A/15A/3A
F1
F2
F3
I
0
POWER IN
LINE
VOLTAGE
Power Cord
Connector
Power On/Off
Switch
Voltage Select
Jumpers
Frequency
Switch
Fuses (3)
Umbilical Connector
Figure 4-4: The T40 Power Supply Control Panel
Fuses (F1, F2, F3)—provide a safety valve for various circuits. Replace fuses
F1, F2 and F3 according to the table below for the line voltage used. To
access a fuse, use a medium flat blade screwdriver to turn the slotted fuse
cap counter-clockwise, then pull the cap off and remove the fuse. Assemble
in reverse order.
Voltage
200 – 240 Vac
100 – 127 Vac
Fuse (Type 3AG) F1/F2/F3
10 A/10 A/3 A
15 A/15 A/3 A
4-5
Millennia IR
Indicators
AC indicator—turns on immediately when line power is applied to the sys-
tem and the power switch is turned on.
LASER EMISSION indicator—turns on when the LASER DIODE keyswitch
is set to the ON position, thus indicating there is laser emission or that it is
imminent.
LCD display—is a 4-line, 20-character display that shows the progress of
the power-up diagnostics and will display error codes for any power supply
failure(s). These codes are used by Spectra-Physics Lasers service technicians to diagnose problems in the power supply; they are not for use by the
user.
Connections
connector (2-pin)—provides attachment for a safety switch.
These contacts must be shorted together before the laser will operate. A
defeating jumper plug is installed at the factory to permit operation without
a safety switch. The plug can be replaced with a similar non-shorting plug
that is wired to auxiliary safety equipment (such as a door switch) to shut
off the laser when actuated (opened). Such a switch must have a minimum
rating of 100 mA at 12 V.
INTERLOCK
connector (15-pin)—provides attachment for a jumpered plug
that configures the T40 power supply for use with the Millennia IR laser.
Do not remove the plug: doing so will keep the system from starting, or will
shut it off if it is already on. Do not confuse this connector with the 15-pin
connector on the laser head.
REMOTE
connector (9-pin)—provides attachment for control lines
from the umbilical. Do not disconnect the umbilical connector attached to
it. Also, do not confuse it with the serial connector on the laser head which
provides attachment for a terminal or computer.
SERIAL COM
LASER HEAD connector (27-pin)—provides
attachment for control lines
from the umbilical. Do not disconnect the umbilical connector.
Laser diode cable connectors (2)—provides attachment for the armored
fiber-optic cables. These cables are permanently attached to the diode modules. Do not try to disconnect them. Call Spectra-Physics Lasers to have a
service engineer replace the diodes when needed.
Power cord connector—provides attachment for the twist-on power cord
provided with the unit. Connect the cord to a power source capable of providing 15/10 A at 110/220 V.
Voltage select jumper terminal block—provides a means for matching
the system to the local power line. Use a screwdriver to loosen the screws,
then position the jumpers according to the silkscreen for the voltage
desired. After making any adjustments, verify the screws are tight.
4-6
Chapter 5
Installation and Alignment
There are no internal controls to adjust or optics to change. This makes the
Millennia IR laser very easy to set up and operate. The following instructions will get you operational in a very short time.
When you received your laser, it was packed with the laser head and power
supply already connected. Do not disconnect the umbilical cables from
either end!
Laser Installation
Note
The following installation procedure is not intended as a guide to the
initial installation and set-up of your laser. Please call your SpectraPhysics Lasers service representative to arrange an installation appointment, which is part of your purchase agreement. Allow only personnel
qualified and authorized by Spectra-Physics Lasers to install and set up
your laser. Spectra-Physics Lasers provides training in the use of this
laser. Please contact your Spectra-Physics Lasers representative if you
desire training. You will be charged for repair of any damage incurred if
you attempt to install the laser yourself, and such action might also void
your warranty
All the tools and equipment you need to set up the Millennia IR laser are in
your accessory kit.
Installing the Laser Head
Warning!
1.
Remove the laser head, power supply and control module from the
shipping crate and inspect for damage. Refer to the “Unpacking and
Inspection” notes at the front of this manual.
2.
Move the laser system into place.
Be careful when moving your system that any bend in the umbilical
does not exceed the 10 cm (4 in.) minimum radius. Exceeding this limit
can fracture and/or break the fiber bundles. Also, be careful not to snag
any of the various cables extending from the power supply.
To move the laser, set the power supply on the ground and the laser
head and controller on top of it, then roll the laser to the table. The
5-1
Millennia IR
laser head is much lighter than an ion laser of similar size (approximately 14 kg), and it can be picked up by one person.
3.
Set the laser head on a suitable optical table and align it to the target
system.
4.
For now, roll the power supply under the table or out of the way. The
umbilical and power cable are each about 3 m long.
5.
Remove the laser head cover.
Two screws hold the cover on. Use one of the large-handled Allen
drivers from the accessory kit to turn the screws ¼ turn counterclockwise, then lift the cover off.
6.
Adjust the height of the laser head.
a. Loosen the large locking nut on each leg. The nuts are threaded
onto each leg and jam against the bottom of the base plate to lock
the foot in place and to add stiffness to the foot.
b. From inside the laser head, use a 5/32 in. Allen driver to adjust each
leg by screwing it up and down.
c. When the height is correct, tighten the locking nuts up against the
base plate again.
7.
Secure the laser head to the table with the four foot clamps provided.
8.
Replace the cover on the laser.
This completes the laser head installation procedure.
Installing the Control Module
Controller installation consists of setting the unit in a convenient place on
the table and plugging the control cord into the 15-pin controller connector
on the laser head rear panel (Figure 5-1).
Spectra-Physics
1344 TERRA BELLA AVENUE
MT. VIEW, CALIFORNIA 94039
VISIBLE AND/OR INVISIBLE*
LASER RADIATION
AVOID EYE OR SKIN EXPOSURE TO
DIRECT OR SCATTERED RADIATION
CLASS 4 LASER PRODUCT
1064 NM
MAXIMUM OUTPUT 15 W
MANUFACTURED:
MONTH
YEAR
MODEL
S/N
THIS LASER PRODUCT COMPLIES
WITH 21 CFR 1040 AS APPLICABLE.
MADE IN U.S.A.
*SEE MANUAL
Spectra Physics Lasers
POST OFFICE BOX 7013
MT. VIEW, CA 94039-7013
THIS PRODUCT IS
PROTECTED BY U.S.A.
PATENT NOS. 4,653,056,
4,656,635, 4,665,529,
4,701,929, 4,723,257,
4,756,003, 4,758,459,
4,837,771, 4,872,177,
4,894,839, 4,908,832,
5,127,068, 5,410,559,
5,412,683, 5,436,990,
5,446,749
0451-0040
RS-232
Serial Port
Connector (9-pin)
Controller
Connector (15-pin)
Umbilical
Attachment
Figure 5-1: The Millennia IR Laser Head Rear Panel
If a remote host system is to be used to control the Millennia IR laser, refer
to the end of Chapter 6, “Operation: The RS-232 Serial Port,” for information on wiring and connections, baud rate, command language, etc.
5-2
Installation and Alignment
Installing the Power Supply
1.
Place the power supply in a convenient location within 3 m of the laser
head (the length of the umbilical cable).
2.
Verify the cable connections from the umbilical are still tight.
The REMOTE, SERIAL COM and LASER HEAD connectors should never
be disconnected from the power supply panel. If, for some reason, they
do get disconnected, take care to reconnect them. Each plug has a different number of pins so they cannot be swapped. Tighten the retaining
screws when you are done.
3.
Verify the interlock jumper is in place or, if desired, remove it and add
a non-jumpered connector and wire it to a safety switch. The switch
must be wired so that when the device is actuated (e.g., a door is
opened), the switch opens and the laser turns off.
4.
Verify the voltage selection jumpers are correctly set to match the voltage in your area.
To change the setting, simply loosen the screws and move the jumpers
to the proper setting. Refer to the silk-screened voltage notation next to
the terminal strip. If the voltage is changed, fuses F1 and F2 must also
be changed. Refer to the fuse rating requirements for the voltage setting used in the specifications table in Chapter 3.
5.
Verify the frequency switch is set to the line frequency in your area.
6.
Attach the power cord to the power supply, then to the power source.
This completes the installation of the Millennia IR system.
Alignment
No formal alignment procedure is required for the Millennia IR laser system: there are no knobs to adjust or no optics to change. If you are ready to
turn on the laser, refer to Chapter 6, “Operation,” for instructions.
5-3
Millennia IR
5-4
Chapter 6
Operation
Please read this entire chapter and Chapter 2 on laser safety before using
your laser for the first time.
Using the Control Module
The controller is a convenient device for operating the Millennia IR laser
(refer to Figure 6-1).
Use the four buttons on the left side of the panel to select one of the four
possible options shown on the left side of the screen. For example, press
the top left button to go to the Setup menu or the next button down to go to
the Info menu, etc. As is the case here, not all menus use all the buttons.
The LASER POWER button turns the laser on and off.
Select
Buttons (4)
Laser Emission
Indicator
LCD
Monitor
LASER EMISSION
Setup |
Info
|
|
|
Laser
On/Off
LASER POWER
5.00
Set:
5.00W
Spectra-Physics
Up/Down Buttons (2)
Figure 6-1: The Millennia IR Controller Showing the Default Main
Menu.
The up/down buttons in the lower right corner either increase or decrease
the value displayed on the screen (such as the power setpoint), or allow you
to select or change a parameter from a list on the display.
The LCD screen displays several things, but what is displayed depends on
the menu in use. The large digits always display actual output power, and
below that, in smaller text, is either the output power setpoint (when power
mode is selected) or the percentage of maximum current (when current
6-1
Millennia IR
mode is selected). RS-232 ENABLED is shown if the system is being operated remotely via the serial link.
In general, use:
•
•
•
the Main menu to monitor output power and to set the power or current
setpoint (the desired output).
the Setup menu to select power or current mode and to select local or
RS-232 control of the system. The RS-232 commands are listed at the
end of this chapter.
the Info menu to view the diode drive current, the temperature for each
laser diode, and the revision level of the Millennia IR software. Also
included is a history (HST) line that shows the last three system error
codes.
Refer to the following sections for more information on each menu.
The Menu System
Four menus, Main, Setup, Standby, and Information, are used to control and
monitor the Millennia IR. Sample menu displays are shown in Figure 6-2.
Setup |
Info
|
|
|
System
Warming Up
Main
80%
Warm-up Menu
Setup |
Info
|
|
|
0.20
Set:
0.20W
|
|
|
|
5.00
RS232 enabled
Main Menu: RS-232 "Enabled" Display
→Mode: Power←
Setup Menu: Mode Select
Setup |
Info
|
|
|
––STANDBY––
Press "POWER"
key to warm up
Standby Menu
Main Menu: Power Monitor
Setup |
Info
|
|
|
*** SETUP ***
Main
⇓
|
|
|
|
*** INFO ***
D1 :19.5 Amps
D2 :18.9 Amps
Information Menu
Figure 6-2: The Millennia IR Menus
The upper left-hand frame shows the warm-up menu that is displayed soon
after the system is powered up from a cold start (the power supply was
turned off). It allows you to monitor the warm-up process, which takes
about 30 minutes. If you are controlling the system remotely using the
serial interface, a query command allows you this same monitoring capability (refer to the “Queries” section later in this chapter).
6-2
Operation
The Standby menu is displayed anytime the laser is turned off for more
than 30 minutes with the power supply left on.
The following sections describe the four menus.
The Main Menu
When the system is ready for operation following the warm-up sequence,
the Main menu is displayed. From here you can set the output power and
monitor system performance. The large letters indicate actual output
power; the smaller letters below it indicate either the desired output power
(the power setpoint when the system is set for power mode), the desired
laser diode drive current (the current setpoint, as a percentage of maximum
current, when the system is set for current mode), or RS-232 ENABLED
when the system is operated remotely via the serial link. The left figure
below shows the power mode display; current mode is shown on the right.
When the system is tracking correctly in power mode, the two numbers,
actual output power and setpoint, are the same, ±0.01 W.
Setup |
Info
|
|
|
0.20
Set:
0.20W
Setup |
Info
|
|
|
0.20
Set:
39.1%
To change the power or current setpoint, simply press one of the up/down
buttons. Note that when the buttons are held down, the setpoint numerical
update pauses from time to time. This is normal. To change from power to
current mode, or vice versa, use the Setup menu.
If an error occurs, ERROR flashes in the lower left corner of the Main
menu. Press the lower left button to display the error source. (Error codes
and their definitions are listed in Appendix A.) When the problem is corrected, the ERROR message turns off. If the error code is generated by the
power supply, it is logged on the history (HST) line in the Info menu.
Menus available from the Main menu are:
•
•
Setup
Info
6-3
Millennia IR
The Setup Menu
Use the Setup menu to change between power and current mode, or to
select LOCAL control (using the hand-held controller) or remote control
(via the RS-232 link). Access this menu from the Main menu.
Main
|
|
|
|
*** SETUP ***
→Mode: Power←
Use the up/down buttons to toggle the selection indicated between the
arrows. Selections include:
•
•
•
Mode: Power
Mode: Current
Mode: RS-232
The new selection is activated upon return to the Main menu.
When RS-232 is selected, RS-232 is displayed on the Main menu, and control is transferred to the host system. The baud rate can be changed to
match the speed of the host system. This setting, along with the software
commands for serial control, are explained later in this chapter under “The
RS-232 Serial Port.”
Setup |
Info
|
|
|
5.00
RS232 enabled
The default RS-232 settings are:
•
•
•
•
9600 baud
8 data bits,
no parity
1 stop bit
Pressing the Main button from the Setup menu returns you to the Main
menu.
6-4
Operation
The Standby Menu
The Standby menu is displayed whenever the laser was placed in the
Standby mode by turning off the laser for more than 30 minutes but leaving
on the T40 power supply.
This display is not shown when the system is started cold, i.e., when the
power supply has been turned off. Nor can it be accessed from any other
menu. It appears automatically whenever the laser is turned off for more
than 30 minutes with the power supply left on.
Setup |
Info
|
|
|
––STANDBY––
Press "POWER"
key to warm up
The Information Menu
The Info menu provides diagnostic information on the laser diodes. It also
contains a history (HST) line that displays the three most recent system
error codes for diagnostic purposes. The codes and their definitions are
listed in Appendix A. Note that only the power supply codes, 0 through
126, are displayed. The Info menu is accessed from the Main menu.
Main
⇓
|
|
|
|
*** INFO ***
D1 :19.5 Amps
D2 :18.9 Amps
Use the select buttons (not the up/down buttons) to scroll the screen (note
the down arrow in the picture above). Two lines are displayed at a time as
follows, from top to bottom:
•
The drive current for each laser diode, D1 and D2.
Note that it is normal to require greater than 60% of full current before
achieving the threshold condition for green output power.
•
•
•
The temperature of each laser diode.
The error code history (HST) line.
The revision level of the Millennia IR software. Have this revision
number available whenever calling for service.
Pressing the Main button returns you to the Main menu.
6-5
Millennia IR
System Start-up/Shut Down
There are two turn on sequences, one for a cold start when the T40 power
supply was turned off, and one for a warm start when the system is in
Standby mode (when the laser is off but the power supply was left on).
Each sequence is described below.
Turning On the Laser, Cold Start
1.
Verify that all connectors are plugged into the power supply (they
should never be disconnected—if they were, refer to Chapter 5,
“Installation and Alignment,” for instructions on re-connecting them).
2.
3.
Turn on the power supply power switch.
Turn on the power supply key switch.
Power Supply Start-up
As the system starts up, the following message sequence is displayed on
the power supply LCD screen:
6-6
•
•
•
•
•
•
•
“Spectra-Physics Lasers” followed by the software version number.
“System Initializing”
“Bypass delay time”
“Laser Diodes Off”
“Status – Wait”
“Cooling System Test”
“Diode Safety Check”
If the key switch is not set to ON, the system will not start up and the
following is displayed on the panel: “System Error, Open Interlock.”
Simply set the switch to ON to clear the error message and enable the
system.
•
“Adjusting Temperature”
This message remains on screen until the laser diodes are at operating
temperature. At this time, the Warm-up menu is displayed on the controller.
•
“Boot Complete, Laser Diodes Off, Power Mode Ready”
This is the final display from the power supply, which indicates it is
ready for use.
Operation
Controller Start-up
The following message sequence is displayed on the controller as the system turns on:
•
•
“Spectra-Physics Lasers”
“Welcome to the new Millennia IR”
After the welcome message, the system begins the warm-up cycle,
which can take up to 30 minutes. A time bar is displayed (0 to 100%)
to indicate progress:
Setup |
Info
|
|
|
4.
System
Warming Up
80%
When the system has warmed up, the following screen is displayed:
Setup |
Info
|
|
|
Hold "POWER"
key to turn on
Set:
0.20W
Press and hold in the LASER POWER button until the laser starts. When
the button is pressed, the LASER EMISSION light flashes for a few seconds. Then, when laser emission occurs, it stops flashing and remains
on, and the emission indicator on the laser head turns on to indicate
radiation is present.
At this point, the Main menu is displayed and, for safety, output power
ramps up slowly to 0.20 W. 0.20 W is displayed if the laser was set to
power mode when it was last used, or an equivalent current value is
displayed if the laser was set to current mode. Power mode is shown in
the Main menu below.
Setup |
Info
|
|
|
5.
6.
0.00
Set:
0.20W
Use the Setup menu to change the laser mode, if desired.
From the Main menu, set laser output power using the up/down buttons. Actual output power will follow the setpoint value.
This completes the cold start turn-on sequence. The system is now ready
for use.
6-7
Millennia IR
Turning On the Laser, Warm Start
This procedure assumes the unit was left in Standby mode after it was last
used, i.e., the laser was turned off, but the power supply was left on. When
this is the case, the following Standby prompt is displayed.
Setup |
Info
|
|
|
1.
––STANDBY––
Press "POWER"
key to warm up
Press the LASER POWER button to begin the short warm-up cycle.
The following prompt is displayed for about 2 minutes while the diode
temperature stabilizes:
Setup |
Info
|
|
|
2.
STABIZING
Diode Tempertature
When the system has warmed up, the following screen is displayed:
Setup |
Info
|
|
|
Hold "POWER"
key to turn on
Set:
0.20W
Press and hold in the LASER POWER button until the laser starts. When
the button is pressed, the LASER EMISSION light flashes for a few seconds. Then, when laser emission occurs, it stops flashing and remains
on, and the emission indicator on the laser head turns on to indicate
radiation is present.
At this point, the Main menu is displayed and, for safety, output power
ramps up slowly to 0.20 W. 0.20 W is displayed if the laser was set to
power mode when it was last used, or an equivalent current value is
displayed if the laser was set to current mode. Power mode is shown in
the Main menu below.
Setup |
Info
|
|
|
3.
4.
0.20
Set:
0.20W
Use the Setup menu to change the laser mode, if desired.
From the Main menu, set laser output power using the up/down buttons. Actual output power will follow the setpoint value.
This completes the warm start turn-on sequence. The system is now ready
for use.
6-8
Operation
Note
Whenever the laser is turned off for more than 30 minutes, the system
automatically reverts to Standby mode and the Standby menu is displayed. To restart the unit, follow the procedure for a warm start turn-on.
Optimizing Laser Output
There are no adjustments on the Millennia IR. It is simply point and shoot.
Turning Off the Laser
To turn off the laser, simply:
1.
Press the LASER POWER button to turn off the laser.
2.
Turn the key switch on the power supply to OFF and remove the key to
prevent unauthorized use.
For temporary power down, do nothing more. The system will go to
Standby mode automatically in 30 minutes. Or,
For long-term power down, turn off the power supply.
3.
4.
This completes the turn off sequence.
6-9
Millennia IR
The RS-232 Serial Port
Pinout/Wiring
The Millennia IR serial port is accepts a standard 9-pin D-sub male/female
extension cable for hook-up. Only three of the pins are actually used:
Pin Numbers
2
3
5
Usage
transmit data (Millennia IR out)
receive data (Millennia IR in)
signal ground
Communications Parameters
Communications must be set to 8 data bits, no parity, one stop bit, using the
XON/XOFF protocol (do not use the hardware RTS/CTS setting in your communications software). The baud rate is variable and can be set to 1200,
2400, 4800 or 9600 (default). The rate is determined at system power-up by
reading positions 1 and 2 of switch S1 on the laser head pc board. Figure 63 shows the location of the DIP switch on the pc board, and the table below
describes the function of the switches.
Switch S1
Position 1
off
off
on
on
Position 2
off
on
off
on
Baud Rate
1200
2400
4800
9600 (default)
Baud Rate
Dip Switch S1
1
On
8
Figure 6-3: Laser head pc board showing the location of baud rate dip
switch S1.
6-10
Operation
Command/Query/Response Format
All commands and responses are in ASCII format. Commands to the Millennia IR system are terminated by an ASCII carriage return, line feed, or
both. All responses from the Millennia IR are terminated by an ASCII line
feed character. In the examples below, a carriage return is indicated by
<CR>, and a line feed by <LF>.
Commands
ON – Turn On Laser
ON<CR>
The response to this command depends on whether
or not the system is warmed up. Use the ?WARMUP% query (see “Queries”) to determine the progress of the warm-up cycle (see table below).
A response of “0” means the system is in Standby
mode. If this is the case, issue an ON command to
begin the temperature stabilization cycle. When the
response to the ?WARMUP% query reaches “100%”,
the laser can be started. Do not issue an ON command while the response to ?WARMUP% is “1 to
99”.
If the response to
?WARMUP% is...
0
1 to 99
100
The response to ON is...
to begin diode temperature stabilization.
(approximately 2 minutes)
an execution error.
(The EXE_ERR bit in the status byte is set.)
the laser diodes turn on, and the system output ramps
to the most recently set power/current.
Note: when the laser turns on, it will be in the mode
(power/current) that was in effect when the unit was
turned off.
OFF – Turn Off Laser
OFF<CR>
Turns off the laser diodes and diode temperature regulation (the latter reduces electrical power consumption). Latched interlocks are cleared. Thirty minutes
after the laser diodes have been turned off, the system enters the Standby mode.
6-11
Millennia IR
P:x.x – Set Power
Sets laser output power to the nearest tenth watt if the unit has been previously set to power mode using the “M” command. This command is
ignored when the system is in current mode. The minimum setting is 0.2
watts, the maximum is 10.5 watts. Commands outside this range are
ignored.
P:5<CR>
Sets the output power to 5.0 W.
P:5.0<CR>
Sets the output power to 5.0 W (no change).
P:4.9<CR>
Sets the output power to 4.9 W.
C%:xx – Set Percent Current
Sets the laser current to a percentage of maximum current if the unit has
been previously set to current mode using the “M” command. This command is ignored when the system is in power mode or when settings less
than zero or greater than one hundred percent are requested.
C%:50<CR>
Sets both diodes to 50% current.
Mx – Set Mode
Sets the laser mode so that output is current regulated or power regulated.
The diode current or output power is ramped to the previous set value.
M1<CR>
Sets the laser to power mode.
M0<CR>
Sets the laser to current mode.
Queries
?P – Get Power Status
?P<CR>
Requests the value of the laser output power in
watts. The response looks like “4.90 W<LF>”.
?Cx – Get Diode Operating Current Status
?C1<CR>
Requests the value of the drive current for diode 1.
Diode 1 = C1, diode 2 = C2. A typical response is
“25.36A1<LF>,” which is interpreted as 25.36 amps
for diode 1.
?M – Get Mode Status
?M<CR>
Requests system mode status. The system responds
with “1<LF>” for power mode, or “0<LF>” for current mode.
?IDN – Get Identification String
?IDN<CR>
6-12
Requests a system identification string. The system
returns an ASCII string that consists of four fields:
Operation
manufacturer, product, software revision number,
and serial number (“ø” if the latter is not implemented). A typical return would be
“Spectra-Physics Lasers, Millennia, 1.02, 0<LF>.”
?STB – Get Status Byte
This query requests a system status byte that indicates which command
errors (if any) have occurred and whether the laser is on or off. The integer
value returned represents the sum of the value of the bits in the status byte.
The bit positions are defined by Table 6-1 below. Each time a status byte is
requested, its register is cleared so that a new status byte can be generated.
The status register accumulates the most recent commands and tracks their
validity. Consider the following sequence of commands:
P:10<CR>
Since the requested power is out of range, the
EXE_ERR bit is set.
P:5<CR>
Valid command, sets power to 5 watts.
Valid command, sets unit to power mode.
Valid command, turns on the laser diodes.
Reads and clears the status byte.
M1<CR>
ON<CR>
?STB<CR>
The status byte returned would be “194<LF>” since the ANY_ERR,
LASER_ON, and EXE_ERR bits are set (194=2+64+128). Table 6-1
describes all the possible errors; Table 6-2 lists all the possible combinations.
Table 6-1: Query Errors
Binary
Digit
0
Decimal
Value
1
Name
Interpretation
CMD_ERR (CE)
Command error.
Something was wrong with the command format, the command
was not understood
1
2
EXE_ERR (EE)
Execution Error
A command was properly formatted, but could not be executed.
For example, a power command of “P:0<CR>” was sent, when
the minimum allowed power is 0.2 watts.
2
3
4
5
4
8
16
32
(reserved)
(reserved)
(reserved
SYS_ERR (SE)
6
7
64
128
LASER_ON (LO)
ANY_ERR (AE)
Any “system” error. (An open interlock, or an internal diagnostic)
Indicates that laser emission is possible.
Any of the error bits are set.
6-13
Millennia IR
Table 6-2: Error Return List
Binary
DigitS
Decimal
Value
Errors Returned
0100 0000
64
LO
1000 0001
129
CE + AE
1000 0010
130
EE + AE
1000 0011
131
CE + EE + AE
1010 0000
160
SE + AE
1010 0001
161
CE + SE + AE
1010 0010
162
EE + SE + AE
1010 0011
163
CE + SE + EE + AE
1100 0001
193
CE + LO + AE
1100 0010
194
EE + LO + AE
1100 0011
195
CE + EE + LO + AE
1110 0000
224
SE + LO + AE
1110 0001
225
CE + SE + LO + AE
1110 0010
226
EE + SE + LO + AE
1110 0011
227
CE + EE + SE + LO + AE
?WARMUP% – Get Warm-up Status
?WARMUP%<CR>
Reads the status of the system warm-up time as a
percent of the predicted total time (see the table
below). The system responds with a value similar to “050%<LF>. When the response is
“100%<LF>”, the laser can be turned on.
Note: an error condition, such as an open interlock, may not affect the
?WARMUP% command. To check for other errors, request the status
byte with the ?STB query command.
System Status
Initial AC power-on warm-up
System is ready to turn on the laser
diodes
System is in Standby mode
System is warming up after leaving
Standby mode
?WARMUP%
Between 1% and 99%
100%
0%
between 1% and 99%
?HDREV – Get Head Software Revision
?HDREV<CR>
Returns a Millennia IR laser head software revision
number similar to “2.01<LF>”.
?PSREV – Power supply Software Revision Query
?PSREV<CR>
6-14
Returns a T40 power supply software revision number similar to “4420 REV D<LF>”.
Operation
?RMREV – Controller Software Revision Query
?RMREV<CR>
Returns the controller software revision number. A
typical response is “1.10<LF>”.
?EC – System Error Code Query
?EC<CR>
Returns the current error code. The code returned is
the same as that displayed on the controller, if it is
attached. Refer to the error code listing in appendix
A for explanations.
?H – History Buffer Query
?H<CR>
Returns a 16-byte (16 code) error list from the “history buffer” with the most recent error listed first.
The history buffer only stores error codes generated
by the power supply, numbers 0 – 126. Errors from
the Millennia IR laser head are not recorded and,
therefore, will not be returned.
?C%SET – Last Current Command Query
?C%SET<CR>
Returns the value for the last percentage current
commanded (“C%”), not the actual diode current. A
typical response might be “75.1%<LF>”.
?PSET – Last Power Command Query
?PSET<CR>
Returns the value for the last power command
(“P%”), not the actual laser output power. A typical
response might be “0.20W<LF>”.
?C%<CR> – Actual Current Setting Query
?C%<CR>
Returns a value equal to the actual operating percentage of maximum diode current. A typical
response might be “75.1%<LF>”.
This completes the operation section.
6-15
Millennia IR
6-16
Chapter 7
Maintenance
Preventive Maintenance
The Millennia IR has been designed for “hands-off” operation, requiring
minimal maintenance.
Its top cover protects the internal components from outside contamination
and prevents unwanted stray optical radiation from escaping the system.
The Millennia IR should always be operated with the top cover in place.
Dust tubes are used to enclose the beam to minimize the amount of maintenance required. These, too, should always be left in place.
Although removal of the fiber optic bundles is not recommended or
needed, always inspect, clean, and re-inspect the fiber ends whenever they
are removed from the Z-head.
It is recommended to annually check the safety features of the Millennia IR
to ensure safety is maintained (see Chapter 2, “Laser Safety” for details).
Equipment Required
•
•
•
•
•
•
•
•
Dry nitrogen, canned air, or rubber squeeze bulb
Photographic lens tissue
Clean forceps or hemostats (optional but very helpful)
Powder-free finger cots or gloves for handling optical components
Fiber holding fixture for cleaning and inspection of fiber bundle
(optional but very helpful)
Spectroscopic-grade methanol (methyl alcohol) or propanol (2-propanol or isopropyl alcohol). Acetone may be used on intracavity optics
only; do not use it on the fiber bundles.
Clean dropper or droplet dispensing unit for the alcohol
Inspection microscope, 50 x to 100 x typical
Cleaning Laser Optics and Optical Fibers
All parts that normally come in contact with laboratory or industrial environments retain surface contamination that can be transferred to optical
components during handling, cleaning and assembly. Indeed, skin oils can
be very damaging to optical surfaces and coatings and can lead to serious
degradation problems under intense laser illumination. It is therefore essential that only clean items come into contact with optical components and
the mechanical parts immediately surrounding them.
7-1
Millennia IR
When cleaning optics, be very careful not to scratch the optic surface.
Laser optics are made by vacuum-deposited microthin layers of materials
of varying indices of refraction on glass substrates. If the surface is
scratched to a depth as shallow as 0.01mm, the operating efficiency of the
optical coating will be reduced significantly.
Losses due to unclean optics or fiber ends, which might be negligible in
ordinary optical systems, can disable a laser and severely reduce the effectiveness of a frequency doubler. Dust on intracavity mirror surfaces can
reduce output power or cause total failure. Cleanliness is essential! However, as long as the Millennia IR intracavity optics are kept enclosed (i.e.,
the dust tubes are never taken off) and the fiber optics are not removed
from the Z-head, there is little need for the routine maintenance associated
with ion lasers. However, if cleaning is required, the maintenance techniques described below must be applied with extreme care and with attention to detail.
Remember, “clean” is a relative description; nothing is ever perfectly clean,
and no cleaning operation ever completely removes contaminants. Cleaning is a process of reducing objectionable materials to acceptable levels.
Warning!
Never clean the crystal with solvents, and only use puffs of air to
remove dust. If the crystal becomes contaminated, consult the factory.
Warning!
NEVER remove any of the optics in the Millennia IR laser. They are
enclosed to minimize contamination and are designed to be cleaned inplace when and if required.
Caution!
Always wear clean, lint-free finger cots or gloves when handling optics
and intracavity parts. Remember not to touch any contaminating surface
while wearing gloves; you can transfer oils and acids onto the optics.
•
•
•
•
7-2
Work in a clean environment and, whenever possible, over an area covered by a soft, lint-free cloth or pad.
Wash your hands thoroughly with liquid detergent, then put on finger
cots before touching any optic.
Body oils and contaminants can render otherwise fastidious cleaning
practices useless.
Use filtered dry nitrogen, canned air, or a rubber squeeze bulb to blow
dust or lint from the optic surface before cleaning it with solvent. Permanent damage can occur if dust scratches the glass or mirror coating.
Use spectroscopic, electronic, or reagent grade solvents. Don’t try to
remove contamination with a cleaning solvent that may leave other
impurities behind.
Since cleaning simply dilutes contamination to the limit set by solvent
impurities, solvents must be as pure as possible. Use as little solvent as
Maintenance
•
•
•
Warning!
possible: as any solvent evaporates, it leaves impurities behind in proportion to its volume. Avoid rewiping a surface with the same swab: a
used swab and solvents will redistribute contamination, they will not
remove it.
Store methanol and acetone in small glass bottles.
These solvents collect moisture during prolonged exposure to air.
Avoid storage in bottles where a large volume of air is trapped above
the solvent.
Use Kodak Lens Cleaning Paper™ (or equivalent photographic cleaning tissue) to clean optics.
Use each piece of tissue only once: dirty tissue merely redistributes
contamination—it does not remove it.
Do not use lens tissue designated for cleaning eye glasses. Such tissue
contains silicones. These molecules bind themselves to the optic coatings and can cause permanent damage. Also, do not use cotton swabs,
e.g., Q-Tips™. Solvents dissolve the glue used to fasten the cotton to the
stick, resulting in contaminated coatings. Only use photographic lens
tissue to clean optical components.
Tools and mechanical items used with optical systems should be thoroughly degreased and cleaned (preferably in an ultrasonic bath) and rinsed
in clean solvents (acetone or alcohol) and/or deionized water prior to use. If
used repeatedly over time, these items should be re-cleaned at regular intervals. If you have any questions regarding these procedures, please contact
your Spectra-Physics Lasers Service representative.
7-3
Millennia IR
General Procedure for Cleaning Optics
All optics are to be cleaned in place.
Warning!
NEVER remove any of the optics in the Millennia IR laser. They are
enclosed to minimize contamination and are designed to be cleaned inplace if required.
1.
Remove the dust cover when the beam splitter or output coupler needs
to be inspected and/or cleaned.
2.
Use a squeeze bulb or dry nitrogen to blow away any dust or grit on the
surface, then test to see if a normal power level returns. If power is
acceptable, do not clean any further.
If canned air is used, hold the can in an upright position to avoid liquid
freon from contaminating the optic.
3.
If solvent cleaning is required, use a tissue folded in a hemostat to
clean the optic.
Figure 7-1: Lens Tissue Folded for Cleaning
a. Fold a piece of lens tissue into a pad about 1 cm on a side and
clamp it in a hemostat (Figure 7-1).
b. If required, cut the paper with a solvent-cleaned tool to allow
access to the optic.
c. Saturate the pad with methanol, shake off the excess, resaturate,
and shake again. No not use excessive solvent!
Excess solvent can wick or run down the surface and can attack
any adhesive that might be holding the optic to the mount or base
and either loosen it or, worse, contaminate the optical surface with
adhesive material.
d. Wipe the surface in a single motion.
Be careful that the hemostat does not touch the optic surface or the
coating may be scratched.
4.
Inspect the cleaned optic under ample light to verify the optic actually
got cleaner, i.e., you did not replace one contaminant with another.
5.
Replace the dust cover(s). Never leave the covers off longer than it
takes to clean the optic. However, allow the optic to dry before replacing the cover(s).
This concludes the procedure for cleaning optics.
7-4
Maintenance
General Procedure for Cleaning Fiber-optic Bundles
Prior to cleaning the fibers, it is advisable to briefly inspect the fiber end
coatings for damage or burn areas.
Danger!
Laser Radiation
Before you do this, however, turn off the power supply to ensure the
diode is disarmed.
The fibers may be easily cleaned using a fiber holder such as Spectra-Physics Lasers P/N 0129-2872 and a small inspection microscope (50 to 100
power). In lieu of the holder, it is advisable that the fiber connector be gently held in a small clamp or vise that is lined with clean lens tissue. Whenever the exposed fiber ends are handled, always wear clean, dust-free finger
cots or gloves.
Inspection of the fiber end coatings should reveal a uniform, bluish, smooth
and shiny surface with few scratches, inclusions or dust particles.
After initial inspection, the fiber ends should be cleaned by one (or both) of
the methods described below, as required, to achieve the desired results.
1.
Begin the cleaning using the “drop and drag” method.
a. Hold the fiber so that the coated surface is facing upward, and
place a sheet of lens tissue over it.
2.
b. Squeeze a drop or two of methanol onto it, and slowly and steadily
draw the tissue across the surface to remove dissolved contaminants and to dry the surface. Repeat as necessary, using a clean tissue each time.
For stubborn contaminants, use a tissue in a hemostat to clean the fiber
end.
a. Fold a piece of tissue in half repeatedly until you have a pad about
3 to 4 mm wide (trim with clean forceps if necessary), and clamp it
in a plastic hemostat (Figure 7-1).
b. Saturate the tissue with methanol, shake off the excess, resaturate,
and shake again.
c. Gently wipe the surface in a single motion.
Take care as you wipe the surface as this method applies more
stress to the coatings and can, if done too roughly or too often,
damage the fiber ends.
Also be careful that the hemostat does not touch the optical surface
or the coating may be scratched.
d. Inspect the cleaned surface to verify the optic actually got cleaner,
i.e., that you did not replace one contaminant with another.
e. Replace the fiber bundle into the Z-head.
It is not advisable to cap or leave exposed any fiber ends that have
been cleaned. This only invites further contamination and further
7-5
Millennia IR
cleaning. Cleaning must be held to a minimum to prevent stress to
the coatings and the fiber itself.
This concludes the procedure for cleaning the fiber-optic bundles.
7-6
Chapter 8
Service and Repair
The Spectra-Physics Lasers Millennia IR laser is a Class IV—High
Power Laser whose beam is, by definition, a safety and fire hazard. Take
precautions to prevent accidental exposure to both direct and reflected
beams. Diffuse as well as specular beam reflections can cause severe
eye or skin damage.
Danger!
Laser Radiation
Because the Millennia IR is designed for operation at 1064 nm and its
output is invisible, it is especially dangerous. Infrared radiation passes
easily through the cornea, which, when focussed on the retina, can cause
instantaneous and permanent damage. Always wear proper eye protection when working on the laser and follow the safety precautions in
Chapter 2, “Laser Safety.”
This troubleshooting guide is for use by you, the user. It is provided to
assist you in isolating some of the problems that might arise while using
the system. A complete repair procedure is beyond the scope of this manual. For information concerning the repair of your unit by Spectra-Physics
Lasers, please call your local service representative. A list of world-wide
service sites is included at the end of Chapter 9. Before you call, note your
current software revision number; it can be found on the Info menu. Simply
scroll to the bottom of the list of specifications displayed on the screen.
Troubleshooting Guide
Symptom: The controller screen does not light up.
Possible Causes
Power is not available to the
system.
Power supply has failed.
Corrective Action
If the power supply fan is off:
a. verify that the power cord is plugged in.
b. verify the voltage selector is set to the correct line voltage.
c. verify the internal voltages are correct (call your Spectra-Physics Lasers
service representative).
d. verify the fuses in the power supply are not blown.
Call your Spectra-Physics Lasers service representative.
8-1
Millennia IR
Symptom: Low power.
Possible Causes
Dirty optics
The beam is clipped.
Corrective Action
Clean, but do not remove the optics.
Call your Spectra-Physics Lasers service representative.
Symptom: The Millennia IR shuts itself off in power mode.
Possible Causes
Dirty optics
Incorrect pick-off calibration
(power readout).
Corrective Action
Clean, but do not remove the optics. Do not attempt to open the Z-head.
Call your Spectra-Physics Lasers service representative.
Symptom: The Millennia IR shuts itself off in current mode.
Possible Causes
There should be no reason
for the unit to shut down in
current mode other than for
power failure or an interlock
interruption. This will show
up on the controller as an
error message.
Corrective Action
Call your Spectra-Physics Lasers service representative.
Symptom: The Millennia IR will not lase.
Possible Causes
The shutter is not open.
A beam tube has fallen into
the beam path
The Millennia IR and power
supply have not completed
the turn-on sequence
An interlock is open.
Corrective Action
Move the shutter lever to the open position (O).
Carefully remove the head cover and reinstall the beam tube.
The Millennia IR turn-on will take approx. 20 seconds. to complete. Allow
enough time for the turn-on sequence.
Ensure that the head cover is properly installed and latched. Ensure that the
LASER ENABLE key on the power supply is in the ON position. Note: an
open interlock should show up on the controller as an error.
Symptom: Long-term stability/beam pointing is poor.
Possible Causes
The laser head is not properly locked down to the optical table
The jam nuts on the feet are
not locked.
The routing mirrors are not
installed correctly.
8-2
Corrective Action
Be sure to use the clamps that were supplied with your Millennia IR. These
clamps were specially designed to eliminate any side loads to the Millennia
IR feet which causes undo stress to the resonator.
Once the laser position and height have been adjusted, the jam nuts should
be adjusted all the up and tightened against the bottom plate.
If the routing mirrors are used as part of the beam delivery set-up, ensure
that they are assembled and locked down correctly.
Service and Repair
Replacement Parts
The following is a list of parts that may be purchased to replace broken or
misplaced components. Also listed are optional components that may be
purchased to enhance your system.
Description
Main pc board assembly
Light pick-off assembly
Table clamp kit
Diode module assembly, new
Diode module assembly, ETN
Light bulb, white, 28 V (emission indicator, 10 ea.)
Controller, Millennia IR
Beam splitter
Part Number
0451-6850S
0451-2480
0451-2490
0129-4106S
0129-4106-ETN
3901-1300S
TREM-C2-08
G0062-000
8-3
Millennia IR
8-4
Chapter 9
Customer Service
Customer Service
At Spectra-Physics Lasers, we take great pride in the reliability of our
products. Considerable emphasis has been placed on controlled manufacturing methods and quality control throughout the manufacturing process.
Nevertheless, even the finest precision instruments will need occasional
service. We feel our instruments have excellent service records compared
to competitive products, and we hope to demonstrate, in the long run, that
we provide excellent service to our customers in two ways: first by providing the best equipment for the money, and second, by offering service facilities that get your instrument repaired and back to you as soon as possible.
Spectra-Physics Lasers maintains major service centers in the United
States, Europe, and Japan. Additionally, there are field service offices in
major United States cities. When calling for service inside the United
States, dial our toll free number: 1 (800) 456-2552. To phone for service in
other countries, refer to the “Service Centers” listing located at the end of
this section.
Order replacement parts directly from Spectra-Physics Lasers. For ordering
or shipping instructions, or for assistance of any kind, contact your nearest
sales office or service center. You will need your instrument model and
serial numbers available when you call. Service data or shipping instructions will be promptly supplied.
To order optional items or other system components, or for general sales
assistance, dial 1 (800) SPL-LASER in the United States, or 1 (650) 9612550 from anywhere else.
Warranty
This warranty supplements the warranty contained in the specific sales
order. In the event of a conflict between documents, the terms and conditions of the sales order shall prevail.
Unless otherwise specified, all parts and assemblies manufactured by
Spectra-Physics Lasers are unconditionally warranted to be free of defects
in workmanship and materials for a period of one year following delivery
of the equipment to the F.O.B. point.
Liability under this warranty is limited to repairing, replacing, or giving
credit for the purchase price of any equipment that proves defective during
the warranty period, provided prior authorization for such return has been
9-1
Millennia IR
given by an authorized representative of Spectra-Physics Lasers. SpectraPhysics Lasers will provide at its expense all parts and labor and one-way
return shipping of the defective part or instrument (if required). In-warranty
repaired or replaced equipment is warranted only for the remaining portion
of the original warranty period applicable to the repaired or replaced equipment.
This warranty does not apply to any instrument or component not manufactured by Spectra-Physics Lasers. When products manufactured by others
are included in Spectra-Physics Lasers equipment, the original manufacturer's warranty is extended to Spectra-Physics Lasers customers. When
products manufactured by others are used in conjunction with SpectraPhysics Lasers equipment, this warranty is extended only to the equipment
manufactured by Spectra-Physics Lasers.
This warranty also does not apply to equipment or components that, upon
inspection by Spectra-Physics Lasers, discloses to be defective or unworkable due to abuse, mishandling, misuse, alteration, negligence, improper
installation, unauthorized modification, damage in transit, or other causes
beyond the control of Spectra-Physics Lasers.
This warranty is in lieu of all other warranties, expressed or implied, and
does not cover incidental or consequential loss.
The above warranty is valid for units purchased and used in the United
States only. Products shipped outside the United States are subject to a warranty surcharge.
Return of the Instrument for Repair
Contact your nearest Spectra-Physics Lasers field sales office, service center, or local distributor for shipping instructions or an on-site service
appointment. You are responsible for one-way shipment of the defective
part or instrument to Spectra-Physics Lasers.
We encourage you to use the original packing boxes to secure instruments
during shipment. If shipping boxes have been lost or destroyed, we recommend that you order new ones. We can return instruments only in SpectraPhysics Lasers containers.
9-2
Customer Service
Service Centers
Benelux
Spectra-Physics BV
Prof. Dr. Dorgelolaan 20
5613 AM Eindhoven
The Netherlands
Telephone: (40) 2 65 99 59
Fax: (40) 2 43 99 22
France
Spectra-Physics S.A.R.L.
Z.A. de Courtaboeuf
Avenue de Scandinavie
91941 Les Ulis Cedex
Telephone: (01) 1 69 18 63 10
Fax: (01) 1 69 07 60 93
Germany and Export Countries*
Spectra-Physics GmbH
Siemensstrasse 20
D-6100 Darmstadt-Kranischstein
Telephone: 06151 7080
Fax: 06151 79102
Japan
Spectra-Physics KK
Daiwa-Nakameguro Building
4-6-1 Nakameguro
Meguro-ku, Tokyo 153
Telephone: (03) 3794-5511
Fax: (03) 3794-5510
United Kingdom
Spectra-Physics Ltd.
Boundary Way
Hemel Hempstead
Herts, HP2 7SH
Telephone: (01442) 25 81 00
Telex: 826411
Fax: (01422) 68 538
* All European and Middle Eastern countries in this region not included elsewhere on
this list.
9-3
Millennia IR
Service Centers (cont.)
United States and Export Countries*
Spectra-Physics Lasers
1330 Terra Bella Avenue
Post Office Box 7013
Mountain View, CA 94039-7013
Telephone: 1 (800) 456-2552 (Service) or
1 (800) SPL-LASER (Sales) or
1 (800) 775-5273 (Sales) or
1 (650) 961-2550 (Operator)
Fax: 1 (650) 964-3584
E-mail: [email protected]
http://www.splasers.com
**And all countries not included elsewhere on this list.
9-4
Appendix A
Error Codes
Listed below are all the error codes and messages that might be displayed
on the controller (not the T40 power supply) while using the Millennia IR
system. Most are self-explanatory and most errors can be corrected by the
user. In the event the error cannot be corrected, or the action required to
correct the error is not known, call your Spectra-Physics Lasers service
representative. Before calling, however, write down the code and message.
Code 0 to 126 are generated by the T40 power supply, codes 127 and up are
generated by the Millennia IR laser head. Codes 142 to 147 are latched
interlock messages that indicate the T40 shut off without a command to do
so. These latched interlock messages are cleared by either:
a. pressing the LASER POWER switch on the controller, or
b. sending the OFF command through the RS232 port.
The Info menu HST line on the controller lists the three most recent error/
status codes with the most recent listed first. The RS232 ?H query reports
the most recent 16 codes, again with the most recent listed first.
Error Code
Error Message
0
Everything is fine
1
Power Mode Ready
2
Current Mode Ready
3
Power Mode Adjust
4
Current Mode Adjust
5
Diodes off, temperature stable, ready to turn on
8
Power Supply in Standby mode
61
EEPROM data read error
62
AC Fault, >50ms
63
System Boot Marker
64
Communications error
65
Laser Power Outside Ready Range
66
Power adjust timeout
67
Passbank over temp
68
Passbanks current limited
69
Diode Module ilock test: bad voltage
70
Diode Module ilock test: bad logic
71
Diode Module Safety Check 2: bad voltage
A-1
Millennia IR
Error Code
A-2
Error Message
72
Diode Module Safety Check 2: bad logic
73
Diode Module Safety Check 1: bad voltage
74
Diode Module Safety Check 1: bad logic
81
EEPROM data not available @ startup
82
EEPROM fault on write condition
83
Bad config for uP
84
Compressor failed startup test
85
Heater failed startup test
86
Shorted therm #2 in power supply
87
Open thermistr #2 in power supply
88
Shorted therm #1 in power supply
89
Open thermistr #1 in power supply
90
Multiple errors
91
Diode over temperature
92
Diode under temperature
93
Current limit passbank 2 active
94
Current limit passbank 1 active
95
Power supply interlock active
96
Safety relay for D2 closed, s.b. open
97
Safety relay for D2 open, s.b. closed
98
Safety relay for D1 closed, s.b. open
99
Safety relay for D1 open, s.b. closed
127
Everything’s fine
130
Z-head thermistor shorted
131
Z-head temperature high
132
Z-head thermistor open
133
SHG duty cycle error
134
SHG thermistor shorted
135
SHG thermistor or heater open (check cable)
136
Head cover interlock open
140
Controller interlock open
141
Communications error between head & supply
142
System shut off: check HST on info menu
143
System shut off: pwr sply interlock
144
System shut off: head interlock
145
System shut off: REMOTE interlock
146
System shut off: power adjust timeout
147
System shut off: current limit
148
Controller communications time out
200
Diode calibration required
Notes
Notes-1
Millennia IR
Notes-2
Notes
Notes-3
Millennia IR
Notes-4
Notes
Notes-5
Millennia IR
Notes-6
Spectra-Physics Lasers User’s Manual–
Problems and Solutions
We have provided this form to encourage you to tell us about any difficulties you have experienced in
using your Spectra-Physics Lasers instrument or its manual—problems that did not require a formal
call or letter to our service department, but that you feel should be remedied. We are always interested
in improving our products and manuals, and we appreciate all suggestions.
Thank you.
From:
Name
Company or Institution
Department
Address
Instrument Model Number
Serial Number
Problem:
Suggested Solution(s):
Mail To:
FAX to:
Spectra-Physics Lasers, Inc
Diode-Pumped Solid State Product Manager
1330 Terra Bella Avenue
Post Office Box 7013
Mountain View, CA 94039-7013
U.S.A.
Attention: Diode-Pumped Solid State Product Manager
(650) 969-3546
E-mail: [email protected]
http://www.splasers.com