1
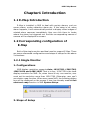
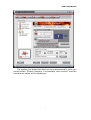
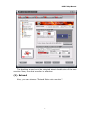
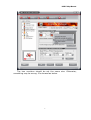
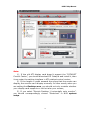
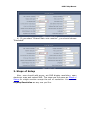
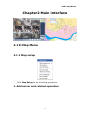
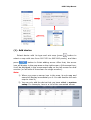
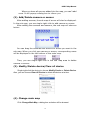
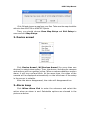
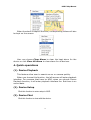
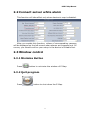
NVR E-Map
USER’S Manual
NVR E-Map Manual
Contents
Chapter1 Introduction..................................................... 3
1.1 E-Map Introduction ..................................................................... 3
1.2 Corresponding configuration of E-Map....................................... 3
1.2.1 Single Monitor ...................................................................................3
1.2.2 Dual Monitor .....................................................................................6
Chapter2 Main interface ............................................... 12
2.1 E-Map Menu.............................................................................. 12
2.1.1 Map setup........................................................................................ 12
2.2 Connect server while alarm ....................................................... 17
2.3 Window control ......................................................................... 17
2.3.1 Minimize Button .............................................................................. 17
2.3.2 Quit program................................................................................... 17
I
NVR E-Map Manual
Chapter1 Introduction
1.1 E-Map Introduction
E-Map is installed in NVR to deal with variety alarms, such as
sensor alarm, motion detection alarm etc. If the setup is ok, when
alarm happens, it will automatically switch to display video images of
related alarm cameras immediately. User can click them to locate
where the alarm be triggered out. And the corresponding names of
camera will be displayed on screen.
1.2 Corresponding configuration of
E-Map
Both of the single monitor and dual monitor support E-Map. There
are some referenced configurations and steps of setups for the above
2 situations.
1.2.1 Single Monitor
1. Configurations
NVR display resolution supports Auto, 1024*768, 1280*768,
1280*1024 and 1680*1050. That is to say, 1024*768 is the least
display resolution for NVR. So, when there is only one monitor, user
must set its resolution more than 1024*768. Otherwise, user can’t
use electro-map function. When user opens NVR, the following dialog
box will be displayed on the screen if user has already enabled Use
electronic map function in NVR System Setup:
2. Steps of Setup
3
NVR E-Map Manual
(1). Set the resolution
↓
Note:
The screen resolution must be more than 1024*768 pixels if you
want to use E-Map.
(2). Add Server
User can add PC DVR and IP server into the system. If you don’t add
any server in the system, you can’t add any device in the map. The
Add/Modify Server Information dialog box is showed as below:
4
NVR E-Map Manual
(3). Set NVR display resolution
We suggest you set NVR Display Resolution as 1024*768, so that
there will be more space for electronic map.
(4). Open electronic map function
5
NVR E-Map Manual
Now, Connect Server While Alarm function is disabled automatically.
(5). Restart NVR
After the above operations, system will prompt you to restart NVR.
The setups will take effect after rebooting.
1.2.2 Dual Monitor
1. Configurations
(1). Stretch
The display card should support the dual monitor. We use ATI
9200 display card. First you should connect the dual monitor to the
display
card.
6
NVR E-Map Manual
The system can detect the dual monitors automatically, then you
should select “Stretch Desktop 1 horizontally onto monitor” and the
interface as below will be displayed:
7
NVR E-Map Manual
The desktop area should be selected about double size of the one
monitor. Now, the dual monitor is effective.
(2). Extend
Also, you can choose “Extend Main onto monitor”.
8
NVR E-Map Manual
The two monitors should be set the same size. Otherwise,
something may be wrong. It’s showed as below.
9
NVR E-Map Manual
Note:
1). If the old ATI display card doesn't support the ”CATALYST
Control Center”, you should download ATI Catalyst and install it ,then
it can enter the setting interface in ATI catalyst control center;
2). If the length or width exceeds the scope that the screen can
display, the monitor can’t display normally. In other words, when you
are setting the Desktop area, you should not only consider whether
your display card supports or not but also your screen;
3). If you select “Stretch Desktop 1 horizontally onto monitor”,
you should correspondingly choose “Stretched” in NVR system
setup.
10
NVR E-Map Manual
4). If you select “Extend Main onto monitor”, you should choose
“Extended”.
2. Steps of Setup
Also,user should add server, set NVR display resolution, open
electronic map and restart NVR. The steps are the same as Steps of
Setup for single monitor except the set of resolution. You can set
Display Resolution as any one you like.
11
NVR E-Map Manual
Chapter2 Main interface
2.1 E-Map Menu
2.1.1 Map setup
Click Map Setup to do following operations.
1. Add server and related operation
12
NVR E-Map Manual
(1). Add device
Select device with its type and sub map (press
button to
select a map with size from 160*120 to 640*480 pixels), and then
button to finish adding server. After that, the server
press
icon will display in the map area on the right screen. At the same time,
it will be displayed in the compressed map on the left screen for dual
monitor (or left side of the screen for single monitor).
Note:
1) When you press a server icon in the map, its sub map and
name will display immediately on it. You can double-click sub
map to close it;
2) You can only add the device that you have added in system
setup. For example, here is a list of the connected server:
13
NVR E-Map Manual
When you have all servers added into the map, you can’t add
more. It will popup a dialog box to inform you.
(2). Add/Delete camera or sensor
After adding a server, the sub map of server will also be displayed.
In the sub map, you can single-right-click to add camera or sensor
After adding the cameras and sensors, the sub map will show as
below:
You can drag the cameras and sensors to where you want in the
sub map. When you click one camera or sensor, corresponding name
will be displayed in the left bottom of the main map.
Then, you can single-right-click in the sub map area to delete
camera or sensor.
(3). Modify/Delete device/Clear all device
Single-right-click the device to choose Modify Device or Delete Device.
Also, you can choose Clear All Device to delete all devices at a time.
(4). Change main map
Click Change Main Map, a dialog box as below will be showed:
14
NVR E-Map Manual
Click OK and choose a map from your files. Take care the map should be
with size from1024*768 to 4096*3072 pixels.
Then, you should choose Save Map Setup and Exit Setup to
save and exit Map Setup.
2. Device armed
Click Device Armed /All Devices Armed (for more than one
devices) to select alarm setup. Then, the device, including its cameras
and sensors will turn golden yellow. When a camera detects a motion
alarm, it will turn red and blink. At the same time, the video of the
camera will be displayed automatically on the left screen if the setup
in the server is suitable.
After the alarm disappeared, the video will disappeared too.
3. Alarm keep
Click When Alarm End to enter the submenu and select the
action when an alarm is end. Selectable options are showed in the
picture as below.
15
NVR E-Map Manual
When the alarm is kept all the time, corresponding videos will also
be kept on the screen.
User can choose Clear Alarm to clear the kept alarm for the
device or click Clear All Alarm to clear alarm for all devices.
4. Quick operations
(1). Device Playback
This feature allow user to search server or camera quickly.
When you choose this function, the left screen will enter playback
interface. For cameras that have no HDD, when you choose Device
Playback function, it will enter playback interface too. But there is no
record data.
(2). Device Setup
Click this function to enter setup in NVR.
(3). Device Chat
Click this function to chat with the device.
16
NVR E-Map Manual
2.2 Connect server while alarm
This function will take effect only when electronic map is disabled.
After you enable this function, videos of corresponding cameras
will be displayed on the left screen when alarms are triggered out. Of
course, you should confirm your setup in the device is suitable first.
2.3 Window control
2.3.1 Minimize Button
Press
button to minimize the window of E-Map.
2.3.2 Quit program
Press
button to shut down the E-Map.
17