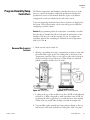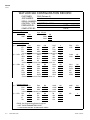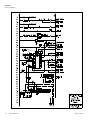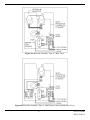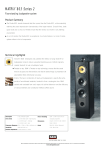
1
Model 3940 Series
Forma Environmental Chamber
Operating and Maintenance Manual
7043940 Rev. 10
Preface
Table 1. Models Covered in This Manual
Model
Capacity
(cu. ft.)
Voltage
3911
11
208-220
3913
11
220-240
3940
29
208-220
3949
29
220-240
MANUAL NUMBER 7043940
10
24405/IN-3830
5/5/08
Updated electrical schematics for alarm wiring update to failsafe operation
ccs
9
23879/SI-9748
1/15/07
Removed COMM from 982 configuration sheets (temp, humidity)
ccs
8
23411/IN-3303
7/11/06
Updated electrical schematic for 3913 & 3949, new MOV
ccs
7
23451/IN-3294
4/6/06
Changed to 15, ±5 PSIG and specified range in required CO2 pressure regulation
ccs
6
22678/IN-3229
1/17/05
Remove 270129 from terminals 15 and 16 of temperature control
aks
--
22672/IN-3227
1/17/05
Revised steam generator wiring
aks
5
22454/IN-3208
9/14/04
Watlow SD 4-20mA standard; new schematics, configuration sheet
ccs
--
22452/IN-3208
9/14/04
Added noise reducing filters to Watlow 982 controllers, new schematics
ccs
4
22453/IN-3208
9/7/04
Updated FLA specs on drawings and specification page
ccs
--
--
8/18/04
Added Puregas dryer preventive maintenance
ccs
3
--
6/28/04
Reinstalled reference to Hold/Run key for silence on Watlow, corrected
ccs
2
22337
5/11/04
Removed reference to Hold/Run key for silence on Watlow, chg pending
ccs
1
22070/22129
1/29/04
Pre-programmed controller/changed thermal fuse
aks
--
--
1/26/04
Updated section 3.1.E dehumidification
aks
--
20843
11/20/03
Release 9
aks
REV
ECR/ECN
DATE
DESCRIPTION
By
Thermo Scientific
Model 3940 Series
i
Preface
Important Read this instruction manual. Failure to read, understand and follow the instructions in this manual
may result in damage to the unit, injury to operating personnel, and poor equipment performance. ▲
Caution All internal adjustments and maintenance must be performed by qualified service personnel. ▲
Material in this manual is for information purposes only. The contents and the product it describes are subject to
change without notice. Thermo Scientific makes no representations or warranties with respect to this manual. In
no event shall Thermo be held liable for any damages, direct or incidental, arising out of or related to the use of
this manual.
©2003 Thermo Scientific. All rights reserved.
ii
Model 3940 Series
Thermo Scientific
Preface
Important operating and/or maintenance instructions. Read the accompanying text carefully.
Potential electrical hazards. Only qualified persons should perform procedures associated with this
symbol.
Equipment being maintained or serviced must be turned off and locked off to prevent possible injury.
Hot surface(s) present which may cause burns to unprotected skin, or to materials which may be
damaged by elevated temperatures.
Marking of electrical and electronic equipment, which applies to electrical and electronic equipment
falling under the Directive 2002/96/EC (WEEE) and the equipment that has been put on the market
after 13 August 2005.
This product is required to comply with the European Union’s Waste Electrical & Electronic
Equipment (WEEE) Directive 2002/96/EC. It is marked with the WEEE symbol. Thermo Scientific
has contracted with one or more recycling/disposal companies in each EU Member State European
Country, and this product should be disposed of or recycled through them. Further information on
Thermo’s compliance with this directive, the recyclers in your country and information on Thermo
products will be available at www.thermo.com.
✔
Always use the proper protective equipment (clothing, gloves, goggles, etc.)
✔ Always dissipate extreme cold or heat and wear protective clothing.
✔ Always follow good hygiene practices.
✔ Each individual is responsible for his or her own safety.
Thermo Scientific
Model 3940 Series
iii
Preface
Do You Need Information or Assistance on
Thermo Scientific Products?
If you do, please contact us 8:00 a.m. to 6:00 p.m. (Eastern Time) at:
1-740-373-4763
1-800-438-4851
1-740-373-4189
http://www.thermo.com
[email protected]
Direct
Toll Free, U.S. and Canada
FAX
Internet Worldwide Web Home Page
Service E-Mail Address
Our Sales Support staff can provide information on pricing and give you quotations. We can
take your order and provide delivery information on major equipment items or make
arrangements to have your local sales representative contact you. Our products are listed on the
Internet and we can be contacted through our Internet home page.
Our Service Support staff can supply technical information about proper setup, operation or
troubleshooting of your equipment. We can fill your needs for spare or replacement parts or
provide you with on-site service. We can also provide you with a quotation on our Extended
Warranty for your Thermo Scientific products.
Whatever Thermo Scientific products you need or use, we will be happy to discuss your
applications. If you are experiencing technical problems, working together, we will help you
locate the problem and, chances are, correct it yourself...over the telephone without a service
call.
When more extensive service is necessary, we will assist you with direct factory trained
technicians or a qualified service organization for on-the-spot repair. If your service need is
covered by the warranty, we will arrange for the unit to be repaired at our expense and to your
satisfaction.
Regardless of your needs, our professional telephone technicians are available to assist you
Monday through Friday from 8:00 a.m. to 6:00 p.m. Eastern Time. Please contact us by
telephone or fax. If you wish to write, our mailing address is:
Thermo Scientific
Controlled Environment Equipment
401 Millcreek Road, Box 649
Marietta, OH 45750
International customers, please contact your local Thermo Scientific distributor.
iv
Model 3940 Series
Thermo Scientific
Preface
Warranty Notes
Information You Should Know Before Requesting Warranty Service
• Locate the model and serial numbers. A serial tag is located on the unit itself.
• For equipment service or maintenance, or with technical or special application inquiries, contact Technical
Services at 1-800-438-4851 or 1-740-373-4763 (USA and Canada). Outside the USA, contact your local
distributor.
Repairs NOT Covered Under Warranty
• Calibration of control parameters. Nominal calibrations are performed at the factory; typically ±1°C for
temperature, ±1% for gases, and ±5% for humidity. Our service personnel can provide precise calibrations as
a billable service at your location. Calibration after a warranty repair is covered under the warranty.
• Damage resulting from use of improper quality water, chemicals or cleaning agents detrimental to
equipment materials.
• Service calls for improper installation or operating instructions. Corrections to any of the following
are billable services:
1) electrical service connection
2) tubing connections
3) gas regulators
4) gas tanks
5) unit leveling
6) room ventilation
7) adverse ambient temperature fluctuations
8) any repair external to the unit
• Damage resulting from accident, alteration, misuse, abuse, fire, flood, acts of God, or improper
installation.
• Repairs to parts or systems resulting from unauthorized unit modifications.
• Any labor costs other than that specified during the parts and labor warranty period, which may
include additional warranty on CO2 sensors, blower motors, water jackets, etc.
Thermo Scientific
Model 3940 Series
v
Table of Contents
Thermo Scientific
Section 1
Installation and Set-Up . . . . . . . . . . . . . . . . . . . . . . . . . . . . . . . . . . . . . . .1-1
Preliminary Cleaning and Disinfecting . . . . . . . . . . . . . . . . . . . . . . . .1-1
Installing the Shelves . . . . . . . . . . . . . . . . . . . . . . . . . . . . . . . . . . . . .1-1
Leveling the Unit . . . . . . . . . . . . . . . . . . . . . . . . . . . . . . . . . . . . . . . .1-1
Connect Water Inlet for Humidity System . . . . . . . . . . . . . . . . . . . . .1-2
Alternate Water Supply for Humidity System . . . . . . . . . . . . . . . . .1-3
Connect Drain Line . . . . . . . . . . . . . . . . . . . . . . . . . . . . . . . . . . . . . .1-3
4-20 Milliamp Output . . . . . . . . . . . . . . . . . . . . . . . . . . . . . . . . . . .1-3
Remote Alarm Contacts . . . . . . . . . . . . . . . . . . . . . . . . . . . . . . . . . . .1-4
Power Connection . . . . . . . . . . . . . . . . . . . . . . . . . . . . . . . . . . . . . . .1-4
Start-Up . . . . . . . . . . . . . . . . . . . . . . . . . . . . . . . . . . . . . . . . . . . . . . .1-4
Set the Overtemp Safety Thermostat . . . . . . . . . . . . . . . . . . . . . . . . .1-5
Set the Undertemp Safety Thermostat . . . . . . . . . . . . . . . . . . . . . . . .1-5
Cobex Recorder (Optional) . . . . . . . . . . . . . . . . . . . . . . . . . . . . . . . .1-6
Change the Chart Paper . . . . . . . . . . . . . . . . . . . . . . . . . . . . . . . . .1-6
Change the Pen . . . . . . . . . . . . . . . . . . . . . . . . . . . . . . . . . . . . . . . .1-7
Honeywell Recorder (Optional) . . . . . . . . . . . . . . . . . . . . . . . . . . . . .1-7
IR CO2 Option . . . . . . . . . . . . . . . . . . . . . . . . . . . . . . . . . . . . . . . . .1-7
Connect the CO2 Source . . . . . . . . . . . . . . . . . . . . . . . . . . . . . . . . .1-7
Set the CO2 Content . . . . . . . . . . . . . . . . . . . . . . . . . . . . . . . . . . .1-8
CO2 Control and Indicators . . . . . . . . . . . . . . . . . . . . . . . . . . . . . .1-9
Section 2
Start-Up and Operation . . . . . . . . . . . . . . . . . . . . . . . . . . . . . . . . . . . . . . .2-1
Control Panel . . . . . . . . . . . . . . . . . . . . . . . . . . . . . . . . . . . . . . . . . . .2-1
Set the Operating Temperature . . . . . . . . . . . . . . . . . . . . . . . . . . . . .2-4
Set the Operating Humidity . . . . . . . . . . . . . . . . . . . . . . . . . . . . . . .2-4
Air Exchange Ventilator Caps . . . . . . . . . . . . . . . . . . . . . . . . . . . . . . .2-5
Heatless Dryer (Optional) . . . . . . . . . . . . . . . . . . . . . . . . . . . . . . . . .2-5
Model 3940 Series
vi
Table of Contents
vii
Model 3940 Series
Section 3
Routine Maintenance . . . . . . . . . . . . . . . . . . . . . . . . . . . . . . . . . . . . . . . . .3-1
Maintaining the Humidity Generator . . . . . . . . . . . . . . . . . . . . . . . .3-1
Preventive Maintenance . . . . . . . . . . . . . . . . . . . . . . . . . . . . . . . . . . .3-2
Section 4
Service . . . . . . . . . . . . . . . . . . . . . . . . . . . . . . . . . . . . . . . . . . . . . . . . . . . . . .4-1
Access Electrical Components . . . . . . . . . . . . . . . . . . . . . . . . . . . . . .4-1
Over/Undertemp Probe and Thermostat . . . . . . . . . . . . . . . . . . . . . .4-1
Humidity/Temp Sensor . . . . . . . . . . . . . . . . . . . . . . . . . . . . . . . . . . .4-2
Program Humidity/Temp Controllers . . . . . . . . . . . . . . . . . . . . . . . .4-3
Remove Mechanical Lockout . . . . . . . . . . . . . . . . . . . . . . . . . . . . .4-3
Remove Software Lockout . . . . . . . . . . . . . . . . . . . . . . . . . . . . . . . .4-4
Controller Configuration . . . . . . . . . . . . . . . . . . . . . . . . . . . . . . . .4-5
Offset Calibration (Temp/Humidity) . . . . . . . . . . . . . . . . . . . . . . .4-5
Replace Optional Recorder and Probe(s) . . . . . . . . . . . . . . . . . . . . . .4-7
Calibrate the Recorder . . . . . . . . . . . . . . . . . . . . . . . . . . . . . . . . . .4-7
Set Door Heater Control . . . . . . . . . . . . . . . . . . . . . . . . . . . . . . . . . .4-8
Clean/Adjust Steam Generator . . . . . . . . . . . . . . . . . . . . . . . . . . . . . .4-8
CO2 Controller Calibration . . . . . . . . . . . . . . . . . . . . . . . . . . . . . . .4-10
Section 5
Specifications . . . . . . . . . . . . . . . . . . . . . . . . . . . . . . . . . . . . . . . . . . . . . . .5-1
Section 6
Spare Parts . . . . . . . . . . . . . . . . . . . . . . . . . . . . . . . . . . . . . . . . . . . . . . . . . .6-1
Section 7
Refrigeration Schematics . . . . . . . . . . . . . . . . . . . . . . . . . . . . . . . . . . . . .7-1
Section 8
Electrical Schematics . . . . . . . . . . . . . . . . . . . . . . . . . . . . . . . . . . . . . . . .8-1
Section 9
Warranty Information . . . . . . . . . . . . . . . . . . . . . . . . . . . . . . . . . . . . . . . . .9-1
Thermo Scientific
Section 1
Installation and Set-Up
Locate the unit on a firm, level surface in an area of minimum ambient
temperature fluctuation. A minimum of three (3) inches of clearance is
required at the top and back of the incubator. This space is necessary to
allow adequate airflow around the refrigeration system. At least eight (8)
inches clearance above the cabinet is required for service access.
Preliminary Cleaning
and Disinfecting
Disinfect all interior surfaces with a general-use laboratory disinfectant.
Rinse thoroughly with sterile distilled water, then 70% ethanol. Dry with a
sterile cloth as needed.
Disinfect the shelf channels and shelves, then rinse with distilled water
before installing.
Caution Before using any cleaning or decontamination method except
those recommended by the manufacturer, users should check with the
manufacturer that the proposed method will not damage the equipment. ▲
Warning Accidental spills of hazardous materials on or inside this unit are
the responsibility of the user. ▲
Installing the Shelves
Leveling the Unit
Thermo Scientific
The shelves may be installed at any level
in the incubator. Install a shelf channel
on each side. With the tabs pointing up,
attach the channel by locating the rivet
into a slotted hole, far end first. Pull the
channel toward the front and slide the
front rivet on the channel into the slotted
hole and press down. Make sure that the
channels are opposite each other so that Figure 1-1. Install Shelf Channel
the installed shelf will be level.
Place a bubble-type level on a shelf inside the incubator. Adjust the feet as
needed; counterclockwise to lengthen or clockwise to shorten. Level the
unit front-to-back and left-to-right.
Model 3940 Series
1-1
Section 1
Installation and Set-Up
Connect Water Inlet
for Humidity System
The humidity reservoir will require approximately three cups (0.710 liter)
of water on the initial filling. For best operation of the incubator, sterilized
distilled, demineralized or de-ionized water should be used in the humidity
reservoir. Water purity should be in the resistance range of 50K to 1M
Ohm/cm, or a conductivity range of 20.0 to 1.0 uS/cm. Refer to ASTM
Standard D5391-93 or D4195-88 for measuring water purity.
Distillation systems, as well as some types of reverse osmosis water purity
systems, can produce water in the quality range specified. Tap water is not
recommended as it may contain chlorine, which can deteriorate the
stainless steel. Tap water may also have a high mineral content, which
would produce a build-up of scale in the reservoir. High purity or ultra
pure water is not recommended as it is an extremely aggressive solvent and
will deteriorate the stainless steel. High purity water has a resistance of
above 1M to 18M Ohm. Even high purity water can contain bacteria and
organic contaminants. Water should always be sterilized or treated with a
decontaminant, safe for use with stainless steel as well as safe for the
product, prior to being introduced into the humidity reservoir.
Caution Distilled or de-ionized water used in the humidity reservoir must
be within a water quality resistance range of 50K to 1M Ohm/cm to
protect and prolong the life of the stainless steel. Use of water outside the
specified range will decrease the operating life of the unit and may void
warranty. ▲
The water inlet is the 1/8” FPT connection located on the rear top center
of the incubator. A 1/4” hose fitting is provided for a hose connection, if
desired. Water inlet pressure must not exceed 40 PSI. A manual shut-off
valve should be installed between the main water supply and the incubator.
Caution To prevent mineral buildup on humidity generator walls, it may
be necessary to clean the humidity generator with a non-metallic abrasive
pad and flush thoroughly every two to three months. Refer to Section 4,
Cleaning the Humidity Steam Generator. ▲
1-2
Model 3940 Series
Thermo Scientific
Section 1
Installation and Set-Up
Alternate Water Supply for
Humidity System
If an in-house water supply of the required purity range (50K to 1M
Ohm) is not available, an alternate water supply method can be used. A
large vented carboy (5 gal. minimum) of water in the required purity range
can be placed on top of the unit. Connect it to the 1/8” FPT water inlet
fitting, located on the rear top center of the incubator.
Note The maximum water consumption of this incubator could be as high
as 2 gallons per day. When using an alternate water supply method, it is
recommended that the supply be checked periodically based on source
volume. ▲
Connect Drain Line
The cabinet’s 3/8” MPT drain line connection is located
on the rear (lower left side) of the cabinet. A P-trap
(Figure 1-2) is included with the unit and must be
installed on the connection.
To install the drain connection:
Figure 1-2. P-Trap
1. Using Teflon pipe thread tape, tape the threads on the cabinet drain
connection.
2. Using an open end adjustable wrench, install the P-trap onto the
connection. Make sure the trap section is positioned down.
3. Push a piece of 3/8” ID tubing onto the trap and direct the tubing to a
convenient drain. Install a hose clamp on the tubing, if desired. A
condensate evaporator (P/N 1900031) or condensate pump (P/N
184062) may also be used.
4-20 Milliamp Output
The environmental chamber is equipped with 4-20mA output for the
remote transmission of temperature, humidity and CO2 data. A terminal
strip is located on the back of the incubator for convenience. Refer to
Figure 1-3 for terminal pin identification.
Figure 1-3. Terminal Pin Identification
Thermo Scientific
Model 3940 Series
1-3
Section 1
Installation and Set-Up
Remote Alarm
Contacts
Remote alarm connections are also included on the terminal strip (Figure
1-3) providing Normally Open (N.O.) and Normally Closed (N.C.)
contacts. C is the Common terminal. The remote alarm will activate when
either the incubator’s temperature, humidity, or CO2 go out of the set
alarm limits.
Power Connection
See the serial tag on the side of the unit for electrical specifications, or refer
to the electrical schematics at the end of this manual.
Caution Connect the incubator to a grounded, dedicated circuit. For
Models 3911 and 3940, the power cord connector is the mains disconnect
device. Models 3913 and 3949 have a fusable disconnect located on the
back of the unit. Position the incubator so the unit can be easily
disconnected. ▲
For Models 3911 and 3940, plug the provided 10 ft. power cord with the
NEMA 14-20 plug into the grounded dedicated electrical circuit.
Start-Up
When the humidification system is operational, the incubator may be
started. Preset the controls as follows:
Overtemp Safety Thermostat . . . . . . Fully Clockwise
Undertemp Safety Thermostat . . . Fully Counterclockwise
Main Power Switch . . . . . . . . . . . . . . . . . . . . . . .ON
Humidity Controller . . . . . . . . . . . .Desired Setpoint
Temperature Controller . . . . . . . . . .Desired Setpoint
Door Heater . . . . . . . . . . . . . . . . . .40% (factory set)
For best overall performance of the incubator, the refrigeration switch
should be turned On for most applications. When running Low or No
humidity at high temperatures, the refrigeration switch may be turned Off.
Caution The defrost switch must be turned on when the temperature
setpoint is 10°C, or below. ▲
1-4
Model 3940 Series
Thermo Scientific
Section 1
Installation and Set-Up
Set the Overtemp
Safety Thermostat
Allow the chamber temperature and humidity to stabilize then set the
overtemp safety thermostat as follows:
1. Turn the overtemp control knob slowly counterclockwise until the
audible alarm sounds and the overtemp indicator lights.
2. Turn the overtemp control knob clockwise at least 2°. The alarm
should be silenced and the overtemp indicator light should go out. The
overtemp safety thermostat is now set a few degrees above the control
temperature setpoint. When the chamber temperature rises to the
overtemp control point, the alarm system will activate, power to the
heaters will shut off, and the chamber temperature will be maintained
at the overtemp control point.
When an overtemp condition occurs, the cause must be determined and
corrected before normal operation under the main temperature controller
can be resumed.
Note When the chamber temperature control setpoint is changed, the
overtemp safety thermostat must be reset to accommodate the change. ▲
Note The overtemp control is not directly calibrated. The numbers on the
dial are for reference only. ▲
Set the Undertemp
Safety Thermostat
Allow the chamber temperature and humidity to stabilize, then set the
undertemp safety thermostat as follows:
1. Turn the undertemp control knob slowly clockwise until the audible
alarm sounds and the undertemp indicator lights.
2. Turn the undertemp control knob counterclockwise at least 2° on the
scale. The alarm will silence and the undertemp indicator light go out.
The undertemp safety thermostat is now set a few degrees below the
control temperature setpoint. When the chamber temperature drops to the
undertemp control point, the alarm system activates, power to the
compressor shuts off, and the chamber temperature is maintained at the
undertemp control point.
When an undertemp condition occurs, the cause must be determined and
corrected before normal operation under the main temperature controller
can be resumed.
Thermo Scientific
Model 3940 Series
1-5
Section 1
Installation and Set-Up
Set Undertemp Safety
Thermostat (cont’d)
Note When the chamber temperature control setpoint is changed, the
undertemp safety thermostat must be reset to accommodate the change. ▲
Note The undertemp control is not directly calibrated. The numbers on
the dial are for reference only. ▲
Cobex Recorder
(Optional)
The seven-day circular chart recorder is located on the front of the
incubator cabinet and is protected by a glass door.
To prepare the recorder for
operation, open the glass door and
snap the connector onto the 9V
battery (Figure 1-4). If the unit is
operating, the green LED lights
steady. If the unit is not turned on,
the LED blinks.
If the battery is weak or not
connected, the green LED will flash.
If power is lost to the cabinet, the
LED will also flash. When replacing
the 9V battery, use only an alkaline
Figure 1-4. Install Battery In Recorder
style battery. Dispose of the old
battery following established
environmental practices.
Change the Chart Paper
1. Press the Change Chart button (#3) and hold it for 1 second until the
pen begins to move to the left of the chart. See Figure 1-4.
2. Remove the existing chart by unscrewing the center knob securing it.
3. Install the new chart, positioning it so that the correct time line
coincides with the time line groove on the chart plate.
4. Replace the center knob and screw it tightly against the chart.
1-6
Model 3940 Series
Thermo Scientific
Section 1
Installation and Set-Up
Change the Pen
1. Using a small flat blade screwdriver, loosen the 2 screws holding the
pen arm and remove the pen and arm as an assembly.
2. Unsnap the plastic hinge securing the pen. Remove and discard the old
pen.
3. Install the new pen by snapping the hinge securely around the pen
arm.
4. Re-install the pen assembly by sliding the pen arm under the screws,
positioning the pen tip in the time line groove. Tighten the screws.
5. Push the Chart Change button and hold it for 1 second until the pen
begins to move back onto the chart.
Note Make sure that the pen is marking on the chart. It may be necessary
to gently lift the pen onto the chart paper. ▲
Honeywell Recorder
(Optional)
The Honeywell, DR 4500 Recorder is a one to four-channel
microprocessor-based, circular chart recorder.
The recorder is capable of recording both temperature and humidity and
printing alphanumeric chart data on blank heat-sensitive chart. Refer to
the Honeywell Configuration Record at the end of Section 4 and the
supplemental Honeywell Recorder manual.
IR CO2 Option
Connect the CO2 Source
This section applies to units with the IR CO2 option only.
For the most economical use, the liquid CO2 supply tanks should be
without siphon tubes, so that only CO2 gas enters the incubator injection
system. Two tanks may be joined together with a manifold to ensure a
continuous CO2 supply.
Install a two-stage pressure regulator, with indicating gauges, at the supply
cylinder outlet. The high-pressure gauge should have an indicating range
of 0 to 2000 psig to monitor tank pressure. The low-pressure gauge should
have an indicating range of 0 to 30 psig to monitor input pressure to the
incubator injection system. A suitable two-stage pressure regulator is
available.
Thermo Scientific
Model 3940 Series
1-7
Section 1
Installation and Set-Up
Connect the CO2 Source
(continued)
The CO2 source must be regulated at a pressure level of 15, ±5 psig.
Higher pressure levels may damage the CO2 control system. The user
should determine the most economical pressure level, between 10 and 20
psig appropriate for the desired CO2 percentage in the chamber. Use only
sufficient pressure to maintain recovery time after door openings.
To connect the CO2 supply (Figure 1-5):
1. Connect the CO2 tubing to the 1/4”
hose fitting installed in the CO2 inlet.
2. Check the tubing connection for leaks.
Figure 1-5. Inlet Connections
Set the CO2 Content
The Watlow SD CO2 controller's upper display shows the actual CO2
content inside the chamber. The lower display shows the CO2 setpoint.
Before setting the CO2 content, allow the chamber temperature and
humidity to stabilize. Do not open door during the stabilization period.
To set the CO2 content (0% to 20%), press the Up or Down Arrow keys
on the Watlow SD Controller.
Figure 1-6. Watlow SD Control
1-8
Model 3940 Series
Thermo Scientific
Section 1
Installation and Set-Up
CO2 Control and Indicators
Sample Port
The sample port is used for checking CO2 percentage in the incubator
chamber by an independent test instrument (such as with a Fyrite, or
similar CO2 test instrument).
Caution To prevent CO2 loss, the sample port must be capped when it is
not in use. ▲
CO2 Alarm
The CO2 alarm is factory set to activate when the chamber CO2 content
deviates from configured alarm set points (see configuration record).
When a CO2 alarm occurs, the CO2 Alarm indicator on the control
panel lights and the audible alarm sounds.
The CO2 alarm high and low setpoints are established through the
Watlow SD CO2 controller (ALO, and AHI). Refer to the Configuration
Record included at the end of Section 4.
Thermo Scientific
Model 3940 Series
1-9
Section 2
Start-Up and Operation
Figure 2-1. Environmental Chamber Control Panel, Shown with Optional CoBex
Recorder and Optional CO2 Control
Control Panel
Main Power Switch and Indicator Light (Figure 2-2)
The main power switch controls power to the incubator. The main
power indicator lights when the power switch is on and the unit is
receiving power.
Figure 2-2. Main Power
Figure 2-3. Switches
Refrigeration Switch and Indicator Light (Figure 2-3)
The refrigeration switch controls power to the refrigeration system. The
refrigeration indicator lights when the refrigeration switch is on and the
compressor is receiving power.
Thermo Scientific
Model 3940 Series
2-1
Section 2
Start-Up and Operation
Control Panel
(continued)
Defrost Switch and Indicator Light (Figure 2-3)
The defrost switch controls power to the defrost system. Setting the
defrost switch to Auto will provide two 15-minute defrost cycles during
a twenty-four hour period. The defrost indicator lights when the defrost
switch is on and the incubator is in a defrost cycle.
Caution The defrost switch must be set to Auto when the temperature
setpoint is 10°C, or below. ▲
Humidity Switch and Indicator (Figure 2-3)
The humidity switch controls the power to the humidification system
circuit. The humidity indicator light will cycle as the controller toggles
between humidify and dehumidify.
Dehumidify Switch and Indicator (Figure 2-3)
The dehumidify switch is used with the optional heatless dryer P/N
1900139 to provide dehumidification. The heatless dryer injects dry air
into the incubator chamber as needed, to maintain humidity levels.
When controlling humidity, the dehumidification switch should be in
the ON position for most applications. The dehumidification light will
cycle on and off as the humidity controller toggles between humidify
and dehumidify.
Heat Indicator (Figure 2-4)
The Heat Indicator illuminates when the heater activates.
Cool Indicator (Figure 2-4)
The Cool Indicator illuminates when the refrigeration system activates.
Overtemp Safety Control, Indicator Light, and Audible Alarm (Figure 2-4)
The overtemp safety thermostat should be set slightly above the operating temperature of the incubator. In the event of an overtemp condition,
the overtemp safety thermostat:
• Activates the audible alarm and the overtemp indicator light.
• Interrupts power to the heaters and maintain the incubator’s cabinet
temperature at the overtemp safety control point.
Note The overtemp control is not directly calibrated. The numbers on the
dial are for reference only. ▲
If an overtemp condition occurs, the alarm can only be silenced by raising
the overtemp safety thermostat setting. However, the cause of the problem
must be determined and corrected before normal operation under the
main temperature controller is resumed.
2-2
Model 3940 Series
Thermo Scientific
Section 1
Start-Up and Operation
Control Panel
(continued)
Figure 2-4. Indicators and Controls
Undertemp Safety Control, Indicator Light and Audible Alarm (Fig. 2-4)
The undertemp safety thermostat should be set slightly lower than the
operating temperature of the incubator. In the event of an undertemp
condition, the undertemp safety thermostat will:
• Activate the audible alarm and the undertemp indicator light.
• Interrupt power to the refrigeration system and maintain the incubator’s cabinet temperature at the undertemp safety control point.
Note The undertemp control is not directly calibrated. The numbers on
the dial are for reference only. ▲
If an undertemp condition occurs, the alarm can only be silenced by
lowering the undertemp safety thermostat setting. However, the cause of
the problem must be determined and corrected before normal operation
under the main temperature controller is resumed.
Audible Humidity Alarm and Indicator Display (Figure 2-4)
The humidity alarm is a function of the humidity controller (Figure 25). When the cabinet humidity goes outside the set parameters of the
controller, L4 indicator on the controller lights, the audible alarm
sounds, and the humidity alarm indicator on the control panel lights.
Thermo Scientific
Model 3940 Series
2-3
Section 2
Start-Up and Operation
Control Panel
(continued)
Hold/Run Key
Pressing the Hold/Run key on the controller
silences the audible alarmand extinguishes the
humidity alarm indicator and the L4 indicator
on the controller. A4HI/A4LO flashes on the
lower display until the cabinet humidity
returns to the system setpoint.
Note The humidity controller’s high and low
limits are factory-set at 100% and 0%. Therefore,
the system will go into the alarm state when the Figure 2-5. Hold/Run Key
humidity exceeds these percentages by one percent. When operating the
incubator near these high or low humidity levels, frequent alarms may
occur. This will require that the controller’s high or low limit be reset to
three or four percent over the high limit or three or four percent under the
low limit. Refer to the Watlow User’s guide provided. Refer also to the
factory configuration records located at the end of Section 4 of this
manual. ▲
Set the Operating
Temperature
The Watlow temperature controller’s upper
numerical display shows the actual
temperature inside the incubator chamber.
The lower display shows the temperature
setpoint.
To raise or lower the setpoint, press the Up or
Down Arrow. Temperatures are set in 0.1°C
increments.
Figure 2-6. Changing Temp
Set the Operating
Humidity
The Watlow humidity controller’s upper
numerical display shows the actual
humidity inside the incubator. The lower
display shows the humidity setpoint.
To raise the setpoint, press the Up or
Down Arrows. Humidity is set in one
percent increments.
Figure 2-7. Changing Humidity
2-4
Model 3940 Series
Thermo Scientific
Section 2
Start-Up and Operation
Air Exchange
Ventilator Caps
Air exchange for the incubator is regulated through the manually
adjustable intake and exhaust ventilator caps located on the top of the
cabinet.
When viewed from the front of the incubator, the intake cap is on the left
and the exhaust cap is on the right. The ventilator caps may be opened by
turning counterclockwise, and closed by turning clockwise.
For optimum performance of the unit, the vent caps should be closed at all
times.
Heatless Dryer
(Optional)
Thermo Scientific
The optional heatless dryer (P/N 1900139) provides dehumidification for
the incubator chamber. The dehumidify switch must be turned On for the
dryer to operate. The dryer is controlled with the humidity controller and
should operate at 90 psi.
Model 3940 Series
2-5
Section 3
Routine Maintenance
Warning De-energize all potential sources of energy to this unit and
lockout/tagout their controls. (O.S.H.A. Regulation, Section 1910-147.) ▲
The continued cleanliness of the stainless steel used in this unit has a direct
effect on the appearance and operation of the unit. Use the mildest
cleaning procedure that will do the job effectively. Clean the outside of the
incubator with soap and water or with any non-abrasive commercial spray
cleaner. Clean the inside of the chamber with alcohol and/or soap and
water. Disinfect the interior panels with a general use laboratory
disinfectant, diluted according to the manufacturer’s instructions. Rinse the
surface thoroughly after each cleaning and wipe the surfaces dry. Always
rub in the direction of the finish polish lines.
Caution CautionDo not use chlorinated solvents on stainless steel as they
can cause rusting and pitting. ▲
Caution Do not use volatile or aromatic solvents for cleaning inside the
cabinet as their residue can contaminate the cabinet environment. ▲
The Thermopane glass door may be cleaned with commercial glass cleaner
or with a solution of ammonia and water.
Maintaining the
Humidity Generator
Thermo Scientific
Depending on the quality of water used in the humidification system, it
may be necessary to clean the humidity generator every 2 to 3 months.
Refer to Section 4 for cleaning instructions.
Model 3940 Series
3-1
3-2
Model 3940 Series
Thermo Scientific
Tips for all incubators:
• Do NOT use bleach or any disinfectant that has high chloros.
• Use sterile, distilled or demineralized water.
• Avoid spraying cleaner on the CO2 sensor.
• Do not use powdered gloves for tissue cultures.
Cleaning and calibration adjustment intervals are dependent upon use, environmental conditions and accuracy required.
We have qualified service technicians, using NIST traceable instruments, available in many areas. For more information on Preventive
Maintenance or Extended Warranties, please contact us at the number below.
The following is a condensed list of preventive maintenance requirements. See the specified section of the instruction manual for further
details.
Your equipment has been thoroughly tested and calibrated before shipment. Regular preventive maintenance is important to keep your unit
functioning properly. The operator should perform routine cleaning and maintenance on a regular basis. For maximum performance and
efficiency, it is recommended that the unit be checked and calibrated periodically by a qualified service technician.
PREVENTIVE MAINTENANCE
Environmental Chambers
Thermo Scientific
Model 3940 Series
3-3
* Inspect and clean the humidity generator, at the minimum.
Clean drip pan and drain lines
Clean refrigeration system condenser
Verify defrost cycle for below 10°C operation
Change filters (under normal conditions)
†Replace the filter elements on the dryer, if applicable.
†Rebuild the solenoid valves on the dryer, if applicable.
†Replace/repack the dessicant towers on the dyer, if applicable.
†Replace the check valve and o-rings on the dryer, if applicable.
5
--
--
--
--
--
--
--
--
* Qualified service personnel only
~ Regular monitoring routines of the various levels in your unit is encouraged.
† Refer to Puregas Dryer manual included in shipping box.
Verify and document all calibrations, at the minimum.
✓
✓
✓
✓
✓
✓
✓
✓
✓
More frequent decontamination may be
required, depending on use and
environmental conditions.
side panels with disinfectant. Rinse everything well with sterile distilled water.
5
Between Experiments
Perform a complete decontamination procedure. Wipe down interior, shelves,
4
5 Years
Check air exchange ventilator caps for adjustment; open or close as required
2 Years
3
✓
✓
Yearly
Inspect door latch, hinges and door gasket seal
Action
--
Refer to
Manual Section
Preventive Maintenance for Environmental Chambers
✓
6 Years
Section 4
Service
Caution Service must be performed by qualified service personnel only! ▲
Warning De-energize all potential sources of energy to this unit and
lockout/tagout their controls. ▲
Access Electrical
Components
Over/Undertemp
Probe and Thermostat
To gain access to the electrical components, remove the two screws located
on the left side of the control panel with a Phillips screwdriver. The control
panel is hinged and will swing open.
1. Remove the incubator top right side air dam by removing the screws
holding it in place.
2. Remove the top three screws from the top of the right duct cover.
3. Lean the duct sheet out, and remove the Permagum seal from around
the probe access hole.
4. Remove the 15” copper capillary overtemp probe by extracting two
plastic clips that hold the probe in place.
5. Open the control panel by removing the four screws located on the top
and bottom of the control panel.
Figure 4-1. To Open Control Panel
Thermo Scientific
Model 3940 Series
4-1
Section 4
Service
Over/Undertemp Probe
and Thermostat (cont.)
6. Pull the probe up through the access hole and into the control panel.
7. Follow the wires from the probe to the thermostat mounted on the
control panel. Clip the plastic ties holding the overtemp cable to the
existing wiring.
8. Pull the overtemp knob on the control panel off.
9. Remove the two screws that hold the overtemp assembly to the control
panel.
10. Disconnect the two wires from the back of the thermostat assembly.
11. Pull the entire assembly from the panel, and remove the unit.
12. Replace the thermostat and probe.
13. Re-assemble in reverse order.
Note Reseal probe access hole with Permagum and tie-wrap overtemp cable
to existing wires after replacing probe. ▲
Humidity/Temp
Sensor
1. Follow instructions 1-6 from ‘Over/Undertemp Probe and Thermostat’
section to locate and remove the probe from the chamber.
2. Clip any plastic ties securing the probe wiring. Disconnect the probe.
3. Install the replacement probe in the chamber. When replacing the
humidity sensor, be sure to mount the probe at the same angle as
originally mounted.
4. Route the probe wire through the access hole into the control housing.
5. Connect the probe to the appropriate controller wiring.
6. Reseal the probe access hole with Permagum and tie-wrap the probe
wire to existing wires.
4-2
Model 3940 Series
Thermo Scientific
Section 4
Service
Program Humidity/Temp
Controllers
The Watlow temperature and humidity controllers have been set at the
factory to operate the incubator within the specifications listed in the
Specifications section of this manual. Reference copies of the Watlow
configuration records are included at the end of this section.
To prevent tampering, mechanical and software lockouts are employed in
the system. These lockouts must only be removed by persons skilled in
configuring controller software.
Caution Re-programming either the temperature or humidity controllers
alters the factory defaults and will seriously alter the performance of the
incubator. This may also void the warranty. Do not re-configure the
controllers without first consulting the Technical Services Department,
(888) 213-1790. ▲
Remove Mechanical
Lockout
1. Make sure the unit is turned off.
2. Wearing a grounding wrist strap or maintaining constant contact with
the metal cabinet, press in the four locking tabs on the frame of the
Temperature controller. There are two tabs on either side as shown in
the front and side views in Figure 4-2. When all tabs are unlocked,
pull the controller module out of its frame.
Figure 4-2. Locking Tabs
Figure 4-3. DIP Switch Location
3. Looking at the top of the module, locate the red DIP switch indicated
in Figure 4-3. With a fingernail or small screwdriver, turn off SW #2
by moving the white toggle down or towards the front of the module.
(SW#2 is the top switch when looking at module from right side.)
4. Very carefully, replace module into frame and press firmly on the top
and bottom of the bezel until all four locking tabs “click” into place.
Thermo Scientific
Model 3940 Series
4-3
Section 4
Service
Remove Software Lockout
1. Press the Up and Down Arrows at the same time and hold them for
about three seconds. The words “inpt” (input) and “set” will appear in
the top and bottom displays. (Figure 4-4) If numbers in the bottom
display begin to scroll up or down, the keys have not been pressed
simultaneously. Try again.
2. Press the Up Arrow until “gLbL” (global) appears in the upper display.
The word “set” will remain in the lower display (Figure 4-5).
Figure 4-4. Input and Set Appear
Figure 4-5. Global and Set Appear
3. Press the Mode key to scroll through the menus until the lower
displays show “Loc” (Figure 4-6). Press the Down arrow key until the
“2” becomes “0” (zero) as shown in Figure 4-7.
Figure 4-6. 2 and Lock Appear
4-4
Model 3940 Series
Figure 4-7. Change 2 to 0
Thermo Scientific
Section 4
Service
Controller Configuration
The Watlow 982 Temperature and Humidity Controllers have been
configured at the factory. Copies of the Watlow Configuration records are
included at the end of this section.
Caution Do not re-configure the controller without first consulting the
Technical Services department at (888) 213-1790. ▲
Offset Calibration
(Temp/Humidity)
It may be necessary to calibrate the temperature or humidity controllers to
match an independent temperature or humidity sensor. To do so, follow
the next few steps.
1. Suspend an independent, calibrated sensor(s) in the center of the
interior chamber.
2. Allow approximately 30 minutes for the incubator to stabilize.
3. Turn off the main power switch.
4. Wear a grounding wrist strap to avoid damaging any electrical
components.
5. Remove the 982 controller module(s) by
pressing in the four retaining tabs, two
on the right side; two on the left side.
Refer to Figure 4-8. Pull the controller
module out by gently rocking it from
Figure 4-8. Retaining Tabs
side to side.
6. Looking at the top and right side of
the controller module, locate the red
DIP switches indicated (Figure 4-9).
Use your fingernail, or a small
screwdriver, to turn Off SW2 by
moving the white toggle towards the
front of the module as in the
illustration.
7. Return the controller to its frame and Figure 4-9. Red DIP Switches
firmly press the top and bottom of the
bezel until all four locking tabs “click” into place.
Thermo Scientific
Model 3940 Series
4-5
Section 4
Service
Offset Calibration
(continued)
8. Turn on the main power switch.
9. Press Up and Down Arrow keys simultaneously for 3 seconds. The
word “InPt” appears in upper display, and “Set” appears in lower
display.
10. Press Down Arrow once, then continue to press the Mode key until
“LOC” appears in lower display. Upper display shows 2. Press Down
Arrow until 0 appears.
11. Press the Mode key once, then Up Arrow once. “InPt” appears in
upper display, and “Set” in lower display. Press the Mode key until
“CAL 1” appears in lower display. Press Up or Down Arrow key to
either add or subtract an offset value. This value is the difference
between the actual value shown on the controller, and the reference
sensor value.
12. Press the Display key once. The hardware and software lockout is Off.
To turn the hardware and software lockout back On:
1. Press the Up and Down Arrow keys simultaneously for 3 seconds. The
word “InPt” appears in upper display, and “Set” in lower display.
2. Press the Down Arrow once, then continue to press the Mode key
until “LOC” appears in lower display. Upper display shows 0. Press Up
Arrow until 2 appears.
3. Press Display key once.
4. Turn off main power switch.
5. Wear a grounding wrist strap to avoid damaging any electrical
components.
6. Remove the 982 controller module(s) by pressing in the four retaining
tabs; two on the right side, two on the left side. Pull the controller
module out by gently rocking it from side to side.
7. Looking at the top and right side of the controller module, locate the
red DIP switches. Use your fingernail, or a small screwdriver, to turn
On SW2 by moving the white toggle towards the back of the module.
8. Return the controller to its frame and press firmly on the top and
bottom of the bezel until all four locking tabs “click” into place.
9. Turn On the main power switch.
4-6
Model 3940 Series
Thermo Scientific
Section 4
Service
Replace Optional
Recorder and Probe(s)
1. Open the incubator door, and locate the probe mounting plate
attached to the center of the right interior wall. Remove the mounting
plate.
2. The recorder probe is attached to the lower end of the back of the
mounting plate. Remove the probe by carefully sliding it out of the
housing.
3. Remove the screws securing the right side air dam.
4. Remove the top three screws on both edges of the right duct sheet.
5. Lean the duct sheet out in order to remove the Permagum seal from
around the probe access hole.
6. Remove the four screws located on the top and bottom of the control
panel and open the control panel door. Remove any Permagum from
around the access hole.
7. Pull the probe(s) carefully up through the hole.
8. Follow the probe cable(s) to the back of the recorder, and carefully clip
any plastic ties holding the cable(s) to other wiring.
9. Remove the four screws securing the recorder and pull it carefully out
from the front of the control panel.
10. Replace the recorder with the correct part.
Note When replacing the recorder and probe(s), retie the probe cable(s) to
the existing wires. ▲
Calibrate the Recorder
Place an accurate thermometer(s) in the chamber next to the recorder’s
probe(s). After about three minutes, compare the thermometer with the
chart recorder. For 2 pen operations, also compare the second
thermometer.
Note For 2 pen operations, first select the pen to be
calibrated. Hold down the #1 arrow for the red (#1)
pen or the #2 arrow for the blue (#2) pen (Figure 410), until the light goes out. Adjust as necessary. ▲
Figure 4-10. Arrows
If an adjustment is necessary, press either the #1 or #2 arrow to move pen
left or right. The arrow must be held about five seconds before pen begins
to move. Release the arrow when pen matches thermometer.
Thermo Scientific
Model 3940 Series
4-7
Section 4
Service
Set Door Heater
Control
Warning High voltage is present behind control panel. Servicing must be
performed only by qualified electrical service personnel. ▲
The infinite heater control is located in
the left side of the incubator top
compartment behind the control panel
door. The control varies the amount of
door heat from no heat (zero) to full heat
(100) as indicated by the dial face. If the
knob is turned past zero, a “click”
indicates that all power to the door is shut
off. If turned past 100, a similar “click”
indicates that the heat is set at maximum. Figure 5-11. Door Heater Control
Initially, the units leave the factory with the dial set at 40. If desired, the
amount of heat can later be reduced until moisture appears on the door,
then the heat advanced. However, in fluctuating ambient conditions, it is
recommended that a minimum of 40% door heat be used.
Clean/Adjust Steam
Generator
Depending upon the quality of water used in the humidification system, it
may be necessary to clean the humidity steam generator (P/N 1900190)
every 2 to 3 months.
Materials Required
6-foot stepladder
Flat and Phillips screwdrivers
11/32 Nutdriver or wrench
Laboratory disinfectant
9/16 Open end wrench
1/2 Open end wrench
Sponge & cleaning materials
Warning De-energize all potential sources of energy to this unit and
lockout/tagout their controls. ▲
1. Remove all contents from the incubator, turn it off, and disconnect
from power source.
2. Turn off the valve supplying the sterile distilled water.
3. From the stepladder, remove the eight screws securing the top of the
incubator cabinet.
4-8
Model 3940 Series
Thermo Scientific
Section 4
Service
Clean/Adjust Steam
Generator (continued)
4. When the steam generator has cooled, remove the four thumbscrews
and wingnuts (Figure 4-12).
Figure 4-12. Access to Steam Generator
5. Disconnect water inlet from steam generator.
Warning The internal temperature of the steam generator is hot enough to
boil water. Make certain sufficient time is allowed for the unit to
completely cool before removing the top. ▲
6. Lift the top off the steam generator and set it aside.
7. Loosen the four nuts holding the front cover and remove it. Mark the
top of heater location for future reference. Unsnap the two toggle
clamps on the heater.
8. Remove the can through the top of the steam generator, taking care
not to spill water out of the can. Empty the water. Clean the can with
a good quality laboratory detergent and disinfectant. Do not use any
type of chloride cleaner. A bristle brush may be needed for stubborn
rust and scale. Also clean the inside of the steam tube using a test tube
brush. Repeat cleaning with soap and water as necessary.
9. Re-assembly in reverse order. Replace the cabinet top and return
incubator to service.
Thermo Scientific
Model 3940 Series
4-9
Section 4
Service
CO2 Controller
Calibration
If it should become necessary to calibrate the CO2 controller, perform the
following procedure.
Start from the standard operating display (setpoint in bottom display,
actual CO2 reading in the upper display).
1. Press the Advance key until “CAL” appears in the lower display.
2. Use the up and down arrows to make offset adjustment.
3. Press the Infinity key to exit the calibration menu.
Figure 4-13. Key Locations
4-10
Model 3940 Series
Thermo Scientific
Section 4
Service
WATLOW 982 CONFIGURATION RECORD
CUSTOMER:
3920 & 3940 (Release 9)
JOB NUMBER:
SERIAL NUMBER:
CONTROL TYPE: TEMPERATURE (RTD)
PREPARED BY: GLS
COMPLETED BY:
Switch Configuration:
(1)*** Main Boards
SW1
ON
SW2
ON
Software Configuration:
Setup Menus
(2)**** gLbL: C_F
C
Err
nLA
Ei1
NO
Ei2
NA
Input 1 Board
SW1
SW2
SW3
Anun
LoP
HiP
AtSP
DATE:
DATE:
12/12/2006
OFF
OFF
ON
OFF
-100
100
90
PtyP
gSd
Pout
IdSP
ti
0.0
Cont
NA
PStr
LOC
StPt
2*
NA
NA
NA
NA
CAL2
Hunt
NA
NA
NA
NA
AL4n
Pr1
0.1
nLA
SIL4
Aout
PrC3
ArL
ArH
ACAL
OFF
Prc1
4-20
-20.0
80.0
**
34.0
OFF
*LOC should be set at 0 until factory testing and calibration is complete
(3)**** InPt:
In1
dEC1
rL1
rH1
RT.D***
NA
-20.0
80.0
CAL1
rtd1
Ftr1
In2
**
DIN
2
NA
rL2
rH2
LrnL
LrnH
**This is a calibration factor and will vary from unit to unit.
(4)**** OtPt: Ot1
PrC1
HyS1
Ot2
PrC2
HyS2
Ht
NA
0.1
CL
NA
0.1
AL2
LAt2
SIL2
Ot3
AL3
HyS3
NA
NA
NA
NA
NA
NA
LAt3
SIL3
Ot4
AL4
HyS4
LAt4
**This is a calibration factor and will vary from unit to unit.
Operation Menus
(6)**** SYS: Ei1S
NA
Ei2S
NA
Ent3
NA
(7)**** PID:
Pb1
rE1
It1
rA1
2.0
0.50
NA
0.19
Ent4
A2LO
A2Hi
NA
NA
NA
A3LO
A3LHi
A4LO
NA
NA
-73.3
A4Hi
Aut
dE1
Ct1
Pb2
rE2
NA
5.0
1.0
0.25
It2
rA2
dE2
Ct2
NA
0.25
NA
30.0
dB
0.0
PROG: See Programming Sheets if required.
***SET THESE PARAMETERS FIRST
****CONFIGURE CONTROL IN IDENTIFIED ORDER.
Thermo Scientific
Model 3940 Series
4-11
Section 4
Service
WATLOW 982 CONFIGURATION RECORD
CUSTOMER:
3940 (Release 9)
JOB NUMBER:
SERIAL NUMBER:
CONTROL TYPE: HUMIDITY (0 - 100%)
PREPARED BY: GLS
COMPLETED BY:
Switch Configuration:
(1)*** Main Boards
SW1
ON
SW2
ON
Software Configuration:
Setup Menus
(2)**** gLbL: C_F
NA
Err
nLA
Ei1
NO
Ei2
NA
Input 1 Board
SW1
SW2
SW3
Anun
LoP
HiP
AtSP
ON
-100
100
90
DATE:
DATE:
12/12/2006
ON
ON
ON
PtyP
gSd
Pout
IdSP
ti
0
Cont
NA
PStr
LOC
StPt
2*
NA
NA
NA
NA
CAL2
Hunt
NA
NA
NA
NA
AL4n
Pr1
1
Nla
SIL4
Aout
PrC3
ArL
ArH
ACAL
ON
Prc1
4-20
0
100
**
NA
NA
0*
A4Hi
Aut
100*
OFF
NA
0.35
NA
30.0
dB
*LOC should be set at 0 until factory testing and calibration is complete
(3)**** InPt:
In1
dEC1
rL1
rH1
0-5***
0
0
100
CAL1
rtd1
Ftr1
In2
**
NA
2
NA
rL2
rH2
LrnL
LrnH
**This is a calibration factor and will vary from unit to unit.
(4)**** OtPt: Ot1
PrC1
HyS1
Ot2
PrC2
HyS2
Ht
NA
1
CL
NA
1
AL2
LAt2
SIL2
Ot3
AL3
HyS3
NA
NA
NA
NA
NA
NA
LAt3
SIL3
Ot4
AL4
HyS4
LAt4
**This is a calibration factor and will vary from unit to unit.
Operation Menus
(6)**** SYS: Ei1S
NA
Ei2S
NA
Ent3
NA
Ent4
A2LO
A2Hi
NA
NA
NA
A3LO
A3LHi
A4LO
* These values are customer settable to there alarm points.
(7)**** PID:
Pb1
rE1
It1
rA1
8
0.05
NA
0.35
dE1
Ct1
Pb2
rE2
NA
5.0
7
0.03
It2
rA2
dE2
Ct2
0
PROG: See Programming Sheets if required.
***SET THESE PARAMETERS FIRST
****CONFIGURE CONTROL IN IDENTIFIED ORDER.
4-12
Model 3940 Series
Thermo Scientific
Section 4
Service
WATLOW SD CONFIGURATION RECORD
1900226 & 1900227 KITS
CUSTOMER:
JOB NUMBER:
UNT SERIAL NUMBER:
CONTROL TYPE:
PREPARED BY:
CO2
GLS
DATE: 12/12/2006
SETUP PAGE:Press UP and DOWN arrow for thee seconds.
SEn
MA
P.dec
0.0
Sc.LO 4.00
Sc.hı
20.00
PI.LE
-1.00
PI.HE 21.00
r9.LO
0.0
r9.hı
20.0
SP.LO
0.0
SP.hı
Ftr.E
FLtr
Ot 1
Ftb1
PL 1
PSL 1
PSh 1
nLF 1
20.0
both
2.0
hEAT
20.0
100.0
0.0
100.0
OFF
Ot 2
Pr.AL
Ot 3
rMt
AO3.U MA
O3.Lo 4.00
O3.Hi 20.00
r3.50 Proc
r3.Hi
20.0
r3.Lo
0.0
r3.Co
0.0
hYS 2
L9c2
LAt2
SIL 2
dSP 2
Unıt
1.Err
FAıL
dSP
0.3
ALO
nLAt
On
On
US
nLAt
OFF
nor
rP
LOC
OFF
0¹
OPERATION PAGE:Press ADVANCE key from home page. LOC = 0 to view and change.
POht
A-M
Aut
0²
Auto
OFF
CAL
htM
Pbht
0.0³
Pıd
1.0
rE.ht
rA.ht
A2hı
0.15
0.10
20.0ʎ
A2Lo
0.0ʎ
FACTORY PAGE:Press UP and DOWN arrow for six seconds.
dSPL = Display Intensity 5 to 99%
rESt = Restore Factory Calibration (Select YES to restore)
Usrr = Restore User Settings (Select YES to restore user configuration)
USrS = Save User Settings (Select YES to save user configuration)
dFLt = Default Parameters (Select YES to reset to default configuration)
NOTE: Not all available parameters are listed on this page. See Watlow manual for more
information.
NOTES:
¹ - Lock out setting range 1 to 4. (Factory set at 3)
² - %power output display. Not configurable.
³ - User settable calibration offset.
ʍ - User selectable alarm points.
Thermo Scientific
Model 3940 Series
4-13
Section 4
Service
HONEYWELL TRULINE CONFIGURATION RECORD
CUSTOMER:
JOB NUMBER:
UNIT SERIAL #:
CONTROL TYPE:
PREPARED BY:
COMPLETED BY:
GROUP
PROMPT
TUNING1
TUNING2
SP RAMP1
SP RAMP2
4-14
Model 3940 Series
DATE:
DATE:
FUNCTION
PROMPT
PROP BD or
GAIN
RATE MIN
RSET MIN or
RESET RPM or
MAN RSET
CYCSEC
PROP BD2 or
GAIN2
RATE2MIN
RSET2MIN or
RSET2RPM
CYC2SEC
PROP BD or
GAIN
RATE MIN
RSET MIN or
RSET PRM or
MAN RSET
CYCSEC
PROP BD2 or
GAIN2
RATE2MIN
RSET2MIN or
RSET2RPM
CYC2SEC
SP RAMP
TIME MIN
FINAL SP
SP RATE
EU/HR UP
EU/HR DN
SP PROG
SP RAMP
TIME MIN
FINAL SP
SP RATE
EU/HR UP
EU/HR DN
SP PROG
VALUE OR
SELECTION
GROUP
PROMPT
CHART
/
/
SHT 1 OF 4
/
/
FUNCTION
PROMPT
CHRTSPD
HOUR/REV
TIME DIV
MINOR DIV
CONTINUE
CHART NAME
HEADER
REMSW
WAKEMIN
WAKE HR
WAKE DAY
WAKE MON
VALUE OR
SELECTION
7 DAY
TIME
MINUTES
HOURS
DAY
MONTH
YEAR
DAY
(CURRENT)
(CURRENT)
(CURRENT)
(CURRENT)
(CURRENT)
(CURRENT)
PEN1
PEN1
PEN1IN
CHART1HI
CHART1LO
PEN1ON
PEN1OFF
MAJORDIV
MINORDIV
RNG1TAG
ENABLE
INPUT 1
80
-20
PEN2
PEN2IN
CHART2HI
CHART2LO
PEN2ON
PEN2OFF
MAJORDIV
MINORDIV
RING2TAG
ENABLE
INPUT 2
100
0
PEN3
PEN3IN
CHART3HI
CHART3LO
PEN3ON
PEN3OFF
MAJORDIV
MINORDIV
RING 3 TAG
DISABLE
PEN2
PEN3
21
FOUR
NO
YES
NONE
10
10
TEMP
10
10
% RH
Thermo Scientific
Section 4
Service
HONEYWELL TRULINE CONFIGURATION RECORD
GROUP
FUNCTION
VALUE OR
PROMPT
PROMPT
SELECTION
PEN4
PEN4
DISABLE
PEN4IN
CHART4HI
CHART4LO
PEN4ON
PEN4OFF
MAJORDIV
MINORDIV
RNG4TAG
INPUT1
INPUT2
INPUT3
Thermo Scientific
DECIMAL
UNITS
ENGUNITS
IN1TYPE
XMITTER
IN1HI
IN1LO
CUTOFF
INPTCOMP
FILTER1
BURNOUT
DECIMAL
UNITS
ENGUNITS
IN2TYPE
XMITTER
IN2HI
IN2LO
CUTOFF2
INPTCOMP
FILTER2
BURNOUT
DECIMAL
UNITS
ENGUNITS
IN3TYPE
XMITTER
IN3HI
IN3LO
CUTOFF3
INPTCOMP
FILTER3
BURNOUT
GROUP
PROMPT
INPUT4
FUNCTION
PROMPT
DECIMAL
UNITS
ENGUNITS
IN4TYPE
XMITTER
IN4HI
IN4LO
CUTOFF4
INPTCOMP
FILTER4
BURNOUT
TOTAL1
(Value)
RESETTOT
TOTAL1
TOTALEU
RATE
SCALER
RSETABLE
2
UP
TOTAL2
XXXX
EU
RH
0-5 V
LINEAR
100
0
(Value)
RSETTOT
TOTAL2
TOTALEU
RATE
SCALER
RSETABLE
CONTROL1
PID SETS
SW VALUE
SP SOURC
RATIO
BIAS
SP TRACK
POWER UP
SP HILIM
SP LOLIM
ACTION
OUT HILIM
OUT LOLIM
DROPOFF
DEADBAND
OUT HYST
FAILSAFE
REM SW
MAN KEY
PBorGAIN
MINorRPM
CONT1ALG
OUT1ALG
4-20 RNG
SHEDMODE
SHED SP
XXX.X
DEG C
100 PT
482.2
-184.4
2
UP
SHT 2 OF 4
VALUE OR
SELECTION
Model 3940 Series
4-15
Section 4
Service
HONEYWELL TRULINE CONFIGURATION RECORD
GROUP
FUNCTION
VALUE OR
PROMPT
PROMPT
SELECTION
CONTROL2
PID SETS
SW VALUE
SP SOURC
RATIO
BIAS
SP TRACK
POWER UP
SP HILIM
SP LOLIM
ACTION
OUT HILIM
OUT LOLIM
DROPOFF
DEADBAND
OUT HYST
FAILSAFE
REM SW
MAN KEY
PBorGAIN
MINorRPM
CONT1ALG
OUT1ALG
4-20 RNG
SHEDMODE
SHED SP
OPTIONS
4-16
Model 3940 Series
INPUT 1
INPUT2
INPUT3
INPUT4
CONTROL1
CONTROL2
REJFREQ
HF REJ
AUX OUT
4mA VAL
20mA VAL
RELHUMID
ATMPRES
DEVIATION
DEVSETPT
SCROLL
INP ALG
COEFF
PV HIGH
PV LOW
RATIO A
BIAS A
RATIO B
BIAS B
RATIO C
BIAS C
GRANDTOT
ComSTATE
ComADDR
SHEDTIME
UNITS
ENABLE
ENABLE
DISABLE
DISABLE
DISABLE
DISABLE
60 HZ
ENABLE
DISABLE
NO
NONE
NONE
DISABLE
GROUP
PROMPT
ALARMS
FUNCTION
PROMPT
A1S1 VAL
A1S2 VAL
A1S1 TYPE
A1S2 TYPE
A1S1 HL
A1S1 EV
A1S2 HL
A1S2 EV
AL1 HYST
A2S1 VAL
A2S2 VAL
A2S1 TYPE
A2S2 TYPE
A2S1 HL
A2S1 EV
A2S2 HL
A2S2 EV
AL2 HYST
A3S1 VAL
A3S2 VAL
A3S1 TYPE
A3S2 TYPE
A3S1 HL
A3S1 EV
A3S2 HL
A3S2 EV
AL3 HYST
A4S1 VAL
A4S2 VAL
A4S1 TYPE
A4S2 TYPE
A4S1 HL
A4S1 EV
A4S2 HL
A4S2 EV
AL4 HYST
A5S1 VAL
A5S2 VAL
A5S1 TYPE
A5S2 TYPE
A5S1 HL
A5S1 EV
A5S2 HL
A5S2 EV
AL5 HYST
A6S1 VAL
A6S2 VAL
A6S1 TYPE
A6S2 TYPE
A6S1 HL
A6S1 EV
A6S2 HL
A6S2 EV
AL6 HYST
SHT 3 OF 4
VALUE OR
SELECTION
NONE
NONE
0.1
NONE
NONE
Thermo Scientific
Section 4
Service
HONEYWELL TRULINE CONFIGURATION RECORD
GROUP
FUNCTION
VALUE OR
PROMPT
PROMPT
SELECTION
EVNT MSG
EVENT 1
NONE
MESSAGE 1
POSITION 1
EVENT 2
NONE
MESSAGE 2
POSITION 2
EVENT 3
NONE
MESSAGE 3
POSITION 3
EVENT 4
NONE
MESSAGE 4
POSITION 4
EVENT 5
NONE
MESSAGE 5
POSITION 5
EVENT 6
NONE
MESSAGE 6
POSITION 6
LOCKOUT
ADJUST
PASSWORD
LOCKOUT
CHANGE
GROUP
PROMPT
FUNCTION
PROMPT
SHT 4 OF 4
VALUE OR
SELECTION
MAX
TRACE LN
GRID LN
PEN TYPE
JUMPERS TO BE FITTED
CONTROL OUTPUT 1 & 2 __________
ALARMS 1 & 2 ____________________
ALARMS 3 & 4 ____________________
ALARMS 5 & 6 ____________________
INPUT JUMPERS TO BE FITTED
W1/MA
INPUT 1
W1
INPUT 2
MA
INPUT 3
INPUT 4
Thermo Scientific
W3
RTD
T/C
Model 3940 Series
4-17
Section 5
Specifications
Temperature
Control . . . . . . . . . . . . . .±0.1°C @ +37°C (98.6°F)
Range . . . . . . . . . . . .0°C (32°F) to +60°C (140°F)
Sensor . . . . . . . . . . . . . . . . . . . . . . . . . . . . . . .RTD
Controller . . . . . . . .Digital electronic proportional
Setpoint . . . . . . . . . . . . . . . . . . . . . . . . . . . .Digital
Display . . . . . . . . . . . . . . . . . . . . . . . .Digital LED
Readability . . . . . . . . . . . . . . . . . . . . . . . . . . .0.1°C
Setability . . . . . . . . . . . . . . . . . . . . . . . . . . . .0.1°C
Uniformity . . . ±0.3°C at 25°C to 37°C with six shelves installed*
Shelves
Standard . . . . . . . . .3911/3913 - 3, 3940/3949 - 6
Maximum . . . . . .3911/3913 - 11, 3940/3949 - 19
Dimensions . . . 30.62”W x 25.81”F-B, (77.78 cm x 65.56 cm)
Construction . . . . . . .Solid stainless steel reinforced
Surface Area . . . . . . .5.4 sq. ft. (.51 sq. m) per shelf
Max. Per Chamber . . . . . .104.3 sq. ft. (9.69 sq. m)
Clearance . . . . .Adjustable on 3” (7.62 cm) centers
Loading . . .35 lbs. (16 kg) (slide in and out), 50 lbs. (23 kg) (stationary)
Construction
Volume . . . . . . .3940, 3949 - 29 cu. ft. (821 liters)
3911, 3913 - 11 cu. ft. (312 liters)
Interior . . . . . . . . . . . . . . . . . .304 2B stainless steel
Exterior . . . . . . . . . . . . . . . . . . . . .Cold rolled steel
Insulation . . . . . . . . . .2” (5.1cm) Foamed urethane
Outer Door Gasket . .Four sided vinyl compression
Finish . . Powder coated. Salt spray tests exceed 1000 hrs. per ASTM
Standard B117-85
* Better than ±0.5°C uniformity at all other temperature parameters.
Thermo Scientific
Model 3940 Series
5-1
Section 5
Specifications
Weight
Net - 3911/3913 . . . . . . . . . . . . .300 lbs. (136 kg)
Net - 3940/3949 . . . . . . . . . . . . .800 lbs. (363 kg)
Shipping
Motor - 3911/3913 . . . . . . . . . . .375 lbs. (170 kg)
Motor - 3940/3949 . . . . . . . . . . .850 lbs. (386 kg)
Temperature Alarm
Sensor . . . . . . . . . . . . . . . . . . . . . . . . . .Thermostat
Controller . . . . . . . . . . . . . . . . . . . . . . .Thermostat
Setpoint . . . . . . . . . . . . . . . . .Analog reference dial
Alarm . . . . . . . . . . . . . . . . . . . . . . . .Audible/visual
Humidity
Control . . . . . . . . . . . . . . . . . . . . . . . . . . .±5% RH
Range . . . . . . . . . . . . . . . . .Above ambient to 95%
Sensor . . . . . . . . . . . . . . . . . . . .Thin film polymer
Controller . . . . . . . .Electronic, direct set in % RH
Setpoint . . . . . . . . . . . . . . . . . . . . . . . . . . . .Digital
Display . . . . . . . . . . . . . . . . . . . . . . . .Digital LED
Readability . . . . . . . . . . . . . . . . . . . . . . . . . . . .1%
Setability . . . . . . . . . . . . . . . . . . . . . . . . . . . . . .1%
Steam Generator . . Initial fill approx. 1 quart (.95 liters)
Fittings
Fill Port . . . . . . . . . . . . . . . . . . . . . . . . . .1/8” FPT
Drain Port . . . . . . . . . . . . . . . .3/8” (1.9 cm) FPT
Unit Heat Load
6000 BTUH (1750W)
Refrigeration
Compressor . . . . . . . . .1/4 Horsepower, air-cooled
Refrigerants . . . . . . . . . . . . . . . . . . . . . . .Non-CFC
5-2
Model 3940 Series
Thermo Scientific
Section 5
Specifications
Electrical
3911, 3940 . . . . .208-220V, 1 PH, 60Hz, 3P, 4W,
15.0 FLA
3913, 3949 . .220-240V, 1 PH, 50/60Hz, 2P, 3W,
15.0 FLA
Line Cord
Model 3911/3940 . . . . . . . . . .10’ NEMA 14-20P
Model 3913/3949 . . none (lockable disconnect provided)
Dimensions
Model 3911/3913
Exterior . . . . . . . .38.00”W x 51.5”H x 32.00”F-B
(96.52 cm x 130.80 cm x 81.28 cm)
Interior . . . . . . . .31.00”W x 24.00”H x 27.00”F-B
(78.74 cm x 60.90 cm x 68.58 cm)
Model 3940/3949
Exterior . . . . . . . .38.00”W x 88.5”H x 32.00”F-B
(96.52 cm x 224.79 cm x 81.28 cm)
Interior . . . . . . . .31.00”W x 60.00”H x 27.00”F-B
(78.74 cm x 152.40 cm x 68.58 cm)
Continuing research and improvements may result in specification changes at any
time. Performance plus or minus the least significant digit unless otherwise specified.
Thermo Scientific
Model 3940 Series
5-3
Section 6
Thermo Scientific
Spare Parts
Part No.
Description
Qty
290163
RTD Temperature Sensor
1
230066
Fuse, Ceramic 10A 350V
2
400051
Power Supply
1
290162
RH Sensor
1
231221
Watlow 982 Temperature Controller
1
231222
Watlow 982 Humidity Controller
1
231224
Watlow SD Controller
1
270129
Arc Filter for Watlow 982 Controller
1
285614
20A Fuse
2
137022
Heater (steam)
1
403940
Over Temp Thermostat
1
403941
Under Temp Thermostat
1
410048
Defrost Timer
1
630090
Heater (wirewound)
1
205062
Condensing Unit, 1/4 HP 115V R-134A
1
991334
Solenoid, 120V .101” Port (Refrig.)
1
230214
Thermal Fuse, 250V 17A
1
830044
Blower Motor, 1/4 HP, 115V
1
110092
SS Humidity tank
1
300175
SS Relay
2
Model 3940 Series
6-1
Section 7
Refrigeration Schematics
Thermo Scientific
Model 3940 Series
7-1
Section 8
Electrical Schematics
Thermo Scientific
Model 3940 Series
8-1
Section 8
Electrical Schematics
8-2
Model 3940 Series
Thermo Scientific
Section 9
Electrical Schematics
Thermo Scientific
Model 3940 Series
8-3
Section 9
Electrical Schematics
8-4
Model 3940 Series
Thermo Scientific
Section 9
Electrical Schematics
Thermo Scientific
Model 3940 Series
8-5
Section 9
Electrical Schematics
8-6
Model 3940 Series
Thermo Scientific
Thermo Scientific
Rev. 3 2/07
REGISTERED
ISO
9001
If equipment service is required, please call your Technical Services Department at 1-888-213-1790 (USA and Canada) or
1-740-373-4763. We're ready to answer your questions on equipment warranty, operation, maintenance, service and special
application. Outside the USA, contact your local distributor for warranty information.
Your local Thermo Sales Office is ready to help with comprehensive site preparation information before your equipment
arrives. Printed instruction manuals carefully detail equipment installation, operation and preventive maintenance.
THIS WARRANTY IS EXCLUSIVE AND IN LIEU OF ALL OTHER WARRANTIES, WHETHER WRITTEN, ORAL OR
IMPLIED. NO WARRANTIES OF MERCHANTABILITY OR FITNESS FOR A PARTICULAR PURPOSE SHALL APPLY.
Thermo shall not be liable for any indirect or consequential damages including, without limitation, damages relating to lost
profits or loss of products.
Replacement or repair of components parts or equipment under this warranty shall not extend the warranty to either the
equipment or to the component part beyond the original warranty period. The Technical Services Department must give prior
approval for return of any components or equipment. At Thermo's option, all non-conforming parts must be returned to
Thermo Electron Corporation postage paid and replacement parts are shipped FOB destination.
During the first year, component parts proven to be non-conforming in materials or workmanship will be repaired or replaced
at Thermo's expense, labor included. Installation and calibration are not covered by this warranty agreement. The Technical
Services Department must be contacted for warranty determination and direction prior to performance of any repairs.
Expendable items, glass, filters and gaskets are excluded from this warranty.
The Warranty Period starts two weeks from the date your equipment is shipped from our facility. This allows for shipping time
so the warranty will go into effect at approximately the same time your equipment is delivered. The warranty protection
extends to any subsequent owner during the first year warranty period.
THERMO FISHER SCIENTIFIC STANDARD PRODUCT WARRANTY
Section 9
Warranty Information
Model 3940 Series
9-1
9-2
Model 3940 Series
Rev. 3 2/07
REGISTERED
ISO
9001
If equipment service is required, please call your Technical Services Department at 1-888-213-1790 (USA or Canada), or
1-740-373-4763. We're ready to answer your questions on equipment warranty, operation, maintenance, service and special application. Outside the USA, contact your local distributor for warranty information.
Your local Thermo Sales Office is ready to help with comprehensive site preparation information before your equipment
arrives. Printed instruction manuals carefully detail equipment installation, operation and preventive maintenance.
THIS WARRANTY IS EXCLUSIVE AND IN LIEU OF ALL OTHER WARRANTIES, WHETHER WRITTEN, ORAL OR
IMPLIED. NO WARRANTIES OF MERCHANTABILITY OR FITNESS FOR A PARTICULAR PURPOSE SHALL APPLY.
Thermo shall not be liable for any indirect or consequential damages including, without limitation, damages relating to lost
profits or loss of products.
Replacement or repair of components parts or equipment under this warranty shall not extend the warranty to either the
equipment or to the component part beyond the original warranty period. The Technical Services Department must give prior
approval for return of any components or equipment. At Thermo's option, all non-conforming parts must be returned to
Thermo postage paid and replacement parts are shipped FOB destination.
During the first year, component parts proven to be non-conforming in materials or workmanship will be repaired or replaced
at Thermo's expense, labor excluded. Installation and calibration are not covered by this warranty agreement. The Technical
Services Department must be contacted for warranty determination and direction prior to performance of any repairs.
Expendable items, glass, filters, reagents, tubing, and gaskets are excluded from this warranty.
The Warranty Period starts two months from the date your equipment is shipped from our facility. This allows for shipping
time so the warranty will go into effect at approximately the same time your equipment is delivered. The warranty protection extends to any subsequent owner during the first year warranty period. Dealers who stock our equipment are allowed
an additional six months for delivery and installation, provided the warranty card is completed and returned to the Technical
Services Department.
THERMO FISHER SCIENTIFIC INTERNATIONAL DEALER WARRANTY
Section 9
Warranty Information
Thermo Scientific
INSTALLATION, OPERATION AND SERVICE INSTRUCTIONS
FOR CIRCULAR CHART RECORDERS
COBEX RECORDERS, INC.
CAUTION:
IT IS IMPORTANT THAT THESE INSTRUCTIONS BE READ BEFORE INSTALLING THE
INSTRUMENT. KEEP THESE INSTRUCTIONS ON FILE FOR FUTURE REFERENCE.
RECEIVING INSPECTION
UNPACKING
As soon as the recorder is received, visually inspect
the shipping container for signs of damage. If there is
evidence of rough handling, inspect the recorder
immediately to make certain that it is intact and has
not been damaged in shipment.
Each recorder is shipped with the standard accessory
items listed below. When unpacking the recorder make
certain that all of the items are accounted for.
1. Charts: One box (where applicable).
2. Battery (for optional battery backed-up units).
3. Installation manual.
TRANSIT LOSS
All COBEX instruments are insured against transit loss
by breakage. To make this insurance effective, all
claims must be filed with the carrier at the destination
within one week of receipt of merchandise. No claims,
regardless of the nature of same, will be accepted
beyond this period.
COBEX RECORDERS, INC.
6601 LYONS ROAD, F-7
COCONUT CREEK, FL 33073
TEL. (954) 425-0003
FAX. (954) 425-0509
www.cobexrecorders.com
1
R70-32 (WEB)
REV(12-04) D
information concerning the connection of the probe to
the recorder.
RECORDER CASE LOCATION
Upon unpacking, find a suitable location to mount the
unit before plugging it in. After the recorder has been
connected to the main AC power supply, connect the
battery to the battery strap and place the battery in its
holder (if your unit is equipped with an optional
battery back-up).
Select a location that is well lighted, free from dust,
dirt and corrosive fumes. The instrument should not be
located near any sources of heat or be subjected to
sudden or extreme temperature changes. It should be
mounted on a rigid support that is not subject to
vibration. Refer to Figures 7 and 8 for recorder case
dimensions.
POWER SUPPLY
The recorder uses AC power when the unit is
operating normally. If the AC power were to fail and
the battery back-up option is installed, then the green
LED light will begin "flashing" to indicate that there is
an interruption in the main power. Otherwise, the
green LED light glows continuously.
The recorder will have either an AC power cord or a
wall mounted transformer for connection to the main
AC power supply. If a permanent connection to the
main AC power supply is to be accomplished in the
field, then refer to Figures 6A, 6B, 6C and 6D for
diagrams showing the connection to a 115VAC 5060Hz or a 230VAC 50-60Hz main power supply.
CONNECTING A PROBE
Most of the temperature recording units will already
have a temperature indicating probe installed. If the
recorder has a Temperature/Humidity type probe,
make sure to remove the protective cap when the
recorder is in use and replace the cap whenever the
environmental chamber is to be rinsed.
If you will be supplying your own probe input device,
then this next section will contain some important
2
This recording unit is capable of accepting input from
either a CURRENT source (such as 4-20mA), a
VOLTAGE source (such as 0-1 Volt, 0-5 Volts, 1-5
Volts or 0-10 Volts) or a 100 ohm RTD probe. Note:
The recorder is programmed (at the factory) to accept
a specific probe input range. Connecting a probe that
supplies the recorder with a current or voltage that is
not within the specified range will give unpredictable
results and may damage the recorder. If you are not
sure of the probe type or input range for your
recorder, please contact COBEX Recorders before
continuing.
In order to connect the probe input device to the
recorder, you must first gain access to the main
microprocessor PC board that is mounted to the back
of the chart plate.
CAUTION! DO NOT TOUCH the
terminals of the transformer while the unit
is connected to the main AC power
supply. To avoid the risk of possible electric shock,
unplug or disconnect the recording unit from the main
power supply before attempting to open the recorder.
If the recorder is installed with the battery back-up
option, disconnect the 9 Volt battery to avoid
damaging the recorder and draining the battery.
On 6" inch recording units mounted in a metal
enclosure, the chart plate on the recorder case is held
by four (4) screws. Unscrew and gently remove the
chart plate to expose the main microprocessor PC
board of the recording unit. Otherwise, your recording
unit will have a hinged chart plate held in place by two
(2) screws located in the upper and lower right hand
corners of the chart plate. Remove these two screws
and open the hinged chart plate. On 8" enclosures,
there is a single screw along the right hand edge that
secures the chart plate inside of the enclosure. Loosen
this screw and open the hinged chart plate.
If you are not sure how to access the back of the chart
plate, please contact COBEX Recorders before
continuing.
R70-32 (WEB)
REV(12-04) D
Next, you will need to determine the type of microprocessor controller PC board that is installed in your
recorder. Refer to Figures 1A, 1B and 1C and
compare these figures to the microprocessor controller
PC board that is installed in your recorder.
TYPE "A" CONTROLLER PC BOARD
If your recorder has a Type A microprocessor
controller PC board installed, then locate screw
terminal blocks J6 and JP5. Screw terminal block J6 is
normally used when connecting an RTD temperature
probe and JP5 is normally used to supply a signal input
to the recorder from a VOLTAGE or CURRENT type
probe. JP5 may also be used when connecting a
second RTD temperature probe (on a two pen
recorder). Refer to Figure 1A for the location of J6
and JP5 on the microprocessor PC board.
Figure 1B: Micro-Controller PC Board (Type B).
TYPE “C” CONTROLLER PC BOARD
If your recorder has a Type C microprocessor
controller PC board installed, then locate screw
terminal block J3 on the microprocessor PC board.
This screw terminal block is used to provide a signal
input to the recorder for one pen. Refer to Figure 1C
for the location of J3 on the micro-controller PC
board.
Figure 1A: Microprocessor PC Board (Type “A”).
TYPE “B” CONTROLLER PC BOARD
If your recorder has a Type B microprocessor
controller PC board installed, then locate screw
terminal blocks J3 and J4 on the microprocessor PC
board. These screw terminal blocks are used to
provide signal input to the recorder for up to two
pens. Refer to Figure 1B for the location of J3 and J4
on the micro-controller PC board. VIN (located on
screw terminal block J4) is used to provide a signal
input to the recorder from a VOLTAGE type probe,
+5V can be used to power an external probe.
3
Figure 1C: Micro-Controller PC Board (Type C).
R70-32 (WEB)
REV(12-04) D
out, the pen color will become lighter. This indicates
that the pen should be replaced.
CHANGING THE CHART PAPER
Press and hold the "change chart" button (#3) for
approximately one (1) second until the pen begins to
move to the left of the chart and then release the
button. Wait until the pen has moved completely off of
the chart. To remove the chart paper, unscrew
(counter-clockwise) the chart "hub" knob at the center
of the chart. Remove the old chart paper and position
the new one so that the correct time line coincides
with the time line groove on the chart plate. Refer to
Figure 5 for the location of the time line groove.
Re-attach the chart "hub" knob and screw securely (by
hand) against the chart. Press and hold the "change
chart" button (#3) again for approximately one (1)
second until the pen begins to move back onto the
chart and then release the button. Check to make sure
that the pen is marking on the chart paper. If it is not,
then carefully adjust the pen arm to establish contact
with the paper.
MARKING SYSTEMS:
MARK-A-MATIC II INKING SYSTEM
REPLACEMENT OF PEN
Note: In non-inking units, (that is, when using
pressure sensitive recording chart paper) replacement
of the pen is not necessary.
Recorders that are equipped with fiber tipped cartridge
pens will have a cartridge that is color coded "red" to
designate pen number one (1) and an optional
cartridge that is color coded "blue" to designate pen
number two (2). The pen cartridge is securely fastened
to the metal pen arm using a special "U" clip tab.
For ease of replacement, it is suggested that the two
(2) screws that hold the pen arm be loosened and the
pen cartridge and metal pen arm be removed as an
assembly. Refer to Figure 5 for the location of the pen
arm screws. Unsnap the plastic "U" clip tab of the pen
cartridge from the metal pen arm, remove and discard
the old pen cartridge. Replace the new cartridge by
opening the hinge and snapping it securely around the
metal pen arm. Refer to the following figure.
This type of pen consists of a self contained ink
reservoir with a porous plastic stylus which is snapped
around the outer edge of the metal pen arm.
A pen cap is provided to extend the life of the ink pen
during shipping or when the recording unit is not in
service. To remove the pen cap, gently lift the pen arm
away from the chart paper. Remove the black plastic
pen cap to expose the fiber tip of the ink pen and
gently place the pen back onto the chart paper. Do not
let the pen arm "snap" back onto the chart paper. This
will flatten the fiber tip of the pen and will no longer
give you a fine line marking on the chart paper. Place
the pen cap in a safe place for future use.
If the stylus does not touch the chart, adjustment can
be made by slightly bending the metal pen arm in the
center towards the chart paper. Do not use more
pressure than is necessary to create a fine line marking
on the chart paper. Note: As the pen ink supply runs
4
Figure 2: Pen Arm Assembly.
PEN ARM CALIBRATION
To check and/or adjust the recording pen(s)
calibration to the outer most temperature graduation
of the chart, press and hold the "change chart" button
(#3) until the pen begins to move off of the chart.
Once the pen(s) has moved off of the chart, again
press and hold the "change chart" button (#3) until the
pen begins to move back onto the chart. The pen
R70-32 (WEB)
REV(12-04) D
should briefly stop at the outer most temperature
graduation of the chart before continuing onto the
chart to begin recording. If the pen does not stop
exactly at this location on the chart, it can be adjusted
or "calibrated" by using the left (#1) or right (#2)
arrow buttons (refer to Figure 3).
When the pen moves back onto the chart and briefly
stops, you will have approximately five (5) seconds in
which to adjust the pen's position using the left and
right arrow buttons of Figure 3.
On multiple pen recorders, each pen will move (oneat-a-time) onto the chart briefly stopping at the outer
most temperature graduation of the chart at which
time the pen's position can be adjusted by using the left
(#1) or right (#2) arrow buttons. When the time to
adjust the position of the first pen has expired, the
second pen will move onto the chart briefly stopping
at the outer most temperature graduation of the chart
at which time the second pen's position may be
adjusted.
2a. For two (2) pen recorders, also compare the
second thermometer's reading to the second pen of
the recorder.
3. If an adjustment is required, use the left (#1) and
right (#2) arrow push buttons on the recorder to
calibrate (or move) the pen's position on the chart
to correspond to the temperature of the solution.
The arrow buttons must be held for approximately
five (5) seconds before the pen will begin to move.
3a. For two (2) pen recorders, you must first select
the pen that you wish to calibrate. This is done by
pressing the left (#1) arrow button to select the
red pen or the right (#2) arrow button to select the
blue pen. The arrow button must be held down
until the green LED light goes out. After the green
LED light goes out, follow the instructions in step
#3 above. (Refer to the following figure for a
diagram of the push buttons).
Each time the chart paper or fiber tip pen cartridge is
changed, you should make sure that each pen stops at
the outer most temperature graduation of the chart
paper. Otherwise, this pen offset will cause the unit to
record an incorrect temperature on the chart.
Figure 3: Push buttons.
TEMPERATURE RECORDER
CALIBRATION CHECK
OPTIONAL FEATURES
This recorder has been accurately calibrated at the
factory. Before making any adjustments, this
instrument should be in service for 24 hours.
Thereafter, if any adjustment is required, perform the
following procedure. Important: DO NOT immerse
a Temperature/Humidity probe in any solution.
1. Place a Certified Test Thermometer(s) in a
solution bottle(s) alongside the recorder's sensor
probe(s).
2. Once the temperature has leveled out, compare the
position of the pen on the recorder to the test
thermometer's reading.
5
BATTERY BACK-UP
The green LED light remains a constant green color
indicating that both the battery and the main power to
the unit are good. Refer to Figure 5 for the location of
the green LED indicating light. If the AC power were
to fail or the battery becomes weak, then the green
LED light will begin "flashing" indicating that either
you have lost the main power to the unit or it is time
to replace the battery. Having a 9 volt DC battery
back-up in place, will allow the recorder to continue to
function normally for approximately 24 hours in the
event of a power failure.
R70-32 (WEB)
REV(12-04) D
BATTERY LOCATION
AND REPLACEMENT
4", 6" AND 10" RECORDERS
To replace the battery, first open the recorder door.
The battery will be located in the upper right hand
corner of the unit. Refer to Figure 5 for the location of
the battery. Note: Use only NEW 9 volt alkaline
replacement batteries.
8" RECORDERS
CAUTION! DO NOT TOUCH the
terminals of the transformer while the unit
is connected to the main AC power
supply. To avoid the risk of possible electric shock,
unplug or disconnect the recording unit from the main
power supply before changing the battery.
To replace the battery on an 8" recorder, first open the
recorder case door. Next, loosen the single screw
located on the right hand side of the chart plate and
open the hinged chart plate. The battery strap and
battery holder are located on the back of the chart
plate. Note: Use only NEW 9 volt alkaline
replacement batteries.
OPTIONAL ALARM/CONTROL RELAY
CONNECTION TO THE RELAY
CAUTION! DO NOT TOUCH the
terminals of the transformer while the unit
is connected to the main AC power
supply. To avoid the risk of possible
electric shock, unplug or disconnect the recording unit
from the main power supply before attempting to
access the terminals of the relay. If the recorder is
installed with the battery back-up option, disconnect
the 9 Volt battery to avoid damaging the recorder and
draining the battery.
On 6" inch recording units mounted in a metal
enclosure, the chart plate on the recorder case is held
by four (4) screws. Unscrew and gently remove the
6
chart plate to expose the relay that is mounted to the
back of the chart plate. Otherwise, your recording unit
will have a hinged chart plate held in place by two (2)
screws located in the upper and lower right hand
corners of the chart plate. Remove these two screws
and open the hinged chart plate. On 8" recording units,
there is a single screw along the right hand edge that
secures the chart plate inside of the enclosure. Loosen
this screw and open the hinged chart plate to expose
the relay terminals. If you are not sure how to access
the relay terminals of your recording unit, please
contact COBEX Recorders before continuing.
The relays that are used in this recording unit are
latching type relays. That is, the contacts of the relay
will remain either closed or open (even when there is
no power applied to the recorder) until the relay is
pulsed with a signal from the recorder to change the
position of the contacts.
Refer to Figures 1B, 1C and 6B for the location of the
screw terminal connections for the relays. Note: A
RED, BLACK and WHITE set of wires may already
be provided as an external connection to the relay's
terminal block. The terminal position NC will be
closed when the pen is positioned to the right of the
control point and will be open when the pen is
positioned to the left of the control point.
The relays are rated for the following maximum
values:
2.0 AMP at 30V DC
0.6 AMP at 125V AC
0.6 AMP at 110V DC
Warning: Damage to the recording unit may result if
the ratings for the relays are exceeded.
SETTING THE CONTROL POINT FOR
THE RELAY
To set the position of the pen on the chart that will
determine when the relay contacts will open or close,
follow these instructions:
R70-32 (WEB)
REV(12-04) D
Press and hold the "change chart" button (#3) until the
pen arm begins to move off of the chart and then
release the button. Wait until the pen has moved
completely off of the chart. When the "change chart"
button (#3) is pressed again, the pen will begin to
move back onto the chart briefly stopping at the
outermost graduation of the chart.
This recording unit has the option for the user to select
from several temperature "ranges" that are
programmed into the recorder. Note: The chart paper
that is used on the recording unit must match the
range that is selected for the recorder. Otherwise, the
pen's position on the chart paper will not correspond
to the temperature that is measured.
The pen arm will then move to the first control point
position and the green LED light will turn off. The pen
will remain at this position for a period of
approximately five (5) seconds during which time the
control point can be adjusted using the left arrow (#1)
or the right arrow (#2) push buttons. Refer to the
following figure for a diagram of the push buttons.
When the time has expired for adjusting the control
point, the green LED light will turn back on and the
unit will begin recording.
Also, if the pen moves to the center or outer edge of
the chart and remains there while the unit is powered
on, then this maybe an indication that the current
range that is selected for the unit is not correct. The
recorder has a built-in safety mechanism that will
always move the pen to the highest temperature on the
chart when the current temperature that is measured is
not within the selected range.
Figure 4: Push buttons.
When the pen has two control points, the pen then
moves to the second control point at which time the
second control point may be adjusted. Having two
control points (per pen) allows you to define HIGH
and LOW temperatures that will open or close the
relay contacts. Approximately five (5) seconds after
you have finished adjusting the control point(s), the
LED light will turn solid green and the pen arm will
move to indicate the probe's temperature and the unit
will begin recording.
CHART "RANGE" SELECTION
If the recorder that you are using has a range sticker
(that lists several temperature ranges) mounted on the
front of the chart plate, then the following section will
apply to you.
7
The recording unit can have up to eight (8) user
selectable ranges programmed into the unit. To select
from one of the available ranges, follow these
instructions:
After the recording unit has been powered-on and is
operating normally (recording temperature), press and
hold the "change chart" button (#3) until the pen arm
begins to move off of the chart. Once the pen has
moved off of the chart, press and hold the left arrow
(#1) or right arrow (#2) button for approximately
eight (8) seconds and then release the button. Refer to
Figure 4 for a diagram of the buttons.
Note: If your recorder has a Type A microprocessor
controller PC board installed, then the current range
that the recorder is operating in will be altered when
this change range mode is entered. For example, if the
recorder is currently operating in range #1 and the left
arrow (#1) button is pressed for the eight second
period as described above and then released, the
current range will be advanced to range #2 and the
LED light will begin flashing two (2) times. Refer to
Figure 1A to determine if you have a Type A
microprocessor controller PC board installed.
The green LED light will begin flashing one (1) time if
range #1 is selected or will flash two (2) times if range
#2 is selected and so on. Press the left arrow button
(#1) to increase the range number or press the
R70-32 (WEB)
REV(12-04) D
right arrow button (#2) to decrease the range number
that is selected for the recorder. When you have
finished selecting the range, press and hold the
"change chart" button (#3) until the pen begins to
move back onto the chart and the selected range will
be saved into the recorder's permanent memory.
RECORDER SPECIFICATIONS
INPUT
Nominal Input Voltage: Single Phase 115/230VAC.
Nominal Input Current: 40mA/20mA
Nominal Input Frequency: 50-60 Hz.
BATTERY (Optional)
Battery Type: 9 Volt Alkaline
Low Battery Signaling: Flashing LED
OPERATING ENVIRONMENT
0oC-40oC (32oF-104oF); 0-95% RH, Non-condensing
Pollution Degree: 2
Installation Category: II
Figure 5: Recorder Assembly (Front View).
8
R70-32 (WEB)
REV(12-04) D
Figure 6A: Recorder Assembly “Type A” (Rear View).
Figure 6B: Recorder Assembly “Type A” with Electric Contact Option (Rear View).
9
R70-32 (WEB)
REV(12-04) D
Figure 6C: Recorder Assembly Type “B” (Rear View).
Figure 6D: Recorder Assembly Type “C” (Rear View).
10
R70-32 (WEB)
REV(12-04) D
Figure 7: 6” Recorder Case Dimensions.
11
R70-32 (WEB)
REV(12-04) D
Figure 8: 8” Recorder Case Dimensions.
For all physical dimensions and panel cut-out dimensions for skeleton and skeleton with door recorders, please
contact COBEX Recorders, Inc.
GUARANTEE: COBEX products are warranted to be of good workmanship and quality and free from defects under normal use and service.
This warranty is limited to repairing such defects, provided return is made prepaid to COBEX Recorders, Inc., Coconut Creek, Florida within
one (1) year after delivery to the original purchaser. COBEX shall not be liable for consequential damages. This warranty is in lieu of all other
warranties, guarantees, liabilities or obligations, statutory, expressed or implied to the original purchaser or to any other person. No agent is
authorized to assume for COBEX Recorders, Inc., any liability, except as set forth above.
Orders submitted on customer's own purchase order forms, which forms may contain statements, clauses, or conditions modifying, adding
to, repugnant to or inconsistent with the terms and provisions of the Seller herein contained will be accepted by the Seller only upon
condition and with the express understanding that notwithstanding any such statements, clauses, or conditions contained in any order forms
of the customer the liabilities of the Seller shall be determined solely by its own terms and conditions of sale, and in accepting and
consummating any such order the Seller shall be deemed not to have in anyway changed, enlarged or modified its liabilities or obligations
as fixed by such terms and conditions of sale as stated by the Seller herein.
12
R70-32 (WEB)
REV(12-04) D
Thermo Scientific
Controlled Environment Equipment
401 Millcreek Road
Marietta, Ohio 45750
United States
www.thermo.com