1
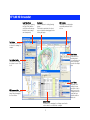
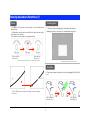
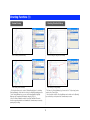
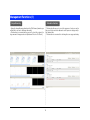
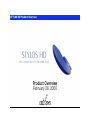
STYLOS HD Product Overview
Product Overview
February 28, 2006
STYLOS HD Screenshot
Light Table Palette
This palette is for operating
the [Light Table] which is
used to show other images
behind the current image,
semi-transparently.
Cel window
This is the window for editing (drawing)
images.
This window is equivalent to the layout
paper or inbetween drawing paper when
working with paper.
File Previewer
This palette is for switching the
sequentially numbered files to
work on.
Tool Palette
This palette is a collection of
tools used for drawing, for
example.
Batch Palette
This palette is for
executing batch
processing where the
same processing is
repeated for multiple
data
Tool Options Palette
This palette is for setting
the options for each of the
tools.
Layer Palette
This palette is for
setting the layers,
such as the order in
which they are to be
overlapped, whether
a particular layer
should be visible or
hidden, etc.
File Browser window
This window is for browsing
image files and managing
the scene folders.
X-sheet window
This window is for managing the cel timings as well as the
order in which the cels should be overlapped.
2
Drawing Functions (1)
Line Compensation
Stroke-in, Stroke-out
• This function smoothes shaky lines drawn using the graphics tablet.
Compensation: OFF
• This function adds [Stroke-In] to the starting point and/or [Stroke-Out] to
the ending point of a line. (Applicable to [Pen], [Line], and [Curve] tools)
• Similar [Stroke-In] and [Stroke-Out] can be added, without the need to
control the pen pressure from the graphics tablet.
Compensation: ON
Line with [Stroke-In],
[Stroke-Out]
Sharpen
Auto-Snap
• Setting Snap option to ON for [Pen], [Line], or [Curve] tool makes a line
to be joined to another close to the mouse pointer.
• This function is convenient when lines need to be closed to avoid paint
overflow.
• This function is useful to sharpening vertices, such as hair ends.
Unsharpened vertex
Line without [Stroke-In],
[Stroke-Out]
Sharpened vertex
3
Drawing Functions (2)
Join Line
Zigzag Compensation
• Gaps equal or smaller than a specified value can be joined by just
dragging the [Join Line] tool.
Before using the
[Join Line] tool
• This function smoothes the zigzags in line parts selected by
dragging the mouse pointer.
After using the
[Join Line] tool
Before using the
[Line Smooth] tool
Reshaping
Change Width
• This function allows you to reshape an already drawn line by picking
a point on the line.
Before using the
[Reshape] tool
After using the
[Line Smooth] tool
• This function allows you to change the thickness of drawn lines
from thick to thin, or make uniform a non-uniform line.
After using the
[Reshape] tool
Before using the
[Change Width] tool
4
After using the
[Change Width] tool
Multi-layer function
With STYLOS HD, it is possible to work efficiently because works can be done using different layers depending on the needs of the workflow.
Sketch layer
Outline/Color Separation Line
layer
[Raster
Sketch
Layer]
This layer is for drawing sketches.
In this layer, lines get thicker as they are drawn over as when drawing
with a pencil.
[Vector
Drawing
Layer]
[Raster Drawing Layer]
This layer is for drawing outlines and color separation lines.
In this layer, it is possible to add outlines and color separation lines as well as
change the way they are overlapped.
* It is not possible to have both Raster Drawing and Vector Drawing layers defined for the same
image.
Drawing Correction layers
[Vector
Correction
Layer]
[Raster Correction Layer]
Shadow Markup Layer
[Shadow
Markup
Layer]
This is a layer for adding Shadow Markup to an image.
Shadow Markup is passed as such to PaintMan HD where it is used
to distinguish the shadows during painting.
These are layers for Chief Animators to write (draw) directions.
5
Drawing Assistance Functions (1)
Eraser
Vanishing Point
• The [Eraser] tool can remove only the part of a vector line between
intersections.
• This function can also remove a whole line in cases such as when a
line is placed over another.
• The function is convenient for erasing stray lines.
Before using the
[Eraser] tool
• This function allows displaying the vanishing point using the
Vanishing Point layer, as a guide for drawing with perspective.
After using the
[Eraser] tool
* The part touched by the [Eraser] tool, up to the intersection is erased.
* The vanishing point can be put out-of-the screen.
Dust Filter
• Dust is wiped away from parts selected by dragging the [Dust Filter]
tool.
STYLOS HD [Eraser] tool keeps the tool shape even when erasing
vector lines.
Before using the
[Dust Filter] tool
6
After using the
[Dust Filter] tool
Drawing Assistance Functions (2)
Light Table
• Light Table with capability of saving the settings.
Positions and angles of images loaded to the Light Table can be called and used any number of times until they are deleted.
• Multiple Light Tables ([Set] function)
The Light Table function can save the location of loaded images, its offset, its transparency, and other information all together in a [Set].
By having multiple [Sets], you may work as with multiple Light Tables.
Off Peg Registration
• This function allows you to use the traditional "Off Peg Registration" technique by displacing and overlapping images on the Light Table.
• You can instantly swap the image you are drawing with those shown on the Light Table.
• After the swap, the image that was on the Light Table becomes the edit target while the image you were working on is shown on the Light
Table.
When you want to correct [0005] while working on the inbetween
[0003]
Double click the
[0005] icon
[0005] becomes the edit target but the positions within the
Light Table remain the same
[0005] becomes the
edit target
[0003] is shown on the
Light Table instead
7
Motion Check Functions (1)
Flip
•The [Quick Motion] command can reproduce the book flipping operation which is essential during the drawing process.
• The [Quick Motion] command is the
computer simulation of the flipping,
traditionally done with the hands relying
on the tact.
Previous inbetween
• Response to the arrow key entries is
quick to recreate the feeling as when the
inbetweens drawn on papers are flipped
using the fingers.
Currently drawn inbetween
Next inbetween
This function allows you to perform a quick trial-and-error as keys and inbetweens can be
flipped back and forth using the arrow key operations.
•Inbetweens can be flipped manually or automatically at a constant speed.
8
Motion Check Functions (2)
[Frame-by-frame advance using the Arrow key]
Motion Check function
• This function allows you to check the motion of pictures according to
timings set in the X-sheet.
Key
Key
• Advances the animation by
one frame at a time
unconditionally.
Frame 31
• Advances the animation by frames,
skipping those without any changes.
Frame 31
Frame 32
Pressing the key skips
all frames without
motion
Frame 33
Frame 34
Frame 35
9
Frame 35
Directing Functions (1)
Shadow Markup
Shooting Direction Markup
Before adding Shadow Markup
Before adding Shooting direction Markup
After adding Shadow Markup
After adding Shooting Markup
• This function allows you to create a [Shadow Markup] layer for including
[Shadow Markups] on the data to be sent to the finishing (painting) process.
On the Shadow Markup layer, you can add Shadow Markups, Highlight
Markups, and Transparency Markups by using the [Fill] tool.
• Since the Shadow Markup can be processed by PaintMan HD as such,
directions regarding shadows are transmitted to downstream processes by
passing only the image.
• The frame for Shooting Markup (e.g., frame scale for T.U. (track up)) can be
created on the [Frame] layer.
• Other directions related to Shooting Markup can be written on the [Markup]
layer so that they can be passed onto downstream processes.
10
Directing Functions (2)
Drawing Correction
Text function
• Input texts can be edited later as they are not input as part of the
drawings but as objects.
• Texts can include Line Feed (LF).
• Remarks can be written using call-outs.
Before adding Chief Animator corrections
After adding Chief Animator corrections
• Directions for [Layout], [Keys], etc. drawing corrections are given using an
overlapping [Corrections] layer, similarly to when giving directions for
correcting drawings on paper.
• As the layer for drawing corrections can be passed on separately from the
original Drawing layer, the directions for corrections can be passed by passing
the image only.
11
Batch Processing function
• [Batch processing] refers to a series of predefined processes executed on a large amount of image files.
• In STYLOS HD, [Batch Palette] is used for batch processing.
• By default, the batch set includes [Change Width]. However, the user can create his/her own set.
[Example : Width Change]
Input
Batch processing items
Specify the images to be subject to batch
processing.
The series of procedures (commands) included in
the batch processing items list is executed on the
images loaded in [Input].
Output
Batch processed image is exported to a
specified location.
Batch processing items are
executed on the image data
specified in [Input]
sequentially from the top of
the list.
Sequentially numbered
image file opened (loaded to
File Previewer) in STYLOS.
Processing target layer
selection
Perform the batch
processing item [Change
Width] settings.
12
Image format
selection
Export
location
Export Function
Scene Folder Conversion
Export to General Raster Image Format
• This function allows you to convert the drawing data from [STYLOS HD
Drawing Scene Folder] to [Finished Drawing Scene Folder] for passing them to
the finishing (paint) process. Simultaneously, the conversion function converts
the image data from DGA format which is exclusive for drawings to a suitable
format for PaintMan HD to load, such as CEL or general raster.
• This function allows you to export the image data to a general raster image
format for passing the image data to a software other than the RETAS!PRO
series.
• Export is possible on a scene, or on an image basis.
[Supported Export General Raster Image Formats]
BMP
PICT
PNG
RAW
SGI
SOFTIMAGE
TARGA
TIFF
[Drawing
Scene
Folder]
[Cel
Drawings
Scene
Folder]
Export to EPS, SWF
•Data of drawings in vector format can be exported to general vector formats such as EPS and SWF.
[Example of Export to EPS]
[Example of Export to SWF]
13
Management Functions (1)
Image Browsing
• Using the Image Browsing function in the [File Browser] window, you
will be able to access to all image data easily.
• This function is convenient when you need to check the content of a
large amount of images such as in [Inbetween Check or Cel Check].
Schedule function
• This function allows you to record the progress of each process for
the scene folder and enter data such as the person in charge and/or
the finished date.
• This function is convenient for checking the scene progress history.
14
Management Functions (2)
Message Board
• This function allows you to write directions, cautions, and messages
to downstream processes in text format.
• You can also attach image files to comments.
Handwriting Memo
• This function allows you to insert diagrams and drawings to better
explain directions, cautions, and messages to downstream processes.
• Handwriting Memo may comprise multiple pages.
15
Working Environment Improvements (1)
(1)
Cel window tool bar
(3)
(2)
(5)
(4)
(6)
(7)
(9)
(8)
(11)
(13)
(15)
(17)
(16)
(10) (12)
(14)
• The Cel window is equipped with a tool
bar with frequently used functions. The
[Tool Bar] is shown on the upper part of
the window.
(1)... [Zoom In] button
(2)... [Zoom Out] button
(3)... [View Scale] field
(4)... [View Scale] slider
(5)... [Fit on Screen] button
(6)... [Actual Pixels] button
(7)... [Rotate] field (STYLOS HD only)
(8)... [Rotate] slider (STYLOS HD only)
(9)... [Flip Horizontal] button
(10)... [Flip Vertical] button
(11)... [Rotate 90 Degrees] button
(12)... [Restore View] button
(13)...
(14)...
(15)...
(16)...
(17)...
[Show Ruler] button
[Show Grid] button
[Show Transparent Area] button
[Snap to Guide] button
[Snap to Grid] button
Full Screen mode
• This function allows you to view the Cel window at full screen by
hiding other windows as well as palettes.
Multi-View function
• This function allows you to open multiple windows on one image.
•This function also allows you have an amplified image along with a "Fit on
Screen" image.
16
Working Environment Improvements (2)
Multiple Undo-Redo
• This function allows you to undo multiple operations. (Maximum 20)
• This function allows you to redo the undone operations. (Maximum 20)
Redo
Redo
Undo
Undo
Shortcut Customization function
• The usability has been improved as a result of the support for [shortcut] assignment customization.
17
Price / System requirements - Windows version
■STYLOS HD <Windows version>
Released on February 28, 2006
Genre: Graphics
Publisher: CELSYS, Inc.
Drawing tool for animators with a supreme drawing
touch.
• Vector drawing for high quality image and raster drawing for
delicate expressions.
•Multiple layers, improved Light Table achieve a working
environment closer to an animator's feeling.
■OS
Microsoft Windows English Operating System (OS)
2000 Professional (Service Pack2 or higher necessary)
XP Home Edition
XP Professional
*1 Internet Explorer 5.01 or higher necessary.
*2 QuickTime 6.0 or higher recommended.
* For price inquiries, please contact a distributor in
your country.
The list of distributors is available at the following
RETAS!PRO Web site:
http://www.retas.com/
[Package content]
Application CD-ROM
User’s manual
Dongle, etc.
■Supported input format
Image : BMP, CEL, DGA, LIF, PICT (*4), PNG, SGI, SKF, SOFTIMAGE, SVD (*1), TARGA, TIFF
(*2)
Audio : AIFF (*3/*4), WAV (*3/*4)
*1 Rasterized after loading.
*2 LZW compression unsupported.
*3 Compression unsupported.
*4 QuickTime 6.0 or higher necessary.
■CPU unit
PC/AT compatible machines only. Personal computers with the above mentioned OS
preinstalled.
■Supported output format
Image : BMP, CEL, DGA, EPS, PICT (*2), PNG, RAW, SGI, SOFTIMAGE, TARGA, TIFF (*1)
Video : FLASH
*1 LZW compression unsupported.
*2 QuickTime 6.0 or higher necessary.
*1 Environment where the above mentioned OS operates comfortably.
*2 Computers not guaranteed by its manufacturer may not be supported.
■CPU
Intel® Pentium® or compatible processor 800 MHz or higher (2.0 GHz or higher
recommended)
■CD-ROM drive
CD-ROM (or DVD-ROM) drive necessary for installing the applications
■Memory (**1)
512 MB or more necessary (1.0 GB or more recommended)
■USB port
Necessary for dongle connection
*1 Only USB port built-in on the motherboard supported. Cannot be used with expansion
USB ports implemented using third-party PCI cards.
■Free space on HDD (**1)
1.0 GB or more necessary (3.0 GB or more recommended)
For installation of application : Approximately 50 MB
For data and installation of dependent applications : Approximately 500 MB
As work space : 500 MB or more
**1 May differ depending on the system requirements.
■Monitor
XGA (1024x768) or higher resolution display, full-color (24 bits, 16.7 million colors)
■Graphics Tablet
WACOM tablet
FAVO, Intuos, Cintiq, PL series, etc.
18
Price / System requirements - Mac OS X version
■STYLOS HD <Mac OS X version>
Released on February 28, 2006
Genre: Graphics
Publisher: CELSYS, Inc.
Drawing tool for animators with a supreme drawing
touch.
• Vector drawing for high quality image and raster drawing for
delicate expressions.
•Multiple layers, improved Light Table achieve a working
environment closer to an animator's feeling.
■OS
Mac OS X English Operating System (OS)
10.3 (10.3.9)
10.4 (10.4.2 or higher)
•For price inquiries, please contact a distributor in
your country.
The list of distributors is available at the following
RETAS!PRO Web site:
http://www.retas.com/
[Package content]
Application CD-ROM
User’s manual
Dongle, etc.
■Supported input format
Image : BMP, CEL, DGA, PICT, PNG, SGI, SKF, SOFTIMAGE, SVD (*1), TARGA, TIFF (*2)
Audio : AIFF (*3), WAV (*3)
*1 Rasterized after loading.
*2 LZW compression unsupported.
*3 Compression unsupported.
■CPU unit
Macintosh computer with Power PC G5 or G4 processor
Power Mac G5/G4, iMac, eMac, Mac mini, PowerBook G4, iBook, etc.
*1 Environment where the above mentioned OS operates comfortably.
*2 Computers not guaranteed by its manufacturer may not be supported.
■Supported output format
Image : BMP, CEL, DGA, EPS, PICT, PNG, RAW, SGI, SOFTIMAGE, TARGA, TIFF (*1)
Video : FLASH
*1 LZW compression unsupported.
■CPU
PowerPC with G5 or G4 processor 800 MHz or higher (1.5 GHz or higher
recommended)
■CD-ROM drive
CD-ROM (or DVD-ROM) drive necessary for installing the applications
■Memory (**1)
512 MB or more necessary (1.0 GB or more recommended)
■USB port
Necessary for dongle connection
*1 Only USB port built-in on the motherboard supported. Cannot be used with expansion
USB ports implemented using third-party PCI cards.
■Free Space on HDD (**1)
1.0 GB or more necessary (3.0 GB or more recommended)
For installation of application : Approximately 50 MB
For data and installation of dependent applications : Approximately 500 MB
As work space : 500 MB or more
**1 May differ depending on the system requirements.
■Monitor
XGA (1024x768) or higher resolution display, full-color (24 bits, 16.7 million colors)
■Graphics Tablet
WACOM tablet
FAVO, Intuos, Cintiq, PL series, etc.
19