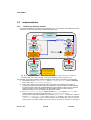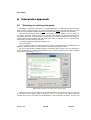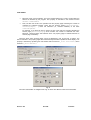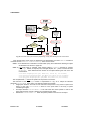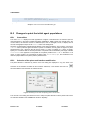
1
CORE MANUAL Manual 4 MOBILE-AGENT SET SIMULATION MASS Core Manual Revision: 128 IV-1/206 18/12/2013 CORE MANUAL Revision: 128 IV-2/206 18/12/2013 CORE MANUAL Core Manual J.H. Collet Laboratoire d'Analyse et d'Architecture des Systèmes du CNRS 7 av du colonel Roche, 31077 Toulouse CEDEX email: [email protected] Contributors to the code and to this manual: D. Hutin (2002), F. Bayol (2003), F. Zermano (2003), J. Alburquerque (2004), A. Deheurles (2004) P. Zajac (2008), J. Wojciechowki (2009) Manual Revision: 1.0: 1.2: 1.4: 1.5: 1.6: 1.7: 1.8: 1.8.2: 1.9: Feb-March 2002 July 2002 June 2003 Jan 2004 March-May 2006 August 2008 June 2009 July 2010 June-Nov 2013 (50 pages) (160 pages) (157 pages) (165 pages) (170 pages) (193 pages, Extension for 3D simulations, page 168) (193 pages, Revision of section 1D) (revision of chapter 2 for multithreading) Copyright © 2002, Jacques Collet, LAAS-CNRS, 7 av. du colonel Roche 31077 Toulouse CEDEX 13. Redistributing or making multiple copies of this document must be done only with written permission from the Copyright holder. Revision: 128 IV-3/206 18/12/2013 CORE MANUAL Revision: 128 IV-4/206 18/12/2013 CORE MANUAL Table of Contents Introduction A B 9 CORE facilities Extensions: DLL 10 11 Core fundamentals A 13 Threads & Modules A.1 A.2 A.3 B C D 14 Interface thread (Thread I) Calculation thread (Thread II) DLLs Shared Data Thread synchronization Cells, Terrain, Zones, Obstacles and Agents D.1 D.2 D.3 D.4 D.5 D.6 E class CELL Terrain class ZONE class OBSTACLE Terrain borders AGENT classes 16 19 20 20 21 22 22 22 23 Startup operations E.1 E.2 E.3 E.4 14 15 16 28 Default initialization Scenario loading Scenario previewing Customization 28 28 31 31 Agent management in MASS 33 A Discrete-time Model of population evolvement A.1 A.2 A.3 B 33 35 35 Single-thread simulation architecture 36 B.1 B.2 C Agents activation by a single thread Scenario execution: function call graph Multi-thread simulation architecture C.1 C.2 C.3 C.4 D Activation in parallel of several worker threads Reuse of Single-Thread DLLs in Multi-Thread execution Implementation Scheduler & worker threads implementation Agent implementation D.1 D.2 Revision: 128 33 General discrete-time model Atomic model Real time and simulation time 36 37 39 39 41 45 46 47 Fast algorithm to retrieve the lowest NAT Integration of the scheduler in MainTestAsynchronous IV-5/206 47 50 18/12/2013 CORE MANUAL E F Synchronous scheduling Agent cycle F.1 G 52 54 Principle 54 Thread initialization G.1 56 DLL: Function calls in the agent cycle Interface: MFC classes A 60 Base Classes A.1 A.2 A.3 A.4 A.5 B 60 class CAGNTApp : public CwinApp class CMainFrame : public CMDIFrameWnd class CChildFrame : public CMDIChildWnd class CAGNTDoc : public ColeDocument class CAGNTView : public CformView Interface classes B.1 B.2 B.3 B.4 B.5 Interpreter approach A.1 A.2 A.3 A.4 B C 60 61 61 61 62 63 Review Parameters management in the property pages Function calls Code to add simulation parameters to the interface Code to store parameters in registries Agent properties calculation at runtime A 59 63 67 68 69 69 72 73 Selecting an existing interpreter Sharing data between the host and the interpreter Practical integration of the interpreter EiC in MASS Where are the functions for interpreting ? 73 75 76 81 Syntax-colored editor DLL approach 82 82 Agent property visualization: CHART 84 A B Chart area decomposition Charting modes B.1 B.2 C D 85 88 Type-1 chart: time kinetics Type-2 chart Function calls in the charting process Class CXChart D.1 D.2 D.3 D.4 D.5 E Declaration Chart construction Chart painting Chart customization & Property pages Saving charts and chart parameters Class CXDataSet Object creation A.1 A.2 A.3 A.4 Revision: 128 89 93 93 94 96 96 98 98 Population initialization: DRAFT A 88 88 100 102 class CPointEx class CLine class Crectangle class CEllipse 102 103 104 105 IV-6/206 18/12/2013 CORE MANUAL A.5 A.6 A.7 A.8 B class CPolyLine class CPolygone: public CPolyLine class CBackground class JHCButton : public CWnd Object selection & customization B.1 B.2 B.3 C Selection Deletion Customization D Generation control box Serialization Interface: GDI & storage of simulation in WMF Tracing agent moves Saving the simulation shots to disk Playing a simulation from disk Saving data to disk Representation & Construction of the Environment A Environment representation A.1 A.2 B COARSE mode FINE mode C Scan modes in the ACTION cycle Low-level scan functions Scan modes in the NODE cycle Simulation results: Prey-predator game Environment construction: Cell scan, COARSE representation C.1 D Routines for COARSE representation Environment construction: Agent scan D.1 Routines for FINE representation Management of DLLs A B C D E Script Class SCRIPTPROCESSOR Class APOLICY (Agent policy) Class VARDATA Class SPOLICY (State policy) Initialization of mission scripts on startup Elimination of closed cycles Implementation of reinforcement learning mechanisms E.1 E.2 E.3 E.4 Revision: 128 120 120 123 124 124 126 127 133 134 138 141 141 145 145 147 148 150 Action and node cycles Call of entry functions to the DLL Mission script decoding C.1 C.2 C.3 C.4 C.5 C.6 119 127 131 Environment construction: Cell scan, FINE representation B.1 B.2 B.3 B.4 112 112 118 Approximate distance to an ellipse A B C D 109 109 111 111 Agent and Obstacle generation C.1 C.2 106 107 107 107 Introduction Action value algorithms Implementation of action value algorithms 166 IV-7/206 150 152 154 154 155 156 158 158 161 161 162 162 162 165 18/12/2013 CORE MANUAL Extension for 3D simulations A 168 Extension of structures and classes A.1 A.2 A.3 A.4 B 168 Structure COREDATA Class AGENT Class MOVE Class CPointEx 168 169 171 171 Changes to read, display and write scenarios B.1 B.2 B.3 B.4 B.5 C D Changes to paint agents during simulations Interface Changes D.1 E Modification to the parameter page Modifications of DLLs 187 193 Framework for a new chapter 196 Deterministic policies in the COARSE mode B.1 182 187 192 Deployer.exe B 172 173 176 177 178 189 MASS deployment A 172 Reading scenario file Changes to generate the agent populations Changes to ActionCycle of the Agent Changes to generate the obstacles on the borders of the 3D playground Changes to paint the initial agent populations Predator policies 196 196 Appendix: Dynamic call of member functions in DLLs 200 Index 204 Revision: 128 IV-8/206 18/12/2013 CORE MANUAL The Devil is in the details! Introduction This manual focuses on the CORE of MASS., i.e., on the fraction of the code providing graphical and processing facilities to all DLLs that application developers may customize for advanced applications. For customization and application examples, see Manual3 entitled “DLLs Manual”, which explains how writing and adding DLLs. To learn how using MASS, see Manual 2entitled “Tutorial”. T his manual is manual four of MASS documentation. Its aim is twofold: First, it is a programming tutorial for new CORE programmers to quickly understand the CORE structure and the algorithms involved in the different modules. Reading this manual without accessing the code will be less beneficial. Second, it is the CORE reference documentation for programmers already involved in the development. MASS is an integrated development environment (IDE) to study the coexistence of large populations of agents. Perhaps, the most interesting feature of MASS is that it is a generic application, allowing each application developer to modify large sections of the code to customize the simulator in relation with his own application. To achieve genericity, we chose to split the simulator code in two parts, namely the CORE and the EXTENSIONS, as described below: (1) The CORE(1) is essentially an agent scheduler. Simply, recall that the progression of the simulation is nothing but the succession of action or communication cycles executed sequentially by the different agents. This mechanim is supervised by the CORE scheduler, which triggers the agent cycles as follows: It is represented at runtime by the executable file MASS.exe. Revision: 128 IV-9/206 18/12/2013 CORE MANUAL 1. 2. Each agent has two private times (ICT), one for its next ACTION cycle and one for its next NODE cycle. NODE cycles are executed for communicating agents only. The CORE scheduler activates the agent having the lowest value of all ICTs. If this times corresponds to an ACTION, the activated agent executes an ACTION. In the other case, the agent executed a NODE cycle, i.e., a communication cycle. 3. At the end of its cycle, the activated agent increments its ICT with a time interval T. Note that the agents operate fundamentally in the asynchronous mode, except when all agents have the same increment time T. Concretely, the CORE animates the coexistence of (at most) six populations of agents (each one comprising from one to several thousands of agents in the steady-state or transient (2, 3) regime) moving among obstacles across a 2-D plane . Additionnally, the CORE provides many facilities to display the agent dynamics, to initiate the agent populations, to calculate agent properties at runtime, etc… The EXTENSIONS, customized by application developers, include the specificity of the agent behavior. Each EXTENSION is represented by a DLL. Consequently, the CORE only schedules the agent cycles and does not know how agents behave because the code controlling the behavior of agents is in the DLLs customized by application developers. DLLs are extensively described in Manual 3 entitled: DLL Manual. Each DLL includes: A decision tree: As we consider a behavioral description of agents, (as in Ref. [1]),each agent executes its mission following a decision tree. This approach allows the modeler to capture agents and their environment as finite-state automata. This paradigm is widely used as a unifying perception throughout the literature of agents and multiagent systems. Action functions executed in the ACTION cyle. Here the agent executes a series of procedures (move, update of its internal variables, etc..) in accordance with its mission. When agent-agent communications (AAC) are enabled, the agent also decodes the messages stored in the input buffer of its node, and possibly creates messages that it stores in the output buffer of the node. Communication functions executed in the A NODE cycle. When AAC are enabled, the agent operates as a network node to remit the messages stored in its input buffer(s). A CORE facilities The CORE includes the general classes to write a Windows application. It implements the following facilities (latest revision of this section: 26 Jan 2002): Three display modes. - Mode 1 displays the terrain and traces at runtime the agent moves (see chapter 7 page 120). - Mode 2 displays the draft window to draw the objects (lines, rectangles, ellipses…) which enable defining any initial distribution of agents and obstacles (see chapter 6 page 100). - Mode 3 displays in a 2D graph any user-defined function (see chapter 5, GRAPH page 84). (2) Adding a third dimension to consider moves in a 3D space would be easy. (3) Extending the code to consider 10 populations of agent would be very easily due to the code scalability. Revision: 128 IV-10/206 18/12/2013 CORE MANUAL We believe that it would be dangerous to underestimate the importance of graphic capabilities and interface interactivity when studying complex systems involving thousands of interacting agents. On the contrary, they are essential for the global efficiency of any simulator dedicated to the analysis of such complex systems. Tracing the agent moves is a crucial feature to observe the behavior of large populations, to analyze the emergence of collective behaviors such as symmetries, order, metastable states irregular diffusions, or simply the evolution in an heterogeneous environment, that could not be detected otherwise. We believe that a great simulation engine in a weak interface is not more powerful than a great interface encapsulating a weak simulation engine. B A syntax-colored editor coupled to a C-code interpreter (see chapter 4, page 72) to edit and calculate at runtime user-defined functions without code recompilation. The 2D GRAPH module plots these functions. Tools to save periodically at runtime WMF images of the terrain and to replay the observed evolution of the agent populations. Several property pages to customize the terrain, the obstacle and agent parameters, the construction and the representation of the environment, and to setup the parameters of the agent policies (see paragraph B page 63). The implementation of a default-application (to make sure that MASS starts even if some extensions are not found on startup), i.e., a Predator-Prey game, based on two agent classes defined as follows: - Agent-0 are predators. They attack agent-1 (mission 1) - Agent-1 are preys. They flee away from agent-0 (mission 2). Extensions: DLL Each agent is attributed a mission. The EXTENSION includes the code to define the agent mission and the policy followed in the framework of the mission. Thus, the behavioral code of the agent is not in the CORE but in the EXTENSIONS, which are represented by dynamic linkable libraries (DLL) written by third-party programmers. Each DLL describes one (or several) policy(ies) followed by the agent to execute its mission (see Manual 3: DLL manual). It must be stressed that the policy defined in the DLL is just a startup policy, as each agent can apply (separately) a reinforcement-learning algorithm to adapt subsequently its own policy depending on its own experience. The policy is constructed by defining states, actions, a reward function and a table to map states and actions. This table is the agent policy (we follow Sutton & Barto’s approach [2,3]). Thus, each agent resembles a finite-state automaton, except that, following each iteration, it must identify the environment state prior to choosing an action following its decision tree. This manual is divided in 3 parts: Part 1 until chapter 7 page 120 describes the base classes to write a Windows application, and more generally the interface. Part 2, chapter 2 page 33 and chapter 8, describe the simulator principle, the agent model, i.e., the concepts of environment, states, actions, policies.. and how these concepts are implemented in C++ classes. Revision: 128 IV-11/206 18/12/2013 CORE MANUAL Part 3 reduces to chapter 9 page 150. It describes how the CORE interacts with DLLs and calls the entry functions. Revision: 128 IV-12/206 18/12/2013 CORE MANUAL Chapter 1 Core fundamentals This chapter outlines the application structure, the location of files. We also review the different modules., the principles of operation and the main functions executed at runtime. A ll files of MASS are grouped together in a (daily-saved) directory. Fig. 1 shows this system file when the development was save in the directory entitled Dec01_DEBUG_OK, probably saved on Dec 1st. Fig. 1: The project is here sotred in the directory Dect01_DEBUG_OK. It includes the three subdirectories entitled CORE, DLLs, TUTORIAL Revision: 128 IV-13/206 18/12/2013 CORE MANUAL All files are distributed in 3 subdirectories respectively entitled CORE, DLLs, and TUTORIAL. CORE itself is split in 17 subdirectories (in the version 2009 of MASS). We have followed the basic principle consisting in dividing the code in quasi-independent modules. Quasiindependent means that: - The different modules correspond to specific and independent sets of functions of MASS. - The code of the different modules is stored is separate directories. Fig. 1 shows that the files in the directory CORE are distributed among several sub-directories, namely: AGENT, AGENT0, AGENT1… until AGENT5, DRAFT, GRAPH, PARSER, NETWORK, XML, etc... - Inter-module communications generally reduce to passing a pointer to one single function in each module, so-called main module function. This modular organization makes that a programmer can durably work to improve a module without interfering (too much) with the programmers operating in other modules.The file (4) decoded by VisualC to manage the CORE project is CORE\AGNT\AGNT.sln . DLLs includes the user-defined DLL projects. The idea is to extend the application by adding the functions describing the agent behavior in DLLs customized by third-party programmers who have no access to the application CORE. The discussion on code customization and DLLs is deferred to chapter page Erreur ! Signet non défini. and to Manual 3 entitled DLLs Manual. TUTORIAL includes the DLL projects, which are studied in Manual 3. A Threads & Modules A.1 Interface thread (Thread I) The interface thread in split in 5 modules as represented in Fig. 2. The functionalities of the different modules are the following ones: (4) WIN32 includes the files initially generated by the Visual C++ IDE to build a MFC application (i.e., the classes derived from CWinApp, CmainFrame, and the couple Cview-Cdocument) plus some additional files to enrich the interface (mostly classes derived from Cdialog, CpropertySheet, Cpropertypage, etc..). See chapter 3 page 60. PARSER is a C-like interpreter based on EiC. See chapter 4 page 72. EiC is a freeware written by Edmond J. Breen, available from the WEB site: http://www.kd-dev.com. The interpreter is embedded to customize at runtime the data plotted by the GRAPH module without recompiling the code. CHART is a tool to plot the function defined in the edition window of the interpreter. See chapter 5 page 84. DRAFT is a vectorial tool for drawing lines, rectangles, polygons… to define the initial distributions of obstacles and agents in the terrain. See chapter 6 page 100. WIN32 invokes DRAFT simply by creating an instance of the top DRAFT object, which is a window containing the user-created objects. Following the terminology of VisualC7, all files needed to develop an application represent a Solution.. Revision: 128 IV-14/206 18/12/2013 CORE MANUAL GDI processes all calls to build a 2-D display of the terrain and to trace the moves of the agents. It is also invoked to save to disk WMF images of the terrain. See chapter 7, page 120. NETWORK includes the classes to integrate agent-agent communications. See Manual 3 entitled DLLs Manualo. XML includes the classes to write and read scenario files from disk. Fig. 2: Threads and modules: The user interacts with Win32 via PARSER, DRAFT (to customize the application parameters), GDI and GRAPH for various displays modes. All these interface modules are executed in Thread I. The population dynamics and the behavior of agents is calculated separately in Thread II. The flowchart in Thread II is a simplified version that does not include agent-agent communications. A.2 Calculation thread (Thread II) The Agent cycle (described extensively from chapter 2, page 33) is executed separately in (5) the second thread entitled Thread II in Fig. 2 . Contrarily to the previous modules, it requires little knowledge of Win32 programming. It contains the routines necessary to evolve 5 For the sake of simplicity at this stage of the manual, Fig. 2 shows the single-thread version of the agent cycle processing. Multi-threaded processing is described in chapter 2. Revision: 128 IV-15/206 18/12/2013 CORE MANUAL the agent populations, to build the representation of the environment of each agent, to identify states, to evolve the agent policy by reinforcement learning and to execute actions. Fig. 2 shows that the agent module is essentially composed of a scheduler, which manages the tours of agents.. A.3 DLLs It is important to underline that the processing thread (Thread II) is BLIND in that the specificity of the application (so-called scenario) is exclusively integrated in the DLLs. Thread II conducts a generic processing which never considers the specificity of the DLLs. Concretely, the user selects a scenario (a file with the extension mas) and the CORE will link at runtime with external DLLs to tackle new (user-defined) missions. Practically, the user selects the DLL (one per agent class) in the directory entitle MissionLibrary (see Fig. 1). B Shared Data Perhaps, the most difficult challenge of the design when writing a large application supposed to evolve over several years is the very the first step, which consists in choosing "judiciously" how representing the data, and how processing them in the application. The initial choices are crucial as they lengthily influence the structure and the simplicity of the code. Unfortunately, the experience proves that, in the long term, any initial choice becomes always inexorably more or less unsatisfactory, simply because the application evolves and because it was impossible to comprehend from the very beginning all the constraints that will emerge in the future developments! Of course, MASS does not avoid this rule. We chose to define a common memory space (CMS) shared by the threads Thread I and Thread II in Fig. 2. This shared space is represented by the structure COREDATA described a few lines below. Practically, the structure COREDATA ThreadData is a member structure of the class CAGNTView. A pointer pData to this structure is passed to the thread function (ThreadFunction) executed in Thread II. During the simulation phase: The computation thread pThread peaks and pokes in ThreadData to calculate the evolution of the agent populations. pView also peaks and pokes in ThreadData to update the graphic display. The update of the graphic display is triggered by pThread which periodically sends private messages that pView uses to synchronously update the graphic display through the GDI or the GRAPH modules. The main advantage of the CMS approach is the simplicity of the CORE. All agent classes belong to the CORE, even if some agent methods are imported from DLLs (when the DLL linkage is selected). Each agent can easily read the terrain state and the members variables of another agent. The CORE programmer can simply overload functions and agent classes. The CORE is simple and efficient. However, there are two drawbacks: It is necessary to careful control the READ and WRITE operations of shared variables that can be interlaced by the operating system, leading to erratic abortion of the application. This issue is discussed below in the section C entitled Thread synchronization. This approach limits the customization of DLLs, which import the agent header from the CORE. Thus, a DLL programmer (i.e., an application developer) can customize the agent methods in the DLLs (without changing the call parameters), but he (she) cannot not extend the agent classes by defining additional methods that would generate different agent headers in the DLLs and in the compiled CORE! The sole solution to extend the agent classes consists Revision: 128 IV-16/206 18/12/2013 CORE MANUAL in extending the headers in the CORE (that is only possible for CORE programmers) and in recompiling the CORE and automatically all DLLs with the utility entitled DLLCompiler.exe described in the DLLs Manual. We detail below the declaration of the agents, of the obstacles and of the terrain in the structure COREDATA: struct COREDATA { ////////////////////////////////////////////////////////////////////////////// short iDY; //SHIFT ////////////////////////////////////////////////////////////////////////////// //SECTION 1: AGENTS AGENT* Agent[AGENTTYPENB]; short iAInitNb[AGENTTYPENB]; //INITIAL NUMBER OF AGENTS short iAMAXNb[AGENTTYPENB]; //MAX NUMBER OF AGENTS RESERVED IN MEMORY AGENT0* Agent0; AGENT1* Agent1; AGENT2* Agent2; AGENT3* Agent3; AGENT4* Agent4; AGENT5* Agent5; etc,etc… Script 1: Beginning of the COREDATA structure declaration The number of different populations of agents is AGENTTYPENB. At the moment, AGENTTYPENB=6 (defined in AGENT\Global.h), so that MASS simulates the coexistence of 6 populations of agents. Note that some agent populations can be empty (i.e., iAMAXNB[i]=0 for population i) when the problem under consideration can be described with less than 6 agent populations. AGENT is the base agent class. The agent populations (AGENT0, AGENT1… until AGENT5) are classes derived from AGENT (the description of the agent classes is postponed to section D.6, page 23). //////////////////////////////////////////////////////////////////////////// //SECTION 2: OBSTACLE short iObst1Nb; //NB OF TYPE1 OBSTACLES IN THE TERRAIN OBSTACLE* Obstacle1; //OBSTACLES OF TYPE1 IN THE TERRAIN etc,etc… Script 2: Fraction of the COREDATA structure declaration Each obstacle is represented by an OBSTACLE object (the declaration of class OBSTACLE is in paragraph D.4, page 22). The number of obstacles is iObst1Nb. //////////////////////////////////////////////////////////////////////////// //SECTION 3: TERRAIN short XDim; //X DIM OF THE TERRAIN short YDim; //Y DIM OF THE TERRAIN CELL* Cell; //THE TERRAIN IS A RECTANGULAR ARRAY OF CELL OBJECTS bool bXtorusMode; //if TRUE, NO X BORDER, CYCLIC CONDITION bool bYtorusMode; //if TRUE, NO Y BORDER, CYCLIC CONDITION short iteratNb; // Script 3: Fraction of the COREDATA structure Revision: 128 IV-17/206 18/12/2013 CORE MANUAL The terrain is a rectangular array of CELL objects. The number of cells is XDim in the X direction (YDim in the Y direction). All cells are stored in a 1-dimension array of dimension Xdim*YDim to enable dynamic construction of the terrain at run time. The declaration of class CELL is shown below in Script 4: class CELL (March 27, 2004) //////////////////////////////////////////////////////////////////////////////////// // THE CELL CLASS ONLY CONTAINS THE CELL STATE AT THE MOMENT. HOWEVER, IT // CAN EVOLVE IN THE FUTURE (FOR INSTANCE TO INCLUDE CHEMICAL TRACES...ETC) //////////////////////////////////////////////////////////////////////////////////// { public: char State[2]; //STATES: State[0]: 'E': EMPTY; 'O': OBSTACLE; // '1': AGENT iAType=0; '2': AGENT iAType=1 short iRank; //RANK OF THE AGENT (OR OBSTACLE)IN THE CELL int* iData; //FREE INTEGER ARRAY int iDataNb; //DIMENSION OF iData float* fData; //FREE FLOAT ARRAY int ifDataNb; //DIMENSION OF fData CELL(); //DEFAULT CONSTRUCTOR ~CELL(); //DEFAULT DESTRUCTOR }; Script 4 The variable iRank is the agent rank, i.e., the second index j of Agent[i][j] to identify the rank of an agent in its array . The class CELL could be easily extended to include explicitly additional properties such as pheromones, or any chemical trace. However, this extension would force recompiling the CORE and all DLLs. So to simplify customization, the CELL class includes two free arrays iData and fData to possibly store parameters specific to the problem under consideration. Example: One may consider the float array fData of dimension 6 (i.e., ifDataNb=6), to describe two pheronoms with their lifetime and diffusion coefficient. In that case: - fData[0], fData[1], fData[2], are the concentration, the Lifetime and the diffusion coefficient for Pheromon1, respectively, - fData[3], fData[4], fData[5], are the concentration, the Lifetime and the diffusion coefficient for Pheromon2, respectively, The benefice of the shared-memory space is that any function in the work-thread can scan (at runtime) the terrain (i.e., the array Cell[i]) or the agents (i.e., the elements agent[i][j], where i is the agent type and j the index of the agent in the array) to retrieve the information necessary to construct the environment representtation and to decide actions. Let us consider two examples for clarity. Example 1: Retrieving agent properties from the terrain scan Suppose we scan the terrain. Each cell of coordinates i and j is represented by the object Cell[i*Ydim+j]. The cell occupation is stored in the member variable Cell(i*Ydim+j).State. If for instance Cell(5*Ydim+3).State=’1’, we conclude that the cell (5,3) is occupied by an agent of type-0 (i.e., iAType=0). Moreover, the rank of the agent in the array Agent[0] is Cell(5*Ydim+3).iRank . Thus, we can access any member variable of this agent through the object Agent[0][Cell(5*Ydim+3).iRank]! Example 2: Retrieving terrain properties from the agent scan Suppose we scan now one population of agents, say population 1. This population is represented by the array {Agent[1][i]|0i<iAMAXNb[1]}. We can access any member variable of the agent. For instance we can retrieve the agent position (X,Y) in the terrain which is: x=Agent[1][i].X Revision: 128 IV-18/206 18/12/2013 CORE MANUAL y=Agent[1][i].Y It is also possible to retrieve the occupation of surrounding cells in the current iteration and in the previous iterations (see chapter 2, paragraph D.6 page 23). C Thread synchronization There is no memory issue so long as threads only READ shared variables. However, a dangerous conflict occurs when two threads attempt to WRITE simultaneously the same shared variable or when one thread writes a shared variable while another one is just reading it. The danger comes from the fact that READ and WRITE operations are not atomic (i.e., they can be interrupted and executed in two steps by the operating system) so that the WRITE operation can modify the data during the READ (or WRITE) operation of the other thread, leading to a READ error or to an incorrect WRITE. In MASS, such a conflict appears if the class AGNTView (i.e., thread I, see Fig. 2) tries to update the graphic interface (which requires to read agent variables in COREDATA) when the calculation thread pThread (i.e., thread II, see Fig. 2) is in progress and modifies these data. This conflict is partly avoided with the following communication mechanism: The calculation thread pThread calls the API function SendMessage to trigger a CView::Paint operation of the interface by CAGNTView. Now, the thread calling SendMessage is automatically put to sleep until SendMessage returns (this a property of SendMessage), and in this case, until pView has completed the graphic display. Thus, the calculation thread executes no WRITE operations while CAGNTView reads the shared data. However, this protection is incomplete. It fails in particular when the user switches the display mode (using the display mode buttons of the left toolbar), forcing the painting of the interface while the calculation thread(s) is (are) in progress. Thus, we protected the next three concurrent critical functions: void AGENT::UpdatePosition void CAGNTView::OnPaint() #include EiCExection.cpp They are protected by the Event mechanism (i.e., a Win32 semaphore) created in the main class of MASS, i.e., in the class AGNTApp. This simple method consists in bracketing any critical code in specific blocks as represented in the function AnyFunction below: void AnyFunction() ////////////////////////////////////////////////////////////////////////////////////// ////////////////////////////////////////////////////////////////////////////////////// { //PROTECT THE VARIABLES USED IN THE CRITICAL SECTION AGAIN ANY CONCURENT READ OR WRITE //OPERATION POSSIBLY SIMULTANEOUSLY ATTEMPTED BY ANOTHER THREAD, CAGNTApp* pApp=(CAGNTApp*) AfxGetApp(); WaitForSingleObject(pApp->m_hSafe1,INFINITE); ////////////////////////////////////////////////////////////////////////////////////// // CRITICAL SECTION. CODE TO PROTECT // .. .. .. //YOUR PROTECTED CODE HERE .. .. .. //YOUR PROTECTED CODE HERE // ////////////////////////////////////////////////////////////////////////////////////// SetEvent(pApp->m_hSafe1); //THUS ANY CALL TO WaitForSingleObjet(m_hSafe1) ////////////////////////////////////////////////////////////////////////////////////// } Revision: 128 IV-19/206 18/12/2013 CORE MANUAL D Cells, Terrain, Zones, Obstacles and Agents Most parameters to build static arrays are declared in the file global.h. ////////////////////////////////////////////////////////////////////////////////////// #define AGENTTYPENB 6 //NB OF DIFFERENT TYPES OF AGENTS #define CELLSTATENB AGENTTYPENB+1 //FOR OCCUPATION BY AGENTS AND OBSTACLES #define CSTATENB 100 //NB OF CRITICAL STATES FOR STRATEGY 1 #define ITERATNB 5 //NB OF INTERATS CONSIDERED WHEN STORING INFORMATION #define REFLECTIONNB 10 //NB OF RELECTION ON OBSTACLES #define MOVENB 5 //NB OF ACTIONS THAT CAN BE CONSIDERED BY THE AGENT #define COMPONENTNB 5 //NB OF COMPONENTS STORED TO CHARARACTERIZE THE AGENTS WHICH //ARE DETECTED IN THE ENVIRONMENT. SEE THE ARRAY FoundAgent //FoundAgent[i][j][k][0]: X ABSOLUTE POSITION //FoundAgent[i][j][k][1]: Y ABSOLUTE POSITION //FoundAgent[i][j][k][2]: Teta=Arctg(Y/X) //FoundAgent[i][j][k][3]: 0 UNDEFINED;1 Target Found;2 Predator Found; //FoundAgent[i][j][k][4]: INDEX OF THE AGENT, I.E, ITS POSITION // IN THE ARRAY Agent-i (OF TYPE iAType=i) #define COARSE 0 //USE TO DEFINE THE ENVIRONMENT MODE #define FINE 1 //USE TO DEFINE THE ENVIRONMENT MODE #define CHECKMODE1 //TURN ON CHECK INSTRUCTIONS. COMMENT THE LINE //TO SPEED UP THE EXECUTION #define FINEPARAMNB 10 //NUMBER OF PARAMETERS TO CHARACTERIZE THE STATE IDENTIFIED //IN THE FINE ENVIRONMENT DESCRIPTION. THIS DIMENSION IS USED //BY THE PARAMETER ARRAY: FINEStateParam. NOTE THAT // FINEStateParam[0] IS ALWAYS THE INDEX OF THE IDENTIFIED STATE //IT IS THE USER'S RESPONSABILITY TO DEFINE THE OTHER ELEMENTS //FINEStateParam[1], FINEStateParam[2],... POSSIBLE IN ACCORDANCE //WITH THE DEFINITION OF THE STATE IDENTIFIED WITH FINEStateParam[0] //WARNING WARNING WARNING WARNING WARNING WARNING WARNING #define FREEPARAMNB 8 //NUMBER OF PARAMETERS THAT CAN BE MODIFIED BY THE PROGRAMMER //IF YOU MODIFY FREEPARAMNB HERE, YOU MUST MODIFY IT IN AGNT.h #define FREEPOLICYPARAMNB 6 //NUMBER OF PARAMETERS THAT CAN BE MODIFIED BY THE PROGRAMMER //IF YOU MODIFY FREESTRATEGYPARAMNB HERE, YOU MUST MODIFY IT //IN AGNT.h #define AGENTCOLORNB 4 //NUMBER OF POSSIBLE COLOR FOR EACH AGENT #define INTERFACEBOOLNB 10 #define PI 3.14159265359 The agent stores in its memory the information it recorded over ITERATNB activations. For instance, the last move directions are stored in the array iSect[ITERATNB], where iSect[0] is the current value, iSect[1] the previous value, iSect[2] the value two activations ago, and so on. Past information may be used to develop non-Markovian policies. The construction of the agent population and the simulation of moves are based on the following classes. D.1 class CELL A cell is an elementary square. It contains one agent or one obstacle at a time. The cell represents the ultimate spatial resolution of the simulator. Thus, the agent is anywhere in a cell. The only solution Revision: 128 IV-20/206 18/12/2013 CORE MANUAL to increase the spatial resolution consists in increasing the number of cells per surface unit. In the present version, a cell is characterized by an occupation state, which can be: 'E': Empty; '1': Occupied by a type-1 agent; '2': occupied by a type-2 agent; …. '6': occupied by a type-6 agent; 'O': occupied by an obstacle. The cell is represented by the following simple class. class CELL ///////////////////////////////////////////////////////////////////////////////////// // THE CELL CLASS ONLY CONTAINS THE CELL STATE AT THE MOMENT. HOWEVER, IT // CAN EVOLVE IN THE FUTURE (FOR INSTANCE TO INCLUDE CHEMICAL TRACES...ETC) ///////////////////////////////////////////////////////////////////////////////////// { public: char State[2]; //STATES: State[0]: 'E': EMPTY; 'O': OBSTACLE; // '1': AGENT iAType=0; // '2': AGENT iAType=1.. etc... short iRank; //RANK OF THE AGENT (OR OBSTACLE)IN THE CELL int* iData; //FREE INTEGER ARRAY int iDataNb; //DIMENSION OF iData float* fData; //FREE FLOAT ARRAY int ifDataNb; //DIMENSION OF fData CELL(); //DEFAULT CONSTRUCTOR ~CELL(); //DEFAULT DESTRUCTOR }; D.2 Terrain The terrain is a rectangular array of cells. Each cell is identified with 2 Cartesian coordinates (i,j). The terrain is dynamically created with this standard C++ instruction: Eq. 1 CELL* Cell = new CELL [XDim*YDim]; where short XDim and short YDim are the number of cells in the X and Y directions. Note that we define a one-dimension array Cell[i] to store a two-dimension table as cells are identified with two coordinates such that 0i<XDim and 0j<YDim. The basic reason is that C++ does enable dynamic adjustment of 2-dimension arrays. With Eq. 1, it is possible to adjust at runtime the size of the terrain in the memory(6). The cell of coordinates (i,j) is located as follows in the 1-D array through the following correspondence: cell(i,j) Cell[i*Ydim+j] Conversely: Cell[n] cell(i,j) with i=n/Ydim (integer division) , j=n%YDim To move from cell(0,0) to cell(3,6), it is necessary for instance to move 3 times in the X direction, then 6 times in the Y direction, respectively. Note some possible redundancy. For instance: (6) For instance the following declaration to reserve a 2-dimension array is illegal: CELL** Cell = new CELL [XDim,YDIM]. Revision: 128 IV-21/206 18/12/2013 CORE MANUAL if Cell[i*XDim+j].State[0]=’1’, then Agent[0][Cell[i*XDim+j].iRank].X=i! D.3 class ZONE A zone is a set of cells without any consideration to the topology of the zone. A complex zone may simultaneously contain several agents, and (or) obstacles. A zone is described by the class ZONE, which stores the numbers of contained agents and obstacles: class ZONE //////////////////////////////////////////////////////////////////////////////// // A ZONE IS A SET OF CELLS. NOTE THAT THE TOPOLOGY OF THE ZONE IS UNDEFINED. // CLOSE TO THE AGENT, ZONES ARE SQUARE CELLS. FAR FROM THE AGENT, A ZONE // IS AN ANGULAR SECTOR. // THE PARAMETERS THAT CHARACTERIZE A ZONE IS SIMPLY THE NUMBER OF OBJECTS // OF THE DIFFERENT TYPES //////////////////////////////////////////////////////////////////////////////// { public: ZONE(); ~ZONE(); short short short short short iRo; iTeta; iObstacleNb; iAgent1Nb; iAgent2Nb; //MODULUS OF THE ZONE IN POLAR-LIKE COORDINATES //ANGLE OF THE ZONE IN POLAR-LIKE COORDINATES //NB OF OBSTACLES IN THE ZONE //NB OF TYPE-1 AGENTS IN THE ZONE //NB OF TYPE-2 AGENTS IN THE ZONE }; Zones are used to represent the environment close to the agent. In the COARSE representation (see paragraph A.1 page 127 ). D.4 class OBSTACLE The class OBSTACLE is at the moment a simple class with two member variables that are the coordinates X and Y of the cell containing the obstacle. class OBSTACLE ////////////////////////////////////////////////////////////////////////////{ public: ////////////////////////////////////////////////////////////////////// short X; //X POSITION OF THE OBSTACLE IN THE GRID short Y; //Y POSITION OF THE OBSTACLE IN THE GRID ////////////////////////////////////////////////////////////////////// public: OBSTACLE(); //DEFALUT CONSTRUCTOR OF RADIUS SERIES ~OBSTACLE(); }; D.5 Terrain borders To border the terrain with impassable barriers, we used the very efficient method that consists in filling up the cells along the borders with obstacles. Thus, the collision of an agent with the border reduces to the collision with an obstacle. Revision: 128 IV-22/206 18/12/2013 CORE MANUAL The borders may profoundly change the coexistence of the populations of agents, especially when the size of the terrain is small so that most of the agents often collide with the borders. Thus, it may be interesting in some cases to remove the borders (suppressing the generation of obstacles along the borders) and to consider cyclic conditions on the agent coordinates. In other words, if an agent is in the cell (i,j) and moves to the cell (i'=i+i , j'=+j), the cyclic condition defines the final position by the relations: i'=(ii+XDim)%XDim; j'=(jj+Ydim)%YDim As a result, an agent moving outside the terrain, for instance on the right-hand side, appears on the left-hand side. Cyclic conditions are also designed as the torus mode. Note that these relations can be used even if there are obstacles along the borders. D.6 AGENT classes An agent is located in a cell. Its position (X,Y) is represented by the cell coordinates. It can move in any of the 8 adjacent cells as shown in Fig. 3, or in other words in the 8 directions of angle n=n/4 (i.e., east, north-east, north, north-west, west, south-west, south, south-east). This representation must be considered as a first approach and will be improved in the future. Fig. 3: Agent can move in the 8 neighboring cells D6.1 Base class : AGENT The header of the agent base class is shown below. It comprises 4 sections: Section 1 declares variables, i.e., agent attributes: the color, the XecutionTime (i.e., the reaction time, see ??), the sense radius, plus some user-defined parameters to customize the application (FreeData[FREEPARAMNB] and FreeStrategyData[FREESTRATEGYPARAMNB]). Section 2 declares the variables and arrays constructed in the COARSE representation of the environment. This representation mode is described in section A.1 page 127. Section 3 declares the variables and arrays constructed in the FINE representation of the environment. This representation mode is described in section A.2 page 131. Section 4 declares the directive functions (not represented). Actions and directives are described in details in chapter.Manual 3 entitled DLLs Manual. Declaration of the member variables of the class AGENT Revision: 128 IV-23/206 18/12/2013 CORE MANUAL class AGENT (13 Feb 2004, modified September 2008) ////////////////////////////////////////////////////////////////////////////////////////// ////////////////////////////////////////////////////////////////////////////////////////// { public: ////////////////////////////////////////////////////////////////////////////////////// SECTION I : GENERAL VARIABLES short X; //X POSITION OF THE AGENT IN THE GRID short Y; //Y POSITION OF THE AGENT IN THE GRID short ShiftX[ITERATNB]; //ARRAY TO STORE THE LAST X SHIFT OF THE AGENT;SHIFT //PER ITERATION IS EQUIVALENT TO THE SPEED!!! short ShiftY[ITERATNB]; //ARRAY TO STORE THE LAST Y SHIF OF THE AGENT short iSect[ITERATNB]; //iSect=0=MOVE EAST;iSect=1=MOVE NORTHEAST;iSect=2= //MOVENORTH;iSect=3=MOVE NORTHWEST;iSect=4=MOVE WEST; //iSect=5=MOVE SOUTHWEST; iSect=6=MOVE SOUTH; iSect=7: //MOVE SOUTHEAST; short iAType; //TYPE OF THE AGENT: 0<=iAType<AGENTTYPENB short iRank; //RANK OF THE AGENT IN ITS POPULATION ARRAY char AgentMode; //AGENT MODE; VALUES: "A" ACTIVE; "I":INACTIVE; "D":DEAD float DActionTime; //TIME INCREMENT TO THE NEXT ACTION TIME float ActionTime[ITERATNB]; //ARRAY OF ACTION TIMES short iPolicy; //POLICY INDEX int ColorMode; //CURRENT AGENT COLOR MODE (0<=ColorMode<AGENTCOLORNB) BOOL bMissionDLL; //IF TRUE, USE AN EXTERNAL MISSION DLL double exponent[AGENTTYPENB];//EXPONENT FOR REPULSION LAW int iACTIONCycleNb; //COUNTER FOR THE NB OF EXECUTED CYCLES int iNODECycleNb; //COUNTER FOR THE NB OF EXECUTED CYCLES int iACTIONFastFullNb; //COUNTER TO ALTERNATE FAST & FULL SCANS IN THE ACTION MODE int iNODEFastFullNb; //COUNTER TO ALTERNATE FAST & FULL SCANS IN THE NODE MODE float Energy; //AGENT ENERGY short* Radius; //ARRAY OF RADIUSES DEFINED AROUND THE AGENT short iRadiusNb; //NB OF RADIUSES DEFINED AROUND THE AGENT short iSectorNb; //NB OF ANGULAR SECTORS DEFINED FAR FROM THE AGENT HMODULE DLLhm; //HANDLE OF DLL FOR DYNAMIC LINKING HWND ViewHWND; //THE AGENT CAN SEND MESSAGES TO THE VIEW. IMPORTANT ////////////////////////////////////////////////////////////////////////////////////// short iEnvironmentMode; //0: COARSE MODE, 1: FINE MODE BOOL bIncremental; //TRUE: INCREMENTAL CONSTRUCTION OF THE ENVIRONEMNT int SenseAngle; //SENSE ANGLE OF THE ANGLE (360 MEANS ISOTROPIC SENSE) BOOL bXtendAngle; //TO DECIDE TO EXTEND THE SENSE ANGLE ////////////////////////////////////////////////////////////////////////////////////// ////////////////////////////////////////////////////////////////////////////////////// SECTION II : FREE ARRAY FOR AGENT CUSTOMIZATION float FreeData[FREEPARAMNB]; //FREE DATA FOR AGENT float FreePolicyData[FREEPOLICYPARAMNB]; //FREE PARAM FOR AGENT STRATEGY //FREE INTERNAL PARAMETERS THAT CAN BE USED IN THE DEVELOPMENT PHASE float Free[FREEPARAMNB]; //FREE DATA FOR AGENT CODE int iFree[FREEPARAMNB]; //FREE DATA FOR AGENT CODE bool bFree[FREEPARAMNB]; //FREE DATA FOR AGENT CODE //FREE AGENT MEMORY short* iFreeMem[FREEMEMORYNB]; //FREE ARRAY FOR AGENT MEMORY float* fFreeMem[FREEMEMORYNB]; //FREE ARRAY FOR AGENT MEMORY BOOL* bFreeMem[FREEMEMORYNB]; //FREE ARRAY FOR AGENT MEMORY ////////////////////////////////////////////////////////////////////////////////////// bool bCountDown; //bool VARIABLE TO AVOID CLOSED LOOPS int iCountDown; //int VARIABLE TO AVOID CLOSED LOOPS int iSameDirection; //int VARIABLE TO AVOID CLOSED LOOPS ////////////////////////////////////////////////////////////////////////////////////// //OPEN ARRAYS Revision: 128 IV-24/206 18/12/2013 CORE MANUAL double Efficiency[ITERATNB]; //ARRAY OF AGENT EFFICIENT ////////////////////////////////////////////////////////////////////////////////////// SECTION III : VARIABLES FOR CLOSED CYCLES DETECTION bool bClosedCycle; //true IF THE AGENT IS IN A CLOSED CYCLE int ReflectPtX[REFLECTIONNB]; //ARRAY OF X COORDINATE OF REFLECTION POINTS int ReflectPtY[REFLECTIONNB]; //ARRAY OF Y COORDINATE OF REFLECTION POINTS ////////////////////////////////////////////////////////////////////////////////////// SECTION IV : COARSE ENVIRONMENT MODE //THE AGENT STORES UP T0 ITERATNB ESTATEs THAT REPRESENT ITS KNOWLEGDE COARSE_ENVIRONMENT COARSEEnviron[ITERATNB];//ARRAY OF ENVIRONMENT REPRESENTATIONS //STORABLE IN THE MEMORY. AN ENVIRONMENT //INCLUDES THE ARRAY OF FILLED ZONES AROUND THE AGENT short StateIndex; //INDEX OF THE IDENTIFIED STATE short iZoneToAttack; //INDEX OF THE ZONE TO ATTACK ////////////////////////////////////////////////////////////////////////////////////// SECTION V : AGENT MEMORY ARRAYS IN THE FINE ENVIRONMENT MODE //THE AGENT STORES STORES INFORMATION ON THE AGENTS DETECTED //AROUND THE AGENT AT DIFFERENT SUCCESSIVE ITERATIONS. THE NUMBER OF CONSIDERED //ITERATIONS IS "ITERATNB" DEFINED IN Global.h short (*FoundAgent[AGENTTYPENB][ITERATNB])[COMPONENTNB]; short iDimA[AGENTTYPENB][ITERATNB]; short iFoundANb[AGENTTYPENB][ITERATNB]; short (*FoundObstacle[ITERATNB])[COMPONENTNB];// short iDimOb[ITERATNB]; // short iFoundObstNb[ITERATNB]; //NUMBER OF FOUND OBSTACLES STORED IN FoundObstacle short (*COPY)[COMPONENTNB]; //COPY POINTER FOR TEMPORARY STORAGE OF THE OTHER //POINTERS DURING CYCLIC PERMUTATIONS; WARNING: //IT MUST NOT BE DIMENSIONNED WITH A new OPERATORS //AS IT WOULD GENERATE A MEMORY LEAK!!!!!!!!!! int iFastToFullScanRatioA; //iFastToFullScanRatioA=3 MEANS 3 FAST SCANS FOR ONE //FULL SCAN IN ACTION CYCLE (LAST LETTER A FOR ACTION) int iScanTypeA; //0=FULL SCAN; 1=FAST MODE AROUND AGENTS, ETC (LAST //LETTER IS "A" FOR ACTION CYCLE ////////////////////////////////////////////////////////////////////////////////////// SECTION VI : VARIABLES & METHODS FOR COMMUNICATION //THE AGENT INCLUDES AN INSTANCE OF THE CLASS NODE, AN OBJECT WITH: // - SEVERAL MESSAGE BUFFERS TO STORE THE INCOMING AND OUTCOMING MESSAGES TRANSMITTED // BY THE NETWORK // - AN ARRAY TO STORE THE NODES FOUND BY THE AGENT. NOTE THAT NODES ARE AGENTS FOUND // INSIDE THE COMMUNICATION RADIUS. THEREFORE, THIS ARRAY IS LARGER THAT THE ARRAY // FoundAgent, WHICH CORRESPONDS TO DIRECT SENSING OF THE ENVIRONMENT NODE* pNode; //THE SOLUTION TO DISACTIVATE A MESSAGE IN THE MESSAGE ARRAYS BELOW CONSISTS IN SETTING //THE MESSAGE TYPE Msg[i].m_iType TO ZERO. MESSAGE* OutMsg; //ARRAY TO STORE THE MESSAGES EMITTED BY THE AGENT int iOutMsgSize; //DIMENSION OF OutMsg MESSAGE* InMsg; //ARRAY TO STORE THE MESSAGES RECEIVED BY THE AGENT int iInMsgSize; //DIMENSION OF InMsg //ARRAY TO STORE THE NODES FOUND BY THE AGENT WHEN SCANNING ITS COMMUNICATION DISK short (*FoundNode[AGENTTYPENB][ITERATNB])[COMPONENTNB2]; short iDimNode[AGENTTYPENB][ITERATNB]; short iFoundNodeNb[AGENTTYPENB][ITERATNB]; int iCOMMode; //0=AD HOC; 1= FULLY INTERCONNECTED, ETC... ROUTE Route; float ReEmitTime; //ELAPSED TIME TO DECIDE THE REEMISSION OF A MSG int iMaxEmitNb; //MAXIMUM NB OF REEMISSIONS. int iFastToFullScanRatioN; //iFastToFullScanRatioN=3 MEANS 3 FAST SCANS FOR ONE //FULL SCAN IN ACTION CYCLE (LAST LETTER N FOR NODE) int iScanTypeN; //0=FULL SCAN; 1=FAST MODE AROUND AGENTS, ETC (LAST //LETTER IS "N" FOR NODE CYCLE) void BuildpMsg(int iTargetType,int iTargetRank,int MsgType,int iMsgSet, MESSAGE* pMsg); void SendMsg(int iTargetType,int iTargetRank,int MsgType,int iMsgSet,int iOutBuf); void SendMsg(int iTargetType,int iTargetRank,int MsgType,int iMsgSet,int iOutBuf, Revision: 128 IV-25/206 18/12/2013 CORE MANUAL int iMsgRank,int iMaxReemitNb,int *pRoute,int data_size,int* pData, void* pLoad=NULL); void DecodeMsg(MESSAGE* pMsg); void DecodeMsgInLocalOutBuffer(); //MEMBER FUNCTION TO STORE NODES IN FoundNode void FINEStoreNodeInArray(short iType,short iTCell,short jTCell, short Index, bool bXtorus, bool bYtorus, short XDim, short YDim); //SCAN THE CELLS OF THE ENVIRONMENT IN THE FINE MODE FOR NETWORK OPERATION __declspec(dllexport) void ScanFINECellNode(CELL* Cell,short XDim,short YDim, AGENT* Agent[AGENTTYPENB], short iAgentNb[AGENTTYPENB], OBSTACLE* Obstacle, short iObstacleNb, bool bXTorus, bool bYTorus, short MaxRadius,short MinRadius); ////////////////////////////////////////////////////////////////////////////////////// SECTION VII : VARIABLES & METHODS FOR REINFORCMENT LEARNING APOLICY APolicy; //AGENT POLICY int iLearnMode; //iLearnMode<0 MEANS NO LEARNING int iRewardMode; //TO SELECT A METHOD TO CALCULATE THE REWARD int iPreviousState; //STATE IDENTIFIED AT PRECEEDING AGENT ACTIVATION int iPreviousAction;//ACTION SELECTED AT PRECEEDING AGENT ACTIVATION float Reward(); //Reward FUNCTION CALCUATED PRIOR TO CHOOSING AN ACTION int SelectAction(int iStateIndex); float DLLReward(); //Reward FUNCTION CALCULATED PRIOR TO CHOOSING AN ACTION int DLLSelectAction(int iStateIndex); ////////////////////////////////////////////////////////////////////////////////////// D6.2 Derived agent classes In the current version, MASS comprises six types of agents derived from the base classe AGENT. The different types are named AGENT0, AGENT1, etc... The header of the class AGENT0 is shown below (the headers of AGENT1, AGENT2, etc.. are similar): class AGENT0 : public AGENT ///////////////////////////////////////////////////////////////////////////////////// ///////////////////////////////////////////////////////////////////////////////////// { public: ///////////////////////////////////////////////////////////////////// //AGENT SCAN (FINE MODE) void FINEAgentScan(CELL*,short,short,AGENT* Agent[AGENTTYPENB], short iAgentNb[AGENTTYPENB],OBSTACLE*,short,bool,bool); void FINEAgentFindState_0(CELL* Cell,short XDim,short YDim,bool,bool); void FINEAgentZoneScan_0(CELL*,short,short,AGENT* Agent[AGENTTYPENB], short iAgentNb[AGENTTYPENB],OBSTACLE*,short,bool,bool); ///////////////////////////////////////////////////////////////////// //CELL SCAN (FINE MODE) void FINECellScan(CELL* Cell,short XDim,short YDim,AGENT* Agent[AGENTTYPENB], short iAgentNb[AGENTTYPENB],OBSTACLE*,short,bool,bool,short,short); bool FINECellCloseScan_0(CELL*,short,short,bool,bool); bool FINECellRingScan_0(CELL*,short,short,AGENT* Agent[AGENTTYPENB], short iAgentNb[AGENTTYPENB],short,bool,bool); void FINECellFindState_0(CELL* Cell,short XDim,short YDim); void FINEMapDirective_0(ACTION* Action,CELL* Cell, short XDim, short YDim); ///////////////////////////////////////////////////////////////////// //FUNCTIONS FOR CALL TO EXTERNAL DLL __declspec(dllexport) void XFINECellScan(CELL* Cell,short XDim,short YDim,AGENT* Agent[AGENTTYPENB], short iAgentNb[AGENTTYPENB],OBSTACLE*,short,bool,bool,short,short); __declspec(dllexport) Revision: 128 IV-26/206 18/12/2013 CORE MANUAL void XFINESelectAction(ACTION* Action,CELL* Cell, short XDim, short YDim); ///////////////////////////////////////////////////////////////////// //CELL SCAN (COARSE MODE) void COARSECellScan(CELL*,short,short, AGENT* Agent[AGENTTYPENB], short iAgentNb[AGENTTYPENB], OBSTACLE*, short,bool,bool,short (*LookUpTable)[2],short,short); bool COARSECellCloseScan_0(CELL*,short,short,ZONE*,short,bool, bool, short*); bool COARSECellRingScan_0(CELL* Cell, short XDim, short YDim, ZONE* zone, short (*LookUpTable)[2], short iLineLength, short* iFoundNb,short iDistInit, bool bXtorus, bool btorus); }; The division of the agent methods between the base and the derived classes must be clear: The base class includes directive and action functions, which are shared by all derived classes. Each derived class includes member functions to construct the environment representation (FINECellCloseScan_0, FINECellRingScan_0), to identify the environment state (FINECellFindState_0), and to map states to directives (FINEMapDirective_0), in accordance with the agent specificity and the agent mission. Some programming considerations are crucial. The code constructs several arrays of derived classes, one per agent type in the methods void ReBuildAgentPopulation0(), void ReBuildAgentPopulation1(), etc of the class CParamSheet. The code for the derived class Agent0 is displayed below in Script. 1. ///////////////////////////////////////////////////////////////////////// i=0; //AGENT TYPE 0, CONSTRUCTION AND INITIALIZATION AGENT0* Agent0 = new AGENT0[ThreadData.iAMAXNb[i]]; for (j=0;j<ThreadData.iAMAXNb[i];j++) { ThreadData.Agent0[j].Build(ThreadData.Radius[i], //RADIUS ARRAY etc… } ///////////////////////////////////////////////////////////////////////// AGENT* Agent[AGENTTYPENB]; ThreadData.Agent[0]=ThreadData.Agent0; //CRUCIAL ///////////////////////////////////////////////////////////////////////// Script. 1 Note particularly the last line, which assigns the pointer Agent[0] to the pointer Agent0, so that the array Agent[iType][iRank] is a 2-dimension array to systematically access any agent of the derived classes. The functions FINEAgentScan, FINECellScan, COARSECellScan (see the header of AGENT0) are declared virtual in the base class so that they are automatically executed by the derived class when an agent is called via Agent[iType][iRank]. Revision: 128 IV-27/206 18/12/2013 CORE MANUAL E Startup operations It is assumed here that you previously read the second manual of the documention entitled Tutorial (i.e., the file Tutorial.pdf) and that you are familiar with the operation of MASS. Running MASS launches the CORE, which executes the start initialization that we describe below. E.1 Default initialization At startup, the CORE executes the function calls display in Script 5 below. These actions are transparent for the user. All these functions are executed to initialize (before any simulation) all arrays from default data read in files or in registries. For instance, LoadMissionDLLs, LoadLibrary… are called by OnInitialUpdate. At the end of this initialization phase, the CORE stays pending until the user selects a scenario. The initialization comprises: The construction of the agent and obstacle arrays. The definition of the agent missions and strategies from the mission scripts (see Manual 3 entitled DLLs Manual), and from data stored in the registry base of Windows. The construction of the learning engine, if learning is activated. CAGNTView::CAGNTView CAGNTView::OnInitialUpdate CAGNTView::LoadMissionDLLs LoadLibrary UpdateInterfaceFromDLL CAGNTView::ReadDataInRegistries CAGNTView::ReadDefaultDataInCore CAGNTView::BuildAgentPopulations Script 5: Call graph during the initialization phase E.2 Scenario loading Following the default initialization described in section E.1, you must load a scenario prior to running any simulation. All scenarios are stored in XML files with the extension MAS. There are 2 methods to load a scenario: Method 1: Run MASS, then click the "File" item of the menu, and select a recent file in the dialog box splashed by these actions. This procedure directly displays in MASS the intial distributions of the selected scenario. The following function calls are executed in this case. CAGNTApp::OnOpenRecentFile (Event function when you click a scenario) XMLNode::openFileHelper CView::ReadAgentFromXML CView::LoadMissionDLLFromScenario CView::ReadAgentFromXML SECOND CALL! CView::ReadPlaygroundFromXML CView::ReadChartParamFromXML CView::CreateDraftWnd() CView::CXDraft::ReadXMLFromDisk_2D CLine::Fill Revision: 128 IV-28/206 18/12/2013 CORE MANUAL CRect::GetAbsCoordinates CRect::FillInside CRect::FillBorder CEllipse::FillInterior CEllipse::FillBorder CPolyLine::Fill CBackground::FillOusideObjects_2D CBackground::AreEnoughCells_2DR CBackground::IsCellInObjects_2DR CBackground::IsCellInObjects_2DR IsObstacleInCellR Script 6: Call graph when loading a scenario using method 1 Method 2: Run MASS, then click the Open file Icon in the left toolbar ( ). This procedure displays the scenario selection box just below. Fig. 4: Scenario selection box Then select a scenario and click the Open button. These actions close the above selection box and trigger the new function call: CAGNTDoc::OnFileOpen //(Event function when you click Open) XMLNode::openFileHelper(szFileName,"MASS") CAGNTView::ReadAgentFromXML //AGENT PARAMS: REACTION TIME, DLL NAME… (CALL1) Revision: 128 IV-29/206 18/12/2013 CORE MANUAL CAGNTView::LoadMissionDLLFromScenario CAGNTView::ReadAgentFromXML(&InXML) //AGENT PARAMS: REACTION TIME, DLL NAME… (CALL2) CAGNTView::ReadPlaygroundFromXML //PLAYGROUND PARAMS: XDIM, YDIM, TORUS MODE,… CAGNTView::ReadSimulationParamFromXML //SIMULATION PARAMS: NB OF ITERATIONS, SYNCHRONICITY, EiC.. CAGNTView::ReadChartParamFromXML // if(pView->ThreadData.ZDim == 1) { CAGNTView::CXDraft::ReadXMLFromDisk(szFileName) //DEFINITION OF INITIAL DISTRIBUTION OF //AGENTS AND OBSTACLES CLine::Fill CLine::FillFull CLine::FillEquallySpaced CLine::FillRandom CRectangle::FillInside CRectangle::FillInsideSquareLattice CRectangle::FillInsideRandom CRectangle::FillBorder CREctangle::FillBorderRandom CREctangle::FillBorderFull CEllipse::FillInterior CEllipse::FillBorder CPolyLine::Fill CPolyLine::FillFull CPolyLine::FillEquallySpaced CPolyLine::FillRandom CBackground::FillOusideObjects else { if(pView->ThreadData.ZDim > 1) CAGNTView::CXDraft:: ReadXMLFromDisk_3D(szFileName) } CParamSheet::FullInitialize //TO UPDATE THE PROPERTY PAGE CParamSheet::InitializeDataArray() Script 7: Call graph when loading a scenario using method 2 In fact, Script 7 and Script 6 are identical! The display of the initial distribution is achieved by the function call to CXDraft::ReadXMLFromDisk_2D. It is important to understand that this function executes tow actions : Step 1: It reads from the scenario XML file the position and paramaters of the objects in the terrain (lines, rectangles, ellipses, polylines, polygone and background). Step 2: It calls for each object fill functions which insert (inside the object or on the borders) agents or obstacles which are generated following the the generation mode stored in the scenario and read in step 1. In other words, the positions of agents and obstacles are NOT stored in the scenario, but generated by MASS from the directives stored for each object (line, rectangle, ellipse, etc..) in the sdcnario. It is important to stress that the method CXDraft::ReadXMLFromDisk builds member objects in the instance CAGNTView::m_draft of CXDraft. In other words, in this step which consists in opening a scenario, an image of the initial distributions of agents and obstacles is displayed but: 1) The cells of the terrain, i.e., the array CELL* Cell[Xdim*Ydim] (i.e., the simulation terrain) is neither construction nor initialized. The terrain is constructed when a simulation is executed, see Script 9 page 37. 2) MASS displays in fact CAGNTView:: m_draft in a special window, not in the simulation windows 3) New populations of agents or obstacles are generated each time a scenario is open when a random generation mode is selected. For instance, if you open two times the same scenario which fillup randomly a rectangle with agents of type 0, you will get two different populations of agents. Loading a scenario means: Revision: 128 IV-30/206 18/12/2013 CORE MANUAL E.3 Loading the mission DLLs. They define the policies of the agents. Loading the script defining the function plotted by the interpreter. This string is stored in a file with the extension EIC. Loading the display parameters of the chart tools. Loading the object postions (line, rectangles, etc..) and generating the initial distributions of agents and obstacles. Scenario previewing The previewing of scenarios is an important option of MASS. To preview a scenario, click this the open file icon in the left toolbar, which opens the scenario selection box as described above in method 2, then check the "Previous Initial Populations" box (see in Fig. 4). This actions will display the initial distributions of the scenario in the previous box of the scenario selection box. The following function calls are executed: int Process_WM_NOTIFY (Event function when the check box in checked) pnmh->code == CDN_SELCHANGE XMLNode::openFileHelper AfxRegisterWndClass CXDraft::CreateEx CView::ReadPlaygroundFromXML CView::CXDraft::ReadXMLFromDisk_2D Script 8: Call graph when loading a scenario using method é The calls from ReadXMLFromDisk_2D are not displayed in Script 7 because they are identical to those shown in the previous scripts. E.4 Customization In principle, loading the scenario updates all interface parameters to run immediately a new simulation. However, it is still possible to directly modify the agent parameters accessible in the property pages (described in the paragraph Interface classes (see section B page 63), for instance the radius of the sense circle, the cycle time (i.e., the period which separates two actions), etc... It is also possible to select different DLLs (explicitly, there is one DLL per agent population) to change the agent mission or the function displayed in the GRAPH window. Revision: 128 IV-31/206 18/12/2013 CORE MANUAL Revision: 128 IV-32/206 18/12/2013 CORE MANUAL Chapter 2 Agent management in MASS Population management is based on the synchronous or asynchronous activation of each agent, which then executes its action cycle. We first describe the schelduler, which activates the different agents, then the cycle executed by the activated agent. In the second part, we describe the classes to represent the different objects: cells, agents, terrain, obstacles, etc.. M ASS simulates the evolution (moves, generation, disappearance, mutation, etc…) of several populations of agents in a rectangular terrain, possibly also including obstacles. In this section we describe two simulator architectures, namely, the singlethread architecture which was first developed in 2003 and the multi-threaded version 10 years later. We first describe the model which captures the dynamics of agent populations, then the structure of the simulator based on the single-thread execution, or parallel and concurrent multithread execution. A Discrete-time Model of population evolvement Revisions: 1.5 minor, August 2008 JHC 2 major, June 2013, JHC In this first discussion of the execution models, we only consider for simplicity noncommunicating agents. Communicating agents use two schedulers. See section IA page 150. A.1 General discrete-time model We follow a discrete-time description of the agent behavior. An agent is an autonomous system which self-activates sequentially at different times. For instance, the agent of index n self-activates at Revision: 128 IV-33/206 18/12/2013 CORE MANUAL times TR n, m for m=0,1,2….. with TR n, m1 TR n, m2 when assume that the agent executes the following cycle: m1 m2 . When it self-activates, we 1) It reads a shared memory space denoted R n, m . In the agent terminology, this space is called 2) the environment of the agent. This space is read at time TR n, m . It also reads private data, also defined as its own state variables. We assume that all reading are atomic. It conducts some processing until time TW n, m with the obvious condition TW n, m TR n, m 3) (see red zones in Fig. 5). At the end of this activity period, i.e., at time TW n, m , a) it updates data in the subspace W n, m of the shared memory space. b) c) 4) It also updates its private memory. It setups the next read time TR n, m 1 , i.e., the start of the its next cycle. Note that, because the agent cannot generally predict the evolution of its environment, it cannot really predict its future… and in particular its forthcoming read times!!! Then, we assume that the agent starts a sleep interval (green zone in Fig. 5). During the sleep interval, it does not sense the memory space, i.e., its environment. Thus, the vision is that each agent alternates some periods of activity and inactivity. The next figure show the execution trace of a three-agent system. It turns out that some agents may be executing in parallel. agent(0) agent 0 inactivity activity activity inactivity activity inactivity agent(1) agent(2) 0 Time T R(0,0) T (0,0) T R(0,1) T (0,1) W W T R(1,0) T W (1,0) T R(1,1) TW (1,1) T R(0,2) T (0,2) W TR(1,2) T R(2,0) T W (2,0) TW (1,2) TR (2,1) TW (2,1) TR (0,3) TW (1,3) T R(2,2) TW (2,2) T W (2,3) Fig. 5: Trace of Read and Write operations at startup by a 3-agent system Unfortunately, this execution model generates one problem. An agent reads its memory one sole time at the beginning of the activity phase and writes the memory at the end of its activity period! Thus, writing may be misleading (with respect to its policy) because the environment may have changed between the reading and writing times!!! For instance, consider agent 1 which completes its activity at time TW 1,2 . Now, agent 2 is also active in the interval TR 2,1, TW 2,1 and TW 2,1 TW 1,2 . Thus, the TW 1,2 may be misleading (with respect to its policy) because agent 2 may have changed the environment before time TW 2,1 . Still more dramatic, agent 1 may disappear in a war game because it is destroyed, annihilated by agent 2 at time TW 2,1 . Thus, one must know writing planed by agent 1 at time what happens in this complex case. Revision: 128 IV-34/206 18/12/2013 CORE MANUAL A.2 Atomic model The agent cycle always follows the cycle described in section A, except that we assume that the agent is able to read the memory and executes its own processing instantaneously. Consequently, TR n, m TW n, m . In other words, the activity time is negligibly small compared to the inactivity time. The benefits of this assumption is crucial as the agent writes the memory which is in the state where it read it, and it cannot execute an inconsistent or impossible action. In this approach, the agent sleeps between two read times, and executes an instantaneous action just after a read. A.3 Real time and simulation time It is extremely important to stress that the real time and the simulation time are totally different. - The simulation time is the time needed to conduct the simulation. The faster the simulator activates the agents and caculates their cycles, the shorter the duration of the simulation. The real time is the time of the real multiagent system. For instance, let us assume that the simulator starts to calcule the cycle of agent 4 at simulated time TR (4,12) . Whatever the duration needed by the simulator to calculate the cycle (simulation time), the real time is always TR (4,12) in the real system because of the full atomic model! In other words, at the end of the time interval needed by the simulator to calculate the agent cycle: 1) 2) 3) The simulated time is always TR (4,12) . The agent writes its shared and private memory spaces. The agent knows its NAT that will be TR (4,13) . Then, the scheduler identifies the agent with the lowest NAT, say the agent of index i. The simulated time hops to TR (i , m) , the NAT of this agent. The scheduler starts the cycle for this agent. Simulated time is then blocked at TR (i , m) . Note that nothing prevents the lowest NAT. In which case agent 4 will be activated twice consecutively! TR (4,13) to be This way, the simulator activates all the agents and jumps between the real times TR (i, j ) . This process is executed until the top-execution time of the simulation is reached. Aditionnally, the screen shot of the terrain (or the display of any data) is periodically updated to display the progression of the simulation as will be shown below Revision: 128 IV-35/206 18/12/2013 CORE MANUAL B Single-thread simulation architecture Revisions: JHC: Aug 2008, June 2013, Oct 2013. In this first discussion of the execution models, we only consider non-communicating agents. Communicating agents use two schedulers. See section IA page 150. In this section we consider the full atomic model. We describe the way it is possible to simulate the time evolution of a multi-agent system using a single thread. B.1 Agents activation by a single thread In this approach, it is assumed that the scheduler, which activates the agents, knows the next read time of each agent. We also call the next read time " next activation time" (NAT). In principle, each agent is able to determine its NAT at the end of its processing. The single-thread simulator activates the agents in the ascending order of their NATs. Therefore it scans the NATs of all the agents in the existing populations and identify the agent with the lowest NAT. Then, it executes the cycle for this lowest Nat agent in accordance with Fig. 6.. Fig. 6: Single-Thread architecture (simplified version) The simulation architecture is made up with two threads, namely, the Interface Thread and the processing thread. Concretely: 1) The Interface thread controls a) the Graphic Display (in particular, the display of screen shots with shows the evolution of agent populations), and b) the interaction of the user with MASS. 2) The processing thread activates the agents. The operation is best described considering a simulation session. At startup, the processing thread is blocked at the barrier A. The user who clicks the RUN button of MASS opens the barrier and the processing thread follows the processing represented by the blue circuit in Fig. 6. As can be seen, the Single Thread activates sequencially the (7) agents involved in the simulation in the ascending order of their NATs . It identifies the agent with the lowest NAT, and executes the agent processing. Then, the NAT of the processed agent is 7 Actually, Fig. 6 is a simplified version of the architecture and several services not integrated in the figure are setup before the loop to activate the agents is executed Revision: 128 IV-36/206 18/12/2013 CORE MANUAL incremented. This loop proceeds until all the lowest NAT of agents exceeds the next screen refresh time. Then, services are executed and the Graphic Display updated. B.2 Scenario execution: function call graph Clicking the button RUN in the bottom bar (or the button Rebuild Chart in any property page) triggers the function CParamSheet::OnRunSession. The function calls which follow are listed in Script 9 (latest version Nov 2013). CParamSheet::OnRunSession CParamSheet::OnRunSessionSingleThread CParamSheet::CheckParams //TEST & CHECK CODE CParamSheet::SaveAndRebuildAll CParamSheet::TransferPage1ParametersToCOREDATA CParamSheet::TransferPage2ParametersToCOREDATA CParamSheet::TransferPage3ParametersToCOREDATA CParamSheet::TransferPage4ParametersToCOREDATA CParamSheet::TransferPage5ParametersToCOREDATA CParamSheet::TransferPage6ParametersToCOREDATA CParamSheet::CheckSizeOfInitialArrays // TEST & CHECK CODE CParamSheet::ReBuildOstaclePopulation InitObstacleFromDraft CParamSheet::ReBuildAgentPopulation0 SCRIPTPROCESSOR::DecodeAgentPolicyString AGENT::Build AGENT.RLEngine::Build AGENT::MapMoveFunctions() //ALWAYS IN DLL CParamSheet::ReBuildAgentPopulation1 CParamSheet::ReBuildAgentPopulation2 CParamSheet::ReBuildAgentPopulation3 CParamSheet::ReBuildAgentPopulation4 CParamSheet::ReBuildAgentPopulation5 InitAgentFromDraft_2D OR InitAgentFromDraft_3D CheckObstaclesInCellArray // TEST & CHECK CODE CheckAgentPopulations // TEST & CHECK CODE CAGNTView::StartThread ThreadProc MainTest MainTestSynchronous MainTestASynchronous BuildActionSet BuildCommSet AddAgent CommunicationMode ActionMode BuildSpatialEnvACTION FindState CELLScan //THREAD FUNCTION //IF SYNCHRONOUS MODE //IF ASYNCHRONOUS MODE //CALL IN THE AGENT DLL //CALL IN THE AGENT DLL //CALL IN THE AGENT DLL Script 9: Call graph during the reconfiguration phase in the Single-Thread mode. For simplicity, we did not include the functions called by CParamSheet::ReBuildAgentPopulation1, CParamSheet::ReBuildAgentPopulation2, etc.., which are similar to those called by CParamSheet:: ReBuildAgentPopulation0. There are two steps: 1) Update all parameters in accordance with the selections and customizations executed in the previous phases and start the processing using the agent functions customized in the DLL. These function are grouped together in the upper grayed background. 2) Start the scheduler thread which activates the agents. Calls are displayed in the lower light blue background. Revision: 128 IV-37/206 18/12/2013 CORE MANUAL B.2.1.1 Agent allocation in memory Prior to running any simulation, the CORE calls the member functions CParamSheet::ReBuildAgentPopulationK() (with 0≤K<AGENTTYPENB) to delete and reallocate all agent populations in the memory. The numbers iAMAXNb[i] and iAInitNb[i] (declared in the structure COREDATA, see Script 1 page 17) are the number of agents of type i allocated in the memory and the number of agents of type i defined at the beginning of a simulation, respectively. Allocating more agents than needed unnecessarily wastes the memory with inactive agents and always slows down the efficiency of the agent scheduler in the asynchronous mode (). Two cases are possible: When the number of agents iAType=i does not increase during the simulation, the best choice consists in allocating the minimum number of agents, thus iAMAXNb[i]=iAInitNb[i]. When the number of type-i agents increases during the simulation (for instance because additional agents are generated), it is necessary to allocate from the very beginning more agents than immediately necessary with iAMAXNb[i]>iAInitNb[i].because the CORE does not redimension dynamically the agent populations at runtime. Perhaps, this method is not very esthetic, but it privileges the program speed because redimensioning the agent arrays dynamically is time consuming. An agent can be active, inactive or dead. This property is reflected by the agent member variable char AgentMode which can be 'A' (active), 'I' (inactive), 'D' (dead). A dead agent is allocated in the memory but not activated in the simulation session, until it is declared as active. If for instance more Agent0 are allocated that immediately needed (i.e, if iAMAXNb[0]>iAInitNb[0]), agents are initialized as follows (see for instance the code in the function INITGeneA.cpp): Agent0[i].AgentMode='A' for 0<=i< iAInitNb[0] Agent0[i].AgentMode='D' for iAInitNb[0]<=i< iAMAXNb[0] Dead agents are skipped by the scheduler and by the function, which scan the environement. B.2.1.2 Agent & Obstacle population reconstruction The CORE recreates the agent and obstacle distributions in the terrain from the populations defined in the DRAFT window (see chapter6 page 100). Recall that: 1) When you open a scenario, the CORE generates the agents and obstacles in the object CAGNTView::m_draft. It means that each object defined in scenario and stored in m_draft (Lines, rectangles, Ellipse, eee) includes a list of points which contain agents of obstacles inside or on the border of the object. This initial generation is achieved automatically when you open a scenario. 2) The methods ReBuildAgentPopulation0, ReBuildAgentPopulation1, etc reallocation the agent population in the memory, but they do not define the agent positions in the terrain. 3) The agent position in the terrain are defined in the function InitAgentFromDraft_2D (or InitAgentFromDraft_2D), see green function in the previous script. In other words, This function defines the coordinates of the agents in the terrain from the position of the agents defines for each graphic objecct of the terrain and stored in each object. The precision problem is that agent coordinates in the terrain are int when agent postion in object are double. B2.2 Simulation The simulation thread is directly launched by the function void CAGNTView::StartThread()). The thread function is UINT ThreadProc(LPVOID pParam) located in the file ThreadFunctions.cpp. Revision: 128 IV-38/206 18/12/2013 CORE MANUAL In the simulation phase, the CORE schedules (synchronously or asynchronously) the agent actions (see the sections 2Erreur ! Source du renvoi introuvable. page Erreur ! Signet non défini., and Agent, page 53) At the end of the simulation, it returns to the customization step E.4. C Multi-thread simulation architecture Version 1: JHC: Oct 2013. Multi-threading the simulator is extremely important, but unfortunately, the reading of this section is relatively difficult if the you do not already understand the operation of MASS, at least in the single-thread mode. Thus, we suggest at first reading, to skip to section D page 47 to proceed in the understanding of the simulator. C.1 Activation in parallel of several worker threads The simulation architecture is made up with an Interface Thread (similarily to the single-thread architecture), a scheduler thread and a variable number of worker threads to activate the agents in parallel (see Fig. 7). Concretely: 1)The Interface thread controls a) the Graphic Display (in particular, the activation of screen shots which shows the evolution of agent populations), and b) the interaction of the user with MASS. Fig. 7: Multi-thread simulation architecture (simplified version): Example of a Scheduler managing 3 worker threads. 2) The Scheduler Thread controls the activation in parallel of several worker threads. Each worker thread executes the processing of one agent at a time. Fig. 7 shows an example where the scheduler manages three workers threads entitled WThread0, WThread1 and WThread2. The number of worker Revision: 128 IV-39/206 18/12/2013 CORE MANUAL threads is defined by the user, but should be reasonably lower than the number of cores in the processor. The scheduler executes an infinite loop (represented by the blue circuit in the figure) which consists in executing various services (triggering screen shots of the agents in the terrain,etc…), and in activating the different worker threads. The crucial point of the figure is the presence of barriers (the red rectangles A, Bi,Ci) which are open or closed to control the execution. To simply understand the operations, let us consider the initial state of the different threads: Initial State: - The scheduler is blocked at the START/STOP barrier A - Worker thread 0 (WThread0) is blocked at barrier B0. Similarily worker thread 1 is blocked at barrier B1 and worker thread 2 at barrier B2. Thus, all threads (the scheduler and the worker threads) have been created but they are all pending because blocked by barriers. Start: The user click 'Start in the interface"! This action opens the START/STOP barrier. The processing executed by the scheduler is shown by the blue circuit. Activation of an agent in WThread0: The scheduler first tests whether the barrier WData[0].m_EndProc is open (i.e., whether the event WData[0].m_EndProc is signaled in terms of Win32 programming). Let us assume that it is as in Fig. 7. The barrier is open when the worker thread WThread0 is pending, i.e., blocked at barrier B0. Then, the scheduler follows the blue circuit! It passes the barrier and tries to "select the lowest NAT agent for WThread0 (see orange block). However, selecting the new agent is a complex question to preserve the order of READ/WRITE operations of shared variables in the memory. We call this question the consistency problem. For the sake of clarity, the discussion is postponed to section C.2. At this stage of the analysis, there are two possible cases: If the scheduler discovers a "consistent" agent (say Agent0), it updates the parameters of WThread0 to execute the cycle of Agent0 in the thread, an opens the barrier WData[0].m_StartProc. Then, the control of the scheduler follows the blue circuit. Therefore, the scheduler tries to select a consistent agent for WThread1. Opening the barrier WData[0].m_StartProc means signaling the event WData[0].m_StartProc in MFC programming, and consequently, the worker thread WThread0 passes the barrier B0 and executes the agent cycle. If the scheduler does not discover a "consistent" agent, it simply follows the blue circuit and therefore tries to select a consistent agent for WThread1. Note that it also signals the event WData[0].m_EndProc to reopen the barrier C0 as it switched to the "close state" when the scheduler passed it. Activation of an agent in WThread1: The activation of an agent for WThread1 is totally similar to the processing described just above for WThread0. As shown by the blue circuit in Fig. 7, the scheduler tests whether the barrier C1 is open (i.e., whether the event WData[1].m_EndProc is signaled). Let us assume that it is NOT as in Fig. 7. Then, the scheduler follows the blue circuit and proceeds with the discovering of a consistent agent for WThread2. Activation of an agent in WThread2: Again, the activation of an agent by WThread2 is totally similar to the processing described just above for WThread0. The barrier C2 is open in Fig. 7. Thus, the scheduler will try to find a consistent agent and to activate the worker thread WThread2 to process this agent.. Execution of services: The blue circuit shows that the scheduler executes services and start a new cycle to activate new agents if worker threads are pending. It is crucial to underline the following points: The scheduler will try again to discover a consistent agent for WThread0. We must stress the following points: Revision: 128 IV-40/206 18/12/2013 CORE MANUAL If the scheduler failed to discover a consistent agent at the preceding cycle for WThread0 (for example), the barrier WData[0].m_EndProc is OPEN! It is because the scheduler signaled the event WData[0].m_EndProc at the en of the previous cycle. If the scheduler succeded to discover a consistent agent at the preceding cycle for WThread0, the barrier WData[0].m_EndProc remains CLOSED so long as the processing of WThread0 is not complete! It is because the Worker0 signals WData[0].m_EndProc only at the end of its own processing (see Fig. 7). Thus, the WThread0 CANNOT be reactivated so long as its own processing is not terminated. The scheduler WThread0 Is blocked at the barrier WData[0].m_StartProc at the end of its processing. It is because this barrier becomes blocking when it passed it at its previous cycle. Thus, the worker threads does not terminate! It becomes pending at the end of its processing at the barrier B0 (see Fig. 7). In other words (to be totally clear): When the WThread0 terminates its agent processing, its signals the event WData[0].m_EndProc which opens the barrier C0. Thus, the scheduler can try to select a consistent agent for WThread0 and reopen the barrier B0 for another processing. C.2 Reuse of execution Single-Thread DLLs in Multi-Thread The ascending compatibility of DLLs, i.e., the reuse in the multi-thread architecture of the DLLs written before the consideration of parallelism in MASS, is an important question. Let us review the possible executions C2.1 Single-Thread execution (action mode) The control of the execution is in the CORE. The figure below details the blue processing loop of Fig. 6. The names of the different functions involved in the processing have been added in the green color. It is the function MainTestAsynchronous which activates sequentially the agents in the ascending order of their NATs. It calls ActionMode which calls the relevant functions in the DLL of each agent. When the agent is terminated in the DLL, there are three necessary updates: Revision: 128 IV-41/206 18/12/2013 CORE MANUAL CORE MainTestAsynchronous CORE MainTestAsynchronous Update Display services CORE MainTestAsynchronous Indentify Lowest-NAT Agent Processing in DLL, Move selection Update variables in private agent memory (in particular position) Update Terrain occupation CORE ActionMode Activate agent with the LOWEST NAT CORE ActionMode Increment Agent NAT YES Is Lowest NAT < ScreenRefreshTime? CORE MainTestAsynchronous . Fig. 8: Function calls in the ST execution. Green text shows the function names in the CORE and the orange form (compare with Fig. 6) shows the external function called in the agent DLL. Red text shows where code to update data, partly in the CORE, partly in the DLL. 1) Update the internal variables of the agent. This operation is conducted in the agent DLL. In the "old-style" DLLs, the update code may be disseminated across the DLL! When the "incremental execution mode" is selected, the update may be in the block CellProcAction.cpp (or CellProcAction.h) and when the "incremental execution mode" is not selected, the update is in the function ScanFineDecisionTree. In some DLLs, the update code may be in the function CheckFinalCellAndUpdate_2D. This relative "anarchy" comes from the fact that the DLLs were written by different authors who chose different code of coding. Update the terrain, to account for the possible new positions or the disappearance of agents. This code is in the function ActionMode of the CORE, after the execution of functions in the DLL. /UPDATE CELL STATE: REMEMBER THAT IN THE ASCII TABLE, CHAR(49)='1' Data->Cell[pAgent->Z*XDim*YDim+pAgent->X*YDim+pAgent->Y].State[0]=CHAR(49+iType); Data->Cell[pAgent->Z*XDim*YDim+pAgent->X*YDim+pAgent->Y].iRank=iRank; 2) Update of the next action time of the agent, also performed in the function ActionMode / UPDATE NEXT ACTION TIME (NAT) Agent->ActionTime[0] = pAgent->ActionTime[0] + pAgent->DActionTime; As this implementation works for ten years, it must be preserved to the maximum even if we search for the ascending compatibility of DLLs in MT execution. Modifying the above CORE functions is possible but difficult if the changes force to modify all existing DLLs. The best solution would be to structure de MT code so that MT execution would be possible with the existing DLLs. Let us analyze now how the simulator operates in case of Multi-Thread execution. We distinguish two Multi-Threading modes. C2.2 Multi-Thread execution with precontrol of consistency C.2.2.1 Activation of agents: 1) As shown in Fig. 7, the activation of agents is controlled by the scheduler which is integrated in the CORE. Fig. 7 shows that the function SchedulerProc allocates the agents to the Revision: 128 IV-42/206 18/12/2013 CORE MANUAL different worker threads. The allocation is sequential BUT the executions of the worker threads overlap and thus reduce the simulation time. There are two problems which do not exist in the Single-Tread execution. Preservation of the activation of agents in the ascending time of NATs We distinguish two cases: A) In the simple cases, the scheduler knows the NAT of the agents in progress (in the worker threads). This occurs for instance when the time increment between two NATs is constant. In this case, the scheduler can find the next agent with the lowest NAT. It may be a pending agent (i.e., an agent not activated) or an agent in progress in a worker thread. Of course, if the lowest-NAT agent is in progress, it will not be activated until the completion of its current cycle. If the lowest-NAT agent is NOT in progress, the scheduler will check whether it is consistent as will be discussed below. B) In the most-general case, the scheduler does not know the NAT of an agent in progress (in a worker thread) until the end of the worker thread processing, because the NAT depends on the environment evolution which is totally unpredictable! The agent has a vision of the world after the scan of its environment. Thus, how finding the next lowestNAT agent if we do not know when will be reactivated the agent in progress ? It is impossible to warrant that the increasing oder of NATs will not be violated !!!!! Strictky, it seems that there is no general solution without addtionnal assumptions. Preservation of the consistency The so-called “strict consistency” for a multi-threaded execution consists of preserving the strict order of the READ and WRITE operations (occurring in a single-thread execution) for the variables shared by different threads. Activating the agents in the ascending order of their NATs duplicates the execution in the real space and preserves the order of READ operation only! It is strictly impossible to preserve the ordering of READ and WRITE if the NATs of the agent in progress are unknown. To circumvate this issue, we shall follow a weak-consistency approach. It is weak because the strict temporal ordering may be violated, but this should not dramatically affect the (8) processing . As the NATs of the agents under processing are unknown, the scheduler retreives the lowest NAT exclusively in the set of pending agents. If the lowest-NAT agent shares no memory with those in progress, it is activated. This approach is palliative because it is not garanteed that one or several agents in progress will not be terminate quicky in the real word (independently of the thread execution time) and should be reactivated quickly in the future before the lowest-NAT agent that was discovered and activated. Let us consider the following example for the sake of clarity: Agent1 (in progress) is a predator hunting a prey. Agent2 is the prey. It is pending, The scheduler discovers that Agent2 is the the lowest-NAT agent to be activated at time T2. Then, it activates it because Agent1 is outside the sens disk of Agent2. However, the NAT of Agent1 in progress (say T1) may be lower than T2, so that the correct ordering of write-read operations may be incorrect. This case occurs for instance if Agent1 wrote inside the sense disk of Agent2 at T1, because starting immediately Agent2 at T2 makes that Agent2 reads it sense disk that will be incorrect. However, it is implicitely admitted that when two agents are distant and beyond their sense disks, they cannot significantly impact their states. Thus, it is hoped that the violation of the correct order of activation will not impact the dynamics of agent population. Again, The final validation should consists in checking whether Multi-Thread executions is faster than Single-Thread execution, but identical. 8 Ultimately, the validation of this approach consists in checking whether the Multi-Thread execution is faster than the Single-Thread one, but provides identical data for the case under consideration. Revision: 128 IV-43/206 18/12/2013 CORE MANUAL C2.3 algorithm to find consistent agents The algorithm described in section Erreur ! Source du renvoi introuvable. may be viewed as the base algorithm that may be summarizes as follow: The scheduler never starts a new lowest-NAT agent so long as one of the agents in progress in the worker thread(s) shared data with it. Concretely, the lowest-NAT agent (say Agent1) is not activated if it shares data with Agent0 in progress. But why not considering to activate the second lowest-NAT agent (say agent2) if it is consistent with Agent0 AND Agent1, or in other words if Agent2 shares no data with Agent0 nor Agent1? In this approach, the activation of some consistent agents is out of order. Fig. 9: Accelerated algorithm to discover consistent agents C2.4 Default consistency models Ultimately, the validation of the consistency model is difficult. The empirical approach consists in comparing several mulithreaded executions (based on different consistency models) and the singlethreaded execution, so as to observe whether the multiagent system evolves in all cases in the same way. The benefits expected from multithreading is a reduction of the simulation times. It is the user responsibility to implement case-dependent consistency models in the agent DLL. However, two defaut consistency models are integrated in the CORE, namely: 1) No consistency constraint. The scheduler activated the lowest-NAT agent without restriction. 2) An agent is activated if no agent in the Progress Set (i.e., under execution in the worker threads) or in the Pending Set is in its sense disk. This conditions is relatively logical as the agent does not see these agents, and there may start a cycle. Revision: 128 IV-44/206 18/12/2013 CORE MANUAL C.3 C3.1 Implementation Default consistency models Fig. 10 below details the execution control displayed in Fig. 7. The names of the different functions involved in the processing have been added in the green color. CORE SchedulerProc services A Is START / STOPm_EndProc CORE SchedulerProc NO is OPEN ? C0 WData[0]. m_EndProc NO C2 WData[2]. m_EndProc CORE SchedulerProc Signaled Validate WThread Execution Signaled Validate WThread Execution Is m_EndProc is OPEN ? Select Agent Update Data in WData[2] CORE WorkerThreadsActivate Signaled Signaled Select NEW Agent Update Data in WData[0] WData[2]. m_StartProc B2 CORE WThreadProc WData[2] WData[0] Processing in DLL, Move selection CORE ActionModePool WThread2 Update variables in private agent memory (in particular position) Update Terrain occupation Fig. 10: Function calls in the MT execution. Green text shows the function names in the CORE and the added yellow form (compare with Fig. 7). The figure highlights the calls and updates in MT. The simulator conducts the following actions to identify the next agent (say AgentA) to be activated: 1) The sheduler function SchedulerProc calls WorkerThreadActivate (see the ORANGE form), which calls SelectAndStartNewAgent. 2) This function retrieves the lowest-NAT agent (say Agent1), and checks that no agent in progress is inside its sense disk. This is the consistency control. Recall that The idea behing this approach is that the order of READ-WRITE may be violated, but this will occur when the agents involved in the time violation are so distant that it should not really modify the population dynamics. It is not violated when agents are closed. 3) If it is, SelectAndStartNewAgent updates the data WData[0] of thread Wthread[0] and opens the barrier which blocked it (see the code in SelectAndStartNewAgent). The execution in the worker thread is in the function WThreadProc. This function calls the function ActionModePool if the agent cycle is an ACTION cycle and the function ComModePool it the agent cycle is a communication cycle (actually, the code for communication cycle is not written 131001). We stress that all the calls to functions in the agent Revision: 128 IV-45/206 18/12/2013 CORE MANUAL 4) DLL are located in ActionModeCycle. The calls to the agent DLL are similar to those conducted in ActionMode in the Single Thead execution. So far, we have not explained how the CORE (i.e, the function SelectAndStartNewAgent) updates the NAT of the selected agent that is to be executed in Wthread[0]. This is a real problem because the function SchedulerProc will pass to the next worker thread Wthread[1] and if it is pending, it will try to find the next lowest-NAT agent for this thread. The NAT of Agent1 allocated in Wthread[0] must be incremented to make that another agent may be selected for Wthread[1]…. and so on. Actually, the trick consists of setting provisorily the NAT of Agent1 to a very large number (for instance FLOAT_MAX of the machine). Thus: The search for the lowest-NAT agent can be conducted in the set of all agents as the agents in progress cannot be reactivated. The NAT of Agent1 will updated at the end of its processing by the Wthread[0] to its exact value that will be known at this time. Where in the code could we update the agent NAT? In the most general case, the next NAT of the agent (i.e., AGENT::ActionTime[0]) is calculated in the DLL! However, as shown in the ST mode described it, is updated in the function ActionMode. Thus, for reusing the DLLs in the MT mode, one may consider to update the Cell and the agent NAT in the function ActionModePool, AFTER THE CALL TO THE AGENT DLL, the code already shown in section C2.1, namely: //UPDATE CELL STATE: REMEMBER THAT IN THE ASCII TABLE, CHAR(49)='1' Data->Cell[pAgent->Z*XDim*YDim+pAgent->X*YDim+pAgent->Y].State[0]=CHAR(49+iType); Data->Cell[pAgent->Z*XDim*YDim+pAgent->X*YDim+pAgent->Y].iRank=iRank; //UPDATE NEXT ACTION TIME (NAT) Agent->ActionTime[0] = pAgent->ActionTime[0] + pAgent->DActionTime; C3.2 Graph of function calls Clicking the button RUN in the bottom bar (or the button Rebuild Chart in any property page) triggers the function CParamSheet::OnRunSession. The function calls which follow are listed in Script 9 (latest version Nov 2013). C.4 Scheduler & worker threads implementation Let us reuse the example introduced in the previous paragraph and assume that a worker thread (say thread 1) starts to calcule the cycle of agent 4 at simulated time TR (4,12) . If the simulator waits for the completion to start another worker thread, there is no parallelism of execution and no speedup of the simulator. The fundamental question concerns the knowledge of the NAT of agent 4. There are two cases: How does the agent react if the action it planed cannot be executed? How does the environment react to this impossible action? Several execution models are possible: Model 1: Atomic model: The activated agent constructs instantaneously its environment states and executes instantaneously its action. We use this atomic execution model. Model 2: Non-atomic models: In these models, the construction of the environment and the calculation of the action Each time the agent samples its environment, it compares it to its previous representation. If it has changed, the agent checks whether the action it planed to execute is still possible. If it is, it assumes it was executed and samples the environment including the consequence of its action. If it was not, it assumes that the action was not carried out. Revision: 128 IV-46/206 18/12/2013 CORE MANUAL D Agent implementation In this introduction to scheduling, we only consider for simplicity non-communicating agents. Communicating agents use two schedulers. See section IA npage 150. In practice, each agent has 2 member variables to control the successive cycles: float ActionTime[ITERATNB]: The agent stores in this array its last action times, where ITERATNB is defined in Global.h. - ActionTime[0] is the agent next-action time (NAT). When the agent is not active, it is the time when the agent is to be activated to execute its next cycle. - The other times {ActionTime[i]|1<i<ITERATNB} are past action times with ActionTime[i]<ActionTime[i+1]. float DActionTime is the time interval separating two action times. Note that the time increment DActionTime is not necessarily constant. Each agent may dynamically change it depending on its own state automaton. Each agent is activated by a global scheduler when time equals its NAT. Thus, the scheduler manages the temporal order of agent activations. It is encapsulated in the class SCHEDULER described below in paragraph Erreur ! Source du renvoi introuvable.. The scheduler operates as follows: 1. 2. 3. 4. 5. D.1 It stores in a single array all agent NATs, i.e., the elements {Agent[i][j]. ActionTime[0]|0≤i<AGENTTYPENB,0≤j<iAMAXNb[AGENTTYPENB]}. It identifies the lowest NAT. Then, it triggers the ACTION cycle of the corresponding agent. At the end of its cycle, the agent shifts its action times (i.e., ActionTime[i+1]=ActionTime[i]) and and increments ActionTime[0] ( i.e., ActionTime[0]= ActionTime[0]+ DActionTime). Then, the agent returns the control to the scheduler, which retrieves the next lowest NAT (step 2), triggers the cycle of the corresponding agent, and so on. Note in passing that the scheduler can trigger several times consecutively the same agent if the agent has a very small DActionTime and thus increments very litte its action time in step 4. Fast algorithm to retrieve the lowest NAT (Revision: June 2013, JHC) D1.1 Principle Writing a fast algorithm to retrieve the lowest NAT is not so easy. The simplest solution consists in scanning all agents to identify the one with the shortest NAT. However, this brute algorithm scales linearly as the total number N of agents, and dramatically slows down the execution speed when there are typically thousands of agents. It is necessary to consider some more sophisticated approach to identify more rapidly the lowest Next Action Time (denoted LowestNAT) from the NAT array. We build the following NATInfo structure: typedef struct { Revision: 128 IV-47/206 18/12/2013 CORE MANUAL ///////////////////////////////////////////////////////////////////////////////////// // THIS STRUCTURE GROUPS TOGETHER POINTERS TO THE NAT (NEXT ACTION TIME) OF // EACH AGENT ///////////////////////////////////////////////////////////////////////////////////// float ** pNAT; // ARRAY OF POINTERS TO Next Node Time OF EACH AGENTS AGENT** pAgent; int iAgentNb; }NATInfo; Code 1: NATInfo structure declaration Let pNatInfo be an instance of this structure. Then, pNatInfo.pNAT[i] points to the NAT of the agent pNATInfo.Agent[i]. Of course, scanning this one dimension array pNatInfo.pNAT enables retrieving the lowest NAT and to identify the corresponding agent. Now, to illustrate how to speed up the identification of the agent with the lowest NAT, let us consider the example displayed in the next figure. There are 27 agents. The array pNatInfo.pNAT[i]is split is 3 subarrays (level 1), namely the array [1,9], [10,18], and [19,27]. Let us assume that we know the index I1 of the agent with the lowest NAT in the array [1,9], the index I2 of the agent with the lowest NAT in the array [10,18], and similarily the index I3 of the agent with the lowest NAT in the array [19,27]. Then this splitting procedure is iterated to level 2. For instance, the array [1,9] is split in three subarrays [1,3], [4,6] and [7,9] and we assume that we know the index of the agents with the lowest NAT respectively in [1,3], [4,6] and [7,9]. This processing is also applied to the level 1 arrays [10,18], and [19,27]. Fig. 11: Tree of LNATs and NATs for 3-layer decomposition of pNatInfo.pNAT Now, let us assume that in a first step, we have develop an algorithm which determines for each interval (i.e., in level 1 and 2): 1) The index of the first agent of the interval, 2) The index (denoted iLowestNAT) of the agent with the lowest NAT in each interval. For clarity, let us consider Fig. 11 and that the agent with the lowest NAT is that of index iLowestNAT=9 in [7,9]. The figure shows that iLowestNAT(1,9) =LNAT(7,9) =9 (see the purple blocks in the figure) ! The sole comparision of the LNATs of [1,9], [10,18], and [19,27] in level 1 is needed to retreive the index of the lowest-NAT agent! This number must be compared to the 27 comparisons needed in the brute scan of the array pNatInfo.pNAT. Now, let us consider that the agent of index 9 is activated and increases its NAT. Consequently, the algorithm must update the LNATs of all the purple sets in Fig. 11. This forces 3 comparisons in level 3 to update the LNAT for the set [7-9] in level 2. Then, 3 comparisons of the LNATs are needed in layer 2 to update LNAT for the set [1-9]. Thus, 6 comparisons are needed to update the different levels of Fig. 11. At all, 9 comparisons are needed to update the LNATs and to extract the LNAT of the whole set of times. This algorithm is 3 times faster than the brute initial algorithm. Consider the general case with N1 leaves (i.e., agents) of the lowest layer are grouped py k to a node in the upper layer. Thus, this node will control N1xk leaves. If the nodes of this layer are also grouped Revision: 128 IV-48/206 18/12/2013 CORE MANUAL by k, a node in the upper layer will control N1xkxk leaves and so on. Thus a tree wih N layers will described N1xkN leaves, i.e., agents. Thus, Example: layer. N A N I k N L 1 , where NL is the number of layer. N L 1 . Thus, one sole layer. Then; N A N I , that is regular because there is one sole N L 3 , just a in solution is trivial.. k 3 . Example: Fig. 11. If NI 3 , then N A 3k 2 . In Fig. 11, N A 27 , thus, the when a node in the tree connects k nodes of the lower level, the total number of agents . Then NA k NL . If the tree has one sole layer, the top interval is not split and includes NA agents If the tree has two layers, the top layer is split in k elements, and each elements is connected to k elements of the lower layer. (9). D1.2 Implementation The fast identification of the agent with the lowest NAT following this algorithm is achived by the class CTimeIntervals written by Fabien Bayol in February 2003 The number k of recursions is an adjustable parameter. In practice, it turns out that (contrarily to the "theoretical" behavior expected from the analysis in the previous paragraph), the fastest identification of the agent with the lowestNAT is achieved when k is not larger than 2 or 3. The code is typically as follows: To setup the NATInfo structure and build a CIntervals instance //SECTION TO INITIALIZE A NATInfo STRUCTURE TO BUILD A CTimeIntervals INSTANCE WHICH //SPEEDS UP THE EXTRACTION OF THE SHORTEST ACTION TIME OF ALL AGENTS NATInfo* pNATInfo = BuildNATInfo(pData->iAMAXNb, pData->Agent); CTimeIntervals ActionTimes;//CREATE TIME INVERVALS TO QUICKLY RETREIVE THE SHORTEST NAT if (pNATInfo->iAgentNb > 15) ActionTimes.Build(pNATInfo->pNAT,pNATInfo->iAgentNb,3); else ActionTimes.Build(pNATInfo->pNAT,pNATInfo->iAgentNb,1); To retrieve the lowest NAT, simply call: iLowestNAT = ActionTimes.getLowestNTRank();//GET INDEX OF LOWER NAT IN ActionTimes float lowestNAT = *pNATInfo->pNAT[iLowestNAT]; To update the array of LNATs, simply call: ActionTimes.Update(pNATInfo->pNAT); Code 2: Code to quickly identify the agent with the lowest NAT WARNING: At the moment, the generation of new agents activates inactive agents at the end of the screen refresh period as a residue of the Old synchronous mode described below. The NATs of (9) Consider only two levels in Fig. 5, and N agents splits in n1 intervals In level 1 consists in comparing the LNAT(i) of the n1 intervals to identify the interval which includes the lowest NAT. This operation costs n1 comparisons. In level 2, there are N/n1 comparisons. The total algorithm costs n1+N/n1 comparisons. This count is minimum when n1 N , and costs in that case 2 N comparisons instead of N comparisons for the brute method. Revision: 128 IV-49/206 18/12/2013 CORE MANUAL inactive agents evolve similarly as those of active agents. This way of adding agents will have to be clarified. D.2 Integration of the scheduler in MainTestAsynchronous Fig. 12 depicts the integration of the scheduler in the function void MainTestAsynchronous(COREDATA* pData). For simplicity, we consider here non-communicating agents, although the code is slightly more complicated when all agents can potentially communicate, and therefore use a double scheduler to manage two possible operation cycles. The operation described in Fig. 12 is more complicated than that represented initially in Erreur ! Source du renvoi introuvable., because the program here: Considers that some agents are not active. Calculates displayed data and refreshes periodically the display. Refreshes the scheduler tree as explained previously. Enables the thread abortion. Generates new agents. We detail the different steps: Step 1: Test whether the maximum simulation time (MSTime) is greater than next Screen Refresh Time (SRT). If MSTime>SRT, exit Scheduling of agents and return the control to the interface for another simulation. If MSTime<SRT, go to step 2. Step 2: Retreive the LNAT from the NAT array, and identify the associated Agent. Step 3: Test whether the LNAT is smaller than the screen refresh time (SRT)? If it is, test whether the agent is active or not (see the blocks 4 in Fig. 12). Step 4: If agent is active, transfer the control to the agent, which excutes its ACTION cycle (following agent's policy). Fig. 12: MainTest and Scheduler interactions flowchart. Revision: 128 IV-50/206 18/12/2013 CORE MANUAL Step 6: Update agent's NAT. Each active agent directly executes this operation at the end of its ACTION cycle. If the agent is inactive, the NAT is artificially increased to a high value (when the agent became active, the NAT is initialized to a coherent value). Step 7: The scheduler’s data be recalculated according to the NAT array, to consider the agent’s NAT evolution. Step 8: If SRT>LNAT, the screen is refreshed (charts or 2D display). Step 9: Increment the SRT for the next screen refresh. Now, we can understand the code in the fuction MainTestAsynchronous, in particular the integration of the scheduler. In fact there are two schedulers in the general cases when agents can communicate. One is the ActionScheduler, which exits for all agents, and the second one is the pNodeSchedulerArrays, which is activated for communicating agents only. In this context, an agent has an ActionTime array (as explained previously) and a NodeTime array, for communications. Line 01, the ActionScheduler retrieves the index iNAT of the agent with the LNAT. Line 02 retrives the lowest NAT! Line 05-06 retrieves the lowest NNT for communicating agents Line 09 compares the two lowestNAT and lowestNNT to the ScreenRefreshTime. If one is smaller than the SRT, an agent cycle is actived, either a communication cycle with the function NodeMode (see line 12) or an action cycle with the function ActionMode (see line 21) void MainTestAsynchronous(COREDATA* pData) ///////////////////////////////////////////////////////////////////////////////////////// ///////////////////////////////////////////////////////////////////////////////////////// { ........................................ ........................................ //////////////////////////////////////////////////////////////////////////////////// while(ScreenRefreshTime<=MaxTIME) { // MAIN LOOP ///////////////////////////////////////////////////////////////////////////////// // SECTION TO //FORCE STEP BY STEP EXECUTION ....................... ///////////////////////////////////////////////////////////////////////////////// //SECTION TO CONTROL THREAD ABORTION ....................... ///////////////////////////////////////////////////////////////////////////////// //SECTION TO GENERATE AGENTS AT RUNTIME ....................... ///////////////////////////////////////////////////////////////////////////////// //SECTION TO SCAN AGENTS UNTIL NEXT ACTION AND NEXT NODE TIMES ARE LARGER //THAN NEXT SCREEN UPDATE!!!! 01 iNAT = ActionScheduler.getLowestNATRank(); 02 float lowestNAT = *pActionSchedulerArrays->pNAT[iNAT]; 03 float lowestNNT; 04 if (pNodeSchedulerArrays->iNodeNb != 0) { //THE NETWORK SCHEDULER WAS CREATED 05 iNNT = NodeScheduler.getLowestNATRank(); 06 lowestNNT = *pNodeSchedulerArrays->pNNT[iNNT]; 07 } 08 else lowestNNT = (float) pow((float)2,31)-1; 09 while(ScreenRefreshTime>lowestNAT || ScreenRefreshTime>lowestNNT) { 10 if (lowestNNT<lowestNAT) { // AGENT COMMUNICATES 11 AGENT* pAgent = pNodeSchedulerArrays->pAgent[iNNT]; 12 NodeMode(pData,pAgent,LookUpTable); //<--- IMPORTANT 13 pAgent->iNODECycleNb+=1; 14 pAgent->iNODEFastFullNb+=1; //RANDOM INITIALIZATION 15 // SCHEDULER UPDATE WITH NEW NNT 16 NodeScheduler.Update(pNodeSchedulerArrays->pNNT); 17 iNNT = NodeScheduler.getLowestNATRank(); Revision: 128 IV-51/206 18/12/2013 CORE MANUAL 18 lowestNNT = *pNodeSchedulerArrays->pNNT[iNNT]; 19 }else { // AGENT ACTS 20 AGENT* pAgent = pActionSchedulerArrays->pAgent[iNAT]; 21 ActionMode(pData,pAgent,LookUpTable); //<--- IMPORTANT 22 pAgent->iACTIONCycleNb+=1; 23 pAgent->iACTIONFastFullNb+=1; //RANDOM INITIALIZATION 24 // SCHEDULER UPDATE WITH NEW NAT 25 ActionScheduler.Update(pActionSchedulerArrays->pNAT); 26 iNAT = ActionScheduler.getLowestNATRank(); 27 lowestNAT = *pActionSchedulerArrays->pNAT[iNAT]; 28 } 29 } //////////////////////////////////////////////////////////////////////////////// ....................... ....................... ....................... } //////////////////////////////////////////////////////////////////////////////// ........................................ ........................................ } Script 10: Scheduler implementation and agent activation in MainTestAsynchronous E Synchronous scheduling Nota: This section persists in the CORE manual for “historical” reasons because MASS initially operated in the pure synchronous mode. However, we recommand using the asynchronous mode exclusively, as it operates in the synchronous mode when all DActionTime are equal. The selection between synchronous or asynchronous activation of agents is automatically defined in the Check Box entitled “Synchronous mode” is selected in ParamPage2 (see Fig. 17 page 64). The synchronous mode is executed in the function void MainTestSynchronous(COREDATA* pData) and the asynchronous mode in the function void MainTestAsynchronous(COREDATA* pData). The flowchart of the synchronous mode is represented in Fig. 13 below, which shows that each time iteration consists in executing 2 imbricate loops, one for the populations, and one for the agents. Revision: 128 IV-52/206 18/12/2013 CORE MANUAL START MainTest MaxIter>Iter (1) yes All populations Selected? Iter=Iter+1 (5) Select new Population No Yes Send WM_PAINT message to CAGNTView (2) All Agents Selected? Yes Scheduler No Select a new Agent Yes Is Agent Active (6) END MainTest Yes No AGENT CYCLE (8) Fig. 13: MainTest and Scheduler interactions flowchart (synchronous mode) In the revision in Oct 2002, all agents sample their environment (i.e., construct their environment table) at the same frequency and move on the grid at the same top speed, namely one cell per cycle. The turns of the agents at each cycle can be randomly redistributed to break the strict ordering that is not very consistent with the reality of asynchronous operations. Classes are described in section D. Recall that It is based on the following structures: The grid The grid is a rectangle (i.e., a 2D array) of identical cells. The size of the grid is limited by the quantity of RAM installed in the computer. The obstacles Obstacles are immobile in the grid. There is at most one obstacle per cell. The agents In the current version, the simulator describes at most six populations of interacting agents. The agents move in the grid. An agent cannot move into a cell already occupied by an obstacle or another agent. Revision: 128 IV-53/206 18/12/2013 CORE MANUAL F Agent cycle F.1 Principle The agent cycle was represented as a "black" box from Erreur ! Source du renvoi introuvable. to Fig. 13. Fig. 14 below details the processing executed by the agent during its cycle. However, remember that: Fig. 14 is incomplete because representing the whole agent cycle is complex. In particular, the agent considered here has no communication capabilities. Fig. 14 is not the real implementation, which depends on how the environment is scanned and built (see below FINE and COARSE modes and the incremental construction). Fig. 14: Decomposition of the agent cycle in 7 steps Whatever the mission is, the agent cycle is always similar and composed of 7 steps: Step1 : Test to construct the spatial environment The first step consists in testing whether the spatial environment must be constructed, as it is not needed in some applications (or some configurations). For example, if agents are not mobile, it is necessary to construct one single time the representation of the environment to locate the neighboring agents. Steps 2 : Construction of the representation of the spatial environment: The construction of the representation of the spatial environment consists in determining who occupies the surrounding cells within a sense radius. This spatial state depends on how is represented the space around the agent. It is important to stress that several representations of the surrounding space are possible and that several constructions are also possible. The COARSE and the FINE representations are described in chapter 8 page 127. Revision: 128 IV-54/206 18/12/2013 CORE MANUAL Steps 3 : State identification The agents must be always able to recognize one state. The state identification (step 4 in Fig. 14) consists in testing a Boolean expression involving both the spatial environment and the state variables of the agent. Steps 4 (optional) : Reinforcement learning processing See section E page 162. Steps 5 : Policy Following the state identification, the agent chooses an action. In general, several actions are possible with different probabilities. If reinforcement learning is activated, the periodically agent updates the different agent probabilities from the comparison of its evolution resulting from the previous actions. The selection of actions represents the agent's policy (see section). The selection of actions represents the agent's policy described in chapter9 page 150. Steps 6 : Execution of the selected action Then, the agent executes the selected action. The concept of action is particularly fuzzy. One may distinguish between low-level and high-level actions. For instance “moving to the next cell in the northwest direction” is a low-level action. Now, “moving away from the agents of the same family” is a high-level action, which requires some additional agent processing to deduce the final low-level action. We shall denote a high-level action as a directive. Following a directive, the agent decides one or several actions and finally selects one. It is generally much simpler to specify a policy (i.e., a state automaton) in terms of directives than in terms of low-level actions. Directives and actions are described in the second manual entitled DLLs Manual. The program must be as versatile as possible to enable changing the agent mission and within a mission to test different environment representations, different environment constructions and different policies. In this context, the programmer can customize the simulation module without rewriting most of the AI code (see Manual 3 for customization). The programmer can: Define the initial distribution of obstacles (see chapter 6 and ). Define the initial distributions of agents (see the Start Distribution group box in Fig. 43, page 127). Define the agent turn mode (synchronous versus asynchronous operation modes of agents, see Fig. 43, page 127). Define the generation mode of additional agents during the simulation (see the Steady State Generation group box in Fig. 43, page 127). Define the environment construction mode. The different construction modes are described in details in paragraph IB of chapter 8, page 133. We consider different incremental and non incremental modes, based on the cell scan or the agent scan. Define the Environment representation. We consider 2 representation modes: The COARSE mode and the FINE mode are described in details in paragraph IA of chapter 8, page 127). Define the missions, tasks and identify actions. Note that the combination of several representation modes (at least 2: COARSE and FINE), of several scan modes (AGENT SCAN & various CELL SCANS, including the incremental and nonincremental construction) AND several tasks (to fulfill the mission) provides a significant flexibility in the agent behavior design. Revision: 128 IV-55/206 18/12/2013 CORE MANUAL G Thread initialization The function void MainTest(COREDATA* pData) interfaces the module WIN32 with the processing thread. Concretely, clicking any button Draw Curve, Add to Chart or Rebuild Chart (see Fig. 43) initiates the following cycle: The control is transferred to the member function void CAGNTView::StartThread(), which begins the thread and calls the thread function ThreadProc, which passes a THREADATA pointer to MainTest (see paragraph B3.2: Control transfer to start simulation page 68). The corresponding code is displayed below. void CAGNTView::StartThread() /////////////////////////////////////////////////////////////////////// /////////////////////////////////////////////////////////////////////// { Invalidate(); INT ThreadProc(LPVOID); //FUNCTION PROTOTYPE ThreadData.bRunThread=true; ThreadData.bAbortThread=false; pWThread=AfxBeginThread(ThreadProc,&ThreadData); .......... etc ......... } UINT ThreadProc(LPVOID pParam) (July 2003) //////////////////////////////////////////////////////////////////////////////////// //////////////////////////////////////////////////////////////////////////////////// { HWND hwnd; void MainTest(COREDATA* pData); //FUNCTION PROTOTYPE ///////////////////////////////////////////////////////////////////////////////// COREDATA* pData= (COREDATA*) pParam; UINT jMessage=1; UINT iCounter=0; MainTest(pData); pData->bRunThread=false; pData->bAbortThread=false; ///////////////////////////////////////////////////////////////////////////////// //IMPORTANT: DO NOT REMOVE THE NEXT INSTRUCTION BECAUSE IT FORCES THE CORRECT //GRAPHIC UPDATE AT THE END OF THE SIMULATION ::SendMessage(pData->m_ViewhWnd,WM_PAINT,0,0); ///////////////////////////////////////////////////////////////////////////////// //REPAINT THE PROPERTY PAGES TO UPDATE ALL CONTROLS IF THEY ARE OPEN ON THE SCREEN CMainFrame* pTop=(CMainFrame*) AfxGetApp()->m_pMainWnd; if (pTop->m_pPropFrame!=NULL) { hwnd=pTop->m_pPropFrame->m_pModelessPropSheet->m_Page1.m_hWnd; ::SendMessage(hwnd,WM_PAINT,0,0); hwnd=pTop->m_pPropFrame->m_pModelessPropSheet->m_Page2.m_hWnd; ::SendMessage(hwnd,WM_PAINT,0,0); hwnd=pTop->m_pPropFrame->m_pModelessPropSheet->m_Page3.m_hWnd; ::SendMessage(hwnd,WM_PAINT,0,0); hwnd=pTop->m_pPropFrame->m_pModelessPropSheet->m_Page4.m_hWnd; ::SendMessage(hwnd,WM_PAINT,0,0); hwnd=pTop->m_pPropFrame->m_pModelessPropSheet->m_Page5.m_hWnd; ::SendMessage(hwnd,WM_PAINT,0,0); } ////////////////////////////////////////////////////////////////////////////// //CODE TO OPEN THE MAIN WINDOW WHEN ICONIZED AT THE END OOF THE COMPUTATION if (::IsIconic(pTop->m_hWnd)) { if(::MessageBox(NULL,"End of Calculation.\n Display data?", Revision: 128 IV-56/206 18/12/2013 CORE MANUAL "FROM AGENTS", MB_YESNO | MB_ICONEXCLAMATION)==IDYES) pTop->ShowWindow(SW_NORMAL); } //////////////////////////////////////////////////////////////////////////////// return 0; } MainTest is executed and controls the simulation session. Fig. 12 showed a partial representation of the flowchart of MainTest. The flowchart in Fig. 15 includes additional service tasks in the main iteration loop required to integrate the AI code in the application. These services comprise: 1- Thread execution control: this module controls the thread abortion, possibly requested by the user 2- Storage of terrain to disk. 3- 45- Interpreter calculation for the module GRAPH: Maintest passes arguments to void DataProcessForChart to calculate the function plotted by GRAPH or GDI (see the previous chapters) Generation of new agent during the simulation. Emission of private messages to update the graphic display (terrain or 2D plot of user-defined functions) Fig. 15 also shows that the AI code is not in Maintest but in external routines which are called depending on the selected scan mode: Cell Scan or Agent Scan. Revision: 128 IV-57/206 18/12/2013 CORE MANUAL Fig. 15: Flowchart of the function MainAsynchronous for a non-communicating agent Revision: 128 IV-58/206 18/12/2013 CORE MANUAL G.1 DLL: Function calls in the agent cycle It is important to know "who calls who", i.e., how the control is transferred to start a simulation session. The script below shows the main calls of functions when the agent cycle is imported from a DLL. MainTest MainTestAsynchronous BuidlLookUpTable #include "EiCInitialization.cpp" NetworkMode CellScanNet DllFINECellScanNetwork AgentScanNet .................................... ActionMode BuildEnvACTION FindState CELLScan DllCOARSECellScan .................................... .................................... DllFINECellScan DllFINECellScanMode1 ScanFINECELLClose #include "CellProcAction.cpp" FINEStoreInArray PolicyFunction UpdatePosition ScanFINECELLRing #include "CellProcAction.cpp" FINEStoreInArray PolicyFunction UpdatePosition DLLFINECELLFindState DllFINECellScanMode2 ScanFINECELLClose ScanFINESAroundObjects DLLFINECELLCloseScan #include "CellProcAction.cpp" FINEStoreInArray PolicyFunction UpdatePosition ScanFINECELLRing #include "CellProcAction.cpp" FINEStoreInArray PolicyFunction UpdatePosition DLLFINECELLFindState AGENTScan DllFINEAgentScan .................................... .................................... #include "EiCExecution.cpp .................................... .................................... MainTestSynchronous Script 11: Function calls in the agent cycle Revision: 128 IV-59/206 18/12/2013 CORE MANUAL Chapter 3 Interface: MFC classes This chapter describes the files in the module WIN32 involved to construct the program interface. A A s previously stressed, MASS is a MFC-based application written with VisualC. The solution file (using the terminology of VisualC7) is (typically) entitled Dec08.net\MASS\AGNT.sln for the code saved on December 8th. WIN32 is the main module as it could work (of course with reduced functionalities) without the other modules when it is impossible conversely. Base Classes WIN32 includes the default classes automatically generated by VisualC and derived from the usual basic MFC classes, namely: A.1 class CAGNTApp : public CwinApp CAGNTApp is the top class of MASS. The header AGNT.h includes the identifiers to send private messages, and also the events declaration necessary to synchronize the accesses of threads to critical sections ///////////////////////////////////////////////////////////////////////////// // PRIVATE MESSAGES USED BY THE THREAD TO COMMUNICATE WITH THE PARENT CAGNTView INSTANCE #define WM_DISPLAY_ITER (WM_USER+120) //USER-DEFINED MESSAGE #define WM_DISPLAY_POPNB (WM_USER+121) //USER-DEFINED MESSAGE #define WM_UPDATE_DISPLAY (WM_USER+122) //USER-DEFINED MESSAGE #define WM_END_THREAD (WM_USER+123) //USER-DEFINED MESSAGE #define WM_SAVE_PLAYGROUND (WM_USER+124) //USER-DEFINED MESSAGE ///////////////////////////////////////////////////////////////////////////// //PRIVATE MESSAGES USED BY THE CParamPage TO COMMUNICATE WITH THE PARENT CParamSheet #define WM_RUN_SESSION (WM_USER+130) //USER-DEFINED MESSAGE #define WM_APPLY_BUTTON (WM_USER+131) //USER-DEFINED MESSAGE Revision: 128 IV-60/206 18/12/2013 CORE MANUAL #define WM_SAVE_DEFAULT (WM_USER+132) //USER-DEFINED MESSAGE #define WM_SWITCH_PAGE2 (WM_USER+133) //USER-DEFINED MESSAGE #define WM_SWITCH_PAGE3 (WM_USER+134) //USER-DEFINED MESSAGE #define WM_SWITCH_PAGE6 (WM_USER+135) //USER-DEFINED MESSAGE #define WM_SWITCH_POLICY (WM_USER+136) //USER-DEFINED MESSAGE #define WM_SWITCH_COLORMODE (WM_USER+137) //USER-DEFINED MESSAGE, USED By PARAMPAGE2 #define WM_CHANGE_AGENTCOLOR (WM_USER+138) //USER-DEFINED MESSAGE, USED By PARAMPAGE2 #define WM_OPEN_DLL (WM_USER+139) //USER-DEFINED MESSAGE, USED By PARAMPAGE6 ///////////////////////////////////////////////////////////////////////////// //PRIVATE MESSAGES USED BY EiC ERROR FUNCTION TO ASK MAINFRAME TO REOPEN THE EDITOR #define WM_REOPEN_EDITOR (WM_USER+140) //USER-DEFINED MESSAGE ///////////////////////////////////////////////////////////////////////////// //PRIVATE MESSAGE TO SAVE TO DATA IN THE MISSION PARAMETERS DIALOG #define WM_SAVE_MISSION_PARAM (WM_USER+145) //USER-DEFINED MESSAGE ///////////////////////////////////////////////////////////////////////////// //PRIVATE MESSAGES USED TO CONTROL THE REPLAY OF WMF IMAGES #define WM_PLAY_WMF (WM_USER+148) //USER-DEFINED MESSAGE ///////////////////////////////////////////////////////////////////////////// //PRIVATE MESSAGES USED BY THE DRAFT MODULE #define WM_OK_OBJECT (WM_USER+160) //USER-DEFINED MESSAGE ///////////////////////////////////////////////////////////////////////////// Script. 2 class CAGNTApp : public CWinApp { public: virtual BOOL PreTranslateMessage(MSG* pMsg); HANDLE m_hSafe1; HANDLE m_hPAUSE; //HANDLE FOR EVENT AND SYNCHRONISATION OF THE THREAD HANDLE m_hSTEP; //HANDLE FOR EVENT, STEP BY STEP CONTROL OF THE THREAD CString MASSDir; CString m_AcrobatReaderpath; void InitDefaultData(); HWND hActiveDlg; //HANDLE OF THE ACTIVE DIALOG BOX CAGNTApp(); void ChangeSystemColors(); CMultiDocTemplate* pDocTemplate; void OpenPDF_File(CString PDF_File); //WARNING WARNING WARNING WARNING WARNING WARNING WARNING #define FREEPARAMNB 8 //NUMBER OF PARAMETERS THAT CAN BE MODIFIED //IF YOU MODIFY FREEPARAMNB HERE, MODIFY IT #define FREEPOLICYPARAMNB 6 //NUMBER OF PARAMETERS THAT CAN BE MODIFIED //IF YOU MODIFY FREEPOLICYPARAMNB HERE, YOU //IN GLOBAL.h .. .. .. .. .. .. }; BY THE CORE IN GLOBAL.h BY THE CORE MUST MODIFY IT A.2 class CMainFrame : public CMDIFrameWnd A.3 class CChildFrame : public CMDIChildWnd A.4 class CAGNTDoc : public ColeDocument Revision: 128 IV-61/206 18/12/2013 CORE MANUAL A.5 class CAGNTView : public CformView As MASS is a multidocument application (MDI), it may contain several instances of the CAGNTView/CAGNTDoc classes, explicitly, one per created simulation window. Each CAGNTView instance contains a set of simulation variables declared in the class header CAGNTView.h. The variables and array shared with the simulation thread are grouped together in the instance ThreadData of the structure COREDATA. These variables comprise: The parameters necessary to run a simulation (size of the terrain, number of agents, condition of agent generation, variables to define the environment construction mode, etc…). Data to control the execution of the simulation thread and data updated by the simulation thread, (used by CAGNTView) to trace graphically the evolution of agent populations during the simulation. The full declaration the structure COREDATA is shown below. Member variables described in the previous paragraph are grayed. Most parameters in section 1 of the header are used to define how the agent constructs its environment and how it scans the memory. struct COREDATA { ////////////////////////////////////////////////////////////////////////////////////// short iDY; //SHIFT ////////////////////////////////////////////////////////////////////////////////////// //SECTION 1: AGENTS AGENT* Agent[AGENTTYPENB]; short iAInitNb[AGENTTYPENB]; //INITIAL NUMBER OF AGENTS short iAMAXNb[AGENTTYPENB]; //MAX NUMBER OF AGENTS RESERVED IN MEMORY AGENT0* Agent0; AGENT1* Agent1; AGENT2* Agent2; AGENT3* Agent3; AGENT4* Agent4; AGENT5* Agent5; BOOL bSynchronous; Int iGenMode[AGENTTYPENB]; //INITIAL AGENT GENERATION MODE (RANDOM,LEFT,RIGHT..) short iAGenNb[AGENTTYPENB]; //NB OF AGENTS GENERATED PER ITERATION int iSSMode[AGENTTYPENB]; //STEADY-STATE AGENT GENERATION MODE(RANDOM,LEFT,RIGHT,) char* AgentMode[AGENTTYPENB]; //AgentMode[i][j]: STATE OF AGENT OF TYPE i & RANK j short iRadiusNb[AGENTTYPENB]; //NB OF RADIUSES AROUND AGENT. NOW: iRadiusNb=2 short* Radius[AGENTTYPENB]; //RADIUSES AROUND EACH AGENT int iSectorNb[AGENTTYPENB]; //NB OF ANGULAR SECTORS TO DESCRIBE FAR ZONES short iAScanMode[AGENTTYPENB];//0:SCAN ZONES; 1:SCAN AGENTS short iAEnvironMode[AGENTTYPENB];//0:COARSE REPRESENTATION; 1: FINE REPRESENTATION COLORREF AgentColor[AGENTTYPENB]; //COLOR OF AGENTS short iAStrategy[AGENTTYPENB]; //AGENT POLICY BOOL bMissionDLL[AGENTTYPENB]; BOOL bDefaultStraightMove[AGENTTYPENB]; //if TRUE, STRAIGHT MOVE IS DEFAULT /////////////////////////////////////////////////////////////////////////////////// //SECTION 2: OBSTACLE short iObst1Nb; //NB OF TYPE1 OBSTACLES IN THE TERRAIN short* ObstacleX; //X-COORDINATE OF OBSTACLES CALCULATED FOR 2D GAPHICS short* ObstacleY; //Y-COORDINATE OF OBSTACLES CALCULATED FOR 2D GRAPHICS OBSTACLE* Obstacle1; //OBSTACLES OF TYPE1 IN THE TERRAIN int iGenModeObstacle1; //INITIAL GENERATION MODE OF OBSTACLES (RANDOM=0, FROM A FILE=1,..) COLORREF ObstacleColor; //COLOR OF obstacles /////////////////////////////////////////////////////////////////////////////////// //SECTION 3: TERRAIN short XDim; //X DIM OF THE TERRAIN short YDim; //Y DIM OF THE TERRAIN CELL* Cell; //THE TERRAIN IS A RECTANGULAR ARRAY OF CELL OBJECTS Revision: 128 IV-62/206 18/12/2013 CORE MANUAL bool bXtorusMode; //if TRUE, NO X BORDER, CYCLIC CONDITION bool bYtorusMode; //if TRUE, NO Y BORDER, CYCLIC CONDITION short iteratNb; // bool bSaveTerrainToDisk; CString TraceFileName; short iTraceSavePeriod; int iAgentSizeInWMF; /////////////////////////////////////////////////////////////////////////////////// //SECTION 4: 2D-GRAPHICS bool bTracing; //true: TRACE THE AGENTS IN THE 2D GRAPHICS bool bDisplay; //true: DISABLE 2D GRAPHICS /////////////////////////////////////////////////////////////////////////////////// //SECTION 5: THREAD CONTROL CString Title; //CVIEW TITLE HWND m_ViewhWnd; //HANDLE OF THE VIEW (TO RETURN MESSAGES) HWND m_TopFRMhWnd; //HANDLE OF THE TOP FRAME (TO DETECT ICONIZED STATE) bool bRunThread; //DEFAULT= true; IF false: STOP THREAD EXECUTION; bool bStepThread; //STEP BY STEP MODE bool bAbortThread; //FALSE=STOP; TRUE=RUN bool m_hWaitTrhead; //TO SUSPEND THE TREAD (??? OBSOLETE?) HANDLE m_hEndTrhead; //SYNCHRONIZATION HANDLE TO RETURN TO MAIN THREAD int m_iTopicsNb; //THE INDEX OF THE TOPICS UNDER PROCESSING int m_iThreadPriority; bool bInfiniteRUN; //true: INFINITE NUMBER OF ITERATIONS bool bRandomizeTour; //true: RANDOMIZE AGENTS TOURS AT EACH ITERATION int iDelayPerItera; //DELAY ADDED TO SLOW DOWN THE MAIN LOOP EXECUTION /////////////////////////////////////////////////////////////////////////////////// //SECTION 6: 2D GRAPH float* XData; //FOR QCWChart float* YData; //FOR QCWChart int iChartPtNb; //NB OF POINT FOR XData & YData ARRAYS /////////////////////////////////////////////////////////////////////////////////// //SECTION 7: PARSER CString EiC_CODE; //CODE FOR THE INTERPRETER /////////////////////////////////////////////////////////////////////////////////// //LIST OF GRAPHIC OBJECTS DEFINING THE OBSTACLE DRAFT CLine* Line; //ARRAY OF LINES DRAWN IN THE WINDOW int iLineNb; //NB OF DRAWN LINES CRectangle* Rect; //ARRAY OF RECTANGLES DRAWN IN THE WINDOW int iRectNb; //NB OF DRAWN RECTANGLES CBrokenLine* BrokLine; //ARRAY OF BROKEN LINES DRAWN IN THE WINDOW int iBrokLineNb; //NB OF DRAWN BROKEN LINE CPolygone* Polygone; //ARRAY OF POLYGONES DRAWN IN THE WINDOW int iPolygoneNb; //NB OF DRAWN POLYGONES /////////////////////////////////////////////////////////////////////////////////// }; B Interface classes B.1 Review We list here several additional classes included in the module WIN32 to enrich the graphic interface and to make as simple as possible the interaction of the user with the application: class CBmpDialog : public CfileDialog. This class is an extension of the Microsoft CfileDialog class, which integrates a Metafile (WMF) viewer in the OpenFile Box. This functionality is particularly useful to preview the obstacles configuration before loading a file. Revision: 128 IV-63/206 18/12/2013 CORE MANUAL class CcolorArray. This simple class simplifies the use of RGB colors. class CParamFrame : public CminiFrameWnd. class CParamSheet : public CpropertySheet. This class is the parent of the pages (CparamPage1, CparamPage2,.. until CparamPage9) to setup the parameters of the simulation session. class CParamPage1 : public CpropertyPage This class controls the terrain parameters, the obstacles, the general execution of the program (number of iterations,..), etc.. Fig. 16: Property Page 1 with the 3 buttons “Draw Curve”, “Add to Chart, and “Rebuild Chart” to start a simulation session. class CParamPage2 : public CpropertyPage. Fig. 17: Property Page 2 with the 3 buttons “Draw Curve”, “Add to Chart, and “Rebuild Chart” to start a simulation session. Revision: 128 IV-64/206 18/12/2013 CORE MANUAL This property page is also described in paragraph Recall that It is based on the following structures: The grid The grid is a rectangle (i.e., a 2D array) of identical cells. The size of the grid is limited by the quantity of RAM installed in the computer. The obstacles Obstacles are immobile in the grid. There is at most one obstacle per cell. The agents In the current version, the simulator describes at most six populations of interacting agents. The agents move in the grid. An agent cannot move into a cell already occupied by an obstacle or another agent. Revision: 128 IV-65/206 18/12/2013 CORE MANUAL Agent page 53 and Fig. 43 page 127. class CparamPage3 : public CpropertyPage. Fig. 18: Property Page 3 for communications. I includes the 3 buttons “Draw Curve”, “Add to Chart, and “Rebuild Chart” to start a simulation session. class CparamPage4 : public CpropertyPage. This class contains the syntax-colored editor, which is coupled to the interpreter (see chapter 5, page 84). This functionality is included to enable customization of the functions plotted at run time in the module GRAPH Fig. 19: Property Page 6 with the 3 buttons “Draw Curve”, “Add to Chart, and “Rebuild Chart” to start a simulation session. Revision: 128 IV-66/206 18/12/2013 CORE MANUAL class CparamPage5 : public CpropertyPage. class CparamPage6 : public CpropertyPage. Fig. 20: Property Page 6 with the 3 buttons “Draw Curve”, “Add to Chart, and “Rebuild Chart” to start a simulation session. class CDialogBarEx : public CdialogBar. class CMyDialogBar : public CdialogBarEx. These classes extend the default CDialogBar class by providing functionality of initialising the dialog bar and direct access to the control via their ID using the function DX_Control( CDataExchange* pDX, int nIDC, CWnd& rControl ). class CSplashWnd : public CWnd. Simple class to display a splash window at application startup. class CNumSpinCtrl : public CspinButtonCtrl. Simple class defined to extend spin control to real numbers. B.2 Parameters management in the property pages Most parameters controlling the simulation sessions (stored in the structure ThreadData) are adjustable in the 6 property pages CParamPage1, CparamPage2, etc.. defined in the previous paragraph, which are members of the class CParamSheet : public CpropertySheet. In this context, it is simpler to manage all pages from their common parent, i.e., from CParamSheet. One reason to use this central control is that CParamPage2 and CParamPage6 display the parameters of the agent selected by the agent type spin control (see Fig. 17 page 64). Thus, depending on the agent selection, CParamPage2 and CParamPage6 display different parameters and it is simpler to keep track of these parameters in tables in CParamSheet, which monitors the display of the different ParamPage. Revision: 128 IV-67/206 18/12/2013 CORE MANUAL It results from this centralized supervision of the agent parameters that many controls in ParamPage2 and ParamPage6 send private messages to ParamSheet, which processes the relevant actions. All private messages are declares in CAGNTApp.h, see Script. 2page 61 (27 Nov 2003): For instance, the message WM_SWITCH_PAGE2, is sent by ParamPage2 to ParamSheet when the users switch the agent type with the agent spin control. ParamPage2 sends the message to its parent with the standart WIN32 function: ::SendMessage(GetParent()->m_hWnd,WM_SWITCH_PAGE2,iAType,iOldAType); B.3 B3.1 Function calls Control transfer to change simulation parameters To change simulation parameters prior to beginning a simulation, the user must open the parameter sheet by clicking the item Params in the application menu (see Erreur ! Source du renvoi introuvable.). Then: The control is transferred to the active instance of CAGNTDoc which executes its member function void CAGNTDoc::OnParamMenu(). This function invokes void CMainFrame::OnProperties(), which calls void CParamSheet::UpdateParamSheet(). The role of this function consists in updating the contents diplayed in the paramPage, i.e., in copying the parameters of the active instance of CAGNTView to the member variables of the property pages, which therefore displays the simulation parameters of the selected window for further modification by the user. Fig. 16 displays the property page1 of the property sheet. B3.2 Control transfer to start simulation The user starts a simulation session by clicking one of the following buttons: “Draw Curve”,, “Add to Chart” or “Rebuild Chart”, in the active property page. Then: The active property page sends a private message WM_RUN_SESSION to the property sheet which executes the function CParamSheet::OnRunSession. Remember that the property sheet is the parent window of all property pages. Thus, the advantage of transferring the control to the property sheet is that all variables defined in the property pages are easily accessible. OnRunSession conducts 3 actions: 4) It calls bool CParamSheet::CheckParams() to check that all parameters updated in the property pages are correct, i.e., in the admissible limits . 5) If it is, it calls void CParamSheet::SaveAndRebuildAll(), which calls CParamSheet::TransferPage1ParametersToCOREDATA, then CParamSheet::TransferPage2ParametersToCOREDATA, and so on to copy the member variables of the property pages to the active CAGNTView instance (remember that MASS is a MDI application) and to update the dimension of the data arrays used to trace the simulation. For instance, the code of CParamSheet::SaveParams() below, shows the section to update the agent populations. pData is a pointer to the structure COREDATA. for (i=0;i<AGENTTYPENB;i++) { delete [] pData->AgentMode[i]; pData->AgentMode[i]= new char[pData->iAMAXNb[i]]; delete [] pData->Agent[i]; pData->Agent[i] = new AGENT[pData->iAMAXNb[i]]; etc… Revision: 128 IV-68/206 18/12/2013 CORE MANUAL 6) B.4 Then, it calls the function CAGNTView::StartThread() of the active instance of CAGNTView, which initiates and launches the simulation thread. Code to add simulation parameters to the interface We assume that the reader is familiar with the environment development of VisualC. We consider an example to show how to add one simulation parameter. This parameter must have an edit box in the interface and must be declared in COREDATA to be used by the simulation thread. We assume that a new integer variable iTest must be added to control the simulation execution. STEP 1: Add a button, or an edit control (of any other resource) to a property page, say for instance to page4. We assume that the ID of this control will be ID_TEST in the resources associated to property page4. STEP2: Run the class wizard of VisualC and add the member variable (for instance denoted m_iTest) to CparamPage4. Thus, m_iTest is associated to the resource ID_TEST of the property CParamSheet::page4. STEP3: Edit the file Threaddata.h and add the variable (for instance denoted iTest) to the COREDATA structure. It is necessary to declare this variable to copy the value of the property page variable CparamPage4::m_iTest to the COREDATA, that is transmitted via a pointer to the Threadfunction. Note that it is particularly simple to use a single name m_iTest to represent the 2 different variables COREDATA::m_iTest and CparamPage4::m_iTest associated to the same parameter. STEP4: Edit void CAGNTView::OnInitialUpdate() and add the initialization code of the variable iTest. For instance, if the initial value is 3, add: ThreadData.iTest=3; STEP5: Edit CParamSheet::CparamSheet add add the next code to transfer the value from the active window to the property page MPage3.m_iTest=pView->ThreadData.iTest STEP6: Add the same code to void CParamSheet::UpdateParamSheet() B.5 STEP7: Edit void CParamSheet::SaveParams() and add the following code to transfer the value from the page to the active view prior to running a simulation pView->ThreadData.iTest=MPage3.m_iTest STEP8: Add the same code to CParamSheet::OnApplyButton Code to store parameters in registries It is possible to store in the Windows registries most parameters that are adjustable in the property pages (Cparampage1, Cparampage2, etc..). The values of parameters saved in the registries become the default initial values for the next run of MASS. Code to write parameters in registries: To save the parameters in all property pages, click the small square button (entitled “save settings as default”) in the right bottom corner. Clicking this button transfers the control to the following member function of CParamSheed : LRESULT CParamSheet::OnSaveParamsAsDefault(WPARAM wParam,LPARAM lParam) Revision: 128 IV-69/206 18/12/2013 CORE MANUAL This function extensively uses the Win32 routines WriteProfileInt and WriteProfileString to save data in the registries. Perhaps, the most interesting feature of this code is the systematic call to the following macro: ///////////////////////////////////////////////////////////////////////////// #define SAVEINREGISTRY(n,String,param) \ if (n==0) AfxGetApp()->WriteProfileInt("PROP PAGE2",String,m_Page2.param); else if (n==1) AfxGetApp()->WriteProfileInt("PROP PAGE3",String,m_Page3.param); else ::MessageBox(NULL,"CODE NOT WRITTEN","FROM SAVEINTEGISTER",MB_OK); ///////////////////////////////////////////////////////////////////////////// The macro does not check the passing parameters and uses the member variables m_Page3 of CParamSheet. \ \ \ \ m_Page2, Code to read parameters in registries: Registries are read when the View is constructed to define default initial values of parameters. The code to read the registries is in void CAGNTView::OnInitialUpdate(). It rests essentially to the call of the functions GetProfileInt and GetProfileString. Revision: 128 IV-70/206 18/12/2013 CORE MANUAL Revision: 128 IV-71/206 18/12/2013 CORE MANUAL Chapter 4 Agent properties calculation at runtime The CORE includes a C - like interpreter (coupled to a syntax-colored editor) to calculate and display at runtime any user-defined agent properties. This appraoch enables customization of the function plotted by the module GRAPH, without additional code compilation. Revisions: 080801: Shift of the Eic interpreter in a DLL (JHC) O ne essential and fundamental facility of the CORE is to make it possible to graphically plot any property of the agents during the temporal evolution of the populations. It is admitted that you already read the chapter entitled "Display & management of data" in the Tutorial of MASS (see the file Tutorial.pdf). MASS includes two solutions to calculate and plot data at runtime: 1) The solution discussed in this chapter consists in calculating the agent property (i.e., any function defined from the agent variables) with an interpreter because it enables changing at runtime the functions (plotted by the module GRAPH, see next chapter) without recompiling the code. We call this approach the interpreter approach. However it has some intrinsic limitation as it does not slow down the execution speed of MASS so long as the time needed to calculate the plot functions (with the interpreter) is a small fraction of the time devoted to calculating the agent dynamics through the compiled code executed in Thread II (see Fig. 2 in page 15). 2) Another solution consists in defining the property function in the DDL (so-called DLL approach). In that case the user-defined code defining the agent function must be inserted in the function GraphFunc of the agent 1. The benefice of this solution is that the property calculation is much faster (as the function code in compiled in the DLL). The price to pay is less interactivity in the definition of the property. Revision: 128 IV-72/206 18/12/2013 CORE MANUAL A A.1 Interpreter approach Selecting an existing interpreter Embedding an third-party interpreter in a compiled application is a tedious task. Why? The main issue consists in finding a solution to make that the interpreter shares data with the host, or in other words, that it is possible transfering data from the compiled code to the interpreter and conversely. Several free C interpreters were available on the WEB in 2002 (for instance: Cint, CH, CSL, EiC, ICI, Quincy, RuntimeC, SAScript, Seer, etc..). However, this diversity was fallacious because most interpreters were either not documented, or written with old C code that VisualC could not compile, or not fully implemented (sometime float and double types were not defined), etc, etc.. Following many tedious tests, we finally chose EiC, because: 1) It simply enables exchanging data with the host; 2) It is documented; 3) It is a freeware under the Artistic license. EiC code and documentation are available from the WEB site: http://www.kd-dev.com. This application was written by Edmond J. Breen. EiC (as most interpreters) originally worked in a DOS-like edition window. Thus, we developed a syntax-colored editor (for C-like code) displayed in Fig. 21 with the default function, which calculates the number of active agents iAType=1. Fig. 21: Edition window in the “Graph Control” property page Note that the control of the interpreter (in particular the edition window shown in Fig. 21) is located in the "Chart Control" property page. It parses the code (i.e., the string in the edition window) to calculate the functions. Concretely, the implementation of EiC in MASS is as follows: The user can Revision: 128 IV-73/206 18/12/2013 CORE MANUAL (10) customize the function plotted in the Chart Mode (see the User Manual) by modifying the function edited in the property page entitled Chart Control. Recall that EiC is a C interpreter, not a C++ interpreter. The user must write C-like code, following the prescription detailed in the EiC manual []. On run (i.e., when depressing Draw Curve, Add to Chart or Rebuild Chart): The script written in the edition window is saved and declared as CString EiC_Code in section VII of the COREDATA structure (see the COREDATA structure in paragraph A.5, page 62). MASS begins the work thread and calls the main function void MainTest(COREDATA* pData), which invokes the interpreter as represented the red strings in Fig. 22 page 74. EiC calculates the plot function(s) defined by EiC_Code. Data calculated by EiC are transferred to the GRAPH module. Fig. 22: Functional blocks in MainTestSynchronous. EiC is embedded through 3 #include instructions represented in the red color. How writing functions is extensively discussed in the next section (see page 84). We only discuss in this chapter how the interpreter is integrated in MASS. The functions written in the edition window must call the the variables of the compiled code, which are used to display data in the graph window. (10) The original default function calculates the number of active type-1 agents. However, by saving the editor window to the file default.eic, it is possible to redefine the default plot function. Revision: 128 IV-74/206 18/12/2013 CORE MANUAL A.2 Sharing data between the host and the interpreter As previously stressed, the main issue to embed any stand-alone interpreter in an application consists in finding a solution to make that the interpreter shares data with the host, or in other words, that it is possible transfering data from the compiled code and conversely or to read the memory space of the application. Suppose for instance that at run time, MASS constructs the following array to calculate the agent dynamics: Eq. 2 int* AgentX = new int [iAgentNb]; As this array belongs to the memory space of MASS, it is not accessible to the interpreter defined as a stand-alone independent application. To move around the difficulty, EiC functions are compiled with MASS and enable building a private array (with same type and dimension), which points to AgentX, enabling data exchange with the compiled data. EiC documentation explains how to define arrays pointing to compiled arrays. This procedure is simple but particularly nasty when one asks EiC to construct arrays with dimension adjusted at runtime to the array defined in MASS as in Eq. 2. Thus, we wrote several simple functions to encapsulate this operation. Function void EiC_BuildInt(char*,int*) This function constructs an integer for the interpreter. Example : To create an integer iX in EiC that points to iCX in the compile code write: int iCX=1; // DEFINITION OF iCX IN THE COMPILE CODE … … EiC_BuildInt("iX",&iCX);//POINTER TO iCX FOR THE INTERPRETER(11) Any operation of EiC on iX modifies the compiled variable iCX. Function void EiC_BuildIntArray(char*,int,char*,int, int*) This function constructs an array of integers for the interpreter. Example 1: To create an array of integers entitled “A3X” in EiC pointing to the integer array MyArray of dimension iDim in the compiled code, write: EiC_BuildIntArray("A",3,"X",iDim,MyArray); Note that iDim is a integer, not a constant, so that EiC constructs an array with the dimension adjusted at run time. Example 2: To create several arrays of integers in EiC entitled “A0X” of dimension iDim[0], “A1X” of dimension iDIm[1], “A2X” of dimension iDim[2], until “ANX” of dimension iDim[N] (where N is an integer) from the arrays of integers MyArray[I] with 0<=I<N, write: for (i=0;i<N;i++) EIC_BuilIntAray("A",i,"X",iDim[i],MyArray[i]); With this code, EiC manipulates the element A0X[k] which points to the element MyArray[0][k], A1X[k] which points to the element MyArray[1][k], etc.. (11) Internally, this function constructs the string MyStr=” int EiC_parseString(MyStr,&iCX). Revision: 128 IV-75/206 iX @ %ld“ and calls 18/12/2013 CORE MANUAL The use of the following function is similar to that of EiC_BuildIntArray Function void EiC_BuildDoubleArray(char*,int,char*,int, double*) Function void EiC_BuildFloatArray(char*,int,char*,int, float*) Function void EiC_BuildBoolArray(char*,int,char*,int, bool*) A.3 Practical integration of the interpreter EiC in MASS EiC is embedded in the function void MainSynchronous(COREDATA* pData), as represented [12] in Fig. 22 page 74. The integration is achieved via the three following include instructions: #include "EiCInitialization.cpp" #include "EiCExecution.cpp" #include "EiCEnd.cpp" A3.1 #include "EiCInitialization.cpp" Prior to invoking EiC, the code in \PARSER\EiCInitialization.cpp (see Script 12 below) constructs several compiled arrays and forces EiC to construct several arrays pointing to these compiled arrays. The role of these arrays is to enable reaching agent parameters in the interpreted code to freely define the functions to plot in the graph window! Explicitly,: 12] [ The code creates the (compiled) arrays AX[0] of dimension iAMaxNb[0], AX[1] of dimension iAMaxNb[1], AX[2] of dimension iAMaxNb[2]… (see the section highlighted with the blue bar 1). Note that these arrays are allocated here in EiCInitialization.cpp, then initialized with the agent positions in EiCExecution.ccp (see Script 13). The array AX[0] is a one-dimension array, which stores the X position of agents, through the initialization: AX[0][i]=Agent[0][i].X! Now, why this crazy duplication of data? Because EiC is a C interpreter and not a C++ interpreter! So, it cannot directly access the member variables of the Agent classe Agent[0][i].X. It is necessary to copy the agents positions { Agent[0][i].X | O≤i< iAMAXNb[i]} in a regular C array, and in a second step, to create a pointer in EiC, which points to the base address of this array. This duplication methods is applied to define the other arrays AX[k] (with the initialization: AX[k][i]=Agent[k][i].X) and the arrays AY[k] (with the intializaition: AY[k][i]=Agent[k][i].Y). This section also contains the (compiled) arrays iSect0[i] and iSect1[i], to reach the arrays Agent[0][i].iSect[0] and Agent[0][i].iSect[1] in the interpreted code. This section creates a one dimension array FreeData[k] to duplicate the agent members Agent[k][i].FreeData[m]. As previously, the reason is that EiC cannot only 1D arrays with the host application. As we duplicate a 2D array (with index i and m) by a 1D array, the dimension of FreeData[k] is the product of the dimensions for i and m, thus: pData->iAMAXNb[i])*FREEPARAMNB. The section highlighted with the blue bar 2 creates standard C functions for EiC. The section highlighted with the blue bar 3 creates the EiC arrays (i.e., the interpreter arrays) A0X of dimension iAMaxNb[0], A1X of dimension iAMaxNb[1], A2X of dimension iAMaxNb[2], etc.. (via the instruction EiC_BuildIntArray("A",i,"X",pData>iAMAXNb[i], AX[i]), lines 51-52) . Thus: A0X[i]=AX[0][i]=Agent[0][i].X. This The integration in MainAsynchronous is very similar. Revision: 128 IV-76/206 18/12/2013 CORE MANUAL equation shows the relation between the EiC variable A0X[i] and the compiled variable Agent[0][i].X via the intermediate array AX[0][i]. Why this complexity? Again, (13) because EiC is a C interpreter , not a C++ interpreter. Thus it is not possible to directly connect the 1-dimension arrays of the interpreter to members of object arrays!! The link is similar for the Y position and for all agent populations. The EiC arrays the (interpreter) arrays AKFreeData[L*FREEPARAMNB+M] points to the array FreeData[k], thus enables to access the member variables Agent[K][L].FreeData[M]. The EiC arrays XData0 and YData0 (lines 56 abd 58) which directly points to the compiled arrays pData->XData[iter] and pData->XData[iter] plotted by the graph functions. Remember that the GRAPH window replots in each iteration the curve defined by the arrays (pData->XData, pData->YData). Thus, the interpreter calculates the point of the current iteration and updates the array before plot. Code in the file \PARSER\EiCInitialization.cpp (August 2008) 1 ///////////////////////////////////////////////////////////////////////////////////// THIS CODE INITIALIZES THE INTERPERETER EiC AND CREATES THE ARRAYS //NECESSARY FOR PROCESSING THE DATA. //NOTE THAT : // - ARRAYS ARE CREATED ONE SINGLE TIME AS THIS SECTION OF CODE IS OUTSIDE // THE MAIN ITERATION LOOP // - ARRAYS DIRECTLY POINT TO ARRAYS OF THE COMPILED CODE THAT ENABLES // EXCHANGING DATA BETWEEN EiC AND THE HOST PROGRAM // ///////////////////////////////////////////////////////////////////////////////////// void myDisplay(char *msg); //PROTOTYPE short i1Nb=0; short i2Nb=0; ///////////////////////////////////////////////////////////////////////////////////// //ALLOCATION OF ARRAYS TO TRANSFER AGENTS POSITION TO THE INTERPRETER. NOTE THAT //THE ARRAYS AX[i], AY[i], AMode[i], iSect0[i], etc.. ARE ALLOCATED IN THIS //CODE BUT NOT INITIALIZED. IN OTHER WORDS? THE SPACE IS RESERVED IN MEMORY, //BUT THE VALUES ARE NOT DEFINED! THEY ARE DEFINED LATER IN THE CODE STORED IN //EiCExecution.cpp int *AX[AGENTTYPENB], *AY[AGENTTYPENB]; int *iSect0[AGENTTYPENB], *iSect1[AGENTTYPENB]; char* AMode[AGENTTYPENB]; float* FreeData[AGENTTYPENB]; int* iFree[AGENTTYPENB]; for (i=0;i<AGENTTYPENB;i++) { //ALL OBJECTS ARE DELETED IN EiCEnd.cpp AX[i]= new int[pData->iAMAXNb[i]]; AY[i]= new int[pData->iAMAXNb[i]]; AMode[i]=new char[pData->iAMAXNb[i]]; iSect0[i]=new int[pData->iAMAXNb[i]]; //FOR ARRAY Agent[i][j].iSect[0] iSect1[i]=new int[pData->iAMAXNb[i]]; //FOR ARRAY Agent[i][j].iSect[1] //ARRAY TO STORE THE FREE PARAMETERS OF THE AGENTS OF TYPE i. NOTE THAT WE //WE STORE THE 2D ARRAY BY A 1D ARRAY BY MULTIPLYING THE DIMENSIONS FreeData[i]= new float[(pData->iAMAXNb[i])*FREEPARAMNB]; iFree[i] = new int [(pData->iAMAXNb[i])*FREEPARAMNB]; } ////////////////////////////////////////////////////////////////////////////// XEiC_init_EiC(); //INITIATE EiC XEiC_setMessageDisplay(myDisplay);//SET THE FUNCTION USED TO DISPLAY EiC'S ERRORS //REDUCED math.h HEADER FOR EiC XEiC_parseString(" double acos(double a); "); (13) To our knowledge, there is no C++ interpreter 2 Revision: 128 IV-77/206 18/12/2013 CORE MANUAL 2 3 3 XEiC_parseString(" double asin(double a); "); XEiC_parseString(" double atan(double a); "); XEiC_parseString(" double atan2(double a, double b); "); XEiC_parseString(" double cos(double a); "); XEiC_parseString(" double sin(double a); "); XEiC_parseString(" double tan(double a); "); XEiC_parseString(" double cosh(double a); "); XEiC_parseString(" double sinh(double a); "); XEiC_parseString(" double tanh(double a); "); XEiC_parseString(" double exp(double a); "); XEiC_parseString(" double frexp(double a, int * b); "); XEiC_parseString(" double ldexp(double a, int b); "); XEiC_parseString(" double log(double a); "); XEiC_parseString(" double log10(double a); "); XEiC_parseString(" double modf(double a, double *b); "); XEiC_parseString(" double pow(double a, double b); "); XEiC_parseString(" double sqrt(double a); "); XEiC_parseString(" double ceil(double a); "); XEiC_parseString(" double fabs(double a); ") XEiC_parseString(" double floor(double a); "); XEiC_parseString(" double fmod(double a, double b); "); ////////////////////////////////////////////////////////////////////////////////////// EiC_Define("AGENTTYPENB",AGENTTYPENB); XEiC_parseString("int i,j;"); EiC_BuildShortArray("ANb",AGENTTYPENB,pData->iAMAXNb); EiC_BuildShort("i2Nb", &i2Nb); EiC_BuildFloat("RefreshPeriod",&pData->ScreenShotPeriod); EiC_BuildFloat("XMin",&pData->XMinChart); EiC_BuildFloat("XMax",&pData->XMaxChart); EiC_BuildInt("iter", &iter); for (i=0;i<AGENTTYPENB;i++) { //INTERPRETER ARRAY AKX[j] SUCH THAT AKX[j]=Agent[K][j].X EiC_BuildIntArray("A",i,"X",pData->iAMAXNb[i],AX[i]); //INTERPRETER ARRAY AKY[j] SUCH THAT AKY[j]=Agent[K][j].Y EiC_BuildIntArray("A",i,"Y",pData->iAMAXNb[i],AY[i]); //INTERPRETER ARRAY AKMode[j] SUCH THAT AKMode[j]=Agent[K][j].Mode EiC_BuildCharArray("A",i,"Mode",pData->iAMAXNb[i],AMode[i]); //INTERPRETER ARRAY AKSect0 SUCH THAT AKSect0[j]=Agent[K][j].iSect[0] EiC_BuildIntArray("A",i,"Sect0",pData->iAMAXNb[i],iSect0[i]); //INTERPRETER ARRAY AKSect1 SUCH THAT AKSect1[j]=Agent[K][j].iSect[1] EiC_BuildIntArray("A",i,"Sect1",pData->iAMAXNb[i],iSect1[i]); //THIS INTERPRETER ARRAY AKFreeData WILL BE USED TO STORE THE FreeData OF EACH //AGENT SUCH THAT : AKFreeData[L*FREEPARAMNB+M]=Agent[K][L].FreeData[M] EiC_BuildFloatArray("A",i,"FreeData",(pData->iAMAXNb[i])*FREEPARAMNB,FreeData[i]); //THIS INTERPRETER ARRAY AKIFree WILL BE USED TO STORE THE iFree OF EACH //AGENT SUCH THAT : AKIFree[L*FREEPARAMNB+M]=Agent[K][L].iFree[M] EiC_BuildIntArray("A",i,"IFree",(pData->iAMAXNb[i])*FREEPARAMNB,iFree[i]); } ////////////////////////////////////////////////////////////////////////////////////// //INTERPRETER ARRAY SUCH THAT XData0[i]=pData->XData[i] FOR GRAPH DISPLAY EiC_BuildFloatArray("XData",0,"",pData->iChartPtNb,pData->XData); //INTERPRETER ARRAY SUCH THAT YData0[i]=pData->YData[i] FOR GRAPH DISPLAY EiC_BuildFloatArray("YData",0,"",pData->iChartPtNb,pData->YData); EiC_BuildInt("iChartPtNb", &pData->iChartPtNb); ////////////////////////////////////////////////////////////////////////////////////// //DEFAULT CODE IN THE EDIT CONTROL OF CParamPage4 IF NO CODE DEFINED if (pData->EiC_CODE=="") { //DEFAULT MINIMUM CODE pData->EiC_CODE= "int i,j;"; pData->EiC_CODE=pData->EiC_CODE+"i2Nb=0;"; pData->EiC_CODE=pData->EiC_CODE+"for (i=0;i<ANb[1];i++) {"; pData->EiC_CODE=pData->EiC_CODE+" if (A1Mode[i]=='A') { i2Nb=i2Nb+1; }"; pData->EiC_CODE=pData->EiC_CODE+"}"; pData->EiC_CODE=pData->EiC_CODE+"if (iter<iChartPtNb) {"; pData->EiC_CODE=pData->EiC_CODE+" XData0[iter]= iter;"; Revision: 128 IV-78/206 18/12/2013 CORE MANUAL pData->EiC_CODE=pData->EiC_CODE+" YData0[iter]= i2Nb;"; pData->EiC_CODE=pData->EiC_CODE+"}"; pData->EiC_CODE=pData->EiC_CODE+"else {"; pData->EiC_CODE=pData->EiC_CODE+" XData0[iChartPtNb-1]= iter;"; pData->EiC_CODE=pData->EiC_CODE+" YData0[iChartPtNb-1]= i2Nb;"; pData->EiC_CODE=pData->EiC_CODE+"}"; } Script 12: Code in \PARSER\EICInitialization.cpp This code shows the difficulties to exchange data between the compiled code and the interpreter. The following interpreter variables are (so far) defined to access compiled code variables: Variable AGENT VARIABLES EiC variable X position of agent of Rank L and Type=K Y position of agent of Rank L and Type=K Number of agents of Type K Activity flag of agents of Type K Move angle of agent of Rank L, Type K, in the current iteration Move angle of agent of Rank L, Type K, in the previous iteration float FreeData[FREEPARAMNB]: Array of the agent of index j and Atype K. This array is mapped to the interface. int iFree[FREEPARAMNB]: Array of free integer array AKX[L] 0<=K<6, 0<L<iANb[K] AKY[L] 0<=K<6, 0<L<iANb[K] iANb[K] 0<=K<6 AKMode[L] 0<=K<6, 0<L<iANb[K] AKSect0[L] 0<=K<6, 0<L<iANb[K] AKSect1[L] 0<=K<6, 0<L<iANb[K] AKFreeData[L*FREEPARAMNB+m] 0<=K<6; 0<L<iANb[K] 0≤m<FREEPARAMNB AKIFree[L*FREEPARAMNB+m] 0<=K<6, 0<L<iANb[K] 0≤m<FREEPARAMNB CHART VARIABLES Iter Index of the current Iteration IterXData0[i] Index of the current screen shot IterationArray of X coordinates plotted in the Graph window XData0[i]YData0[i] Array of X coordinates plotted in the Graph window returned to the charting toolArray of Y coordinates plotted in the Graph window Array of Y coordinates returned to the charting tool YData0[i]iChartPtNb plotted in the Graph windowNumber of points in the a curve iChartPtNb Number of points in the a curve Minimum of X Axis XMin Maximum of X Axis XMax Table 1: Correspondence of compiled and interpreted variables The definitions in Table 1 ought to be extended to all the member variables of the AGENT class. Revision: 128 IV-79/206 18/12/2013 CORE MANUAL A3.2 #include "EiCExecution.cpp" (August 2008) Note in particularly the grayed section, which duplicates the members variables pData>Agent[ii][jj].FreeData[kk] in a One dimension array over jj and kk. ///////////////////////////////////////////////////////////////////////////// // // THIS CODE IS INCLUDED IN THE FUNCTION void MainTest(COREDATA* pData) // IN THE FILE MAIN.CPP // ////////////////////////////////////////////////////////////////////////////// //UPDATE THE VALUES STORED IN THE EiC ARRAYS AND RUN THE INTERPRETER for (int ii=0;ii<AGENTTYPENB;ii++) for (int jj=0;jj<pData->iAMAXNb[ii];jj++) { AX[ii][jj]= pData->Agent[ii][jj].X; //X POSITION OF THE AGENTS AY[ii][jj]= pData->Agent[ii][jj].Y; //Y POSITION OF THE AGENTS AMode[ii][jj]=pData->Agent[ii][jj].AgentMode; //Mode OF THE AGENTS iSect0[ii][jj]=pData->Agent[ii][jj].iSect[0]; //iSect[0] OF AGENTS iSect1[ii][jj]=pData->Agent[ii][jj].iSect[1]; //iSect[1] OF AGENTS for (int kk=0;kk<FREEPARAMNB;kk++) { FreeData[ii][jj*FREEPARAMNB+kk]= pData->Agent[ii][jj].FreeData[kk]; iFree[ii][jj*FREEPARAMNB+kk] = pData->Agent[ii][jj].iFree[kk]; } } //IF "infinite mode", SHIFT ARRAY TO SHIFT CHART DISPLAY if (iter>=pData->iChartPtNb) for (int kk=0;kk<(pData->iChartPtNb-1);kk++){ //SHIFT THE POINTS THAT ARE DISPLAYED BY THE GRAPHER pData->XData[kk]=pData->XData[kk+1]; pData->YData[kk]=pData->YData[kk+1]; } ///////////////////////////////////////////////////////////////////////////////////// //PROTECT THE VARIABLES USED IN EiC_parseString AGAIN ANY CONCURENT READ OR WRITE //OPERATION POSSIBLY SIMULTANEOUSLY ATTEMPTED BY ANOTHER THREAD, IN PARTICULAR BY A //USER-TRIGGERED INTERFACE UPDATE. REMEMBER THAT EiCparString WRITES THE ARRAY XData0[i] //WHICH IS READ BY THREAD1 IN THE CHART MODE WaitForSingleObject(pApp->m_hSafe1,INFINITE); ///////////////////////////////////////////////////////////////////////////////////// //RUN EiC TO INTERPRETE THE STRING THAT CALCULATES DE DATA FOR THE GRAPHER XEiC_parseString(pData->EiC_CODE.GetBuffer(pData->EiC_CODE.GetLength())); ////////////////////////////////////////////////////////////////////////////// SetEvent(pApp->m_hSafe1); //FREE THE ACCESS TO THE PROTECTED VARIABLES BY THE CODE //BLOCKED BY WaitForSingleObjet(m_hSafe1) ///////////////////////////////////////////////////////////////////////////////////// Script 13: Code of EicExecution.cpp Note that this code is in the iteration loop of MainTest so that the interpreter calculates data for GRAPH in each iteration. A3.3 #include "EiCEnd.cpp" Code in the file \PARSER\EiCEnd.cpp ///////////////////////////////////////////////////////////////////////////// // // THIS CODE IS INCLUDED IN THE FUNCTION void MainTest(COREDATA* pData) // IN THE FILE MAIN.CPP // ////////////////////////////////////////////////////////////////////////////// //THIS CODE DELETES THE ARRAY DYNAMICALLY CREATED IN EiCInitialization.cpp Revision: 128 IV-80/206 18/12/2013 CORE MANUAL ////////////////////////////////////////////////////////////////////////////// //DELETE OBJECTS CREATED TO INITIALIZE EiC for (i=0;i<AGENTTYPENB;i++) { delete [] AX[i]; delete [] AY[i]; delete [] AMode[i]; delete [] iSect0[i]; delete [] iSect1[i]; delete [] FreeData[i]; delete [] iFree[i]; } ////////////////////////////////////////////////////////////////////////////// Script 14: Code of EicEnd.cpp WARNING: One persistent issue when writing new plot functions with EiC is that the application sometime aborts when errors are detected by the interpreter. To partly circumvent this issue, the code of the edition window is always saved prior to running the threat which embeds the interpreter and which may cause the execution abortion. A.4 Where are the functions for interpreting ? The functions invoking the interpreter are in the blocks #include "EiCInitialization.cpp" #include "EiCExecution.cpp" #include "EiCEnd.cpp" which are located in the functions - MainSynchronous(COREDATA* pData) in MainSynchronous.cpp - MainAsynchronous(COREDATA* pData) in MainAsynchronous.cpp These files includes the header: #include "..\PARSER\EiCFunctions.h" The code is below: //EiCFunctions.h ///////////////////////////////////////////////////////////////////////////// // FUNCTION PROTOTYPES TO LINK EiC TO C++ CODE ///////////////////////////////////////////////////////////////////////////// //ENTRY FUNCTION DEFINED IN THE DLL EIC_DLL.dll _declspec(dllexport) void XEiC_init_EiC(void); _declspec(dllexport) void XEiC_setMessageDisplay(void (*)(char *)); _declspec(dllexport) void XEiC_parseString(char* MyStr); //_declspec(dllexport) void XEiC_parseString(CString MyStr); _declspec(dllexport) CString Build(char* achName1, int i,char* achName2); _declspec(dllexport) void EiC_Define(char* Str1, int iVal); _declspec(dllexport) void EiC_BuildDoubleArray(char* ArrayName1,int i,char* ArrayName2, int iDim, double* pSource); _declspec(dllexport) void EiC_BuildFloatArray(char* ArrayName1,int i,char* ArrayName2, int iDim, float* pSource); _declspec(dllexport) void EiC_BuildIntArray(char* ArrayName1,int i,char* ArrayName2, int iDim, int* pSource); Revision: 128 IV-81/206 18/12/2013 CORE MANUAL _declspec(dllexport) void EiC_BuildCharArray(char* ArrayName1,int i,char* ArrayName2, int iDim, char* pSource); _declspec(dllexport) void EiC_BuildIntArray(char* ArrayName, int iDim, int* pSource); _declspec(dllexport) void EiC_BuildShortArray(char* ArrayName, short iDim, short* pSource); _declspec(dllexport) void EiC_BuildInt(char* iName, int* iSourceName); _declspec(dllexport) void EiC_BuildShort(char* iName, short* iSourceName); _declspec(dllexport) void EiC_BuildFloat(char* iName, float* iSourceName); ///////////////////////////////////////////////////////////////////////////// The header code shows that all functions to interpret the code are in a DLL entitled EIC_DLL! This code exportation became necessary when upgrading the compiler from VisualC++6 to VisualC++8 because we face complex linkage problems. The DLL Code is in the project: 080730EIC_DLL_VC6. Another project is integrated in 080730TEST_EICDLL_VC6. CRITICAL WARNING: The DLL DLL_EIC.dll (generated by the project EIC_DLL) MUST BE COMPILED with the compiler VisualC++6 even the CORE and the application DLLs (in the directories DLL and TUTORIAL) are upgraded and compiled with VisualC++8 B Syntax-colored editor The syntax-colored editor (SCE) is an extension of the CrichEditCtrl class that includes a parser to color the syntax. The code is in ParamPage4.cpp and ParamPage4.h. The coloring tool is in the class CsyntaxColorizer in the files syntaxColorizer.cpp and syntaxColorizer.h. The SCE enables auto-indentation when a new line is inserted in the code. C DLL approach As stressed in the introduction, the second solution to calculate user-defined agent properties at run time consists in writing the corresponding function a DLL. The selection between the two methods (i.e., Interpreter versus DLL approach) is achieved by checking the box entitled "Function in DLL" in the top right corner of the property page shown in Fig. 21 page 73. The function code must be exclusively in the DLL of the first agent. This property is mandatory. We show below an example of code in the DLL. __declspec(dllexport) void GraphFunc(AGENT* Agent[AGENTTYPENB], short iAgentNb[AGENTTYPENB], CELL* Cell, int XDim, int YDim, float* XData,float* YData, int iGraphPtNb, int iter) ////////////////////////////////////////////////////////////////////////////// // HISTORY: FIRST IMPLEMENTATION jFeb 2004, JHC ////////////////////////////////////////////////////////////////////////////// Revision: 128 IV-82/206 18/12/2013 CORE MANUAL { int i=0; ////////////////////////////////////////////////////////////////////////////// int iInbuffer=0; if (iter<iGraphPtNb) { for (i=0;i<iAgentNb[0];i++) { if (Agent[0][i].AgentMode =='A') { iInbuffer=iInbuffer+Agent[0][i].pNode->InBuffer[0].m_iBufSize; } } XData[iter]=(float) iter; YData[iter]=(float) ((10.0*iInbuffer)/iAgentNb[0]); } else { //IMPORTANT CODE TO AVOIDE ABORTION IF iter>=iGraphPtNb XData[iGraphPtNb-1]= (float) iter; YData[iGraphPtNb-1]= (float) 0; } ////////////////////////////////////////////////////////////////////////////// } Revision: 128 IV-83/206 18/12/2013 CORE MANUAL Chapter 5 Agent property visualization: CHART The CHART module displays the data calculated with the INTERPRETER described in the previous chapter. he charting module is derived from the code initially written by Massimo Colurcio. It is available from the following web page http://www.codeguru.com/article.php/c2241 of the CodeGuru site. We added many extensions to the original version, which provided no runtime interactivity to customize the different chart elements as the colors (for lines, markers, labels, background…), the styles (for lines, markers…), the sizes (lines, markers, labels…). A typical chart is displayed in Fig. 23. T Chart Title 120 Number of living preys 100 80 60 40 20 0 -20 0 40 80 120 160 200 240 280 Screen shot number Fig. 23: Example of chart generated by the module CHART. This figure shows the decay of the number of preys for different predator policies. The current version makes the chart fully customizable at runtime through the integration of 3 property pages. It includes the following features: Revision: 128 IV-84/206 18/12/2013 CORE MANUAL A Extension of the basic charting capabilities from the original classes CXChart, CXDataSet written by Massimo Colurcio. In particular, the chart becomes a a separate and resizable window. Customization at runtime, using a property sheet (based on the classes CChartPropFrame, CChartPropSheet, CChartPropPage1, CChartPropPage2, CChartPropPage3, CChartPropPage4) and color selection using the classes CColorButton and CColourPopUp. Registration of the chart parameters in the scenario file (with the extension MAS) using the XML format. Registration of the chart image in the paste buffer. The chart is saved in the WMF format. Chart area decomposition A chart is a window derived from the generic class CWnd. The declaration is: class CXChart : public CWnd (see the header declaration in paragraph DD.1 page 93). This class includes several CRect declarations CRect CRect CRect CRect CRect CRect CRect m_rectUsable; m_rectData; m_rectGraph; m_rectXAxis; m_rectYAxis; m_rectTitle; m_rectArea; // // // // // // // usable area data area graph area x axis area y axis area main title area entire control area to decompose the chart shown in Fig. 23 in a series of imbricate rectangles, containing the different elements (the chart title, the axis, the axis labels…). We distinguish: The topmost rectangle is m_rectArea, which is nothing but the client rectangle of the class CXChart of the chart code. The WIN32 function GetClientRect(m_rectArea) retreives the coordinates of this window m_rectArea.top=0 and m_rectArea.left=0 so that all coordinates in the description of this module are relative to the top left corner of the client area. m_rectArea includes all other rectangles. The usable rectangle m_rectUsable (represented in the next figure) is defined to eliminate user-defined margins (see the code below). m_rectUsable.top m_rectUsable.bottom m_rectUsable.left m_rectUsable.right = = = = m_rectArea.top m_rectArea.bottom m_rectArea.left m_rectArea.right + + - m_rectArea.Height()/HMX_AREA_MARGINS; m_rectArea.Height()/HMX_AREA_MARGINS; m_rectArea.Width() /HMX_AREA_MARGINS; m_rectArea.Width() /HMX_AREA_MARGINS; HMX_AREA_MARGINS is typically 80 so that the margin represents 5% of the height and 5% of the width of m_rectArea. m_rectArea m_rectUsable Fig. 24: Representation of the rectangles m_rectArea and m_rectUsable Revision: 128 IV-85/206 18/12/2013 CORE MANUAL The usable rectangle, m_rectUsable is decomposed in two rectangles, the Title rectangle and the Graph rectangle respectively entitled m_rectTitle and m_rectGraph (see the code below). m_rectTitle m_rectGraph m_rectArea m_rectUsable Fig. 25 m_rectTitle.top m_rectTitle.left m_rectTitle.bottom m_rectTitle.right m_rectGraph.top m_rectGraph.left m_rectGraph.bottom m_rectGraph.right = = = = = = = = m_rectUsable.top; m_rectUsable.left; m_rectUsable.bottom/HMX_AREA_TITLE; m_rectUsable.right; m_rectTitle.bottom; m_rectUsable.left; m_rectUsable.bottom; m_rectUsable.right; m_rectGraph is decomposed as represented in Fig. 26 to define the rectangles m_rectYAxis, m_rectXAxis, and m_rectData. m_rectGraph m_rectYAxis m_rectTitle m_rectArea m_rectData m_rectUsable m_rectXAxis Fig. 26 m_rectYAxis.top m_rectYAxis.left m_rectYAxis.bottom m_rectYAxis.right = = = = m_rectGraph.top; m_rectGraph.left; m_rectGraph.top + m_rectGraph.Height()*(100-HMX_AREA_XAXIS)/100; m_rectGraph.left + m_rectGraph.Width()*(HMX_AREA_YAXIS)/100; m_rectXAxis.top m_rectXAxis.left m_rectXAxis.bottom m_rectXAxis.right = = = = m_rectGraph.top + m_rectGraph.Height()*(100-HMX_AREA_XAXIS)/100; m_rectGraph.left + m_rectGraph.Width()*(HMX_AREA_YAXIS)/100; m_rectGraph.bottom; m_rectGraph.right; m_rectData.top m_rectData.bottom m_rectData.left m_rectData.right = = = = m_rectGraph.top; m_rectXAxis.top; m_rectYAxis.right; m_rectGraph.right; Fig. 27 shows the placement of the different rectangles that we just described in a real graph. Revision: 128 IV-86/206 18/12/2013 CORE MANUAL m_rectTitle Chart Title Number of living preys 120 100 80 60 m_rectData 40 20 0 m_rectYAxis -20 0 40 80 120 160 200 240 Screen shot number 280 m_rectXAxis Fig. 27: Placement of rectangles in a real chart Revision: 128 IV-87/206 18/12/2013 CORE MANUAL B B.1 Charting modes Type-1 chart: time kinetics In general, a chart includes several data lines, as represented in Fig. 32. Recall that the chart is periodically updated when the screen is painted. With type-1 charts, one single point of a single data line is recalculated between two successive screen shots (see Fig. 28). In other words, the painting operation changes one data point in the screen, and to some extend, it is only necessary to redraw the data line close to the recalculated point. Line 2 A (a) Line 1 Number of living preys Number of living preys Line 1 Line 2 A B (b) B 2.0 4.0 6.0 8.0 Time (arb units) 2.0 4.0 6.0 8.0 Time (arb units) Fig. 28: Examples of two successive drawings of a chart in the mode I. In this example, data displayed by line number 2 are being calculated and the line is under construction. Point B in still not calculated in figure (a). Contrarily, It has been calculated in figure (b) and line is updated accordingling. One single point (B here) is drawn between two successive plots. This mode is appropriate to plotting the time kinetics of any parameter during the simulation run. However, as the whole data line is displayed before the end of the simulation, some points corresponding to future data that are temporarily unknown. Thus the simulation begins by initializing all YData0[i] values to 0, i.e, YData0[i]=0 for all i. In this charting mode, the number of data points is automatically setup to nCount=ThreadData.iScreenShotNb, i.e., the number of screen shots adjusted in ParamPage1. Thus, XData0[i]=i*ThreadData.iScreenShotPeriod. The sole point of coordinates (XData0[iter],XData0[iter]) is updated, where iter is the screen shot iteration index. B.2 Type-2 chart With type-2 charts, all data points of the curve under consideration are recalculated between two successive plots. Thus, the charting tools must completely redraw the data line. In other words, the plotted curve represents any function F(S,t) calculated at points Si equally spaced between SMin and SMax. The program plots F(S,t0) at screen shot 0, F(S,t0+T) at screen shot 1, F(S,t0+2T) at screen shot 2, and so on. Revision: 128 IV-88/206 18/12/2013 CORE MANUAL Let us consider an example for clarity. The interpreter code below calculates the number of agents N(x) (i.e., the agent distribution in the terrain) versus their position with 0x<XDim. 1 2 3 4 5 for (i=0;i<iChartPtNb;i++) YData0[i]=0; for (i=0;i<ANb[0];i++) { if (A0Mode[i]=='A') { YData0[A0X[i]]=YData0[A0X[i]]+1; } } YData0[i] is the number of agents in the terrain at the abscissa Agent.X=i, with possibly different Y coordinates. The code first resets all YData0[i] to 0 (line 1). Then, it scans all agents iAtype=0 (line 2). If the agent is active, it increments the occupation YData0[i] at the agent abscissa, i.e., it increments A0X[i]] (line 4). The important point for the charting tool is that this code recalculates all points of the curve and therefore shows the time evolution of the agent distribution. In Type-2 charts, the chart point number nCount is arbitrarily defined in ParamPage4 (see Fig. 29), as well as the minimum and maximum values XMin and XMax of XData0[i]. However, remember that the restriction persists to consider equally spaced points between XMin and Xmax. C Function calls in the charting process The function calls are represented by the script below. CParamSheet::OnRunSession() CParamSheet::SaveAndRebuildAll() CParamSheet::TransferPage4ParametersToThreadData() CAGNTView::StartThread MainTestAsynchronous(COREDATA*) GraphicUpdate(COREDATA*,int)//SENDS MESSAGE TO OnUpdateDisplay CAGNTView::OnUpdateDisplay(WPARAM,LPARAM) CAGNTView::DrawChart(int) CXChart::Invalidate() CXChart::CalcDatas() CXChart::PaintBkGnd(CDC) CXChart::PaintDataArea(CDC) CXChart::DrawTitle(CDC) CXChart::DrawVertLine(CDC) CXChart::DrawTicksX(CDC) CXChart::DrawHorzLine(CDC) CXChart::DrawTicksY(CDC) CXChart::DrawFrame(CDC) CXChart::DrawBaseline(CDC) CXChart::DrawAxes(CDC) CXChart::DrawYScale(CDC,BOOL); CXChart::DrawXScale(CDC,BOOL) CXChart::DrawDatasets(CDC) Script 15 Let us describe this script in details. The CORE proceeds as follows when a simulation is launched: 1. The control is transferred to the function CParamSheet::OnRunSession which calls CParamSheet::SaveAndRebuildAll(). This function, first calls TransferPage4ParametersToThreadData(), which saves the values of parameters in the edit boxes of ParamPage4 represented below Revision: 128 IV-89/206 18/12/2013 CORE MANUAL The value of the edit box "Nb of Graph Points" is saved to ThreadData.iChartPtNb. The value of the edit box "Graph mode" is saved to ThreadData.iChartMode. There are 2 chart modes, in accordance with the description of the previous paragraph The value of the edit box "XMin" is saved to ThreadData.XMinChart. The value of the edit box "XMax" is saved to ThreadData.iXMaxChart. Fig. 29 2. CParamSheet::SaveAndRebuildAll() reallocates the arrays XData and YData, which are periodically calculated by the interpreter and passed to CXChart during the simulation run. In the chart mode I, the dimension of these arrays is automatically set to ThreadData.iScreenShotNb in accordance with the description of Type-1 charts. The relevant code in is below: //VERY IMPORTANT LINE: AUTOMATIC RESET OF THE NB OF POINTS TO THE NUMBER OF //SCREEN SHOTS IN THE CHART MODE iChartMode=1 if (pView->ThreadData.iChartMode==1) pView->ThreadData.iChartPtNb=pView->ThreadData.iScreenShotNb; delete [] pView->ThreadData.XData; delete [] pView->ThreadData.YData; pView->ThreadData.XData = new float[pView->ThreadData.iChartPtNb]; pView->ThreadData.YData = new float[pView->ThreadData.iChartPtNb]; //TEMPORARY INITIALIZATION OF XData AND YData. THESE ARRAYS ARE UPDATED BY THE //INTERPRETER IN THE SIMULATION LOOP for (i=0;i<pView->ThreadData.iChartPtNb;i++) { pView->ThreadData.XData[i]= (float) i*pView->ThreadData.ScreenShotPeriod;//DEFAULT X, TEMPORARY pView->ThreadData.YData[i]=1; //DEFAULT Y, TEMPORARY } 3. CParamSheet::OnRunSession transfers the control to CAGNTView::StartThread, which starts the simulation thread and executes MainAsynchronous or MainSynchronous. 4. MainTestAsynchronous executes the include instruction Revision: 128 IV-90/206 18/12/2013 CORE MANUAL #include "..\PARSER\EiCExecution.cpp" This code computes (following the user-written script) the array XData[i] and YData[i]. For a Type-1 chart, you only need to calculate the point XData[iter] and YData[iter], where iter is the index of the current screen shot. Example of script for Type-1 chart: In the EiC code, XData and YData are respectively replaced by XData0, and YData0. This code counts the number of living agents of type1. i2Nb=0; for (i=0;i<ANb[1];i++) { if (A1Mode[i]=='A') { i2Nb=i2Nb+1; } } XData0[iter]= iter*RefreshPeriod; YData0[iter]= i2Nb; Example of script for Type-2 chart: All data points are recalculated. //DENSITY PROFILE (Distribution0.EIC) for (i=0;i<iChartPtNb;i++) { YData0[i]=0; XData0[i]=XMin+i*(XMax-XMin)/iChartPtNb; } for (i=0;i<ANb[0];i++) { if (A0Mode[i]=='A') { YData0[A0X[i]]=YData0[A0X[i]]+1; } } 5. The function MainTestAsynchronous() calls GraphicUpdate(), which sends the message WM_UPDATE_DISPLAY (through the instruction SendMessage(pData>m_ViewhWnd,WM_UPDATE_DISPLAY,iter,0)) to CAGNTView::OnUpdateDisplay. 6. CAGNTView::OnUpdateDisplay calls CAGNTView::DrawChart(int), the code of which is duplicated below. CAGNTView::DrawChart first tests whether the chart window exists (line ?). If it does not, it creates the chart window with the instruction m_chart.CreateChart() (line??). The chart is never destroyed in the code. It is hidden when it is not used. Thus, the section of DrawChart, which creates the chart, is executed one single time during a session. Note that the function DrawChart does not directly draw the chart! It calls m_chart.Invalidate(TRUE) or the SDK function InvalidateRect to execute the member function CXChart::OnPaint(). void CAGNTView::DrawChart(int iter) /////////////////////////////////////////////////////////////////////////////////////// // HISTORY: Version 1.0; SUMMER 2002, AUTHOR JHC // 2.0; AUGUST 2003, JHC, CODE MADE SIMPLER // 3.0: AUGUST 2003; COMPLETELY REWRITTEN TO USE THE CXChart CLASS // INSTEAD OF CGraph. JHC /////////////////////////////////////////////////////////////////////////////////////// { int i=0,j=0; CClientDC dc(this); ///////////////////////////////////////////////////////////////////////////////////// CString sBuffer; iDisplayMode=1 ///////////////////////////////////////////////////////////////////////////////////// //NO CHART WINDOW AT THE MOMENT! THIS SECTION IS EXECUTED ONE SINGLE TIME! if (!::IsWindow(m_chart.m_hWnd)) { m_chart.CreateChart(this->m_hWnd); for (int i = 0; i < ThreadData.iChartPtNb; i++) { m_chart.SetData( 0, 1.0*ThreadData.YData[i]); sBuffer.Format("%5.1f", ThreadData.XData[i]);//5 CHARS, WITH ONE DIGIT Revision: 128 IV-91/206 18/12/2013 CORE MANUAL m_chart.SetXScaleLabel( i, sBuffer ); } m_chart.SetDatasetMarker(0,HMX_DATASET_MARKER_TRI );//PARAMETER 1: CHART INDEX m_chart.SetDatasetPenColor(0,m_chart.BASECOLORTABLE[0]); m_chart.SetDatasetPenSize(0,3 ); m_chart.SetYTicks( 10 ); //NB OF TICKS IN THE Y AXE! m_chart.SetRoundY( 20 ); m_chart.SetTitle("Chart Title"); //NB OF POINTS BETWEEN 2 TICKS OF THE X AXE m_chart.SetXLabelStep(XStep(ThreadData.iChartPtNb)); m_chart.SetYText("Prey number"); m_chart.SetXText("Screen shot number"); iDrawnCurveNb=1; //VERY IMPORTANT m_chart.m_bFullPaint=true; m_chart.Invalidate(TRUE); //THUS THE PROGRAM EXECUTES m_chart.OnPaint() return; } /////////////////////////////////////////////////////////////////////////////////// //REGULAR CODE WHEN THE CHART WINDOW EXISTS //PART 1: UPDATE DATA m_chart.SetDatasetPenSize(iNextCurveIndex,3); m_chart.SetDatasetMarker( iNextCurveIndex, HMX_DATASET_MARKER_TRI ); if (iNextCurveIndex<iDrawnCurveNb) { //YOU REDRAW AN EXISTING LINE for (int i = 0; i < ThreadData.iChartPtNb; i++) { m_chart.ResetData( iNextCurveIndex, i, 1.0*ThreadData.YData[i]); // sBuffer.Format("%d", i ); //m_chart.SetXScaleLabel( i, sBuffer ); } } else if (iNextCurveIndex==iDrawnCurveNb) { //YOU ADD A NEW LINE. THIS SECTION IS iDrawnCurveNb=iDrawnCurveNb+1; //EXECUTED ONE SINGLE TIME! m_chart.SetDatasetPenSize( iNextCurveIndex, 3 ); for (int i = 0; i < ThreadData.iChartPtNb; i++) { m_chart.SetData( iNextCurveIndex, 1.0*ThreadData.YData[i]); //sBuffer.Format("%d", i ); //m_chart.SetXScaleLabel( i, sBuffer ); } } /////////////////////////////////////////////////////////////////////////////////// //PART 2: UPDATE DISPLAY //THE GOAL OF THESE LINES IS TO DETERMINE A REDUCED RECTANGLE AROUND THE CURRENT //NEW POINT TO INVALIDE A LIMITED AREA OF THE CHART WINDOW USING InvalidateRect //BECAUSE I DON'T KNOW HOW TO REMOVE BLANKING EFFECTS THAT I SEE ON THE SCREEN RECT Rect1=m_chart.m_rectData; double nBarWidth = (double)(Rect1.right-Rect1.left)/(double)m_chart.m_nXMax; //THE SHIFT (int)(2.5*nBarWidth) IS EMPIRICAL Rect1.right= Rect1.left + (int)(nBarWidth*iter)+(int)(2.5*nBarWidth); //THE SHIFT -(int)(2.0*nBarWidth) IS EMPIRICAL Rect1.left= Rect1.left + (int)(nBarWidth*iter)-(int)(2.0*nBarWidth); //YData FOR THE POINT OF INDEX i1 int i1=iter-1; if (i1<0) i1=0; double nTemp1 = ( 1.0*ThreadData.YData[i1] - m_chart.m_nYMin) * (Rect1.bottom-Rect1.top)/(m_chart.m_nYMax-m_chart.m_nYMin); //YData FOR THE POINT OF INDEX i2 int i2=iter+1; if (i2>=ThreadData.iChartPtNb) i2=ThreadData.iChartPtNb-1; double nTemp2 = ( 1.0*ThreadData.YData[i2] - m_chart.m_nYMin) * (Rect1.bottom-Rect1.top)/(m_chart.m_nYMax-m_chart.m_nYMin); int ibottom=max(Rect1.bottom - (int)(nTemp1),Rect1.bottom - (int)(nTemp2)); int itop=min(Rect1.bottom - (int)(nTemp1),Rect1.bottom - (int)(nTemp2)); Rect1.top =itop-3; Rect1.bottom =ibottom+3; if (iter==0) { m_chart.m_bFullPaint=true; m_chart.Invalidate(TRUE); Revision: 128 IV-92/206 18/12/2013 CORE MANUAL // } else { m_chart.m_bFullPaint=false; m_chart.m_bFullPaint=true; ::InvalidateRect(this->m_hWnd,&Rect1,TRUE); } /////////////////////////////////////////////////////////////////////////////////// } The code of the function CXChart::OnPaint(), which draws the chart, is displayed in paragraph D.3 page 96. D D.1 Class CXChart Declaration class CXChart : public CWnd { public: CChartPropFrame* m_pPropFrame; CStringArray m_XScaleLabel; // x AXE labels int m_nXLabelStep; // x label step bool m_bShowXScale; // show x scale bool m_bShowYScale; // show y scale BOOL m_bShowTitle; // Int m_nXMax; // MAX OF THE X AXIS (MIN IS ZERO) double m_nYMax; // MAX OF THE Y AXIS CString m_YAxeLabelFormat; CString m_XAxeLabelFormat; int m_iXDigitNb; int m_iXDecimaleNb; int m_iYDigitNb; int m_iYDecimaleNb; BOOL m_bShowGridX; int m_GridXLineStyle; int m_TickSizeX; int m_XTextLength; //LENTGTH (IN PIXELS) OF THE Y AXE LABEL double m_nYMin; // MIN OF THE Y AXIS double m_nRoundY; // ROUNDING OF m_nYMax AND m_nYMin. IN OTHER //WORDS, THE MAX AND MIN OF THE Y AXIS ARE //MULTIPLE VALUES OF m_nRoundY int m_nYTicks; // NB OF TICKS ON THE Y AXIS BETWEEN //m_nYMin AND m_nYMax int m_YTextLength; //LENTGTH (IN PIXELS) OF THE Y AXE LABEL BOOL m_bAutoScaleY; BOOL m_bShowGridY; int m_GridYLineStyle; int m_TickSizeY; CXDataset Int CString CString CString CRect CRect CRect CRect Revision: 128 m_Dataset[MAX_DATASET];// m_nCountDataset; // m_strTitle; // m_strYText; // m_strXText; // m_rectUsable; // m_rectData; // m_rectGraph; // m_rectXAxis; // ARRAY OF YDATA SETS dataset counter main title Y text X text usable area data area graph area x axis area IV-93/206 18/12/2013 CORE MANUAL CRect m_rectYAxis; CRect m_rectTitle; CRect m_rectArea; COLORREF m_clrBkGnd; COLORREF m_clrDataArea; COLORREF m_clrGraphArea; COLORREF BASECOLORTABLE[12]; COLORREF m_clrGridVert; COLORREF m_clrGridHorz; COLORREF m_clrFrame; int m_ThickFrame; int HMX_AREA_TITLE; int HMX_AREA_YAXIS; int HMX_AREA_XAXIS; // // // // // // y axis area main title area entire control area backgroung color DATA AREA COLOR GRAPH AREA COLOR // backgroung color // backgroung color // FRAME COLOR, INCLUDING BASE LINE //THICKNESS OF THE LINE TO DRAW THE FRAME //12 //11 // percentage int m_iSelectedObject;//OBJECT SELECTED WHEN MOVING THE CURSOR ACROSS THE CHART bool m_bFullPaint; //TO CONTROL THE OnPaint FUNCTION double m_OldYMin, m_OldYMax; etc… Member function declaration here… } D.2 Chart construction As we previously stressed, the charting module plots the arrays of points M(X,Y) with coordinates X=ThreadData.XData[i], and Y=ThreadData.YData[i] calculated by the interpreter or the DLL in the simulation thread. We shall use an example to show the way the data are processed the CXChart class and the resulting limitations. Let us assume that the simulation thread builds the following array of equally spaced points {XData[i]|0i<8} with XData[0]=2.5; XData[1]=5; XData[2]=7.5; XData[3]=10; XData[4]=12.5; XData[5]=15; XData[6]=17.5; XData[7]=20; The ordinates Ydata[i] play no role at the moment. In this example, the simulation thread calculates eight floating abscissa. However, these values are not stored by the class CXChart as floating numbers, but as CStrings in the array m_strXScaleLabel declared as CStringArray m_XScaleLabel. The fact that abscissas are stored as strings means that their values are not considered in the plotting process! In other words, the function CXChart::DrawXScale, which plots the X-axis graduation labels, does not care about the values associated to the graduations! You could store anything you want in the arrayI m_strXScaleLabel. CXChart::DrawXScale considers that the strings in m_strXScaleLabel must be drawn equally spaced and therefore, it determines the distance in pixels between two consecutive graduation labels of the X axe. The code in CXChart::DrawXScale (duplicated below) is clear: line 1 counts the number of labels in the array m_XScaleLabel and line 3 determines the distance between 2 labels in the rectangle m_rectData. The loop from line 19 to 23 draws the equally spaced labels! bool CXChart::DrawXScale(CDC & dc, BOOL bWMF) ////////////////////////////////////////////////////////////////////////////////////// // return true if ok, else false ////////////////////////////////////////////////////////////////////////////////////// { int nCount = m_XScaleLabel.GetSize(); if( !nCount ) return false; Revision: 128 IV-94/206 18/12/2013 CORE MANUAL double nX = (double)m_rectData.Width()/(double)nCount; //DISTANCE BETWEEN 2 GRADUATIONS /////////////////////////////////////////////////////////////////////////////////////// //DRAW THE GRADUATION STRINGS int f, nFontSize = (int)(m_rectXAxis.Height()/2.7); //JHC CRect rectTemp; const int nBkModeOld = dc.SetBkMode( TRANSPARENT ); COLORREF color = m_clrFrame, clrOld; CPen pen(PS_SOLID, 3, color ), *pPenOld; CFont font, *pFontOld; font.CreateFont( nFontSize, 0, 0, 0, FW_NORMAL, FALSE, FALSE, FALSE, ANSI_CHARSET, OUT_TT_PRECIS, CLIP_TT_ALWAYS, PROOF_QUALITY, DEFAULT_PITCH, "Arial"); pPenOld = dc.SelectObject(&pen); pFontOld = dc.SelectObject(&font); clrOld = dc.SetTextColor( color ); for( f=0; f<nCount; f=f+m_nXLabelStep ) { // draw text rectTemp.top = m_rectXAxis.top; rectTemp.bottom = m_rectXAxis.bottom; rectTemp.left = m_rectXAxis.left + (int)(nX*(f-m_nXLabelStep/2)); //JHC rectTemp.right = m_rectXAxis.left + (int)(nX*(f+1+m_nXLabelStep/2));//JHC dc.DrawText(m_XScaleLabel.GetAt(f),rectTemp, DT_CENTER | DT_TOP | DT_SINGLELINE ); } /////////////////////////////////////////////////////////////////////////////////////// //DRAW THE AXIS LABEL if( !m_strXText.IsEmpty() ) { int nFontXTextSize = (int) (1.4*nFontSize); //JHC CFont fontXText; fontXText.CreateFont( nFontXTextSize, 0, 0, 0, FW_NORMAL, FALSE, FALSE, FALSE, ANSI_CHARSET, OUT_TT_PRECIS, CLIP_TT_ALWAYS, PROOF_QUALITY, DEFAULT_PITCH, "Arial"); dc.SelectObject(&fontXText); if (bWMF) dc.DrawText(m_strXText,m_rectXAxis, DT_CENTER | DT_BOTTOM | DT_SINGLELINE ); else { //MODIFICATIONS BY JHC; NOW THIS CODE DOES NOT WORK IN A CALL // FOR DRAWING A WMF FILE CRect MyRect=m_rectXAxis; CSize TextSize = dc.GetTextExtent(m_strXText); m_XTextLength=TextSize.cx; MyRect.left =(MyRect.left+MyRect.right)/2-TextSize.cx/2; dc.DrawText( m_strXText, MyRect, DT_LEFT | DT_BOTTOM | DT_SINGLELINE ); } } /////////////////////////////////////////////////////////////////////////////////////// dc.SelectObject(pPenOld); dc.SelectObject(pFontOld); dc.SetTextColor(clrOld); dc.SetBkMode(nBkModeOld); return true; } The point number nCount (line 1) is a crucial parameter for CXChart::DrawXScale. It is the dimension of the array m_strXScaleLabel, which is constructed in the loop extending from line 11 to 15, (especially line 14) of the function CAGNTView::DrawChart. This loop shows that: nCount=ThreadData.iChartPtNb. Line 13 in CAGNTView::DrawChart fomats the abscissa. Let us consider that we want to pass XData[0]=31.21. It is possible to use the following various formats: Format for floats or double XData[0]=31.21 sBuffer.Format("%f2",XData[0]) sBuffer.Format("%5.1f",XData[0]) Revision: 128 Result 31.21 (2 numbers following the dot) 31.2 (5 chars, including 1 number after the dot IV-95/206 18/12/2013 CORE MANUAL sBuffer.Format("%5d3",XData[0]) 3.121E000 Format for integer XData[0]=312 sBuffer.Format("%d",XData[0]) 312 D.3 Chart painting Chart painting is executed by the member function void CXChart::OnPaint(). The Boolean variable m_bFullPaint is used to partly repaint the chart, in order to avoid some blanking effects. void CXChart::OnPaint() ////////////////////////////////////////////////////////////////////////////////////// ////////////////////////////////////////////////////////////////////////////////////// { CPaintDC dc(this); // device context for painting if (m_bFullPaint) { if (m_bAutoScaleY) AutoScaleY(); //AUTOMATIC DETERMINATION OF m_nRoundY CalcDatas(); m_nYTicks=(int)((m_nYMax-m_nYMin)/m_nRoundY); PaintBkGnd( dc ); PaintDataArea( dc ); //THE AREA CONTAINING THE DATA POINTS DrawTitle( dc ); ///////////////////////////////////////////////////////////////////////////////// if (m_bShowGridX) DrawVertLine( dc ); DrawTicksX(dc); if (m_bShowGridY) DrawHorzLine( dc ); DrawTicksY(dc); ///////////////////////////////////////////////////////////////////////////////// DrawFrame(dc); DrawBaseline( dc ); DrawAxes( dc ); DrawYScale( dc ); DrawXScale( dc ); ///////////////////////////////////////////////////////////////////////////////// DrawDatasets( dc ); ///////////////////////////////////////////////////////////////////////////////// } else { // CalcDatas(); PaintBkGnd( dc ); PaintDataArea( dc ); //THE AREA CONTAINING THE DATA POINTS m_nYTicks=(int)((m_nYMax-m_nYMin)/m_nRoundY); DrawTitle( dc ); DrawGrid( dc ); DrawBaseline( dc ); // DrawAxes( dc ); DrawYScale( dc ); DrawXScale( dc ); DrawDatasets( dc ); } } D.4 Chart customization & Property pages To customize the chart, first select a chart element (curve, label, grid line, axe….). In other words: Revision: 128 IV-96/206 18/12/2013 CORE MANUAL Move the cursor onto the element. The cursor should switch from a cross to a hand when the element is identified by the program. This property is controlled in the member function CXChart::OnMouseMove. Then, left click the mouse. This operation fires the property page containing the controls to customize the selected element. There are four property pages (CChartPropPage1, CChartPropPage2,… ) which are elements (i.e., member variables) of the class .CChartPropSheet. For instance, if you select an axe by clicking an axe of the chart, the program activates the second page (CChartPropPage2), which contains the controls to customize the axes. Moreover, clicking another chart element when one property page is selected switches to another page if necessary. There are three active property pages, which are displayed in Fig. 30 and Fig. 31 below. The actions selected in the property pages are instantaneously executed to update the chart display. This property is achieved by repainting the chart window with the function m_chart.Invalidate()which executes m_chart.OnPaint(). Fig. 30 Fig. 31 The chart customization is straightforward. Fig. 32 shows two different charts of the same data. Revision: 128 IV-97/206 18/12/2013 CORE MANUAL Chart Title 100 100 90 90 80 70 60 50 80 70 60 50 40 40 30 30 20 20 0 4 8 12 Another Title 110 Prey number Prey number 110 16 20 24 28 0 4 8 12 16 20 24 28 Screen shot number Screen shot number Fig. 32: Examples of customization of the same chart D.5 Saving charts and chart parameters Chart parameters are saved in the scenario file. Thus, simply open the FileSave dialog box (click the left-bar buttom A chart can be copied to the clipboard to generate a WMF image. This property is controlled by the code in CMainFrame:: OnCopyToWMFButton(). Fig. 23 page 84 was inserted in this document following this procedure. To copy the chart to the clipboard, simply click the button E ), as save to a file with extension MAS. in the left bar. Class CXDataSet Revision: 128 IV-98/206 18/12/2013 CORE MANUAL Revision: 128 IV-99/206 18/12/2013 CORE MANUAL Chapter 6 History: last revision April 2006 Population initialization: DRAFT The module DRAFT is used to define graphically (almost) any initial configuration of agents and obstacles in the simulation terrain. F unctionally, DRAFT is a vectorial drawing tool integrated in MASS to generate visually the initial populations of obstacles and agents in the terrain. From the programmation point of view, DRAFT is an instance of the class CXDraft declared as shown in the header below. class CXDraft : public CWnd { public: CLine* int int CRectangle* int int CPolyLine* int int bool CPolygone* int int bool int int CWnd* RECT JHCButton JHCButton JHCButton bool CPoint CPoint int bool Revision: 128 m_Line; //ARRAY OF LINES DRAWN IN THE WINDOW iLineNb; //NB OF DRAWN LINES iSelectedLine; //INDEX OF THE SELECTED LINE (IF ANY) m_Rect; //ARRAY OF RECTANGLES DRAWN IN THE WINDOW iRectNb; //NB OF DRAWN RECTANGLES iSelectedRect; //INDEX OF THE SELECTED RECTANGLE (IF ANY) m_PolyLine; //ARRAY OF POLYLINES DRAWN IN THE WINDOW iPolyLineNb; //NB OF DRAWN POLYLINES iSelectedPolyLine; //INDEX OF THE SELECTED POLYLINES (IF ANY) bPolyInProgress; //true AFTER FIRST POINT OF THE POLYLINE m_Polygone; //ARRAY OF POLYGONES DRAWN IN THE WINDOW iPolygoneNb; //NB OF DRAWN POLYGONES iSelectedPolygone; //INDEX OF THE SELECTED POLYGONE (IF ANY) bPolygoneInProgress;//true AFTER FIRST POINT OF THE POLYGONE iDistMax; //MAXMIMUM DISTANCE TO SELECT AN OBJECT iSelectMode; //SELECMODE OF THE SELECTED OBJECT. //ABOVE IN THE HEADER pParent; //POINTER TO THE PARENT WINDOW m_InitRec; //RECT STRUCTURE TO STORE THE INITIAL WINDOW SIZE JButton1,JButton2,JButton3,JButton4,JButton5; JButton6,JButton7,JButton8,JButton9,JButton10; JButton11,JButton12,JButton13,JButton14,JButton15; bShowButton; //false: HIDE THE APPLICATION BUTTONS m_FromPt, m_ToPt; OldMousePoint; m_iLineStyle,m_iLineWidth; m_bDraw; IV-100/206 18/12/2013 CORE MANUAL CString bool int etc… OpenFileName; bModified; DSquare; } Script 16 Thus: DRAFT is encapsulated in a window class CXDraft derived from the class CWnd. This class contains the graphical objects (lines, rectangles, polygons..) drawn by the user, as we describe below. This class organization decouples most draft properties from those of the host application. DRAFT is integrated in the CORE as the member object CXDraft m_draft of the parent class CAGNTView. The DRAFT window opens on top of its parent windows CAGNTView. To fire the DRAFT window, simply click the Draft icon in the left toolbar. This action executes the function void CAGNTView::OnToolbarDraft(), which calls CAGNTView::CreateDraftWnd(), which build the draft windows through the member function: BOOL CXDraft::CreateDraft(HWND ParenthWnd, //PARENT bool bEnable)//false= HIDDEN AT CREATION Draw line Draw rectangle Draw ellipse Draw polyline Draw polygon Add one point Delete selected object Vertical symmetry Horizontal symmetry Duplicate object Close draft window Setup draft parameters Left draft toolbar Fig. 33: typical DRAFT window; Note the additional vertical bar including the CHART tools to drawn and modified objects, which are represented in the window The presence of the DRAFT window is revealed by the change or the mouse pointer (which switches from an arrow to a cross) and also by the appearance of an additional left toolbar (to draw, erase, move and modify the objects) as shown in Fig. 33. The procedure for defining agents and obstacles in the terrain is the following: Revision: 128 IV-101/206 18/12/2013 CORE MANUAL First, it is necessary to define and customize objects in the terrain: lines, rectangles, ellipses, polylines, polygons and the background. An object represents a zone in the terrain. Creating an object amount to creating an empty envelope that will be filled up with agents or obstacles. If there is no line, rectangle, ellipse, polyline, nor polygon, the sole object is the background that contains all the terrain points. In other words, the background is the complement with respect to the terrain of all other objects, i.e., the set of "all terrain cells, which are not in the other objects". Second select an existing object. Perhaps, customize again the object shape. Third, fill the selected object with agents and (or) obstacles. Filling the background object consists in filling the terrain area outside the other objects. In this framework, it is possible to define as much objects as necessary, and to customize separately the number of agents and the number of obstacles inserted in each object, inside the object (for rectangles, ellipses, polygons, and the terrain) and (or) in the border (for all objects except the terrain). A A.1 Object creation class CPointEx The point is the basic object. A line, a rectangle or an ellipse are defined with two points. For the line, the 2 points are the end points. For a rectangle or an ellipse, the 2 points are the top-left corner and the right-bottom corner. A polyline is represented by a set of N points. The header of the Class CpointEx header is as follows: class CPointEx { public: double x; double y; … } It is important to stress that points are defined with relative coordinates. For instance the points of coordinates (x=0,y=0) and (x=1,y=1) are respectively located in the top left and the bottom right corners of the client window. One complication comes from the fact that each point must be represented in the screen (for display) and in the terrain (for simulation). The typical code to derive the screen coordinates (Xpos, Ypos) of an object (agent or obstacle) from its relative coordinates (x,y) is the following one: RECT rect; GetParent()->GetClientRect(&rect); double XCoef= rect.right-rect.left; double YCoef= rect.bottom-rect.top; int Xpos= (int) (x*(rect.right-rect.left)); int Ypos= (int) (y*(rect.bottom-rect.top)); The typical code to derive the cell coordinates (XCell, YCell) in the terrain of an object (agent or obstacle) from its relative coordinates (x,y) is the following one: int XCell= (int) (x*XDim); int YCell= (int) (y*YDim); Revision: 128 IV-102/206 18/12/2013 CORE MANUAL where XDim and YDim are the number of cells in the X and Y directions respectively. A.2 class CLine We diplay below the header of the class Cline. class CLine { public: int COLORREF COLORREF int CPointEx int int iWidth; iColor; ColorRef[2]; iStyle; P0,P1; iSelectMode; DSquare; //END POINTS OF THE LINE // -2: THE LINE IS NOT SELECTED // -1: THE LINE IS SELECTED BUT NO POINT IS SELECTED // 0: POINT OF INDEX 0 IS SELECTED // 1: POINT OF INDEX 1 IS SELECTED //SIZE OF THE SQUARE AROUND THE ENDS WHEN HIGHLIGHTED CPointEx* int int AgentCell[AGENTTYPENB]; iAgentNb[AGENTTYPENB]; iAgentGenMode[AGENTTYPENB];//GENERATION MODE FOR EACH AGENT TYPE // =0 :Random // =1 :Line filled up (I.E., SATURATED) // =2 :Equally spaced points CPointEx* ObstacleCell; int iObstacleNb; int iObstacleGenMode; //VARIABLES TO CONTROL THE OBJECT CREATION DIALOG BOX int iSelectedAType; //AGENT SELECTED IN THE OBJECT CREATION BOX bool bAgentSelected; //true WHEN AGENT SELECTED IN OBJECT CREATION BOX etc… The grayed lines show that a Cline object includes populations of agents and obstacles, which are represented by arrays of points, the number of elements of which are adjusted at run time and stored in the arrays iAgentNb and IObstacleNb. The conditions of generations are also specified at runtime and stored in the arrays iAgentGenMode and iObstacleGenMode. To create and customize a new line, i.e., an instance of the Cline: Click the line button in the left toolbar. 7)This action triggers the button function JHCButton::OnLButtonDown as all buttons of the left draft toolbar in Fig. 33 page 101 are instances of the class JHCButton. The description of the button class is postponed to paragraph A.8 page 107. 8)JHCButton::OnLButtonDown sends a message to ist parent window (i.e. to CXDraft), which executes its member fucntion LRESULT CXDraft::OnClickBitmap. Then move the cursor to the line starting point, depress the left button of the mouse (left button down). 9)This operation triggers the function CXDraft::OnLButtonDown which executes CXDraft::ExtendLineArray to extend the member array m_Line. Thus, the dimension of this array is dynamically updated at runtime depending on the number of lines drawn in the window. The number of lines is iLineNb (see the declaration in the header CXDraft, page 101). Revision: 128 IV-103/206 18/12/2013 CORE MANUAL 10) It also sets up the starting point P0 coordinates in the Cline object. Keep the left button down! Move to the final point of the line. Then, release the left button (left button up). This operation sets up the end point P1 coordinates in the Cline object. To stop the line drawing operation, click again the line icon or depress another icon in the left toolbar In the present version, we chose to draw all objects with the same color selected in the dialog box fired by the icon . The relevant variables are COLORREF CTranspWnd.iDefaultDrawPen and CTranspWnd.iDefaultLineStyle. A.3 class Crectangle class CRectangle { public: int iWidth; COLORREF iLineColor; int iLineStyle; //RELATIVE COORDINATES OF THE TOP-LEFT AND RIGHT-BUTTON CORNERS OF THE RECTANGLE. //COORDINATES ARE RELATIVE TO THE DISPLAY WINDOW OF MASS. FOR INTANCE left=0.5 //AND top=0.5, MEANS THAT THE TOP-LEFT CORNER OF THE RECTANGLE IS IN THE MIDDLE //OF THE CView WINDOW. double left; double top; double right; double bottom; int iSelectMode; int DSquare;//SIZE OF THE SQUARE AROUND THE ENDS WHEN HIGHLIGHTED //ARRAY REPRESENTING THE RELATIVE POSITION OF AGENTS IN THE RECTANGLE. //FOR INSTANCE AgentCell[0][3].x=0.5 MEANS THAT THE AGENT iAType=0 OF INDEX 3 //IN THE ARRAY IS IN THE MIDDLE OF THE CView WINDOW, NOT IN THE MIDDLE OF THE //THIS RECTANGLE. //THUS left<=AgentCell[i][j].x<right AND top<=AgentCell[i][j].y<bottom CPointEx* AgentCell[AGENTTYPENB]; int iAgentNb1[AGENTTYPENB]; //NB OF AGENTS OF EACH TYPE int iAgentNb2[AGENTTYPENB]; //NB OF AGENTS USED TO PLOT A SQUARE LATTICE int iAgentGenMode[AGENTTYPENB]; //GENERATION MODE FOR EACH AGENT TYPE // =0 :Inside random // =1 :Border random // =2 :Border filled up (I.E., SATURATED) // =3 :Generation of a square lattice //ARRAY REPRESENTING THE RELATIVE POSITION OF OBSTACLES IN THE RECTANGLE. //FOR INSTANCE ObstacleCell[3].x=0.5 MEANS THAT THE OBSTACLE OF INDEX 3 //IN THE ARRAY IS IN THE MIDDLE OF THE CView WINDOW, NOT IN THE MIDDLE OF THE //THIS RECTANGLE CPointEx* ObstacleCell; int iObstacleNb1; //NUMBER OF OBSTACLES IN THE ELLIPSE int iObstacleNb2; //NUMBER OF OBSTACLES IN THE ELLIPSE int iObstacleGenMode; //GENERATION MODE OF OBSTACLES IN THE ELLIPSE //VARIABLES TO CONTROL THE OBJECT CREATION DIALOG BOX int iSelectedAType; //AGENT SELECTED IN THE OBJECT CREATION BOX bool iAgentSelected; //true WHEN AGENT SELECTED IN OBJECT CREATION BOX etc… } Revision: 128 IV-104/206 18/12/2013 CORE MANUAL Note that 2 numbers are associated to each object population. For instance the number of agents iAType=0 is defined by the numbers iAgentNb1[0] and iAgentNb2[0]. The use of this numbers depends on the selection mode of the objects. If iAgentGenMode[0] equals 0 (fill random), 1 (fill border random), or 2 (fill full border), the number of agents is simply iAgentNb1[0]. However, when iAgentGenMode[0]=3, corresponding to the generation of a rectangular lattice of objects in the rectangle, the number of agents is iAgentNb1[0]* iAgentNb2[0]. To create and customize a new rectangle, i.e., an instance of the CRectangle: A.4 Click the line button in the left toolbar. 11) This action triggers the button function JHCButton::OnLButtonDown as all buttons of the left draft toolbar in Fig. 33 page 101 are instances of the class JHCButton. The description of the button class is postponed to paragraph A.8 page 107. 12) JHCButton::OnLButtonDown sends a message to ist parent window (i.e. to CXDraft), which executes its member fucntion LRESULT CXDraft::OnClickBitmap. Then move the cursor to the rectangle starting point, depress the left button of the mouse (left button down). 13) This operation triggers the function CXDraft::OnLButtonDown which executes CXDraft::ExtendRectangleArray to extend the member array m_Rect. Thus, the dimension of this array is dynamically updated at runtime depending on the number of lines drawn in the window. The number of lines is iRectNb (see the declaration in the header CXDraft, page 101). 14) It also sets up the starting point coordinates (left,top) in the CRectangle object. Keep the left button down! Move to the final point of the line. Then, release the left button (left button up). This operation sets up the end point coordinates (right, bottom) in the Cline object. To stop the rectangle drawing operation, click again the line icon or depress another icon in the left toolbar class CEllipse class CEllipse { public: //VARIABLES REPRESENTING THE ELLIPSE POSITION, STYLE, COLOR.... int iWidth; COLORREF iLineColor; int iStyle; double left; double top; double right; double bottom; int iSelectMode; int DSquare;//SIZE OF THE SQUARE AROUND THE ENDS WHEN HIGHLIGHTED //VARIABLES REPRESENTING THE POPULATIONS OF OBJECTS IN THE ELLIPSE //CELLS OF THE AGENT IN THE TERRAIN FOLLOWING THEIR CREATION IN THE ELLIPSE //FOR INSTANCE AgentCell[0][3].x IS THE X COORDINATE OF THE CELL CONTAINING THE //AGENT iAType=0, AND OF INDEX 3. //WARNING: AgentCell[0][3].x IS AN INTEGER! THE POSITION IN THE TERRAIN AND //IT IS CALULATED USING DE DIMENSION XDim OF THE TERRAIN IN THE X DIRECTION CPointEx* AgentCell[AGENTTYPENB]; int iAgentNb[AGENTTYPENB]; //NB OF AGENTS OF EACH TYPE Revision: 128 IV-105/206 18/12/2013 CORE MANUAL int iAgentGenMode[AGENTTYPENB]; //GENERATION MODE FOR EACH AGENT TYPE //CELLS OF THE OBSTACLES IN THE TERRAIN FOLLOWING THEIR CREATION IN THE ELLIPSE //FOR INSTANCE ObstacleCell[3].x IS THE X COORDINATE OF THE CELL CONTAINING THE //OBSTACLE OF INDEX 3. CPointEx* ObstacleCell; int iObstacleNb; //NUMBER OF OBSTACLES IN THE ELLIPSE int iObstacleGenMode; //GENERATION MODE OF OBSTACLES IN THE ELLIPSE //VARIABLES TO CONTROL THE OBJECT CREATION DIALOG BOX int iSelectedAType; //AGENT SELECTED IN THE OBJECT CREATION BOX bool bAgentSelected; //true WHEN AGENT SELECTED IN OBJECT CREATION BOX etc… To create and customize a new ellipse, i.e., an instance of the CEllipse: Click the line button Follow the same procedure as that described for drawing a rectangle. The update of the ellipse array is also identical to that described for rectangles. A.5 in the left toolbar. class CPolyLine class CPolyLine { public: int iWidth; COLORREF iLineColor; int iStyle; CPointEx* LinePt; int iLinePtNb; int iSelectMode; //-2<=iSelectMode<iLinePtNb BOOL bShow; //BOOL VARIABLE TO SHOW OR HIDE THE OBJECT. SEE WGShowObject bool bSelect; //BOOL VARIABLE TO SHOW OR HIDE THE OBJECT. SEE WGShowObject int DSquare; //SIZE OF THE SQUARE AROUND THE ENDS WHEN HIGHLIGHTED //VARIABLES REPRESENTING THE POPULATIONS OF OBJECTS IN THE ELLIPSE IN RELATIVE //COORDINATES CPointEx* AgentCell[AGENTTYPENB]; int iAgentNb[AGENTTYPENB]; //NB OF AGENTS OF EACH TYPE // POSSIBLE VALUE iAgentGenMode[i]=0 :Inside random // =1 :Border filled up (I.E., SATURATED) int iAgentGenMode[AGENTTYPENB]; //GENERATION MODE FOR EACH AGENT TYPE CPointEx* ObstacleCell; int iObstacleNb; //NUMBER OF OBSTACLES IN THE ELLIPSE int iObstacleGenMode; //GENERATION MODE OF OBSTACLES IN THE ELLIPSE //VARIABLES TO CONTROL THE OBJECT CREATION DIALOG BOX int iSelectedAType; //AGENT SELECTED IN THE OBJECT CREATION BOX bool bAgentSelected; //true WHEN AGENT SELECTED IN OBJECT CREATION BOX etc… The number of polylines in CXDraft, i.e, the dimension of the array m_BrokLine is iPolyLineNb (see the declaration in the header CXDraft, page 101). The dimension of this array is dynamically updated at runtime depending on the number of broken lines drawn in the transparent window. The method to draw polylines or polygons slightly differs from that described for lines, rectangles or ellipses. As previously, you must first select the polyline or the polygon button. Then: Click the screen at the starting point of the polyline. "Click" means left button down and up. This operation triggers the function CXDraft:: OnLButtonDown, which executes Revision: 128 IV-106/206 18/12/2013 CORE MANUAL A.6 CXDraft::ExtendPolyLineArray to extend the member array m_PolyLine. Thus, the dimension of this array is dynamically updated at runtime depending on the number of polylines drawn in the window. Note that you need not keeping the left button down when you move the cursor to the location of the second point. Click again (left button down and up) to add one point to the polyline or the polygon. This operation triggers the function CXDraft:: OnLButtonDown, which executes CXDraft::ExtendPolyLineArray to extend the number of points in the polyline under construction. Repeat this operation for the other points of the polyline. Right click to generate the last point. class CPolygone: public CPolyLine CPolygon is derived from CPolyLine. Note that: Polylines and polygons are defined as arrays of points. Each object (line, rectangle, brokenline, polygon) includes a member variable iSelectMode. This variable is a flag with the following possible values: iSelectMode=-2: Object is not selected =-1: Object is selected as a whole, no point is selected. = 0: The point of index 0 is selected = 1: The point of index 1 is selected, and so on… The number of polygons in CXDraft, i.e, the dimension of the array m_Polygone is iPolygoneNb (see the declaration in the header CXDraft, page 101). The dimension of this array is dynamically updated at runtime depending on the number of polygones drawn in the window. The method to draw polygons is identical to that described in the previous paragraph to draw polylines, except that you need click the polygon A.7 button to start the draft. class CBackground public: CPointEx* AgentCell[AGENTTYPENB]; int iAgentNb[AGENTTYPENB]; //NB OF AGENTS OF EACH TYPE int iAgentGenMode[AGENTTYPENB];//GENERATION MODE FOR EACH AGENT TYPE CPointEx* ObstacleCell; int iObstacleNb; //NUMBER OF OBSTACLES IN THE ELLIPSE int iObstacleGenMode; //GENERATION MODE OF OBSTACLES IN THE ELLIPSE //VARIABLES TO CONTROL THE OBJECT CREATION DIALOG BOX int iSelectedAType; //AGENT SELECTED IN OBJECT CREATION BOX bool bAgentSelected; //true WHEN AGENT SELECTED IN OBJECT CREATION BOX int iAgentSize; A.8 class JHCButton : public CWnd Recall that the class CXDraft includes 16 button objects (JButton1, JButton2,… JButton16) derived from the class JHCButton. Most of this buttons are used to add new graphic objects to CXDraft as described in the previous paragraphs. The header is displayed below: Revision: 128 IV-107/206 18/12/2013 CORE MANUAL class JHCButton : public CWnd { public: CBitmap m_bitmap1,m_bitmap2; int m_ID; bool bState; JHCButton(); // Construction void Create(int iLeft, int iTop, int iWidth, int iHeight, CWnd* pParent,int ID_BITMAP1,int ID_BITMAP2,int nID); void ResetBitmap(); protected: //{{AFX_MSG(JHCButton) afx_msg void OnLButtonDown(UINT nFlags, CPoint point); afx_msg void OnLButtonUp(UINT nFlags, CPoint point); afx_msg void OnPaint(); //}}AFX_MSG DECLARE_MESSAGE_MAP() }; A8.1 Button creation The class JHCButton is used to create the buttons which are displayed in the left draft toolbar (see Fig. 33 page 101). Recall that the buttons are created through the function JButton1.Create when the XDRAFT windows is created through the function call: BOOL CXDraft::CreateDraft(HWND ParenthWnd, //PARENT bool bEnable) //false= HIDDEN AT CREATION ////////////////////////////////////////////////////////////////////////////////////// //CONSTRUCTOR FOR A DRAFT WINDOW THAT COVERS THE FULL CLIENT AREA OF ITS PARENT ////////////////////////////////////////////////////////////////////////////////////// { CString NEWCLASS1=AfxRegisterWndClass(0, AfxGetApp()->LoadStandardCursor(IDC_CROSS), (HBRUSH) ::GetStockObject(WHITE_BRUSH), 0); if (CreateEx(WS_EX_CONTEXTHELP, NEWCLASS1, //WINDOW CLASS NAME "Transp", //WINDOW NAME WS_CHILD | //CHILD WINDOW; STAYS IN THE PARENT WINDOW WS_MAXIMIZE, //OCCUPY FULL PARENT CLIENT AREA 0,0,0,0, ParenthWnd, 0, NULL) == FALSE) { MessageBox("FAIL TO CREATE CXDraft WINDOW","FROM CreateDraft",MB_OK); return FALSE; } ////////////////////////////////////////////////////////////////////////// JButton1.Create(0,0,25,25, this,IDB_BITMAP1, IDB_BITMAP2,0); //LINE JButton2.Create(0,24,25,25, this,IDB_BITMAP3, IDB_BITMAP4,1); //RECTANGLE JButton3.Create(0,48,25,25, this,IDB_BITMAP5, IDB_BITMAP6,2); //ELLIPSE JButton4.Create(0,72,25,25,this,IDB_BITMAP7, IDB_BITMAP8,3); //BROKENLINE JButton7.Create(0,96,25,25,this,IDB_BITMAP13,IDB_BITMAP14,6); //POLYGONE JButton8.Create(0,120,25,25,this,IDB_BITMAP15,IDB_BITMAP16,7); //ADD A POINT IN LINE JButton9.Create(0,144,25,25,this,IDB_BITMAP17,IDB_BITMAP18,8); //DELETE SELECTED OBJECT JButton11.Create(0,168,25,25,this,IDB_BITMAP21,IDB_BITMAP22,10); //VERTICAL SYMMETRY JButton12.Create(0,192,25,25,this,IDB_BITMAP23,IDB_BITMAP24,11); //HORIZONTAL SYMMETRY JButton13.Create(0,216,25,25,this,IDB_BITMAP25,IDB_BITMAP26,12); //DUPLICATE SELECTED OBJECT JButton10.Create(0,240,25,25,this,IDB_BITMAP19,IDB_BITMAP20,9); //CLOSE WINDOW JButton16.Create(0,264,25,25,this,IDB_BITMAP27,IDB_BITMAP28,13); //DRAW PARAMETERS SETTING ////////////////////////////////////////////////////////////////////////// Revision: 128 IV-108/206 18/12/2013 CORE MANUAL ::GetClientRect(ParenthWnd,&m_InitRec); ////////////////////////////////////////////////////////////////////////// EnableWindow(bEnable); //HIDE OR SHOW AT CREATION return TRUE; } void JHCButton::Create(int iLeft, int iTop, int iWidth, int iHeight, CWnd* pParent, int ID_BMP1, //IDENTIFIER OF THE DEFAULT BUTTON BITMAP int ID_BMP2, //IDENTIFIER OF THE DEPRESSED-BUTTON BITMAP int nID) ///////////////////////////////////////////////////////////////////////////// // HERE IS THE ONLY WEAKNESS OF THE JHCButton CLASS: YOU MUST INSERT THE BITMAPS // OF THE BUTTON IN THE RESOURCE OF THE APPLICATION. // USE THE RESOURCE EDITOR OF VISUALC TO INCLUDE THE BITMAP IN THE RESOURCE FILE // ID_BMP1 IS THE IDENTIFIER IN THE RESOURCE FILE OF THE DEFAULT-BITMAP OF THE BUTTON ///////////////////////////////////////////////////////////////////////////// { m_ID=nID; if ((!m_bitmap1.LoadBitmap(ID_BMP1)) || (!m_bitmap2.LoadBitmap(ID_BMP2))) { ::MessageBox(NULL,"CANNOT OPEN BITMAP","",MB_OK); return; } RECT rect; rect.left=iLeft; rect.top=iTop; rect.right=iLeft+iWidth; rect.bottom=iTop+iHeight; CString NEWBUTTON=AfxRegisterWndClass(0,AfxGetApp()->LoadStandardCursor(IDC_ARROW), (HBRUSH) ::GetStockObject(LTGRAY_BRUSH),0); CWnd::Create(NEWBUTTON,"",WS_CHILD|WS_VISIBLE,rect,pParent,0,NULL); } A8.2 B B.1 Button Click Object selection & customization Selection Selecting an object makes it possible to modify its topology (if it is free of agents or obstacles) or to populate it. m_pdraft controls the selection or deselection of the different “populations” of objects by executing the member functions CXDraft::OnLButtonDown, CXDraft::OnMouseMove, and CXDraft::OnLButtonUp, which are trigged by the action of the left mouse button. The flowchart is represented in Fig. 34. Revision: 128 IV-109/206 18/12/2013 CORE MANUAL Fig. 34: Flowchart of the cycle induced by depressing, moving and releasing the left mouse button. when the left button of the mouse in depressed in the draft window, the class CXDraft executes it members function CXDraft::OnLButtonDown().There are two cases : Case 1: If one draft button is selected in the left toolbar (see), the module starts drawing an object as decribed in the section A page 102. Case 2: If no draft button is selected, each existing object in CXDraft executes its function Highlight. Indeed, all objects (lines, rectangle, ellipses, etc…) have a member function HighLight, which determines the reaction of the object following the click of the left mouse button. void void void void CLine::HighLight(CDC* pDC, RECT rect, CPoint Pt, int DistMax) Crectangle::HighLight(CDC* pDC,RECT rect,CPoint Pt,int DistMax); CPolyLine::HighLight(CDC* pDC,RECT rect,CPoint Pt,int DistMax); Cpolygone::HighLight(CDC* pDC,RECT rect,CPoint Pt,int DistMax); The call parameter Pt must be the position of the pointer in the screen. The flowchart of the HighLight function is represented in Fig. 35. It setups the selection parameter iSelectMode of the object. The following values are possible: Single-point selection: This case occurs when the mouse pointer is very close to a point of the object. In that case iSelectMode=k where k is the point index in the array of points constituting the agent. Full-object selection: iSelectMode=-1. This case when the mouse pointer is close to the object without being close to a specific point constituting the object Deselection: iSelectMode=-2. When the pointer position is too far from the object. Revision: 128 IV-110/206 18/12/2013 CORE MANUAL Fig. 35: Flowchart of Highlight function B.2 Deletion Deleting an object is executed by the function CXDraft::OnObjectDelete(). It consists of: Erasing the object in the screen. Writing of erasing an object in the screen are executed by the member functions InvertHighlight for each object. In other words, if the object is not drawn it is drawn, and if it is drawn, it is erased. The trick to achieve this dual property with the same function consists in defining the context device as follows for all drawing operations: ///////////////////////////////////////////////////////////////////////// CClientDC dc(this); CPen* penCur = new CPen(this->iDefaultLineStyle,1,this->iDefaultDrawPen); dc.SelectObject(penCur); dc.SetROP2(R2_NOTXORPEN); ////////////////////////////////////////////////////////////////////////// Deleting the object in the memory. The deletion in memory forces to shrink an array of objects, the line array, or the rectangle array, or the Ellipse array…. void CXDraft::OnObjectDelete() ///////////////////////////////////////////////////////////////////////////////////// ///////////////////////////////////////////////////////////////////////{ if (iSelectedLine>-1) ShrinkLineArray(); if (iSelectedRect>-1) ShrinkRectangleArray(); if (iSelectedEllipse>-1) ShrinkEllipseArray(); if (iSelectedPolyLine>-1) ShrinkPolyLineArray(); if (iSelectedPolygone>-1) ShrinkPolygoneArray(); GetTotalObjectNb(); } B.3 B3.1 Customization Line customzation Revision: 128 IV-111/206 18/12/2013 CORE MANUAL To modify an existing line: First select the line by left clicking the line with the mouse (button down, see paragraph B.1). Il you click one end point, you select specifically this end point. Note that in the selected mode, the line end points are decorated with two small squares. Then, you can move globally the line (or the selected end point, depending on the selection mode) by moving the mouse (remember that the left button is down during this operation). To move very accurately the line, use the direction keys of the keypad (UP, LEFT, RIGHT, or DOWN), once the line has been selected. To operate a vertical symmetry, select the line and click the icon in the left toolbar. This action executes the function CXDraft::Horinzontal Symmetry(). To operate a vertical symmetry, select the line and click the icon action executes the function CXDraft::Vertical Symmetry(). To duplicate a line, select the line and click the icon executes the function CXDraft::DuplicateObject(). To delete a line, select the line and click the icon When an object is selected (with CXDraft::OnLButtonDown), the corresponding family flag is switched to the index of the object, i.e., its rank in the corresponding array. For instance, if no polygon was selected,, iSelectedPolygone is switched from –1 (default value, no selection) to a value between 0 wand iPolygoneNb-1. B3.2 in the left toolbar. This in the left toolbar. This action in the left toolbar. Rectangle and ellipse customzation The procedure to customize a rectangle or an ellipse is very intuitive and similar to that described in the previous paragraph for the line object. However, remember that the object must be empty, i.e., free of agents and obstacles. C C.1 Agent and Obstacle generation Generation control box Once an object has been created (line, rectangle, ellipse, etc … following the prescription described in the previous sections), it is possible to fill it up with agents and obstacles. This operation is controlled by the GENERATION box displayed in Fig. 36 page 113. Revision: 128 IV-112/206 18/12/2013 CORE MANUAL Fig. 36 : Generation control box To fire this dialog box, simply right click the object. in Fig. 36, the user just right clicked the rectangle drawn in the screen. Firing the GENERATION box for the background is slightly more complicated: first, left click the background outside any object, keep the left button down and right click. In all cases, you should see the box represented in Fig. 36. Note that the left-top corner of the GENERATION box in the screen is exactly corresponds to the mouse position during the right-click action.This action triggers the function CXDraft::OnRButtonDown displayed below: void CXDraft::OnRButtonDown(UINT nFlags, CPoint point) /////////////////////////////////////////////////////////////////////////////////// ///////////////////////////////////////////////////////////////////////////////////{ CMainFrame* pMain= (CMainFrame*) AfxGetApp()->m_pMainWnd->GetTopLevelFrame(); int i=0; //////////////////////////////////////////////////////////////////////////// OnRButtonDownLineTest(nFlags,point); OnRButtonDownRectangleTest(nFlags,point); OnRButtonDownEllipseTest(nFlags,point); OnRButtonDownPolyLineTest(nFlags,point); OnRButtonDownPolygonTest(nFlags,point); if (IsLeftButtonDown) OnRButtonDownBackgroundTest(nFlags,point); /////////////////////////////////////////////////////////////////////////////////// GetTotalObjectNb(); //////////////////////////////////////////////////////////////////////////// //UPDATE THE ARRAYS OF THE PROPERTY SHEET IF IT IS ALREADY OPEN if (pMain->m_pPropFrame != NULL) { pMain->m_pPropFrame->m_pModelessPropSheet->FullInitialize(); } //////////////////////////////////////////////////////////////////////////// CWnd::OnRButtonDown(nFlags, point); } Revision: 128 IV-113/206 18/12/2013 CORE MANUAL The function OnRButtonDown launches for each graphical object in CXDraft the processing cycle shown in Fig. 37. Fig. 37 This diagram simply shows that the cycle first tests whether some object has been selected by executing HighLight for all objects. If it is (see the flowchart of Highlight in Fig. 35 page 111)) OBJ.iSelectMode>-2, the cycle fires the dialog box (i.e., an instance Dlg of CDgObjectCreation class) to define the generation conditions of agents and (or) obstacles in the highlighted object. The header of this class is displayed below: class CDlgObjectCreation : public CDialog /////////////////////////////////////////////////////////////////////////////////// /////////////////////////////////////////////////////////////////////////////////// { public: CDlgObjectCreation(CWnd* pParent = NULL); // standard constructor virtual ~CDlgObjectCreation(); // Dialog Data enum { IDD = IDD_DLG_OBJ_GENERATION }; public: CPoint TopLeftCorner; int m_iSelectedAType; //SELECTED AGENT TYPE int m_iAgentNb1[AGENTTYPENB];// int m_iAgentNb2[AGENTTYPENB];//THIS SECOND NUMBER IS ONLY USED TO GENERATE //A SQUARE LATTICE OF AGENTS int m_iGenMode[AGENTTYPENB]; int m_iSelectedAgentNb1; //NB OF AGENTS OF TYPE m_iSelectedAType int m_iSelectedAgentNb2; bool m_bAgentSelected; //true IS THE AGENT MODE IS SELECTED int m_iObstacleNb1; int m_iObstacleNb2; //THIS SECDOND NUMBER IS ONLY USED TO GENERATE //A SQUARE LATTICE OF OBSTACLES int m_iObstacleGenMode; CComboBox InitGenMode; CNumSpinCtrl m_Spin1; HWND ParenthWnd; int iCallingObject; //0: THIS FUNCTION IS CALLED BY A LINE //1: THIS FUNCTION IS CALLED BY A RECTANGLE //2: THIS FUNCTION IS CALLED BY AN ELLIPSE int iCloseMode; //iCloseMode=0 OK; iCloseMode=1 Test Generation //iCloseMode=2 Erase ALL Revision: 128 IV-114/206 18/12/2013 CORE MANUAL int m_iTotalANb[AGENTTYPENB]; //TOTAL NB OF AGENTS CREATED IN ALL OBJECTS int m_iTotalObNb; //TOTAL NB OF OBSTACLES CREATED IN ALL OBJECTS DECLARE_DYNAMIC(CDlgObjectCreation) afx_msg afx_msg afx_msg afx_msg afx_msg virtual afx_msg protected: virtual virtual public: afx_msg afx_msg afx_msg }; void void void void void BOOL void OnSelChangeInitGenMode(); OnPaint(); OnBnClickedAgent(); OnBnClickedObstacle(); OnEnChangeAgentType(); OnInitDialog(); OnBnClickedCheck1(); void OnOK(); void DoDataExchange(CDataExchange* pDX); // DDX/DDV support void OnBnClickedCancel(); void OnBnClickedTestGeneration(); void OnBnClickedEraseObjects(); The correspondence between the fields in the dialog box and the member variables of CDlgObjectCreation is as follows (see Fig. 38): "Agents iAType" updates m_iSelectedAType. Fig. 38 The two edit controls located on the right side of the field "Agent number" define the number of agents. The right-most control is generally inactive, so that the number of agents is defined by the left sole active control. For instance in Fig. 38, the sole active edit control corresponds to m_iAgentNb1[iAType] and the program will set up 31= m_iAgentNb1[iAType]. However, the right-most control may be activated, depending on the generation mode, in particular if the generation mode "square lattice" is selected. In that case, the program will set up 64=m_iAgentNb2[iAType]. The total number of generated agents will be the product of the two numbers. The field "Total agent number" is not adjustable. It simply shows the total number of agents with the selected type m_iSelectedAType in all the created objects. The generation options available in the "Generation" combo box depend on the nature of the selected object. Generating agents and obstacles inside the object is possible for rectangles, ellipses and polygons. The rectangle object offers the most sophisticated generation options, comprising: Inside random, Inside square lattice, Border random, Border filled up, square lattice (see for instance Fig. 36 page 113). This box controls the generation of agents and obstacles. To randomly generate 1000 agents of type=0 in the example represented in Fig. 36, change the "Agent number" field to 1000 and click the button "GENERATE". If you see no agents, check that the agent color is for instance different from the background! It is possible to generate objects inside the ellipse or on the border depending on the selection of the "generation" combo box. The generation mode depends on the nature of the selected object. The figure below show several examples of agents generation in various objects. Revision: 128 IV-115/206 18/12/2013 CORE MANUAL Fig. 39: Example of agent and obstacle distributions It is important to describe the sequence of function calls following the click of the button GENERATE in the dialog box. The following functions are executed: 1. void CDlgObjectCreation::OnBnClickedTestGeneration(), which essentially stores the data of the edit boxes in the member variables of the class CDlgObjectCreation. The dialog box is closed with iCloseMode=1. 2. As the dialog box was a modal box, the control returns to the function which created the box. This function depends on the object, which was selected when right-clicking the draft windows. The control returns to: - CXDraft::OnRButtonDownLineTest if a line was selected. - CXDraft:: OnRButtonDownRectangleTest if a rectangle was selected. - CXDraft:: OnRButtonDownEllipseTest if an ellipse was selected. - CXDraft:: OnRButtonDownPolylineTest if a polyline was selected. - CXDraft:: OnRButtonDownPolygonTest if a polygon was selected. CXDraft:: OnRButtonDownBacgroundTest if the background was selected. Perhaps, the simplest method to understand the processing consists in studying in details a practical case. Let us assume that a rectangle was selected and populated with agents of obstacles. The function OnRButtonDownRectangleTest is executed. Its code is displayed below: void CXDraft::OnRButtonDownRectangleTest(UINT nFlags, CPoint point) //////////////////////////////////////////////////////////////////////////////////////////// //////////////////////////////////////////////////////////////////////////////////////////// Revision: 128 IV-116/206 18/12/2013 CORE MANUAL { int i=0, j=0, k=0; ////////////////////////////////////////////////////////////////////////// CAGNTView* pView=GetActiveView1(); COLORREF AColor[AGENTTYPENB]; for (k=0;k<AGENTTYPENB;k++) AColor[k]=pView->AgentColor[k][0]; int XDim=pView->ThreadData.XDim; int YDim=pView->ThreadData.YDim; ////////////////////////////////////////////////////////////////////////// RECT rect; GetParent()->GetClientRect(&rect); double XCoef=1.0/(rect.right-rect.left); double YCoef=1.0/(rect.bottom-rect.top); ///////////////////////////////////////////////////////////////////////////// CClientDC pDC(this); CPen* penCur = new CPen(this->iDefaultLineStyle,1,this->iDefaultDrawPen); pDC.SelectObject(penCur); pDC.SetROP2(R2_NOTXORPEN); ////////////////////////////////////////////////////////////////////////// CDlgObjectCreation* dlg = new CDlgObjectCreation(this); iSelectedRect=-1; //DEFAULT: NO RECTANGLE SELECTED for (i=0;i<iRectNb;i++) { m_Rect[i].HighLight(&pDC,rect,point,iDistMax); //REMEMBER THAT HighLight UPDATES iSelectMode TO -2,-1,0,1,2,3 if (m_Rect[i].iSelectMode>-2) { iSelectedRect=i; bool bGenerate1=false; bool bGenerate2=false; while (!bGenerate1 || !bGenerate2) { this->GetTotalObjectNb(); for (int k=0;k<AGENTTYPENB;k++) dlg->m_iTotalANb[k]=this->iAgentNb[k]; dlg->m_iTotalObNb=this->iObstacleNb; for (j=0;j<AGENTTYPENB;j++) { dlg->m_iAgentNb1[j]=m_Rect[i].iAgentNb1[j]; dlg->m_iAgentNb2[j]=m_Rect[i].iAgentNb2[j]; dlg->m_iGenMode[j]=m_Rect[i].iAgentGenMode[j]; } dlg->TopLeftCorner=point; dlg->m_iSelectedAType=m_Rect[i].iSelectedAType; dlg->m_bAgentSelected=m_Rect[i].bAgentSelected; if (dlg->m_bAgentSelected) { dlg->m_iSelectedAgentNb1=dlg->m_iAgentNb1[dlg->m_iSelectedAType]; dlg->m_iSelectedAgentNb2=dlg->m_iAgentNb2[dlg->m_iSelectedAType]; } else { dlg->m_iSelectedAgentNb1=m_Rect[i].iObstacleNb1; dlg->m_iSelectedAgentNb2=m_Rect[i].iObstacleNb2; } dlg->m_iObstacleNb1=m_Rect[i].iObstacleNb1; dlg->m_iObstacleNb2=m_Rect[i].iObstacleNb2; dlg->m_iObstacleGenMode=m_Rect[i].iObstacleGenMode; dlg->iCallingObject=1;//THE DIALOG BOX IS CALLED BY A RECTANGLE //LINE1 if (IDOK==dlg->DoModal()) {// //////////////////////////////////////////////////////////////////////// //CRUCIAL: FIRST ERASE ALL EXISTING OBJECTS IN THE RECTANGLE!!!!!!!!!! m_Rect[i].InvertInternalObjects(&pDC,rect,XDim,YDim,AColor); //////////////////////////////////////////////////////////////////////// for (j=0;j<AGENTTYPENB;j++) { m_Rect[i].iAgentNb1[j]=dlg->m_iAgentNb1[j]; m_Rect[i].iAgentNb2[j]=dlg->m_iAgentNb2[j]; m_Rect[i].iAgentGenMode[j]=dlg->m_iGenMode[j]; } m_Rect[i].iSelectedAType=dlg->m_iSelectedAType; m_Rect[i].bAgentSelected=dlg->m_bAgentSelected; m_Rect[i].iObstacleNb1=dlg->m_iObstacleNb1; m_Rect[i].iObstacleNb2=dlg->m_iObstacleNb2; m_Rect[i].iObstacleGenMode=dlg->m_iObstacleGenMode; ///////////////////////////////////////////////////////////////// //LINE2 if (dlg->iCloseMode==1) {//GENERATION OF AGENTS & OBSTACLES Revision: 128 IV-117/206 18/12/2013 CORE MANUAL //FIRST, DEFINE THE POPULATIONS OF AGENTS AND OBSTACLES bGenerate1=m_Rect[i].FillInterior(XDim,YDim); bGenerate2=m_Rect[i].FillBorder(XDim,YDim); //SECOND, PAINT THE POPULATIONS IN THE TRANSPARENT WINDOW if (bGenerate1 && bGenerate2) m_Rect[i].InvertInternalObjects(&pDC,rect,XDim,YDim,AColor); bGenerate1=false;//TO FORCE REOPENING THE DIALOG BOX } ///////////////////////////////////////////////////////////////// else if (dlg->iCloseMode==2) {//DELETE ALL POPULATIONS for (j=0;j<AGENTTYPENB;j++) { m_Rect[i].iAgentNb1[j]=0; dlg->m_iAgentNb1[j]=0; } dlg->m_iSelectedAgentNb1=0; m_Rect[i].iObstacleNb1=0; dlg->m_iObstacleNb1=0; m_Rect[i].InvertInternalObjects(&pDC,rect,XDim,YDim,AColor); } ///////////////////////////////////////////////////////////////// //LINE3 } else {//CANCEL BUTTON bGenerate1=true; bGenerate2=true; } } } } ////////////////////////////////////////////////////////////////////////// pDC.SelectStockObject(BLACK_PEN); delete penCur; //AS IT IS UNSAFE TO delete A SELECTED RESOURCE, THE BLACK_PEN delete dlg; ///////////////////////////////////////////////////////////////////////////// } The generation dialog box is open at LINE1. When it is closed with iCloseMode=1, the processing begins at LINE2. Note that the box is immediately reopened! Several comments are in order here: Agents and obstacles generated in the background object are automatically created outside ellipses, rectangles and polygons. It is not possible to move a filled object, simply to avoid the overlap of agents or obstacles in different objects. To move an empty object, first erase the populations using the "ERASE all objects" button in the generation control box (see Fig. 36) Moving or resizing an empty object in a filled background may move background agents or obstacles inside the object. To avoid this issue, select the background and recalculate all populations. Note that Dlg does not directly create the agents. It is closed to come to the parent window to create to populations, and then reopened. C.2 Serialization Objects (i.e., lines, rectangles, ellipses…) are saved and read from disk files with the extension OBJ. Saving an object to disk consists in saving the object definition points, the number of generated agents and (or) obstacles, and the condition of generation. Note that the location of the agents or obstacles that contain each object are not saved. The conditions of generation (as defined in the generation combo) are only saved to disk. Revision: 128 IV-118/206 18/12/2013 CORE MANUAL The routine for saving to disk is void CXDraft::WriteToDisk. CXDraft::OnFileSave(), which calls void The routine for read from disk is void CXDraft::OnFileOpen(), which calls void CXDraft::ReadFromDisk. D Approximate distance to an ellipse 2 The ellipse equation reads: 2 x X 0 y Y0 1 A B The center of this ellipse is just the point (X0,Y0). Let us consider a point in (X,Y) in the plane. The equation of the line joining this point to the ellipse center is: y Y0 Y Y0 x X 0 . X X0 The intersection of this line with the ellipse is represented by the 2 solutions of the following equation: 2 x X 0 Y Y0 A X X0 Thus: The D x X 0 2 2 x X0 1 B 1 1 Y Y0 A 2 X X 0 approximate distance , and 2 y Y0 1 2 B to the ellipse Y Y0 x X 0 X X0 is D MinD , D X x 2 Y y 2 Revision: 128 IV-119/206 18/12/2013 with CORE MANUAL Chapter 7 Interface: GDI & storage of simulation in WMF The GDI module is a graphic module to trace the moves of the agents in the terrain. T A he GDI module enables direct observation of the agent trajectories in the terrain as displayed in Fig. 40 and also saving the successive screen shots to disk. This functionality is indispensable in many cases, especially in inhomogeneous systems. It is possible to trace diffusion, to observe the emergence of order, or simply to debug the agent decision functions that can lead to inconsistent behaviors. Tracing agent moves The simulation thread (Thread II, see Fig. 2 page 15) sends one WM_PAINT message to CAGNTView to update the display. Thus, the function CAGNTView::OnPaint() manages the representation of the data, with three possible display modes, i.e, the Run Mode, the Chart Mode, and the Draft Mode (see the Tutorial Manual). Chart and Draft Modes were described in chapters 5 and 6 respectively. The Run Mode shows the evolution of the agent population in the terrain. CAGNTView::OnPaint()directly calls the device-context functions to trace the moves of the agents through the terrain. The member function CAGNTView::OnUpdateDisplay operates as a switch to update the display depending on the value of the parameter iDisplayMode with iDisplayMode=0 for the Run Mode, iDisplayMode=1 for the Chart Mode, iDisplayMode=2 for the Draft Mode. Revision: 128 IV-120/206 18/12/2013 CORE MANUAL Fig. 40: Display of two populations of agents (red & green lines) and obstacles (black lines) by the module GDI in the Run Mode. LRESULT CAGNTView::OnUpdateDisplay(WPARAM wparam, //SCREEN SHOT INDEX LPARAM lparam) //UNUSED ///////////////////////////////////////////////////////////////////////////////////////// ///////////////////////////////////////////////////////////////////////////////////////// { //////////////////////////////////////////////////////////////////////////////////////// //MAKE SURE THAT NO ACTION CONCERNING THE INTERFACE IS CONCURENTLY IN PROGRESS CAGNTApp* pApp=(CAGNTApp*) AfxGetApp(); // WaitForSingleObject(pApp->m_hSafe1,INFINITE); //////////////////////////////////////////////////////////////////////////////////////// CClientDC dc1(this); //MANDATORY!!!!!!!!!! static int iPrevGraphMode =-1; //////////////////////////////////////////////////////////////////////////////////////// if (iDisplayMode==0) {//CURRENT DISPLAY: 2D REPRESENTATION OF AGENTS if (::IsWindowVisible(m_chart.m_hWnd)) m_chart.ShowWindow(SW_HIDE); if (::IsWindowVisible(m_draft.m_hWnd)) m_draft.ShowWindow(SW_HIDE); if (iDisplayMode!=iPrevGraphMode) { //JUST TO ERASE THE BACKGROUND ONE TIME PaintBackGround(&dc1,0); //WHEN YOU SWITCH iGraphMode iPrevGraphMode=iDisplayMode; } DrawObstacles(&dc1,0); DrawAgents(&dc1,1); DrawPolylines(&dc1,1); } //////////////////////////////////////////////////////////////////////////////////////// else if (iDisplayMode==1) { //CURRENT DISPLAY: CHART MODE iPrevGraphMode=iDisplayMode; if (::IsWindowVisible(m_draft.m_hWnd)) m_draft.ShowWindow(SW_HIDE); if (::IsWindow(m_chart.m_hWnd)) m_chart.ShowWindow(SW_NORMAL); DrawChart(ThreadData.iShotIndex);//iScreen SAVED PREVIOUSLY IN GraphicUpdate } //////////////////////////////////////////////////////////////////////////////////////// else if (iDisplayMode==2) { //CURRENT DISPLAY: DRAFT MODE if (iPrevGraphMode!=iDisplayMode) { iPrevGraphMode=iDisplayMode; Revision: 128 IV-121/206 18/12/2013 CORE MANUAL if (::IsWindowVisible(m_chart.m_hWnd)) m_chart.ShowWindow(SW_HIDE); if (::IsWindow(m_draft.m_hWnd)) { m_draft.ShowWindow(SW_NORMAL); m_draft.Invalidate(); //REDRAW THE DRAFT WINDOW } } } //////////////////////////////////////////////////////////////////////////////////////// SetEvent(pApp->m_hSafe1); //THUS ANY CALL TO WaitForSingleObjet(m_hSafe1) //////////////////////////////////////////////////////////////////////////////////////// return 0; } Note the calls to the member functions: void CAGNTView::DrawAgents(CDC* dc, int iter) void CAGNTView::DrawObstacles(CDC* dc, int iter) to draw the agents and obstacles, including color and shape. START Yes Paint Obstacle No Is it First Iteration? Yes Are All AGENT populations painted? Paint Background Are all Obstacles painted? Select Obstacle No Select NEW population No No Select AGENT Yes DrawPlayGround END Are All AGENTS painted? Paint OLD Position with background Color Paint NEW Position with AGENT Color Fig. 41: DrawTerrain flowchart Revision: 128 IV-122/206 18/12/2013 CORE MANUAL B Saving the simulation shots to disk Saving a simulation to disk consists in periodically storing WMF images of the terrain to a selected directory. This procedure is controlled by the Copy/Read property page displayed below in Fig. 42 page 123. To activate the simulation storage mechanim, click the check boxe entitled "Save to WMF files". This action launches the function void CParamPage5::OnSetDirectory(), which immediately fires the common dialog box to select a directory for the WMF files (see Fig. 42). Fig. 42 The box entitled "GENERIC NAME FOR WMF FILES" enables selecting the directory to store WMF files. This name will be displayed in the field entitled "Generic File Name". In Fig. 42, WMF files will be named IMAGE0.WMF, IMAGE1.WMF, IMAGE2.WMF, etc... The storage mechanism is executed at runtime by the simulation thread (Thread II, see Fig. 2 page 15). Explictly, the function void MainTestAsynchronous(COREDATA* pData) executes the next fragment of code to send the message WM_SAVE_PLAYGROUND to CAGNTView which ultimately executes LRESULT CAGNTView::OnSavePlayground(..) to save the playground each time it updates the screen to store the evolution. ////////////////////////////////////////////////////////////////////////////////// //SECTION TO STORE THE PLAYGROUND DISPLAY TO DISK if (pData->bSaveGroundToDisk) { int iterat= (int) (ScreenRefreshTime/ScreenShotPeriod); if ((iterat%pData->iTraceSavePeriod)==0) ::SendMessage(pData->m_ViewhWnd,WM_SAVE_PLAYGROUND,iterat,0); } ////////////////////////////////////////////////////////////////////////////////// LRESULT CAGNTView::OnSavePlayground(WPARAM wparam, //ITERATION INDEX LPARAM lparam) //UNUSED /////////////////////////////////////////////////////////////////////////////////////////// Revision: 128 IV-123/206 18/12/2013 CORE MANUAL //FUNCTION TO SAVE AUTOMATICALLY THE PLAYGROUND TO A DISK FILE /////////////////////////////////////////////////////////////////////////////////////////// { CString FileName=ThreadData.TraceFileName; //GENERIC TraceFileName USER-DEFINED IN ParamPage5 char buffer[20]; _itoa( wparam, buffer, 10); if (wparam<10) FileName=FileName+"000"+buffer+".wmf"; else if (wparam<100) FileName=FileName+"00"+buffer+".wmf"; else if (wparam<1000) FileName=FileName+"0"+buffer+".wmf"; else FileName=FileName+buffer+".wmf"; CFile myFile(FileName,CFile::modeCreate | CFile::modeWrite | CFile::typeBinary); myFile.Close(); CMetaFileDC * cDC = new CMetaFileDC(); cDC->CreateEnhanced(GetDC(),NULL,NULL,"the_name"); //NEXT CALL DRAWS THE METAFILE EXACTLY AS THE SCREEN DrawPlaygroundForDisk(cDC,0); //SECOND PASSING PARAMETER UNUSED HENHMETAFILE handle = cDC->CloseEnhanced(); //CLOSE meta CMetafileDC AND GET ITS HANDLE if (CopyEnhMetaFile(handle,FileName.GetBuffer())==NULL) MessageBox("ERROR TO COPY WMF TO DISK","",MB_OK); else DeleteEnhMetaFile(handle); // cDC->Detach(); delete cDC; return 0; } C Playing a simulation from disk The simulation run has been saved in a directory as a series of WMF files. The reading of the different screen shots is controlled by the parampage represented in Fig. 42. The reading is exectuted in a separate thread, to maintain the interaction with the interface. The Thread function is UINT ThreadAnimProc(LPVOID pParam) D Saving data to disk void CParamPage5::OnBnClickedSaveDataTodisk(), which calls the function void CParamPage5::OnBnClickedDataDir(). Revision: 128 IV-124/206 18/12/2013 CORE MANUAL The "DATA FILE NAME" box enables selecting the directory to store data, and the file name. These two names will be displayed in the field entitled "Data file Name" and Directory Name" of the Copy/Read property page,when closing the "DATA FILE NAME" box. In ????. Revision: 128 IV-125/206 18/12/2013 CORE MANUAL Chapter 8 Representation & Construction of the Environment This chapter describes two representations of the agent environment (COARSE & FINE) and several constructions (Agent Scan, Cell Scan, Incremental, non Incremental, etc…). P rior to developing any action, each agent must know how to represent its environment, and how to construct this representation. These preliminary steps are described in this chapter. Then, it can proceed its processing by identifying states and by following directives (i.e., high level actions) to apply a strategy (see chapter 2, page 33). It is important to distinguish the environment representation mode from the environment construction mode. The environment representation is the way parameters are defined to represent the environment in the agent memory. The choice of the representation mode is a crucial step, which critically affects the way states and directives can be defined. The representation is often optimized with respect to some basic strategic ideas that will govern the agent directives. In the following, we consider two representation modes, designed as COARSE and FINE. The COARSE representation (see paragraph A.1 below, page 126) corresponds to the idea that an agent cannot observe far and close with the same accuracy. Thus, the far environment description is degraded compared to that deduced for close cells. The FINE representation (paragraph A.2 page 131) corresponds to the idea that there are no precision issues and that the agent can exactly know the position of the objects it detects inside its sense radius (agents & obstacles), independently of the distance. The environment construction mode is the way the environment is scanned. The construction mode is also important as it may critically affect the time needed to build the representation. In the following, we shall consider two construction modes (Cell Scan Mode or Agent Scan Mode). In the cell scan modes, the environment is constructed from the direct scan within a sense radius of the cells surrounding the agent. Real robots directly practice this method. In the agent scan modes, the environment is constructed Revision: 128 IV-126/206 18/12/2013 CORE MANUAL from the scan of computer memory. This method is not applicable to real agents except if we assume that a full-interconnected system is implemented through agent-agent communication. In general, it must be viewed as a method to shorten the simulation times at low agent density. Note that, even if a representation has been chosen to implement easily some strategic principles, it has to be proven that the environment can be effectively constructed in a time compatible with the runtime constraints of the agent behavior or in a time that does not slow down too much the simulator performance. In practice, the faster the environment is calculated, the better! The selection of the environment representation (COARSE or FINE) and the construction mode (Cell Scan mode, possible incremental, or AGENT Scan mode) is achieved in ParamPage2 (see Fig. 43). Note in particular the two group boxes entitled "Environment Representation" and Environment Construction". DActionTime iAType iEnvironmentMode FreeData[0] FreeData[1] FreeData[2] iSectorNb Radius[1] Radius[2] FreeData[3] FreeData[4] FreeData[5] FreeData[6] bIncremental FreeData[7] Fig. 43: Agent page for general settings (Representation mode, construction mode, initial distribution, steady state distribution) A A.1 A1.1 Environment representation COARSE mode Definition The COARSE mode corresponds to the idea that an agent observes far and close with different accuracies, and that the accuracy of the far-environment description is necessarily degraded compared to that for close cells. In practice, we chose to distinguish as follows a nearby and a far environment. All zones are identified with polar-like coordinates (). A typical example of far representtation is shown in Fig. 44. Revision: 128 IV-127/206 18/12/2013 CORE MANUAL The nearby environment is mapped with 25 elementary cells as represented in Fig. 44 (see the Class CELL definition page 20). We identify: - The zones (), which represent the 8 cells adjacent to the agent in the red central square. These zones reduce to simple cells. - The zones (), which correspond to the 16 cells one-cell farer from the agent. (3,4) Container square (3,2) (3,5) (2,5) (3,6) (2,4) (2,3) (2,2) (3,1) R[1]=4 (2,6) (1,6) (1,5) (1,4) (1,3) (1,2) (2,1) Agent (3,7) (2,7) (1,7) (0,3) (0,2) (0,1) (1,1) (1,8) (0,4) (3,8) Cell (X,Y) R[2]=5 (3,3) (2,8) (3,9) (2,0) (3,0) (0,0) (1,0) (1,9) (0,5) (0,6) (0,7) (1,15) (2,15) (3,15) (2,9) (1,10)(1,11) (1,12)(1,12)(1,14) (2,14) (3,14) (2,10) (2,13) (2,11) (2,12) (3,13) (3,10) (3,11) Zone (3,12) Fig. 44: Example of COARSE representation of the environment with 25 cells close to the agent and 16 angular sectors. The container cell comprises 120 cells, excluding the agent cell in the center. The far environment is described by angular sectors, with the restriction that the exact localization of the agents is impossible in these zones. The only available information is the number of objects (agents, obstacles) in each zone in accordance with the object ZONE definition page 22. Fig. 44 displays 16 angular sectors, but the number of sectors iSectorNb is customizable and user-defined. The zones ( are inside a circle of radius R[1]=4, where “4” means 4 cells away from the agent located in the center. The zones (), alse represent angular sectors. Again, The zones ( are inside a circle of radius R[2]=5. 5 means 5 cells away from the agent located in the center. For customization, the programmer may define a set of iRadiusNb radiuses. In Fig. 44, iRadiusNb=2. The total number of zones NZ necessary to buid the COARSE representtation is: Eq. 3 NZ=(2*R[0]+1)*(2*R[0]+1)-1+(iRadiusNb-1)*iSectorNb From Fig. 44, we deduce iRadiusNb[0]=2. So, NZ=(2*2+1)*(2*2+1)-1+(3-1)*16=56. One issue with the COARSE representation is that the far angular sector is composed of cells but some cells overlap with several angular zones as shown in Fig. 45. Thus, the zone-cell mapping is imperfect However, it is often not critical for the policy of the agent in (0,0), which does not need to know perfectly the location of far obstacles or far agents. Revision: 128 IV-128/206 18/12/2013 CORE MANUAL 5 2 0 0 1 2 R2=11 R1=5 Fig. 45: Irregular decomposition of angular zones in elementary cells A1.2 Array in memory Logically, the environment is represented as an array of ZONE objects (see the ZONE definition in chapter 2, paragraph D.3 page 22). As for the terrain, we face the issue of storing a 2-index array (the indexes here are & ) in a 1-dimension table to enable dynamic adjustment of the zone number at runtime because the radius and the number of sectors are adjustable at runtime. The code to declare the array Square1 reads : short iLineLength=__max(16,iSectorNb); short iZoneNb=(iRadius1Nb+1)*iLineLength; ZONE* Zone = new ZONE[iZone1Nb]; //NEIGHBORHOOD SEEN BY AGENT 1 The number of zones necessary to define the representation is NZ (Eq. 3). This number comprises 8 zones for the first (square) neighborhood, 16 for the second (square) neighborhood, and iSectorNb zones per circular neighborhood. However, we chose to store Square1 in an array with dimension iZoneNb slightly larger than iZone1Nb. The different zones are stored as follows: The 8 closest neighbors () are stored in {Zone[j] |0<=j<8}. The 16 second closest neighbors () are stored in the elements Zone[iLineLength1+j]|with 0<=j<16. stored in the elements The sectors (iSector1Nb) are stored {Zone[3*iLineLength1+j]} with 0<=j<iSector1Nb. in the elements And so on! The sectors (iSector1Nb) are Zone[2*iLineLength1+j] with 0<=j<iSector1Nb. Clearly, this indexing sacrifices a few storage space especially if iZoneNb>16. In return, this storage mode is systematic as the Zone[k] stores the zone of coordinates (k/iLineLength1, k%iLineLength1). The distance to the agent is therefore easily accessed by the number k/iLineLength1. Revision: 128 IV-129/206 18/12/2013 CORE MANUAL ..............> ..............> Zone[i].iObstacleNb Zone[i].iAgent1Nb Zone[i].iAgent2Nb 0 0 0 1 0 0 X X 0 0 1 0 0 0 X X 1 1 0 0 1 1 X X .............. .............. .............. Zone[iZone1Nb-1] Zone[iZone1Nb-2] Zone[iZone1Nb-3] Zone[iZone1Nb-4] Zone[iZone1Nb-5] Zone[5] Zone[4] Zone[3] Zone[2] Zone[1] Zone[0] ..............> 0 0 1 0 1 0 1 0 0 6 closest zones Fig. 46: Storage array of the states of the zones surrounding an agent A1.3 Class COARSE_ENVIRONMENT In the COARSE representation, one must determine the number of agents and obstacles in each zone {Square[k]|0<=k<iZone1Nb} of polar coordinates (=k/iLineLength1, =k %iLineLength1). The way the environment representation is built is the problem of the environment construction. Independently of the construction method, this array needlessly stores empty zones, i.e., zones without obstacles or agents. Therefore, it wastes a fraction of the memory that may become a critical handicap when considering very large populations of agents. Thus, we build the class COARSE_REPRESENTATION, which contains the adjustable array of filled zones, the size of which is adjusted at run time to the number of zones really filled in the array {Square1[k]|0<=k<iZone1Nb}. The declaration is as follows: class COARSE_ENVIRONMENT ///////////////////////////////////////////////////////////////////////////// // THE ENVIRONMENT STATE IS DESCRIBED BY A SET OF iFilledZoneNb ZONES THAT CONTAINS // AGENTS OF OBSTACLES. THE NUMBER iFilledZoneNb IS COMPUTED AT RUN TIME, AT EACH // ITERATION. ///////////////////////////////////////////////////////////////////////////// { public: COARSE_ENVIRONMENT(); void Build(short YDim); void ReBuild(short YDim); ~COARSE_ENVIRONMENT(); short iFilledZoneNb; //NB OF ZONES WHICH ARE NOT EMPTY; DIMENSION OF Zone ZONE* Zone; // short iCStateIndex; //THE CRITICAL STATE ASSOCIATED TO THE PHYSICAL STATE }; Revision: 128 IV-130/206 18/12/2013 CORE MANUAL A.2 A2.1 FINE mode Definition The FINE mode corresponds to the idea that there are no precision issues and that the agent can exactly know the position of the objects it detects within a sense radius. Contrarily to the COARSE representation, it is not necessary to define far angular sectors. The agent stores in its memory the series of agents and obstacles it detects within its sense radius. A2.2 Array in memory The agent header (see paragraph D.6, page 23) includes the following lines, which show that each agent stores the FINE representation of its environment in three respectively entitled FoundAgent, FoundObstacle and FoundNode: //////////////////////////////////////////////////////////////////////////////////// //SECTION 3 : ENVIRONMENT STATES: FINE MODE //READ THE PROGRAMMER'S MANUAL FOR INFORMATION short (*FoundAgent[AGENTTYPENB][ITERATNB])[COMPONENTNB]; short iDimA[AGENTTYPENB][ITERATNB]; short iFoundANb[AGENTTYPENB][ITERATNB]; short (*FoundObstacle[ITERATNB])[COMPONENTNB];// short iDimOb[ITERATNB]; // short iFoundObstNb[ITERATNB]; //NB OF FOUND OBSTACLES STORED IN FoundObstacle short (*COPY)[COMPONENTNB]; //COPY POINTER FOR TEMPORARY STORAGE short DimCOPY; // ////////////////////////////////////////////////////////////////////////////////////// //ARRAY TO CHARACTERIZE THE NODES FOUND BY THE AGENT. //NOTE THAT NODES ARE AGENTS FOUND INSIDE THE COMMUNICATION RADIUS. THUS, THIS ARRAY IS //LARGER THAT THE ARRAY FoundAgent, WHICH CORRESPONDS TO DIRECT SENSING OF THE ENVIRON //MENT short (*FoundNode[AGENTTYPENB][ITERATNB])[COMPONENTNB2]; short iDimNode[AGENTTYPENB][ITERATNB]; short iFoundNodeNb[AGENTTYPENB][ITERATNB]; ////////////////////////////////////////////////////////////////////////////////////// FoundAgent The first line of the header declares the 4-index array FoundAgent[i][j][k][q] where: The first index 0<=i<AGENTTYPENB is the type of the found agent. For instance, data regarding the found agents iAtype=1 are stored in FoundAgent[1][j][k][q]. The second index 0<=j<ITERATNB is the iteration index. For instance, data regarding the found agents iAtype=1 collected during the current iteration are stored in FoundAgent[1][0][k][q]. Data collected in the previous iteration are stored in FoundAgent[1][1][k][q], and so on… The third index k is the discovery rank (i.e., the index) of the agent. For instance, Data regarding the first found agent of iAtype=1 during the current cycle are stored in FoundAgent[1][0][0][q]. Data regarding the second found agent of iAtype=1 are stored in FoundAgent[1][0][1][q]. A crucial point results from the declaration of the 4 index array as: short (*FoundAgent[AGENTTYPENB][ITERATNB])[COMPONENTNB] The array is considered by the compiler as a 2-index table of pointers to vectors with COMPONENTNB components! In other words, FoundAgent[i][j] is a pointer to an array of dimension iDimA[i][j] of vectors with COMPONENTNB components (used to store the information Revision: 128 IV-131/206 18/12/2013 CORE MANUAL found by the agents of type i at iteration j). From this declaration, it results that the dimension of k in FoundAgent[i][j][k][q] is adjusted at runtime and to represent the maximum number of found agents of type-i. The FoundAgent arrays are typically initialized with the following code (see the function void AGENT::Build): for (k=0;k<ITERATNB;k++) for (int q=0;q<AGENTTYPENB;q++) { iDimA[q][k]=INITIAL;//MAX NUMBER OF FOUND AGENTS (INITIALIZATION) iFoundANb[q][k]=0; //NB OF FOUND AGENT STORED IN FoundAgent[q][k] FoundAgent[q][k] = new short [INITIAL][COMPONENTNB]; } Note that the dimension of the index k must be adjusted at runtime when the number of detected agent becomes larger than INITIAL. Finally, the last index q in the array FoundAgent[i][j][k][q] (0q<COMPONENTNB) enables to identify agent data. The following identification holds (latest revision: Oct 15, 2002): - FoundAgent[i][j][k][0]: Absolute X-coordinate of the cell containing the found agent - FoundAgent[i][j][k][1]: Absolute Y-coordinate of the cell containing the found agent - FoundAgent[i][j][k][2]: teta=arctg(Y/X), i.e, direction to move from the agent to the found agent. This direction is measured in multiples of /4, thus, it is an integer such that: 0teta<8. - FoundAgent[i][j][k][3]: Target flag. Possible values: 0: undefined; 1: the agent iAtype = j has been identified as a target by the policy, which is developed in conjunction with the environment construction. This flag is useful in the non-incremental mode for the following reason. In that mode, the agent scans its entire environment (until the sense radius) and therefore, may store the localization of several preys, some ones that can be attacked and some other ones that cannot be attacked in accordance with the policy under consideration. In a second step (in the non-incremental mode) the agent scans the preys it detected (in the function FINECellFindState) and uses FoundAgent[i][j][k][3] to choose one prey. 2: The agent has identified a predator. - FoundAgent[i][j][k][4]: iRank of the found agent in the Agent[i] array. Note some redundancy due to the above definition of the array FoundAgent[i][j][k][. For instance, the following identity holds: X=FoundAgent[0][0][0][0]=Agent[0][FoundAgent[0][0][0][4]].X FoundObstacle The 3-index array FoundObstacle[i][j][k] stores the obstacles found by the agent. The first index 0<=j<ITERATNB is the iteration index. For instance, all information regarding the obstacles collected during the current iteration is stored in FoundAgent[0][k][q]. Information collected in the previous iteration is stored in FoundAgent[1][1][k][q], and so on. The second index k is the rank (i.e., the index) of the obstacle. It simply identifies the obstacle. For instance, all information regarding the the first found obstacles is stored in FoundObstacle[0][0][q]. Finally, the components {FoundAgent[i][j][k][q] |0q<COMPONENTNB)} have the following meaning (latest revision: Oct 15, 2002): Revision: 128 IV-132/206 18/12/2013 CORE MANUAL - FoundObstacle[i][j][0]: Absolute X-coordinate of the cell containing the found obstacle - FoundObstacle[i][j][1]: Absolute Y-coordinate of the cell containing the found obstacle FoundNode The agent stores in the 4-index array FoundNode[i][j][k][q] the information it retrieves on the other nodes during the scan of its environment. This array is organized as the array FoundAgent[i][j][k][q] with the following differences regarding the interpretation of the last index (0q<COMPONENTNB2): - A2.3 FoundNode[i][j][k][0]: X-coordinate of the cell containing the agent. FoundNode[i][j][k][1]: Y-coordinate of the cell containing the agent FoundNode[i][j][k][2]: Open, undefined. Storage procedures To store an obstacle or an agent, call the member function: void AGENT::FINEStoreInArray(short short short short bool bool short short iType, //-1,0,1 FOR OBSTACLES,AGENT[0],AGENT[1].. iCell, //ABSOLUTE X COORDINATE OF THE FOUND AGENT jCell, //ABSOLUTE Y COORDINATE OF THE FOUND AGENT Index, //READ THE EXPLANATION BELOW bXtorus, bYtorus, XDim, YDim) Call this function with iType=-1 to store an obstacle in the array FoundObstacle. Otherwise, call it will 0≤iType<AGENTTYPENB to store an agent in the array FoundAgent. Note that this function includes several protection mechanisms, which makes that: B An obstacle or an agent cannot be stored two times in the arrays. The agent, which executes FINEStoreInArray cannot self-detect itself and store itself in the memory. Environment construction: Cell scan, FINE representation In all Cell Scan Modes (CSM), the agent analyzes the surrounding cells within the sense radius. There are several CSMs, depending on the way the agent scans surrounded cells. They critically affect the simulation speed. As will be shown below, one solution for fast environment scan consists in keeping track and in using the position of the agents and obstacles stored in the previous scans to limit the number of analyzed cells. However, there is a trade-off between environment scan speed and safety of identification. It is important to stress that scan functions are located in each DLL. Thus, some CORE facilities are executed by function located in each DLL. The DLL programmer can modify the scan conditions, although in principles he has not to customize the CORE facilities. Revision: 128 IV-133/206 18/12/2013 CORE MANUAL B.1 Scan modes in the ACTION cycle HISTORY OF SECTIONS B.1-B.4: Version 1.0: Feb 2004: A. Deheurles Version 2.0: May 2006: JHC Recall that the CORE scheduler activates each agent in the ACTION or in the NODE cycle. The NODE cycle is only executed for communicating agents. In the ACTION cycle, the agent is free to scan or to not scan (depending on its policy) its environment to identify the agents and the obstacles inside its sense disk. Scan modes in the ACTION cycle are managed by the agent method AGENT::ScanFINECellAction, which is a DLL entry function directly called by the CORE to scan the environment cells. Each DLL has a private copy of this function that can be customized if necessary. The code of the function AGENT::ScanFINECellAction is displayed below for clarity. The environment construction mode is selected by the box "Environment construction displayed in Fig. 43 page 127. There are two basic, scan functions, namely: ScanFINECellMode1: This function scans the cells inside the sense disk around the agent in a circular mode, with a sense agnel of 360‡, starting from the closest cell. It stores in the private memory of the agent the coordinates of the cells containing the discovered agents or obstacles. ScanFINECellMode2: This function scans the cells inside the sense disk as follows: 1)It scans the 24 cells of the close environment. 2)It scans the close environment around the agents found at the preceding scan and stored in the private memory of the agent 3)In the non-incremental mode, it scans the sense disk close to the max radius, to detect the possible penetration of agents in the sense disk Four scan modes are defined from these two functions . The scan may be: Circular: It is the default mode. The agent exclusively uses the function ScanFINECellMode1 to scan the cells inside its sense disk. Thus, the circular mode scans each cell one time in the sense (or the communication) disk. This mode is displayed in Fig. 47 below. Simply, the agent first analyses the occupation of the cells in the close 5x5 squares in the center( ). Then, it analyses the cells associated with the purple color , then the cells with the pink color , and so on through the colors represented in the next squares , , , , , to approach a circular environment at large distance. This way, the agent scans its environment in the ascending order of distance to cells. When a cell contains an agent, it is automatically stored in the agent memory, i.e. in the array AGENT::FoundAgent[i][j][k][m](see the description of the agent memory). Similarly, if the cell contains an obstacle, it is stored in the array AGENT::FoundObstacle[j][k][m]. // // // // Circular & around agents: The code alternates the functions ScanFINECellMode1 and ScanFINECellMode2. The edit box FAST/FULL scan ratio” adjusts the relative frequency of the two modes. For instance, in Fig. 53, the ratio is 5, meaning that one Circular mode is executed every 5 scans. Setting the ratio to 1 would mean that the agent only uses the circular mode! INFORMATION: THIS ROUTINE BUILDS THE REPRESENTATION OF THE ENVIRONMENT BY SCANNING THE SENSE DISK AROUND THE AGENT AS FOLLOWS: 1) IT FIRST SCANS THE 24 CELLS OF THE CLOSE ENVIRONMENT AROUND THE AGENT. Revision: 128 IV-134/206 18/12/2013 CORE MANUAL // 1) IT SCAN THE CLOSE ENVIRONMENT AROUND THE AGENT POSITIONS FOUND AT THE PREVIOUS // SCAN & PREVIOULSY STORED IN THE ARRAY FoundAgent. // 2) IN THE NON-INCREMENTAL MODE, SCAN THE AGENT SENSE DISK CLOSE TO THE MAX RADIUS TO // TO DECTECT EXTERNAL AGENTS ENTERING THE SENSE RADIUS. Container square 10 9 8 7 6 5 4 3 2 1 0 Fig. 47: Incremental construction of the environment in the ring mode. The different colors show the cell which are added every iteration, until iteration 10. Automatic: Here, the agent calculates the number of cells, which it would have to scan calling ScanFINECellMode1 or ScanFINECellMode2, and it chooses the method that scans the smaller number of cells. The Circular method is general more efficient at high agent density, i.e., when there is much agent in the communication circle. Free for test: This methods calls ScanFINECellMode2 only. Rectangular: This mode is obsolete. However, the code still includes several functions to scan the environment following the rectangular construction shown in Fig. 48. Container square 9 8 7 6 5 4 3 2 1 0 Fig. 48: Incremental construction of the environment in the rectangular mode. The different colors show the cell which are added every iteration, until iteration 10. It is important to stress that this function is always call with this limit for the spatial extension of the scan: MinRadius=ThreadData.Radius[i][0]= 2; Revision: 128 IV-135/206 18/12/2013 CORE MANUAL MaxRadius=ThreadData.Radius[i][1]=pApp>GetProfileInt(Str,"Radius1",5); Thus, it results that in the FINE mode, Radius[0] and Radius[1] are exclusively used. Consequently, the edit box for Radius[2] is UNUSED when the FINE mode is selected (see figure below). DActionTime iAType iEnvironmentMode FreeData[0] FreeData[1] FreeData[2] iSectorNb Radius[1] Radius[2] FreeData[3] FreeData[4] FreeData[5] FreeData[6] bIncremental FreeData[7] __declspec(dllexport) void AGENT::ScanFINECellAction(CELL* Cell,short XDim,short YDim, AGENT* Agent[AGENTTYPENB], short iAgentNb[AGENTTYPENB], OBSTACLE* Obstacle, short iObstacleNb, bool bXTorus, bool bYTorus, short MaxRadius, short MinRadius) //////////////////////////////////////////////////////////////////////////////////// // HISTORY: VERSION 1.0: Aymeric Deheurles, dec. 2003 //////////////////////////////////////////////////////////////////////////////////// { switch (iScanTypeA) { case 0: //SCAN TYPE = 0 ScanFINECellMode1(Cell,XDim,YDim,Agent,iAgentNb, Obstacle, iObstacleNb, bXTorus, bYTorus, MaxRadius, MinRadius, 0); //0 FOR ACTION CYCLE break; case 1: //SCAN TYPE = 1 if (iACTIONFastFullNb%iFastToFullScanRatioA == 0) ScanFINECellMode1(Cell,XDim,YDim,Agent,iAgentNb, Obstacle, iObstacleNb, bXTorus, bYTorus, MaxRadius, MinRadius, 0); //0 FOR ACTION CYCLE else { ScanFINECellMode2(Cell,XDim,YDim,Agent,iAgentNb, Obstacle, iObstacleNb, bXTorus, bYTorus, MaxRadius, MinRadius, 0);//0 FOR ACTION CYCLE } break; case 2: //SCAN TYPE = 2: ADAPTATIVE SCAN if (iACTIONFastFullNb%iFastToFullScanRatioA == 0) ScanFINECellMode1(Cell,XDim,YDim,Agent,iAgentNb, Obstacle, iObstacleNb, bXTorus, bYTorus, Revision: 128 IV-136/206 18/12/2013 CORE MANUAL MaxRadius, MinRadius, 0);//0 FOR ACTION CYCLE else { int Somme=0; int Dist=3; //FullArea = NUMBER OF CASES SCANNED BY FULL METHOD double FullArea=PI*MaxRadius*MaxRadius; //LightArea = AREA SCANNED BY DllFINECellScanMode2 double LightArea=0; //Sum = NUMBER OF DIFFERENT TYPE AGENTS FOUND AT LAST ITERATION for (int i=0;i<AGENTTYPENB;i++) Somme+=iFoundANb[i][1]; //Area = CIRCUMFERENCE SCANNED BY DllFINECellScanMode2 WITH RingScan for (int j=MaxRadius-Dist;j<=MaxRadius;j++) LightArea+=2*PI*j; //Area IS THE SUM OF CIRCUMFERENCES AND CLOSE CASES (24) AROUND EACH AGENT LightArea=LightArea+24*(Somme+1); //TEST WHICH IS THE LESS-CONTRAIGNANT METHOD if (FullArea < LightArea) ScanFINECellMode1(Cell,XDim,YDim,Agent,iAgentNb, Obstacle, iObstacleNb, bXTorus, bYTorus, MaxRadius, MinRadius, 0); else ScanFINECellMode2(Cell,XDim,YDim,Agent,iAgentNb, Obstacle, iObstacleNb, bXTorus, bYTorus, MaxRadius, MinRadius, 0);//0 FOR ACTION CYCLE } break; case 3: //SCAN TYPE = 3 ScanFINECellMode2(Cell,XDim,YDim,Agent,iAgentNb, Obstacle, iObstacleNb, bXTorus, bYTorus, MaxRadius, MinRadius, 0);//0 FOR ACTION CYCLE break; } } The function calls in the ACTION mode are displayed below: __declspec(dllexport) void AGENT::ScanFINECellAction void AGENT::ScanFINECellMode1 bool AGENT::ScanFINECellClose #include "CellProcAction.cpp" bool AGENT::ScanFINECellRing #include "CellProcAction.cpp" bool AGENT::ScanFINECellSector #include "CellProcAction.cpp" void AGENT::ScanFINECellMode2 bool AGENT::ScanFINECellClose #include "CellProcAction.cpp" bool AGENT::ScanFINECellAroundObjects #include "CellProcAction.cpp" bool AGENT::ScanFINECellAroundObjectsSector #include "CellProcAction.cpp" bool AGENT::ScanFINECellRing #include "CellProcAction.cpp" The indentation displays the calls. For instance, ScanFINECellAction calls ScanFINECellMode1 or ScanFINECellMode2, which calls the "low-level" functions ScanFINECellClose, ScanFineCellRing, ScanFINECellSector… and so on. All low-level functions call the same behavioral blocks CellProcAction.cpp. The benefice of this approach is that the code, which scans the environment, is decoupled from the code, which analyzes each cell to define the agent behavior! Why? It is very important to understand the following point: In the ACTION cycle, the agent is free to scan or to not scan (depending on its policy) its environment to identify the agents and the obstacles inside its sense disk. Revision: 128 IV-137/206 18/12/2013 CORE MANUAL B.2 In the NON-INCREMENTAL scan mode (selected by a check box in the interface), The agent completely scans the cells in the sense disk. The agent behavior (i.e., the recognition of states) is implemented in the sole function ScanFineDecisionTree. In the INCREMENTAL scan mode, the agent can stop at any time the scan process. The agent behavior is implemented in the block CellProcAction.cpp and in the function ScanFineDecisionTree. The agent stops its construction in the block CellProcAction.cpp. Low-level scan functions We describe in details in this section the low-level scan functions, namely ScanFINECellRing, ScanFINECellSector, ScanFINECellAroundObjects, ScanFINECellAroundObjectsSector, and ScanFINECellClose B2.1 ScanFINECellRing bool AGENT::ScanFINECellRing(CELL* Cell, short XDim, short YDim, AGENT* Agent[AGENTTYPENB], short iAgentNb[AGENTTYPENB], OBSTACLE* Obstacle, short iObstacleNb, short iDistInit, bool bXtorus, bool bYtorus, short XPos, short YPos, int iMode) This function scans all cells approximately located in a thin ring around a center of absolute coordinates (XPos,YPos) as show in Fig. 49. The distance to the center is d such that iDistInit<d≤iDistInit+1. 8 -1,0 It must be stressed that the function alternatively scans the ring cells from left to right or from right to left (and similarly up or down) to maintain the isotropy of the scan mechanism. 9 6 Fig. 49: The light-blue, dark green and light green cells show the cells scanned by the function ScanFINECellRing respectively called with iDinstInit=7, 8 or 9. B2.2 The function calls CELLProcAction.cpp for each cell in the ring if iMode=0 (ACTION mode), and CELLProcNode.cpp if iMode=1 (NODE mode). ScanFINECellSector bool AGENT::ScanFINECellSector(CELL* Cell, short XDim, short YDim, AGENT* Agent[AGENTTYPENB], short iAgentNb[AGENTTYPENB], OBSTACLE* Obstacle, short iObstacleNb, short iDistInit, bool bXtorus, bool bYtorus, short XPos, short YPos, int iMode, double Teta1, double Teta2) //WARNING: ANGLES IN DEGRES This function is used to scan the cells approximately located in a thin ring around a center of absolute coordinates (XPos,YPos) and additionally symmetrically located on the two symmetric angular sectors along the move direction of the agent (i.e., the variable AGENT::iSect[1]). Revision: 128 IV-138/206 18/12/2013 CORE MANUAL For simplicity and clarity, let us consider an example, i.e., the call of ScanFINECellSector with iDistInit=9. ScanFINECellSector considers the cells defined previously with ScanFineCellRing (see Fig. 49). Now let us consider that the agent moves east, parallel to the X axe. In that case, ScanFINECellSector scans the cells in the two angles A0B and A'0B' (see Fig. 50a). C0A and C0B are respectively the call parameters Teta1 and Teta2. Concretely, these cells of coordinates (x,y) are identified by the conditions: Eq. 4 x1=iDisInit.cos(COA=Teta1) < x ≤ x2=iDisInit.cos(COB=Teta2) 2 2 2 2 Eq. 5 iDistInit <x + y ≤ (iDistInit+1) Fig. 50b shows the sectors scaned when the agent moves Northeast. Again, the function ScanFINECellSector scans the cells in the two angles A0B and A'0B'. Now, these angles are nothing but the angles A0B and A'0B' in Fig. 50a rotated with an angle . Thus, the solution consists in scanning the cells in the angles represented in Fig. 50a, and in checking the occupation of the real cells in Fig. 50b using a rotation of angle . In other words, the cells are scanned using Eq. 4 and Eq. 5, and the occupation is tested for the rotated cell (x',y') defined using the rotation equations: x'= x sin –y cos y'= x cos+ y sin A (a) (b) (x,y) O x1 (x,y) B B' C x2 B A O C x1 x2 A' B' A' Fig. 50 B2.3 ScanFINECellClose bool AGENT::ScanFINECellClose(CELL* Cell, short XDim, short YDim, AGENT* Agent[AGENTTYPENB],short iAgentNb[AGENTTYPENB], OBSTACLE* Obstacle, short iObstacleNb, bool bYtorus, bool bXtorus, short XPos, short YPos, int iMode) This function is important, as it is used by all the medium-level scan functions described below in section B.2. When the vision angle is not reduced, it first scans the eight adjacent cell (Fig. 51a), then the sixteen pale green cells represented in Fig. 51b. When the vision angle is less that 180‡, the function scans the environment as represented in Fig. 51c,d for an agent moving to WEST, and Fig. 51e,f for an agent moving along the diagonal lines, here North-East. Revision: 128 A A A A A A (a) (b) (c) (d) (e) (f) IV-139/206 18/12/2013 CORE MANUAL Fig. 51: (a) adjacent cells; (b) Full close environment; (c) adjacent cells in the reduced vision for an agent moving west; (d) adjacent cells in the reduced vision for an agent moving North-East; (e) Full close environment for an agent moving West; (f) Full close environment for an agent moving NorthEast. B2.4 ScanFINECellAroundObjects bool AGENT::ScanFINECellAroundObjects(CELL* Cell, short XDim, short YDim, AGENT* Agent[AGENTTYPENB],short iAgentNb[AGENTTYPENB], OBSTACLE* Obstacle, short iObstacleNb, short iDistInit, bool bXtorus, bool bYtorus, int iMode) This function is used to quickly scan the environment. Instead of scanning all cells inside the sense (or the communication) radius, the agent retrieves from its memory the position of the agents founded in the previous cycles (scanning the array FoundAgents). Then, it scans around these positions with the previous function ScanFINECellClose to identify the new position of the agent. Each scanned cell is analyzed with CellProcAction.cpp in the ACTION mode or with CellProcNode.cpp in the NODE mode (see Fig. 52). Additionally, the function also scans the external crown of the agent disk to identify any new agent possibly entering the environment. The speed of the functions ScanFINECellAroundObjects and ScanFINECellRing is proportional to the numbers of scanned cells, which read respectively: ScanFINECellRing: N1 RS2 ScanFINECellAroundObjects: N 2 2Rs R 241 N F When there are few agents in the environment, ScanFINECellAroundObjects is faster than the repeated utilization of ScanFINECellRing to scan the whole disk. Unfortunately, there is a price to pay, because in some configurations, the function ScanFINECellAroundObjects may miss some agents! This situation occurs for instance if the agent disk includes obstacles and if an agent 1 hidden by the obstacles becomes visible. In that case, ScanFINECellAroundObjects simply miss it! On the contrary, ScanFINECellAroundObjects is slower at high agent density. 2> Fig. 52: Example of cells scanned by the function ScanFINECellAroundObjects when the agent previously stored the positions labeled 1 and 2 of two objects in its environment. B2.5 ScanFINECellAroundOb jectsSector bool AGENT::ScanFINECellAroundObjectsSector(CELL* Cell, short XDim, short YDim, AGENT* Agent[AGENTTYPENB],short iAgentNb[AGENTTYPENB], OBSTACLE* Obstacle, short iObstacleNb, short iDistInit, bool bXtorus, bool bYtorus, int iMode) This function operates as ScanFINECellAroundObjects, except that before scanning the environment around an agent identified in the previous cycles, it checks that it is located inside the sense angle. This function is used when the vision angle is less than 360‡. Considering the direction of our agent and its vision angle, only the “agent-visible” previous agents are processed by this function. Revision: 128 IV-140/206 18/12/2013 CORE MANUAL The ACTION cycle (see Erreur ! Source du renvoi introuvable. page Erreur ! Signet non défini.) shows the general procedure to identify the agent states in the cell scan mode. The script below shows the main function calls when the agent cycle is executed in a DLL (Note: Erreur ! Source du renvoi introuvable. in incomplete). Black functions are CORE functions, beyond the scope of this manual. Red, bold underlined functions are entry functions to the DLL, directly called by the CORE (see their description in the CORE Manual). Green functions are DLL functions, called by the entry functions. The indentation reveals the calls. For instance ScanFINECell calls ScanFINECellMode1 and ScanFINECellMode2. B.3 Scan modes in the NODE cycle In the NODE cycle, the agent always scans its environment to identify the other agents located inside its communication disk. The functions called are exactly the same in the ACTION or in the NODE mode, except that the CORE calls the sole function AGENT::ScanFINECellNode , which is an entry function to the DLL. This function is in the file ScanFINECellNode.cpp. The function calls in the NODE mode are displayed below: __declspec(dllexport) void AGENT::ScanFINECellNode void AGENT::ScanFINECellMode1 bool AGENT::ScanFINECellClose #include "CellProcNode.cpp" bool AGENT::ScanFINECellRing #include "CellProcNode.cpp" bool AGENT::ScanFINECellSector #include "CellProcNode.cpp" void AGENT::ScanFINECellMode2 bool AGENT::ScanFINECellClose #include "CellProcNode.cpp" bool AGENT::ScanFINECellAroundObjects #include "CellProcNode.cpp" bool AGENT::ScanFINECellAroundObjectsSector #include "CellProcNode.cpp" bool AGENT::ScanFINECellRing #include "CellProcNode.cpp" Note that all low-level functions call now the behavioral block CellProcNode.cpp instead of CellProcAction.cpp. B.4 B4.1 Simulation results: Prey-predator game Scan mode adjustment CELL scan mode selection: For each agent, use the Mode dropping box. The possible choices are Circular (default), Circular & around agents, Automatic, and Free for test. Adjustment of the vision angle: For each agent population, adjust the vision angle with the Sense angle edit box displayed in Fig. 53. The angle is expressed in degrees, adjustable from 10 to 360°. Extension of the vision angle: The activation of the option entitled Auto Extend sense angle (see Fig. 53) makes that the agent increases gradually and symmetrically its vision field when it finds nothing inside its current vision cone. A vision of 360° is more effective than Revision: 128 IV-141/206 18/12/2013 CORE MANUAL a vision of 90°, even when the option Auto extend sense angle (see activated. Fig. 53) is Fig. 53: Adjustement tools of the scan mode in the ACTION cycle B4.2 Testing the effiency of Policy: 0 Run MASS.exe, then, select the scenario MASS\CORE\Background1.MAS. The property page of agents iAType=0 is shown below. In principle, POLICY: 1 should be selected (see implementation in the mission Erreur ! Source du renvoi introuvable. page Erreur ! Signet non défini.). If it is not, toggle the Policy Index to 1. Run the scenario.. The excution of this scenario shows that predators exterminate preys. Of course, that is no surprise. The two next figures show the influence of the scan methods on the predator efficiency and the reduction of the execution time. Revision: 128 IV-142/206 18/12/2013 CORE MANUAL Radius : 20 (Hunter) - 10 (Prey). 500 Hunters, 500 Preys 500 circular non-incremental circular incremental Alternating non-incremental Alternating incremental Automatic non-incremental Automatic incremental Number of living preys 400 300 200 100 0 0.0 100.0 200.0 300.0 400.0 Screen shot number Fig. 54: Comparison of the efficiency of the different scan methods in the prey-predator game. Color blue cyan green dark green red yellow Mode circular circular alternating alternating automatic automatic Incremental no yes no yes no yes Time for the 500 iterations 1'07 1'00 0'34 0'31 0'35 0'32 Fig. 55: Comparison of the execution times of the different scan methods The predator radius was 20. The next figure shows the same simulation for a larger predator radius of 50. It is noteworthy to point out that the different non- incremental methods are very closed (blue, red, light-green) as well as the different incremental methods (cyan, green, yellow). Color blue cyan green dark green red yellow Mode circular circular alternative alternative automatic automatic Incremental no yes no yes no yes Time for the 500 iterations 5'19 4'36 2'03 1'44 2'02 1'45 Fig. 56 Revision: 128 IV-143/206 18/12/2013 CORE MANUAL Radius : 50 (Hunter) - 10 (Prey). 500 Hunters, 500 Preys Number of living preys 500 circular non-incremental circular incremental Alternating non-incremental Alternating incremental Automatic non-incremental Automatic incremental 400 300 200 100 0 0.0 100.0 200.0 300.0 400.0 Screen shot number Fig. 57: Comparison of the efficiency of the different scan methods in the prey-predator game. The next figure show the decay of the number of living preys for various vision angles. Radius : 20 (Hunter) - 10 (Prey). 500 Hunters, 500 Preys Number of living preys 500 400 360Ä vision 270Ä vision with extended angle 270Ä vision 180Ä vision with extended angle. 90Ä vision with extended angle. 30Ä vision with extended angle. 180Ä vision. 90Ä vision 30Ä vision 300 200 100 0 0.0 100.0 200.0 300.0 400.0 Screen shot number Fig. 58: Comparison of the decay of the number of living preys versus various vision modes Revision: 128 IV-144/206 18/12/2013 CORE MANUAL C Environment construction: COARSE representation C.1 Cell scan, Routines for COARSE representation We restrict the analysis to AGENT0 as the con clusions are similar for AGENT1. In the COARSE mode, the CSM constructs the representation with the following routines, which are member functions of the AGENT class: void AGENT::COARSECellScan (virtual function) bool AGENT::COARSECellCloseScan_0 bool AGENT::COARSECellRingScan_0 void AGENT::COARSECondenseZoneInfo Concretely, the construction method consists in scanning the cells in the container square and in determining whether each cell is included in a particular zone, as defined in Fig. 44, page 128. If it is, the number of agents (or obstacles) of the zone is incremented (i.e.,+1) in accordance with the zone occupation field, i.e., the field COARSEEnviron[0].Zone[i].iAgent1Nb for agent of type iAType=0, or COARSEEnviron[0].Zone[i].iAgent2Nb for agents of type iAType=1. Mapping cells to zones is time consuming (particularly for far zones because we must compare the cell location to the angular definition of the zone), we use lookup tables. Lookup tables are build one single time during the configuration phase of MainTest (see Fig. 15 page 58). The lookup table store which zone (,) contains each cell of relative coordinates (X,Y) in the container square (see Fig. 44). The LookUpTable is a 1D table or 2-component vectors declared as follows: short (*LookUpTable1)[2]; short iDimContainer=(2*Radius[iRadius1Nb-1]+1)*(2*Radius[iRadius1Nb-1]+1); //NOTE THAT LookUpTable IS A 1-D ARRAY TO STORE A 2D ARRAY (i,j) LookUpTable = new short [iDimContainer][2]; where IDimContainer is the number of cells in the container square, for instance 120 in Fig. 44. The following relations identify the zone for each cell: LookUpTable1[X*iDimContainer+Y].[0] is the coordinate of the zone containing the cell of relative Cartesian coordinates (X,Y).Possible values are therefore 0,1,2,3. The program returns –1 when no zone contains the cell, typicall for the cells for the cellsnclose to vertices of the container square. LookUpTable1[X*iDimContainer+Y].[1] is the coordinate of the zone containing the cell of relative Cartesian coordinates (X,Y). Revision: 128 IV-145/206 18/12/2013 CORE MANUAL Fig. 59: Predator cycle in the COARSE representation mode using the Circular Construction of the environment. The test “Is another agent close” depends on the agent policy (see predator policies, page168). Note that LookUpTable is a one-dimension table to store information on cells in the container square, i.e., on a 2-dimension array. We clarify the storage by considering several examples in Fig. 60: Revision: 128 IV-146/206 18/12/2013 CORE MANUAL (2,5) (2,6) (2,7) (2,4) (2,3) (2,2) (1,6) (1,5) (1,4) (1,3) (1,2) (1,7) (0,3) (0,2) (0,1) (1,1) (2,1) iDiameterMax=2*Radius[iRadiusNb-1]+1 (2,0) (1,8) (0,4) (0,0) (0,0) (1,0) LookUpTable1[3][0] LookUpTable1[3][1] LookUpTable1[2][0] LookUpTable1[2][1] LookUpTable1[1][0] LookUpTable1[1][1] LookUpTable1[0][0] LookUpTable1[0][1] (2,15) (2,8) LookUpTable1[7*iRadiusMax+2][0] LookUpTable1[7*iRadiusMax+2][1] (1,9) (0,5) (0,6) (0,7) (1,15) (2,4) (2,9) (1,10) (1,11) (1,12) (1,12) (1,14) (2,10) b (2,13) (2,11) (2,12) a c LookUpTable1[8*iDiameterMax][0] LookUpTable1[8*iDiameterMax][1] Fig. 60: Correspondence in the lookup table The polar coordinates () of the zone containing the left bottom cell (cell a) are stored in LookUpTable[0] with =LookUpTable1[0][0]. As this cell is outside the largest circle, we chose to write LookUpTable1[0][0])=-1 to code that this cell is outside the zones of the environment. The cell just above cell a is stored in LookUpTable[1] and so on. The polar coordinates () of the zone containing the cell b are stored in LookUpTable1[7x9+2].As, cell b is in the angular sector (2,4) (see Fig. 60), =LookUpTable1[7x9+2][0]=2 and =LookUpTable[7x9+2][1]=4. The zone () containing the cell c are in LookUpTable1[8x9+0][0]. As cell c is outside the environment (see Fig. 60), LookUpTable1[7x9+2][0]=-1. Once the lookup table has been built, it is possible by quickly scanning the cells in the container square to deduce the occupation of all the far zones of the environment. The code to build the far neighborhood is in the function: void AGENT::BuildFarZone. C1.1 Hidden Agents Agents in the container square hidden by obstacles are counted in no representation (COARSE or FINE mode). The code is in the member function Agent::IsObstacle(). D Environment construction: Agent scan The previous construction methods (CSM) built the environment representation by scanning the cells around the agent in the sense disk of radius R. The agent scan mode (ASM) scans agent arrays in the memory of the computer, and identifies the agents inside the sense radius to build the environment representation. This method is faster at low agent densities. To compare the two methods, let us consider the limit case when the whole sense disk is scanned because the construction is not incremental or because the agent does not succeed in identifying an environment state. The CSM scans approximately (2R[2]+1)2 cells. The overhead to construct the representation quickly increases with the radius R[2] of the environment. Revision: 128 IV-147/206 18/12/2013 CORE MANUAL The ASM scans the populations of agents ( NA1 , NA2, NA3, etc..) and obstacles Nob to identify which agents are in the sense disk. Comparing the two methods, we deduce that ASM is faster than the CSM if: N Ob N Ai 2R2 1 2 i The ASM is faster than the CSM when the number of agents is small or when the sense radius is large. This situation corresponds typically to predators tracking a small number of preys. In that case, the predators rarely finds the prey and must complete the whole scan of their environment in the CSM. With NA=500, the ASM ought to be faster if the radius is larger than 15! Perhaps, the most attractive property of the ASM is that the construction time of the environment representation is independent of the sense radius of the agent. D.1 Routines for FINE representation The following routines are used to construct the FINE representation of the environment in the agent scan mode. FineAgentZoneScan (virtual function) FineAgentZoneScan_0 Following the environment construction, there two additional phases, corresponding to the identification of states (function FINEAgentFindState_0) and the mapping of directives to states (FINEMapDirective_0, which is commun with the FINECellMode). Note that the CSM and the ASM call the function FineAction0 and FineAction1. Acceleration of the ASM at high agent density The ASM ought to be still dramatically accelerated by partitioning the terrain in subsquares and in building a table, which identifies the agents in each square. Then, the method reduces to identifying the square comprising an agent, and scanning the square. Let us consider for simplicity the problem of identifying the agent environment in a simple segment [0,Xmax] that we partition in a set of subintervals i: L L i i, i L 2 2 In fact we define two sets intervals as shown in the next figure. Even intervals 0, 2, etc… are adjacent and interlaced with odd intervals 1, 3… Note that the last interval may be larger than L, up to 2L- . 2R 0 2 4 6 8 10 12 0 L 2L 3L 4L 5L 6L 7L 14 Xmax 1 3 5 7 9 11 13 In which interval is the environment represented by the red square of side 2R in the figure? If the environment is small, such that 2R<L/2, it is always at least in one interval i. Let X be the position of the agent in the middle of the red square. The index i of the interval containing the agent is defined by: i (2 X L / 2)%L where % represents the integer division. Examples: if the agent is such that X[0,3L/4], then i=0. If X[3L/4,5L/4[ , then i=1. If X>(7L+L/4), then, i=14 corresponding to the last interval. Revision: 128 IV-148/206 18/12/2013 CORE MANUAL Therefore, It is possible to partition the interval [0,Xmax] with the intervals i and to simply identify the interval containing the agent environment. Practically, the length L of interval i must verify L2R+2, where R is the radius of of the environment. The number 2 is added to make sure that the interval is two times larger than the environment diameter. The number N of intervals is: N X MAX % 2 R 2 The 2-dimension case is easily deduced from this example. The terrain is now divided by a set of squares . The numbers of squares in the directionsv X and Y are respectively: N X X MAX % 2 R 2 , N Y X YAX % 2 R 2 The total number of squares in N=NX.NY. The square (i,j) contains all points (X,Y) such that: The L L L L X i, i L Y j , j L 2 2 2 2 agent of coordinates (X,Y) is in the square: i ( 2 X L / 2)% L , j ( 2Y L / 2)% L . Thus it is necessary to scan the agents located in this square to construct the agent environment in the framework of the ASM. This approach forces to construct a lookup table which maps the agents in the squares Revision: 128 IV-149/206 18/12/2013 CORE MANUAL Chapter 9 Management of DLLs We detail the CORE functions, which control the evolvement of the simulation and the calls to the DLL entry functions. We also describe the classes, which decode the mission script. W A e assume that you already read the DLLs manual, which describes in details how writing DLLs. Action and node cycles Non-communicating agents execute the sole ACTION cycle as displayed in Fig. 15 page 58. Communicating agents are more complex. They execute the ACTION cycle (as non-communicating agents) and the NODE cycle. In the ACTION mode, the agent scans as previously its environment and its internal variables to decide an action. The novelty is that a communicating agent also asks its node to sort the messages in the input buffers before deciding and action. Finally, it may also decide to send new messages as a consequence of its policy. In the NODE mode, the communicating agent scans its environment to identify the other agents inside the communication radius. Then, it scans its input buffers to process the incoming messages. The node processing consists in reemitting the message for other nodes detected inside the communication radius, in transfering to a buffer for local processing, in detecting errors in the message… etc To operate asynchronously in the two modes, each agent has two event times. The ACTION time (represented by the variable AGENT::ActionTime[0]) and the NODE time (represented by the variable AGENT::NODE::NodeTime[0]) are incremented with the variable DActionTime and DNodeTime, respectively. MASS is now equipped with two schedulers as represented in Fig. 61. Revision: 128 IV-150/206 18/12/2013 CORE MANUAL Fig. 61: Flowchart of the function MainAsynchronous for a communicating agent; Compare with Fig. 15 page 58 for a non-communication agent. It is particularly instructive to compare the different representations of the agent cycle reported throughout the manuscript. The AC was first represented as a black box in Erreur ! Source du renvoi introuvable. and Fig. 12. Then, Fig. 14 page 54 displayed a partial representation of the AC implementation in the FINE CELL scan mode, restricted to the function AGENT0::FINECellScan. Revision: 128 IV-151/206 18/12/2013 CORE MANUAL B Call of entry functions to the DLL Recall that the calculation thread executes the function ThreadProc, which calls the function void MainTest(COREDATA* pData) (see the thread synchronization principles described in paragraph G page 56). Then, this function calls in the asynchronous mode the function void MainTestAsynchronous(COREDATA* pData), which calls the functions void ActionMode(..) or void NodeMode(..) to execute an ACTION or a NODE cycle, respectively. The script below details the function calls when the ACTION or NODE cycles are executed in a DLL. Black functions are CORE functions when Green functions are entry functions to the DLL, directly called by the CORE. ThreadProc MainTest if (pData->bSynchronous==TRUE) { MainTestSynchronous } else { MainTestAsynchronous BuidlLookUpTable #include "EiCInitialization.cpp" NodeMode BuildSpatialEnvNODE CellScanNet ScanFINECellNode AgentScanNet .................................... NODE::DllModifyMsg NODE::DllProcessing NODE::OutPolicy .................................... ActionMode BuildSpatialEnvACTION if (AgentA::bMissionDLL==TRUE) {AGENT::BuildEnvACTION} else AgentA::BuildEnvACTION_CORE FindState if (AgentA::bMissionDLL==TRUE) {DllFindState } else AGENT::FindState CELLScan if (AgentA->bMissionDLL==TRUE) { AgentA::ScanFINECellAction AgentA::DLLCoarseCellScan } else { AgentA::FINECellScan AgentA::COARSECellScan } AGENTScan if(AgentA::bMissionDLL==TRUE) { AgentA::DLLFineAgentScan AgentA::DLLCoarseAgentScan } else { AgentA::FINEAgentScan AgentA::COARSEAgentScan ....................................} if (!pData->bFuncInDLL) { #include "EiCExecution.cpp } else {GraphFunc} Update Revision: 128 IV-152/206 18/12/2013 CORE MANUAL .................................... } .................................... .................................... etc.. Script. 3; Function calls in the main loop of mass. Green functions are calls to entry functions of the DLL Note that the CORE knows neither what happens in each DLL nor how the DLL functions are customized to generate the agent behavior as requested by the application. It calls the entry functions listed in Script. 3, and considers that the different agents always execute the same entry functions to DLLs! Simply, for each agent, the CORE calls the entry functions in the right DLL identified by the handle module AGENT::DLLhm, because each agent has a reference to its bevioral DLL(14). Unfortunately, this "nice" approach generates two complications: As user-defined DLLs are selected at runtime, during a "customization" phase, DLLs cannot (15) be loaded immediately on startup . This constraint eliminates the static-link method of DLLs that is extremely simple, and reduces to including the DLL lib file in the client project for simple linkage. Dynamic link is necessary. It consists in loading explicitly the DLLs (with the LoadLibrary instruction) and in finding the address of the member functions in the DLL (with the function GetProcAddress). Unfortunately, the determination of the function address is complicated when one tries to export member functions from DLLs. This issue comes from the fact that the C++ compilers generate decorated names for DLL functions, and that there is no standardization so that each compiler generates its own decorated names making the call of DLLs complicated (to say the least) when the code is compiled with different compilers. The procedure to call dynamically members functions in the DLL is detailed in Appendix A1page 200. The code of the function CELLScan below shows (in the grayed zones) the dynamic link to the entry functions in the agent DLL. void CELLScan(AGENT* AgentA, //POINTER SHIFTED TO THE RIGHT AGENT AGENT* Agent[AGENTTYPENB], short iAgentNb[AGENTTYPENB], OBSTACLE* Obstacle, short iObstacleNb, Short (*LookUpTable)[2], //LOOKUP TABLE FOR Agent1 CELL* Cell, short XDim, short YDim, bool bXTorus, bool bYTorus, short iEnvironmentMode, //COARSE OR FINE short MaxRadius, short MinRadius) ///////////////////////////////////////////////////////////////////////////////////// // ROUTINE TO CONSTRUCT THE ENVIRONMENT THROUGH THE SCAN OF THE CELLS SUR// ROUNDING THE AGENT ///////////////////////////////////////////////////////////////////////////////////// { if (iEnvironmentMode==COARSE) { AgentA->COARSEShiftState(); if (AgentA->bMissionDLL==TRUE) {//SIMULATION WITH DLLs ///////////////////////////////////////////////////////////////////////////// //MAP TO AGENT::DllCOARSECellScan IN DLL. USE MANGLE NAME IN DLL.def typedef void (AGENT::*PCOARSECELLSC)(CELL* Cell,short XDim,short YDim, AGENT* Agent[AGENTTYPENB], short iAgentNb[AGENTTYPENB], OBSTACLE* Obstacle, short iObstacleNb, bool bXTorus, bool bYTorus, short (*LookUpTable)[2],//LOOKUP TABLE FOR Agent1 short MaxRadius,short MinRadius); (14) so that, most of the time, any agent can execute any DLL. (15) Default DLLs (if loaded on startup) must unloaded to select another behavioral DLL! Revision: 128 IV-153/206 18/12/2013 CORE MANUAL PCOARSECELLSC pCoarseCellSc = force_cast<PCOARSECELLSC> (GetProcAddress((HINSTANCE) AgentA->DLLhm,"CoarseCellScan")); if (pCoarseCellSc==NULL) ::MessageBox(NULL,"FAILURE FOR pCoarseCellSc ALLOCATION","",MB_OK); ((AgentA)->*pCoarseCellSc)(Cell,XDim,YDim, Agent,iAgentNb, Obstacle,iObstacleNb, bXTorus,bYTorus, LookUpTable,MaxRadius,MinRadius); } else { //SIMULATION WITH THE CORE AND THE DEFAULT GAME AgentA->COARSECellScan(Cell,XDim,YDim, //COARSECellScan IS virtual Agent,iAgentNb, Obstacle,iObstacleNb, bXTorus,bYTorus, LookUpTable,MaxRadius,MinRadius); } } ///////////////////////////////////////////////////////////////////////////////////// else if (iEnvironmentMode==FINE) { AgentA->FINEShiftState(); if (AgentA->bMissionDLL==TRUE) {//SIMULATION WITH DLLs ///////////////////////////////////////////////////////////////////////////// //MAP TO AGENT::ScanFINECell IN DLL. USE MANGLE NAME IN DLL.def typedef void (AGENT::*PFINECELLSC)(CELL* Cell,short XDim,short YDim, AGENT* Agent[AGENTTYPENB], short iAgentNb[AGENTTYPENB], OBSTACLE* Obstacle, short iObstacleNb, bool bXTorus, bool bYTorus, short MaxRadius,short MinRadius); PFINECELLSC pFineCellSc = force_cast<PFINECELLSC> (GetProcAddress((HINSTANCE) AgentA->DLLhm,"FineCellScanAction")); if (pFineCellSc==NULL) ::MessageBox(NULL,"FAILURE FOR pFineCellSc ALLOCATION","",MB_OK); ((AgentA)->*pFineCellSc)(Cell,XDim,YDim, Agent,iAgentNb, Obstacle,iObstacleNb, bXTorus,bYTorus, MaxRadius,MinRadius); } else { //SIMULATION WITH THE CORE AND THE DEFAULT GAME AgentA->FINECellScan(Cell,XDim,YDim, //FINECellScan IS virtutal Agent,iAgentNb, Obstacle,iObstacleNb, bXTorus,bYTorus, MaxRadius,MinRadius); } } } The CORE executes internal agent functions when the DLL linkage is not selected, C C.1 Mission script decoding Script We recall that the way an agent executes its mission is described by a mission script (see the DLLs Manual). A typical mission script is represented below. MISSION: A0 attacks A1, A1 flees A Revision: 128 IV-154/206 18/12/2013 CORE MANUAL ********************************** POLICY: 0 BASIC STATES (S: Spatial; I: internal): S0: Agent1 detected S1: NO Agent1 detected, Agent0 detected S2: NO Agent1 detected, NO Agent0 detected END1 DIRECTIVES: M0: Move to Agent1 M1: Move away from Agent(s)0 M2: Move Alone END2 STATE-DIRECTIVE TABLE: S0: 100%[M0];0%[M1];0%[M2] S1: 10%[M0];70%[M1];20%[M2] S2: 0%[M0];90%[M1];10%[M2] END3 STATE VARIABLES VAR0: Energy;2.0;3;1;1.5;2 END4 Script. 4: Example of MISSION Script It is divided in 4 sections beginning respectively with the keywords BASIC STATES, DIRECTIVES, STATE-VARIABLE TABLE, STATE VARIABLES and ending with the delimiter keywords END1, END2… which are mandatory. In the current version, MASS only decodes the two last sections entitled STATE-DIRECTIVE TABLE and STATE VARIABLES. The rest of the script is nothing but information for the programmer to identify the mission. The STATE-DIRECTIVE TABLE means: Line 1 means: Following the identification of state of index 0 (i.e., S0), the agent executes the action of index 0 (i.e. M0) Line 2 means: Following the identification of state of index 1 (i.e., S1), the agent chooses the action of index 0 (i.e., M0) with probability 10%, or the action of index 1 (Ii.e., M1) with probability 70%, or the state of index 2 (i.e., M2) with probability 20% Line 3 means: Following the identification of state of 3 (i.e., S3), the agent chooses the action of index 1 (i.e., M1) with probability 90%, or the action of index 2 (i.e., M2) with probability 10% C.2 Class SCRIPTPROCESSOR The class SCRIPTPROCESSOR(16) decodes and encapsulates the information initially stored in the mission script. In general, the mission script may includes several policies. Each one is stored in an instance of the class APOLICY (with A for agent) described below in section C.3. Thus, SCRIPTPROCESSOR includes the array {APolicy[i]| 0≤f <m_iAgentPolicyNb} of APOLICY objects, one per policy. The header of the class SCRIPTPROCESSOR is listed below: class SCRIPTPROCESSOR (16) This class and its subclasses were written by Frédéric Zermano in Jan-Feb 2003 Revision: 128 IV-155/206 18/12/2013 CORE MANUAL { public: CString CString int m_MissionStr; //FULL MISSION STRING m_MissionNameStr; m_iAgentPolicyNb; //NB OF AGENT POLICIES. REMEMBER THAT EACH AGENT //MAY HAVE SEVERAL POLICIES (DEFINED IN THE MISSION //SCRIPT) AND THAT EACH AGENT POLICY IS THE SUM // OF STATE POLICIES. APOLICY* APolicy; //ARRAY OF AGENT POLICIES void operator=(const SCRIPTPROCESSOR &other); bool DecodeMissionString(CString MissionStr); + a list of methods... }; SCRIPTPROCESSOR calls the method bool DecodeMissionString(CString MissionStr) to decode the script and to create dynamically the array of agent policies. C.3 C3.1 Class APOLICY (Agent policy) Definition This class is declared as follows: class APOLICY //AGENT POLICY ///////////////////////////////////////////////////////////////////////////////////// // THE CLASS APOLICY (AGENT POLICY) STORES ALL INFORMATION THAT CAN BE RETREIVED FROM // THE DECODING OF THE MISSION SCRIPT FOR EACH POLICY ///////////////////////////////////////////////////////////////////////////////////// { public: CString CString CString CString m_StateStr; m_StateVariablesStr; m_StateActionStr; m_DirectiveStr; //STATE STRING DISPLAYED IN A RichEditCtrl //STATE VARIABLE STRING DISPLAYED IN A RichEditCtl //STATE-ACTION STRING DISPLAYED IN A RichEditCtrl //DIRECTIVE STRING DISPLAYED IN A RichEditCtrl //VARIABLES FOR EACH AGENT POLICY int m_iStateNb; //NUMBER OF STATES IN THE "BASIC STATES" SECTION OF THE //THE AGENT POLICY SCRIPT int m_iStateVarNb; //NB OF STATE VARIABLES IN THE CURRENT POLICY CString* m_StateVarName; //NAMES OF THE STATES OF THE CURRENT POLICY, UNUSEFUL? int* m_iSamplePtNb; //NUMBER OF SAMPLE POINTS FOR EACH STATE VARIABLE float* m_StateVar; //INITIAL VALUES OF STATE VARIABLES VARDATA* m_VarData; //VarData[i]: OBJECT TO STORE THE SAMPLE POINTS NEEDED //TO ANALYZE THE STATE VARIABLES SPOLICY* m_SPolicy; //WARNING: THE AGENT POLICY IS AN ARRAY OF STATE //POLICIES! THE CLASS POLICY IS A CLASS TO ENCAPSULATE //ONE SINGLE STATE POLICY APOLICY(); ~APOLICY(); void operator=(const APOLICY &other); void CheckAll(); }; This header shows that the object APOLICY includes member variables to describes the policy STATE variables (m_iStateVarNb, m_iSamplePtNb, m_StateVar, m_VarData), the number Revision: 128 IV-156/206 18/12/2013 CORE MANUAL of states (m_iStateNb) and the policy for each state (m_SPolicy). Note that m_SPolicy is an array of State policies (class SPOLICY) of dimension m_iStateNb. There is one state policy per BASIC STATE in the mission script. C3.2 Construction The method bool DecodeMissionString(CString MissionStr)first retrieves the member strings m_StateStr, m_StateVariablesStr, m_StateActionStr, m_DirectiveStr (from MissionStr) for each agent policy. Example 1: Let us consider the agent policy represented below. We assume that this policy is to be encapsulated in APolicy[0]: BASIC STATES (S: Spatial; I: internal): S0: Agent1 detected S1: NO Agent1 detected, Agent0 detected S2: NO Agent1 detected, NO Agent0 detected END DIRECTIVES: M0: Move to Agent1 M1: Move away from Agent(s)0 M2: Move Alone END2 STATE-DIRECTIVE TABLE: S0: 100%[M0];0%[M1];0%[M2] S1: 10%[M0];70%[M1];20%[M2] S2: 0%[M0];90%[M1];10%[M2] END3 STATE VARIABLES: VAR0: Energy; 2.0;4.0;0.5;1;1.5;2 END4 Fig. 62 DecodeMissionString will initialize the member variables of APolicy[0] as follows: //GetStateStrings() RETREIVES THE “BASIC STATE” STRING FOR EACH AGENT POLICY //DEFINED IN THE MISSION SCRIPT. THUS, IT RETRIEVES APolicy(0].m_StateStr, //APolicy(1].m_StateStr,… FOR THE AGENT POLICY OF INDEX 0, WE DEDUCE: APolicy[0].m_StateStr =" S0: Agent1 detected \nS1: NO Agent1 detected, Agent0 detected \nS2: NO Agent1 detected, NO Agent0 detected" //GetStateVariableString() RETREIVES THE “STATE VARIABLE” STRING FOR EACH AGENT //POLICY DEFINED IN THE MISSION SCRIPT. FOR POLICY OF INDEX 0, WE GET: APolicy[0].m_StateVariablesStr = "VAR0: Energy;2.0;3;1;1.5;2" //GetStateDirectiveString() RETREIVES THE “STATE-DIRECTIVE TABLE” STRING FOR EACH //AGENT POLICY DEFINED IN THE MISSION SCRIPT. FOR THE POLICY OF INDEX 0, WE GET: APolicy[0].m_StateActionStr = "S0: 100%[M0];0%[M1];0%[M2] \nS1: 10%[M0]; 70%[M1];20%[M2] \nS2: 0%[M0];90%[M1];10%[M2]"; //GetDirectiveStrings() TO RETREIVE THE “DIRECTIVE” STRING FOR EACH AGENT POLICY //DEFINED IN THE MISSION SCRIPT. FOR THE POLICY OF INDEX 0, WE GET: APolicy[0].m_DirectiveStr= "M0: Move to Agent1 \nM1: Move away from Agent(s)0 \nM2: Move Alone" //GetNumberOfSpatialStates(int i) RETREIVES THE NUMBER OF STATES FOR FOR THE //POLICY OF INDEX i. FOR THE POLICY OF INDEX 0, WE GET: APolicy(0].m_StateStr=3; m_iDirectiveNb=3; //TOTAL NB OF POSSIBLE DIRECTIVES IN THE CURRENT POLICY //GetNumberOfStateVariable(int i) RETREIVES THE NB OF VARIABLES IN THE POLICY //OF INDEX i. APolicy(0].m_iStateVarNb=1; Revision: 128 IV-157/206 18/12/2013 CORE MANUAL //GetNamesOfStateVariables(int i) TO RETREIVE THE NAMES OF STATE VARIABLES IN //THE POLICY OF INDEX i. APolicy(0].m_StateVarName; //GetNbOfSamplesForEachVariable(int i) RETREIVES THE NB OF SAMPLES PER //STATE VARIABLE IN THE POLICY OF INDEX i. APolicy(0].m_iSamplePtNb; //GetInitialValueOfStateVariable(int i) RETREIVES THE INITIAL VALUES THE STATE VARIABLE IN THE POLICY OF INDEX i. APolicy(0].m_StateVar; C.4 Class VARDATA The class VARDATA stores the sample points used to analyze the behavior of the state variable (see the section STATE VARIABLES in Script. 4 page 155). The class APOLICY includes an array of VARDATA objects, one per state variable. VARDATA is declared as follows: class VARDATA ////////////////////////////////////////////////////////////////// // CLASS TO STORE THE DATA NECESSARY TO ANALYSE EACH STATE VARIABLE ////////////////////////////////////////////////////////////////// { public: int iDataPtNb; float* DataPt; VARDATA(); ~VARDATA(); void operator=(const VARDATA &other); void Build(int XDataPtNb, float* XDataPt); protected: void GetInterval(float X); }; The method VARDATA.Build(…) reads the state variable string and copies the sample points in the dynamic array DataPt[iDataPtNb]. C.5 C5.1 Class SPOLICY (State policy) Definition The class SPOLICY encapsulates the state policy, which stores the set of directives (with their respective probabilities) that can be executed when the agent has recognized its state. It is explicitly defined by one line in the section STATE-DIRECTIVE STABLE of the mission script. The class SPOLICY is declared as follows: class SPOLICY //STATE POLICY ///////////////////////////////////////////////////////////////////////////////////////// // THE CLASS SPOLICY REPRESENTS THE POLICY FOR ONE STATE. THE AGENT // POLICY IS AN ARRAY OF STATE POLICIES, ONE PER STATE. ///////////////////////////////////////////////////////////////////////////////////////// { public: int m_ActionNb; //NB OF POSSIBLE ACTIONS int* m_Action; //ACTION ARRAY. FOR INSTANCE m_Action[2]=5 MEANS THAT THE //THIRD POSSIBLE ACTION WHEN THE ENVIRONMENT IS IN THIS Revision: 128 IV-158/206 18/12/2013 CORE MANUAL //STATE IS THE ACTION OF INDEX 5 float* ActionValue; //ACTION VALUE IN LEARNING MECHANISM float* m_Proba; //VALUE OF THE POSSIBLE ACTIONS. SPOLICY(); ~SPOLICY (); void operator=(const SPOLICY &other); void Build( int* Action, int iActionNb, float* ActionValue); int SelectAction(); }; C5.2 Construction The method DecodeMissionString(CString MissionStr) calls the method bool SCRIPTPROCESSOR::DecodeAgentPolicyString(int i) for each agent policy. This method first splits the string APolicy[i].m_StateActionStr (see the example 1 just above) in state policy strings (the array SPolicyStr, see the code), where the string SPolicyStr[i] corresponds to the line of index i in m_StateActionStr. Then, it calls SCRIPTPROCESSOR::DecodeStatePolicyString to decode all strings SPolicyStr[i], to determine APolicy[0].m_SPolicy[i].m_ActionNb and the arrays APolicy[0].m_SPolicy[i].m_Action[j] and APolicy[0].m_SPolicy[i]. m_Proba[j]with 0≤ APolicy[0].m_SPolicy[i].m_ActionNb. Example 2: Let us consider the first agent policy already described in example 1. The State-Action string for this agent policy was: APolicy(0].m_StateActionStr= "S0: 100%[M0];0%[M1];0%[M2] \nS1: 10%[M0]; 70%[M1];20%[M2] \nS2: 0%[M0];90%[M1];10%[M2]"; DecodeAgentPolicyString(int i) will define the policy strings: SPolicyStr[0]=”S0: 100%[M0]; 0%[M1]; 0%[M2]” SPolicyStr[1]=”S1: 10%[M0];70%[M1];20%[M2]” SPolicyStr[2]=”S0: 0%[M0];90%[M1];10%[M2]” DecodeStatePolicyString(int i) will define the arrays: APolicy[0].m_SPolicy[0].m_ActionNb=3; APolicy[0].m_SPolicy[0].m_Action[0]=0; APolicy[0].m_SPolicy[0].m_Proba[0]=1; APolicy[0].m_SPolicy[0].m_Action[1]=1; APolicy[0].m_SPolicy[0].m_Proba[1]=0; APolicy[0].m_SPolicy[0].m_Action[2]=2; APolicy[0].m_SPolicy[0].m_Proba[2]=0; APolicy[0].m_SPolicy[0].m_ActionNb=3; APolicy[0].m_SPolicy[1].m_Action[0]=0; APolicy[0].m_SPolicy[1].m_Proba[0]=0.1; APolicy[0].m_SPolicy[1].m_Action[1]=1; APolicy[0].m_SPolicy[1].m_Proba[1]=0.7; APolicy[0].m_SPolicy[1].m_Action[2]=2; APolicy[0].m_SPolicy[1].m_Proba[2]=0.2; APolicy[0].m_SPolicy[2].m_Action[0]=0; APolicy[0].m_SPolicy[2].m_Proba[0]=0.1; APolicy[0].m_SPolicy[2].m_Action[1]=1; APolicy[0].m_SPolicy[2].m_Proba[1]=0.9; APolicy[0].m_SPolicy[2].m_Action[2]=2; APolicy[0].m_SPolicy[2].m_Proba[2]=0.1; Note that APolicy[0].m_SPolicy[2].m_Action[2]=12 would mean that the third possible action (i.e., directive) for the state of index 2 will be the Revision: 128 IV-159/206 18/12/2013 CORE MANUAL directive M12 in the “DIRECTIVE” section of the mission script, which in this example must include at least 12 directives. C5.3 State identification and directive selection We assume here that you are familiar with the writing of DLLs. The state recognition in CellProcAction.cpp (or in ScanDecisionTree) is always followed by these two generic lines. int value=DLLSelectAction(FINEStateParam[0]); (this->*PolicyFunctions[value])(FINEStateParam,Cell,XDim,YDim,Move); The first line calls the following agent int AGENT::DLLSelectAction(int iStateIndex) (the code of which is listed below), which calls the method int SPOLICY::SelectAction(). int AGENT::DLLSelectAction(int iStateIndex) //////////////////////////////////////////////////////////////////////////////////// //SELECT THE ACTION, POSSIBLY USING REINFORCEMENT LEARNING //////////////////////////////////////////////////////////////////////////////////// { switch( iLearnMode ) { case -1: //NO LEARNING MECHANISM return this->APolicy.m_SPolicy[iStateIndex].SelectAction(); break; case 0: //YOUR CODE HERE TO CALCULATE REWARD FUNCTION //YOUR CODE HERE TO UPDATE ACTION VALUES FOR THE PREVIOUS STATE //UPDATE ACTION PROBABILITIES IN THE PREVIOUS STATE POLICY ::MessageBox(NULL,"CODE NOT WRITTEN","AGENT::SelectAction",MB_OK); return 0; break; } ::MessageBox(NULL,"IRREGULAR TERMINATION","AGENT::SelectAction",MB_OK); return 0; // } The code of SPOLICY::SelectAction() is listed below. int SPOLICY::SelectAction() ////////////////////////////////////////////////////////////////////////////// // INFORMATION // THE FUNCTION SELECTS ONE OF THE ACTIONS IN THE SET OF m_ActionNb ACTIONS // AND FINALLY IDENTIFIES THE ACTION IN THE FULL SET OF ACTIONS ////////////////////////////////////////////////////////////////////////////// { int i; if (m_ActionNb==1) return this->m_Action[0]; //STEP 2: SELECT ONE OF THE POSSIBLE ACTIONS FROM A RANDOM TEST float Test = (float) (1.0*rand()/(1.0+RAND_MAX)); float Threshold=m_Proba[0]; for (i=0;i<m_ActionNb;i++) { if (Test<Threshold) break; else Threshold=Threshold+m_Proba[i+1]; } //RETURN THE ACTION INDEX return this->m_Action[i]; } Revision: 128 IV-160/206 18/12/2013 CORE MANUAL The method SelectAction() selects an action in the array of the m_ActionNb possible actions, which are in the state policy and finally returns the index of the action in the full action table. Note that this step is purely logical, independent of the reality of states and actions. C.6 Initialization of mission scripts on startup MASS (i.e., the CORE) always loads default scripts on startup, one per agent. The default mission scripts are returned by following methods: CString CString CString CString CString CString CAGNTView::DefaultMissionScript0() CAGNTView::DefaultMissionScript1() CAGNTView::DefaultMissionScript2() CAGNTView::DefaultMissionScript3() CAGNTView::DefaultMissionScript4() CAGNTView::DefaultMissionScript5() for agent iAType=0 for agent iAType=1 for agent iAType=2 for agent iAType=3 for agent iAType=4 for agent iAType=5 In the current version, they describe the prey-predator game. Global initialization of all variables is executed in void CAGNTView::OnInitialUpdate(), which calls void CAGNTView::BuildAgentPopulations() which finally creates one instance of SCRIPTPROCESSOR, (one per agent class) from ScriptP[0].DecodeMissionString(DefaultMissionScript0()); ScriptP[1].DecodeMissionString(DefaultMissionScript1()); Etc.. Explicitely, ScriptP[0].DecodeMissionString(DefaultMissionScript0()), decodes the mission string for agent iAType=0, i.e., creates the instance of SCRIPTPROCESSOR for the agent class iAType=0, using the default script returned by DefaultMissionScript0. D Elimination of closed cycles Closed cycles become an issue at low agent density, i.e., when agent-agent collisions are unable to redistribute the agent directions. Two types of closed cycles are possible: Two-reflection cycles occur when an agent is reflected under normal incidence by the borders. In that case, it moves vertically or horizontally in an infinite cycle. Four-reflection cycles occur when the agent is reflected in the diagonal directions (northwest, northeast, southeast and southwest). In that case, it enters a diamond-like cycle. Reflections on obstacles and borders (as borders are obstacles) are detected by the function AGENT::DetectCycle(bool DropOrMain, int Diagonal). The operation is simple: First, DetectCycle() systematically stores the coordinates of the last reflection points in the arrays ReflectPtX[REFLECTIONNB] and ReflectPtY[REFLECTIONNB]. In the current version REFLECTIONNB =10 (see GLOBAL.h). The last reflection is stored in Revision: 128 IV-161/206 18/12/2013 CORE MANUAL ReflectPtX[0], ReflectPtY[0]. The coordinates of the previous reflection points are stored in ReflectPtX[0], ReflectPtY[0], those of the previous reflection poinrq in ReflectPtX[1], ReflectPtY[1] and so on… Second, DetectCycle() checks whether it previously stored the last point into its arrays. if it is, the agent is inside a Closed Cycle and DetectCycle() switches the Boolean member variable AGENT::ClosedCycle to true. The detection of the close loop is executed when the agent moves and calls the functions void AGENT::FINEMoveAlone2 or void AGENT::FINEMoveToCell. The loop breaking is executed during the next agent activation by the function AGENT::BreakClosedLoop(), which is integrated in MainTest. This function operates as follows:: It randomly initializes a counter iCountNb between 0 and 100. The counter is decremented of 1 units in each agent iteration. When iCountNb=0, MainTest randomly changes the agent direction. The detection of closed cycles in the torus mode requires a specific treatment because there is no reflection at all. It is possible to trace the previous directions of the agent as they are stored in the two arrays ShiftX[ITERATNB] and ShiftY[ITERATNB], which are updated so that (ShiftX/Y[0] is copied to ShiftX/Y[1], ShiftX/Y[1] to ShiftX/Y[2], and so on…) in AGENT::BreakClosedLoop()while the current iteration is stored to ShiftX/Y[0] in AGENT::FINECell/AgentScan and AGENT::COARSE Cell/AgentScan. In the torus mode, AGENT::DetectCycle(bool DropOrMain, int Diagonal) is called by MainTest, and check how many times the agent has moved in the same direction. When this value is bigger than Diagonal, this function put the boolean ClosedCycle to true. E Implementation of reinforcement learning mechanisms E.1 Introduction In a reinforcement learning process, the programmer defines the states that the agent recognizes, the state policies (i.e., the actions that the agent considers following each state) and an optimization function (Reward function). These are to some extend the static properties. Reinforcement learning algorithms are dynamic mechanisms that adapt the actions chosen by the agent (i.e., the agent policy) to bring quickly the agent in high-reward states. E.2 Action value algorithms In the action value algorithms (AVA), each action is scored by a value number. The value estimates how good the action is with respect to the agent mission. The value estimation is based on the following mechanism: Revision: 128 IV-162/206 18/12/2013 CORE MANUAL 1) The agent executes an action ap using the current values { Qn S , ai |0≤i<N } of the possible a actions (n is the iteration index and Na is the number of possible action following S). The AVAs Qn S , ai to select an action. Later, the agent identifies its environment, and calculates the reward function Rn1 . The reward differ in the way the agent uses the current action values 2) function depends on the current environment state. It is used to update the value of the previous action (as the agent remember its previous action ap and it previous state S): Qn1 S , a p Qn S , a p Rn1 Qn S , a p The AVAs also differ in the way the coefficient is chosen. The execution of a reinforcement learning session (RLS) is therefore composed of an initialization procedure followed by a dynamic adjustment of the policy. These two phases are described below: INITIALIZATION PHASE Step 1: Define the environment and states to represent the environment. This step can be especially difficult when the number of states is infinite, as some method will have to be defined to reduce the computation overhead. The solution generally consists in using some abstraction to reduce the number of states. Moreover, the way the environment is defined often deeply influences the actions that can be defined. Step 2: Define the set of possible actions (In principle, the set of possible actions is unchanged during the RLS). Step 3: For each state, define the set of possible actions with their initial probabilities. This initialization may reflect the programmer expertise to provide a minimum efficient policy to the agent. The neutral initialization consists in affecting the same value to all actions. Step 4: Define a reward function to appreciate how a state is close to the execution of the mission. The reward function is crucial. Table 2 The next table represents two examples of reinforcement learning algorithm. ITERATIVE PHASE : -greedy algorithm) Step 0: Consider iteration n+1. Step 1: Observe the reaction of the environment, and construct the representation Sn+1 of the environment. In general, the environment is the product of the spatial state by the state of agent variables. Step 2: Calculate the reward Rn 1 . Step 3: Then, update the action value for the action ap selected at the previous iteration n: Qn 1 S , a p Qn S , a p Rn 1 Qn S , a p with 01. Alternatively, one may use Revision: 128 IV-163/206 1 , where n is the number of selections n 1 18/12/2013 CORE MANUAL of action ap following S since the beginning the test learning procedure. In this method, Qn+1 is the average reward.. Step 4: Identify the greedy action following state S, i.e., the action aiMax , which has the top estimated action value Qn1 S , a among all possible actions following the identification of state S. Step 5: Choose the greedy action with probability (1-) and another action with probability /(Na-1), where Na is the number of possible actions following S. Step 6: Go to step 1. Table 3 ITERATIVE PHASE (pursuit algorithm) Step 0: We consider iteration n+1. Step 1: Observe the reaction of the environment, and construct the representation Sn+1 of the environment. In general, the environment is the product of the spatial state by the state of agent variables. Step 2: Considering the previous state Sn and the current state, Sn+1. Determine the reward Rn 1 Sn , ai obtained choosing the ai when the environment was in at previous iteration. Step 3: Then, update the action value for the action ai selected at the previous iteration n: Qn 1 S , a p Qn S , a p Rn 1 Qn S , a p with 01. Alternatively, one may use 1 , where n is the number of n 1 selections of action ap following S since the beginning the test learning procedure. In this method, Qn+1 is the average reward. Step 4: Identify the greedy action following state S, i.e., the action aiMax , which has the top estimated action value Qn S , a among all possible actions following the identification of state S. Step 5: Update the probability n 1 S n , i to select the next action ai: S , i 1 n S n , i n 1 Sn , i n n n Sn , i n Sn , i for the greedy action for any other action with <0. Note that, the greedy solution increases to 1, when iterating the process. Step 6: Select an action ai. using the above probabilities and execute the action. Step 7: Go to step 1. Table 4 Revision: 128 IV-164/206 18/12/2013 CORE MANUAL E.3 Implementation of action value algorithms The agent has several member variables and methods to implement AVAs. The next lines show the relevant declarations in the agent header: ///////////////////////////////////////////////////////////////////////////////////// //REINFORCEMENT LEARNING VARIABLES ANDS FUNCTIONS APOLICY APolicy; //AGENT POLICY int iLearnMode; //iLearnMode<0 MEANS NO LEARNING int iRewardMode; //TO SELECT A METHOD TO CALCULATE THE REWARD int iPreviousState; /STATE IDENTIFIED AT PRECEEDING AGENT ACTIVATION int iPreviousAction; //ACTION SELECTED AT PRECEEDING AGENT ACTIVATION float Reward(); //METHOD TO CALCULATE THE REWARD float DLLReward(); // int SelectAction(int iStateIndex); int DLLSelectAction(int iStateIndex); ////////////////////////////////////////////////////////////////////////////////// Consider an agent, which executes a mission defined in a DLL. When the agent is activated by the scheduler, it first constructs a representation of its environment and identifies a state. Recall that a state is nothing but a Bolean condition involving the environment and the agent state variables. The state is labeled by a state index, in accordance with the agent mission string. In general, the state index is stored in the agent member variable FINEStateParam[0]. The rest of the agent cycle depends on wether learning mechanisms are integrated. When no learning method (LM) is implemented, (i.e., when the member variable iLearnMode<0), the agent calls the method DLLSelectAction to select an action in the state-directive tables. When, an AVA algorithm is implemented (iLearnMode>=0), the agent: 1) calculates the reward function AGENT::Reward() (which requires knowing the current state); 2) Updates the action value Q(S n-1,a n-1) (which requires knowing the previous state Sn-1 and the previous action an-1); 3) Updates the probability to select a n-1Q from S n-1, and finally 3) calls the method DLLSelectAction to select an action in the state-directive tables. Remember that: The class SPolicy includes the array float* ActionValue to store the action values of all possible actions (see the class declaration in section C.5 page 158). - The agent remembers its previous state and its previous action, which it stores in its member variables iPreviousState and in iPreviousAction, respectively. - The ActionValue, which must be updated is therefore: APolicy.m_SPolicy[iPreviousState].ActionValue[iPreviousAction] - The action probability, which must be updated is therefore: APolicy.m_SPolicy[iPreviousState].m_Proba[iPreviousAction] - The code of the member function AGENT::DLLSelectAction is displayed below. Note that the call parameter is the state index (StateIndex), which must have been identified prior to calling this function. int AGENT::DLLSelectAction(int iStateIndex) ////////////////////////////////////////////////////////////////////////////////////// //SELECT THE ACTION, POSSIBLY USING REINFORCEMENT LEARNING ////////////////////////////////////////////////////////////////////////////////////// { switch( iLearnMode ) { case -1: //NO LEARNING MECHANISM return this->APolicy.m_SPolicy[iStateIndex].SelectAction(); break; Revision: 128 IV-165/206 18/12/2013 CORE MANUAL case 0: //CALCULATE REWARD FUNCTION //UPDATE ACTION VALUES FOR THE PREVIOUS STATE. THE AGENT STORES THE VARIABLES //iPreviousState AND iPeviousAction. THE ACTION VALUE TO UPDATE IS THEREFORE //APolicy.m_SPolicy[iPreviousState].ActionValue[iPreviousAction] //UPDATE ACTION PROBABILITIES IN THE PREVIOUS STATE POLICY, I.E., UPDATE: //APolicy.m_SPolicy[iPreviousState].m_Proba[iPreviousAction] ::MessageBox(NULL,"CODE NOT WRITTEN","AGENT::SelectAction",MB_OK); return 0; break; } ::MessageBox(NULL,"IRREGULAR TERMINATION","AGENT::SelectAction",MB_OK); return 0; // } E.4 Revision: 128 IV-166/206 18/12/2013 CORE MANUAL Revision: 128 IV-167/206 18/12/2013 CORE MANUAL Chapter Chapter history: Version 1.0, April-June 2009 by JHC and Jaroslaw Wojciechowski 10 Extension for 3D simulations This chapter describes the changes added in the code of the core and of DLLs to enable 3D moves of agents. M A ASS was initially designed as a 2D simulator, and consequently; agents move in a plane. This chapter shows the changes which were added in Spring 2009 to the CORE and to DLLs to enable agents to move in a 3D space. Concretely, an agent has two coordinates X and Y and move in a 2D array of cells. The changes consists in adding one more coordinate Y and in enabling the torus mode in the new direction. We first describe the extension of several classes. Extension of structures and classes We describe in this section the extension of several classes and structures to enable 3D moves of agents. Note that extending an object to prepare future developments is risk-free and that all existing code should recompile and run smoothly! A.1 Structure COREDATA Recall that the structure COREDATA is the memory shared by the CORE and all DLLs, as it is the call parameter for each worker thread. Recall that this structure is extensively described in section B page 16. It has been modified to enable 3D moves. The part entitled "SECTION 3: TERRAIN" of the structure COREDATA (see SECTION 3 page 17) becomes: //////////////////////////////////////////////////////////////////////////// //SECTION 3: TERRAIN short XDim; //X DIM OF THE TERRAIN short YDim; //Y DIM OF THE TERRAIN //CODE ADDED BY JAREK WOJCIECHOWSKI TO ENABLE 3D 3D MOVES short ZDim; //Z DIM OF THE PLAYGROUND short iPlaneIndex; //FROM 1 to XDIM, YDIM, ZDIM (NEW) short iWhichPlane2D; //0:XY,1:XZ,2:ZY (NEW) Revision: 128 IV-168/206 18/12/2013 CORE MANUAL bool (NEW) CELL* bool bool bool short b_show_alllayers; //SHOWS ALL AGENTS IN ALL LAYERS IGNORING iPlaneIndex Cell; //THE TERRAIN IS A RECTANGULAR bXtorusMode; //if TRUE, NO X BORDER, CYCLIC bYtorusMode; //if TRUE, NO Y BORDER, CYCLIC bZtorusMode; ; //if TRUE, NO Z BORDER, CYCLIC iteratNb; Script 17: Extension of the COREDATA structure for ARRAY OF CELL OBJECTS CONDITION CONDITION CONDITION (NEW) 3D moves The changes consist in defining the dimension ZDim in the Z direction, in enabling the torus mode in the new direction and in adding the short iPlaneIndex; short iWhichPlane2D; to be used by paint functions and manipulated by the user interface controls. iPlaneIndex is denoting which level of one of three plains to paint in the 2D graph and iWhichPlane2D is denoting which plain to show (D paragraph). A.2 Class AGENT The AGENT class has been extended to add one more coordinate to the agent position which is now defined by the triplet (X,Y,Z). The 2D agent class declaration (i.e., the agent header Agent.h) displayed in section D6.1 page 23 has been modified accordingly. The extended SECTION I: GENERAL VARIABLES is displayed below. class AGENT (May 2009) ////////////////////////////////////////////////////////////////////////////////////////// ////////////////////////////////////////////////////////////////////////////////////////// { public: ////////////////////////////////////////////////////////////////////////////////////// SECTION I : GENERAL VARIABLES short X; //X POSITION OF THE AGENT IN THE GRID short Y; //Y POSITION OF THE AGENT IN THE GRID short Z; short ShiftX[ITERATNB]; //Z POSITION OF THE AGENT IN THE GRID (NEW) //ARRAY TO STORE THE LAST X SHIFT OF THE AGENT; //SHIFT PER ITERATION IS EQUIVALENT TO THE SPEED!!! short ShiftY[ITERATNB]; //ARRAY TO STORE THE LAST Y SHIF OF THE AGENT //CODE AJOUTE PAR JAREK WOJCIECHOWSKI short ShiftZ[ITERATNB]; ............... etc..... //ARRAY TO STORE THE LAST Z SHIF OF THE AGENT (NEW) } Additionnally, we extended the number of call parameters of numerous member functions. The principle of the extension is simple: When a member function of the class AGENT contains the dimensions XDim and YDim in the 2D plane, we added a new call parameter ZDim which is the dimension in the Z direction. When a member function of the class AGENT contains the positions iTCell and jTCell of the agents in the 2D plane, we added a new call parameter kTCell that will be its position in the Z direction. When a member function of the class AGENT contains the bXTorus and bZTorus option for X and Y axis, we added a new call parameter bZTorus that will be torus option for Z axis. Revision: 128 IV-169/206 18/12/2013 CORE MANUAL Note that adding call parameters which are unused at this step of the development makes that all member functions automatically work. We preserve the ascending compatibility. class AGENT //////////////////////////////////////////////////////////////////// { ............... public: (NEW CALL PARAMETERS OF MEMBER FUNCTION ARE HIGHLIGHTED IN RED) //MEMBER FUNCTION TO STORE NODES IN FoundNode void FINEStoreNodeInArray( short iType,short iTCell,short jTCell, short kTCell, short Index, bool bXtorus, bool bYtorus, bool bZtorus, short XDim, short YDim, short ZDim); //SCAN THE CELLS OF THE ENVIRONMENT IN THE FINE MODE FOR NETWORK OPERATION __declspec(dllexport) void ScanFINECellNode(CELL* Cell,short XDim,short YDim,short ZDim, AGENT* Agent[AGENTTYPENB], short iAgentNb[AGENTTYPENB], OBSTACLE* Obstacle, short iObstacleNb, bool bXTorus, bool bYTorus, bool bZTorus, short MaxRadius,short MinRadius); //FUNCTIONS USED WHEN THE SPATIAL ENVIRONMENT CONSTRUCTION IS NOT NEEDED virtual BOOL BuildEnvACTION_CORE(CELL* Cell, short XDim, short YDim,short ZDim, AGENT* Agent[AGENTTYPENB],short iAgentNb[AGENTTYPENB], OBSTACLE* Obstacle, short iObstacleNb,bool bXTorus,bool bYTorus);//,bool bZTorus virtual void FindState(CELL* Cell,short XDim,short YDim,short ZDim, AGENT* Agent[AGENTTYPENB], short iAgentNb[AGENTTYPENB], bool bXTorus, bool bYTorus, bool bZTorus); ///////////////////////////////////////////////////////////////////////////////////// … //ARRAY OF FUNCTIONS TO MAP WITH MOVE FUNCTIONS. void (AGENT::* PolicyFunctions[POLICYFUNCTIONNB]) (short* MoveParam,CELL* Cell,short XDim,short YDim,short ZDim, MOVE* Move); //UTILITY FUNCTIONS … //SERVICE FUNCTIONS bool KillPrey(…short ZDim,…); void UpdatePosition(…short ZDim,…); //INTERFACE FUNCTIONS IN MISSION DLLs __declspec(dllexport) void ScanFINECellAction(…short ZDim, …,bool bZtorus,…); __declspec(dllexport) BOOL BuildEnvACTION(…short ZDim, …,bool bZtorus,…); __declspec(dllexport) BOOL BuildEnvNODE(…short ZDim, …,bool bZtorus,…); __declspec(dllexport) void DllFindState(…short ZDim, …,bool bZtorus,…); __declspec(dllexport) void DllCOARSECellScan(…short ZDim, …,bool bZtorus,…); __declspec(dllexport) void DllFINEAgentScan(…short ZDim, …,bool bZtorus,…); __declspec(dllexport) void DllCOARSEAgentScan(…short ZDim, …,bool bZtorus,…); //FUNCTIONS IN THE MISSION DLLs REPULSIVE_1_3D EXCLUSIVELY bool ScanFINECellClose_3D(CELL* Cell, short XDim, short YDim, short ZDim, AGENT* Agent[AGENTTYPENB], short iAgentNb[AGENTTYPENB], OBSTACLE* Obstacle, short iObstacleNb, bool bYtorus, bool bXtorus, bool bZtorus, int iMode); bool ScanFINECellRing_3D(CELL* Cell, short XDim, short YDim,short ZDim, AGENT* Agent[AGENTTYPENB], short iAgentNb[AGENTTYPENB], OBSTACLE* Obstacle, short iObstacleNb, short iDistInit, bool bXtorus, bool bYtorus,bool bZtorus, int iMode); void ScanFINEDecisionTree_3D(CELL* Cell,short XDim,short YDim,short ZDim, AGENT* Agent[AGENTTYPENB], short iAgentNb[AGENTTYPENB], OBSTACLE* Obstacle, short iObstacleNb, bool bXtorus, bool bYtorus, bool bZtorus); Revision: 128 IV-170/206 18/12/2013 CORE MANUAL void FINEStoreInArray_3D(short iType,short iTCell,short jTCell, short kTCell, short Index, bool bXtorus, bool bYtorus,bool bZtorus, short XDim, short YDim, short ZDim); void FINEMoveAlone2_3D (short* MoveParam,CELL* Cell, short XDim,short YDim,short ZDim,MOVE* Move); void FINEMoveAway2_3D (short* MoveParam,CELL* Cell, short XDim,short YDim,short ZDim,MOVE* Move); void FINEStoreNodeInArray_3D(short iType,short iTCell,short jTCell, short kTCell, short Index,bool bXtorus, bool bYtorus, bool bZtorus, short XDim, short YDim, short ZDim); ............... } Script 18: Listing of modified member function declarations A.3 Class MOVE The class MOVE is extended and now includes the shift DZ .The parameter iSect is being interpreted now not only for moves in plain but also for up and down values. class MOVE ///////////////////////////////////////////////////////////////////////////// // AT THE MOMENT, AN ACTION REDUCES TO A SINGLE MOVE. HOWEVER, THE CLASS STRUCTURE // COULD BE EXTENDED TO CONSIDER OTHER EFFECTS ///////////////////////////////////////////////////////////////////////////// { public: short DX; //SHIFT IN X DIRECTION short DY; //SHIFT IN Y DIRECTION short DZ; //SHIFT IN Z DIRECTION short iSect; //iSect=0: MOVE EAST; iSect=1: MOVE NORTH EAST; iSect=2: MOVE NORTH; //iSect=3: MOVE NORTH WEST; iSect=4: MOVE WEST; iSect=5: MOVE SOUTH WEST; //iSect=6: MOVE SOUTH; iSect=7: MOVE SOUTH EAST; //MOVE UP OR DOWN IN 3D //iSect=7,8....25 double weight; //RATE OF THE ACTION char mode; //'U': UNDEFINED; 'M': MOVE; 'K': MOVE & KILL }; Script 19: Listing of modified class MOVE A.4 Class CPointEx This class is also extended and now includes the z position of the Cell. class CPointEx { public: double x; double y; double z; CPointEx(); CPointEx(float X, float Y); CPointEx(float X, float Y,float Z); void operator = (const CPointEx &other); bool operator == (const CPointEx &other); bool operator != (const CPointEx &other); Revision: 128 IV-171/206 18/12/2013 CORE MANUAL }; Script 20: Listing of modifications in class CPointEx B B.1 Changes to scenarios read, display and write Reading scenario file Recall that the first action executed by the user when he (she) runs MASS consists in selecting and reading an existing scenario. A scenario is nothing but a XML file. When the user selects a scenario, the CORE executes the function CAGNTDoc::OnFileOpen() which calls the member function CAGNTView::ReadPlaygroundFromXML(&InXML) to read the XML scenario and retrieve the dimensions ThreadData.XDim, ThreadData.YDim, and ThreadData.ZDim of the terrain. The code changes in the function CAGNTDoc::OnFileOpen() are displayed in the script below. void CAGNTDoc::OnFileOpen() ////////////////////////////////////////////////////////////////////////////////// ////////////////////////////////////////////////////////////////////////////////// { ............ ............ pView->ReadPlaygroundFromXML(&InXML); //RETREIVE THE TERRAIN DIMENSIONS! ............ ............ ///////////////////////////////////////////////////////////////////////////////////// //BRANCH if(pView->ThreadData.ZDim == 1) { //CREATES A CXDraft WINDOW (ON TOP OF THE VIEW) //WHICH GETS THE FOCUS //OLD CODE pView->m_draft.ReadXMLFromDisk(szFileName); //PZAJAC 22-07-2008 } else if (pView->ThreadData.ZDim > 1){ pView->m_draft.ReadXMLFromDisk_3D(szFileName); //JWojciechowski 22-04-2009 } ////////////////////////////////////////////////////////////////////////////////// … ............ ............ } Script 21: Modifications in the function CAGNTDoc::OnFileOpen() The next script displays the modifications in the function pView::ReadPlaygroundFromXML void CAGNTView::ReadPlaygroundFromXML(XMLNode* InXML) ////////////////////////////////////////////////////////////////////////////////// // HISTORY: VERSION 1: June 2003, JHC // 2: July 2008 PZAJAC // 3: April 2009 JWOJCIECHOWSKI // ZDIM,ZTorus { ////////////////////////////////////////////////////////////////////////////////// int iProvi; InXML->read("MASS:PLAYGROUND:XDIM", iProvi,450); ThreadData.XDim = (short) iProvi; InXML->read("MASS:PLAYGROUND:XTORUS_MODE", iProvi,1); Revision: 128 IV-172/206 18/12/2013 CORE MANUAL if (iProvi==1) ThreadData.bXtorusMode=true; else ThreadData.bXtorusMode=false; InXML->read("MASS:PLAYGROUND:YDIM", iProvi,350); ThreadData.YDim= (short) iProvi; InXML->read("MASS:PLAYGROUND:YTORUS_MODE", iProvi, 1); if (iProvi==1) ThreadData.bYtorusMode=true; else ThreadData.bYtorusMode=false; InXML->read("MASS:PLAYGROUND:ZDIM", iProvi,1); if (iProvi!=NULL && iProvi>0) ThreadData.ZDim= (short) iProvi; else ThreadData.ZDim= 1; InXML->read("MASS:PLAYGROUND:ZTORUS_MODE", iProvi, 1); if (iProvi==1) ThreadData.bZtorusMode=true; else ThreadData.bZtorusMode=false; } Script 22: Modifications in the function CAGNTView::ReadPlaygroundFromXML Note the following important points: Script 22 shows that when the field ZDim is missing in the scenario file, the default value for ZDim is 1, and the torus mode in the Z direction is not activated, i.e., bZTorusMode = FALSE. These values are set to preserve the ascending compatibility when the new code reads an old 2D scenario. We integrated a branch in the function CAGNTDoc::OnFileOpen() (see Script 21) to separate the processing of 3D scenarios from that of existing 2D processing. The fundamental idea behind the branch introduction is to avoid mixing old code (for 2D scenario) with the new 3D code. The function ReadXMLFromDisk_3D is described in C.2 section. B.2 Changes to generate the agent populations The function ReadXMLFromDisk_3D generates the agents positions in the 3D background (space). Let us recall that the scenario does not include a list of agent positions, but simply a directive for generating the agent positions. The code below of the function ReadXMLFromDisk_3D shows that the agent generation directive is stored in the member variable m_Background.iAgentGenMode[i] for the agent of type i. Then, ReadXMLFromDisk_3D calls the function FillOusideObjects_3D to generate the agents positions. void CXDraft::ReadXMLFromDisk_3D(CString FileName) //////////////////////////////////////////////////////////////////////////////////////////// // 1: April 2009 JWojciechowski ///////////////////////////////////////////////////////////////////////////////////// { int i,j,k; CString Str1="", Str01=""; CString Str2="", Str02=""; //XML_ParamIO InXML; int iVersionNb; ////////////////////////////////////////////////////////////////////////// CAGNTView* pView=GetActiveView1(); COLORREF AColor[AGENTTYPENB]; for (k=0;k<AGENTTYPENB;k++) AColor[k]=pView->AgentColor[k][0]; int XDim=pView->ThreadData.XDim; int YDim=pView->ThreadData.YDim; int ZDim=pView->ThreadData.ZDim; ////////////////////////////////////////////////////////////////////////// CClientDC pDC(this); CPen* penCur = new CPen(this->iDefaultLineStyle,1,this->iDefaultDrawPen); pDC.SelectObject(penCur); pDC.SetROP2(R2_NOTXORPEN); Revision: 128 IV-173/206 18/12/2013 CORE MANUAL ///////////////////////////////////////////////////////////////////////////////////// RECT rect; GetParent()->GetClientRect(&rect); ///////////////////////////////////////////////////////////////////////////////////// XMLNode InXML=XMLNode::openFileHelper(FileName,"MASS"); ////////////////////////////////////////////////////////////////////////////// InXML.read("MASS:VersionNb",iVersionNb,0); ////////////////////////////////////////////////////////////////////////////// //OBSTACLE CODE HAS BEEN REMOVED //READ BACKGROUND PARAMETERS //READ ONLY FOR iVersion>2 Str1=Str01+"MASS:STARTCONFIG:BACKGROUND"; for (j=0;j<AGENTTYPENB;j++) { Str2=Str1+":AGENT"+CHAR(48+j); InXML.read(Str2+":NB",m_Background.iAgentNb[j],0); InXML.read(Str2+":GENMODE",m_Background.iAgentGenMode[j],0); GENERATION MODE! } InXML.read(Str1+":OBST:NB",m_Background.iObstacleNb,0); InXML.read(Str1+":OBST:GENMODE",m_Background.iObstacleGenMode,0); m_Background.AgentSize=AgentSize; m_Background.FillOusideObjects_3D(XDim,YDim,ZDim); ///////////////////////////////////////////////////////////////////// //this->Invalidate(); GetTotalObjectNb(); ///////////////////////////////////////////////////////////////////// } Script 23: Code of the function CXDraft::ReadXMLFromDisk_3D The code of the generation function CBackground::FillOusideObjects_3D is responsible for the generation of Agents in the field outside the obstacles. However, as we have omitted obstacles in the 3D environment, an agent may be placed in any cell of the 3D terrain. The important point is that the CPointEx class has been modified to store the Z coordinate for the Cell class (see paragraph A.4 of this chapter). bool CBackground::FillOusideObjects_3D(int XDim,int YDim,int ZDim) ////////////////////////////////////////////////////////////////////////////////// // HISTORY: Version 1, April 2009, JWojciechowski // INFORMATION: FILL UP THE 3D background WITH AGENTS. ////////////////////////////////////////////////////////////////////////////////// { ................ int iPtNb3D=0; int SHIFT=0; //STEP 1: CALCULATE THE NUMBER OF POINTS int mesh calculated as doubles int iBackgroundPtNb3D=iPtNb3D; //for 3D ////////////////////////////////////////////////////////////////////////////////// //NOW, DEFINE THE ARRAY Cell. EACH CELL IS REPRESENTED BY 4, X,Y,empty,Z INTEGER NUMBERS. //EXTEND PTCOMPONENTNB IF YOU WANT TO DESCRIBE THE CELL WITH MORE NUMBERS //int (*Cell)[PTCOMPONENTNB]; //Cell = new int[iBackgroundPtNb][PTCOMPONENTNB]; double (*Cell)[PTCOMPONENTNB]; Cell = new double[iBackgroundPtNb3D][PTCOMPONENTNB]; //CONSTRUCT THE CELLS for (i=SHIFT; i<XDim-SHIFT;i++){ for (j=SHIFT; j<YDim-SHIFT;j++) { for (z=SHIFT; z<ZDim-SHIFT;z++) { Cell[iPtNb3D][0]=(1.0*i)/XDim; Revision: 128 IV-174/206 18/12/2013 CORE MANUAL Cell[iPtNb3D][1]=(1.0*j)/YDim; Cell[iPtNb3D][2]=-1; //DEFAULT:EMPTY; Cell[iPtNb3D][3]=(1.0*z)/ZDim; }}} //CHECK THAT YOU CAN GENERATE THE NUMBER OF REQUESTED OBJECTS IN THE PLAYGROUND //%%%%%%%%%%%%%%%%%%%%%%%%%%%%%%%%%%%%%%%%%%%%%%%%%%%%%%%%%%%%%%%%%%%%%%%%%%%%%%% //STEP 2: FILL UP THE BACKGROUND WITH OBJECTS (AGENTS ) int iShift=0; for (i=0; i<AGENTTYPENB;i++) { if (iAgentGenMode[i]==0) { for (j=0;j<iAgentNb[i];j++) { Cell[iShift+j][2]=i; } iShift=iShift+iAgentNb[i]; } } int iTotalObjectNb=iShift; //%%%%%%%%%%%%%%%%%%%%%%%%%%%%%%%%%%%%%%%%%%%%%%%%%%%%%%%%%%%%%%%%%%%%%%%%%%%%%%% //STEP 3: REDISTRIBUTE RANDOMLY THE CELLS WHICH REPRESENT BACKGROUND 3D POINTS //IN THE Cell ARRAY for (i=0;i<iBackgroundPtNb3D;i++) { int iRan1 = rand(); int iRan2 = rand(); iRan = (iRan1*RAND_MAX+iRan2) % iBackgroundPtNb3D ; iProviType= (int) Cell[iRan][2]; Cell[iRan][2]=Cell[i][2]; Cell[i][2]=iProviType; } //%%%%%%%%%%%%%%%%%%%%%%%%%%%%%%%%%%%%%%%%%%%%%%%%%%%%%%%%%%%%%%%%%%%%%%%%%%%%%%% //STEP4: DEFINE THE ARRAYS AgentCell 3D for (i=0;i<AGENTTYPENB;i++) { if (iAgentGenMode[i]==0) { //IMPORTANT!!! if (AgentCell[i]!=NULL) delete AgentCell[i]; AgentCell[i] = new CPointEx[iAgentNb[i]]; for (j=0;j<iAgentNb[i];j++) { AgentCell[i][j].x=0; AgentCell[i][j].y=0; AgentCell[i][j].z=0; }}} //%%%%%%%%%%%%%%%%%%%%%%%%%%%%%%%%%%%%%%%%%%%%%%%%%%%%%%%%%%%%%%%%%%%%%%%%%%%%%%% //STEP5: TRANSFERT POINTS POSITION AND TYPE TO THE NEW ARRAYS int Position[AGENTTYPENB+1]; for (i=0;i<AGENTTYPENB+1;i++) Position[i]=0; for (i=0;i<iBackgroundPtNb3D;i++) { //data prepared for 3D now be painted by CBackground::InvertObjects if (Cell[i][2]>-1) { if (Cell[i][2]<AGENTTYPENB) { AgentCell[(int)Cell[i][2]][Position[(int)Cell[i][2]]].x=Cell[i][0]; AgentCell[(int)Cell[i][2]][Position[(int)Cell[i][2]]].y=Cell[i][1]; AgentCell[(int)Cell[i][2]][Position[(int)Cell[i][2]]].z=Cell[i][3]; } Position[(int)Cell[i][2]]=Position[(int)Cell[i][2]]+1; } } } Script 24: Code of the function CBackground::FillOusideObjects_3D Revision: 128 IV-175/206 18/12/2013 CORE MANUAL In step 2 of the script there is a iAgentGenMode variable responsible for generation mode of agents. The generation mechanism is in STEP5. The already generated Z position is copied to AgentCell array of the background. B.3 Changes to ActionCycle of the Agent void ActionMode (COREDATA *pData, AGENT* pAgent, short(*LookUpTable[AGENTTYPENB])[2]) ///////////////////////////////////////////////////////////////////////////////////////// // HISTORY: Version 1: November 2003, AUTHOR: Julien ALBURQUERQUE // // INFORMATION: // THIS FUNCTION REALISE ACTIONS OF THE AGENT WHICH HAS THE SMALLEST NAT // // CODE PREVIOUSLY INCLUDED IN MainTestAsynchronous AND MOVE IN THIS FUNCTION // FOR MORE LIGIBILITY ///////////////////////////////////////////////////////////////////////////////////////// { short XDim=pData->XDim; //NB OF CELL IN THE X DIRECTION short YDim=pData->YDim; //NB OF CELL IN THE Y DIRECTION short ZDim=pData->ZDim; //3D, CODE AJOUTE PAR JWOJCIECHOWSKI if (ZDim==1 && pAgent->Z!=0 ){ pAgent->Z=0; ::MessageBox(NULL,"WARNING Z IS INCORRECT!","FROM MAINAsynchronous.cpp",MB_OK); } //SIZE OF THE DIAGONAL OF THE PLAN int Diagonal=(int) sqrt((float)(pData->XDim*pData->XDim+pData->YDim*pData->YDim)); int iType=pAgent->iAType; int iRank=pAgent->iRank; if (pAgent->AgentMode=='A') { //AGENT IS ACTIVE if(ZDim==1){//only for 2D pAgent->BreakClosedLoop(); } ...... ...... ...... //UPDATE CELL STATE: REMEMBER THAT IN THE ASCII TABLE, CHAR(49)='1' pData->Cell[pAgent->Z*XDim*YDim+pAgent->X*YDim+pAgent>Y].State[0]=CHAR(49+iType); //JWOJCIECHOWSKI pData->Cell[pAgent->Z*XDim*YDim+pAgent->X*YDim+pAgent->Y].iRank=iRank; } for (int i=ITERATNB-1;i>0;i--) { pAgent->ActionTime[i] = pAgent->ActionTime[i-1]; } // UPDATE NEXT ACTION TIME (NAT) pAgent->ActionTime[0] = pAgent->ActionTime[0] + pAgent->DActionTime; } Script 25: Code of the function void ActionMode () Revision: 128 IV-176/206 18/12/2013 CORE MANUAL B.4 Changes to generate the obstacles on the borders of the 3D playground The function BuildBorder2_3D is executed in the function void CParamSheet:: ReBuildOstaclePopulation(). The sequence is as follows: OnBar1Start(), then SaveAndRebuildALL(), then ReBuildOstaclePopulation(), then BuildBorder2_3D() void CParamSheet::ReBuildOstaclePopulation() ///////////////////////////////////////////////////////////////////////////////////////// ///////////////////////////////////////////////////////////////////////////////////////// { CAGNTView* GetActiveView1(); CAGNTView* pView=GetActiveView1(); int i; COREDATA* pData=&pView->ThreadData; ///////////////////////////////////////////////////////////////////////// ......... ......... //---------------------------------------------------------------------------------------//INITIALIZATION OF POPULATIONS OF OBSTACLE1 if(pView->ThreadData.ZDim==1){ BuildBorder2(pData->Cell,pData->XDim,pData->YDim, pData->bXtorusMode,pData->bYtorusMode); }else if (pView->ThreadData.ZDim>1){ BuildBorder2_3D(pData->Cell,pData->XDim,pData->YDim,pData->ZDim, pData->bXtorusMode,pData->bYtorusMode,pData->bZtorusMode); } } Script 26: Code of the function CParamSheet::ReBuildOstaclePopulation() void BuildBorder2_3D(CELL* Cell, //OCCUPATION STATE OF ALL CELLS IN THE GRID short XDim, //NUMBER OF CELLS IN THE X DIRECTION short YDim, //NUMBER OF CELLS IN THE Y DIRECTION short ZDim, bool bXtorus, //bXTorus=true -> NO X BORDER bool bYtorus, //byTorus=true -> NO Y BORDER bool bZtorus) ///////////////////////////////////////////////////////////////////////////// // THE BORDER LIMITS ARE DEFINED BY OBSTACLES // ///////////////////////////////////////////////////////////////////////////// { int i; if (bXtorus==false) for (i=0;i<XDim;i++) //ADD OBSTACLES TO BUILD THE BORDER { for(int k=0;k<ZDim;k++){ Cell[k*XDim*YDim+i*YDim].State[0]='O'; Cell[k*XDim*YDim+i*YDim+YDim-1].State[0]='O'; } } if (bYtorus==false) for (i=0;i<YDim;i++) //ADD OBSTACLES TO BUILD THE BORDER { for(int k=0;k<ZDim;k++){ Cell[k*XDim*YDim+i].State[0]='O'; Cell[k*XDim*YDim+(XDim-1)*YDim+i].State[0]='O'; } } if (bZtorus==false) for (i=0;i<XDim;i++) //ADD OBSTACLES TO BUILD THE BORDER { for(int j=0;j<YDim;j++){ Revision: 128 IV-177/206 18/12/2013 CORE MANUAL Cell[i*YDim+j].State[0]='O';//+j Cell[(ZDim-1)*XDim*YDim+i*YDim+j].State[0]='O'; } } } Script 27: Code of the function BuildBorder2_3D B.5 B5.1 Changes to paint the initial agent populations Generalities The class CXDraft displays the initial populations of agents constructed from the scenario (see the class description in the section entitled Population initialization: DRAFT page 100). Recall that in the current version, 3D scenarios contain no obstacles (thus, also no rectangle, no line, no ellipsis) so that the sole used graphical object of the CXDraft class is the background. We have not developed a sophisticated 3D display of the agent populations. In this version, we use the CXDraft class to paint the agents located in a plane. For instance, we may paint the agent in a plane perpendicular to the Z direction. We call such a plane a XY plane. To identify a XY plane, we simply specify its Z coordinate that we call the plane index. The plane index is identified by the integer variable iPlaneIndex. This approach is transposed for the planes parallel to the YZ or ZX directions. In all cases, to select a plane, we must define the plane index iPlaneIndex, (i.e., the coordinate in the direction perpendicular to the plane) and the plane direction. B5.2 Selection of the plane and interface modification The plane selection is executed by means of the new dialog box displayed in Fig. 63, which is an extension of the interface of MASS for 3D scenarios. Moreover, a new bottom with this icon has been added in the left-toobar to activate this box. Fig. 63: New dialog box to select the painting plane in the 3D case The controls in this dialog box allows the user to setup the plane direction and the plane index which are member variables of the COREDATA structure. Explicitly: Revision: 128 IV-178/206 18/12/2013 CORE MANUAL ThreadData.iWhichPlane2D is defined with the possible values 0,1 or 2 respectively for XY, XZ, or ZY planes. ThreadData.iPlaneIndex is defined in the range 1iPlaneIndexXDim. Unfortunately, there a small issue because positions are defined with continuous coordinates in the CXDraft class. Thus, we derive a double type index dLevel to get the plane index in the background of the CXDraft. This is a simple proportionality expression. For planes parallel to XY, YZ or ZX, we define dLevel respectively as: double dLevel= (1.0*IPlaneIndex-1)/ZDim; dLevel= (1.0*IPlaneIndex-1)/XDim dLevel= (1.0*IPlaneIndex-1)/YDim And for absolute coordinate the iLevel is regular number from 3DDlgBox: int iLevel=ThreadData.iLevNbToPaint2D-1; //with the borders The dialog box allows the user to change the plane direction and the levels of plains to be painted by manipulating the variables in COREDATA : short iPlaneIndex; short iWhichPlane2D;. The data are changed by user interface controls. iPlaneIndex is denoting which level of one of three plains to paint in the 2D graph and iWhichPlane2D is denoting which plain to show. The dialog box shown in Fig. 63 is associated to the class CDlg3DBox, the header of which is displayed below. class CDlg3DBox : public CDialog {… public: CString s_XDIM; CString s_YDIM; CString s_ZDIM; int m_iCurrentLevel; CString m_sCurrentPlain; CComboBox m_comboPlane; CNumSpinCtrl m_Spin1_current_level; HWND ParenthWnd; … } Script 28: Header of the class CDlg3DBox This box is a member variable of the MFC class AGNTView and consequently declared as follows in the header AGNTView.h: CDlg3DBox* m_pDlg3DBox;//POINTER TO THE BOX WHEN 3D SPACE IS USED FOR //SIMULATIONS, I.E., WHEN ZDIM>1 Note that the pointer m_pDlg3DBox MUST be initialized to NULL in the constructor CAGNTView::CAGNTView(). This initialization is very important to stability of MFC applications. When you click the button splashes the CDlg3DBox. : in the left toolbar, the core executes te following function which void CMainFrame::OnSelect3DBox() { ////////////////////////////////////////////////////////////////////////////// / //CODE ADDED BY JWOJCIECHOWSKI. TO PROCESS THE MENU ITEM WINDOW, 3D options Revision: 128 IV-179/206 18/12/2013 CORE MANUAL ////////////////////////////////////////////////////////////////////////////// / CAGNTView* pView = GetActiveView1(); if (pView != NULL ) { if(pView->m_pDlg3DBox==NULL){ pView->m_pDlg3DBox=new CDlg3DBox(this); pView->m_pDlg3DBox->Create(IDD_DLG_3DBOX,this); } pView->m_pDlg3DBox->ShowWindow(SW_NORMAL); pView->m_pDlg3DBox->Invalidate(); } } Script 29: New function to activate the CDlg3DBox The code below checks whether ZDim is larger than 1 to activate this button. Indeed this button must not be activated when the scenario is a 2D scenario. void CMainFrame::OnUpdateSelect3DBox(CCmdUI* pCmdUI) /////////////////////////////////////////////////////////////////////////////// //CODE ADDED BY JWOJCIECHOWSKI. TO PROCESS THE MENU ITEM WINDOW, 3D options /////////////////////////////////////////////////////////////////////////////// { CMDIChildWnd* pActive= MDIGetActive(NULL); if (pActive==NULL) return; //if there will not be the check for MDIGetActive then it MASS crashes CAGNTView* pView = GetActiveView1(); if (pView->ThreadData.ZDim>1){ pCmdUI->Enable(TRUE); //ENABLE THE BUTTON pCmdUI->SetCheck(0); } else { pCmdUI->SetCheck(0); //UNCHECK BUTTON IN TOOL BAR pCmdUI->Enable(FALSE);//DISABLE THE BUTTON BECAUSE NO WINDOW } } Script 30: Modifications in the function CAGNTView::OnPaint() Changing the plane orientation controls updates "immediately" the data in the shared structure Threaddata. The code is in the dialog class CDlg3DBox.cpp. void CDlg3DBox::OnCbnSelchangeComboWhichplain() { ............ CAGNTView* GetActiveView1(); //PROTOTYPE CAGNTView* pView=GetActiveView1(); CString str; int iPrior=m_comboPlane.GetCurSel(); if (iPrior==0) { str.Format("XY",NULL); CString tmp; tmp.Format("%d",pView->ThreadData.XDim); s_XDIM=tmp; tmp.Format("%d",pView->ThreadData.YDim); s_YDIM=tmp; tmp.Format("%d",pView->ThreadData.ZDim); s_ZDIM=tmp; pView->ThreadData.iPlaneIndex=1; pView->ThreadData.iWhichPlane2D=0; m_Spin1_current_level.SetDecimalPlaces (0); m_Spin1_current_level.SetTrimTrailingZeros (FALSE); m_Spin1_current_level.SetRangeAndDelta (1,pView->ThreadData.ZDim,1); m_Spin1_current_level.SetPos(1); Revision: 128 IV-180/206 18/12/2013 CORE MANUAL m_comboPlane.SetCurSel(0);//XY plane m_sCurrentPlain="XY"; m_sCP="Z="; ............ } } Script 31: Modifications in the function CAGNTView::OnPaint() The spin control uses the CNumSpinCtrl class with AutoBuddy behavior property set to True. This property selects the previous control value when the action of the spin is triggered. In the code spin control changes the m_iCurrentLevel edit box which triggers the execution of void CDlg3DBox::OnEnChangeEdit1m_iCurrentLevel(): void CDlg3DBox::OnEnChangeEdit1m_iCurrentLevel() { int pos=m_Spin1_current_level.GetPos(); m_iCurrentLevel=pos; CAGNTView* GetActiveView1(); CAGNTView* pView=GetActiveView1(); //PROTOTYPE pView->ThreadData.iPlaneIndex=m_iCurrentLevel; pView->Invalidate(); ............ } Script 32: Modifications in the function CAGNTView::OnPaint() B5.3 Painting the agents in draft in a plane The next function CBackground::InvertObjects_3D (in the file Background.cpp) paints the agents generated by the function CBackground::FillOusideObjects_3D. in the plane selected by the plane selection dialog box. void CBackground::InvertObjects_3D(CDC* pDC, RECT rect, //PARENT RECTANGLE int XDim, //PLAYGROUND X DIMENSION int YDim, //PLAYGROUND Y DIMENSION int ZDim, short iPlaneIndex, short iWhichPlane2D, COLORREF* color) ////////////////////////////////////////////////////////////////////////////////// //HISTORY: VERSION 1.0 MAY 2009, BY J JWOJCIECHOWSKI //3D SLICES XY,XZ,ZY PAINTING IN 2D PLAIN DRAFT ////////////////////////////////////////////////////////////////////////////////// { ................ ................ if(iWhichPlane2D==0){//XY dLevel=((1.0*IPlaneIndex-1)/ZDim); if(AgentCell[i][j].z==dLevel) ................ }else if(iWhichPlane2D==1){//XZ if(b_show_alllayers==true){ Arect.left= Round(XFactor*AgentCell[i][j].x)-AgentSize/2; Arect.top= Round(YFactor*AgentCell[i][j].y)-AgentSize/2; Arect.right= Round(XFactor*AgentCell[i][j].x)+ AgentSize/2+AgentSize%2; Arect.bottom= Round(YFactor*AgentCell[i][j].y)+ Revision: 128 IV-181/206 18/12/2013 CORE MANUAL AgentSize/2+AgentSize%2; pDC->Rectangle(&Arect); itmpNb++; }else{ ................ dLevel=((1.0*IPlaneIndex-1)/YDim); if(AgentCell[i][j].y==dLevel){ ................ }else if(iWhichPlane2D==2){//ZY ................ dLevel=((1.0*IPlaneIndex-1)/XDim); if(AgentCell[i][j].x==dLevel) { Arect.left=Round(XFactor*AgentCell[i][j].z)-AgentSize/2; Arect.top= Round(YFactor*AgentCell[i][j].y)-AgentSize/2; Arect.right=Round(XFactor*AgentCell[i][j].z)+AgentSize/2+AgentSize%2; Arect.bottom= Round(YFactor*AgentCell[i][j].y)+AgentSize/2+AgentSize%2; pDC->Rectangle(&Arect);// PAINTING FUNCTION } ................ ................ Script 33: Modifications in the function CBackground::InvertObjects_3D C Changes to paint agents during simulations Painting periodically the agents is also necessary during a simulation. However, agents are no more painted by the CXDraft class. When the user starts a simulation (for instance when he (she) clicks the button RUN in the bottom toolbar of MASS application window), the function void InitAgentFromDraft displayed below converts the relative position of agents defined in the CXDraft class to absolute coordinates in the terrain. New code needed for the Z dimension is highlighted with grey background. void InitAgentFromDraft_3D(CELL* Cell,short XDim,short YDim, short ZDim, AGENT* Agent[AGENTTYPENB],short iInitNb[AGENTTYPENB], short iMaxNb[AGENTTYPENB], CXDraft* pTWnd) ///////////////////////////////////////////////////////////////////////////////////// //// // // HISTORY: Version 1: MAY 2009, AUTHOR: Jarek Wojciechowski ///////////////////////////////////////////////////////////////////////////////////// //// { //::MessageBox(NULL,"OK HERE","",MB_OK); int i=0, j=0, k=0, iSHIFT=0; int iANb=0; int XCoord, YCoord,ZCoord; for (i=0;i<AGENTTYPENB;i++) { iSHIFT=0; /////////////////3D for (k=0;k<pTWnd->m_Background.iAgentNb[i];k++) { //SCAN ALL POINTS IN BACKGROUND XCoord= (int) (XDim*pTWnd->m_Background.AgentCell[i][k].x); YCoord= (int) (YDim*pTWnd->m_Background.AgentCell[i][k].y); Revision: 128 IV-182/206 18/12/2013 CORE MANUAL ZCoord= (int) (ZDim*pTWnd->m_Background.AgentCell[i][k].z); //REMEMBER THAT IN THE ASCII TABLE CHAR(49)='1' Cell[ZCoord*XDim*YDim+XCoord*YDim+YCoord].State[0]=CHAR(49+i); Cell[ZCoord*XDim*YDim+XCoord*YDim+YCoord].iRank=iSHIFT; Agent[i][iSHIFT].X=XCoord; Agent[i][iSHIFT].Y=YCoord; Agent[i][iSHIFT].Z=ZCoord; Agent[i][iSHIFT].AgentMode='A'; ///////////////////////////////////////////////////////////////////////// //DEFINE INITIAL AGENT MOVE DIRECTION Agent[i][iSHIFT].ShiftX[0]=rand()%3-1; Agent[i][iSHIFT].ShiftY[0]=rand()%3-1; Agent[i][iSHIFT].ShiftZ[0]=rand()%3-1; ///////////////////////////////////////////////////////////////////////// iSHIFT=iSHIFT+1; } ///////////////////////////////////////////////////////////////////////////////// // INITIALIZATION OF INACTIVE AGENTS IF iInitNb<iMaxNb. A SIMPLE TRICK TO // INITIALIZE THE WHOLE ARRAY for (j=iInitNb[i];j<iMaxNb[i];j++) { Agent[i][j].X=0; Agent[i][j].Y=0; Agent[i][j].Z=0; Agent[i][j].AgentMode='D'; } ///////////////////////////////////////////////////////////////////////////////// } } Script 34: Modifications in the function InitAgentFromDraft() Painting of the terrain is executed periodically by the member function CAGNTView::OnPaint(). As shown below, we integrated in this function a branch to separate the new 3D code from the existing one to preserve the ascending compatibility and to make that any hypothetical fault in the new code could no perturbate the operation of MASS for 2D applications. void CAGNTView::OnPaint(){ ................ //code ajoute par JWOJCIECHOWSKI CAGNTView* GetActiveView1(); //PROTOTYPE CAGNTView* pView=GetActiveView1(); if(pView->ThreadData.ZDim==1){ DrawAgents(&dc1,1); }else if (pView->ThreadData.ZDim>1){ DrawAgents_3D(&dc1,1); } ................ } Script 35: Modifications in the function CAGNTView::OnPaint() Revision: 128 IV-183/206 18/12/2013 CORE MANUAL The code shows that 3D painting of agents at runtime is executed by the function CAGNTView::DrawAgents_3D. We follow the approach already described in section B.5 page 178 for painting the agent populations when a scenario is selected. Consequently, we paint the agents located in a plane, possibly a XY or YZ or ZX plane. In all cases, we must define the plane index iLevel, i.e., the coordinate in the direction perpendicular to the plane. The iLevel variable selects the agent to be painted from appropriate level. It addresses the integer coordinates. iLevel is decreased by one to address the agents in array indexed started with 0 to less than XDIM or YDIM or ZDIM. ThreadData.iWhichPlane2D variable selects the appropriate plain to be painted. The value is set to 0,1 or 2 respectively of XY,XZ,ZY plain. ThreadData.iPlaneIndex and ThreadData.iWhichPlane2D are changed by controls of CDlg3DBox dialog described in D.2. void CAGNTView::DrawAgents_3D(CDC* dc, int iter) … //////////////////////////////////////////////////////////////////////////////// // //DRAW NEW POSITION int iLevel=ThreadData.iPlaneIndex-1; bool b_show_alllayers=ThreadData.b_show_alllayers; … dc->SelectObject(APen); //code to paint the slices in XZ and ZY plains if(ThreadData.iWhichPlane2D==0){//XY Xpos=Round(1.0*ThreadData.Agent[i][j].X*(rect.right-rect.left)/(ThreadData.XDim1)); Ypos=Round(1.0*ThreadData.Agent[i][j].Y*(rect.bottom-rect.top)/(ThreadData.YDim1)); Zpos=Round(1.0*ThreadData.Agent[i][j].Z); //*(rect.bottom-rect.top)/(ThreadData.ZDim-1)); if(b_show_alllayers==true){//PAINTING ALL 3D AGENTS IN PLAIN DrawShape(dc,ThreadData.Agent[i][j].iShape,Xpos,Ypos,iRectSide); itmpNb++; }else{ if(Zpos==iLevel){ DrawShape(dc,ThreadData.Agent[i][j].iShape,Xpos,Ypos,iRectSide); … } } }else if(ThreadData.iWhichPlane2D==1){//XZ Xpos=Round(1.0*ThreadData.Agent[i][j].X*(rect.right-rect.left)/(ThreadData.XDim1)); Ypos=Round(1.0*ThreadData.Agent[i][j].Y); Zpos=Round(1.0*ThreadData.Agent[i][j].Z*(rect.bottom-rect.top)/(ThreadData.ZDim1)); if(b_show_alllayers==true){ DrawShape(dc,ThreadData.Agent[i][j].iShape,Xpos,Zpos,iRectSide); itmpNb++; }else{ if(Ypos==iLevel){ DrawShape(dc,ThreadData.Agent[i][j].iShape,Xpos,Zpos,iRectSide); … } } }else if(ThreadData.iWhichPlane2D==2){//ZY Xpos=Round(1.0*ThreadData.Agent[i][j].X)*1;//; Revision: 128 IV-184/206 18/12/2013 CORE MANUAL Ypos=Round(1.0*ThreadData.Agent[i][j].Y*(rect.bottom-rect.top)/(ThreadData.YDim1)); Zpos=Round(1.0*ThreadData.Agent[i][j].Z*(rect.right-rect.left)/(ThreadData.ZDim1)); if(b_show_alllayers==true){ DrawShape(dc,ThreadData.Agent[i][j].iShape,Zpos,Ypos,iRectSide); itmpNb++; }else{ if(Xpos==iLevel){ DrawShape(dc,ThreadData.Agent[i][j].iShape,Zpos,Ypos,iRectSide); … } } }delete ABrush;delete APen; } } //////////////////////////// //WORKING, CORRECT CODE TO PAINT HIDDEN OBSTACLES AROUND THE 3D PLAYGROUND //USED ONLY FOR TESTING THE MEMORY CBrush* ABrush = new CBrush(RGB(0,0,0)); //PROVISORY COLOR FOR BLACK OBSTACLES CPen* penCur = new CPen(PS_NULL,1,RGB(0,0,0)); dc->SelectObject(ABrush); dc->SelectObject(penCur); dc->SetROP2(R2_NOTXORPEN); if(ThreadData.iWhichPlane2D==0){//XY //iLevel is for Z; int i; if (ThreadData.bXtorusMode==false) for (i=0;i<ThreadData.XDim;i++) //ADD OBSTACLES TO BUILD THE BORDER { //Cell[iLevel*XDim*YDim+i*YDim].State[0]='O'; //Cell[iLevel*XDim*YDim+i*YDim+YDim-1].State[0]='O'; //checking only Y always 0 or max char EndState=ThreadData.Cell[(iLevel)*ThreadData.XDim*ThreadData.YDim +i*ThreadData.YDim + 0].State[0]; if (EndState=='O') { dc->Rectangle( (i*(rect.right-rect.left)/(ThreadData.XDim-1))-iRectSide/2, 0-iRectSide/2, (i*(rect.right-rect.left)/(ThreadData.XDim1))+iRectSide/2+iRectSide%2, 0+iRectSide/2+iRectSide%2); } EndState=ThreadData.Cell[(iLevel)*ThreadData.XDim*ThreadData.YDim +i*ThreadData.YDim + ThreadData.YDim-1].State[0]; if (EndState=='O') { dc->Rectangle( (i*(rect.right-rect.left)/(ThreadData.XDim-1))-iRectSide/2, ((ThreadData.YDim-1)*(rect.bottom-rect.top)/(ThreadData.YDim-1))iRectSide/2, (i*(rect.right-rect.left)/(ThreadData.XDim1))+iRectSide/2+iRectSide%2, ((ThreadData.YDim-1)*(rect.bottom-rect.top)/ (ThreadData.YDim-1))+iRectSide/2+iRectSide%2); } } if (ThreadData.bYtorusMode==false) for (i=0;i<ThreadData.YDim;i++) //ADD OBSTACLES TO BUILD THE BORDER Revision: 128 IV-185/206 18/12/2013 CORE MANUAL { char EndState=ThreadData.Cell[(iLevel)* ThreadData.XDim*ThreadData.YDim+ 0+ i].State[0]; if (EndState=='O') { dc->Rectangle( 0-iRectSide/2, (i*(rect.right-rect.left)/(ThreadData.YDim-1))-iRectSide/2, 0+iRectSide/2+iRectSide%2, (i*(rect.right-rect.left)/ (ThreadData.YDim-1))+iRectSide/2+iRectSide%2); } EndState=ThreadData.Cell[(iLevel)*ThreadData.XDim*ThreadData.YDim +(ThreadData.XDim-1)*ThreadData.YDim+i].State[0]; if (EndState=='O') { dc->Rectangle( ((ThreadData.XDim-1)*(rect.right-rect.left)/ (ThreadData.XDim-1))-iRectSide/2, (i*(rect.right-rect.left)/(ThreadData.YDim-1))-iRectSide/2, ((ThreadData.XDim-1)*(rect.right-rect.left)/ (ThreadData.XDim-1))+iRectSide/2+iRectSide%2, (i*(rect.right-rect.left)/ (ThreadData.YDim-1))+iRectSide/2+iRectSide%2 ); } } //if iLevel from Z MIN to MAX if (ThreadData.bZtorusMode==false) for (i=0;i<ThreadData.XDim;i++) //ADD OBSTACLES TO BUILD THE BORDER { for(int j=0;j<ThreadData.YDim;j++){ // Cell[i*YDim+j].State[0]='O';//+j // Cell[(ZDim-1)*XDim*YDim+i*YDim+j].State[0]='O'; char EndState=ThreadData.Cell[(iLevel)* ThreadData.XDim*ThreadData.YDim+i*ThreadData.YDim +j].State[0]; if (EndState=='O') { dc->Rectangle( (i*(rect.right-rect.left)/(ThreadData.XDim-1))-iRectSide/2, (j*(rect.right-rect.left)/(ThreadData.YDim-1))-iRectSide/2, (i*(rect.right-rect.left)/(ThreadData.XDim1))+iRectSide/2+iRectSide%2, (j*(rect.right-rect.left)/(ThreadData.YDim1))+iRectSide/2+iRectSide%2); } } } // }// }//XY plain delete ABrush; delete penCur; Script 36: Modifications in the function CAGNTView::DrawAgents_3D() Revision: 128 IV-186/206 18/12/2013 CORE MANUAL D Interface Changes D.1 Modification to the parameter page The Z dimension of background space and Z torus mode may be changed with Menu->param dialog. Saving the settings to the registry is done in CParamSheet::OnStoreInRegistries ParamSheet.cpp - Fig. 64: Figure of param1 dialog graphics interface LRESULT CParamSheet::OnStoreInRegistries(WPARAM wParam,LPARAM lParam) { ............ //STORE PAGE1 SETTINGS AS DEFAULT PARAMETERS AfxGetApp()->WriteProfileInt("PROP PAGE1","XDim",m_Page1.XDim); AfxGetApp()->WriteProfileInt("PROP PAGE1","YDim",m_Page1.YDim); AfxGetApp()->WriteProfileInt("PROP PAGE1","ZDim",m_Page1.ZDim); … if (m_Page1.bZTorusMode==TRUE) AfxGetApp()->WriteProfileInt("PROP PAGE1","bZTorusMode",1); else AfxGetApp()->WriteProfileInt("PROP PAGE1","bZTorusMode",0); ............ etc ... } Script 37: Modifications in the function CParamSheet::OnStoreInRegistries () The changes to parameter page when the Dlg3DBox is open results in changing on line the Dlg3DBox controls what is presented in the code below. Revision: 128 IV-187/206 18/12/2013 CORE MANUAL void CParamSheet::TransferPage1ParametersToCOREDATA() ///////////////////////////////////////////////////////////////////////////////////// //// // AUTHOR: JHC // HISTORY: VERSION 1: JAN 2003 // 2: JWOJCIECHOWSKI JUNE 2009 // // INFORMATION: // CODE WRITTEN TO BE AUTOSCALABLE VERSUS THE NUMBER OF AGENTS! THIS FUNCTION IS CALLED // PRIO TO RUNNING A SIMULATION TO COPY THE AGENT PARAMETERS IN CParamSheet TO // CView.ThreadData ///////////////////////////////////////////////////////////////////////////////////// //// { if (m_Page1.m_hWnd==NULL) return; ///////////////////////////////////////////////////////////////////////// int i,j,k; CAGNTView* GetActiveView1(); //PROTOTYPE CAGNTView* pView=GetActiveView1(); COREDATA* pData=&pView->ThreadData; ///////////////////////////////////////////////////////////////////////// m_Page1.UpdateData(TRUE); pData->XDim=(short) m_Page1.XDim; pData->YDim=(short) m_Page1.YDim; pData->ZDim=(short) m_Page1.ZDim; //UPDATE OF m_pDlg3DBox IF IT IS AVAILABLE if (pView != NULL ) { if(pView->m_pDlg3DBox!=NULL){ CString tmp; tmp.Format("%d",pData->XDim); pView->m_pDlg3DBox->s_XDIM=tmp; tmp.Format("%d",pData->YDim); pView->m_pDlg3DBox->s_YDIM=tmp; tmp.Format("%d",pData->ZDim); pView->m_pDlg3DBox->s_ZDIM=tmp; OPEN int ioldpos=pView->m_pDlg3DBox->m_Spin1_current_level.GetPos(); pView->m_pDlg3DBox->m_Spin1_current_level.SetDecimalPlaces (0); pView->m_pDlg3DBox->m_Spin1_current_level.SetTrimTrailingZeros (FALSE); pView->m_pDlg3DBox->m_Spin1_current_level.SetRangeAndDelta (1,pData>ZDim,1); if(ioldpos<pData->ZDim) { pView->m_pDlg3DBox->m_Spin1_current_level.SetPos(ioldpos); }else{ pView->m_pDlg3DBox->m_Spin1_current_level.SetPos(1); } pView->m_pDlg3DBox->UpdateData(0); pView->m_pDlg3DBox->Invalidate(); } } //THE PLAYGROUND IS A RECTANGULAR ARRAY OF CELLS //GENERATION AND DEFAULT INTIALIZATION OF THE GRID. POSSIBLE STATES FOR CELL: // 'E': EMPTY, 'O': OBSTACLE, '1': AGENT OF TYPE 1, '2': AGENT OF TYPE 2 Revision: 128 IV-188/206 18/12/2013 CORE MANUAL delete [] pView->ThreadData.Cell; pData->Cell= new CELL[m_Page1.XDim*m_Page1.YDim*m_Page1.ZDim]; int itmp=0; for (i=0;i<m_Page1.XDim;i++){ for (j=0;j<m_Page1.YDim;j++){ for (k=0;k<m_Page1.ZDim;k++){ pData>Cell[k*m_Page1.XDim*m_Page1.YDim+i*m_Page1.YDim+j].State[0]='E'; itmp++; }}} … ///////////////////////////////////////////////////////////////////////// pData->ScreenShotPeriod=m_Page1.ScreenShotPeriod; m_bSynchronous=m_Page1.bSynchronous; pData->bSynchronous=m_bSynchronous; ///////////////////////////////////////////////////////////////////////// } Script 38: Modifications in the function CParamSheet::TransferPage1ParametersToCOREDATA () E Modifications of DLLs E1.1 Modifications of skeleton methods of DLLs There are 26 DLLs missions projects, the methods of which had been changed to meet the declared signature methods in Agent.h. MASS VC9_3D_cvs\DLLs\ <DIR> A0 with Com <DIR> Aym Default for A0 <DIR> Aym Default for A1, A2, A3 <DIR> Default for A0 <DIR> Default for A1, A2, A3 <DIR> FleeA_AttackB version1 <DIR> LifeGame <DIR> Metastability1 for A0 <DIR> Minimum DLL <DIR> Repeater02 <DIR> Repeater06 <DIR> Repeater21 <DIR> StayClose <DIR> Terminal02 <DIR> Terminal06 <DIR> Terminal21 And the DLLs in tutorial directory: VC9_3D_cvs\TUTORIAL DLLs\ <DIR> Revision: 128 Energy for A0 IV-189/206 18/12/2013 CORE MANUAL <DIR> Energy for A0 with Com <DIR> FleeA_AttackB version2 <DIR> Move Alone_1 <DIR> Repeater01 <DIR> Repulsive_0 <DIR> Repulsive_1 <DIR> Several Station For A2 <DIR> Station For A2 <DIR> Terminal01 E.1.1.1 Registering the mangled names for DLLs functions In the file definition “.def” of each DLL there are registered mangled names for the member functions of the AGENT class. They are generated by the dumpbin.exe according to the procedure described in Appendix A1 of this manual. Below are presented the signatures of the new 3D ready methods implemented by DLLs. It should be stressed that adding another variable to the skeleton methods implemented by DLLs one should comment the actual definition of the mangled name for the changed function, compile the DLL, execute the procedure described in Appendix A1, paste the new mangled name to the definition file and compile. DllBuildSE = ?BuildEnvACTION@AGENT@@QAEHPAVCELL@@FFFQAPAV1@QAFPAVOBSTACLE@@F_N44@Z PRIVATE DllFindState = ?DllFindState@AGENT@@QAEXPAVCELL@@FFFQAPAV1@QAF_N33@Z FineAgentScan = ?DllFINEAgentScan@AGENT@@QAEXPAVCELL@@FFFQAPAV1@QAFPAVOBSTACLE@@F_N44@Z PRIVATE PRIVATE CoarseCellScan = ?DllCOARSECellScan@AGENT@@QAEXPAVCELL@@FFFQAPAV1@QAFPAVOBSTACLE@@F_N44PAY01FFF@Z PRIVATE CoarseAgentScan = ?DllCOARSEAgentScan@AGENT@@QAEXPAVCELL@@FFFQAPAV1@QAFPAVOBSTACLE@@F_N44@Z PRIVATE FineCellScanAction = ?ScanFINECellAction@AGENT@@QAEXPAVCELL@@FFFQAPAV1@QAFPAVOBSTACLE@@F_N44FF@Z PRIVATE FineCellScanNode = ?ScanFINECellNode@AGENT@@QAEXPAVCELL@@FFFQAPAV1@QAFPAVOBSTACLE@@F_N44FF@Z DllBuildSE_NODE = ?BuildEnvNODE@AGENT@@QAEHPAVCELL@@FFFQAPAV1@QAFPAVOBSTACLE@@F_N44@Z NodeScanOutBuf PRIVATE Revision: 128 PRIVATE PRIVATE = ?DllOutPolicy@NODE@@QAEXQAPAVAGENT@@QAFQAY04PAY03FQAY04F@Z IV-190/206 18/12/2013 CORE MANUAL Revision: 128 IV-191/206 18/12/2013 CORE MANUAL Chapter Chapter history: Version 1.0, June 2008 by JHC 11 MASS deployment This chapter describes the different operations necessary to generate the installation program deploying MASS on PCs at least operated under Win2000. We describe the utility Deployer.exe, which automates the procedure. The deployment is the final phase of the development which consists in generating the application entitled MASS_SetUp.exe, which installs the file system to run MASS.exe and to develop additional DLLs. All files involved in the deployment phase are in the directory MASS\INSTALLER as shown in Fig. 1 page 13. The contents of this directory is represented in the next figure. Note that the final file MASS_SetUp.exe is in MASS\INSTALLER\Output. INSTALLER Installer source InnoWebDoc.pdf isetup-3.0.6.exe istool-3.0.6.3.exe IsToolWebDoc.pdf Output The deployment of the application consists in writing a script compiled by Inno Setup, which is a free installer for Windows programs. The Script, entitled MASS.iss, is located in MASS\INSTALLER. Its development is greatly simplified with another freeware entitled IsTools. Both programs are stored in MASS\INSTALLER\Installer Source. However, the latest versions can be freely downloaded from the web sites: http://www.jrsoftware.org, and http://www.istool.org/. We assume in the following that both programs have been installed in the machine. MASS_Setup.exe MASS.iss Select a project a directory that contains a MASS project. For instance, let us assume for clarity that you selected the project in the directory D:\Projects03\MASS\April03. Copy all files of the selected project in the directory D:\Projects\MASS\TEMP. Remember that the project (including the CORE and all DLLs) is always developed in the Debug mode. Thus, it is safe to copy all project files in a new directory and to recompile it in the release mode. The development files are therefore not affected by the deployment process. Note that Fig. 65: Files and directories in the deployment procedure The procedure to create the final file MASS_SetUp.exe is a task, which is not complicated but long and tedious. Revision: 128 IV-192/206 18/12/2013 CORE MANUAL the directory TEMP is deleted at the end of the cycle. All following operations are executed in the temporary directory TEMP. Recompile the core solution (D:\Projects\MASS\TEMP\CORE\ Agnt.sln) in the release mode Recompile all DLLs projects (in the directories D:\Projects\MASS\ TEMP\DLLs and D:\Projects\MASS\TEMP\ TUTORIAL) in the release mode. Copy all DLLs output files (i.e., Default for A0.dll, Default for A1.dll, …) in D:\Projects\MASS\TEMP\CORE\ MissionLibrary. (In principle this operation is automatically executed when recompiling the DLLs). Copy default DLLs in D:\Projects\MASS\TEMP\CORE (as A0Mission.dll, A1Mission.dll, …). Run Inno Setup to compiler the setup string D:\Projects\MASS\ INSTALLER\MASS.iss. Delete D:\Projects\MASS\TEMP. The previous operations generate the installation D:\Projects\MASS\INSTALLER\Ouptput\MASS_Setup.exe. We developed the utility entitled Deployer.exe to automate all above operations. A file small Deployer.exe This application is located in . The frame window of Deployer.exe is shown in Fig. 66. Fig. 66 3 directories must be selected to run the program, namely: 1) The directory, which contains the development project of MASS. In the previous discussion, we considered D:\Projects03\MASS\April03. To select the directory click the button Set Revision: 128 IV-193/206 18/12/2013 CORE MANUAL Project Node. This operation fires the new tree window represented in Fig. 67. Simply select the directory containing the project that must used to generate the SetUp application. 2) The directory, which contains the development environment Visual.net. Simply click the left button "Set Top Visual Dir" to select this directory. This selection will be saved in the system registries and loaded on startup for the next runs of the program. 3) The directory, which contains the compiler Inno Setup. Simply click the left button "Inno SetUp Dir" to select this directory. This selection will be saved in the system registries and loaded on startup for the next runs of the program. Fig. 67 Revision: 128 IV-194/206 18/12/2013 CORE MANUAL Revision: 128 IV-195/206 18/12/2013 CORE MANUAL Chapter 12 Framework for a new chapter This chapter describes t… T B B.1 B1.1 he deployment is the final phase of the development which consists in generating the application entitled MASS_SetUp.exe, which installs the file system to run MASS.exe and to develop additional DLLs. All files involved in the deployment phase are in the directory MASS\INSTALLER as shown in Fig. 1 page 13. The contents of this directory is represented in the next figure. Note that the final file MASS_SetUp.exe is in MASS\INSTALLER\Output. Deterministic policies in the COARSE mode Predator policies Policy0: States in Policy0 are identical in the FINE and COARSE modes. They are described in the natural language in Erreur ! Source du renvoi introuvable.. Policy0 is a 3-State policy. The difference between Erreur ! Source du renvoi introuvable. and Erreur ! Source du renvoi introuvable. is that we do not use the same parameters to label the states. State Identification Signification State0 No prey, no predator detected inside the sense radius State1 No prey detected. Predators inside the sense radius State2 On (or several) prey(s) detected inside the sense radius detected Table 5: Set of States The FINE and COARSE modes store differently the environment. Revision: 128 IV-196/206 18/12/2013 CORE MANUAL The FINE mode stored the environment in the array FoundAgent[I][j][k] (see the declaration in the agent header). The COARSE mode stores the environment in the array COARSE_ENVIRONMENT COARSEEnviron[ITERATNB](see the declaration in the agent header). The The agent scans the surrounding cells and build a COARSE representation of the sectors in accordance with definition in paragraph A.1 page 127. Erreur ! Source du renvoi introuvable.-1 represents State0. Erreur ! Source du renvoi introuvable.-2 represents one example of state1.Erreur ! Source du renvoi introuvable. (from 3 to 6) (1) (2) (3) (4) (5) (6) Fig. 68: Examples of states; Green circle: predator; Red circles: preys Predator Cycle COARSE environment Cell Scan Mode Incremental Strategy 0 Identify Sector Containing the cell Yes START AGENT CYCLE Select New Cell No Is Construction completed? Construct Environment No IDENTIFY Environment STATE Is a prey detected? Yes No Preys & No predators detected No Preys but predators detected One or several Preys detected Move Alone Move Away Attack Fig. 69: Algorithm to construct the environment and choose a policy in the COARSE incremental mode, iPolicy0=0.. The execution is the following: COARSECellRingScan0 identifies the sector that contains any new cell and checks whether a prey is identified. If it is, the construction is aborted and an “Attack” action is undertaken. Revision: 128 IV-197/206 18/12/2013 CORE MANUAL B1.2 Policy 1 The construction of the COARSE environment is incremental and uses the Cell Scan Mode (CSM). Each iteration, the member function void AGENT::COARSECellScan0 executes the algorithm shown in Erreur ! Source du renvoi introuvable.. The agent stops the incremental construction when it finds a prey (condition 1) and when there is no partner in the same far sector (condition 2). Predator Cycle COARSE environment Cell Scan Mode Incremental Strategy 1 Is Construction completed? No Select New Cell Identify Sector Containing the cell Construct Environment Yes START AGENT CYCLE No Is a prey detected? IDENTIFY Environment STATE Yes Yes No Preys & No predators detected No Preys but predators detected Move Alone Move Away One or several No Preys detected Is a predator in the sector of the prey? Attack Fig. 70: Algorithm to construct the environment and choose a policy in the COARSE incremental mode, iPolicy0=1. Note the change with respect to Erreur ! Source du renvoi introuvable.. B1.3 Policy 2 The agent stops the scan when it finds a prey (condition 1) and there it is no partner in the same far sector (condition 2) and no partner in adjacent sectors (condtion 3).Because of the incremental construction, condition 2 makes that the construction stops if there is no partner between the prey and the agent. Condition 3 makes that the construction is stopped is there is a partner closer in an adjacent sector. Revision: 128 IV-198/206 18/12/2013 CORE MANUAL Predator Cycle COARSE environment Cell Scan Mode Incremental Strategy 2 Is Construction completed? No Select New Cell Identify Sector Containing the cell Construct Environment Yes START AGENT CYCLE No IDENTIFY Environment STATE Is a prey detected? Yes Yes Revision: 128 No Preys & No predators detected No Preys but predators detected Move Alone Move Away IV-199/206 One or several No Preys detected Is a predator in the sector of the prey and in adjacent sectors? Attack 18/12/2013 CORE MANUAL A1 Appendix: Dynamic call of member functions in DLLs History: New Version April 2012 JHC We analyze in details an example to show how calling dynamically member functions in a DLL. Let us consider that we wish to export the member function int AGENT::MyFunc(int Par1) from a DLL. The function is it declared in the AGENT header as __declspec(dllexport) int MyFunc(int Par1); and implemented in the DLL code, for instance as: __declspec(dllexport) int AGENT::MyFunc(int Par1) { float provi=sin(Par1); return (int) 10*provi/(provi+1); } So far, so good. Now, how to call this member function in the client application? The natural method consist in loading the DLL and retrieving the function address. Let us assume that DLL3.dll has been selected. The right code could be similar to the following lines: FIRST: ADD (ONE TIME) THIS BLOCK ANYWHERE IN THE CLIENT PROJECT: #ifndef _FORCECAST_H_ #define _FORCECAST_H_ template<class Dest, class Src> Dest force_cast(Src src) { union { Dest d; Src s; } c onvertor; convertor.s = src; return convertor.d; } #endif //_FORCECAST_H_ SECOND: ADD THIS CODE IN THE CLIENT TO CALL THE MEMBER FUNCTION IN THE DLL Revision: 128 IV-200/206 18/12/2013 CORE MANUAL ///////////////////////////////////////////////////////////////////////////////// //LOAD THE DLL HMODULE hm=LoadLibrary("DLL3.dll"); ///////////////////////////////////////////////////////////////////////////////// //DEFINE A FUNCTION POINTER TYPE TO POINT TO AGENT::MyFunc IN THE DLL typedef int (AGENT::*PMYFUNC)(int); //MAP THE POINTER TO void AGENT::MyFunc() IN DLL. USE MANGLE NAME IN DLLName.def PMYFUNC pMapMyFunc = force_cast<PMYFUNC> (GetProcAddress((HINSTANCE) hm,"MangleMyFunc")); ///////////////////////////////////////////////////////////////////////////////// int iPar=3; //FOR INSTANCE ((pAgent)->*pMapMyFunc)(iPar); //EXECUTE THE FUNCTION IN THE DLL.WE WE ASSUME //THAT pAgent IS A POINTER TO AN AGENT OBJECT ///////////////////////////////////////////////////////////////////////////////// The trick here is that "MangleMyFunc" is NOT the name of the function in the DLL (in this example, it is MyFunc) but a friend name to replace the mangled name attributed by the compiler which is extremely long in general. It is mandatory because: 1) All C++ compilers change the function name in the DLL export table; 2) There is no standardization so that every compiler changes the name in a separate way. To replace the mangled name by a user-defined friend name with VisualC7, operate as follows: 1) Open the file MissionDLL.lib witn VisualC. If you compile in the DEBUG mode, this file is in the directory DEBUG of you DLL project. Thus with Visual Studio, move to this directory and double click the file MissionDLL.lib. Visual Studio should display this kind of file The important column is the right most column. It contains the mangle names of the member functions of classes which are entry functions of the DLL. How to identify such mangle names. Simply, each one begins with and question mark! Revision: 128 IV-201/206 18/12/2013 CORE MANUAL Look at the highlighted text in the right most colum. It is explicitly: ?DllCOARSEAgentScan@AGENT@@QAEXPAVCELL@@FFFQAPAV1@QAFPAVOBSTACLE@@F_N44@Z It is the mangle name in the DLL of the member function: void AGENT::DllCOARSEAgentScan. Thus in the file MissionLIB.def, there should be one line which refers to the mangle name to call this function, for instance: CoarseAgentScan ?DllCOARSEAgentScan@AGENT@@QAEXPAVCELL@@FFFQAPAV1@QAFPAVOBSTACLE@@F_N44@Z PRIVATE THIRD: It is YOUR RESPONSIBILITY TO ADD THIS LINE IN THE FILE MIssionLIB.def! Here the mangle name (also called friend name) is CoarseAgentScan and it refers to the DLL function DllCOARSEAgentScan. Similarily, the next mangle name in the DLL is: DllCOARSECellScan@AGENT@@QAEXPAVCELL@@FFFQAPAV1@QAFPAVOBSTACLE@@F_N44PAY01FFF@Z It corresponds to the function void AGENT::DllCOARSECellScan Thus in the file MissionLIB.def, there should be the line: CoarseCellScan = ?DllCOARSECellScan@AGENT@@QAEXPAVCELL@@FFFQAPAV1@QAFPAVOBSTACLE@@F_N44PAY01FFF@Z PRIVATE Revision: 128 IV-202/206 18/12/2013 CORE MANUAL Here the mangle name is CoarseCelltScan Another method 1. Change the working directory to VisualStudio .NET\vc7\bin. 2. Copy the file DLL1.lib in this directory that contains the tool dumpbin.exe. 3. Execute vcvars32.bat to allocate the paths needed to execute dumpbin.exe. 4. Execute the command line: dumpbin.exe /ALL MissionDLL.lib. The mangled names of the functions in the DLL are in the last part of the file generated by this instruction, in the EXPORT section. Let us assume for clarity that the mangled name is ?MyFunc@AGENT@@QAEXXZ. 5. Once the mangled name of the function has been identified, you must modify the def file of the dll, (here DLL1.def), which is automatically generated by VisualC in the files of the DLL. In this example, we choose the friend name MangleMyFunc to replace real mangled name. Add the next red line EXPORTS ; Explicit exports can go here MangleMyFunc = ?MyFunc@AGENT@@QAEXXZ 6. PRIVATE Recompile the DLL Revision: 128 IV-203/206 18/12/2013 CORE MANUAL Index AGENT allocation in memory ..............................22 array FoundAgent .................................110 array FoundObstacle .............................112 base class header...................................100 cycle.......................................................91 derived classes......................................103 Environment.........................................105 moves...................................................100 operation mode .......................................91 static parameters .....................................97 C++ Dynamic call of DLLs...........................145 Private messages.....................................32 VisualC .................................25, 33, 34, 37 CLASSES DRAFT classes CBackground......................................72 CEllipse..............................................71 CPlygone............................................72 CPointEX...........................................69 CPolyLine ..........................................72 CRectangle.........................................70 CXDraft .............................................73 ENVIRONMENT classes CELL .................................................97 ZONE ................................................99 OBJECTS classes AGENT (base)..................................100 AGENT (derived) .............................103 OBSTACLE .......................................99 POLICY classes APOLICY ........................................125 SCRIPTPROCESSOR .............. 123, 124 SPOLICY.........................................127 VARDATA ......................................127 SCHEDULER ........................................87 WIN32 classes CAGNTApp .......................................25 CAGNTView .....................................27 CChildFrame ......................................26 CDialogBarEx ....................................32 CMainFrame ......................................26 CParamPage1 .....................................29 CParamPage2 .....................................29 Revision: 128 IV-204/206 CParamPage3 .....................................30 CParamPage4 .....................................30 CParamPage5 .....................................31 CParamPage6 .....................................31 CSplashWnd ......................................32 DRAFT ..................... 14, 15, 28, 63, 65, 69, 74 CbrokenLine......................................74 CPolygone ...............................................73 CRectangle........................................74 ENVIRONMENT construction Agent Scan Mode ............................. 116 Cell Scan Modes............................... 113 representation COARSE definition ..................................... 107 storage in memory........................ 108 FINE Arrays in memory......................... 110 defintion....................................... 110 FINEStoreInArray........................ 112 File MainTest.cpp.......... 40, 89, 93, 94, 114, 131 static parameters, global.h.......................97 Function calls for agent cycle in DLL............................96 for customization ....................................22 for initialization ......................................20 for reconfiguration..................................22 for scenario loading ................................20 for thread initialization............................93 Interpreter...................................................25 general description..................................37 syntax-colored editor ..............................47 MASS CORE ....................................................10 DLLs & Customization......................... 137 EXTENSIONS .......................................11 Files distribution.....................................13 modules..................................................14 operation customization ............................... 22, 32 18/12/2013 CORE MANUAL initialization....................................... 20 reconfiguration................................... 22 scenario loading................................. 20 simulation.......................................... 23 shared memory, COREDATA ................ 16 thread synchronization.................................. 19 WIN32 interface .................................... 25 Obstacle class OBSTACLE .................................. 99 generation.............................................. 63 ParamPage2 figure.............................................. 30, 106 parameters management ......................... 32 Playground border.................................................... 99 Revision: 128 cell .........................................................97 cyclic conditions ...................................100 definition of the ......................................98 Scheduler asynchronous mode.................................84 class SCHEDULER ................................87 Reaction time..........................................84 synchronous mode ..................................89 State Automaton introduction to MASS ...............................9 Thread calculation thread....................................16 interface thread .......................................14 synchronization of...................................19 ThreadAnimProc function .......................80 ThreadProc function..................................93 IV-205/206 18/12/2013 CORE MANUAL A [1] References B. Shattenberg and A.M. Uhrmarcher Planning Agentss in JAMES, Proc. of the IEEE, vol 89, pp 158-172, (2001) [2] R.S. Sutton, and A.G. Barto Reinforcement Learning: An introduction. MIT Press, Cambridge MA, 1998, A Bradford book (http://www-anw.cs.umass.edu/~rich/book/the-book.html) [3] L.P. Kaelbling, M.L. Littman, and A.W. Moore Reinforcement learning: a survey , J. of AI research, vol 4, pp 237-285, (1996) Revision: 128 IV-206/206 18/12/2013