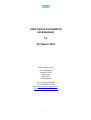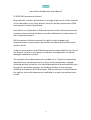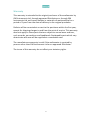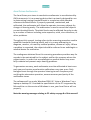
1
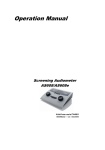
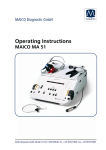
 ASRA OSICUS AUDIOMETER USER MANUAL 1 ASRA OSICUS AUDIOMETER USER MANUAL V1 25th March 2010 GM Instruments Ltd Unit 6, Ashgrove Ashgrove Road Kilwinning KA13 6PU United Kingdom Tel +44 (0)1294 554664 Fax +44 (0)1294 551154 Email [email protected] or enquiries@gm‐instruments.com
web www.gm‐instruments.com
2 Asra Osicus Audiometer User Manual © 2010 GM Instruments Limited Reproduction, transfer, distribution or storage of part or all of the contents in this document in any form without the prior written permission of GM Instruments Limited is prohibited. Asra Osicus is a trademark of GM Instruments Limited. Other product and company names mentioned herein may be trademarks or trade names of their respective owners. GM Instruments Limited reserves the right to make changes and improvements to any products described in this document without prior written notice. Under no circumstance shall GM Instruments be responsible for the loss of any data or income or any special, incidental, consequential, or indirect damages howsoever caused. The contents of this document are provided ‘as is’. Except as required by applicable law, no warranties of any kind, either expressed or implied, including but not limited to, the implied warranties of merchantability and fitness for a particular purpose, are made in relation to the accuracy, reliability or contents of this document. GM Instruments Limited reserves the right to revise this document or withdraw it at any time without prior notice. 3 Warranty This warranty is extended to the original purchaser of the audiometer by GM Instruments Ltd, through approved Distributors or through GM Instruments Ltd, and covers defects in materials of workmanship for a period of 1 year from the date of delivery to the original purchaser. Defects will be corrected at no cost to the purchaser within the first year, except for shipping charges to and from the point of service. This warranty does not apply to those parts that are subject to normal wear and tear, such as cords, ear cushions and headbands. Replaceable parts which may deteriorate with use will be supplied at a reasonable cost. The manufacturers warranty is void if the audiometer is repaired by persons other than GM Instruments Ltd or an approved Distributor. The terms of this warranty do not affect your statutory rights. 4 Asra Osicus Audiometer The Asra Osicus pure tone air conduction audiometer is manufactured by GM Instruments. It is a screening device that is primarily designed for use in determining hearing threshold levels in comparison with standard reference threshold levels. If properly operated, maintained, and calibrated, the audiometer will allow the operator to screen subjects for changes in hearing acuity. The audiometer is used to record the subject’s current threshold levels. Threshold levels may be affected from day to day by a number of factors including noise exposure, colds, sinus infections, or other problems. Throughout this manual, testing refers to the screening procedure used to establish thresholds (hearing levels) and is in no way attempting to diagnose, monitor, or treat any medical problem, disease or injury. Where a problem is suspected, the subject should be referred to an audiologist or medical doctor for evaluation. The audiograms obtained from this screening procedure provide a way for records to be maintained for the subject and for the company where the subject works, in order that an audiologist or medical doctor may more fully evaluate and prevent major hearing problems. To guarantee accuracy, each audiometer must be calibrated at least once each year and receive an exhaustive calibration every two years. Daily biological tests through the operator listening to each frequency and verifying the attenuator operation, ensures accuracy and purity of the audiometer tones. The software will run under Windows 2000, XP, Vista or Windows 7 on a laptop or desktop PC. Provided the specification of the PC is approved by Microsoft to run the version of Windows in use, your Asra Osicus will run properly. Note the warning message relating to PC safety on page 8 of this manual! 5 WEEE Notice This mark applies only to countries within the European Union (EU) and Norway. This device is labelled in accordance with European Directive 2002/96/EC concerning waste electrical and electronic equipment (WEEE). The Directive determines the framework for the return and recycling of used appliances as applicable throughout the European Union. This label is applied to various products to indicate that the product is not to be thrown away, but rather reclaimed at the end of its life as per this Directive. Please contact GM Instruments at the address in this manual to arrange return of the device. Your Asra Osicus audiometer is a medical device, the design and production of which is covered by the European Medical Device Directive, and monitored by Intertek Amtac, our Notified Body, under registration number 0473. 0473
0473 6 Audiometer Features Electrical characteristics: Voltage: 5V Frequency: DC Current: 100mA Performance and Accuracy: Audiometer specifications are within the limits as stated in BS EN ISO 60645. Frequencies 250, 500Hz, 1, 2, 3, 4, 6, 8KHz Accuracy ± 0.1% Harmonic Distortion 0.1 % Hearing Level Range ‐10dB HL to +90dB HL Accuracy ± 0.5dB Linearity ± 0.2dB Standards Audiometry BS EN 60645 Electrical BS EN 60601 CE Marked as a Medical Device Size 122 x 82 x 39 mm Weight 0.3 Kg Power 5V, 100mA, 0.5W Software: The Asra Osicus software runs on Windows operating systems: 2000, XP, Vista or Windows 7. Ensure that the latest service packs have been installed and that .NET and the Microsoft Installer are also up to date before installation. The software is supplied on a CD, along with the drivers required to run the USB interface.
7 WARNINGS To ensure patient safety only PC’s and printers, which comply with EN 60950, and which when used in combination with Asra Osicus do not exceed allowable patient leakage current, should be used. Live parts are made accessible when cover is removed. Never remove covers unless qualified to do so. In the event of damage to the circuit board, there is the remote possibility that the audiometer may produce a tone at 130dBHL for more than 2 seconds. This may damage the hearing of a person wearing the headphones if this occurred. Disconnect audiometer and remove headphones as quickly as possible. If hearing damage is suspected consult a doctor. Please notify GM Instruments. Each time you use the audiometer ensure all the parts are correctly connected to the sound module and the module is correctly connected to the computer which has the Asra Osicus software loaded onto it. An audiometer is calibrated with one set of headphones. The audiometer number and matching headphone numbers are stored during audiometer setup. The audiometer should only be used with the headphones used during calibration. Not performing the daily and weekly checks may invalidate any testing that you do, as the audiometer may not have been working correctly. Water or fluids should not be allowed to enter the case or the internal electronics may be damaged. Do not apply pressure to the headphones themselves or this may damage the springs supporting them. 8 Index 1. Introduction ................................................................................... 10 2. Preparing the system ..................................................................... 11 2.1 Starting the Program ..................................................................... 11
2.2 Introducing the Home Screen ....................................................... 11
2.3 Perform Machine Checks............................................................... 12
2.4 Select Audiometer ......................................................................... 13
2.5 Test Settings .................................................................................. 14 2.6 Tester Information.................................................................... ... .15 3. New and Find buttons .................................................................... 15 3.1 New Subject................................................................................... 15
3.2 Find Subject ................................................................................... 17
3.3 Comparison of Audiograms ........................................................... 19 3.4 Predictive Analysis..........................................................................19 4.Running Hearing Tests..................................................................... 21 4.1 Automatic Testing.......................................................................... 21
4.2 Manual Operation ......................................................................... 22
4.3 Audiograms & H&SE Categories .................................................... 22
4.4 Printing.......................................................................................... 23
5. Appendix........................................................................................ 24 5.1 HSE Categories............................................................................... 24
5.2 Cleaning, Maintenance and Storage.............................................. 26
5.3 Hearing Test Procedure ................................................................. 27
5.4 End User License............................................................................ 29
9 1. Introduction Thank you for choosing the Asra Osicus Solo audiometer. The Osicus Audiometer is intended for use in industrial and corporate settings for the screening of hearing. It is anticipated that, at a minimum, a trained competent person or an audiometrician will use the audiometer to conduct hearing testing. Along with this manual you should find the following items in the box: • A sound module • A set of headphones • A response switch • A USB cable • A CD‐ROM • An Installation Manual In addition to these items you will need: • A PC or laptop The PC or laptop will need to have a spare USB port to connect to the sound module and be running a Microsoft Windows operating system, Windows 2000, XP, Vista or Windows 7 to run the Osicus Audiometer control software. The following chapters will introduce you to setting up the device and the software and its operation, starting with helpful displays that visually guide you through the different functions. 10 2. Preparing the System The following displays are designed to help you use the main features of the Asra Osicus software. 2.1 Starting the program You will find an icon on your desktop and by clicking on START/All Programs, with the title Osicus Solo. Clicking on this will start the program. 2.2 Introducing the Home Screen The Home screen is the central point where the functions of the audiometer can be accessed. Clicking on the Home icon at any time will return you to the Home screen. From the Home screen, you can create New records, Find records, Run Tests and Exit the program, all by clicking on the associated icon. Additionally you can prepare the audiometer for use by using the 4 setup buttons – Perform machine Checks – Select Audiometer – Settings – Tester Settings. The following chapter takes you through these functions. Fig 2.2 11 2.3 Perform Machine Checks. When you click on the start button, the system presents a series of tones at whatever level you select in one ear, followed by the other, and logs your response to the tones. This allows you to hear each frequency, listening for distortion or a change in level. If you click on Save, the responses to the test tones will be saved to a file for record keeping purposes. Fig 2.3 12 2.4 Select Audiometer Fig 2.4 Viewing this screen allows you to check that you are using the correct audiometer/earphone combination and that the calibration file is up to date. An audiometer is calibrated with one set of headphones. The audiometer number and matching headphone numbers are stored during audiometer setup. The audiometer should only be used with the headphones used during calibration. If the audiometer number is incorrect, click on the Change button, then select the correct audiometer from the list. If the audiometer is not listed, then its details must be added by loading in a new calibration file. Now click on OK to move to the next screen. To guarantee accuracy, each audiometer must be calibrated at least once each year and receive an exhaustive calibration every two years. The date of last calibration is displayed with the audiometer details. After calibration, you will be supplied with a file containing calibration information. To update the calibration information, press the Change button, browse to this file and click on Ok. 13 2.5 Settings Fig 2.5 The location of the Calibration File and location where audiograms generated will be Saved are specified here. Note that if you wish to analyse audiograms generated by different groups of workers, either from the same company or from different companies, using the optional Asra Batch_Utility software, you should create a folder for each group and set the appropriate folder using this screen prior to testing. Other test settings such as the frequencies tested, the tone characteristics, the threshold determination criteria and order of ear testing can all be altered from within this dialogue. Shortening the test time increases the possibility that the subject will be able to retain concentration for the duration of the test, and therefore produce the most favourable and accurate result. We recommend testing the frequencies listed above, with a tone length no greater than 1.5 seconds and a threshold search criteria based on 2 from 3 responses. 14 2.6 Tester Information Fig 2.6 Enter the name of the person who will be doing the tests, and the company they represent. 3 Subject Details 3.1 New Subject Fig 3.1.1 When you click on New, a screen which allows the entry of Name, Gender, ID Number and Date of Birth is offered. Name:‐ Enter details as First name Last name. Gender:‐ Use the menu to select. ID Number:‐ Letters or numbers are accepted for entry, but as the content of this field is used as the unique identifier for the Asra Batch_Utility 15 software and Occupational Health Databases such as Opas or Cohort, it is important to enter this detail carefully. Date of Birth:‐ Use the menu arrow to display a calendar and set the date and month from this, then highlight and type the year, using 4 characters. An example of a completed screen is shown below Fig 3.1.2 16 3.2 Find Subject Fig 3.2.1 The search can be based on the content of a particular folder/directory and it’s sub folders/directories. It can be done manually by clicking on browse or it can be done automatically by entering the Surname or an ID (Personnel) Number. An example of a search based on partial ID is shown below. Fig 3.2.2 17 Having found the person you want, highlight the entry and click on Select. The screen shown below will then become available and you have the option of using the Details/Tests/Audiograms tabs to view the previously generated data. Fig 3.2.3 The details tab will show the Subject information entered. The Tests tab will show all of the stored audiograms for the selected person. If you want to view a particular audiogram, select it and click on Display Test or click on the Audiograms tab. An example of a completed audiogram, brought back from saved records is shown on the following page. 18 Fig 3.2.4 Below the audiogram is shown the HSE Category. HSE Categories are explained further in Appendix A. To print the audiograms, click on the Print button. 3.3 Comparison of Audiograms To compare the selected audiogram with another, click the Compare Audiograms button. A further window will open to allow you to select the audiogram to be compared with the previously selected one. Highlight the one you want and then click on the Select button. Both will then be shown superimposed. 19 3.4 Predictive Analysis Predictive Analysis is one of the unique features of the Asra Osicus software. Hearing test data can be analysed by intelligent algorithms and future hearing trends can be predicted. The predicted audiogram shows how the intelligent analysis thinks the subject’s audiogram will look in a year’s time. It assumes no change in hearing protection or in the current working noise environment. Although analysis is made to the highest possible standards, there is no guarantee that the prediction is accurate, because many factors could influence the final outcome. However it is often found to be useful in reinforcing the message that hearing conservation matters. The current audiogram can be superimposed on the predicted by clicking on the Compare with Current Test button. To print a report of the predicted results, press the Print button. Fig 3.4 20 4. Running Hearing Tests
Having previously either entered details for a new person or selected someone who has been tested before, click on Run Test from the home screen. Before testing, you should ensure that the subject’s ears are not blocked, the audiometer is connected and has been tested and the headphones are correctly in place. 4.1 Automatic Operation To use automatic operation, check that the Automatic Test tab is set as shown above and decide whether or not you want to have standard tone presentations or pulsed tone presentations. If pulsed, click on the Pulsed Tones tick box. Fig 4.1 To start a hearing test click on the Run Test button. During the hearing test the subject will hear tones in one ear at each of up to eight different frequencies and then again in the other ear. Each tone will increase in volume until the subject confirms that they have heard the tone by pressing the response switch. The system will run through this several times for each tone to ensure a consistent response. If there is no consistent response you will be notified by a message appearing on screen. As the test proceeds, the results will be plotted on the audiogram. 21 If at any point the test must be paused or stopped, use the buttons provided on the interface. Pressing Pause will temporarily stop the test, allowing it to be restarted at the current frequency. Pressing Stop will stop the test but retain all results up to that point. 4.2 Manual Operation To switch to manual operation, select the Manual Test tab as shown above: To produce a tone, select the frequency, amplitude ear, and then press the Produce Tone button. As each tone is produced, points will be plotted on the audiograms, showing the progress of the test. The audiogram will show the last response at each frequency. If no response is recorded at 90 dBHL this will be recorded as no response on the audiogram. 4.3 Audiograms and HSE Categories Audiograms are the recognised method of displaying hearing test data. They are graphs showing the level at which the subject responded for each tone. Each ear is graphed separately. Fig 4.4 As the test proceeds, points are plotted on the audiogram, representing the test subject’s results. The above shows an example of audiograms for the left and right ears. The left ear audiogram is blue and points are plotted using crosses. The right ear audiogram is red with points plotted 22 using circles. No response to a frequency is plotted at 90 dBHL (maximum amplitude) and the symbol includes an arrow pointing down. This is shown above at 3 and 4 kHz on the left ear. At the end of the test, press the button to calculate the HSE categories. Depending on the circumstances caution is recommended in discussing audiogram results and HSE Categories with subjects. User comments can be added by typing in the User Comments box. These can relate to any observations during the test and will be printed on the audiograms. The results must be saved to the database before exiting the test window. Results can be saved by pressing the Save button. The audiograms and related information can be printed as a report by pressing the Print button. 4.4 Printing Audiograms When you choose to print audiograms, a new window will open with a print preview of the report including any related personnel and test data. From this window you can choose to print the document to a selected printer, save the document to file or zoom in and out of the document. 23 5 5.1 Appendix A HSE Categories The following tables A1 and A2 are used to perform HSE Categorisation on the audiogram produced from the hearing tests. Sum of hearing levels 1, 2, 3, 4 and 6 kHz Age Males Females Warning Referral Warning Referral Level Level Level Level 18‐24 51 95 46 78 25‐29 67 113 55 91 30‐34 82 132 63 105 35‐39 100 154 71 119 40‐44 121 183 80 134 45‐49 142 211 93 153 50‐54 165 240 111 176 55‐59 190 269 131 204 60‐64 217 296 157 235 65+ 235 311 175 255 Table 5.1.1: Classification of hearing levels into warning and referral levels The warning and referral levels, from table A1 above, are compared with the sum of the results at 1kHz, 2kHz, 3kHz, 4 kHz and 6kHz for each ear. If the sum for both ears is below the warning level, an HSE category 1 is assigned. If the sum for either ear equals or exceeds the warning level, an HSE category of 2 is assigned. If the sum for either ear equals or exceeds the referral level, the HSE category is upgraded to 3. The sum of the results at 3kHz, 4kHz and 6kHz for each ear are compared with those for the last hearing test recorded for the employee. If there is an increase in hearing threshold level of 30dB or more, this indicates rapid hearing loss and an HSE category of 4 is assigned. Next the sum of the results at 1kHz, 2kHz, 3kHz and 4 kHz for each ear are compared. A difference of 40 between ears indicates unilateral 24 hearing loss. This suggests a problem due to disease or infection. This does not affect the HSE category. The definitions and actions for each HSE category are detailed in table A2 below. Category Calculation Action 1 ACCEPTABLE HEARING Sum of hearing levels at 1, None ABILITY 2, 3, 4 and 6 kHz. Hearing within normal limits. 2 MILD HEARING Sum of hearing levels at 1, Warning
IMPAIRMENT 2, 3, 4 and 6 kHz. Compare th
Hearing within 20 percentile, value with figure given for i.e. hearing level normally appropriate age band and experienced by 1 person in 5. gender in Table A1. May indicate developing NIHL. 3 POOR HEARING Sum of hearing levels at 1, Referral th
Hearing within 5 percentile, 2, 3, 4 and 6 kHz. Compare i.e. hearing level normally value with figure given for experienced by 1 person in 20. appropriate age band and Suggests significant NIHL. gender in Table A1. 4 RAPID HEARING LOSS Sum of hearing levels at 3, 4 Referral Reduction in hearing level of and 6 kHz. 30dB or more, within 3 years or less. Such a change could be caused by noise exposure or disease. UNILATERAL HEARING LOSS Sum of hearing levels at 1, Referral Suggesting a problem due to 2, 3 and 4kHz for both ears. disease or infection If the difference between the ears is greater than 40dB the individual should be advised of the findings. Table 5.1.2: The HSE Categorisation Scheme NIHL: Noise Induced Hearing Loss Reference HSE Controlling Noise at Work The Control of Noise at Work Regulations 2005, pg 118 & 119. 25 5.2 Appendix B Cleaning, Maintenance and Storage Cleaning The sound module of the Asra Osicus Audiometer can be cleaned with a damp cloth or light solvent. Water or fluids should not be allowed to enter the case or the internal electronics may be damaged. The headphones and audiocups should be cleaned regularly for hygiene purposes. It is recommended that they be cleaned between each test. An antiseptic tissue wipe is best used for this purpose. Carefully wipe the headphone surface and the rim of the audiocup and allow to dry. Do not apply pressure to the headphones themselves or this may damage the springs supporting them. Maintenance The sound module should be calibrated at least once a year. Contact GM Instruments to have your audiometer calibrated. Daily and weekly checks should also be carried out to ensure correct operation. These can be performed using the Asra Osicus software. Ensure the sockets on the sound module are free from dust. This can be done by gently blowing air into the socket. No other maintenance needs to be done on the sound module. Storage The audiometer comes with a box and packaging that is designed for the safe storage of the sound module, cables and headphones. It is recommended that all cables, the module and the headphones are returned to the packaging when not in use. Keep the packaged audiometer in a dry, dust free location. 26 5.3 Appendix C Hearing Test Procedure The recommended hearing testing procedures are based on the British Standards BS 6655:1986 ISO 6189‐1983 and BS EN ISO 8253‐1:1998. Automatic operation of the software will perform tests following these standards. When performing manual tests, the following steps should be used as a guide. Equipment Check • Otoscope – ensure that batteries have been inserted and bulb is working. • Clean and examine the audiometer and all accessories. Check earphone cushions, plugs, leads and accessory leads for signs of wear or damage. • Switch on equipment and leave for 5 minutes. • Check that audiometer number and earphone numbers tally. • Perform a daily check to ensure that the audiometer, earphones and response switch are performing correctly. Pre‐test Examination The tester should perform an otoscopic examination of the ear immediately before the test to detect any major abnormality or the presence of fluid or wax, which may affect the results. The tester should also be familiar with any hearing protection, which may be used by workers so they can discuss proper fitting, cleaning and maintenance. Testing Procedure Test tones shall be presented with length of 1 to 2 seconds. When a response occurs, the interval between the tone presentations shall be varied randomly, but shall not be shorter than the test tone duration. If the test duration becomes too long or the test subject becomes distressed or uncomfortable, the test subject should be given a rest period and the complete test started again. 27 Familiarisation Present a test tone of 30 dB HL at 1 kHz to one ear. If a response is not evoked, increase the level in steps of 10dB until a response occurs. Repeat for 2 kHz and 3 kHz. This assures the tester that the test subject understands and can perform the response task. Tones shall be presented in the sequence: 1000, 2000, 3000, 4000, 6000, 8000, 500, to one ear followed by the same sequence to the other ear. Step 1 Present a tone at 30 dB HL. If no response, increase the level by 10 dB HL until a response occurs. Step 2 After the response, decrease the level by 10dBHL until no response occurs. Step 3 Increase the level by 5 dB HL until response occurs. Note this value. Step 4 Repeat steps 2 and 3 until three responses out of a maximum of five trials occur at a single level (2 out of 3 also acceptable). If less than three responses out of five trials are obtained at a single level, present a tone at 30 dB HL then repeat the test procedure. Step 5 Proceed to the next test frequency, repeating steps 1 to 4. Finish all test frequencies at one ear. Step 6 Repeat steps 1 to 5 for the second ear. Step 7 Retest the first ear at 1 kHz. If the results of the repeat measurement for that ear agree to within 10dB with those of the first measurement finish the test. Record the lower of the two responses. If 10dB or a larger deviation in hearing threshold level is discernible, continue to 2 kHz, 3 kHz etc. until responses are within 10 dB. Table 5.3: Hearing Test Steps 28 5.4 Appendix D End User License Agreement (EULA) END‐USER LICENSE AGREEMENT FOR ASRA OSICUS SOFTWARE GM Instruments Limited (“GM”) grants to you (as an individual or as a legal entity) (“Licensee”) a non‐exclusive, indefinite license to install and use the number of copies of each version of Asra Osicus (“The Software”) as provided with the Asra Osicus Audiometer. The Software includes computer software and any associated electronic or "online" documentation, associated media, and printed materials. Licensee may not to attempt to modify, reverse engineer, decompile, or disassemble the Software. GMI will provide support for the Software for a period of 12 months from the date of invoice. After that period you may continue to use the Software but will not be eligible for support from GM for the Software. Continued support and software updates may be purchased from GM. The Software is for use exclusively with the Asra Osicus Audiometer. In the event that the Licensee ceases to own or loan the audiometer, or this license is terminated for any reason, you agree to remove the Software from all computers and destroy all associated copies and documentation. GM and its suppliers own all title and intellectual property rights in the Software. GM is not liable for any consequential damages arising from the use of the Software, such use being outside its control. 29