1
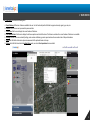
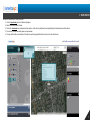
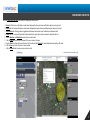
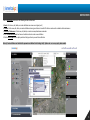
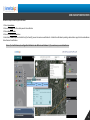
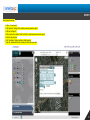
AMERICALOC - GPS TRACKING
User Guide v3.0.E
www.americaloc.com
© 2015 Americaloc. All rights reserved.
“
“
“
,
”
and “Americaloc” are registered trademarks of Orbiflex Inc and are protected in the United States and in other countries.
Designs and specifications are subject to change without notice.
Information about the functionality of the system and the images published in this document may differ depending on the version of the operating system, browser and/or the Americaloc
platform version in use. Also, some of the contents in this manual may differ from the actual product. Options and services may vary by device model.
TRADEMARK NOTICES
User Manual v3.0.E February 16th 2015.
1
VISTA GENERAL
INDICE
PAGE
TOPIC
03 ……………………………………………………………………………………………..…………………………………..ACCESS AND GENERAL NAVIGATION
04 ……………………………………………………………………………………………..…………………………………..1 YOUR DEVICES!
06 ……………………………………………………………………………………………..…………………………………..2 TRACKING HISTORY
08 ………………………………………………………………………………………………..………………………………..3 DRAW ZONES AND ROUTES
11 …………………………………………………………………………………………..……………………………………..CONFIGURE YOUR DEVICE
13 ……………………………………………………………………………………………..…………………………………..NOTIFICATIONS
15 ……………………………………………………………………………………..…………………………………………..ZONE AND ROUTE NOTIFICATIONS
17 ……………………………………………………………………………………………..…………………………………..REPORTS
20 ……………………………………………………………………………………………..…………………………………..SUPPLEMENTARY MENUS
21 ………………………………………………………………………………………………..………………………………..SUB-ACCOUNTS
22 …………………………………………………………………………………………..……………………………………..ZONE FOLDER
2
ACCESS AND GENERAL NAVIGATION
To access your account from any PC, tablet or smartphone navigate to www.americaloc.com from a web browser; enter the username and password provided by Americaloc; click the Login button.
Once open, you will be brought to the main screen and you will see 4 different sections:
A.
B.
C.
D.
Section to view current and historical locations, customize and configure devices, create zones, routes and places, and generate reports.
Section used to display geographic data from Google Maps.
Section to view established areas, routes and places.
Section used to configure the main and sub-accounts, view video tutorials and access help documents.
3
1 YOUR DEVICES
Click 1 your devices to activate the following icons:
A.
B.
C.
D.
E.
F.
G.
Device Directory: Will contain all devices available to the user. Use the functionality within this folder to organize devices by region, type, route, etc.
Devices: Click the device icon to personalize by name and color.
Locate Now: Click the icon to display the current location of the device.
Last Known Position: Click the icon to display the last known position and state of the device. This feature is used when the current location of the device is unavailable.
Settings: Click the icon to view and modify settings, create custom notifications, generate reports and view the connection status of the particular device.
Auto: Select this field to track minute-by-minute movements of the particular device on the map.
History: Select this field to activate the tracking history panel, see section 2 track your devices for more details.
4
1 YOUR DEVICES
Follow these instructions to locate your device:
1. Click on 1 your devices; your list of devices will appear.
2. Select the device you wish to locate.
3. Click on the Locate now icon to activate real time searches. As the search is performed, the map will display the last known location of the device.
4. The results of the real time search appear in a new window.
5. The map will show the current location of the device as well as a legend with details on the current status of the device.
5
2 TRACKING HISTORY
Selecting 2 tracking history will activate the following commands:
A. Advanced Search: This command allows you to perform a historical search of the units selected in section 1. Enter a date range in the calendar drop-down.
B. Search: Click this icon to execute the historical search for a specific device.
C. Search All: Click this icon to execute the historical search for all the devices selected in section 1.
D. Watch: Click to show a map and table of all the paths and actions taken by a given device for the date range specified in step A.
E. KML: Select this icon to export a Google Earth (kml) file of the routes taken by the selected device.
6
2 TRACKING HISTORY
Follow these instructions to display paths:
1.
2.
3.
4.
5.
6.
Navigate to the 1 your devices section and select the History flag for the desired devices. Is very important to enable devices in this section before proceeding to the next step.
Navigate to the 2 tracking history section; only the devices flagged in step 1 will appear in this section.
Select from the list of pre-determined date and time ranges or select Advanced Search to perform a historical search.
Click Search to view the results of the device you selected.
Click Watch to view a map and table of all the actions and paths taken by a given device for the date range selected.
Click on each icon in the path or table to display the corresponding details.
Note: It is very important to accomplish step 1 to enable devices in step 2.
7
3 DRAW ZONES AND ROUTES
Selecting 3 draw zones and routes will activate the following tabs and functions:
A.
B.
C.
D.
E.
F.
G.
H.
I.
Zones tab: Click to view, edit, delete or create zones. Subsequently create and receive notifications upon zone entry and exit.
Routes tab: Click to view edit, delete or create routes. Subsequently create and receive notifications upon route entry and exit.
Get Directions tab: Click to generate a suggested route between two locations as well as directions and distance detail.
Places tab: Click to view, edit, delete and create landmarks such as gas stations, banks, monuments, hospitals, parks, etc.
Use the New Zone and New Route icons to create zones and routes.
Click the Draw button to activate the layout of the zone or route on the map.
Use the Circle Zone Type to draw a circular zone. Set the radius and click Preview; the recommended minimum radius is 200 yards.
Click the Save icon to save the zones or routes created.
Click the Cancel button to remove zones or routes created.
8
3 DRAW ZONES AND ROUTES
Follow these instructions to create zones:
1. Click on 3 draw zones and routes.
2. Click the Zones tab to display already established zones.
3. Click the New Zone button to start creating a zone.
4. Enter a name, color, type of area, group or folder and a radius for the zone.
5. Click the Draw button to enable drawing on the map.
6. Click on the map in the center of the desired zone, the zone will auto populate on the map.
7. Adjust the radius of the zone if necessary; click the Preview button to apply the change.
8. Click the Save button to store the zone.
9
3 DRAW ZONES AND ROUTES
Follow these instructions to create routes:
1. Click on 3 draw zones and routes.
2. Click the Routes tab to display already established routes.
3. Click the New Route button to start creating a route.
4. Enter a name, color and radius for the route.
5. Click the Draw button to enable drawing on the map.
6. Draw a route by clicking points on the map. Each click creates a point in the route, the points are automatically joined together to form a route.
7. Adjust the radius of the route if necessary; click the Preview button to apply the change.
8. Click the Save button to store the route.
10
CONFIGURE YOUR DEVICE
Click 1 your devices to activate the following icons:
A. View Settings: Click to view the settings, notifications and reports configured for each device.
B. Settings: Click to modify the parameters of the selected device.
C. Notifications: Click to view, edit, delete, or create notifications.
D. Zones and Routes: Click to view, edit, delete, or create notifications upon entry or exit of assigned zones and routes.
E. Reports: Click to generate and download ad hoc reports for the selected device or all devices on the account.
F. Diagnostics: Click to display the current connection status of the device.
11
CONFIGURE YOUR DEVICE
Click 1 your devices to activate the following icons: (continued)
G. Tracking: Enables or disables the automatic tracking of each device.
H. Traveled Distance: Shows the distance that the vehicle has traveled.
I. Speed Alert: Sets the maximum permissible speed limit for the vehicle.
J. Ignition Sensor: Enables or disables logging ignition changes.
K. Movement Alert: Enables or disables logging of vehicle movement.
L. Long Stop Alert: Sets the length of time that the vehicle can be idle.
Note: Options and services may vary by device model.
12
NOTIFICATIONS
Click the Notifications tab to access the following sub-tabs and functions:
A. Events: Click to view, edit, delete, or create notifications on various events types (see E)
B. Distance: Click to view, edit, delete, or create notifications when a given distance is travelled. This feature can be used to schedule vehicle maintenance
C. Insurance / Maintenance. Click to view, edit, delete, or create insurance/maintenance reminders.
D. Click the New Notification button from each sub-tab in order to create a new notification.
E. Click the Event Type button to display and select the type of event you want to be notified on.
Notes: a) Event notifications are limited to the parameters established in the Settings tab. b) Options and services may vary by device model.
13
NOTIFICATIONS
Follow these instructions to create notifications:
1. Click on 1 your devices.
2. Click on the Settings icon of the vehicle you wish to be notified on.
3. Click on the Notifications tab.
4. Click the sub-tab for the type of notification you want to create (Events, Distance, Insurance / Maintenance)
5. Click the New Notification button.
6. Select an event from the Event Type drop down list. Schedule the notifications by selecting a date and time range. Enter the email addresses that will receive the notifications.
Notes: a) Each notification may be configured for distribution to two different email addresses. If you need more you can add another row.
b) Options and services may vary by device model.
14
ZONE AND ROUTE NOTIFICATIONS
Click the Areas and Routes tab to access the following functions and settings:
A. New Notification: Click to create a notification upon entry or exit of zones and routes.
B. Name: Drop down the list and select that area or route that applies to the notification.
C. Save: Click to save the notification created.
D. Remove: Click to remove a notification.
Note: a) Zones and routes must be pre-established in the system in order to create entry/exit notifications. b) Automatic tracking must be on in order to receive entry/exit notifications because
our system uses those positions to determine if your device is inside or outside the zone/route.
15
ZONE AND ROUTE NOTIFICATIONS
Follow these steps to create Entry/Exit notifications:
1. Click on 1 your devices.
2. Click on the Settings icon of the vehicle you wish to be notified on.
3. Click on Areas and Routes.
4. Click on the New Notification button.
5. Select from the Name drop down list which Zone (Z) or Route (R) you want to create a new notification for. Schedule the notifications by selecting a date and time range. Enter the email addresses
that will receive the notifications.
Notes: a) Each notification may be configured for distribution to two different email addresses. b) If you need more you can add another row.
16
REPORTS
Click the “Reports” tab to obtain the reports information:
First you must select the dates from which you want to obtain the information for the report. Choose the dates in the Start and End calendars.
A.
B.
C.
D.
Select the report you want to obtain.
The “Excel Report” will create the report in excel format.
The “Online Report” will create the report in html format, in a new browser window.
The events report checks, are a list of events which you can obtain the information in excel form. The events you check are the ones appearing in the report.
Note: The information displayed in the reports depends directly in the configuration of the events from the “Settings tab” and for the zones and routes report there must be configured
notifications in the “Zones and Routes” tab
17
REPORTS
You can find these reports (may vary by device model):
1. Tracking Report: Generates a report with all positions and events in the selected dates.
2. Idle Time: Generates a report with the location, time and date when the vehicle had speed zero.
3. Distance: Generates a report with the total distance and time traveled in the selected dates.
4. In Out Zone Report: Lists the location, date, time, speed and link to google maps where in and out of zones occurred.
5. Filtered by Speed Events: Generates all the locations where the speed exceeds the speed chosen by the user.
6. Complete Report: Show all positions that occurred in the selected dates. With the total distance traveled, average speed, speed limit and the number of times that this speed is exceeded, as
well as a link for viewing in Google Maps.
7. Ignition On Time: Shows the total ignition “on” time of the vehicle in the chosen dates.
8. Top 10 Max Speed: This report shows the top 10 vehicles that exceeded the chosen speed, with the location, time and date where they occurred.
9. Over Speed: This report shows the number of times the vehicle exceeded the speed selected by the user and shows the maximum speed recorded.
10. Day Report: This report shows total distance, speed, idle time more a 20 minutes, distance between idle points and vehicles that are closer than 10 miles, all this information is shown by
device.
11. Last Known Location of All Devices: Shows the last location registered.
12. Complete Report of All Devices: Lists all the vehicles registered in the platform. For each one shows: the total distance traveled, maximum speed, average speed, number of speed events, idle
time an ignition “on” time during de selected dates.
13. Zone Report of All Devices: Shows all the in-out zones events of the vehicles registered in the platform.
Note: The reports 1, 2, 4, 6, 7, 9, 10 y 11 can be generated online, the information is displayed in tables and graphs for better interpretation.
18
REPORTS
How to generate a report:
1.
2.
3.
4.
5.
6.
7.
Click on “1 your devices”.
Click the button “Settings” of the vehicle you want to generate a report.
Click the tab “Reports”.
Click a day from the calendars “Start” and “End” to select dates and hours for the report.
Select the typo of report.
Click “Excel Report” button to obtain an Excel document.
Open the downloaded Excel file to display the information generated.
19
SUPPLEMENTARY MENUS
Click these icons to access the following functions:
A. General Reports: Quickly access a given list of frequently used reports.
B. Help: Access general information about the system.
C. Account Options: Access this function to save the current view as the default, change passwords and update contact details.
D. Users: Access this function to perform user administration tasks.
20
SUB-ACCOUNTS
Follow these steps to create a sub-account:
1. Click the Users icon to view the existing list of users.
2. Click on New User to launch a User tab in your browser. Enter the user details and select the appropriate privilege levels.
3. Click Save to create the user.
Note: The user code and password must be at least eight alphanumeric characters. Accents and special characters are not permitted in the user name or password.
21
ZONE FOLDER
Follow these instructions to create a Zone Folder:
1. Click on the main Zone Folder, or Zone Sub-folder, where you would like to create the zone group.
2. In the window that opens, click on Create New Group.
3. Enter a name for the Zone Folder.
4. Click the Save New Group button.
Note: Zone Folders can be used to classify zones by region, state, type, etc.
22


![User Manual here [ 3427KB]](http://vs1.manualzilla.com/store/data/005961880_1-89f360bcc6dca28ab650306b93dc2a96-150x150.png)