1
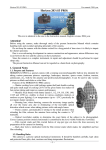
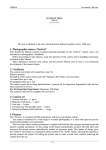
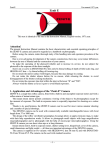
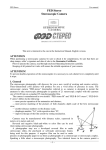
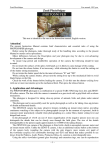
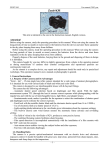
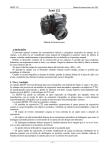
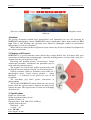
Horizont
User manual, 1970 year
Horizont
This text is identical (some errors were corrected) to the one in the User manual, English version,
1970 year.
Attention!
The present description contains brief characteristics and instructions for care and operation of
HORIZONT photographic camera. HORIZONT camera considerably differs from camera of FT-2
type. That is why handling and operation rules should be thoroughly studied by professional
photographers as well as by beginners.
Minor differences between the description and your camera may be due to technical development of
the camera construction.
1. Purpose and Features
HORIZONT is a special panorama camera fitted with a rotating built-in lens. Its features offer great
convenience in different types of photography, especially in taking pictures of scenes with a large area.
Angular field of view of the lens is 120°.
Interesting and beautiful pictures of landscapes, various
architectural ensembles, monuments and panoramas may be
made with this panorama camera.
The negative size (24×58 mm) enables to print photos with
the help of universal enlargers for 6×6 cm, 6×9 cm negatives.
Optical viewfinder allows to determine correct limits of a
photographed object. Correct camera position — strictly
horizontal — is indicated by the spirit level seen in the
viewfinder.
The detachable grip offers greater convenience in
photographing.
The design of HORIZONT camera shutter has one specific
feature: when the exposure time is changed, the shutter speed
remains the same. The exposure time is varied due to changing
the shutter slit.
2. Specifications
Frame size: 24×58 mm
Width of perforated film: 35 mm
Number of frames: 21
Exposure times: 1/30, 1/60, 1/125, 1/250 sec
Angular field of the lens:
horizontal — 120°
vertical — 45°
Lens: OF-28P
Focal length: 28 mm
–1–
Horizont
User manual, 1970 year
Relative aperture: f/2.8 to f/16
Optical viewfinder:
eyepiece magnification — 0,4x
angular field of view — 110×44°
Spirit level accuracy: 5°
Tripod socket thread: 1/4ʺ
Weight (with the cassette loaded with film): 1025 g
1. Lens
2. Bracket for attaching the viewfinder
3. Viewfinder
4. Viewfinder spirit level
5. Screw of the grip
6. Grip
7. Film reverse rewind knob
8. Exposure time scale
9. Film speed reminder
10. Diaphragm scale
11. Indicating mark of diaphragms and exposure
times
12. Release button
13. Shutter setting knob with exposure counter
14. Camera cover lock
15. Tripod bush
16. Cassette chamber
17. Cassette spool guide
18. Film guide roller
19. Film gate
20. Film slide
21. Falling in button
–2–
22. Sprocket
23. Take-up spool
24. Take-up spool slit
25. Folding back cover
Horizont
User manual, 1970 year
3. Loading the camera
Do not load the camera in direct sun light. It should be loaded and unloaded in subdued light. To load
the camera act as follows:
1. Remove the viewfinder
2. Open the back cover having pulled down the lock
latch.
3. Press the film rewind knob and turn it against the
direction shown by the arrow. Pull the knob up as far as
it will go; then remove the cassette.
The HORIZONT camera is designed for using
standard cassettes.
It is not recommended to use cassettes consisting of
two cylinders.
4. Load the cassette with film.
If the latter has not a standard-cut end, cut it in the
way shown in the picture.
5. Carefully insert the film end under the guide
roller and pull about 15 cm of film from under it.
6. Put the cassette into the chamber, having pulled
up the film rewind knob as far as it will go.
7. Pass the end of the film under the sprocket so that
it appears from under the take-up spool. To make the
process of drawing the film easier, press the falling in
button and rotate the sprocket with your finger thus
moving the film to the take-up spool.
–3–
Horizont
User manual, 1970 year
8. Insert the end of the film into the take-up spool
slit and, rotating the take-up spool with your finger,
slightly tighten the film.
9. Return the film rewind knob to its initial position and fix it by turning in the arrow direction.
10. Set the shutter by turning the shutter setting knob as far as it will go.
Press the release button.
Tighten up the film on the take-up spool.
11. Close the back cover.
If the camera is loaded correctly, the film rewind knob will spin. If not, check the camera for correct
loading. It is possible that the film end left the take-up spool slit. In this case, reload the camera.
12. Set the exposure counter at the red line. To do this
lift the winding knob up to the stop and, turning the lower
disk, align the red line with the index on the winding
knob.
13. Wind the film till figure 1 appears in the window
of the exposure counter.
14. Not to forget the sensibility of the film loaded in
your camera, set its value in the window of film speed
reminder.
4. Taking the Picture
–4–
Horizont
User manual, 1970 year
To obtain photos of high quality mount the camera on
the tripod.
When photographing hold the camera in the way
shown in the picture. Otherwise you will often
photograph your own fingers. If you want to photograph
with the camera mounted on the tripod, the grip should
be removed. For this aim screw off the grip screw and
put the grip into the carrying case.
Before taking a picture set the desired exposure time
and diaphragm value against the index. The exposure
time dial and the diaphragm scale have one and the same
index at the top of the camera against the exposure time
dial.
The latter can be rotated only in small limits; each
position of the dial is fixed. Exposure time and
diaphragm may be set only with the shutter cocked. Each
position of the diaphragm is fixed. To obtain high quality
pictures small diaphragm openings should be preferred
when determining the exposure, i. e. it is advisable to use
the smallest possible diaphragm and a longer exposure
time.
Looking through the viewfinder eyepiece, compose the scene to be photographed.
Correct horizontal position of the camera ensures a perspectively correct picture of the subject. For
this aim the ball of the spirit level should be placed in the contour of the light circle.
If you can not see the ball, carefully change the position of the camera so that the ball appears in the
circle.
When taking vertical pictures, the level is not used.
The release button should be pressed smoothly.
Correct position
Wrong position
–5–
Horizont
User manual, 1970 year
5. Unloading the Camera
When the exposure counter shows number 21, the exposed film should be rewound into the cassette.
To do this, act as follows:
1. Remove the viewfinder.
2. Press the film rewind knob and turn it against the
direction, shown by the arrow.
3. Disengage the shutter setting mechanism. For this
aim press the film rewind button to fix it in its extreme
lower position. When doing this, the shutter should be
released.
Rotating the film rewind knob in the arrow
direction, rewind the film into the cassette. All the film
being rewound into the cassette, the knob becomes
easier to rotate.
4. Open the back cover of the camera.
5. Pull the rewind knob upwards to the stop and remove the cassette.
6. “Horizont” Outfit
The camera set
comprises:
– the camera
itself;
– detachable
viewfinder;
– grip;
– carrying case
with a shoulder
strap;
– cable release;
– cassette.
–6–
Horizont
User manual, 1970 year
The picture is taken
with “HORIZONT”
camera.
The picture is taken with “ZORKI-4” camera.
7. Camera Care
The camera should be handled carefully. Keep it clean, protect from sharp jolts, moisture and sharp
temperature fluctuations.
Do not keep the camera for a long period of time with the shutter cocked. Thus you will save the
spring. Wind the shutter always to the stop.
Keep the camera in a closed carrying case. The grip should be removed and fastened to the case
cover.
Before rewinding the film, remove the viewfinder and put it into the carrying case.
Do not touch the optical surfaces with hands as this may cause deterioration of the coating.
The coated optical surfaces should be cleaned only with a clean soft cloth or cotton wool, slightly
moistened in alcohol.
Since the camera is a complicated optical mechanical device, it should be repaired and adjusted
only by highly trained specialists and in repair shops.
8. Depth of field table for the lens of “Horizont” camera
Diaphragm Depth of field (m) Depth of field (ft)
2.8
5.5 ÷ ∞
16.5 ÷ ∞
4
3.9 ÷ ∞
11.7 ÷ ∞
5.6
2.9 ÷ ∞
8.7 ÷ ∞
8
2÷∞
6÷∞
11
1.5 ÷ ∞
4.5 ÷ ∞
16
1÷∞
3÷∞
http://eugigufo.net/en/download/photovideo/
–7–