1
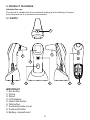
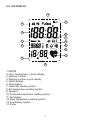
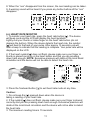
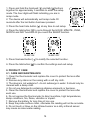
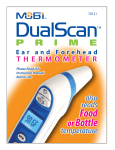
INDEX
1. Introduction
2. Contents
3. Safety instructions
4. Quick start guide
5. Product features
6. Instructions for use
7. Advanced settings
8. Product care
9. Troubleshooting
10. Specifications & symbols
1. INTRODUCTION
Congratulations on your purchase of this clinical lR thermometer with pulse
reading function.
Before using this device, please read all instructions in this manual
carefully. For the safe and correct use of this product, please read the
safety precautions explained in this user manual.
Please store for future reference as it contains important information.
2. CONTENTS
1 clinical lR thermometer
1 stand
1 storage and travel bag
2 x AAA batteries
1 instruction manual and guarantee
If any of the above is missing, please contact your retailer.
3. SAFETY INSTRUCTIONS
3.1. WARNING
Warning marks and symbols are included for safety and a correct use of this product
and prevention of any injury.
See below for the description of warning marks and symbols:
• WARNING: Means the possibility of personal injury in case of improper use.
• NOTICE: Means the possibility of injuries or damage* in the case of
improper use.
[*This covers any damage to your house, personal belongings and pets]
• PROHIBITION: Means that the detailed items expressed in words or figures
within or beside the symbol are totally forbidden. The symbol on the left
means forbidden in general.
• MUST BE OBSERVED: This means obligatory with the detailed items
expressed in words or figures within or beside the mark. The one on the left
means that it is compulsory in general.
• THE MEANING OF THE SYMBOL: Means Type-BF device.
3
• It is dangerous for patients to perform a self-evaluation and selftreatment based on the results of the reading. Be sure to follow your
doctor's instructions.
*A self-evaluation may cause deterioration in the state of the patient's
health.
• Don't touch or blow on the infra-red sensor.
*A dirty infra-red sensor may cause an inaccurate reading.
• Clean the infra-red sensor with a soft wet cloth.
* Do not clean with toilet paper or a tissue as this may scratch the infrared
sensor and cause an inaccurate reading.
• Clean the infra-red sensor every 4 uses (following the instructions
given on the manual, section 8.1 CARE AND MAINTENANCE).
• Keep the machine out of children's reach
* If a child takes his own reading, it may cause damage to his ear. Please
consult the doctor at once if a battery is accidentally swallowed.
• In the case of having performed any outdoor activities, no reading
should be taken until the patient's body temperature is the same as
the room temperature.
*If the patient has used a water-filled pillow or hot water bottle, this may
cause an inaccurate reading.
• If there is a difference in temperature between the storage area and
the place where the reading is to take place, leave the thermometer at
room temperature for approximately 30 minutes.
*A failure to do so may cause an inaccurate reading.
• If the reading exceeds 38°C and / or the patient feels uncomfortable,
the user should get in contact with a doctor.
• Stop using the product in the event of any pain.
*It is likely to cause damage to the inside of the patient's ear.
• It is not recommended to use the product by users suffering ear
disease including otitis and tympanitis.
*The affected part is likely to get worse.
• Don't use the product in a wet ear.
*It may cause damage to the ear.
• Do not dispose of the batteries by throwing them into a fire.
* They may explode.
FEVER! If the reading exceeds 38°C (100.4°F) and / or the patient feels
uncomfortable, the user should get in contact with a doctor.
• It is dangerous for patients to perform a self-evaluation and self-treatment
based on the results of the reading. Be sure to follow your doctor’s
instructions.
• Keep the thermotalk out of children’s reach.
• The device is intended for occasional reading and monitoring of body
temperature in a domestic environment. Do not use the product for other
purposes.
4
3.2. RECOMMENDATIONS
• The product should not be exposed to any chemical solvent, direct
sunshine or high temperatures.
• Do not drop, step on or subject the product to any vibration or impact.
• Do not use a mobile phone near the thermometer when it is being used
IMPORTANT
• Changes and modifications carried out by anyone other than the
MINILAND technical service will not be covered by the product guarantee.
• The warranty excludes misuse:
- Unauthorized disassembly and modification of the product.
- If the product is dropped during application or transportation.
- An incorrect use of the product.
4. QUICK START GUIDE
4.1. TAKING A FOREHEAD TEMPERATURE
• Ensure the forehead probe is fitted to the unit, then locate the probe
gently in the middle of the forehead. Press the forehead button [ ]once. The
device will beep twice to indicate that the reading is complete (1-2 seconds).
The LCD will display the temperature. You will also hear the result via the
speaker if the TALK function is enabled.
• FEVER! If the reading exceeds 38°C (100.4°F) and / or the patient feels
uncomfortable, the user should get in contact with a doctor.
• You can press the heart rate button [ ] at any time and this will return you
to the time mode.
4.2. TAKING IN AN INNER EAR TEMPERATURE
• Remove the forehead probe cover from the unit, and gently insert the
temperature probe as deep as possible into the ear. Press the ear button [ ]
once. The device will beep twice to indicate that the reading is complete. The
LCD will display ‘ooo’ and the temperature. You will also hear the result via
the speaker if the TALK function is enabled.
• FEVER! If the reading exceeds 38°C (100.4°F) and / or the patient feels
uncomfortable, the user should get in contact with a doctor.
• When the “ooo” disappears from the screen, the next reading can be taken.
• A warning sound will be heard if you press any button before all the “ooo“
disappear.
5
5. PRODUCT FEATURES
Intended for use:
The device is intended for the occasional reading and monitoring of human
body temperature in a domestic environment.
5.1 PARTS
1
7
2
4
3
5
6
IMPORTANT
1. Ear button
2. Probe
3. Stand
4. LCD display
5. Heart rate button
6. Talk button
7. Forehead probe cover
8. Forehead button
9. Battery compartment
6
8
9
5.2. LCD DISPLAY
14
13
1
2
12
11
3
10
4
9
8
7
5
6
1. AM/PM
2. Time, temperature or pulse display
3. Memory number
4. Memory number or year display
5. Month display
6. Date display
7. Heart rate reading symbol
8. Ear temperature reading symbol
9. Speaker
10. Forehead temperature reading symbol
11. Set display
12. Body temperature reading symbol
13. Low battery symbol
14. Pulse
7
5.3. FEATURE DESCRIPTION
5.3.1. ROOM TEMPERATURE, DATE & TIME DISPLAY
The LCD display will alternate every
5 seconds between showing the time
and then the room temperature.
The date range is 2001-2099 and the
time is displayed in a 24 hour clock
format.
TIME
TEMPERATURE
5.3.2. READING AND DISPLAY OF ROOM TEMPERATURE
Reading ranges from 5.0°C to 59.9°C (41.0°F to 139.8°F).
5.3.3. READING AND DISPLAY OF BODY TEMPERATURE
Readings range from 32.0°C to 42.9°C (89.6°F to 109.3°F).
5.3.4. MEMORY
Maximum of 15 sets of temperature records can be stored in the
devices memory. The temperature is stored together with date, memory
number and mode (Ear or Forehead).
5.3.5. AUDIO
Temperature, time and records can be heard using the TALK function.
5.3.6. HEART RATE MONITOR
Range: 40~140bpm.
6. INSTRUCTIONS FOR USE
6.1. LANGUAGE SETUP
To change between languages, press and hold the talk button [ ] for 3
seconds and release. Repeat to scroll through Spanish, English, German,
French, Italian, Russian or mute function. When the TALK function is
enabled (i.e. you have selected a language), the [ ] icon is displayed.
6.2. PREPARATIONS
1. For a correct reading, the thermometer must be in the same
environment 30 minutes before the reading takes place.
Replace any low-voltage battery to ensure full power supply.
2. When using for the first time, we recommend taking the reading 3 times
in the same ear. The maximum reading should be recorded in the case of
different results as there may be a slight difference of between (+/- 0.3°C,
+/- 0.5°F) if the thermometer is used continuously.
8
3. Any sudden changes in the temperature of the environment are likely to
affect an accurate reading.
4. Three readings can be taken consecutively. Wait only 30 seconds before
taking another reading on the same patient to avoid excessive cooling of
the skin. However, after the 3rd reading, wait 10 minutes before taking
another reading.
5. For users in sound health, both ears are almost the same in terms of
body temperature. You should select the ear that shows a constantly higher
temperature (feels warmer).
6. The reading must be taken in a clean ear to assure maximum accuracy.
Please clean the ear before taking a reading.
7. The reading must be taken when the patient is in a state of rest for
maximum accuracy.
8. If the patient has used a water-filled pillow or hot water bottle, this may
cause an inaccurate reading.
9. The temperature is likely to rise immediately after exercise or bathing.
In the case of having performed any outdoor activities, no reading should
be taken until the patient’s body temperature is the same as the room
temperature. Allow 30 minutes for the body to cool down before taking a
temperature.
10. If there is a difference in temperature between the storage area and the
place where the reading is to take place, leave the thermometer at room
temperature for approximately 30 minutes, failure to do so may cause an
inaccurate reading.
NOTE: The unit may not function correctly in an environment with
electrostatic discharge so it may be necessary to reset the unit.
6.3. TAKING A TEMPERATURE
6.3.1. TAKING A FOREHEAD TEMPERATURE
1. Ensure the forehead probe is fitted to the unit,
then locate the probe gently in the middle of the
forehead. Press the forehead button [ ]once. The
device will beep twice to indicate that the reading is
complete (1-2 seconds). The LCD will display the
temperature. You will also hear the result via the
speaker if the TALK function is enabled.
2. FEVER! If the reading exceeds 38°C (100.4°F)
and / or the patient feels uncomfortable, the user
should get in contact with a doctor.
9
3. The result will automatically be recorded in the memory. Once 15
recordings have been stored, on taking the 16th recording, the first set of
data will be removed and the new recording will take the top position.
4. Three readings can be taken consecutively. However, you should wait for
at least 10 minutes before taking a new reading.
5. Display of the results:
A. An accurate value display for result ranges between 32.0°C and 42.9°C
(89.6°F and 109.3°F)
B. "Hl" is displayed for result above 42.9°C~109.3°F
C. "LO" is displayed for result below 32.0°C~89.6°F
6. Once the reading has finished, the unit will automatically return to time
mode after 30 seconds.
7. The display will automatically turn off after 3 minutes after the last key has
been pressed (if sleep mode is enabled).
8. You can press the heart rate button [ ] at any time and this will return you
to the time mode.
6.3.2. TAKING IN AN INNER EAR TEMPERATURE
1. Remove the forehead probe cover from the unit, and
gently insert the temperature probe as deep as possible into
the ear. Press the ear button [ ] once. The device will beep
twice to indicate that the reading is complete. The LCD will
display ‘ooo’ and the temperature. You will also hear the
result via the speaker if the TALK function is enabled.
2. FEVER! If the reading exceeds 38°C (100.4°F) and /
or the patient feels uncomfortable, the user should get in
contact with a doctor.
3. The result will automatically be recorded in the memory. Once 15
recordings have been stored, on taking the 16th recording, the first set of
data will be removed and the new recording will take the top position.
4. Three readings can be taken consecutively. However, you should wait for
at least 10 minutes before taking a new reading.
5. Display of the results:
A. An accurate value display for result ranges between 32.0°C and 42.9°C
(89.6°F and 109.3°F)
B. "Hl" is displayed for result above 42.9°C~109.3°F
C. "LO" is displayed for result below 32.0°C~89.6°F
6. Once the reading has finished, the unit will automatically return to time
mode after 30 seconds.
7. The display will automatically turn off after 3 minutes after the last key has
been pressed (if sleep mode is enabled).
10
8. When the “ooo” disappears from the screen, the next reading can be taken.
9. A warning sound will be heard if you press any button before all the “ooo“
disappear.
6.4. HEART RATE MONITOR
1. To monitor your heart rate, press the heart rate button [ ]. The device
will beep once and the LCD will display the heart symbols.
Lightly rest your thumb or index finger on the heart rate button (do not
depress the button). When the device detects the heart rate, the symbol
[ ] will beat to the beat of your pulse. After approx 15 seconds you will
hear a beep to indicate that the reading is complete. Your pulse rate will be
displayed on the LCD.
2. If the heart symbol [ ] does not flash, please make sure your finger or
thumb is placed correctly on the heart button and that you are pressing
down hard enough. NOTE: Excessive pressure will obstruct the local blood
circulation and the device will not be able to detect the heart rate.
MONITORING
RESULT
3. Press the forehead button [ ] to exit heart rate mode at any time.
Caution:
1. Do not keep the [ ] pressed down when the device is
taking a reading of your heart rate.
2. If the symbol [ ] does not flash, please make sure your finger is placed
correctly and you are pressing down hard enough. Excessive pressure will
obstruct the local blood circulation and the device will not be able to detect
the heart rate.
3. The maximum reading time is 15 seconds.
11
4. Avoid swimming or intense physical exercise at least half an hour before
measuring heart rate.
5. Do not measure heart rate if your hand is shaking.
6. You must put your finger on the heart rate button (7) without moving it.
7. Whilst measuring, do not talk or move.
8. If the measurement is incorrect, you may take it again. However, you
must wait 5 to 15 minutes before taking the next measurement.
9. Make sure you use the same finger if you decide to repeat the heart rate
measurement so that you can compare the results.
10. The results obtained after measuring heart rate must only be regarded
as a reference. They cannot be used as the basis for carrying out clinical
diagnoses or evaluations. It is dangerous to draw conclusions or start
treatments based on these results. Please consult your doctor and follow
his indications if you don't feel well.
6.5. MEMORY MODE
Each temperature result will automatically be stored in the memory.
Once 15 temperatures have been stored, on taking the 16th temperature,
the first result will be removed and the new recording will take the top
position.
1. Press the forehead [ ] and talk button [ ] together once to enter
memory mode. “-- -” will be displayed if no data is stored.
2. To scroll between stored data, press the forehead button [ ] whilst in
memory mode. Press and hold the forehead button [ ] to scroll quickly
between stored data.
3. Press the talk button [ ] to hear the currently selected stored
temperature data. Press any button to stop the sound during the
announcement.
4. Maximum storage capacity is 15 sets of data with date and memory
number shown.
5. The unit automatically returns to clock
mode 5 seconds after the last button has been
pressed.
6. You can press the heart rate button [ ] at
any time before the 30 seconds is up and this
will return you to the time mode.
12
Memory NO
data
Memory
data
7. ADVANCED SETTINGS
7.1. FAHRENHEIT/CELSIUS SETUP
To change between Fahrenheit (°F) and
Celsius (°C) press the ear button [ ] and
talk button [ ] together.
CELSIUS
FAHRENHEIT
7.2. TIME & DATE SETUP
1. Press and hold the forehead [ ] and talk [ ] buttons
together for approximately 3 seconds to enter the setup
mode. The hour digits will flash indicating you are in
setup mode.
2. The device will automatically exit setup mode 30
seconds after the last button has been pressed.
3. Press the heart rate button [ ] at any time to exit setup.
4. Press the talk button [ ] to select between setting the HOUR, MINUTE,
YEAR, MONTH, DAY and SLEEP functions.
HOUR
MINUTE
YEAR
MONTH
DAY
5. Press forehead button [ ] to modify the selected function. Pressing and
holding the forehead button [ ] will scroll through the digits more quickly.
6. Press the talk button [ ] to confirm the settings and go to the next
function.
7.3. SLEEP MODE SETUP
It is recommended that you use sleep mode as this will prolong the battery
life. In sleep mode the display will automatically turn off after 3 minutes to
save battery power if sleep mode is set to “ON”.
13
1. Press and hold the forehead [ ] and talk [ ] buttons
together for approximately 3 seconds to enter the setup
mode. The hour digits will flash indicating you are in
setup mode.
2. The device will automatically exit setup mode 30
seconds after the last button has been pressed.
3. Press the heart rate button [ ] at any time to exit setup.
4. Press the talk button [ ] to cycle through the HOUR, MINUTE, YEAR,
MONTH and DAY functions till you reach the SLEEP function.
SLEEP ON
SLEEP OFF
5. Press forehead button [ ] to modify the selected function.
6. Press the talk button [ ] to confirm the settings and exit setup.
8. PRODUCT CARE
8.1. CARE AND MAINTENANCE
1. Clean the thermometer and replace the cover to protect the lens after
each use.
2. Remove any stains on the casing with a soft dry cloth.
3. The device is not waterproof - do not submerge in water. It should only be
cleaned with a damp cloth.
4. Do not use detergents containing abrasive elements or benzene.
5. Clean the thermometer and replace the cover to protect the lens after
each use.
6. Do not expose the thermometer to direct sunshine, high temperatures,
damp conditions, fire, flame, vibration or impact.
7. Remove the battery for long time of non use.
8. Keep the probe surface clean, otherwise the reading will not be accurate.
9. Do not touch or blow on the infrared sensor as a dirty infrared sensor
may cause an inaccurate reading.
14
10. Do not clean the infrared sensor with toilet paper or a tissue as this may
scratch it and cause an inaccurate reading.
11. Clean the probe with clean, soft, paper moistened in water or alcohol,
and take the reading after the water on the surface of the probe all
evaporates.
8.2. CALIBRATION
• This thermometer is calibrated at the time of manufacture. If the
thermometer is used according to instructions, periodic recalibration is not
required. If at any time you question the accuracy of the measurement,
please contact the retailer immediately.
• The unit may not function correctly in an environment
with electrostatic discharge so it may be necessary to
reset the unit.
• Don’t attempt to modify or reassemble the
thermometer.
8.3. BATTERIES
8.3.1. REPLACE THE BATTERIES
• Replace batteries if low battery symbol is
displayed [ ].
• Remove the battery compartment flap.
• Use only new batteries (2 x AAA battery).
• Replace the battery compartment firmly.
• Remove the batteries if storing the product for
long periods of non use.
8.3.2. BATTERY & PRODUCT DISPOSAL INFORMATION
• Remember to dispose of the product responsibly.
• Do not mix products bearing the crossed-out bin symbol with your general
household waste.
• For the correct collection and treatment of these products take them to
the collection points designated by your local authority. Alternatively contact
the retailer who sold you the product.
• Please consult the doctor at once if a battery is accidentally swallowed.
• Do not dispose of the batteries by throwing them into a fire as they may
explode.
• For the disposal of batteries and waste, please act according to local law.
15
9. TROUBLESHOOTING
PROBLEMS
CHECK LIST
SOLUTIONS
No response/
Automatic reset
when the insulator
is taken out.
Battery used up.
Insert a new battery.
Battery in wrong polarity.
Remove battery, turn it over
and re-insert.
Poor battery contact.
Remove battery, clean
contacts and re-insert.
Battery symbol
on LCD.
Low battery life.
Insert a new battery.
“Lo” on screen
(result below
32.0°C or 89.6°F).
Ensure thermometer is placed Follow user’s manual
correctly in the
to point at the eardrum /
eardrum / forehead.
forehead.
“Hi” on screen
(result below
42.9°C or 109.3°F).
Please check the
operation method.
Follow user’s manual
for correct reading.
“Errp” on screen.
Hardware problem.
Consult your dealer
“ErrE” on screen.
Environment temperature
beyond the scope of :
10°C~40°C (50.0°F~104.0°F)
for ear.
15°C~40°C (59.0°F~104.0°F)
for forehead.
Condition the thermometer
until it reaches environment
temperature:
10°C~40°C (50.0°F~104.0°F)
for ear.
15°C~40°C (59.0°F~104.0°F)
for forehead.
“Err” on screen.
Operation error, more than 15 Please repeat the operation,
seconds without test result in following the instructions in
heart rate mode.
user manual.
10. SPECIFICATIONS & SYMBOLS
10.1 TECHNICAL SPECIFICATION
• Product Name: Clinical IR thermometer
• Model: 89068
• Power supply: DC3V (2 x AAA battery)
• Temperature sensing Part: IR sensor
• Range: 32.0°C ~ 42.9°C (89.6°F ~109.3°F)
• Room Temperature: 5.0°C ~ 59.9°C (41.0°F ~139.8°F)
Accuracy:
+/- 0.2°C (or +/- 0.4°F)
35.5°C ~ 42.0°C (or 95.9°F ~107.6°F)
+/- 0.3°C (+/- 0.5°F)
35.0°C ~ 35.4°C (or 89.6°F ~ 95.8°F)
42.1°C ~ 42.9°C (or 107.7°F ~ 109.3°F)
16
• Room Temperature: +/- 2°C (4°F)
• Size: 127(L) x 39(W) x 63(D) mm
• Weight : 67g (without batteries)
Working environment:
10°C~40°C (50.0°F~104.0°F) for Ear
15°C~40°C (59.0°F ~104.0°F) for Forehead
Relative humidity: 20%RH~85%RH
• Storage environment: -10°C~55°C (14°F~131°F)
Relative humidity: 20%RH~85%RH
• Precision/repeatability: +/- 0.3°C (+/- 0.5°F)
10.2. NORMALIZED SYMBOLS
The following is a list of symbols that can be found on the product,
packaging and instructions.
•
Attention: Read the operating Instructions for use!
•
Applied part of type BF
•
Disposal in accordance with Directive 2002/96/EC (WEEE)
•
Complies with the European Medical Device Directive (93/42/EEC)
and amended by directive 2007/47/EC requirements. Notified body
TÜV Rheinland (CE0197)
•
Batch code
•
Serial number
•
The name and the address of the manufacturer.
•
Authorized Representative in the European Community
17
050514