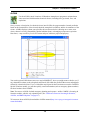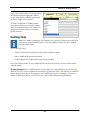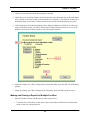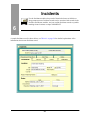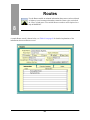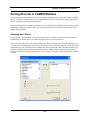
1
The CAMEO® Software Suite
CAMEO
®
User Manual
October 2010
D S T AT
ES
E
N
TA
IO
V IR O N M
NA
G E NC Y
•
IT E
•
EN
UN
L P R OTE C
T
U.S. Environmental Protection Agency
Office of Emergency Management
Washington, D.C.
National Oceanic and Atmospheric Administration
Office of Response and Restoration
Emergency Response Division
Seattle, Washington
Terms and Conditions for CAMEO®
The recipient of the CAMEO software and documentation agrees to the following guidelines and
restrictions:
Use and Distribution Restrictions
CAMEO is available at no charge to those organizations and individuals (recipients) responsible for the safe
handling of chemicals.
Limitation of Liability
The United States Government has used its best efforts to incorporate accurate and complete data into
CAMEO. Nevertheless, the United States Government does not warrant accuracy or completeness, is not
responsible for errors and omissions, and is not liable for any direct, indirect, or consequential damages
flowing from the recipient’s use of CAMEO.
The CAMEO software is being distributed “as is” and the United States Government does not make any
warranty claims, either express or implied, with respect to the CAMEO software, its quality, accuracy,
completeness, performance, merchantability, or fitness for any intended purpose.
Indemnification
Non-governmental recipients shall indemnify and save harmless the United States and its agents and
employees against any and all loss, damage, claim, or liability whatsoever, due to personal injury or death,
or damage to property of others directly or indirectly due to the use of CAMEO by the recipient, or any
other act or omission of the recipient, including failure to comply with the provisions of these terms and
conditions.
Trademarks
CAMEO®, ALOHA®, and MARPLOT® are registered trademarks of the United States Government.
Table of Contents
Introduction to CAMEO . . . . . . . . . . . . . . . . . . . . . . . . . . . . . . . . . . . . . . . . . . . . 9
CAMEO in Brief. . . . . . . . . . . . . . . . . . . . . . . . . . . . . . . . . . . . . . . . . . . . . . . . . . . . . . . . . 9
CAMEO Development . . . . . . . . . . . . . . . . . . . . . . . . . . . . . . . . . . . . . . . . . . . . . 10
CAMEO Users . . . . . . . . . . . . . . . . . . . . . . . . . . . . . . . . . . . . . . . . . . . . . . . . . . . 10
CAMEO Resources Online. . . . . . . . . . . . . . . . . . . . . . . . . . . . . . . . . . . . . . . . . . 11
CAMEO and EPCRA . . . . . . . . . . . . . . . . . . . . . . . . . . . . . . . . . . . . . . . . . . . . . . 11
CAMEO and the Clean Air Act . . . . . . . . . . . . . . . . . . . . . . . . . . . . . . . . . . . . . . 11
CAMEO Modules Overview . . . . . . . . . . . . . . . . . . . . . . . . . . . . . . . . . . . . . . . . . . . . . . 12
Other Programs in the CAMEO Suite . . . . . . . . . . . . . . . . . . . . . . . . . . . . . . . . . . . . . . . 13
CAMEO Chemicals . . . . . . . . . . . . . . . . . . . . . . . . . . . . . . . . . . . . . . . . . . . . . . . 13
ALOHA . . . . . . . . . . . . . . . . . . . . . . . . . . . . . . . . . . . . . . . . . . . . . . . . . . . . . . . . 14
MARPLOT . . . . . . . . . . . . . . . . . . . . . . . . . . . . . . . . . . . . . . . . . . . . . . . . . . . . . . 15
Some CAMEO-Related Programs . . . . . . . . . . . . . . . . . . . . . . . . . . . . . . . . . . . . . . . . . . 15
Tier2 Submit . . . . . . . . . . . . . . . . . . . . . . . . . . . . . . . . . . . . . . . . . . . . . . . . . . . . . 15
RMP*Comp . . . . . . . . . . . . . . . . . . . . . . . . . . . . . . . . . . . . . . . . . . . . . . . . . . . . . 16
Getting Started . . . . . . . . . . . . . . . . . . . . . . . . . . . . . . . . . . . . . . . . . . . . . . . . . . . 17
Home and Navigation . . . . . . . . . . . . . . . . . . . . . . . . . . . . . . . . . . . . . . . . . . . . . . . . . . . . 17
Anatomy of a CAMEO Module . . . . . . . . . . . . . . . . . . . . . . . . . . . . . . . . . . . . . . . . . . . . 18
The Toolbar. . . . . . . . . . . . . . . . . . . . . . . . . . . . . . . . . . . . . . . . . . . . . . . . . . . . . . . . . . . . 18
List and Record Views . . . . . . . . . . . . . . . . . . . . . . . . . . . . . . . . . . . . . . . . . . . . . . . . . . . 19
Browsing and Searching . . . . . . . . . . . . . . . . . . . . . . . . . . . . . . . . . . . . . . . . . . . . . . . . . . 20
Using the Show Related Command . . . . . . . . . . . . . . . . . . . . . . . . . . . . . . . . . . . . . . . . . 21
Editing Records. . . . . . . . . . . . . . . . . . . . . . . . . . . . . . . . . . . . . . . . . . . . . . . . . . . . . . . . . 21
Getting Help . . . . . . . . . . . . . . . . . . . . . . . . . . . . . . . . . . . . . . . . . . . . . . . . . . . . . . . . . . . 22
Facilities. . . . . . . . . . . . . . . . . . . . . . . . . . . . . . . . . . . . . . . . . . . . . . . . . . . . . . . . . 23
Adding and Editing Facilities Records . . . . . . . . . . . . . . . . . . . . . . . . . . . . . . . . . . . . . . . 25
Adding a New Facilities Record . . . . . . . . . . . . . . . . . . . . . . . . . . . . . . . . . . . . . . 26
Editing a Facilities Record . . . . . . . . . . . . . . . . . . . . . . . . . . . . . . . . . . . . . . . . . . 26
Adding Contact Information for Facilities . . . . . . . . . . . . . . . . . . . . . . . . . . . . . . . . . . . . 27
Adding a Phone Number to a Facilities Record . . . . . . . . . . . . . . . . . . . . . . . . . . 27
Adding a Contacts Record for a Facility . . . . . . . . . . . . . . . . . . . . . . . . . . . . . . . 27
3
Adding and Removing Site Plans for Facilities . . . . . . . . . . . . . . . . . . . . . . . . . . . . . . . . 28
Adding a Site Plan to a Facilities Record . . . . . . . . . . . . . . . . . . . . . . . . . . . . . . . 28
Removing a Site Plan for a Facilities Record . . . . . . . . . . . . . . . . . . . . . . . . . . . . 28
Mapping a Facility . . . . . . . . . . . . . . . . . . . . . . . . . . . . . . . . . . . . . . . . . . . . . . . . . . . . . . 29
Documenting Incidents at Facilities . . . . . . . . . . . . . . . . . . . . . . . . . . . . . . . . . . . . . . . . . 29
Modeling Screenings and Scenarios at Facilities . . . . . . . . . . . . . . . . . . . . . . . . . . . . . . . 29
Accessing Facility Information. . . . . . . . . . . . . . . . . . . . . . . . . . . . . . . . . . . . . . . . . . . . . 29
Making a Basic Search for a Facilities Record. . . . . . . . . . . . . . . . . . . . . . . . . . . 29
Making an Advanced Search for a Facilities Record . . . . . . . . . . . . . . . . . . . . . . 31
Making and Printing Reports on Facilities . . . . . . . . . . . . . . . . . . . . . . . . . . . . . . . . . . . . 32
Making and Printing a Report for a Single Facility . . . . . . . . . . . . . . . . . . . . . . . 32
Making and Printing a Report for Multiple Facilities. . . . . . . . . . . . . . . . . . . . . . 33
Making and Printing a Set of Mailing Labels. . . . . . . . . . . . . . . . . . . . . . . . . . . . 34
Making KML Files . . . . . . . . . . . . . . . . . . . . . . . . . . . . . . . . . . . . . . . . . . . . . . . . . . . . . . 35
Chemicals in Inventory . . . . . . . . . . . . . . . . . . . . . . . . . . . . . . . . . . . . . . . . . . . . 41
Adding and Editing Chemicals in Inventory Records . . . . . . . . . . . . . . . . . . . . . . . . . . . 42
Adding a New Chemicals in Inventory Record . . . . . . . . . . . . . . . . . . . . . . . . . . 42
Editing a Chemicals in Inventory Record. . . . . . . . . . . . . . . . . . . . . . . . . . . . . . . 43
Chemicals in Inventory Fields . . . . . . . . . . . . . . . . . . . . . . . . . . . . . . . . . . . . . . . . . . . . . 43
Contacts. . . . . . . . . . . . . . . . . . . . . . . . . . . . . . . . . . . . . . . . . . . . . . . . . . . . . . . . . 47
Adding and Editing Contacts Records . . . . . . . . . . . . . . . . . . . . . . . . . . . . . . . . . . . . . . . 48
Adding a New Contacts Record . . . . . . . . . . . . . . . . . . . . . . . . . . . . . . . . . . . . . . 48
Making an Association with a Contacts Record . . . . . . . . . . . . . . . . . . . . . . . . . . 49
Editing a Contacts Record . . . . . . . . . . . . . . . . . . . . . . . . . . . . . . . . . . . . . . . . . . 49
Contact Fields . . . . . . . . . . . . . . . . . . . . . . . . . . . . . . . . . . . . . . . . . . . . . . . . . . . . . . . . . . 49
Incidents . . . . . . . . . . . . . . . . . . . . . . . . . . . . . . . . . . . . . . . . . . . . . . . . . . . . . . . . 51
Adding and Editing Incidents Records . . . . . . . . . . . . . . . . . . . . . . . . . . . . . . . . . . . . . . . 52
Adding a New Incidents Record . . . . . . . . . . . . . . . . . . . . . . . . . . . . . . . . . . . . . . 52
Editing an Incidents Record . . . . . . . . . . . . . . . . . . . . . . . . . . . . . . . . . . . . . . . . . 53
Adding Reporter/Discharger Contact Information . . . . . . . . . . . . . . . . . . . . . . . . . . . . . . 53
Mapping an Incident . . . . . . . . . . . . . . . . . . . . . . . . . . . . . . . . . . . . . . . . . . . . . . . . . . . . . 53
Incident Fields. . . . . . . . . . . . . . . . . . . . . . . . . . . . . . . . . . . . . . . . . . . . . . . . . . . . . . . . . . 54
4
Special Locations . . . . . . . . . . . . . . . . . . . . . . . . . . . . . . . . . . . . . . . . . . . . . . . . . 57
Adding and Editing Special Locations Records . . . . . . . . . . . . . . . . . . . . . . . . . . . . . . . . 58
Adding a New Special Locations Record . . . . . . . . . . . . . . . . . . . . . . . . . . . . . . . 58
Editing a Special Locations Record . . . . . . . . . . . . . . . . . . . . . . . . . . . . . . . . . . . 58
Adding Contact Information for Special Locations . . . . . . . . . . . . . . . . . . . . . . . . . . . . . 58
Adding a Phone Number to a Special Locations Record . . . . . . . . . . . . . . . . . . . 58
Adding a Contacts Record for a Special Location . . . . . . . . . . . . . . . . . . . . . . . . 59
Adding and Removing Site Plans for Special Locations . . . . . . . . . . . . . . . . . . . . . . . . . 59
Adding a Site Plan to a Special Locations Record . . . . . . . . . . . . . . . . . . . . . . . . 59
Removing a Site Plan for a Special Locations Record . . . . . . . . . . . . . . . . . . . . . 60
Mapping a Special Location . . . . . . . . . . . . . . . . . . . . . . . . . . . . . . . . . . . . . . . . . . . . . . . 60
Special Location Fields. . . . . . . . . . . . . . . . . . . . . . . . . . . . . . . . . . . . . . . . . . . . . . . . . . . 60
Routes . . . . . . . . . . . . . . . . . . . . . . . . . . . . . . . . . . . . . . . . . . . . . . . . . . . . . . . . . . 63
Adding and Editing Routes Records. . . . . . . . . . . . . . . . . . . . . . . . . . . . . . . . . . . . . . . . . 64
Adding a New Routes Record . . . . . . . . . . . . . . . . . . . . . . . . . . . . . . . . . . . . . . . 64
Editing a Routes Record . . . . . . . . . . . . . . . . . . . . . . . . . . . . . . . . . . . . . . . . . . . . 64
Mapping a Route. . . . . . . . . . . . . . . . . . . . . . . . . . . . . . . . . . . . . . . . . . . . . . . . . . . . . . . . 64
Tracking Chemicals Transported along a Route. . . . . . . . . . . . . . . . . . . . . . . . . . . . . . . . 64
Tracking Incidents on a Route . . . . . . . . . . . . . . . . . . . . . . . . . . . . . . . . . . . . . . . . . . . . . 65
Routes Fields. . . . . . . . . . . . . . . . . . . . . . . . . . . . . . . . . . . . . . . . . . . . . . . . . . . . . . . . . . . 65
Resources. . . . . . . . . . . . . . . . . . . . . . . . . . . . . . . . . . . . . . . . . . . . . . . . . . . . . . . . 67
Adding and Editing Resources Records . . . . . . . . . . . . . . . . . . . . . . . . . . . . . . . . . . . . . . 68
Adding a New Resources Record . . . . . . . . . . . . . . . . . . . . . . . . . . . . . . . . . . . . . 68
Editing a Resources Record . . . . . . . . . . . . . . . . . . . . . . . . . . . . . . . . . . . . . . . . . 68
Adding Contact Information for Resource Suppliers . . . . . . . . . . . . . . . . . . . . . . . . . . . . 68
Adding a Phone Number to a Resources Record . . . . . . . . . . . . . . . . . . . . . . . . . 68
Adding a Contacts Record for a Resource Supplier . . . . . . . . . . . . . . . . . . . . . . . 69
Adding and Removing Documents for a Resource Supplier . . . . . . . . . . . . . . . . . . . . . . 69
Adding a Document to a Resources Record . . . . . . . . . . . . . . . . . . . . . . . . . . . . . 69
Removing a Document for a Resources Record . . . . . . . . . . . . . . . . . . . . . . . . . . 70
Mapping a Resource . . . . . . . . . . . . . . . . . . . . . . . . . . . . . . . . . . . . . . . . . . . . . . . . . . . . . 70
Resource Fields. . . . . . . . . . . . . . . . . . . . . . . . . . . . . . . . . . . . . . . . . . . . . . . . . . . . . . . . . 70
5
Screening & Scenarios . . . . . . . . . . . . . . . . . . . . . . . . . . . . . . . . . . . . . . . . . . . . . 73
Using Screening & Scenarios to Assess Hazards . . . . . . . . . . . . . . . . . . . . . . . . . . . . . . . 74
Choosing Between Screening and Scenarios . . . . . . . . . . . . . . . . . . . . . . . . . . . . 74
Making Screening Calculations . . . . . . . . . . . . . . . . . . . . . . . . . . . . . . . . . . . . . . . . . . . . 75
About Screening Calculations . . . . . . . . . . . . . . . . . . . . . . . . . . . . . . . . . . . . . . . 75
Estimating a Screening Zone . . . . . . . . . . . . . . . . . . . . . . . . . . . . . . . . . . . . . . . . 76
Making Scenarios Calculations . . . . . . . . . . . . . . . . . . . . . . . . . . . . . . . . . . . . . . . . . . . . 77
About Scenarios Calculations . . . . . . . . . . . . . . . . . . . . . . . . . . . . . . . . . . . . . . . . 77
Estimating Vulnerable Zones . . . . . . . . . . . . . . . . . . . . . . . . . . . . . . . . . . . . . . . . 77
Plotting a Threat Zone on a Map . . . . . . . . . . . . . . . . . . . . . . . . . . . . . . . . . . . . . . . . . . . 79
Differences Between Screening & Scenarios, ALOHA, and RMP Endpoints. . . . . . . . . 80
Screening & Scenarios Fields . . . . . . . . . . . . . . . . . . . . . . . . . . . . . . . . . . . . . . . . . . . . . . 82
Importing and Exporting Data . . . . . . . . . . . . . . . . . . . . . . . . . . . . . . . . . . . . . . 85
Avoiding Trouble . . . . . . . . . . . . . . . . . . . . . . . . . . . . . . . . . . . . . . . . . . . . . . . . . . . . . . . 85
CAMEO Data Ownership Rule . . . . . . . . . . . . . . . . . . . . . . . . . . . . . . . . . . . . . . 85
Possible Data Transfers . . . . . . . . . . . . . . . . . . . . . . . . . . . . . . . . . . . . . . . . . . . . . . . . . . 86
Zipped Merge Files: The CAMEO Standard File Format . . . . . . . . . . . . . . . . . . . . . . . . 87
How CAMEO Assigns and Uses Record IDs. . . . . . . . . . . . . . . . . . . . . . . . . . . . . . . . . . 87
Parent and Child Modules and Record IDs . . . . . . . . . . . . . . . . . . . . . . . . . . . . . 87
Data Transfers and Record IDs. . . . . . . . . . . . . . . . . . . . . . . . . . . . . . . . . . . . . . . 89
Viewing Record IDs . . . . . . . . . . . . . . . . . . . . . . . . . . . . . . . . . . . . . . . . . . . . . . . 89
Importing Data from Tier2 Submit . . . . . . . . . . . . . . . . . . . . . . . . . . . . . . . . . . . . . . . . . . 90
Things to Know Before Importing Tier II Data . . . . . . . . . . . . . . . . . . . . . . . . . . 91
Importing a Tier2 Submit Data File . . . . . . . . . . . . . . . . . . . . . . . . . . . . . . . . . . . 93
Transferring Data Between CAMEO Programs . . . . . . . . . . . . . . . . . . . . . . . . . . . . . . . . 93
Exporting Data from All CAMEO Modules. . . . . . . . . . . . . . . . . . . . . . . . . . . . . 94
Exporting Data from All Records in a CAMEO Module . . . . . . . . . . . . . . . . . . . 94
Exporting Data from a Subset of the Records in a Module . . . . . . . . . . . . . . . . . 95
Exporting Data from a Single CAMEO Record . . . . . . . . . . . . . . . . . . . . . . . . . . 96
Exporting Map Links and Map Objects . . . . . . . . . . . . . . . . . . . . . . . . . . . . . . . . 96
Exporting Site Plans and Linked Documents . . . . . . . . . . . . . . . . . . . . . . . . . . . . 97
Importing Data from Another Copy of CAMEO . . . . . . . . . . . . . . . . . . . . . . . . . 98
Strategies for Avoiding Duplicate Records . . . . . . . . . . . . . . . . . . . . . . . . . . . . . 99
Exporting Data to Other Programs . . . . . . . . . . . . . . . . . . . . . . . . . . . . . . . . . . . . . . . . . 102
6
Managing Your CAMEO System . . . . . . . . . . . . . . . . . . . . . . . . . . . . . . . . . . . 103
CAMEO Management Plan . . . . . . . . . . . . . . . . . . . . . . . . . . . . . . . . . . . . . . . . . . . . . . 103
Reasons to Make a CAMEO Management Plan. . . . . . . . . . . . . . . . . . . . . . . . . 103
Elements of a Good CAMEO Management Plan . . . . . . . . . . . . . . . . . . . . . . . . 103
CAMEO System Manager . . . . . . . . . . . . . . . . . . . . . . . . . . . . . . . . . . . . . . . . . . . . . . . 105
Preparing a Plan for Entering and Updating Data . . . . . . . . . . . . . . . . . . . . . . . . . . . . . 105
Program Security . . . . . . . . . . . . . . . . . . . . . . . . . . . . . . . . . . . . . . . . . . . . . . . . . . . . . . 106
Password Protection . . . . . . . . . . . . . . . . . . . . . . . . . . . . . . . . . . . . . . . . . . . . . . 106
Implementing a CAMEO Backup Program . . . . . . . . . . . . . . . . . . . . . . . . . . . . 107
Installing and Running CAMEO on a Network . . . . . . . . . . . . . . . . . . . . . . . . . . . . . . . 107
Ensure Security First. . . . . . . . . . . . . . . . . . . . . . . . . . . . . . . . . . . . . . . . . . . . . . 108
Possible Configurations . . . . . . . . . . . . . . . . . . . . . . . . . . . . . . . . . . . . . . . . . . . 108
Installing the Runtime Version on a Network . . . . . . . . . . . . . . . . . . . . . . . . . . 108
Using FileMaker Pro to Host Runtime Files . . . . . . . . . . . . . . . . . . . . . . . . . . . 108
Using FileMaker Server . . . . . . . . . . . . . . . . . . . . . . . . . . . . . . . . . . . . . . . . . . . 113
Managing Multiple Users . . . . . . . . . . . . . . . . . . . . . . . . . . . . . . . . . . . . . . . . . . 113
Using CAMEO if You Already Have FileMaker . . . . . . . . . . . . . . . . . . . . . . . . . . . . . . 114
Reference Information . . . . . . . . . . . . . . . . . . . . . . . . . . . . . . . . . . . . . . . . . . . . 115
CAMEO Menus . . . . . . . . . . . . . . . . . . . . . . . . . . . . . . . . . . . . . . . . . . . . . . . . . . . . . . . 115
Searching . . . . . . . . . . . . . . . . . . . . . . . . . . . . . . . . . . . . . . . . . . . . . . . . . . . . . . . . . . . . 118
Making a Basic Search . . . . . . . . . . . . . . . . . . . . . . . . . . . . . . . . . . . . . . . . . . . . 119
Searching State Fields. . . . . . . . . . . . . . . . . . . . . . . . . . . . . . . . . . . . . . . . . . . . . 119
Making an Advanced Search . . . . . . . . . . . . . . . . . . . . . . . . . . . . . . . . . . . . . . . 120
Saving Searches . . . . . . . . . . . . . . . . . . . . . . . . . . . . . . . . . . . . . . . . . . . . . . . . . 121
Making Append Searches and Subset Searches . . . . . . . . . . . . . . . . . . . . . . . . . 121
Sorting Records in CAMEO Modules . . . . . . . . . . . . . . . . . . . . . . . . . . . . . . . . . . . . . . 122
Choosing Sort Criteria . . . . . . . . . . . . . . . . . . . . . . . . . . . . . . . . . . . . . . . . . . . . 122
Sorting Records by a Single Criterion . . . . . . . . . . . . . . . . . . . . . . . . . . . . . . . . 124
Unsorting Records . . . . . . . . . . . . . . . . . . . . . . . . . . . . . . . . . . . . . . . . . . . . . . . 125
Sorting a Subset of Records in a Module . . . . . . . . . . . . . . . . . . . . . . . . . . . . . . 125
Sorting by Multiple Criteria . . . . . . . . . . . . . . . . . . . . . . . . . . . . . . . . . . . . . . . . 126
Linking a Record to a Map Object . . . . . . . . . . . . . . . . . . . . . . . . . . . . . . . . . . . . . . . . . 127
Creating a Map Link . . . . . . . . . . . . . . . . . . . . . . . . . . . . . . . . . . . . . . . . . . . . . . 128
Viewing a Record Location on a Map . . . . . . . . . . . . . . . . . . . . . . . . . . . . . . . . 128
Deleting a Map Link . . . . . . . . . . . . . . . . . . . . . . . . . . . . . . . . . . . . . . . . . . . . . . 128
7
Overview of Legislation . . . . . . . . . . . . . . . . . . . . . . . . . . . . . . . . . . . . . . . . . . . . . . . . . 128
EPCRA . . . . . . . . . . . . . . . . . . . . . . . . . . . . . . . . . . . . . . . . . . . . . . . . . . . . . . . . 128
CAA 112(r) . . . . . . . . . . . . . . . . . . . . . . . . . . . . . . . . . . . . . . . . . . . . . . . . . . . . . 134
Glossary. . . . . . . . . . . . . . . . . . . . . . . . . . . . . . . . . . . . . . . . . . . . . . . . . . . . . . . . 135
Index . . . . . . . . . . . . . . . . . . . . . . . . . . . . . . . . . . . . . . . . . . . . . . . . . . . . . . . . . . 139
8
Introduction to CAMEO
CAMEO® (Computer-Aided Management of Emergency Operations) is a software tool
for emergency planning and response. This section explains what CAMEO is, its basic
functions, who designed it, and why—and for whom—it was developed.
1
CAMEO in Brief
The CAMEO software suite is a collection of software programs designed to assist first responders and
emergency planners to:
• Access chemical property and response information.
• Model potential chemical releases.
• Display key locations and release predictions on a map.
• Manage planning data (especially data required by the Emergency
Planning and Community Right-to-Know Act, see “CAMEO and
EPCRA” on page 11).
The complete CAMEO suite consists of two kinds of components:
• Modules: Eight modules (or databases) are included in the CAMEO program, which you can use for
response and planning record-keeping. The CAMEO modules are Facilities, Chemicals in Inventory,
Contacts, Incidents, Special Locations, Routes, Resources, and Screening & Scenarios. (For more
information, see “CAMEO Modules Overview” on page 12.)
• Programs: Three programs can be used with the modules: CAMEO Chemicals, ALOHA, and
MARPLOT. (For more information, see “Other Programs in the CAMEO Suite” on page 13.)
All of the CAMEO components work interactively to display critical information in an easy-to-understand
manner. During a response to a chemical release, the CAMEO software suite of programs can help
decision makers quickly get the information they need for a safe, effective response.
9
Chapter 1: Introduction to CAMEO
To complete various tasks, you’re likely to use two or three CAMEO modules or programs in sequence.
For example, suppose you want to assess the potential hazard posed to your community by a particular
chemical in the inventory of a local chemical processing plant. As part of your investigation, you might:
1. Find the record for that plant in CAMEO’s Facilities module.
2. View the location of the plant on a map in MARPLOT.
3. Check the record in CAMEO’s Chemicals in Inventory module for the chemical of concern in the
plant’s inventory.
4. Review the chemical’s physical properties and response recommendations in CAMEO Chemicals.
5. Use ALOHA to predict the extent of the area that could be at risk if that chemical were released, and
then use MARPLOT to show that threat zone area on a map.
CAMEO Development
CAMEO was developed by the National Oceanic and Atmospheric Administration’s
Office of Response and Restoration (NOAA OR&R, http://response.restoration.noaa.gov)
and the U.S. Environmental Protection Agency’s Office of Emergency Management (EPA
OEM, http://www.epa.gov/emergencies).
CAMEO was developed because NOAA recognized the need to assist first responders
with easily accessible and accurate response information. Since 1988, NOAA and EPA
have collaborated to further the development of CAMEO. The U.S. Census Bureau and
the U.S. Coast Guard also have worked with EPA and NOAA to enhance CAMEO.
CAMEO Users
Within the United States, CAMEO’s primary users include firefighters, State Emergency Response
Commissions, Tribal Emergency Response Commissions, Local Emergency Planning Committees,
industry, schools, environmental organizations, and police departments.
Outside of the United States, CAMEO is in use in many countries. CAMEO was selected by the United
Nations Environment Programme (UNEP, http://www.unep.org) as a tool for helping developing nations
prepare for and respond to chemical accidents, and is part of the UNEP’s Awareness and Preparedness for
Emergencies at the Local Level (APELL) program. It has been demonstrated or taught in 50 countries as
part of the APELL workshops on community preparedness for chemical accidents. Additionally,
organizations in other countries have translated CAMEO into several languages over the years.
10
Chapter 1: Introduction to CAMEO
CAMEO Resources Online
The CAMEO website (http://www.epa.gov/emergencies/content/cameo) has many resources for CAMEO
users, including:
• News items and updates.
• Software downloads and training materials.
• CAMEO training and events calendars.
• CAMEO News Service.
We encourage you to subscribe to the CAMEO News Service, an email announcement list (one-way
listserve) used by CAMEO managers and developers to keep the CAMEO community informed.
Subscribing to the news service is a way to get updated information. Check the CAMEO website to find
out how to subscribe to the CAMEO News Service.
Note: You can find additional CAMEO suite resources on the NOAA OR&R website at
http://response.restoration.noaa.gov/cameo.
CAMEO and EPCRA
CAMEO was designed to help people meet their responsibilities under the Emergency Planning and
Community Right-to-Know Act of 1986 (EPCRA). EPCRA establishes requirements for industry and
federal, state, and local governments for emergency planning and “community right-to-know” reporting on
hazardous and toxic chemicals (see “EPCRA” on page 128).
You can use CAMEO for EPCRA-related tasks such as:
• Maintaining and reviewing Tier II information submitted by facilities in your local area (see “Tier II
Information and CAMEO” on page 24).
• Assessing the hazards to your community from accidental releases of locally stored hazardous
chemicals (see “Using Screening & Scenarios to Assess Hazards” on page 74).
CAMEO and the Clean Air Act
Many CAMEO users, especially facility operators, must also meet certain responsibilities under Section
112(r) of the Clean Air Act (CAA) Amendments of 1990 (see “CAA 112(r)” on page 134). You may be
able to use programs in the CAMEO software suite for some of your CAA-related projects. For example,
you can check a chemical’s datasheet in CAMEO Chemicals to find out whether the substance is covered
under Section 112(r) and find out what its designated threshold quantity is. However, note that you can’t
use CAMEO’s Screening & Scenarios module for the offsite consequence analyses required under Section
112(r). For more on this topic, see “Differences Between Screening & Scenarios, ALOHA, and RMP
Endpoints” on page 80.
11
Chapter 1: Introduction to CAMEO
CAMEO Modules Overview
Use the Facilities module to store information about facilities where chemicals are
maintained, including addresses, emergency contact information, and site plans showing the
layout of the facility. You can link records in this module to symbols on a MARPLOT map so
that you can quickly see where a facility is located in your community. See Chapter 3,
“Facilities,” beginning on page 23.
Use the Chemicals in Inventory module to maintain inventory records for stored chemicals,
including descriptions of each chemical’s physical state, storage conditions and locations, and
quantities routinely on site. You can also keep track of chemicals that are commonly
transported on routes in your community. See Chapter 4, “Chemicals in Inventory,” beginning
on page 41.
Use the Contacts module as a telephone and address directory of important contacts, such as
chemical experts, government agencies and organizations, facility operators, response
resources, and other people who can help you with emergency planning or response. See
Chapter 5, “Contacts,” beginning on page 47.
Use the Incidents module to track information about hazardous chemical spills, either at
facilities or along transport routes. You can link records in this module to symbols on a
MARPLOT map. See Chapter 6, “Incidents,” beginning on page 51.
Use the Special Locations module to keep descriptions of schools, nursing homes, hospitals,
and other facilities that require special protection and consideration during emergencies. You
can link records in this module to symbols on a MARPLOT map. See Chapter 7, “Special
Locations,” beginning on page 57.
Use the Routes module to compile information about routes (such as railroads or highways)
commonly used to transport chemicals. You also can maintain information about the
particular chemicals transported along a given route, and you can link records in this module
to routes shown on a MARPLOT map, so that you can quickly find a route on a map. See
Chapter 8, “Routes,” beginning on page 63.
Use the Resources module to maintain information about resources (such as supplies, experts,
and contractors) that you may need to access during a response or in your planning activities.
You can link records in this module to symbols on an MARPLOT map. See Chapter 9,
“Resources,” beginning on page 67.
Use the Screening & Scenarios module to make hazards analyses for your community, using
procedures described in Technical Guidance for Hazards Analysis, which is also known as the
Green Book (see “Technical Guidance” on page 138). In such a hazards analysis, you estimate
the extent of the area around a facility, or other potential spill site, that might be affected by
the accidental release of a chemical of concern. You then can plot this area (called a threat
zone) on an MARPLOT map. See Chapter 10, “Screening & Scenarios,” beginning on
page 73.
12
Chapter 1: Introduction to CAMEO
Other Programs in the CAMEO Suite
CAMEO Chemicals, ALOHA, and MARPLOT are programs in the CAMEO software suite—not modules
in the CAMEO program. This means that you have to download them separately, and that you can use
them on their own or in conjunction with the CAMEO program. All of the CAMEO modules and programs
can be accessed from the CAMEO Home navigation window (see “Home and Navigation” on page 17).
However, you can also access the programs from CAMEO’s Sharing menu.
The following sections give a brief overview of CAMEO Chemicals, ALOHA, and MARPLOT. However,
to learn how to use these programs, you should refer to the documentation that comes with them.
CAMEO Chemicals
Use the CAMEO Chemicals program to search through a hazardous materials database with
thousands of datasheets, print customized reports, and find out how chemicals would react if
they mixed.
There are two main types of datasheets:
• Chemical datasheets include hazard information (such as whether the chemical reacts with air or
water), response recommendations (such as firefighting, protective clothing, and first aid), physical
properties (such as the melting point, Lower Explosive Limit, and toxic Levels of Concern) and
regulatory information (such as threshold planning quantities).
• UN/NA datasheets include information from the Emergency Response Guidebook (such as response
guides, isolation and protective action distances, and toxic-by-inhalation gas warnings) and the
Hazardous Materials Table from 49 CFR 172.101 (such as hazard class, labels, and placards).
Both an online version (http://cameochemicals.noaa.gov) and a downloadable desktop version
(http://response.restoration.noaa.gov/cameochemicals) are available. However, only the downloadable
version can be used interactively with the other programs in the CAMEO suite. To learn more about
CAMEO Chemicals, refer to the on-screen help that comes with both versions.
13
Chapter 1: Introduction to CAMEO
ALOHA
Use the ALOHA (Areal Locations of Hazardous Atmospheres) program to estimate threat
zones associated with hazardous chemical releases, including toxic gas clouds, fires, and
explosions.
Once you enter a description of a chemical release into ALOHA, the program makes a hazard prediction
based on the characteristics of the released chemical, atmospheric conditions, and the circumstances of the
release. ALOHA displays a threat zone plot (like the one shown at below) showing one or more areas
where a hazard—toxicity, flammability, thermal radiation (heat), or damaging overpressure (explosion
blast force)—may exceed key Levels of Concern and pose a threat to people and property.
You can also plot ALOHA threat zones on a map in MARPLOT, where you might want to check to see if
any vulnerable locations (such as hospitals and schools) fall within the predicted threat zone and might be
affected by a chemical release. If you’ve linked the map objects for those locations to records in CAMEO’s
Special Locations module, you can then quickly extract information (such as emergency phone numbers)
for these locations from CAMEO.
Note: You can use ALOHA for both emergency planning and response—unlike CAMEO’s Screening &
Scenarios module, which is only a planning tool. (See “Differences Between Screening & Scenarios,
ALOHA, and RMP Endpoints” on page 80.)
To learn more about ALOHA, download the ALOHA manual (http://www.epa.gov/emergencies/content/
cameo/aloha.htm).
14
Chapter 1: Introduction to CAMEO
MARPLOT
Use the MARPLOT (Mapping Application for Response, Planning, and Operational Tasks)
program to create, view, and modify maps of your community that show roads, facilities,
schools, response assets, and other information useful for response and planning tasks.
You can link CAMEO records for facilities, special locations, transport routes, and other items of interest
to symbols representing those locations on maps in MARPLOT (see “Linking a Record to a Map Object”
on page 127). You can also plot threat zones from Screening & Scenarios or ALOHA to consider areas that
could be impacted by a chemical release. (An ALOHA toxic threat zone plot is shown above on a
MARPLOT map.)
To learn more about MARPLOT, read through the extensive on-screen helps that come with the program.
Some CAMEO-Related Programs
There are two other programs produced by the CAMEO development team that may be useful for CAMEO
users: Tier2 Submit and RMP*Comp.
Tier2 Submit
Each year, facilities covered by EPCRA must submit an emergency and hazardous chemical inventory
form to their Local Emergency Planning Committee, State Emergency Response Commission, and local
fire department. Facilities provide either a Tier I or Tier II form; however, most states require the Tier II
form. Tier II forms require basic facility identification information, employee contact information, and
information such as storage amounts, storage conditions, and locations for chemicals stored or used at the
facility. (See “Sections 311 and 312: Community Right-to-Know Requirements” on page 131.)
15
Chapter 1: Introduction to CAMEO
Tier2 Submit is a chemical inventory software program for both reporting facilities and for state and local
emergency responders:
• Facilities can use Tier2 Submit to manage, print, and send electronic Tier II reports.
• State and local emergency responders can import those facilities’ reports directly into their copies of
CAMEO. By importing facility reports, responders can have current chemical inventory and contact
information available to them if they need to respond to an incident at a reporting facility.
For more information, go to http://response.restoration.noaa.gov/tier2submit.
RMP*Comp
RMP*Comp is a program you can use to complete the offsite consequence analyses (both worst-case
scenarios and alternative scenarios) required under the Risk Management Planning Rule, which
implements Section 112(r) of the 1990 Clean Air Act (see “CAA 112(r)” on page 134).
For more information, go to http://response.restoration.noaa.gov/rmpcomp.
Note: Offsite consequence analyses are like the hazards analyses required under EPCRA, but they aren’t
quite the same (see “Differences Between Screening & Scenarios, ALOHA, and RMP Endpoints” on
page 80).
16
Getting Started
This section contains an overview of the basic features of CAMEO and an explanation of
how you use them. These explanations only apply to the CAMEO modules, not the other
programs in the CAMEO suite. CAMEO Chemicals, ALOHA, and MARPLOT work
differently, and you should refer to their documentation to learn how they work.
2
Home and Navigation
CAMEO’s Home is a navigation window containing buttons you can use to quickly navigate among
CAMEO’s modules and the other programs in the suite. You can also use the Quick Search buttons to
complete a facility search (in CAMEO) or a chemical search (in the downloadable version of CAMEO
Chemicals).
To display the Home window, select Go Home from the File menu or click the Home button in the toolbar.
17
Chapter 2: Getting Started
Anatomy of a CAMEO Module
Each module in CAMEO is a database, which is an organized collection of information. Each CAMEO
module includes the same standard components as other computer databases:
• Records. A database is composed of records. Each record is a compilation of information about a
particular entity. For example, in CAMEO’s Facilities module, each record describes a particular
facility (or division of a large facility).
• Data fields. Each record is composed of data fields, and each field contains a particular type of
information. In the Facilities module, one field contains the address, another holds the zip code, etc.
CAMEO’s modules are interrelated (see “CAMEO Modules Overview” on page 12). For example, in the
Chemicals in Inventory module, you can keep track of the chemical inventories of facilities in your
Facilities module. Likewise, in the Contacts module, you can keep information about contact people, such
as representatives of:
• Facilities (described on Facilities records).
• Special locations (described on Special Locations records).
• Response organizations (described on Resources records).
You can quickly access information in one module when you’re working with a related record in another.
The Toolbar
CAMEO contains a simple toolbar that’s visible when any CAMEO module is open (except when you’re
searching the module or editing a record). It contains:
Buttons for common operations:
• Click
to open the Home navigation window.
or
to switch between list view (where you see a list of the
• Click
records in the module) and record view (where you see the contents of a single record). See “List
and Record Views” on page 19.
• Click
to perform a new search within the open CAMEO module.
• Click
when you need to edit the record you’re currently viewing (see “Editing
Records” on page 21).
• Click
• Click
when you want to open up a new, blank record in Edit mode.
to go to the list of Help topics.
18
Chapter 2: Getting Started
Buttons for navigation:
• Click
to see the first record in the module.
• Click
to see the previous record in the module.
• Click
to see the next record in the module.
• Click
to see the last record in the module.
List and Record Views
Whenever you have a CAMEO module open, you’re viewing that
module in either list or record view. When you first open a module,
you’re in list view and you see a list of all the records in that module. In
list view, click on a record name to select that record. Once a record is
selected, a small black rectangle appears to the left of its name and the
row becomes shaded. In the example at right, General Hardware and
Garden is selected.
Note: Records appear in the list in the order in which you create them—unless you sort them into a
different order (see “Sorting Records in CAMEO Modules” on page 122).
In record view, you see a record in that module. When you’re in record view, you can view the information
contained in all the individual fields on that record. Although you can only see one record at a time in
record view, you can still browse through the other records in that module (see “Browsing and Searching”
on page 20).
19
Chapter 2: Getting Started
You can go back and forth between the two views by clicking the
and
buttons in
the toolbar. If you’re in list view, you also can double-click on the name of any record in the list to see that
record.
Browsing and Searching
You can browse through the records in a CAMEO module in four ways:
• In list view, scan the list of records visually until you find the one you want. Use the scroll bar to
review the entire list if it’s too long to fit in the window.
• In record view, click the navigation buttons on the right side of the toolbar to navigate from record
to record.
• Click the pages of the book icon in the upper left corner of the module window to
page through the records in the module.
• From the Record menu, select Go To, then select either First, Previous, Next, or Last
to navigate through the records in the module.
If you can’t find a record you need by browsing, search the module to find that record:
1. Click the New Search button or select Start Search from the Search menu.
2. For a quick, simple search, just type the word(s) or number(s) you’re looking for, then click Search.
To learn how to make more complex searches, see “Searching” on page 118.
20
Chapter 2: Getting Started
Using the Show Related Command
You can associate records in your
CAMEO modules with other records to
which they’re logically related. For
example, you can create a record for a
school in the Special Locations module,
then create a Contacts record for that
school’s principal. That Contacts record
for the principal is then automatically
associated with the school’s record in
Special Locations.
When you’re working with a record that is
associated with one or more other records,
select Show Related from the Record
menu to quickly access the records
associated with that record. You’ll also
need to indicate the module of interest.
For example, from the Facilities record for
a local chemical processing plant, select Show Related, and then Contact Records, to view the Contacts
records associated with the plant.
Editing Records
You can edit records in CAMEO’s modules in three ways:
• You can manually change records in any CAMEO module.
• You can import Tier II data (see “Importing Data from Tier2 Submit” on page 90).
• You can import data from someone else’s copy of CAMEO (see “Importing Data from Another
Copy of CAMEO” on page 98).
Whenever you start CAMEO, you’re in Browse mode. To make changes to your CAMEO records, you
in the toolbar.
must switch to Edit mode by clicking
On a CAMEO record in Edit mode, different data fields have different appearances: one may be a text box
(in which you’d type, say, the amount of a stored chemical), while another might be a drop-down list (from
which you’d choose the units for the amount, such as pounds, tons, or kilograms).
21
Chapter 2: Getting Started
When you’re in Edit mode, you can edit some of
the drop-down lists that appear in CAMEO
records. Only the lists with Edit at the bottom
(as shown at right) can be modified.
To delete a record from a CAMEO module,
select that record, then select Delete <module
name> from the Record menu (for example, in
the Special Locations module, select Delete
Special Location).
Getting Help
Whenever CAMEO is running on your computer, you can access its help system using your
web browser (such as Internet Explorer or Firefox). Note: You don’t have to be online to
access the help content.
To view the help, either:
• Click the Help button (shown above) on the Home navigation window.
• Select CAMEO Help from the Help menu.
• Click the Help button on the toolbar when viewing a module.
If you can’t find the answer to your CAMEO question in the on-screen help, you may want to contact
technical support.
Technical Support. The CAMEO help desk can be reached via e-mail ([email protected]) or by
phone at (703) 227-7650 on weekdays from 8 am to 4:30 pm (Eastern Time). The help desk is available to
answer questions about any of the programs in the CAMEO software suite. Alternately, you can also email the CAMEO Specialist ([email protected]) at the Office of Response and Restoration.
22
Facilities
Use the Facilities module to keep track of information about facilities with
hazardous materials. Facilities records can be associated with records in the
Chemicals in Inventory, Contacts, Incidents, and Screening & Scenarios
modules, and you can link Facilities records to symbols on MARPLOT maps.
3
A sample Facilities record is shown below; see Table 3-1 on page 35 for detailed explanations of the
information shown on a Facilities record.
The primary information about a facility is stored in its Facilities record, including its location, owner, the
type of business it is, and any applicable site plans. Additionally, you can link the Facilities record to a
symbol that you place on a MARPLOT map, so that you can quickly see the facility’s location in your
community—or use the Screening & Scenarios module or ALOHA to assess the potential hazard to the
community posed by chemicals at the facility (see Chapter 10, “Screening & Scenarios,” beginning on
page 73).
23
Chapter 3: Facilities
Supplementary information about facilities can be stored as related records within four other CAMEO
modules:
• In the Chemicals in Inventory module, you can create a record for each of the hazardous substances
stored at a facility. Each Chemicals in Inventory record contains information such as the quantity of
the substance stored at the facility, storage conditions, and its location within the facility.
• In the Contacts module, you can create a record for each of the contact people for the facility (such
as the emergency manager and the facility owner).
• In the Screening & Scenarios module, you can assess the hazards to the surrounding community
from accidental releases from that facility, following the procedures described in Technical
Guidance for Hazards Analysis (see “Technical Guidance” on page 138).
• In the Incidents module, you can keep records describing past releases of hazardous substances
from that facility. This information can be used for risk analysis.
Even though information for a facility may be split across several modules, you can access all of the
information about a given facility from its record in the Facilities module, which acts as a central hub for
information about that facility. All of the records related to the facility’s record can be accessed by
selecting the Show Related menu item from the Record menu, while the facility’s record is selected.
Additionally, you can access related Contacts and Chemicals in Inventory records by double-clicking on
the items of interest on the Contacts and Chemical Inventory tabs on the facility’s record itself.
The facility information stored within CAMEO is designed to allow you to keep track of information
provided by facilities on Tier II reports required under the Emergency Planning and Community Right-toKnow Act (EPCRA).
Tier II Information and CAMEO. Under EPCRA, facilities that maintain more than threshold amounts
of certain hazardous materials must submit an annual chemical inventory report, called a Tier II form, to
their State Emergency Response Commission, Local Emergency Planning Committee, and local fire
department (see “Sections 311 and 312: Community Right-to-Know Requirements” on page 131).
You can store information submitted on Tier II reports in the Facilities, Chemicals in Inventory, and
Contacts modules. If you’re familiar with Tier II forms, you’ll notice that many of the data fields in those
modules are identical to the fields on Tier II forms. If the Tier II reports were prepared using Tier2 Submit
(see “Tier2 Submit” on page 15), you’ll be able to import the data automatically into CAMEO; otherwise,
you’ll have to enter the information by hand.
Note: In addition to the standard information that is required on Tier II forms, some states have developed
their own reporting requirements. This state-specific information can be entered on the State Fields tab that
is available for records in both the Facilities and Chemicals in Inventory modules.
24
Chapter 3: Facilities
Adding and Editing Facilities Records
You can add a new Facilities record in three different ways:
• Create a new Facilities record manually, in order to enter information from a paper Tier II form or
other source (see “Adding a New Facilities Record” on page 26).
• Transfer data from someone else’s copy of CAMEO to automatically generate Facilities records (see
“Transferring Data Between CAMEO Programs” on page 93).
• Import a Tier2 Submit data file to automatically generate Facilities records (and any associated
Chemicals in Inventory or Contacts records) for all of the facilities in the data file (see “Importing
Data from Tier2 Submit” on page 90).
Regardless of which method you used to create a facility’s record, all Facilities records are edited the same
way.
25
Chapter 3: Facilities
Adding a New Facilities Record
1. Open the Facilities module.
2. Click the New Record button or select New Facility from the Record menu. A new, blank record
appears.
3. Fill out all applicable tabs in the new Facilities record. For additional information, see:
• Table 3-1 on page 35 for explanations of all the fields on a record.
• “Adding Contact Information for Facilities” on page 27 to add an associated Contacts record for
the facility.
• “Adding and Removing Site Plans for Facilities” on page 28 to associate a site plan or other
document with the facility.
• “Adding and Editing Chemicals in Inventory Records” on page 42 to add an associated
Chemicals in Inventory record for the facility.
• “Mapping a Facility” on page 29 to create a link to an object on a MARPLOT map.
• “Documenting Incidents at Facilities” on page 29 to add an associated Incidents record for the
facility.
• “Modeling Screenings and Scenarios at Facilities” on page 29 to add an associated Screening &
Scenarios record for a chemical in the facility’s inventory.
4. Click Save Changes.
Note: If you’re manually entering data from Tier II forms into CAMEO this way, you have two choices
when you update your records in subsequent years. You can either:
• Edit the Facilities, Chemicals in Inventory, and Contacts records to update them as needed.
• Add new records with a different reporting year in all applicable modules.
The first method allows you to minimize data entry, by only making the necessary changes to ensure that
your records from last year match the newly reported data. However, the second method is best if you want
to keep a record of the specific information that each facility reported in different reporting years.
Editing a Facilities Record
To edit an existing Facilities record, go to that record, then click the Edit button in the toolbar (see “Editing
Records” on page 21).
26
Chapter 3: Facilities
Adding Contact Information for Facilities
You can add contact information for facilities (such as an emergency number or a site manager’s name) by:
• Entering phone numbers directly into a Facilities record—without creating separate Contacts
records. You might do this if you want to quickly contact facilities during an emergency response by
referring to CAMEO to access the phone numbers.
• Creating an association with a Contacts record, where you can keep addresses and notes (such as
notes from meetings or phone conversations) as well as phone numbers. When you add a new
contact from a Facilities record, you’re actually adding a new record to the Contacts module, but
information about that contact will also be displayed under the Contacts tab in the Facilities record.
Note: New Contacts records will automatically be added to CAMEO whenever you import a Tier2 Submit
data file that contains facility contact information. See “Importing Data from Tier2 Submit” on page 90.
Adding a Phone Number to a Facilities Record
1. Go to the Facilities record, and then click the Edit button in the toolbar.
2. Select the Facility Phones tab.
3. Click within the first blank table row below the Type heading. Classify the phone number by
choosing a type (such as 24-hour or emergency) from the drop-down list. Note: If you need to add
or modify a type, select Edit from the drop-down list.
4. Type the phone number in the same table row.
5. Click Save Changes.
Adding a Contacts Record for a Facility
1. Go to the Facilities record, and then click the Edit button in the toolbar.
2. Select the Contacts tab.
3. Click Add Contact. A list of all records in the Contacts module appears.
4. Select an existing contact or create a new contact:
• If the contact is already in the list, click on their name, then click Select. Note: You can associate
the same Contacts record with more than one facility by repeating these steps for each of the
facilities for which this person is a contact.
• If the contact isn’t already in the list, click Add New. You’ll see a new, blank Contacts record. Fill
in the record (see Table 5-1 on page 49 for explanations of all the items), then click Save
Changes. Note: When you create a new Contacts record from the Facilities module, the Contacts
record will be associated with that Facilities record automatically.
27
Chapter 3: Facilities
Adding and Removing Site Plans for Facilities
You can link site plans, photos, and other documents to Facilities records.
Adding a Site Plan to a Facilities Record
1. Go to the Facilities record, and then click the Edit button in the toolbar.
2. Select the Site Plan tab.
3. Click Add.
4. Browse to the file you want to add, and then click Open. The file name will appear in the list on the
Site Plan tab.
5. Click Save Changes. At this point, CAMEO automatically makes a copy of the file and stores it in
the SitePlans folder, which is inside of the CAMEO Data folder.
Now you can go to this document from the Facilities record whenever you need to, by double-clicking on
its name in the list on the Site Plans tab.
Note: Only files in a standard graphic file format (for example, JPG, GIF, or PNG) will be displayed within
CAMEO. If you’ve added another type of file (such as PDF or DOC), when you double-click on its name
in the list, a dialog appears with a button you need to click in order to open the file in an external program
(such as Adobe Reader or Microsoft Word). If your computer operating system does not recognize the file
type, you may need to specify the type of program that should open that file type (often a Properties setting
for the operating system).
Removing a Site Plan for a Facilities Record
1. Go to the Facilities record, and click the Edit button in the toolbar.
2. Select the Site Plan tab.
3. Click on the name of the site plan or other document to select it in the list.
4. Click Remove. A dialog appears to confirm that you really want to delete this file.
5. Click Delete.
6. Click Save Changes. At this point, CAMEO will permanently delete the copy of the file that was
stored in the SitePlans folder, which is inside of the CAMEO Data folder.
28
Chapter 3: Facilities
Mapping a Facility
You can link any Facilities record to a symbol on a MARPLOT map representing the location of that
facility. To make a link, follow the procedure described in “Linking a Record to a Map Object” on
page 127.
Documenting Incidents at Facilities
Use the Incidents module to record incidents (such as accidental spills and releases) that have occurred at a
particular facility. To create an Incidents record that is associated with a Facilities record, follow the steps
in “Adding and Editing Incidents Records” on page 52.
Modeling Screenings and Scenarios at Facilities
Use the Screening & Scenarios module to model threat zones (according to the procedures in Technical
Guidance for Hazards Analysis, see “Technical Guidance” on page 138) for a chemical in the facility’s
inventory. To create a screening or scenario record that is associated with a Facilities record, follow the
steps in Chapter 10, “Screening & Scenarios,” beginning on page 73.
Accessing Facility Information
To see the information in CAMEO on a particular facility, first search the Facilities module to find the
record describing that facility. Once you’ve found that record, you can:
• Click tabs on the facility’s record to review most of the information about that facility. Check
Table 3-1 on page 35 for definitions of the various kinds of information shown on Facilities records.
• Select Show Related from the Record menu to see additional information about the facility on
associated Chemicals in Inventory, Contacts, Incidents, and Screening & Scenarios records.
You can make either a basic search or a more advanced search to find a facility record.
Making a Basic Search for a Facilities Record
Make a basic search when you just need to look up a facility by its name, address, or other straightforward
piece of identifying information. Here’s how:
1. Start the search in either of two ways:
• While you’re working in the Facilities module, click the New Search button or select Start Search
from the Search menu.
• In the Home navigation window, click Search for a Facility. (To access the Home navigation
window, click the Home toolbar button or, from the File menu, select Go Home.)
29
Chapter 3: Facilities
2. In the Basic Search dialog, fill out the information you have about the facility you’re looking for.
Choose contains characters to search for part of a word, phrase, code, or number; or contains
word starting with to search either for the first part (or all) of a word, phrase, code, or number.
Check Table 3-1 on page 35 to see explanations of the other choices in the dialog.
Note: If you enter multiple criteria, CAMEO will search for facilities that match all criteria. For example,
if you type “haymarket” in the City field and choose Yes from the Has EHS Chemical in Inventory dropdown list (as shown below), CAMEO will find a list of all the facilities in your CAMEO database that are
in Haymarket and have Extremely Hazardous Substances on site.
3. Click Search. CAMEO will run the search and display a list of the facilities that match your criteria
(or a message if no facilities match your criteria).
4. Double-click on the name of any facility in the Found Facilities list to view that facility’s record.
Whenever you want to return to the Found Facilities list, click the View List button in the toolbar. If
you’d like to view the list of all facilities again (as opposed to just the ones that met your search
criteria), from the Search menu, select Clear Search.
Some basic search examples:
• To find the most recent records for facilities in a particular zip code: type that zip code in the Zip
Code box, then for Report Year, choose “is equal to” from the drop-down list and type the most
recent report year in the box.
• To find the facilities in a particular county that store EHS chemicals: choose Yes from the Has EHS
Chemical in Inventory drop-down list, and then type all (or part) of the county name in the County
box.
30
Chapter 3: Facilities
Making an Advanced Search for a Facilities Record
Make an advanced search when you need to use criteria other than the ones in a basic search. Here’s how:
1. Start your search just as you would start a basic search, by either:
• Clicking the New Search button or selecting Start Search from the Search menu, while you’re
working in the Facilities module.
• Clicking Search for a Facility on the Home navigation window.
2. Click Go to Advanced Search.
3. Click Select field. The Select a Field window appears.
4. Select one of the following options from the list on the left:
• Facilities—to search for a facility by basic information about it (such as its name or address).
• Chemicals in Inventory—to search for a facility that stores or uses a particular chemical.
• Contacts—to search for a facility for which a particular person is a contact (such as an emergency
contact or the facility’s owner).
• Facility IDs—to search for a facility with a particular identification number or type.
• Incidents—to search for a facility where a particular incident occurred.
• Mixture Components—to search for a facility storing a mixture made up of particular
components.
• Screening and Scenarios—to search for a facility for which you have prepared hazards analysis
screenings or scenarios.
• Storage Locations—to search for a facility where a chemical is stored at a particular location
(such as Warehouse 43).
5. Based on your selection, a list of searchable fields appears. Click on a field name, then click Select.
The Advanced Search window reappears.
6. Choose an operator from the drop-down list (such as “contains characters” or “is greater than”).
Your choices for operator depend on the kind of data you’re searching for: whether it’s text, a
number, a date, or yes/no information.
7. Type the word, phrase, number, or code to search for in the box. Leave the box empty if you don’t
need to type something in—for example, when you choose an operator like “is empty” or “is not
empty.”
8. Click Search.
31
Chapter 3: Facilities
Adding More Choices. You can make an advanced search for records that match multiple criteria.
To add additional criteria to your advanced search:
1. While you’re working in the Advanced Search dialog, click Add a Choice to add a second criterion.
2. Follow Steps 3-7 in the previous section to set up the search for the second criterion.
3. Indicate whether to search for records that meet:
• Both your criteria (by clicking “Search for all of the following”), or
• Either criterion (by clicking “Search for any of the following”).
4. If you want to add another choice, press Add a Choice again. You can add up to three more choices,
for a total of four choices. If you need to search for more than four criteria, first run a search for the
first four of your criteria, then you’ll need to run either an Append Search or a Subset Search (see
“Making Append Searches and Subset Searches” on page 121).
5. Click Search.
You can save any set of advanced search criteria to reuse later (see “Saving Searches” on page 121).
Some advanced search examples:
• To find all the facilities that store or use chemicals that pose a fire hazard: search Chemicals in
Inventory for Fire Hazard is Yes.
• To find facilities owned by a particular person: search Contacts for Contact Type contains characters
“owner” AND Last Name contains characters “<last name of that person>” AND First Name
contains characters “<first name of that person>.”
• To find all the facilities in Haymarket that store chlorine in quantities averaging 500 pounds or more:
search Facilities for City contains characters “Haymarket” AND search Chemicals in Inventory for
Chemical Name contains characters “chlorine” AND search Chemicals in Inventory for Average
Amount on Site is greater than or equal to “500.”
Making and Printing Reports on Facilities
You can make three kinds of reports from the Facilities module: reports on a single facility, reports on
multiple facilities, and mailing labels for a given set of facilities.
Making and Printing a Report for a Single Facility
1. Go to the Facility record.
2. From the File menu, select Print Report.
32
Chapter 3: Facilities
3. Check to be sure that the Current Record option is selected.
4. Check the box for each kind of data to be included in the report. (Note that some of the information
about a facility is stored in records in related modules. For example, if you check the Contacts box,
information from records in the Contacts module for this facility will be included in the report.)
5. Click Print Report. The Print Setup dialog will be displayed. Note: If you’d like to see what your
report will look like before you print it, click on Preview Report instead. You’ll see a view of the
printable report and can choose to print or cancel the report from there.
6. Adjust any settings you’d like to change on the Print Setup dialog, then click OK. The Print dialog
appears.
7. Adjust any settings you’d like to change on the Print dialog, then click OK to print the report.
Making and Printing a Report for Multiple Facilities
1. Open the Facilities module, and then choose either option below:
• To include all your Facilities records in the report, choose Show All Records from the Record
menu to clear any existing found set.
33
Chapter 3: Facilities
• To include just certain records in the report, run a search, choosing your search criteria so that just
the records you want in your report will be included in the found set. For more information about
searching for facility records, see “Accessing Facility Information” on page 29.
2. From the File menu, select Print Report.
3. Select the Found Set option.
4. Check the box for each kind of data to be included in the report. (Note that some of the information
about a facility is stored in records in related modules. For example, if you check the Contacts box,
information from records in the Contacts module for each facility will be included in the report.)
5. Click Print Report. The Print Setup dialog will be displayed. Note: If you’d like to see what your
report will look like before you print it, click on Preview Report instead. You’ll see a view of the
printable report and can choose to print or cancel the report from there.
6. Adjust any settings you’d like to change on the Print Setup dialog, then click OK. The Print dialog
appears.
7. Adjust any settings you’d like to change on the Print dialog, then click OK to print the report.
Making and Printing a Set of Mailing Labels
To make a set of 1-inch by 2 5/8-inch mailing labels for some (or all) of your Facilities records:
1. Open the Facilities module, and then choose either option below:
• To make mailing labels for all your Facilities records, choose Show All Records from the Record
menu to clear any existing found set.
• To make mailing labels for just certain Facilities records, run a search, choosing your search
criteria so that just the records you want labels for will be included in the found set. For more
information about searching for facility records, see “Accessing Facility Information” on
page 29.
2. From the File menu, select Print Report.
3. Select the Found Set option.
4. Click Mailing Labels. You’ll see a preview of your mailing labels.
5. From the File menu, select Print Report to print the labels. The Print Setup dialog will be displayed.
6. Adjust any settings you’d like to change on the Print Setup dialog, then click OK. The Print dialog
appears.
7. Adjust any settings you’d like to change on the Print dialog, then click OK to print the labels.
34
Chapter 3: Facilities
Making KML Files
In addition to the standard types of exporting available for all modules (see Chapter 11, “Importing and
Exporting Data,” beginning on page 85), the Facilities module also allows you to save a portion of the
facilities data into a KML file that you can open in Google Earth or Google Maps. You can create a KML
file for a single record, a found set, or all records in the module. The KML file will include the facility
name, address, latitude and longitude, 24-hour phone number for emergency contacts, and last modified
date. If you prefer, you can also add a comment to the KML as well.
1. Open the Facilities module, and then choose one of the options below:
• To include all your Facilities records in the KML file, you don’t need to do anything right now.
Proceed to step 2.
• To include just certain records in the KML file, run a search, choosing your search criteria so that
just the records you want in your file will be included in the found set. For more information
about searching for facility records, see “Accessing Facility Information” on page 29.
• To include just one record in the KML file, either pull up that record while in record view or
select it from the list in list view.
2. From the File menu, select Make KML file.
3. Select the option (Current Record, Found Set, or All Records) that matches the choice you made in
step 1.
4. If you have Google Earth installed on your computer, you can check the box next to Open in Google
Earth to have the computer immediately open up the KML file in Google Earth as soon as CAMEO
is done creating the file.
5. If you want, you can type in a comment to include in the KML file.
6. Click Make KML File.
Facility Fields
Table 3-1. Items on a Facilities Record
Item
Description
Shipper
When checked, indicates that the facility ships chemicals.
Report Year
The reporting year for which the Tier II information contained in the record was
submitted by the facility. See “Sections 311 and 312: Community Right-to-Know
Requirements” on page 131.
Facility Name
Name of the facility.
35
Chapter 3: Facilities
Table 3-1. Items on a Facilities Record (Continued)
Item
Description
Department
Name of a particular department of a facility (if the record is just for that department
rather than for the entire facility).
Site
Indicates the number of physical site locations for the facility and allows you to
differentiate records with the same facility name and report year. For example, a
facility with only one location would be listed as Site 1 of 1, but if the facility had
two locations, the first site would be listed as Site 1 of 2.
Address Tab
Street Address
Street address for the facility, as well as the county (or borough or parish), fire
district, and country where it’s located.
Mailing Address
Mailing address for the facility.
Email
Email address for the facility.
Facility Phones Tab
Type
Type of phone number (such as 24-hour, emergency, or office); choose the type from
the editable drop-down list.
Phone
Phone number for the facility.
Contacts Tab
Last/First Name
Name of the contact who is associated with the facility. The name is filled in
automatically using information on the associated Contacts record, which is the
record you need to edit if you want to make corrections to the name.
Title
Job title or position of the contact who is associated with the facility. The title is
filled in automatically using information on the associated Contacts record, which is
the record you need to edit if you want to make corrections to the title.
Organization
Organization with which this contact is affiliated. The name of the organization is
filled in automatically using information on the associated Contacts record, which is
the record you need to edit if you want to make corrections to the name.
Chemical Inventory Tab
CAS
Chemical Abstracts Service (CAS) number for a chemical in the facility’s inventory.
The CAS number is filled in automatically using information on the associated
Chemicals in Inventory record, which is the record you need to edit if you want to
make corrections to the CAS number.
Chemical Name
Name of a chemical in the facility’s inventory. The name is filled in automatically
using information on the associated Chemicals in Inventory record, which is the
record you need to edit if you want to make corrections to the name.
36
Chapter 3: Facilities
Table 3-1. Items on a Facilities Record (Continued)
Item
Description
Datasheet
On saved records, clicking this button will take you to a chemical datasheet with
response recommendations and physical properties based on the CAS number and
chemical name you entered. You’ll only be taken to a chemical datasheet if (a)
you’ve installed the downloadable version of CAMEO Chemicals, and (b) the CAS
number and chemical name match a chemical datasheet in CAMEO Chemicals.
Checklist Tab
Submitted general site
plan...
When checked, indicates that the facility has submitted a general site plan to state
and local emergency planners (see “Section 301-303: Emergency Planning” on
page 129).
MSDS Received with
Tier II Forms
When checked, indicates that a Material Safety Data Sheet (MSDS) has been
received from the facility along with a Tier II form.
Is facility subject to the
Clean Air Act (112r)?
When checked, indicates that the facility is subject to section 112(r) of the Clean Air
Act (see “CAA 112(r)” on page 134).
Are dikes or other
safeguard measures
employed?
When checked, indicates that passive safeguards (such as dikes, berms, enclosures,
or drains) are used to mitigate accidental hazardous releases at the facility.
Site Coordinate
Abbreviations
Submitted
When checked, indicates that a list of site coordinate abbreviations (that correspond
to buildings, lots, areas, etc., located throughout the facility) were submitted.
Date Tier II Signed
Date when the Tier II form submitted by the facility was signed (see “Sections 311
and 312: Community Right-to-Know Requirements” on page 131).
Date Tier II Received
Date when the Tier II form submitted by the facility was received (see “Sections 311
and 312: Community Right-to-Know Requirements” on page 131).
Signature
Name of owner/operator or authorized representative of the facility who signed the
Tier II Chemical Inventory Form.
Checked Automatically
if Items Present in
CAMEO
These boxes are checked automatically if there are associated records for the facility
in the Chemicals in Inventory, Screening & Scenarios, or Incidents modules; if the
facility uses or stores EHS chemicals; and if the facility record is linked to an object
on a MARPLOT map. Not editable.
ID Codes Tab
Number of Employees
on Site
The maximum number of employees on site at the facility at any time.
State Fees Total
Total fees (if any) collected by the state for Tier II reporting.
37
Chapter 3: Facilities
Table 3-1. Items on a Facilities Record (Continued)
Item
Description
Type
Type of identification code—for example, Dun and Bradstreet, Standard Industrial
Classification (SIC), or North American Industry Classification System (NAICS)—
for the facility; choose the type from the editable drop-down list.
ID
Identification code number for the facility. Depending on the type you selected in
the preceding field, this field may either be a drop-down list of choices (for example,
if you selected SIC for the type, you’ll see a list of pre-defined code numbers for the
ID) or a text field where you can type in a number.
Description
Description of the kind of facility represented by this identification code. If the ID
type is listed as SIC or NAICS, this field will appear as a drop-down list; otherwise,
it will be a text field where you can type in your own description.
State Fields Tab
State Fields
On annual Tier II reports submitted by facilities, some states require additional data
fields beyond those required on all Tier II forms. Once you’ve entered the 2-letter
abbreviation for a state under the Address tab, CAMEO automatically displays all
the additional required and optional fields for annual reporting in that state.
Map Data Tab
Latitude/Longitude
Latitude and longitude of the facility, expressed as decimal values.
This box is checked automatically if the latitude and longitude values are within the
bounding box of the county listed with the street address.
Lat/Long Within
Bounding Box of County
A bounding box is a square area that approximates the area of the county. Checking
the lat/long values against a bounding box’s coordinates will give you a rough
verification of whether or not the lat/long values are within the listed county.
However, be aware that this is not an absolute verification. For instance, if a county
is particularly non-square in shape, many lat/long values that are actually within
neighboring counties will still pass the “bounding box” county check.
Method for Determining
Latitude and Longitude
Code and description of the method by which latitude and longitude were measured;
choose from the drop-down list.
Location Identified by
Latitude and Longitude
Code and description of the location for which latitude and longitude were
measured.
Record is Linked to
MARPLOT Object
This box is checked automatically if the record is linked to an object on a
MARPLOT map (see “Linking a Record to a Map Object” on page 127). Not
editable.
38
Chapter 3: Facilities
Table 3-1. Items on a Facilities Record (Continued)
Item
Description
Site Plan Tab
Site Plan Names
A list of the names of site plan files associated with the facility. Double-click on the
name of any site plan file to display that site plan in another view. (To add or edit
site plans, see “Adding and Removing Site Plans for Facilities” on page 28.)
Notes Tab
Notes
Additional notes about the facility.
39
Chapter 3: Facilities
40
Chemicals in Inventory
Use the Chemicals in Inventory module to keep track of hazardous chemicals
and mixtures that are stored or transported. Chemicals in Inventory records
must be associated with records in the Facilities or Routes modules.
4
A sample Chemicals in Inventory record is shown below; see Table 4-1 on page 43 for detailed
explanations of the information shown on an Chemicals in Inventory record.
41
Chapter 4: Chemicals in Inventory
Adding and Editing Chemicals in Inventory Records
When you create a new Chemicals in Inventory record, you must associate it with a particular facility or
transportation route. You can add a new Chemicals in Inventory record in three different ways:
• Create a new Chemicals in Inventory record manually, in order to enter information from a paper
Tier II form or other source (see “Adding a New Chemicals in Inventory Record” on page 42).
• Transfer data from someone else’s copy of CAMEO to automatically generate Chemicals in
Inventory records (see “Transferring Data Between CAMEO Programs” on page 93).
• Import a Tier2 Submit data file to automatically generate Facilities records (and any associated
Chemicals in Inventory or Contacts records) for all of the facilities in the data file (see “Importing
Data from Tier2 Submit” on page 90).
Regardless of which method you used to create a inventory chemical’s record, all Chemicals in Inventory
records are edited the same way.
Adding a New Chemicals in Inventory Record
Note: If you’re adding a new Chemicals in Inventory record directly from the Chemical Inventory tab on
either a Facilities or a Routes record, skip to Step 4.
1. Chemicals in Inventory records must be associated with a particular facility or transportation route,
so you need to first create the associated record in either the Facilities or Routes modules.
2. Open the Chemicals in Inventory module.
3. Click the New Record button or select New Chemical in Inventory from the Record menu. A new,
blank record appears.
4. Fill out all applicable tabs in the new Chemicals in Inventory record. For additional information,
see:
• Table 4-1 on page 43 for explanations of all the fields on a Chemicals in Inventory record.
• “Looking up a Chemical or Component” on page 42.
5. Click Save Changes.
Now you’ll be able to access information about the inventory chemical directly from the Chemicals in
Inventory record or from the associated Facilities or Routes record.
Looking up a Chemical or Component. The Look Up Chemical and Look Up Component buttons
are provided to assist you in filling in the name of the chemical or component. You may wish to use this
feature to facilitate the use of consistent names and to minimize data entry errors.
42
Chapter 4: Chemicals in Inventory
Clicking these buttons takes you to a new dialog where you can either search for chemical names in
CAMEO Chemicals (if you’ve downloaded the standalone version) or from the list of names already
entered as chemicals (or components) on Chemicals in Inventory records.
Editing a Chemicals in Inventory Record
To edit an existing Chemicals in Inventory record, go to that record, then click the Edit button in the
toolbar (see “Editing Records” on page 21).
Chemicals in Inventory Fields
Table 4-1. Items on a Chemicals in Inventory Record
Item
Description
Facility/Route
Name of the facility that maintains the chemical or the name of the transportation
route along which the chemical is transported. The name is filled in automatically
using information on the associated Facilities or Routes record.
Report Year
The year for which this chemical inventory information applies (typically, the
reporting year in which the Tier II form or data file was submitted). The report year
is filled in automatically using information on the associated Facilities record. The
report year will be blank if the chemical is associated with a Routes record.
Dept. (or Route Type)
Department or division of a facility (or the type of route). This field is filled in
automatically using information on the associated Facilities or Routes record.
City
City where the facility or route is located. The city is filled in automatically using
information on the associated Facilities or Routes record.
State
State where the facility or route is located. The state is filled in automatically using
information on the associated Facilities or Routes record.
CAS #
Chemical Abstracts Service (CAS) number for the chemical.
Look Up Chemical
Visible only in Edit mode. Click this button to search for chemical names in
CAMEO Chemicals (if you’ve downloaded the standalone version) or from the list
of names already entered as chemicals on Chemicals in Inventory records.
Datasheet
On saved records, clicking this button will take you to a chemical datasheet with
response recommendations and physical properties based on the CAS number and
chemical name you entered. You’ll only be taken to a chemical datasheet if (a)
you’ve installed the downloadable version of CAMEO Chemicals, and (b) the CAS
number and chemical name match a chemical datasheet in CAMEO Chemicals.
Chemical Name
Name of the chemical.
In Inventory
When checked, indicates that the chemical is associated with a facility. CAMEO
automatically checks this once the Chemicals in Inventory record is saved; not
editable.
43
Chapter 4: Chemicals in Inventory
Table 4-1. Items on a Chemicals in Inventory Record (Continued)
Item
Description
In Transit
When checked, indicates that the chemical is associated with a transportation route.
CAMEO automatically checks this once the Chemicals in Inventory record is saved;
not editable.
EHS Substance
When checked, indicates that the chemical (or one of the components, if it’s a
mixture) is one of the Extremely Hazardous Substances (EHSs) identified by EPA.
Trade Secret
When checked, indicates that the formula for this chemical is a trade secret.
MSDS
Material Safety Data Sheet (MSDS) number for the chemical (provided by
manufacturer).
Location Tab
Amount
Amount of the chemical stored or transported.
Unit
Units (mass or volume) for the amount of the chemical listed in the Amount field;
choose the unit from the editable drop-down list.
Letter code for the type of chemical storage; choose from the drop-down types list:
Type
A = Above ground tank
B = Below ground tank
C = Tank inside building
D = Steel drum
E = Plastic or non-metallic drum
F = Can
G = Carboy
H = Silo
I = Fiber drum
J = Bag
K = Box
L = Cylinder
M = Glass bottles or jugs
N = Plastic bottles or jugs
O = Tote bin
P = Tank wagon
Q = Rail car
R = Other
Number code for the chemical’s storage pressure; choose from the drop-down list:
Press
1 = Ambient pressure
2 = Greater than ambient pressure
3 = Less than ambient pressure
44
Chapter 4: Chemicals in Inventory
Table 4-1. Items on a Chemicals in Inventory Record (Continued)
Item
Description
Number code for the chemical’s storage temperature; choose from the drop-down
list:
Temp
4 = Ambient temperature
5 = Greater than ambient temperature
6 = Less than ambient temperature, but not cryogenic conditions
7 = Cryogenic conditions
Location at Facility
For facility-linked records, short description of the location of the stored chemical.
Physical State & Quantity Tab
Pure/Mixture
When checked, indicates that the chemical is either in pure form or that it’s a
mixture.
Solid/Liquid/Gas
When checked, indicates the physical state(s) of the stored (or transported) chemical.
Fire
When checked, indicates that the chemical is a fire hazard (for example, flammables,
combustible liquids, and oxidizers).
Pressure
When checked, indicates that the chemical is a “sudden release of pressure” hazard
(for example, explosives and compressed gases).
Reactive
When checked, indicates that the chemical is a reactive hazard (for example, water
reactives, unstable reactives, and organic peroxides).
Acute/Chronic
When checked, indicates that the chemical poses either acute (immediate) or chronic
(delayed) health risks. Examples of acute health hazards include toxics, corrosives,
irritants, and sensitizers; chronic health hazards include carcinogens.
Max Daily Amount/
Max Code
Maximum amount of the chemical stored or transported; choose the appropriate code
for the maximum amount from the drop-down list. (These codes are the same as the
reporting range codes used on Tier II forms.)
Average Daily Amount/
Ave Code
Average amount of the chemical stored or transported; choose the appropriate code
for the average amount from the drop-down list. (These codes are the same as the
reporting range codes used on Tier II forms.)
Max Amount in Largest
Container
Maximum amount (in pounds) of the chemical in a single container or in
interconnected vessels.
Components Tab
Each mixture component is described in a separate table row. All rows should be blank for pure chemicals.
EHS
When checked, indicates that the component is an Extremely Hazardous Substance
(EHS).
CAS
Chemical Abstracts Service (CAS) number for the component.
45
Chapter 4: Chemicals in Inventory
Table 4-1. Items on a Chemicals in Inventory Record (Continued)
Item
Description
Component
Name of the component.
%
Percentage by weight or volume of the component within the mixture.
Wt/Vol
Units for the percentage; choose either Weight or Volume from the drop-down list.
Look Up Component
Visible only in Edit mode. Click this button to search for chemical names in
CAMEO Chemicals (if you’ve downloaded the standalone version) or from the list
of names already entered as components on Chemicals in Inventory records.
Datasheet
On saved records, clicking this button will take you to a chemical datasheet with
response recommendations and physical properties based on the CAS number and
component name you entered. You’ll only be taken to a chemical datasheet if (a)
you’ve installed the downloadable version of CAMEO Chemicals, and (b) the CAS
number and component name match a chemical datasheet in CAMEO Chemicals.
Dates Tab
Report Year from
January 1 to December
31
The year for which this chemical inventory information applies (typically, the
reporting year in which the Tier II form or data file was submitted). The report year
is filled in automatically using information on the associated Facilities record. The
report year will be blank if the chemical is associated with a Routes record.
Chemical Identical to
Previous Year
When checked, indicates that the chemical is identical to the information submitted
during the previous year.
Days On Site
Number of days during the reporting year that the chemical was found at this facility
(or on the route).
Date Tier II Signed
Date when the Tier II form was signed by the facility owner or operator. The date is
filled in automatically using information on the associated Facilities record. The date
will be blank if the chemical is associated with a Routes record.
Date Tier II Received
Date when the Tier II form for a facility was received. The date is filled in
automatically using information on the associated Facilities record. The date will be
blank if the chemical is associated with a Routes record.
State Fields Tab
State Fields
On annual Tier II reports submitted by facilities, some states require additional data
fields beyond those required on all Tier II forms. CAMEO automatically displays all
the applicable additional required and optional fields for annual reporting in that
state. (This tab will be blank if the chemical is associated with a Routes record.)
Notes Tab
Notes
Additional notes about the chemical.
46
Contacts
Use the Contacts module as a directory of people and organizations involved
in hazardous materials emergency response and/or planning. You can
associate a given Contacts record with the record for a specific facility, special
location, incident, or response resource (such as a supplier provider).
5
A sample Contacts record is shown below; see Table 5-1 on page 49 for detailed explanations of the
information shown on a Contacts record.
47
Chapter 5: Contacts
Adding and Editing Contacts Records
You can add a new Contacts record in three different ways:
• Create a new Contacts record manually (see “Adding a New Contacts Record” on page 48).
• Transfer data from someone else’s copy of CAMEO to automatically generate Contacts records (see
“Transferring Data Between CAMEO Programs” on page 93).
• Import a Tier2 Submit data file to automatically generate Facilities records (and any associated
Chemicals in Inventory or Contacts records) for all of the facilities in the data file (see “Importing
Data from Tier2 Submit” on page 90).
When you create a new Contacts record, you can associate it with a facility, special location, response
resource, or incident—you can even associate the contact’s information with multiple records. The
advantage of associating a Contacts record with a facility, special location, incident, or resource is that you
then can use the Show Related command in the Record menu to quickly move between the related records
(see “Using the Show Related Command” on page 21).
Regardless of which method you used to create a contact’s record, all Contacts records are edited the same
way.
Adding a New Contacts Record
Note: If you’re adding a new Contacts record directly from the Contacts tab on a Facilities, Special
Locations, or a Resources record (or from the Notification tab on an Incidents record), skip to Step 3.
1. Open the Contacts module.
2. Click the New Record button or select New Contact from the Record menu. A new, blank record
appears.
3. Fill out all applicable tabs in the new Contacts record. For additional information, see Table 5-1 on
page 49 for explanations of all the fields on a Contacts record.
4. Click Save Changes.
Your contact will now appear in the list of Contacts records. Note that:
• If you started this process by coming from either the Contacts or Notification tabs on a related
record, your new Contacts record will be automatically associated with that record. Now you’ll be
able to access contact information directly from the Contacts record or from the associated Facilities,
Special Locations, Resources, or Incidents record.
• If you started this process at Step 1, your contact won’t be automatically associated with any
Facilities, Special Locations, Resources, or Incidents records. You need to follow the steps in the
next section if you want to associate a record with your new Contacts record.
48
Chapter 5: Contacts
Making an Association with a Contacts Record
1. Go to the Facilities, Special Locations, Resources, or Incidents record that you want to associate
with a Contacts record, and then click the Edit button in the toolbar.
2. Select the Contacts tab (or the Notification tab on an Incident record).
3. Click Add Contact. A list of all records in the Contacts module appears.
4. Select an existing contact or create a new contact:
• If the contact is already in the list, click on his or her name, then click Select. Note: You can
associate the same Contacts record with multiple records by repeating these steps for each of the
records for which this person is a contact.
• If the contact isn’t already in the list, click Add New. You’ll see a new, blank Contacts record. Fill
in the record (see Table 5-1 on page 49 for explanations of all the items), then click Save
Changes.
The Contacts record is now associated with that Facilities, Special Locations, Resources, or Incidents
record. Now you’ll be able to access contact information directly from the Contacts record or from the
associated Facilities, Special Locations, Resources, or Incidents record.
Editing a Contacts Record
To edit an existing Contacts record, go to that record, then click the Edit button in the toolbar (see “Editing
Records” on page 21).
Contact Fields
Table 5-1. Items on a Contacts Record
Item
Description
First/Last Name
First and last name of the contact.
Organization
Organization with which the contact is affiliated.
Title
Job title or position of the contact.
Contact Type
Description of up to four of the contact’s primary functions (such as compliance
officer); choose the contact type(s) from the editable drop-down lists.
Address Tab
Street Address
Street address of the contact, as well as the county (or borough or parish), fire
district, and country.
Mailing Address
Mailing address of the contact.
49
Chapter 5: Contacts
Table 5-1. Items on a Contacts Record
Item
Description
Email
Email address of the contact.
Phones Tab
Type
Description of the contact’s phone number type (such as 24-hour, emergency, or
work); choose from the editable drop-down list.
Phone
Phone number of the contact.
Notes Tab
Notes
Additional notes about the contact.
50
Incidents
Use the Incidents module to keep track of chemical releases at facilities or
along transport routes. Incidents records can be associated with records in the
Facilities and Routes modules, and you can link Incidents records to symbols
marking release locations on maps in MARPLOT.
6
A sample Incidents record is shown below; see Table 6-1 on page 54 for detailed explanations of the
information shown on an Incidents record.
51
Chapter 6: Incidents
Under EPCRA (see “Section 304: Emergency Notification” on page 131), facility operators must report
accidental releases of:
• Extremely Hazardous Substances (also known as EHS chemicals, and defined in EPCRA), and
• Hazardous Substances (also known as CERCLA chemicals, and defined in CERCLA).
You can use the Incidents module to store the required information for these types of releases, as well as
information that is recommended by the National Fire Information Council and the Emergency Response
Notification System for use in reporting incidents.
Note: You can find information about past incidents at facilities in your area by querying the National
Response Center’s incident database at http://www.nrc.uscg.mil/foia.html.
Adding and Editing Incidents Records
When you create a new Incidents record, you can associate it with a particular facility or route where the
incident occurred.
Adding a New Incidents Record
1. If you want to associate the new record with a facility or route where the incident occurred, create
either a Facilities record or a Routes record—if you haven’t already done so. If you don’t want to
create an association, skip to Step 2.
2. Open the Incidents module.
3. Click the New Record button or select New Incident from the Record menu.
4. When asked whether you’d like to associate the new record with a route or facility, click either
Route, Facility, or Neither. If you choose Neither, skip to Step 6—but note that you won’t be able to
associate the incident with a facility or route later.
5. In the list of routes or facilities, click on the name of a route or facility, then click Select. A new,
blank Incidents record will be created for this route or facility.
6. Fill out all applicable tabs in the new Incidents record. For additional information, see:
• Table 6-1 on page 54 for explanations of all the fields on an Incidents Record.
• “Adding Reporter/Discharger Contact Information” on page 53.
• “Mapping an Incident” on page 53.
7. Click Save Changes.
52
Chapter 6: Incidents
Editing an Incidents Record
To edit an existing Incidents record, go to that record, then click the Edit button in the toolbar (see “Editing
Records” on page 21).
Adding Reporter/Discharger Contact Information
You can create Contacts records that contain contact information for incident reporters or dischargers who
are associated with incidents. When you add a contact for an incident, you’re actually adding a new record
to the Contacts module, but information about that contact will also be displayed in the Reporter/
Discharger section under the Notification tab in the record for that incident.
To add a Contacts record for a reporter or discharger associated with a particular incident:
1. Go to the Incidents record, and then click the Edit button in the toolbar.
2. Select the Notification tab.
3. Click Add Contact. A list of all records in the Contacts module appears.
4. Select an existing contact or create a new contact:
• If the reporter/discharger is already in the list, click on his or her name, then click Select. Note:
You can associate the same Contacts record with more than one incident by repeating these steps
for each of the incidents for which this person is a contact.
• If the reporter/discharger isn’t already in the list, click Add New. You’ll see a new, blank Contacts
record. Fill in the record (see Table 5-1 on page 49 for explanations of all the items), then click
Save Changes. Note: When you create a new Contacts record from the Incidents module, the
Contacts record will be associated with that Incidents record automatically.
Mapping an Incident
You can link any Incidents record to an object on a MARPLOT map representing the location of that
incident. To make a link, follow the procedure described in “Linking a Record to a Map Object” on
page 127.
53
Chapter 6: Incidents
Incident Fields
Table 6-1. Items on an Incidents Record
Item
Description
Name of Facility or Route
Name of facility or route where the incident took place. The name is filled in
automatically using information on the associated Facilities or Routes record. (If
this record isn’t associated with a facility or route, this box is blank.)
Route Type or Facility
Department
Type of route or department/division of facility where the incident took place.
This field is filled in automatically using information on the associated Facilities
or Routes record. (If this record isn’t associated with a facility or route, this box is
blank.)
Incident
Name of the incident.
Location/Date Tab
Location
Description of the location of an incident, including the county and fire district,
route or waterway, and milepost where the incident occurred.
Date/Time Spilled
Date and time when the incident happened.
Date/Time Discovered
Date and time when the incident was discovered.
Date/Time Reported
Date and time when the incident was reported to the authorities.
Source Tab
Source Checkboxes
11 source categories (such as underground tank); check any applicable category
to indicate the source(s) of the spill.
Vehicle ID
Identification or license number, if a vehicle was the source of the spill.
# of Tanks
Number of tanks involved in the release.
Tank Capacity/Units
Weight or volume of each tank; choose the units from the editable drop-down list.
Material Type
Type of material that has been released; check any of the four checkboxes to
indicate the type.
Chemical
Name of the spilled chemical. If a mixture spilled, use a separate line to describe
each hazardous component of the mixture.
Quantity/Units
Amount of the chemical that was released into the environment; choose the units
from the editable drop-down list.
Qty in Water/Units
Amount of the chemical that was released into water; choose the units from the
editable drop-down list.
54
Chapter 6: Incidents
Table 6-1. Items on an Incidents Record (Continued)
Item
Description
Cause Tab
Medium
Type of medium or media (such as air or groundwater) into which the chemical
was released; check any of the eight checkboxes to indicate the type.
Cause
Cause(s) of the incident; check any of the seven checkboxes to indicate the cause.
Cause Description
Short description of the cause(s) of the incident.
Action Taken
Short description of the initial action taken to respond to the incident.
Notification Tab
Notified
Check any of the six boxes to indicate the agencies notified and the means of
notification used. Click Multiple Reports if more than one agency was notified.
Agency Notified
If you clicked the Other checkbox (under the Notified heading), type the name of
the agency notified about the incident.
Reporter/Discharger
Names and titles of the people who either reported the incident or are responsible
for the discharge. Double-click on a contact name or title to see the associated
Contacts record.
Confidentiality
When checked, indicates that the reporter information in the record or in the
associated Contacts record is confidential.
Through NRC
When checked, indicates that the incident was reported to the National Response
Center (NRC).
Location/Report
When checked, indicates that a known location was reported.
SSI Report
When checked, indicates that a report on a statistically significant increase (SSI)
in a continuous release has been filed.
Incident/Discharge
When checked, indicates that this is a single incident or discharge (rather than a
continuous release).
Case ID
Case identification numbers assigned to the incident by either the regional
Environmental Protection Agency or U.S. Coast Guard office (Regional Case
ID), the National Response Center (NRC), the discharger (Discharger), and/or
the EPA for a continuous release (CR).
Response & Evaluation Tab
Response Agency/Type
List of the agencies involved in the response to the incident; choose the agency
type (such as state or local) from the editable drop-down list.
Evacuation Required
When checked, indicates that people were evacuated in response to the incident.
55
Chapter 6: Incidents
Table 6-1. Items on an Incidents Record (Continued)
Item
Description
Followup Required
When checked, indicates that a report describing the spill is required to be
submitted by the discharger to the U.S. Department of Transportation,
Environmental Protection Agency, or the Chemical Safety Board.
Followup Received
When checked, indicates that a followup report describing the incident has been
submitted by the discharger to the U.S. Department of Transportation,
Environmental Protection Agency, or the Chemical Safety Board.
Response & Evaluation
Brief description of the response to the incident and the evaluation of the incident.
Injuries
Number of people injured by the incident.
Deaths
Number of people killed by the incident.
Property Damage >
$50,000
When checked, indicates that the incident caused more than $50,000 in property
damages.
Map Data Tab
Latitude/Longitude
Latitude and longitude of the incident location, expressed as decimal values.
Method for Determining
Latitude and Longitude
Code and description of the method by which latitude and longitude were
measured; choose from the drop-down list.
Description of Location
Identified by Latitude and
Longitude
Code and description of the location for which latitude and longitude were
measured.
Record is Linked to
MARPLOT Object
This box is checked automatically if the record is linked to an object on a
MARPLOT map (see “Linking a Record to a Map Object” on page 127). Not
editable.
Notes Tab
Notes
Additional notes about the incident.
56
Special Locations
Use the Special Locations module to keep track of locations that have highdensity, confined, or sensitive populations that might need special attention
during an emergency (such as schools, nursing homes, or hospitals). You can
link Special Locations records to symbols on a map in MARPLOT.
7
A sample Special Locations record is shown below; see Table 7-1 on page 60 for detailed explanations of
the information shown on a Special Locations record.
57
Chapter 7: Special Locations
Adding and Editing Special Locations Records
Adding a New Special Locations Record
1. Open the Special Locations module.
2. Click the New Record button or select New Special Location from the Record menu. A new, blank
record appears.
3. Fill out all applicable tabs in the new Special Locations record. For additional information, see:
• Table 7-1 on page 60 for explanations of all the fields on a Special Locations record.
• “Adding Contact Information for Special Locations” on page 58.
• “Adding and Removing Site Plans for Special Locations” on page 59.
• “Mapping a Special Location” on page 60.
4. Click Save Changes.
Editing a Special Locations Record
To edit an existing Special Locations record, go to that record, then click the Edit button in the toolbar (see
“Editing Records” on page 21).
Adding Contact Information for Special Locations
You can add contact information for special locations (such as a school’s emergency phone number or the
name of a facility manager) by:
• Entering phone numbers directly into a Special Locations record—without creating separate
Contacts records. You might do this if you want to quickly contact special locations during an
emergency response by referring to CAMEO to access the phone numbers.
• Creating an association with a new or existing Contacts record, where you can keep addresses and
notes (such as notes from meetings or phone conversations) as well as phone numbers. When you
add a new contact from a Special Locations record, you’re actually adding a new record to the
Contacts module, but information about that contact will also be displayed under the Contacts tab in
the record for that special location.
Adding a Phone Number to a Special Locations Record
1. Go to the Special Locations record, and then click the Edit button in the toolbar.
2. Select the Phones tab.
58
Chapter 7: Special Locations
3. Click within the first blank table row below the Type heading. Classify the phone number by
choosing a type (such as 24-hour or emergency) from the drop-down list. Note: If you need to add
or modify a type, select Edit from the drop-down list.
4. Type the phone number in the same table row.
5. Click Save Changes.
Adding a Contacts Record for a Special Location
1. Go to the Special Locations record, and then click the Edit button in the toolbar.
2. Select the Contacts tab.
3. Click Add Contact. A list of all records in the Contacts module appears.
4. Select an existing contact or create a new contact:
• If the contact is already in the list, click on his or her name, then click Select. Note: You can
associate the same Contacts record with more than one special location by repeating these steps
for each of the special locations for which this person is a contact.
• If the contact isn’t already in the list, click Add New. You’ll see a new, blank Contacts record. Fill
in the record (see Table 5-1 on page 49 for explanations of all the items), then click Save
Changes. Note: When you create a new Contacts record from the Special Locations module, the
Contacts record will be associated with that Special Locations record automatically.
Adding and Removing Site Plans for Special Locations
You can link site plans, photos, and other documents to Special Locations records.
Adding a Site Plan to a Special Locations Record
1. Go to the Special Locations record, and then click the Edit button in the toolbar.
2. Select the Site Plan tab.
3. Click Add.
4. Browse to the file you want to add, and then click Open. The file name will appear in the list on the
Site Plan tab.
5. Click Save Changes. At this point, CAMEO automatically makes a copy of the file and stores it in
the SitePlans folder, which is inside of the CAMEO Data folder.
Now you can go to this document from the Special Locations record whenever you need to, by doubleclicking on its name in the list on the Site Plans tab.
59
Chapter 7: Special Locations
Note: Only files in a standard graphic file format (for example, JPG, GIF, or PNG) will be displayed within
CAMEO. If you’ve added another type of file (such as PDF or DOC), when you double-click on its name
in the list, a dialog appears with a button you need to click in order to open the file in an external program
(such as Adobe Reader or Microsoft Word). If your computer operating system does not recognize the file
type, you may need to specify the type of program that should open that file type (often a Properties setting
for the operating system).
Removing a Site Plan for a Special Locations Record
1. Go to the Special Locations record, and click the Edit button in the toolbar.
2. Select the Site Plan tab.
3. Click on the name of the site plan or other document to select it in the list.
4. Click Remove. A dialog appears to confirm that you really want to delete this file.
5. Click Delete.
6. Click Save Changes. At this point, CAMEO will permanently delete the copy of the file that was
stored in the SitePlans folder, which is inside of the CAMEO Data folder.
Mapping a Special Location
You can link any Special Locations record to a symbol on a MARPLOT map. To make a link, follow the
procedure described in “Linking a Record to a Map Object” on page 127.
Special Location Fields
Table 7-1. Items on a Special Locations Record
Item
Description
Location Name
Name of the special location.
Location Type
Location type (for example, Elementary School); choose the type from the
editable drop-down list.
Building Type
Type of building (such as Single Family or Tower) for the location; choose the
type from the editable drop-down list.
Address Tab
Street Address
Street address for the location, as well as the county (or borough or parish), fire
district, and country where it’s located.
Mailing Address
Mailing address for the location.
60
Chapter 7: Special Locations
Table 7-1. Items on a Special Locations Record (Continued)
Item
Description
Email
Email address for the location.
Population Tab
Hours of Operation
Time periods during the day when people are present at the location (for
example, 8:00 am - 5:00 pm).
Peak Season
Season of the year when the largest number of people are present at the location
(for example, “school year” for a school or “summer” for a resort hotel).
Average Population
Average number of people at the location during its hours of operation on
typical days.
Average Age
Average age of the people at the location.
Daily Population, Min/Max
Minimum and maximum number of people at the location during a day.
Seasonal Population, Min/
Max
Minimum and maximum number of people at the location during a season.
(Minimum is the number present during the slowest season; maximum is the
number during the peak season.)
Phones Tab
Type
Type of phone number (such as 24-hour, emergency, or office); choose the type
from the editable drop-down list.
Phone
Phone number for the location.
Contacts Tab
Last/First Name
Name of the contact who is associated with the location. The name is filled in
automatically using information on the associated Contacts record.
Title
Job title or position of the contact who is associated with the location. The title
is filled in automatically using information on the associated Contacts record.
Organization
Organization with which this contact is affiliated. The name of the organization
is filled in automatically using information on the associated Contacts record.
Map Data Tab
Latitude/Longitude
Latitude and longitude of the special location, expressed as decimal values.
Method for Determining
Latitude and Longitude
Code and description of the method by which latitude and longitude were
measured; choose from the drop-down list.
Description of Location
Identified by Latitude and
Longitude
Code and description of the location for which latitude and longitude were
measured.
61
Chapter 7: Special Locations
Table 7-1. Items on a Special Locations Record (Continued)
Item
Description
Record is Linked to
MARPLOT Object
This box is checked automatically if the record is linked to an object on a
MARPLOT map (see “Linking a Record to a Map Object” on page 127). Not
editable.
Site Plan Tab
Site Plan Names
A list of the names of site plan files associated with the special location.
Double-click on the name of any site plan file to display that site plan in another
view. (To add or edit site plans, see “Adding and Removing Site Plans for
Special Locations” on page 59.)
Notes Tab
Notes
Additional notes about the location.
62
Routes
Use the Routes module to maintain information about routes (such as railroads
or highways) used to transport hazardous materials. Route types can include
air, water, or land routes. You can link Routes records to routes depicted on a
map in MARPLOT.
8
A sample Routes record is shown below; see Table 8-1 on page 65 for detailed explanations of the
information shown on a Routes record.
63
Chapter 8: Routes
Adding and Editing Routes Records
Adding a New Routes Record
1. Open the Routes module.
2. Click the New Record button or select New Route from the Record menu. A new, blank record
appears.
3. Fill out all applicable tabs in the new Routes record. For additional information, see:
• Table 8-1 on page 65 for explanations of all the fields on a Routes record.
• “Mapping a Route” on page 64.
• “Tracking Chemicals Transported along a Route” on page 64.
• “Tracking Incidents on a Route” on page 65.
4. Click Save Changes.
Editing a Routes Record
To edit an existing Routes record, go to that record, then click the Edit button in the toolbar (see “Editing
Records” on page 21).
Mapping a Route
You can link any Routes record to a polyline object on a MARPLOT map representing that route. To make
a link, follow the procedure described in “Linking a Record to a Map Object” on page 127.
Tracking Chemicals Transported along a Route
You can associate Chemicals in Inventory records with a Routes record. You would do this if you need to
track hazardous materials that are regularly transported along the route (such as regular shipments of a
particular hazardous material from a facility located along the route). To create a Chemicals in Inventory
record that is associated with a Routes record, follow the steps in “Adding and Editing Chemicals in
Inventory Records” on page 42.
Once you’ve created a Chemicals in Inventory record for a hazardous material shipped along a particular
route, you can use the Screening & Scenarios module to investigate potential hazards posed by an
accidental release of that substance. Follow the instructions in Chapter 10, “Screening & Scenarios,”
beginning on page 73.
64
Chapter 8: Routes
Tracking Incidents on a Route
Use the Incidents module to record incidents (such as accidental spills and releases) that have occurred
along a particular route. To create an Incidents record that is associated with a Routes record, follow the
steps in “Adding and Editing Incidents Records” on page 52.
Routes Fields
Table 8-1. Items on a Routes Record
Item
Description
Route Name
Name of the route.
Route Type
Route type (for example, county road, railroad, river, or canal); choose the type from the
editable drop-down list.
Types of Vehicles
Types of vehicles common on the route or used to transport hazardous materials along
the route.
Evacuation
When checked, indicates that the route is designated as an evacuation route during
chemical emergencies.
Snow
When checked, indicates that the route is designated as an snow emergency route.
School
When checked, indicates that the route is designated for school-related transportation.
HAZMAT
When checked, indicates that the route is designated for vehicles carrying hazardous
materials (HAZMAT).
Mass Transit
When checked, indicates that the route is designated for mass transit (for example, a bus
route).
Start/End Point
Starting and ending points of the route or route segment of concern.
County/District
County or other political unit through which the route passes.
Fire District
Fire district through which the route passes.
Vehicles Per Day
Average number of vehicles traveling the route each day.
Route Plotted in
MARPLOT
This box is checked automatically if this record is linked to an object on a MARPLOT
map (see “Linking a Record to a Map Object” on page 127). Not editable.
Intersections Tab
Order
The order of the intersections along the route (for example, you might assign the order
number “1” to the first intersection in a sequence, “2” to the second intersection, and so
on).
Intersection
An intersection name or milepost number identifying a specific location on a route that is
of particular concern—either because of congestion and accident risks, or because of
high volumes of hazardous materials moving through the area.
65
Chapter 8: Routes
Table 8-1. Items on a Routes Record (Continued)
Item
Description
Chemical Inventory Tab
CAS
Chemical Abstracts Service (CAS) number of the chemical transported along the route.
The CAS number is filled in automatically using information on the associated
Chemicals in Inventory record.
Chemical Name
Name of the chemical transported along the route. The name is filled in automatically
using information on the associated Chemicals in Inventory record.
Datasheet
On saved records, clicking this button will take you to a chemical datasheet with
response recommendations and physical properties based on the CAS number and
chemical name you entered. You’ll only be taken to a chemical datasheet if (a) you’ve
installed the downloadable version of CAMEO Chemicals, and (b) the CAS number and
chemical name match a chemical datasheet in CAMEO Chemicals.
Notes Tab
Notes
Additional notes about the route.
66
Resources
Use the Resources module to keep information about companies, people, or
organizations that supply resources for emergency response or planning. For
example, you might want to track media outlets, cleanup contractors,
hospitals, heavy equipment operators, or equipment rental companies.
9
A sample Resources record is shown below; see Table 9-1 on page 70 for detailed explanations of the
information shown on a Resources record.
67
Chapter 9: Resources
Adding and Editing Resources Records
Adding a New Resources Record
1. Open the Resources module.
2. Click the New Record button or select New Resource from the Record menu. A new, blank record
appears.
3. Fill out all applicable tabs in the new Resources record. For additional information, see:
• Table 9-1 on page 70 for explanations of all the fields on a Resources record.
• “Adding Contact Information for Resource Suppliers” on page 68.
• “Adding and Removing Documents for a Resource Supplier” on page 69.
• “Mapping a Resource” on page 70.
4. Click Save Changes.
Editing a Resources Record
To edit an existing Resources record, go to that record, and then click the Edit button in the toolbar (see
“Editing Records” on page 21).
Adding Contact Information for Resource Suppliers
You can add contact information for resource suppliers by:
• Entering phone numbers directly into a Resources record—without creating separate Contacts
records. You might do this if you want to quickly contact resource suppliers during an emergency
response by referring to CAMEO to access the phone numbers.
• Creating an association with a new or existing Contacts record, where you can keep addresses and
notes (such as notes from meetings or phone conversations) as well as phone numbers. When you
add a new contact from a Resources record, you’re actually adding a new record to the Contacts
module, but information about that contact will also be displayed under the Contacts tab in the
record for that resource.
Adding a Phone Number to a Resources Record
1. Go to the Resources record, and then click the Edit button in the toolbar.
2. Select the Supplier Phones tab.
68
Chapter 9: Resources
3. Click within the first blank table row below the Type heading. Classify the phone number by
choosing a type (such as 24-hour or emergency) from the drop-down list. Note: If you need to add
or modify a type, select Edit from the drop-down list.
4. Type the phone number in the same table row.
5. Click Save Changes.
Adding a Contacts Record for a Resource Supplier
1. Go to the Resources record, and then click the Edit button in the toolbar.
2. Select the Contacts tab.
3. Click Add Contact. A list of all records in the Contacts module appears.
4. Select an existing contact or create a new contact:
• If the contact is already in the list, click on his or her name, then click Select. Note: You can
associate the same Contacts record with more than one resource by repeating these steps for each
of the resources for which this person is a contact.
• If the contact isn’t already in the list, click Add New. You’ll see a new, blank Contacts record. Fill
in the record (see Table 5-1 on page 49 for explanations of all the items), then click Save
Changes. Note: When you create a new Contacts record from the Resources module, the
Contacts record will be associated with that Resources record automatically.
Adding and Removing Documents for a Resource
Supplier
You can link documents to Resources records.
Adding a Document to a Resources Record
1. Go to the Resources record, and then click the Edit button in the toolbar.
2. Select the Documents tab.
3. Click Add.
4. Browse to the file you want to add, and then click Open. The file name will appear in the list on the
Documents tab.
5. Click Save Changes. At this point, CAMEO automatically makes a copy of the file and stores it in
the SitePlans folder, which is inside of the CAMEO Data folder.
69
Chapter 9: Resources
Now you can go to this document from the Resources record whenever you need to, by double-clicking on
its name in the list on the Documents tab.
Note: CAMEO will use the computer’s default program to display the document (e.g., Microsoft Word for
a DOC file). If your computer operating system does not recognize the file type, you may need to specify
the type of program that should open that file type (often a Properties setting for the operating system).
Removing a Document for a Resources Record
1. Go to the Resources record, and click the Edit button in the toolbar.
2. Select the Documents tab.
3. Click on the name of the document to select it in the list.
4. Click Remove. A dialog appears to confirm that you really want to delete this file.
5. Click Delete.
6. Click Save Changes. At this point, CAMEO will permanently delete the copy of the file that was
stored in the SitePlans folder, which is inside of the CAMEO Data folder.
Mapping a Resource
You can link any Resources record to a symbol on a MARPLOT map representing the location of that
resource (or resource supplier). To make a link, follow the procedure described in “Linking a Record to a
Map Object” on page 127.
Resource Fields
Table 9-1. Items on a Resources Record
Item
Description
Supplier Name
Name of the company, person, or organization that can supply response resources.
Type
Brief description of the type of supplier (for example, 911 Center, Bomb Disposal);
choose the type from the editable drop-down list.
Address Tab
Street Address
Street address for the supplier, as well as the county (or borough or parish), fire
district, and country where it’s located.
Mailing Address
Mailing address for the supplier.
Email
Email address for the supplier.
70
Chapter 9: Resources
Table 9-1. Items on a Resources Record (Continued)
Item
Description
Supplier Phones Tab
Type
Type of phone number (such as 24-hour, emergency, or office); choose the type
from the editable drop-down list
Phone
Phone number for the supplier.
Items Tab
ID
Model number or other ID number for an item from the resource supplier.
Item
Name or short description of the item supplied.
Amount
Number or quantity of items available (for example, “4” for number of respirators,
or “30” for gallons of a chemical neutralizer).
Contacts Tab
Last/First Name
Name of the contact who is associated with the resource. The name is filled in
automatically using information on the associated Contacts record.
Title
Job title or position of the contact who is associated with the resource. The title is
filled in automatically using information on the associated Contacts record.
Organization
Organization with which this contact is affiliated. The name of the organization is
filled in automatically using information on the associated Contacts record.
Map Data Tab
Latitude/Longitude
Latitude and longitude of the location of the resource, expressed as decimal values.
Method for Determining
Latitude and Longitude
Code and description of the method by which latitude and longitude were measured;
choose from the drop-down list.
Description of Location
Identified by Latitude
and Longitude
Code and description of the location for which latitude and longitude were
measured.
Record is Linked to
MARPLOT Object
This box is checked automatically if the record is linked to an object on a
MARPLOT map (see “Linking a Record to a Map Object” on page 127). Not
editable.
71
Chapter 9: Resources
Table 9-1. Items on a Resources Record (Continued)
Item
Description
Documents Tab
Document Names
A list of the names of documents associated with the resource supplier. Double-click
on the name of any document to display that document in another view. (To add or
edit documents, see “Adding and Removing Documents for a Resource Supplier”
on page 69.)
Notes Tab
Notes
Additional notes about the resource supplier.
72
Screening & Scenarios
You can use the Screening & Scenarios module as a planning tool to assess the
hazards from accidental releases of hazardous chemicals. Such an assessment
is called a hazards analysis, and you can use the results of the analysis to
prepare emergency response plans for your community.
10
A sample Screening & Scenarios record is shown below; see Table 10-3 on page 82 for detailed
explanations of the information shown on a Screening & Scenarios record.
73
Chapter 10: Screening & Scenarios
Using Screening & Scenarios to Assess Hazards
The basic procedures for hazards analysis are described in Technical Guidance for Hazards Analysis:
Emergency Planning for Extremely Hazardous Substances (1987). This guidebook, which is commonly
referred to as the Green Book, was prepared by the U.S. Environmental Protection Agency (EPA), the
Federal Emergency Management Agency, and the U.S. Department of Transportation. The procedures
described in the Green Book were developed to help community planners—especially members of Local
Emergency Planning Committees—meet the provisions of the Emergency Planning and Community
Right-to-Know Act of 1986 (see “EPCRA” on page 128).
The Green Book describes calculations you can make to estimate the size of the area around a chemical
storage facility or along a transportation route that could be affected by an accidental release of a
hazardous chemical. This area is called the threat zone. It may also be called the vulnerable zone or the
screening zone, to reflect the particular type of hazards analysis you perform.
Screening & Scenarios is essentially a calculator that you use to estimate the
radius of a threat zone (as shown at right). To do this, you enter a set of simple
conditions to describe an accidental chemical release at a facility or along a
transportation route. Screening & Scenarios then estimates the radius of the
threat zone around the facility or along the route, using the Green Book
calculations. You can also plot these threat zones on a MARPLOT map.
You can only make Screening & Scenarios calculations for Extremely
Hazardous Substances (EHSs), over 350 chemicals that have been identified by
EPA as acute inhalation toxic threats and listed under EPCRA.
Important: Never use Screening & Scenarios as an emergency response tool or for meeting the
requirements of Section 112(r) of the Clean Air Act of 1990. See “Differences Between Screening &
Scenarios, ALOHA, and RMP Endpoints” on page 80.
Choosing Between Screening and Scenarios
When you use Screening & Scenarios, you choose to estimate the threat zone using either a:
• Screening calculation based on EPA’s credible worst-case assumptions (see Table 10-1 on page 75).
• Scenario calculation based on atmospheric and chemical information that you judge to be more
typical of the region and facility.
Use the screening assumptions to compare the relative risks to your community from the worst possible
releases of all chemicals of concern, both at fixed facilities and along transportation routes. Once you’ve
completed your initial screening, you can construct scenarios to explore how changing your release
assumptions might influence the size of the vulnerable zone. (You also could use ALOHA to further
investigate potential release scenarios; for more information, see the ALOHA manual.)
74
Chapter 10: Screening & Scenarios
Making Screening Calculations
About Screening Calculations
When you use EPA’s worst-case assumptions, you’re performing a screening, and the threat zone is
typically called a screening zone. In a screening, you estimate screening zones for all EHSs that are either:
• Stored above their specified Threshold Planning Quantity (TPQ) at a local chemical facility, or
• Transported along a local route in quantities greater than the TPQ.
Table 10-1. Worst-case Assumptions Used for Screening Zone Estimates
Atmospheric Stability Class = F
Indicates very stable, nighttime atmospheric conditions (see Table 10-2
on page 79).
Wind Speed = 3.35 Miles per Hour
On average, a chemical cloud can travel the farthest downwind at this
relatively low wind speed.
Wind Direction = Any Direction
Wind direction can’t be predicted in advance. Because an escaping
chemical cloud could potentially travel in any direction away from its
point of release, the screening zone forms a circle around the potential
release point. Therefore, the zone doesn’t represent the area that could
be affected during a release; the part of the zone that is affected would
depend on the wind direction during the release.
Ground Roughness = Open Country
A chemical cloud can travel the farthest when it travels across flat, rural
terrain that presents no obstacles to air movement.
Level of Concern = Green Book
Value for that EHS
A conservative estimate of the chemical concentration that might cause
adverse health effects. A screening zone encompasses the area around
the potential release point within which ground-level concentrations of
pollutant could reach or exceed your level of concern.
Amount Released = Maximum
Quantity in Vessel or
Interconnected Vessels
Maximum quantity of a chemical that can be contained in a single
storage vessel or in a group of interconnected vessels within the facility
under examination. Release is from ground level.
Release Duration = 10 Minutes
(Unless it Depends on the
Evaporation or Volatilization Rate)
Depends on the chemical’s state. Solids in powder or solution form and
gases are expected to be released within 10 minutes. The duration of a
liquid or molten solid’s release depends on its rate of evaporation or
volatilization.
75
Chapter 10: Screening & Scenarios
Once you’ve estimated your screening zones, the Green Book describes in detail the remaining steps of a
hazards analysis. Briefly, those steps are:
1. Use your estimated screening zones as an aid in identifying the populations and critical facilities
that might be placed at risk by a worst-case, accidental release. This gives you a way to estimate the
greatest possible severity of the consequences of a release.
2. Estimate the likelihood of a given release.
3. Use your estimates from Steps 1 and 2 to estimate the overall risk associated with a particular
chemical for each facility and transportation route.
4. Differentiate between high-priority and low-priority risks to your community. You might choose to
focus first on high-priority risks when preparing emergency plans.
Estimating a Screening Zone
Before you begin, you need to make the following preparations:
1. Create a Facilities or Routes record.
2. Create a Chemicals in Inventory record for an EHS chemical that’s either maintained at the facility
or routinely transported along the route (see “Adding and Editing Chemicals in Inventory Records”
on page 42). Note: To run a screening calculation, you must enter a value for Max Amount in
Largest Container.
Once you’ve made these preparations, follow the steps below to estimate the radius of a screening zone for
a particular EHS at a facility or along a route:
1. Select the Chemicals in Inventory record for the chemical for which you want to estimate a threat
zone, then select New Screening/Scenario Record from the Record menu.
2. Click Screening when asked whether you want to create a screening record or alternative scenario.
Information about the chemical and the facility or route will be copied onto a new Screening &
Scenarios record, which will be displayed in Edit mode. Note: For each Chemicals in Inventory
record, you can create just one screening record (which you can edit whenever you like). You can
create as many alternate scenario records as you like.
3. Type a name for the screening in the Screening Name box.
4. The chemical’s physical state—solid, liquid, or gas—at 68°F is automatically filled in. If the
chemical is a liquid or a solid at that temperature, a drop-down list will appear to the right of the
state. Use the drop-down list to select additional information about the state (such as liquid is near
boiling point). Your choice influences how CAMEO makes threat zone calculations (see the Green
Book for more details about how the calculations are made).
5. If the chemical’s container is surrounded by a dike, type the diked area in square feet.
76
Chapter 10: Screening & Scenarios
6. Click Estimate Threat Zone Radius. The radius estimate will be displayed.
7. Fill in the risks and consequences of the release, if desired. Consult the Green Book for assistance.
8. Click Save Changes.
For the directions for plotting the screening zone on a MARPLOT map, see “Plotting a Threat Zone on a
Map” on page 79.
Making Scenarios Calculations
About Scenarios Calculations
If you change at least one of the screening assumptions, you’re making a scenario calculation instead of a
screening calculation. You might choose to make a scenario calculation if you thought that one or more of
the worst-case assumptions (listed in Table 10-1 on page 75) for weather, release amount, level of concern,
and/or other circumstances of a release didn’t represent likely release circumstances for a particular facility
or route. For example, you might change wind speed and stability class to fit historical weather data. You
can then find the size of a threat zone under more typical weather conditions rather than the worst-case
conditions. When you make scenarios instead of screening calculations, the threat zone is typically termed
the vulnerable zone to distinguish it from a screening zone.
Estimating Vulnerable Zones
Before you begin, you need to make the following preparations:
1. Create a Facilities or Routes record.
2. Create a Chemicals in Inventory record for an EHS chemical that’s either maintained at the facility
or routinely transported along the route (see “Adding and Editing Chemicals in Inventory Records”
on page 42).
Once you’ve made these preparations, follow the steps below to estimate the radius of a vulnerable zone
for a particular EHS at a facility or along a route:
1. Select the Chemicals in Inventory record for the chemical for which you want to estimate a threat
zone, then select New Screening/Scenario Record from the Record menu.
2. Click Scenario if you’re asked whether you want to create a screening record or alternative scenario.
(CAMEO will skip this step if you’ve already created a screening for this chemical, because there
can be only one screening for each Chemicals in Inventory record.) Information about the chemical
and the facility or route will be copied onto a new Screening & Scenarios record, which will be
displayed in Edit mode.
3. Type a name for the scenario in the Scenario Name box.
77
Chapter 10: Screening & Scenarios
4. The chemical’s physical state—solid, liquid, or gas—at 68°F is automatically filled in. If the
chemical is a liquid or a solid at that temperature, a drop-down list will appear to the right of the
state. Use the drop-down list to select additional information about the state (such as liquid is near
boiling point). Your choice influences how CAMEO makes threat zone calculations (see the Green
Book for more details about how the calculations are made).
5. Adjust any storage and release conditions that need to be changed (see “Choosing a Stability Class”
on page 78 and Table 10-3 on page 82).
6. Click Estimate Threat Zone Radius. The radius estimate will be displayed.
7. Fill in the risks and consequences of the release, if desired. Consult the Green Book for assistance.
8. Click Save Changes.
For the directions for plotting the vulnerable zone on a MARPLOT map, see “Plotting a Threat Zone on a
Map” on page 79.
Choosing a Stability Class. Atmospheric stability class is one of the conditions you can adjust when
making scenario rather than screening calculations. The atmosphere is more or less turbulent at any given
time, depending on the amount of incoming solar radiation as well as other factors. Meteorologists have
defined six atmospheric stability classes, each representing a different degree of turbulence in the
atmosphere.
• When moderate-to-strong incoming solar radiation heats air near the ground so that it rises and
generates large eddies, the atmosphere is considered unstable or relatively turbulent. Unstable
conditions are associated with atmospheric stability classes A and B.
• When solar radiation is relatively weak, air near the surface has less of a tendency to rise and less
turbulence develops. In this case, the atmosphere is considered stable (stability classes E and F).
• Stability classes D and C represent conditions of more neutral stability, or moderate turbulence.
Neutral conditions are associated with relatively strong wind speeds and moderate solar radiation.
Use Table 10-2 on page 79 to choose the stability class that best fits a given combination of wind speed and
solar radiation strength.
78
Chapter 10: Screening & Scenarios
Table 10-2. Stability Class Choices (adapted from Turner 1994)
Wind Speed
Day: Incoming Solar Radiation
Night: Cloud Cover
Miles per
Hour
Meters per
Second
Strong
Moderate
Slight
> 50%
< 50%
<4
<2
A
A–B
B
E
F
4 to 7
2 to 3
A–B
B
C
E
F
7 to 11
3 to 5
B
B–C
C
D
E
11 to 13
5 to 6
C
C–D
D
D
D
> 13
>6
C
D
D
D
D
Notes:
• For completely overcast conditions during day or night, the stability class is D.
•
This table is for releases over land. If the release occurs over water, the stability class will be
either D or E.
•
Wind speed is measured from a wind reference height of 10 meters.
•
Strong incoming solar radiation corresponds to clear skies with the sun high in the sky (solar
angle greater than 60 degrees).
•
Slight incoming solar radiation corresponds to clear skies with the sun low in the sky (solar
angle between 15 and 35 degrees).
•
Night is the period from 1 hour before sunset to 1 hour after sunrise.
Plotting a Threat Zone on a Map
To plot a threat zone on a MARPLOT map from a Screening & Scenarios record, first link the associated
Facilities or Routes record to a map object (see “Linking a Record to a Map Object” on page 127). Any
Screening & Scenarios records you create for the facility or route will become indirectly linked to the same
map object, and you’ll then be able to plot a threat zone for that facility or route on the map.
Then, click
on the Screening & Scenarios record (or, from the Sharing menu, select
MARPLOT, then Show on Map). MARPLOT will start up and display the map with the threat zone on it.
In the case of a facility, the threat zone will appear as a shaded circle around the facility, with a radius equal
to the threat zone radius shown on the Screening & Scenarios record. A threat zone for a scenario also
includes a small oval area (as shown on the next page), representing the area that could potentially be
affected if the wind blows from the direction you indicated on the scenario record. Threat zones for
screenings don’t include an oval area because wind direction isn’t specified in screenings. In the case of a
route, the threat zone will appear as a shaded corridor along the full length of the route, twice as wide at
every point along the route as the calculated threat zone radius.
79
Chapter 10: Screening & Scenarios
You can find out which special locations (such as schools) could be at risk during a potential incident by
using records from the Special Locations and Screening & Scenarios modules along with MARPLOT.
All your threat zones will be removed automatically from the map when you quit MARPLOT. To delete a
threat zone from your map without quitting from MARPLOT, return to the Screening & Scenarios record
from which you plotted the threat zone, and select MARPLOT from the Sharing menu, then Delete
Scenario Object. If you’ve plotted multiple threat zones on your map and would like to remove them all,
select Delete All Scenario Objects instead.
Differences Between Screening & Scenarios, ALOHA,
and RMP Endpoints
Three kinds of toxic hazard predictions can seem very similar on first encounter:
• Screening & Scenarios threat zone estimates.
• Toxic threat zone estimates produced by ALOHA, CAMEO’s hazard model. ALOHA’s toxic threat
zone is defined as the area downwind of an accidental release where chemical concentrations in the
air near ground level may be high enough to be of concern.
• Endpoint distance estimates from offsite consequence analyses under the Risk Management
Planning Rule (or RMP Rule; see “CAA 112(r)” on page 134). An endpoint distance represents the
distance to a particular level of hazard, such as a toxic gas concentration or heat radiation intensity.
The RMP*Comp program (see “RMP*Comp” on page 16) or similar software can be used to
estimate endpoint distances.
First, what’s the difference between Screening & Scenarios and ALOHA? CAMEO’s Screening &
Scenarios module makes the simplified threat zone calculations described in the Green Book. ALOHA
makes a toxic threat zone estimate by taking into account many factors—such as additional chemical
properties, weather conditions, and release source characteristics—that aren’t included in Screening &
Scenarios calculations. ALOHA’s calculations are more complex, and may more accurately predict the
release effects. For more information, see http://response.restoration.noaa.gov/ADA/GreenBook.
80
Chapter 10: Screening & Scenarios
Second, an endpoint distance for an offsite consequence analysis is similar in concept to a Screenings &
Scenarios threat zone radius—so how are they different? At first glance, the hazard analysis procedures
described in the Green Book and implemented in Screening and Scenarios look similar to the RMP
consequence analysis procedures specified by the RMP Rule. For example, both the RMP Rule and the
Green Book specify F stability and 3.4 miles per hour wind speed conditions for worst-case scenarios. But
there are key differences between the two procedures:
• For many substances, the toxic endpoints specified in the RMP Rule differ from the Levels of
Concern specified in the Green Book.
• Screening & Scenarios only uses Gaussian dispersion calculations, but the RMP Rule specifies that
you must “appropriately account for gas density.” That is, you must use another technique to model
heavy gases (Gaussian calculations are designed for neutrally buoyant gases).
• While the Green Book mandates rural terrain for all worst-case scenarios, the RMP Rule specifies
that you should choose either urban or rural terrain conditions, depending on which choice best
describes the terrain.
• Both the Green Book and the RMP Rule specify that toxic gases should be assumed to be released
over a 10-minute period. But the Green Book specifies that the dispersion distance then be estimated
by treating the release as a steady-state (infinite-duration) emission, at the rate that would result in
the release of the entire quantity of the substance in 10 minutes. In contrast, the RMP Rule specifies
that the distance be estimated by treating the release as an emission lasting only 10 minutes. This
difference in method may seem obscure, but it can make a big difference. Distances estimated using
the Green Book method can be substantially longer.
Here are the key points to remember:
• For emergency response, use ALOHA—not Screening & Scenarios.
• Don’t use Screening & Scenarios to estimate endpoint distances for the offsite consequence analyses
required under the RMP Rule. You can use ALOHA or RMP*Comp for this task.
• Use Screening & Scenarios only for the hazards analyses described in the Green Book, in order to
meet EPCRA requirements.
For more information, see the Ask Dr. ALOHA articles on this subject, which are available at
http://response.restoration.noaa.gov/ADA/RMP_EPCRA.
81
Chapter 10: Screening & Scenarios
Screening & Scenarios Fields
Note: For all Screening & Scenarios calculations, temperature is assumed to be 68°F (20°C).
Table 10-3. Items on a Screening & Scenarios Records
Item
Description
Facility/Route Name
Name of the facility that maintains the chemical or the name of the
transportation route along which the chemical is transported. The name is
filled in automatically using information on the associated Facilities or
Routes record.
Chemical
Name of the chemical. The name is filled in automatically using information
on the associated Chemicals in Inventory record.
CAS
Chemical Abstracts Service (CAS) number for this chemical. The CAS
number is filled in automatically using information on the associated
Chemicals in Inventory record.
Screening Name (Scenario
Name)
Name of this screening or scenario.
Datasheet
On saved records, clicking this button will take you to a chemical datasheet
with response recommendations and physical properties based on the CAS
number and chemical name you entered. You’ll only be taken to a chemical
datasheet if (a) you’ve installed the downloadable version of CAMEO
Chemicals, and (b) the CAS number and chemical name match a chemical
datasheet in CAMEO Chemicals.
In Inventory
When checked, indicates that the Screening & Scenarios record is associated
with a facility. CAMEO automatically checks this if applicable; not editable.
In Transit
When checked, indicates that the Screening & Scenarios record is associated
with a transportation route. CAMEO automatically checks this if applicable;
not editable.
Shipper
When checked, indicates that the Screening & Scenarios record is associated
with a facility that ships chemicals (as indicated on the associated Facilities
record). CAMEO automatically checks this if applicable; not editable.
Screening (Scenario) Description Tab
Amount Released
Amount of chemical released, in pounds. For screening calculations, this is
the maximum amount stored in one vessel or in connected vessels. For
scenario calculations, you can choose other values.
Concentration
Concentration of the chemical, in weight percent. For screening calculations,
this is 100 percent. For scenario calculations, you can choose other values.
82
Chapter 10: Screening & Scenarios
Table 10-3. Items on a Screening & Scenarios Records (Continued)
Item
Description
Release Duration
Duration of the chemical release (in minutes). For screening calculations,
this is 10 minutes (unless it depends on the evaporation or volatilization
rate). For scenario calculations, you can choose other values.
Physical State
Chemical’s physical state (solid, liquid, or gas) at 68°F is filled in
automatically. If the chemical is a liquid or a solid at that temperature, use
the drop-down list to the right of the state to select additional information
about the state (such as liquid is near boiling point).
If Stored in a Container with a
Dike, Enter Surface Area
within Dike
Area within the dike (in square feet).
Atmospheric Concentration
Level of Concern
Or LOC. Atmospheric concentration of the chemical on which to base threat
zone calculations (in grams per cubic meter). The value listed in the Green
Book is automatically filled in; you can use a different value for scenarios.
LOC Description
Description about where the chosen level of concern came from, either
Greenbook LOC or Other.
Wind Speed
Wind speed in miles per hour. For screening calculations, this is 3.4 miles
per hour. For scenario calculations, you can choose other values, but the
wind speed must be appropriate for the stability class (see Table 10-2 on
page 79).
Wind From
Direction from which the wind is blowing, in degrees true north. For
screening calculations, this remains blank.
Ground Roughness
A measure of the size of the obstacles on the ground that a dispersing
chemical cloud must pass over. For screening calculations, this is set to
Open Country. For scenario calculations, you can choose either Open
Country (relatively smaller and fewer obstacles) or Urban or Forest
(relatively more and larger obstacles).
Stability Class
Atmospheric stability class depends on wind speed and cloud cover. For
screening calculations, stability class is set to F. For scenarios, review
Table 10-2 on page 79 to choose a class.
Risk/Consequences/Overall
Risk
Using the information you entered for the Screening/Scenarios calculations,
you can rank the likelihood, consequences, and overall risk of a release of a
chemical; choose either high, medium, or low from each drop-down list.
(Refer to the Green Book for more on risk assessment.)
83
Chapter 10: Screening & Scenarios
Table 10-3. Items on a Screening & Scenarios Records (Continued)
Item
Description
Threat Zone Radius
Distance from the release point beyond which the predicted concentration of
the airborne pollutant is expected to be below the LOC. At locations closer
to the release point and directly downwind, concentrations are predicted to
exceed the LOC. Because wind direction is not taken into account when this
distance is calculated, a threat zone around a release point always forms a
circle. This value is calculated for you when you click Estimate Threat Zone
Radius in Edit mode.
Estimate Threat Zone Radius
Visible only in Edit mode. Click this button to estimate the threat zone
radius.
Show on Map
On saved records where the associated Facilities or Routes record has been
linked to a map object, clicking this button will display the facility/route and
threat zone on a MARPLOT map.
Notes Tab
Notes
Additional notes about the screening or scenario.
84
Importing and Exporting Data
In this section, you’ll find explanations of the kinds of data transfers that can be made to or
from CAMEO, and instructions for completing each kind of transfer. You’ll also find
background information you’ll need to know to avoid problems when you transfer data.
11
Avoiding Trouble
To avoid trouble when you transfer data to and from CAMEO, we recommend that you:
• Always back up your existing data before importing data into CAMEO. It’s easy to do: just export
all the data from the affected module(s) into an archive file (see “Exporting Data from All CAMEO
Modules” on page 94 and “Exporting Data from All Records in a CAMEO Module” on page 94).
• Follow the CAMEO Data Ownership Rule.
To avoid inadvertently duplicating records, see “Strategies for Avoiding Duplicate Records” on page 99.
CAMEO Data Ownership Rule
The Ownership Rule says that the CAMEO user with the most detailed knowledge of the data on a
CAMEO record should be considered the owner of that record. The owner of a record should be the only
person who makes changes to it (or directs others to change it). To implement the Ownership Rule, first,
establish who owns which data. Then, import data only from its owner, and export data only if you own it.
Here’s an example of how the rule works in practice: Suppose that you work for a fire district that has a
mutual aid agreement with neighboring districts. Also suppose that each district has agreed to be
responsible for collecting information about the facilities in their district and creating CAMEO records
describing those facilities.
To prepare for mutual aid calls, you might want to import the other districts’ facility records into your copy
of CAMEO. The other districts likewise might ask you to export your facility records to them, for use in
their copies of CAMEO. You can avoid causing problems by agreeing to the following rules:
• Each district is the owner of the data describing the facilities in its own fire district.
• Each district will export only the records that it owns.
• Each district will import records only from their owner.
To export your facility records to the other districts, you would follow the steps in “Exporting Data from a
Subset of the Records in a Module” on page 95 to export just the data for the facilities in your district.
85
Chapter 11: Importing and Exporting Data
What if your fire district, and the neighboring districts, instead receive your facility data from the State
Emergency Response Commission (SERC), which compiled that data from submitted Tier II reports? You
would then consider the SERC to be the owner of the facility data for all your districts. Each district would
import data only from the SERC. Districts would never export facility records.
The reason why following the Ownership Rule can save you time and trouble has to do with the way
CAMEO keeps track of records (see “How CAMEO Assigns and Uses Record IDs” on page 87).
Possible Data Transfers
You can transfer data to and from CAMEO in three ways:
• From Tier2 Submit to CAMEO. Tier2 Submit is a program used by facilities for preparing and
submitting Tier II chemical inventory reports. See “Importing Data from Tier2 Submit” on page 90.
• Between two copies of CAMEO. See “Transferring Data Between CAMEO Programs” on page 93.
• From CAMEO to a data file that can be imported into a spreadsheet, database, or other program. See
“Exporting Data to Other Programs” on page 102.
Note that:
• Data can’t be exported from CAMEO to Tier2 Submit. (However, data can be transferred
between different copies of Tier2 Submit. See the Tier2 Submit manual for details.)
• It would be difficult, though not impossible, to import data created in non-CAMEO programs
into CAMEO. A file using CAMEO’s field order and format could be imported into CAMEO, but
you would need to carefully consider assignment of record IDs (see “How CAMEO Assigns and
Uses Record IDs” on page 87). If you want to try creating an import file, first export a file from any
CAMEO module. Then, inspect the exported file in a database or spreadsheet program, so that you
can see the field order and format used by CAMEO. The first record within any file exported from
CAMEO provides data field names and field order; import files must be in zipped merge format (see
“Zipped Merge Files: The CAMEO Standard File Format” on page 87).
86
Chapter 11: Importing and Exporting Data
Zipped Merge Files: The CAMEO Standard File Format
To import and export data, CAMEO uses a standard type of data file called a merge file. When you export
data from CAMEO, a merge file is created for each module from which data is exported (merge files are
also created for behind-the-scenes supporting files). Merge files exported from CAMEO contain the data
exported from the corresponding modules and/or supporting files.
A merge file is a text file in which data fields are separated by commas, records are separated by carriage
returns, and the contents of each data field are enclosed in quotation marks. A merge file has a .mer file
extension.
With each data export, the merge files exported from CAMEO are automatically compressed together into
a single zipped file, which has a .zip file extension. Depending on the nature of the data you’re exporting
from CAMEO, the zipped file created by CAMEO may contain a single merge file or multiple merge files.
Once you’ve exported merge files from CAMEO and have uncompressed (unzipped) them, you can open
and work with them in standard database, spreadsheet, and text editing programs.
Tier2 Submit File Format. You might receive Tier2 Submit data files either directly from facilities
reporting their chemical inventory data or from colleagues. Tier2 Submit data files contain the Tier II
information submitted by those facilities, and can be imported into CAMEO (see “Importing Data from
Tier2 Submit” on page 90). A data file generated from Tier2 Submit is a collection of individual merge
files compressed together into a single zipped file. CAMEO can automatically uncompress a Tier2 Submit
file and import the data from the merge files.
How CAMEO Assigns and Uses Record IDs
CAMEO uses record ID numbers to keep track of the records in its modules and the relationships between
records. Each new record is assigned a unique 20-character record ID when it’s created. In the case of
CAMEO’s facility records, a record ID is assigned to a given facility in either of two ways:
• When you manually create a facility record in CAMEO, a record ID is automatically generated for
that record.
• When you import a Tier2 Submit facility record into CAMEO, CAMEO uses the record ID that was
created in Tier2 Submit and imported into CAMEO along with the facility record.
Parent and Child Modules and Record IDs
Record IDs are used in CAMEO to track relationships among records stored in different modules,
particularly relationships between records in parent and child modules. In CAMEO, as with other kinds of
databases, this type of relationship hierarchy is useful to describe which records belong to other records—
for example, child modules are subordinate to parent modules.
87
Chapter 11: Importing and Exporting Data
For the purposes of tracking relationships among records in CAMEO:
• Parent Modules: Facilities, Special Locations, Routes, and Resources.
• Child Modules: Chemicals in Inventory, Contacts, and Incidents. The main
purpose of these modules is to store information that helps to describe
facilities, routes, and special locations.
• Grandchild Module: Screening & Scenarios.
For example, records in a child module typically belong to (that is, are associated
with) a record in a parent module:
• Chemicals in Inventory records describe either chemicals in a facility’s
inventory or chemicals routinely transported along a given route.
• Incidents records typically describe incidents that have happened at facilities
or along routes.
• Some Contacts records describe contact people for facilities and special
locations. Other Contacts records may describe people involved in incidents
(such as the discharger) or contact people for companies that provide response
resources.
In the Facilities and Routes modules, each new facility or route record is
assigned a record ID when it is created. From then on, when a new
Chemicals in Inventory record is created to describe a chemical (or
mixture) stored at a given facility or transported on a given route, the
new record is given its own unique record ID and also a parent record
ID that matches the facility or route’s record ID (as in the example
Chemicals in Inventory record at right). CAMEO uses the parent record
ID to track the facility or route associated with the Chemicals in
Inventory record.
Screening & Scenarios can be considered a grandchild module
because it’s subordinate to the Chemicals in Inventory module, just
as the Chemicals in Inventory module is subordinate to the Facilities
and Routes modules. For that reason, any Screening & Scenarios
record contains three record IDs: its own unique record ID, the
parent record ID for the related Chemicals in Inventory record, and
the grandparent record ID for the facility or route record that’s
related to the Chemicals in Inventory record (as in the example
Screening & Scenarios record at left). CAMEO uses the parent
record ID to associate the Screening & Scenarios record with the
Chemicals in Inventory record, allowing information about the chemical to be used in threat zone
estimation. It uses the grandparent record ID when you choose to plot a threat zone on a map (the threat
zone is plotted either around the facility or along the route that has a record ID matching the grandparent
record ID).
88
Chapter 11: Importing and Exporting Data
Data Transfers and Record IDs
For each record in a data file exported from one copy of CAMEO (the source copy) into another copy of
CAMEO (the target copy), one of two things happens:
• A new record is created in the target copy of CAMEO to hold the newly imported data.
• An existing record is updated.
Whether a new record is created or an existing record is updated depends on the record ID for that record,
which is included in the file and imported along with the rest of the data in that record. The record ID for
each imported record is compared with the record IDs for the existing records in a given target module:
• If no match is found, a new record containing the imported data is added to the target module, and
the record ID for the new record is set to match the record ID of the imported record.
• If a match is found, the corresponding record in the target module is updated with the imported data.
During the update, all the data in the target record is replaced by the matching imported record.
Records in CAMEO—especially records describing facilities—can be duplicated when you might not
necessarily expect it, because of how CAMEO uses record IDs. For example:
• A duplicate record for a facility is created if a record for that facility was already created manually in
the Facilities module and you then import a Tier2 Submit file containing information about that
facility. Even though the facility name and other identifying information may be the same, the record
IDs will not match because both CAMEO and Tier2 Submit assigned different IDs to that facility.
• Records can be duplicated when you transfer data between two copies of CAMEO, if the source and
target modules each contain a record for the same entity (such as a facility) and those records came
from different sources (that is, have different record IDs).
The best way to avoid unintended record duplication is to follow the “CAMEO Data Ownership Rule” on
page 85. For other strategies, see “Strategies for Avoiding Duplicate Records” on page 99.
Viewing Record IDs
Record ID numbers aren’t displayed in CAMEO, because you generally don’t need to see the record IDs
for the records in your copy of CAMEO. However, you can view them if you need to. For example, you
might want to view the record IDs in a particular module if you suspect that the module contains unwanted
duplicates of some records.
To see the record IDs in any of your CAMEO modules:
1. Export the data from that module, following the steps in “Exporting Data from All Records in a
CAMEO Module” on page 94.
2. Open the exported file in a spreadsheet program, following the steps in “Exporting Data to Other
Programs” on page 102.
89
Chapter 11: Importing and Exporting Data
In the exported file, you can recognize record IDs by their distinctive format. Each is 20 characters long
(without any spaces), and the record IDs for each CAMEO module can be identified by their unique twoletter prefix. For example, “FA” are the first two characters of any facility record ID.
Importing Data from Tier2 Submit
Under the Emergency Planning and Community Right-to-Know Act (EPCRA), facilities that maintain
more than threshold amounts of certain hazardous materials must submit an annual chemical inventory
report—called a Tier II form—to their state’s State Emergency Response Commission (SERC), Local
Emergency Planning Committee (LEPC), and local fire department. Facility operators can use Tier2
Submit to prepare their annual Tier II report as an electronic file (see “Tier2 Submit” on page 15).
You might receive Tier2 Submit files if you are:
• A member of a SERC, LEPC, or local fire department to whom facilities submit their reports.
• A local responder or planner who receives—from your SERC or LEPC—a Tier2 Submit file of data
for facilities in your area.
When you import a Tier2 Submit file into CAMEO, data from that file will be imported into the Facilities,
Chemicals in Inventory, and Contacts modules, as follows:
• A new Facilities record will be
created for each facility
described in the Tier2 Submit
file. It will be assigned the
record ID generated for that
facility by Tier2 Submit.
• A new Chemicals in Inventory
record will be created for each
chemical (or mixture) in a given
facility’s inventory that is listed
in the Tier2 Submit data file.
The parent record ID assigned to
this record will match the
facility’s record ID.
• A new Contacts record will be
created for each contact person listed in the Tier2 Submit data file. The parent record ID assigned to
this record will match the facility’s record ID.
Note: The procedure for importing a Tier2 Submit file is unaffected by how many facilities are represented
in the file. A Tier2 Submit file submitted by the operator of a reporting facility would generally contain
information for just a single facility. In contrast, a Tier2 Submit file generated by a SERC to share with
local planners and responders would contain data on multiple facilities.
90
Chapter 11: Importing and Exporting Data
Things to Know Before Importing Tier II Data
If your copy of CAMEO already contains records for some of the facilities, chemicals in inventory, or
facility contacts included in the Tier2 Submit file (either because you created those records manually or
because you imported a Tier2 Submit data file in a previous reporting year), new records for all those
facilities, chemicals, and contacts will be created when you import the Tier2 Submit file.
Any existing records in your copy of CAMEO will not be updated, because their record IDs will not match
the record IDs in the Tier2 Submit file. (Tier2 Submit generates its own record IDs when someone enters
information in that program.)
Given CAMEO’s record-keeping method, there are two ways for you to manage your Tier II data in
CAMEO, each with advantages and drawbacks.
Method 1: Records for Each Reporting Year. First, you can simply import new Tier2 Submit data
file(s) for the facilities of interest to you each year, following the steps in “Importing a Tier2 Submit Data
File” on page 93. Then, for each reporting facility, for each reporting year, there will be one record in your
Facilities module, one Chemicals in Inventory record for each chemical (or mixture) in the facility’s
inventory, and a new Contacts record for each facility contact. Note that there will be multiple Contacts
records for the same contact person if multiple facilities have reported the same contact person.
Because reporting year is shown on records in the Facilities and Chemicals in Inventory modules, you can
differentiate among records that were created in different reporting years in these modules. For example, if
you have facility records from multiple reporting years, and want to work with your Facilities records for
just the current reporting year:
1. Open the Facilities module and then click the New Search button or select Start Search from the
Search menu.
2. Type the current reporting year in the Report Year box, set the drop-down list to “is equal to,” then
click Search. The found set for this search will contain just the Facilities records for the current
reporting year.
If you want to find just the record for a particular facility for the current reporting year, follow the previous
steps, but also include the facility’s name on the search form.
However, if you want to view the data for a particular facility from all consecutive reporting years:
1. Open the Facilities module and then click the New Search button or select Start Search from the
Search menu.
2. Type the name of the facility in the Facility Name box, then click Search. The found set for this
search will contain only the records for the given facility, for all reporting years.
3. To sort these records by date, follow the instructions in “Sorting Records by a Single Criterion” on
page 124 to sort the found set by Report Year.
91
Chapter 11: Importing and Exporting Data
Reporting year isn’t shown on Contacts records. To access the most recent Contacts record for a facility
contact person, begin in the Facilities module rather than the Contacts module:
1. Go to the most recent Facilities record for that facility.
2. Select the Contacts tab.
3. Double-click on the name of the contact person. The most recent Contacts record for that contact
will be displayed.
Note: An alternative procedure is to go to the most recent Facilities record for the facility, then select Show
Related from the Record menu, and then Contact Records.
Method 2: Records for a Single Reporting Year. Rather than keeping data from multiple reporting
years in your copy of CAMEO, you could delete all the records for previous reporting years and then
import the current year’s Tier2 Submit files. Then, when you import the Tier2 Submit data files, for each
reporting facility there would be just one record in your Facilities module, just one Chemicals in Inventory
record for each chemical in the facility’s inventory, and just one Contacts record for each contact person
for that facility (unless multiple facilities have listed the same contact person).
Important: Do not choose this approach if you foresee needing facility-related data from previous
reporting years in any of the following modules: Facilities, Contacts, Chemicals in Inventory, Incidents,
and Screening & Scenarios. For example, if you want to keep Incidents records for accidents at a particular
facility over a period of years, avoid this approach.
If you choose this approach, back up your Tier II data from previous year(s) and then delete those records
from CAMEO (before you import Tier2 Submit data file(s) for the current reporting year):
1. Open the Facilities module.
2. From the File menu, select Import\Export, then click Export.
3. Click Export Data for Entire Module. When you export data from the Facilities module, data is also
exported from related records in the Contacts, Chemicals in Inventory, Incidents, and Screening &
Scenarios modules. The result of the export is a single zipped file containing a set of merge files.
4. When prompted, choose a location and name for the export file, then click Save. A zipped file
containing your exported data will be created at that location. We recommend that you make a
second copy of the archive file on another storage device.
5. Click OK on the completion message and click Done on the Import/Export Log.
6. While the Facilities module is still open, select Show All Records from the Record menu.
7. From the Record menu, select Delete All Records. This deletes all records from the Facilities
module. Records related to the deleted facilities in the Chemicals in Inventory, Contacts, Incidents,
and Screening & Scenarios modules are also deleted. (If any facility-associated Contacts record is
also related to a record that isn’t deleted, such as a Resources record, the Contacts record will not be
deleted.) Note: You need to be in list view to see this menu item.
92
Chapter 11: Importing and Exporting Data
Importing a Tier2 Submit Data File
1. Start CAMEO.
2. Back up your facilities-related data, see “Exporting Data from All Records in a CAMEO Module”
on page 94.
3. From the File menu, select Import\Export.
4. Click Import, then click Import again when reminded to back up data.
5. Find and open the Tier2 Submit file. The import will start immediately.
Note: If you accidently import the same Tier2 Submit data file more than once, don’t worry. Each of the
newly imported records will simply be overwritten, rather than duplicated, because the record IDs will be
the same.
Transferring Data Between CAMEO Programs
In some situations, you might need to transfer data between your own copy of CAMEO (the source copy)
and someone else’s (the target copy). Note: You would follow the same procedure if you wanted to
transfer data from the previous version of CAMEO into the latest version.
To transfer data from your copy of CAMEO to someone else’s, you export the data
from your own records into an export file. Your colleague then imports the data from
that file into his or her copy of CAMEO, as at right. If instead you received data from
your colleague, you would import his or her export file.
You can export data from:
• All your CAMEO modules at once.
• A single CAMEO module. Data will also be exported from related records in
child and grandchild modules. For example, when you export Facilities
records, related records in the Chemicals in Inventory, Contacts, Incidents, and
Screening & Scenarios modules are exported as well.
• A found set of records in a single CAMEO module (that is, a set of records
found during a search). Data will also be exported from related records in child
and grandchild modules.
• A single CAMEO record. Data will also be exported from related records in
child and grandchild modules.
When you transfer data between two copies of CAMEO, it’s possible to unintentionally duplicate records.
Before transferring data, review “Data Transfers and Record IDs” on page 89.
93
Chapter 11: Importing and Exporting Data
Exporting Data from All CAMEO Modules
Sometimes, you might want to export all the data from CAMEO into a single export file. This procedure is
an easy way to create a backup archive file of all of your CAMEO data.
To export all the data from all of your CAMEO modules:
1. From the File menu, select Import\Export, then click Export.
2. Click Export ALL CAMEO data.
3. When prompted, choose whether or not you want to include site plan and document files in the
export. We recommend clicking Yes. See “Exporting Site Plans and Linked Documents” on page 97
for additional information.
4. When prompted, choose a location and name for the export file, then click Save. A zipped file
containing your exported data will be created at that location.
5. Click OK on the completion message and click Close on the Import/Export Log.
If some of the exported records are linked to map objects, see “Exporting Map Links and Map Objects” on
page 96.
Exporting Data from All Records in a CAMEO Module
Sometimes, you might need to transfer all the data from just one module, along with data from related
records in any child or grandchild modules. For example, you might want to do this if you represent a fire
district that has just entered into a mutual aid agreement with neighboring districts. If each district only has
records for facilities in that district in its copy of CAMEO, then each district could export all its facility
data, and share that export file with neighboring districts. Under the “CAMEO Data Ownership Rule” on
page 85, each district would “own” the data for facilities in that district. Note, though, that if each district
has records for facilities not only in its own district but also in neighboring districts, each district would
instead export just the subset of its records containing only the facilities in its own district (see “Exporting
Data from a Subset of the Records in a Module” on page 95).
To export all the data from a CAMEO module:
1. Open the module from which you want to export data. Note: Whenever you export data from the
Facilities or Routes modules, related records in the Chemicals in Inventory, Contacts, Incidents, and
Screening & Scenarios modules are exported as well.
2. From the File menu, select Import/Export, then click Export.
3. Click Export Data for Entire Module.
4. When prompted, choose whether or not you want to include site plan and document files in the
export. We recommend clicking Yes. See “Exporting Site Plans and Linked Documents” on page 97
for additional information.
94
Chapter 11: Importing and Exporting Data
5. When prompted, choose a location and name for the export file, then click Save. All the data from
all the records in the open module, along with all data from related records in child and grandchild
modules, will be exported to a single zipped file at that location.
6. Click OK on the completion message and click Close on the Import/Export Log.
If some of the exported records are linked to map objects, see “Exporting Map Links and Map Objects” on
page 96.
Exporting Data from a Subset of the Records in a Module
Sometimes, you might need to transfer data from only certain records in a CAMEO module, along with
data from related records in any child/grandchild modules. For example, Tier II data is particularly useful
to emergency responders. So if you’re a member of a State Emergency Response Commission that has
received Tier II data, you might want to share that data with county- and tribal-level response organizations
or with fire departments. You might want to export only certain records to each receiving organization: for
example, just the records for King County to that county’s emergency management organizations.
Exporting a subset of records can be a way to honor the “CAMEO Data Ownership Rule” on page 85.
When you need to export records, you can search a module to create a found set containing just the records
you “own” (for example, just your fire district’s records, rather than all your facility records). Then, you
can export just the found set.
To export only a subset of records from a CAMEO module:
1. In the module, create a found set containing just the records you want to export. To do this, search
the module in such a way that only the records you want will be found. For example, to create a
found set in the Facilities module that contains just the records for facilities in Johnson County,
choose Start Search from the Search menu, type “Johnson” in the County box, then press Search.
(For more details about setting up searches, see “Searching” on page 118.) Note: Whenever you
export data from the Facilities or Routes modules, related records in the Chemicals in Inventory,
Contacts, Incidents, and Screening & Scenarios modules are exported as well.
2. From the File menu, select Import\Export, then click Export.
3. Click Export Data for Found Set.
4. When prompted, choose whether or not you want to include site plan and document files in the
export. We recommend clicking Yes. See “Exporting Site Plans and Linked Documents” on page 97
for additional information.
5. When prompted, choose a location and name for the export file, then click Save. All the data from
all the records in the found set, along with all data from related records in child and grandchild
modules, will be exported to a single zipped file at that location.
6. Click OK on the completion message and click Close on the Import/Export Log.
95
Chapter 11: Importing and Exporting Data
If some of the exported records are linked to map objects, see “Exporting Map Links and Map Objects” on
page 96.
Exporting Data from a Single CAMEO Record
You can export the data from just a single CAMEO record, along with data from related records in child
and grandchild modules:
1. Select the record from which you want to export data.
2. From the File menu, select Import/Export, then click Export.
3. Click Export Data for Current Record.
4. When prompted, choose whether or not you want to include site plan and document files in the
export. We recommend clicking Yes. See “Exporting Site Plans and Linked Documents” on page 97
for additional information.
5. When prompted, choose a location and name for the export file, then click Save. The data from the
record, along with all data from any related records in child and grandchild modules, will be
exported to a single zipped file at that location.
6. Click OK on the completion message and click Close on the Import/Export Log.
If some of the exported records are linked to map objects, see “Exporting Map Links and Map Objects” on
page 96.
Exporting Map Links and Map Objects
If the CAMEO records that you’re exporting are linked to objects on your CAMEO map, you’ll typically
want to export the map objects as well.
To export all the records, map links, and map objects linked to records in a CAMEO module:
1. Export the records, following the instructions in “Exporting Data from All Records in a CAMEO
Module” on page 94. The exported file contains the data from your records, including the map links
from linked records, but not the linked map objects themselves.
2. Open the module (if it isn’t already).
3. From the Sharing menu, select MARPLOT, then Show All on Map. The map objects linked to
records in this module will be selected and displayed in MARPLOT.
4. While the objects remain selected, from MARPLOT’s File menu, select Export.
5. Set up the export by selecting the “selected objects” and “MARPLOT Import/Export (MIE)”
options, then click Export. An MIE file containing all the selected objects is created. (MIE files are
a kind of text file that MARPLOT uses for importing and exporting data.)
96
Chapter 11: Importing and Exporting Data
6. Give your colleagues both the file that you exported from CAMEO and the MIE file that you
exported from MARPLOT.
If you need to export just a subset of the records in a CAMEO module (for example, just the records you
own under the “CAMEO Data Ownership Rule” on page 85, not the records you obtained from someone
else) along with related map links and map objects, then:
1. Follow the steps in “Exporting Data from a Subset of the Records in a Module” on page 95.
2. While the found set is still in place, from the Sharing menu, select MARPLOT, then Show All on
Map. The map objects linked to the found records will be selected and displayed in MARPLOT.
3. While the objects remain selected, from MARPLOT’s File menu, select Export.
4. Set up the export by selecting the “selected objects” and “MARPLOT Import/Export (MIE)”
options, then click Export. An MIE file containing all the selected objects is created. (MIE files are
a kind of text file that MARPLOT uses for importing and exporting data.)
5. Give your colleagues both the file that you exported from CAMEO and the MIE file that you
exported from MARPLOT.
Exporting Site Plans and Linked Documents
You can include site plans and linked documents in the export file that CAMEO creates. This is the
recommended way for transferring site plans (on Facilities or Special Locations records) and linked
documents (on Resources records) to other colleagues. Linked documents in the Resources module were
added starting in CAMEO version 2.2.
Note: Both site plans and linked documents are stored in subfolders within the SitePlans folder. The
subfolders (such as FATR200829PF2C002W43) are named based on the record ID of the associated
Facilities, Special Locations, or Resources record.
To share Facilities, Special Locations, and Resources records that contain links to site plans or documents
with colleagues, along with the site plans and documents themselves:
1. Export the records, following the instructions in either “Exporting Data from All Records in a
CAMEO Module” on page 94 or “Exporting Data from a Subset of the Records in a Module” on
page 95.
• CAMEO Version 2.1 (and higher) users: During the export process, click Yes when you are
asked whether you want to include site plans and document files in the export file.
• CAMEO Version 2.0 users: You don’t have the option of including site plans in the export file
(and linked documents in the Resources module were not added until version 2.2). Create your
export file, then make a copy of your SitePlans folder (inside of the CAMEO Data folder).
2. Give the export file to your colleague. (CAMEO 2.0 users must also include a copy of their
SitePlans folder.)
97
Chapter 11: Importing and Exporting Data
Important: Follow the “CAMEO Data Ownership Rule” on page 85 when you share site plan files. One
possible way to keep track of the owner of a particular site plan file is to include a code in the file name to
indicate the owner. For example, you could use “FD1_” as the prefix in the names of all site plan files
owned by Fire District 1.
Importing Data from Another Copy of CAMEO
Most often you will follow the steps below to import a file from another CAMEO user. However, you
would also follow these steps after you have exported data from your old version of CAMEO and you want
to import it into a newly installed version of CAMEO—if this is the case, then you should start on step 3.
1. First check to be sure that the “CAMEO Data Ownership Rule” on page 85 is being followed. That
is, be sure that the exporter of the data is its owner.
2. Create backup copies:
• Export data from your CAMEO modules: Backup the data in all of the CAMEO modules into
which you will import data. If you’re importing data into multiple CAMEO modules, follow the
instructions in “Exporting Data from All CAMEO Modules” on page 94. To back up a single
module, follow the instructions in “Exporting Data from All Records in a CAMEO Module” on
page 94. This file serves as an archive file.
• Locate your SitePlans and CAMEOMAP folders: These folders are stored within the CAMEO
Data folder. You picked the location for this folder during the CAMEO installation. (The typical
location is C:\Documents and Settings\All Users\Documents\CAMEO Data in Windows XP.) If
your copy of CAMEO is newly installed, you may not have a SitePlans folder in your CAMEO
Data folder.
• Copy your SitePlans and CAMEO Map folders: Copy these folders to create an archive.
3. Verify that you have all the data required for an import:
• Export file: This is the file exported from another user’s copy of CAMEO or your older version
of CAMEO.
• Site plans and linked documents: If the export file contains links to site plans that are
associated with Facilities or Special Locations records (or linked documents associated with
Resources records), you need to have access to the site plans and linked documents themselves. If
the export file was created from CAMEO version 2.1 or higher, verify that the site plans and
linked documents were included in the file. (Note that linked Resource documents are only
available in exports from version 2.2 or higher.) Otherwise, you will need a copy of the SitePlans
folder from the other copy of CAMEO.
• MIE file: If the export file contains links to objects on a MARPLOT map, you will also need an
MIE file that contains those objects. (See “Exporting Map Links and Map Objects” on page 96
for more information.)
98
Chapter 11: Importing and Exporting Data
4. Transfer the site plan and linked document files (if applicable):
• If the export file includes site plans and linked documents: Proceed directly to step 5. The site
plans and linked documents will be transferred automatically as part of the import process.
• If you were given a SitePlans folder: Follow this process to allow new content to be added to
your SitePlans folder and have the computer ask you about how to handle content with duplicate
names. If you’re on a Windows operating system, copy the other user’s SitePlans folder on top of
your SitePlans folder (or just copy it into the CAMEO Data folder if no SitePlans folder exists). If
you’re on a Macintosh computer, open up the other user’s SitePlans folder and copy the entire
contents into your own SitePlans folder. However, if you don’t have a SitePlans folder in your
CAMEO Data folder, you should copy the other user’s SitePlans folder into the CAMEO Data
folder—not just the contents. Once you’ve completed the manual transfer of site plans, proceed
to step 5.
5. Import the CAMEO data:
• From CAMEO’s File menu, select Import\Export, then Import.
• Browse to the export file, then click Open. The file will be imported into your copy of CAMEO.
• Click OK on the completion message and click Close on the Import/Export Log.
6. Import the MARPLOT objects (if applicable):
• Start MARPLOT.
• In MARPLOT, from the File menu, select Import.
• Browse to the MIE file, then click Open. The map objects are then added to the CAMEO Map (if
there isn’t already a map overlay for the objects, a new overlay will be created). Map links
between the imported records and map objects will now be functional in your copy of CAMEO.
Strategies for Avoiding Duplicate Records
The key to successfully exchanging data between two copies of CAMEO—so that all parties obtain just the
data they want and no data they don’t want—is to honor the “CAMEO Data Ownership Rule” on page 85.
Below are additional troubleshooting suggestions, in case a procedure goes awry despite your best efforts
at honoring the rule.
Before Data Import: Strategy 1. Sometimes, you might know or suspect that duplicate records will be
generated when you import data from a colleague. For example, you might have obtained facility data from
one colleague, but later realized that a different colleague is the actual owner of that data. Your records and
the owner’s records for the same facilities then are likely to have different record IDs, so if you import the
owner’s data for those facilities, you’re likely to obtain duplicate records (see “How CAMEO Assigns and
Uses Record IDs” on page 87).
99
Chapter 11: Importing and Exporting Data
A solution that you might choose is to delete all the records from your module before you import the
owner’s data. Do this only if it’s acceptable to you to replace the entire contents of one of your CAMEO
modules (along with related records in child and grandchild modules) with new, imported data. When you
import the new file, new records will automatically be created.
Important: Do not choose this approach if you foresee needing any of your existing facility-related data in
any of the following modules: Facilities, Contacts, Chemicals in Inventory, Incidents, and Screening &
Scenarios. For example, if you have created Incidents records for accidents at a particular facility over a
period of years, avoid this approach.
To delete all the records from a CAMEO module in preparation for importing data:
1. Follow the directions in “Exporting Data from All Records in a CAMEO Module” on page 94 to
back up the data in that module as an export file. We recommend that you also make a copy of the
export file on another storage device.
2. From the Record menu, select Delete All Records to delete all the records in the open module
(along with related records in child and grandchild modules). Note: You need to be in list view to
see this menu item.
Once you’ve completed these steps, you’re ready to import the new data. Follow the procedure in
“Importing Data from Another Copy of CAMEO” on page 98.
Before Data Import: Strategy 2. Sometimes, you might need to replace only certain records in a
module, rather than all the records in a module. For example, you might have obtained facility records for
Fire District 20 from a colleague, but then realized that another colleague is the actual owner of the facility
data for Fire District 20. Your records and the owner’s records for the facilities in Fire District 20 then are
likely to have different record IDs, so if you import the owner’s data for those facilities, you’re likely to
obtain duplicate records.
A solution that you might choose is to delete those records from your module before you import the
owner’s data. When you import the new file, new records will automatically be created. Important: Do
not choose this approach if you foresee needing any of your existing facility-related data in any of the
following modules: Facilities, Contacts, Chemicals in Inventory, Incidents, and Screening & Scenarios.
You could simply browse through your Facilities records, deleting those that are to be replaced (related
records in child and grandchild modules also will be deleted). To delete a record, select it or open it in
record view, then select Delete Record from the Record menu.
However, whenever you can, run a search that finds just the records that you need to delete, and then delete
them, as follows:
1. Open the module in which you want to delete and then replace records. For example, if you need to
delete and replace facilities data, open the Facilities module.
100
Chapter 11: Importing and Exporting Data
2. From the Search menu, select Start Search. Set up and run a search that will find only the records to
be replaced. In the case of the example above, you would make an Advanced Search for facility
records with “20” in the Fire District field. For help with setting up and running searches, see
“Searching” on page 118.
3. Check over the set of found records to be sure that it contains only the records to be replaced. When
a found set has been created, you can browse through only the records in that found set. So if you
see any records that you don’t intend to delete, you’ll know that you need to refine your search.
4. Before deleting the found records, you’ll back up the data from them into an archive file. From the
File menu, select Import\Export, then click Export.
5. Click Export Data for Found Set.
6. When prompted, choose whether or not you want to include site plan and document files in the
export. We recommend clicking Yes. See “Exporting Site Plans and Linked Documents” on page 97
for additional information.
7. When prompted, choose a location and name for the new archive file, then click Save. All the data
from all the records in the found set, along with all data from related records in child and grandchild
modules, will be exported to a single zipped file at that location.
8. Click OK on the completion message and click Close on the Import/Export Log.
9. From the Record menu, select Delete All Found Records. Selecting this command while a found set
exists in the module deletes only the found records, leaving the other records in the module
untouched.
Once you’ve deleted the records to be replaced, you’re ready to import your new data. Follow the
procedure in “Importing Data from Another Copy of CAMEO” on page 98.
After Data Import Strategies. If you’ve already imported data into a CAMEO module, and now realize
that you’ve inadvertently duplicated some records, you may be able to remove unwanted duplicates in one
of the following ways. These methods will work only if you can tell by visual inspection which duplicates
to keep and which to delete.
• Follow the instructions in “Sorting Records in CAMEO Modules” on page 122 to sort the records in
the module so that duplicate records appear next to each other in list view. For example, sort the
Facilities module alphabetically by the “FacilityName” data field in order for duplicate records for
the same facility to appear adjacent to each other in the list. Browse through the list to find
duplicates. Inspect the duplicate records for a given facility or other entity to identify the record to
keep. To delete an unwanted duplicate record, select it, then select Delete Record from the Record
menu.
• If possible, before you look for duplicates, first run a search to create a found set of just the records
likely to be duplicates. For example, you may have realized that you’ve inadvertently duplicated just
the records for contact people in Haymarket. In this case, you would search the Contacts module for
records in which the City field contains “Haymarket.” Once you’ve completed the search, from the
101
Chapter 11: Importing and Exporting Data
Record menu, sort the found records as above, then select View List. You then can most quickly
browse through the names of all the records found in the search to identify duplicates.
Important: Before beginning either procedure, back up the data in the module by following the procedure
in “Exporting Data from All Records in a CAMEO Module” on page 94.
Exporting Data to Other Programs
You can open and view a data file exported from CAMEO in any spreadsheet or database program that
supports merge files:
1. Uncompress (unzip) the export file. This file contains one or more merge files (one for each
CAMEO module from which data was exported, along with a merge file for any supporting files
from which data also was exported).
2. Open any of the merge files in your spreadsheet or database program. Merge files are comma
delimited files—that is, the data fields are separated by commas, records are separated by carriage
returns, and the contents of each data field are enclosed in quotation marks. A merge file has a .mer
file extension.
Note: To open a merge file in some database or spreadsheet programs, you may need to rename it so that
its file extension is .txt rather than .mer.
For more information about CAMEO’s export file format, see “Zipped Merge Files: The CAMEO
Standard File Format” on page 87.
102
Managing Your CAMEO System
This section describes how to create a management plan for your CAMEO system, and
proposes elements to include in that plan. It also explains how to implement CAMEO on a
network, how to protect your CAMEO files, and what to do when multiple people use the
same CAMEO system.
12
CAMEO Management Plan
Before you begin to use CAMEO, consider how you intend to manage and use your new system. This
section describes some of the issues to consider and guidelines to follow as you prepare a CAMEO
management plan for your workplace.
As you plan how you’ll manage your CAMEO system, consider your intended uses of all of the CAMEO
components: the CAMEO data management modules, CAMEO Chemicals, MARPLOT, and ALOHA.
Reasons to Make a CAMEO Management Plan
It’s important to plan how you intend to manage and use your CAMEO system before you dedicate
resources to implementing your CAMEO, CAMEO Chemicals, ALOHA, and MARPLOT programs,
because:
• A good management plan can help you to address issues before they become a problem.
• Your plan can prepare you for requesting additional resources as you require them, developing a
training program, and handling future software and hardware developments.
• You can use your plan as a guide for implementing the CAMEO suite.
Elements of a Good CAMEO Management Plan
An effective CAMEO implementation goes beyond installing the programs, flipping through the manuals,
searching for a few chemical records, and placing a few symbol objects on a MARPLOT map. To
effectively implement CAMEO, you’ll need to plan in advance your procedures for entering, maintaining,
and using information; protecting and backing up both data and programs; training personnel; and
customizing your CAMEO system. Your management plan should also address your equipment and
personnel needs. An effective management plan can make CAMEO a more useful tool for your
organization. Address the topics discussed below as you draft your CAMEO management plan.
Proposed Uses of CAMEO. Describe your planning and response duties, and any other intended uses
of your computer system.
103
Chapter 12: Managing Your CAMEO System
Hardware and Software. Describe your hardware inventory, including computer models, operating
systems (for example, Windows XP, Macintosh OS X, and so on), hard drive sizes and available memory
(RAM), and other hardware (such as modems, storage devices, and printers). Describe your local network
if you have one.
Describe your software inventory. List the word-processing, graphics, spreadsheets, database and other
programs that you intend to use with your CAMEO system.
List the addresses of websites where you can obtain resources and information you plan to use with your
CAMEO system.
CAMEO System Manager. Describe the position and responsibilities of the system manager. Include
his or her name, telephone number(s), and email address.
CAMEO Information Management. Outline the procedures you’ll use to enter information into
CAMEO and onto the MARPLOT maps you’ll use with CAMEO. Describe procedures for making data
linkages both within CAMEO and between CAMEO and MARPLOT, and information-tracking
procedures. Propose data element standards, such as acceptable common abbreviations (for example, “St.”
for Street) or what map symbols represent throughout your area.
Describe your strategies for maintaining, tracking, and updating information. Describe your method for
backing up your CAMEO system, and include a schedule (see “Implementing a CAMEO Backup
Program” on page 107).
If you plan to import Tier II data into your CAMEO system, see “Importing Data from Tier2 Submit” on
page 90.
Training. Describe who will be trained and the purposes and goals of your CAMEO training program.
Discuss word processing, graphics, and other skills required of trainees. Outline your proposed training
program and list the subjects that you intend to cover. Describe the resources that you need to conduct your
program. Include a training schedule.
CAMEO Changes. Describe any modifications that you propose to make to your CAMEO system. For
example, you might add items to some of the editable drop-down lists in the CAMEO modules. Plan how
you’ll keep track of the changes you make to CAMEO, so you’ll be able to update future versions of the
program.
Program Security. Describe your method of ensuring program security and any procedures that you
intend to use to restrict access to the program.
104
Chapter 12: Managing Your CAMEO System
CAMEO System Manager
An important decision affecting your CAMEO system will be selection of the system manager. Designate
one person as the system manager. This person should be experienced in using CAMEO as well as the
computer operating system and office software.
The responsibilities of the system manager include:
• Receiving and installing program updates,
• Troubleshooting,
• Directing the training program,
• Ensuring that backups are made,
• Supervising modifications to CAMEO,
• Directing data entry,
• Ensuring program security, and
• Developing data element standards.
Some components of these tasks may be delegated to others. In essence, the system manager should be
responsible for maintaining your CAMEO system and ensuring that it’s used as effectively as possible. The
importance of this position can’t be over emphasized. If your system manager isn’t in tune with the
CAMEO system, its needs, and your needs, then CAMEO may never prove to be a useful tool for you.
Preparing a Plan for Entering and Updating Data
The quality of your CAMEO system depends on the quality of the data that you enter into your system.
Before you enter data, develop a data entry plan. As you develop your plan, try to answer these questions:
1. What information do you intend to enter into CAMEO? Identify the information that can help you
to perform your emergency planning and response duties.
2. How will you keep track of the information that you enter? We recommend that you bear the
“CAMEO Data Ownership Rule” on page 85 in mind as you consider this topic.
3. Do you need to develop data standards? You may want to standardize information such as facility
identification numbers, abbreviations, the symbols placed in MARPLOT, and other information.
4. Do you need to develop step-by-step procedures for entering information into CAMEO? An
advantage of preparing written, step-by-step procedures for entering and maintaining information is
that you then can refer to these procedures during training sessions and when entering, maintaining,
and verifying CAMEO information. The more you can standardize your data entry system, the
105
Chapter 12: Managing Your CAMEO System
better the quality of your CAMEO data, and the lower the risk of errors associated with entering
multiple records for the same facility, organization, or other entity.
5. Who will be responsible for entering information? Assign data entry and maintenance
responsibilities only to trained and responsible staff members. They should follow the procedures
that you develop. If several people will enter and maintain your CAMEO data, be sure to develop
and use an effective tracking system to minimize errors.
6. How (and how often) do you plan to verify or update the information in your CAMEO system? Plan
to verify and update your CAMEO information regularly. Establish a schedule for verifying and
updating data and stick to it (you might want to schedule data verification and updating tasks around
regular fire department inspections or important EPCRA-related dates, such as reporting deadlines).
If you plan to import data into CAMEO (including Tier II data) or transfer data between copies of
CAMEO, review Chapter 11, “Importing and Exporting Data,” beginning on page 85.
Finally, consider how you might enhance CAMEO to better meet your data entry and management needs.
Program Security
The success of your CAMEO program will depend on your ability to ensure the security of your system.
Your CAMEO system, and the information that it contains, can easily be modified or damaged. When
program security is inadequate, a novice user or failed hard drive can jeopardize your entire CAMEO
system. Only well-trained, authorized users should have full access to CAMEO. You may want to limit
access by other users. Such access restrictions can help to prevent unacceptable CAMEO system
modifications.
There are two kinds of security concerns: program access and program backup. As you address program
security in your management plan, ask yourself:
• Who should have access to my CAMEO system?
• What methods for restricting access to CAMEO should I use (if any)?
• How will I back up my system? Who will perform backups, how, and how often? (Backing up your
CAMEO data is easy and quick; see “Implementing a CAMEO Backup Program” on page 107.)
Password Protection
One way to restrict access to your CAMEO files is to implement password protection.
All of the CAMEO files are already password-protected. However, users aren’t asked for a password when
they work with CAMEO, because the passwords for these files are set as defaults. You can change
CAMEO’s passwording so that people would need to enter a password to work with your CAMEO
modules. To do this, you would need to purchase a copy of version 8.5 or later of either FileMaker Pro or
FileMaker Pro Advanced (http://www.filemaker.com/products).
106
Chapter 12: Managing Your CAMEO System
Especially before you share your CAMEO files over a network, we recommend that you change the
password(s) for your CAMEO files. Change the passwords both for the administrator and for normal users,
and delete the default passwords. Once you change the password(s), people would need to enter a
password to use the CAMEO files. To learn how to modify passwords and delete default passwords in
FileMaker files, including CAMEO, check the FileMaker manual for your product.
Once you make this change, any CAMEO user would need to enter a password before being able to access
the data or change CAMEO records.
Other ways to use passwording to restrict access to CAMEO include:
• Requiring a password to log onto the computer where CAMEO is installed.
• Using a password screensaver on that computer.
Implementing a CAMEO Backup Program
You can quickly and easily create backup archive files containing all your CAMEO data, or just data from
selected modules. Follow the procedures for creating export files in “Transferring Data Between CAMEO
Programs” on page 93; the files that you export serve as your backup files.
We recommend that you:
• Export all your CAMEO data into an archive file on a regular basis.
• Keep at least the two most recent archive files on physically separate storage media. Consider
keeping older backups in case problems remain undiscovered until after one or more backup cycles.
Installing and Running CAMEO on a Network
You can install and run the CAMEO modules on a network. You might want to do so if multiple people in
your workplace need to use a single copy of CAMEO as a reference. We recommend that ALOHA,
CAMEO Chemicals, and MARPLOT be installed and run on individual users’ local computers, rather than
on the network.
There are two main ways to network CAMEO:
• From a dedicated server computer, to which every user connects over the network. This is your best
choice if multiple people need to routinely use the same copy of CAMEO.
• From one user’s computer, to which others on the network connect from time to time.
While we’ve completed some testing of CAMEO on networks, we couldn’t emulate all possible network
configurations. If you encounter problems installing or running CAMEO on your particular network,
please check the CAMEO website (http://www.epa.gov/emergencies/content/cameo/) for troubleshooting
help and resources. More user support resources are available on the FileMaker website
(http://www.filemaker.com/support/). The comments in this section are provided as guidelines only.
107
Chapter 12: Managing Your CAMEO System
Ensure Security First
Carefully consider file security before you install CAMEO on a network and especially before you share
sensitive CAMEO data, such as Tier II data, over a network. Above all, check to be sure that your network
is secure, so that unauthorized people can’t access your data. Consider password-protecting your CAMEO
files to prevent unwanted access (see “Password Protection” on page 106).
Possible Configurations
You can network CAMEO and support multiple users in three ways. The most appropriate choice for you
depends mainly on the number of concurrent CAMEO users you need to support. You can:
• Install the runtime version of CAMEO on a network (this is the version of CAMEO that you can
download and install). This configuration allows you to support just one CAMEO user at a time.
(See “Installing the Runtime Version on a Network” on page 108.)
• Purchase and install either FileMaker Pro or FileMaker Pro Advanced (version 8.5 or later), which
you use to host the CAMEO files. This configuration allows you to support a limited number of
concurrent users, each of whom also must have a licensed copy of FileMaker Pro. The number of
users who can work with CAMEO concurrently depends on how many files each has open at the
same time; fewer people can use the program when each has more files open. With this
configuration, up to five people can use CAMEO if each has all or nearly all of the CAMEO files
open at the same time. (See “Using FileMaker Pro to Host Runtime Files” on page 108.)
• Use either FileMaker Server or FileMaker Server Advanced (version 8.5 or later) for the fastestpossible CAMEO networking. This configuration allows you to support up to 250 concurrent
CAMEO users, each of whom must have a licensed copy of FileMaker Pro. (See “Using FileMaker
Server” on page 113.)
Installing the Runtime Version on a Network
You can install the runtime version of CAMEO either on a network server or in a shared directory on a
networked workstation without purchasing and installing any additional software. Just one person at a time
can work with the runtime version of CAMEO over a network.
Using FileMaker Pro to Host Runtime Files
The CAMEO files can be modified so that multiple people can work with them concurrently.
When FileMaker databases (such as the CAMEO modules) are set to be shared over a network, whoever
first opens a particular database file (such as a CAMEO module) becomes the host of that file, and their
computer becomes the server of the file. Other users can modify the file by connecting to the host
computer.
108
Chapter 12: Managing Your CAMEO System
From the CAMEO perspective, the main advantage of hosting files is that you can serve multiple
concurrent users. The runtime version of CAMEO can’t host files, but you can use either FileMaker Pro or
FileMaker Pro Advanced (version 8.5 or later) to host the CAMEO files on your network so that multiple
people can work with them. To accomplish this, you would install both FileMaker Pro and the CAMEO
modules either in a shared directory on a networked workstation or on your network server computer.
Others on the network (who also have installed FileMaker Pro) can work concurrently with the shared
copy of CAMEO (they don’t need to have CAMEO installed on their computers).
In our own tests of FileMaker Pro hosting of CAMEO on local networks, we observed the following:
• Multiple users can view the same record in Browse mode at the same time.
• Multiple people also can open the same record in Edit mode. However, as soon as one person clicks
his or her cursor within an editable field, the others are locked out of Edit mode; they see an
explanatory message when this happens.
• Multiple people can perform basic searches of the same CAMEO module at the same time. Multiple
people also can view the advanced search dialog at the same time. However, as soon as one person
selects a field to use as a search criterion, saves a set of search criteria, or opens a saved set of search
criteria, the others are locked out (and are shown an explanatory message).
Important: A key to trouble-free networking of CAMEO is to be sure that only one computer hosts all the
CAMEO files. We recommend that you use a dedicated computer to host CAMEO, and that you keep the
CAMEO files open on that computer all the time, to prevent other users from accidentally hosting any of
those files.
Follow all the procedures below to set up CAMEO for hosting on either FileMaker Pro or FileMaker Pro
Advanced.
Relocate Plug-in Files. Once you have installed CAMEO and FileMaker Pro on the computer that will
host CAMEO, you must move some files from the default installer locations.
In Windows: Copy the following files from the Extensions folder inside the CAMEO folder into the
Extensions folder inside the folder containing FileMaker (e.g., C:\Program Files\FileMaker\FileMaker Pro
8.5\Extensions):Cameo.fmx, Marplot.fmx, and Menu.fmx.
On a Macintosh: Copy the following files from the Extensions folder inside the CAMEO folder into the
Extensions folder inside the folder containing FileMaker (e.g., Macintosh HD:Applications:FileMaker Pro
8.5 Folder:Extensions): Cameo.fmplugin, Marplot.fmplugin, and Menu.fmplugin.
Prepare the CAMEO Files to be Shared. Once you’ve installed the software, then follow the steps
below to prepare your CAMEO files to be shared by multiple, networked users. You’ll only need to
complete these steps once.
1. Start FileMaker Pro. If you see “Open New or Existing File” go directly to Step 2. Otherwise, select
Open from FileMaker Pro’s File menu.
2. If you’re working in Windows, select “All Files” from the “Files of Type” list.
109
Chapter 12: Managing Your CAMEO System
3. Hold down either the Shift key in Windows or the Option key on a Macintosh as you select
Home.CAM (inside the CAMEO folder) and click Open.
4. When prompted for an account name and password, type Admin (case sensitive) in both places and
then click OK.
5. From the Scripts menu, select ScriptMaker.
6. In the list of scripts, highlight (but do not check) “Change All Files to Multi-User for Hosting,” then
click Perform to run the script.
7. From the Scripts menu, select ScriptMaker.
8. Check the box next to “Open All Files for Hosting.”
9. Highlight the FileMaker Menus line, then click Perform to run the script.
10. From the Edit menu, select Sharing, then FileMaker Network.
110
Chapter 12: Managing Your CAMEO System
11. In the FileMaker Network Settings dialog box, turn Network Sharing on. Select all of the currently
open files in the list (Ctrl+A in Windows) and change the Network access to “All users,” then click
OK.
12. Quit or Exit from FileMaker.
Prepare Users’ Computers. You’ll need to copy supporting files to the computer of each colleague
who will work with the hosted copy of CAMEO.
In Windows: Copy the following files into the Extensions folder inside the folder containing FileMaker
(e.g., C:\Program Files\FileMaker\FileMaker Pro 8.5\Extensions):Cameo.fmx, Marplot.fmx, and
Menu.fmx.
On a Macintosh: Copy the following files into the Extensions folder inside the folder containing
FileMaker (e.g., Macintosh HD:Applications: FileMaker Pro 8.5 Folder:Extensions): Cameo.fmplugin,
Marplot.fmplugin, and Menu.fmplugin.
Begin Hosting CAMEO. To begin hosting the CAMEO files over your network, follow the steps below.
You must complete these steps each time you want to start hosting the CAMEO files from a computer:
1. On the computer that will be used to host the CAMEO files, start FileMaker Pro. If you see “Open
New or Existing File,” click Remote. Otherwise, select Open Remote from FileMaker Pro’s File
menu. The Open Remote File dialog box appears.
111
Chapter 12: Managing Your CAMEO System
2. Review the list to be sure that Home does not appear in the list of available files for any of the local
hosts. If it appears in the list, another computer is hosting this file. If so, ask that user to quit from
FileMaker.
3. Click Cancel on the Open Remote File dialog box.
4. If you’re working in Windows, select “All Files” from the “Files of Type” list.
5. Open Home.CAM.
6. From the Scripts menu, select “Open All Files for Hosting.”
Accessing the Hosted CAMEO. Once the CAMEO files are being hosted by a computer on your
network, those colleagues on the network now can access CAMEO, as follows:
1. Start FileMaker Pro (on their computer). If you see “Open New or Existing File,” click Remote.
Otherwise, select Open Remote from FileMaker Pro’s File menu. The Open Remote File dialog box
appears.
2. Set the view to Local Hosts and highlight the host computer in the Hosts box. In the Available Files
box, highlight Home.
3. Click Open.
Important: Your colleagues should open only the copy of Home on the host computer. If they see that
Home is being hosted on any other computer, you or they should ask that user to quit FileMaker Pro.
112
Chapter 12: Managing Your CAMEO System
Using FileMaker Server
Using either FileMaker Server or FileMaker Server Advanced (version 8.5 or later) to host your CAMEO
files (rather than FileMaker Pro), allows you to support many more concurrent users—up to 250 at a
time—and CAMEO operations will proceed substantially faster.
If you choose this approach, you’ll need to install FileMaker Server and the CAMEO files on a networked
workstation or on a dedicated server computer. Others on the network who also have installed FileMaker
Pro (but not CAMEO) then can work with the shared copy of CAMEO, concurrently. For more details on
FileMaker Server, check http://www.filemaker.com.
Note: We didn’t specifically test CAMEO hosting via FileMaker Server, but our best understanding is that
if you choose this approach, you’ll need to prepare your files as explained in “Using FileMaker Pro to Host
Runtime Files” on page 108.
Managing Multiple Users
We recommend that you plan your CAMEO projects so that multiple people don’t routinely use CAMEO
on your network at the same time. We especially recommend that you manage your workflow to avoid
having multiple people working concurrently over a network to edit records and/or perform CAMEO
operations that require the most computer power, such as adding records. The program needs time to
complete scripts and respond to user commands, and CAMEO operations are slower over a network.
We recommend that you avoid importing and exporting data to or from a hosted copy of CAMEO via
client computers over your network. Instead, whenever you or your colleagues need to import or export
data, work either on the host computer or on a copy of CAMEO that isn’t networked.
Managing Data Entry by Multiple People. Sometimes, you may need to have multiple people
entering CAMEO data. For example, if you receive Tier II data from many facilities, you may need to give
a stack of Tier II forms to each of several data entry operators who then would create new Facilities records
to contain that Tier II data.
When you need to have multiple people entering data concurrently, we suggest that each person be given a
copy of the runtime version of CAMEO (that is, a copy of CAMEO that hasn’t been modified for multiuser hosting). Each person can add records to their own copy of CAMEO, rather than having everyone
making editing changes to a single, networked copy of CAMEO.
113
Chapter 12: Managing Your CAMEO System
When each data entry operator has
completed adding records, he or she
should export a file containing those
records, by following the procedure in
either “Exporting Data from All Records
in a CAMEO Module” on page 94 if
records have been added to just one
module, or “Exporting Data from All
CAMEO Modules” on page 94 if records
have been added to multiple modules.
The data file exported by each data entry
operator can then be imported into a
central, networked copy of CAMEO (as
shown at right), by following the
procedure in “Importing Data from
Another Copy of CAMEO” on page 98.
Using CAMEO if You Already Have FileMaker
When you follow the standard installation instructions (that is, not the network instructions), you install the
runtime version of CAMEO. We recommend that as you work with CAMEO, you use the runtime version
of CAMEO even if you already have a copy of either FileMaker Pro or FileMaker Pro Advanced (version
8.5 or later), unless you are hosting CAMEO on a network (see “Installing and Running CAMEO on a
Network” on page 107). If you aren’t hosting the CAMEO files, there is no advantage to running CAMEO
in FileMaker Pro rather than as a runtime program, because all of CAMEO’s features are available in the
runtime version.
114
Reference Information
This section contains basic reference information about CAMEO: explanations of the
functions of CAMEO’s menu items, explanations of how to search for and sort records in
CAMEO modules, how to link records to MARPLOT objects, and an overview of the
legislation on which CAMEO is based.
13
CAMEO Menus
Below are explanations of the functions of each of CAMEO’s menu.
Table 13-1. CAMEO’s Menus
File Menu
Go Home
Opens the Home navigation window (which contains buttons to open CAMEO’s
modules and perform common tasks). See “Home and Navigation” on page 17.
Open
Select Open, then point to any module name to open that module.
Close
Close the current window.
Import\Export
Displays controls you use to import or export data to or from CAMEO. See “Importing
and Exporting Data” on page 85.
Make KML File
Creates a KML file with information from the Facilities records. Only available when
the Facilities module is open. See “Making KML Files” on page 35.
Print Report
Displays controls you use to create and print reports.
Exit (or Quit on a
Macintosh)
Quits CAMEO.
Edit Menu
The Edit menu contains standard FileMaker menu items, most of which work in some places in CAMEO (for
example, text-editing menu items work within text boxes in CAMEO, but not within lists of records).
Undo
Undoes your most recent text-editing action.
Cut
Removes selected text from a text box, and places it in the Clipboard.
Copy
Copies selected text into the Clipboard.
Paste
Pastes the contents of the Clipboard into the currently selected text box.
Clear
Deletes selected text from a text box.
Select All
Selects all the text with in a text box in which you have clicked.
115
Chapter 13: Reference Information
Table 13-1. CAMEO’s Menus
Spelling
Checks the spelling of text in text boxes: select the text, select Spelling from the Edit
menu, then Check Selection. You can check spelling in either Browse or Edit mode, but
you can replace misspelled words only in Edit mode.
Preferences
In Windows, you can use a checkbox on the General tab to set a larger window size for
increased readability. You shouldn’t adjust any other preferences settings.
Record Menu
View List
Displays a list of the records in the current module (that is, the list view of the records).
See “List and Record Views” on page 19. Available only when you’re in record view.
View Record
Displays the selected record in record view (in list view, click on a record to select it;
you’ll then see a small black rectangle next to its name). See “List and Record Views”
on page 19. Available only when you’re in list view.
Next Tab
Brings the next tab forward. Available only when you’re in record view.
Show Related
Displays a submenu listing all modules that could be related to the current record.
Choose a module name to view a list of all the records in that module that are related to
the current record. See “Using the Show Related Command” on page 21.
Sort
Choose to sort the records in the current module (or found set) alphabetically,
numerically, or chronologically by one or more data fields. See “Sorting Records in
CAMEO Modules” on page 122.
Show All Records
Choose to view all the records in the current module, rather than just the found set of
records collected during your most recent search or other activity. You would choose
this menu item after you had finished working with a search.
New <module>
Creates a new record in the current module (for example, in the Facilities module,
choosing New Facility creates a new Facility record).
Edit <module>
Allows you to edit the current record (for example, while you’re viewing a record in the
Incidents module, choose Edit Incident in order to edit that record).
Delete <module>
Deletes the current record, along with subordinate (“child”) records in other modules.
(For example, when a Facility record is the current record, choosing Delete Facility
deletes not only that record but also all Chemicals in Inventory, Screening & Scenarios,
and Incidents records for that facility, as well as all Contacts records for that facility that
aren’t also associated with another facility or organization.)
Delete All Records
Deletes all the records from the current module. Available only when you’re in list
view.
Delete All Found
Records
Deletes all the records from the current found set. Available only when you’re in list
view.
116
Chapter 13: Reference Information
Table 13-1. CAMEO’s Menus
Go To
Displays a submenu of navigation menu items: choose First to view the first record in
the current module (or set of found records), Previous to view the record preceding the
current one, Next to view the record immediately after the current record, and Last to
view the last record in the module.
Search Menu
Start Search
Initiates a search of the current module (for example, in the Contacts module, choose
Start Search to find the record for a particular contact). See “Searching” on page 118.
Append Search
Choose when you want to broaden a search; that is, to search for more records than you
found in a previous search. Any records found in an append search that aren’t in the
existing set of records found in your previous search will be added to that set of found
records. See “Making Append Searches and Subset Searches” on page 121.
Subset Search
Choose when you want to narrow your search; that is, to search through a set of records
you found in a previous search in order to find those that meet more restrictive criteria.
See “Making Append Searches and Subset Searches” on page 121.
Clear Search
Allows you to view all the records in the current module, rather than just the found set
of records collected during your most recent search.
Sharing Menu
ALOHA/Help on
ALOHA
Displays an explanation of ALOHA and how it works with CAMEO. For more on
ALOHA, see the ALOHA manual.
ALOHA/Go to
ALOHA
Starts ALOHA if it isn’t already running, and brings it forward.
CAMEO Chemicals/
Help on CAMEO
Chemicals
Displays an explanation of CAMEO Chemicals and how it works with CAMEO. For
more on CAMEO Chemicals, see the on-screen help in the downloadable version of
CAMEO Chemicals (or on the CAMEO Chemicals website at
http://www.cameochemicals.noaa.gov).
CAMEO Chemicals/
Go to CAMEO
Chemicals
Starts CAMEO Chemicals if it isn’t already running, and brings it forward.
MARPLOT/Help on
MARPLOT
Displays an explanation of MARPLOT and how it works with CAMEO. For more on
MARPLOT, see the on-screen MARPLOT helps.
MARPLOT/Show on
Map
If the current record is linked to a map object, brings MARPLOT forward with that
object visible and selected. In Screening & Scenarios, displays the threat zone (if the
associated facility or route is linked to a map object; see “Plotting a Threat Zone on a
Map” on page 79).
MARPLOT/Show All
on Map
If multiple records in the current module or found set are linked to map objects, brings
MARPLOT forward with those objects visible and selected.
117
Chapter 13: Reference Information
Table 13-1. CAMEO’s Menus
MARPLOT/Unlink
If the current record is linked to a map object, unlinks that record and object. See
“Deleting a Map Link” on page 128.
MARPLOT/Delete
Scenario Object
Deletes the threat zone map object linked to the current Screening and Scenarios record.
See “Plotting a Threat Zone on a Map” on page 79. Available only when you’re in the
Screening & Scenarios module.
MARPLOT/Delete
All Scenario Objects
Deletes all Scenario objects in MARPLOT. See “Plotting a Threat Zone on a Map” on
page 79. Available only when you’re in the Screening & Scenarios module.
MARPLOT/Go to
MARPLOT
Starts MARPLOT if it isn’t already running, and brings it forward.
Scripts Menu
Custom Menus
Restores CAMEO’s normal menus if they fail to display properly.
***
This menu item must appear in the menu for CAMEO to function normally, but
choosing it doesn’t initiate any actions.
Help Menu
CAMEO Help
Opens and displays the CAMEO help table of contents in your web browser. (However,
you don’t have to be connected to the internet.)
About CAMEO
Displays version information.
Link Menu
This is a temporary menu that is only visible when you have begun linking a MARPLOT map object to a CAMEO
record (see “Linking a Record to a Map Object” on page 127).
Link this Record
Links the selected map object to the current CAMEO record.
Cancel
Cancels the link in progress.
Searching
You can make either a basic search or a more advanced search for the records you want to see in any
CAMEO module, as explained in this section. You also can save the criteria you used for particularly
complex searches so that you can rerun them again later.
Note: You can find additional instructions about searching for records on particular facilities in “Accessing
Facility Information” on page 29.
118
Chapter 13: Reference Information
Making a Basic Search
Use a basic search when you just need to look up records by name, address, or other straightforward piece
of identifying information. Here’s how to do a basic search:
1. To start your search, first open the module you want to search, then click the New Search toolbar
button or select Start Search from the Search menu.
2. In the Basic Search dialog, fill out the information you have about the record you’re looking for.
Choose either contains characters (to search for part of a word, phrase, or code) or contains word
starting with (to search either for the first part of a word, phrase, or code—or for an entire word,
phrase, or code). Note: If you fill in multiple criteria, CAMEO will search for records that match all
your criteria.
3. Click Search. CAMEO will run the search and then display either a list of the records that match
your criteria (or a message if no records match your criteria).
4. Double-click the name of any record in the list to view that record. Whenever you want to return to
the list, click the View List button in the toolbar. If you’d like to view the list of all records in the
module again, from the Search menu, select Clear Search.
Searching State Fields
Both Facilities and Chemicals in Inventory records contain a State Fields tab to support the emergency
planning work of U.S. states that have developed their own reporting requirements in addition to the Tier II
requirements specified in EPCRA (which apply to all 50 states). Tier II forms submitted in those states
contain additional data fields, which are called State Fields in CAMEO. CAMEO’s State Fields provide a
place where people working in these states can maintain their reporting information.
You can search for records for facilities or inventory chemicals that contain particular information in one
or more State Fields. For example, the State of Arizona requires facilities to report whether they are located
on Tribal Land.
To search State Fields:
1. Open the module you want to search, then click the New Search toolbar button or select Start Search
from the Search menu.
2. Click Search State Fields. You’ll see the window for basic state field searches.
3. If the report year and state shown aren’t what you want to search for, click Choose State and Report
Year, change the report year and/or the state, then click Select. Note: You can only search for
records with a particular report year and state at one time. If you need to search for records for more
than one report year (for example, for facilities on Tribal Lands for which records were created in
report years 2005, 2006, and 2007), run a search for one of those years, then run successive Append
searches, one for each of the other years. (See “Making Append Searches and Subset Searches” on
page 121.)
119
Chapter 13: Reference Information
4. Fill out the information you have about the records you’re looking for. For example, if you’re
searching for Arizona facilities located on Tribal Lands, search for records for which “Is the facility
on Tribal Land?” is “Yes.” Note: If you fill in multiple criteria, CAMEO will search for records that
match all your criteria.
5. Click Search.
Making an Advanced Search
You can make an advanced search whenever you need to use other criteria than the ones available for a
basic search. Here’s how:
1. Start your search just as you would start a basic search: in the module you want to search, either
select Start Search from the Search menu or click the New Search toolbar button.
2. Click Go to Advanced Search.
3. Click Select field to indicate which data field to search.
4. In the list of searchable fields, click the name of a field, then click Select.
5. Choose an operator from the drop-down list (for example, “contains characters,” “is equal to,” or “is
greater than”). The operator to choose depends on the search you’re making.
6. Type the word, phrase, number, or code to search for in the box. Note: Leave the box empty if you
don’t need to type something in—for example, when you choose an operator like “is empty” or “is
not empty.”
7. Click Search to start your search.
Adding More Choices. You can make an advanced search for records that match more than one
criterion.
To add a second criterion to your search:
1. While you’re working in the Advanced Search dialog, click Add a Choice.
2. Follow steps 3 through 6 in the previous section to set up the search for that criterion.
3. Indicate whether to search for either
• Records that meet both your criteria—click “Search for all of the following (AND search).”
• Records that meet either criterion—click “Search for any of the following (OR search).”
120
Chapter 13: Reference Information
Saving Searches
You can save any advanced search to reuse later. To save a search, first fill out the Advanced Search dialog
with the criteria choices you’d like to save, and then click Save This Search. Type a name for the saved
search, then click Save This Search.
If you’ve just run an advanced search, your criteria will remain in the Advanced Search dialog until you do
a new search (or quit CAMEO). So, if you later decide that you want to save that search, just return to the
Advanced Search dialog and click Save This Search. (To return to the Advanced Search dialog at any time,
select Start Search from the Search menu, then click Go to Advanced Search.)
To open and reuse a saved search, in the Advanced Search dialog, click Open Saved Search. From the
drop-down list of search names, choose a search name, then click Select This Search. The Advanced
Search dialog will be filled in with the criteria for this search. You then can click Search to run this
reopened search.
Making Append Searches and Subset Searches
Once you’ve run a search and collected a set of found records, there are two ways to continue your search.
In the Search menu, run a second search by selecting either:
• Append Search. This widens your search. Records found during an append search will be added to
the existing set of found records. You might choose to append a search if your first search didn’t turn
up all the records you needed to work with. For example, you might have run a search for facilities
with a particular report year, then realized that you also wanted to work with the records for the
previous year. You would run an append search for the second report year in order to obtain a set of
records for facilities who reported information in either year.
• Subset Search. This narrows your search. Only records that were found in the first search and that
also are found during your second search will be included in the set of found records. You might
choose a subset search if your first search turned up too many records, and you needed to narrow
down the number of found records. For example, if you search the Chemicals in Inventory module
for chemicals that are Extremely Hazardous Substances, you might end up with a lot of results
(depending on the facilities in your area). You might need to refine the search by doing a subset
search—for example, by also specifying that the amount (or quantity) of the chemical onsite must
exceed some value. The results of this found set will include only the inventory chemicals that are
stored in large quantities and classified as Extremely Hazardous Substances.
121
Chapter 13: Reference Information
Sorting Records in CAMEO Modules
You can change the order of the records in any module by sorting them into a new order. When you do this,
the new sort order is retained until you resort the module or unsort it. (Unsorted records are listed in the
order in which they were added to the module.)
You can sort either all the records in a module or just a found set of records (those records that you found
by running a search of a module). When you sort just a found set, the sort order of those records is lost
when you quit CAMEO.
Choosing Sort Criteria
To sort records, you must choose one or more sort criteria. For example, to sort your Facilities records
alphabetically by facility name, you would use facility name as your sort criterion.
You set up a sort and choose your criteria using the Sort Records dialog. In the Sort Records dialog, you
see a list of the field names that you can use as sort criteria. These names generally are similar to the field
names shown on your CAMEO records, although they don’t correspond exactly (because the names you
see in the Sort Records dialog are internal names used by CAMEO). Many names begin with a one- or
two-letter prefix indicating the module they are in (for example, “FCounty” is the County field in Facilities
records).
122
Chapter 13: Reference Information
Table 13-2 shows some sort criteria names that you may find useful for sorting each CAMEO module.
Table 13-2. Some CAMEO Sort Criteria
Item to Sort
Name of the Corresponding Sort Criterion
Chemicals in Inventory Items
Facility/Route Name
_CFacilityRouteName
Chemical Name
EnteredChemName
Facility Department
_CFacilityDepartment
Contacts Items
Last Name
LastName
First Name
FirstName
Organization
Organization
Facilities Items
Facility Name
FacilityName
Report Year
ReportYear
Department
FacilityDept
Incidents Items
Facility/Route Name
_FacRouteName
Incident Name
IncidentName
Spilled Date
SpillDate
Resources Items
Supplier Name
ResourceName
Resource Type
ResourceType
Routes Items
Route Name
RouteName
Route Type
RouteType
Screening & Scenarios Items
Facility/Route Name
_scFacilityName
Chemical
EnteredChemName
123
Chapter 13: Reference Information
Table 13-2. Some CAMEO Sort Criteria (Continued)
Item to Sort
Name of the Corresponding Sort Criterion
Threat Zone Radius
_RadiusValue
Screening
Screening
Special Locations Items
Location Name
LocationName
Location Type
LocationType
Sorting Records by a Single Criterion
To sort all the records in a module using a single data field—such as chemical name or reporting year—as
your sort criterion:
1. Open the module to be sorted.
2. From the Record menu, select Show All Records to clear any existing found set (there will be a
found set if you ran a search in the module, unless you cleared your search results).
3. From the Record menu, select Sort. The Sort Records dialog will be displayed.
4. Choose the field to use as your sort criterion, as follows:
• To add a sort criterion to the
Sort Order box, click on its
name in the list of fields on
the left, then click Move.
• To remove all sort criteria
from the Sort Order box,
click Clear All (as shown at
right). The criteria will still
be available in the list of
fields on the left side if you
want to sort by them again.
• To remove one sort criterion,
click on that field name in the
Sort Order box to highlight it,
then click Clear. (When you
highlight items in the Sort
Order box, the Move button
becomes the Clear button.)
124
Chapter 13: Reference Information
5. Once the Sort Order box contains just the criterion of your choice, click on the name of your
criterion in the Sort Order box to select it, and then select either:
• Ascending order (to sort the records alphabetically from A to Z, in numerical order from smallest
to largest number, or in chronological order from earliest to latest date/time), or
• Descending order (to sort the records alphabetically from Z to A, in numerical order from largest
to smallest number, or in chronological order from latest to earliest date/time).
6. Click Sort (or Cancel if you decide not to sort the records).
Unsorting Records
To unsort the records in any CAMEO module (that is, return them to the order in which the records were
created):
1. Open the module to be unsorted.
2. From the Record menu, select Sort. The Sort Records dialog will be displayed.
3. Click Unsort (or Cancel if you decide not to unsort the records).
Sorting a Subset of Records in a Module
Sometimes, you might want to sort just some of the records in a module. For example, in the Facilities
module, you might need to sort just the records for facilities in the town of Haymarket without sorting the
records for facilities elsewhere.
To sort just some records, first search the module to find just the records you want to sort, then sort those
records, as follows:
1. From the Search menu, select Start Search.
2. Choose the criteria for your search, making an Advanced Search if necessary, then click Search.
(For help setting up searches, see “Searching” on page 118.) When you run a search, a found set of
records that meet your criteria is established within the module you’ve searched. You can access
and sort only those records until you clear your search.
3. From the Record menu, select Sort.
4. Choose the criteria for your sort, then click Sort (see “Sorting Records by a Single Criterion” on
page 124). Only the records in the found set will be sorted. In list view, you’ll see just the names of
those records, sorted in the order you chose.
5. When you’ve finished working with your sorted records, if you want to clear your search so you can
work with all the records in the module, select Clear Search from the Search menu (or Show All
Records from the Record menu). The found set will be cleared, and the found records will revert to
their default order among the other records in the module.
125
Chapter 13: Reference Information
Sorting by Multiple Criteria
Sometimes, you might find it useful to use more than one criterion to sort a module. For example, you
might want to sort the records in the Contacts module alphabetically by last name. If some of your contacts
have the same last names, you also might want to sort the records alphabetically by first name. If you sort
this way, Abe Johnson would appear in your sorted list ahead of Sarah Johnson.
When you use multiple criteria in a sort, arrange your criteria so that the most important criterion appears
first in the Sort Order box. In the example above, last name would appear before first name. In that case,
your Contacts records will be sorted first by last name and then, within each last name, by first name.
To sort the records in a module using multiple criteria:
1. Open the module to be sorted.
2. From the Record menu, select Show All Records to clear any existing found set (unless you want to
sort the found set; a found set exists if you ran a search in the module, and haven’t cleared your
search results).
3. From the Record menu, select Sort. The Sort Records dialog will be displayed.
4. Choose the fields to use as your sort criteria, as follows:
• To add a sort criterion to the Sort Order box, click on its name in the list of fields on the left, then
click Move.
• To remove all sort criteria from the Sort Order box, click Clear All. The criteria will still be
available in the list of fields on the left side if you want to sort by them again.
• To remove one sort criterion, click on that field name in the Sort Order box to highlight it, then
click Clear. (When you highlight items in the Sort Order box, the Move button becomes the Clear
button.)
5. Order your sort criteria by their importance: move the most important criterion to the top of the Sort
Order list (in the example above, last name is the most important criterion), the next most important
to the position just below it, and so on. To move a criterion, click and drag the double-headed arrow
button (to the left of the criterion’s name in the list) to move the criterion up or down in the list.
For example, you might sort your Contacts records first by Organization (the most important
criterion) and then by last name (the less-important criterion). Your contacts then will be sorted by
organization, with contacts for the same organization listed alphabetically.
126
Chapter 13: Reference Information
6. Once the Sort Order box contains just the criteria of your choice, click on the name of each criterion
in the Sort Order box to select it, and then select either:
• Ascending order (to sort the records by that criterion alphabetically from A to Z, in numerical
order from smallest to largest number, or in chronological order from earliest to latest date/time).
• Descending order (to sort the records by that criterion alphabetically from Z to A, in numerical
order from largest to smallest number, or in chronological order from latest to earliest date/time).
For example, you might sort your Facilities records (a) alphabetically by city (ascending order), (b) then
alphabetically by facility name (ascending order), which orders records within cities, and then (c)
chronologically by most recent report year (descending order), which orders the records for any given
facility with the most recent records listed before less recent records.
7. Click Sort (or Cancel if you decide not to sort the records).
Linking a Record to a Map Object
You can link CAMEO records to MARPLOT map objects. From CAMEO, this will allow you to show the
location on a map and perform advanced planning and response analysis (for example, viewing special
locations within a threat zone). From MARPLOT, this will allow you to quickly return to linked CAMEO
records to get in-depth information about the map objects (for example, getting phone numbers and contact
information for special locations within a threat zone).
Three types of map objects are commonly linked to CAMEO records:
• Symbol and polygon objects that
mark the locations of facilities (such as
chemical processing plants), special
locations (such as schools or hospitals),
response/planning resources (such as
equipment stockpiles), and past
incidents.
• Polyline objects that represent routes
(along roads, rivers, railroads, or
combinations of these) used to
transport hazardous substances.
Note: For more information about linking records, see the on-screen MARPLOT helps.
127
Chapter 13: Reference Information
Creating a Map Link
You can link any record in the Facilities, Special Locations, Routes, Incidents, and Resources modules to
an object on a MARPLOT map. Screening & Scenarios threat zones can be displayed on a map once
you’ve linked the related Facilities or Routes record to a map object.
1. Open MARPLOT and select the map object that you want to link to. Note: Beginning with
MARPLOT version 4.0, the roads are part of the basemap background; they are not objects that you
can link to. If you want to create a route link, draw your own polyline object on top of the applicable
road segment.
2. In MARPLOT’s Sharing menu, select CAMEOfm, then Link Object. CAMEO will come forward
and the Link menu appears.
3. In CAMEO, go to the record that you want to link the map object to.
4. From CAMEO’s Link menu, select Link this Record. (The Link
menu will disappear when the link has been made.)
Viewing a Record Location on a Map
1. Go to the linked CAMEO record.
2. From the Sharing menu, select MARPLOT, then Show on Map. MARPLOT will come forward and
display a map that is centered on the map object.
Note: To see if a record is linked, select the Map Data tab on a
record. CAMEO automatically checks the box shown at right if
the record is linked.
Deleting a Map Link
1. Open MARPLOT and select the map object that you wish to unlink.
2. From MARPLOT’s Sharing menu, select CAMEOfm, then Unlink Objects. This will delete (or
break) the link information, but the map object and the CAMEO record will still exist. You’ll need
to delete those separately if you no longer want them.
Overview of Legislation
CAMEO is designed not only to be an emergency response tool, but to be useful for people who must meet
the provisions of the Emergency Planning and Community Right-to-Know Act of 1986 (EPCRA).
EPCRA
EPCRA, also known as Title III of the Superfund Amendments and Reauthorization Act of 1986 (SARA),
establishes requirements for federal, state, and local governments and for industry for emergency planning
128
Chapter 13: Reference Information
and community right-to-know reporting on hazardous chemicals. The community right-to-know
provisions of EPCRA are intended to increase public knowledge of—and access to—information about the
presence of hazardous chemicals in their communities and releases into the environment.
Under EPCRA, manufacturers and other facilities are required to report accidental releases of hazardous
chemicals to state and local officials and local fire departments. State and local officials are required to
prepare contingency plans for communities where hazardous materials are manufactured, stored, or
processed. Records of chemical inventories at facilities, and of accidental and routine chemical spills must
be readily available to interested citizens, local and state governments, and local fire departments.
Table 13-3. Brief Summary of EPCRA’s Major Sections.
Sections
Summary
Sections 301 to 303:
Emergency Planning
Local governments are required to prepare chemical emergency response plans,
and to review them annually. State governments are required to oversee and
coordinate local planning efforts. Facilities that maintain any Extremely Hazardous
Substance on site in a quantity that is greater than the listed Threshold Planning
Quantity must cooperate in emergency plan preparation.
Section 304:
Emergency Notification
Facilities must immediately report accidental releases of Extremely Hazardous
Substances and “hazardous substances” in quantities greater than the Reportable
Quantities (defined under the Comprehensive Environmental Response,
Compensation, and Liability Act) to state and local officials. Information about
accidental chemical releases must be available to the public.
Sections 311 and 312:
Community Right-toKnow Requirements
Facilities manufacturing, processing, or storing designated hazardous chemicals
must report inventories of onsite chemicals for which Material Safety Data Sheets
(MSDSs) exist to state and local officials and local fire departments—and make
the MSDSs available to them. (MSDSs describe the properties and health effects of
the chemicals.) This information must also be available to the public.
Section 313:
Toxic Chemical Release
Reporting
In the Toxic Release Inventory, EPA must maintain records of toxic chemical
emissions from certain facilities, and use this information in research and in
preparation of guidelines and regulations. Facilities subject to these reporting
requirements must submit annual reports of total amounts of chemicals released
into the environment (both routinely and accidentally) to EPA and state officials.
You can learn more about the reporting and planning requirements of EPCRA by (a) reading the following
pages, (b) going to EPA’s EPCRA website (http://www.epa.gov/emergencies/content/epcra/), or (c)
contacting the nearest EPA regional office. You can also review parts of the Code of Federal Regulations
(CFR) describing these requirements. The relevant parts are 40 CFR § 300 and 355 (describing Sections
301 to 303 and Section 304 of EPCRA); 40 CFR § 370 (describing Sections 311 to 312); and 40 CFR § 372
(describing Section 313).
Section 301-303: Emergency Planning. The emergency planning sections of EPCRA are designed
to develop state and federal emergency response and preparedness capabilities through improved
coordination and planning, especially within local communities. When enacted, EPCRA required the
governor of each state to designate a State Emergency Response Commission (SERC). Each SERC then
129
Chapter 13: Reference Information
designated local emergency planning districts and appointed a Local Emergency Planning Committee
(LEPC) for each district. Each SERC is responsible for supervising and coordinating the activities of
LEPCs, establishing procedures for receiving and processing public requests for information collected in
order to meet other provisions of EPCRA, and reviewing local emergency plans.
At a minimum, each LEPC includes elected state and local officials; police; fire; civil defense and public
health professionals; environment, hospital, and transportation officials; as well as representatives of
facilities subject to the reporting requirements, community groups, and the media. As soon as facilities
become subject to the emergency planning requirements, they must designate representatives to participate
in the EPCRA planning process.
The LEPC’s primary responsibility is to develop a chemical emergency response plan, and to review it
annually thereafter. In developing a response plan, each LEPC evaluates available resources for preparing
for and responding to a potential chemical accident.
Each plan:
• Identifies facilities and transportation routes of extremely hazardous substances.
• Describes onsite and offsite emergency response procedures.
• Designates a community emergency response coordinator and facility coordinator(s) to implement
the plan.
• Outlines emergency procedures.
• Describes methods for determining the occurrence of a release and the possible affected area and
population.
• Describes community and industry emergency equipment and facilities, and identifies the people
responsible for them.
• Outlines evacuation plans.
• Describes a training program (including schedules) for emergency response personnel.
• Presents methods and schedules for exercising emergency response plans.
Note: To assist LEPCs in preparing and reviewing plans, the National Response Team (which is composed
of 16 federal agencies with emergency response responsibilities) published the Hazardous Materials
Emergency Planning Guide in March 1987.
Each emergency response plan must initially be reviewed by the SERC and then must be reviewed at least
annually by the LEPC. Regional Response Teams (composed of federal regional officials and state
government representatives) may also review the plans and provide assistance to LEPCs upon request.
Planning activities of LEPCs and facilities should initially focus on any Extremely Hazardous Substances
(EHSs) in their areas, and then expand to address all hazardous materials of concern within their
community and cover transportation routes as well as fixed facilities.
130
Chapter 13: Reference Information
Any facility that has EHSs in quantities equal to or greater than the listed Threshold Planning Quantities
(TPQs) is subject to the emergency planning requirements. Additionally, state governors and SERCs can
designate other facilities to be subject to these requirements (after a period of public comment). A facility
must notify the appropriate SERC and LEPC that it has become subject to EPCRA planning requirements
within 60 days after beginning to keep any EHS chemical onsite in quantities equal to or greater than its
TPQ. In addition, the SERC must notify the nearest EPA regional office of all facilities subject to these
emergency planning requirements, including any facilities designated by the SERC or governor.
Section 304: Emergency Notification. Facilities must immediately notify any LEPCs and SERCs
likely to be affected by a release into the environment of a listed hazardous substance in an amount
exceeding the reportable quantity (RQ) of that substance. Substances subject to this requirement include
both Extremely Hazardous Substances (listed in 40 CFR § 355) and hazardous substances under the
Comprehensive Environmental Response, Compensation, and Liability Act (listed in 40 CFR § 302.4).
Initial notification can be made by telephone, radio, or in person. Emergency notification requirements for
transportation incidents can be met by dialing the 911 emergency number, if possible, or otherwise by
calling the operator. Releases of CERCLA hazardous substances must also be reported to the National
Response Center (800-424-8802).
Sections 311 and 312: Community Right-to-Know Requirements. Two community right-toknow requirements are included in EPCRA.
Section 311: Under the Occupational Safety and Health Administration’s regulations, certain facilities
must prepare Material Safety Data Sheets (MSDSs). Under Section 311 of EPCRA, those facilities must
also submit required MSDSs (or a list of all onsite MSDS chemicals) to the LEPC, SERC, and local fire
department with jurisdiction over the facility. If a list is submitted, the facility must provide an MSDS for
any chemical on the list, if requested by the LEPC or SERC. (Whenever a facility becomes subject to
Section 311, they have three months to prepare their MSDS data.)
Hazard Categories under Section 311: If the facility chooses to submit a list of MSDS chemicals, that
list must include the common or chemical name of each substance and must identify the applicable hazard
categories into which each substance falls: immediate (acute) health hazard; delayed (chronic) health
hazard; fire hazard; sudden release of pressure hazard; or reactive hazard.
Threshold Exceptions under Section 311: Facilities aren’t required to report onsite hazardous chemicals
in quantities below the appropriate threshold established by EPA. The current Section 311 thresholds are:
• For extremely hazardous substances: either 500 pounds, or the Threshold Planning Quantity,
whichever is lower.
• For all other hazardous chemicals: 10,000 pounds.
Updates under Section 311: Facilities must submit either an MSDS or a revised list once they store new,
previously unreported hazardous chemicals on site in quantities at or above the established threshold
levels. Also, if MSDSs were submitted rather than a list, an updated MSDS must be submitted whenever
significant new information about a hazardous chemical becomes available.
131
Chapter 13: Reference Information
Section 312: Under Section 312, each subject facility must submit an annual emergency and hazardous
chemical inventory form to the LEPC, SERC, and local fire department with jurisdiction over the facility.
Hazardous chemicals covered by Section 312 are those chemicals (a) for which facilities are required to
prepare or have available an MSDS under the Occupational Safety and Health Administration’s Hazard
Communication Standard, and (b) that were present at the facility in quantities equaling or exceeding
threshold quantities at any time during the previous year. (These are the same chemicals covered under
Section 311.)
Threshold Exceptions under Section 312: A facility isn’t required to report onsite hazardous chemicals
in quantities below the appropriate threshold established by EPA. The current Section 312 thresholds,
which are identical to the Section 311 threshold quantities, are:
• For extremely hazardous substances: either 500 pounds or the Threshold Planning Quantity,
whichever is lower.
• For all other hazardous chemicals: 10,000 pounds.
Tier I and Tier II Reporting under Section 312: The required inventory form incorporates a two-tier
approach. Under Tier I, facilities must submit the following information about chemicals within each
applicable hazard category:
• An estimate (in ranges) of the maximum amount of chemicals in each category present at the facility
at any time during the preceding calendar year.
• An estimate (in ranges) of the average daily amount of hazardous chemicals in each category on site
during the preceding calendar year.
• The approximate location of hazardous chemicals in each category.
If requested by an LEPC, SERC, or local fire department, a facility must also provide the following Tier II
information for each requested substance:
• The common or chemical name of the substance, as indicated on the MSDS.
• An estimate (in ranges) of the maximum amount of the chemical present at the facility at any time
during the preceding calendar year.
• A brief description of the manner in which the chemical is stored.
• The location of the chemical at the facility.
• An indication of whether the owner/operator elects to withhold location information from public
disclosure.
Note: Because many states impose additional requirements or have incorporated the federal reporting
provisions on their own forms, Tier I/II forms should be obtained from the SERCs.
132
Chapter 13: Reference Information
Facilities may choose to submit Tier II rather than Tier I forms, and some states require that Tier II forms
be submitted. Individual citizens may also request copies of completed Tier II forms from either a SERC or
LEPC. In such a case, if a Tier II form isn’t available, it must be requested from the facility. Information
submitted by facilities under Sections 311 and 312 generally must be available for public inspection during
normal working hours. Facilities must provide Section 311 and 312 information whenever requested,
regardless of whether onsite quantities of hazardous chemicals equal or exceed threshold quantities.
Section 313: Toxic Chemical Release Reporting. Section 313 of EPCRA requires EPA to establish
and maintain an inventory of toxic chemical emissions from certain facilities. Facilities subject to this
reporting requirement must complete a Toxic Chemical Release Inventory Form (commonly known as
Form R) for specified chemicals and submit it to EPA and designated state officials.
These reports should include descriptions of both routine and accidental releases of hazardous chemicals
from subject facilities during the preceding calendar year. The purpose of this reporting requirement is to
inform the public about routine releases of toxic chemicals to the environment. The information is also
intended for use in research and in the development of regulations, guidelines, and standards.
The Section 313 reporting requirement applies to facilities that (a) have at least 10 full-time employees, (b)
are in Standard Industrial Classification codes 20 through 39, and (c) manufacture, import, process, or
otherwise use at least one listed toxic chemical in excess of specified threshold quantities. More than 700
chemicals in more than 20 categories are now included on the list. EPA, through its rule-making authority,
can add or remove chemicals from this list.
EPA maintains a national toxic chemical inventory, called the Toxic Release Inventory (TRI) database,
containing the submitted inventory information. Individuals may access this national module directly or
obtain included information by several other means. For more information, see http://www.epa.gov/tri/.
Other EPCRA Provisions. Section 322 of EPCRA addresses the effect of trade secrets on emergency
planning, community right-to-know, and toxic chemical release reporting.
Section 325 of EPCRA describes the penalties for failure to comply with the requirements of this law. Civil
and administrative penalties ranging from up to $10,000 to $75,000 per violation or per day per violation
can be assessed on facilities that fail to comply with the emergency planning (Section 302), emergency
notification (Section 304), community right-to-know (Sections 311 and 312), toxic chemical release
(Section 313), and trade secret (Sections 322 and 323) reporting requirements. Criminal penalties of up to
$50,000 or five years in prison may also be assessed on any individual who knowingly and willingly fails
to provide emergency notification of a hazardous chemical release. Penalties of up to $20,000 and/or up to
one year in prison may be assessed on any person who knowingly and willfully discloses any information
entitled to protection as a trade secret.
In addition, Section 326 includes provisions allowing citizens to initiate civil actions against EPA, SERCs,
or the owner or operator of a facility for failure to meet the requirements of the emergency planning and
community right-to-know provisions of EPCRA. A SERC, LEPC, or state or local government may
initiate actions against facility owners or operators for failure to comply with EPCRA requirements.
Finally, states may file suit against EPA for failure to provide trade secret information.
133
Chapter 13: Reference Information
CAA 112(r)
Section 112(r) of the Clean Air Act (CAA) Amendments of 1990 requires EPA to publish regulations
focusing on preventing chemical accidents. The regulations build on the chemical safety work begun under
EPCRA, as well as the Occupational Safety and Health Administration’s Process Safety Management
regulations. While EPCRA requires communities to develop emergency response plans using information
on hazardous chemicals provided by local industries, under CAA 112(r), facilities must identify and assess
their chemical hazards and carry out certain activities designed to reduce the likelihood and severity of
accidental chemical releases. Once the chemical information is shared among industry, government, and
the community, those entities can work to reduce the risks to public health and the environment.
In 1996, EPA published the final rule for CAA 112(r), called the Risk Management Plan (RMP) Rule (40
CFR Part 68). A facility is subject to the RMP Rule if, in any process at the facility, there is more than a
threshold quantity of any hazardous substance that is regulated under the rule. Facilities subject to the
RMP Rule must perform an offsite consequence analysis to check whether its process puts nearby
populations at risk. If it does, the facility must take steps to manage that risk (as described in the rule).
You can view the text of CAA 112(r) and the RMP Rule, see the list of regulated substances and their
threshold quantities, and obtain factsheets and other information related to CAA 112(r), at
http://www.epa.gov/emergencies/content/rmp.
The similarity between the offsite consequence analyses required by the RMP Rule and the hazards
analysis procedures required under EPCRA has confused some CAMEO users. The main point to
understand is that CAMEO’s Screening & Scenarios module is designed to implement the hazards analysis
procedures described in an EPCRA guidance document (Technical Guidance for Hazards Analysis:
Emergency Planning for Extremely Hazardous Substances), and not for offsite consequence analyses (see
“Differences Between Screening & Scenarios, ALOHA, and RMP Endpoints” on page 80). For offsite
consequence analyses, you can use the RMP*Comp software program, which can be downloaded at no
cost from http://www.epa.gov/emergencies/content/rmp/rmp_comp.htm.
134
Glossary
A
Acute. Acute health effects usually develop rapidly after
a short-term exposure to hazardous chemicals. Acute
effects have a short duration. Contrast with Chronic.
ALOHA. Computer model that predicts the area
potentially affected by a toxic gas release, fire, or
explosion; ALOHA is a component of the CAMEO
software suite. Find out more about ALOHA on the
NOAA OR&R site (http://response.restoration.
noaa.gov/aloha).
CERCLA. Comprehensive Environmental Response,
Compensation, and Liability Act of 1980 (also known
as Superfund). Creates a framework for federal
involvement in response and cleanup activities
following hazardous substance releases. For more
information, see http://www.epa.gov/superfund/
policy/cercla.htm.
CFR. Code of Federal Regulations
(http://gpoaccess.gov/cfr).
C
CAMEO. A suite of software programs developed by
NOAA and EPA. The suite supports a number of
information management functions, such as retrieval
of chemical-specific information to support
emergency response activities, threat zone calculation
and plotting for risk assessment, organization and
management of EPCRA information, and mapping.
Find out more about CAMEO on the NOAA OR&R
site (http://response.restoration.noaa.gov/cameo).
See also ALOHA. See also MARPLOT.
Child module. A module that is below another, related
module in CAMEO’s file hierarchy. Chemicals in
Inventory is a child module relative to the Facilities
and Routes modules.
Chronic. Of long duration, or frequently recurring.
Chronic health effects become apparent and/or
continue for some time after exposure to hazardous
chemicals. Contrast with Acute.
Commission. The State Emergency Response
Commission, or the governor if there is no
commission, for the state in which a facility is located.
See State Emergency Response Commission (SERC).
Committee. The Local Emergency Planning Committee
(LEPC) for the emergency planning district in which a
facility is located. See Local Emergency Planning
Committee (LEPC).
CAMEO Chemicals. A hazardous materials database
where you can search thousands of datasheets, print
customized reports with physical properties and
response recommendations, and find out how
chemicals would react if they mixed. Both an online
version (http://cameochemicals.noaa.gov) and a
downloadable version (http://response.restoration.
noaa.gov/cameochemicals) are available.
D
CAMEO Map. A MARPLOT map designed to hold all
CAMEO-related objects, such as symbol objects
representing facilities or special locations, and
polyline objects representing hazardous materials
transportation routes. See also MARPLOT.
Database. An organized collection of information. Each
of CAMEO’s modules is a database. Each record in a
database describes an important element of
information (for example, each record in the Facilities
module describes a particular facility). Each record is
composed of data fields that store a particular kind of
information (for example, Street Address is a field on
a Facilities record). See also Module.
CAS number. Or CAS #. Chemical Abstracts Service
Registry number. This chemical identification number,
in the format XXX-XX-X, is assigned by the
American Chemical Society (http://www.cas.org/
expertise/cascontent/registry/regsys.html).
135
Glossary
E
placed in a found set. Whenever a found set exists in a
CAMEO module, only the records in the found set are
shown in list view. To clear a found set, select Show
All Records from the Record menu. See also Search
collection.
EHS. Extremely Hazardous Substance. EHS chemicals
have been identified by the U.S. Environmental
Protection Agency as particular toxic threats. They are
listed under EPCRA in the appendices to 40 CFR 355,
Emergency Planning and Notification.
EPA. U.S. Environmental Protection Agency. NOAA’s
Office of Response and Restoration (http://response.
restoration.noaa.gov) co-developed the CAMEO suite
with the EPA’s Office of Emergency Management
(http://www.epa.gov/emergencies).
EPCRA. Emergency Planning and Community Right-toKnow Act (also known as SARA Title III). Defines
list of chemicals that are classified as Extremely
Hazardous Substances (EHSs) and requires planning
for and reporting of EHS releases from facilities. See
“EPCRA” on page 128.
Extremely Hazardous Substances (EHS). EHS
chemicals have been identified by the U.S.
Environmental Protection Agency as particular toxic
threats. They are listed under EPCRA in the
appendices to 40 CFR § 355, Emergency Planning and
Notification.
G
Green Book. Formally known as Technical Guidance
for Hazards Analysis: Emergency Planning for
Extremely Hazardous Substances. A guidebook for
use by members of Local Emergency Planning
Committees in assessing the potential risks to a
community from accidental airborne releases of
extremely hazardous substances. It was published in
1987 by the U.S. Environmental Protection Agency,
Federal Emergency Management Agency, and U.S.
Department of Transportation. It’s available online at
http://www.epa.gov/emergencies/docs/chem/tech.pdf.
H
Hazards analysis. A systematic method for evaluating
the potential hazard to a community from accidental
airborne releases of hazardous chemicals stored,
transported, manufactured, or used within that
community. See also Technical Guidance.
F
I
Facility. Defined in Section 302 of EPCRA as all
buildings, equipment, structures, and other stationary
items located on a single site or on contiguous or
adjacent sites and which are owned or operated by the
same person (or by any person who controls, is
controlled by, or under common control with, such
person). For purposes of emergency release
notification, the term also includes motor vehicles,
rolling stock, and aircraft.
Field. Or data field. An area within a record in a
CAMEO module where a specific kind of information
is stored (such as the name of a facility or a phone
number). See also Database.
Found set. A found set is created in a CAMEO module
in three ways: (1) when you search the module,
records that meet your search criteria are placed in a
type of found set also called a search collection; (2)
when you choose a command from the Show Related
submenu of the Record menu, the records related to
the current record are placed in a found set in the
related module; and (3) when you select map objects,
then select Get Info, records linked to those objects are
Inventory form. The Tier I and Tier II emergency and
hazardous chemical inventory forms described in 40
CFR § 370.4. (See “Sections 311 and 312: Community
Right-to-Know Requirements” on page 131.) Record
fields in the Chemicals in Inventory module resemble
the fields on Tier II forms. See also Tier II.
L
LEPC. Local Emergency Planning Committee. A
committee appointed by the State Emergency
Response Commission, as required by EPCRA, first to
design, then to regularly review and update a
comprehensive emergency plan for an emergency
planning district. See “Section 301-303: Emergency
Planning” on page 129.
Level of Concern (LOC). Threshold concentration of an
airborne pollutant, usually the concentration above
which a hazard to people is believed to exist. Find out
more about LOCs on the NOAA OR&R site
(http://response.restoration.noaa.gov/locs).
136
Glossary
P
Link. A connection between a CAMEO record and a
related object on a MARPLOT map.
List view. View of a CAMEO module in which records
in the module are displayed as a list. Double-clicking
any record in the list displays that record in record
view. Contrast with Record view.
LOC. Level of Concern. Threshold concentration of an
airborne pollutant, usually the concentration above
which a hazard to people is believed to exist. Find out
more about LOCs on the NOAA OR&R site
(http://response.restoration.noaa.gov/locs).
Local Emergency Planning Committee (LEPC). A
committee appointed by the State Emergency
Response Commission, as required by EPCRA, first to
design, then to regularly review and update a
comprehensive emergency plan for an emergency
planning district. See “Section 301-303: Emergency
Planning” on page 129.
M
Parent module. A CAMEO module located above
another, related module in CAMEO’s file hierarchy.
Facilities and Routes are parent modules relative to
the Chemicals in Inventory module.
R
Record. In any CAMEO module, each record describes
an important entity or element of information. For
example, each Facilities record describes a single
facility (or department within a large facility). Each
record contains fields that each store a particular kind
of information (such as the Street Address field on a
Facilities record). See also Database.
Record view. View of a single record within a CAMEO
module, in which you can access all the information
contained in that record (typically, you click tabs to
see different kinds of information in a record).
Contrast with List view.
Risk analysis. A systematic method of assessing the
damage that could be caused to a community by a
hazardous substance release.
MARPLOT. CAMEO’s mapping program. Find out
more about MARPLOT on the NOAA OR&R site
(http://response.restoration.noaa.gov/marplot).
S
Module. Any of the databases included in CAMEO
(such as Facilities or Routes). See also Database.
SARA. Superfund Amendments and Reauthorization
Act of 1986. Title III of SARA is also known as the
Emergency Planning and Community Right-to-Know
Act of 1986 (EPCRA). See also EPCRA.
MSDS. Material Safety Data Sheet. Product data sheet
prepared under 29 CFR § 1910.1200 by the
manufacturer or marketer of a hazardous material;
describes product, its hazards, and safe handling and
response procedures.
Screening zone. Threat zone for screening calculations.
N
NOAA. National Oceanic and Atmospheric
Administration (http://www.noaa.gov).
O
OR&R. NOAA’s Office of Response and Restoration
(http://response.restoration.noaa.gov). OR&R codeveloped the CAMEO suite with the Environmental
Protection Agency’s Office of Emergency
Management (http://www.epa.gov/emergencies).
Search collection. A type of found set. When you
perform a search or request information on linked
MARPLOT objects, CAMEO collects together the
records in the given module that meet your criteria.
You then can browse through the collected records.
While a search collection exists, you can move among
only the collected records. Before you can work with
other records in the module, you must clear the search
collection (choose Clear Search from the Search
menu). See also Found set.
Search criteria. The criteria, or conditions, that you set
when you search a CAMEO module for a specific
piece of information, such as the record for a
particular facility in the Facilities module.
137
Glossary
SERC. State Emergency Response Commission. A
commission appointed by each state governor under
EPCRA. A SERC designates emergency planning
districts, appoints Local Emergency Planning
Committees, supervises and coordinates the activities
of planning committees, reviews emergency plans,
receives chemical release notifications, and
establishes procedures for receiving and processing
requests from the public for information. See also
Local Emergency Planning Committee (LEPC).
Sharing. The process by which CAMEO, CAMEO
Chemicals, ALOHA, and MARPLOT share
information in order to establish and use links between
module records, chemical datasheets, map objects, and
ALOHA threat zones.
Special locations. Locations of people who may be more
susceptible to the toxic effects of an accidental release
than the general population, because of pre-existing
health conditions, age, or other factors. Schools, daycare centers, and nursing homes are examples of
special locations.
State Emergency Response Commission (SERC). A
commission appointed by each state governor under
EPCRA. A SERC designates emergency planning
districts, appoints Local Emergency Planning
Committees, supervises and coordinates the activities
of planning committees, reviews emergency plans,
receives chemical release notifications, and
establishes procedures for receiving and processing
requests from the public for information. See also
Local Emergency Planning Committee (LEPC).
State Fields. Records in the Facilities and Chemicals in
Inventory modules contain a State Fields section,
designed to support the emergency planning work of
U.S. states that have developed their own reporting
requirements, in addition to the Tier II requirements
specified in EPCRA (which apply to all 50 states). In
these states, Tier II forms contain additional fields,
which are entered into CAMEO in the State Fields.
T
Technical Guidance. Technical Guidance for Hazards
Analysis: Emergency Planning for Extremely
Hazardous Substances. A guidebook for use by
members of Local Emergency Planning Committees
in assessing the potential risks to a community from
accidental airborne releases of extremely hazardous
substances. This guidance is commonly known as the
Green Book, and it was published in 1987 by the U.S.
Environmental Protection Agency, Federal Emergency
Management Agency, and U.S. Department of
Transportation. It’s available online at http://www.epa.
gov/emergencies/docs/chem/tech.pdf.
Threat zone. Area within which a hazard level is
predicted to exceed a specified Level of Concern
(LOC) at some time after a release begins. See also
LOC.
Tier II. Facilities covered by EPCRA must annually
submit a hazardous chemical inventory form to the
Local Emergency Planning Committee, the State
Emergency Response Commission, and the local fire
department. Facilities provide either a Tier I or Tier II
form. Most states require the Tier II form. See
“Sections 311 and 312: Community Right-to-Know
Requirements” on page 131.
U
Unlink. A command which breaks a link previously
established between a CAMEO record and an object
on a MARPLOT map. Contrast with Link.
V
Vulnerable zone. Threat zone for scenarios calculations.
Superfund. The trust fund established under CERCLA
to provide funding for cleanup of hazardous
substances.
Superfund Amendments and Reauthorization Act of
1986 (SARA). Title III of SARA is also known as the
Emergency Planning and Community Right-to-Know
Act of 1986 (EPCRA). See also EPCRA.
138
Index
A
Advanced searches: 120–121
See also Searching.
saving searches: 121
ALOHA: 14
on a network: 107
Sharing menu items: 117
vs. Screening & Scenarios: 80–81
Append Search menu item: 117
Append searches: 121
Atmospheric stability class: 78–79
B
Backing up CAMEO data: 107
Basic searches: 119–120
See also Searching.
Browsing: 20
C
CAA 112(r): 134
CAMEO
and EPCRA: 11
and federal legislation: 128–134
and the Clean Air Act: 11
basic operations: 17–22
components: 12–15
data management: 105–106
Data Ownership Rule: 85–86, 99
difficult or impossible data transfers: 86
getting started: 17–22
help: 22, 118
importing and exporting data: 85–102
managing your system: 103–114
menu items: 115–118
modules overview: 12
on a network: 107–114
password protection: 106–107
possible data transfers: 86
program security: 106–107
programs overview: 13–15
system manager: 105
technical support: 22
users: 10
website: 11
CAMEO Chemicals: 13
on a network: 107
Sharing menu items: 117
website: 13
Chemicals in Inventory: 41–46
adding and editing records: 42
data field definitions: 43–46
Clean Air Act of 1990: 134
Clear Search menu item: 117
Contacts: 47–50
adding and editing records: 48
adding for facilities: 27
adding for incidents: 53
adding for resource suppliers: 68–69
adding for special locations: 58–59
data field definitions: 49–50
making an association: 49
D
Data fields
definition: 18
text boxes vs. drop-down lists: 21
Data importing and exporting
See Importing and exporting data.
Datasheet button: 43, 82
Delete All Found Records menu item: 116
Delete All Records menu item: 116
Deleting records: 22
139
Index
Documents for resource suppliers
exporting: 97
importing: 99
Documents for resource suppliers: 69–70
E
Edit button: 18
Editing drop-down lists: 22
EHSs: 52, 74, 130
Emergency Planning and Community Right-toKnow Act
See EPCRA.
EPCRA: 128–133
and CAMEO: 11
and Tier II reporting: 132–133
in Code of Federal Regulations: 129
LEPCs and SERCs: 129
Sec. 301-303, emergency planning: 129–131
Sec. 304, emergency notification: 131
Sec. 311-312, right-to-know: 131–133
Sec. 313, toxic chemical release reporting: 133
Sec. 322, trade secrets: 133
Sec. 325, penalties: 133
Sec. 326, civil actions: 133
Export files: 87
Exporting data
See also Importing and exporting data.
from a single record: 96
from a subset of records in a module: 95–96
from all CAMEO modules: 94
from all records in a module: 94–95
to other programs: 102
Extremely Hazardous Substances: 52, 74, 130
F
making facility reports: 32–34
making KML files: 35
mapping facilities: 128
modeling screenings and scenarios: 29
File menu
Go Home menu item: 115
Make KML File menu item: 115
Open menu item: 115
FileMaker and CAMEO: 114
Finding facilities: 29–32
G
Glossary of CAMEO terms: 135–138
H
Hazards analysis: 73–84
See also Threat zones.
Help in CAMEO: 22
Help menu items: 118
technical support: 22
Home button: 18
Home: 17
I
Import/Export
See Importing and exporting data.
Importing and exporting data: 85–102
avoiding duplicate records: 99–102
avoiding trouble: 85–86
CAMEO Data Ownership Rule: 85–86, 99
difficult or impossible data transfers: 86
exporting data to other programs: 102
exporting from a single record: 96
exporting from a subset of records in a module:
Facilities: 23–39
adding and editing records: 25
adding and removing site plans: 28
adding contact information: 27
data field definitions: 35–39
documenting incidents: 29
getting information about: 29–32
95–96
exporting from all modules: 94
exporting from all records in a module: 94–95
exporting linked documents: 97
exporting map links and objects: 96–97
exporting site plans: 97
140
Index
importing from another copy of CAMEO: 98–
99
importing from previous CAMEO version: 93,
98–99
importing from Tier2 Submit: 90–93
importing linked documents: 98–99
importing map objects: 98–99
importing site plans: 98–99
merge files as standard file format: 87
possible data transfers: 86, 93
record ID numbers: 87–90
Incidents: 51–56
adding and editing records: 52
adding Reporter/Discharger information: 53
associating with a facility: 52
associating with a route: 52
data field definitions: 54–56
historical incident data source: 52
mapping incidents: 128
K
KML files (for facilities only): 35
L
Legislation: 128–134
LEPCs: 130
Level of concern: 75
Link menu items: 118
Link menu: 128
Linking
modules that can be linked to maps: 128
records to map objects: 128
List
browsing: 20
editing drop-down lists: 22
View List button: 18
view: 19
Local Emergency Planning Committees: 130
Look Up Chemical button: 42
Look Up Component button: 42
M
Make KML File menu item: 35
Making KML files for facilities: 35
Management plan for CAMEO: 103–114
data backup: 107
elements of a plan: 103–104
password protection: 106–107
planning data management: 105–106
program security: 106–107
reasons to plan: 103
role of system manager: 105
Maps
exporting map links and objects: 96–97
importing map objects: 99
mapping a facility: 128
mapping a resource: 128
mapping a route: 128
mapping a special location: 128
mapping an incident: 128
polygon objects: 127
polyline objects: 127
symbol objects: 127
MARPLOT: 15
See also Maps.
exporting map links and objects: 96–97
importing map objects: 99
links, about: 127–128
map objects, about: 127–128
on a network: 107
Sharing menu items: 117
Menus defined: 115–118
Merge files: 87
Modules
basic anatomy: 18
brief descriptions: 12
interrelated: 18, 87–88
N
National Response Center incident database: 52
Navigation: 17
141
Index
Networking CAMEO: 107–114
data entry by multiple people: 113–114
hosting in FileMaker Pro: 108–112
managing multiple users: 113–114
networking the runtime version: 108
possible configurations: 108
security concerns: 108
using FileMaker Server: 113
New Record button: 18
O
Offsite consequence analysis: 134
P
Parent and child modules: 87–88
Password protection: 106–107
Polygon objects on a map: 127
Polyline objects on a map: 127
Print Report menu item
making facility reports: 32–34
Programs
brief descriptions: 13–15
R
Record
definition: 18
deleting: 22
linking to a map: 127–128
navigating: 20
View Record button: 18
view: 19
Record ID numbers: 87–90
and Tier2 Submit data: 90–91
viewing record IDs: 89–90
Record menu
Delete All Found Records menu item: 116
Delete All Records menu item: 116
Delete menu item: 116
Go To menu item: 20
Show All Records menu item: 116
Show Related menu item: 21, 116
Sort menu item: 116
View List menu item: 116
View Record menu item: 116
Resources: 67–72
adding and editing records: 68
adding and removing documents: 69–70
adding contact information: 68–69
data field definitions: 70–72
mapping resources: 128
Risk Management Plan Rule: 134
RMP Rule: 134
RMP*Comp: 16, 80
Routes: 63–66
adding and editing records: 64
and Screening & Scenarios: 64
data field definitions: 65–66
mapping routes: 128
tracking incidents along: 65
tracking transported chemicals: 64
S
SARA Title III
See EPCRA.
Screening & Scenarios: 73–84
See also Hazards analysis.
See also Threat zones.
and the Green Book: 74
and the Technical Guidance: 74
data field definitions: 82–84
difference from ALOHA: 80–81
estimating screening zones: 76–77
estimating vulnerable zones: 77–78
making scenarios calculations: 77–79
making screening calculations: 75–77
mapping threat zones: 79–80, 128
screening vs. scenarios: 74
worst-case screening assumptions: 75
Scripts menu: 118
142
Index
Search menu
See also Searching.
Append Search menu item: 117
Clear Search menu item: 117
Start Search menu item: 117
Subset Search menu item: 117
Searching: 20, 118–121
advanced facility search: 31–32
advanced searches: 120–121
append searches and subset searches: 121
basic facility search: 29–30
basic searches: 119–120
for facility records: 29–32
saving searches: 121
searching state fields: 119–120
Section 112(r): 134
Sharing menu
ALOHA menu items: 117
CAMEO Chemicals menu items: 117
MARPLOT menu items: 117
Show All on Map menu item: 117
Show All Records menu item: 116
Show on Map menu item: 117
Show Related menu item: 21, 116
Site plans
adding for facilities: 28
adding for special locations: 59–60
adding resource documents: 69–70
exporting: 97
importing: 99
removing for facilities: 28
removing for special locations: 59–60
removing resource documents: 69–70
Sort menu item: 116
See also Sorting records.
Sorting records: 122–127
by a single criterion: 124–125
by multiple criteria: 126–127
choosing criteria: 122–124
sorting a subset of records: 125
unsorting: 125
Special Locations: 57–62
adding and editing records: 58
adding and removing site plans: 59–60
adding contact information: 58–59
data field definitions: 60–62
mapping special locations: 128
Stability class: 78–79
Start Search menu item: 117
State fields: 24, 119–120
Subset Search menu item: 117
Subset searches: 121
Symbol objects on a map: 127
T
Technical support: 22
Threat zones:
See also Hazards analysis.
See also Screening & Scenarios.
deleting from a map: 80
estimating a screening zone: 76–77
estimating a vulnerable zone: 77–78
plotting on maps: 79–80
Tier II data: 24–25
and EPCRA: 132–133
state fields: 24
Tier2 Submit: 15, 86
file format: 87
importing data from: 90–93
Title III
See EPCRA.
Toolbar: 18–19
Edit button: 18
Home button: 18
navigation: 18
New Record button: 18
View List button: 18
View Record button: 18
143
Index
U
Unsorting records: 125
V
View List button: 18
View List menu item: 116
See also List view.
View Record button: 18
View Record menu item: 116
See also Record view.
W
Website for CAMEO: 11
Worst-case screening assumptions: 75
144