1
COZAR
MICROSYSTEMS
CYBERSHOP END USER MANUAL
Help Documentation | Cosmas
Page |2
Copyright © 2014 by Cozar MycroSystems.
44/46 Adegbola (Pavilion Hotel Complex)
Anifowoshe, Ikeja,
Lagos,
Nigeria.
All rights reserved.
I
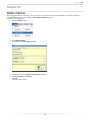
mportant licensing information. Please read.
This book is available for free on CyberShop CD or download from www.cozappz.com.
This book is licensed for reading as a user manual only if obtained from the specified sources.
This book is licensed strictly for personal, educational use.
Redistribution in any form is prohibited.
The authors and copyright holders provide absolutely no warranty for any information provided.
The authors and copyright holders shall not be liable for any claim, damages, or any other liability arising from, out of, or in
connection with the information in this book.
Please do not use this book if the listed terms are unacceptable.
Use shall constitute acceptance of the terms listed.
E
dited by
This publication was edited by Cosmas Arumala, product manager, Cozar MicroSystems.
2
Page |3
Contents at a Glance
Introduction ………………………………………………………………………………………………………………………………………………………………………….8
Chapter 1 . Installation …………………………………………………………………………………………….……………………………………………………………9
Chapter 2 . What’s new in CyberShop ………………………………………………………………………………………….……………………………………..11
Chapter 3 . Getting started with CyberShop ………………………………………………………………………………………….…………………………….18
Chapter 4 . Stocking ………………………………………………………………………………………….…………………………………………………………………42
Chapter 5 . Sales ………………………………………………………………………………………….……………………………………………………………………..46
Chapter 6 . Purchases ………………………………………………………………………………………….………………………………………………………………53
Chapter 7 . Expenses ………………………………………………………………………………………….……………………………………………………………….59
Chapter 8 . Local Purchase Orders………………………………………………………………………………………….……………………………………………64
Chapter 9 . Profit Evaluation ………………………………………………………………………………………….……………………………………………………68
Chapter 10 . PayRoll………………………………………………………………………………………….…………………………………………………………………71
Chapter 11 . Delete Options ………………………………………………………………………………………….…………………………………………………….79
Chapter 12 . Expired Products………………………………………………………………………………………….………………………………………………….80
Chapter 13 . Backup and Recovery ………………………………………………………………………………………….………………………………………….82
Chapter 14 . Password and Permissions ………………………………………………………………………………………….………………………………….85
Chapter 15 . Report Summaries ………………………………………………………………………………………….………………………………………………88
Appendix A . Miscellaneous Routines ………………………………………………………………………………………….…………………………………..103
Index ………………………………………………………………………………………….……………………………………………………………………………………..104
3
Page |4
Contents
Introduction ……………………………………………………………………………………….………………………………………………………….…………………….8
Chapter 1 . Installation ……………………………………………………………………………………….……………………………………….……………………….9
Installing CyberShop ………………………………………………………………………………………….……………………………………………………..........9
Installation Requirements ……………………………………………………………………………………….…………………………………………….………….9
Installing CyberShop on a Local Machine ……………………………………………………………………………………….…………………….…………..9
Chapter 2 . What is new in CyberShop ……………………………………………………………………………………….……….…………………….………..11
Changing CyberShop background image …………………………………………………………………………………….….…………………….…………..11
Importing Stock from external sources ………………………………………………………………………………………..…………………….…………….11
Bank Account Management ……………………………………………………………………………………….…………….…………………….………………..13
Invoice Management Permission ……………………………………………………………………………………….…….…………………….………………..15
Purchases Processing ……………………………………………………………………………………….…………………….……………………….……………….15
Application Activation ………………………………………………………………………………………….………………….……………………….………………16
Chapter 3 . Getting Started with CyberShop ……………………………………………………………………….……………….……………….…………….18
Customizing the work environment …………………………………………………………………………………..……….…………………….………………18
Company Defaults ………………………………………………………………………………………….………………..………………………………………………18
Set Values ………………………………………………………………………………………….……………………………..……………………………………………..19
Entity ………………………………………………………………………………………….……………………………………..…………………………………………….20
Display Settings ………………………………………………………………………………………….…………………..……….……………………………………….21
Customer Information ………………………………………………………………………………………….……………………………………………………………22
Creating a new Customer ………………………………………………………………………………………….…..…………………………………………………22
Editing a Customer ………………………………………………………………………………………….…………….…………………………………………………23
Deleting a Customer ………………………………………………………………………………………….…………….……………………………………………...23
Supplier Information ………………………………………………………………………………………….…………………..…………………………………………24
Creating a new Supplier ………………………………………………………………………………………….………………………….…………………………….24
Editing a Supplier ………………………………………………………………………………………….…………………………………….……………………………25
Deleting a Supplier ………………………………………………………………………………………….………………………………….…………………………….25
Employee Information ………………………………………………………………………………………….…………………………….……………………………..26
Creating a new Employee ………………………………………………………………………………………….……………………….…………………………….26
Editing an Employee ………………………………………………………………………………………….……………………………….…………………………….27
Deleting an Employee ………………………………………………………………………………………….…………………………….…………………………….27
Departments ………………………………………………………………………………………….…………………………………………….…………………………….27
Creating a new Department ………………………………………………………………………………………….…………………….……………………………28
Editing a Department ………………………………………………………………………………………….……………………………….…………………………..29
Deleting a Department ………………………………………………………………………………………….…………………………….……………………………29
Positions ………………………………………………………………………………………….…………………………………………………………………………………29
Creating a new Position ………………………………………………………………………………………….………………………………………………………..30
Editing a Position ………………………………………………………………………………………….………………………………………………………………….30
Deleting a Position ………………………………………………………………………………………….………………………………………………………………..31
Product Group Names (Categories) ………………………………………………………………………………………….………………………………………..31
Creating a new Group Name ………………………………………………………………………………………….…………………………………………………32
Editing a Group Name ………………………………………………………………………………………….…………………………………………………………..32
Deleting a Group Name ………………………………………………………………………………………….…………………………………………………………33
States ………………………………………………………………………………………….………………………………………………………………………………………33
Creating a new State ………………………………………………………………………………………….…………………………………………………………….33
Editing a State ………………………………………………………………………………………….……………………………………………………………………….34
Deleting a State ………………………………………………………………………………………….…………………………………………………………………….34
Countries ………………………………………………………………………………………….………………………………………………………………………………..35
Creating a new Country ………………………………………………………………………………………….…………………………………………………………35
Editing a Country ………………………………………………………………………………………….…………………………………………………………………..36
Deleting a Country ………………………………………………………………………………………….………………………………………………………………..36
4
Page |5
Contents
Banks ………………………………………………………………………………………….………………………………………………………………………………………36
Creating a new Bank ………………………………………………………………………………………….……………………………………………………………..37
Editing a Bank ………………………………………………………………………………………….……………………………………………………………………….37
Deleting a Bank ………………………………………………………………………………………….…………………………………………………………………….38
Percent Names ………………………………………………………………………………………….……………………………………………………………………….38
Creating a new Percent Name ………………………………………………………………………………………….………………………………………………39
Editing a Percent Name ………………………………………………………………………………………….………………………………………………………..39
Deleting a Percent Name ………………………………………………………………………………………….………………………………………………………39
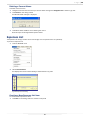
Expenses List ………………………………………………………………………………………….…………………………………………………………………………..40
Creating a new Expenses Name ………………………………………………………………………………………….…………………………………………….40
Editing an Expenses Name ………………………………………………………………………………………….…………………………………………………….41
Deleting an Expenses Name ………………………………………………………………………………………….………………………………………………….41
Chapter 4 . Stocking ………………………………………………………………………………………….………………………………………………………………..42
Electronic Stocking ………………………………………………………………………………………….………………………………………………………………..42
Creating a stock file ………………………………………………………………………………………….………………………………………………………………42
Rules for updating the stock file ………………………………………………………………………………………….……………………………………………42
Deleting all stock items ………………………………………………………………………………………….…………………………………………………………42
Uploading the stock file ………………………………………………………………………………………….………………………………………………………..42
Manual Stocking ………………………………………………………………………………………….…………………………………………………………………….42
Creating a new Product ………………………………………………………………………………………….…………………………………………………………43
Editing an existing Product ………………………………………………………………………………………….……………………………………………………44
Deleting a Product ………………………………………………………………………………………….………………………………………………………………..44
Previewing the Stock list ………………………………………………………………………………………….………………………………………………………..45
Printing the Stock list ………………………………………………………………………………………….……………………………………………………………..45
Chapter 5 . Sales ………………………………………………………………………………………….………………………………………………………………………46
Sales Orders ………………………………………………………………………………………….……………………………………………………………………………46
Creating a new Sales order ………………………………………………………………………………………….……………………………………………………47
Previewing a Sales Invoice ………………………………………………………………………………………….…………………………………………………….49
Printing a Sales Invoice ………………………………………………………………………………………….………………………………………………………….49
Editing a Sales order ..……………………………………………………………………………………….………………………………………………………………50
Deleting a Sales order ………………………………………………………………………………………….……………………………………………………………50
Removing a Shopping Detail ………………………………………………………………………………………….………………………………………………….51
Removing a Payment Detail ………………………………………………………………………………………….………………………………………………….51
Chapter 6 . Purchases ………………………………………………………………………………………….………………………………………………………………53
Purchase Orders ………………………………………………………………………………………….……………………………………………………………………..53
Creating a new Purchase Order ……………….…….………………………………………………………………….……………………………………………..53
Previewing a Purchase Invoice ………………………………………………………………………………………….………………………………………………55
Printing a Purchase Invoice ………………………………………………………………………………………….…………………………………………………..56
Editing a Purchase Order ...……………………………………………………………………………………….………………………………………………………56
Deleting a Purchase Order ………………………….…………………………………………………………….……………………………………………………..57
Removing a Shopping Detail ………………………………………………………………………………………….…………………………………………………57
Removing a Payment Detail ……………..………………………………………………………………………….………………………………………………….58
Chapter 7 . Expenses ………………………………………………………………………………………….……………………………………………………………….59
Expense Orders ………………………………………………………………………………………….………………………………………………………………………59
Creating a new Expenses order ………………………………………………………………………………………….………………….…………………………59
Previewing an Expenses Invoice ………………………………………………………………………………………….……………………………………………61
Printing an Expenses Invoice ………………………………………………………………………………………….………………………………………………...61
Editing an Expenses Order ……………………………………………………………………………………….……………………………………………………….61
Deleting an Expenses order ………………………………………………………………………………………….…………………………………………………..62
Removing a Shopping Detail ………………………………………………………………………………………….………………………………………………….62
5
Page |6
Contents
Removing a Payment Detail ………………………………………………………………………………………….………………………………………………….63
Chapter 8 . Local Purchase Orders (LPO) ………………………………………………………………………………………….………………………………....64
Local Purchase Orders ………………………………………………………………………………………….…………………………………………………………….64
Creating a new Local Purchase order ………………………………………………………………………………………….…………………………………….64
Previewing a Local Purchase Order Invoice ………………………………………………………………………………………….…………………………..65
Printing a Local Purchase Order Invoice ………………………………………………………………………………………….………………………………..65
Editing a Local Purchase order ……………………………………………………………………………………….…………………………………………..…….66
Deleting a Local Purchase order ………………………………………………………………………………………….…………………………………………...66
Removing a Detail ……………………………………………………………………………………….……………………………………………………………….....66
Chapter 9 . Profit Evaluation ..……………………………………………………………………………………….…………………………………………………….68
Profit Evaluation …..………………………………………………………………………………………….………………………………………………………………..68
Creating a New Profit Evaluation …………………………………………………………………….………………………………………………………………..68
Editing a Profit Evaluation ……..……………………………………………………………………….………………………………………………………………..69
Deleting a Profit Evaluation ..………………………………………………………………………….………………………………………………………………..69
Chapter 10 . PayRoll ………………………………………………………………………………………….………………………………………………………………..71
Staff PayRoll …………………………………………………………………………………………………….………………………………………………………………..72
Department Details ………………………………………………………………………………………….………………………………………………………………..72
Creating a new Department Detail ………………………………………………………………….………………………………………………………………..72
Editing a Department Detail ..………………………………………………………………………….………………………………………………………………..72
Deleting a Department Detail …..…………………………………………………………………….………………………………………………………………..73
Allowance/Deduction Detail ..………………………………………………………………………….………………………………………………………………..73
Creating a new Allowance/Deduction Detail .………………………………………………….………………………………………………………………..73
Editing an Allowance/Deduction Detail ….……………………………………………………….………………………………………………………………..74
Deleting an Allowance/Deduction Detail .……………………………………………………….………………………………………………………………..74
Loan Details …………………………………..……..………………………………………………………….………………………………………………………………..74
Creating a Loan Detail …………………………………………………………………………………….………………………………………………………………..74
Editing a Loan Detail ……………………………………………………………………………………….………………………………………………………………..75
Deleting a Loan Detail …………………………………………………………………………………….………………………………………………………………..75
PayRoll Details ……..………………………………………………………………………………………….………………………………………………………………..76
Creating a new PayRoll Detail ..……………………………………………………………………….………………………………………………………………..76
Previewing a Payslip ……………………………………………………………………………………….………………………………………………………………..76
Printing a Payslip ……………..…………………………………………………………………………….………………………………………………………………..77
Editing a PayRoll Detail ………………………………………………………………………………….………………………………………….……………………..77
Deleting a PayRoll Detail ………………………………………………………………….…………….……………………………………………….………………..77
Chapter 11 . Delete Options …………………………………………………………………….……….………………………………………………….……………..79
Executing Delete options ……………………………………………………………………….………….……………………………………………….……………..79
Chapter 12 . Expired Products ………………………………………………………………….……….………………………………………………………………..80
Displaying All Expired Products ……………………………………………………………………….………………………………………………………………..80
Displaying Expired Products for a Specific Date ..…………………………………………….………………………………………………………………..80
Deleting Expired Products …………………………………………..………………………………….………………………………………………………………..81
Previewing Expired Products ………………………………………………………………………….………………………………………………………………..81
Printing Expired Products ……………………………………………………………………………….………………………………………………………………..81
Chapter 13 . Backup And Recovery ……………………………………………………………………………………………………………………………………..82
Creating a Data backup …………………………………………………………………………………….……………………………………………………………….82
Backing up Data to the Local system …………………………………..………………………….………………………………………………………………..82
Backing up Data to an external storage media ………………………….…………………….………………………………………………………………..82
Restoring Data from Backup …………………………………………………………………………….………………………………………………………………..84
Recovering Data from a local Backup ……………………………………….…………………….………………………………………………………………..84
Recovering Data from an external storage media …………………………………………..………………………………………………………………..84
Chapter 14 . Password and Permissions …………………………………………………………….………………………………………………………………..85
6
Page |7
Contents
User Passwords ………………………………………………………………………………………….………….…………………………………………………………..85
Creating a User Password ……………………………………………………………………………….………………………………………………………………..86
Assigning Permissions to a User …………………………………………….……………………….………………………………………………………………..86
Editing a User Password ………………………………………………………………………………….………………………………………………………………..87
Deleting a User Password ……………………………………………………………………………….………………………………………………………………..87
Chapter 15 . Report Summaries …………………………………………………………….………….………………………………………………………………..88
Previewing and Printing Summary Reports …………………………………………………….………………………………………………………………..88
Income Statements ………………………………………………………………………………………..………………………………………………………………..89
Current Stock Report …………………………………………………………………………………..….………………………………………………………………..89
Debtors’ List ………………………………………………………………………………………..………….………………………………………………………………..89
Creditors’ List ………………………………………………………………………………………………….………………………………………………………………..91
Product Summary by Group Names ……………………………………………………….……….………………………………………………………………..91
Product History …..………………………………………………………………………………………….………………………………………………………………..92
Monthly Sales Chart ……………………………………………………………………………………….………………………………………………………………..92
Product Stock Reorder Report .……………………………………………………………………….………………………………………………………………..91
Out-of-Stock Product Report ………………………………………………………………………….………………………………………………………………..93
Product Expiry Summary Report …………………………………………………………………….………………………………………………………………..93
Product Sales Rating ..…………………………………………………………………………………….………………………………………………………………..94
Product Tracking …………..……………………………………………………………………………….………………………………………………………………..95
Sales Ledgers ………………………..……………………………………………………………………….………………………………………………………………..96
Purchase Ledgers ……………………………….………………………………………………………….………………………………………………………………..96
Sales Orders Summary Report ……………………………………………………………………….………………………………………………………………..97
Sales Summary By Staff ………………………………………………………………………………….………………………………………………………………..97
Purchase Orders Summary Report ………………………………………………………………….……………………………………………………………….98
Expenses Summary Report …………………………………………………………………………….………………………………………………………………..98
PayRoll Summary Report ……………………………………………………………………………….………………………………………………………………..99
Cash Flow Summary Report ………………………………………………………………………………………….………………………………………………..100
Cash Evaluation Summary Report ………………………………………………………………………………………….……………………………………….101
Customer Patronage ………………………………………………………………………………………….…………………………………………………………..102
Current Financial Statement ….……………………………………….……………………………………………….……………………………………………..102
Appendix A ………..……………………………………………………….………………………………….………………………………………………………………..103
Index …………………………………………………………………………………………………………………………………………………………………………………104
7
Page |8
Introduction
Welcome to Cozar CyberShop, a POS (Point-Of-Sales) application that has a unique feature by which you can create orders
for multiple Customers from one Sales Point. This application is designed by Cozar Microsystems to handle automated
sales/inventory/accounting operations in Retail and Wholesale Outlets.
With Cozar CyberShop, you migrate your sales outlet into the cyberspace where transactions and computations are carried
out with utmost ease and accuracy.
Note that these benefits are assured only when your hardware and related software accessories are in optimal working
conditions.
Note that every operation described in this book assumes that you have already started the application and logged in to
the Application Explorer
For the initial login, the ADMINISTRATOR login password is “ad” without the quotation.
8
Page |9
Chapter 1
Installation
This chapter shows you how to install CyberShop locally from your product distribution media.
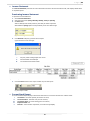
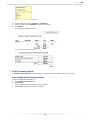
Installation Requirements
Minimum Installation Requirements
Operating Systems
Computer Processor
Memory
Disk Space
Drive
Windows XP SP3
Windows 2003 Server
Windows 7
133MHz or Higher Pentium CPU.
At least 512 megabytes (MB), 1 gigabyte (GB) is
recommended, 4 GB maximum.
1 gigabyte
CD-ROM or DVD Drive
Table 1.0 Installation requirements
Installing CyberShop on a Local Machine
If you are installing CyberShop on a computer running any of the supported operating systems (see Minimum installation
requirements above), you must have Administrator privileges. The installation process creates registry entries and may
update some system files that require Administrator rights.
Close all currently running programs before installing CyberShop.
Go to the Installation CD to install Windows XP Service Pack 3 (SP3) if it is necessary.
To Install CyberShop on a Local Machine
1.
2.
3.
4.
5.
Unless Autoplay is enabled for your CD-ROM drive, run setup.exe from the CyberShopPro or CyberShopHome
Installer directory of your product distribution depending on your choice.
Click Ok.
.Click Change Directory if you want to install CyberShop to a directory different from the default location.
The default directory is C:\Program Files\CyberShop\ or C:\Program Files (x86)\CyberShop\ (for 64 bit systems)
Click the installation button.
The Start Installation dialog box appears.
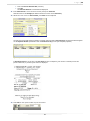
Click Continue to begin copying files to your local drive.
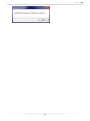
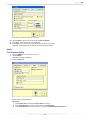
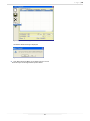
Note: Depending on the configuration of your current system, you may receive a Version Conflict message asking
you to keep your existing files. If this happens, click Yes and continue with the installation.
Fig 1.0 Version Conflict
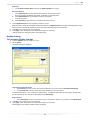
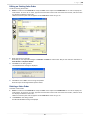
6.
On completion, you will receive the success message as shown below.
9
P a g e | 10
Fig 1.1 Success Message
10
P a g e | 11
Chapter 2
What is new in CyberShop
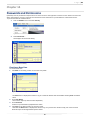
The use of CyberShop in sales outlets for Effective and Efficient Information (Inventory, Sales, Accounts, Security etc)
management has been very well established in users. CyberShop now offers new features and enhancements.
This chapter introduces these features and enhancements.
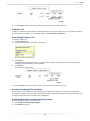
Changing the Background Image (Picture) of CyberShop
To leverage the use of CyberShop in various Sales environments, CyberShop now offers users the opportunity to change the
background picture of the application to properly reflect their products.
To change the background picture:
1.
2.
3.
4.
Get a background image or picture in JPEG (.jpg) format.
Name the image backgroundimage.
The name would then be backgroundimage.jpg
Save the image to the Images folder of the CyberShop directory or folder
The CyberShop image directory or folder is on the path C:\Program Files\CyberShop\Images\
Run the CyberShop application
The application would display the new image
Importing Stock from external sources
To facilitate stock input, CyberShop now provides a process by which product stocks can be imported by way of an external
file. This is also referred to as Electronic Stocking.
The processes involved in importing stocks into CyberShop, includes the following:
i. Creating a stock file
ii. Rules for updating the stock file
iii. Deleting All stocks
iv. Importing the stock file
Creating a Stock File
To create a Stock file
1. Go to the Docs folder of the CyberShop directory or folder
You would find it on the path C:\Program Files\CyberShop\Docs\
2. Locate an MS Excel file called Stock.xls
You would find an existing product stock.
3. To enter your own stock:
i. Modify the content of the file according to the file headings and content format or
ii. Delete or clear the file contents leaving the headings and then enter your stock according to the headings
and content format.
4. Save the file.
Rules for Updating the Stock File
The rules for updating the stock file are as follows:
i. The Item_ID column must be UNIQUE
This field does not allow duplicate IDs
ii. The Item_Name column must be UNIQUE
This field does not allow duplicate names
iii. No field must be left blank
Enter zero (0) for a numeric field and dash (–) for an alphanumeric field
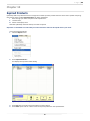
Deleting All Stocks
To delete all stocks:
1. Start CyberShop
2. Log in
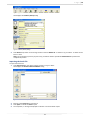
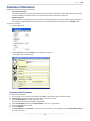
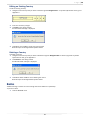
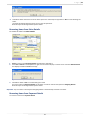
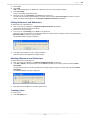
3. Click Products on the Application Toolbar
11
P a g e | 12
Fig 2.0 Application Toolbar
This displays the Products (Stock) dialog
Fig 2.1 Products (Stock) dialog
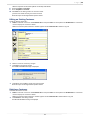
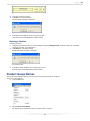
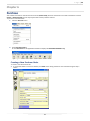
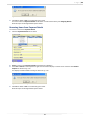
4.
Click Delete drop button on the dialog Toolbar and select Delete All - as shown in Fig 2.1 above - to delete all the
items in stock
Note: For the purpose of security to your stock, you will be asked to provide the Administrator’s password to
complete the process.
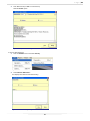
Importing the Stock File
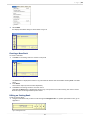
To import the stock file
1. Click Import Stock on the dialog Toolbar as shown in Fig 2.1 above
This displays the SELECT STOCK TO IMPORT dialog
Fig 2.2 Select Stock To Import dialog
2.
3.
4.
Browse to the Stock.xls file and select it
Click Open to initiate the Stock import
On completion, a message is displayed to indicate a successful Stock import
12
P a g e | 13
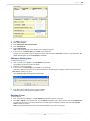
Bank Account Management
CyberShop can help manage your business account offline by the use of its new Bank Transactions module. This actually
involves the judicious entry of all bank lodgements and cheque payments. With this, CyberShop can assist you in monitoring
the balances on those accounts. This process may include the following:
All Accounts
Bank lodgements
Cheque payments
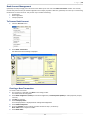
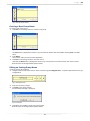
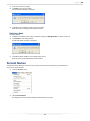
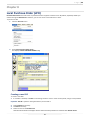
To Process Bank Account
1.
Click the Accounts menu
Fig 2.3 Accounts Menu
2.
Select Bank Transactions
The Bank Transactions dialog is displayed
Fig 2.4 Bank Transactions dialog
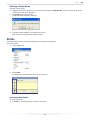
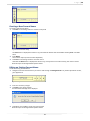
Creating a New Transaction
To create a new transaction:
1. If a transaction is selected, Click New on the dialog Toolbar
This would reset the entry fields.
2. Select Bank Lodgements (Credit) to make bank lodgements, Credit Payments (Debit) to make payments (cheque,
cash etc).
3. Set Date if necessary
4. Select Company Name
Your Company Name is displayed when making bank lodgements
5. Select Mode Of Payment
6. Enter the Number for the mode of payment selected in step 4, if necessary.
Note: CASH doesn’t require a number
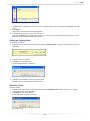
7. Select Bank Name
13
P a g e | 14
If the bank name does not exist,
Click the Bank Name button (ellipsis) to display the Bank Names dialog
Enter the new bank name and save it.
Click Close to close the dialog.
Click the Bank Name dropdown
Select the name you just entered
8. Enter Amount
9. Click Save on the dialog Toolbar
The transaction appears on the spreadsheet
Note the report on the Application Explorer Status
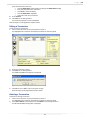
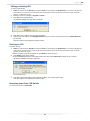
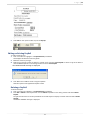
Editing a Transaction
To edit an existing transaction:
1. Click on the transaction on the spreadsheet to select it
This highlights the transaction and displays its details on the entry fields
Fig 2.5 Bank Transactions dialog
2.
3.
Enter the necessary changes
Click Save on the dialog Toolbar
The UPDATE PROMPT message box is displayed
Fig 2.6 Update Alert
4.
Click Yes to save or No to reject saving the changes
Note the report on the Application Explorer Status
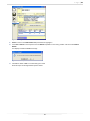
Deleting a Transaction
To delete an existing transaction:
1. Click on the transaction on the spreadsheet to select it
This highlights the transaction and displays its details on the entry fields
2. Press Del or Delete on the keyboard or click Delete on the dialog Toolbar or
The DELETE PROMPT message box is displayed
14
P a g e | 15
Fig 2.7 Delete Prompt
3.
Click Yes to delete or No to reject deleting the record
Note the report on the Application Explorer Status
Invoice Management Permission
Generally, employees are not permitted to delete records, especially sales records. CyberShop provides utilities to set the
permissions. The delete function for sales and invoicing is now customized to be operational until payment is made for an
invoice. This basically means that sales employees can initiate sales orders, add and remove items from such orders until
payment is made, after which, only administrative users with the right permissions can delete such orders.
It is very important to note that at this instance, the user is permitted to delete only those entries he/she made since
CyberShop monitors every entry made by each user.
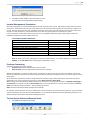
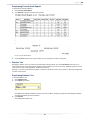
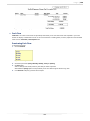
SALES AND INVOICING PERMISSIONS
Operation
Initiate Sales orders
Add items to sales orders before payment
Remove items from sales orders before payment
Add items to sales orders after payment
Remove items from sales orders after payment
Delete sales orders before payment
Delete sales orders after payment
Administrator/Admin_User
User
-
Table 2.0 Sales and Invoicing Permissions
Note: An Admin_User is the name given to a lower-level Administrator. To create an Admin_User, append the word
ADMIN_ to the User Name when creating Login credentials for a user.
Purchase Processing
CyberShop maintains two types of stocks:
Active Stock (The stock affected when sales are made)
Reserve Stock (The stock affected when purchases are entered)
Making sales depletes or reduces the Active stock. To replenish or add more stocks, purchases are entered. If the Active
stock is not exhausted, Purchases are stored on Reserve Stock (in batches according to entries), otherwise, they are sent to
Active Stock.
By this distinction, CyberShop maintains multiple batches of stock (by expiry dates especially for stocks that can expire).
CyberShop has an internal mechanism by which it moves Reserve Stock to Active Stock.
While making sales and CyberShop detects that there are no stocks to complete the transaction, (and before displaying a
no stock alert), it would do a check for Reserve Stock. If there are available stocks in reserve, it moves them to the Active
Stock and continues selling from there – without displaying the alert.
Note: This stock movement is done internally and in batches.
For example: if Active Stock for Item A is 2 and Reserve Stock is 15 and you want to sell 4 units of this item, you must sell the
2 (Active Stock) first, then proceed to sell the additional 2. In an attempt to make further sales CyberShop will move the 15
(Reserve Stock) to Active Stock and continue selling from there.
To view Active Stock and Reserve Stock
1.
Click Sales on the Application Toolbar
Fig 2.8 Application Toolbar
15
P a g e | 16
2.
This display the SALES ORDERS dialog as shown in Fig 2.9
Select a product from Products dropdown
Note the Active Stocks and Reserved Stocks values
Fig 2.9 Sales Orders dialog
Application Activation
CyberShop has become a brand name. Its use in Retail and Wholesale outlets is spreading very fast. For proper monitoring
and active support, every copy of CyberShop now comes with a 14 digit Life Activation Key. This means that whatever
source from which you acquired CyberShop (CD or online download), you must call for an Activation Key to activate your
copy.
Note that if not activated, CyberShop would run for about 65 days after which it must be activated.
Activating CyberShop
To Activate CyberShop
1.
Click the Help menu
Fig 2.10 Help Menu
2.
Select Application Activation
The Application Activation dialog is displayed
Fig 2.11 Application Activation
3.
Enter the 14 digit key correctly
The key is case sensitive
4. Click the Activate button when it becomes active
The ACTIVATION SUCCESS ALERT message is displayed
16
P a g e | 17
Fig 2.12 Activation Success Alert
To check if the Application is activated
1.
2.
Click the Help menu as shown in Fig 2.10
Select About CyberShop
Fig 2.13 About CyberShop dialog
17
P a g e | 18
Chapter 3
Getting Started with CyberShop
It is assumed that you have installed one of the versions of CyberShop. This book was actually designed for the Pro edition –
CyberShopPro, but just about everything explained in this book applies to the Ent edition – CyberShopEnt. Some of the
features of the Ent edition that are not supported by the Pro Edition concern item Location tools, which will be discussed in
the next edition of this book.
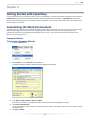
Customizing the Work Environment
CyberShop work environment also called the Application Explorer describes the view of your screen after a successful login.
Customizing the Application Explorer involves configuring certain display and functional settings required for the
operational convenience of the application depending on your choices. These include setting for the Company Name,
Backup, sales mark-up prices etc
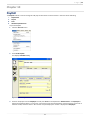
Company Defaults
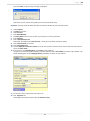
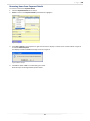
To Customize Company Defaults
1.
Click the Utilities menu
Fig 3.0 Utilities Menu
2.
Select Options or press Shift+F9 on the keyboard
The Options dialog is displayed with the Company Defaults tab selected
Fig 3.1 Options dialog Company Defaults tab
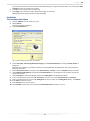
3.
Enter Name, Address, Phones, Emails and Moto
These are your Company’s information and they are the details that are displayed on invoices
4. Check Item Collection Date.
This is used in outlets where Customers are to pick up their Items at a later date, where the user is made to specify
a collection date.
5. Set Days To Collect
18
P a g e | 19
If you want the System to set the Collection Date automatically (i.e. regular collection date) , you must set the Days
To Collect in order to minimize error entries
6. Click OK to save changes and close the dialog
7. Click Apply if you still need to make additional changes on other tabs.
Clicking Apply saves changes without closing the dialog
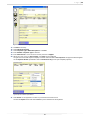
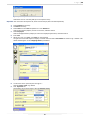
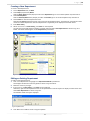
Set Values
To Customize Set Values
1.
2.
3.
Click the Utilities menu as shown in Fig 3.0
Select Options
The Options dialog is displayed
Click the Set Values tab
Fig 3.2 Options dialog Set Values tab with Receipt
4.
Check View Sales Summary By Product Grouping to view Income Statement summary by Group Names or
categories
These are your Company’s information and these are the details that will displayed on your invoices that are
printed for Customers
5. Check Auto Print Invoice to instantly send a Sales Invoice to a Printer as soon as Payment entries are saved.
6. Check Display Scrolling Banner to display the Company Name on a scrolling banner at the status part of the
Application Explorer.
7. Check Set Expiry to make CyberShop to monitor the Expiry Date of all registered products
8. Enter a number greater than zero on % Cost Price to set price mark-up for Unit Cost Price on Purchases
9. Enter a number greater than zero on % Selling Price to set price mark-up for Selling Price (Retail) on Products
10. Enter State for the home state
11. Enter Country for the home country
12. Select Receipt to print sales invoices with the POS Receipt Printer as shown in Fig 3.2
19
P a g e | 20
Fig 3.3 Options dialog Set Values tab with Invoice
13. Select Invoice to print sales invoices with the A4 size printer
14. Click OK to save changes and close the dialog
15. Click Apply if you still need to make additional changes on other tabs
Generally, clicking Apply saves changes without closing the dialog
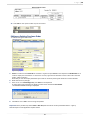
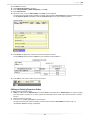
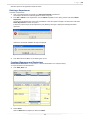
Entity
To Customize Entity
1.
2.
3.
Click the Utilities menu as shown in Fig 3.0
Select Options
The Options dialog is displayed
Click the Entity tab
Fig 3.4 Options dialog Entity tab
Set the values for the following:
Expiry Date
i. Check Allow Alert to display the Expiry Alert list at log in
ii. Enter Alert Period to set the number in days of the Expiry Alert
iii. Enter General Period to set the number in days of the Product Expiry Summary list
20
P a g e | 21
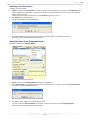
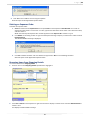
Birth Days
i. Check Allow Customer Alert to display the Birth Days Alert list at log in
Data Store Backup
i. Enter Default Drive to set the default drive letter for data backup storage
Be sure to confirm the default drive letter, preferably a removable drive
ii. Enter Default Name to set the default name for the backup
It can be any name
iii. Check Use Date to append the current date to the backup name
4.
Check Negative Stocks to allow negative quantities in stock
Generally, items cannot be sold without quantities However, if Negative Stocks is checked, CyberShop allows you to
sell items and automatically update the stocks later when the item purchases are entered.
5. Click OK to save changes and close the dialog
6. Click Apply if you still need to make additional changes on other tabs
Clicking Apply saves changes without closing the dialog
Display Settings
To Customize Display Settings
1.
2.
Click the Utilities menu as shown in Fig 3.0
Select Options
The Options dialog is displayed
Figure 3.5 Options dialog Display Settings tab
Pole Display Initial Information
i. Enter First Line to set the initial information displayed on the first line of the Customer Pole Display
ii. Enter Second Line to set the initial information displayed on the second line
This initial information – your company’s scrolling advert - is displayed when sales are not ongoing. During Sales,
the running total of current invoice is displayed on the Pole Display
Receipt Advert
i. Enter Information to set any information that you may want to display as an advert on the Sales Receipt
3. Click OK to save changes and close the dialog
4. Click Apply if you still need to make additional changes on other tabs.
Clicking Apply saves changes without closing the dialog.
21
P a g e | 22
Customer Information
CyberShop maintains two types of Customers:
Anonymous Customers
These are unregistered customers that patronize the sales outlet on and off basis. Note that anonymous customers
lack the capability for credit purchases. This means that Anonymous Customers cannot owe.
Named Customers
Named Customers are registered customers that have regular patronage at the sales outlet and have pre-defined
credit facility. CyberShop allows these Customers to owe and the debts can be monitored on the Debtors’ List
To process a customer:
1. Click the File menu
Fig 3.6 File Menu
2.
Select Customers Or Click Customers on the Application Toolbar
This displays the Customers dialog
Fig 3.7 Customers dialog
Creating a New Customer
To create a new Customer:
1. If a customer record is already selected then click New on the dialog Toolbar to reset the fields
2. Customer ID is generated by the system therefore, do not enter a value.
3. Enter Company Name to set the customer’s name
This can be the name of an individual or organization
4. Enter Contact Name, especially if Company Name in step 3 is an organization
5. Enter the Job Title of the contact
6. Enter the Address
7. Set Date of Birth for the Customer in order to have the customer’s name displayed on the Customer Date of Birth
alert list on that day.
22
P a g e | 23
What is important on the Date of Birth are the Day and Month
8. Select the State and Country
9. Enter Telephone and Email
10. Click Save on the dialog Toolbar to save the record.
If entries are made correctly, the record is saved
Note the report on the Application Explorer Status
Editing an Existing Customer
To edit an existing Customer:
1. Select a customer name from the Customer ID list and press Enter on the keyboard or Double Click on a customer
name to display the customer’s detail.
Make sure that only the Customer’s number appears on the Customer ID as shown in Fig 3.8
Fig 3.8 Customers dialog
2.
3.
Make or enter the necessary changes
Click Save on the dialog Toolbar
The UPDATE PROMPT message is displayed
Fig 3.9 Update Prompt
4.
Click Yes to save or No to cancel saving the changes
Note the report on the Application Explorer Status
Deleting a Customer
To Delete a Customer record:
1. Select a customer name from the Customer ID list and press Enter on the keyboard or Double Click on a customer
name to display the customer’s detail.
Make sure that only the Customer’s number appears on the Customer ID as shown above in Fig 3.8
2. Click Delete on the dialog Toolbar
The DELETE PROMPT message is displayed
23
P a g e | 24
Fig 3.10 Delete Prompt
3.
Click Yes to delete or No to cancel deleting the record
Note the report on the Application Explorer Status
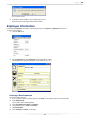
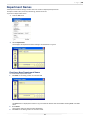
Supplier Information
In CyberShop, all Suppliers must be registered. This is necessary to create and store Purchase Invoices and also to monitor
and track Creditors and their accounts on the Creditors’ List
To process a supplier:
1. Click the File menu
Fig 3.11 File Menu
2.
Select Suppliers Or Click Suppliers on the Application Toolbar
This displays the Customers dialog as shown below in Fig 3.12
Fig 3.12 Supplier dialog
Creating a New Supplier
To create a new Supplier:
1. If a Supplier record is already selected then click New on the dialog Toolbar to reset the fields
2. Supplier ID is generated by the system therefore, do not enter a value.
3. Enter Company Name to set the Supplier’s name
This can be the name of an individual or organization
24
P a g e | 25
4.
5.
6.
7.
8.
Enter Representative especially if Company Name is an organization
Enter the Address
Select the State and Country
Enter Contact Telephone and Email
Click Save on the dialog Toolbar to save the record.
If entries are made correctly, the record is saved
Note the report on the Application Explorer Status
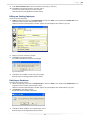
Editing an Existing Supplier
To edit an existing Supplier:
1. Select a Supplier name from the Supplier ID list and press Enter on the keyboard or Double Click on a Supplier
name to display the Supplier’s detail.
Make sure that only the Supplier’s number appears on the Supplier ID as shown in Fig 3.10
Fig 3.13 Suppliers dialog
2.
3.
Make or enter the necessary changes
Click Save on the dialog Toolbar
The UPDATE PROMPT message is displayed.
Fig 3.14 Update Prompt
4.
Click Yes to save or No to cancel saving the changes
Note the report on the Application Explorer Status
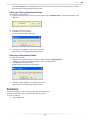
Deleting a Supplier
To Delete a Supplier record:
1. Select a Supplier name from the Supplier ID list and press Enter on the keyboard or Double Click on a Supplier
name to display the Supplier’s detail.
Make sure that only the Supplier’s number appears on the Supplier ID as shown above in Fig 3.13
2. Click Delete on the dialog Toolbar
The DELETE PROMPT message box is displayed
25
P a g e | 26
Fig 3.15 Delete Prompt
3.
Click Yes to delete or No to cancel deleting the record
Note the report on the Application Explorer Status
Employee Information
In CyberShop, Employee information is generally necessary for Payroll and Expenses transactions
To process an Employee:
1. Click the File menu
Fig 3.16 File Menu
2.
Select Employees Or Click Employees on the Application Toolbar
This displays the Employees dialog as shown above in Fig 3.17
Fig 3.17 Employee dialog
Creating a New Employee
To create a new Employee:
3. If an Employee record is already selected, click New on the dialog Toolbar to reset the fields
4. Enter Employee ID.
This must be unique (no duplicates)
5. Enter First Name, Last Name and Address
6. Select Sex or gender, State and Country
7. Set Date Of Birth
8. Enter Phone(s) and Email, if necessary
26
P a g e | 27
9. Enter Account Number (Bank Account Number for payslip), if necessary
10. Click Save on the dialog Toolbar to save the record.
If entries are made correctly, the record is saved
Note the report on the Application Explorer Status
Editing an Existing Employee
To edit an existing Employee:
1. Select an Employee name from the Employee ID list and press Enter on the keyboard or Double Click on an
Employee name to display the Employee’s detail.
Make sure that only the Employee’s number appears on the Employee ID as shown in Fig 3.18
Fig 3.18 Employee dialog
2.
3.
Make or enter the necessary changes
Click Save on the dialog Toolbar
The UPDATE PROMPT message box is displayed
Fig 3.19 Update Alert
4.
Click Yes to save or No to cancel saving the changes
Note the report on the Application Explorer Status
Deleting an Employee
To Delete an Employee record:
1. Select an Employee name from the Employee ID list and press Enter on the keyboard or Double Click on an
Employee name to display the Employee’s detail.
Make sure that only the Employee’s number appears on the Employee ID as shown above in Fig 3.18
2. Click Delete on the dialog Toolbar
The DELETE ALERT message is displayed
Fig 3.20 Delete Alert
3.
Click Yes to delete or No to cancel deleting the record
Note the report on the Application Explorer Status
27
P a g e | 28
Department Names
The Department Names dialog is used to store the names of Employee Departments.
Examples include: Sales, Accounts, Marketing, and Personnel etc.
To process a Department Name:
1. Click the File menu
Fig 3.21 File Menu
2.
Select Departments
This displays the Department Names dialog as shown below in Fig 3.22
Fig 3.22 Department Names dialog
Creating a New Department Name
To create a new Department Name:
1. Click New on the dialog Toolbar to reset the field
Fig 3.23 Department Names dialog
2.
3.
The Save button is displayed as shown in Fig 3.23. Note the buttons that are disabled. Clicking Save re-enables
them.
Enter Name.
This must be unique (it does not allow duplicates)
Click Save on the dialog Toolbar to save the record.
28
P a g e | 29
Note that the New button is displayed as shown in Fig 3.22. If entries are made correctly, the record is saved
Note the report on the Application Explorer Status
Editing an Existing Department Name
To edit an existing Department:
1. Navigate to the department that you want to edit through the Navigation Bar. For further information, go to
Appendix A
Fig 3.24 Navigation Bar
2.
3.
Enter the necessary changes
Click Edit on the dialog Toolbar
The EDIT ALERT message is displayed
Fig 3.25 Edit Alert
4.
Click Yes to save or No to cancel saving the changes
Note the report on the Application Explorer Status
Deleting an Department Name
To Delete a Department:
1. Navigate to the department that you want to delete through the Navigation Bar
As shown in Fig 3.24. For further information on this, go to Appendix A
2. Click Delete on the dialog Toolbar
The DELETE ALERT message box is displayed
Fig 3.26 Delete Alert
3.
Click Yes to delete or No to cancel deleting the record
Note the report on the Application Explorer Status
Positions
The Positions dialog is used to store the names of Employee Positions.
Examples include: Sales Rep, Accountant, Manager, Director etc.
To process a Position:
1. Click the File menu
29
P a g e | 30
Fig 3.27 File Menu
2.
Select Positions
This displays the Positions dialog as shown below in Fig 3.27
Fig 3.28 Positions dialog
Creating a New Position
To create a new Position:
1. Click New on the dialog Toolbar to reset the entry field
Fig 3.29 Positions dialog
The Save button is displayed as shown in Fig 3.29. Note the buttons that are disabled. Clicking Save re-enables
them.
2. Enter Position.
This must be unique (it does not allow duplicates)
3. Click Save on the dialog Toolbar to save the record.
Note that the New button is displayed as shown in Fig 3.28. If entries are made correctly, the record is saved
Note the report on the Application Explorer Status
Editing an Existing Position
To edit an existing Position:
1. Navigate to the Position that you want to edit through the Navigation Bar. For further information on this, go to
Appendix A
30
P a g e | 31
Fig 3.30 Navigation Bar
2.
3.
Enter the necessary changes
Click Edit on the dialog Toolbar
The EDIT ALERT message is displayed
Fig 3.31 Edit Alert
4.
Click Yes to save or No to cancel saving the changes
Note the report on the Application Explorer Status
Deleting a Position
To Delete a Position:
1. Navigate to the Position that you want to delete through the Navigation Bar as shown in Fig 3.30. For further
information on this, go to Appendix A
2. Click Delete on the dialog Toolbar
The DELETE ALERT message is displayed
Fig 3.32 Delete Alert
3.
Click Yes to delete or No to cancel deleting the record
Note the report on the Application Explorer Status
Product Group Names
The Group Names dialog is used to store the names of Product groupings or categories.
To process a Group Name:
1. Click the File menu
Fig 3.33 File Menu
2.
Select Product Group Names
This displays the Group Names dialog as shown below in Fig 3.34
31
P a g e | 32
Fig 3.34 Group Names dialog
Creating a New Group Name
To create a new Group Name:
1. Click New on the dialog Toolbar to reset the entry field
Fig 3.35 Group Names dialog
The Save button is displayed as shown in Fig 3.35. Note the buttons that are disabled. Clicking Save re-enables
them.
2. Enter Name.
This must be unique (it does not allow duplicates)
3. Click Save on the dialog Toolbar to save the record.
Note that the New button is displayed as shown in Fig 3.34. If entries are made correctly, the record is saved
Note the report on the Application Explorer Status
Editing an Existing Group Name
To edit an existing Group Name:
1. Navigate to the Group Name that you want to edit through the Navigation Bar. For further information on this, go
to Appendix A
Fig 3.36 Navigation Bar
2.
3.
Enter the necessary changes
Click Edit on the dialog Toolbar
The EDIT ALERT message is displayed
Fig 3.37 Edit Alert
4.
Click Yes to save or No to cancel saving the changes
Note the report on the Application Explorer Status
32
P a g e | 33
Deleting a Group Name
To Delete a Group name:
1. Navigate to the Group name that you want to delete through the Navigation Bar as shown in Fig 3.36. For further
information on this, go to Appendix A.
2. Click Delete on the dialog Toolbar
The DELETE ALERT message is displayed
Fig 3.38 Delete Alert
3.
Click Yes to delete or No to cancel deleting the record
Note the report on the Application Explorer Status
States
The States dialog is used to store and manage the names of States in CyberShop.
To process a State:
1. Click the File menu
Fig 3.39 File Menu
2.
Select States
This displays the States dialog as shown below in Fig 3.40
Fig 3.40 States dialog
Creating a New State
To create a new State:
1. Click New on the dialog Toolbar to reset the entry field
33
P a g e | 34
Fig 3.41 States dialog
The Save button is displayed as shown in Fig 3.41. Note the buttons that are disabled. Clicking Save re-enables
them.
2. Enter Name.
This must be unique (it does not allow duplicates)
3. Click Save on the dialog Toolbar to save the record.
Note that the New button is displayed as shown in Fig 3.40. If entries are made correctly, the record is saved
Note the report on the Application Explorer Status
Editing an Existing State
To edit an existing State:
1. Navigate to the State that you want to edit through the Navigation Bar. For further information on this, go to
Appendix A
Fig 3.42 Navigation Bar
2.
3.
Enter the necessary changes
Click Edit on the dialog Toolbar
The EDIT ALERT message is displayed
Fig 3.43 Edit Alert
4.
Click Yes to save or No to cancel saving the changes
Note the report on the Application Explorer Status
Deleting a State
To Delete a State:
1. Navigate to the State that you want to delete through the Navigation Bar as shown in fig 3.42. For further
information on this, go to Appendix A
2. Click Delete on the dialog Toolbar
The DELETE ALERT message is displayed
Fig 3.44 Delete Alert
34
P a g e | 35
3.
Click Yes to delete or No to cancel deleting the record
Note the report on the Application Explorer Status
Countries
The Countries dialog is used to store and manage the names of Countries in CyberShop.
To process a Country:
1. Click the File menu
Fig 3.45 File Menu
2.
Select Countries
This displays the Countries dialog as shown below in Fig 3.46
Fig 3.46 Countries dialog
Creating a New Country
To create a new Country:
1. Click New on the dialog Toolbar to reset the entry field
Fig 3.47 Countries dialog
The Save button is displayed as shown in Fig 3.47. Note the buttons that are disabled. Clicking Save re-enables
them.
2. Enter Name.
This must be unique (it does not allow duplicates)
3. Click Save on the dialog Toolbar to save the record.
Note that the New button is displayed as shown in Fig 3.47. If entries are made correctly, the record is saved
Note the report on the Application Explorer Status
35
P a g e | 36
Editing an Existing Country
To edit an existing Country:
1. Navigate to the Country that you want to edit through the Navigation Bar. For further information on this, go to
Appendix A
Fig 3.48 Navigation Bar
2.
3.
Enter the necessary changes
Click Edit on the dialog Toolbar
The EDIT ALERT message is displayed
Fig 3.49 Edit Alert
4.
Click Yes to save or No to cancel saving the changes
Note the report on the Application Explorer Status
Deleting a Country
To Delete a Country:
1. Navigate to the Country that you want to delete through the Navigation Bar as shown in fig 3.48. For further
information on this, go to Appendix A
2. Click Delete on the dialog Toolbar
The DELETE ALERT message is displayed
Fig 3.50 Delete Alert
3.
Click Yes to delete or No to cancel deleting the record
Note the report on the Application Explorer Status
Banks
The Banks dialog is used to store and manage the names of Banks in CyberShop.
To process a Bank:
1. Click the Accounts menu
36
P a g e | 37
Fig 3.51 Accounts Menu
2.
Select Banks
This displays the Banks dialog as shown below in Fig 3.52
Fig 3.52 Banks dialog
Creating a New Bank
To create a new Bank:
1. Click New on the dialog Toolbar to reset the entry field
Fig 3.53 Banks dialog
The Save button is displayed as shown in Fig 3.49. Note the buttons that are disabled. Clicking Save re-enables
them.
2. Enter Name.
This must be unique (it does not allow duplicates)
3. Click Save on the dialog Toolbar to save the record.
Note that the New button is displayed as shown in Fig 3.52. If entries are made correctly, the record is saved
Note the report on the Application Explorer Status
Editing an Existing Bank
To edit an existing Bank:
1. Navigate to the Bank that you want to edit through the Navigation Bar. For further information on this, go to
Appendix A
Fig 3.54 Navigation Bar
37
P a g e | 38
2.
3.
Enter the necessary changes
Click Edit on the dialog Toolbar
The EDIT ALERT message is displayed
Fig 3.55 Edit Alert
4.
Click Yes to save or No to cancel saving the changes
Note the report on the Application Explorer Status
Deleting a Bank
To Delete a Bank:
1. Navigate to the Bank that you want to delete through the Navigation Bar as shown in Fig 3.54
2. Click Delete on the dialog Toolbar
The DELETE ALERT message is displayed
Fig 3.56 Delete Alert
3.
Click Yes to delete or No to cancel deleting the record
Note the report on the Application Explorer Status
Percent Names
The Percent Names dialog is used to store the names of Payroll Percent Allowances and Deductions.
To process a Percent Name:
1. Click the Accounts menu
Fig 3.57 Accounts Menu
2.
Select Percent Names
This displays the Percent Names dialog as shown below in Fig 3.58
38
P a g e | 39
Fig 3.58 Percent Names dialog
Creating a New Percent Name
To create a new Percent Name:
1. Click New on the dialog Toolbar to reset the entry field
Fig 3.59 Percent Names dialog
The Save button is displayed as shown in Fig 3.59. Note the buttons that are disabled. Clicking Save re-enables
them.
2. Enter Name.
This must be unique (it does not allow duplicates)
3. Click Save on the dialog Toolbar to save the record.
Note that the New button is displayed as shown in Fig 3.58. If entries are made correctly, the record is saved
Note the report on the Application Explorer Status
Editing an Existing Percent Name
To edit an existing Percent Name:
1. Navigate to the Percent Name that you want to edit through the Navigation Bar. For further information on this,
go to Appendix A
Fig 3.60 Navigation Bar
2.
3.
Enter the necessary changes
Click Edit on the dialog Toolbar
The EDIT ALERT message box is displayed
Fig 3.61 Edit Alert
4.
Click Yes to save or No to cancel saving the changes
Note the report on the Application Explorer Status
39
P a g e | 40
Deleting a Percent Name
To Delete a Percent name:
1. Navigate to the Percent name that you want to delete through the Navigation Bar as shown in fig 3.61
2. Click Delete on the dialog Toolbar
The DELETE ALERT message is displayed
Fig 3.62 Delete Alert
3.
Click Yes to delete or No to cancel deleting the record
Note the report on the Application Explorer Status
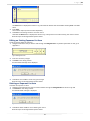
Expenses List
The Expenses List dialog is used to store and manage a list of expenses items in CyberShop.
To process a Expenses List:
1. Click the Accounts menu
Fig 3.63 Accounts Menu
2.
Select Percent Names
This displays the Percent Names dialog as shown below in Fig 3.64
Fig 3.64 Expenses List dialog
Creating a New Expenses List Item
To create a new Expenses List Item:
1. Click New on the dialog Toolbar to reset the entry field
40
P a g e | 41
Fig 3.65 Expenses List dialog
The Save button is displayed as shown in Fig 3.65. Note the buttons that are disabled. Clicking Save re-enables
them.
2. Enter Item.
This must be unique (it does not allow duplicates)
3. Click Save on the dialog Toolbar to save the record.
Note that the New button is displayed as shown in Fig 3.64. If entries are made correctly, the record is saved
Note the report on the Application Explorer Status
Editing an Existing Expenses List Item
To edit an existing Expenses List Item:
1. Navigate to the Item that you want to edit through the Navigation Bar. For further information on this, go to
Appendix A
Fig 3.66 Navigation Bar
2.
3.
Enter the necessary changes
Click Edit on the dialog Toolbar
The EDIT ALERT message box is displayed
Fig 3.67 Edit Alert
4.
Click Yes to save or No to cancel saving the changes
Note the report on the Application Explorer Status
Deleting an Expenses List Item
To Delete an Expenses List Item:
1. Navigate to the Expenses List that you want to delete through the Navigation Bar as shown in Fig 3.66
2. Click Delete on the dialog Toolbar
The DELETE ALERT message is displayed
Fig 3.68 Delete Alert
3.
Click Yes to delete or No to cancel deleting the record
Note the report on the Application Explorer Status
41
P a g e | 42
Chapter 4
Stocking
Stocking is the process of collating the details of your stocks and loading them into CyberShop with important
details such as the Name, Retail Price, Wholesale Price if necessary, Quantity, Cost Price etc.
There are two types of stocking:
Electronic Stocking
Manual Stocking
Electronic Stocking
Refer to Importing Stocks from External Sources in Chapter 2
Manual Stocking
With manual stocking, commonly used, Product stocks are entered directly into CyberShop. The processes involved in
manual stocking include the following:
i.
ii.
iii.
Creating a new Product
Editing an existing Product
Deleting a Product
To process a product:
1. Click the File menu
Fig 4.0 File Menu
2.
Select Products
Or press Ctrl + F2 on the keyboard or click Products on the Application Toolbar to display the PRODUCTS
(STOCK) dialog as shown in Fig 4.2
Fig 4.1 Application Toolbar
42
P a g e | 43
Fig 4.2 Products (Stock) dialog
Creating a new Product
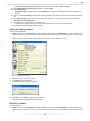
To create a new Product:
1. If a product is selected, click New on the dialog Toolbar otherwise, go to step 2 below
If you click New, the Input Prompt message is displayed
Fig 4.3 Input Prompt
Click Yes to register a new product
2.
Enter the Product ID
The Product ID is a unique number used to identify each product. It can be a Barcode, NAFDAC number or any
series of uniquely generated numbers. It can also be alphanumeric. Please, avoid the use of special characters
such as these (. , / \ * ’ { [ ] } etc).
3. Enter the Product Name
The Product Name must be unique and should not be too long especially if you are using the POS printer. The
Product Name is important for Product Tracking in terms of which Customer bought an item and which
Supplier supplied the item.
4. Select a Group Name
Group Names are used to categorize the products. E.g. Antibiotics, Antacids, Analgesics etc
5. Enter Batch Number
The Batch Number is very important for Product Tracking in terms of which Customer bought an item and
which Supplier supplied the item.
6. Set Expiry Date
It’s very important to set the Expiry Date accurately for stocks that could expire. That way CyberShop is able to
track and promptly alert users of the expiry dates of their stocks
7. Enter the Unit of Measurement
This is optional
8. Enter Selling Price and Cost Price
These are important entries for CyberShop to display the marginal Profit in the Income Statement Summary
reports
9. Enter Quantity by the smallest unit of sales
Click the Quantity button (ellipsis) to reset the quantities of all products in stock to zero. This may be necessary
when recounting Stocks, which is generally done at regular intervals
10. Select Sales Type
43
P a g e | 44
The default Sales Type is Unit. Select Pack for stocks that are sold both in units and packs
11. Enter Quantity Per Pack if Sales Type selected in step 10 is Pack.
12. Enter Reorder Level
The Reorder Level is used to determine the Quantity the stock gets to, for a Reorder Alert to be displayed to
the user.
13. Check or uncheck User Expiry to determine whether CyberShop should look up the expiry date of the product or
not.
14. Check Discontinued for a product that is no longer available for sale. That way, the Product is not available on
Sales Orders and Purchase Orders.
15. Click Save on the dialog Toolbar to save the record.
If all entries are made correctly, the record is saved and its name appears in the Product ID list
Note the report on the Application Explorer Status
Editing an Existing Product
To edit an existing Product:
1. Select an Item from the Product ID list and press Enter on the keyboard or Double Click on an Item to display the
product details. To search for an Item, type the first few letters of the Item until it becomes visible, and then select
it.
Make sure that only the Product Number appears on the Product ID as shown in Fig 4.4
Figure 4.4 Product (Stock) dialog
2.
3.
Make or enter the necessary changes
Click Save on the dialog Toolbar
The UPDATE ALERT message is displayed
Fig 4.5 Update Alert
4.
Click Yes to save or No to cancel saving the Updates
Note the report on the Application Explorer Status
Deleting a Product
To Delete a Product:
1. Select an Item from the Product ID list and press Enter on the keyboard or Double Click on an Item to display the
product details. To search for an Item, type the first few letters of the Item until it becomes visible, and then select
it.
44
P a g e | 45
2.
Make sure that only the Product Number appears on the Product ID as shown in Figure 4.4
Click Delete on the dialog Toolbar
The DELETE ALERT message box is displayed
Fig 4.6 Delete Alert
3.
Click Yes to delete or No to cancel deleting the record
Note the report on the Application Explorer Status
Previewing Product Stock List
To preview the Product Stock list Press F10 on the keyboard
Fig 4.7 Product Stock List
Printing Product Stock List
To print the Product list, click the Print button on the report Toolbar
Fig 4.8 Report Toolbar
45
P a g e | 46
Chapter 5
Sales
CyberShop offers very simple and user-friendly processes with which you can carry out sales transactions. These
transactions generate Sales Invoices and Receipts after payments are entered. Units of items sold are automatically
removed from stock (Active Stock). That way, CyberShop maintains an active status of the current stock of each item.
To process a Sales Order:
1. Click Accounts menu
Fig 5.0 Accounts Menu
2.
Select Sales Orders
Or press Ctrl + F1 or click Sales on the Application Toolbar
Fig 5.1 Application Toolbar
This displays the SALES ORDERS dialog
Fig 5.2 Sales Orders dialog
Important: To attend to multiple Customers at the same time, repeat step 2 as many times, as shown in Fig 5.3
46
P a g e | 47
Fig 5.3 Multiple Sales Points
Creating a New Sales Order
To create a new Sales Order:
1. If a Sales Order or Invoice is selected, click New on the dialog Toolbar else go to step 2 below
If you click New, an Input Prompt message is displayed
Fig 5.4 Input Prompt
Click Yes to clear or reset all the entry fields for a new Sales Order entry
Important: Order ID (Invoice Number) is system or auto generated, so do not enter it
2.
Select Customer if it’s an order for a named customer
Using Barcode Scanner
3.
Be sure that the cursor is on ID on the Sales Details tab, then scan the product
This fetches the product details such as Product Name and Selling Price
Using Product Name
4.
5.
Select a product from the Product list of the Sales Details tab
This fetches the product details such as Product ID and Selling Price as well
Select Qty to enter the quantity (units) of items ordered by the customer.
Alternatively, enter the quantity and press Enter on the keyboard to add an item to the Invoice. The item and the
details of the transaction appear on the Sales Details spread sheet. With each item added, Note the Invoice Total
Fig 5.5 Invoice Total
6.
To add more items repeat steps 3 through to 5 as shown Fig 5.6 below.
47
P a g e | 48
Fig 5.6 Sales Orders dialog
7.
Select Payment Details
This displays the tab with the payment details. Note the Amount To Pay
Fig 5.7 Sales Orders dialog
8. Select Mode Of Payment
9. Enter Cheque Number if Mode Of Payment is not Cash
10. Enter Discount Amount if required
To enter Discount Amount in percentage
Click the Discount Amount button (ellipsis).
This displays the DISCOUNT RATE dialog.
Fig 5.8 Discount Rate Dialog
48
P a g e | 49
Enter the Percent Discount Rate (numeric)
Click OK.
The Discount Amount is calculated and displayed.
11. Enter Amount Paid. This is the exact amount paid by the Customer
Note the value on the Change (the balance amount to return to the Customer)
12. While the cursor is still on Amount Paid, press Enter on the keyboard
Fig 5.9 Context menu
Or right-click on the tab surface to display a context menu and select Save Payment. The payment details appear
on the Payment Details spreadsheet. Note the Amount To Pay (set to 0 for complete payment)
Fig 5.10 Payment Details spreadsheet
If Auto Print Invoice is on (do this in the Set Values section in Chapter 3), the Invoice is instantly sent to the
printer. Otherwise, a preview of the invoice is displayed.
Fig 5.11 Sales Invoice
13. Click Print on the report Toolbar to print the Invoice
Fig 5.12 Report Toolbar
49
P a g e | 50
Editing an Existing Sales Order
To edit an existing Sales Order:
1. Select an order from the Order ID list and press Enter on the keyboard or Double Click on an order to display the
order details. To search for an order, type the first few letters of the order until it becomes visible, and then select
it to display the details of the order.
Make sure that only the order ID appears on the Order ID as shown in Fig 5.13
Fig 5.13 Sales Orders dialog
2.
3.
Make the necessary changes
Note that you can only make changes to Customer and Date on a sales order. But you can remove or add items to
Sales Details and Payment Details
Click Save on the dialog Toolbar
The UPDATE ALERT message is displayed
Fig 5.14 Update Alert
4.
Click Yes to save or No to cancel saving the Updates
Note the report on the Application Explorer Status
Deleting a Sales Order
To Delete a Sales Order:
1. Select an order from the Order ID list and press Enter on the keyboard or Double Click on an order to display the
order details. To search for an order, type the first few letters of the order until it becomes visible, and then select
it to display the details of the order.
Make sure that only the order ID appears on the Order ID as shown in Fig 5.13
1. Click Delete on the dialog Toolbar
The DELETE PROMPT message is displayed
50
P a g e | 51
Fig 5.15 Delete Prompt
2.
Click Yes to delete the Order and all its details (items are restocked) and payments or No to cancel deleting the
Order.
You need the appropriate Permissions to carry out this operation.
Note the report on the Application Explorer Status
Removing Items from Sales Details
To remove an item from Sales Details
Fig 5.16 Shopping Details Spreadsheet
1
2
Select an item on the Shopping Details spreadsheet to highlight it.
Press Del or Delete on the keyboard or right-click the item to display a context menu and select Delete Details
This displays a DELETE PROMPT message
Fig 5.17 Delete Prompt
3.
Click Yes to delete or No to cancel deleting the record
You must remove all Payment Details on the Order in order to remove items from the Shopping Details.
Note the report on the Application Explorer Status
Important: Any item that is removed from Shopping Details is automatically returned to its Stock
Removing Items from Payment Details
To remove an item from Payment Details
51
P a g e | 52
Fig 5.18 Payment Details spreadsheet
1.
2.
3.
Click the Payment Details tab to select it
Select an item on the Payment Details spreadsheet to highlight it.
Press Del or Delete on the keyboard or right-click the item to display a context menu and select Delete Payment
This displays a DELETE PROMPT message
Fig 5.19 Delete Prompt
4.
Click Yes to delete or No to cancel deleting the record
You must remove all Payment Details in order to add or remove items from the Sales Order.
Note the report on the Application Explorer Status
52
P a g e | 53
Chapter 6
Purchase
Just as Sales transactions remove items from stocks (Active Stock), Purchase transactions are used to add items to stocks
(Active or Reserved Stock as case may be) and also to store purchase invoices.
To process a Purchase Order:
1. Click the Accounts menu
Fig 6.0 Accounts Menu
2.
Select Purchase Orders
Or click Purchases on the Application Toolbar to display the PURCHASE ORDERS dialog
Fig 6.1 Application Toolbar
Creating a New Purchase Order
To create a new Purchase Order:
1. If a Purchase Order or Invoice is selected, click New on the dialog Toolbar to clear all fields else go to step 2
below
Fig 6.2 Purchase Orders dialog
53
P a g e | 54
If you click New, an Input Prompt message is displayed
Fig 6.3 Input Prompt
Click Yes to clear or reset all entry fields for a new Purchase Order entry
Important: You must enter the Order ID which is the Invoice Number on your Purchase Invoice
2.
3.
4.
5.
6.
7.
8.
Select Supplier
Set Date if necessary.
Select Product
Enter Batch Number
Set Expiry Date which is set to the date a year from the current system date
Enter Quantity
Enter Total Quantity Price
Notice that, this displays the Unit Cost Price – which you may choose to keep or modify
9. Enter Unit Cost Price if necessary
10. Enter Unit Selling Price
11. Uncheck Apply Current Prices To Stock if you do not want the new prices to be used to overwrite the old stock
prices (in Active Stock)
12. If the cursor is on Unit Selling Price, press Enter on the keyboard
Or right-click on the tab surface to display a context menu and select Save Details as shown in Fig 6.9 below. The
details should appear on the Shopping Details spreadsheet as shown in Fig 6.4 below
Fig 6.4 Shopping Details Spreadsheet
13. To add more items, repeat steps 4 through to 12
14. Click Payments tab
This displays the payment details. Note the Amount To Pay
54
P a g e | 55
Fig 6.5 Purchase Orders dialog
15.
16.
17.
18.
19.
20.
Set Date if necessary
Select Mode Of Payment
Select Payment Type if Mode Of Payment is not Cash
Enter Number if Payment Type is selected
Enter Amount Paid. This is the exact amount paid to the Supplier
While the cursor is still on Amount Paid, press Enter on the keyboard
Or right-click on the tab surface to display a context menu and select Save Payment. The payment details appear
on the Payment Details spreadsheet. Note the Amount To Pay (set to 0 for complete payment)
Fig 6.6 Payment Details Spreadsheet
21. Click Invoice on the Application Toolbar to preview the Purchase Invoice.
Or Click the Reports menu and select Invoice or press F6 button on the keyboard
55
P a g e | 56
Fig 6.7 Purchase Invoice
22. Click Print on the report Toolbar to print the Invoice
Fig 6.8 Report Toolbar
Editing an Existing Purchase Order
To edit an existing Purchase Order:
Fig 6.9 Shopping Details Spreadsheet
5.
6.
7.
Select an order from the Order ID list as shown in Fig 6.5 and press Enter on the keyboard or Double Click on an
order to display the order details. To search for an order, type the first few letters of the order until it becomes
visible, and then select it.
Note that you can also display the details of an Order or Invoice by entering the Order ID or Invoice Number
Make the necessary changes.
If the cursor is on Unit Selling Price, press Enter on the keyboard
Or right-click on the tab surface to display a context menu and select Save Details.
The UPDATE PROMPT message is displayed
Fig 6.10 Update Prompt
8.
Click Yes to save or No to cancel saving the Updates
Important: Edit is possible only when Status is Not Sent (the last column on the spreadsheet above – Fig 6.9)
Note the report on the Application Explorer Status
56
P a g e | 57
Deleting a Purchase Order
To Delete a Purchase Order:
1. Select an order from the Order ID list as shown in Fig 6.5 and press Enter on the keyboard or Double Click on an
order to display the order details. To search for an order, type the first few letters of the order until it becomes
visible, and then select it.
Make sure that only the order ID appears on the Order ID as shown in Fig 6.5
2. Click Delete on the dialog Toolbar
The DELETE PROMPT message is displayed
Fig 6.11 Delete Prompt
3.
Click Yes to delete the Order and all its details and payments or No to cancel deleting the Order
Note the report on the Application Explorer Status
Removing Items from Shopping Details
To remove an item from Shopping Details
Fig 6.12 Shopping Details Spreadsheet
3
4
Select an item on the Shopping Details spreadsheet to highlight it.
Press Del or Delete on the keyboard or right-click the item to display a context menu and select Delete Details
This displays a DELETE PROMPT message
Fig 6.13 Delete Prompt
5.
Click Yes to delete or No to cancel deleting the record
You must remove all Payment Details on the Order in order remove items from the Shopping Details.
Note the report on the Application Explorer Status
57
P a g e | 58
Removing Items from Payment Details
To remove an item from Payment Details
1. Click the Payment Details tab to select it
2. Select an item on the Payment Details spreadsheet to highlight it.
Fig 6.14 Payment Details Spreadsheet
3.
Press Del or Delete on the keyboard or right-click the item to display a context menu as shown above in Fig 6.14
and select Delete Payment
This displays a DELETE PROMPT message as shown in Fig 6.15
Fig 6.15 Delete Prompt
4.
Click Yes to delete or No to cancel deleting the record.
Note the report on the Application Explorer Status
58
P a g e | 59
Chapter 7
Expenses
Expenses are made on a daily basis. CyberShop offers utilities with which you can enter and manage all your expenses.
To process an Expenses Order:
1. Click the Accounts menu
Fig 7.0 Accounts Menu
2.
Select Expenses…
Or click Expenses on the Application Toolbar to display the EXPENSES dialog
Fig 7.1 Application Toolbar
Fig 7.2 Expenses dialog
Creating a new Expenses Order
To create a new Expenses Order:
1. If an Expenses Order is selected, click New on the dialog Toolbar to clear all entry fields else go to step 2 below
If you click New, an Input Prompt message is displayed
59
P a g e | 60
Fig 7.3 Input Prompt
Click Yes to clear or reset the fields for a new Expenses entry
Important: You must enter the Expenses ID, which must be unique (does not allow duplicates)
2.
3.
4.
5.
6.
7.
Select Supplier if necessary
Set Date if necessary.
Select Item from the Item dropdown list on the Details tab
Click the Item button (ellipsis) to enter a new item, and then select it
Select Employee
Click the Employee button (ellipsis) to enter new employee information, and then select it
Enter Cost
While the cursor is on Cost, press Enter on the keyboard
Or right-click on the tab surface to display a context menu and select Save Details as shown in Fig 7.4 below. The
details should appear on the Shopping Details spreadsheet
Fig 7.4 Expenses dialog
8.
9.
To add more items repeat steps 4 through to 7
Note the Invoice Total. E.g. 300.00
Click Payments tab
This displays the payment details. Note the Amount To Pay
Fig 7.5 Payments Tab
60
P a g e | 61
10.
11.
12.
13.
14.
Set Date if necessary
Select Mode Of Payment if necessary
Enter Cheque Number if Mode Of Payment is not Cash
Enter Amount Paid.
While the cursor is still on Amount Paid, press Enter on the keyboard
Or right-click on the tab surface to display a context menu and select Save Payment. The payment details appear
on the Payment Details spreadsheet. Note the Amount To Pay (set to 0 for complete payment)
Fig 7.6 Payment Details Spreadsheet
15. Click Invoice on Application Toolbar to preview the Expenses Invoice.
Or Click Reports menu and select Invoice or press F6 button on the keyboard
Fig 7.7 Expenses Invoice
16. Click Print on the report Toolbar to print the Invoice
Fig 7.8 Report Toolbar
Editing an Existing Expenses Order
To edit an existing Expenses Order:
1. Select an order from the Expenses ID list and press Enter on the keyboard or Double Click on an order to display
the order details. To search for an order, type the first few letters of the order until it becomes visible, and then
select it.
2. Make the necessary changes.
3. If the cursor is on Cost, press Enter on the keyboard
Or right-click on the tab surface to display a context menu and select Save Details as shown in Fig 7.4.
The UPDATE PROMPT message is displayed
61
P a g e | 62
Fig 7.9 Update Prompt
4.
Click Yes to save or No to cancel saving the Updates
Note the report on the Application Explorer Status
Deleting an Expenses Order
To Delete an Expenses Order:
1. Select an order from the Expenses ID list and press Enter on the keyboard or Double Click on an order to
display the order details. To search for an order, type the first few letters of the order until it becomes visible,
and then select it.
Make sure that only the Expenses ID or number appears on the Expenses ID as shown in Fig 7.4
2. Click Delete on the dialog Toolbar or right-click the Expenses dialog to display a context menu and then select
Delete Expenses
The DELETE PROMPT message is displayed
Fig 7.10 Delete Prompt
3.
Click Yes to delete the Order and all its details and payments or No to cancel deleting the Order
Note the report on the Application Explorer Status
Removing Items from Shopping Details
To remove an item from Shopping Details
1. Select an item on the Shopping Details spreadsheet to highlight it.
Fig 7.11 Shopping Details Spreadsheet
2.
Press Del or Delete on the keyboard or right-click the item to display a context menu and select Delete Details as
shown in 6.11
This displays a DELETE ALERT message
62
P a g e | 63
Fig 7.12 Delete Alert
3.
Click Yes to delete or No to cancel deleting the record
You must remove all Payment Details on the Order in order remove items from Shopping Details.
Note the report on the Application Explorer Status
Removing Items from Payment Details
To remove an item from Payment Details
1. Click the Payment Details tab to select it
Fig 7.13 Payment Details Spreadsheet
2.
3.
Select an item on the Payment Details spreadsheet to highlight it.
Press Del or Delete on the keyboard or right-click the item to display a context menu and then select Delete
Payment as shown in Fig 7.13
This displays a DELETE ALERT message as shown in Fig 7.14
Fig 7.14 Delete Alert Message
4.
Click Yes to delete or No to cancel deleting the record.
Note the report on the Application Explorer Status
63
P a g e | 64
Chapter 8
Local Purchase Order (LPO)
Local Purchase Orders are orders that are placed for further supplies to restock items. By default, CyberShop allows you
restock through the Reorder List. However, you can also access a list of all items in stock.
To process an LPO:
1. Click the Accounts menu
Fig 8.0 Accounts Menu
2.
Select Local Purchase Order (LPO)…
This displays LOCAL PURCHASE ORDER dialog
Fig 8.1 Local Purchase Order dialog
Creating a new LPO
To create a new LPO:
1. If an Order is selected, click New on the dialog Toolbar to clear or reset all entry fields, else go to step 2 below
Important: LPO ID is system or auto generated so, do not enter it.
2.
3.
4.
Select Supplier if necessary
Set Date if necessary.
Select an item on the Re Order List
Note that the Re Order List displays all items that have their quantities on or below their Reorder Levels
64
P a g e | 65
5.
6.
7.
8.
Check All Items to display all items in stock on the Re Order List
Enter Qty Request – the quantity you are placing an order for
Enter Unit Cost Price
Enter Remark if necessary
If the cursor is on Remark, press Enter on the keyboard
Or click the Save dropdown on the dialog Toolbar and then click Save Details as shown below
This adds the item and its detail to the LPO Product List spreadsheet
Fig 8.2 LPO dialog
9.
To add more items, repeat steps 4 through to 8
Click Invoice on Application Toolbar to preview the LPO.
Or Click Reports menu and select Invoice or press F6 button on the keyboard
Fig 8.3 Expenses Invoice
10. Click Print on the report Toolbar to print the Invoice
Fig 8.4 Report Toolbar
65
P a g e | 66
Editing an Existing LPO
To edit an existing LPO:
1. Select an order from the LPO ID list and press Enter on the keyboard or Double Click on an order to display the
order details. To search for an order, type the first few letters of the order until it becomes visible, and then
select it, as shown in Fig 8.2
2. Make the necessary changes to Supplier and Date.
3. Click Save on the dialog Toolbar.
The UPDATE PROMPT message box is displayed
Fig 8.5 Update Prompt
4.
5.
Click Yes to save or No to cancel saving the Updates.
Repeat steps 4 through to 8 of Adding A New LPO section in order to add more items to the LPO Product List
spreadsheet
Note the report on the Application Explorer Status
Deleting an LPO
To Delete an LPO:
1. Select an order from the LPO ID list and press Enter on the keyboard or Double Click on an order to display the
order details. To search for an order, type the first few letters of the order until it becomes visible, and then
select it. as shown in Fig 8.7
Make sure that only the LPO ID appears on the LPO ID as shown in Fig 8.7
2. Click Delete on the dialog Toolbar
Or click the Delete dropdown on the dialog Toolbar and then select Delete LPO as shown in Fig 8.7 below
The DELETE PROMPT message is displayed
Fig 8.6 Delete Prompt
3.
Click Yes to delete the Order and all its details or No to cancel deleting the Order
Note the report on the Application Explorer Status.
Removing Items from LPO Details
To remove an item from LPO Details
66
P a g e | 67
Fig 8.7 LPO dialog
1.
2.
Select an item on the LPO Product List spreadsheet to highlight it.
Press Del or Delete on the keyboard click the Delete dropdown on the dialog Toolbar and then select Delete
Details
This displays a DELETE PROMPT message
Fig 8.8 Delete Prompt
3.
Click Yes to delete or No to cancel deleting the record
Note the report on the Application Explorer Status
67
P a g e | 68
Chapter 9
Profit Evaluation
Profit Evaluation allows you to compare the physical cash from sales with the amount generated by the system from sales
and purchases and then reports a Balance, Shortage or Excess evaluation.
BALANCE EVALUATION: The amount generated is equal to the physical cash counted or amount submitted
(recommended)
SHORTAGE EVALUATION: The amount generated by the system is more than the physical cash counted or amount
submitted. This means that all the amounts generated by the system was not submitted (not recommended)
EXCESS EVALUATION: The amount generated is less than the physical cash counted or amount presented. This
means that there is the possibility that all sales invoices were not paid for (not recommended). To avoid this, make
sure that all sales invoices are promptly paid on the system.
However, giving discounts on sales invoices may also result in differences between cash generated and submitted.
To process a Profit Evaluation:
1. Click the Accounts menu
Fig 9.0 Accounts Menu
2.
Select Profit Evaluation…
This displays PROFIT EVALUATION dialog
Fig 9.1 Profit Evaluation dialog
Creating a new Profit Evaluation
To create a new Profit Evaluation:
1. Check Range for a date period
68
P a g e | 69
2.
3.
4.
5.
Set Begin date if necessary
Set End date if Range is checked
Enter Cash Submitted
Observe Balance and Status.
While the cursor is on Cash Submitted, press Enter on the keyboard
Or click Save on the dialog Toolbar. This adds the detail to the Evaluated Income List spreadsheet
Editing an Existing Profit Evaluation
To edit an existing Profit Evaluation:
1. Select an item on the Evaluated Income List to display its details.
Fig 9.2 Profit Evaluation dialog
2.
3.
Make or enter the necessary changes
While the cursor is on Cash Submitted, press Enter on the keyboard
Or click Save on the dialog Toolbar. This adds the update to the Evaluated Income List spreadsheet
Deleting a Profit Evaluation
To Delete a Profit Evaluation:
1. Select an item on the Evaluated Income List to display its details.
Press Del or Delete on the keyboard or click the Delete dropdown on application Toolbar and select Delete
Selection as shown in Fig 9.4 below
The DELETE PROMPT message is displayed
Fig 9.3 Delete Prompt
2.
3.
Click Yes to delete or No to cancel deleting the record
To delete all the records, click the drop button of Delete and then select Delete all.
69
P a g e | 70
Fig 9.4 Profit Evaluation dialog
The DELETE ALERT message is displayed
Fig 9.5 Delete Alert
4.
Click Yes to delete or No to cancel deleting all the records
Note the report on the Application Explorer Status
70
P a g e | 71
Chapter 10
PayRoll
The PayRoll module is used to manage all staff payroll information and transactions in the areas of the following:
i. Department
ii. Payroll
iii. Loan
iv. Allowances/Deductions
To process PayRoll:
1. Click the Accounts menu
Fig 10.0 Accounts Menu
2.
Select Staff PayRoll…
This displays PAYROLL dialog
Fig 10.1 PayRoll Dialog
3.
Select an Employee from the Employee list and press Enter on the keyboard or Double Click on an Employee to
display the Employee details. To search for an Employee, type the first few letters of the Employee’s name until it
becomes visible, and then select it. Be sure that only the employee’s number is displayed on Employee.
71
P a g e | 72
Creating a New Department
To create a New Department:
1. On the Department tab, Set Date
2. Select Dept. (Department) Name
Click the Dept. Name button (ellipsis) to add a new Department (If it’s not on the dropdown list) and select it.
3. Select Position/Rank
Click the Position/Rank button (ellipsis) to add a new Position (If it’s not on the dropdown list) and select it.
4. Check Status to make the Department active
Note that the Active Department is the one used to pay the Employee Salary, and also that, an Employee can be
moved to another department when that department is registered for the Employee and made Active.
5. Enter Basic Salary
6. While the cursor is on Basic Salary, press Enter on the keyboard
Or right-click on the tab surface to display a context menu and select Save Department as shown in Fig 10.2
below. The details should appear on the Department spreadsheet
Fig 10.2 PayRoll dialog
Editing an Existing Department
To edit an existing Department:
1. Click on the department to highlight it on Department Details spreadsheet
This displays the details on the entry fields as shown in Fig 10.2 above.
2. Make the necessary changes.
3. If the cursor is on Basic Salary, press Enter on the keyboard
Otherwise, right-click the department row on the spreadsheet or the tab surface to display a context menu and
select Save Department as shown in Fig 10.2.
The UPDATE ALERT message is displayed
Fig 10.3 Update Alert
4.
Click Yes to save or No to cancel saving the Updates
72
P a g e | 73
Note the report on the Application Explorer Status
Deleting a Department
To Delete a Department:
1. Click on the department to highlight it on Department Details spreadsheet
This displays the details on the entry fields as shown in Fig 10.2
2. Press Del or Delete on the keyboard or click the Delete dropdown on the dialog Toolbar and select Delete
Department.
Or right-click the department row on the spreadsheet or the tab surface to display a context menu and select
Delete Department as shown in Fig 10.2.
If there are payroll entries for the Department, the following message is displayed cancelling the Delete
operation:
Fig 10.4 Error Alert
Otherwise, the DELETE PROMPT message is displayed
Fig 10.5 Delete Prompt
3.
Click Yes to delete or No to cancel deleting the record
Creating Allowances and Deductions
Allowances and Deductions are required for a detailed breakdown of an employee Salary
To create Allowances and Deductions:
1. Click Allow./Ded. Tab
Fig 10.6 PayRoll dialog
2.
Select Name
Click the Name button (ellipsis) to add a new Name.
73
P a g e | 74
3.
4.
5.
6.
Select Type
Check Skip
Skip is used to skip paying an Allowance or Deduction on the current employee payslip.
Enter Percentage
This is a percentage of the Basic Salary
While the cursor is on Percentage, press Enter on the keyboard
Or right-click on the tab surface to display a context menu and select Save Percentages as shown in Fig 10.6
above. The details should appear on the Allowances/Deductions Details spreadsheet
Editing Allowances and Deductions
To edit Allowances and Deductions:
1. Click on the item to highlight it on Allowances/Deduction Detail spreadsheet
This displays the details on the entry fields.
2. Make the necessary changes.
3. If the cursor is on Percentage, press Enter on the keyboard
Otherwise, right-click the item row on the spreadsheet or the tab surface to display a context menu and select
`Save Percentages as shown in Fig 10.6 above
The UPDATE ALERT message is displayed
Fig 10.7 Update Alert Message box
4.
Click Yes to save or No to cancel saving the Updates
Note the report on the Application Explorer Status
Deleting Allowances and Deductions
To Delete Allowances and Deductions:
1. Click on the item to highlight it on Allowances/Deduction Detail spreadsheet
2. Press Del or Delete on the keyboard or click the Delete dropdown on the dialog Toolbar and select Delete
Percentages.
Or right-click the item row on the spreadsheet or the tab surface to display a context menu and select Delete
Percentages
The DELETE PROMPT message is displayed
Fig 10.8 Delete Prompt
3.
Click Yes to delete or No to cancel deleting the record
Creating a Loan
To create a Loan:
1. Click Loan (Ded.) Tab
74
P a g e | 75
Fig 10.9 PayRoll dialog
2.
3.
4.
5.
6.
7.
Set Date if necessary
Enter Loan Amount
Enter Repayment Amount Per Month
Enter Percent Rate
Check Skip Payment
Skip is used to skip paying a loan on the current employee payslip.
If the cursor is on Percent Rate, press Enter on the keyboard
Or right-click on the tab surface to display a context menu and select Save Loan as shown in Fig 10.9 above. The
details should appear on the Loan Details spreadsheet
Editing an Existing Loan
To edit an Existing Loan:
1. Click on the item to highlight it on Loan Details spreadsheet
This displays the details on the entry fields.
2. Make the necessary changes.
3. If the cursor is on Percent Rate, press Enter on the keyboard
Otherwise, right-click the item row on the spreadsheet or the tab surface to display a context menu and select
Save Loan as shown in Fig 10.9.
The UPDATE ALERT message box is displayed
Fig 10.10 Update Alert
4.
Click Yes to save or No to cancel saving the Updates
Note the report on the Application Explorer Status
Deleting A Loan
To Delete A Loan:
1. Click on the item to highlight it on Loan Details spreadsheet as shown in Fig 10.9
2. Press Del or Delete on the keyboard or click the Delete dropdown on the dialog Toolbar and select Delete Loan.
Or right-click the item row on the spreadsheet or the tab surface to display a context menu and select Delete
Loan as shown in Fig 10.9
Note: If payment had begun on the loan and not completed, you receive a message:
75
P a g e | 76
Fig 10.11 Error Alert
Otherwise, the DELETE PROMPT message is displayed
Fig 10.12 Delete Prompt
3.
Click Yes to delete or No to cancel deleting the record
Creating a PayRoll
To create a PayRoll:
1. Click PayRoll Tab
Fig 10.13 PayRoll Details Spreadsheet
2.
3.
Set Date if necessary
Right-click on the tab surface to display a context menu and select Save PayRoll as shown in Fig 10.14 below. The
details should appear on the PayRoll Details Spreadsheet
Fig 10.14 PayRoll Context Menu
4.
Right-click on the tab surface to display a context menu and select Preview PaySlip as shown in Fig 10.14 above
to display a preview of the payslip as shown in Fig 10.15 below.
Note: Selecting Print PaySlip instantly sends the Payslip to a printer
76
P a g e | 77
Fig 10.15 Payslip
5.
Click Print on the report Toolbar to print the Payslip
Fig 10.16 Report Toolbar
Editing an Existing PayRoll
To edit an Existing Loan:
1. Click on the item to highlight it on PayRoll Details spreadsheet
This displays the details on the entry fields.
2. Make the necessary changes.
3. Right-click on the tab surface to display a context menu and select Save PayRoll as shown in Fig 10.14 above or
click the Save dropdown on the dialog Toolbar and select Save PayRoll.
The UPDATE ALERT message is displayed
Fig 10.17 Update Alert
4.
Click Yes to save or No to cancel saving the Updates
Note the report on the Application Explorer Status
Deleting a PayRoll
To Delete A PayRoll:
1. Click on the item to highlight it on PayRoll Details spreadsheet
2. Press Del or Delete on the keyboard or click the Delete dropdown on the dialog Toolbar and select Delete
PayRoll.
Or right-click the item row on the spreadsheet or the tab surface to display a context menu and select Delete
PayRoll
The DELETE PROMPT message is displayed
77
P a g e | 78
Fig 10.18 Delete Prompt
3.
Click Yes to delete or No to cancel deleting the record
78
P a g e | 79
Chapter 11
Delete Options
After using CyberShop for some time, you may need to do a cleanup in order for the application to operate optimally or
more efficiently. To do this, you need to run the Delete Options commands.
To process a Delete Options:
1. Click the Utilities menu
Fig 11.0 Utilities Menu
2.
Select Delete Options
This displays the Delete Options dialog
Fig 11.2 Delete Options dialog
3.
4.
5.
Check any or all of the Select Area (s) To Delete options
Set the Start Date and End Date
Click OK
Note the success report.
79
P a g e | 80
Chapter 12
Expired Products
CyberShop offers very effective tools to manage sales outlets especially outlets that have items that a capable of expiring.
One of those tools includes Expired Products, by which CyberShop:
i. Runs through your stock and pulls out all expired items
ii. Collates them,
iii. Values and displays them.
Note that CyberShop would not sell any item that is expired.
Important: It’s advisable to run this utility at certain intervals to take out all expired items in your stock
To process Expired Products:
1. Click the Reports menu
Fig 12.0 Reports Menu
2.
Select Expired Products…
This displays the Expired Products dialog
Fig 12.1 Expired Products dialog
3.
4.
Select All option to view all expired products and their details
Select Date option and set a date to view the expired products for the specified date.
80
P a g e | 81
Deleting Expired Products
To Delete Expired Products:
1. Select an item on the spreadsheet.
2. Press Del or Delete on the keyboard or click the Delete button
The DELETE PROMPT message is displayed
Fig 12.2 Delete Prompt
3.
4.
Click Yes to delete or No to cancel deleting the record
To delete all the records, click Delete all.
The DELETE ALERT message is displayed
Fig 12.3 Delete Alert
5.
Click Yes to delete or No to cancel deleting all the records
Note the report on the Application Explorer Status
Previewing Expired Products
To Preview Expired Products click the Preview button as shown in Fig 12.1
Fig 12.4 Expired Products
81
P a g e | 82
Chapter 13
Backup and Recovery
Data backup and recovery are an integral part of a business especially a computer-based business outfit. Stocks and
accounts information need to be backed up and kept safely, so, on occasion of a system failure, these information can be
recovered or restored back to their original state for easy and proper running of the business. That way, business
information is secured and within reach when needed. Backups can done on the local drive (C :) but preferably on a
removable or external drive.
To process Data Backup:
1. Click the Utilities menu and select Security
Fig 13.0 Utilities Menu
2.
Select Backup Data Store…
This displays the Backup Data Store dialog
Fig 13.1 Backup dialog
Creating a Backup
To create a backup:
1. Set Backup Path by selecting a drive letter.
To create a backup on an external or removable drive, attach the drive.
Note the letter assigned to the drive and select it.
2. Click Backup
The BACK UP ALERT message is displayed
Fig 13.2 Backup Alert Message box
82
P a g e | 83
3.
Click Yes to backup or No to cancel backup
Note the Status report
Fig 13.3 Backup Data Store dialog
To process Data Recovery:
1. Click the Utilities menu and select Security
Fig 13.4 Utilities Menu
2.
Select Recover Data Store…
This displays the Restore Data Store dialog
Fig 13.5 Restore Data Storage dialog
83
P a g e | 84
Restoring a Backup
To restore a backup:
1.
Set Restore Path by clicking the search button
.
This allows you to search for the backup file Shops.mdb from which you want to restore your data.
2. Click Restore
Note the Status report
Fig 13.6 Restore Data Storage dialog
84
P a g e | 85
Chapter 14
Passwords and Permissions
CyberShop uses its passwords and permissions to control access to the application and the various utilities and resources
within the software. This way, important and sensitive business information is protected from unwarranted access.
To process Passwords and Permissions
1. Click the Utilities menu and select Security
Fig 14.0 Utilities Menu
2.
Select Passwords…
This displays the Passwords dialog
Fig 14.1 Passwords dialog
Creating a New User
To create a new User:
1. Click New on the dialog Toolbar to reset the entry fields
Fig 14.1 Passwords dialog
2.
3.
4.
The Save button is displayed as shown in Fig 14.1. Note the buttons that are disabled. Clicking Save re-enables
them.
Enter User Name.
This must be unique (it does not allow duplicates)
Enter Password
It allows any combination of alphanumeric values
Click Save on the dialog Toolbar to save the record.
Note that the New button is displayed as shown in Fig 3.5. If entries are made correctly, the record is saved
Note the report on the Application Explorer Status
85
P a g e | 86
Assigning Permissions to a User
To assign Permissions to a User:
1. If the User is not displayed, navigate to it through the Navigation Bar. For more information on this, go to Appendix
A
Fig 14.2 Navigation Bar
2.
Click Permit
This displays the Permissions dialog
Fig 14.3 Permissions dialog
3.
4.
Check (mark) all the necessary permissions for the user
Click Select All on the dialog Toolbar to check all the permissions.
Click Save on the dialog Toolbar
The EDIT ALERT message is displayed
Fig 14.4 Edit Alert
5.
Click Yes to save or No to cancel saving the permissions
Note the report on the Application Explorer Status
Editing an Existing User
86
P a g e | 87
To edit an existing User:
1. If the User is not displayed, navigate to it through the Navigation Bar as shown in Fig 14.2 above
2. Enter the necessary changes
3. Click Edit on the dialog Toolbar
The EDIT ALERT message is displayed
Fig 14.5 Edit Alert
4.
Click Yes to save or No to cancel saving the changes
Note the report on the Application Explorer Status
Deleting a User
To Delete a User:
1. If the User is not displayed, navigate to it through the Navigation Bar. As shown in fig 14.2
2. Click Delete on the dialog Toolbar
The following message is displayed
Fig 14.6 Delete Alert
3.
Click Yes to delete or No to cancel deleting the user
Note the report on the Application Explorer Status
Note: The Administrator's permissions are fixed and cannot be modified or deleted.
87
P a g e | 88
Chapter 15
Summaries and Reports
CyberShop offers utilities that present business information in the form of Summaries and Reports for qualitative and
quantitative analysis of your business. With these, you can determine the financial worth of you business, track products,
monitor sales and expenses, make projections etc.
To process Summaries
1. Click Reports menu
Fig 15.0 Reports menu
2.
Select Summaries…
Or click Summaries on the Application Toolbar
Fig 15.1 Application Toolbar
This displays the Summaries dialog
Fig 15.2 Summaries dialog
88
P a g e | 89
Income Statement
The Income Statement processes all sales information based on all items that were sold, and displays details with
an expected profit
Previewing Income Statement
To preview Income Statement:
1. Select Income Statement
2. Select the parameter (Daily, Monthly, Weekly, Yearly or Specify)
3. Set From date
Select a date for the month, week or year that you want to preview
Note that the Specify option in step 2 allows you to set a date range
Fig 15.3 Date Range
4.
Click Preview to display a preview of the report
If you receive an error message:
Fig 15.4 Error
i.
ii.
iii.
Set your printer settings Paper Size to A4
Set Orientation to Landscape
Try previewing the report again
Fig 15.5 Monthly Income Statements
5.
Click the Print button on the report Toolbar to print the report
Fig 15.6 Report Toolbar
Current Stock Report
The Current Stock Report displays information about the current stock of each item and the totals:
i.
Total Items - the total quantity of all items in stock,
ii.
Total Cost Value - the total cost price of all items,
iii.
Total Sales Value - the total selling price of all items,
iv.
Expected Profit and
v.
Records - Total number of products, as at the time of display.
89
P a g e | 90
Previewing Current Stock Report
To preview Current Stock Report:
1. Select Current Stock Report
2. Click Preview to display a preview of the report
.
.
.
Fig 15.7 Current Stock Report
3.
Click the Print button on the report Toolbar to print the report as shown in Fig 15.6
Debtors’ List
Managing a debtors’ list is one of the key functionalities of CyberShop. Any named Customer that owes on an
invoice gets his/her name automatically registered on the debtors’ list on invoice basis. Multiple payments can be
made on each invoice and CyberShop monitors the balances.
However, as soon the final balance payment is made for a particular invoice, that invoice is instantly de-registered
or taken out of the list.
Previewing Debtors’ List
To preview debtors’ list:
1. Select Debtors’ List
2. Select Name parameter
Fig 15.8 Customer list
3.
The <ALL> item displays all debtors’ names by invoice numbers. Selecting a particular name displays all debts
owed by that debtor by invoice numbers.
Click Preview
This displays the debtor’s list
90
P a g e | 91
Fig 15.9 Debtors’ List
4.
Click the Print button on the report Toolbar to print the report as shown in Fig 15.6
Creditors’ List
Creditors’ List displays all debts owed to creditors (Suppliers) by invoice numbers. This can track balances based on
multiple payments. Creditors’ List is based on credits on both Purchases and Expenses
Previewing Creditors’ List
To preview creditors’ list:
1. Select Creditors’ List
2. Specify parameter option (Purchases or Expenses)
Fig 15.10 Creditors’ List Parameters
3.
4.
Select Name
The <ALL> option displays all Creditors’ names by invoice numbers. Selecting a particular name displays all
credits owed to that creditor by invoice numbers.
Click Preview
This displays the creditor’s list
Fig 15.11 Debtors’ List
5.
Click the Print button on the report Toolbar to print the report as shown in Fig 15.6
Product Summary By Group Name
If a Group Name is specified for each product during the registration of products on the stock list, CyberShop
automatically categorizes the products and allows you to view the products categorized by their group names. This
is important because it helps to simplify stock management.
Previewing Product Summary by Group Name
To preview Product Summary by Group Name:
1. Select Product Summary by Group Name
2. Select Name parameter
91
P a g e | 92
Fig 15.12 Product Group Names
3.
Click Preview
This displays the Product Summary by Group Name
Fig 15.13 Product Summary by Group Name
4.
Click the Print button on the report Toolbar to print the report as shown in Fig 15.6
Product History
With this Summary, you can monitor the Purchase history of your products
Previewing Product History
To preview Product History:
1. Select Product History
2. Select Name parameter
Fig 15.14 Product Info Names
3.
Click Preview
This displays the Product History Report
Fig 15.15 Product History Report
4.
Click the Print button on the report Toolbar to print the report as shown in Fig 15.6
Monthly Sales Chart
This tool is used for sales analysis and projection. It displays payments made on invoices - calculated on a monthly
basis - in the form of graphical columnar or bar charts, ranging from January through December.
Please note that the bars are arranged in alphabetical (and not monthly) order, but with each month of the year
accounted for.
Previewing Monthly Sales Chart
To preview Monthly Sales Chart:
1. Select Monthly Sales Chart
2. Click Preview
This displays the Monthly Sales Chart
92
P a g e | 93
Fig 15.16 Monthly Sales Chart
Out-Of-Stock Product Report
This report displays all Products that are out of stock. It’s a handy tool for placing orders for purchases on items
that are out stock.
Previewing Out-Of-Stock Product Report
To preview Out-Of-Stock Product Report:
1. Select Out-Of-Stock Product Report
2. Click Preview
This displays the Out-Of-Stock Product Report
Fig 15.17 Out-Of-Stock Report
3.
Click the Print button on the report Toolbar to print the report as shown in Fig 15.6
Product Expiry Summary Report
This is a report of all Products that are expired. This is actually operational for Sales Outlets that track Expiry Dates
of items. It basically offer some details.
Previewing Product Expiry Summary Report
To preview Product Expiry Summary Report:
1. Select Product Expiry Summary Report
93
P a g e | 94
2.
Click Preview
This displays the Product Expiry Summary Report
Fig 15.18 Product Expiry Report
3.
Click the Print button on the report Toolbar to print the report as shown in Fig 15.6
Product Sales Rating
CyberShop offers the facility by which product sales are rated based on the following:
1. Frequency (The number of times that each product is sold).
Frequency rating reports are displayed either by figures (All products sold) or graphically (Column charts first seven products).
2. Quantity (The number of units of each product sold).
Quantity rating reports are displayed either by figures (All products sold) or graphically (Column charts - first
seven products).
Previewing Product Sales Rating
To preview the Product Sales Rating:
1. Select Product Sales Rating.
Fig 15.19 Product Sales Rating Parameters
2.
3.
4.
5.
6.
Select the Rating Type (Frequency or Quantity).
Check the chart box to preview the chart.
Select the Rating Period (Daily, Monthly etc)
Set From date
For Monthly Rating Period, select a date for the month that you want to preview.
Click Preview.
This displays the Product Sales Rating Report
Fig 15.20 Product Sales Rating Report
7.
Click the Print button on the report Toolbar to print the report as shown in Fig 15.6
Checking the chart box displays the chart
94
P a g e | 95
Fig 15.21 Product Sales Rating Chart
Product Tracking
Product Tracking is very important when there is the need to identify a particular Product on occasion of the
product being returned by a customer after Sales. You can track a product by the following:
i. Name or
ii. Batch Number
That is, if the batch number was made available.
While tracking, you can specify whether to search for the Customer that bought the product or the Supplier from
whom the product was purchased.
Previewing Product Tracking
To preview Product Tracking Report:
1. Select Product Tracking
Fig 15.22 Product Info Parameters
2.
3.
4.
5.
6.
Select Name to track with Product Name or
Enter Batch Number to track with a registered batch number
Select Customer or Supplier to determine what to search for
Check Dates to specify a date period as shown in Fig 15.3
Click Preview
This displays the Product Tracking Summary Report
95
P a g e | 96
Fig 15.23 Product Tracking Report
Sales Ledgers
The Sales Ledgers option allows you to preview Customer Ledgers for Sales transactions that are grouped together
by Invoice Numbers
Previewing Sales Ledgers
To preview Sales Ledgers:
1. Select Sales Ledgers.
Fig 15.24 Customer Names List
2.
3.
Select Name (to specify a Customer Name)
Click Preview
This displays selected Customer’s Sales Ledger
Fig 15.25 Sales Ledger
Purchase Ledgers
The Purchase Ledgers option allows you to preview Supplier Ledgers for Purchase transactions group together by
Invoice Numbers
Previewing Purchase Ledgers
To preview Purchase Ledgers:
1. Select Purchase Ledgers.
Fig 15.26 Supplier Names List
2. Select Name (to specify a Supplier Name)
3. Click Preview
This displays selected Supplier’s Purchase Ledger
96
P a g e | 97
Fig 15.27 Purchase Ledger
Sales Orders Summary Report
This is a preview of all Sales Orders (Invoices) displayed either on a monthly or yearly basis.
Previewing Sales Orders Summary Report
To preview Sales Orders Summary Reports:
1. Select Sales Orders Summary Reports.
Fig 15.28 Date Parameter
2.
3.
4.
Select parameter option (Monthly or Yearly)
Set From date
Select a date for the month or year that you want to preview
Click Preview
This displays Sales Orders Summary Report
Fig 15.29 Sales Summary Report
Sales Summary By Staff Report
One of the Tools in CyberShop with which you can determine the actual physical cash realised from your business
transactions is the Sales Summary by Staff Report. Another is the Cash Flow. This report can be viewed on a
monthly or periodic basis and totals are arranged by staff names.
Previewing Sales Summary by Staff Report
To preview Sales Summary by Staff Reports:
1. Select Sales Summary By Staff Report.
Fig 15.30 Date Parameter
97
P a g e | 98
2.
3.
4.
Select parameter option (Daily or Specify)
Set From date
Note that the Specify option in step 2 allows you to set a date range as shown in Fig 15.3
Click Preview
This displays Sales Summary by Staff Report
Fig 15.31 Sales Summary Report
Purchase Orders Summary Report
This is used to preview all Purchase Orders displayed either on a monthly or yearly basis.
Previewing Purchase Orders Summary Report
To preview Purchase Orders Summary Reports:
1. Select Purchase Orders Summary Reports.
2. Select parameter option (Monthly or Yearly) as shown in Fig 15.28
3. Set From date
Select a date for the month or year that you want to preview
4. Click Preview
This displays Purchase Orders Summary Report
Fig 15.32 Purchase Summary Report
Expenses Summary Report
The Expenses Summary Report displays two types of reports:
i.
Summary Reports
Displays a preview of all monthly expenses summary
ii.
Unit Based Reports
Displays a preview of all expenses based on the individual items on the expenses transaction
Previewing Expenses Summary Report
To preview Expenses Summary Reports:
1. Select Expenses Summary Reports.
98
P a g e | 99
Fig 15.33 Expenses Summary Parameters
2.
3.
4.
Select the Summary option (Expenses or Unit Based)
Select parameter option (Monthly for Expenses Summary)
Click Preview
This displays the Summary Report
Fig 15.34 Expenses Summary Report
Fig 15.35 Expenses Item Summary Report
PayRoll Summary Report
The PayRoll Summary Report is used to display a summary of all salaries paid on the month in review
Previewing PayRoll Summary Report
To preview PayRoll Summary Report:
1. Select PayRoll Summary Report
2. Set From date
Select a date for the month that you want to preview
3. Click Preview to display a preview of the report
99
P a g e | 100
Fig 15.36 PayRoll Summary Report
Cash Flow
Cash Flow is one of the Summaries in CyberShop that allows you to view the actual cash expected in your cash
drawer. It displays a distribution of cash in various transactions including Sales, Purchase, Expenses and calculated
totals such as Total Sales, Total Expenses etc.
Previewing Cash Flow
To preview Cash Flow:
1. Select Cash Flow
Fig 15.37 Date Range
2.
3.
4.
Select the parameter (Daily, Monthly, Weekly, Yearly or Specify)
Set From date
Select a date for the month, week or year that you want to preview
Note that the Specify option in step 2 allows you to set a date range as shown in Fig 15.6
Click Preview to display a preview of the report
100
P a g e | 101
Fig 15.38 Cash Flow Report
Cash Evaluation Summary Report
The result from Profit Evaluation transactions can be viewed on Cash Evaluation Summary Report.
Previewing Cash Evaluation Summary Report
To preview Cash Evaluation Summary Reports:
1. Select Cash Evaluation Summary Reports.
Fig 15.39 Option Names
2.
3.
Select Name
Click Preview
This displays the Cash Evaluation Summary Report
Fig 15.40 Cash Evaluation Summary Report
101
P a g e | 102
Customer Patronage
Customer Patronage is a tool that displays a list of Named customers according to their patronage, with respect to
the amount they spent on visits – calculated cumulatively on a monthly basis. The customer names are arranged in
descending order, according to the amount that they spent. Certain rewards can be offered to these customers as
encouragement.
Previewing Customer Patronage
To preview Customer Patronage:
1. Select Customer Patronage.
2. Select parameter option (Monthly or Yearly) as shown in Fig 15.28
3. Set From date
Select the date for the month or year that you want to preview
4. Click Preview
This displays the Customer Patronage List
Fig 15.42 Customer Patronage
Current Financial Statement
Current Financial Statement is used to display the total financial activities of your business for the period
specified. It offers, at a glance, the health status of your business, with the various fiscal parameters.
Previewing Current Financial Statement
To preview Current Financial Statement:
1. Select Current Financial Statement.
Fig 15.43 Date Range
2.
3.
4.
Select the Statement Type
Set From date
For Aggregate Statement, set a date period as shown in Fig 15.3
Click Preview
This displays the Current Financial Statement Report
Fig 15.44 Current Financial Statement Report
102
P a g e | 103
Appendix A
Page Navigation
Page navigation allows you to move from one page to another on a multi-page report or from one record (row) to another
on a form dialog. You will repeatedly come across navigation bars with buttons that when clicked, displays a new page or
record, that is, if it’s available.
There are two types of navigation bars
i. Record Navigation Bar found on dialogs
Fig 16.0 Record Navigation Bar
ii.
Page Navigation Bar found on reports
Fig 16.1 Page Navigation Bar
Navigation Buttons
Navigate to the first record/page
Navigate to the previous record/page
Navigate to the Next record/page
Navigate to the Last record/page
103
P a g e | 104
Index
104
P a g e | 105
Contacts
Tel:
+234(0)8033667378
+234(0)8121710802
Email:
[email protected]
Updated 2nd August, 2014
105