1
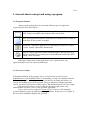
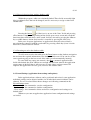
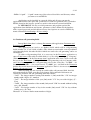
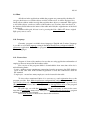
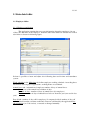
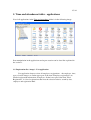
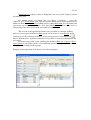
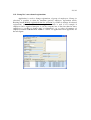
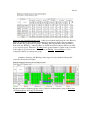
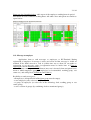
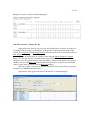
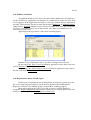
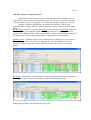
TimeApp
Evidence, time and attendance
and access control
ver 3.70
14.3.2012
User manual
www.intro-ri.hr
2 / 41
Table of Contents
1. General about concept and using a program ................................................................... 3
1.1. Program elements..................................................................................................... 3
1.2. User access rights ..................................................................................................... 3
1.3. Using the applications .............................................................................................. 4
1.4. Screen/Settings (application form settings and options) .......................................... 6
1.5. Date and time appearance ........................................................................................ 7
1.6. System Maintenance - Review and Database Administration ................................. 8
1.7. Ini files (files for application options) ..................................................................... 8
1.8. Database self-generating fields ................................................................................ 9
1.9. Hints ....................................................................................................................... 10
1.10. Language .............................................................................................................. 10
1.11. Licence data ......................................................................................................... 10
2. Main data folder ............................................................................................................ 11
2.1. Employee folder ..................................................................................................... 11
2.2. Working hours folder ............................................................................................. 13
3. Time and attendance folder - applications .................................................................... 15
3.1. Registration list - image? - List application ........................................................... 15
3.2. Registraton parameters........................................................................................... 16
3.3. Registration report ................................................................................................. 20
3.4. Working time/schedule .......................................................................................... 21
3.5. Registration action ................................................................................................. 23
3.6. Working time calculation ....................................................................................... 23
3.7. Working time report ............................................................................................... 25
3.8. Registration action report ....................................................................................... 26
3.9. Registration list ...................................................................................................... 26
3.10. Working time - summary report .......................................................................... 27
3.11. Group list / correction of registrations ................................................................. 28
3.12. Working time - summary per day ........................................................................ 29
3.13. Message to employee ........................................................................................... 31
3.14. Employee presence .............................................................................................. 32
3.15. Predefined hours .................................................................................................. 32
3.16. Day off calculation ............................................................................................... 33
3.17. Working time summary - Day off ........................................................................ 33
3.18. Week day factor day off ....................................................................................... 34
3.19. Working time - Employee/Day ............................................................................ 34
3.20. Fast overview / change per day ............................................................................ 35
3.21. Holiday calculation .............................................................................................. 36
3.22. Registration / hours - Detail report ...................................................................... 36
3.23. Registration transfer from remote location .......................................................... 37
3.24. Fast overview / change in period ......................................................................... 38
4. Using the program in brief......................................................................................... 40
3 / 41
1. General about concept and using a program
1.1. Program elements
After program starting there are four main different types of application
(represented by icons) like follows:
Application - Main application form for input / editing and manipulation of
data. Usually are linked to the database tables and records.
List - List application form for search and revies database data. Usually in
form data are not possible to change.
Parameter - Parameter application for adjusting the parameters of whole
system. Usually adjusted by administrator.
Report - Report application form for making reports and exports. Every
report is possible to save and export to many different formats like .XLS,
.PDF., .DOC and others.
If the upper right corner of the application icon is a padlock icon - the
applicationcan be accessed only by administrator.
1.2. User access rights
In default installation of the program, users are divided into two basic levels:
Administrator (1) and Standard Client (2). Depending on setup, the standard client has
limited access rights: acces rigths for vrious calculations, inserting and editing a of
records and making reports in the program. It has no authority to change important
records, parameters and options of the program. The administrator has all access rights.
If application icon has a icon of padlock in the upper right corner, only
administrators are able to access to the specified application.
Users can be also be assigned to Client (3) types of access, with manually
specified different groups of applications and applications. In this way access rights of
the user can be manually adjusted and specified.
4 / 41
1.3. Using the applications
Each application is most closely associated with the database and serves as a form
of manipulation of data. To use the applications it is necessary to know the following
basic figures:
1.3.1. Manipulation with database table
The following figure shows the most common form of tables with object fields:
A table can be searched in two ways:
- Search by entering text into "Search" edit-box (Search)
If there is a "Search" edit-box object above the table, enter the text into it and
press <Enter> or press the button <Find>. Application searches for the data in the active
column of the table that meats condition.
- Search inside the table
Faster search can be performed in a manner that the focus is put on one field in
the table (by clicking on the appropriate field within the table): for example, if you want
to search for in the above table all employees whose names contains the string "Pe" press
the one field in the column Nama and start to type the name "Peters". Pressing the
"P" shows all records where the Name contains the letter"P", pressing "e" show
all records that contain "Pe", etc. According to the adjusted parameters, searches are
not case sensitive.
If application is linked to the database table, important parameter in each
application is saved in menu Database under item Select top. Item holds the number of
record retrieved from the SQL database server. Parameter is used to faster SQL queries
but sometimes user need to retrieve more records then number in the parameter or all
records. Then parameter should be changed in the way to increase the number or to insert
0 (Zero) (means to retreive all records from the SQL server that meets conditions).
Default value of the parameter is 30.
5 / 41
- Local sorting of the records inside the table
Sorting records within the table by any column can be done by pressing the left
mouse button on the column heading - the small triangle in the column appears (see Code
column in previous figure). With first click value in the table are sorted ascending.
Second click descending and with third click local sorting is turned off.
- Local filter
Right mouse clicking on the header column of the table, opens the edit-box to
enter the filter. Depending on the filter the data that meats condition are displayed.
- Column width adjusting
Pressing the upper-left corner of the table (circle), the width of the columns are
adjusted by the minimum required width to displayed all text in every field
- Other functions and options
Right mouse click on the table shows menu for other functions and options:
- Old style / New style - Old or new style of the table
- Grid options - to adjust colors, effects, font and other options of the table.
- Color options - for new style of the table adjusting fields, row and column colors
- Default colors - implementation of the standard table colors
- Adjust column widths - Column width adjusting to fit all column into the width of the
table.
1.3.2. Database navigation bar
Database navigation bar is used for navigation through database records and it looks like
follows:
The meaning of the individul icons in order from left to right like follows:
- First record (First) - go to the first record in the table
- Previous record (Prior) - go to the previous record in the table
- Next record (Next) - go to the next record in the table
- Last record (Last) - go to the last record in the table
- Insert record (Insert) - insert (add) the new record in the table (on the server, record is
saved on the last position)
- Delete record (Delete) - delete selected recrd from the table
- Edit record (Edit) - edit (change) selected record in the table. Usually, mentioned
command is automatically executed with writing to one of the database field
- Save the record (Post) - if record is changed, command saves the record (post and saves
changed record on the database server)
- Reject changes (Reject) - Changes of the record are rejected. Previous valueas are
shown. izmjena u slogu (korigiranom slogu) se poništava. Valid for record which is
locally changed (Post command is not executed).
- Refresh the record (Refresh) - reads and shows records from the database server.
6 / 41
1.3.3. Record selection from another database table
Within the program, tables are relationally linked. These fields are usually light
blue (predefined colors that can be changed) and it is necessary to assign a value from
another table.
Pressing the button
or if the focus is on one of the "blue" fields and pressing
<F9> button or simply starting writing in blue fields opens a new screen and search the
data from other relational tables. After search, field are selected by pressing the <Enter>
key or <OK> button. Action (field search) is canceled by pressing the <Esc> key.
In the case of reports applications or applications where the selected data is
not relationally connected with the search table, by pressing <Del> key (focus is inside
blue boxes) selected data are deleted.
1.3.4. Inserting record to the database table
To add a new record to the table press the Insert button on the database navigation
bar and enter the required information to the database fields record. You can also do the
same operation going on the last record of the table (record automatically inserted).
If some fields are empty (not entered), after Post command, application fills
fields with default data. If in addition, not enough data has been entered, the application
reports name of the field that is still necessary to enter. Once you have entered all
required data application can save (post) record to the database table.
1.4. Screen/Settings (application form settings and options)
In the application form, widnow can be positioned and resized, some application
individual settings can be adjusted and the size of individual controls within it can be
adjusted. To save, load and delete thouse changes use following commands in the
Screen/Settings menu:
- Save settings - the command to save the configuration
- Load settings - the command to load the configuration
- Clear settings - the command to delete and restore configuration and settings to its
default value.
Whenever you start an application, application forms configuration and settings
are loaded.
7 / 41
1.5. Date and time appearance
Display appearance of the date/time format in the certain fields in the program
can be defined. Global settings for date/time format appearance are set to Control
Panel settings in Regional and Language Options section.
Also possible is to set formats internally (within the program) for date/time and
the meaning of certain characters in the settings are as follows:
c
Displays the date using the format given by the ShortDateFormat global
variable, followed by the time using the format given by the LongTimeFormat
global variable. The time is not displayed if the date-time value indicates
midnight precisely.
d
Displays the day as a number without a leading zero (1-31).
dd
Displays the day as a number with a leading zero (01-31).
ddd
Displays the day as an abbreviation (Sun-Sat) using the strings given by the
ShortDayNames global variable.
dddd
Displays the day as a full name (Sunday-Saturday) using the strings given by the
LongDayNames global variable.
ddddd Displays the date using the format given by the ShortDateFormat global
variable.
dddddd Displays the date using the format given by the LongDateFormat global
variable.
m
Displays the month as a number without a leading zero (1-12). If the m specifier
immediately follows an h or hh specifier, the minute rather than the month is
displayed.
mm
Displays the month as a number with a leading zero (01-12). If the mm specifier
immediately follows an h or hh specifier, the minute rather than the month is
displayed.
mmm Displays the month as an abbreviation (Jan-Dec) using the strings given by the
ShortMonthNames global variable.
mmmm Displays the month as a full name (January-December) using the strings given
by the LongMonthNames global variable.
yy
Displays the year as a two-digit number (00-99).
yyyy
Displays the year as a four-digit number (0000-9999).
h
Displays the hour without a leading zero (0-23).
hh
Displays the hour with a leading zero (00-23).
n
Displays the minute without a leading zero (0-59).
nn
Displays the minute with a leading zero (00-59).
s
Displays the second without a leading zero (0-59).
ss
Displays the second with a leading zero (00-59).
z
Displays the millisecond without a leading zero (0-999).
zzz
Displays the millisecond with a leading zero (000-999).
t
Displays the time using the format given by the ShortTimeFormat global
variable.
tt
Displays the time using the format given by the LongTimeFormat global
variable.
am/pm Uses the 12-hour clock for the preceding h or hh specifier, and displays 'am' for
any hour before noon, and 'pm' for any hour after noon. The am/pm specifier can
use lower, upper, or mixed case, and the result is displayed accordingly.
8 / 41
a/p
Uses the 12-hour clock for the preceding h or hh specifier, and displays 'a' for
any hour before noon, and 'p' for any hour after noon. The a/p specifier can use
lower, upper, or mixed case, and the result is displayed accordingly.
ampm Uses the 12-hour clock for the preceding h or hh specifier, and displays the
contents of the TimeAMString global variable for any hour before noon, and the
contents of the TimePMString global variable for any hour after noon.
/
Displays the date separator character given by the DateSeparator global variable.
:
Displays the time separator character given by the TimeSeparator global
variable.
'xx'/"xx" Characters enclosed in single or double quotes are displayed as-is, and do not
affect formatting.
Size of the letters are ignored except for format "am/pm" and "a/p".
Eg. "dd-mm-yy" format shows date like "03-05-11" which means May 3rd 2011;
"hh:nn:ss" shows time value in form "15:05:34".
1.6. System Maintenance - Review and Database Administration
The application in the Main data/System maintenance submap is applicaton for
maintenance the database. Maitenance application can automatically delete the image
registrations. Specifically, for a free database of MS SQL Express Edition 2008 R2 the
largest possible size of the database is 10 Gb. If used for recording images of registrations
of each employee, and especially if the image resolution is high, the specified maximum
database size is possible to fill very quickly within a year.
Within application, if you click on Show size can see the current size of the
primary database and supporting databases.
Pressing the Delete photographs older than, if field above has value of 60 (days),
program deletes photographs older than 60 days. When deleting files from the database,
the database file is not reduced and filesize remains, but memory within the file is
released (memory from deleted photographs) and is listed in the space of writing new
data. Pressing the Shrink database filesize is reduced by released memory and more space
on your hard disk is available.
1.7. Ini files (files for application options)
There are two types of "ini" files which are generated by using the TimeApp
program: "MPPServer.INI" and "MPP2006.INI". The file "MPPServer.INI" has data or
directory where the file "MPP2006.INI" is saved. There are three possibilities:
- IniDir=Normal - file is located in the directory where the TimeApp application is
installed. It is used for systems with local installations.
- IniDir=NoPath - file is located in the directory c:\windows\. If the user of the
application does not have rights to access this directory TimeApp
application will be not able to save and change "MPP2006.INI" file.
9 / 41
- IniDir="c:\path" - "c:\path" means any of the selected local drive and directory where
you want to record INI file.
Application can be installed in a network folder and all users can run the
application from the same place but parameters for each user (platform) has a particular
INI file; therefore the last two options are used for the network system installation.
In "MPP2006.INI" file are saved all parameters and program options like
applications form definitions and layouts, parameters of the columns for the database
table, crypted passwords and all other necessary data. Options are saved to INI fila by
menu command Screen/Settings Save settings.
1.8. Database self-generating fields
In map Basic data there is submap Documents with applications Document and
Document items.
Two applications are used to set database fields which will be self-generating
fields (usually it is "Code" fields of tables). The default system installs several predefined
self-generating fields, but other fields for which we want to be self-generating can be set
and adjusted.
To adjust self-generating filed, it is necessary in the Document application to
enter a Table name of the table for which field(s) is to be self-generating (eg. "Company"
(Table of Companies). In the Documents items application must enter a new record with
the text in the Field name field (eg "Code" for self-generating code in Company table)
and Code format (eg "Co-4N% self-generating code for the codes like: "Co-0001" - for
first record, "Co-0002" - for second record, "Co-0003" etc.) and link in the Document
field to the record entered in the Document application. There is also necessary to check
Enable self-generated code.
When inserting any new records in a table with a self-generated field, the field
will automatically be filled according Code format. Self-generated field format can
contain any character and self-generating mark like follows:
- "%nN" - For integer number starting with number 1 (Only mark like "%N" for integer
number with 4 digits; (N - number)
- "%nY" - For integer number of the year (Only mark "%Y" for year with 4 digits); (Y Year)
- "%nM" - For integer number of the month (Only mark "%M" for month without leading
zero); (M - Month)
- "%nD" - For integer number of day in the month (Only mark "%D" for day without
leading zero); (D - Day)
Character "n" in above marks means number of digits.
10 / 41
1.9. Hints
All objects in the applications within the program are permeated by the hints. If
you pass the mouse over certain objects or fields, if hint exists, it will be displayed in a
small yellow window with a message that explains these object or command. This applies
to all visible objects, text boxes, tables of the database etc. Last line of the text boxes of
the database fields indicates the name of the table and field (the original name of the field
is displayed).
Database table grid, if focus is on it, pressing the Ctrl + Shift + F7 shows original
SQL query sent to server.
1.10. Language
Currently, program is available in two languages: English and Croatian. Language
is possible to set in the Language setting in the Main data/System configuration/Main
parameters application. In near future program will have the text files and translations of
all other languages.
1.11. Licence data
Program is licensed by number of users that are using application and number of
employees that are inserted in the database tables.
Free version of the program which is downloadable from www.intro-ri.hr site is
with following limits:
- 2 users - number means a maximum connections from the program to the SQL database
server in the same time. If PC-terminal registration is used, one connection is used for
PC-terminal.
- 5 employees - means how many employees can be inserted in the table.
To clear above mentioned limits it is necessary to send registration key to the
program provider: Start Main data/System configuration/Configuration parameter form,
open Licence data tab and press Get registration button. Copy provided registration key
(Registraion key edit-box) and send it (by e-mail to [email protected]) to the program
provider.
He will reply you with the licence key which is necessary to enter in the same
form but in Licence key memo field. After pressing Check and save licence key, program
will have new licence data adjusted.
Press Show licence to show licence data in the text boxes.
11 / 41
2. Main data folder
2.1. Employee folder
2.1.1. Employee application
The application contains the necessary information about the employees. On top
of the code and name of the employee, under the other data which are divided into several
tab-folders as shown in following figure:
In form is possible to insert and adjust also following data used in time and attendance
system:
Work schedule in the Main data tab define employee working schedule. According these
information and employee registrations, working hours are calculated.
Annual leave tab - information of employee number of days of annual leave:
Year - year of the annual leave number of days
Number of days - number of days of annual leave (for employee)
Transfer - number of days of annual leave left over from last year (not used in last
year)
Day off tab - number of days off for employee; if company decided, number of days off
are calculated from the overtime work hours. Data are calculated by the application Day
off calculation (see 3.16 section), or entered or changed manually.
12 / 41
Fields are similar to data in Annual leave tab and have same meaning and have
additional field Calc.Date - date when calculation was performed.
Hour pool/day - number of working hour of employee per day. Default value is 8
working hours.
2.1.2. Other applications in Employee folder
Employee barcode cards - report of the employee barcode cards. Used for systems with
barcode registration. Employee barcode card contains company logo image.
Employee group report - reports of the employee by certain groups. Inside the report
application there are several reports: Cost center group, Location/Shed group, Working
group etc.
Occupation - application for data regarding occupation of the employees.
Occupation report - report of the employees with the occupation.
Employee supervisor - application for setting of the supervisor for the employee. For
example: only supervisor can change working hours of the employee etc.
2.1.3. Registration codes
Application for enter the RFID code or other card codes for each employee.
Entering the registration code for the system for barcode registration is not needed
because everything is regulated within the TimeApp application. For registration with
contactless cards (RFID cards) or other cards with particular codes it is necessary to
insert card code for each employee.
13 / 41
2.2. Working hours folder
2.2.1. Kind of working hours
When calculating working hours from the employee registrations, program
calculates: kind of the working hours and how many hours for a particular day.
Application Kind of working hours is shown in the following figure:
2.2.2. Hour kinds per period
Working time within one day can be splitted into regular and nigth (or some
other). Working hours per employees calculated from registrations, depending in what
time of the day they occured, are calculated like regular or night (or other) kind of
working hours.
2.2.3 Holidays
Application for inserting a holidays for a selected year. When started, the
application displays the current year and information about the specific day or holiday.
To insert a new holiday, select the day in the calendar and check Holiday in the Kind of
selected day radio button group. Application asks for confirmation. After finish od
adjusting day data should be saved by Save list button command. It is only possible to
change the holidays for a days after the current date. Standard not working days are set to
Saturday and Sunday and usually should not be changed. To view the holidays for other
years select a different year.
14 / 41
2.2.4. Hour calculation from Working Contract
If working tima is calculated from workers registrations on working contract, in
parameter application are some of the necessary options.
2.2.5. Group of hour kinds
Application for grouping of hour kind groups. Data used for special reports of
recapitulation of the employee hours: for compact and simpler report to show groups of
hour kinds instead of hour kinds (eg. to see direct working time: it means, regular,
overtime, night etc kind of working hours togather).
2.2.6. Remote location server
The data used for systems who have one or more remote locations for employee
registration. Required data are server addresses (IP), the table name, user name and
password. With this data program connects to the selected remote location directly to the
SQL Server and copies registration information to central location.
If username and password are not inserted (left blank), during connection to the
remote location application asks the username and password.
To adjust transfer successfully, some of conditions should be met: that the remote
SQL Server has access to the Internet and direct connection to the SQL Server from the
central location (i.e. the SQL server at the remote site should be accessed locally from a
central location). To set such systems one of the free application from the net is Hamachi
program (free downloadable from the Internet). After configuring the Hamachi on both
locations (remote and central) they get local IP address and can be directly accessed.
In the right part of the application are date-time data of all of completed
registration data transver until current date.
15 / 41
3. Time and attendance folder - applications
List of all applications in the Time and attendance folder is in the following image:
Data manipulation in the applications and report creation can be done like explained in
the section 1.
3.1. Registration list - image? - List application
List application form to review all employees registrations - the employee, time,
types of action images etc. In the upper part of the form "Employee registration" are
detailed registration information of employee. In the lower part of the form "Find
Registration" is a list of registrations that meet the selection criteria: search by date,
employee and registration kind.
16 / 41
Registration list form is like in the following image:
3.2. Registraton parameters
3.2.1. Main parameters
Terminal screen parameters
Screen reset - number of seconds after registration when screen is put in original
state (all entered data on terminal like employee name, action or message are reset to
null).
User re-registration - number of minutes when employee re-registration is
possible again. This parameter exists to disable employee registration twice and if
employee try to registrate himself, it gets a message. If employee has message (see
Message to employee section), message is displayed on the bottom side of the terminal
screen no depending to this parameter.
Show Editbox – shows codes of employee registration no metter to kind of
registration system. Default value is unchecked.
Show registraton code label – to show employee registration code label for
barcode registration systems.
Show employee code label – to show employee code label during registration
17 / 41
Show regular/official panel - for touch screen is possible to activate option to
allow that user enters options by Touch screen. Options are regular/official enter or exit.
Automatic registration at midnight - if employee makes registration "enter" before
midnight, and make registration "exit" after midnight, than program automatically make
registrations "exit" at millisecond before midnight and "enter" at midnight (therefore next
day). Option is used for right registration reports per days (or periods).
Check employee reg. code in DB - if only barcode cards are used, this option can
be unchecked. If RFID card/tokens or other cards are used, option must be checked. With
checked options terminal applications checks card registration code to find appropriate
employee.
Modify data in the terminal window - for special version of graphic terminal to
enable possibility to adjust or change data and settings on the graphic terminal screen.
Terminal time - updating local terminal time from time on SQL server
It is possible to update terminal time from SQL server time if SQL server
installation is on another computer (server).
Update period is period when terminal checks the time with SQL server
Allowable difference the allowed difference of local and server time. If bigger then
entered value, terminal time is corrected according server time.
Camera
Take photo of employee - activation/deactivation of photo taking (photographing)
of employee during registration process.
Show camera video on terminal - to show camera video on terminal
Disconnect camera after registration - to disconnect camera after employee
registration. When next employee makes registration, camera activates, takes photo and
deactivates. Default value is unchecked.
Frequency of employee photo taking - option to determine frequency of taking
photos. Default set value is all registrations. There are few possibilities: a) To take photo
of all registrations; b) To take only on enter; c) to take only on exit or d) To take photo
images in the random percentage of registrations. In last option, number between 0 and
100 is necessary (means percent). Eg. if number 30 is entered, means that 30% percent of
randomly selected registration will be photographed.
18 / 41
Security
Lock terminal screen - to lock terminal screen. Without password the terminal
screen is not possible to close. Key combinations like Ctrl+Esc, Ctrl+Alt+Del, Ctrl+Tab
and all other posibilities for application closing are disabled.
Enter unlock password - to set up the unlocking terminal screen password. If
password is not inserted, terminal screen windows is unlocked by <Enter> key.
Messages
Show message to employee - if option is checked, program enables and displays
messages of employees on the terminal screen
3.2.2. Kind of registrations
There are two standard kinds of registration: regular and official. Official
registrations are registrations where employee registers entrance before begin of the
working time, or exit after the end of the working time. In that case, in hour calculation
from registrations, program treats mentioned registrations like employee came on time to
the job and exit at time from the job, means full working time.
If some of registrations are official, it means that employee comes (or leaves) the
standard workplace in behalf of company (it goes to other company working place etc.).
In that case, program will calculate again full woriking time for the employee.
If official time is entered by barcode cards, application form is used also for
printing the barcode cards with few possibilities and several sizes of the cards.
3.2.3. Working hour calculation
Kind of calculation - selection of working time calculation kind. Default kind is
Calculation with predefined hours. Other calculation kinds are left for compatibility with
the earlier versions of the program.
Message note for single hour calculation - messages report kind during working
hour calculations.
Hour calculation - Option to set number real number rounding of calculated
working hour. Default integer number -2 means to round to the two decimal places (e.g.
1.234 gets 1.23).
Insert also zero values - If calculation of working hours is zero and if option is
checked, program inserts zero record into table.
19 / 41
Allow to manually modifying registrations - in List form: Registration list image? and other similar forms, if checked, the data of employees registrations are
possible to modify.
Prikaz poruka kalkulaciju sati - ispisa poruka koristniku kod izračuna radnih sati:
nikad ne prikaži, uvijek prikaži, prikaži samo ako kalkulacija ima neuspjele akcije.
Correction of employee registrations
Default value is value saved in Working schedule database table. With second
option (from data below) is possible for all working schedules to set corrections.
Correction - correction of employee registrations on full or half hour (60 or 30
minutes number possible). If employee enters between 7:31 and 8:00; if correction is to
half hour (30 minutes) during calculation of working hours (from registrations) it
calculates like he enters at 8:00; if he enters between 7:01 and 7:30 it calculates until
7:30. While, if correction is to full hour (60 minutes) in both cases program calculates to
8:00.
Shift - if shift is 5 minutes: if working schedule of employee is from 8:00 to 16:00
than employee can late to job for 5 minutes and go 5 minutes before 16:00 (means he can
enter at 8:05 calculate 8:00; and he can exit at 15:55 calculates 16:00)
Predefined hour
Predefined hours are hours set once for period for employee during holiday,
illness or other events. During that period, employee has no registrations and when
working hours are calculated program automatically inserts predefined hours.
Insert hours if calc.day is non working day - to insert predefined hours if
calculation day is non working day.
Insert hours if calc.day is holiday - to insert predefined hours if calculation day is
non holiday.
Holiday - number and kind of hours
If calculation day is holiday, employees are usually not registered and during
workin hour calculations program inserts Number of hours and Kind of hours for specific
holiday.
Check box Not include holiday (in working week) for hour pool calculation by
default is not checked: for hour pool calculation if one day in working week is holiday,
program calculates 5 working days (means 40 working hours per week). If check box is
checked program calculates 4 working days (means 32 working hours per week).
By default, check box Insert for all employees following number of hours per
holiday is not checked, program inserts number from field Hour/Day from Employee
20 / 41
table (Used when some of the employees are working shorts than 8 hours). If check box
is checked program inserts for all employees number from Number of hour field in this
parameter application. Number must be grater then zero. Note: if in the same period
predefined hours exists, during calculation Holiday has advantage for inserting.
3.2.4. Input devices/Trasfer
Parameters used for special terminal with fingerprint registration.
3.3. Registration report
Report application form for creating reports and exports. Possible to report per
date/time, employee, location/shed, work group and cost center - depends how company
is organized.
Following kind of reprot exists:
Regular - regular report of each employee registration like following figure:
Regular with description - Regular report of each employee like above with additional
description text for each employee
21 / 41
Compact - report of each employee registration with enter and exit actions are in the
same row like following figure (figure shows same data like in Regular report):
3.4. Working time/schedule
Application parameter form contain data of the working time and schedule of the
company. Data are very important for calculation of the working hours from employees
registrations. Within all working time/schedules, it is also necessary to enter values
Correction and shift for each schedule. The meaning of values are explained in section
3.2.3. Correction of employee registrations.
Explanation of the data for working time and schedule
Param1 = 1 - Free working time: No working schedule, employee working hour is
calculated for time what he spend at work, no matter when he enter and exit. Necessary
input data are Correction and Shift.
Param1 = 2 - Regular working time: Regular working time e.g. 8:00 to 16:00.
Data to input are Start and End of the job. Hour calculation for employee is if he spent all
the time on the job. If not, program calculates overtime in minus (means how many hours
in official time he was not on job) and program calculates overtime in plus (if he enters
before start of the job and/or exit later than end of the job.
Param1 = 3 - Flexible working time with correction: Necessary data are Start of
the job (e.g. 8:00), End-Flexible (e.g. 9:00) means flexible time until employee need to
enter to job, and Hours/shift (e.g. 8) means how many hours per day. Calculation is the
same like Regular working time except that on start of the job is possible to have flexible
entering (e.g. from 8:00 to 9:00; 8h means that if employee enter at 8:00 must finish at
16:00; if enter at 9:00 must finish at 17:00). Program calculates to full or to half hour
depending of saved options.
Param1 = 4 - Flexible working time without correction: Necessary data to input
are Start (e.g. 8:00) of the job, End-Flexible (e.g. 9:00)means flexible time until
employee need to enter to job, and Hours/shift (e.g. 8) means how many hours per day.
Calculation of hours are without correction ... if employee enter at 8:17 and exit at 16:18
program calculates 8 hours of working while in Flexible working time with correction it
would calculate 7,5 hour (for half hour correction).
22 / 41
Correction - correction of employee registrations for working hour's calculation.
Parameters can be:
- 60 (minutes) - correction to full hour (means if employee enter at 8:10; if
working time is from 8:00, enter time is corrected to 9:00; if he enter at 7:45, program
calculates enter time from 8:00)
- 30 (minutes) - correction to half hour (means if employee enter at 8:10; program
calculates enter time to 8:30; if employee enter at 7:45, program calculates from 8:00).
The same logic is for exit registration but opposite, if employee exits at 16:15,
program calculates 16:00; if he exits at 15:45 it calculates 15:30.
Shift - allowed late time for start of working time and before exit time for end of
the working time. If value is 5 (minutes) then if employee come until 8:05, program
calculates 8:00. The same logic is for exit registration but opposite.
Calculate overtime before - Calculation of overtime hours before start of the
working time. Default value is checked (option is active).
Calculate overtime after - Calculation of overtime hours after end of the working
time. Default value is checked (option is active).
Lunch - durance of lunch time in minutes. Default value is 0 (zero), program do
not calculate lunch time into working time. If value is bigger then 0, program includes
lunch time into working time. That means; if two registrations are inside entered value
(e.g. 30 minutes) than program doesn't overpass two registrations and takes next one. If
employee doesn't come inside Lunch time, program calculates like classic exit and enter
during working time + corrections (full hour / half hour); program calculates overtime in
minus.
Late lunch - Additional time for lunch time. Time for Lunch time is bigger for
value of Late lunch. If lunch time is 30 minutes; late lunch 10 minutes; employee can be
on lunch maximal 40 minutes.
Calculation negative overtime - Option to include negative (overtime) hours
during working time. Default value is checked (option is active). It means if employee is
not present at job during working time, program calculates that hours (overtime in
minus).
Overtime to day off - If option is checked program calculates overtime hours to
days off. There is option how many hours is one day off (default 8 hours). E.g. if
employee has during month (or other period) 24 overtime hours; program calculates 3
days off.
Add to reg. hours [min] / Reg. hour condition >= [h] - Input value in minutes are
add to regular hours if regular hours are equal or bigger to condition. E.g. if first value is
30 minutes, and second value is 6 hours, program calculates working hours in following
way: if working hours are bigger or equal to 6 hours, it add 0,5 hours (30 minutes) to
working time.
23 / 41
Round to hour/shift - To round calculated hours to the full hour (hour per shift)
per specified day according following condition:
If value is 6 (hours) program act like follows:
- If calculated hours from employee registration are less then 6 hours - program inserts
calculated hours (6 hours)
- If calculated hours is between 6 and full day hour (8 hours) - program inserts 8 hours.
- If calculated hours are more then full day hour (8 hours) - program insert 8 hours +
overtime hours (if overtima calculation is enabled).
Option is used for some special client requirements.
Flexible lunc time - if option is checked, program calculates working time like
Total time - Absence time + Lunch time. Otherwise, if option is not checked, if employee
registrate lunch more then duration of the lunch, program means that employee was not
on the lunch than absent and according that calculates the working hours.
In Waiting hours tab there are two options: Insert wait hours check box and field
selection Kind of hours from table. If Insert wait hours option is checked and data
selected in the field selection box, if on specified working day employee is not registered,
during the calculation of the working hours, program calculates and inserted Kind of
hours per specified day.
3.5. Registration action
Each registrations has two possible actions: Enter and Exit. During employee
registration, program in database checks last registration for this employee, if registration
is Exit, then program register Enter and opposite. If employee makes registration for the
first time, then actual registration is Enter.
Data Enter/Exit are default.
3.6. Working time calculation
Application Form for calculation of the working hours from registrations of
employees. It is possible to select employees per shed, working group, cost center and
employee itself. Before calculation it is necessary to select the Date option and specified
Date from the calendar.
There are following commands for the calculation process:
Calculate all (day) button to calculate working hours for all selected employees in
the left database grid..
Delete all (day) button to delete all calculated working hours for selected
employees.
Calculate hours (1) button to calculate working hours for one selected employee
(in the left database grid)
24 / 41
Delete hours (1) button to delete working hours for one selected employee (in the
left database grid).
For manual inserts of working time (e.g. illness or holidays) ... select the
employee, press insert button (plus sign) or keyboard button arrow down and then insert
number of hours (in Hours correct column) and in column Hour kind press F9 button and
select hour type from displayed table. Save data with Post edit button (check icon) or
with moving to the next record (with arrow buttons on keyboard).
This version of the application form has also possibility to calculate working
hours for selected period. Instead of Date option it is necessary to select Period option
and from to text box (displayed below) to select proper period for calculation with
button. With the above explained commands it is possible to calculate working hours but
per period.
For better usage of the screen, checking the checkbox Hide select options / Show
select options it is possible to hide / select additional options for employee selection from
the database according standard groups.
Example of the application form display is on following figure:
25 / 41
3.7. Working time report
Report form for making reports of employees working hours. Possibility of
working hour's selection per date and standard groups of selection: employee,
location/shed, working group and cost center.
There are following kind of reports:
Report By employee: Employee working
hours in period - report of working hours by
employee
Group by type of hours - report of working hours
grouped by employee and kind of hours
(Employee working hours in period - group by
kind of hours)
.
26 / 41
3.8. Registration action report
Report form for making report for registration action. Report is used for barcode
printing of cards that employee use to registrate action. During registration, if employee
takes registration action Official time and then his barcode card (or key tag, RFID card
etc.), terminal make registration: official enter (or exit). Terminal with touch screen has
also possibility to make registrations regular/official time by touch screen (touch panel
must be active in parameter form). Barcode card for official time is like on following
figure:
It is possible to print two different sizes of the registration card and selection between
Report All (prints all records from the table) and Report selected (prints selected record
from the table but to more cards).
3.9. Registration list
List form, the same like list form Registration list - image? with fix time of
registrations which is not possible to change. If registration time of employee has
changed, form use to check original time of the registration.
27 / 41
3.10. Working time - summary report
Report form for summary report of working hour for selected period. Possibility
to select employee by location/shed, working group, cost center or employee. Report
calculates hour pool per month (or per selected period), sum of employee hours and sum
of employee hours by type of working hours. It has possibility to select to calculated
remaining days for annual leave.
Appearance of the application report form look as shown in the following figure:
Example of regular report of working hours per employee per month as shown in the
following figure:
Report consist of Pool hours - number of working hour (per selected period equals
employee working hours per day times working days per period), Sum h. - employee real
working hours, Kind of working hours and Annual leave hours - how many days (hours)
employee has in selected year (annual leave days plus transfer annual leave days minus
used a.l. days by employee until starting selected period).
There are similar reports to reports in example depending of hours kind.
28 / 41
3.11. Group list / correction of registrations
Application is used to change registrations of group of employees. Group (or
selection) is possible to select by date/time (period), employee, registration action.
Pressing button Modify registration time for selection is possible to change all selected
registrations (shown in table below). Application form is used if for example if
employees have organised transport to job by company bus, if bus late than for these
employees is possible to change time of registration: e.g. to select all entrance of
employee between 8:00:00 and 8:10:00 to 7:59:59; see application form appearance on
the next figure:
29 / 41
3.12. Working time - summary per day
Report for making summaries of working hours of employees for period per day.
Possibility to select employee per location/shed, working group, cost center and
employee itself. Appearance of the application form is like follows:
There are four different kind of reports:
Group per day - table report consist of sum of working hours for each employee per day
per selected period. Totals displayed are per row (employee per period) and columns (all
employees per day).
Group per day / hour type - table report consist like report before but hours per day per
each employee are splitted into kind of hours. This is one of detailed summary report of
working hours.
30 / 41
Group per day / hour kind group color - table report in hour kind group in color. Kind of
hours are grouped to have simple and compact report. In next figure (report example)
kind of hours are grouped in six groups: Working, Missing, Business Trip, Readiness,
Non work.day, Holiday... othervise there are much more kind of hours (what is possible
to see on next report). Therefore, Working hours group includes: regular work, overtime
work, night or special work etc... The same is for Mising , Non working etc. User
(companiy) makes its own reports group.
Saturdays, Sundays and Holidays in the report are also marked with specific
colors like shown in next figure:
Parameter form for adjusting group colors of kind of working hours group is Main data
Working hours Group of hour kinds.
31 / 41
Group per day / hour kind color - table report of the employee working hours in period
with details in colors of kind of working hours. All other colors and options are similar to
report before.
3.13. Message to employee
Application form to send messages to employees to PC-Terminal. During
registration of employee, if message is active and exists for him, message is visible on
terminal. If he didn't succeed to read it (visible time was to short) he can make reregistration to see message again (re-registration must be inside time of User reregistration value in Parameter form).
Te enter a message, click Add button (new raw is inserted) from navigation icons,
insert to which employee (group of employees by location/shed, working group, cost
center etc.) and valid period (Valid from and Valid to).
Possibility to send messages to:
- all employees (all input fields in Recipient group must be empty).
- to one employee (only select one employee).
- to group of employees (to select one of the following: shed, working group or cost
center group).
- to cross section of groups (by combining of above mentioned groups).
32 / 41
3.14. Employee presence
Report form for reporting employee presence in day or period. Possible to select
employee by shed, working group, cost center or one employee.
There are following report kind:
Present employees at work - reporting of employees who are present at work during
selected day (today) or period.
Present and left employee from work - reporting of employees which are present at work
or left from work during selected day (today) or period
Employees without registration - report of employees which has no registrations in the
selected day or period.
There is possibility of selection actual time or other time or period.
Example of second report form is shown in the following figure:
3.15. Predefined hours
Program has possibility of defining of employee hours in advance. It is possible to
input following data. Employee name, period (date from and date to), number of hours
(e.g. 8) and hour type (e.g. annual leave).
It use for employee who has has (will) not make registration on the terminal in
some period, and if predefined hours are inserted, during calculation process program
puts them.
For example: Employee has annual leave from March 6 to March 11, 2012 annual leave of 8 hours for 7 days (4 working days). Employee has no registrations for
June 6, and during working hours calculation, program inserts 8 hours of annual leave for
this employee.
For each time is possible to define more than one predefined hours for each
employee. See parameters for predefined hours in 3.2. Registration parameter form /
predefined hours.
33 / 41
3.16. Day off calculation
Company can deside to not pay for overtime job than to transfer such hours to
days off. Aplication form is calculating employee days off from overtime hours. Note: it
is possible to calculate only if in table Working schedule parameter Overtime to day off is
checked (Working time/schedule form).
For calculation, it is necessary to press button Calculate for all (program
calculates for selection of employee - left database grid) or button Calculate hours
(calculation for only one selected employee). Program inserts data to following columns:
Year, Calc.date and Number of days. There is also column Transfer (means how many
days are transferred usually from the last year (or period) if employee didn't used all
assigned days off or annual leave days; e.g. if employee has 3 annual leave days form last
year, in program is necessary to insert 3 days in transfer column and in Calc.date to insert
January 1st of actual year).
Application form appearance is shown in the following figure:
In figure is shown that program calculated 1 day for Steven Buchman; he has from last
calculation to March 19, 2012 in total 8 overtime hour what is 1 day off.
3.17. Working time summary - Day off
Report form for employee working hours for selected period. Report is similar to
report: 3.10 Working time - summary report. It is inserted option of calculating of days
off for each employee for period of start of the year until end day of selected period (days
off from working hour calculation). In report is also calculation of assigned days off for
34 / 41
employee. Mentioned these two numbers are subtracted and calculated value is amount of
remaining days off per employee.
Example of report is in following figure:
Figure shows for example, Anne Fuller has 4 days off untill March 2012, and she
in March used 16 free d. hours, what is 2 days. Remaining is 2 days off to use. Also,
report shows Annual leave days as well.
3.18. Week day factor day off
Parameter application form for day off hours calculation from overtime including
factors. Factor means that overtime hours are multiplied with factor proportionally
(increased or decreased) for employee days off calculation. Factor is necessary to insert
for every day in the week. E.g. if for Monday is factor 1.1 (real number) and employee
has 8 hour of overtime, program calculates 8.8 hours for day off (or 1.1 days off). If
factor for Saturday is 1.4 program calculated 1.4 days off.
3.19. Working time - Employee/Day
Report form for making reports of working hours for selected period. Reports are
made by each employee grouped by each day. Possibility to select employee per
location/shed, working group, cost center or employee. Report calculates hour pool per
month (or per selected period), sum of employee hours and sum of employee hours by
kind of working hours. It has possibility to report remaining days of annual leave.
35 / 41
Example of report is shown on following figure:
3.20. Fast overview / change per day
Application form for fast data overview and modification. Selection of employees
according standard groups: location/shed, work group etc. Displayed table in the form
consist of of employees and their registration (first entry and last exit) and active fields of
kind of hours.
To view all registrations is possible by pressing the Show All inputs / outputs
button. To edit, add or delete of certain hours (registrations of kind of hour fields) it is
enough to go to the specific field to enter data. Data is written to the database by going to
another record or with Post edit in the database Navigator bar. To delete data insert null
(empty) value in the specified field and Post edit changes.
The time of entry / exit may be entered without the date (eg. inserting 8, program
recognizes as 8:00:00 in specified date).
Appearance of the application form is shown like on following figure:
36 / 41
3.21. Holiday calculation
An application form used to insert, edit and transfer annual leave for employees
for the selected year. Application can transfer rest of annual leave to the next year (if not
used complete). In the application user need to select year, and the data are displayed in
the table. The following data are presented in the table: Employee, the Number of days
(annual leave), Transfer (number of not used days of annual leave from the year before),
Used days (used annual leave days in the selected year), Rest (rest annual leave for
selected days of the year).
Application form appearance is like on the following figure:
Number of days and Transfer days is possible to change in the selected.
By pressing Copy "Rest" to next year button, application copies data to the next
year in Transfer field).
By pressing Copy "Num of days" to next year button, application copies data to
the next year under Num of days field.
3.22. Registration / hours - Detail report
Detail report of registrations and working hours of employees grouped per day.
For every single employee and day, report shows registration and working hours.
Employee selection is by standard groups: location/shed, working group etc.
In the report application form it is possible to select to display Employee
longname: Display longname in report and to report dates in selection period even if no
detail records exists for date: Display date if no data exists.
37 / 41
Appearance of the report for two employees for three days looks as shown on the
following figure:
3.23. Registration transfer from remote location
In a system with a multiple remote locations for registration of the employee
working hours, where the SQL Server is installed it is possible to copy the registration
information to a central server. In this way, for example, in one place can be performed
the calculation of the working hours and creatin the reports.
To configure remote location look section 2.2.6 Remote location server.
Before start of the transfer of employee registration data, employee fields Code
and ID, action code and hour kind code must correspond (mentioned fields in both
databases are used for recognition). If these data on remote location are identical to the
central location, applicaton copies the registration information from to central location.
To make connection to the remote location do like follows::
- to select remote location
- press <Connection> button - if connection data are OK and link to remote location is
valid, application is connecting to the remote location and message in the left message
box displayed.
- press <Show data> button - after successfull connection, in the table are displayed all
registration from last transfer.
- press <Transfer data> button - first, application checks if all data for transport are
corresponding to central database according recognition fields. If yes, data are
registration data are transferred.
If in settings adjusted, transferred list is also saved in txt field in the "Log"
directory (for adjustin Log folder, see Main parameters form).
During command executing, on the right side of the applicaton form, command messages
are dipslayed..
38 / 41
3.24. Fast overview / change in period
Application is used for fast overview and changement of the working hours of
employee per selected period. To display data, first is necessary to select the period and
to specify employees per some groups select additional data group employee selection.
Saturdays, Sundays and Holidays are displayed in different color (color is
adjustable in the settings). There are three main sligtly different displays of the working
hours:
Per hour kind - display to overview and change employee hours per hour kind. In the left
table, select the proper hour kind field and adequate employee working hours will be
displayed. To change the data, edit specified number, to insert put the number of hours in
the empty field. To delete the number of hours simply delete specified number.
Summary hours - summary display of all working hours of employee per day in period.
According hour kind colors, hours are displayed in color. Data in this view are not
possible to change. Appearance of the application form display is like on following
figure:
Per group - group display of working hours per specified group od hour kind. Appearance
of the display is like on the following figure (with hided additional options):
In tha application there are addtional two list reports:
39 / 41
Show all regirstrations - by selecting specified date (in table below) program lists all
registrations of selected employee per specified date
Show all working hours - by selecting speficied date program lists all registrations of
selected employe per specified date.
40 / 41
4.
Using the program in brief
Section explains in brief the procedure from employment to final reports and
exports. Here are steps in order which are necessary to use the program without spending
much time for learning.
By employee employment into company it is necessary to insert employee into
database. Application Main data / Employee / Employee application. By default, it is
possible to insert only Code and Name, all other data, if not entered gets default values.
After employee is inserted into database, regarding kind of company registration
system, it is necessary to print or adjust employee cards:
- Barcode card: For employee barcode registration is necessary to print his barcode
registration card by report form Main data / Employee / Employee barcode ID cards. In
report is possible to select many options (to report by employee, group of employees etc.)
For selection more than one employee in database grid below is used Ctr key + left
mouse button.
- RFID or other cards with fix ID number: For registration with RFID card is necessary to
insert RFID card ID number into Registr.code field: Application Main data / Employee /
Registration code.
It is also necessary to check in parameter form Time and attendance / Registration
parametere in Main parameter tab option Check employee registr.code in database.
Without this option, employee is not possible to make registration on the terminal.
Now, employee can registrate iself on the registration terminal. Also it is possible
to make reports regarding employee registrations by following report forms (Time and
attendance / Registration report) or to list registration by list form Time and attendance /
Registration list). If option is checked, terminal takes photos of each employee, so in list
application form is also possible to check to take employee photos.
For each employee it is necessary to perform hour calculation of the working
hours from registrations. It is done by Time and attendance / Working hour calculation
(v2) application form. Calculation is done per each day depending of employee options,
working schedule and other options in Registration parameter form. It is possible to
calculate working hours for all employees or per one employee, per day or per period.
After working hour calculation there is possible to make lots of reports by many
of select options (report forms like: Working time report, Working time summary report,
Working time summary per day report, Employee presence report etc.). Every report is
possible to export to CVS, XLS, Text, ODS ... etc. file formats.
Also, it is possible to fast overview and chande working hour data by application
forms Time and attendance Fast overview/change per day and Time and attendance Fast overview/change per period. Applications are user friendly because in one display it
is possible to overview date and addjuste settings and colors for beeter display. In the sam
form, it is posible to change data regarding each employee.
41 / 41
If mistaks are found or listed reports or calculations are not sufficient, please,
make us suggestions and report us to [email protected]. In the shortest possible time,
we will make required addons and software updates.