1
Real-Time Monitor,
Control Panel and
Demonstration Tool
User Manual
for Embedded Applications
Rev. 0.1, 06/2004
MOTOROLA.COM/SEMICONDUCTORS
FreeMaster for Embedded
Applications
User Manual — Rev. 0.1
by: Michal Hanak
Freescale Semiconductor
Roznov Czech System Center
Roznov p.R., Czech Republic
FMASTxxx — Rev. 0.1
MOTOROLA
FreeMaster for Embedded Applications
3
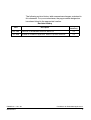
The following revision history table summarizes changes contained in
this document. For your convenience, the page number designators
have been linked to the appropriate location.
Revision history
Date
Page
Number(s)
Description
Feb. 2002
Published as 56F800 SDK document SDK111/D
n/a
Jun. 2004
Updated for FreeMaster Application. Made as separate document.
n/a
FMASTxxx — Rev. 0.1
MOTOROLA
FreeMaster for Embedded Applications
4
FreeMaster
Table of Contents
Section 1. INTRODUCTION
1.1
Overview. . . . . . . . . . . . . . . . . . . . . . . . . . . . . . . . . . . . . . . . . . . 7
1.2
Supported Platforms . . . . . . . . . . . . . . . . . . . . . . . . . . . . . . . . . . 7
1.3
FreeMaster Features . . . . . . . . . . . . . . . . . . . . . . . . . . . . . . . . . 8
1.4
License . . . . . . . . . . . . . . . . . . . . . . . . . . . . . . . . . . . . . . . . . . . . 8
Section 2. QUESTIONS and ANSWERS
2.1
Why do I need it? . . . . . . . . . . . . . . . . . . . . . . . . . . . . . . . . . . . 13
2.2
What does it do?. . . . . . . . . . . . . . . . . . . . . . . . . . . . . . . . . . . . 14
2.3
Why is it so great demonstration tool? . . . . . . . . . . . . . . . . . . . 14
2.4
What could I do with it if I follow the instructions? . . . . . . . . . . 14
2.5
How is it connected to a target development board? . . . . . . . . 15
2.6
What are all of these dialog boxes for? . . . . . . . . . . . . . . . . . . 15
2.7
How does a project relate to my application? . . . . . . . . . . . . . . 15
2.8
How do I set up remote control? Why would I want to? . . . . . .16
2.9
What is the Watch-grid? . . . . . . . . . . . . . . . . . . . . . . . . . . . . . .16
2.10
What is the Recorder? . . . . . . . . . . . . . . . . . . . . . . . . . . . . . . . 16
2.11
What is the Oscilloscope? . . . . . . . . . . . . . . . . . . . . . . . . . . . . 16
Section 3. INSTALLATION
FMASTxxx — Rev. 0.1
MOTOROLA
3.1
System Requirements . . . . . . . . . . . . . . . . . . . . . . . . . . . . . . . 18
3.2
Enabling FreeMaster Connection on Target Application . . . . . 18
FreeMaster for Embedded Applications
5
3.3
How to Install . . . . . . . . . . . . . . . . . . . . . . . . . . . . . . . . . . . . . . 19
Section 4. FreeMaster USAGE
4.1
Application Window Description . . . . . . . . . . . . . . . . . . . . . . . . 20
4.2
Variables. . . . . . . . . . . . . . . . . . . . . . . . . . . . . . . . . . . . . . . . . . 42
4.3
Commands . . . . . . . . . . . . . . . . . . . . . . . . . . . . . . . . . . . . . . . . 49
4.4
Importing Project Files . . . . . . . . . . . . . . . . . . . . . . . . . . . . . . . 55
4.5
Menu description . . . . . . . . . . . . . . . . . . . . . . . . . . . . . . . . . . . 58
4.6
Toolbars . . . . . . . . . . . . . . . . . . . . . . . . . . . . . . . . . . . . . . . . . . 62
Section 5. PROJECT OPTIONS
5.1
Communication. . . . . . . . . . . . . . . . . . . . . . . . . . . . . . . . . . . . .64
5.2
Symbol Files . . . . . . . . . . . . . . . . . . . . . . . . . . . . . . . . . . . . . . . 66
5.3
Packing Resource Files into Project File . . . . . . . . . . . . . . . . . 71
5.4
HTML Pages. . . . . . . . . . . . . . . . . . . . . . . . . . . . . . . . . . . . . . . 74
5.5
Demo Mode . . . . . . . . . . . . . . . . . . . . . . . . . . . . . . . . . . . . . . . 75
Section 6. HTML and SCRIPTING
6.1
Special HTML Hyperlinks . . . . . . . . . . . . . . . . . . . . . . . . . . . . . 77
6.2
FreeMaster ActiveX Object. . . . . . . . . . . . . . . . . . . . . . . . . . . . 78
6.3
FreeMaster ActiveX Object Methods . . . . . . . . . . . . . . . . . . . .80
6.4
FreeMaster ActiveX Properties. . . . . . . . . . . . . . . . . . . . . . . . . 97
6.5
FreeMaster ActiveX Object Events. . . . . . . . . . . . . . . . . . . . . . 99
6.6
Examples . . . . . . . . . . . . . . . . . . . . . . . . . . . . . . . . . . . . . . . .100
Appendix A. References
FMASTxxx — Rev. 0.1
MOTOROLA
FreeMaster for Embedded Applications
6
User Manual – FreeMaster
Section 1. INTRODUCTION
1.1 Overview
This User Manual describes the FreeMaster application (formerly known
as PC Master) developed by Motorola/Freescale engineers to allow
control of an embedded application from a graphical environment
running on a PC. The application was initially created for developers of
hard-real time motor control applications but many users found it very
useful for their custom development.
The FreeMaster application is fully backward compatible with previous
“PC Master” versions.
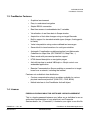
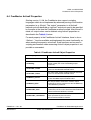
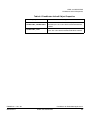
1.2 Supported Platforms
The PC-side FreeMaster application can be installed on any Microsoft
Windows-based systems starting Windows 98. Table 1-1 gives a brief
summary of embedded-side “drivers” which implement the FreeMaster
communication protocol.
Table 1-1. Supported Platforms
Device / Family
56F800/E
Software Package containing FreeMaster support
Metrowerks IDE / Processor Expert
Embedded DSP Software Development Kit (SDK)
56F800_Quick_Start development tool
56F800E_Quick_Start development tool
HC08/HCS08
Stand alone implementation (Freescale Application Note
AN2637)
HC12/HCS12
Stand alone implementation derived from HC08 code
MPC500
MPC500_Quick_Start development tool
MPC5500
MPC5500_Quick_Start development tool
FMASTxxx — Rev. 0.1
MOTOROLA
FreeMaster for Embedded Applications
INTRODUCTION
7
INTRODUCTION
FreeMaster Features
1.3 FreeMaster Features
•
Graphical environment
•
Easy to understand navigation
•
Simple RS232 connection
•
Real-time access to embedded-side C variables
•
Visualization of real-time data in Scope window
•
Acquisition of fast data changes using on-target Recorder
•
Built-in support for standard variable types (integer, floating point,
bit fields)
•
Value interpretation using custom defined text messages
•
Several built-in transformations for real type variables
•
Automatic C-application variable extraction from Metrowerks
CodeWarrior output files (ELF/DWARF1/2, Map Files,...)
•
Demo mode with password protection support
•
HTML-based description or navigation pages
•
ActiveX interface to enable VBScript or JScript control over
embedded application
•
Remote Communication Server enabling a connection to target
board over a network, including the Internet
Features not available in free distribution
•
Custom communication plug-in modules available for various
physical media and protocol (CAN/CCP, JTAG, BDM)
•
Matlab interface to the FreeMaster ActiveX object
1.4 License
FREESCALE SEMICONDUCTOR SOFTWARE LICENSE AGREEMENT
This is a legal agreement between you (either as an individual or as an
authorized representative of your employer) and Freescale
Semiconductor, Inc. (“Freescale”). It concerns your rights to use this file
FMASTxxx — Rev. 0.1
MOTOROLA
FreeMaster for Embedded Applications
INTRODUCTION
8
INTRODUCTION
License
and any accompanying written materials (the “Software”). In
consideration for Freescale allowing you to access the Software, you are
agreeing to be bound by the terms of this Agreement. If you do not agree
to all of the terms of this Agreement, do not download the Software. If
you change your mind later, stop using the Software and delete all
copies of the Software in your possession or control. Any copies of the
Software that you have already distributed, where permitted, and do not
destroy will continue to be governed by this Agreement. Your prior use
will also continue to be governed by this Agreement.
LICENSE GRANT. Freescale grants to you, free of charge, the
non-exclusive, non-transferable right (1) to use the Software
exclusively in conjunction with a development, prototype, or
production platform utilizing at least one processor unit from
Freescale (“Exclusive Use”), (2) to reproduce the Software, (3) to
distribute the Software, and (4) to sublicense to others the right to use
the distributed Software. The Software is provided to you only in object
(machine-readable) form. You may exercise the rights above only with
respect to such object form. You may not translate, reverse engineer,
decompile, or disassemble the Software except to the extent applicable
law specifically prohibits such restriction. In addition, you must prohibit
your sublicensees from doing the same. If you violate any of the terms
or restrictions of this Agreement, Freescale may immediately terminate
this Agreement, and require that you stop using and delete all copies of
the Software in your possession or control.
COPYRIGHT. The Software is licensed to you, not sold. Freescale owns
the Software, and United States copyright laws and international treaty
provisions protect the Software. Therefore, you must treat the Software
like any other copyrighted material (e.g. a book or musical recording).
You may not use or copy the Software for any other purpose than what
is described in this Agreement. Except as expressly provided herein,
Freescale does not grant to you any express or implied rights under any
Freescale or third-party patents, copyrights, trademarks, or trade
secrets. Additionally, you must reproduce and apply any copyright or
other proprietary rights notices included on or embedded in the Software
to any copies or derivative works made thereof, in whole or in part, if any.
FMASTxxx — Rev. 0.1
MOTOROLA
FreeMaster for Embedded Applications
INTRODUCTION
9
INTRODUCTION
License
SUPPORT. Freescale is NOT obligated to provide any support,
upgrades or new releases of the Software. If you wish, you may contact
Freescale and report problems and provide suggestions regarding the
Software. Freescale has no obligation whatsoever to respond in any way
to such a problem report or suggestion. Freescale may make changes
to the Software at any time, without any obligation to notify or provide
updated versions of the Software to you.
NO WARRANTY. TO THE MAXIMUM EXTENT PERMITTED BY LAW,
FREESCALE EXPRESSLY DISCLAIMS ANY WARRANTY FOR THE
SOFTWARE. THE SOFTWARE IS PROVIDED “AS IS”, WITHOUT
WARRANTY OF ANY KIND, EITHER EXPRESS OR IMPLIED,
INCLUDING, WITHOUT LIMITATION, THE IMPLIED WARRANTIES
OF MERCHANTABILITY, FITNESS FOR A PARTICULAR PURPOSE,
OR NON-INFRINGEMENT. YOU ASSUME THE ENTIRE RISK
ARISING OUT OF THE USE OR PERFORMANCE OF THE
SOFTWARE, OR ANY SYSTEMS YOU DESIGN USING THE
SOFTWARE (IF ANY). NOTHING IN THIS AGREEMENT MAY BE
CONSTRUED AS A WARRANTY OR REPRESENTATION BY
FREESCALE THAT THE SOFTWARE OR ANY DERIVATIVE WORK
DEVELOPED WITH OR INCORPORATING THE SOFTWARE WILL BE
FREE FROM INFRINGEMENT OF THE INTELLECTUAL PROPERTY
RIGHTS OF THIRD PARTIES.
INDEMNITY. You agree to fully defend and indemnify Freescale from
any and all claims, liabilities, and costs (including reasonable attorney’s
fees) related to (1) your use (including your sublicensee’s use, if
permitted) of the Software or (2) your violation of the terms and
conditions of this Agreement.
LIMITATION OF LIABILITY. IN NO EVENT WILL FREESCALE BE
LIABLE, WHETHER IN CONTRACT, TORT, OR OTHERWISE, FOR
ANY INCIDENTAL, SPECIAL, INDIRECT, CONSEQUENTIAL OR
PUNITIVE DAMAGES, INCLUDING, BUT NOT LIMITED TO,
DAMAGES FOR ANY LOSS OF USE, LOSS OF TIME,
INCONVENIENCE, COMMERCIAL LOSS, OR LOST PROFITS,
SAVINGS, OR REVENUES TO THE FULL EXTENT SUCH MAY BE
DISCLAIMED BY LAW.
FMASTxxx — Rev. 0.1
MOTOROLA
FreeMaster for Embedded Applications
INTRODUCTION
10
INTRODUCTION
License
COMPLIANCE WITH LAWS; EXPORT RESTRICTIONS. You must use
the Software in accordance with all applicable U.S. laws, regulations and
statutes. You agree that neither you nor your licensees (if any) intend to
or will, directly or indirectly, export or transmit the Software to any
country in violation of U.S. export restrictions.
GOVERNMENT USE. Use of the Software and any corresponding
documentation, if any, is provided with RESTRICTED RIGHTS. Use,
duplication or disclosure by the Government is subject to restrictions as
set forth in subparagraph (c)(1)(ii) of The Rights in Technical Data and
Computer Software clause at DFARS 252.227-7013 or subparagraphs
(c)(l) and (2) of the Commercial Computer Software--Restricted Rights
at 48 CFR 52.227-19, as applicable. Manufacturer is Freescale
Semiconductor, Inc., 6501 William Cannon Drive West, Austin, TX,
78735.
HIGH RISK ACTIVITIES. You acknowledge that the Software is not fault
tolerant and is not designed, manufactured or intended by Freescale for
incorporation into products intended for use or resale in on-line control
equipment in hazardous, dangerous to life or potentially life-threatening
environments requiring fail-safe performance, such as in the operation
of nuclear facilities, aircraft navigation or communication systems, air
traffic control, direct life support machines or weapons systems, in which
the failure of products could lead directly to death, personal injury or
severe physical or environmental damage (“High Risk Activities”). You
specifically represent and warrant that you will not use the Software or
any derivative work of the Software for High Risk Activities.
CHOICE OF LAW; VENUE; LIMITATIONS. You agree that the statutes
and laws of the United States and the State of Texas, USA, without
regard to conflicts of laws principles, will apply to all matters relating to
this Agreement or the Software, and you agree that any litigation will be
subject to the exclusive jurisdiction of the state or federal courts in
Texas, USA. You agree that regardless of any statute or law to the
contrary, any claim or cause of action arising out of or related to this
Agreement or the Software must be filed within one (1) year after such
claim or cause of action arose or be forever barred.
PRODUCT LABELING. You are not authorized to use any Freescale
trademarks, brand names, or logos.
FMASTxxx — Rev. 0.1
MOTOROLA
FreeMaster for Embedded Applications
INTRODUCTION
11
INTRODUCTION
License
ENTIRE AGREEMENT. This Agreement constitutes the entire
agreement between you and Freescale regarding the subject matter of
this Agreement, and supersedes all prior communications, negotiations,
understandings, agreements or representations, either written or oral, if
any. This Agreement may only be amended in written form, executed by
you and Freescale.
SEVERABILITY. If any provision of this Agreement is held for any
reason to be invalid or unenforceable, then the remaining provisions of
this Agreement will be unimpaired and, unless a modification or
replacement of the invalid or unenforceable provision is further held to
deprive you or Freescale of a material benefit, in which case the
Agreement will immediately terminate, the invalid or unenforceable
provision will be replaced with a provision that is valid and enforceable
and that comes closest to the intention underlying the invalid or
unenforceable provision.
NO WAIVER. The waiver by Freescale of any breach of any provision of
this Agreement will not operate or be construed as a waiver of any other
or a subsequent breach of the same or a different provision.
FMASTxxx — Rev. 0.1
MOTOROLA
FreeMaster for Embedded Applications
INTRODUCTION
12
User Manual – FreeMaster
Section 2. QUESTIONS and ANSWERS
First question: why place this topic immediately after an introduction?
The reason is really quite practical. While writing this User Manual, the
following questions were raised. Since the answers to these questions
clarified terms and topics described further in the manual, it was decided
to put this topic before those that are more detailed and perhaps less
easily understood.
2.1 Why do I need it?
The primary goal of developing FreeMaster software was to deliver a
tool for debugging and demonstrating Motor Control algorithms and
applications. The result was a tool with the versatility to be used for
multipurpose algorithms and applications. Some real-world uses
include:
•
Real-Time debugging - FreeMaster allows users to debug
applications in true real-time through its ability to watch variables.
Moreover, it allows debugging at the algorithm level, which helps
to shorten the development phase.
•
Diagnostic tool - FreeMaster remote control capability allows it to
be used as a diagnostic tool for debugging customer applications
remotely across a network.
•
Demonstrations - FreeMaster is an outstanding tool for
demonstrating algorithm or application execution and variable
outputs.
•
Education - FreeMaster may be used for educational purposes. Its
application control features allow students to play with the
application in demonstration mode learning how to control
program execution.
FMASTxxx — Rev. 0.1
MOTOROLA
FreeMaster for Embedded Applications
QUESTIONS and ANSWERS
13
QUESTIONS and ANSWERS
What does it do?
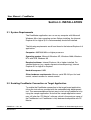
2.2 What does it do?
FreeMaster communicates with the target system application via serial
communication to read and write application internal variables.
FreeMaster provides the following visualization features for displaying
variable information in a friendly format:
•
Oscilloscope - provides monitoring/visualization of application
variables in the same manner as a classical oscilloscope with
CRT. In this case, monitoring rates are limited by the serial
communication speed.
•
Recorder - provides monitoring/visualization of application
variables that are changing at a rate faster than the sampling rate
of the oscilloscope. While the Scope periodically reads
FreeMaster variable values and plots them in real-time, the
Recorder is running on the target board. Variable values are
sampled into a memory buffer on the board, then the sampled data
is downloaded from board to FreeMaster. This mechanism allows
a much shorter sampling period and enables sampling and
plotting of very quick actions.
2.3 Why is it so great demonstration tool?
The embedded-side algorithm can be demonstrated in one block, or
divided into several blocks, depending on which possibility better reflects
the algorithm structure. Each block’s input parameters may be explored
to observe how they affect output parameters. Each block has a
description tab for explaining algorithm details using multimedia-capable
and scriptable HTML format.
2.4 What could I do with it if I follow the instructions?
Using the demo project included with the embedded-side
implementation, it is easy to learn how to use FreeMaster by playing with
the project’s defined blocks and parameters. The demo project allows
you to understand how to control the application as well. You can go into
details of each item, check its properties, change parameters and
FMASTxxx — Rev. 0.1
MOTOROLA
FreeMaster for Embedded Applications
QUESTIONS and ANSWERS
14
QUESTIONS and ANSWERS
How is it connected to a target development board?
determine how each can be used in your application. For a detailed
explanation of the parameters, see Section 4.
2.5 How is it connected to a target development board?
FreeMaster requires a serial communication port on the target
development hardware. Connection is made using a standard RS-232
serial cable. On one side, the cable is plugged into the PC serial port
(COM1, COM2 or other) and, on the opposite side, into the target
development board’s serial connector.
In addition to RS232 link, the custom communication plug-in modules
can be written and used by FreeMaster. As an option not included in the
free distribution, the communication plug-ins are available e.g. for CAN
Calibration Protocol, JTAG Real-time Data Exchange port on 56F800E,
BDM interface on HCS08/12 devices etc.
2.6 What are all of these dialog boxes for?
In Section 4, you will see pictures with dialog boxes. These dialog boxes
are used as a questionnaire, where you will enter parameters describing,
for example, one algorithm block or application variable and its
visualization.
2.7 How does a project relate to my application?
There can be many FreeMaster projects related to a single target-board
application. For example, three specific FreeMaster projects can work
with the same board application to provide three different purposes:
•
to provide information used during debug process
•
to provide service maintenance capabilities
•
may be used for learning about your application during operator
training phase
FMASTxxx — Rev. 0.1
MOTOROLA
FreeMaster for Embedded Applications
QUESTIONS and ANSWERS
15
QUESTIONS and ANSWERS
How do I set up remote control? Why would I want to?
2.8 How do I set up remote control? Why would I want to?
For remote control, you need at least two computers connected via a
network, one running the stand-alone mini-application called
FreeMaster Remote Communication Server and the second running the
standard FreeMaster application. The target development board is then
connected to the computer running FreeMaster Server.
Remote control operation is valuable for performing remote debugging
or diagnostics. An application may be diagnosed remotely by connecting
the target development board to the remote PC and then running the
FreeMaster locally with a service project for this customer’s application.
2.9 What is the Watch-grid?
Watch-grid is one of the panes in FreeMaster application window. It
shows selected application variables and their content in human
readable format. The application variables displayed are selected
separately in the block property settings of each project block.
2.10 What is the Recorder?
Recorder is created in software on the target development board and
stores changes of variables in real-time. You can define the list of
variables which will be recorded by the embedded-side timer periodic
interrupt service routine. After the requested number of variable samples
are stored within the Recorder buffer on the target board, it is
downloaded from the board and displayed in FreeMaster Recorder pane
as a graph. The main advantage of the Recorder is the ability to sample
very fast actions.
2.11 What is the Oscilloscope?
FreeMaster Oscilloscope is similar to the classical hardware
oscilloscope. It shows graphically selected variables in real-time. The
variable values are read from the board application in real-time through
the serial communication line. Oscilloscope GUI looks similar to the
FMASTxxx — Rev. 0.1
MOTOROLA
FreeMaster for Embedded Applications
QUESTIONS and ANSWERS
16
QUESTIONS and ANSWERS
What is the Oscilloscope?
Recorder, except that the sampling speed of variables is limited by the
communication data link.
FMASTxxx — Rev. 0.1
MOTOROLA
FreeMaster for Embedded Applications
QUESTIONS and ANSWERS
17
User Manual – FreeMaster
Section 3. INSTALLATION
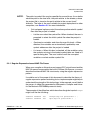
3.1 System Requirements
The FreeMaster application can run on any computer with Microsoft
Windows 98 or later operating system. Before installing, the Internet
Explorer 4.0 or higher (5.5 is recommended) should be installed.
The following requirements result from those for the Internet Explorer 4.0
application:
Computer: 486DX/66 MHz or higher processor
Operating system: Microsoft Windows XP, Windows 2000, Windows
NT4 with SP6, Windows 98
Required software: Internet Explorer 4.0 or higher installed. For
selected features (e.g. regular expression-based parsing), Internet
Explorer 5.5 or higher is required.
Hard drive space: 8 MB
Other hardware requirements: Mouse, serial RS-232 port for local
control, network access for remote control
3.2 Enabling FreeMaster Connection on Target Application
To enable the FreeMaster connection to the target board application,
follow the instructions provided with the embedded-side development
tool. The recommended and fastest way to start using FreeMaster is by
trying the sample application. Note that the sample application name
may still refer the “PC Master” software, which is the previous name of
the FreeMaster tool. FreeMaster is fully backward compatible with PC
Master.
FMASTxxx — Rev. 0.1
MOTOROLA
FreeMaster for Embedded Applications
INSTALLATION
18
INSTALLATION
How to Install
3.3 How to Install
The FreeMaster application is distributed either as a part of bigger
development tool (e.g. Metrowerks CodeWarrior) or as a stand-alone
single-file self-extracting executable file. In the latter case, run the
executable file and follow the instructions on the screen.
FMASTxxx — Rev. 0.1
MOTOROLA
FreeMaster for Embedded Applications
INSTALLATION
19
User Manual – FreeMaster
Section 4. FreeMaster USAGE
This chapter contains a detailed description of the user interface for the
FreeMaster application.
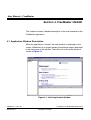
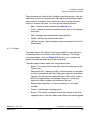
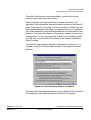
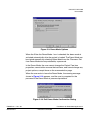
4.1 Application Window Description
When the application is started, the main window is displayed on the
screen. When there is no project loaded, the welcome page is displayed
in the main pane of the window. The initial look of the main window is
shown in Figure 4-1.
Figure 4-1. Initial Application Window
FMASTxxx — Rev. 0.1
MOTOROLA
FreeMaster for Embedded Applications
FreeMaster USAGE
20
FreeMaster USAGE
Application Window Description
The welcome page contains links to the documentation and to the
application help. There are also several other links corresponding to the
standard menu commands (for example, the Open project command).
In the remaining part of this chapter, an application usage is
demonstrated on an example of a motor control project. The FreeMaster
project and the source code of the related embedded application, can be
found in Motorola’s Embedded Software Development Kit or in Motor
Control library for MC56F800E_Quick_Start tool.
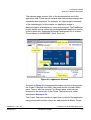
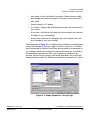
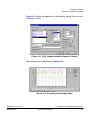
Figure 4-2. Application Window
As shown in Figure 4-2, the application window consists of three panes:
the Project Tree pane, the Detail View pane and the Variable Watch
pane. There is also the optional Fast Access pane, which can be
displayed in the lower part of the Project Tree pane and is further
described in Section 4.5.3.
The Project Tree pane contains a logical tree structure of the application
being monitored/controlled. Users can add project sub-blocks, Scope,
FMASTxxx — Rev. 0.1
MOTOROLA
FreeMaster for Embedded Applications
FreeMaster USAGE
21
FreeMaster USAGE
Application Window Description
and Recorder definitions to the project block in a logical structure to form
a Project Tree. This pane provides point and click selection of defined
Project Tree elements.
The Detail View pane dynamically changes its content depending on the
item selected in the Project Tree. Depending on the type of the item
selected in the tree, this pane also provides several tabs to sub-pages of
additional information associated with the item.
•
control page = An HTML page created for controlling the target
system
•
algorithm block description = An HTML page or another document
whose URL is defined in the selected Project Tree item’s
properties
•
current item help = Another HTML document whose URL is
defined in the Scope or Recorder properties.
•
oscilloscope = A real-time graph displaying application variables
as defined in the Scope properties
•
recorder = A graph displaying recorded application variables as
defined in the Recorder properties
•
The control page, when defined, is available for all Project Tree
items to allow the user to control the board at any time. The
content of the algorithm block description page changes with the
Project Tree item selected. When a Scope or Recorder is selected
from the Project Tree, the current item help and
oscilloscope/recorder chart pages are also available.
The Variable Watch pane contains the list of variables assigned to the
watch. The pane displays the immediate variable values and also
enables you to change them (if this is enabled in the variable definition).
All the information related to one application is stored in a single project
file with the extension “.pmp”. This information includes the project
settings and options, the Project Tree, Detail View HTML pages,
real-time chart definitions, watch interface settings, variables and
commands, stimulators and more.
FMASTxxx — Rev. 0.1
MOTOROLA
FreeMaster for Embedded Applications
FreeMaster USAGE
22
FreeMaster USAGE
Application Window Description
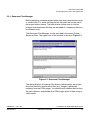
4.1.1 Project Tree
When a new project is created, the Project Tree window contains an
empty structure with just one root project block called “New Project”. You
can then change properties of this block or add sub-blocks, Scopes or
Recorders to the structure.
Property changes and Project Tree additions can be done in two ways:
•
Select an item in the Project Tree and right mouse click to use the
local menu
•
Select an item in the Project Tree and select main menu “Item”
pull-down
4.1.1.1 Project Block and Sub-block
The Project block should cover an integral component of the selected
algorithm. Sub-blocks may be added should the user care to break the
algorithm into multiple blocks. Each block has its own algorithm block
description page, (shown in Figure 4-19), watch variables and
commands. All of these can be defined in the Project block properties
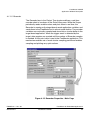
dialog, as shown in Figure 4-3.
Figure 4-3. Project Block Properties - Main Page
FMASTxxx — Rev. 0.1
MOTOROLA
FreeMaster for Embedded Applications
FreeMaster USAGE
23
FreeMaster USAGE
Application Window Description
The Main page contains the following user configuration items.
•
Name = Name of Project block that will be displayed in the Project
Tree
•
Description URL = Select a description URL or .htm or .html file to
be shown in the Detail View pane under the algorithm block
description tab. This file may be created with any HTML editor
such as MS Front Page Express or Netscape Composer.
•
Watch-Grid setup = You can select columns to display in the
Watch-Grid (Name, Value, Unit, Period); specify column order
using the Up and Down arrow buttons; check the grid behavior
options (column resizing/swapping, row resizing); allow format
changes to grid cells with Toolbar (see Section 4.6.2) and edit
in-place variable values by checking the next option boxes.
The Watch page shown in Figure 4-4 selects which FreeMaster project
variables are to be watched in the context of this project block.
Figure 4-4. Project Block Properties - Watch Page
The variables in the Watched variables list are the project variables
which are currently selected for watching in the Watch-Grid. The
Available variables list contains the remaining available project variables
FMASTxxx — Rev. 0.1
MOTOROLA
FreeMaster for Embedded Applications
FreeMaster USAGE
24
FreeMaster USAGE
Application Window Description
not selected for watching with the current block item selected in the tree.
You can use the following buttons:
•
Add/Remove = Moves variables into and out of the Watched
variables window
•
New = Creates a new variable (see Section 4.2)
•
Clone = Creates a new variable based on a copy of the selected
variable
•
Edit = Changes the selected variable properties
•
Delete = Deletes the selected variable from the project
•
Up/Down arrows = Sets the display order of the watched variables
in the Watch-Grid
FreeMaster communicates with the board application by reading/writing
variables and/or sending so called “application commands” (see
Section 4.3). As the variable appearance in the Watch-Grid can be
dependent on the block selected in the Project Tree pane, the availability
of application commands can also be dependent on the selected block.
The App. commands page, shown in Figure 4-5, sets which commands
will be available in the Fast Access pane in the context of this project
block and also enables the management of application commands.
Figure 4-5. Project Block Properties - App. commands Page
FMASTxxx — Rev. 0.1
MOTOROLA
FreeMaster for Embedded Applications
FreeMaster USAGE
25
FreeMaster USAGE
Application Window Description
The commands are listed in the Available commands window. Use the
Add button to move a command into the Displayed commands window
and to make it available in the Fast Access pane. Use the Remove
button for reverse operation. You can use the following buttons:
•
New = Creates a new command (see Section 4.3)
•
Clone = Creates a new command based on a copy of the selected
command
•
Edit = Changes the selected command properties
•
Delete = Deletes the selected command
•
Up/Down arrows = Sets the display order of commands in the Fast
Access pane
4.1.1.2 Scope
The Scope item in the Project Tree structure defines a new real-time
oscilloscope chart to be shown in the Detail View pane. The Scope
properties window, shown in Figure 4-6, allows you to configure the
appearance and characteristics of the scope chart.
The Main page contains these user configuration items:
•
Name = The name of the Scope item that will be displayed in the
Project Tree
•
Description URL = Specify the URL of the document or local path
to a file to be shown in the Detail View pane under the current item
help tab. This file may be created with any HTML editor, such as
MS Front Page Express or Netscape Composer, and should
explain the chart variables and settings to the user.
•
Scope global properties = Common properties for all scope
variables
•
Period = Oscilloscope sampling period
•
Buffer = The number of samples in one data subset in the chart
•
Legend location = Set the visibility and location of the chart legend
FMASTxxx — Rev. 0.1
MOTOROLA
FreeMaster for Embedded Applications
FreeMaster USAGE
26
FreeMaster USAGE
Application Window Description
Figure 4-6. Scope properties - Main Page
•
Grid = Choose the horizontal and/or vertical grid lines to be
displayed in the chart
•
Graph type = Select the mode of oscilloscope operation
•
Time graph = A variable (values versus time) will be displayed in
the chart
•
X-Y graph = Inter-variable dependencies (value versus value) will
be displayed in the chart
•
Graph setup (for Time graph):
•
X-axis label = Specify the name displayed for the X axis
•
X-axis units = Select the axis units
•
X-axis width = Specify the range of the X axis
FMASTxxx — Rev. 0.1
MOTOROLA
FreeMaster for Embedded Applications
FreeMaster USAGE
27
FreeMaster USAGE
Application Window Description
•
Auto-scale X axis until width is reached = Scales the axis width
after Scope start when the length of subset is shorter than the X
axis width
•
Graph setup (for X-Y graph):
•
X-variable = Selects the variable whose values will be used for X
axis values
•
X-axis min = Sets the X axis lower limit value (checks the auto box
to enable X axis auto-scaling)
•
X-axis max = Sets the X axis upper limit value (checks the auto
box to enable X axis auto-scaling)
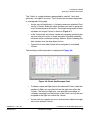
The Setup page (Figure 4-7) is used to assign variables to be displayed
on the oscilloscope chart. Up to eight Chart vars (seven in X-Y mode)
may be selected for display in the chart and assigned to a maximum of
five Y-blocks. Select one of eight positions and browse for a variable in
the drop-down list below the list to set or change a variable at this
position. Select the first (empty) item in the drop-down list to clear the
selected position in the list. Each chart variable is assigned to a Y block.
Figure 4-7. Scope Properties - Set-up Page
FMASTxxx — Rev. 0.1
MOTOROLA
FreeMaster for Embedded Applications
FreeMaster USAGE
28
FreeMaster USAGE
Application Window Description
The Y block is a graph element represented by one left Y axis and,
optionally, one right Y axis also. The Y blocks can be drawn separately,
or overlapped in the graph.
•
Assign vars to block button = Assigns successive selected Chart
vars to a Y block. Select the chart variables you want to group into
one Y block and press this button. The simple assignment of three
variables into single Y block is shown in Figure 4-7.
•
In the Y-block Left axis frame, set the axis range by specifying the
min and max axis value, or check auto box to enable automatic
minimum and/or maximum tracking. Select a Style of drawing the
data subsets from the drop-down list box.
•
Type the Left axis label, which will be assigned to a selected
Y-block.
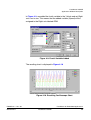
The resulting oscilloscope chart is displayed in Figure 4-8.
Figure 4-8. Basic Oscilloscope Chart
•
To define a separate Right axis for the selected Y-block, select the
number of Right axis vars that will use the right axis within the
Y-block. The value of Right axis vars specifies the number of
variables (counting from the bottom of the Chart vars list) that are
assigned to the right axis within the Y-block.
•
As with Left axis, specify min, max, style and axis label for the right
axis in the selected Y block.
FMASTxxx — Rev. 0.1
MOTOROLA
FreeMaster for Embedded Applications
FreeMaster USAGE
29
FreeMaster USAGE
Application Window Description
In Figure 4-9, we added the fourth variable to the Y-block and set Right
axis vars to one. This means that the added variable (Speed) will be
assigned to the Right axis labeled RPM.
Figure 4-9. Fourth Variable Added
The resulting chart is displayed in Figure 4-10
Figure 4-10. Resulting Oscilloscope Chart
FMASTxxx — Rev. 0.1
MOTOROLA
FreeMaster for Embedded Applications
FreeMaster USAGE
30
FreeMaster USAGE
Application Window Description
Figure 4-11 shows the addition of a fifth variable, Period Time, put into
a separate Y-block.
Figure 4-11. Fifth Variable Added in Separate Y-block
The resulting chart is displayed in Figure 4-12
Figure 4-12. Resulting Oscilloscope Chart
FMASTxxx — Rev. 0.1
MOTOROLA
FreeMaster for Embedded Applications
FreeMaster USAGE
31
FreeMaster USAGE
Application Window Description
•
Join button = Several successive Y-blocks can be joined and set
to be overlapped. The overlapped blocks then behave as a block
with multiple left axes and, optionally, multiple right axes as well.
Figure 4-13 shows the joining of two Y-blocks defined in previous
examples.
Figure 4-13. Two Y-blocks Joined
Figure 4-14 displays the Oscilloscope Chart that resulted when
Y-blocks were set to overlap.
Figure 4-14. Resulting Oscilloscope Chart (Y-blocks Overlap)
FMASTxxx — Rev. 0.1
MOTOROLA
FreeMaster for Embedded Applications
FreeMaster USAGE
32
FreeMaster USAGE
Application Window Description
4.1.1.3 Recorder
The Recorder item in the Project Tree structure defines a real-time
recorder chart to be shown in the Detail View pane. While the Scope
periodically reads variable values and plots them in real time, the
Recorder is running on the target board, reads application variables, and
sends them to the FreeMaster tool in a burst mode fashion. The recorder
variables are continually sampled and stored into a circular buffer in the
target board application. When the trigger event is detected by the
target, data samples are counted until the number of Recorder samples
is reached. At this point, data is sent to the FreeMaster application. This
mechanism enables use of much shorter sampling period and enables
sampling and plotting very quick actions.
Figure 4-15. Recorder Properties - Main Page
FMASTxxx — Rev. 0.1
MOTOROLA
FreeMaster for Embedded Applications
FreeMaster USAGE
33
FreeMaster USAGE
Application Window Description
The Main page contains the following user configuration items:
•
Name = The name of the Recorder item that will be displayed in
the Project Tree
•
Description URL = Specify the document’s URL or local path to a
file to be shown in the Detail View pane under the current item help
tab. This file may be created with any HTML editor, such as MS
Front Page Express or Netscape Composer, and should explain
the chart variables and settings to the user.
•
Recorder global properties = Common properties for all Recorder
variables
– Board time base = A sampling period preset by the board
application. In the SDK, the time base value can be adjusted
by setting PC_MASTER_RECORDER_TIME_BASE in the
appconfig.h file during the board application development.
– Time base multiple = Sets an integer multiple of the time base
to extend the sampling period used for recorder operation
– Recorded samples = The number of samples buffered for one
recorded subset
– On board recorder memory = Displays the amount of on-board
application memory allocated for recorder operation. Based on
the memory size, recorded variables format, and the number
of recorded variables, the maximum number of points which fit
in the recorder’s memory is calculated and displayed. The
Recorded samples value set should be lower than this result.
•
Legend location = Sets the visibility and location of the chart
legend
•
Grid = Chooses the horizontal and/or vertical grid lines to be
displayed in the chart
•
Graph type = Selects the mode of recorder operation
– Time graph = A variable (values versus time) will be displayed
in the chart
– X-Y graph = Inter-variable dependencies (value versus value)
will be displayed in the chart
FMASTxxx — Rev. 0.1
MOTOROLA
FreeMaster for Embedded Applications
FreeMaster USAGE
34
FreeMaster USAGE
Application Window Description
•
Graph setup (for Time graph):
– X-axis label = Specify the name displayed for X axis
– X-axis units = Selects the axis units
•
Graph setup (for X-Y graph):
– X-variable = Selects the variable whose values will be used for
X axis values
– X-axis min = Sets the lower limit value of the X axis (check the
auto box to enable auto-scaling of the X axis)
– X-axis max = Sets the upper limit value of the X axis (check the
auto box to enable auto-scaling of the X axis)
The Setup page of the Recorder properties dialog, shown in
Figure 4-16, looks exactly the same as the appropriate page of the
Scope properties dialog. For more information about how to add
variables to the recorder chart and how to set up the chart itself, see
Section 4.1.1.2.
Figure 4-16. Recorder Properties - Setup Page
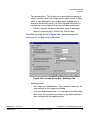
The Trigger page, shown in Figure 4-17, defines the Recorder start
conditions. The trigger starts the Recorder when the Trigger variable
FMASTxxx — Rev. 0.1
MOTOROLA
FreeMaster for Embedded Applications
FreeMaster USAGE
35
FreeMaster USAGE
Application Window Description
exceeds the specified Threshold value with the selected type of slope,
(positive = rising edge or negative = falling edge).
Figure 4-17. Recorder Properties - Trigger Page
•
Threshold = Specify conditions for the trigger event
– Trigger variable = Selects a variable to be tracked for the
trigger event
– Threshold value = The value of the variable being recorded
that, when crossed, causes the trigger event. Specify a
threshold value and select whether the value is in raw format
(as in the board application) or whether it must be translated
back into raw format (e.g., when a real-type transformation is
defined for the variable and you want to apply an inverse
transformation on the trigger value before it is set as threshold
in the embedded application).
– Threshold crossing slope = Selects the slope on which the
threshold crossing is monitored
– Pretrigger samples = Specify the number of samples to save
and display prior to the trigger event
FMASTxxx — Rev. 0.1
MOTOROLA
FreeMaster for Embedded Applications
FreeMaster USAGE
36
FreeMaster USAGE
Application Window Description
•
Auto run = Specifies conditions for reactivating the trigger for
repeated recording
– Auto run mode = Select to enable repeated recording. After
detecting the trigger event, filling the buffer and downloading
the buffer data to FreeMaster, the trigger is automatically
reactivated and new data is downloaded immediately after the
next trigger event occurs.
– Hold triggered signal = Check this box and specify how long to
wait after one signal is displayed in the chart and before
reactivating the trigger.
– Automatic stopping = Check this box and specify the maximum
time period for detecting the trigger event. If the event is not
detected within the specified time, the sampling is
unconditionally stopped, and actual buffer data is downloaded.
4.1.2 Detail View
The Detail View is a multipage pane. Availability of various pages in the
Detail View depends on the type of item selected in the Project Tree.
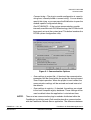
The control page, when defined in project Options (Section 5.4), is
available for all Project Tree items to allow the user to control the board
at any time. The content of the algorithm block description page changes
with the Project Tree item selected. When a Scope or Recorder item is
selected in the Project Tree, the current item help and
oscilloscope/recorder chart pages are also available.
FMASTxxx — Rev. 0.1
MOTOROLA
FreeMaster for Embedded Applications
FreeMaster USAGE
37
FreeMaster USAGE
Application Window Description
4.1.2.1 Control Page
The Control Page is an HTML page created for board application control.
It typically contains the scripts-enhanced form or forms which enable
user-friendly control of the embedded application. The URL of the page
or the path to the HTML file with a page source code can be specified in
project Options dialog described in Section 5.4.
The control page for a simple motor control application is shown in
Figure 4-18.
Figure 4-18. Example of Control Page
HTML scripting and other techniques to create active control pages are
described in Section 6.2.
FMASTxxx — Rev. 0.1
MOTOROLA
FreeMaster for Embedded Applications
FreeMaster USAGE
38
FreeMaster USAGE
Application Window Description
4.1.2.2 Algorithm Block Description
The Algorithm Block Description page in the Detail View pane is
designated for placing an HTML page describing the selected block
functionality. The URL or local path to the source file is specified in block
item properties dialog, described in Section 4.1.1.1. This page is
displayed when it is defined and when the user selects the appropriate
block item or any of its child scope or recorder items.
As the standard HTML page, this page can also contain the scripts or
other controls, but it is not a common practice.
Figure 4-19. Example of an Algorithm Block Description Page
FMASTxxx — Rev. 0.1
MOTOROLA
FreeMaster for Embedded Applications
FreeMaster USAGE
39
FreeMaster USAGE
Application Window Description
4.1.2.3 Current Item Help
The Current item help tab is designated for placing an HTML page
describing the selected Scope or Recorder. This page should contain
such information as definitions or use instructions and is specified as the
Description URL (see Figure 4-3) for scope and recorder items. A
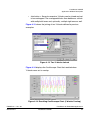
simple example of such a page is shown in Figure 4-20.
Figure 4-20. Example of Current Item Help Tab
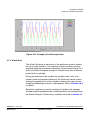
4.1.2.4 Oscilloscope / Recorder
The Oscilloscope page in the Detail View pane contains the real-time
chart representing tracked variables, as shown in Figure 4-21. Similarly,
the Recorder page contains the chart created from the recorded data.
Select Scope in the project tree to view the oscilloscope page or select
recorder to view the recorder page.
See Section 4.1.1.2 and Section 4.1.1.3 for more information about
setting up the oscilloscope or recorder views.
FMASTxxx — Rev. 0.1
MOTOROLA
FreeMaster for Embedded Applications
FreeMaster USAGE
40
FreeMaster USAGE
Application Window Description
Figure 4-21. Example of Oscilloscope View
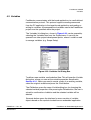
4.1.3 Watch-Grid
The Watch-Grid pane in the bottom of the application window contains
the list of watch variables. The selection of watch variables and their
graphical properties are defined separately for each project block. As a
result, the Watch-Grid pane changes its contents each time a different
project block is selected.
During the definition of the variable, the variable name, units, and
number format are specified. Moreover, the Watch bar can be used to
change the graphical look of the variable, including font type and size,
foreground and background color, and alignment. Refer to Section 4.6.2
for details.
Read-only variables can only be monitored. Variables with changes
allowed (modifying enabled in the variable definition) can be altered from
the Watch-Grid pane. Details about variables are found in Section 4.2.
FMASTxxx — Rev. 0.1
MOTOROLA
FreeMaster for Embedded Applications
FreeMaster USAGE
41
FreeMaster USAGE
Variables
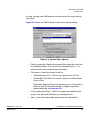
4.2 Variables
FreeMaster communicates with the board application via a well-defined
communication protocol. This protocol supports sending commands
from the PC application to the target board application and reading or
writing its variables. All commands and variables used in the FreeMaster
project must be specified within the project.
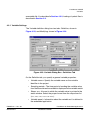
The Variables list dialog box, shown in Figure 4-22, can be opened by
selecting the Variables item from the Project menu. It can also be
opened from other project-development points, where it could be used
to manage variables (e.g. Scope Setup).
Figure 4-22. Variables list Dialog Box
To define a new variable, use the button New. This will open the Variable
dialog box, where you can set the variable properties described in
Section 4.2.1. When you need to create a copy of an existing variable,
select the original variable and press the Clone button.
The Edit button opens the same Variable dialog box for changing the
selected variable properties. After pressing the Delete button, the user is
asked for confirmation of deletion and the selected variable will be
deleted.
Generate button opens the interface for mass creation of variable
objects based on the symbols loaded from an embedded application
FMASTxxx — Rev. 0.1
MOTOROLA
FreeMaster for Embedded Applications
FreeMaster USAGE
42
FreeMaster USAGE
Variables
executable file. It is described in Section 4.2.2; loading of symbol files is
described in Section 5.2.
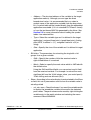
4.2.1 Variable Settings
The Variable definition dialog has two tabs: Definition, shown in
Figure 4-23, and Modifying, shown in Figure 4-24.
Figure 4-23. Variable Dialog Box - Definition Tab
On the Definition tab, you specify a general variable properties.
•
Variable name = Specify the variable name as the variable
identifier in the project
•
Sampling period = The time period of reading the variable value
from the board when the variable is displayed in the variable watch
•
Shows as = A format in which the variable value is printed in the
watch window. Select the proper format from the drop-down list
(DEC, HEX, BIN, ASCII or REAL).
•
Variable panel = Information about the variable as it is defined in
the embedded application
FMASTxxx — Rev. 0.1
MOTOROLA
FreeMaster for Embedded Applications
FreeMaster USAGE
43
FreeMaster USAGE
Variables
– Address = The physical address of the variable in the target
application memory. Although you can type the direct
hexadecimal value, it is recommended that you select a
symbol name of the application variable from the drop-down
list. A symbol table can be loaded directly from the embedded
application executable (if it is in standard ELF/Dwarf1 format)
or from the text-based MAP file generated by the linker. See
Section 5.2 for more information about loading the symbol
tables from selected files.
– Type = Select the variable type as it is defined in the target
application (unsigned fixed point, signed fixed point, floating
point IEEE, fractional <-1,1), unsigned fractional <0,2) or
string)
– Size = Specify the size of the variable as it is defined in target
application
•
Bit fields = The parameters for extracting the single bit or bit
groups from a given variable
– Shift = Specify the number of bits the received value is
right-shifted before it is masked
– Mask = Select or specify the mask value which is AND-ed with
the shifted value
Using the Shift and Mask fields, you can extract any bit field
from the received variable. For example: to extract the most
significant bit from the 16-bit integer value, you would specify
15-bit shifting and one-bit mask (0x1).
•
Show = According to the value display format selected in the Show
as field, this set of parameters controls how the variable value is
actually printed
– val, min, max = Check the boxes if you want the variable watch
to display the immediate variable value and/or the detected
peak values. The peak values can be reset by right-clicking the
variable entry in the watch window and selecting the menu
command Reset MIN/MAX.
FMASTxxx — Rev. 0.1
MOTOROLA
FreeMaster for Embedded Applications
FreeMaster USAGE
44
FreeMaster USAGE
Variables
– Fixed digits (for Show as set to DEC, HEX or BIN) = Prints
numeric values left-padded by zeroes or spaces to a given
number of digits
– Fixed digits (for Show as set to REAL) = Prints floating-point
numeric values with a constant number of digits after the
decimal point
– Zero terminated (for Show as set to string) = The string values
are printed only to the first occurrence of zero character. For
string values, you can also select whether to display
unprintable characters as HEX numbers (or question marks)
and a few other string-specific settings.
•
Real type transformation = When the Show as format is set to
REAL, you can define further post-processing numeric
transformation, which is applied to the variable value.
– Transformation type
linear: ax + b: Specify the a and b constants of the linear
transformation y = ax + b. The ‘a’ and ‘b’ parameters can be
specified as a numeric values or by the name of the project
variables whose immediate value (last valid value) is then used
as the parameter.
linear two points: If it is more convenient for you to specify the
linear transformation by two points, rather than by the
parameters a and b, fill in the two coordinate points (x1, y1)
and (x2, y2). As the parameter values, you can again specify
the numeric values or variable names.
hyp: d/(ax+b) + c: Specify the parameters a, b, c and d of a
hyperbolic transformation function.
– Unit = The name of unit displayed in the variable watch
– Use “Moving Averages” filter = When monitoring a noisy
action, you might want to display the average value instead of
the immediate one
– History time = The time interval from which the average value
is computed
FMASTxxx — Rev. 0.1
MOTOROLA
FreeMaster for Embedded Applications
FreeMaster USAGE
45
FreeMaster USAGE
Variables
•
Text enumeration = This allows you to describe the meaning of
certain variable values and assign the text label to each of them,
which is then displayed in the variable watch together with or
instead of the numeric value. Use Edit, Add and Del buttons to
manage the look-up table with value to text label assignment.
– Default = Specify the default text label, which is displayed
when no matching text is found in the look-up table.
The Modifying page, shown in Figure 4-24, contains settings and
restrictions for variable value modifications.
Figure 4-24. Variable Dialog Box - Modifying Tab
•
Modifying mode
– Don’t allow any modifications = The variable is read-only; all
other settings on this page are disabled
– Any value within proper limits = You can specify the Min and/or
Max value. The value the user enters in the watch window is
then validated with the specified limits.
FMASTxxx — Rev. 0.1
MOTOROLA
FreeMaster for Embedded Applications
FreeMaster USAGE
46
FreeMaster USAGE
Variables
– One of listed values only = Once you have specified a list of
values, only those values will be accepted in the watch window
to be written. The acceptable values can be specified in the
Pre-defined values group.
All numbers from min to max = All the numbers from “min” to
“max” by “step” will be treated as predefined values
Text enumeration = Treat all values from the text enumeration
look-up table as predefined
Other = Specify any other predefined values (comma or
semicolon separated)
•
Edit style = Select the look of the edit interface for a given variable,
which is displayed in the appropriate cell in the watch window grid
– Edit box with spin control = The variable value edit interface will
be displayed in the form of an edit box with two spin arrows for
incrementing and decrementing the value
– Combo box with pre-defined values = The variable value edit
interface will be displayed in the form of a drop-down list box.
The predefined values will be available in the list.
– Hide edit interface at inactive cells = The variable edit interface
will be hidden when the appropriate cell in the watch grid
looses a keyboard focus
•
Write style = Specify exactly when the new variable value is
actually sent to the board application.
– Write immediately after each value changes = The modified
variable value will be sent to the embedded application each
time the user presses the spin arrow button or selects a new
value in the drop-down list box.
– Write after ENTER or kill focus only = The modified variable
value will not be sent to the embedded application until the
user does not press the Enter key
FMASTxxx — Rev. 0.1
MOTOROLA
FreeMaster for Embedded Applications
FreeMaster USAGE
47
FreeMaster USAGE
Variables
4.2.2 Generating Variables
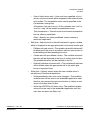
The Generate button in the variable list dialog (Figure 4-25) opens the
Generate variable dialog box shown in Figure 4-26.
Figure 4-25. Project Variable List
In this dialog, the user can automatically generate the variable objects
for the symbols loaded from an embedded application executable (ELF)
or a linker MAP file (see Section 5.2 for more information about symbol
tables).
Figure 4-26. Generating Variables
FMASTxxx — Rev. 0.1
MOTOROLA
FreeMaster for Embedded Applications
FreeMaster USAGE
48
FreeMaster USAGE
Commands
The list in the dialog shows all the symbols available in the project as
they were read from the current symbol file. The symbols for which the
variables are already defined are marked with a check mark.
•
Edit symbol variable = Press this button to edit a variable bound to
the selected symbol, if any
•
Delete symbol variable = Press to delete a variable bound to the
selected symbol(s)
•
Generate single variables = Generates a new variable with the
same name as the symbol and with proper address, type and size
settings. After creation, you can push the Edit symbol variable
button to see and change other settings in the Variable dialog box
•
Generate array for symbol = Enables you to generate a set of
variables encapsulating the selected symbol and its successive
locations (offsets)
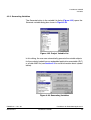
4.3 Commands
The list of Application commands defined in the project can be opened
by selecting the Project / Commands menu and is shown in Figure 4-27.
You can use the buttons New, Clone, Edit and Delete to manage the list.
It is very similar to variables management:
•
New button = Creates a new application command
•
Edit button = Edits properties of the selected application command
•
Clone button = Creates a new command as a copy of the selected
command
•
Delete button = Deletes the selected command
•
Send button = Opens the interface which enables the command to
be sent to the embedded application
FMASTxxx — Rev. 0.1
MOTOROLA
FreeMaster for Embedded Applications
FreeMaster USAGE
49
FreeMaster USAGE
Commands
Figure 4-27. Project Application Commands
In the Send application command dialog box which follows after pressing
the Send button, specify the command parameters (if any) and you can
send the command to the embedded application. The dialog is shown in
Figure 4-28. For each argument, you can define the help message,
which is displayed in this dialog when typing the argument value as
shown in Figure 4-29.
Figure 4-28. Sending Application Command
FMASTxxx — Rev. 0.1
MOTOROLA
FreeMaster for Embedded Applications
FreeMaster USAGE
50
FreeMaster USAGE
Commands
If you wish to wait for data to be returned from the board (a command
result) without closing the dialog, check the Wait for result box. Before
sending the command, you can review or edit the command definition.
When defining or editing the command, the Application command dialog
box is opened. The first of three pages of the dialog is shown in
Figure 4-29.
Figure 4-29. Application Command - Definition Tab
On the Definition tab, enter the Command name used in the project and
specify the one-byte command Code which identifies the command in
the target board application. The command codes and their purposes, as
well as the command return codes and their purposes, come from the
board application developer.
The Response time-out is the maximum time interval in milliseconds that
FreeMaster waits for response from the board application. If the
embedded application does not acknowledge the command and
respond to it before this time-out occurs, the text entered into the
Timeout error message field appears in alert window.
FMASTxxx — Rev. 0.1
MOTOROLA
FreeMaster for Embedded Applications
FreeMaster USAGE
51
FreeMaster USAGE
Commands
Figure 4-30. Application Command - Arguments Tab, page 1
The Arguments tab, shown in Figure 4-30, is used for definition of
command arguments. Commands which do not have arguments will
have an empty argument list. Commands can have arguments to pass a
value to the target board application together with the command code.
Use the New button to create a new argument, the Delete button to
delete an argument selected in the list, and the up and down arrows to
change the arguments’ order.
On the Argument setup sub-page, you define the selected argument
parameters:
•
Name = Specify the argument name as it should appear in the list
and in the Send application command dialog when the user is
prompted for argument values. You can also select the existing
argument name from the drop-down list box.
•
Type = Specify the argument’s numeric value (integer or floating
point)
•
Size = Specify the argument’s value size in bytes
•
Unit = Specify any text which will be displayed as argument units.
This text is not sent to the target application.
FMASTxxx — Rev. 0.1
MOTOROLA
FreeMaster for Embedded Applications
FreeMaster USAGE
52
FreeMaster USAGE
Commands
•
Dflt = Enter the default value of the argument. This value will be
set in the argument list of the Send application command dialog.
If empty, the user must type the value any time he sends the
command.
•
Modifiable = Unless this box is checked, the user is not allowed to
change the default argument value in the argument list of Send
application command dialog.
•
Visible = If this box is not checked, the argument will not be
displayed in the argument list and its default value will always be
sent to the target application.
•
Help = Write any text information which will be shown in the Send
application command dialog when the user will be prompted for an
argument value.
Figure 4-31. Application Command - Arguments Tab, page 2
On the Enter validation sub-page, shown in Figure 4-31, you define the
validation criteria for the argument value:
•
Specify which values are allowed for the argument
– Any value = Any numeric value is allowed as the argument
value. The value must be between Min and Max limits, if these
are set.
FMASTxxx — Rev. 0.1
MOTOROLA
FreeMaster for Embedded Applications
FreeMaster USAGE
53
FreeMaster USAGE
Commands
– One of predefined values = Only one of the values defined in
the Pre-defined values fields can be supplied as an argument
value
•
Pre-defined values
– All numbers from min to max = When this box is checked, all
numbers between Min and Max limits, incremented by Step,
are considered to be valid for the argument value
– Other = Check this box and specify the list of other values
(comma separated) which are valid as argument value
The Return codes page, shown in Figure 4-32, is used for specifying the
command return code messages. To create a return code, enter the
return code value in hexadecimal (0x00) or decimal form in the code field
at the lower left of the page; enter the return code message in the next
field; and click the New button. The return code item will appear in the
list. Repeat to create all desired return codes. A Message icon may be
assigned to each return code message from the panel at the lower right
of the page. It will then appear in the message dialog, together with the
text of message.
Figure 4-32. Application Command - Return Codes Tab
FMASTxxx — Rev. 0.1
MOTOROLA
FreeMaster for Embedded Applications
FreeMaster USAGE
54
FreeMaster USAGE
Importing Project Files
Return codes can be local or global. Local return codes apply to a single
command, while global return codes are valid for all commands of the
project. To switch between local and global validity, use the Make local
and Make global buttons.
Check the Show default messages for unknown return codes box at the
top of the page to pop up a standard message box with return code when
an unlisted code returns from the board application.
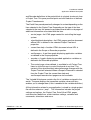
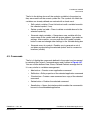
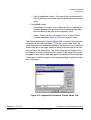
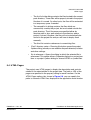
4.4 Importing Project Files
When preparing your project, you may want to reuse the variables,
commands, scope and recorder definitions or watch definitions you
created in previous projects. Selecting the File / Import menu command
opens a dialog in which you can select objects defined in different
projects and import them to the current project.
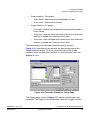
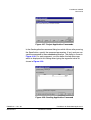
The first dialog of the Import procedure is shown in Figure 4-33. After
specifying the name of the original project file, you select and check the
project tree items you wish to have in your current project. You can also
select the target block item under which you want the imported items to
be created.
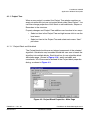
Together with imported tree items, all referenced objects, such as
variables or application commands, are also automatically imported.
Using the switch radio-buttons below the lists, you can specify how the
referenced objects are created:
•
Overwrite existing = When there is an object, such as a variable,
imported with a tree item, for example, an oscilloscope, the current
project is searched for an object of the same type (variable) and
with the same name. If found, it is overwritten with the one
imported.
•
Bind to existing = If an object with the same name is found, it is not
overwritten, but the imported tree item binds to it
•
Always create new = All referenced objects are created, even if
they already exist in the current document; in such a case, the
name will be duplicated
FMASTxxx — Rev. 0.1
MOTOROLA
FreeMaster for Embedded Applications
FreeMaster USAGE
55
FreeMaster USAGE
Importing Project Files
•
Merge imported root item = When importing the root item, it is
possible to merge its variable watch definition with the watch of the
root item in the current project. When this option is not checked,
the root item will be imported and inserted as a standard block
item.
Figure 4-33. Import Project Tree Items
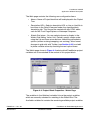
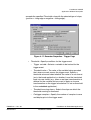
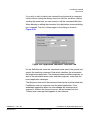
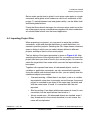
Pressing the Next button opens the second part of the Import procedure,
where you can select additional objects to be imported. The second
dialog is shown in Figure 4-34. The three check-box lists contain the
objects found in the source project file:
•
Variables = Put a check mark by each variable you want to import.
You don’t need to import variables which are referenced from the
tree items selected in previous dialog from Figure 4-33; such
variables are always unconditionally imported.
•
App. commands = Put a check mark by each application
command definitions you want to import. As with variable objects,
you don’t need to check commands which are referenced from the
block tree items selected in previous dialog.
FMASTxxx — Rev. 0.1
MOTOROLA
FreeMaster for Embedded Applications
FreeMaster USAGE
56
FreeMaster USAGE
Importing Project Files
– Global return messages = If this box is checked, the
application commands return codes and messages are
imported from the source document.
– Overwrite existing = The existing return codes are overwritten
with those being imported.
•
Stimulators = Put a check mark by each variable stimulator you
want to import.
Figure 4-34. Import Project Objects
FMASTxxx — Rev. 0.1
MOTOROLA
FreeMaster for Embedded Applications
FreeMaster USAGE
57
FreeMaster USAGE
Menu description
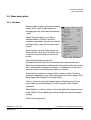
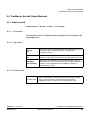
4.5 Menu description
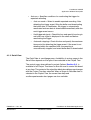
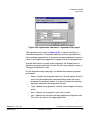
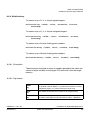
4.5.1 File Menu
Selecting New Project creates a new empty
project, while Open Project opens an
existing project file, which has the extension
.pmp.
Import Wizard enables you to import
selected objects (Project Tree items,
variables, commands, stimulators) from an
existing project (.pmp file) into the current
project.
Save Project saves the open project into
the current file, while Save As allows users
to specify a new filename for the current
project.
Figure 4-35. File Menu
Stop Communication pauses the
communication with the board and unlocks the communication port.
When the communication is released from the paused state, the symbol
file is automatically checked for changes. If a difference is found, the
user can choose to reload the new version of the file.
Print prints the content of current window, when possible. Currently,
printing is supported only for HTML description and control pages. Print
Setup opens the standard Print Setup dialog.
The list of the most recently loaded projects: Selecting one of these
items loads the specified project, just like using the Open Project
command.
Demo Mode is a switch to enter or leave the application demonstration
mode. While in Demo Mode, you cannot modify any important project
settings.
Exit exits the application.
FMASTxxx — Rev. 0.1
MOTOROLA
FreeMaster for Embedded Applications
FreeMaster USAGE
58
FreeMaster USAGE
Menu description
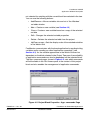
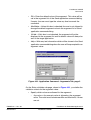
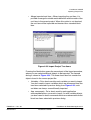
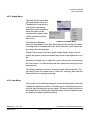
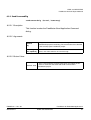
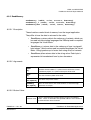
4.5.2 Edit Menu
Edit menu contains standard clipboard manipulation commands (Cut,
Copy and Paste).
Copy Special is enabled when the Oscilloscope or Recorder graph is
active. The command enables saving the graph image to the clipboard
or to a file in a different format or size. The set-up dialog is shown in
Figure 4-36.
Figure 4-36. Export graph image Dialog
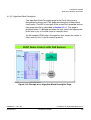
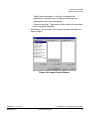
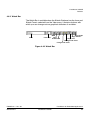
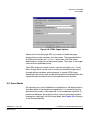
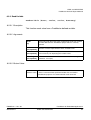
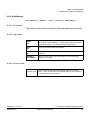
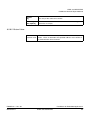
4.5.3 View Menu
In the View menu, you can
select whether to show or hide
the Toolbar, the Watch Bar
or the Status Line.
Another feature of the View
menu is the ability to adjust
the size of individual panes
without using a mouse. Use
Adjust Left Splitter for
changing the height of the
Figure 4-37. View Menu
Fast Access pane in the Tree
pane. Adjust Right Splitter can be used for changing the height of the
Detail View pane (HTML pages and charts). Finally, Adjust Vertical
Splitter changes the width of the Project Tree pane.
FMASTxxx — Rev. 0.1
MOTOROLA
FreeMaster for Embedded Applications
FreeMaster USAGE
59
FreeMaster USAGE
Menu description
Show Fast Access Pane switches the display of the Fast Access pane,
a small helper window located at the bottom-left part of the application
window. It contains two pages: the Commands Page, which lists
currently-defined application commands and the Stimulators Page,
which lists all stimulator objects. When the menu item Show all project
commands is checked, FreeMaster is forced to show all application
commands defined in the project. The content of the commands page is
then independent of which block is currently selected from the Project
Tree. Otherwise, only commands selected for displaying in the current
tree context are displayed; see Figure 4-5 and Section 4.1.1.1 for more
information.
4.5.4 Explorer Menu
The Explorer sub-menu is available when an
HTML page (Control page, Block Description
page or Chart Variables Info) is displayed in
the Detail View. When a Chart View page is
displayed in the Detail View, then the Explorer
menu item is replaced by the Scope or
Recorder sub-menu.
Items Back, Forward and Refresh represent
Figure 4-38.
Explorer Menu
commands for the Internet Explorer window
embedded in the FreeMaster. They are used
to move through previously-visited pages and to refresh the page
contents.
Fonts sets the font size for the current Internet Explorer window.
FMASTxxx — Rev. 0.1
MOTOROLA
FreeMaster for Embedded Applications
FreeMaster USAGE
60
FreeMaster USAGE
Menu description
4.5.5 Scope Menu
The Stop Scrolling and Stop
Data commands cause the
FreeMaster to stop moving
(rolling) the oscilloscope
chart and to enter a mode in
which the chart can be
zoomed and the data series
can be examined with the
data cursor.
Figure 4-39. Scope Menu
The difference between
these two commands is that Stop Scrolling stops the picture, but allows
incoming data to be appended to the end of the chart, while Stop Data
also stops the incoming data.
Export Picture opens the Export graph image dialog, where you can
specify the picture format and export the picture to the clipboard or to a
file.
Data cursor enables you to select the style of data cursor for examining
the chart values. The Next Subset sub-item selects the next chart line to
be examined.
The Zoom submenu consists of zooming modes and commands. The
Horizontal Zoom Only mode allows “x-axis only” zooming; Horz and Vert
Zoom allows free rectangle zooming.
4.5.6 Item Menu
The content of this sub-menu depends on the selected object within the
FreeMaster application window. The same menu is displayed when you
click the right mouse button on this object. The menu usually consists of
the Delete item for deleting the selected object and the Properties item
for opening an object properties dialog.
FMASTxxx — Rev. 0.1
MOTOROLA
FreeMaster for Embedded Applications
FreeMaster USAGE
61
FreeMaster USAGE
Toolbars
4.5.7 Project Menu
Variables opens the Variables list dialog box,
where you can manage all project variables at
once.
Commands opens the Application commands
dialog box, where you can manage all project
commands.
Figure 4-40.
Project Menu
The Reload Map File command updates the
physical addresses of board application variables from the .map file.
Options opens the multipage dialog box for all project option settings.
4.6 Toolbars
4.6.1 Toolbar
The toolbar allows quick access to some of the menu commands.
Properties
Back
Shift Down
Save Project
Forward
Shift Up
Watch Grid
Stop Data
Stop Communication
Stop Scrolling
Show Fast Access Pane
Zoom All
Print
Copy Special
Horizontal Zoom Only
Zoom Out
Horz and Vert Zoom
Export Picture
Open Project
Figure 4-41. Toolbar
FMASTxxx — Rev. 0.1
MOTOROLA
FreeMaster for Embedded Applications
FreeMaster USAGE
62
FreeMaster USAGE
Toolbars
4.6.2 Watch Bar
The Watch Bar is available when the Watch-Grid pane has the focus and
Watch Pane is selected from the View menu. It contains buttons with
which you can change various graphical attributes of variables.
Font
Font Size
Align Right
Align Center
Align Left
Background Color
Foreground Color
Bold
Italic
Underlined
Figure 4-42. Watch Bar
FMASTxxx — Rev. 0.1
MOTOROLA
FreeMaster for Embedded Applications
FreeMaster USAGE
63
User Manual – FreeMaster
Section 5. PROJECT OPTIONS
To set application and project options, use the Options dialog, which can
be activated by selecting Options from the Project menu. The dialog
consists of several pages - each dedicated to a different group of
settings.
5.1 Communication
To set up the parameters related to communication between FreeMaster
application and target board, select the first tab, as shown in Figure 5-1.
•
Communication
– Direct RS232 connection = The standard serial interface
(3-wire RS232 cable) will be used to connect to the target
application
Port = Select the serial port on which the board is accessed
Speed = Select or specify the communication baud rate. This
speed must correspond with the embedded application
settings.
– Plug-in Module Interface = The communication with an
embedded device will be handled by a separate (custom)
plug-in module. The module must conform to the Microsoft
COM specification and must be registered in the system
registry database. See protocol and communication library
documentation for more information.
The drop-down list contains all plug-in modules known
(registered) in the local system.
FMASTxxx — Rev. 0.1
MOTOROLA
FreeMaster for Embedded Applications
PROJECT OPTIONS
64
PROJECT OPTIONS
Communication
Connect string = The plug-in module configuration is saved in
string form, internally called a “connect string”. You can directly
specify this string, or you can press the Build button to open the
module-specific configuration dialog.
Run DCOMCNFG = If the custom communication module
internally uses Microsoft DCOM technology, the DCOM should
be properly set up at the system level. This button launches the
DCOM system configuration utility.
Figure 5-1. Communication Options
– Save settings to project file = If checked, the communication
parameters will be stored within the project file during the next
Save Project operation. When the project is next loaded, the
communication settings will be restored and used instead of
the defaults.
– Save settings to registry = If checked, the settings are stored
in the local computer registry database. These settings will be
used as default when the application is started next time.
NOTE:
There are two communication plug-in modules distributed within the
FreeMaster installation pack. Both modules handle a communication
with the FreeMaster Remote Server application. The difference between
FMASTxxx — Rev. 0.1
MOTOROLA
FreeMaster for Embedded Applications
PROJECT OPTIONS
65
PROJECT OPTIONS
Symbol Files
the two is a protocol used to connect to the server. One uses Microsoft
DCOM remote procedure call interface while the other uses standard
HTTP text-based protocol.
When using the DCOM-based communication to remote server, the
security issues must be considered when connecting over the network.
Both sides of the communication must have the DCOM properly set up
on the system level by running the DCOMCNFG utility. Also, the remote
server must be properly installed on the remote side. If there are
problems connecting to the remote computer, contact your local network
administrator.
•
Communication state = By selecting one of three options, you can
set whether the communication port will be opened or not when
the application is started.
Open port at start-up
Do not open port at start-up
Store port status on exit, apply it on start-up
– Store status to project file, apply it on its load = If checked, the
state of the communication port will be saved to a project file
during the next Save Project operation. The state will be then
restored the next time the project is loaded.
5.2 Symbol Files
When defining project variables, it is often useful to specify the physical
address of the target memory location as the symbol name instead of
direct hexadecimal value. The symbol table can be loaded directly from
the embedded application executable if it is the standard ELF or
Dwarf1debugging format. For other cases, the text MAP file generated
by the linker may be loaded and parsed for symbol information.
In the project, you can specify multiple files which contain the symbol
table. Later, you can switch between different symbol tables from
different files by selecting the menu command Project / Select Symbol
File. For example, with the DSP embedded application tested on an
EVM board, you can have two symbol files specified in the project--one
FMASTxxx — Rev. 0.1
MOTOROLA
FreeMaster for Embedded Applications
PROJECT OPTIONS
66
PROJECT OPTIONS
Symbol Files
for code running from RAM memory and the second for code running
from Flash.
Figure 5-2 shows the MAP File tab in the project Options dialog.
Figure 5-2. Symbol Files Options
•
Default symbol file = Specify the name of the symbol file, which will
be loaded by default. You can press the browse button (...) to
locate the file in the standard open file dialog.
•
File format = Select the format of the file
– Standard binary ELF = Choose this option for an ELF file
– Hiware MAP File 509 = Choose this option for HiWare Smart
Linker v5.0.9
– Define new Regular Expression-based parser = Choose this to
define a new text file parser based on regular expression
pattern matching; see Section 5.2.1
•
List of valid symbol files = The list of symbol files defined in the
project. Use New and Del buttons to manage the list.
•
View = View the symbol table parsed from the selected file
FMASTxxx — Rev. 0.1
MOTOROLA
FreeMaster for Embedded Applications
PROJECT OPTIONS
67
PROJECT OPTIONS
Symbol Files
NOTE:
The paths to symbol files may be specified in several forms. It can be the
absolute path on the local disk, the path relative to the directory where
the project file is stored or the path relative to the current “pack”
directory. The latter is the most suitable for project deployment to other
computers; see Section 5.3 for more information.
•
On Load panel options control the actions performed with symbol
files after the project is loaded:
– Let the user select the symbol file = When checked, the user is
prompted to select the initial symbol file when the project is
loaded.
– Synchronize variables each time the map file loads = When
checked, the variables are automatically updated by new
symbol addresses after the project is loaded
– List errors = When this box is checked, all the variables using
the symbols missing in the loaded symbol table are listed in a
special dialog box. The user is able to edit the corrupted
variables or select another symbol file.
5.2.1 Regular Expression-based MAP File Parser
When your compiler or linker does not support ELF output format and the
MAP file cannot be parsed by the built-in HiWare 5.0.9 parser, you must
describe the internal MAP file structure by using the regular expression
pattern.
It would be out of the scope of this document to describe the theory of
regular expression pattern matching, but a simple example might help to
understand the strength of this technology. In the example, we will define
the parser of xMap files generated by Metrowerks Compiler and Linker
for the Motorola DSP56800 processor family.
The example of the xMap line, which describes the global symbol length
might look like the following:
00002320 00000001 .bss
00002321 00000001 .bss
Flength(bsp.lib pcmasterdrv.o
Fpos(bsp.lib pcmasterdrv.o )
FMASTxxx — Rev. 0.1
MOTOROLA
)
FreeMaster for Embedded Applications
PROJECT OPTIONS
68
PROJECT OPTIONS
Symbol Files
First, we must describe the line format by the regular expression pattern.
The following pattern
[0-9a-fA-F]+\s+[0-9a-fA-F]+\s+\S+\s+F\w+
could be read as follows:
•
first, there are one or more hexadecimal digits: [0-9a-fA-F]+
•
followed by one or more spaces (or another white characters): \s+
•
followed again by one or more hexadecimal digits: [0-9a-fA-F]+
•
followed again by one or more white characters: \s+
•
followed by a set of any non-white characters: \S+
•
followed by one or more white characters again: \s+
•
followed by the character F
•
followed by one or more alphanumeric (word) characters: \w+
To identify the sub-patterns which describe the symbol parameters, we
put them in the round parentheses:
([0-9a-fA-F]+)\s+([0-9a-fA-F]+)\s+\S+\s+F(\w+)
Now we must identify the sub-pattern indexes for individual symbol
values:
•
The first sub-pattern corresponds with the symbol address (index
1)
•
The next sub-pattern corresponds with the symbol size (index 2)
•
The next sub-pattern corresponds with the symbol name (index 3)
Supply all the parameters prepared above in the regular expression
dialog as shown in Figure 5-3.
FMASTxxx — Rev. 0.1
MOTOROLA
FreeMaster for Embedded Applications
PROJECT OPTIONS
69
PROJECT OPTIONS
Symbol Files
Figure 5-3. Regular Expression-based xMap File Parser
By pressing Test your regular expression button, the dialog vertically
expands and the test panel is displayed as shown in Figure 5-4. Cut and
paste a single line from the xMap file to Input line field and press the
button Execute reg. expression:
Figure 5-4. Testing Your Regular Expression
The Symbol name, Symbol address and Symbol size output fields
should be displayed as shown in figure Figure 5-4. If you have errors,
please be sure that you have Internet Explorer 5.5 or higher installed on
your machine for the regular expression functionality.
FMASTxxx — Rev. 0.1
MOTOROLA
FreeMaster for Embedded Applications
PROJECT OPTIONS
70
PROJECT OPTIONS
Packing Resource Files into Project File
To finish our example, you must set a one bit shifting of the “size” value
in the Symbol post-processing parameters. This is because the symbol
size is printed in word units (16-bit) in the xMap file, but we need this
value in bytes.
NOTE:
All created regular-expression parsers will automatically be saved to the
project file and to the local computer registry database for future use.
5.3 Packing Resource Files into Project File
The project often uses data from many different files. For example, each
HTML page displayed for a project tree item or each image used on such
a page is stored in a separate file. This may cause problems when you
want to deploy or distribute a project to different computers. Using the
Pack options shown in Figure 5-3, you can choose to pack the resource
files into the project file when it is saved.
Figure 5-5. Pack Directory Options
To pack resource files into the project file, put all these files into one
directory or a directory structure and specify the path to that directory in
both fields of the Pack Dir page. By pressing the browse button (...), you
can find and select the directory in the standard open directory dialog.
FMASTxxx — Rev. 0.1
MOTOROLA
FreeMaster for Embedded Applications
PROJECT OPTIONS
71
PROJECT OPTIONS
Packing Resource Files into Project File
The path to the directory can be specified by a path relative to the
directory where the project file is saved.
When the project with the packed files is loaded next time by the
application, the original path, entered in the second entry of the Pack Dir
page, is checked. If it is missing, or if one of the files in it differs from the
files originally packed in the project, a temporary directory is created in
the system temporary space and the packed files are extracted into that
directory. The temporary directory is then set as a default for the rest of
resource files. It is thus very important to specify the FreeMaster paths
to HTML files or to the symbol file relative to the directory specified in
Pack Dir dialog.
The Pack Dir page displays the path to the temporary directory if it is
currently in use, but still remembers the path to the original resource
directory.
Figure 5-6. Pack Directory Options, Example 2
Using the other Pack Directory options shown in Figure 5-6, you can set
the conditions under which the temporary directory is created.
FMASTxxx — Rev. 0.1
MOTOROLA
FreeMaster for Embedded Applications
PROJECT OPTIONS
72
PROJECT OPTIONS
Packing Resource Files into Project File
5.3.1 Resource Files Manager
Before deploying a complex project which uses many external resources
or symbol files, it is worth verifying that all file paths are correct and in
the proper relative format. The path relative format must in turn be
properly evaluated when the files are extracted to a temporary directory
on different hosts.
The Resource Files Manager can be activated in the menu Project /
Resource Files. The typical look of the window is shown in Figure 5-7
Figure 5-7. Resource Files Manager
The dialog displays all external files directly referenced by the project.
Note that there can also be other files (e.g., images) referenced
indirectly from the HTML pages. You should verify whether the files lie in
the pack directory and whether the HTML pages point to them using a
relative path.
FMASTxxx — Rev. 0.1
MOTOROLA
FreeMaster for Embedded Applications
PROJECT OPTIONS
73
PROJECT OPTIONS
HTML Pages
– The first list in the dialog contains the files located in the current
pack directory. These files will be properly stored in the project
file when it is saved. On other hosts, the files will be extracted
in a temporary space if needed.
– The second list in dialog contains the files which are
successfully used by the project, but are located outside the
pack directory. Their file names are specified either by
absolute path or by a path relative to the directory where
project is stored. However, the files will not automatically be
stored in the project file and you will have to deploy them
manually.
– The third list contains references to nonexisting files.
•
“Pack” directory setup = Pressing this button opens the project
Options dialog, where you can redefine the pack directory location
and other settings.
•
Go to reference = Opens the dialog in which the selected file is
referenced. This can be either a Properties dialog for a project tree
item or a project Options dialog for shared HTML or symbol files.
5.4 HTML Pages
The project uses HTML pages to display the description and controls
related to the selected item in the project tree. The path or URL of the
pages are specified in the property dialog for each tree item. On the
HTML Pages options tab, shown in Figure 5-8, you can specify the
paths to common HTML files, displayed in the application main window.
FMASTxxx — Rev. 0.1
MOTOROLA
FreeMaster for Embedded Applications
PROJECT OPTIONS
74
PROJECT OPTIONS
Demo Mode
Figure 5-8. HTML Pages Options
Specify the Frame Set page URL if you want to divide the pages
displayed for project tree items into the frames. The page specified in
this field must contain the <FRAMSET> declaration, with one frame
dedicated as a target for the description pages. The name of the target
frame must be specified exactly.
The HTML code can contain frames, controls and scripts (i.e., Visual
Basic Script) which can be used to access the attached target board
through defined variables and commands. A special HTML page
dedicated to the control task can be defined and can be displayed in the
separated tab in the detail view of the application main window.
5.5 Demo Mode
An important part of the FreeMaster’s capabilities is the demonstration
and description of the target board application. It is essential that the
demonstration project, once prepared, is not accidentally modified. To
prevent modification, the project’s author can lock the project against
changes by switching it into the Demo Mode. See Figure 5-9 for details
of the Demo Mode tab.
FMASTxxx — Rev. 0.1
MOTOROLA
FreeMaster for Embedded Applications
PROJECT OPTIONS
75
PROJECT OPTIONS
Demo Mode
Figure 5-9. Demo Mode Options
When the Enter the Demo Mode... box is checked, the demo mode is
activated automatically after the project is loaded. The Demo Mode can
be started manually by selecting Demo Mode from the File menu. Exit
from Demo Mode can be protected by a password.
In the Demo Mode, the user cannot change the Project Tree item
properties, cannot add or remove the tree items, and cannot change any
project options, except those on the communication page.
When the user asks to leave the Demo Mode, the warning message
shown in Figure 5-10 appears, and the user is prompted for the
password if the Demo Mode is password-protected.
Figure 5-10. Exit Demo Mode Confirmation Dialog
FMASTxxx — Rev. 0.1
MOTOROLA
FreeMaster for Embedded Applications
PROJECT OPTIONS
76
User Manual – FreeMaster
Section 6. HTML and SCRIPTING
All HTML pages used in FreeMaster are rendered using the standard
Microsoft Internet Explorer component.
The advantage of using the HTML and Internet Explorer component is
that it fully supports scripting languages and enables scripts to embed
and access third-party ActiveX controls. The FreeMaster application
itself implements an (non-visual) ActiveX component to let script-based
code to access and control the target board application.
The following text is recommended only for HTML page creators
experienced with scripting and interfacing of the ActiveX controls.
6.1 Special HTML Hyperlinks
When creating HTML pages which are to be displayed in the FreeMaster
environment, the author can use special hyperlinks to let users navigate
in the project tree or to invoke selected application commands (see
Section 4.3).
Application command invocation hyperlinks include:
•
HREF=pcmaster:cmd:cmdname(arguments) sends an
application command cmdname. Command argument values can
be specified in round brackets. An argument with a defined default
value may be omitted.
•
HREF=pcmaster:cmdw:cmdname(arguments) sends an
application command cmdname and waits until the target
application processes it
•
HREF=pcmaster:cmddlg:cmdname(arguments) displays “Send
Application Command” dialog for the application command
cmdname. Any specified argument values are filled into
appropriate fields in the dialog.
FMASTxxx — Rev. 0.1
MOTOROLA
FreeMaster for Embedded Applications
HTML and SCRIPTING
77
HTML and SCRIPTING
FreeMaster ActiveX Object
•
HREF=pcmaster:selitem:itemname:tabname selects a project
tree item named itemname and displays detail view and watch
view contents exactly as if the user had selected the item
manually. It then selects the specified tab in detail view.
Valid tabname identifiers are:
– ctl,ctltab,control,controltab = Control Page tab
– blk,blktab,blkinfo,blkinfotab = Algorithm Block Description tab
– info,infotab,iteminfo,iteminfotab = Current Item Help tab
– scope,osc,oscilloscope,osctab,scopetab = Oscilloscope tab
– recorder,rec,rectab,recordertab = Recorder tab
6.2 FreeMaster ActiveX Object
The FreeMaster object is registered in the system registry during each
start of the FreeMaster application. Its class ID (CLSID) is
{48A185F1-FFDB-11D3-80E3-00C04F176153}
The registry name is "MCB.PCM.1"; version independent name is
"MCB.PCM".
FreeMaster functions can be called from any HTML code via the
FreeMaster ActiveX control. Insert the FreeMaster ActiveX control into
your HTML code by the Class ID number (see the example below) and
set the dimensions (height and width) to zero to make the object
invisible.
<object name="PCMaster" width="0" height="0"
classid="clsid:48A185F1-FFDB-11D3-80E3-00C04F176153">
The FreeMaster ActiveX control provides the following functions:
•
SendCommand sends FreeMaster-defined command
•
SendCommandDlg opens command dialog and send a
FreeMaster-defined command
•
ReadVariable reads value from a FreeMaster-defined variable
FMASTxxx — Rev. 0.1
MOTOROLA
FreeMaster for Embedded Applications
HTML and SCRIPTING
78
HTML and SCRIPTING
FreeMaster ActiveX Object
•
WriteVariable writes value to a FreeMaster-defined variable
•
ReadMemory, ReadMemoryHex reads a block of memory from a
specified location
•
GetCurrentRecorderData retrieves data currently displayed in the
recorder chart
•
GetCurrentRecorderSerie retrieves one data series from the
currently-displayed recorder chart
•
StartCurrentRecorder starts the currently-displayed recorder
•
StopCurrentRecorder stops the currently-displayed recorder
•
GetCurrentRecorderState retrieves the current recorder status
code and text
One callback event is implemented:
•
OnRecorderDone, called when the currently-selected recorder
finishes downloading new recorder data
FMASTxxx — Rev. 0.1
MOTOROLA
FreeMaster for Embedded Applications
HTML and SCRIPTING
79
HTML and SCRIPTING
FreeMaster ActiveX Object Methods
6.3 FreeMaster ActiveX Object Methods
6.3.1 SendCommand
SendCommand (bsCmd, bWait, bsRetMsg)
6.3.1.1 Description
This function sends a FreeMaster-defined application command to the
target application.
6.3.1.2 Arguments:
bsCmd
[in]
String value with the command name and arguments to be sent.
The command must be defined in the currently-open
FreeMaster project
bWait
[in]
Boolean value which selects whether to wait for the result of the
command; select True (non-zero) to wait, False (zero) not to wait
bsRetMsg
[out, optional]
String value returned after the command invocation. When an
error occurs, this value contains an error message; otherwise, it
contains a message defined in the FreeMaster project as
command return value
6.3.1.3 Return Value:
Boolean Value
“True” is returned if the command has been sent without errors.
“False” is returned if the command could not be found in
FreeMaster project or if there was a communication error.
FMASTxxx — Rev. 0.1
MOTOROLA
FreeMaster for Embedded Applications
HTML and SCRIPTING
80
HTML and SCRIPTING
FreeMaster ActiveX Object Methods
6.3.2 SendCommandDlg
SendCommandDlg (bsCmd, bsRetMsg)
6.3.2.1 Description
This function invokes the FreeMaster Send Application Command
dialog.
6.3.2.2 Arguments:
bsCmd
[in]
String value with the command name and arguments which
should be displayed in the dialog. The command must be defined
in the currently-open FreeMaster project
bsRetMsg
[out, optional]
Text returned after the command invocation. When an error
occurs, this value contains an error message
Boolean value
“True” is returned if the command has been sent without errors.
“False” is returned if the command could not be found in
FreeMaster project.
6.3.2.3 Return Value:
FMASTxxx — Rev. 0.1
MOTOROLA
FreeMaster for Embedded Applications
HTML and SCRIPTING
81
HTML and SCRIPTING
FreeMaster ActiveX Object Methods
6.3.3 ReadVariable
ReadVariable (bsVar, vValue, tValue, bsRetMsg)
6.3.3.1 Description
This function reads value from a FreeMaster-defined variable.
6.3.3.2 Arguments:
bsVar
[in]
String value with the name of the variable to be read. The variable
must be defined in the FreeMaster project which is currently
opened.
vValue
[out, optional]
Returns numeric representation of the variable bsVar
tValue
[out, optional]
Returns string value which represents the variable format and
units necessary for displaying the variable value
bsRetMsg
[out, optional]
When an error occurs, this value contains an error message;
otherwise, it is empty
Boolean value
“True” is returned if the variable has been read without errors.
“False” is returned if the specified variable was not found in
FreeMaster project or if a communication error occurred.
6.3.3.3 Return Value:
FMASTxxx — Rev. 0.1
MOTOROLA
FreeMaster for Embedded Applications
HTML and SCRIPTING
82
HTML and SCRIPTING
FreeMaster ActiveX Object Methods
6.3.4 WriteVariable
WriteVariable (bsVar, vValue, bsRetMsg)
6.3.4.1 Description
This function writes a value to a FreeMaster variable.
6.3.4.2 Arguments:
bsVar
[in]
A string value with the name of the variable to be written. The
variable must be defined in the currently-open FreeMaster project
vValue
[in]
Value to write to the variable
bsRetMsg
[out, optional]
When an error occurs, this value contains an error message;
otherwise, it is empty
Boolean value
“True” is returned if the variable has been written without errors.
“False” is returned if the specified variable was not found in
FreeMaster project, if the value passed was invalid, or if a
communication error occurred.
6.3.4.3 Return Value:
FMASTxxx — Rev. 0.1
MOTOROLA
FreeMaster for Embedded Applications
HTML and SCRIPTING
83
HTML and SCRIPTING
FreeMaster ActiveX Object Methods
6.3.5 ReadMemory
ReadMemory (vAddr, vSize, arrData, bsRetMsg)
ReadMemory_t (vAddr, vSize, arrData, bsRetMsg)
ReadMemoryHex (vAddr, vSize, bsRet, bsRetMsg)
6.3.5.1 Description
These functions read a block of memory from the target application.
They differ in how the data is returned to the caller.
•
ReadMemory returns data in the safearray of variants, which can
be used in both scripting languages like VBScript and in compiled
languages like Visual Basic.
•
ReadMemory_t returns data in the safearray of type “unsigned 1
byte integer”, which can be used in compiled languages like Visual
Basic. Using typed arrays is faster than using arrays of variants.
•
ReadMemoryHex returns data in the string value. Each byte is
represented in hexadecimal form by two characters.
6.3.5.2 Arguments:
vAddr
[in]
The address of the memory block to be read. This can be either an
absolute numeric address, a symbol name valid in the current
FreeMaster project, or a symbol name plus offset value
vSize
[in]
The size of memory block to be read
arrData
[out, optional]
The return array of the values
bsRetMsg
[out, optinal]
When an error occurs, this value contains an error message;
otherwise, it is empty
Boolean value
“True” is returned if the memory block has been read without
errors. “False” is returned if the specified address was invalid or if
a communication error occurred.
6.3.5.3 Return Value:
FMASTxxx — Rev. 0.1
MOTOROLA
FreeMaster for Embedded Applications
HTML and SCRIPTING
84
HTML and SCRIPTING
FreeMaster ActiveX Object Methods
6.3.6 WriteMemory
WriteMemory (vAddr, vSize, arrData, bsRetMsg])
6.3.6.1 Description
This function writes a block of bytes to the target application’s memory.
6.3.6.2 Arguments:
vAddr
[in]
The address of the memory area to be written. This can be either
an absolute numeric address, a symbol name valid in the current
FreeMaster project, or a symbol name plus offset value
vSize
[in]
The size of memory block to be written
arrData
[in]
Safe array of bytes to be written. It must contain at least vSize
elements.
bsRetMsg
[out, optinal]
When an error occurs, this value contains an error message;
otherwise, it is empty
Boolean value
“True” is returned if the memory block has been read without
errors. “False” is returned if the specified address was invalid or if
a communication error occurred.
6.3.6.3 Return Value:
FMASTxxx — Rev. 0.1
MOTOROLA
FreeMaster for Embedded Applications
HTML and SCRIPTING
85
HTML and SCRIPTING
FreeMaster ActiveX Object Methods
6.3.7 ReadXxxArray
To access array of 1,2, or 4-byte signed integers:
ReadIntArray (vAddr, vSize, vElemSize, arrData,
bsRetMsg)
ReadIntArray_t (vAddr, vSize, vElemSize, arrData,
bsRetMsg)
To access array of 1,2, or 4-byte unsigned integers:
ReadUIntArray (vAddr, vSize, vElemSize, arrData,
bsRetMsg)
ReadUIntArray_v (vAddr, vSize, vElemSize, arrData,
bsRetMsg)
ReadUIntArray_t (vAddr, vSize, vElemSize, arrData,
bsRetMsg)
To access array of 4-byte floating point numbers:
ReadFloatArray (vAddr, vSize, arrData, bsRetMsg)
ReadFloatArray_t (vAddr, vSize, arrData, bsRetMsg)
To access array of 8-byte floating point numbers:
ReadDoubleArray (vAddr, vSize, arrData, bsRetMsg)
ReadDoubleArray_t (vAddr, vSize, arrData, bsRetMsg)
6.3.7.1 Description
These functions read a block of memory from the target application and
translate return it to the caller in the form of integer or floating point
numbers. For each call, there are one or two optional functions which
can be used in different scripting environments:
•
ReadXxxArray returns data as a safearray of variants, which can
be used in both scripting languages like VBScript and in compiled
languages like Visual Basic. As VBScript engine does not handle
FMASTxxx — Rev. 0.1
MOTOROLA
FreeMaster for Embedded Applications
HTML and SCRIPTING
86
HTML and SCRIPTING
FreeMaster ActiveX Object Methods
variants encapsulating 2 and 4-byte unsigned integer types, this
method converts such a values to floating point format before
returning.
•
ReadXxxArray_v is the same as ReadXxxArray except it does not
perform the VBScript translation for 2 and 4-byte unsigned integer
types.
•
ReadXxxArray_t returns data in the safearray of strictly typed
values, which can be used in compiled languages like Visual
Basic. Using typed arrays is significantly faster than using arrays
of variants.
6.3.7.2 Arguments:
vAddr
[in]
The address of the memory block to be read. This can be either an
absolute numeric address, a symbol name valid in the current
FreeMaster project, or a symbol name plus offset value
vSize
[in]
The number of elements to be read from the array
vElemSize
[in]
The size of an array element in bytes. The total number of bytes
read from the target can be calculated as vSize * vElemSize.
arrData
[out, optional]
The return array of the values
bsRetMsg
[out, optinal]
When an error occurs, this value contains an error message;
otherwise, it is empty
Boolean value
“True” is returned if the memory block has been read without
errors. “False” is returned if the specified address was invalid or if
a communication error occurred.
6.3.7.3 Return Value:
FMASTxxx — Rev. 0.1
MOTOROLA
FreeMaster for Embedded Applications
HTML and SCRIPTING
87
HTML and SCRIPTING
FreeMaster ActiveX Object Methods
6.3.8 WriteXxxArray
To access array of 1,2, or 4-byte signed integers:
WriteIntArray (vAddr, vSize, vElemSize, arrData,
bsRetMsg)
To access array of 1,2, or 4-byte unsigned integers:
WriteUIntArray (vAddr, vSize, vElemSize, arrData,
bsRetMsg)
To access array of 4-byte floating point numbers:
WriteFloatArray (vAddr, vSize, arrData, bsRetMsg)
To access array of 8-byte floating point numbers:
WriteDoubleArray (vAddr, vSize, arrData, bsRetMsg)
6.3.8.1 Description
These functions translate an array of numbers passed by the caller into
a block of bytes suitable for the target CPU and write it into the target
memory.
6.3.8.2 Arguments:
vAddr
[in]
The address of the memory block to be written. This can be either
an absolute numeric address, a symbol name valid in the current
FreeMaster project, or a symbol name plus offset value
vSize
[in]
The number of elements to be written to the target memory.
vElemSize
[in]
The size of an array element in bytes. The total number of bytes to
be written to the target can be calculated as vSize * vElemSize.
FMASTxxx — Rev. 0.1
MOTOROLA
FreeMaster for Embedded Applications
HTML and SCRIPTING
88
HTML and SCRIPTING
FreeMaster ActiveX Object Methods
arrData
[in]
The array of the values to be written
bsRetMsg
[out, optinal]
When an error occurs, this value contains an error message;
otherwise, it is empty
Boolean value
“True” is returned if the memory block has been Write without
errors. “False” is returned if the specified address was invalid or if
a communication error occurred.
6.3.8.3 Return Value:
FMASTxxx — Rev. 0.1
MOTOROLA
FreeMaster for Embedded Applications
HTML and SCRIPTING
89
HTML and SCRIPTING
FreeMaster ActiveX Object Methods
6.3.9 GetCurrentRecorderData
GetCurrentRecorderData (arrData, arrSerieNames,
timeBaseSec, bsRetMsg)
GetCurrentRecorderData_t (arrData, arrSerieNames,
timeBaseSec, bsRetMsg)
6.3.9.1 Description
These functions retrieve data currently displayed in the recorder chart.
They differ in how the data is returned to the caller.
•
GetCurrentRecorderData returns data in the safearray of variants,
which can be used in both scripting languages like VBScript and
in compiled languages like Visual Basic
•
GetCurrentRecorderData_t returns data in the safearray of type
“double floating point”, which can be used in compiled languages
like Visual Basic. Using typed arrays is faster than using arrays of
variants.
6.3.9.2 Arguments:
arrData
[out, optinal]
Return, two-dimensional array of values; the first dimension
is series index, the second dimension is value index
arrSerieNames
[out, optional]
Return array with names of series on appropriate indexes
timeBaseSec
[out, optional]
Returned time between individual recorded samples in
seconds; this value can be 0 if the target does not supply
such a value.
bsRetMsg
[out, optional]
When an error occurs, this value contains an error message;
otherwise, it is empty
Boolean value
“True” is returned if the data has been retrieved successfully from
the recorder item. “False” is returned if there is no valid data in the
recorder or there is no currently-active recorder.
6.3.9.3 Return Value:
FMASTxxx — Rev. 0.1
MOTOROLA
FreeMaster for Embedded Applications
HTML and SCRIPTING
90
HTML and SCRIPTING
FreeMaster ActiveX Object Methods
6.3.10 GetCurrentRecorderSeries
GetCurrentRecorderSeries (bsSerieName, arrData,
timeBaseSec, bsRetMsg)
GetCurrentRecorderSeries_t (bsSerieName, arrData,
timeBaseSec, bsRetMsg)
6.3.10.1 Description
These functions retrieve one data series from the currently-displayed
recorder chart. They differ in how the data is returned to the caller.
•
GetCurrentRecorderSeries returns data in the safearray of
variants, which can be used in both scripting languages like
VBScript and in compiled languages like Visual Basic.
•
GetCurrentRecorderSeries_t - returns data in the safearray of
type “double floating point”, which can be used in compiled
languages like Visual Basic. Using typed arrays is faster than
using arrays of variants.
6.3.10.2 Arguments:
bsSerieName
[in]
String with the name of the series whose data is to be
retrieved
arrData
[out, optional]
Return array of the values
timeBaseSec
[out, optional]
Returned time between individual recorded samples in
seconds; this value can be 0 if the target does not supply
such a value.
bsRetMsg
[out, optional]
When an error occurs, this value contains an error
message; otherwise, it is empty
6.3.10.3 Return Value:
Boolean value
“True” is returned if the data has been retrieved successfully from the
recorder item. “False” is returned if there is no valid data in the recorder or if
there is no recorder currently active.
FMASTxxx — Rev. 0.1
MOTOROLA
FreeMaster for Embedded Applications
HTML and SCRIPTING
91
HTML and SCRIPTING
FreeMaster ActiveX Object Methods
6.3.11 StartCurrentRecorder
StartCurrentRecorder (bsRetMsg)
6.3.11.1 Description
This function starts the recorder which is currently-displayed in the
FreeMaster window.
6.3.11.2 Argument:
bsRetMsg
[out, optional]
When an error occurs, this value contains an error message;
otherwise, it is empty
Boolean value
“True” is returned if the recorder has been started successfully.
“False” is returned if there is no recorder currently active.
6.3.11.3 Return value:
FMASTxxx — Rev. 0.1
MOTOROLA
FreeMaster for Embedded Applications
HTML and SCRIPTING
92
HTML and SCRIPTING
FreeMaster ActiveX Object Methods
6.3.12 StopCurrentRecorder
StopCurrentRecorder (bsRetMsg)
6.3.12.1 Description
This function manually stops the Recorder which is currently-displayed
in the FreeMaster window.
Argument:
bsRetMsg
[out, optional]
When an error occurs, this value contains an error message;
otherwise, it is empty
Boolean value
“True” is returned if the recorder has been successfully stopped.
“False” is returned if there is no recorder currently active.
6.3.12.2 Return Value:
FMASTxxx — Rev. 0.1
MOTOROLA
FreeMaster for Embedded Applications
HTML and SCRIPTING
93
HTML and SCRIPTING
FreeMaster ActiveX Object Methods
6.3.13 GetCurrentRecorderState
GetCurrentRecorderState (nState, bsRetMsg)
6.3.13.1 Description
This function retrieves current recorder status code and assigned status
text.
6.3.13.2 Arguments:
nState
[out, optional]
Return numeric value identifying current recorder state. Valid
states codes are:
0=idle;
1=starting;
2=running;
3=downloading results;
4=holding received signal;
5=error;
6=manually stopping;
7=not initialized
bsRetMsg
[out, optional]
When an error occurs, this value contains an error message;
otherwise, it contains text description of current recorder state
Boolean value
“True” is returned if the recorder state has been read
successfully. “False” is returned if there is no recorder currently
active.
6.3.13.3 Return Value:
FMASTxxx — Rev. 0.1
MOTOROLA
FreeMaster for Embedded Applications
HTML and SCRIPTING
94
HTML and SCRIPTING
FreeMaster ActiveX Object Methods
6.3.14 RunStimulators
RunStimulators (bsStimNames)
6.3.14.1 Description
This function starts one or more FreeMaster variable stimulators.
6.3.14.2 Arguments:
bsStimNames
[in]
A semicolon-delimited list of stimulators to be started.
6.3.14.3 Return Value:
Integer Value
Number of stimulators actually started. This number may be
equal or less than the number of semicolon-delimited stimulator
names passed in bsStimNames parameter. The return count
does not include stimulators not found by name and stimulators
which were already running.
FMASTxxx — Rev. 0.1
MOTOROLA
FreeMaster for Embedded Applications
HTML and SCRIPTING
95
HTML and SCRIPTING
FreeMaster ActiveX Object Methods
6.3.15 StopStimulators
StopStimulators (bsStimNames)
6.3.15.1 Description
This function halts one or more FreeMaster variable stimulators.
6.3.15.2 Arguments:
bsStimNames
[in]
A semicolon-delimited list of stimulators to be halted.
6.3.15.3 Return Value:
Integer Value
Number of stimulators actually stopped. This number may be
equal or less than the number of semicolon-delimited stimulator
names passed in bsStimNames parameter. The return count
does not include stimulators not found by name and stimulators
which were not running.
FMASTxxx — Rev. 0.1
MOTOROLA
FreeMaster for Embedded Applications
HTML and SCRIPTING
96
HTML and SCRIPTING
FreeMaster ActiveX Properties
6.4 FreeMaster ActiveX Properties
Starting version 1.2.20, the FreeMaster also supports scripting
languages which do not implement by-reference passing of the function
parameters (e.g. JScript). The “output” parameters in all ActiveX
methods are now declared as “optional” and do not need to be specified
by the caller at the time the FreeMaster method is called. After the call is
made, all output values can be fetched using ActiveX properties as
described in the Table 6-1 below.
For each property in the FreeMaster ActiveX interface, there is also a
“GetLast...” function available and implements the same functionality as
when reading the property value itself. Such functions can be used in
scripting environment where accessing ActiveX object properties is not
possible or convenient.
Table 6-1 FreeMaster ActiveX Object Properties
Property Name
Description
LastResult
The return value of the last ActiveX function called
LastRetMsg
The error message returned by the last ActiveX
function called (the value of bsRetMsg output
parameter)
LastVariable_vValue
The value of the “vValue” output parameter returned
by the last ReadVariable method called
LastVariable_tValue
The value of the “tValue” output parameter returned
by the last ReadVariable method called
LastMemory_hexstr
The value of the “bsRet” output parameter returned by
the last ReadMemoryHex method called
LastMemory_data
The array of values returned in “arrData” output
parameter by the last call to one of the ReadMemory
or ReadXxxArray methods.
LastRecorder_data
The array of values returned in “arrData” output
parameter by the last call to GetCurrentRecorderData
or GetCurrentRecorderSeries methods.
LastRecorder_serieNames
The array of values returned in “arrSerieNames”
output parameter by the last call to
GetCurrentRecorderData method.
FMASTxxx — Rev. 0.1
MOTOROLA
FreeMaster for Embedded Applications
HTML and SCRIPTING
97
HTML and SCRIPTING
FreeMaster ActiveX Properties
Table 6-1 FreeMaster ActiveX Object Properties
Property Name
Description
LastRecorder_timeBaseSec
The value of the “timeBaseSec” output parameter
returned by the last call to GetCurrentRecorderData
method.
LastRecorder_state
The value of the “nState” output parameter returned
by the last call to GetCurrentRecorderState method.
FMASTxxx — Rev. 0.1
MOTOROLA
FreeMaster for Embedded Applications
HTML and SCRIPTING
98
HTML and SCRIPTING
FreeMaster ActiveX Object Events
6.5 FreeMaster ActiveX Object Events
6.5.1 OnRecorderDone
OnRecorderDone()
6.5.1.1 Description
This event is called when the active recorder finishes downloading of a
new data.
FMASTxxx — Rev. 0.1
MOTOROLA
FreeMaster for Embedded Applications
HTML and SCRIPTING
99
HTML and SCRIPTING
Examples
6.6 Examples
FreeMaster ActiveX control functions can be used within HTML script
code, JScript, or VBScript. The following example demonstrates the use
in VBScript. JScript users should also refer to Section 6.4.
<script language="VBScript">
Function GetSpeed()
succ = pcm.ReadVariable("Speed", vValue, tValue, bsRetMsg)
If succ then
idSpeed.InnerText = tValue
If vValue > 100 then
pcm.SendCommand("SlowDown()", 1)
End If
Else
idError.InnerText = bsRetMsg
End If
End Function
</script>
<object classid="clsid:48A185F1-FFDB-11D3-80E3-00C04F176153"
height="0" width="0" id="pcm" name="pcm">
<input TYPE=button VALUE="Get Speed" onClick="GetSpeed()">
FMASTxxx — Rev. 0.1
MOTOROLA
FreeMaster for Embedded Applications
HTML and SCRIPTING
100
FreeMaster
Appendix A. References
1. DSP56800 Family Manual; Motorola (DSP56800FM/D)
2. DSP56F801/803/805/807 16-Bit Digital Signal Processor User’s
Manual; Motorola (DSP56F801-7UM/D)
3. DSP56800E 16-bit DSP Core Reference Manual; Motorola
(DSP56800ERM/D)
4. 56F8300 Hybrid Controller Peripheral User Manual; Motorola
(MC56F8300UM/D)
5. MPC500 Family RCPU Reference Manual; Motorola
(RCPURM/AD)
6. MPC555 / MPC556 USER’S MANUAL; Motorola (MPC555UM/D)
7. DSP56800_Quick_Start User’s Manual; Motorola
8. DSP56800E_Quick_Start User’s Manual; Motorola
9. MPC500_Quick_Start User’s Manual; Motorola
10. MPC5500_Quick_Start User’s Manual; Motorola
FMASTxxx — Rev. 0.1
MOTOROLA
FreeMaster for Embedded Applications
References
101
TDxxx/D
HOW TO REACH US:
USA/EUROPE/LOCATIONS NOT LISTED:
Motorola Literature Distribution;
P.O. Box 5405, Denver, Colorado 80217
1-303-675-2140 or 1-800-441-2447
JAPAN:
Motorola Japan Ltd.; SPS, Technical Information Center,
3-20-1, Minami-Azabu Minato-ku, Tokyo 106-8573 Japan
81-3-3440-3569
ASIA/PACIFIC:
Motorola Semiconductors H.K. Ltd.;
Silicon Harbour Centre, 2 Dai King Street,
Tai Po Industrial Estate, Tai Po, N.T., Hong Kong
852-26668334
TECHNICAL INFORMATION CENTER:
1-800-521-6274
Information in this document is provided solely to enable system and software
implementers to use Motorola products. There are no express or implied copyright
licenses granted hereunder to design or fabricate any integrated circuits or
integrated circuits based on the information in this document.
Motorola reserves the right to make changes without further notice to any products
herein. Motorola makes no warranty, representation or guarantee regarding the
suitability of its products for any particular purpose, nor does Motorola assume any
HOME PAGE:
http://motorola.com/semiconductors
liability arising out of the application or use of any product or circuit, and specifically
disclaims any and all liability, including without limitation consequential or incidental
damages. “Typical” parameters which may be provided in Motorola data sheets
and/or specifications can and do vary in different applications and actual
performance may vary over time. All operating parameters, including “Typicals”
must be validated for each customer application by customer’s technical experts.
Motorola does not convey any license under its patent rights nor the rights of
others. Motorola products are not designed, intended, or authorized for use as
components in systems intended for surgical implant into the body, or other
applications intended to support or sustain life, or for any other application in which
the failure of the Motorola product could create a situation where personal injury or
death may occur. Should Buyer purchase or use Motorola products for any such
unintended or unauthorized application, Buyer shall indemnify and hold Motorola
and its officers, employees, subsidiaries, affiliates, and distributors harmless
against all claims, costs, damages, and expenses, and reasonable attorney fees
arising out of, directly or indirectly, any claim of personal injury or death associated
with such unintended or unauthorized use, even if such claim alleges that Motorola
was negligent regarding the design or manufacture of the part.
Motorola and the Stylized M Logo are registered in the U.S. Patent and Trademark
Office. digital dna is a trademark of Motorola, Inc. All other product or service
names are the property of their respective owners. Motorola, Inc. is an Equal
Opportunity/Affirmative Action Employer.
© Motorola, Inc. 2003