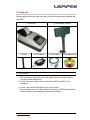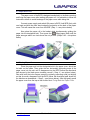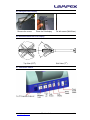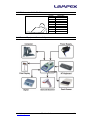
1
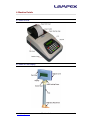
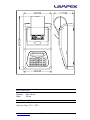
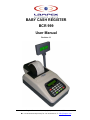
BABY CASH REGISTER
BCR 999
User Manual
Revision 1.1
Regd. Office: 6-2/231/B, Kukatpally, Hyderabad-500072, INDIA.
: +91-40-23157701~9(9 Lines) Fax: +91-40-23157710 : [email protected]
CONTENTS
1. INTRODUCTION .............................................................................5
2. SALIENT FEATURES OF BCR999 ................................................6
3.CHECK LIST ....................................................................................8
3.1 PRECAUTIONS ................................................................................................ 8
4. MACHINE DETAILS........................................................................9
4.1PARTS OF BCR ............................................................................................... 9
4.2 PARTS OF POLE DISPLAY ................................................................................ 9
4.3 PAPER ROLL FEED .......................................................................................10
4.4 CLOSING PAPER COVER ...............................................................................10
4.5 FIXING THE POLE DISPLAY ............................................................................11
4.6 AXES MOVEMENT ON POLE DISPLAY .............................................................11
4.7 CONNECTOR DETAILS ...................................................................................11
4.8 COMMUNICATION CABLE DETAILS .................................................................12
4.9 RJ45 CONNECTOR CABLE PIN OUT ..............................................................12
4.10 D9 CONNECTOR CABLE PIN OUT ...............................................................13
4.11 EXTERNAL EQUIPMENT CONNECTIVITY .........................................................13
5. KEYPAD DESCRIPTION ..............................................................14
5.1 ALPHABETS & NUMERIC KEYS ......................................................................14
5.2 SCROLL KEYS ..............................................................................................14
5.3 SPECIAL FUNCTION KEYS ..............................................................................14
6. BASIC DEFINITIONS....................................................................15
6.1 HEADER .......................................................................................................15
6.2 FOOTER .......................................................................................................15
6.3 MANAGER ....................................................................................................15
6.4 CASHIERS ....................................................................................................15
6.5 TAX LEVEL ...................................................................................................15
6.6 BASE UNITS .................................................................................................15
6.7 DISCOUNT ....................................................................................................15
6.8 SPLIT PRICING ..............................................................................................16
6.9 SURCHARGE ................................................................................................16
6.10 PLU (PRICE LOOK UP) ...............................................................................16
7. GETTING STARTED.....................................................................17
7.1TURN ON THE POWER ...................................................................................17
7.2 LOGIN ..........................................................................................................17
7.3 SETTING HEADER/FOOTER ............................................................................18
7.4 SETTING CASHIER .........................................................................................19
7.5 SET DATE & TIME .........................................................................................19
7.6 ADDING PLU’S .............................................................................................19
7.7 EXAMPLE TO ADD NEW PLU........................................................................23
8. MODE KEY OPERATIONS ...........................................................25
8.1 MANAGER SETTINGS .....................................................................................25
8.1.1 UNIT STATUS................................................................................................................ 26
8.1.2 MACHINE SETTINGS ...................................................................................................... 26
8.1.3 CASHIER SETTINGS....................................................................................................... 26
8.1.4 PLU SETTINGS............................................................................................................. 27
[email protected]
Revision 1.1
2
8.1.5 RECEIPT SETTINGS ....................................................................................................... 28
8.1.6 TAX SLAB SETTINGS ..................................................................................................... 29
8.1.7 SALE UNIT SETTINGS .................................................................................................... 30
8.1.8 BASE UNIT SETTINGS ................................................................................................... 30
8.1.9 TEMPLATE SETTINGS .................................................................................................... 30
8.1.10 DEPARTMENT SETTINGS.............................................................................................. 30
8.2 GET REPORTS ..............................................................................................31
8.3 SERIAL MODE ...............................................................................................32
8.4 LOCK KEYPAD ..............................................................................................32
9. OPERATION .................................................................................33
9.1 ON POWER UP .............................................................................................33
9.2 OPERATING THE BCR ...................................................................................33
9.3 OBTAINING BILL DETAILS, UPDATING STOCK, DUPLICATE & REFUND BILLS ...34
10. REPORT GENERATION .............................................................35
10.1 DAILY REPORT ...........................................................................................35
10.2 DATE WISE REPORT ...................................................................................35
10.3 GROSS REVENUE REPORT ..........................................................................35
10.4 BILL WISE REPORT .....................................................................................36
10.5 PLU DETAIL REPORT .................................................................................36
10.6 PLU SUMMARY REPORT .............................................................................36
10.6.1 STOCK REPORT .......................................................................................................... 36
10.6.2 PRICE REPORT ........................................................................................................... 36
10.6.3 REORDER REPORT ..................................................................................................... 36
10.7 ITEM SALE REPORT ....................................................................................36
10.8 TAX SLABS REPORT ...................................................................................36
10.9 SALE UNIT REPORT ....................................................................................37
10.10 BASE UNIT ...............................................................................................37
10.11 CASHIER REPORT .....................................................................................37
10.11.1 CASHIER DAILY REPORT ........................................................................................... 37
10.11.2 CASHIER SUMMARY REPORT .................................................................................... 37
10.12 VOID BILL REPORT ...................................................................................37
11. SAMPLE BILLS ..........................................................................38
11.1 SAMPLE .....................................................................................................38
11.2 GROSS REVENUE/DAILY REPORT ................................................................39
11.3 CASHIER SUMMARY/DAILY REPORT .............................................................39
11.4 SALE UNITS ................................................................................................40
11.5 BASE UNITS ...............................................................................................40
11.6 TAX SLABS .................................................................................................40
11.7 PRICE LOOK UP ..........................................................................................41
12.TROUBLE SHOOTING ................................................................42
13. ADDITIONAL INFORMATION ....................................................43
14. SPECIFICATION .........................................................................44
14.1 CONTROLLER .............................................................................................44
14.2 REAL TIME CLOCK ......................................................................................44
14.3 DISPLAY .....................................................................................................44
14.4 KEY BOARD................................................................................................44
14.5 PRINTER .....................................................................................................44
14.6 COMMUNICATION PORTS .............................................................................44
14.7 CONNECTOR CABLE....................................................................................44
[email protected]
Revision 1.1
3
14.8 OPTIONAL CONNECTORS.............................................................................44
14.9 BCR DETAILS ............................................................................................45
14.9.1 SIZE........................................................................................................................... 45
14.9.2 WEIGHT ..................................................................................................................... 45
14.9.3 MECHANICAL DIMENSIONS .......................................................................................... 45
14.9.4 PAPER ROLL .............................................................................................................. 46
14.9.5 OPERATING TEMPERATURE ......................................................................................... 46
14.9.6 POWER CONSUMPTION................................................................................................ 47
15. FAQ’S..........................................................................................48
16.WARRANTY.................................................................................50
16.1 WARRANTY TERMS AND CONDITIONS...........................................................50
16.2 EXCLUSIONS FROM STANDARD WARRANTY .................................................50
16.3 WARRANTY CARD .......................................................................................51
17. CONTACT DETAILS ...................................................................52
18. REVISION HISTORY...................................................................53
19. USER NOTES .............................................................................54
[email protected]
Revision 1.1
4
1. Introduction
Lampex BCR999 is a rugged, versatile, portable, light in weight, user friendly
and easy to program cash register. It has built-in impact printer and serial
communication link to get connected to a host computer for data transfer. It has
non-volatile memory for storing data.
This manual will serve you to familiarize with the various operating instructions.
A user can load/store up to a maximum of 999 unit descriptions and prices,
referred to as Price Look Ups or PLUs. In addition, other important data such as
Stock level, Tax rates, Surcharge, Sale Units, Base Units etc., can also be
programmed. It also generates MIS data in the form of various reports.
There are two models of BCR:
1) With 20 Keypads: 999 PLUs (BCR999)
2) With 30 Keypads: 16/25 Departments & 2000 PLUs. (BCR999F)
This is Baby Fiscal Cash Register.
a) Impact printer (similar to BCR999)
b) Thermal Printer
Both models can work with battery power also.
[email protected]
Revision 1.1
5
2. Salient Features of BCR999
• 16 Departments/25 Department optional
• User-friendly key operation for managing 2000 PLUs.
• Large non-volatile memory for data Storage.
• Easy Upload/Download of data to and from the computer via serial port.
• Rugged Impact printer to issue bills/receipts.
• System Lock when not in use.
• Paper End Sensor to detect printing paper availability.
• Battery Backed Real Time Clock.
• Multi function keypad with backlit LCD Display.
• Rugged construction to withstand shocks/vibrations etc.
• Ergonomically designed ABS plastics housing in pleasing colors.
• Provision to connect external PC Keyboard, Electronic Weighing Scale or
bar code scanner, Pole Display.
• Operator side LCD Display with backlight and Cash Drawer connectivity.
• Rugged, scratch resistant rubberized keypad
• Impact two-color printing.
IDEAL FOR
9MULTI-BRAND STORES
9FAST-FOOD RESTAURANTS
9GROCERY/RATION SHOPS
9SHOE/JEWELERY SHOPS
9PHOTOGRAPHIC LABS
9CO-OPERATIVE STORES
9SUPERMARKETS
9BAKERY/PASTRY / SWEET SHOPS
9GARMENT/Cloth STORES
9PETROL PUMPS
9HOSPITAL / NURSING HOMES
9SERVICE ESTABLISHMENTS and many more…
SPECIAL HIGHLIGHTS
¾ SMALL FOOTPRINT: Ideal for Counter-top.
¾ VAT – ENABLED: Auto calculation of taxes.
¾ IMPACT PRINTER: For clear, crisp, smudge-free printing.
¾ ITEM SCROLLING / SEARCH: For Quick item billing without
memorizing codes.
¾ PC CONNECTIVITY: To download inventory and pricing information
and to upload bills and transaction data for further analysis and
accounting.
¾ NETWORKING CAPABILITY: Connectivity to central server through
wire.
¾ INTERNET CONNECTIVITY: by using optional external converter.
¾ OTHER CONNECTIVITY/ ATTACHMENTS: - External Keyboard,
[email protected]
Revision 1.1
6
Weighing Scale, Cash Drawer etc.
¾ Elegant Customer Pole Display - optional
TECHNICAL SPECIFICATIONS
HARDWARE FEATURES
¾ High performance Micro-controller based design
¾ 24 characters x 2 lines LCD displays with backlight for Operator
¾ Pole Display for Customer
¾ 20 keys – Keypad / 30 Keypad
¾ Memory for storing over two-months of bills and data.
¾ Real Time Clock with battery back-up for date and time
¾ Built-in Receipt Printer
¾ Connectivity top PC, Digital Weighing Scale, Barcode Scanner,
External AT Keyboard, Customer Pole Display, Cash Drawer.
SOFTWARE FEATURES
¾ 16 Departments (Choose the department number from 01-16)
¾ 2000 PLUs (Price Look Ups) – items.
¾ 4 Operator Logins
¾ 16 Characters Alpha description
¾ Multiple sale prices / Open price.
¾ Programmable Tax rates
¾ Cash / Cheque / Credit / Sodex.
¾ Item Scroll and Edit in Bill before printing.
¾ Refund, return, item cancellation, bill cancellation
¾ Item / bill discounts by value or percentage
¾ Duplicate bill issue
MIS / REPORTS
¾ Daily Sales Report: Item wise by quantity or value
¾ Inventory Report: Status, Reorder levels
¾ Tax / VAT Report
¾ Cashier Report
¾ PLU Price List
¾ Purchase Report
¾Bill-wise Summary
In one of the reports add type of payment received for a bill.
SECURITY
¾ Two locks
¾ One for cashier and one for manager/owner
¾ Login passwords for up to 4 Cashiers.
[email protected]
Revision 1.1
7
3. Check List
Check supplied items and make sure that you have following items supplied with
your BCR.
1. BCR 999
3. Screw
2. Pole Display (Option)
4. AC Adaptor
5. Serial Cable
6.User Manual CD
3.1 Precautions
1. Do not short-circuit the DC plug of AC adaptor with any metallic objects.
This may cause malfunction.
2. Check if the serial cable (used to connect the BCR to the PC) is not
damaged.
3. Check if the optional Pole Display is in proper Order.
4. Any damage to any of the above items will render the BCR inoperable and
therefore should be immediately reported to the vendor.
[email protected]
Revision 1.1
8
4. Machine Details
4.1 Parts of BCR
4.2 Parts of Pole Display
[email protected]
Revision 1.1
9
4.3 Paper Roll Feed
The paper cover of the BCR is designed aesthetically to facilitate removing
and fixing the paper cover after loading with paper roll. It is advisable to follow the
instructions herein to avoid breakage of the paper cover while doing this.
Connect power supply and switch ON power to BCR. Hold BCR firmly with
one hand and with the other hand nudge the projection at the back of the paper
cover. This will unseat the cover from the BCR. (Step 1 – see picture below)
Now place the paper roll in the basket while simultaneously guiding the
paper into the designated slot. Then press the
Key (paper feed) until the
paper emerges about one inch above the out put end. (Steps 2 &3 – see picture
below)
4.4 Closing Paper Cover
Place the paper end into the designated slot in the paper cover, which has
its teeth on the inside. Then guide the two horizontally protruding ends of the
paper cover into the slot until it disappears into the BCR (follow the directional
path shown by the black arrow towards yourself – Step 4 – see picture below).
Now with both the index fingers press the vertically protruding ends just slightly
so that its mouth disappears into the BCR (follow the directional path shown by
the black arrow downwards – Step 5 – see picture below). After that gently press
the paper cover from the top so that it clicks shut. Fixing Back the Paper Cover
[email protected]
Revision 1.1
10
4.5 Fixing the Pole Display
Remove the screw
Place the Poledisplay
Fix with screw (M4x35mm)
4.6 Axes Movement on Pole Display
°
42°
135
35 °
135
°
Top View (2700)
Side View (770)
4.7 Connector Details
[email protected]
Revision 1.1
11
4.8 Communication Cable Details
To BCR999
To PC
4.9 RJ45 Connector Cable Pin Out
PIN No.
1
2
3
4
5
6
7
8
[email protected]
Revision 1.1
Description
NC
NC
RXD In
GND
TXD Out
NC
NC
NC
12
4.10 D9 Connector Cable Pin Out
PIN No.
1
2
3
4
5
6
7
8
9
Description
NC
TXD out
RXD In
NC
GND
NC
NC
NC
NC
4.11 External Equipment Connectivity
[email protected]
Revision 1.1
13
5. Keypad Description
Basic data entry is through a 20 key keypad. The layout of rugged, scratch
resistant rubberized keypad is shown below. (30 Keypad optional)
5.1 Alphabets & Numeric Keys
These keys are used for the entry of both alphabets
and numerals (Alpha Numeric Keys) hence are multifunctional.
These are single function keys used to enter only
numeric values.
5.2 Scroll Keys
Scroll keys (up/down) for scrolling.
5.3 Special Function Keys
This key is used to cancel an operation or return to the previous screen.
(One screen up)
This key is used to select Price Look Ups (PLU’s) from the BCR.
This is a multi-function key and normally used for deleting one character.
(Functions as a back space key in a PC)
This key is the Paper Feed key. When pressed the paper advances by
one line, if held down, multiple line feeds are generated. Useful when
new paper roll is being inserted.
This key is used to Update Stock and obtains bill details.
This is the Enter Key (acts as confirm key).
This key allows user to enter into settings. This key will function only
when logged in as Manager.
This key is the DOT key.
[email protected]
Revision 1.1
14
6. Basic Definitions
6.1 Header
The header on each printed receipt contains introductory information,
preceding information of goods purchased. It is mainly used to identify/advertise
the departments, stores, etc.
Header may be printed at the beginning of every Receipt. (See Setting
Header/Footer Page No 18.) The header is printed in Red Color.
6.2 Footer
Footer on every receipt is optional. It consists of two lines, which are
programmable. (See Header /Footer Page No 18.) The Footer is also printed in
Red Color.
6.3 Manager
The Manager is a master user who can add/modify/delete any data, effect
BCR settings etc. BCR supports one Manager to use the machine. On a new
machine a Manager is created with a default password. A Manager can create a
maximum of three cashiers who can login and issue bills.
6.4 Cashiers
A cashier has limited access to the resources of the machine and can
issue bills. The cash register allows a maximum of 3 independent cashiers. The
cashier details contain the name of the cashier (16 characters), Password
(maximum 10 digits) (Please see Cashier Settings Page No 26.)
6.5 Tax Level
A novel method is adopted to provide a maximum of 15 different tax
percentages for PLU’s, called tax levels. Every PLU can be assigned one of
these 15 levels for the purpose of tax calculation.
Each tax level contains two programmable features:
¾Tax Rate – each number representing the percentage.
¾Tax Name – can be of 10 characters long.
6.6 Base Units
Base unit effectively means number of items in a pack. The system allows
7 base units to be programmed (1-7), each base unit representing the number of
Items in a pack. (Eg: a base unit number say 1 can be given a value 10 and this
base unit can be assigned to a PLU which means that PLU item refers to a pack
of ten items). This base unit is assigned to the PLU when split pricing is enabled
in a PLU.
[email protected]
Revision 1.1
15
6.7 Discount
Discounts can be offered on goods purchased. The system permits
programming discount either as a percentage on the price of the PLU or fixed
amount. (See PLU settings Page No 27.)
6.8 Split Pricing
Some items come in packs containing sub units. The sub units are sold as
independent items, it is here that split-pricing feature is used, where the cashier
can get the value of items (subunits out of the pack) and subsequently print the
bill. A PLU can be assigned minimum number of subunits that can be sold from a
pack. A total of 6 levels of subunits can be programmed and one out of the six
can be assigned to a PLU. (See Base Unit Settings Page No 30.)
6.9 Surcharge
The surcharge is calculated on a tax level, this is an optional feature,
which can be set when editing Total tax level. Surcharge effectively means tax on
tax.
6.10 PLU (Price Look Up)
A PLU has an Item name, a sale price, stock available and a properties
field. A total of 999 PLUs can be loaded into the BCR.
Is there no minimum stock requirement for a PLU? If it is not there then how are
we generating re-order information?
[email protected]
Revision 1.1
16
7. Getting Started
7.1 Turn ON the Power
1.At power ON the BCR performs a self-test by testing various peripherals,
memories etc. During this test, if any failure is detected, the same is displayed
on the LCD screen, provided the LCD is working properly.
2.After power ON self-test the BCR is now ready for use or can be configured
by the Manager. (Using special software installed on a PC can also configure
BCR. Please contact vendor for more details….)
7.2 Login
Main screen of the BCR LCD when turned ON is shown in the figure below.
Lampex/Baby cash Register
01 14-Jan-2007 00:00:59
Main Screen
Press any key on the BCR keypad. The BCR displays for User Name and
Password Entry for Login in as Cashier or Manager (if cashiers are not set the
BCR works in Manager mode with default User Name: MANAGER Pass Word:
1111).
User Name:
Password:
Password Screen
If the password does not match, then the BCR displays “Invalid Password”
message as shown below for 5 seconds and returns to the Main Screen.
Invalid Password..!
Invalid Password Screen
If the user enters the correct password then the BCR prompts for Item code
Entry.
[email protected]
Revision 1.1
17
Enter Item Code:
No Item Selected
Item Code Entry Screen
Initially BCR must be setup properly. Please set the following date, time,
Header, footer and cashiers. (Names and corresponding passwords) If not set
the default header, footer, date and time are retained.
Password can be of max ten numeric characters. The machine’s default
manager’s password is 1111 and is used to first set up and initialize the unit. The
password can later be changed. (See Manager Settings Page No 25.)
Note: Once a new password has been setup for the manager, the manager has
to remember this password for any future logins. (Contact vendor if password is
lost)
7.3 Setting Header/Footer
key, the next screen will display “Manager Settings” on LCD, to select
Press
this setting press
key, using
and
scroll keys go to “Receipt
Settings“ and select the “Set Receipt Heading” option by pressing
key. Set
the number of Header Lines to be printed on the receipt.
Note: The Manager can enter a maximum of 4 header lines and can ask the unit
to print 1 / 2 / 3 / 4 lines on the receipts.
To set receipt header select the “Set Receipt Heading” option by pressing
key, then the BCR prompts for header line number to be entered. (Maximum 4)
(See fig below)
Header Line No: X
Header Line Screen
Then the BCR prompts for the header line font.
(Enter
- Bold or
- Normal font)
Then the BCR prompts for the entry of header text. (Contain 24 characters of
normal size or 12 characters of double size.)
Enter Header:
XXXX YYYY Company
Header Entry Screen
[email protected]
Revision 1.1
18
After the entry of the Header text the BCR displays “Header altered” Message.
Similarly the Footer can also be set. Footer consists of two programmable lines.
The user can set the no of lines to be printed on the receipt.
To set the footer lines scroll down to “set no of footer lines “ option and then set
the no. of footer lines to be printed on the receipt. If a ‘0’ is entered then no footer
will be printed on the receipt, if ‘1’is entered then only Footer line will be printed.
Similarly a ‘2’ means two Footer lines on the receipt.
Then scroll down to “set receipt footer” and option and then select the footer no to
which the text can be entered. Before the Footer line text is entered the unit
prompts for the entry of Bold or Normal print option in a similar manner as in the
Header.
Note: press
to select and enter values for any option.
7.4 Setting Cashier
Manager can create maximum of three cashiers, only manager has the authority
to change or assign passwords to each cashier. (See Cashier Settings Page No
26.)
7.5 Set Date & Time
key, the next screen will display
First login as manager, press
“Manager Settings” on LCD, to select this setting press
key, using
and
scroll keys go to “Machine settings”, then press
key, the BCR displays
“Set Machine date & time” (various other options can also be selected using
scroll keys.)
and
On pressing
key the BCR prompts for date and time to be entered in the
format shown below.
Enter DT.&Time(Format):
YYYYMMDDHHmmSS
Date and Time Screen
After entry of date and time in the format shown above the BCR displays “Date &
Time set” message.
7.6 Adding PLU’s
Manager can add a new PLU Item to the New/existing PLU list of BCR.
Login in Manager mode (by entering Manager password and pressing the
key.
key) and press
[email protected]
Revision 1.1
19
The BCR will display Manager settings option, now press
key and
to “PLU Settings” this allows the Manager to add/edit/delete PLU’s.
key
While adding the BCR prompts for the entry of PLU features. (A
key press
after the entry of appropriate values takes the control to the next screen.)
PLU Name: The name of the item can be maximum 16 characters.
Price: A PLU can have a maximum value of 99999.99
Stock: Maximum is 8 characters of which 3 are decimal places. The fraction is to
support split pricing.
Discount: Value. Discount calculation depends on the attributes set for the PLU.
If the attribute is set as % then this field is taken as percentage of the PLU value,
else this field is taken as fixed amount to be deducted.
Reorder level: This takes a maximum of 7 numeric characters, 5 before decimal
and 2 after. When the stock level falls below the reorder level then the BCR
flashes a message “reorder stock” whenever a receipt containing that particular
PLU is printed. (This indicates to the cashier that stock for that PLU has to be
replenished)
Machine flag: This flag specifies whether to take weight as units from a weighing
scale connected to the BCR. Enable/disable the weighing scale. Value Based
quantity can also be selected. It takes only 1 character (0 - Disable, 1 – Enable, 2
– Value Based).
Weighing scale setup to be included.
Templates: Choose the template number from 01-10.Assign the template(1-10)
to the PLU. Here again a table of 10 entries is maintained in the BCR. The
Manager can set every entry in the table. When issuing the bill the templates are
drawn from this table and displayed. (See PLU Settings Page No 27.)
Will discuss template later. Name to be changed.
Please explain what a template is?
Departments:
Choose the department number from 01-16.Assign the
department (1-16) to the PLU. Here again a table of 16 entries is maintained in
the BCR. The Manager can set every entry in the table. When issuing the bill the
departments are drawn from this table and displayed. (See PLU Settings Page
No 27.)
The BCR then prompts for the entry of PLU Attributes in format as given below.
[email protected]
Revision 1.1
20
PLU attributes: Every PLU has several attributes and these attributes describe
how each PLU is to be treated for billing purpose. (See PLU Settings Page No
27.)
Attributes are contained in 9 numeric characters.
First two characters specify Tax level 01-15 (00 No Tax). Each tax level
consists of two programmable features viz. tax rate (can take Floating point
values as shown below) and tax name. (See Tax Slab Settings Page No 29.)
Tax level
01
02
03
04
05
06
07
08
09
10
11
12
13
14
15
Tax Name
Tax A
Tax B
Tax C
Tax D
Tax E
Tax F
Tax G
Tax H
Tax I
Tax J
Tax K
Tax L
Tax M
Tax N
Tax O
Tax Rate (value)
xx. xx
yy
zz
nn
ww
rr
kk
pp
jj
tt
mm
rt
df
dy
hg
Tax Name: Tax E
Tax Rate: ww %
Eg: If a tax level 05 is entered for a particular PLU, then the tax name would be
Tax E and Tax rate would be ww% as shown above.
Third character specifies Tax Included or Excluded.
(0 – Included and 1 - Excluded)
If the Tax Level entered for a particular PLU, then it should be mentioned whether
the Tax is included or excluded in/from the price.
Fourth character gives the sale feature of the PLU. It takes single digit (0-3)
Sale Feature
0
1
2
3
[email protected]
Description
Sale
Forbidden
(Eg.forbidden by GOVT etc.
though stocks exist)
Open
Price
(Manually
entered Price).
Fixed
Price
(preprogrammed price).
Cashier can select preprogrammed price or enter
price manually.
Revision 1.1
21
Fifth character sets the Stock Consideration. It takes single digit (0-Consider, 1Not consider). (This means without considering the stock, bills are issued.)
Sixth character enables split pricing possibility of the PLU. It takes a single digit
(0-6). Split pricing depends on the six programmable base units described below
with each unit specifying the number of items in a pack. 0 specifies no split
pricing. A table having six entries is maintained in the BCR. Every entry in the
table can be given a value indicating the number of subunits in a pack. (See Base
unit Settings Page No 30.)
Split Pricing
Index
1
2
3
4
5
6
Value entered by Manager
(number of subunits)
Xx1
Xx2
Xx3
Xx4
Xx5
Xx6
This sixth character of PLU attributes is used as an index into this table. For
example if 3 is entered, then the value in the above table Xx3 is taken as number
of subunits that can be sold independently.
Seventh character sets the PLU Discount type. It takes single Digit (0-1). (See
PLU settings Page No 27.)
Discount Type
0
1
Value
Percent Discount from unit price
Amount Discount from unit price.
Eighth and Ninth characters assign the sale Units to the PLU (0-15). Here
again a table of 15 entries is maintained in the BCR. The Manager can set every
entry in the table. When printing the bill the units are drawn from this table and
printed. A maximum of 4 characters can be entered per entry. (See Sale Unit
Settings Page No 30.)
Index
00
01
02
03
04
05
06
07
08
09
10
11
12
13
[email protected]
Sale Unit
No sale unit
Pcks
Btls
Pkg
Kgs
Gms
Ltrs
250g
500g
250m
500m
50ml
25ml
750g
Revision 1.1
22
14
15
100g
350g
As an example, if 09 is entered in the PLU attributes, the corresponding units in
the table is printed in the bill. (In this example of 09, the entry in the table is
meters, hence for this PLU, meters will be printed in the bill).
PLU Attributes Format (No spaces in between):
7.7 Example to Add New PLU
For example, to add a new PLU with name say Dettol, the following are the steps
to be followed.
•Login in manager mode and go to Manager Settings.
•Now using
key.
and
scroll keys go to Add PLU Option and press
•Enter the Name of the PLU: Dettol (Max. 16 Characters, Hear Dettol is the
key.
PLU Name.) Then press
•Enter the Price of the PLU: 22.50 (Max. price 99999.99, Here 22.50 is the
price for Dettol.) Press
key.
•Enter the Stock Quantity: 50 (Max. 99999.99, Here 50 is Stock Quantity.)
Press
key.
•Enter the Discount Value: 0 (Max. 99 if % discount or 99999.99 if Amount
discount, Here 0 is No discount and set in % discount.)
•Enter the Reorder Level: 20 (Max. 99999.99, Here 20 is Reorder Level.)
Press
key.
[email protected]
Revision 1.1
23
•Enter the Weighing Scale Feature: 0 (0 or 1, Here 0 is Disable). Press
key.
•Enter the PLU Attributes: 010200001
PLU Attributes In Format
01020001
PLU Attributes Formate Screen
Here
01
Tax Level.
0
Tax Included
2
Fixed Price
0
Stock Considered
0
Split Pricing Attribute is Disable
0
% Discount
1Unit is Packets
[email protected]
Revision 1.1
24
8. Mode Key Operations
Log in Manager mode and press
options described below.
key and then scroll down to select various
1.Manager Settings
2.Serial Mode
3.Get Reports
4.Lock keypad
8.1 Manager Settings
In order to add/modify/delete PLUs and/or settings, login in Manager mode
key) and press
key.
(by entering Manager password and pressing the
The BCR will now go into settings mode. In order to set various parameters press
key press will allow the Manager
key to go to Manager Setting option,
to modify various unit settings.
Manager Settings
Press GT Key to Confirm
Manager Settings Screen
1.Unit Status
2.Machine Settings
3.Cashier Settings
4.PLU Settings
5.Receipt Settings
6.Tax Settings
7.Sale Unit Settings
8.Base Unit Settings
9.Template Settings
10.Department Settings
Each of the Manager settings described above has corresponding subsettings explained against indexes under each settings Heading. (An appropriate
and
scroll keys and pressing
sub-setting can be selected by using
key to enter into that setting. Some of the sub-settings may require two or more
entries/options, in that case a
key press will take the user to the next screen,
Eg: to edit a tax level, the Manager has to enter the tax level number then the tax
name and then the tax value each entry/value to be entered in a different screen
and each screen selected by pressing the
key).
For example to set Machine Time first login as Manager, then press
key and using
key go to Manager Settings Screen. Now press
key and
key to go to Machine Settings Screen then press
key and use using
key to select Machine time option, press
key to set/modify the BCR
[email protected]
Revision 1.1
25
Date and Time as per the format shown below. In the same way several such
sub-settings can be edited/modified under each of the settings.
8.1.1 Unit Status
It only Displays the details of the BCR, i.e., PLU count, number of Bills
issued and Amount collected.
PLU Count:xx Bills:xx
Amount: xxxxx.xx
Unit Status Screen
8.1.2 Machine Settings
Set Machine Time: To set/modify the BCR Date/Time, in the format shown
below (year month day hours minutes seconds. No spaces are allowed in
between).
Enter DT.& Time(Format):
YYYYMMDDHHmmSS
Machine settings screen
Set BCR ID: This option is to change the BCR ID it takes the two numbers
(01-99). By default the ID will be 01. Different IDs are required if more than one
BCR is connected to one computer.
Auto Daily Report: This option is used to Enable/Disable auto daily report
feature (0 – Disable, 1 - Enable). When set the BCR generates a daily report
automatically for every day change.
Clear Memory: All transaction data is cleared. PLU’s and Tax entries are
not cleared.
Keypad Lock: If enabled, the keypad will be locked, if not used for a predefined time. (0 – Disable, 1 - Enable)
8.1.3 Cashier Settings
Modify/Set the cashier details.
On pressing
key and use
options described below.
[email protected]
and
Revision 1.1
scroll keys to select various
26
Cashier Details: This gives the details of the cashier i.e. Name of Cashier,
Total bills issued and total amount collected by this cashier upon entry of the
cashier number (1-4). The BCR supports 4 Cashiers including the Manager.
Edit Cashier: Edit/Add cashier(s). Manager can add a cashier, maximum
being 3. Once created a cashier cannot be deleted. But the name and other
details can be modified, resulting in complete change of a cashier.
To edit/add a new cashier Select Edit cashier option (by pressing
key).The unit then prompts for the entry of the cashier number(b/w 1 – 4) to be
entered. Upon a correct entry the unit displays the old cashier name (if present)
and prompts for the entry of a new cashier name (max of 16 characters)
The unit then prompts for entry of new password. For addition of a new
cashier the password can be entered. If the manager is editing an existing
cashier the password has to be typed in.
The unit then asks if old values are to be retained or not (i.e. if old values
exist i.e. no of bills issued, bills issued etc)
A
changed.
/
key press retains old values and only name or password are
A
key press erases all old values and the cashier starts afresh. (This
normally used when adding a new cashier).
Cashier Receipt Settings: The cashier details can be printed at the end of
each bill. The details of the cashier that are printed on the bill can be changed. It
takes a single digit value (0-4).
0 - Do not print any details.
1 - Print number of the Cashier.
2 - Print Cashier name on the receipt.
3 - Print both Number and Name of the cashier on the receipt
3 - Print name of the Manager (Manager).
8.1.4 PLU Settings
PLU’s can be added/edited/deleted. Press
key and using
scroll keys to select various options descried below.
and
PLU Settings
Press GT Key Confirm
Edit PLU (Y/N):
[email protected]
Revision 1.1
27
PLU Setting Screen
key press makes
Edit PLU: Edit/Modify PLU Attributes in the BCR, a
the BCR prompt for the entry of Item code to edit/modify, on entering the correct
item code the BCR displays Name, Price and stock.
On a
key press the BCR asks for confirmation i.e. whether to edit PLU
or
key to proceed further or enter
to cancel editing)
or not. (Enter
Upon confirmation, the BCR prompts for retention of old PLU name. On pressing
or
key will retain old name, and if press
entry will make the BCR
prompt for entry of new PLU name.
Similarly the BCR will prompt the user to either retain the existing settings
or allow modification. Thus all the parameters of the PLU can be changed, if
required.
Add PLU: We can Add a new PLU Item to the new/existing PLU list. (See
Adding PLU’s Page No 19.)
Delete PLU: You can delete a PLU from the existing PLU list. The BCR
prompts to enter item code PLU to be deleted .It takes 3 digit value (001-999).
The BCR then displays the PLU name and price of that item and prompts
for confirmation to delete. (Press
or
key to deletes the PLU and a
message ”PLU deleted” is flashed).
Clear PLU’s: This feature deletes all the existing PLU's from the list. Before
clearing of PLU’s the BCR prompts for confirmation. (Press
or
key to
deletes the PLU’s and a message ”PLU’s Cleared” is flashed).
Note: Always press
time of confirmation.
key to cancel any of the above operations at the
8.1.5 Receipt Settings
This is used to set a receipt number/ header/ line feed etc; various options
available are listed below.
Set Number of Header Lines: set the number of lines to be printed on
each receipt
Set Receipt Heading: This changes the header on the printed receipt.
(See Setting Header/Footer Page No 18.)
Set Number of Footer Lines: This option is used to enter the bill footer.
(Similar to Set Receipt Header described above).
Set Receipt Footer: This sets the Footer (Max of 2 lines. See Setting
Header/Footer Page No 18.)
[email protected]
Revision 1.1
28
Set Receipt No: To set a receipt No. first select the Set Receipt No. option
and then enter the number. Press
key and using
key to Reset Receipt
No. Option.
Reset Receipt No: After entering the receipt No. press
BCR flashes “Reset Receipt Number”
key when the
Print Date On Receipt: This option is used to print the Current Date on the
receipt(1-Enable 2-Disable).
Print Time On Receipt: This option is used to print the Current Time on
the receipt(1-Enable 2-Disable).
Receipt Line Feed: This sets the line feed after each receipt. It takes two
input value (1-20).
Optional Print Settings: This is used to set the options that are to be
printed on the receipt. Here 4 options are provided that are to be printed.
•Machine Code
•No. of Items and Sub Total
•Amount tendered and Return change.
•Reserved.
Note: To select the above options using
key to set values.
and
scroll keys and
8.1.6 Tax Slab Settings
key press will make
Edit Tax: This is used to edit tax level values. A
the BCR prompt for entering of a Tax Unit. (i.e. Tax Level No.) If a tax level entry
already exists the BCR displays the same and prompts the user whether he/she
wants to edit it, on confirmation the BCR prompts for the tax name to be entered.
The BCR then prompts for the entry of tax value. Then BCR prompts for
confirmation for setting of surcharge value for that tax level. If ‘N’ is entered (i.e
surcharge is not set for that tax level) the BCR flashes, “Unit altered “message,
else a
or
key press will make the BCR prompt for entry of surcharge
value. On an appropriate value being entered the BCR flashes “Unit altered
message”.
Delete Tax: For deletion of a tax level to BCR first prompts for entry of tax
level to delete. Upon entry of tax level the BCR displays the tax name and tax
value. A
key Press makes the BCR prompt for confirmation to delete the tax
level and Press
or
key to deletes the tax level and BCR displays “tax
level deleted” message.
and
scroll keys and
Note: To select the above options, use
key to set values.
[email protected]
Revision 1.1
29
8.1.7 Sale Unit Settings
Edit Sale Unit: To Edit a sale unit. The BCR prompts for entry of the sale
unit (two digit value max 15 sale units). If a previous entry already exists then the
BCR displays the same and on a
key press prompts for confirmation
(whether to edit). On confirmation the BCR prompts for the entry of the sale unit.
(Two digit value) The user can then enter a new number against the old number.
Note: The sale unit name cannot be changed. (See PLU Settings Page No
27.)
Delete Sale Unit: Sale units can be deleted by entering the sale unit
number. (Two digit value)
Note: To select the above options, use
key to set values.
and
scroll keys and
8.1.8 Base Unit Settings
Edit Base Unit: To edit a base unit, the BCR prompts for the entry of Base
unit (1-6) to edit. If an entry already exists the BCR displays the same and then
prompts for confirmation (whether the user wants to edit the existing base unit)
and prompts for the entry of the value for that base unit (which indicates No. of
items in a pack). The new base value will now be stored against the base unit.
Delete Base Unit: To delete a base unit the BCR prompts for the entry of
the base unit (1-6) and on confirmation it deletes it.
Note: to select the above options, use
and
scroll keys and
key to
set values.
All the above settings can also be affected by using software installed in
the PC and by connecting the BCR to the PC via the serial com2 port. Contact
vendor for more details…
8.1.9 Template Settings
The BCR prompts for entry of the Template No. (two digit value max 10
Templates). If a previous entry already exists then the BCR displays the same
and prompts for entry of the new template name and on a
key press the
template is saved.
8.1.10 Department Settings
The BCR prompts for entry of the Department No. (two digit value max 16
Departments). If a previous entry already exists then the BCR displays the same
[email protected]
Revision 1.1
30
and prompts for entry of the new department name and on a
department is saved.
key press the
8.2 Get Reports
See Report Generation section. (See page No 35.)
[email protected]
Revision 1.1
31
8.3 Serial Mode
A
Key Press prompts for selection of following two options.
Key press enables the BCR to receive data from the PC.
Key press enables the BCR to transfer data to the PC.
[1] PC to Unit
[2] Unit to PC
•Communication Port1 & Port2 are used for connecting Weighing Machine.
•Communication Port2 used for Programming Baby cash Register.
•Downloading/Uploading of Item list from the Baby Cash Register to PC is
through communication Port2.
8.4 Lock Keypad
The BCR prompts for the locking of keypad.
A
key Press here locks the Keypad.
A Login in any mode unlocks the Keypad.
Note: If the BCR is left unused for more than 3 min the BCR locks the keypad.
[email protected]
Revision 1.1
32
9. Operation
9.1 On Power Up
The Cash Register automatically detects the external AT keyboard if it is
connected, then the default keypad in the BCR is disabled. After BCR testing is
complete the Header of the BCR is displayed on the first line and on the second
line it displays Register ID, Date and time on the Main Screen.
XXXXXXXXXXX Company
01 DD-MMM-YYY HH:MM:SS
BCR Main Screen
The BCR allows a Manager and three Cashiers. The BCR recognizes each user
based on their password (including the manager).
9.2 Operating the BCR
To issue a bill, the user can enter the item code of the PLU (1-999) or select from
a list of PLU’s by pressing the
key on Keypad (scroll up/down by using
/
keys).
If the Sale of the PLU is forbidden then the BCR does not allow adding that item
to the bill.
Depending upon the sale mode of the Item selected, the price is retrieved from
the PLU list.
The BCR prompts for the quantity of the item. The user can enter the number of
items or simply press
key to select single item.
If the Item has Split Pricing characteristic set then BCR prompts for split price
Entry.
If the stock is available for the required (Entered item) quantity then the Item is
added to the bill.
Continue adding items as required.
Then the BCR prompts for Amount Tendered to be entered, on
pressed the BCR displays change to be Returned/Amount short.
key being
BCR then display the total Amount on LCD and then prompts for printing of the
bill. A
/
press prints the bill.
[email protected]
Revision 1.1
33
9.3 Obtaining Bill Details, Updating Stock, Duplicate Bills,Refund Bills
After login (User or Manager mode) an
key press displays the below screen.
[1]Update Stock
[2]Bill Details
Stock Update & Bill Details Screen
key press makes the screen prompt for the entry of the item’s code (1999) On correct entry the BCR first displays the item its price, name and stock. A
key press makes the BCR prompt for confirmation from the user.
A
or
press makes the BCR prompt for the entry of the item’s
new stock. A successful entry results in a message being flashed on the screen
giving the new stock value for the item.
key press will display the following Screen; here we can issue a
Duplicate bill by entering the Bill number.
Duplicate Bill
Press GT Key to Select
Duplicate Bill Screen
Pressing the scroll down
Key from the above Duplicate Bills Screen will
make the BCR prompt for printing of “Bill Tax & Sale Dtls” Report which prints the
Tax and sale details for specified Bills. On further
/
scroll key press (from
duplicate bill screen) BCR prompts for entry of Bill number to be refunded. On
/
scroll key press (from Refund bill screen) BCR prompts for Cashier
Reports. (See Report generation section Page No 35).
[email protected]
Revision 1.1
34
10. Report Generation
BCR999 can generate MIS data in the form of various reports as listed
below.
Manager can take the following reports from the BCR.
•Daily Report
•Date Wise Report
•Gross Revenue Report
•Bill Wise Report
•PLU Detail Report
•PLU Summary Report
1.Stock Report
2.Price Report
3.Reorder Report
•Item Sale Report
•Tax Slabs Report
•Sale Unit Report
•Base Unit Report
•Cashier Report
1.Cashiers Daily Report
2.Cashier Summary Report
•Void Bill Report
key and
To Print above Reports, login in Manager mode and press
key, to Get Report option screen and then select
scroll down using
appropriate report to print.
10.1 Daily Report
This report gives Details of daily transactions viz. No. of receipts, Amount
collect by cash, by credit, Tax, Discount etc and total amount collected along with
bills issued are printed out. (Daily Report only reflects Transaction during one day
i.e. 24Hrs.)
10.2 Date Wise Report
This report gives Details of daily transactions for each date viz. No. of
receipts, and Total amount collected along with bills issued are printed out for the
in between dates(From date - To date) .
10.3 Gross Revenue Report
[email protected]
Revision 1.1
35
This is similar to Daily report but values printed are cumulative in nature.
i.e. The values keep on adding until cleared by the Manager.
10.4 Bill Wise Report
This report gives Details of each Receipt No. and its Total Amount present
in the unit.
10.5 PLU Detail Report
This report gives Details of daily transactions viz. No. of receipts, Amount
collect by cash, by credit, Tax, Discount etc and total amount collected along with
bills issued are printed out.
10.6 PLU Summary Report
Several reports have been grouped under PLU Summary Reports, they are
as follows.
10.6.1 Stock Report
This report prints item (PLU) name and the stock of that item.
10.6.2 Price Report
This prints the item name, and the price of that item (PLU).
10.6.3 Reorder Report
This report prints reorder level of each PLU.
Note: for all the above PLU reports the BCR prompts for the entry of the
range of PLU’s i.e. from xx – to – yy, if xx and yy values are entered, the BCR
prints all those corresponding PLU reports in this range.
Eg: if we want an item sale report, the BCR prompts for entry of two
values (xx- yy) which specify the range i.e. the BCR prints the item sale report
only for those PLU’s in the range from xx to yy (both inclusive).
10.7 Item Sale Report
This gives details of only those items that were sold viz Item (PLU) name,
sale value (amount collected from that PLU by selling it) etc.
10.8 Tax Slabs Report
Prints details of various Tax Levels programmed into the BCR.
[email protected]
Revision 1.1
36
10.9 Sale Unit Report
Gives details of 15 sale units (each max 4 characters long)
programmed into the BCR.
10.10 Base Unit
Prints Details of 7 Base units of PLU viz-base unit type, base unit
value etc.
10.11 Cashier Report
10.11.1 Cashier Daily Report
Daily Cashier Report: Details of Cashier’s Name, No of Bills issued and
Collections. (Daily Cashier Report only reflects Transaction during one day i.e.
24Hrs.)
10.11.2 Cashier Summary Report
Cashier Summary Report: Details of Cashier’s Name, No of Bills issued
and Collections on cumulative basis.
Note: Other cashiers can also generate Cashiers reports. (Not in Manager
mode) By pressing
key & selecting bill details option and scrolling down to
cashier reports option.
10.12 Void Bill Report
Prints the details of the Receipts that are cancelled along with the Receipt
No. and amount refunded.
[email protected]
Revision 1.1
37
11. Sample Bills
11.1 Sample
Grocer’s Choice
Mains - Linkage Road
Cash Memo# B01/0011
11-DEC-2005
00:30:42
______________________
_
[email protected]
Discount
5.00% 12.54
Maltova
132.00
[email protected]
Dettol
140.00
Discount
4.00% 5.60
Palm Oil
50.50
[email protected]
Pepsodent
112.00
[email protected]
Ujala Blue
30.00
[email protected]
Discount 3.00% 0.90
______________________
_
Subtotal:
774.21
Discount
5.00% 38.71
VAT 6
6.00% 8.06
Sales tax 2.00% 9.64
Grand Total
753.00
Grocer’s Choice
Mains - Linkage Road
Cash Memo# B01/0011
11-DEC-2005
00:30:42
______________________
[email protected]
Discount
5.00% 12.54
Maltova
132.00
[email protected]
Dettol
140.00
Discount
4.00% 5.60
Palm Oil
50.50
[email protected]
Pepsodent
112.00
[email protected]
Ujala Blue
30.00
[email protected]
Discount 3.00% 0.90
________________________
Subtotal:
774.21
Discount
5.00% 38.71
VAT 6
6.00% 8.06
Sales tax 2.00% 9.64
Grand Total
753.00
________________________
Cashier: Joseph
THANK YOU - VISIT AGAIN
.
[email protected]
Revision 1.1
38
11.2 Gross Revenue Report
Gross Revenue Report is printed daily with values of the previous day’s
transactions. After the report is printed these values are reset.
Grocer’s Choice
Mains - Linkage
Road
Gross Revenue
Report
Bills Issued: 9
Total Amount:
1255.00
Unit Price: 1276.69
Total Sale: 1.00
Tax Amount: 40.76
Surcharge: 00.00
11.3 Cashier Summary/Daily Report
The cash register allows 3 independent cashiers and a Manager. The Cashier Report
contains the Cashier number, name of the cashier, No. of bills issued and his/her total
collection amount for all the three cashiers along with Manager report.
Cashier Report
Cashier Num: 01
Name: Srinivas
Bills Issued: 2
Collection: 180.00
------------------Cashier Num: 02
Name: Swaminathan
Bills Issued: 2
Collection: 360.00
-------------------Cashier Num: 03
Name: Kumar
Bills Issued: 1
Collection: 34.00
-------------------Cashier Num: 04
Name: Manager
Bills Issued: 0
[email protected]
Revision 1.1
39
11.4 Sale Units
The Sale Units can be assigned to each PLU. It is possible to program 15 sale units
each 4 characters long. The sale unit is printed with each item in the Receipt.
Grocer’s Choice
Mains - Linkage
Road
Sale Units
Sale Unit 01 Pcks
Sale Unit 02 Btls
Sale Unit 03 - Pkg
Sale Unit 04 - Kgs
Sale Unit 05 - Gms
Sale Unit 06 Ltrs
Sale Unit 07 250g
Sale Unit 08 500g
Sale Unit 09 -
11.5 Base Units
The Base units used in split pricing can be programmed. The system allows 7
base units to be programmed.
Grocer’s Choice
Mains - Linkage
Road
Base Units
Base
Base
Base
Base
Base
Unit
Unit
Unit
Unit
Unit
01:
02:
03:
04:
05:
5
10
15
20
25
11.6 Tax Slabs
The cash register allows the use of 15 Tax Levels. The each Tax Level contains two
programmable features
TAX LOOKUP
1. Tax level1
0.00
2. Tax level2
0.00
3. Tax level3
0.00
4. Tax level4
0.00
.
.
15.Tax level15
0.00
[email protected]
Revision 1.1
40
11.7 Price Look Up
PLU code represents the goods name, the sale price, stock available and Various
Flags. A max. of 999 PLUs can be loaded into the BCR.
Grocer’s Choice
Mains - Linkage
Road
Price Look up
01-Horlicks
8.00
02-Boost
149.00
03-Maltova
500.00
.
.
999-xxxxxxxxx
Price look up (Detail)
Grocer’s Choice
Mains - Linkage
Road
Summary Report
PLU: 1
Name: Boost
Price: 112.50
Stock: 149.00
Tax Level: 1
Single Item PLU:0
Sale Feature: 3
Sale Stk.Neg:0
Split Pricing:0
Sale Unit: 1 pcks
PLU: 2
Name: Maltova
Price: 132.00
Stock: 500.00
Tax Level: 3
Single Item PLU: 1
Sale Feature: 2
Sale Stk.Neg:0
Split Pricing:0
Sale Unit: 1 pcks
.
.
.
PLU: 999
[email protected]
Revision 1.1
41
12. Trouble Shooting
1. The BCR flashes, “EEPROM test failed” etc at power ON…
The BCR performs a self-test at power on by testing out various internal
memories, peripherals etc, it is in this process that the above messages
may be flashed which would mean a failure of the respective components.
Usually a restarting of the BCR may alleviate the problem, if the problem
persists change of the components/unit may be required.
2. The printed receipt shows junk characters/numbers instead of intended values.
Junk values being displayed (LCD) or printed can mean data corruption in
memories of the BCR. Check if the other reports are printing correctly if yes,
try to print all the reports and then clear memory and then start operations
again. (This will erase all previous records/data in the BCR). Contact vendor
to change components.
3. The BCR is not accepting any new PLU while adding new PLUs….
BCR can take at most 999 PLUs and only accepts new PLU’s within this
range. Thus always ensure that total PLU’s are within this range.
4. The main or any other screen after power ON is blurred.
BCR is always to be connected with the supplied adapter, if any other
adapter is used then LAMPEX does not guarantee its performance.
Therefore always use the adaptor supplied with the BCR and ensure that
that the connections are in place properly and the adapter itself is in proper
condition. If the problem still persists contact the vendor.
5. The printed receipt contents are not clear and appear blurred/dull and at times
the printer gets stuck.
Possible reasons include, malfunctioning of the printer, or improper
connection of power supply or improper insertion of paper rolls etc. It should
always be kept in mind that the paper roll needs to be inserted carefully
before commencing operations, the paper and the printer ribbon also needs
to be checked for any loose ends etc. Always use standard paper rolls for
better printing. For any printer malfunction contact vendor.
6. Improper Paper feeds after every printing of Receipt/Report print
Please set the number of paper feeds you want after every Receipt/Report
print. (Manager setting->Receipt Settings ->Receipt Line Feed)
7. Unit and temperature tolerance.
The BCR always has to be kept in a dry, moderately cool place for optimal
performance. The BCR always needs to be kept away from any high power
drawing appliances to avoid damage to the BCR electronic components.
(See Additional Information Page No 43)
8. Unable to detect external keyboard (PS2 Keyboard)
Always ensure that the external keyboard is properly inserted into PS2
socket of the BCR and then restart the BCR. The BCR now automatically
detects the keypad.
[email protected]
Revision 1.1
42
13. Additional Information
•Install the cash register in a place where it will not be exposed to direct
sunlight, unusual temperature changes (under 0° C and above 50°C) or high
humidity. Installation in such places could result in damage to the cabinet and
electrical components as well.
•After transporting the BCR from a cold environment to a warm one and vice
versa, do not switch on the cash register for 20 minutes at a minimum giving
all components time to be conditioned to the new temperature conditions.
•An individual having wet hands should not operate the cash register. Water
could seep into the interior of the BCR and cause component failure.
•Clean the cash register with dry, soft cloth. Never use such cleaning agents
like petrol or solvents. Using such chemicals can result in discoloration or
deterioration of cabinet.
•Avoid spilling of any liquids on the cash register as they may damage its
functionality. The keyboard is to be carefully protected.
•Connect the cash register with the supplied adapter into a standard network
plug. Other electrical equipment connected in the same network circuit may
cause improper functioning of the cash register. In an environment with strong
interference use the special anti-interference aids recommended by the
manufacturer of the cash register.
•Contact your authorized dealer for service for any malfunction. Do not try to
repair the register yourself. Do not open the cash register.
•Pull out the AC/DC adapter plug from its electrical connection if the device is
to be fully disconnected.
•During receipt printing wait until the printer has finished printing. Do not tear
off the receipt during printing. Printer damage may result.
•Use only high-quality paper and color ribbon. Improper ribbons may result in
damage to the printer or shorten its lifetime. By using suitable ribbons and by
properly maintaining the printer, the average lifetime is up to 1.5 million lines.
•Use only the supplied AC/DC adapter or source recommended by authorized
dealer for electrical connection. The use of other adapter type may result the
damage of the cash register.
•Use only the program recommended by your authorized dealer as well as the
original interconnecting cable for the cash register communication with a
computer.
•If the cash register is used in ways other than those described in these
instructions, the dealer cannot be responsible for data corruption and resulting
damages.
[email protected]
Revision 1.1
43
14. Specification
14.1 Controller
Industry Standard High Speed RISC Microcontroller with program memory of
256K Bytes. The controller supports in-system programming and hence program
changes can be effected easily with the use of Serial Port.
14.2 Real Time Clock
Lithium Ion Battery Backed Real Time Clock with time advance and retard
feature. This feature is useful when the day temperatures vary due to seasonal
changes.
14.3 Display
LAMPEX LCD Module of 24 Character x 2 lines Alphanumeric with backlight.
Backlight switches OFF when the BCR is left idle for more than 3 minutes.
14.4 Key Board
Silicon Rubber Elastormeric Key pad of 20 keys.
14.5 Printer
24 Column Dual Color Heavy Duty Dot Matrix Alphanumeric Impact Printer with
speed approximately 2 Lines / sec.
14.6 Communication Ports
Two RS232 ports are provided with fixed Baud Rate of 115200 for Uploading and
downloading of data to and from the BCR. In addition to these two ports, an insystem serial port is provided for loading program.
14.7 Connector Cable
Connector cable with one end (D-9 connector) connected to the serial port of PC
and the other end (RJ-45) connected to the comm. port of the BCR. (See
communication cable Details Page No 12.)
14.8 Optional Connectors
BCR has been provided with few additional connector facilities such as:
[email protected]
Revision 1.1
44
•PS-2 Connector:
For External PC Keyboard connectivity.
•PD Connector: For Pole Display connectivity.
•CD Connector: For Cash Drawer Connectivity.
14.9 BCR Details
14.9.1 Size
Compact and as well as lightweight.
14.9.2 Weight
3 Kilograms.
14.9.3 Mechanical Dimensions
Length
298mm
Width
162mm
Height
117mm
[email protected]
Revision 1.1
45
117.00
298.00
162.00
162.00
14.9.4 Paper Roll
Diameter
Width
Max. 68 mm
56 mm
14.9.5 Operating Temperature
Operating Temp.: 00 C ~ 500 C.
[email protected]
Revision 1.1
46
14.9.6 Power Consumption
40-Watts
AC/230 V
50 Hz
DC/ 12 Volts
[email protected]
Revision 1.1
47
15. FAQ’s
1.What are Manager Mode and Cashier Mode?
A Manager has full access to generate all the reports, Modify PLU’s, Cashier
key only works for
details, set/edit corresponding Password’s etc, also the
Cashier and can only view the PLU’s generate Bills. One can log into
Manager/Cashier mode by selecting the appropriate option (1/2) at power on
and subsequently entering correct password.
2.How to Generate bills?
A Enter the item code as below.
Enter Item code: xx [only values from 1 - 999 are valid]. The BCR then
prompts for the price to be entered or use values from PLU table (for some
items if the PLU entry does not exist the cashier can manually enter it). Price:
xx (For some items split price option has also been provided, the values thus
have to be entered accordingly). Then, on selecting the bill print option, the bill
is printed.
3.How to insert Paper Feed to the Bill?
key)-> Receipt Settings-> Receipt Line Feed,
A Manager Settings (Press
here we can give the line feed count.
4.How to enter/edit/delete PLU values?
A Manager Mode-> Manager Settings-> Edit PLU’s, here we can add/delete/
modify. The PLU values, Note that the PLU values have to be entered in a
format specified in the manual. In the same way the tax units, base units etc
can also be modified.
5.What is a daily report?
A Daily report is a Report of the day’s transactions that can be auto set to
Generate every 24 hrs. Press
key-> daily report Daily report can be
generated along with several reports Viz. financial report, PLU report, tax level
reports, sale unit reports, cashier report.
6.How does the BCR communicate with the outside world?
A Press
key (works only in Manager mode)-> Serial mode, here we have
the option to send/receive to/from a PC.
7.How to set the BCR Date & Time?
key (works only in Manager mode) Manager settings-> Unit
A
Press
Status-> Machine details, here we can alter the BCR date and time.
8.What are receipt settings?
A Press
key Manager Settings->Receipt settings, we can then set the
receipt Nos, Line feed values.
Note: the individual cashier names can also be included in the bill print by moving
To Cashier Details-> Cashier Receipt settings and giving the cashier No. to print.
9.Why we get the “message” want to enter price? (Y/N)” and at times the
message “enter price”?
A The cashier can manually enter the price of an item or can use the values in
the lookup
tables. This option has been given to take care of changes
in prices of items in the market, wherein the cashier concerned need not
depend on values in the lookup tables (the changed values may later be
entered by the Manager). Sometimes the price of an item may not be present
[email protected]
Revision 1.1
48
in the lookup tables, and then the BCR prompts the user to enter the price
manually.
10.What is split pricing?
A Some times the customer may not want an entire pack of items but only some
of the items in the pack, it is here that split pricing feature is used where the
cashier can Calculate the value of items (out of the pack) and subsequently
print the bill.
[email protected]
Revision 1.1
49
16. Warranty
Lampex electronics gives a warranty period of 1 year for all of its major products
from the date the BCR are purchased. The company also accepts malfunctioning
units/products and arranges for replacement/repair of the units/products during
this period.
16.1 Warranty Terms and Conditions.
1.LAMPEX agrees, subject to the terms and conditions specified below, to
repair or replace at company’s cost the product purchased by you when the
product does not perform in accordance with its specifications during the
Standard Warranty period of 1 year from the date of purchase.
2.All repair or replacement products are to be sent to LAMPEX for analysis
and to be collected back after the necessary repair or replacement. No to and
fro freight charges would be borne by LAMPEX. No site installations or repairs
are in LAMPEX scope of responsibility.
3.The vendor in the warranty card will fill up the date of purchase and bill
particulars, and the same must be preserved for any claim during the warranty
period.
16.2 Exclusions from Standard Warranty
A.The standard warranty does not extend to the BCR999 in the following
circumstances: 1.If it has been installed in a place where the ambient temperatures are above
50°C or below 5°C.
2.If the supply voltage exceeds the operating voltage prescribed.
3.If it is found, at any time during the warranty period, to have been attended to
for repairs and/or for maintenance by any person or agency not authorized
/approved by LAMPEX in writing.
4.If there is brought about any change in the defined system or or if the
ownership of the system changes without LAMPEX’ s prior concurrence.
5.If it suffers from any defect arising out of any cause beyond reasonable
control of any body, including: a.Acts of gods like Earthquakes, floods, lightening or any other natural
calamities.
b.Strikes, Riots, Civil commotion at the instance of employees or general
public.
c.War & terrorism.
d.Acts of sabotage or mishandling of the equipment by sources known or
unknown or malfunctioning of components not covered under this act.
e.Any other force majaeure conditions
B.LAMPEX cannot be held accountable to any implied warranties unless
described above or specifically admitted separately. Even so, LAMPEX’s
responsibility is restricted only to the products during the validity of contract.
LAMPEX does not accept or cannot be held responsible for any consequential,
incidental or other damages /losses to the company's plant, premises, products,
data, information or people arising out of malfunctioning or non-serviceability of
the system.
[email protected]
Revision 1.1
50
16.3 Warranty Card
1 Customer’s Name
2 Address
3
4
4
5
Date of Purchase
Serial No.
Tax Bill No.
Dealer’s Stamp
6
Dealer’s Signature
[email protected]
Revision 1.1
51
17. Contact Details
To find out more about our products and services email us at [email protected],
[email protected], [email protected] or contact us at our office below:
Head Office: Lampex Electronics Ltd.
6-2/231/B,
Kukatpally,
Hyderabad- 500 072
India.
Ph.No.+91-40-23157701-09(09Lines)
Fax No. +91-40-23157710
Home Page. http://www.lampex.com
[email protected]
Revision 1.1
52
18. Revision History
Revision Content
[email protected]
Revision 1.1
Page
Date
53
19. User Notes
[email protected]
Revision 1.1
54