1
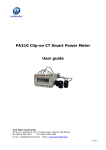
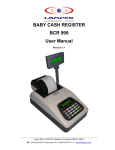
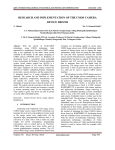
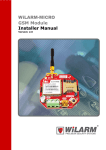
SPOT BILLING MACHINE
Model SBM V801
User Manual
Revision 1.0
: +91-40-23157701~9(9 Lines) Fax: +91-40-23157710 cdtsoftmailto:[email protected]
SBM
Application
Electricity Billing
Bus Tickets
Water Billing
Property Taxes
Regional Transport Officers
Parking Fees Receipts
Toll Gate Collections
Chit funds Receipt/Bank dues
Play/Game Rooms
Theatre/Cinema Tickets
Recreation Centers tickets
Exhibitions
Amusement Parks
Other types of mobile receipts issue applications
Advantages
Simple to operate
Rugged construction
Long charge life of batteries
Adequate Data backup
Automatic uploading of data with linked to PC
Built-in printer
Pre-Printed Roll can be printed (custom based program)
Spot Billing (Hand held) Machine Specifications
The hand held computers manufactured by M/s Lampex Electronics Ltd
are specially designed for billing applications. The electronic circuits are
designed to allow for easy customizing of billing applications. The
electronics are housed in lightweight rugged ABS plastic enclosures (in
pleasing colors) specially designed for hand held applications. The units
have rugged printers attached for data such as bills etc, for printing on
the spot.
The units are battery operated with built-in battery charger. The
electronics are designed to work off the batteries drawing low power.
[email protected] 1.02
The following are the general specifications:
•
•
•
•
•
•
•
•
•
•
•
•
Processor: Industry standard high-speed RISC core based
controller, capable of In-System-programming. This feature
allows easy modification/ updating of firmware. Choice of
program memory with 64K, 128K or 256K bytes.
Normal core operation 8 million instructions per second (MIPS),
optionally 16 MIPs can be provided. Program development in
high level ‘C’ language. Supports multi threading operating
system.
Printer: High-speed impact printer is provided. 24-column printer
is standard with the unit and a 40-column impact printer is
optional.
Memory: 1 MB of non-volatile data memory is provided with the
units. Data retention: Minimum 10 years without any power
being applied.
Real Time Clock: Lithium battery supported real time clock is
provided on-board. RTC clocking time can be advanced or
retarded through software.
USART: Two RS232 ports are provided for communication
interface.
Keyboard: A 30 key multi-function key board is provided on the
front panel.
LC Display: 20 characters by 4 line LC display with back light is
provided for user interaction. Graphical display of battery status
on LCD (provided in firmware).
Batteries: The units are powered by 2000 mAH NiMH rechargeable batteries.
Modem: Built-in modem optional.
Smart card interface: Contact type smart card interface optional.
Battery Charger: External intelligent 12-24VDC-battery charger
is provided. The charger can change between boost and float
charge modes automatically
[email protected] 1.03
CONTENTS (Click & Go)
1. INTRODUCTION
2. SALIENT FEATURES OF SBM V701
3.CHECK LIST
[email protected] 1.04
3.1 PRECAUTIONS
4. MACHINE DETAILS
4.1 MECHANICAL DIMENSIONS
4.2 PARTS OF SBM
4.3 CONNECTOR DETAILS
4.4 PLACING PAPER ROLL
4.5 REPLACING RIBBON CATRIDGE
4.6 EXTERNAL EQUIPMENT CONNECTIVITY
4.7 COMMUNICATION CABLE DETAILS
5. KEYPAD
5.1 KEY DESCRIPITION
6. GETTING STARTED
6.1 ON POWER UP
6.2 ERO NAME
6.3 AGENCY NAME
6.4 SECTION NAME
6.5 SERVICE NUMBER SPACE POSITION
6.6 BILL FOOTER
7. OPERATION
7.1 OPERATING THE SPOT BILLING MACHINE
7.2 FUNCTIONS OF SBM
7.3 SBM REPORTS
8. ADDITIONAL INFORMATION
9. SPECIFICATION
9.1 CONTROLLER
9.2 REAL TIME CLOCK
9.3 DISPLAY20
9.4 KEY BOARD
9.5 PRINTER20
9.6 COMMUNICATION PORTS
9.7 COMMUNICATION CABLE
9.8 SBM DETAILS
10. CONTACT DETAILS
11. TEST REPORT
12. USER NOTES
[email protected] 1.05
1.
Introduction
Spot Billing Machines (SBMs) are increasingly finding use in various day-to-day
applications. These are rugged and versatile instruments, which can be
programmed for specific needs. These instruments are light in weight, portable
and have non-volatile memory for storing data, a built-in printer for generating
print outs and serial communication link to get connected to a host computer for
data transfer. The SBMs work on re-chargeable batteries and can work for many
hours for one full charge. Specially developed and tailored programs (in high
level languages, such as ‘C’) can be loaded on to these instruments and the
program or data can be changed very easily, thus making them ideally suited for
many applications, including electricity bill generation.
These instruments are designed around very advanced micro-controllers, which
have high MIPS throughput, draw very low power from batteries, can be put into
power down mode, interface non-volatile memories etc.
[email protected] 1.06
2.
Salient Features of SBM V701
•
Portable and light in weight (less than 750 grams).
•
LiON 2.0 AH battery based.
•
Large 20x4 LCD with backlight for easy reading.
•
A multi-function keypad, having 30 keys.
•
Provision to monitor Battery Status.
•
Power Down Feature for longer Battery Life.
•
Large Data Storage in non-volatile memory (Record storage).
•
Easy Upload/Download of data to and from the computer via two serial
ports.
•
24-column impact printer to print bills/receipts.
•
Battery Backed Real Time Clock.
•
Application programme up-gradation via serial port.
•
LED Indication on the front panel for Battery charging. Additional green
LED to indicate Unit ON and keypad shift mode.
•
Rugged construction to withstand shock/vibrations etc.
•
Ergonomically designed ABS plastic casing, facilitates easy handling of
the unit.
•
A buzzer is provided for audio indication upon error, acceptance of key
press etc.
[email protected] 1.07
3.
Check List
Check supplied items and make sure that you have following items supplied with
your SBM.
SBMAC AdaptorSerial CableUser Manual Carry BAG
3.1
Precautions
1.
You must keep charging the unit at regular intervals to
prevent batteries from discharging, even if the unit is not being
operated. (Batteries will be permanently damaged if deep discharged)
2.
The unit must be charged for 4-6 hours to charge the internal
batteries to full capacity. The RED LED on the panel indicates the Unit
charging condition. Fully charged status is indicated by constant glow of the
AMBER LED on the panel.
3.
Use only the supplied AC/DC adapter for charging the unit.
4.
During receipt printing wait until the printer has finished printing.
Do not tear off the receipt during printing. Doing so may result in printer
damage.
5.
Use only suggested paper and ribbon. The average lifetime of
the printer is 1.5 million lines.
6.
Do not operate the unit with wet and dirty hands. Prevent the
unit from exposure to direct sunlight.
7.
Avoid spilling water and any liquids on the device, which may
damage its functionality.
[email protected] 1.08
8.
Clean the SBM with dry, soft cloth. Never use cleaning agents
like petrol or solvents. Using such chemicals can result in discoloration or
deterioration of cabinet and keys.
9.
Use only the program recommended by LAMPEX as well as the
original interconnecting cable for the SBM communication with a computer.
10.
If the device malfunctions, contact LAMPEX for service. Do not
try to repair the device yourself. Do not open the device.
[email protected] 1.09
4.
Machine Details
4.1 Mechanical Dimensions
83.15
320.66
110.00
4.2 Parts of SBM
Paper Cover Top
Paper Cutting Edge
Paper Cutter
LCD
Top Cover
Keypad
Paper
Cover Bottom
LEDs
Bottom Cover
[email protected] 1.010
4.3 Connector Details
DC
On/Off
Comm 2 Comm 1
•
COMM1 For data upload/download. (From/to PC)
•
COMM2 For data upload/download. (From/to PC)
•
DC Power supply Jack.
•
OFF/ON Power Switch.
4.4 Placing Paper Roll
Paper Roll can be replaced by opening the top cover of the paper holder. Insert a
roll of paper, in the holder. Trim the paper end uniformly and push the paper
smoothly into the paper slot. Holding the paper in the slot press the Paper Feed
key until the paper advances and comes out of the SBM. If it is a preprinted
stationary, advance paper till it gets aligned.
4.5 Replacing Ribbon Catridge
The SBM ’s built in printer uses an ink ribbon cassette for printing. A ribbon
cassette of good quality contributes to clear and contrast print.
After a certain time the ink is consumed by printing and the cassette must be
replaced. The ink ribbon replacement is necessary if the ink ribbon or cassette is
defective. The defective ink ribbon can be recognized by the threads at the edges
or by the gaps in the ribbon fabric. Improper print can also be the result of
defective cassette mechanism and this will adversely affect the printer
mechanism.
Ribbon can be replaced by removing the paper cover on the top of the unit and
by gently lifting the ribbon the cartridge can be removed and a new ribbon can be
placed.
[email protected] 1.011
4.6 External Equipment Connectivity
4.7 Communication Cable Details
To SBMTo PC
4.7.1 RJ45 connector cable pin out
1
8
PIN No.
1
2
3
4
5
6
7
8
Description
NC
NC
RXD In
GND
TXD Out
NC
NC
NC
PIN No.
1
2
3
4
5
6
7
8
9
Description
NC
TXD out
RXD In
NC
GND
NC
NC
NC
NC
4.7.2 D9 connector cable pin out
1
6
5
9
[email protected] 1.012
5.
Keypad
Basic data entry is through a 30 key keypad. The layout of rugged, scratch
resistant rubberized keypad is shown below.
5.1 Key Descripition
5.1.1 Alphabets & Numeric Keys
These keys are used as functional keys. (F1, F2, F3, F4 and
F5) When shift is pressed they act as alphabet keys. (A, B,
C, D and E).
These keys are used as special characters. (/, (, *, ), -, #, +,
,, = and .) When shift is pressed they act as alphabet keys.
(F, G, K, L, P, Q, U, V, W and Y).
These keys are used as numeric keys. (1 to 9 and 0) When
shift is pressed they act as alphabet keys. (H, I, J, M, N, O,
R, S, T and X).
This key is used for backspace. When shift is pressed it acts
as space keys.
This key is used to cancel an operation or return to the
previous screen. (One screen up). When shift key is pressed
it acts as alphabit key Z.
This is Shift key.
This key is the Paper Feed key. When pressed the paper
advances by one line, if held down, multiple line feeds are
generated. Useful when new paper roll is being inserted.
This is the Enter Key (acts as confirm key).
[email protected] 1.013
6.
Getting Started
6.1 ON Power up
1.
At power ON the SBM performs a self-test by testing various peripherals,
memories etc. During this test, if any failure is detected, the same is displayed
on the LCD screen, provided the LCD is working properly.
2.
After power ON self-test the spot-billing machine is ready for use.
6.2 ERO Name
ERO Name is 20 character long printed on each bill. This can be modified in the
Unit or set from the Utility Program provided with the SBM.
6.3 Agency Name
Agency Name is 20 characters long, which is printed at the end of every bill. This
can be modified in the unit or set through the Utility Program provided with SBM.
6.4 Section Name
Section Name is 20 characters long, which is printed on the bill. This can be set
through the Utility Program.
6.5 Service Number Space Position
The Service numbers generally have a space in between, which results in more
number of key presses by the user. To simplify the entry of service number in the
SBM an option is provided to set the position of space in the Service Number
through the Utility Program. When the user enters the Service Number when the
cursor reaches this position a space is automatically generated minimizing the
key presses.
6.6 Bill Footer
Footer of each bill contains text set by the ERO, which is mainly used for
providing information to the consumer. Two Lines (24 character for each line) of
Bill Footer can be set.
[email protected] 1.014
7.
Operation
7.1 Operating the Spot Billing Machine
In order to print a bill, the details of the consumer have to be stored in the SBM.
The SBM is connected to the computer via the RS-232 serial port for the same. A
communication program provided on the PC to upload and download consumer
data and bills issued log, in the form of records. The SBM must first be put in
communication mode to send/receive records to/from the computer. The records
sent from the PC are stored in the non-volatile memory of the SBM. Once the
records are sent to the SBM, the unit is ready for printing bills and accepting
queries from the keypad.
7.1.1 SBM Main Screen
Main screen of the SBM LCD when turned ON is shown in the figure below.
A.P.C.P.D.C.L
Password:
Main Screen
Where
, are graphical icons displaying the battery status. A total of 5
icons are used to display the battery status from fully charged to completely
discharged condition.
7.1.2 Login
A password must be entered to login. If the password entered is valid, main menu
is displayed on the LCD, else “Invalid password” is displayed on the LCD for 5
secs and the control returns to the Login Screen.
A.P.C.P.D.C.L
Password:******
Login Screen
[email protected] 1.015
7.1.3 Password
Password can be of max ten numeric characters. The machine’s default
Administrator password is 1111 and is used to first set up and initialize the unit.
The password can later be changed through the Utility Program.
Note: Once a new password has been setup for the Administrator, the
Administrator has to remember this password for any future logins. (Contact
vendor if password is lost)
7.2 Functions of SBM
7.2.1 Function Selection Screen
After successful login (User/Admin mode), four options are available to the user.
Selection of the options is through function keys (F1 to F4).
The following
Function Selection Screen will be displayed after a successful login.
[F1]
[F2]
[F3]
[F4]
Change Settings
Transfer Data
Issue Bills
Unit Reports
Function Selection Screen
The user can return to the previous screen by pressing ‘ESC’ Key.
•
In Administrator Mode, all the functional keys (F1-F4) can be accessed.
•
In User Mode, only functional keys (F3 & F4) can be accessed.
If the user selects F1 or F2 keys, in this mode, error message along with an audio
** Access Denied **
You do not have
Sufficient Security
Privileges!!
beep will be displayed.
No Privileges Screen
[email protected] 1.016
7.2.2 Change Settings Screen
On selecting option [F1] from Function Selection Screen the Change Settings
Screen appears as follows:
[F1]
[F2]
[F3]
[F4]
Change Password
Change Port
Paper Options
Set ERO & Agency
Change Settings Screen
7.2.2.1
Change Password Screen
Enter the new user password and re-enter the new password and press ‘Enter’.
New Pwd:
Re-Enter:
Save Password(Y/N)?
Press Esc to Return
Change Password Screen
On successful validation of the new user password the screen prompts for
confirmation of new password [Y]es / [N] o.
On pressing [Y],[N] “Password Saved” and “Password not saved” messages are
displayed respectively for 5 secs on the LCD panel and control returns to the
previous screen.
7.2.2.2
Change Port Screen
Select Port:
COM Port : [1]*
COM Port : [2]
Press Esc to Return
Change Port Screen
A ‘*’ denotes the current selected Port. User can press [1] or [2] key to select the
port. “Port Set Success” message on LCD Panel is displayed for 5 seconds after
the selection and control returns to the previous screen.
[email protected] 1.017
7.2.2.3
Paper Options Screen
Pre Printed (Y/N)?N
Enter the no.of Lines
after each bill:4
Press Esc to Skip
Paper Option Screen
Press [Y] to select pre-printed paper and [N] to select plain paper. To maintain
the previous selections press Esc Key.
After the paper selection is done set the number of line feeds after each bill. The
Unit prompts for the Bill Footer in the next screen. This is a 48 character
message, which is printed at the end of each bill.After completion of this
operation, the screen returns to the previous screen.
7.2.2.4
ERO & Agency Screen
Enter ERO Name:
ERO XYZ
Enter Agency Name:
Agency ABC
ERO & Agency Screen
An ‘Enter’ key press confirms the inputs and returns to Change Settings Screen.
7.2.3 Transfer Data Menu
Transfer Data from PC
[P] : PC to Unit
[U] : Unit to PC
Press Esc to Return
Transfer Data Screen
For uploading data from the Unit to the PC press the key [U] and during upload
the following screen is displayed till uploading process completes.
Uploading..
Press Esc to Abort
Uploading Screen
[email protected] 1.018
After Successful Uploading, the following message is displayed for 5 seconds
and the control returns to the Function Selection Screen.
N Records Uploaded
Upload Complete Screen
N is the number of records uploaded.
For downloading data from PC to SBM press the key [P] and during download
the following screen is displayed till download completes.
Downloading..
Press Esc to Abort
Download Screen
After Successful downloading, the following message is displayed for 5 seconds
and the control returns to the Function Selection Screen.
N Records Downloaded
Upload Complete Screen
N is the number of records downloaded.
7.2.4 Issue of Bills
On selecting the option [F3], the unit prompts user to enter the Service number of
the customer. To print the previously saved bill, user can simply press ‘F5’.
Enter Service
No:
[F5] Print Last Bill
Service Number Acceptance Screen
On entering the valid Service number details of the customer like name, address,
Meter Number, Category, Phase etc are displayed.
[email protected] 1.019
If any key is pressed the unit displays previous reading and unit prompts to enter
current meter reading. User can skip the reading by pressing “Enter” Key.
Prev: XXXX
Reading:
Status:
Meter Reading Screen
Then meter status is prompted, for LIVE status user can directly press ‘Enter’ key
or enter the actual status number. Depending on reading and status, total units
will be displayed and the user is prompted to issue the bill.
Units:
Amount:
Issue Bill (Y/N)?
Issue Bill Screen
On pressing [Y] bill is stored and printed. On pressing [N] the bill is not saved.
While printing the billing unit displays the following message on LCD panel.
Printing..
Please Wait !
Printing Display Screen
After completion of this operation, Unit prompts for the next Service number with
the following message.
Previous Service
Processed..
Next SCNo: XXXX XXXXX
Issue Bill (Y/N)?
Next Service No. Display
On pressing [Y] unit displays Customer Details as previously explained and the
process continues. On pressing [N] Service Number Acceptance Screen is
displayed.
[email protected] 1.020
7.3 SBM Reports
7.3.1 Unit Status
On selecting option [F4] from the Function Selection screen information regarding
the status of the number of bills are displayed in the Unit Status Screen as
follows.
Billed : XXXX
UnBilled: YYYY
Uploaded: ZZZZ
Print Report(Y/N)?
Unit Status Screen
On pressing [Y] Report Selection Screen is displayed. Pressing [N] returns the
control to Function Selection screen. .
7.3.2 Report Selection Screen
Select Report Screen
[F1] Billed Report
[F2] Unbilled Report
[F3] Summary Report
Report Selection Screen
Selecting option [F1] prints the Billed Services Report.
Selecting option [F2] prints the Unbilled Services Report.
Selecting option [F3] displays the Bill Summary Report Screen as follows.
[F1] Billed Summary
[F2] Status Report
[F3] Status Wise
Report
Bill Summary Report Screen
On selecting option [F1] Billed Summary Report is printed.
On selecting option [F2] Status Report is printed.
On selecting option [F3] Unit prompts for the Status. After the status is entered,
all the service numbers billed under this status are printed.
[email protected] 1.021
8 Additional Information
•
Clean the SBM with dry, soft cloth. Never use cleaning agents like petrol
or solvents. Using such chemicals can result in discoloration or deterioration of
cabinet and keys.
•
Avoid spilling of any liquids on the unit as they may damage its
functionality. The keyboard is to be carefully protected.
•
Contact your authorized dealer for service for any malfunction. Do not try
to repair the unit yourself. Do not open the SBM.
•
During receipt printing wait until the printer has finished printing. Do not
tear off the receipt during printing. Printer damage may result.
•
Use only high-quality paper and ribbon. Improper ribbons may result in
damage to the printer or shorten its lifetime. By using suitable ribbons and by
properly maintaining the printer, the average lifetime is up to 1.5 million lines.
•
Use only the supplied AC/DC adapter for charging the SBM. The use of
other adapter type may result in damage of the SBM.
•
Use only the program recommended by your authorized dealer as well as
the original interconnecting cable for the SBM communication with a computer.
•
If the Spot Billing Machine is used in ways other than those described in
these instructions, LAMPEX is not responsible for data corruption and resulting
damages.
[email protected] 1.022
9 Specification
9.1 Controller
Industry standard high speed RISC micro controller. The controller has two
programmable serial ports, In-system programming facility, timers, 10 bit ADCs,
digital I/O ports, timers etc. ‘C’ compiler support is available for this range of
processors, therefore code is easy to maintain.
9.2 Real Time Clock
Battery Backed Real Time Clock with time advance and retard feature. This
feature is useful when the day temperatures vary due to seasonal changes.
9.3 Display
20 character by 4 lines alphanumeric backlight LCD. Backlight will be OFF when
the SBM is left idle (no key is pressed) for 10 seconds.
9.4 Key Board
Fully covered Rubberised Key pad.
9.5 Printer
24 columns Heavy Duty Dot matrix alphanumeric impact printer with maximum
speed of 2.5 lines/sec, paper width - 56mm.
9.6 Communication Ports
Two RS232 ports are provided with fixed Baud Rate of 115200 for Uploading and
downloading of data to and from the SBM.
9.7 Communication Cable
Connector cable with one end (D-9 connector) connected to the serial port of PC
and the other end (RJ-45) connected to one of the communication ports of the
SBM.
9.8 SBM Details
9.8.1 Size
Compact and as well as lightweight (shoulder hanging).
[email protected] 1.023
9.8.2 Weight
750 grams without Paper Roll
9.8.3 Dimensions
Length320mm
Width110mm
Height 83mm
9.8.4 Paper Roll
DiameterMax. 68 mm
Width56 mm
9.8.5 Operating Temp.
50 C to 500 C.
[email protected] 1.024
10 Contact Details
To find out more about our products and services email us at [email protected]
or contact us at our office below:
CD Technologies Pvt. Ltd.
6-2/231
Kukatpally,
Hyderabad 500 072
India.
Tel: +91-40-23157701-09 (9 Lines)
Fax: +91-40-23157710
Mobile: +91 9885207515
URL: http://www.cdtsoft.com/
[email protected] 1.025
11 Test Report
Serial No:
Date of Delivery:
Name & Address of the customer:
Tests performed on Spot Billing Machine
(Hardware tested at Lampex Electronics Ltd., Kukatpally, Hyderabad, India)
Tested the following Hardware for proper operation by putting the unit in test
mode.
S. No
Module
1
LCD Module with backlight
2
Keyboard
3
Data Memory
4
Program Memory
5
Printer
6
Serial Ports (COM1 and COM2)
7
Real Time Clock
8
Battery Charging
Remark
QA
[email protected] 1.026
12 User Notes
[email protected] 1.027