1
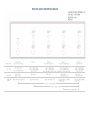
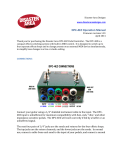
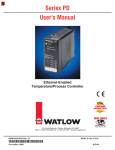
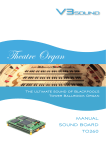
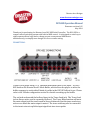
Disaster Area Designs www.disasterareadesigns.com DPC-‐8EZ Operation Manual Firmware revision 1.05 May 2014 Thank you for purchasing the Disaster Area DPC-‐8EZ Pedal Controller. The DPC-‐8EZ is a compact effects switching system with built-‐in MIDI control. It is designed to switch up to eight separate effects loops and to change presets on an external MIDI device simultaneously, to simplify tone changes in a live or studio setting. CONNECTIONS: Connect your guitar using a 1/4" shielded instrument cable to the input. The DPC-‐ 8EZ features the Disaster Area Z-‐Mode Buffer, which allows the player to tailor the buffer response to work with all kinds of pedals in the DPC-‐8EZ effects loops. Please refer to the Z-‐Mode configuration section for details on setting up the buffer. The red jack underneath the buffered input is the Tuner Send jack. The Tuner Send jack is always active, and is separately buffered. The Tuner Mute function will mute the main output (and the insert send in Stereo Link mode) but the tuner send stays active even when the main output is muted. The tuner send may also be connected to the insert return to split the input signal into two stereo paths. The next four pairs of 1/4" jacks are the sends and returns for the first set of four effects loops. The top (black) jacks are the send channels, and the lower (red) jacks are the returns. The two jacks in the middle of the panel are the “insert” connections. The insert jacks are reversed in color from the loop send / receive jacks – the insert send is red and the return jack is black. The insert is an always-‐on loop that is ideal for connecting a volume pedal, compressor, or other pedal that does not need to be switched on and off. The insert may also be used as a “split point” for connecting to an amp and effects with the 4-‐cable method, or to split the DPC-‐8EZ in two sections for stereo use. Please note that the insert return jack is fed through a buffer, to eliminate loading due to long cable lengths in the insert loop. The insert buffer is identical to the main Z-‐Mode buffer but is set at the default low impedance setting and cannot be changed. The next four pairs of ¼” jacks are the sends and returns for the second set of four effects loops. Like the first four loops, the top (black) jacks are the send channels, and the lower (red) jacks are the returns. The final jack is the main output (red.) When the pedal is set to tuner mute, the main output is shorted to ground through a relay and its output is muted. The MIDI input and Output are described in the MIDI section below. The USB-‐Mini-‐B jack is used for firmware update and customization. The USB jack also functions as a USB MIDI interface, and works with most computers and tablets without driver installation. The power jack is 2.1mmID, center negative, 9V DC 85mA minimum. The DPC-‐8EZ may be powered by one of the standard outputs on the Voodoo Labs Pedal Power 2 Plus, or by most available power supply units. Disaster Area Designs recommends a multi-‐output isolated power supply for the DPC-‐8EZ, rather than a daisy-‐chained single power supply. CONFIGURATION: The left-‐most switch (button 5) is the mode / bank switch. The other four switches are the select switches. Throughout this document, they may be referred to as B1-‐ B4. Holding the buttons when the DPC-‐8EZ boots allows you to change the way the controller operates. Autoconfig – Hold Button 1 at boot Hold button 1 at boot to enter Autoconfig mode. While in this mode, sending MIDI Continuous Controller (CC) 99 will set the DPC-‐8 receive channel. The value of the command received will set the MIDI channel. The Disaster Area DMC Gen2 and DPC-‐ 5 controllers will send this command at boot. Connect the DMC or DPC MIDI OUT to the DPC-‐8EZ MIDI IN with a standard MIDI cable. Power on the DPC-‐8EZ while holding Button 1, then power on the DMC or DPC controller. The DPC-‐8EZ will configure itself and then flash to indicate its status. Startup Mode – Hold Button 2 at boot Hold Button 2 to set the DPC-‐8EZ to start up in Preset Mode or Manual Mode. If you primarily use the controller in one mode or the other then you can set the DPC-‐8EZ to always start in your desired mode. Stereo Link – Hold Button 3 at boot (REV 1 PCB ONLY) Hold Button 3 to set the DPC-‐8EZ to Stereo Link mode. While in this mode, the DPC-‐ 8EZ loops will switch together in pairs for use with stereo effects. Loops 1+5, 2+6, 3+7 and 4+8 switch together in this mode. Insert Assign – Hold Button 3 at boot (REV 2 PCB ONLY) Works for serial numbers ~290+ Rev 2 boards have the ability to assign the location of the insert jacks. The default position of the insert is jack pair 5, between loops 4 and 5. Hold down button 3 at boot to enter the assign mode. Tap B1 and B2 to assign the insert position. When the insert is in the correct location, hold B3 to save. PLEASE NOTE that the insert jacks themselves move to reflect this assignment. If the insert is assigned to position 3 (blue LED above button 3) then you will need to place your volume pedal after loop 2 in the 3rd jack pair. It may be helpful to reverse the jack nuts on the insert jack pair to show their function. MIDI Send – Hold Button 4 at boot Hold Button 4 at boot to enable or disable MIDI sending from the DPC-‐8EZ. If MIDI sending is enabled, MIDI commands will be sent when selecting a preset, turning loops on and off, or enabling the mute. If MIDI sending is disabled, the DPC-‐8EZ MIDI input and output still function, but the output only serves as a MIDI “thru,” to pass data from the input to the output. Disable MIDI sending if you are using a master MIDI controller with the DPC-‐8EZ. Hold Button 5 at boot to enable or disable the automatic noise reduction in the DPC-‐ 8EZ. When the automatic noise reduction is enabled, the DPC-‐8EZ will mute the output for a few milliseconds before and after switching its loops. This can be useful if some of the effects connected create loud “pops” or “clicks” while switching, but it does introduce a slight audio dropout when changing loops or presets. The default setting is Automatic Noise Reduction ON. Reset Presets and Configuration Hold Buttons 5 + 1 to reset all parameters to their defaults. This will also overwrite all presets. Hold Buttons 3 + 1 to reset the configuration to defaults. This leaves presets intact. Please note that if you have previously saved presets in Stereo Link mode then these presets will behave differently in mono mode. Hold Buttons 2 + 1 to enter firmware update mode. In this mode the DPC-‐8EZ will operate as a USB serial port for firmware update. Z-‐MODE BUFFER: The DPC-‐8EZ input uses a transparent signal buffer, designed to eliminate loading on the instrument pickups by the rest of the signal chain. The output impedance of the buffer is normally 560 ohms, which is low enough to drive hundreds of feet of cable or many parallel loads. Some effects such as fuzz pedals (particularly germanium-‐based) and “vibe” pedals (Uni-‐Vibe based phase shifting units) may react in unexpected ways to a low-‐impedance input signal. To compensate for this, the DPC-‐8EZ Z-‐Mode Buffer allows the player to tailor the impedance of the buffer to suit any connected effects units. The Z-‐Mode Buffer impedance may be adjusted using three DIP switches inside the DPC-‐ 8EZ. Open the rear cover by removing the four screws at the corners of the unit. The DIP switches are numbered 1, 2, and 3. In most cases, the default setting of 560 ohms will be correct. If your pedals sound different when used in the DPC-‐8EZ, try increasing the buffer impedance one step at a time until the sound is correct. Disaster Area Designs recommends leaving the Z-‐Mode set to 560 in almost all cases, but settings of 1k or 10k may be used to better work with fuzz pedals. Using the DPC-‐8EZ PRESET MODES: The DPC-‐8EZ has the ability to engage multiple bypass loops and a MIDI program with a single tap. This collection of settings is called a “preset.” If you prefer to control your loops manually, the DPC-‐8EZ may be set to start up in the manual mode and the preset modes may be safely ignored. The DPC-‐8EZ has four presets per bank, and each folder contains three banks for a total of forty-‐eight (48) presets accessible from the DPC-‐8EZ itself. 127 presets may be saved and accessed by using an external MIDI controller. The current preset bank may be selected by tapping button B5 to cycle through the red, yellow, or violet modes. The folder may be selected by press-‐holding buttons B2 (folder DOWN) and B3 (folder UP) and is indicated by the green folder LEDs above the blue preset indicators. To select a preset, press any select button B1-‐B4 while the DPC-‐8EZ is in the red, yellow, or violet preset mode. Pressing the currently selected preset puts the DPC-‐8EZ into its bypass state. The bypass state may be set up as an additional preset or “favorite” sound. MANUAL MODE: To enter manual mode, simply hold the bank button (B5) until its LED turns blue. Tap B5 in manual mode to switch between the blue bank (loops 1-‐4) and the green bank (loops 5-‐8.) The bank LED indicates the active loop bank. Tap buttons 1-‐4 to select the loops in the current bank. For example, to select loop 1 press B1. To select loop 6, tap the bank button B5 until its LED is green, then press B2. To save the currently selected loops to a preset, press-‐hold B4 to store. The bank LED will begin flashing red. Tap B5 to select the destination bank (red, yellow, or violet.) Tap b2 to select the destination folder. Once the folder and bank have been selected, press-‐hold any button B1-‐B4 to save the preset to that location. Tapping B1 while the bank LED is flashing sets the loop status to “don’t care.” In this mode, selecting this preset will not change the status of the loops. This can be used to send a MIDI change to a connected device without affecting the non-‐MIDI pedals. The DPC-‐8EZ will indicate “don’t care” mode by flashing the blue LED above B1. Save the preset while the LED is flashing to assign “don’t care” to that location. If a MIDI controller is connected to the DPC-‐8EZ MIDI input, the DPC-‐8EZ can “learn” an incoming MIDI program change to save a preset. Enable the loops for the preset, then hold B4 to enter store mode. Optionally, tap B1 to assign “don’t care” if desired, and then send a MIDI program change from your MIDI controller. The DPC-‐8EZ will flash to indicate the preset has been saved. Sending MIDI program change 0 will set the “bypass” preset. MIDI: The DPC-‐8EZ features both DIN (5-‐pin) MIDI and USB MIDI. The two interfaces work at the same time and are bridged together. Sending a MIDI message into the DIN port will transfer the message to both the DIN output and to a connected computer or tablet using the USB port. Likewise, an application running on a connected computer or tablet can control the DPC-‐8EZ or send messages to a connected device through the DIN output port. Please visit disasterareadesigns.com for video examples of the USB MIDI connectivity. The DPC-‐8EZ responds to MIDI Program Change (PC) and MIDI Continuous Controller (CC) messages. Program Change messages will engage the presets or the bypass setting on the DPC-‐8EZ. Continuous Controller messages may be used to change the status of the DPC-‐8EZ loops, engage or disengage the tuner mute, or to store a preset. Please consult the MIDI implementation chart for details of specific commands that the DPC-‐8EZ will accept. Recalling a preset on the DPC-‐8EZ will send a MIDI Program Change message. Engaging the bypass preset will send Program Change 0, red mode in folder A sends Program Changes 1-‐4, yellow mode sends Program Changes 5-‐8, etc. When the DPC-‐8EZ receives a program change message, the loops will change state to match the preset saved in that location. Engaging a loop in manual mode sends a MIDI Continuous Controller message. If MIDI SEND is set to OFF in the power-‐on configuration, then neither Program Change nor Continuous Controller messages will be sent by the DPC-‐8EZ. The MIDI input and output still function and pass messages through whether MIDI SEND is enabled or not, as is the USB MIDI functionality. MIDI IMPLEMENTATION CHART THE DPC-‐8EZ RESPONDS TO THE FOLLOWING MIDI MESSAGES Function Loop21 Loop22 Loop23 Loop24 Loop25 Loop26 Loop27 Loop28 Controller CC50 CC51 CC52 CC53 CC54 CC55 CC56 CC57 Value 06632BYPASS,26461272ENGAGE 06632BYPASS,26461272ENGAGE 06632BYPASS,26461272ENGAGE 06632BYPASS,26461272ENGAGE 06632BYPASS,26461272ENGAGE 06632BYPASS,26461272ENGAGE 06632BYPASS,26461272ENGAGE 06632BYPASS,26461272ENGAGE Notes Mute CC58 06632UNMUTE,26461272MUTE Save2Preset CC122 06127 Value2is2number2of2preset2to2save. Saves2current2status2of2Loops2168. Load2Preset Program2Change 06127 Program202is2"bypass." Programs216482are2accessible2from2DPC68EZ2itself Programs2061272are2accessible2from2external2MIDI2controller DPC-‐8EZ Block Diagram DPC-‐8EZ QUICK REFERENCE GUIDE