1
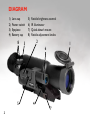
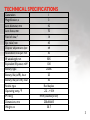
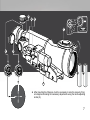
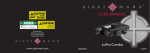
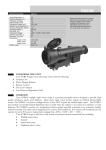
®
VICTORY JUSTIFIES EVERYTHING®
NVRS 3x42
NIGHT VISION RIFLESCOPE
USER MANUAL
®
VICTORY JUSTIFIES EVERYTHING®
Engineered for high intensity, fast-paced situations, from extreme shooting sports to
tactical training simulations to home defense, Firefield products are designed for the
next generation shooter and serious gun enthusiast. Our goal is to provide optimal
solutions for demanding tactical, hunting and competitive training situations.
Firefield products are tested for durability in extreme terrain and extreme climates.
Consisting of shooting accessories compatible with extreme shooting guns, AR-15s,
tactical carbines, air guns, shotguns and pistols, the Firefield product line includes:
riflescopes, red dot sights, reflex sights, laser sights, magnifiers, bore sights, night vision,
digital night vision, flashlights, spotting scopes, rails and mounts.
Delivering high quality and exceptional durability to every intense moment, Firefield is
the key to victory. Transform fear to power, panic to excitement and chaos to glory
with Firefield units.
To view this manual in other languages, or for more information
please visit www.fire-field.com.
© Sellmark Corporation, all rights reserved
NVRS NIGHT VISION RIFLESCOPE
Featuring a 42mm lens for higher light gathering capabilities and a powerful 3x
magnification, the NVRS 3x42 offers a clear picture of medium- to long-range
targets. Its rock-solid, lightweight titanium body and flip-up lens covers shield
it from impact and harsh weather conditions. The flip-up lens covers open to
reveal enhanced, multi-coated optics and an illuminated red duplex reticle with
incremental brightness adjustment, allowing the shooter to quickly adapt to
their surrounding environment.
FEATURES:
•
•
•
•
•
•
•
High quality image and resolution
Lightweight and durable titanium body
Quick-detach weaver mount
Built-in, high power IR illuminator
Incremental reticle brightness adjustment
Ergonomic design and quick power up
Protective flip-up objective lens cover
1
DIAGRAM
1)
2)
3)
4)
Lens cap
Power switch
Eyepiece
Battery cap
8
5)
6)
7)
8)
Reticle brightness control
IR illuminator
Quick-detach mount
Reticle adjustment knobs
2
3
1
6
5
2
4
7
TECHNICAL SPECIFICATIONS
Generation
Magnification, x
1
3
Lens diameter, mm
Lens focus, mm
42
70
Field of view, º
Eye relief, mm
Diopter adjustment, dptr.
Resolution, lines per mm
IR wavelength, nm
Equivalent IR power, mW
Battery type
Battery life (w/IR), hour
Battery life (w/o IR), hour
Reticle type
Operating temp, ºF
IP rating
Dimensions, mm
Weight, oz
14
45
±4
30
805
100
2xAA
20
50
Red duplex
-22 ... +104
IPX4 (weatherproof)
230x80x85
30.7
3
4
OVERVIEW
Your NVRS starlight night vision scope is a professional-quality device designed to provide high quality viewing in
nearly total darkness. Many active night vision devices require an artificial infrared light source. The NVRS is a
passive starlight device: it does NOT require any artificial light source. The NVRS does include a powerful infrared
illuminator that is useful when the subject to be viewed is in shadows or total darkness. The NVRS consists of a
sophisticated electro-optical assembly contained in an extremely durable titanium housing. The entire unit is engin eered for extreme field conditions. It is entirely self-contained and can operate for up to 50 hours at temperatures
ranging from -22º F to +104º F ( -30º C ~ +40º C ).
Your NVRS scope is ideal for a wide variety of professional and recreational uses including:
Wildlife observation
Security
Search and rescue
Nighttime photo/video
WARNINGS AND PRECAUTIONS
Your NVRS night vision scope was designed to provide many years of reliable service. To ensure that you get the
most enjoyment out of your NVRS, always obey the following warnings and precautions:
Do not point the NVRS towards any light source greater than 1 lux (such as car headlights) if the unit has been
activated or if the eyepiece shows a green glow. Turn the unit off and wait until the green glow dissipates before
removing the lens cap.
Do not open the case of the NVRS or otherwise attempt to service this device.
Clean optical parts (lenses) with professional lens-cleaning supplies designed for use with multicoated optics.
Failure to observe these warnings may void the warranty!
5
BATTERY INSTALLATION
To install the two AA batteries, unscrew the battery compartment
cover. Slide in the batteries according to +/- polarity indicated on
the cover. Tighten the battery compartment cover (4) .
OPERATION
Your NVRS scope operates using two AA batteries.
Make sure they have been installed according to instructions listed
in the Battery Installation section.
Move into a dark area before powering on the device. You can also try
your scope in daylight with the lens cover on.
Remove the lens cap (1) only when the scope is in the dark.
Activate the device by turning the power switch (2) down to the
first click (ON position).
When additional illumination is needed, activate the IR illuminator by
turning the power switch (2) until second click (IR position).
To illuminate the reticle, turn the switch (5) clockwise and adjust the reticle
brightness by rotating the switch clockwise or counterclockwise.
To focus the scope, select an object approximately 100 yds. away and
rotate the eyepiece lens (3) until the image is clear.
The green LED indicates that the scope is on. The “ON” LED turns red when
the battery starts discharging.
The night vision riflescope NVRS can be attached on any rifle equipped with a
bar for side or top mounting by use of a Weaver mount. The scope is produced
with different mount modifications.
The unauthorized replacement or assembly of the mounts is not allowed.
6
3
2
5
1
9
8
8
4
After mounting the riflescope, it will be necessary to zero the scope by firing
at a target and making the necessary adjustments using the reticle-adjusting
knobs (8).
7
ATTENTION! Your NVRS can be used in extremely cold temperatures. However, when the unit is
brought back into a warm environment, you must wait approximately 5 HOURS before using the unit.
This is due to condensation that may accumulate on the electronic circuitry.
ZEROING OF THE RIFLESCOPE
It is recommended to zero your riflescope at operating temperature according to the following sequence:
place your rifle with a riflescope on a support;
make sure there are no bright light sources in your scope’s field of view;
put the target at a zeroing distance, for instance 50m. The illumination of the target area should not be greater
than 1 lux;
remove flip-up cap from the objective lens;
activate the device by turning the power switch to the “ON” position;
aim the rifle at the center of the target;
rotate the eyepiece ring until the target image is clear;
adjust the reticle brightness by rotating the switch;
if the center of the target does not coincide with the aiming dot (the center of the red reticle), remove the caps
from reticle-adjusting knobs and rotate the knobs R and UP until the center of the target and the center
of the reticle coincide;
aim at the aiming dot and fire 3-4 control shots;
determine the close grouping of shots and the position of the middle hit point;
if the deviation of the middle hit point is more than the allowable value, rotate the reticle-adjusting knobs
(UP - vertical adjustment, R - horizontal adjustment) until the middle hit point coincides with the aiming dot.
One click of the adjusting knob will cause a 20mm shift at a distance of 100m;
check the accuracy of adjustment by shooting.
Your riflescope is zeroed at a chosen distance.
8
ATTENTION!
The recommended energy for Generation 1 Riflescopes NVRS should not exceed 3700 Joules. The Generation 1
riflescopes tolerate the overload shock corresponding to the caliber of no more than 7.62/.308. The guarantee is
null and void if cartridges with calibers of more than 7.62/.308 or self-made cartridges have been used.
MAINTENANCE
To avoid failures during operation of your riflescope and to provide the detection and elimination of reasons
causing the premature deterioration of assemblies and parts in time, it is necessary to carry out technical
inspection and technical maintenance of the riflescope
A)TECHNICAL INSPECTION
It is necessary to take the following steps during technical inspection:
- carry out the external examination of the riflescope (external surfaces should not have dents and signs
of corrosion);
- check if the riflescope is properly and securely mounted on the rifle;
- check the condition of optical surfaces: objective and eyepiece lenses should not have splits, fat stains,
dirt, and various coatings on them;
- check the condition of power supply elements and contacts (contacts should not be oxidized or have salt
coatings);
- check the work of operation switches and of a reticle brightness switch;
Having detected some malfunction while using the riflescope, it is necessary to check the following:
- riflescope’s mounting on a rifle;
- the absence of dust, dirt, frost, water, etc on the objective lens;
- if the batteries are discharged;
- if the riflescope is on.
Pay particular attention to ensure that batteries have been installed.
9
B) CURRENT MAINTENANCE
Carry out the current maintenance of the riflescope at least once every 6 months.
Current maintenance requires the following steps to be taken:
- remove dust, dirt and moisture from the riflescope;
- clean the external surfaces of metal parts;
- clean the optics of the scope using a light coating of lens cleaning solution on a soft cotton cloth.
ATTENTION! DISASSEMBLY OF THE RIFLESCOPE IS PROHIBITED!
USING THE PHOTO ADAPTER
You can take night pictures with the help of the riflescope using digital cameras. For these purposes
you require a night vision photo adapter for digital cameras. Install the reducer into a riflescope’s mount.
Setup the digital camera is done according to the photo adapter operating manual.
STORAGE
Always store the NVRS in its case in a dry, well-ventilated area away from heating/air conditioning vents,
or heating devices. Temperature should not go below +500F. Humidity should not exceed 70%.
Remove the batteries if the device is to be stored for longer than 2 months.
TROUBLESHOOTING
The riflescope will not turn on...
Check that the battery is installed properly. Install the battery according to the (+) and (-) polarity, ensuring that the
markings on the battery and battery compartment correspond with one another. Check the battery contact to ensure
it is clean and free of corrosion; if necessary, clean the contact. Make sure that the external contact lug is not broken.
If necessary, replace the battery as it may be depleted. Also, be sure that the power is in the “ON” position when
trying to turn on the scope.
Distinct black dots appear on the screen...
The dots are minor cosmetic blemishes resulting from tube production processes and do not interfere with the
reliability or performance of the riflescope.
10
The image flickers, flashes or “snows”...
The scope may flicker or flash when used in a bright environment; to correct this, place the cap over the objective
lens and enter a dark environment. The scope will restore itself to a natural functioning state in several minutes or
hours, depending on how long the scope had been exposed to the light.
The scope may flicker for the first several seconds of use, even when in a dark environment, before the scope
corrects itself and functions properly.
The scope may “snow” for several minutes after being exposed to a bright light source (daylight, a car's headlights,
fire, etc.) even if being operated in complete darkness.
The red reticle is blurred and can not be focused with the eyepiece…
The diopter adjustment range of the eyepiece is not powerful enough for your eye; if you use glasses stronger than
+/- 5 diopters, use your glasses while looking through the eyepiece.
The image will not focus but the red reticle is clearly seen…
Make sure the lenses are not foggy or dusty; if so, carefully clean the external surfaces of lenses with a soft cotton
fabric. Replace the battery if the total battery charge is less than 2.2 V.
If the unit is brought into a warm environment from a cold one, condensation may appear on the internal lenses;
you must wait two hours before using the unit.
If this does not correct the problem, then most likely the object you are viewing is too close. The objective of your
riflescope does not have distance focusing.
The scope or the IR does not turn off via the “ON/OFF” switch...
If the scope was activated by remote control, then turn the scope and IR off by again using the remote control.
Make sure the LED indicators for “on” are turned off. The image will take several minutes to completely turn off.
The reticle will not hold zero...
Make sure that the scope is firmly attached to the mount and be sure that the same caliber and type of bullets are
being used as when the scope was initially sighted in. If the scope was sighted in during the summer, and is now
being used in the winter, or vice versa, a small displacement of the aiming point is possible.
Visibility decreases or disappears...
Bright light sources, such as headlights, may cause visibility to decrease or disappear and the image to flicker. Turn
the power off and turn the riflescope away from the light source; visibility will restore itself in several minutes.
11
12
Manufactured by
Sellmark Corporation
2201 Heritage Parkway
Mansfield,TX 76063
13
www.fire-field.com