1
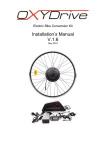
Electric Bike Conversion Kit User Manual PLEASE READ ME FIRST 1. What is an electric assistance in bicycles and what is it used for? The motor-powered electric assistance for bicycles was created to help you achieve longer distances on your bike, or cycle faster without getting overtired. The device is particularly useful for hill climbing, off road cycling, daily commute, or cycling in difficult weather conditions (i.e. head winds). The electric motor can be fitted on most types of conventional bicycles and is usually located either in the front or rear hub, or in centrally placed crank drives. 2. How to avoid common mistakes when using the electric assistance Most mistakes come from not understanding the concept of the electric assist and the way it works. It is important to understand that having an electric assistance fitted onto your bike will not turn your bike into a scooter-type vehicle that can be used by ‘’twist and go’’ only. The average output on your e-bike is 250W – enough to give you assistance when cycling uphill or against headwinds, but not enough if you want to cycle uphill by just twisting the throttle and no pedalling at all. Cycling on the twist throttle only is perfectly fine as long as you cycle on flat roads, downhill, or against mild headwind. But using the twist throttle only mode for a long uphill journey may cause the motor, battery, or controller to overheat; or it can blow the fuse on the battery and make the whole system stop working completely. 1. Washing instructions To wash the electric motor, the battery, or the controller, use dry sponge and cloth with just minimal use of water or any other liquids. IMPORTANT: Never use pressure washers (i.e. KARCHER) for washing your ebike. 4. How to start using the electric assistance on your bike To turn the power on Step 1. Press the green button at the right hand side of the battery. Step 2. There are three control buttons on the handlebar. Press the middle one and hold it for approx 2-3 seconds until the display figures come up. How to switch selected level of the pedal assist Use the switch on the handlebar to set the level of assistance in the pedelec mode – you can select the levels from 1 (the least powerful) to 5 (the fastest mode with maximum assist), depending on how much electric assistance you want to have. You can switch the levels of assist as you cycle along. PLEASE NOTE: We recommend that you use level 5 of the electric assist only in certain moments of your journey, i.e. at the start, during an uphill ride, and for no longer than 30 seconds. Level 5 is the most powerful level of pedal assist with the highest power consumption and using it for longer duration of your journey would quickly drain the battery. How to check the battery level The OXYDrive conversion kit is equipped with two battery indicators that show the level of battery charge: To check the battery level on the indicator located on the LCD display (top left corner) – look at the fields on the display. The fewer fields are displayed, the less power is left in the battery. To check the battery level on the indicator located on the battery, press the button in the middle: the more lights are on, the higher level of battery charge remains (i.e. all lights on means the battery is fully charged) Understanding the purpose of the power displayer The main console is equipped with a power displayer that shows the current power output on the motor. The figures are shown in WATTS. You can also use this function to see how much strain you put on the system. Once you start using the OXYDrive, you will notice that the peak power can reach even 400 or 500 Watts. This is the maximum power that the motor can achieve in the peak and it normally happens at the start or during hill climbing. Cycling with an average power output close to 500Watts means that 100% power available is being used. Cycling at 100% power output is fine for some short parts of your journey (i.e. during quick hill climbing) but we advise that you don’t use the peak power all the time or during very long hill climbing. We recommend that you use the power output between 100 to 250Watts while cycling on a flat road, and up to 350W during long hill climbing. This way you can maximise the efficiency and lifetime of the battery, motor and all other components. 5. The battery How to charge the battery Please follow these steps when charging your battery: The battery must be fully charged before the first use. To charge the battery, plug the power socket into the mains and a round plug of the charger into the battery socket. Once it’s done, you can plug the charger’s main plug to the electricity socket. It is important that you follow this specific order as connecting the charger’s main plug first may cause a short circuit. The red light on means the battery is still charging – please do not disconnect it until the green light comes up. The green light on means the battery is fully charged. Battery care and maintenance Once the battery has been fully discharged, it is always best to charge it on the same day, but not earlier than approx 10-20 minutes after your bike ride, as the battery needs some time to cool off. If you are planning not to use your bike for a period longer than a week, it is very important that you charge the battery beforehand. Batteries unused and stored for longer period of time should be 2 charged every 2 months for 30min to 1 hour to approx. 50-70% charging level- neglecting it may cause the battery losing its capacity and voltage and result in a complete damage to the battery. Battery storage recommendations All lithium batteries should be stored at room temperatures of around 16-24C. It is important that the battery is NOT stored in wet, humid, or cold conditions as this may affect the battery performance. If the battery is out of use and stored for longer than one week, it should be charged to approx 5070% beforehand. IMPORTANT: Please do not store fully charged (100%) or completely discharged (around 0%) batteries. Why recharging the battery is so important Each lithium polymer battery is built up from a number of small cells. All these cells – when connected and working together in one battery – are maintained by one battery management system (BMS). The BMS is nothing else but a tiny computer that balances the cells continuously and makes sure that all cell groups have the same the voltage. Failing to do re-charge the battery may result in the battery cells dying. If the voltage on each individual cell drops below 2.8V, or 28V on the entire battery pack, then this will damage the cells with no option of recovery. Please do pay attention to this and make sure that your battery is stored at approx 50-70% charging level (it’s particularly important during autumn and winter as this is the time when we tend not to cycle too often). Please note: If batteries claimed under the warranty and found to have voltage lower then 28V, the warranty may become void due to lack of proper battery care and negligence. How to maximise the range and the lifetime of the battery To put it simply – riding an electric bike is quite similar to driving a car when it comes to using battery, changing gears, accelerating, or braking. In order not to use too much fuel in your car (as it’s becoming more and more expensive!), it’s best to keep the recommended tyre pressure, don’t keep too much heavy luggage in the car boot, don’t accelerate too quickly, and always drive using the most optimal gear for your speed. Same rules apply to riding an electric bike, and bearing them in mind can help you reduce the power consumption of your bike and maximise the range it can achieve. Here are some basic steps that can help you: Always try to give your own pedal assistance. The electric assistance is there to give you, well… the assistance, and not the replacement of the power of your own muscles. Then more you pedal the less power the motor has to provide and the less strain goes on the motor, the battery and the controller. And it gives you some exercise at the same time : ) When cycling uphill try to give your own assistance but also look at the power meter display. Try to avoid reaching the levels of 400-500Watts of power output for longer than 30 seconds – the peak output should only be used in certain moments of your journey, i.e. hill climbing. Again, it’s like with driving a car - we normally drive within 2000 to 3000 RMP and, although most car engines are capable of achieving 5000-6000 RPM, we usually only reach these levels when overtaking - driving on such high levels for longer duration would consume huge amounts of fuel and be very hard on the engine as well. Same applies to e-bikes. Cycling at the top power results in huge battery power consumption as is no good for the motor and the controller system because of the high current level used. When climbing up very sharp hills you may find your cruising speed decreasing to approx 1012km/h, no matter what level of pedal assist we are using. This is caused by the loss of efficiency. 3 Each motor or car engine has its own optimal level of operations when it generates the highest efficiency. For example, if you drive a car at 20mph uphill on the 5th gear with only 1100RPM, no matter how hard you push the accelerator the car won’t speed up because the engine is not working at its optimal level. Pushing too hard on the accelerator will only make the engine increase its power consumption but your driving speed will stay the same. And again, same rule applies to e-bikes. If your cruising speed drops down below certain level, the motor then enters the level of inefficiency meaning that the power consumption is high but the output remains low. And for that reason, if your cruising speed drops below 10mp, use maximum level 3 of the pedal assist and avoid using level 5. Labels on the charger On your battery case you will find a label with all the basic information about the battery care along with safety instructions. Failure to follow the battery guidelines may be dangerous and may invalidate the battery warranty. IMPORTANT: Never open the battery case - the battery case should only be opened by an authorised service centre appointed by Oxygen Bicycles. Unlawful breach of this rule will automatically invalidate the battery warranty. Opening the battery case by unauthorised individuals may cause a serious injury or even death. Oxygen Bicycles are not responsible for any accidents and damages caused by unlawful battery maintenance. Thank you for reading this manual. If there is anything you are not sure about, or have any additional questions regarding the Oxydrive kit, please do contact us by email at [email protected] or call directly on +447738866502 or +442081443350. 4