1
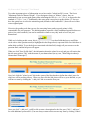
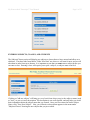
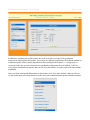
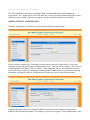
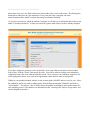
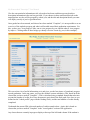
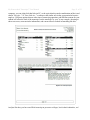
U
S
E
R
M
A
N
U
A
L
Version 0.8
copyright © 2011 by MyHomeSchoolTranscripts.com. All Rights Reserved.
My Homeschool Transcripts User Manual
TM
Page 2 of 23
INTRODUCTION & LOGGING IN
Welcome to My Homeschool Transcripts . This manual is designed to introduce you to the various
components of the application, and to get you up and running in entering your own records and
information that will ultimately be used for generating a transcript.
TM
So...let's get started!
To begin, open your web browser and navigate to http://www.myhomeschooltranscripts.com. Once
there on the website, you will notice the log-in box (labeled "MyHST Login") to the right.
Type in the username and password that were provided to you, and click "Log In". If you have entered
them correctly, you will go to the main screen of the application, separate from the public website.
My Homeschool Transcripts User Manual
TM
Page 3 of 23
The first time you log in, before entering any data, the screen will look like the picture above.
ENTERING SCHOOL AND USER INFORMATION
Click on "school profile" (right under the title) to fill in information about your homeschool.
My Homeschool Transcripts User Manual
TM
Page 4 of 23
Here, you'll type the name of your homeschool as you wish it to appear on the transcript itself. Some
states require you to actually name your homeschool, others do not. If you live in a state that does not
require you to name your school, you may call it whatever you wish here for the purpose of printing it
on the transcript.
The number of reporting periods each year is customizable by you, and basically just determines how
many different grades you'll be entering over the course of a school year for each class. For example,
the standard public school system usually uses four reporting periods each year. You may opt to just
assign one grade for the entire year for each class, or one per month, or whatever you prefer.
Remember, the "my" in "My Homeschool Transcripts" refers to you! This is your homeschool, and so
this application allows you to handle grades, etc. the way you choose to. It's also important to note that
while you may select a certain number of reporting periods, you will have the option--when entering
grades for a particular class--to enter less number of grades for any class and still mark the class
complete. (For example, if you normally assign four grades per year per class and yet you have a class
that only lasts one semester, or half the year, you can give two grades to that class and mark the class
complete. This will be explained further when we get to that part of the application in this manual.)
In this case, I've filled in the information with the name of our homeschool (we started homeschooling
in North Carolina and were required to name our school, so we chose "Blue Ridge Academy" as the
name of our school to reflect the beautiful mountains in which we lived at the time) and some fictitious
address and phone number information. I've selected the standard four reporting periods per year, but
you may select any value in that dropdown that you choose.
My Homeschool Transcripts User Manual
TM
Page 5 of 23
Two other important pieces of information are set here on the "school profile" screen. The first is
"Minimum Grade for Honors Weight". If you designate classes as "honors" classes, they are
traditionally given an extra grade point when calculating the GPA (i.e., A = 5, B = 4, as opposed to the
standard A = 4, B = 3, etc.). Traditionally, this extra point is not given to grades below a C- but you
have the option here to select the minimum grade (defaults to the traditional C-) that will receive that
extra weighted point.
Likewise, the grading scale that you use for converting letter grades to grade points is fully
customizable for your purposes. The default numbers represent a fairly traditional approach (there are
quite a few scales out there), but can be modified in whatever way they need to be to suit your
homeschool.
While we're looking at this screen, this is a good time to point out that fields that have a small blue
circle with a white question mark (as highlighted in the image above) represent fields for which there is
online help available. To see the help text associated with that field, simply roll your mouse over the
question mark, and the help text will appear.
When we click "Save Profile Info", the information about the school is saved, and you will notice that
the title now replaces "My" with the name of your homeschool (in my case, "Blue Ridge Academy's
Homeschool Transcripts").
Next, let's click the "school years" link in the center of the blue header to define the school years for
which we will be tracking classes. When you first click the link, there will be no years defined, so you
will have to start by clicking the "+ add year" link to create the first year.
Once you click "+ add year", you'll be able to enter a description for the first year. Click "+ add year"
for each additional year needed. (You can always return to this screen at any time by clicking "school
My Homeschool Transcripts User Manual
TM
Page 6 of 23
years" so don't feel like you have to enter all of the years at one time, if you don't want.)
In my case, I have used the standard school year designation (2010-2011, etc.), but you can label them
whatever you wish. These labels will simply be useful to you in assigning classes to particular years
(especially if you are entering back data for multiple years). Once you are complete with entering the
years you wish to enter right now, click "Save School Years" to save this information to the database.
Now, let's move on to the "user profile".
Here is where you'll enter your name, title, and email. In my case, I've entered my name and
"Principal" as my title. Again, this is reflective of your homeschool, so use whatever title you need to.
This information will ultimately print on the transcript.
My Homeschool Transcripts User Manual
TM
Page 7 of 23
You can also change your username and password for the application here, if desired, and adjust
settings related to an optional auto-logoff security feature. If "Use auto-logoff" is checked (the default
setting) and you do not click the screen for the number of minutes specified in the adjacent field, you
will be automatically logged off of the application. You can set the number of minutes to whatever
value you would like, or you may uncheck the box and not use the auto-logoff feature at all.
When you have finished making changes to this page, click "Save User Info", and you will notice that
the header bar now displays your name and title (as highlighted in the image below).
For the rest of our data entry, we will be using the menu down the left-hand side of the screen, so let's
familiarize ourselves with that.
Because we don't have much information entered yet, there isn't much showing in the menu. Once we
have data entered, the "Students" section is where we'll be able to update student info, assign a student
to particular classes, record their grades, and view their progress.
My Homeschool Transcripts User Manual
TM
Page 8 of 23
ENTERING SUBJECTS, CLASSES, AND STUDENTS
The Subjects/Classes section will display any subjects or classes that we have entered and allow us to
edit those. The three links found below "Enter New Data" are where we will start for now, and we will
take them in order from top to bottom. It is important to note that you must enter a subject before you
can enter a class. Entering a class will require you to pick a subject, so subjects must exist first!
Clicking on "add new subject" will bring up a very basic form where you give the subject a name (such
as "Arts", as you see) and a description. The description is not at all required, and only helps you recall
basic information about the subject name that you created. Once you have entered at least a Subject
Name, click "Save New Subject". Now, you will notice a drop-down appears in the menu under
"Subjects/Classes" showing the new subject that you just created.
My Homeschool Transcripts User Manual
TM
Page 9 of 23
Continue clicking "add new subject" to add other subjects in the same way until you have the subjects
entered that you plan on using. (You can come back at any time to add more subjects.) As you enter
new subjects, they will show up in the drop-down list in the menu for you to edit them, if necessary.
Once we have our subjects created, we can begin to create classes within those subjects. Click "add
new class" to get started.
My Homeschool Transcripts User Manual
TM
Page 10 of 23
Here, you must give the class a name and choose its appropriate subject. You can also give the class a
brief description. If this is an honors class, check the "Honors Class" box. Likewise, if the class is a
Dual Enrollment class (i.e., taken at a local college), check that box. Both will be identified as such on
the transcript.
My Homeschool Transcripts User Manual
TM
Page 11 of 23
Finally, you can type in comments about the class. For example, you might wish to record what
curriculum you used for this class, or other information that describes the course content. When you
print a transcript, you'll have the option of printing a "Course Description Addendum" which will show
the contents of this text box for each class the student has on their transcript.
Once you have filled in the necessary information for your class, you can click "Save New Class" and
you will see another drop-down appear in the menu to the left with a list of all the classes that you add.
(They are grouped by subject, with the subject name appearing in parentheses after the class name.)
Continue adding whatever classes you need to add. You can always come back to this screen later and
add more classes.
Once classes have been created, you are ready to add your students to the database. To do so, click on
"add new student". You'll see the following screen:
Enter the first and last name of the student in the spaces provided. This is the name that will appear on
the transcript, so you probably don't want to use nicknames or anything other than an official name. In
the example below, I've used my son's name, the one for whom I started developing this application in
the first place!
My Homeschool Transcripts User Manual
TM
Page 12 of 23
In addition to inputting the student's name, this is the area where you specify the graduation
requirements for this particular student. Just as there are different requirements for different students in
a traditional public school (usually dependent on their post-high school plans, i.e., college-prep vs.
vocational tech), here you can customize your graduation requirements for each student. You'll see
every subject listed that you entered, and you can select the number of credits required for that student
to graduate.
Once you finish entering the information for the student, click "Save New Student" and you will now
see the student appear in a drop-down list in the menu, plus additional menu options related to students.
My Homeschool Transcripts User Manual
TM
Page 13 of 23
The "edit student info" link exists for making changes to the student's name and/or graduation
requirements. The "assign classes" link is the next one we will visit for this student, although you may
continue to enter students, if necessary, using the "add new student" link that we used earlier.
ADDING STUDENT ACADEMIC DATA
Clicking "assign classes" will bring up a class selection window for this student.
At first, you may wonder why a class drop-down does not exist on the "assign classes" screen, but
selecting a subject will quickly answer that question for you. Once you select a subject, a list of classes
within that subject will appear. Select a subject, a class within that subject, the school term (so that it
can be reflected correctly on a chronological transcript (this wouldn't matter if you choose a transcript
format that is grouped by subject), and the amount of credits the class is worth for this student.
Assigning the credits at this level allows flexibility with certain classes without having to create
duplicate class title and descriptions. For example, you may have a generic "Physical Education" class
My Homeschool Transcripts User Manual
TM
Page 14 of 23
that at times may serve as a half-credit course and at other times a one-credit course. By allowing this
distinction to take place on a per-student level every time the class is assigned, one class
name/description does double- or triple-duty and gives ultimate flexibility.
As you save each class to which the student is assigned, it will show up in the bottom part of the screen
under "Currently Enrolled in:" so that you can tell at a glance what classes you have already assigned.
If you have assigned a student to a class by mistake, or for some other reason need to remove them
from a class, click the "delete" link next to the class. You will be asked to confirm your intention to
completely remove the class from the student's record. Once you have your student(s) assigned to all
of the appropriate classes, your work in the application is done until it's time to issue grades.
Whatever your grading schedule, when it is time to enter grades, MyHST makes it easy for you. Select
the student for whom you wish to submit grades from the drop-down under "Students" and click on
"record grades". You will see a list of all the classes the student is enrolled in, and a grade selector for
each reporting period. (The number was determined on the "school profile" that we set up earlier, and
can be changed at any time.)
My Homeschool Transcripts User Manual
TM
Page 15 of 23
For each reporting period, and for each class, select the grade from the corresponding drop-down. You
do not have to do all of the grades at one time. Every time you update the grades and click "Submit
Grades", it will save whatever you have entered and display it the next time you come back to this
screen.
In the example above, you can see that I have already filled in the first two reporting periods. Also,
note the "Complete" checkbox to the far right of each class's row of grades. This checkbox can be
checked at any point in the year if the student has already finished the class. For example, if you have
a half-credit class that only meets for one semester, and if you have four reporting periods for the year,
you will only need to assign grades for that class for the first two reporting periods. In this case, simply
My Homeschool Transcripts User Manual
TM
Page 16 of 23
leave the third and fourth reporting periods blank for that class, and check "Complete" when you have
entered the last grade.
A side-note about grades: The application will calculate a final grade for each
class once you check "Complete" and click "Submit Grades". Until you mark the
"Complete" checkbox for a class, that class will continue to show up on this
screen. Once you check "Complete", however, the final grade is calculated based
on the number of grades you entered. For example, in the screenshot above, the
Music Theory I class is marked complete after just two reporting periods. When I
click "Submit Grades", that class's final grade will be calculated using the 2 B+
and A- recorded. Numeric equivalents are assigned to each grade, and the two
are added together, then divided by two. The result is then converted back into a
letter grade which serves as the final grade for the class.
The next time we return to this screen, any classes that we marked as "Complete" will no longer show
up.
As you can see, the Music Theory I class no longer shows up because it is now complete. The
remaining classes, however, remain for me to continue entering grades for the remaining reporting
periods. In order for a class to show up on the transcript and to be calculated into the GPA and to be
marked as completed credits toward graduation, you must check "Complete" and "Submit Grades".
The application never assumes that a class is completed until you tell it that it is completed.
In addition to entering class data and grades, the application also provides the ability to enter test scores
for standardized tests that the student may take (i.e., PSAT, SAT, ACT, etc.). Clicking on the "record
test scores" link brings up the following window:
My Homeschool Transcripts User Manual
TM
Page 17 of 23
Enter the test name or abbreviation (usually an abbreviation such as SAT) in the first field. Click on the
"Test Date" field and a popup calendar will appear. You can either find the date of the test on the
calendar and click it, or you can manually type the date into the field. If you enter the date manually, it
should be entered in mm/dd/yyyy format. The "Test Score(s)" field is just a text field because some
tests have multiple scores that need to be entered, some just have one. Type the score(s) into this field
in the format of your choosing. If you opt to show test scores on the transcript later on, the scores will
display exactly as you type them here.
The "record extracurricular info" link on the menu brings up a screen where you can enter any
extracurricular information you want to keep a record of. For example, this is where you can enter
awards that have been received by the student, community work in which they have participated, other
honors and accomplishments, etc.
My Homeschool Transcripts User Manual
TM
Page 18 of 23
Give the extracurricular information a title, select the school term, and then type any details or
description information in the text box provided. If you choose to show extracurricular info on the
transcript later on, they will be grouped by school year, and the title and description/details you enter
will display exactly as you've typed them here.
Once grades have been entered, and classes have been marked "Complete", it is now possible to see an
overview of the student's progress and what is still needed toward their graduation requirements. For
this, we have two "view progress" links, one to view progress by year, and the other to view progress
by subject. Clicking either of these brings up a handy overview screen (by year, in this example):
This screen has a lot of useful information on it, and gives you the best picture of a student's progress
toward graduation. In the top center, you'll see the student's current cumulative GPA, based on all the
classes that you have marked "Complete". GPA is calculated using a standard formula that takes into
account the number of credits for a class, the numeric equivalent of the final grade for a class (as you
defined on the "school profile" page with the Grading Scale), and the total number of credits already
completed.
Underneath the current GPA is the total number of credits earned to date. Again, this is based on
classes that you have marked "Complete" in the "record grades" section of the application.
Any classes that are currently in progress display at the top of the left-hand column. If the student is
My Homeschool Transcripts User Manual
TM
Page 19 of 23
currently enrolled in classes and those classes have not been marked "complete", they will show up
here with a grade based on any grades that you have entered up until this point. (At this point, you
have the option, once again, of removing the class from the student's record by clicking "delete" next to
the class which you wish to remove.)
The classes that have been completed are detailed below the current classes (if any). In this example,
they are grouped by subject within each year. This is the only place where the "view progress by
subject" screen is different. On that screen, the courses are simply grouped by subject, regardless of the
year taken. Here, they are grouped by year, and within that year, they are grouped by subject. The title
of each class is followed by the number of credits earned for that class and the final grade. As
explained earlier, this final grade is calculated by the system based on the number of grades you
entered for the class and the actual value of those grades. If a class has mistakenly been marked
"complete", or for some reason, you need to go back and revise the grades given, you must first click
"mark incomplete" which will move the class back to the "Current Classes" section. At this point, the
class will once again show up in the "record grades" window where you can alter the grades or do
whatever you need to do to it before checking "complete" again.
The right-hand column contains a visual representation of the student's progress toward graduation.
The number of credits that you have selected as required for each course are represented as shaded
circles, one for each credit. Originally, the circles are gray, showing that they are required, but not
completed. As a student completes credits, the circles turn red for each credit completed. Once the
student completes all the necessary credits for that subject, the circles turn green, showing that the
particular subject requirements have been met.
For example, in the example shown above, you'll see that my son has completed all of the necessary
requirements for History. Having completed two out of two required credits, the History credits now
show as green instead of red. Note, also, that half-credits, such as the one indicated in Arts in my
example, show as half-circles.
Finally, underneath the visual representation of the credits completed, you'll see the number of credits
that still are needed prior to graduation, as well as the number currently in progress. All of the
information on this screen is designed to give you a snapshot, birds-eye view of the progress this
student has made and is making in his/her high school classes and the progress toward fulfilling the
requirements for graduation.
GENERATING TRANSCRIPTS
And since the program is called My Homeschool Transcripts, we now come to the point where you
can view and print a student's transcript! Near the top of the "view progress" screens is a link for
"Generate PDF Transcript". Clicking that link brings up a box where you have several options from
which to choose for your transcript printing.
You can select to print by year or by subject, include test scores (defaults to being included), include
extracurricular activities (defaults to being included), include current classes (defaults to not being
included...this would display classes that are not marked "complete"--helpful when you need a
transcript that shows the current state of the student's progress, i.e., when applying to colleges in the
fall of a student's senior year), and whether or not to print out a "Course Description Addendum" along
with the transcript.
My Homeschool Transcripts User Manual
TM
Page 20 of 23
Selecting the appropriate options and clicking "Generate Transcript for..." will begin the process of
generating a PDF file of the transcript. You'll see a message asking you to wait while it's being
generated. Once generation is complete, and the file is available (usually only takes a few seconds),
you'll be given a link such as the one shown below:
Depending on the functionality and configuration of your web browser, clicking the link may result in
the PDF being displayed in a new tab, a popup window, or in an external application such as Adobe
Acrobat Reader. If you have trouble displaying it this way or wish to save the PDF file to your
My Homeschool Transcripts User Manual
TM
Page 21 of 23
computer, you can right-click that link (on PC, or the equivalent keystroke combination on Mac) and
choose "Save As..." or "Save Link As..." or whatever the similar text is that your particular browser
employs. Different options chosen at the time of transcript generation, and different content for your
student will affect the look of the transcript, but the transcript "by year" in my example, choosing to
show test scores, extracurricular information, and current classes resulted in something like this:
And just like that, you have an official transcript to present to colleges, local school authorities, etc.!
My Homeschool Transcripts User Manual
TM
Page 22 of 23
SUPPORT REQUESTS, BUG REPORTS, AND FEATURE REQUESTS
Before we close, there is one final area of the application that we have not shown you. That is the inline
support availability. In the upper-righthand corner, next to the "logout" link, is a link for "support".
Clicking this link brings up a window with three tabs: Support Request, Bug Report, and Feature
Request. While the "Support Request" and "Feature Request" tabs simply have a text box in which you
can type your question or request, the "Bug Report" screen is a bit more involved.
If something goes wrong in the program, or doesn't behave the way you think it is meant to, you can fill
out a bug report without leaving the program or where you were in your work at all. Fill out the form
with as much information as possible to help us duplicate and repair the code that might be in error.
My Homeschool Transcripts User Manual
Page 23 of 23
TM
When you submit the form (any of the three forms on this screen), an email will be sent to the MyHST
team informing them of your request or report.
Additionally, you can email the team directly at [email protected] at any time.
Our turnaround response time is usually quite fast, and when you report bugs, we try to fix them as
soon as possible.
CONCLUSION
Thank you for choosing My Homeschool Transcripts . We hope that you are quite successful in
turning My Homeschool Transcripts into Your Homeschool Transcripts!
TM
TM