1
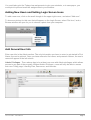
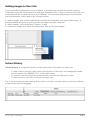
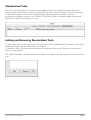
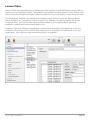
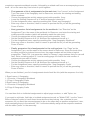
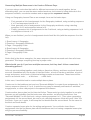
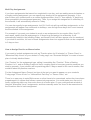
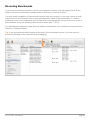
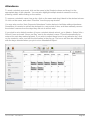
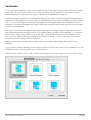
OLLY for Mac - User Manual
OLLY for Mac - User Manual
Page 1
Tips for Using the OLLY App
Saving: OLLY automatically saves your data as it is created. However, it is a good practice to
press <return> or <tab> after entering information in a text field to let OLLY know that you are
finished editing.
Making Backups: Don't lose your data! If something should ever happen to your hard drive, all of
your homeschooling records could be lost. We STRONGLY recommend making frequent backups
to at least one other external hard drive or "Dropbox." Go to "File" in the OLLY toolbar and select
"Backup to Location."
Restore from Backup: If you need to reinstall OLLY after a hard drive crash or other problem, go
to "File" in the OLLY toolbar and select "Revert to Backup." Then choose the appropriate OLLY
database wherever you have your backups stored.
Undo: Made a mistake? Don't like how something turned out? Use Command-Z or "Undo" from
the OLLY > Edit toolbar to undo your last command.
Syncing: If you have OLLY installed on more than one Mac computer or iOS device in your
household, you will want to sync the data between them. OLLY is designed to sync with a very
useful service called “Dropbox.” It is a free and easy way to store copies of important files, as well
as share files quickly between computers (if you choose to). Even if you don’t need to sync, it is a
good thing to have a backup copy of your OLLY data stored here.
To get started, first visit www.dropbox.com to set up a free account. If you already have Dropbox,
you can skip this step. While you are on their website, you might want to look at some of their
“Getting Started” material to see everything you can do with the service.
Once you have a Dropbox account, open OLLY and click on “File” in the top tool bar. Select “Sync
with Dropbox.” A pop-up will appear asking you to link your OLLY account with Dropbox. Just
follow the on-screen instructions.
When finished, you can upload your OLLY data files to Dropbox, where they will be stored, ready
to download to any of your computers. You will need to repeat this initial process for your other
computers and devices.
Once OLLY is linked to Dropbox on all of your personal computers, you can download the latest
data file from your master computer.
IMPORTANT: Because this is not “real time” syncing like iCloud, you will have to keep track of
which computer has the latest updates and upload them to Dropbox before making changes to
another computer. If you regularly use different computers, make a habit of syncing to Dropbox
after every OLLY Session. If you forget, then make changes to another computer, you will then
have to choose which computer to sync from – which will then override the changes on the other.
For this reason, we recommend only making changes on one computer at a time, then syncing.
You may view on multiple computers at once with no problems.
Using OLLY with kids: Every student has their own log-in name and Today page, which will
show his or her personal assignments for the day or week. OLLY can be used on all the Mac
computers and iOS devices in your own household, so if your kids have access to their own
computer, they can see assignments and mark complete, then sync with Dropbox.
OLLY for Mac - User Manual
Page 2
You could also print the Today view assignments to give your students, or to save paper, you
could print to.pdf and email the assignments to your students.
Adding New Users and Setting Login Screen Icons
To add a new user, click on the small triangle in the upper right corner, and select "Add user."
To choose a picture for this user that will appear on the Login Screen, select "Set Icon," and a
Browse window will open for you to choose a photo from your computer.
Add General User Info
Enter user info in the Admin section. The only information you have to enter to get started is First
Name, the rest is optional. Once you have entered a first name, and pressed <return>, the user's
name will appear in the left column.
Admin Privileges - There always has to be at least one user with Admin privileges, which allows
access to any part of the program. Without Admin Privileges, a user will only be able to access
their own Today page, Learning Plan, Resources, and Journals.
OLLY for Mac - User Manual
Page 3
Adding Images to User Info
If you would like to add photos of your students or activities that can later be used in creating
Yearbooks, there are several places to add them throughout OLLY. Here in General User Info, you
could add portraits or candid shots of your students. You could also add photos in the Activities
and Achievements section and in the Journals section.
To add an image, click on the small triangle beneath the image box, and select "Add Image." A
browser window will open for you to choose an image from your computer.
To add a caption, click on the word "Caption" to edit.
To remove an image, first select the image, then click on "Remove Image."
School History
School History is an optional section, to enter past school information for each user.
• To add a school, use the "Add" button at the bottom of the page, and change the sample
text as needed. Use MM/DD/YYYY for the date format.
• To remove a school, select the undesired entry and click the "Remove" button.
• To edit any entry, just click on the text and type over.
Tip: If you are having trouble viewing all the text in a column, you can resize a column by clicking
on the vertical line and dragging.
OLLY for Mac - User Manual
Page 4
Activities and Achievements
This is the place to enter sports, special classes, hobbies, and other activities.
To Add an Achievement, click on the small triangle on the right side of the Activity bar and select
"Add Achievement." Type in a name for the activity and press <return>. Adjust the start and end
dates as necessary. If the activity is ongoing, you can adjust the end date to a projected date in
the future, or simply wait to edit that field until it becomes relevant. All the other fields are optional.
To add notes about this achievement, just click in the "Notes" text box and start typing.
Once you have named an activity or achievement, it will appear on the list in the left hand column.
To remove an activity or achievement, first select the entry from the list, then click on the triangle
and select "Remove Achievement."
Adding images to Activities and Achievements
Images you add here can be included in the "Activities and Achievements" Reports for your
students, or for any Yearbooks you create.
To add an image, click on the small triangle beneath the image box, and select "Add Image." A
browser window will open for you to choose an image from your computer.
To add a caption, click on the word "Caption" to edit.
To remove an image, first select the image, then click on "Remove Image."
OLLY for Mac - User Manual
Page 5
Standardized Tests
This is an optional section to record any standardized tests your student has taken. Because
different tests break down scores in so many different ways, use the "Notes" line to record scores
for individual sections of each test, along with any other pertinent information, such as
percentages, rankings, location, etc. Use the "Total Score" field if the test provides a numerical
total score, otherwise just leave it at zero.
Adding and Removing Standardized Tests
To add a test, click on the "Add" button at the bottom of the Standardized Test window. Then click
inside each field to edit the information as needed.
To remove a test, first select the test from the list and then click on the "Remove" button at the
bottom of the window.
TIP: When entering or editing information in fields, use <tab> to quickly move from one field to the
next.
OLLY for Mac - User Manual
Page 6
School - General Info, Activities and Subjects
This is an optional section for adding information about your school. Later, you can choose to
include your school name or other info in printed reports.
To enter the name of your school, double-click on the text "New School" to edit, and then press
<return>. Then enter any other information you wish, using <tab> to move quickly between fields.
"Activities," as listed on this page, are used in OLLY to describe what type of work students will
do in the assignments you create. Some standard activities are provided, but you can add to or
delete from this list by using the "+" and "-" buttons to the right of the Activities box.
"Subjects," as listed on this page, are used in OLLY to help broadly categorize the courses you
will create. This is primarily useful when printing out reports that will be turned in to various school
officials. You can add or delete subjects by using "+" or "-" buttons to the right of the Subjects box.
OLLY for Mac - User Manual
Page 7
School Years
The left hand column of the School Years window shows all of the school years you have ever
created. The ACTIVE school year appears in green (and in the top right corner throughout OLLY).
Each of the years listed serves as an archive of all the Learning Plans, completed assignments
and grades for each user.
**DO NOT DELETE any school year if you wish to keep any records from it.
To add a new school year, use the "+" button at the bottom of the window, below the reference
calendar (see the orange box below).
• Adjust the start and end dates, then choose your school terms. The standard terms of
semesters, trimesters, and quarters have been provided, but you may also create custom
terms by selecting "custom" and using the "+" and "-" to adjust the number of terms. OLLY
will automatically create start and end dates for your terms, based on the length of your
school year, but you may adjust those dates however you wish. Just double click on a date
to edit.
•
• Specify which days are your usual school days. This will change the default view of which
days are shown on the Today page, and also the default settings for the Assignment
Calendar.
•
• Enter your anticipated holidays and vacations by using the "Add" and "Remove" buttons in
the bottom right corner of the Holidays/Vacations box. Click on the text to edit, and use
MM/DD/YYYY for your date format. It is a good idea to set your holidays and vacations
before assigning lesson plans to the year, so that you will not have to bump or change
assignments later.
•
• VERY IMPORTANT - Add students to your school year by using the "Add" button at the
bottom of the Students box. This is also the place to specify which grade each student will
be in, and the usual number of hours per school day they will be engaging in learning work.
If users are not enrolled as students in the school year, they will not be able to create a
Learning Plan for the year.
To edit a previously created school year, select the appropriate year from the "Year" column, and
edit as necessary. If you also plan to edit Learning Plans, grades, assessments, benchmarks,
attendance, or other information specific to this year, click the "Set as Active" button in the bottom
right corner of the window.
If you really need to delete a school year from the list, use the "-" at the bottom of the "Year"
column. IMPORTANT: Deleting a school year will remove all the records for that year, so be very
careful before deleting an entry.
OLLY for Mac - User Manual
Page 8
OLLY for Mac - User Manual
Page 9
Grading Scales
If you choose to use numerical grades, this is the place to set up different grading scales. You can
specify which grading scale to use for each course inside the "Courses" page. If you prefer to use
benchmarks and/or written assessments, there will also be a place to enter those evaluations in
the Learning Section. Whichever grading scales you choose to use, it's important to be consistent,
especially during the high school years when you will be accumulating records/grades for the
student's transcript.
To create a new grading scale, click on the triangle in the upper right corner and select "Add."
Double-click on the words "New Grading Scale" to name your scale, then press <return>.
You may set a minimum passing %, but this is optional.
To add a new grade level, click on "Add item" and double click in the "Letter Grade" field to start
entering. The Letter Grade can be any word or letter combination you choose. The Minimum
Percent and Grade Point must be numerical values.
To edit any information, double-click in the field to type over.
To remove a grade level, select the level and click "Remove Item."
To remove a grading scale, first select which scale to remove from the list, then click on the
small triangle in ther upper right corner and select "Remove."
OLLY for Mac - User Manual
Page 10
Resources
Resources are the books, software, websites, movies, or other items (such as games,
manipulatives, musical instruments, etc.) you will use for your coursework. It's usually easier to
add them here first, before starting lesson planning.
To add a new book to your resource library, click on the little triangle in the upper right corner
(see orange circle below), and choose either "Add" to add manually, or "Search for New" to use
Google Books to search for the correct title.
To add manually: Type over the words "New Resource" in the Title box to enter the correct title,
then press <return>. Your new resource will then appear in the left hand column. The other fields,
such as author and publisher, are all optional. Click inside each field to enter any desired
information.
TIP: Use <tab> to move quickly between fields.
To manually add a photo of your resource, click and drag a photo from your desktop or photo
library to the photo box.
To "Search for New," simply type in the title or author in the search bar and press <return>. Then
choose which title you wish to use from the search results, and click "Add." All available fields will
automatically be filled in.
If you don't see the book you are looking for, you will need to add it manually.
To add software, website or movie titles to your resource library, the process is exactly the
same as manually adding books - there is no "Search for New" option.
To add an "Other" resource, first click on the triangle and select "Add." Type over the name
"New Resource" in the Name box and press <return>. If you would like to create a category for the
type of "Other Resource" this is, use the "+" to add a new category, such as "Game."
Managing Your Resource Library:
Over time, your lists of resources might grow long and cumbersome, so it helps to group certain
resources into categories. You can group by subject, grade level, curriculum, archive, or any other
category that works for you.
To create a category, just click on the name of a title and drag it over the top of another title. The
two will be grouped together under a default "New Category." Click on the words "New Category"
to rename it anything you wish.
To add titles to an existing category, just click and drag. Use the little triangle next to the category
name to minimize or expand the category contents.
You can also create subcategories inside of categories, using the same method.
To remove a title from a category, just click and drag it outside the category list..
If you remove all the titles from a category, the category will disappear.
OLLY for Mac - User Manual
Page 11
Resource Lists
Resource lists are lists of books or other resources that can be created for each student; for
assigned or pleasure reading; for wish lists of items to borrow or buy; or for any other purpose.
To add a new Resource List, click on the "Add Resource List" button at the left bottom corner of
the window. Double click on the words "New Resource List" in the column to change the name.
To add an item to a list, make sure that the proper Resource List is highlighted, then click on the
the small triangle in the upper right corner (see below) and select "Add ______" to enter
information about any new item. This information will also be added to your mastery library list.
You may also go directly to your Book, Software, Website, Movie or Other Library to drag titles to
any Resource List in the left column.
Resources and Resource Lists can be printed in the Reports Section of OLLY.
OLLY for Mac - User Manual
Page 12
Today Page
The Today view is the first page a user sees after logging in to OLLY. This shows all of the
assignments for the Day or Week, for any or all users. This is also where Routines are created
and viewed. Note that even the teacher/admin user has a Today view. You can use OLLY for
more than just student planning - you can also use it for your own learning goals, habit reminders,
routines, and planning purposes.
To switch the user view, select from the dropdown box at the bottom of the window. Admin users
can also select "All" from the dropdown to see assignments for everybody at once.
To switch from Weekly to Daily view, use the the toggle at the top of the window. Move to a
different day or week by using the "Previous" and "Next" buttons at the bottom corners. Use the
vertical scroll bar to see all of the assignments listed.
To print the daily or weekly assignments, use the "Print" button in the bottom left corner. To avoid
using color ink while printing, just uncheck the "Show Colors" box.
The "Reminders" box at the bottom of the page is a simple text box that is not connected to any
assignment, just the user. It is a good place to post quotes, notes, chore reminders or any other
information that doesn't fit elsewhere. The text in this box is only saved "As Is," so there will be no
record of past reminders, only the text that is currently in that space for each user. To edit, simply
click in the box and start typing.
OLLY for Mac - User Manual
Page 13
Preferences for Today View
To customize what kind of assignment information is shown on the Today page, go to OLLY >
Preferences in the tool bar.
"School Days" are set by you in the Admin > School Years section, but you can choose to show
non-school days here by unchecking the "Show Only School Days" boxes.
This is also the place to customize font and font size for the Today view.
OLLY for Mac - User Manual
Page 14
Routines
Routines can be created for different days of the week, individual users, household tasks, or any
sequential list that bears repeating.
To add a new routine, with or without times, click on the small triangle in the upper right corner
and select the appropriate type of routine.
• Type over the words "New Routine" to name it.
• In a Routine with Times, double-click on the appropriate time slots to add an item.
• In a Routine without Times, click on the field with the "+" to add a new item, then use <tab>
to continue adding new items to each line.
• When you are done editing, click on the triangle again to switch from edit to "View Mode."
Use the dropdown menu in the routine title bar to switch between different routines.
To delete a routine, first select the appropriate routine from the dropdown menu, then click on the
triangle and select "Delete Routine."
OLLY for Mac - User Manual
Page 15
Learning Section
The Learning Section is really the backbone of OLLY. This is where most of the planning and
recordkeeping happens. It is divided into three major sections: Planning, Recording, and Journals.
Planning
If you are just getting started planning for the school year ahead, it is sometimes easier to
brainstorm and rough out an outline on paper, particularly if you are putting together an eclectic
curriculum from scratch.
When you're ready to start inputing your plans into OLLY, use the following order:
1. Courses describe what will be studied.
2. Lesson Plans describe how the material will be covered.
3. Learning Plans show who will be studying what.
4. Assignment Calendar shows when the material will be studied.
OLLY for Mac - User Manual
Page 16
Courses
Planning in OLLY starts with Courses. These are the topics that your student will be studying over
the school year, and these are the names that will appear on Grade Reports and Transcripts. The
substance of each course will be made up of specific lesson plans that you will create later, but
this is the place to define what your student will be learning and how their learning will be
evaluated.
On this page, you will see all the courses you have ever created in the left column. If the list gets
too long, you can create categories by subject, grade level, curriculum, archive, or any other way
that works for you. Create a category by dragging one course on top of another and renaming the
"New Category" to anything you like. You can also create subcategories inside of categories.
To create a new course, click on the small triangle in the upper right corner and select "Add."
Double-click inside the "Name" field to type in the name of your course, and press <return>.
OLLY for Mac - User Manual
Page 17
Lesson Plans
Lesson Plans are essentially lists of assignments that describe in detail HOW the material will be
learned for your different courses. There can be any number of lesson plans for each course, and
they can be reused again and again for future students, so you only have to create each one once.
For the greatest flexibility, we recommend creating a separate lesson plan for each resource
(book, software, etc.) you plan to use in a course. For example, in a course called "4th Grade
Language Arts," you could create separate lesson plans for your spelling book, grammar
workbook, reading lists, poetry memorization, etc.
However, if you are using a pre-packaged curriculum that specifies a very particular order and
sequence of resources to be used for each daily lesson, it is possible to combine all of it in one
lesson plan - just a bit more time consuming to put it all together.
OLLY for Mac - User Manual
Page 18
Creating a New Lesson Plan
• Click on the triangle in the upper right corner and select "Add."
• Type over the words "New Lesson Plan" to name it. It's best to be specific, perhaps using
the name of the primary curriculum resource used, or specifying a grade level. This way, if
you create a poetry lesson plan for your 3rd grader, it won't later be confused with a poetry
lesson plan you wish to make for an 11th grader, using entirely different books.
• Entering a description for your lesson plan is optional.
The bulk of the Lesson Plans page is devoted to assignments. There are three different ways to
create assignments:
1. Add Single: A way to create assignments one at a time, one after another. This is useful if
you have a very eclectic unit study planned or want to "jump around" within a resource.
This is also a good option for recording learning as it happens, rather than planning ahead.
2. Insert Before Selected: allows you to create one assignment at a time, inserting it in your
assignment list wherever it belongs. This is especially useful for inserting tests or
supplemental activities that don't follow a regular pattern.
3. Generate Multiple: The easiest way to generate a whole list of assignments that will follow
a consistent pattern.
We'll cover each of these methods in turn, but first, here are definitions of the other terms used
with assignments:
Sequence Numbers: Refer to the order assignments are completed. These are primarily used by
OLLY for scheduling assignments in the calendar. TIP: You can use decimal numbers to tell OLLY
that certain assignments must be assigned to the same day. Any sequence numbers with the
same prefix (i.e. 1.1, 1.2, 1.3, 1.4) will automatically be assigned to the same day.
Starting Sequence Number: This is used when generating multiple assignments. If you have
already created some assignments, you may want the new assignments to start *after* the
previously created assignments. So, if your last assignment was sequence #21, you could set a
starting sequence number of 22 for the new batch.
Sequence Interval: This is also used when generating multiple assignments. OLLY can only
generate assignments for one resource at a time, so if you plan to mesh several different
resources into one lesson plan, you will want to leave spaces in the sequence to add those other
resources. For example, if you will be meshing 3 separate resources together, set a sequence
interval of at least 3 (it's OK to have extra space).
Assignment Type: This is only used when generating multiple assignments. OLLY needs to know
what type of assignment you are creating, in order to create a logical progression. The options are:
Chapter, Chapter Subsection, Lesson, Lesson Subsection, Exercise, Page, Week - Day, Custom,
and Custom Subsections. The term "subsection" is useful when the curriculum you are using has
chapters or lessons that are further broken down into smaller parts, labelled with numbers or
letters.
Segment: This refers to the part of the resource used in the assignment, which depends on what
type of assignment it is. It could be page numbers, a lesson or exercise number, a chapter number
or some other custom type of segment. If you are entering assignments one at a time, you can call
this whatever you like.
OLLY for Mac - User Manual
Page 19
Points Possible: Enter points possible if you wish to grade assignments. Without grades, you
may still use written assessments or progress reports, which show completion of benchmarks. But
if your student is high school level and needs to have a traditional transcript for college
applications, numerical grades are necessary to compute Grade Point Average (GPA).
Prospective colleges may or may not require traditional looking transcripts, but it is something to
consider. OLLY does not have a built-in way to weight different types of assignments (regular,
quizzes, tests, etc.), but there is a spreadsheet calculator available to download from our website
that will help you determine Points Possible to enter for each type of assignment:
http://www.ollyhomeschool.com/record-keeping/free-points-possible-calculator-for-weighting/
Length in Days: If you know that an assignment should be completed over a certain period of
days (more than one), enter the number here. Then, when you assign this to the calendar, the
assignment will automatically span the designated number of days.
Topic: This is an optional field, but it could help you remember what is covered in each
assignment and/or better coordinate unit studies across subjects.
Directions: This is an optional field, to use if you have particular directions for your student on
how an assignment should be completed. This is also a good place to put links to webpages (be
sure to use the full URL with http:// prefix).
Notes: Another optional field, which you might use for personal planning notes, supplies, or other
information that your student wouldn't necessarily need to see. You will have the option to hide
Notes or Directions from your student's view of assignments.
Resource: This field specifies which resource (book, software, movie, etc.) is used for the
particular assignment. Resources need to be entered in the Resource Library first.
Activity: This explains what type of work will be done during the assignment, such as "Workbook,"
"Read Aloud," "Memorization," etc. The list of available activities can be edited in Admin > School
Info > Activities & Subjects.
Assignment Name Format: When generating multiple assignments, you may customize the
name of your assignment to include the most important information for *you*, using any
combination of text, spaces, and "tags" that OLLY uses to insert fields. Tags are preceded by a
semicolon. Here's a key showing the available tags, and the data fields they represent:
;resource = Name of resource
;seq = Sequence number
;seg = Segment (e.g. Lesson 1)
;act = Name of activity
Here is an example of how to enter a name format: "Complete ;seg of ;resource" would appear as
"Complete Lesson 4B of Teaching Textbooks." If you wanted to shorten the assignment name,
and abbreviate the name of a commonly used resource, just insert your own text, for example:
";seg of TT" would appear "Lesson 4B of TT."
You don't have to use any field tags in the name. For example, if you want to make a list of
identical assignments called "Practice piano 30 minutes" or "Soccer Practice" or "Homeschool
Park Day," you could just write any text in the name and it will be repeated for all the generated
assignments.
OLLY for Mac - User Manual
Page 20
This system is only necessary for "Generate Multiple," because when you add assignments one at
a time, you can already enter any name you wish for the assignment.
How to enter assignments using "Add Single:"
• Click on the little triangle in the Assignments Box, and select "Add Single."
• A new assignment will be added to the end of any assignments already listed.
• In the detail view, type over the words "New Assignment" to name it, then add any other
information you wish by clicking in a field to edit. For more information on each of these
fields, please see the definitions above.
How to enter assignments using "Insert Before Selected:"
• First , select (highlight) from your assignment list the name of the assignment you wish to
come after your new assignment.
• Then click on the triangle and choose "Insert Before Selected." OLLY will create a new
blank assignment before the one you had selected. All the subsequent assignments will be
bumped down the list.
• In the detail view, type over the words "New Assignment" to name it, then add any other
information you wish by clicking in a field to edit. For more information on each of these
fields, please see the definitions above.
How to enter assignments using "Generate Multiple:"
Using "Generate Multiple" is by far the most common and efficient way to enter assignments, but it
requires a little planning ahead if you want to create complex lesson plans. If you are unfamiliar
with the terms used when creating assignments, please review that section (above) before diving
in. This first example will explain how to generate a simple, straight-forward list of assignments.
Then, in the next section, we'll provide more complicated examples.
• Click on the Assignment triangle and select "Generate Multiple." The OLLY Assignment
Generator box will appear. Just follow the steps on each screen and press "Next" to move
on.
• The first screen asks for Assignment Type. Pick the one that most closely matches the
curriculum you are using. For this example, we'll use "Chapter."
• The next screen asks for which Resource you will be using. Tap on that field and choose
from the dropdown list. If your resource isn't listed, you can use the "+" button to add it.
Enter the First Chapter # and the Final Chapter # you will be covering.
• On the next screen, choose an Activity from the dropdown list if you wish. The default
fields for all the other information on this screen will be "1" but you can edit these as
necessary.
• On the next screen, set your Assignment Name Format as described in the definitions
section above.
• On the next screen, you may enter any "Notes" or "Directions" as desired.
• The last screen will show you a preview of what the assignments will look like. If you want
to change the name format, or any other information, tap the "Back" button to go back and
fix it. If you would like to add "Topic" or adjust the points possible for each assignment, this
is a good place to do that. When you are satisfied, press "Finish."
• A list of your new assignments will appear in the Assignment List box. If you don't like how
it looks, use "Undo" to try it again. If you wish to edit points possible, or topic, or any other
field for a specific assignment, just select it to edit in the detailed view box.
OLLY for Mac - User Manual
Page 21
Advanced Lesson Planning
"Generate Multiple" with Subsections
If your curriculum has chapters or lessons that are broken up into smaller segments, use the
"subsections" option.
• Inside the Assignment Generator box, choose the appropriate subsection type from the
dropdown list. For this example, we'll use "Lesson Subsection." Then, choose how the
subsections should appear: with Numbers (4-1, 4-2, 4-3), Capitalized letters (4A, 4B, 4C)
or Lowercase letters (4a, 4b, 4c). For this example, we'll use Capitalized letters.
• On the next screen, choose which resource you will be using. Let's say it is the Math-USee Beta workbook. Enter the starting Lesson # as 1 (or higher if you plan to skip ahead)
and the final Lesson #, which would be 30 in this case. On the same screen, enter the
*average* number of subsections in each Lesson. You will have an opportunity to adjust
this for individual Lessons later. We'll use "6."
• On the next screen, choose an activity, and set the Points Possible. In reality, each
assignment may have a different number of problems, which would mean a different
number of "Points Possible," but pick the number you are likely to use the most often. The
rest can be changed later. Edit any other information on this screen as necessary.
• On the next screen, edit the number of subsections per Lesson if needed, and add topics
such as "Inequalities" or "Skip Counting by 2," for each section if you wish.
• Next, choose an assignment name format. We'll use ";seg MUS Beta" (short for Math-USee Beta).
• Next, enter any directions or notes that will be repeated on all of the assignments, or leave
blank.
• The final screen gives you a Preview of all the assignments that will be generated. If you
want to change something, use the "Back" button. Otherwise, click "Finish."
The final list of assignments will look something like this:
Lesson 1A MUS Beta
Lesson 1B MUS Beta
Lesson 1C MUS Beta
Lesson 1D MUS Beta
Lesson 1E MUS Beta
Lesson 2A MUS Beta
etc.
Now you can click on individual assignments to adjust the "Points Possible" or other info such as
topics.
If you want to add tests to this lesson plan, use the "Insert Before Selected" method to individually
add tests in all the right places.
Generating Multiple Resources to Be Used on the Same Day
If you are using a curriculum that calls for different resources to be used together, on the same
day, then it is fairly easy to blend these together using "Generate Multiple" for each resource in
turn, and using decimals in the sequence number. For example, let's say we want to create a
Geography Lesson Plan that will have our students read a short lesson from a main text, then
OLLY for Mac - User Manual
Page 22
complete a separate workbook exercise, followed by a related craft from an accompanying source
book - all on the same day. Here's how to put it together:
• First generate a list of assignments for the main text. Use "Lesson" as the Assignment
Type, the name of the Geography text for Resource, and enter the starting and ending
lesson numbers.
• Choose the appropriate activity category and points possible, if any.
• Leave the Starting Sequence # at 1, and the sequence interval at 1.
• For the Assignment name, specify something like: "Read ;seg Geography"
• Enter any notes or directions, then hit <next> to preview the list you will be generating.
Press <Finish>.
• Next, generate a list of assignments for the workbook. Use "Exercise" as the
Assignment Type, the name of the workbook for Resource, and enter the starting and
ending exercise numbers (which will probably match the main text).
• Choose the appropriate activity category and points possible, if any.
• Set the Starting Sequence # at 1.1 and leave the sequence interval at 1.
• For the Assignment name, specify something like: ";seg Geography Workbook"
• Enter any notes or directions, then hit <next> to preview the list you will be generating.
Press <Finish>.
• Finally, generate a list of assignments for the craft projects. Use "Page" as the
Assignment Type, and the name of the source book for Resource. Since this book offers
so many projects to pick and choose from, the page numbers will not follow a logical
progression. That's OK - just generate a batch of "dummy" page numbers that you can edit
later. Enter a starting page # of 1 and an ending page # to match the total number of
assignments you want to create.
• Choose the appropriate activity category and points possible, if any.
• Set the Starting Sequence # at 1.2 and leave the sequence interval at 1.
• For the Assignment name, specify something like: ";seg Geography Crafts"
• Enter any notes or directions, then hit <next> to preview the list you will be generating.
Press <Finish>.
When you are finished, your list of assignments should look like this (with the sequence # on left):
1 Read Lesson 1 Geography
1.1 Exercise 1 Geography Workbook
1.2 Page 1 Geography Crafts
2 Read Lesson 2 Geography
2.1 Exercise 2 Geography Workbook
2.2 Page 2 Geography Crafts
etc.
You can then click on individual assignments to adjust page numbers, or add Topics, etc.
If you want to add tests, field trips or isolated assignments such as "Watch DVD," use the "Insert
Before Selected" option to insert those items wherever they belong. Use a decimal in your
sequence # if you want the new assignment to be on the same day as another assignment. Later,
when assigning these in the calendar, OLLY will automatically assign all the sequence numbers
with the same *prefix* to the same day.
OLLY for Mac - User Manual
Page 23
Generating Multiple Resources to be Used on Different Days
If you are using a curriculum that calls for different resources to be used together, but on
alternating days, you can use the same method as above, but instead of using decimals in the
sequence numbers, use whole numbers and an appropriate sequence interval.
Using our Geography Lesson Plan as an example, here are the basic steps:
• First generate a list of assignments for the Geography textbook, using a starting sequence
# of 1 and sequence interval of 3.
• Next, generate a list of assignments for the Geography workbook, using a starting
sequence # of 2 and sequence interval of 3.
• Finally, generate a list of assignments for the Craft book, using a starting sequence # of 3
and sequence interval of 3.
When you are finished, your list of assignments should look like this (with the sequence # on the
left):
1 Read Lesson 1 Geography
2 Exercise 1 Geography Workbook
3 Page 1 Geography Crafts
4 Read Lesson 2 Geography
5 Exercise 2 Geography Workbook
6 Page 2 Geography Crafts
etc.
Notice that in the above examples, the same sequence interval was used each time a list was
generated. This keeps everything lined up in proper order.
What should you do if you have multiple resources, but they don't follow a consistent
alternating pattern?
Let's say you are putting together a unit study on American History, and have one book that will
serve as a backbone text, four books of historical fiction, a book of hands-on activities, a book of
songs and poems, and a book of historical writing prompts and exercises. These items will be
used in an eclectic order, . . . a little here . . . a little there.
In this case, it would be best to create multiple lesson plans.
Create one for the backbone text and use "Generate Multiple" to create those assignments. If you
leave a sequence interval of 3 or 4, it would be very easy to manually add hands-on activities,
songs/poems, or other odd projects in the spaces left between.
Create another lesson plan just for historical fiction. These would go nicely together in one plan
because you will probably read the books one after another, not all at the same time. Use
"Generate Multiple" for the first book, using a starting sequence # of 1. Then, when generating
assignments for the second book, be sure to set a starting sequence # that will come *after* the
first book. If you use 1 again, it will bump the first book below the second book. Do the same for
the third and fourth books.
Create a separate lesson plan for the writing assignments. You could also insert these
assignments into the first lesson plan with the backbone text, but having a separate lesson plan
will give you more flexibility.
OLLY for Mac - User Manual
Page 24
Multi-Day Assignments
If you have assignments that cannot be completed in one day, such as reading several chapters or
a lengthy writing assignment, you can specify any duration in the assignment generator. If you
plan to have your student work on a certain assignment Mon. thru Fri., then specify "5" days long
when prompted in the assignment generator. Then, if you assign this assignment to a Monday on
the calendar, it will automatically extend to Friday.
You can also specify longer assignments, but OLLY will not split up multi-day assignments, so the
assignments will appear over weekends or holidays, even though those days don't count towards
the time allotted for the assignment.
For example, if you want your student to work on an assignment for two weeks, Mon. thru Fri.
each week, specify that this assignment is 10 days long and assign it to a Monday. It will
automatically extend to the following Friday, as intended, but it will also appear over the weekend.
If you wish to avoid this, it's best to break assignments down into segments that can be completed
in 5 days or less.
How to Assign Practice or Memorization
If you want to include assignments such as "Practice piano for 20 minutes" or "Dance Class" or
"Memorize Daily Verse" on your student's Today page, use "Generate Multiple" to create a lesson
plan of virtually identical items.
Use "Custom" for the assignment type, calling it something like "Practice." Enter a Starting
Practice # of 1, and an Ending Practice # that is roughly equal to how many practice sessions you
wish to generate. If your student will be practicing piano 5 days a week for the next 4 months, that
would be about 80 practice sessions.
For the Assignment Name Format, just type in the text you want to appear on your student's
Today page: "Piano 20 min" or "Homeschool Park Day" or "Dance Class," etc.
There is no easy way to enter Bible verses or other items to be memorized, unless they have been
prepackaged in a system that follows a numerical progression. You could make your own set of
cards, numbering each one, then enter those in a lesson plan. Or you could generate a batch of
identical "Memorize Verse" assignments, and then manually enter the Verse to be memorized in
the Directions field of each assignment.
OLLY for Mac - User Manual
Page 25
Learning Plans
After you have created some courses and lesson plans, it's time to assign them to the appropriate
students. Learning Plans are unique to each student, representing everything they plan to learn in
the year ahead. Students must have a Learning Plan in place before using the Assignment
Calendar, because only those lesson plans currently assigned to a student will appear in his or her
calendar.
This page displays an overview of each student’s learning plan, along with a filing cabinet of all the
courses and lesson plans you have created. Courses and lesson plans are reusable, so they can
be used for multiple students, year after year. If you do not see any courses or lesson plans listed
in the Filing Cabinet, that means you have not created any yet. To add new courses, navigate to
Planning > Courses within the Learning section of OLLY. Likewise, to add new lesson plans,
navigate to Planning > Lesson Plans.
If you do not see columns for each of your students, return to Admin > School Info > School Years,
near the bottom of the window, and add your students to the active school year. You can also drag
your students' names up or down to specify how they will appear on the Learning Plans page.
To get started with creating a customized learning plan for each student, first drag the desired
courses from the filing cabinet over to the student’s column. Then you can drag the appropriate
lesson plans over to the course name. Remember: Courses are assigned to students; lesson
plans are assigned to courses.
If you wish to remove a course or lesson plan, just select the name of the item, click on the small
triangle next to the student’s name, and select “Remove.”
**IMPORTANT NOTE** - If you remove a lesson plan or a course from a student's Learning Plan,
it will also remove any records of completed work in those lesson plans. Be VERY CAREFUL to
only remove items from the Learning Plans before actual work on assignments has begun, or if
you are sure you don't wish to keep those records.
Arranging the Order of Courses
If you would like to specify the order that courses appear on a student's Today Page, this is the
place to do it.
Click and drag the courses up or down within the student's column to adjust the order they appear.
You will see a thin blue line to indicate where the course will be dropped. If you don't see the blue
line, move your cursor more to the left.
OLLY for Mac - User Manual
Page 26
OLLY for Mac - User Manual
Page 27
Assignment Calendar
The Assignment Calendar is the place to assign WHEN assignments should be completed. Each
student has his or her own Calendar.
First choose the student/s from the list in the right-hand column. If the student is not listed, that
means that they are not enrolled for this school year. In this case, return to Admin > School Info >
School Years to add students.
Listed under the student’s name will be all the lesson plans in that student’s learning plan for the
year. If nothing is listed or the list is incomplete, go to the “Learning Plans” section to add lesson
plans to that student’s courses. If you have selected more than one student, you will only see the
lesson plans that are shared by all the selected students.
Use the hide/expand triangle next to each lesson plan name to show a list of all the lesson plan
items which have not yet been assigned. There are two ways to assign lesson plan items: one at a
time or “Auto Assign” to automatically assign a whole list of items.
To assign one at a time, first use the side arrows in the calendar window to select the desired
month. Click on the desired lesson plan item and drag it over to the day you wish for your student
to complete the item (or to the day he or she already completed it). Once assigned, you may also
drag the item to a different day, or “unassign” it by dragging the item back over to the right-hand
column.
To assign a whole lesson plan at once, click on the “Auto Assign” button in the bottom right corner
of the window. Follow the prompts in the pop-up window.
NOTE: If you are assigning a multi-day assignment, OLLY cannot split up the assignment over
non-consecutive days. Assignments will appear over non-school days even though those days
don't count towards the total number of days. For example, an assignment that is meant to take
two Mon-Fri schoolweeks (10 days) will display properly for the full two weeks, but it will also
appear over the weekend in-between. If this is a problem, the best solution is to break up
assignments into smaller portions.
TIP: If you are having trouble seeing all the assignments in the monthly view, try switching to
weekly view in the bottom left corner of the window. You can also uncheck the "Show
Completed?" box to help visualize all the assignments yet to be completed.
OLLY for Mac - User Manual
Page 28
OLLY for Mac - User Manual
Page 29
Bumping Assignments
If you get ahead or behind schedule, you can bump assignments using the "Bump Assignments"
option in the gear icon, bottom right corner of the Assignment Calendar. A pop-up window will
appear.
To easily re-assign previously scheduled assignments:
• First select the start day from which all chosen assignments will be pushed forward, or
backwards.
• Specify forward or backward, and then enter how many school days you wish to bump
over.
• Finally, select which lesson plans you wish to be re-assigned, and which days of the week
you wish to be available for “School Days."
For example, if a student is sick for a week, and you normally do “school” on Mondays through
Fridays, just select Monday - Friday as school days and enter “5” under number of school days to
increment. Select which lesson plans you wish to bump forward, and press <complete>. OLLY will
automatically re-assign all the regular Monday assignments to the next Monday, all the Tuesday
assignments to the next Tuesday, etc.
If you do not like how OLLY assigned things, immediately select <undo> from the “Edit” menu in
the top toolbar. Open the “Bump Assignments” box again to adjust your choices.
To change the start or end dates for a single assignment:
Click on the assignment in the calendar and a pop-up will appear with options to change dates,
unassign, or show more info about the assignment.
OLLY for Mac - User Manual
Page 30
Assignment Completion
This is the section to enter numerical grades for your students. After selecting a student from the
left hand column, a list will appear of all the Lesson Plans assigned to that student for the Active
School Year. Click on any of the Lesson Plans to open a list of all the assigned assignments. If
you decide not to assign a Lesson Plan item, it will not be included in this list, and thus, won't
affect your student's grade.
To Mark an Assignment as Complete: If an assignment has been marked complete on the
Today page, it will also be shown as completed on this page. If it hasn't yet been marked, click on
the "Completed?" box to indicate that the assignment has been completed.
Grading:
By default, OLLY enters the full "Points Obtained." If you would like to change this behavior, go to
OLLY > Preferences > Assignments and uncheck "Grade assignments 100% when completed."
To edit the actual "Points Obtained," click on the field to type the correct number of points. The
percentage will automatically be updated.
To see the full list of grades, including letter grades, go to Reports > Grade Report.
OLLY for Mac - User Manual
Page 31
Recording Benchmarks
If you have entered benchmarks in any of your student's courses, they will appear here. If you
wish to add more benchmarks, please return to Planning > Courses to enter.
You may mark completion of benchmarks here as they are covered, or you may choose to wait
until the end of an academic term to mark proficiency for each of the benchmarks. To enter a
proficiency level for a benchmark, click on the field in the appropriate column and row to enter a
date attained, using the following date format to enter: Mar 1, 2013.
The benchmark proficiency levels and any written assessments for a student can be printed from
Reports > Progress Report.
Tip: If you are having trouble viewing all the text in the benchmark column, you can resize a
column by clicking on the vertical line and dragging.
OLLY for Mac - User Manual
Page 32
Written Assessments
Written Assessments may be used in addition to or instead of benchmarks or grading. This may
be a short description of what the student learned in the course, any strengths or weaknesses,
projects/work completed, student opinions of the subject material, quotes, questions, ideas for
future learning, etc.
To enter or edit written assessments, first select the appropriate student in the left-hand column,
then choose the appropriate course from the student's list of courses. Click in the text field to start
typing.
Written Assessments for each course can be printed from Reports > Progress Report.
OLLY for Mac - User Manual
Page 33
Attendance
To mark a student as present, click on the name in the Student column and drag it to the
appropriate day of the calendar. You may also highlight multiple student names at once by
pressing <shift> while clicking on the names.
To remove a student’s name from a day, click on the name and drag it back to the student column.
Or click on the name, and select “Remove” from the pop-up window.
You may also use the “Auto Generate Attendance” button below to facilitate adding attendance.
Sometimes it is easier to add all the students for a set period of time, and then manually remove
the student’s names from the days they did not do school work.
If you wish to set a default number of hours a student attends school, go to Admin > School Info >
School Years and mark “Hours per Day” next to the student’s name. This will automatically be
entered for each day marked present. If you wish to adjust these hours for a particular day, click
on the student’s name, and edit the information in the pop-up. The hours will then be calculated
with the days attended when you print out an Attendance Report.
OLLY for Mac - User Manual
Page 34
Journals
Journals are especially useful for recording "after-the-fact" learning. If you don't like to plan lesson
plans in advance or assign grades, journals are a great way to record what you did each day.
Even if you do record assignments, journals provide a place to elaborate and jot down questions,
thoughts, or memories. You can also add photos to your journals.
Every user can create any number of journals for a variety of purposes, such as a workout log,
reading log, personal diary, field trip log, learning log, or a place to brainstorm ideas.
All of the Journals will be listed in the left hand column of the Journals window. In order to see all
of the entries for each Journal, tap on the name of the Journal to open it.
To Create a New Journal
Click on the small triangle in the upper right corner and select "Add." Then type over the words
"New Journal" to rename it.
To Create a New Journal Entry
First open the correct journal, then click on the triangle in the Entries column to select "Add." Most
of these fields are optional, but it will be helpful to write a little something descriptive for "What" to
help remember what the journal entry is about. Use the "Notes" field to type in your actual entry.
To Add Images to a Journal Entry
Images you add here can be included in the "Journals" Reports, or for any Yearbooks you create.
• To add an image, click on the small triangle beneath the image box, and select "Add
Image." A browser window will open for you to choose an image from your computer.
• To add a caption, click on the word "Caption" to edit.
• To remove an image, first select the image, then click on "Remove Image."
To Remove a Journal Entry
First select the entry you wish to remove, then click on the triangle in the Entries column and
select "Remove."
OLLY for Mac - User Manual
Page 35
OLLY for Mac - User Manual
Page 36
Reports
All of the available Reports are listed in the left-hand column. The main preview window shows the
selected Report.
To Prepare a Report for Printing:
• Click on the name of the Report in the column to open a "Configure" pop-up window.
• Use the drop-down menus, if any, to define by student, year, course, etc. as applicable.
• Select which fields you wish to include in the Report by clicking on the appropriate check
boxes.
• Click "Finish" when ready.
• Preview the Report in the main window. If it is satisfactory, click "Print" in the bottom left
side of the window. If you wish to make changes, click "Configure" at the bottom right of
the window to open the edit pop-up again.
Resource LIbrary: To print the list of any resources, as configured, from your library.
Resources Lists: To print the contents of any Resource List.
Activities & Achievements: To print the activities and achievements for a specific user, for a
specific date range.
Standardized Tests: To print the list of standardized tests for a specific user.
Routines: To print out your choice of Routines. Choose "One Column" printing if you plan to cut
out the Routines for posting.
Journals: To print selected entries, within a certain date range, from the Journal you choose.
Assignments: To print the contents of a chosen Lesson Plan, either assigned or unassigned.
Annual Learning Plan: To print any Learning Plan for a selected student and year.
Course Descriptions: To print selected Course Descriptions for a certain student and range of
years. This is a report that might be useful for high school students applying to colleges.
Attendance: To print days attended for a selected student and year.
Progress Report: To print any benchmarks and written assessments for selected courses, for a
chosen student and year.
Grade Report: To print any grades for selected courses for a given student and year.
High School Transcript: To display grades for selected courses for a given student over a range
of years. Also includes cumulative GPA and Credit Hours earned.
Yearbook: Use templates to create visual summaries of years, students, certain interests or
activities, or perhaps special projects.
OLLY for Mac - User Manual
Page 37
Yearbooks
To create a new yearbook, click on the small triangle in the upper right corner and select “Create
Yearbook.” A pop-up will prompt you to enter the name of your yearbook. Next, click on the “+”
below the page to create your first page. A selection of templates will pop-up.
Note that the gray squares in the templates indicate text boxes, the blue squares indicate photo
frames, and the green boxes are for titles or subheadings. Choose the template you wish to work
with. You may also choose a background image that will appear behind the text/photos of your
template. Just select “Background Image” within the same pop-up window and choose an image
file from your computer.
Once you have loaded a template and optional background image, select “complete.” Now you
may drag photos from the right column to the photo frames (tinted) of the template. To remove a
photo from a frame, drag it back over to the right. Click inside a text frame (non-tinted) to enter
text. You may edit the text/font properties by clicking “Format” > “Font” in the very top toolbar,
causing a text formatting window to appear.
When you are done working with a page, click on the upper right triangle and select “Save
changes.”
If you wish to continue working on a previous yearbook, select the name of the yearbook from the
dropdown button in the top left corner of the window.
When you are ready to print, click on the small triangle in the upper right corner and select “Print.”
OLLY for Mac - User Manual
Page 38