1
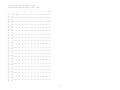
SCSI DataScrubber™
Version 6.1.0
SCSI Toolbox LLC
PO Box 620520
Littleton, CO 80162
email: [email protected]
© Copyright, 2002, SCSI Toolbox LLC
COPYRIGHT NOTICE
Copyright 1994 by SCSI Toolbox LLC, LLC (STB) All rights
reserved. This item and the information contained herein are
the property of STB. No part of this document may be
reproduced, transmitted, transcribed, stored in a retrieval
system, or translated into any language or computer language in
any form or by any means, electronic, mechanical, magnetic,
optical, chemical, manual, or otherwise, without the express
written permission of SCSI Toolbox LLC P.O. Box 620520,
Littleton, Colorado 80162.
DISCLAIMER
STB makes no representation or warranties with respect to the
contents of this document and specifically disclaims any
implied warranties of merchantability or fitness for any
particular purpose. Further, STB reserves the right to revise
this publication and to make changes in it from time to time
without obligation of STB to notify any person or organization
of such revision or change.
SCSI DataScrubber is a trademark of SCSI Toolbox LLC, Inc.
Manual Revision 6-96
LICENSE AGREEMENT
This SOFTWARE LICENSE is an agreement made by and between SCSI
Toolbox LLC(hereafter "STB") and you, the end user(hereinafter
"LICENSEE"):
This license agreement is for proprietary software owned by
Choice Software Inc. (hereafter Choice), and licensed by STB
identified as The SCSI DataScrubber (hereinafter the "LICENSED
PRODUCT");
By opening the sealed media package, on which this PRODUCT is
distributed are agreeing to be bound by the terms of this
agreement. If you do not agree to the terms of this agreement,
return the unopened media package and accompanying materials to
the place where you obtained them within 10 days from the date
of shipment for a full refund.
This agreement supersedes all prior agreements, proposals, and
representations between you Choice and STB.
LICENSE AND TERM
STB and any applicable sublicensors grant to the LICENSEE a
non-exclusive, non-transferable license to use the programs and
related documentation(collectively referred to as the
"Software") on licensed client processing unit(s). Any
attempted sublicense, assignment, rental, sale or other
transfer of the Software or the rights or obligations of the
Agreement without the prior written consent of STB shall be
void. This license will automatically terminate without notice
if LICENSEE should fail to comply with its terms. The Software
and documentation are copyrighted. Unauthorized copying,
reverse engineering, decompiling, disassembling, and creative
derivative works based on the Software are prohibited. Title to
the Software is not transferred to LICENSEE by this license.
Ownership and title to the Software, including any copy of the
Software, and the associated documentation, are retained by
Choice.
LICENSEE shall have the right to copy or transfer the Software
as follows:
a)
LICENSEE may transfer the Software from one computer
to another of the same type and model) provided that
the Software is installed on only one computer at a
time and covered under a current software
maintenance contract.
b)
LICENSEE may transfer the Software to a computer of
another type and model supported by STB, after
paying a service and/or upgrade
charge which can
be quoted upon request.
c)
Copy the software for the purpose of backup or
archival.
LICENSEE agrees to reproduce and include STB's copyright notice
on all copies of the Software.
SOFTWARE LIMITATIONS
STB does not warrant that the Software will be free from error
or will meet your specific requirements. You assume complete
responsibility for decisions made or actions taken based on
information obtained using the Software. Any statements made
concerning the utility of the Software are not to be construed
as unexpressed or implied warranties. THE LICENSEE SHALL HAVE
THE SOLE RESPONSIBILITY FOR ADEQUATE PROTECTION AND BACKUP OF
ITS DATA USED IN CONNECTION WITH THE LICENSED PRODUCT. IN NO
EVENT WILL STB, CHOICE NOR ANY SUBLICENSOR BE LIABLE FOR:
i) SPECIAL, INDIRECT, OR CONSEQUENTIAL DAMAGES,
ii) ANY DAMAGES WHATSOEVER RESULTING FROM LOSS OF USE,
DATA, OR PROFITS, RERUN TIME, INACCURATE INPUT OR
WORK DELAYS, OR ANY DIRECT PROPERTY DAMAGE ARISING
OUT OF OR IN CONNECTION WITH THIS AGREEMENT OR THE
USE OR PERFORMANCE OF THE LICENSED PRODUCT, WHETHER
IN ACTION, IN CONTRACT, OR TORT INCLUDING
NEGLIGENCE.
LIMITED WARRANTY AND DAMAGES DISCLAIMER
Subject to the conditions and limitations on liability stated
herein, STB warrants for a period of ninety(90) days from the
delivery of the first copy of each type of SOFTWARE, as so
delivered, will materially conform to STB's then current
documentation for such SOFTWARE. This warranty covers only
problems reported to STB during the warranty period. ANY
LIABILITY OF STB WITH RESPECT TO THE SOFTWARE OR THE
PERFORMANCE THEREOF UNDER ANY WARRANTY, NEGLIGENCE, STRICT
LIABILITY OR OTHER THEORY WILL BE LIMITED EXCLUSIVELY TO
PRODUCT REPLACEMENT OR, IF REPLACEMENT IS INADEQUATE AS A
REMEDY OR, IN STB'S OPINION, IMPRACTICAL, TO REFUND OF THE
LICENSE FEE. EXCEPT FOR THE FOREGOING, THE SOFTWARE IS PROVIDED
"AS IS" WITHOUT WARRANTY OF ANY KIND INCLUDING WITHOUT
LIMITATION, ANY WARRANTY OF FITNESS OR MERCHANTABILITY OR
FITNESS FOR A PARTICULAR PURPOSE. FURTHER, STB DOES NOT
WARRANT, GUARANTEE, OR MAKE ANY REPRESENTATIONS REGARDING THE
USE, OR THE RESULTS OF THE USE, OF THE SOFTWARE OR WRITTEN
MATERIALS IN TERMS OF CORRECTNESS, ACCURACY, RELIABILITY, OR
OTHERWISE. The Licensee understands that STB is not responsible
for and will have no liability for hardware, software, or other
items or services provided by any persons other STB. STB shall
have no liability for delays or failures beyond its reasonable
control.
STB SHALL NOT BE RESPONSIBLE OR LIABLE WITH RESPECT TO ANY
SUBJECT MATTER OF THIS SOFTWARE LICENSE AGREEMENT OR THE
AGREEMENT OF WHICH IT IS A PART OR ANY ATTACHMENT, PRODUCT
ORDER, SCHEDULE OR TERM OR CONDITIONS RELATED THERETO UNDER ANY
CONTRACT, NEGLIGENCE, STRICT LIABILITY OR OTHER THEORY:
A) FOR LOSS OR INACCURACY OF DATA OR(EXCEPT FOR RETURN
OF AMOUNTS PAID TO CHOICE THEREFOR),COST OF
PROCUREMENT OF SUBSTITUTE GOODS, SERVICES OR
TECHNOLOGY,
B) FOR ANY INDIRECT INCIDENTAL OR CONSEQUENTIAL DAMAGES
INCLUDING, BUT NOT LIMITED TO LOSS OF REVENUES AND
LOSS OF PROFITS; OR
C) FOR ANY MATTER BEYOND ITS REASONABLE CONTROL.
This Agreement shall be construed, interpreted and governed by
the laws of the State of Colorado and by international laws and
treaties governing copyrights, patents, and intellectual
property rights.
Table of Contents
Chapter One
The SCSI DataScrubber™ .........................................................................................
1
Chapter Two
SCSI DataScrubber Installation ..................................................................................
SunOS 4.1.x Installation ..................................................................................
System Requirements ....................................................................................
Loading Distribution Media .............................................................................
Running the STB_ install Script ........................................................................
The Loadable Device Driver .............................................................................
Solaris 2.x Installation ..................................................................................
System Requirements ....................................................................................
Loading Distribution Media .............................................................................
Running the STB_install script. ........................................................................
The Loadable Device Driver .............................................................................
Installing the Application Program .....................................................................
IRIX Installation .........................................................................................
System Requirements ....................................................................................
Loading Distribution Media .............................................................................
Running the STB_install Script .........................................................................
DOS Installation ..........................................................................................
System Requirements ....................................................................................
Completing the Installation ............................................................................
Copying the Distribution Disk...........................................................................
2
2
2
2
2
3
5
5
5
5
6
6
7
7
7
7
9
9
9
9
Chapter Three
UNIX Main Window / Command Line Syntax ..........................................................................
Menu Bar ..................................................................................................
Select Device Window ......................................................................................
Lock Target Menu ..........................................................................................
Program Text Window .......................................................................................
Status Line ...............................................................................................
Command Line Version Syntax ...............................................................................
10
10
11
11
11
11
11
Chapter Four
UNIX Test Menu ..................................................................................................
Quick QC Test .............................................................................................
Purge Test ................................................................................................
12
12
12
Chapter Five
DOS Program Execution ...........................................................................................
Scanning the SCSI Bus .....................................................................................
Purging a Disk ............................................................................................
Common Problems ...........................................................................................
Example ...................................................................................................
17
17
17
17
18
Chapter Six
SCSI Tutorial ...................................................................................................
Introduction to SCSI Philosophy ...........................................................................
SCSI Hardware .............................................................................................
Data Lines ................................................................................................
Control Lines .............................................................................................
Single-ended SCSI .........................................................................................
Single-ended Termination ..................................................................................
Differential SCSI .........................................................................................
Cables and Connectors .....................................................................................
SCSI Software .............................................................................................
SCSI Bus Phases ...........................................................................................
The Bus Free Phase ........................................................................................
The Arbitration Phase .....................................................................................
The Selection\Reselection Phase ...........................................................................
The Command Phase .........................................................................................
Command Descriptor Blocks .................................................................................
CDB Format ................................................................................................
The Data In \ Out Phase ...................................................................................
Asynchronous Transfers ....................................................................................
Synchronous Transfers .....................................................................................
The Status Phase ..........................................................................................
The Message Phase .........................................................................................
SCSI Commands .............................................................................................
SCSI Bus Operation--An Example ............................................................................
Typical SCSI Operation .................................................................................
Disconnect ................................................................................................
Disconnection Notes .......................................................................................
Miscellaneous SCSI Issues ................................................................................
SCSI Standards .........................................................................................
SCSI Cabling ...........................................................................................
Simple Peripheral Installation
Guidelines ..........................................................................................
Appendix A
Request Sense & Sense Key Interpretation ........................................................................
19
19
20
20
20
20
21
21
21
22
22
23
23
23
24
24
24
25
25
26
26
26
27
28
28
29
31
31
32
32
34
37
Chapter One
The SCSI DataScrubber™
The SCSI DataScrubber™ runs under the DOS, SunOS
4.1.x, Solaris 2.3, and IRIX operating systems. It
utilizes a Motif-style Graphical User Interface
(GUI) to provide an easy and intuitive operator
interface. The SCSI DataScrubber consists of a
loadable device driver if needed, an application
executable, and a X11 resource file for
customizing the user interface.
The SCSI DataScrubber provides a means to
completely erase all data from a disk drive. Three
different data patterns are written to every block
on the disk, including all blocks that are used as
alternate blocks and all blocks held in reserve
for flaw remapping. For each of the three data
patterns, each block on the drive has the pattern
written to it, then the block is read back and
each byte is compared to be sure that it matches
the data pattern. By the time the function is
complete every byte on the drive has had the
following patterns written and confirmed - All
Ones, All Zeros, and alternating Ones and Zeros. A
user-selected block on the drive is designated as
a verification block. The data on the verification
block is printed out after each data pattern is
written to give a confirmation of what data is now
stored on the drive. A disk file called purge.dat
is created that contains a record of the purge
process.
This file contains a journal type report of the
progress of the purge.
The verification block data is printed to this
file after each of the three data patterns is
written as a confirmation that all data on the
drive has been erased.
1
2
Chapter Two
SCSI DataScrubber Installation
SunOS 4.1.x Installation
System Requirements
The SCSI DataScrubber software requires an X11R5
or OpenWindows windowing system to be operational
on the Workstation. It will operate with the
OpenLook window manager, mwm, twm and many other
window managers.
Loading Distribution Media
The installation should be performed when logged
in as the root user.
The next step is to create the installation
directory. This directory can be located in any
file system on your computer. The contents of this
directory may be deleted after the installation is
complete.
mkdir
<install directory>
Now move to the installation directory by typing:
cd <install directory >
The SCSI DataScrubber software is supplied in tar
format. Use the following commands to load the
distribution media:
For tape distribution mt -t <tape device name> rewind
tar xvpf <tape device name>
For floppy distribution tar xvpf /dev/fd0c
Running the STB_install Script
The STB_install script will uncompress and extract
3
the files from the distribution format. It will
then prompt for necessary information as it
performs the installation. You will be asked into
which directory you want the device driver
installed, into which directory you want the
application files installed, and asked for your
authorization string. The script will install the
loadable device driver based on your answers to
the above questions, and copy the program files
into the appropriate directory.
The Loadable Device Driver
The loadable device driver is built by the install
script. If you plan on having the stb device
driver load automatically on system startup you
should place the driver files in a file system
which is mounted during the boot process. The
standard location would be a subdirectory under
/sys for example /sys/stb.
The script loadstb which is created in the
specified device driver directory must be executed
after every system boot to load the driver.
The SCSI DataScrubber device driver for SunOS is a
loadable driver and the loadstb script may be
called from the /etc/rc.local file to load the
driver on boot. The device names are specified in
the file makestb which is created by the
install_sds program and are specific to the SCSI
target number specified. The user does not need
to know these device names, as the SCSI
DataScrubber program handles the file names
internally.
Any user account which will be running the SCSI
DataScrubber application will need read and write
access to the stb device files. The load script
created above will assign read and write access to
4
all users. If the system manager does not desire
all users to have this access, the load script can
be modified as needed.
Installing the Application Program
The SCSI DataScrubber program executable file is
copied into the application directory during the
above installation process. This file, stb, can be
executed from there.
Also included with the distribution is a default
application resource file Xstb. Copy this file to
the home directory of any user who will be running
the SCSI DataScrubber program, or install it in
the app-defaults directory used by your windowing
system.
Required Environment Variables
The SCSI DataScrubber program requires two
environment variables to be set for any user who
will be running the program. These variables are:
SDSHOME -
Set to point to the directory in
which the application programs
were installed.
XKEYSYMDB
Set to point to the file
XKeysymDB which was copied into
the SDSHOME directory during the
installation process.
5
Solaris 2.x Installation
System Requirements
The SCSI DataScrubber software requires an X11R5
or OpenWindows windowing system to be operational
on the Workstation. It will operate with the
OpenLook window manager, mwm, twm and many other
window managers.
Loading Distribution Media
The installation should be performed when logged
in as the root user.
The next step is to create the installation
directory, this directory can be located in any
file system on your computer. The contents of
this directory may be deleted after the
installation is complete.
mkdir
<install directory>
Now move to the installation directory by typing:
cd <install directory >
The SCSI DataScrubber software is supplied in tar
format. Use the following commands to load the
distribution media:
For tape distribution mt -t <tape device name> rewind
tar xvpf <tape device name>
For floppy distribution tar xvpf /dev/fd0c
Running the STB_install Script
The STB_install script will uncompress and extract
the files from the distribution format. It will
then prompt for necessary information as it
performs the installation. You will be asked which
6
directory you want the application files installed
into, and asked for your authorization string.
The script will install the loadable device
driver, and copy the program files into the
appropriate directory.
The Loadable Device Driver
The loadable device driver is built by the install
script and loads automatically on the first access
after a reboot. The device names are specified in
the file /etc/devlinks.tab which is edited by the
install_sds program and are specific to the SCSI
target number. The user does not need to know
what these device names are as the SCSI
DataScrubber program handles the file names
internally.
Any user account which will be running the SCSI
DataScrubber application will need read and write
access the stb device files. The install script
created above will assign read and write access to
all users. If the system manager does not desire
all users to have this access, call tech support
at STB for instruction on changing the file
protection.
Installing the Application Program
The SCSI DataScrubber program executable file is
copied into the application directory during the
above installation process. This file, stb, can be
executed from there.
Also included with the distribution is a default
application resource file Xstb. Copy this file to
the home directory of any user who will be running
the SCSI DataScrubber program or install it in the
app-defaults directory used by your windowing
7
system.
Required Environment Variables
The SCSI DataScrubber program requires two
environment variables to be set for any user who
will be running the program. These variables are:
SDSHOME
XKEYSYMDB
Set to point to the directory in
which the application programs
were installed.
Set to point to the file
XKeysymDB which was copied into
the SDSHOME directory during the
installation process.
8
IRIX Installation
System Requirements
The SCSI DataScrubber software requires an X11
windowing system to be operational on the
workstation. It also requires the /dev/scsi
devices to be present on the workstation.
Loading Distribution Media
The installation should be performed when logged
in as the root user.
The next step is to create the installation
directory on your computer this directory may be
located anywhere.
mkdir <install directory>
Now move to the installation directory by typing:
cd <install directory>
The SCSI DataScrubber software is supplied in tar
format. Use the following commands to load the
distribution media:
For tape distribution mt -t <tape device name> rewind
tar xvpf <tape device name>
Running the STB_install Script
Now run the install program:
STB_install
The install program will ensure that the necessary
device files are present on your system and create
them if necessary. It will then ask for a path
into which to copy the application files, create
that directory if necessary and copy the program
files into it.
9
Installing the Application Program
The SCSI DataScrubber program executable file is
copied into the application directory during the
above installation process. This file, stb, can
be executed from there.
Also included with the distribution is a default
application resource file Xstb. Copy this file to
the home directory of any user who will be running
the SCSI DataScrubber program or install it in the
app-defaults directory used by your windowing
system.
Required Environment Variables
The SCSI DataScrubber program requires two
environment variables to be set for any user who
will be running the program. These variables are:
SDSHOME
Set to point to the directory in
which the application programs
were installed.
10
DOS Installation
System Requirements
The SCSI DataScrubber program runs on any IBM PC
that has an ASPI- compliant SCSI adapter. Adapters
that have been tested with this program include
those from Adaptec, DPT, Busteck, Trantor, Always,
Qlogic, Shining, and Eclipse. Since the SCSI
DataScrubbertm program is an ASPI application, you
need to make sure that you have properly installed
the ASPI software for your SCSI adapter.
Completing the Installation
The SCSI DataScrubber program can be run from the
supplied floppy disk drive, or from a hard disk.
To load the program onto a hard drive simply use
the DOS copy command to copy all files from the
floppy disk to your hard disk.
Copying the Distribution Disk
Feel free to make a backup copy of the original
program disk and keep it in a safe place. The SCSI
DataScrubber program is NOT copy protected. Please
be sure to honor the license agreement and only
use the program on ONE COMPUTER AT A TIME. If you
need to purge more than one drive at a time you
need to order additional copies of the program.
11
Chapter Three
UNIX Main Window / Command Line Syntax
The SCSI DataScrubber GUI main application window
consists of a menu bar, the Select Device menu,
the Lock Target menu, the Program text window and
the Status line.
Menu Bar
The SCSI DataScrubber main menu bar has five menu
buttons:
File
This pull down menu has application
specific functions.
There are two menu
selections:
Probe Bus
Scans the SCSI bus for devices and
completes the
Select Device menu.
Quit
Options
Quits the program.
This pull-down toggle button menu
allows the user to turn two options on or
off by pushing in or pushing out
the
associated buttons. The options are as
follows:
Destructive - If on, this allows tests to write
to the device. If off, no
write tests are
allowed.
Log Errors If turned on all errors generated
during testing will be
written to a log
file.
Commands -
This pull-down menu provides access to
the SCSI commands which are available
for the selected device (see Chapter
12
4).
Tests -
This pull-down menu provides access
to the standard tests which are available
for the selected device
(see Chapter 5.)
Select Device Window
This portion of the main window is a radio button
menu ( only one button may be selected at a time
). Devices which are locked are "grayed" out and
are unable to be selected. Pressing the button
next to a displayed device selects that device for
test.
Lock Target Menu
This menu allows the user to lock specific devices
to prevent them from being selected in the Select
Device menu. A good example is locking the system
disk so it will not be written on inadvertently.
Program Text Window
This area of the main application window is a noneditable text window in which all program output
is displayed. The window is defined as an area of
24 lines of 80 characters. If the font selected
in the Xstb file is too large to allow the display
of this much text horizontal and or vertical
scroll bars will appear.
Status Line
This line displays various messages from the
program regarding the current test status, or the
completion status of a test.
Command Line Version Syntax
The command line version of the SCSI DataScrubber
13
uses the following command syntax.
purge <SCSI target>
[h] [s]
Where:
SCSI Target
- Defines the SCSI Target
of the device to be purged
h
Print help information
s
Scan the SCSI bus and display
device
information
The command line program uses the same purge
algorithm and produces the same output file as the
GUI version of the program.
14
Chapter Four
UNIX Test Menu
Quick QC Test
This test will test all drive functionality over a
sample block range that covers the entire drive.
Positioning, writing, and reading are all verified
by writing and verifying 1000 blocks at the
beginning, middle, and end of the drive. This is a
quick quality control check to verify that the
drive is indeed functioning. Most operating
systems pay particular attention to the first and
last blocks of a disk, for boot blocks, label
information, and spare blocks for defect mapping.
Purge Test
The Purge function provides a means to completely
"erase" all data from a disk drive. Three
different data patterns are written to every block
on the disk, including all blocks that are used as
alternate blocks and all blocks held in reserve
for flaw remapping. For each of the three data
patterns, each block on the drive has the pattern
written to it, then the block is read back and
each byte is compared to be sure that it matches
the data pattern.
By the time the function is complete every byte on
the drive has had the following patterns written
and confirmed - all ones, all zeros,and
alternating ones & zeros. A user-selected block on
the drive is designated as a verification block.
The data on the verification block is printed out
after each data pattern is written to give a
confirmation of what data is now stored on the
drive. A disk file called PURGE.DAT is created
that contains a record of the purge process. This
file contains a user-supplied serial number or
15
other data to identify the drive that has been
purged, and a journal type report of the progress
of the purge. The verification block data is
printed to this file after each of the three data
patterns is written as a confirmation that all
data on the drive has been erased.
Operation
The Purge Function is chosen from the Test menu.
The user is warned that this test will destroy all
data on the selected drive, and is asked to
confirm that the function should be run. Entering
Y at this prompt starts the purge function.
The user will be prompted to enter a serial number
or other identification for the drive being
purged. Whatever is entered here will be printed
to the PURGE.DAT file on the DOS computer as a
means to relate the purge report to a particular
disk drive.
The user is then prompted to enter a block number
to be used as a verification block. This block
will be examined after each data pattern has been
written, and the data from this block will be
printed to the PURGE.DAT file on the DOS computer.
After this the purge function begins and proceeds
in the following order:
1.
The three data patterns are written to all
alternate and spare blocks on the drive.
2.
The three data patterns are written to all
user accessible data blocks on the drive.
3.
The file purge.dat is available to be
printed.
Because of the process involved in accessing all
alternate blocks on the drive, and in writing and
confirming every data block on the drive, the
16
purge function can take a long time to complete.
In cases involving very large capacity disks, it
will be necessary to let the purge run overnight
to complete. Because the progress of the purge
function is monitored and tracked in the PURGE.DAT
file, it is not necessary for the user to
intervene in the purge process. The faster the
adapter, the more quickly the purge process will
complete.
A sample PURGE.DAT file is shown below,
illustrating the purge operation on a small
Seagate disk. In this example the disk
identification was entered as 20 mb seagate
the verification block was 432.
and
SEAGATE ST138N
20 mb seagate
204 Spare Blocks Remapped
Zeros written to all spare blocks
Ones written to all spare blocks
Random data written to all spare blocks
Reallocating Spare Blocks
Zeros written to all data blocks
Verification Block # 432, Data = 00
0
D
00
1
E
00
2
F
00
3
4
5
6
7
8
00
00
00
00
00
00
00
00
00
00
00
00
00
00
00
00
00
00
00
9
A
B
C
00
00
00
00
00
00
00
00
00
00
00
00
00
00
00
00
00
00
00
00
00
00
00
00
00
00
00
00
00
00
00
00
00
00
00
00
00
00
00
00
00
00
00
00
00
00
00
00
00
00
00
00
00
00
00
00
00
00
17
00
00
00
00
00
00
00
00
00
00
00
00
00
00
00
00
00
00
00
00
00
00
00
00
00
00
00
00
00
00
00
00
00
00
00
00
00
00
00
00
00
00
00
00
00
00
00
00
00
00
00
00
00
00
00
00
00
00
00
00
00
00
00
00
00
00
00
00
00
00
00
00
00
00
00
00
00
00
00
00
00
00
00
00
00
00
00
00
00
00
00
00
00
00
00
00
00
00
00
00
00
00
00
00
00
00
00
00
00
00
00
00
00
00
00
00
00
00
00
00
00
00
00
00
00
00
00
00
00
00
00
00
00
00
00
00
00
00
00
00
00
00
00
00
00
00
00
00
00
00
00
00
00
00
00
00
00
00
00
00
00
00
00
00
00
00
00
00
00
00
00
00
00
00
00
00
00
00
00
00
00
00
00
00
00
00
00
00
00
00
00
00
00
00
00
00
00
00
00
00
00
00
00
00
00
00
00
00
00
00
00
00
00
00
00
00
00
00
00
00
00
00
00
00
00
00
00
00
00
00
00
00
00
00
00
00
00
00
00
00
00
00
00
00
00
00
00
00
00
00
00
00
00
00
00
00
18
Ones written to all data blocks
Verification Block # 432, Data = FF
0
1
D
FF
FF
FF
FF
FF
FF
FF
FF
FF
FF
FF
FF
FF
FF
FF
FF
FF
FF
FF
FF
FF
FF
FF
FF
FF
FF
FF
FF
FF
FF
FF
FF
FF
FF
FF
FF
FF
FF
FF
FF
FF
FF
E
FF
FF
FF
FF
FF
FF
FF
FF
FF
FF
FF
FF
FF
FF
FF
FF
FF
FF
FF
FF
FF
FF
FF
FF
FF
FF
FF
FF
FF
FF
FF
FF
FF
FF
FF
FF
FF
FF
FF
FF
FF
FF
2
3
4
5
6
7
8
A
B
FF
FF
FF
FF
FF
FF
FF
FF
FF
FF
FF
FF
FF
FF
FF
FF
FF
FF
FF
FF
FF
FF
FF
FF
FF
FF
FF
FF
FF
FF
FF
FF
FF
FF
FF
FF
FF
FF
FF
FF
FF
FF
FF
FF
FF
FF
FF
FF
FF
FF
FF
FF
FF
FF
FF
FF
FF
FF
FF
FF
FF
FF
FF
FF
FF
FF
FF
FF
FF
FF
FF
FF
FF
FF
FF
FF
FF
FF
FF
FF
FF
FF
FF
FF
FF
FF
FF
FF
FF
FF
FF
FF
FF
FF
FF
FF
FF
FF
FF
FF
FF
FF
FF
FF
FF
FF
FF
FF
FF
FF
FF
FF
FF
FF
FF
FF
FF
FF
FF
FF
FF
FF
FF
FF
FF
FF
FF
FF
FF
FF
FF
FF
FF
FF
FF
FF
FF
FF
FF
FF
FF
FF
FF
FF
FF
FF
FF
FF
FF
FF
FF
FF
FF
FF
FF
FF
FF
FF
FF
FF
FF
FF
FF
FF
FF
FF
FF
FF
FF
FF
FF
FF
FF
FF
FF
FF
FF
FF
FF
FF
FF
FF
FF
FF
FF
FF
FF
FF
FF
FF
FF
FF
FF
FF
FF
FF
FF
FF
FF
FF
FF
FF
FF
FF
FF
FF
FF
FF
FF
FF
FF
FF
FF
FF
FF
FF
FF
FF
FF
FF
FF
FF
FF
FF
FF
FF
FF
FF
FF
FF
FF
FF
FF
FF
FF
FF
FF
FF
FF
FF
FF
FF
FF
FF
FF
FF
F
FF
FF
FF
FF
FF
FF
9
C
19
20
Random data written to all data blocks
Verification Block # 432, Data = 5A
0
1
B
5A
5A
5A
5A
5A
5A
5A
5A
5A
5A
5A
5A
5A
5A
5A
5A
5A
5A
5A
5A
5A
5A
5A
5A
5A
5A
5A
5A
5A
5A
5A
5A
5A
5A
5A
5A
5A
5A
5A
5A
5A
5A
C
5A
5A
5A
5A
5A
5A
5A
5A
5A
5A
5A
5A
5A
5A
5A
5A
5A
5A
5A
5A
5A
5A
5A
5A
5A
5A
5A
5A
5A
5A
5A
5A
5A
5A
5A
5A
5A
5A
5A
5A
5A
5A
2
3
4
5
6
7
8
9
A
D
5A
E
5A
F
5A
5A
5A
5A
5A
5A
5A
5A
5A
5A
5A
5A
5A
5A
5A
5A
5A
5A
5A
5A
5A
5A
5A
5A
5A
5A
5A
5A
5A
5A
5A
5A
5A
5A
5A
5A
5A
5A
5A
5A
5A
5A
5A
5A
5A
5A
5A
5A
5A
5A
5A
5A
5A
5A
5A
5A
5A
5A
5A
5A
5A
5A
5A
5A
5A
5A
5A
5A
5A
5A
5A
5A
5A
5A
5A
5A
5A
5A
5A
5A
5A
5A
5A
5A
5A
5A
5A
5A
5A
5A
5A
5A
5A
5A
5A
5A
5A
5A
5A
5A
5A
5A
5A
5A
5A
5A
5A
5A
5A
5A
5A
5A
5A
5A
5A
5A
5A
5A
5A
5A
5A
5A
5A
5A
5A
5A
5A
5A
5A
5A
5A
5A
5A
5A
5A
5A
5A
5A
5A
5A
5A
5A
5A
5A
5A
5A
5A
5A
5A
5A
5A
5A
5A
5A
5A
5A
5A
5A
5A
5A
5A
5A
5A
5A
5A
5A
5A
5A
5A
5A
5A
5A
5A
5A
5A
5A
5A
5A
5A
5A
5A
5A
5A
5A
5A
5A
5A
5A
5A
5A
5A
5A
5A
5A
5A
5A
5A
5A
5A
5A
5A
5A
5A
5A
5A
5A
5A
5A
5A
5A
5A
5A
5A
5A
5A
5A
5A
5A
5A
5A
5A
5A
5A
5A
5A
5A
5A
5A
5A
5A
5A
5A
5A
5A
5A
5A
5A
5A
5A
5A
5A
5A
5A
5A
5A
5A
5A
5A
5A
5A
21
Purge Complete
22
Chapter Five
DOS Program Execution
Help
By typing “purge” <cr> at the DOS command line,
the DataScrubber Help Menu will be displayed. This
menu will explain all available DataScrubber
options.
Scanning the SCSI Bus
By typing "purge s" at the DOS command line, the
program will scan the SCSI bus and display
information about all devices connected to the
bus. The manufacturer, part number, device type,
and the capacity and block size (in the case of
disk drives) will be shown next to the SCSI Target
number. This function is useful to confirm that
the device that you intend to purge is connected
at the SCSI address that you think it is.
Viewing Disk Defects
The disk drive defect list can be viewed or saved
to a file by typing “purge g#” <cr> (where # is
the Target number of the SCSI disk) at the DOS
command prompt. You will be asked whether you want
to see:
·P, G or both P & G lists
·the list format, and
·if you’d like to view the defect data on the
screen or save it to a file. If you choose to save
the data to a file, you will be asked to enter a
file name.
Purging a Disk
By typing "purge n", where n equals the SCSI
target you wish to purge, you will initiate the
purge function. A status line at the bottom of the
screen will show which drive is selected. You will
23
be asked to confirm that you wish to purge this
device. You will then be asked to enter a serial
number or ID for this device. This number will
appear on the purge report. Finally, you will be
asked to specify a block number for verification.
This block number will be read after each data
pass and the data contained in this block will be
written to the purge report file.
As the purge progresses, the screen will be
updated to reflect the operation stage of the
purge function. At the end of the purge, a file
will be created on the disk from which you are
operating. This file is named "purge.dat" and will
contain the results of the purge operation. Refer
to section 4.2 for a description of this file.
Subsequent purge operations will append to the end
of this file, or you can print the file and delete
it after each purge.
Unrecoverable Errors
During the purge process, the disk is reformatted
and all grown defects are discarded. After the
format, the purge program will check for any new
grown defects; if new grown defects are found, the
purge will be aborted. This is to insure that if
there are any physically damaged sectors which
cannot be overwritten, the drive is not
declassified.
Common Problems
The most common problem is not having the ASPI
software for the SCSI adapter loaded properly.
This will result in an error message that says
"ASPI Shell Not Loaded" when you try to execute
the program. Refer to the user manual supplied
with your SCSI host adapter to correct this
problem. If any problems are encountered please
24
call for technical support at (303)763-7488.
Example
The user wishes to declassify the SCSI disk
located at SCSI address 3. At the DOS command line
enter:
purge 3
The user will be prompted to enter a serial number
or other identification for the drive under test.
Whatever is entered here will be printed to the
purge.dat file on the DOS computer as a means to
relate the purge report to a particular disk
drive.
The user is then prompted to enter a block number
to be used as a verification block. This block
will be examined after each data pattern has been
written, and the data from this block will be
printed to purge.dat file on the DOS computer.
After this the purge function begins and proceeds
in the following order:
1. The three data patterns are written to
all alternate and spare blocks on the
drive.
2. The three data patterns are written to
all user accessible data blocks on the
drive.
3. The file purge.dat is available to be
printed.
Because of the process involved in accessing all
alternate blocks on the drive, and in writting and
confirming every data block on the drive, the
purge function can take a long time to complete.
This will also be a function of what type of SCSI
25
host adapter is being used. In cases involving
very large capacity disks and slow SCSI adapters
it will be necessary to let the purge run
overnight to complete. Because the progress of the
purge function is monitored and tracked in the
purge.dat file, it is not necessary for the user
to intervene in the
purge process.
26
Chapter Six
SCSI Tutorial
Introduction to SCSI Philosophy
The purpose of this chapter is to give an overview
of SCSI. SCSI encompasses hardware interfaces as
well as software protocol specifications. The
overall goal of the SCSI specification is to free
system and peripheral designers from the physical
specifications of the hardware they are working
with, and to allow intelligence to be embedded
within peripherals. This embedded intelligence
should allow the host, or main, processor to
concentrate its power on running application code,
rather than mundane tasks needed to operate the
peripheral.
The SCSI specification allows the system designer
to view all peripherals as black boxes that
contain blocks of data. This data may be
accessible randomly, as in a disk drive, or it may
be sequentially accessible, as in a tape drive or
a scanner. SCSI does away with dealing with heads,
sectors, and cylinders on disk drives, because
SCSI only deals with logical blocks of data in the
device. In the case of disk drives, the SCSI
specification allows the drive itself to deal with
defective blocks, keeping track of spare blocks
and remapping internally, that is, within the SCSI
black box. This means that even though a drive may
have defective blocks, the disk appears as a
contiguous number of flawless blocks to the SCSI
world.
This black box approach to data storage and
retrieval makes the job of writing a universal
device driver a fairly simple task. For instance,
a disk device driver can accommodate drives of
27
virtually any size, because the SCSI specification
lets you ask a disk drive how many blocks of data
it can hold. And reading or writing data to a SCSI
disk consists of simply telling the drive how many
blocks you want to write, what block number to
start writing at, then sending the data to the
drive as the drive asks for it. The device driver
never knows physically where on the drive the data
is going because the SCSI peripheral takes care of
all logical block to physical geometry mapping. As
long as you do not try to read or write data
beyond the highest accessible block number,
everything is fine.
As SCSI specifications have evolved, support of
input and output devices other than disk and tape
have been added. The SCSI-2 specification defines
standard methods to deal with scanners, printers,
and jukebox robotics. The SCSI-2 specification
also defines a hardware upgrade path that allows
higher data transfer rates and several wider data
transfer paths.
SCSI Hardware
The SCSI bus is made up of eighteen lines that
carry data, in the case of single-ended SCSI,
several lines representing signal ground in the
case of differential SCSI, eighteen differential
signal lines. These eighteen signal lines can be
thought of as two groups: nine control lines and
nine data lines.
Data Lines
The data lines consist of eight bits of data and
one bit of parity data. The SCSI-2 specification
actually allows for a wide SCSI data path of 16 or
32 bits.
28
Control Lines
The nine control lines consist of two lines that
control bus handshaking, six lines that define
what state or phase the bus is in, and a reset
line. These data and control lines that make up
the physical SCSI bus can use two different
electrical methods to convey information across
the bus--single-ended and differential.
Single-ended SCSI
With the single-ended method, binary values on the
SCSI bus are represented by two voltage levels on
the bus lines. A high level is a voltage over 2.5
volts (+ - 5%) and a low level is a voltage that
is less than .4 volts. The single-ended SCSI
specification is an active low definition. That
means that a logical one is represented by a low
voltage level, and a logical zero is represented
by a high voltage level. The single-ended SCSI
specification allows for a bus cable length of up
to 6 meters, although the maximum single-ended
cable length is dependent upon the number of
devices on the bus speeds at which they run.
Single-ended Termination
The SCSI bus, like any high speed bus, must be
terminated properly to prevent ringing and false
signals. Single-ended termination consists of a
resistor network on each signal line. This
resistor network presents a constant impedance to
the SCSI bus. The network consists of a 220 ohm
resistor connected between 5 volts (the termpower
line on the SCSI bus) and the signal line, and a
330 ohm resistor connected between the signal line
and ground. It is essential to proper termination
29
that the terminating resistor network is supplied
with +5 volts on the term power line.
Unfortunately, it is a common occurrence for the
device supposed to be providing term power to have
blown the fuse in line with the term power line.
Unless you have a SCSI terminator with an LED to
show that term power is valid, you may never know
if the proper +5 volts is being supplied to your
termination. Recalling that the SCSI bus is an
active low bus, you can see why the lack of this
+5 volts can lead to very unpredictable results!
It is well worth using only terminators with term
power indicators to avoid hours of troubleshooting
headaches.
Differential SCSI
Differential SCSI consists of a pair of signal
lines for each signal. The voltage levels on these
pairs of lines move in opposite directions, and
both the high and the low lines are checked in
order for their data to be valid. This method
provides its own noise cancellation and allows for
cable lengths up to 25 meters. Single-ended SCSI
to Differential SCSI converters are available,
otherwise you can not mix single-ended and
differential devices on the same SCSI bus.
Cables and Connectors
Typically, a raw SCSI device will have a 50 pin
dual-in-line male connector for its SCSI bus
connection. This type of connector has two rows of
25 pins spaced .1" apart. The active SCSI signals
are connected to the even numbered pins, and the
odd numbered pins are signal ground.
Most systems use a connection other than the 50
pin dual-in-line type. Some use a DB-50 type
connector, some a 50 pin variation on the
30
Centronics type connector, while others use a
miniature version of the D type connector. Some
use only female gender connectors on their
enclosures, while others use male gender. The SCSI
Disk Optimizer uses a DB-25 female connector wired
in accordance with the Apple Macintosh standard.
In other words, there is not one standard for
connections and cables in the SCSI world!
SCSI Software
The SCSI specification describes a software
protocol as well as a hardware definition. An
understanding of this software aspect of SCSI will
be helpful when interpreting SCSI problems and
errors. A SCSI transaction happens between two
SCSI devices, at which time each of the devices
takes on one of two roles, Initiator or Target.
The initiator is typically the host computer, and
the target is typically the peripheral device.
The completion of the series of transactions that
make up a full SCSI transaction between an
initiator and a target is called a nexus. The
intermediate steps that happen to complete a nexus
are called SCSI Bus Phases. These phases are:
Bus Free Phase
Arbitration Phase
Selection Phase
Reselection Phase
Information Transfer Phases, which consist of:
Command Phase
Data In Phase
Data Out Phase
Status Phase
Message Phase
The current bus phase is defined by the state of
several of the control signal lines. Some phases
can be entered from any other phase, while others
must progress between phases in a specific order.
31
Phase order, and transition between phases is
controlled by the SCSI controller chips on the
host adapter and on the SCSI peripherals. These
chips are dedicated micro- processors that control
all of the timing and signal transitions necessary
to assure conformance with the SCSI
specifications.
The Bus Free Phase
The bus free phase refers to the time when no SCSI
activity is occurring on the bus. No devices are
selected, no transfers are taking place during
this phase. From this phase the SCSI bus can go to
the arbitration phase, or in the case of a SCSI
subsystem that does not support arbitration it can
go to either the selection or re-selection phase.
The Arbitration Phase
In this phase SCSI devices can negotiate for
access to the bus. SCSI devices arbitrate by
setting their ID number and the SCSI BUSY line. If
more than one device wants the bus, the device
with the highest SCSI address wins the arbitration
and sets the SELECT line. Arbitration is required
in SCSI II implementations.
The Selection\Reselection Phase
In this phase the SCSI initiator selects which
SCSI target it will talk to. The SCSI initiator
puts the bus in select phase, and sets the address
of the target. Then it waits for the target to
respond that it is there. Once the target has
responded to selection the target device will
control the SCSI bus until the transaction is
completed or until the target disconnects from the
bus.
If the SCSI target determines that it will need
32
some time before it fulfills the request, it will
disconnect itself from the bus, allowing the bus
to be used by other peripherals. For instance, if
a SCSI tape drive receives a command to space
forward it will know that this is a time consuming
operation. Rather than make the host computer and
other peripherals wait for it the tape drive can
send a disconnect message to the host. This
messages effectively says, “I m going to be busy
for a while, I ll let you know when I m ready to
do something else.” The host remembers that it
started an operation with this peripheral, but
that the operation is not finished yet. When the
tape drive is ready, it will use the SCSI
reconnect phase to tell the host, “Hey, I m back
now.” The host will then pick up where it left
off, finishing the command.
The Command Phase
The command phase is used to send a command code
from the initiator to the target. This command
code is made up of a number of bytes grouped into
a data packet called a Command Descriptor Block
(CDB).
Command Descriptor Blocks
A CDB can be 6, 10, or 12 bytes long. These bytes
describe the command to the target, including
information about any parameters that the target
needs to execute the command. If more information
is needed than can fit into the CDB, additional
data blocks can be sent to the target. These
additional data blocks are sent using the Data
phase of the SCSI bus.
CDB Format
The basic format of a six-byte CDB is as follows:
Bit 7
6
5
4
3
33
2
Byte
1
0
0
Operation Code
1
Logical Block (MSB)
2
Address
3
Address (LSB)
4
Length
5
Flag Link
LUN |
Logical Block
Logical Block
Transfer Data
Control Byte
The operation code defines the command.The most
basic SCSI command is the Test Unit Ready command,
and its operation code is 0. The CDB for the Test
Unit Ready command is
00
00
00
00
00
00
This command does not transfer any data, therefore
the logical block address and the transfer data
length are set to zero. Most SCSI commands will
deal with logical unit 0, therefore the LUN field
is also set to zero. It is very hard to set an
illegal parameter in the Test Unit Ready command,
since all of the parameters are zero!
A more complex command,The SCSI INQUIRY command
will transfer data from the device, but it does
not transfer the data from a data block on the
device. Instead, it transfers the data from the
device’s controller. The operation code for the
INQUIRY command is 0x12. The CDB for this command
is:
34
12
00
00
00
ff
00
The 0xff value in byte 4 of the above CDB
specifies that we want to transfer up to 255 bytes
of information. If the device has fewer than 255
bytes to transfer this will not result in an
error, the device will send all of the data that
it has and then signal that it is finished. If we
specified a transfer length of 5 bytes, and the
device could have sent us 32 bytes, it will only
transfer the 5 bytes that we requested. Many of
the SCSI commands that have a data phase will
return a data header or special information about
how many bytes were transferred.
The basic CDB structure is the same for the 10 and
12 byte CDBs, there is just more room in the
command to specify a larger logical block address
and a large transfer byte length. The more
complex SCSI commands will have additional data
phases that will send additional information to
the device, as well as receive data from the
device.
The Data In \ Out Phase
The data phases are used to transfer data to or
from the initiator. This data can be additional
command parameters, such as Mode Select data or
defect data, or it can be actual user data. Data
transfers can happen in two different ways,
Asynchronously or Synchronously.
Asynchronous Transfers
When a SCSI subsystem transfers data from a
peripheral to a host there needs to be a way for
the devices to signal each other when they are
ready for data or when they cannot receive data.
This process is called handshaking. The peripheral
that is receiving the data tells the sender when
it is ready, and the sender always waits until it
35
is told to send data. With Asynchronous SCSI this
handshaking process happens with each and every
byte of data. The sender says, I ve got some data
for you, then waits for the receiver to say, O.K.,
send it over. This process happens with every byte
sent, including SCSI commands, messages, user
data, and status bytes.
Synchronous Transfers
With Synchronous transfers, the target and the
initiator decide beforehand how fast they can
talk. Using the SCSI message phase, a device will
ask another device, Can you do sync transfers? If
the answer is yes, one device will ask the other,
How fast can you transfer? If the reply is Five
megabytes per second, but the first device can
only run at 4.6 MB/sec, the dialog will continue
until a transfer rate is agreed upon between the
two devices.
Once a transfer rate has been negotiated, whenever
data is transferred it’s clocked out at that data
rate. The two devices know how many bytes of data
were supposed to transfer, and each device will
toggle its handshaking line that many times, while
counting the handshaking line from the other
device. As long as the number of handshakes agrees
with the number of bytes transferred, everything
is fine, and of course the data transfer happens
in less time. In order to do sync-type transfers,
both the SCSI hardware and the host SCSI device
driver must be designed to do so.
The Status Phase
The status phase is used for the target to let the
initiator know if a command was completed
successfully or not. If a command does not
complete successfully, the initiator can issue a
36
REQUEST SENSE command to ask the target what went
wrong. The sense data returned will describe the
problem and hopefully point the way to a solution.
The Message Phase
The message phase is used for several functions,
such as sync transfer negotiations, signaling
command complete, telling the host to save data
pointers, disconnecting/reconnecting, and many
others. This allows initiators and targets to
learn about each other and optimize performance.
SCSI Commands
While the SCSI controller chips take care of
switching between bus phases and handling all of
the handshaking, it is up to the system device
driver to assemble CDB s, send them in the proper
order, and interpret the data returned by them.
The Command Menu in the SCSI Disk Optimizer allows
you to send individual SCSI commands to the device
under test and observe the results. Understanding
what SCSI commands are available, and what those
commands do is essential to successful SCSI
troubleshooting. Reading the Commands chapter of
this manual, and browsing through SCSI software
manuals for the peripherals that you work with
will give you a good overview of how these
commands work.
SCSI Bus Operation--An Example
Typical SCSI Operation
This example describes the typical SCSI bus
sequence between a SCSI host initiator and a
target, in detail:
1.
The host arbitrates for the SCSI bus by
37
asserting BSY and the data line corresponding to
its bus ID. If any other devices wish to compete
for the bus, they also assert BSY and the
appropriate data line. Each arbitrating device
then inspects the data bus and the device with the
highest ID wins it. All the other devices must
release BSY and their data lines.
2. The host attempts to select the target by
asserting SEL and releasing BSY. The host
maintains its ID and asserts the target s ID on
the data bus. Each target then checks the data
lines. If the target s ID matches that on the data
bus, it accepts selection by asserting BSY. Once
the host has detected BSY being asserted, it
asserts ATN to indicate that it will want the
target to go to the MESSAGE OUT phase. The host
releases SEL.
3. The target now has control of the SCSI bus and
it is the target which switches between phases.
The target responds to the ATTENTION condition and
initiates the MESSAGE OUT phase. The host sends an
IDENTIFY message which tells the target which
logical unit the host wishes to talk to. The fact
that the target responds to the ATN indicates to
the host that the target can accommodate more than
just a COMMAND COMPLETE message.
4. The target initiates the COMMAND phase and
transfers the Command Descriptor Block from the
host. In the COMMAND phase, the target decodes the
command and either executes the command (TEST UNIT
READY) or sets itself up for a data transfer to
the host (for example, READ, WRITE, INQUIRY). The
target then either switches to the STATUS phase if
the command is complete, or DATA phase if it is
ready to transfer data.
38
5. The data transfer length is set by the host in
the Command Descriptor Block. The target remains
in the DATA phase until all data is transferred.
6. The target then initiates a STATUS phase and
transfers one byte to the host to indicate whether
it has completed the command successfully. If the
target has detected an error, the next command
that the host is expected to send is REQUEST
SENSE. This allows the target to return further
status information to the host.
7. The target completes the SCSI sequence by
going to the MESSAGE IN phase and transferring a
COMMAND COMPLETE message to the host. The target
then releases BSY, allowing the bus to go to the
BUS FREE state.
Disconnect
In order to improve bus usage and performance,
many SCSI devices are capable of disconnecting
from the host in order to free the bus to allow
other requests to be sent to other targets. To do
so, however, the host needs to support
Disconnect/Reselect. If Disconnect is implemented,
the procedure is as follows:
1. The host arbitrates for the SCSI bus and if it
wins it, selects the target device. Before
releasing SEL and completing the selection phase,
the host asserts the ATN line. The host then
releases SEL and BSY. The target now has control
of the SCSI bus. By asserting ATN, the host has
indicated that the target should go to a MESSAGE
OUT phase.
2. After the SELECTION phase is completed, the
target responds to the host’s ATTENTION condition
39
by initiating a MESSAGE OUT phase. It receives a
message from the host which tells it whether the
host can support Disconnect/Reselect and the
desired logical unit number on the target.
3. The I/O activity from this point is controlled
entirely by the target. The target initiates the
COMMAND phase and reads in the Command
Descriptor Block from the host. After decoding
the command, the target determines whether it
should disconnect from the bus. The target
disconnects from the bus for any non-trivial
commands.
4. The disconnect process is when the target
initiates a MESSAGE IN phase and sends the host a
SAVE DATA POINTERS (during a DATA phase only) and
a DISCONNECT message. Following the MESSAGE IN
phase, the target releases BSY, freeing the bus
which then enters the BUS FREE state. The host can
now select another target, or allow another target
to win the bus and reselect the host.
5. Although the host and the target are
physically disconnected, they are still logically
connected. Both know that they have a command to
finish and will return to that job later. This
principle allows many I/O commands to be executed
simultaneously using a single peripheral bus.
Once the target has completed a task and is ready
to communicate with the host, it must re-establish
the physical path. The reselection process
involves the target arbitrating for the bus and
reselecting the host. After the physical
reconnection is made, the target sends an IDENTIFY
message to the host to indicate which target
initiates the next appropriate phase for the
command, usually a DATA phase.
40
6. During a large data transfer, the target may
disconnect at intervals depending on its use of
the bus. The drive optimizes its use of the bus
so as to maximize the transfer rate when it is
connected to the host, and to minimize the time
for which it holds the bus without handshakes. If
the target disconnects, during a data transfer,
the target initiates a MESSAGE IN phase and send
the host a SAVE DATA POINTERS message and a
DISCONNECT message. The host responds to the SAVE
DATA POINTERS message by saving the current data
pointer. After transmission of the DISCONNECT
message the target releases BSY, freeing the bus.
7. Once the target is again ready to reselect the
host, it goes through the same process as beforearbitrating for the bus, reselecting the host and
sending an IDENTIFY message. However, the host s
response is slightly different in this case since
the disconnect was during a data transfer. Host
acceptance of the IDENTIFY message also implies a
RESTORE DATA POINTERS message to the host. The
data transfer can now be resumed.
8. After completion of the data transfer, the
target initiates a STATUS phase and sends a single
status byte to the host. The final action of the
target is to initiate a MESSAGE IN phase and send
a COMMAND COMPLETE message to the host.
Disconnection Notes
Certain devices will disconnect on completion of a
data transfer if the final transfer occurs on a
disconnect boundary, before initiating the STATUS
phase. This is intended to optimize bus usage.
Most devices do not disconnect on receipt of the
following commands:
41
INQUIRY
REQUEST SENSE
TEST UNIT READY
The drive will disconnect on other commands if it
is programmed or configured to do so.
42
Miscellaneous SCSI Issues
SCSI Standards
The SCSI standard describes the physical and
electrical characteristics of a parallel I/O bus
used when connecting computers and peripherals in
a daisy-chained manner. The connection of devices
such as disk drives, tape drives, optical drives,
printers, CD-ROM drives, and other devices without
hardware modification is specified by the
standard.
The SCSI bus provides two electrical
specifications: single-ended and differential. The
single-ended driver and receiver configuration
uses TTL (Transistor-Transistor Logic) logic
levels and is primarily designed for applications
within a cabinet. The single-ended version uses
cable lengths up to 6 meters (19.68 feet). The
differential driver and receiver configuration
uses EIA RS-485 signals and is primarily designed
for applications requiring longer cable lengths.
The differential version uses cable lengths of up
to 25 meters (82.02 feet). The original SCSI
standard was approved in 1986 and was called SCSI1.
The SCSI-2 revision was released in 1992, and
incorporates wide SCSI which permits 16 or 32 bit
parallel transfer using two cables. Combined with
the fast SCSI option, data transfer rates up to 40
megabytes per second are possible. Active
termination was also specified for this standard.
The SCSI-3 revision is releasing in 1993. New
features have been suggested and are being
implemented to improve the SCSI-2 revision.
Improvements include: the ability to address 32
devices, a single 16 bit data bus cable, and a
serial SCSI protocol.
43
SCSI Cabling
The Small Computer System Interface (SCSI) is now
being used by faster and more complex devices. The
SCSI interface and associated ANSI standards are
very flexible and allow for faster transmission
rates. A major limiting factor to higher
throughput and data integrity is SCSI cabling.
SCSI cables must be engineered correctly in order
to handle the increased transmission rates of
today’s SCSI devices.
Over the years that STB has been involved with
SCSI products and enhancements, experience shows
that more than 80% of the problems with a new
installation of external SCSI-based devices (disk
drives, tapes, optical drives, etc.) have been
related to the SCSI cables used in the
installations. Ten percent of the problems relate
to improper termination, and five percent with
software improperly installed. With modern SCSI
devices, only a small percentage actually involve
true device failure (and even in these instances
the power supply that powers the SCSI peripheral
is often the problem source).
When there is a problem with the cable, the
symptoms vary greatly. The system may not operate
at all, or there will be intermittent SCSI
communi- cation failures. In many cases the
symptoms are initially thought to be due to the
devices on the SCSI bus or the software drivers
running the devices, resulting in excessive system
installation delays and costs.
Most SCSI integrators are using some form of
shielded round cables when daisy-chaining external
SCSI devices. Shielded round SCSI cables came
44
into being because of the problems that unshielded
flat ribbon cables have with electromagnetic
interference (EMI).
Unshielded cable can not pass FCC requirements,
whereas properly shielded round cable can function
within FCC specifications. However, unlike poorly
constructed round cabling, crosstalk noise in the
bus is not a problem with flat ribbon cable.
Crosstalk noise is best controlled in round
cabling by careful conductor placement (clocks in
the center, data around the periphery), and by
using twisted-pair cables. The combination of
cabling types (round versus flat) and quality
(shielded, grounded, etc) within a single SCSI bus
can create cable impedance mismatches, another
common source of frustrating SCSI problems.
The 3 meter and 6 meter length limits suggested
for 10 and 5MB per second transfers (Fast SCSI-2
and SCSI-1 respectively), are aimed at eliminating
potential data problems on the SCSI bus.
With many integrators not readily able to provide
specifications as to how their cables are
constructed, it is usually very hard to determine
if the purchased round SCSI cable will work errorfree in the target SCSI environment. There are
SCSI round cable suppliers providing cables with
connectors that, though specified as SCSI 50-pin
cables, may have as few as 25 lines wired from
connector to connector.
Differential applications will not operate under
these conditions, and many single-ended SCSI
applications will also have trouble maintaining
uncorrupted signal transmissions with cable more
than 6 feet long, as most of the ground lines are
45
not connected. Even if all of the wires are
connected, and even if twisted pair cable made
specifically for SCSI is used, depending upon how
the cable is wired to the connector, there can
also be problems. The twisted pairs on the cable
must be matched with the correct pin numbers.
Otherwise it is possible to have the plus side of
two signal lines going through the same wire pair,
inducing interference between the signals. This
causes problems on fast SCSI-based systems, and
systems with longer SCSI cable lengths. As is the
case also with SCSI termination issues, STB
recommends careful examination of cabling
specifications as part of a properly engineered
SCSI environment. Cabling problems present
challenging and frustrating problems in the real
world of SCSI.
Simple Peripheral Installation Guidelines
SCSI gives new meaning to the term "plug-andplay." A single peripheral attached to a matching
host adapter is usually easy to install, but when
you plug several into a single host, things can
get more complicated. The SCSI-2 draft
specification, universal drivers, and easier
installation routines go a long way toward making
things easier. But even so, it s likely that you
ll come up against at least one or two problems
along the way. Here are eight tips for getting
your setup to go as smoothly as possible.
1. Start simple. Start with the basics. Rather
than plugging a chain of peripherals into a single
SCSI card and then booting up (and confronting the
confusion and possible conflicts that are likely
to result), get the host adapter installed first
and then install the first hard disk. You will
want to continue installing devices one at a time,
46
checking to see that they are working before
moving to the next. This may seem like a bit of
extra work (you will have to install and reinstall
device drivers for most of the peripherals, for
example), but in a complex setup, this is often a
shortcut in disguise.
2. Make a list. When adding a new device, make
sure that you know all of the existing SCSI
identification numbers on the chain before you
start installation. If you have a host adapter
that reports the IDs during bootup (as the Adaptec
AHA-1542C does), the task is easy; otherwise
prepare to check the jumper or switch settings on
each peripheral in the chain. Or better yet, keep
an up-to-date, easily accessible list of all the
SCSI peripheral IDs on the chain, as well as the
I/O address and BIOS (Basic Input/Output System)
location of the host adapter. Devices with low
number settings have a higher priority. As a rule,
you ll want to set your first hard disk at 0 and
your second hard disk at 1. Host adapters are
generally set at 7, and some operating systems
(such as those that are Unix-based) expect to find
them set there. In certain cases, some operating
systems also expect other peripherals, such as CDROMs, to hold specific IDs; check your software
and adapter manuals before installation. SCO Unix,
for example, expects a CD-ROM to be located at
ID5. If you ignore such rules, the system may
ignore your device.
3. Internals first. Try to install all your
internal units first (starting with hard disks).
But install them one ar a time and before you
start experimenting with external devices and
termination. Adding an external device means you
need to make a change in the devices that are
47
terminated.
4. Observe proper termination. In a SCSI set up,
each end of the SCSI chain must be terminated. If
you have only internal or external devices on the
bus, the host adapter and last device on the chain
should be terminated. If you have external and
internal devices on the chain, you will generally
terminate the first and last of these devices but
not the SCSI host adapter.
5. Making connections. There are a variety of
SCSI cable connectors; 25-pin for SCSI-1, 50-pin
for SCSI-2, and 68-pin for the Wide-SCSI. Look at
the connectors on the items you need to attach
before you buy, and be sure to obtain quality
cables with good shielding. Your best bet is to
buy internal and external cables as short as
possible, but no shorter than one foot long (to
avoid signal noise.)
6. Check and test. Turn on any external devices
before booting your PC; most external devices must
be running to be recognized by their driver when
the PC boots. If a unit (or the whole chain)
fails, try the following: Check the ID numbers and
cable connections to make sure that peripherals
requiring specific IDs are set for them and that
all devices are appropriately connected. Then
power-down and power-up the system, watching the
messages during the initialization of the
configuration files. Make sure all drivers are
loaded properly.
If you can isolate an offending device, reposition
it elsewhere on the chain. If that fails, change
its ID number; perhaps the device is just unable
to work at the ID number for which it was set.
48
Next, try swapping cables between units and
experiment with different combinations of
termination, changing one element at a time. There
may be a conflict, or the term power level may not
be sufficient.In the latter case, you may have to
add a terminator to the host adapter or even to
another device on the chain.
49
Appendix A
Request Sense & Sense Key Interpretation
Sense Key
Description
--------------------------------------------------------------------------------------------------0h NO SENSE. Indicates that there is no specific sense
key information to be reported for the designated
logical unit. This would be the case for a
successful command or a command that received CHECK
CONDITION or COMMAND TERMINATED status because one of
the filemark, EOM, or ILI bits is set to 1.
1h RECOVERED ERROR. Indicates that the last command
completed successfully with some recovery action
performed by the target. Details may be determined by
examining the additional sense bytes and the
information field. When multiple recovered errors
occur during one command, the choice of error to
report (first, last, most severe, etc.) is device
specific.
2h NOT READY. Indicates that the logical unit addressed
cannot be accessed. Operator intervention may be
required to correct this condition.
3h MEDIUM ERROR. Indicates that the command terminated
with a non-recovered error condition that was
probably caused by a flaw in the medium or an error
in the recorded data. This sense key
may also be
returned if the target is unable to distinguish
between a flaw in the medium and a specific hardware
failure (sense key 4h).
4h HARDWARE ERROR. Indicates that the target detected a
non-recoverable hardware failure (for example,
controller failure, device failure, parity error,
etc.) while performing the command or during a self
50
test.
5h ILLEGAL REQUEST. Indicates there was an illegal
parameter in the command descriptor block or in the
additional parameters supplied as data for some
commands (FORMAT UNIT, SEARCH DATA, etc.). If the
target detects an invalid parameter in the command
descriptor block, then it shall terminate the command
without altering the medium. If the target detects an
invalid parameter in the additional parameters
supplied as data, the target may have already altered
the medium. This sense key may also indicate that an
invalid IDENTIFY message was received.
6h UNIT ATTENTION. Indicates that the removable medium
may have been changed or the target has been reset.
7h DATA PROTECT. Indicates that a command that reads or
writes the medium was attempted on a block that is
protected from this operation. The read or write
operation is not performed.
8h BLANK CHECK. Indicates that a write-once device or a
sequential- access device encountered blank medium or
format-defined end-of-data indication while reading
or a write-once device encountered anon-blank medium
while writing.
9h Vendor Specific. This sense key is available for
reporting vendor specific conditions.
Ah COPY ABORTED. Indicates a COPY, COMPARE, or COPY AND
VERIFY command was aborted due to an error condition
on the source device, the destination device, or
both.
Bh ABORTED COMMAND. Indicates that the target aborted
the command. The initiator may be able to recover by
trying the command again.
Ch EQUAL. Indicates a SEARCH DATA command has satisfied
an equal comparison.
Dh VOLUME OVERFLOW.
Indicates that a buffered
51
peripheral device has reached the end-of-partition
and data may remain in the buffer that has not been
written to the medium. A RECOVER BUFFERED DATA
command(s) may be issued to read the unwritten data
from the buffer.
Eh MISCOMPARE. Indicates that the source data did not
match the data read from the medium.
Fh RESERVED.
52