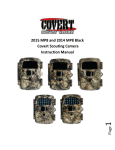
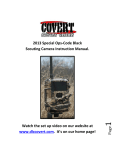
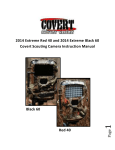
1
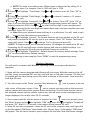
Covert Special Ops “Code Black”
The Special Ops is capable of sending photos via MMS or GPRS to your email or cell phone.
The camera will work with any cell provider that uses the GSM network and SIM cards. The
user must provide a SIM card and a cell plan which includes multimedia messaging (MMS).
Please talk to your local provider to determine if they offer this service. Currently the two
most popular providers that offer this service are T-Mobile and AT&T. There are no “Plans”
or “Contracts” to buy from Covert Scouting Cameras.
Getting started
1. Load 12 new Alkaline or Lithium AA batteries for long term use or 4 for short term use.
2. Insert SD card. Camera accepts SD cards from 8mb-8GB in size.
3. For wireless operation you must insert an activated SIM card from a GSM cell provider.
4. Control buttons function as described below:
•
•
•
•
•
•
“MENU” : enter or exit the programming menu
,
,
,
: used to navigate through the menu
“OK” : used to save changes and to play back videos
: enter or exit the playback screen to review pictures or videos
“DEL” : delete an image or video
: manually take a photo or video from the preview screen
Custom Programming
To enter custom programming, turn the cameras power switch to the “SETUP” position.
1.
2.Press the menu button to begin programming.
3.Note that “CAM” is highlighted. Press to make changes to “Camera” settings. With
“Camera mode” highlighted, use the
save.
or
4.Press
to highlight “Photo Size”. Use
“OK” to save.
5.Press
to highlight “Photo Burst”. Use
“OK” to save.
to choose photo or video and press “OK” to
or
or
to choose 3MP, 5MP, or 8 MP and press
to choose 1, 2, or 3 photos and press
6.If you chose “Video” in step 6, Press
to highlight “video size”. Use
or
to choose
VGA or QVGA and press “OK” to save. VGA is high resolution video (640x480), HVGA is
low res (320x240).
7. Press
to highlight “video length”. Use
seconds and press “OK” to save.
or
to choose video length from 5-60
8.Press
until the highlight bar goes away. Press
to highlight “PIR”. Press
to
Highlight “SENSITIVITY”. Use
or
to choose the cameras sensitivity. Choose between
“LOW, NORMAL, HIGH, or OFF”, press “OK” to save.
a. Note: off is used when taking time lapse photos if you do not want the camera to
automatically trigger on movement.
b. Note: NORMAL will work under most conditions. If you feel your camera is
triggering on objects other than animals, reduce the sensitivity to low. If you feel
the camera is not triggering when animals are present increase the sensitivity to
high. Sensitivity will likely have to be lowered in high temperatures.
9.Press
to Highlight “INTERVAL”. Use
or
to choose how often the camera will
trigger. You can choose between “0 SEC and 60 MIN”, press “OK” to save.
a. Note: true interval between pictures will be determined by the interval selection
plus the time required to write images to the SD card. This is dependant upon
many factors such as the “write” speed of the SD card, size of the image being
stored and the number of images taken per trigger. For instance, if you choose an
interval of “0 SEC”, the actual interval between triggers may be 6-15 seconds.
10.Press
to Highlight “TIME LAPSE”. Use
or
to turn the time lapse feature on/off
and select an interval for the camera to automatically trigger even when there is not
motion present. This feature is perfect for scouting large areas where movement may be
out of range for the camera to sense. The included “Game-Trakker” software can be used
to make videos from these photos to watch several days worth of activity in just a few
minutes.
11.Press
to Highlight “START-STOP”. This feature is used to program the camera to
function during a certain time of day and will control the camera in both standard
operation and Time-lapse mode. It is very useful when the Time-lapse feature is
activated. Use it to prevent the camera from taking pictures at night when most of the
activity will be beyond the reach of the IR Flash. Use
or
to turn the start-stop timer
on/off and press “OK” to save. If you choose “ON”, the start-stop timer programing
screen will appear. Use
or
to select the start hour. Press
to highlight the start
minutes. Repeat these steps to set the remainder of the timer parameters for both the
start and stop times. Once the start and stop times have been set, press OK to save.
12.Press
until the highlight bar goes away. Press
to highlight “SYS”. Press
to
Highlight “Set Clock” and press “OK”. Use
or
to select the Month. Press
to
highlight the Day. Repeat these steps to set the remainder of the date and time
parameters and press”OK” to save.
a. NOTE: The clock uses military time. Military time is determined by adding 12 to
the pm times. For example, 9am is 0900 and 3pm is 1500.
Press
to Highlight “Time Stamp”, Use
or
to choose on or off. Press “OK” to
save.
Press
to Highlight “Flash Range”, Use
or
to choose 6 meters or 12 meters.
Press “OK” to save.
Press
to Highlight “Password”, Use
or
to choose “On or Off”. Press “OK” to
save. If you turn the password on, the password programming screen will appear. The
default password is 0000. Use
or
to select the first digit in your new password.
Press
to proceed to the next digit and repeat these steps until you complete your new
password. Press “OK” to save.
a. Note: Write your password down and keep it in a safe place. You will need it each
time you turn the camera on to activate it.
Press
to Highlight “Format”. The Format function will erase all data on the SD card
and properly format the SD card for use in your camera. Press “OK” format. The format
screen will appear. Press
or
to choose “Yes” to format and press OK.
a.NOTE: The camera itself has no internal memory. All changes are saved to the SD card.
Formatting the SD card will erase custom settings and return to default settings. You
may want to format the SD card prior to making changes to avoid this.
Press
to Highlight “Default Set”. Default restores the factory default settings. Press
“OK” to restore the factory Default settings.
Programming is now complete. Press “MENU” to exit the programming menu.
13.
14.
15.
16.
17.
18.
Wireless Operation
You will need a computer with Windows operating system to program the wireless
operation.
1. Begin with the camera programmed following all prior steps. With the camera in the off
position, insert an activated SIM card into sim card slot on left side of camera. The Sim card
is inserted with the label facing up and the notch to the top of the camera. Also insert the
8mb-8gb SD card.
2. Turn the camera to the “Setup” position. Note whether the
icon is present in the top
right corner of the menu screen. If the
icon is present you must wait on the camera to
acquire contact with the cellular system before proceeding. You will know that the camera
has obtained contact with the cellular system once the red menu screen messages are no
longer displayed, this usually takes 20-30 seconds.
3. Once contact with the cellular system is acquired or if the
icon is not present, press
the “Menu” button and use
to highlight “GSM” then press the
to highlight “Download”
and press “OK”. Wait 10-15 seconds, turn camera off and remove SD card.
4. Insert SD card into a computer. Locate the SD card in the computer menu and right click
on the file labeled “GSM Setup” then double click “Extract Here”. A file labeled “GSM setup”
will appear. This file can be saved to your computer for use later. Note that future changes
to the programming can be made with this file when it is saved on your computer without
using the download tool in the cameras menu.
5. Double click “GSM Setup” to open the program use the following decriptions to make the
necessary changes to program. Note that when programming, those fields marked with the
red * are required.
6. “Send Mode”
a. Instant: The camera will send images instantly when taken.
b. Daily Report:The camera sends a daily message with the total # of photos taken
and the most recent image.
c. Off: The camera acts as a standard trail camera
and does not send messages.
7. “Send Via”
a. “MMS”: utilizes messaging plans
b. “GPRS”: utilizes Data plans
8. “Send to”
a. Phone: sends message to cell phone
b. Email: sends message to email
c. Both: sends message to both email and phone
9. “Country select”: select the country you will be using the camera
10. “Operator Select”: Select the cell provider you are using for the camera. If the provider
you are using is not present you will need to go back to “Country Select” and choose custom
for use in step 11.
11. “Operator Parameter”: These settings have been pre-filled for all providers listed in
“Operator Select”. If you are using custom settings you will need to acquire all information
for these parameters from your cell provider.
12. “SMTP Parameter”: This information is obtainable from your provider if needed.
13. “Recipients”: This is where you enter the the email address and/or phone numbers of
where the messages are to be sent. Up to 4 phone numbers and/or 4 emails can be entered.
Phone numbers should be entered with prefix, area code and the number with no dashes or
spaces.
14. “Path”: Press the … button to the right of path to select where you want to save your
settings. Most people will want to save a copy to their desktop for future use as well as
directly to the SD card. Any time the SD card is changed, this file will need to be saved to
the new SD card in order for the camera to send messages.
15. Once saved on the SD card, remove it and insert into the camera. Turn camera on and
note a message should appear that states “Update successful”
16. Programming is now complete. It is recommended to setup camera in an area with a
good signal and test before deploying in a remote area.
Other camera features and functions
1. Take a picture or video manually:
a. Prior to taking pictures or video you must program the camera mode. See step 3
above. You can also qucikly change from photo to video mode by using
or
from the “Preview Screen”
b. Slide the power switch to the “SETUP” position to enter the “Preview Screen” or
press the “MENU” button to exit the programming menu. When in the “Preview
Screen” the LCD screen will display what ever the camera is pointing to.
2.
3.
4.
5.
6.
c. Press
to take a picture or begin recording video. Press
to stop recording
video.
To view photos or videos press
while on the preview screen to enter the “Replay”
screen. Use
or
to scroll through photos and videos.
To play videos, press
. Press
again to stop video.
To delete photos or videos press one at a time, press “DEL” while viewing the image you
wish to delete. Use
or
to select “Yes” and press “OK” to delete the current image.
Select “NO” and press OK to cancel.
To delete all photos, press “MENU” while viewing any image. “Playback” will be
highlighted, press
to highlight “Delete”. Use
or
to select “Delete All” or “Delete
one”. The Delete screen will appear and prompt you to choose yes or no to delete. Use
or
to select yes to delete or no to cancel. Press
to exit the delete menu.
To exit the replay screen press
.
1.
2.
3.
4.
5.
Camera mounting and deployment
The camera can be mounted using the included attachment strap or by utilizing the
threaded insert on the bottom of the camera and a standard 1/4x20 threaded tripod
style mount such as the Covert Tree60 camera mount available seperately at retailers
or www.dlccovert.com
For best results, mount the camera approximately 4 feet off the ground facing
straight forward as level as possible.
To enhance the flash, we recommend positioning the camera in an area with a
backdrop to reflect the maximum amount of light. For instance, place the camera
20-30 feet from a field edge facing the woods. For use inside of timber, positioning
the camera facing a thicket approximately 20-30 feet away.
Turn the camera on, latch the case and walk away!
These are just recommended guidelines for ideal performance. Once you become
familiar with the camera you will determine positioning that better suits your use.
Do you have a great photo from your covert camera and want to share it? Email it to
[email protected] also check out our photo contests at www.dlccovert.com/
contest.html
www.facebook.com/covertscoutingcameras
Questions can be sent to [email protected]
Warranty Policy and Procedure
Covert Scouting Cameras, Inc warrants the cameras will be free from defects in materials and workmanship for
a period of one (1) year from the date of purchase, If the product proves defective during the warranty period,
Covert, at its option, will:
(1) Repair the product by means of telephone support, E-mail or depot service at no charge for parts or labor,
shipping prepaid by customer, return shipping prepaid by Covert. (US only) Return shipping to be billed to
customer and must be paid prior to shipping, if camera is found not to be defective in materials or
workmanship.
(2 Replace the product with a comparable product which may be new or refurbished, (warranty is not extended
beyond original purchase date).
(3) Covert recommends the Customer first utilize support materials shipped with the product, product
diagnostics, information contained on the Web, and email support. If unsuccessful, to obtain service under
this warranty the Customer must notify Covert Telephone Support or Covert Support email, of the defect
before the expiration of the warranty period. Customers will provide appropriate assistance to Telephone
Support personnel to resolve issues.
If telephone support is unsuccessful, Covert or its authorized dealer will instruct the customer on how to receive
warranty repair as provided below.
• Service is available in the United States
• Outside the US, service is available through the distributor/reseller of purchase.
•
•
•
All returns must have an RMA number provided by Covert. Copy of Proof of Purchase required for all
returns.
Covert is not responsible for lost or damaged merchandise incurred during the shipping process.
Insurance for returns is at the discretion of the Customer, additional charges apply for return shipping.
Covert reserves the right to charge for service in exception cases.
A description of the depot process may be obtained from the authorized Covert reseller/distributor. Depot
service is at Covert’s or its authorized dealer’s sole discretion and is considered an option of last resort.
In the maintenance of the product, Covert may use new or equivalent to new parts, assemblies or products for
equal or improved quality. All defective parts, assemblies, and products become the property of Covert. Covert
may require the return of parts, assemblies and products to a designated Covert Depot or the Covert
representative from which the part, assembly, or product was originally purchased. Return and claims will be
handled according to the current Covert procedure.
These warranties shall not apply to any defect, failure or damage caused by improper use or improper or
inadequate maintenance and care. Covert shall not be obligated under these warranties:
a) To repair damage resulting from attempts by personnel other than Covert representatives to install, repair
or service the product unless directed by a Covert representative,
b) To repair damage, malfunction, or degradation of performance resulting from improper use or connection
to incompatible equipment or memory,
c) To repair damage, malfunction, or degradation of performance caused by the use of non Covert supplies
or consumables or the use of Covert supplies not specified for use with this product,
d) To repair an item that has been modified or integrated with other products when the effect of such
modification or integration increases the time or difficulty of servicing the product or degrades
performance or reliability,
e) To perform user maintenance or cleaning or to repair damage, malfunction,
f) to repair damage, malfunction, or degradation of performance resulting from use of the product in an
environment not meeting the operating specifications set forth in the user manual,
g) To repair damage, malfunction, or degradation of performance resulting from failure to properly prepare
and transport the product as prescribed in published product materials
h) Failure to register the product warranty within 10 days of purchase
i) To replace items that have been refilled, are used up, abused, misused, or tampered with in any way;
j) To install replacement items that are considered customer replaceable;
k) To support software not supplied by Covert;
l) To provide software or firmware updates or upgrades.
Any service identified in the above list and provided by Covert at the Customer’s request shall be invoiced to
Customer, at Covert’s then current rates for parts, labor and shipping.
THE ABOVE WARRANTIES ARE GIVEN BY COVERT WITH RESPECT TO THIS PRODUCT AND ITS
RELATED ITEMS IN LIEU OF ANY OTHER WARRANTIES, EXPRESS OR IMPLIED. COVERT AND ITS
VENDORS DISCLAIM ANY IMPLIED WARRANTIES OF MERCHANTABILITY OR FITNESS FOR A
PARTICULAR PURPOSE OR ANY SIMILAR STANDARD IMPOSED BY APPLICABLE LEGISLATION.
COVERT' RESPONSIBILITY TO REPAIR, REPLACE, FOR DEFECTIVE PRODUCTS AND RELATED
ITEMS IS THE SOLE AND EXCLUSIVE REMEDY PROVIDED TO THE CUSTOMER FOR BREACH OF
THESE WARRANTIES.
Some states, provinces, and countries do not allow the exclusion or limitation of incidental or consequential
damages or exclusions or limitations on the duration of implied warranties or conditions, so the above
limitations or exclusions may not apply to you. This warranty gives you specific legal rights, and you may also
have other rights that vary by state, province, or country.
TO THE EXTENT ALLOWED BY LOCAL LAW, EXCEPT FOR THE OBLIGATIONS SPECIFICALLY
SET FORTH IN THIS WARRANTY STATEMENT, IN NO EVENT SHALL COVERT AND ITS VENDORS
BE LIABLE FOR ANY INDIRECT, SPECIAL, INCIDENTAL OR CONSEQUENTIAL DAMAGES
(INCLUDING LOSS OF PROFITS) WHETHER BASED ON CONTRACT, TORT, OR ANY OTHER
LEGAL THEORY AND IRRESPECTIVE OF WHETHER COVERT OR THE VENDOR HAS ADVANCE
NOTICE OF THE POSSIBILITY OF SUCH DAMAGES.