1
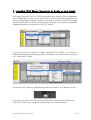
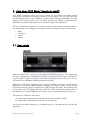
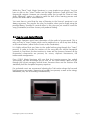
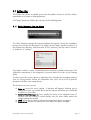
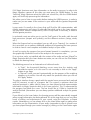
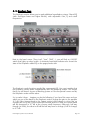
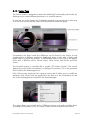
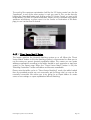
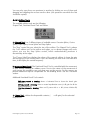
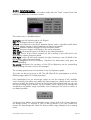
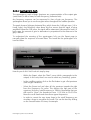
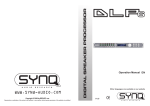
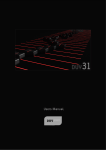
DUY Magic Spectrum 1.0 USER’S MANUAL INDEX 1. Quick start page 2 2. 3. Inserting DUY Magic Spectrum in Audio or Aux tracks Quick-use guide page 3 4. 5. What is DUY Magic Spectrum? How does DUY Magic Spectrum work? page 6 5.1 Basic Mode page 7 5.2 How to Learn Audio efficiently page 8 6. page 5 page 7 DUY Magic Spectrum sections page 10 6.1 Edition bar page 13 6.1.1 Patch Manager page 13 6.1.2 Edit Buttons page 14 6.1.3 Memory Buttons page 15 6.1.4 Help page 15 6.2 Input Section page 16 6.3 Output Section page 17 6.4 Tab Pages Section: Magic Spectrum Modes page 18 6.4.1 Basic Page page 19 6.4.1.1 “Learn” Source and Destination 6.4.1.2 LCD Display 6.4.1.3 Spectrogram 6.4.2 Emphasis Page page 22 6.4.3 Vector Page page 24 6.4.3.1 “Direct Vector Match” Button 6.4.4 Expert Page page 26 6.4.4.1 Edit Curve Selection 6.4.4.2 Edition Tools 6.4.4.3 Transform Section 6.4.4.3.1 The Frequency Limiter 6.4.4.4 Spectrogram in depth DUY Magic Spectrum User’s Manual Page 1 1. Quick start Please read DUY Magic Spectrum’s installation guide to install the software. You will find it included both in the Downloaded version or in the CD you purchased, according to the version you chose when you purchased the software. If you have purchased DUY Magic Spectrum as an online download, make sure that the software has been downloaded correctly. Once you uncompressed the downloaded file, it should look like this: If the icon looks different, it means that you may have had some problem during the download and the file may be corrupted. Therefore, please download the file again and repeat the process. To install the software, double-click on the Install icon. Read the License Agreement very carefully and click on the “Agree” button only if you agree to accept the terms and conditions of the provided license agreement. You will be asked to enter your serial number. Please enter it. Make sure the serial number is inserted in capital letters, with no spaces and looking similar to this: XXXXX-XXXXX-XXXXX-XXXXX, where “X” can be a capital letter or a number. The serial number will be provided at the top of your registration card, if you have purchased a boxed CD, or in the email we provided if you have purchased the software as an online download. You must also install DUY Magic Spectrum’s settings, included in a separate installer, using the same procedure as detailed above. DUY Magic Spectrum User’s Manual Page 2 2. Inserting DUY Magic Spectrum in Audio or Aux tracks DUY Magic Spectrum PRO (for TDM) is presented as a Mono to Mono equalization effect. Depending on your version of ProTools or other DAE-aware application, the process of inserting the plug-in is done in one way or another. Look for DUY Magic Spectrum PRO either in the list of Mono to Mono plug-ins or, if they’re arranged by categories/families, you will find it in the “EQ” section: If you’re going to be using DUY Magic Spectrum PRO (TDM) as a Stereo or Multichannel process which requires precise correlation, you should insert your plugin in “multi-mono” mode: For this last case (stereo or multichannel) make sure that the “Link” button is active: If you’re a user of the non-TDM version of DUY Magic Spectrum (for RTAS, Audio Units, VST or MAS), you may also insert the plug-in as a stereo instance. DUY Magic Spectrum User’s Manual Page 3 This is DUY Magic Spectrum’s edition window in Basic Mode: DUY Magic Spectrum is formed by: • • • • An LCD Display section that provides information and instructions on the operations of the plug-in and its basic use. A Input Gain control with a level visualizer. The lower central part shows a dynamic spectrogram which displays updated information about the current state of the spectral analysis.. At the right hand side of the plug-in’s interface, you will find the “Amount” knob to control the amount of effect you want to add, and an output level visualization with a Clip indicator. DUY Magic Spectrum User’s Manual Page 4 3. Quick-use guide We sincerely recommend reading chapters 5 and 6 of this manual, which include detailed explanations of all sections and tools within DUY Magic Spectrum. To process audio with DUY Magic Spectrum, insert it in a track and press Play on your host system. Click on the LEARN button within the “Destination” section of DUY Magic Spectrum. Your audio will be analysed. You can stop the analysis at any time by clicking on the same LEARN button, and then re-start it again if you like. We advise you to process your audio track through those parts where the instrumentation is at its richest stage, and therefore the frequency content is the greatest. Once you have started the LEARNING process, you will be able to modify any parameter and also select any of the available settings. When the PROCESS bar is complete, this will mean that DUY Magic Spectrum has already enough information to make the appropriate spectral adjustments to your audio. The “AMOUNT” adjustment is very important. If the amount value is 0%, then the output signal will be the original audio (there have been no changes made to the signal), whereas for a 100% value, the transformation curve is applied fully to the original signal. Normally, the best choice is to have the amount value set to 0% and once the LEARN process is complete, gradually increase the Amount value slowly, to choose exactly how much effect you want to add. DUY Magic Spectrum User’s Manual Page 5 4. What is DUY Magic Spectrum? Magic Spectrum is a high-quality tool that allows you to modify frequencial contents in a multidirectional and arbitrary way. Therefore, you can edit any frequencial content of any kind of audio material. Its practical design includes a range of functions that vary from a very basic use to a total control over the audio spectrum, with an impressive high resolution and an unprecedented degree of quality. In the designing stage of DUY Magic Spectrum, we strived to develop and ultimately achieve proprietary techniques and algorithms that enabled us to treat the audio signal in a strictly professional manner, with internal 56-bit resolution, phase coherence, algorithms of immediate response, in-depth statistical analysis and much more! The design of DUY Magic Spectrum provides different edition levels: the basic mode allows you to match frequencial contents, whereas the very powerful advanced manual mode provides intelligent tools and plenty of graphic information. DUY Magic Spectrum User’s Manual Page 6 5. How does DUY Magic Spectrum work? DUY Magic Spectrum helps you in the search for the perfect chromatic sound balance by controlling the spectral contents of your audio. You, the user, will have the feeling that you’re only controlling a system with 2 buttons and faders if you’re working in the basic mode, or you can drive yourself to a degree of obsession and perfection by controlling frequency in a very thin range of the spectrum! We have divided the interface in 4 sections which can be used complementarily or not, depending on the degree of control you want to achieve. These 4 sections are: • • • • Basic Emphasis Vector Expert 5.1. Basic mode Within the Basic level, users can go through the LEARNING process. This stage is the first step –obligatory and extremely important-, through which the system will “listen” to your audio in order to analyze it and subsequently proceed to process it. This is the heart of the intelligent Matching Spectrum process. What does DUY Magic Spectrum do? It aims at making one piece of audio sound identical to another, spectrally speaking. Suppose you have a audio source with an EQ that you like very much. Suppose you’d like to apply the same “frequential spirit” to your own mix. DUY Magic Spectrum will “learn” the characteristic frequencies of the original mix and will apply the same levels to each frequential band in your mix. This process is divided in two steps: a) Learning the frequencies and levels of the piece of audio we like b) Learning the frequencies and levels of our own mix. Once we know both spectrums, a complex process of comparing both results will take place. DUY Magic Spectrum User’s Manual Page 7 Within the “Basic” level, Magic Spectrum is have to click on the “Learn” button and let frequencial contents. However, we sincerely Audio Efficiently” section, in order to make process the audio with a correct balance. a very simple-to-use plug-in. You just Magic Spectrum “read and learn” the advise you to read the “How to Learn the best of the learning process and You must have in mind that the step of listening to the Source’s spectrum is not always necessary. This may be the case, for instance, when you’re simply using the provided library, classified in musical styles. In this case you just need to Learn the song (Destination) and then choose your preferred Setting. 5.2 How to Learn Audio Efficiently DUY Magic Spectrum must have information of the audio to be processed. This is why you have a “Learn” button, which can be switched on or off at any time clicking on the same button (either for the Source or the Destination). It is highly advised that you listen to the audio before going through the “Learn” process, in order to locate the sections of the song with the richest frequential contents. In Pop Music, the best sections to Learn are the choruses, because all the frequential components are present, for voices, rhythmic instruments, full instrumental arrangements... Even if DUY Magic Spectrum tells you that the Learning process has ended successfully, we still encourage you to click on the Learn button again and go through the richest passages several times, because these are the sections that statistically hold the complete frequency response. For orchestral music we recommend selecting the Tutti section where the low and high frequency percussion (timpani and cymbals) are present, as well as the strings, woodwinds, etc., are all sounding simultaneously. DUY Magic Spectrum User’s Manual Page 8 Once the Learning process is over, Magic Spectrum’s calculation engine will have calculated millions of values for the frequential micro-bands that form the piece of audio. This is translated into the characteristic statistic result and... The Magic will begin! When the learning process is over for the Destination, several options are available, depending on the degree of edition you want to achieve: a) The first option is to apply the settings/presets provided in the factory library. You can select them by using the Patch Manager within the Edition Bar. When you load a setting, the Destination’s information remains untouched, but the Source’s is changed to a new one, brought to you by the selected setting. When a session is saved in ProTools or another DAE-aware (host) application, the result of the learning process for the Destination is saved (it is not lost). b) We always advise adjusting the Amount knob properly, making sure that the Overflow led is not alight. If this occured, you should lower the value of the Input Level knob. DUY Magic Spectrum User’s Manual Page 9 c) Use the Emphasis page. In this section you can correct the result using a 5band parametric EQ with their Q, frequency value control, and variable gain. The lower and higher bands (“Very Low Band” and “Very Hi Band”) are shelf EQs. Please read the “Emphasis Level” section. d) Use the Vector page. This page contains the amazing Spectral Bidimensional Morphing Tool, which allows 4 different spectrums to be combined proprietarily to form a new one. Please read the “Vector Level” section. DUY Magic Spectrum User’s Manual Page 10 e) Use the Expert page to edit the spectrum yourself. You can actually edit the spectrum directly with the typical tools of a manual editor. Please read the “Expert Level” section for further information. DUY Magic Spectrum User’s Manual Page 11 6. DUY Magic Spectrum sections DUY Magic Spectrum’s window is formed by several parts in common, which are always visible regardless of the level or the type of edition mode active at the time. The central part is controlled by tabs, which allow you to select the edition mode. The Input and Output sections, as well as the Edition Bar, are always visible. The “Tab Pages” section varies according to your choice. DUY Magic Spectrum User’s Manual Page 12 6.1 Edition Bar The Edition Bar allows to rapidly access the fast-edition functions and the edition, organization and search of settings/presets. DUY Magic Spectrum’s Edition Bar consists of the following parts: 6.1.1 Patch Manager Pop-Up Menu The Patch Manager arranges the presets/settings documents. During the installation process, the presets will be placed in a folder named “Magic Spectrum patches” in the Preferences directory. Note that with all DUY products, we also name “presets” as “patches” or “settings”. This folder contains a series of subfolders that contain the presets themselves. The subfolders correspond to the categories of presets within the main (root) Settings folder. The first part of the menu (above a separation line) includes the managing options, such as saving presets. Below the separation line you’ll see the list of presets, grouped in families (see image above) The functions you can use are: a) Save as: saves the active setting . A window will appear, allowing you to change the name you would like to give the preset and where you would like to store it on your drive. b) Save in Patch Manager as: Does exactly the same as the standard “save as” function, but the setting is saved directly into the main folder where the current settings are stored. c) Load: allows you to select a settings document and open it to apply it. d) Preferences: Shows the options you have within the patch manager. DUY Magic Spectrum User’s Manual Page 13 - Cache On: allows you to activate the loading of all the presets in memory, so that the system doesn’t have to read from disk each time a setting is used. This is helpful to reduce the time of reading to disk. Cache Patches: When the “cache on” is active, if you select this option, all the presets will be loaded when you use DUY Magic Spectrum for the first time. Cache Patches when needed: If you select this option, only the presets that are called or used during a session will be saved in the cache. Select Root Folder: allows you to choose the folder that contains the structure of subfolders that holds the presets. You can have an infinite presets folders in your hard disk, but only one can be active at a time. So, if you prefer to change the name of the folder or where it is stored in your hard drive, you can manually move it and then select the position where it’s located by using this option. Once you have done this, click on the “Re-build Patches List” when you click OK if you would like the list of presets to be refreshed. 6.1.2 Edit Buttons (Copy, Paste, Undo, Redo) These buttons allow you to copy, paste, undo or redo. If it’s not possible to use a certain function, the button will be tagged in lighter gray. This will occur, for example, if there is nothing to Paste (which would mean you haven’t clicked “Copy” first). “Copy” will copy the state of a whole screen. This information can then be pasted using the “Paste” button in this instance of Magic Spectrum or in another. The “Undo” and “Redo” buttons allow you to return to the “previous” or “next” state after your last edition. A history of the last 10 editions is stored. Therefore, you have 10 levels of Undo or Redo. If you would like to clean the history or stored states, click on the Copy button while holding the Opt key. DUY Magic Spectrum User’s Manual Page 14 In depth, the “Copy” function acquires data of the Source’s spectrum plus all parameters except for the Destination spectrum (which depends on the position of the plug-in instance). If you need to copy the destination spectrum as well, you can use the “Total copy” feature: hold the Command key and click on the Copy button. This tool may be useful, for example, when using DUY Magic Spectrum on a multichannel output project for mastering, which may require to capture the details of the input spectrum for the most relevant channels and then apply the result to all the other channels. 6.1.3 Memory Buttons (A, B, C, D, E, F) The A, B, C, D, E, F buttons are temporary memories which can be used in many cases. For example, if you would like to compare several settings. To save a screen state to one of these memories, simply click on the memory button (A, B, C, D, E or F). If the memory is empty, the button will be highlighted in gray. Once you click on the button and save the content of the screen, the lettering will turn black. If you want to empty a memory, click on the button while holding the Opt key. If you would like to load all the memories in a circular way, click on the Rotate button. If you only have memories A and B full, the sequence in rotation from one memory to another will be A, B, A, B... 6.1.4 Help Magic Spectrum has Help Balloons and also Spoken Help (you will need the Speech Manager in your system for Spoken Help to function). To use any of these two, click the respective icons. DUY Magic Spectrum User’s Manual Page 15 6.2 Input Section The input section is formed by an Input slider control, a level display and a Mastering button. It’s important to check the system’s internal overflow process state. For this reason, DUY Magic Spectrum has a clipping led at the output. If the led lights up, it’s advisable that you reduce the input level to avoid having unwanted distortion. The Mastering button (active unless you click on it) determines that you’re looking for the ideal frequency response for Mastering. If you’re working on a live project, we advise you to switch this option off, so that a phase optimization algorithm comes into place, sacrificing a 20-27 Hz range (which is hardly ever audible). This may result in having an added noise when the knobs are being tweakened. DUY Magic Spectrum User’s Manual Page 16 6.3 Output Section The output section is formed by the Amount control, the Clip indicator and the output level value. The Clip indicator will show us if there has been an internal calculation overflow. If it goes alight, you should move the input slider down. The light can be switched off by clicking on it. The “Amount” knob controls the amount of effect that should be applied to the input signal. When at 0%, the signal is a bypass (ignoring the change of level caused by the Gain slider). As you increase the value of the Amount control, the effect of DUY Magic Spectrum will increase too. DUY Magic Spectrum User’s Manual Page 17 6.4 Tab Pages Section: DUY Magic Spectrum’s Modes DUY Magic Spectrum contains 4 edition and operation levels: Basic, Emphasis, Vector, Expert. These 4 levels are also called “modes” in this manual. You can switch from one to another by clicking on any of the 4 tabs that correspond to each “page” or “mode”. DUY Magic Spectrum’s most simple function is an intelligent Spectral Matcher, capable of learning the spectrum (frequency contents) of a piece of audio, and applying it to another. However, DUY has created an amazing tool that allows you to tweak this plug-in far beyond that basic use: DUY Magic Spectrum can arbitrarily modify the frequency contents of any audio signal!! Whenever you save your audio session, Magic Spectrum will remember the mode (also called Page or Tab) you were using, for the next time the session is recalled. It will determine what spectral matching system is used in each case. For example: if you have saved a session within the Basic level tab, its matching will be done at this level (applying Source to Destination). If it’s been set to Vector, the Vectorial matching system will be used. If you save using the Emphasis or Expert modes, no matching will take place (these two levels are used for access to more precise controls and fine EQ’ing as we will see further on. DUY Magic Spectrum User’s Manual Page 18 6.4.1 Basic Page The “Basic Page” is the simplest functioning mode within Magic Spectrum. The point is the following: we have a piece of audio and we want to make it sound (frequentially) like another. This process is called Spectral Matching: it studies the frequential ‘fingerprint’ of a piece of audio and applies them to another. In DUY Magic Spectrum, we call SOURCE the frequential spectrum we’d like to apply to the DESTINATION’s frequential spectrum. Therefore the “source” is the sound we like, and the Destination is the sound we currently have, which will later be modified applying the characteristics of the Source frequencial spectrum. As you can imagine, in order to apply one spectrum to the other, the Spectral Matching process must have the information of both “sounds”. We will “teach” Magic Spectrum all about our Source and Destination thanks to the Learning process. However, DUY Magic Spectrum includes a vast library of elaborated spectrums, which have been obtained by analyzing commercial recordings. This means that if you prefer using the provided library, you only need Magic Spectrum to “learn” the Destination. 6.4.1.1 Learn Source & Destination The Learning process of both the source and destination takes place within the Basic mode. The Learn section of DUY Magic Spectrum consists of 2 main buttons (Learn and Clean) and 4 additional buttons (Apply, Manual, Auto and Reset): Click on the Learn button o start or stop the learning process. While DUY Magic Spectrum is learning, it will be compiling information on the audio to process. The Learning process is considered the most important step in the correct functioning of Magic Spectrum, because it implies analyzing the precise information of the audio piece. DUY Magic Spectrum User’s Manual Page 19 DUY Magic Spectrum must have information on the audio to process. In order to let Magic Spectrum capture all this data, you must press the LEARN button. To stop “teaching” Magic Spectrum what the audio mix sounds like, click the LEARN button again, and it will stop processing the information. We advise you to listen to your audio before starting the LEARN process, in order to make sure you are aware of the sections in your audio with the greatest frequential content. In pop music it’s usually in the chorus that you’ll find the full instrumentation, with rhytmic instruments and voices. It’s advisable that while you’re in the Learn process, you play these sections multiple times, even in loop mode if necessary, in order to achieve greater precision. In orchestral music we advise you to use the “tutti” parts of the audio, with low and high percussion (timpani and cymbals), and the different sections (strings, winds, etc...) When the Progress bar has completed, you can still go on “learning”. As a matter of fact, we advise you to perform additional auditions and repeating the Learn process in order to have a more complete and detailed analysis of your audio. As well as seeing the progress bar move forward towards its completion, you can also graphically visualize the result of the analysis in the response curve. If, at any time, we’re not satisfied with the content of the audio we have “played” to Magic Spectrum while the Learn button was active, we can click on the Clear button to delete the learning history. The Matching process has an Automatic and a Manual mode: • • In “Auto”, the frequential Matching occurs every time the statistics and calculations require so. In this case it’s not necessary to click on the “Apply” button at any stage. In “Manual” mode, you won’t automatically see the progress of the matching algorithm as it evolves. You will only match the spectrums when you click on the “Apply” button. The plug-in interface shows a graph with the spectral curve processed and analysed until the moment, as well as a progress bar. The system is optimum when the analyzed spectrum is stable (which means you have played enough representative information to Magic Spectrum while in the Learn process). This is represented by the progress bar below the curve. The bar should be at 100% to consider the analysis finished. (Remember you can always perform additional analysis for greater precision) If you clicked on the Learn button, the learning process will be automatically stopped when enough information has been gathered. It’s at this stage that you can use other levels of edition and adjustments to your sound, using the Emphasis or Expert modes. Nevertheless, you can always click on the Learn button again to gather more information on the characteristics of your audio (remember to stop it yourself once you have played through your section enough, by clicking on the Learn button again DUY Magic Spectrum User’s Manual Page 20 to stop the process). The more information you gather, the more exact the spectral curve will be. Clicking on the Reset button will flatten your frequency enhancements. Please note that in the Emphasis mode this option is not available, since its operation is independent from the Matching process. Please read the Emphasis section for further information. The Learn and Clear buttons can not only be found on the Destination part of the screen (right hand side), but also on the Source section (at the left). If you load any of the provided presets, the spectrum on the Source section will be replaced by the characteristics of the loaded preset. So, if you have learnt the spectrum of your audio, you should save it somehow, to avoid losing it, before loading a preset. Once you’re satisfied with the statistic values and calculations of your Source, save this as a preset/setting to use it in the future. 6.4.1.2 LCD Display The LCD display shows the status of the progress in learning, and the messages or important suggestions/instructions that the system may need to give you. Once the Learning process is over, we advise you to use the Amount knob to increase or decrease the Matching effect. The next step to perfection our process is to modify our EQ with either minor or major changes. Read the Emphasis section for more information. 6.4.1.3 Spectrogram The Spectrogram is a graph that displays the output spectrum, this being the final spectrum that must be applied to the processed audio. DUY Magic Spectrum User’s Manual Page 21 6.4.2 Emphasis Page The Emphasis section allows you to apply additional equalization using a 5-band EQ (with shelf-type lower and higher bands), with adjustable Gain, Q and cutoff frequencies. Next to the band name (“Very Low”, “Low”, “Mid”…), you will find an ON/OFF switch that lights up when active. A miniature band-state-indicator also shows the state of the Emphasis added EQ on the pages/modes tab: The Emphasis mode functions exactly like a parametric EQ. You must consider that the Emphasis section works independently from the Matching section. This means that if you still haven’t chosen a Matching system or if the frequencial curves are flat, the Emphasis section will be active. So, to make it clear… Imagine you do the following: if you have flat curves and you switch on one of the bands in the Emphasis section, change the gain to, for example -3.7 dB. If the Amount knob in the Output section of the plug-in is set at 0%, no changes will occur, but if you increase the Amount knob to 100%, the chosen band will be decreased in 3.7 dB at the chosen cutoff frequency. Obviously, half way through (at 50%), the value in dB will be half way from no change (0 dB in change) to -3.7 dB. DUY Magic Spectrum User’s Manual Page 22 In summary: DUY Magic Spectrum can behave as a constant parametric EQ. To do so, select the Emphasis tab (without touching any other curve or spectrum) and apply the EQ normally. While you’re viewing the Emphasis tab, don’t forget to save your setting! DUY Magic Spectrum User’s Manual Page 23 6.4.3 Vector Page The Vector section is designed to extend the Matching’s functionality even further, by allowing you to control different spectrums in a vectorial manner! As you can see in the image, the Destination spectrum is accessed in the same way as in the Basic mode, with the Learn and Clear buttons below the graph. Compared to the Basic mode, the difference can be found in the Source. It now corresponds to 4 different spectrums, distributed along a circle with a Radius and Angle control to adjust the position. To differentiate them in the Source, we identify them with 4 different colors: Yellow Vector, Violet Vector, Red Vector and Blue Vector. The Vectorial system is controlled like a joystick (2D Vector Control). This control displays the result of the vectorization, according to its position. This is the spectrum that’s used for the Matching process. Each of the vector spectrums has a pop-up menu which allows you to modify the spectrum (Flat, Clear), load the spectrum in the Source or the Destination or load any of the settings/presets included in the Patch Manager. This setup allows you to load up to 4 different sources and gently combine them according to the position of the 2D Vector Control (in the inner part of the circle). DUY Magic Spectrum User’s Manual Page 24 The result of the spectrum vectorization held by the 2D Vector control can also be “transferred” to any of the other vectors, in case you need it. This can be done by holding the Command button and clicking on the 2D Vector Control, as seen in the image below. This kind of “spectrum transfer” allows you to re-vectorize any present spectrum ad-infinitum, or even move it to the Source or Destination of the Basic page, to use it at that level if desired. 6.4.3.1 ”Direct Vector Match” Button This button switches the Vectorial Matching system on or off. When the “Direct Vector Match” button is ON, the Matching system is disconnected to allow you to use the vectors as generic spectral equalization tables. This means you can create arbitrary equalizations according to the tables loaded in each spectrum or start from scratch, in the Expert page. When the “Direct Vector Match” button is ON, the “Matching Destination” section will darken and become unavailable. Please note that while you’re in “Direct Vector Matching” mode, the tables loaded from the provided presets are not necessarily apt for being used, or may not be musically convenient. We advise you to try going for an Expert edition to create curves or use settings as a pure equalization without Matching. DUY Magic Spectrum User’s Manual Page 25 6.4.4 Expert Page The Expert page contains tools that allow you to perform a very powerful manual edition, for any of the spectrums in each one of Magic Spectrum’s pages. When you’re using the Expert mode, you become a “digital surgeon”, editing with great precision. DUY Magic Spectrum provides a pixel-by-pixel editable spectrogram. To understand what Magic Spectrum’s spectrogram is, we advise you to read the “Spectrogram in depth” section. The spectrogram is located at the bottom of the Expert page and has a scroll bar that helps you to visually slide the spectrum in the screen. With your mouse and 3 edition tools you’ll make amazing changes to the spectrum. 6.4.4.1 Edit Curve Selection A 7-button section allows you to select the spectrum you’d like to edit: These are the editable spectrums: the basic Source and Destination (Src, Dst), the vectorial Yellow, Violet, Red and Blue (Ylw, Vio, Red, Blu), and a seventh, called “Main”. The “Main” spectrum holds the result of any matching, which means it’s the final spectrum (before applying the Emphasis and Amount). It’s very important that you consider that when you proceed to edit the “Main” spectrum, you’re editing the final curve, and therefore this is the closest access to the plug-in’s process. To select a certain curve, click with your mouse on any of the 7 buttons. DUY Magic Spectrum User’s Manual Page 26 You may also copy from one spectrum to another by clicking on one of them and dragging and dropping the mouse over the other (the spectrum over which the first should be copied). 6.4.4.2 Edition Tools The available edition tools are the following: Shaped Tool, FreeHand Pencil Tool and Eraser. a) Shaped Tool : has 5 different types of available curves: Gaussian Spline, Cosine Spline, Cubic Spline, Linear Spline and Step Spline. The “Size” control lets you select the size of the edition. The Shaped Tool is always the “soft” edition tool in the outline and edges, so no abrupt changes will occur, unless you use the Step Spline control, which mathematically produces a discontinuity at the edges. The “Cursor Value” box displays the values of the manual edition: it shows the gain and frequency of the chosen band. If you are working on more than one band at a time, it will display the central frequency. b) FreeHand Pencil Tool : The FreeHand Pencil Tool is controlled with the movement of your mouse, drawing an arbitrary curve. Due to the nature of the movement of your mouse, the resulting curve you draw may not be precise. For this reason, we provide additional help to compensate for the drawing errors. See the Transform section. Additional FreeHand Pencil Tool controls: Shift key pressed + drawing: draws a horizontal line to leave the bands gain constant. Alt key pressed + drawing: draws a neutral equalization curve (0 dB gain for all the drawn frequencies). Cmd key pressed + drawing: draws an EQ curve with a -∞ dB (minus infinite dB) gain. c) Eraser Tool : deletes the frequential contents (frequencies. DUY Magic Spectrum User’s Manual ∞ dB gain), for the selected Page 27 6.4.4.3 Transform Section At any time, you can undo the last edition softly with the “Fade” control (Fade Last Edition), located in the Transform section. This section has 10 Modifier buttons: Normalize: sets the highest peak at a 0 dB gain. Flat: sets all frequencies at a 0 dB gain. Smooth: smoothens the transitions between bands, and is especially useful when there are abrupt changes in gains between one band and another. Random: performs random changes for each frequency band. Gain Up: increases the gain of all bands in the same proportion. Gain Down: decreases the gain of all bands in the same proportion. Shift Left: moves all the bands towards the left, inserting a new null band in the immediately superior frequency band. Shift Right: moves all the bands towards the right, inserting a new null band in the immediately inferior frequency band. Accent: exaggerates the EQ tendency. Therefore, the attenuations and gains are more outstanding. De-accent: decreases the tendency of the EQ by flattening out the outstanding values (making the result closer to the average). The resulting spectrum can be visualized in the Out Spectrum graph. The scale can be set to Linear or dB. This will affect all the spectrograms on all the different pages within DUY Magic Spectrum. Each spectrogram has an auto-range system to see the entirety of the available curve. However, the edition area within the Expert page has a better control over the range to simplify the change of level. At the top part of the Expert page you can see the current range and 2 arrows (up and down), which allow you to change the visualization and edition range if possible, since showing all the curve on screen is not always possible. To decrease the edition and visualization range, simply click on the Down Arrow in the Range section. To increase it, click on the Up arrow. If you click outside the arrows, the Auto-Range will select the best possible range, adapted to the existing curve. DUY Magic Spectrum User’s Manual Page 28 6.4.4.3.1 Frequency Limiter Take a close look at the “Out Spectrum” window. At the top left hand side of the graph you will see a round dot. Click on it to open the Frequency Limiter menu: The frequency limiter allows you to limit the frequency variation from 0 to +24.0 dB, in 6 dB steps (see the image above). You can also switch the limiter off, though this is not recommended, since you could overemphasize certain frequencies too much. We advise you to lower your monitoring system’s level when using this menu. The Frequency Limiter dot, shown in the “Out Spectrum” window, will light in the following cases: Highlighted in purple: The limiter is active and limiting. Highlighted in red : The limiter if OFF and you must pay special attention to the output level. Off (gray): The limiter is on, but no frequencies have been limited yet. The limiter functions within the frequency domain, and isn’t related to the output level! For example: you can program DUY Magic Spectrum to bring the level up 5 dB at a certain frequency, but if the audio doesn’t contain that precise frequency, the increase in level will not be reflected at the output. DUY Magic Spectrum User’s Manual Page 29 6.4.4.4 Spectrogram in depth The spectrograms used in Magic Spectrum are a representation of the output gain (vertical axis) in dB or linear, for each frequency (horizontal axis). Any frequency response can be expressed in form of gain per frequency. The spectrogram allows you to see these gain values throughout the audible spectrum. The graph shows a light-gray horizontal line, which shows the 0 dB gain area (1.0 in Linear scale). Any frequency value above this line means that the signal is being amplified. Below the 0 dB curve, the signal will be attenuated (decreased in level). In both cases, the amount of gain or attenuation is proportional to the distance to the gray 0 dB line. To understand the meaning of the spectrogram, let’s use the Expert page to manually draw the response of known filters. This would be the spectrogram of a Low Pass filter: How do you do this? Let’s look at it step by step: - Within the Expert, select the “Main” curve (which corresponds to the output). In this case, there’s no need to select any “matching” system. - In the modifiers section, click on the Flat button to get a flat spectrum (with no gain variations). - Select the Eraser tool and clean all the spectrum towards the right from the Frequency Cut value. This deletes the high part of the spectrum (from the cutoff frequency to 22KHz). Remember that you will need to “clean” the frequencies from 11.05 KHz to 22.05 KHz. Move the scroll thumb and erase those upper frequencies. - In order to correct the very steep slope in the cutoff frequency, we simulate a slope to smoothen the result. This can be done by clicking on the Smooth button 25 times, for example. DUY Magic Spectrum User’s Manual Page 30 This is the spectrogram of a Hi Pass filter: This can be done in the same way as the previous example, though the passing band has been exchanged for the reject band. We encourage you to practice with this example! By following similar procedures you can achieve filters of very arbitrary responses. Take a look at the “Experimental & FXs” folder/family, included in the available presets, which can be loaded from the patch manager. DUY Magic Spectrum User’s Manual Page 31 This guide is copyrighted ©2006 by DUY, with all rights reserved. Following copyright laws, this software manual may not be duplicated in whole or in part without the written consent of DUY. All trademarks are the property of their respective owners. Features and specifications may be subject to change without notice. DUY Magic Spectrum User’s Manual Page 32