1
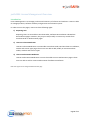
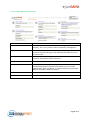
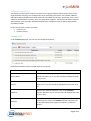
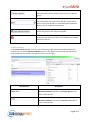
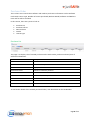
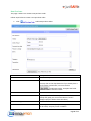
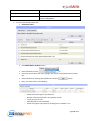
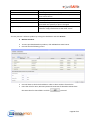
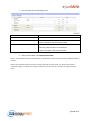
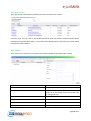
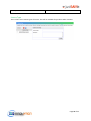
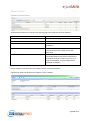
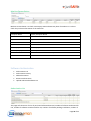
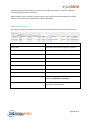
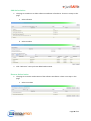
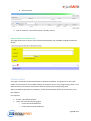
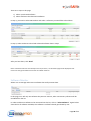
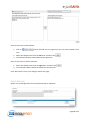
License Management User Manual October Revision This is a user manual to perform software license management in justSAMit. This manual outlines the step by step approach in managing software license purchases, authorizing license usage and how you can effective use this information to manage your software asset in your organization. Table of Contents justSAMit License Management Overview ......................................................................................... 3 Introduction .................................................................................................................................. 3 License Management Overview ..................................................................................................... 4 Software Inventory ............................................................................................................................ 5 Inventory List ................................................................................................................................. 5 Create Inventory ............................................................................................................................ 6 Purchase Order ................................................................................................................................. 8 Purchase List.................................................................................................................................. 8 New Purchase................................................................................................................................ 9 Purchase Full List ......................................................................................................................... 13 New Vendor ................................................................................................................................ 13 License Type ................................................................................................................................ 14 Reconciliation.................................................................................................................................. 15 Software Reconciliation ............................................................................................................... 15 Machine Reconciliation................................................................................................................ 16 Software Authorization ................................................................................................................... 16 Authorization List ........................................................................................................................ 16 Authorization History................................................................................................................... 17 Add Authorization ....................................................................................................................... 18 Remove Authorization ................................................................................................................. 18 Upload Authorize Software List.................................................................................................... 19 Software Bind .................................................................................................................................. 19 Page 2 of 22 justSAMit License Management Overview Introduction License Management is to manage purchase and inventory of software and machines. Users are able to manage purchase, software authority and generate reconciliation reports. In order to access the pages, users must have following rights: 1) Reporting User Reporting Users are accessible to Purchase Order, Software Reconciliation and Machine Reconciliation pages. However, they may not add, modify or remove any records from Purchase Order or Authorization pages. 2) License Purchase Moderator License Purchase Moderators are accessible to Purchase Order, Bind Purchase to Installation, Vendor and License Type page. These users are able to add, modify or remove Purchase Orders, Vendors and License Types. 3) License Authorization Moderator License Authorization Moderators are users that able to access Authorization pages. These users are able to add or remove authorization of Software Installation. Note: User rights can be changed at Administration page Page 3 of 22 License Management Overview Name Software Inventory Description Group software with common names into a single software inventory. This is very useful in license compliancy management. Purchase Order Records Purchase Information. Users may add, modify or remove purchase records in this page. Click Add Purchase Order to insert a purchase order. Reconciliation Display software licensing gaps and its compliancy level. Recorded purchases for machines can be seen here. Software Authorization Record authority of installed software inventory. Software Bind Bind purchased software to installed Software. This is to record the installed Software with purchase information such as Cost and Support Expiry Date. In addition, it is also to identify the purchased software already installed on machines. Software Monitor Manage and monitor selected purchased software. Patch Monitor Manage and monitor patches and hotfixes installed. Page 4 of 22 Software Inventory The objective of having this function is to allow user to group software with common names into a single Software Inventory so to manage the license compliancy level easier. For example, SAMLite will capture Microsoft Office Enterprise 2007 with a few different versions, where they are the same software. With Software Inventory, users can group them together. This feature will affect Software Authorization, Purchase Order, Software Reconciliation, Compliancy Level, Software Expiry details and Software Audit. In this section there are parts to look at: Inventory List Create Inventory Inventory List In the Inventory List page, user will see a list displayed as below: Displayed is software that has already been put into group. Item/Column Description Display Name Name of the software group. Click on the Display Name header will allow user to sort the record by alphabetical order (A-Z) or (Z-A). Version Software group’s version. Click on the Version header will allow user to sort the record by alphabetical order (A-Z) or (ZA). Publisher Name of the software publisher. Click on the Publisher hearder will allow user to sort the record by alphabetical order (A-Z) or (Z-A). Software Displayed the total number of software grouped under this software group. Click on the Software header will allow user to sort the number from largest to smallest or smallest to largest. Page 5 of 22 If the box is checked, user will be able to see what are the software and its version parked in the each of the software group. Allows user to narrow down the list by typing in the search criteria/keyword in the search box and click on the search button. Search will be done on the Display Name (Software Name), Version, Publisher and Software. Click on this icon/link will lead user to page where they can create and group for the common software. Check on the checkbox next to the displayed software name and click on this button will allow user to delete the software group from the list. Create Inventory In the Create Inventory page, user can create software group from the list of software detected install in users’ machines (Detected Software pane on the right) or create software group that has been installed by user without selecting from the list on the right. Item/Column Description Display name will be auto-generated in first selection of Detected Software. However, the Display Name is editable in the box itself. Version will be auto-generated in first selection of Detected Software. However, the Version is edit-able to user in the box itself. Page 6 of 22 Where user can insert the name of the Publisher. This field can be left blank. Display Name Name of the software group. Click on the Display Name header will allow user to sort the record by alphabetical order (A-Z) or (Z-A). Version Software group’s version. Click on the Version header will allow user to sort the record by alphabetical order (A-Z) or (Z-A). Already Group Indicate whether displayed software is already group into a software group or otherwise. Shown result will be Yes or No. Click on this will allows user to filter the list of Detected Software based on the Software View. Allows user to narrow down the list by typing in the search criteria/keyword in the search box and click on the search button. Search will be done on the Display Name (Software Name) and Version. Checking this checkbox will filter out a list of Detected Software that has “0” installation. Checking this checkbox will filter out a list of Detected Software that has already been put into group (in the Already Grouped column, there will be a Yes indication). Follow the steps below to create inventory (software group): 1. Go to License Management from the top menu. Click on Create Inventory from Software Inventory section. 2. From the Detected Software list, select software to be grouped together. E.g.: Microsoft Enterprise 2007. 3. Please note that you will see that the Display Name is already auto-generated. 4. Click on button to have the selected software populated in the Selected Software list (on the left pane). 5. Should you have decided that there are some software you do not wants to include in the Selected Software list, you may remove by checking the checkbox and click on button. 6. When you have finished adding the software, click on redirected to the Inventory List to see created inventory. . And you will be Page 7 of 22 Purchase Order This is where user records their software and machine purchases. Information such as Software Purchased, License Type, Number of License purchased, Machine Model, Software and Machine Price and etc will be recorded. In this section, there are 5 parts to look at: Purchase List Purchase Full List New Purchase Vendor License Type Purchase List This page is to display a list of created purchase orders with vendor, products and total price of Software and Machine. Column PO Number Description Name of Purchase Order. Purchase Date Date where the purchase order is recorded. Vendor Display vendor name. Software Product Number of software products. Software Price Total Price for All unit of software. Machine Product Number of machine products. Machine Price Total Price for All units of Machines. Total Product Summation of Total Software Product and Total Machine Product. Total Price Total Price of Purchase Order To see further details of the created purchased order, user should click on the PO Number. Page 8 of 22 New Purchase This page is where user creates new purchase order. Follow steps below to create a new purchase order: 1. Click to add new purchase order. Field Name PO Number Description Number of the purchase order. Vendor Vendor Details of current PO. You may click on the drop down list if you already have a list of vendor created. Else, user must click on to add new vendor. Complete the fields and click Create to add the vendor. Date of Issue Issued date for current PO. Payment due Date Payment due date of current purchase order. If the PO has already fully paid, you can set the value as “never”. (Simply empty the field to have the value) Person In charge Person who handles current PO Bill To Location, person or company the being billed. This field can be name, company name or address Page 9 of 22 Company Select company that belonged to the PO Description Additional notes Attachment External files that related to the PO. The file size must not exceed 4.0 Megabytes 2. To record purchased product for: a. Software Product Click Add Software Product button. Select software from the list. User may narrow down the list by typing in the search criteria/keyword into search box. Select software by checking the checkbox and click on Now, user have to fill in the following: o o o o o button. Select the license type for this software Number of license purchase in the quantity column Insert price for per unit Extended will be auto calculated Select the support expiry date by clicking on the “calendar” icon. Page 10 of 22 Column name Software Product License Quantity Price Extended Support Expiry Date Description Name of purchased software, together with its version License type of purchased software. You may select a license from the list. Quantity of purchased software. Cannot be 0 Price of purchased software. Summation of quantity and price. This field will be autogenerated once quantity or price is changed The expiry support/maintenance date of purchased software. Empty this field to set the value “never” You may remove a software product by ticking the checkboxes and click Remove b. Machine Products To insert purchased Machine products, click Add Machine Item button. User will see the following screen: User will have to check the checkbox in order to select machine from the list. Insert the value for Price, Warranty Date and Lease Date if selected machines have the same value for above fields. And click to proceed. Page 11 of 22 User will then see the following screen: Column name Computer Description Computer name, together with Department and Location Product ID Product ID and its description. Product ID can be the item name or Model of selected machine item Product Details Price: Price of the machine Warranty: Warranty date of the machine Lease: Lease expiry date of the machine You may remove a machine item by ticking the checkboxes and click Remove. After you have done, click Add Purchase Order. Note 1: The mandatory fields of Purchase Order are PO Number, Vendor and have at least 1 software/machine product. Note 2: If the selected machine items are already under other purchase order, you will be redirected to a confirmation page. Click Confirm to change the machines into current PO, or cancel to change the machine items Page 12 of 22 Purchase Full List This page displays comprehensive details about the purchase order created. From this page, user can click on the PO Number which opens up another window with full details information of the click PO number. If user clicks on the Display Name it will show user of the details information of the software. New Vendor This is where user creates a list of vendor. This will be available for purchase order creation. Field Name Vendor ID Description Unique ID for vendor. This field is compulsory Company Vendor’s Company. Normally is same as Vendor Unique ID. If you change the ID, the company will be changed as well Person Person/Vendor’s Name Phone Number Vendors’ Contact Number Email Vendor’s Email Address Address Vendor’s Company Address/Personal Address Page 13 of 22 Description Additional notes for current vendor License Type This is where user creates types of license. This will be available for purchase order creation. Page 14 of 22 Reconciliation Software Reconciliation Software Reconciliation is to identify the licensing gaps and compliancy level of software. Column Name Display Name Description Name of Software, together with Version. Purchased Total purchased unit of software Detected Number of machines that detected software installation Balance Purchase Balance. Value in red means Under Purchase while Value in Blue means over purchased. Compliancy Compliancy level. It is to determine the percentage between Purchases and detected installation. If the purchase has more then or equal to installation, the percentage will be displayed as 100.00% Click a software name from the list to display details of selected software. Figure below show the details when software name is clicked:l Page 15 of 22 Machine Reconciliation Machine reconciliation is to check Lease Expiry Date and Warranty date of machines. It is also to check the purchase information of the machines. Column Name Computer Name Description Display Computer Name Username Name of the user who owns the machine Department Department of machines Location Where machines is located Serial Number Machines’ serial number Lease Expiry date Lease Expiry date Warranty Expiry Date Warranty Date Purchase Order Purchase information that already bound to machine Product ID Recorded Product ID from PO Software Authorization Authorization List Authorization History Add Authorization Remove Authorization Upload Authorized Software List Authorization List This page will show user of a list of purchased software detected, number of software authorized for use, number of software unauthorized for use, number of software pending installation, number of Page 16 of 22 software pending removal because of unauthorized usage and number of software completed removing using unauthorized software. When software name is clicked, user will be able to see machines list detected with this software, which are the machines has authorization and unauthorization. Authorization History This page is to store the records that you have done new authorization and remove authorization. Item/Column Description Action Date Date when authorization is given or removes. Computer Name Machine hostname. User Id Id of the user for the machine. Username The name of the user for the machine. Department Machine’s Department Location Where is this machine located Display Name Software Name Version Software version Type Show what type of authorization been conducted, Authorize or Removal Action By User that made this action to give authorization or to remove authorization Page 17 of 22 Add Authorization 1. This page is to authorize to allow software installation of machines. There are 2 steps in this page: a. Select software b. Select machine 2. Click “Authorize”. Now you have added authorization. Remove Authorization 1. This page is to remove authorization of the software installation. There are 2 steps in this page: a. Select a machine Page 18 of 22 b. Select software 2. Click on “Remove”. Now authorization is already remove. Upload Authorize Software List This page allows users to import a list of Authorized Software into justSAMit using Microsoft Excel format. Software Bind This page is to bind the purchased software to software installation. The purpose is to link a few details from purchase to the installed software on machines such as cost, support expiry date. It is to determine the exact amount of purchased software quantity that already being used. When you bind the purchase to installation, all selected installation will be set to authorize to use the software. Pre-requisite: At least 1 purchased software Users must have the following rights: o License Purchase Moderator o License Authorization Moderator Page 19 of 22 There are 2 steps in this page: 1) Select a purchased software 2) Select machines that detected installation In Step 1, you need to select PO Number and select a software you would like to bind them. In Step 2, select machines to bind with selected software done in step 1 After you have done, click “Bind” Note: If selected machines have already bound to purchase, a confirmation page will be displayed. Click Confirm to change the Software Purchase of notified machines. Software Monitor Allows user to manage and monitor software that really interest them. In this page, user will only see software they want to monitor; other unnecessary software will be excluded from the list. In order to add more software to be monitored into the list, click on “Select Software”. Figure below show the list of software available, this software is software already purchased by user. Page 20 of 22 Here are the steps to add software: 1. Click on a list. and it will lead you to a page where you can select software from 2. Select the software title from the left pane, and then click 3. The selected software will be added to the right pane. . Here are the steps to remove software: 1. Select the software title from the right pane, and then click 2. The removed software will be moved back to the left pane. . Click “Ok” button to save your changes and exit the page. Patch Monitor Allows user to manage and monitor patch/hotfix that is important. Page 21 of 22 Here are the steps to add hotfix: 1. Select the hotfix name from the “Select a Hotfix” drop down list. 2. The selected hotfix will be shown at the left pane. 3. Select either operating system or software that is required to be installed with the selected software at the right pane. 4. Click “Add” button to add the selected hotfix to the monitoring list. Here are the steps to remove hotfix: 1. Click “Remove” button of the selected hotfix. 2. The monitoring list will be updated immediately. Click “Save” button to save your changes and exit the page. Page 22 of 22