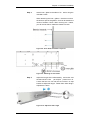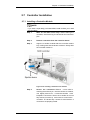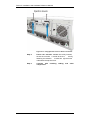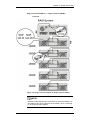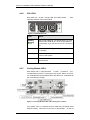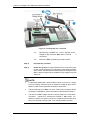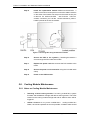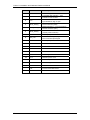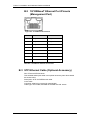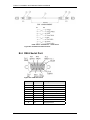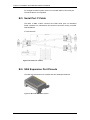
1
Falcon IV RAID Subsystem Series Hardware Manual Rev. 2.0 (2009) Falcon IV Installation and Hardware Reference Manual Warnings and Certifications RESTRICTED ACCESS LOCATION: This equipment is intended to be installed in a RESTRICTED ACCESS LOCATION only. Access can only be gained by SERVICE PERSONS or by USERS who have been instructed about the reasons for the restrictions applied to the location and about any precautions that shall be taken; and Access is by an authorized person through the use of a TOOL or lock and key, or other means of security, and is controlled by the authority responsible for the location. ELECTRIC SHOCK WARNING! To Prevent Electric Shock: 1. Access to this equipment is granted only to trained operators and service personnel who have been instructed of and fully understand the possible hazardous conditions and the consequences of accessing non-field-serviceable units, e.g., system backplane or power supplies. 2. Unplug the system before you move it or when it has become damaged. RELIABLE EARTHING! Particular attention should be given to prepare reliable earthing with the power supply connections other than direct connections to the branch circuit (e.g., use of power strips). The AC power cords provide the main earth connection. Check proper grounding before powering on the enclosure. OVERLOADING PROTECTION! 1. The enclosure should be installed according to specifications on a chassis label. Provide a suitable power source with electrical overload protection. 2. Do not overload the AC supply branch circuit that provides power to the rack. The total rack load should not exceed 80 percent of the branch circuit rating. BATTERY USE WARNING! Risk of explosion if battery is replaced by an incorrect type. Dispose of used batteries according to local ordinance. iv Falcon IV Installation and Hardware Reference Manual THERMAL PRECAUTIONS: 1. If installed in a closed or multi-unit rack assembly, the operating ambient temperature of the rack environment may be greater than room ambient. Appropriate measures, such as increasing airflow, should be available to maintain the temperature below 35°C. 2. The openings on the enclosure are for air convection. DO NOT COVER THE OPENINGS. 3. To comply with safety, emission, and thermal requirements, all module bays should be populated with plug-in modules. The system should not be operated with the absence of any covers. HANDLING PRECAUTIONS: 1. The system can either be installed into a standard EIA-310 19” rack cabinet or placed on a desktop. Mechanical loading of the enclosure should be carefully handled to avoid hazardous condition. A drop or fall could cause injury. 2. Lay this system on a reliable surface with desktop installation. A drop or fall can cause injury. 3. Mounting this enclosure requires two people. 4. The enclosure can weigh up to 34.4lb (15.64kg) without disk drives. With disk drives loaded, the enclosure can weigh up to 52.4lb (24kg). A reliable surface should be available to support this weight. 5. Disk drives should be installed after the enclosure is securely installed. v Falcon IV Installation and Hardware Reference Manual FCC (applies in the U.S. and Canada) FCC Class A Radio Frequency Interference Statement This device complies with Part 15 of the FCC rules. Operation is subject to the following two conditions: (1) this device may not cause harmful interference, and (2) this device may accept any interference received, including interference that may cause undesired operation. NOTE: This equipment has been tested and found to comply with the limits for a Class A digital device, pursuant to Part 15 of the FCC Rules. These limits are designed to provide reasonable protection against harmful interference when the equipment is operated in a commercial environment. This equipment generates, uses, and can radiate radio frequency energy and, if not installed and used in accordance with the instruction manual, may cause harmful interference to radio communications. Operation of this equipment in a residential area is likely to cause harmful interference in which case the user will be required to correct the interference at his own expense. Any changes or modifications not expressly approved by the party responsible for compliance could void the user’s authority to operate the equipment. WARNING: A shielded power cord is required in order to meet FCC emission limits and also to prevent interference to nearby radio and television reception. Use only shielded cables to connect I/O devices to this equipment. You are cautioned that changes or modifications not expressly approved by the party responsible for compliance could void your authority to operate the equipment. This device is in conformity with the EMC. CB vi (Certified Worldwide) This device meets the requirements of the CB standard for electrical equipment with regard to establishing a satisfactory level of safety for persons using the device and for the area surrounding the apparatus. This standard covers only safety aspects of the above apparatus; it does not cover other matters, such as style or performance. Falcon IV Installation and Hardware Reference Manual CCC For Power Supplies’ compatibility to China Compulsory Certification. China RoHS In Compliance with AeA China RoHS Regulations (SJ/T 11364-2006) ITE BSMI Class A, CNS 13438 (for Taiwan) This device is in conformity with UL standards for safety. Инструкция по безопасности Модель: FC to SAS/SATA 3U/16, 4U/24 Bay RAID Subsystem, Models )DOFRQxxxxxx, )DOFRQxxxx, )DOFRQ, )DOFRQ where “x” can be “0-9”, “A-Z“, blank, or dash “x” for marketing purpose and no impact safety related critical components and constructions. 1. 2. 3. 4. 5. 6. 7. 8. Перед использованием оборудования внимательно прочтите инструкцию. Сохраняйте инструкцию для дальнейшего использования в работе. Не допускайте попадания влаги на изделие. Устанавливайте оборудование на устойчивую поверхность. Падение может нанести ущерб оборудованию. Соблюдайте климатические требования, использование оборудование при температуре окружающей среды выше 50°С, может привести к выходу оборудования из строя. Размещайте шнур питания в недоступном для пользователя месте. Запрещается ставить на шнур питания какие-либо предметы. При работе с оборудованием необходимо учитывать все предупреждения и замечания. Если оборудование не используется в течении длительного времени, отключите его от сети питания. vii Falcon IV Installation and Hardware Reference Manual 9. Запрещается вскрывать оборудование. Оборудование может вскрываться только квалифицированным персоналом. 10. При возникновении одного из повреждений оборудования вызовите обслуживающий персонал: a. Повреждение шнура питания или вилки. b. Оборудование не работает или его работа не соответствует инструкции пользователя . e. Оборудование повреждено. f. Оборудование имеет очевидный признак поломки. 11. Источник питания должен быть установлен в соответствии с инструкцией. Ток нагрузки и выходная мощность не должны превышать указанных в спецификации. RAID, Inc. is committed to being properly prepared and taking all the necessary steps that will result in our compliance with the new European directive, RoHS (2002/95/EC), on or before the specific dates set forth in those applicable laws and regulations. RAID, Inc is applying its own internal efforts and expertise and is working closely with customers and suppliers to achieve compliance while maintaining an uninterrupted supply of quality products. RAID, Inc is currently investigating, evaluating, and qualifying our materials and components to ensure that products sold on or after 1 July 2006, in such territory, are in compliance with the above regulations. Disposal of Old Electrical & Electronic Equipment (Applicable in the European Union and other European countries with separate collection systems) This symbol on the product or on its packaging indicates that this product shall not be treated as household waste. Instead it shall be handed over to the applicable collection point for the recycling of electrical and electronic equipment. By proper waste handling of this product you ensure that it has no negative consequences for the environment and human health, which could otherwise be caused if this product is thrown into the garbage bin. The recycling of materials will help to conserve natural resources. For more details about recycling of this product, please contact your local city office, your household waste disposal service or the shop where you purchased the product. viii Falcon IV Installation and Hardware Reference Manual Table of Contents CONTACT INFORMATION ............................................................................................... II COPYRIGHT 2009 ........................................................................................................III This Edition First Published 2009 ...................................................................................... iii Disclaimer ......................................................................................................................... iii Trademarks ....................................................................................................................... iii SAFETY PRECAUTIONS .............................................................................................. XIV Precautions and Instructions ........................................................................................... xiv ESD Precautions .............................................................................................................. xv ABOUT THIS MANUAL ................................................................................................. XV REVISION HISTORY .................................................................................................... XV WHO SHOULD READ THIS MANUAL? ............................................................................. XV Related Documentation .................................................................................................... xv CONVENTIONS .......................................................................................................... XVI Naming Lists ....................................................................................................................... xvi .......................................................................................................................xvii WARNINGS AND CERTIFICATIONS ................................................................................. IV TABLE OF CONTENTS .................................................................................................. IX LIST OF TABLES .......................................................................................................... XI LIST OF FIGURES ....................................................................................................... XII SOFTWARE AND FIRMWARE UPDATES ....................................................................... XVII CHAPTER 1 INTRODUCTION 1.1 PRODUCT OVERVIEW .....................................................................................1-1 1.1.1 Introduction .......................................................................................................1-1 Model Variations..............................................................................................................1-2 1.1.2 Enclosure Chassis.............................................................................................1-3 1.1.2.1 Chassis Overview ........................................................................................1-3 1.1.2.2 Physical Dimensions ....................................................................................1-3 1.1.2.3 Front Panel Overview...................................................................................1-3 1.1.2.4 Hard Drive Numbering .................................................................................1-4 1.1.2.5 Rear Panel Overview ...................................................................................1-4 1.1.2.6 Backplane Board..........................................................................................1-5 1.2 SYSTEM COMPONENTS ..................................................................................1-6 1.2.1 1.2.2 1.2.3 1.2.4 1.2.5 1.2.6 1.2.7 1.2.8 1.3 SYSTEM MONITORING ..................................................................................1-12 1.3.1 1.3.2 1.3.3 1.4 Drive Trays ........................................................................................................1-6 MUX Kit .............................................................................................................1-7 The RAID Controller Module .............................................................................1-8 Controller Module Interfaces .............................................................................1-9 Cache Module .................................................................................................1-10 CBM (Cache Backup Module) .........................................................................1-10 Power Supply Units .........................................................................................1-11 Cooling Modules..............................................................................................1-11 I2C bus ............................................................................................................1-12 LED Indicators.................................................................................................1-12 Audible Alarm ..................................................................................................1-13 HOT-SWAPPABLE COMPONENTS ...................................................................1-13 1.4.1 1.4.2 1.4.3 Hot-swap Capabilities......................................................................................1-13 Components ....................................................................................................1-13 Normalized Airflow ..........................................................................................1-14 CHAPTER 2 HARDWARE INSTALLATION 2.1 2.2 2.3 INTRODUCTION ..............................................................................................2-1 INSTALLATION PREREQUISITES .......................................................................2-1 SAFETY PRECAUTIONS ...................................................................................2-3 2.3.1 2.3.2 2.4 Precautions and Instructions .............................................................................2-3 Static-free Installation........................................................................................2-6 GENERAL PROCEDURE ..................................................................................2-7 Installation Procedure Flowchart .....................................................................................2-7 ix Falcon IV Installation and Hardware Reference Manual 2.5 UNPACKING THE SYSTEM ...............................................................................2-9 2.5.1 2.5.2 2.6 Preinstalled Components ................................................................................2-10 Components to be Installed.............................................................................2-10 RACK/CABINET INSTALLATION ......................................................................2-11 Removing Chassis ........................................................................................................2-16 2.7 CONTROLLER INSTALLATION .........................................................................2-17 2.7.1 2.8 2.8.1 2.8.2 2.9 2.10 Installing a Controller Module ..........................................................................2-17 HARD DRIVE INSTALLATION ..........................................................................2-19 Hard Drive Installation Prerequisites ...............................................................2-19 Drive Installation..............................................................................................2-19 DRIVE TRAY INSTALLATION ...........................................................................2-21 INSTALLING CBM (OPTIONAL FOR G MODEL) ................................................2-23 CHAPTER 3 SYSTEM CONNECTIONS 3.1 FC HOST CONNECTION PREREQUISITES .........................................................3-1 3.1.1 Choosing the Fibre Cables ................................................................................3-1 FC Lasers .......................................................................................................................3-2 FC Speed Auto-detection ................................................................................................3-2 SFP Transceivers............................................................................................................3-2 FC Port Dust Plugs..........................................................................................................3-3 Other Concerns ...............................................................................................................3-3 3.1.2 Topology and Configuration Considerations .....................................................3-5 Fibre Channel Topologies ...............................................................................................3-5 Host-side Topologies.......................................................................................................3-5 Associated Host-side Parameters ...................................................................................3-6 3.2 3.3 3.4 SAMPLE TOPOLOGIES ....................................................................................3-8 FC CABLING ................................................................................................3-14 EXPANSION LINKS ........................................................................................3-16 SAS Expansion Configuration .......................................................................................3-18 Single-controller RAID to 3U single-controller JBODs:..................................................3-21 3.5 3.6 3.7 CONNECTING OTHER INTERFACES ................................................................3-22 CONNECTING POWER CORDS .......................................................................3-23 POWER ON..................................................................................................3-24 Check List .....................................................................................................................3-24 Power On Procedure.....................................................................................................3-25 Power On Status Check ................................................................................................3-26 LCD Screen...................................................................................................................3-27 3.8 POWER OFF PROCEDURE ............................................................................3-28 CHAPTER 4 SYSTEM MONITORING 4.1 4.2 OVERVIEW.....................................................................................................4-1 STATUS-INDICATING LEDS .............................................................................4-3 4.2.1 LCD Keypad Panel............................................................................................4-3 4.2.2 Drive Tray LEDs ................................................................................................4-4 4.2.3 Controller Module LEDs ....................................................................................4-5 How to Use the Restore Default Button?...................................................................4-7 4.2.4 FC Host Port LEDs............................................................................................4-9 4.2.5 Ethernet Port LEDs ...........................................................................................4-9 4.2.6 PSU LEDs .......................................................................................................4-10 4.2.7 Cooling Module LEDs......................................................................................4-10 4.3 AUDIBLE ALARM...........................................................................................4-11 4.3.1 4.4 Alarm Triggers.................................................................................................4-11 I2C .............................................................................................................4-12 CHAPTER 5 SYSTEM MAINTENANCE 5.1. OVERVIEW.....................................................................................................5-1 5.1.1 5.1.2 5.2. REPLACING A CONTROLLER MODULE ..............................................................5-3 5.2.1 5.2.2 5.2.3 x Maintenance......................................................................................................5-1 General Notes on Component Replacement.....................................................5-1 Overview ...........................................................................................................5-3 Notes on Controller Maintenance ......................................................................5-3 Removing the Controller Module .......................................................................5-3 Falcon IV Installation and Hardware Reference Manual 5.2.4 5.3. 5.3.1 5.3.2 5.3.3 5.4. Memory Module Installation Overview...............................................................5-5 Selecting the Memory Modules .........................................................................5-6 DIMM Module Installation ..................................................................................5-6 REPLACING A FAULTY CBM ...........................................................................5-8 5.4.1 5.4.2 5.4.3 5.5. Replacing a Controller Module ..........................................................................5-5 REPLACING OR UPGRADING MEMORY MODULES .............................................5-5 BBU Warnings and Precautions ........................................................................5-8 Replacing a Faulty BBU ....................................................................................5-9 Replacing a Faulty Flash.................................................................................5-11 REPLACING A FAULTY PSU ..........................................................................5-11 5.5.1 Notes on PSU Module Maintenance ...............................................................5-11 Power Supply Fault Conditions & Firmware Reactions..............................................5-12 5.5.2 Replacing the PSU Module .............................................................................5-12 5.6. COOLING MODULE MAINTENANCE.................................................................5-14 5.6.1 5.6.2 5.7. Notes on Cooling Module Maintenance...........................................................5-14 Replacing a Cooling Module ...........................................................................5-15 REPLACING A HARD DRIVE ...........................................................................5-16 5.7.1 5.7.2 Hard Drive Maintenance Overview..................................................................5-16 Replacing a Hard Drive ...................................................................................5-16 APPENDIX A SPECIFICATIONS A.1. TECHNICAL SPECIFICATIONS ......................................................................... A-1 EMC............................................................................................................................ A-2 Vibration...................................................................................................................... A-2 A.2. CONTROLLER SPECIFICATIONS ...................................................................... A-3 A.2.1 A.2.2 A.3. A.4. A.5. Configuration .................................................................................................... A-3 Architecture ...................................................................................................... A-3 POWER SUPPLY SPECIFICATIONS .................................................................. A-4 RAID MANAGEMENT ..................................................................................... A-4 FAULT TOLERANCE MANAGEMENT ................................................................. A-5 APPENDIX B PINOUTS B.1 B.2 B.3 B.4 B.5 B.6 B.7 8GB/S FC PORT PINOUTS ............................................................................. B-1 10/100BASET ETHERNET PORT PINOUTS (MANAGEMENT PORT) .................... B-3 STP ETHERNET CABLE (OPTIONAL ACCESSORY) ........................................... B-3 DB-9 SERIAL PORT....................................................................................... B-4 SERIAL PORT Y-CABLE ................................................................................. B-5 SAS EXPANSION PORT PINOUTS ................................................................... B-5 POWER ........................................................................................................ B-6 List of Tables Table 3-1: Falcon IV RAID and JBOD Matching Table ....................................... 16 Table 3-2: Serial Port Defaults.................................................................................... 22 Table 4-1: LCD Panel LED Definitions.......................................................................... 4 Table 4-2: Drive Tray LED Definitions .......................................................................... 5 Table 4-3: Controller LED Definitions ........................................................................... 7 Table 4-4: 8G FC Port LED Definitions........................................................................ 9 Table 4-5: 10/100BaseT Management Port LED Definitions........................................ 9 Table 4-6: PSU Module LED Definitions..................................................................... 10 Table 5-1: Power Supply Fault Conditions & Firmware Reactions ............................. 12 Table B-1: SFP Port Pinout Definitions......................................................................... 2 Table B-2: 10/100BaseT Ethernet Port Pinouts............................................................ 3 Table B-3: Serial Port Pinout Definitions....................................................................... 4 Table B-4: SAS Expansion Port Pinout Definitions....................................................... 6 xi Falcon IV Installation and Hardware Reference Manual List of Figures Figure 1-2: )DOFRQ Front View....................................................................................... 3 Figure 1-3: )DOFRQ Rear View.............................................................................. 4 Figure 1-4: )DOFRQ,9 Rear View ............................................................................. 5 Figure 1-5: Drive Tray Front View................................................................................. 6 Figure 1-6: Comparison between Dual-ported SAS and Single-port SATA Connectors ...............................................................................................................................7 Figure 1-7: MUX Kit Working Theory ............................................................................ 7 Figure 1-8: MUX Kit....................................................................................................... 8 Figure 1-9: Controller Module Interfaces ...................................................................... 9 Figure 1-10: Modules within a Controller Canister...................................................... 10 Figure 1-11: PSU Module............................................................................................ 11 Figure 1-12: Cooling Module....................................................................................... 12 Figure 2-1: Supported and Unsupported Drive Configurations..................................... 3 Figure 2-2: Airflow Direction.......................................................................................... 5 Figure 2-3: Controller Convection Holes....................................................................... 5 Figure 2-4: Installation Procedure Flowchart ................................................................ 8 Figure 2-5: System Package......................................................................................... 9 Figure 2-7: Rack-mount Position & Cage Nut Positions on Rack Posts..................... 12 Figure 2-8: Inner Glide Orientation: Top View ............................................................ 13 Figure 2-9: Attaching an Inner Glide ........................................................................... 13 Figure 2-10: Adjust the Rail Length ............................................................................ 13 Figure 2-11: Fitting the Rail into Rack......................................................................... 14 Figure 2-12: Securing a Filler Plate behind Chassis Ears .......................................... 14 Figure 2-13: Mounting the Enclosure.......................................................................... 15 Figure 2-14: Securing Enclosure to Rack ................................................................... 15 Figure 2-15: Removing Chassis from Rack ................................................................ 16 Figure 2-16: Inserting a Controller into Chassis ......................................................... 17 Figure 2-17: Using Ejection Levers to Secure Controller............................................ 18 Figure 2-18: Installing a Hard Drive ............................................................................ 20 Figure 2-19: Drive Locations with and without the MUX Board .................................. 20 Figure 2-20: Drive Tray Front Bezel............................................................................ 21 Figure 2-21: Drive Tray Release Button ..................................................................... 21 Figure 2-22: Installing a Drive Tray............................................................................. 22 Figure 2-24: Front Bezel Rotary Lock ......................................................................... 22 Figure 2-24: Removing a RAID Controller .................................................................. 23 Figure 2-26: Installing BBU Module ............................................................................ 24 Figure 3-1: Drive Mechanical Speed and Logical Drive Speed .................................... 4 Figure 3-2: DAS Connections, )DOFRQ,9................................................................. 8 Figure 3-3: DAS Connections, )DOFRQ,9................................................................. 9 Figure 3-4: Simple End-to-End Connections .............................................................. 11 Figure 3-5: Connections via Switched Fabric ............................................................. 13 Figure 3-6: Connecting SFP Transceiver and LC Type Cables.................................. 15 Figure 3-7: JBOD Enclosure IDs................................................................................. 17 Figure 3-8: Redundant-controller RAID to 3U Dual-controller JBODs........................ 18 Figure 3-9: Fault-tolerant Links to SAS disk Drives .................................................... 19 Figure 3-10: Single-controller RAID to 3U Single-controller JBODs........................... 21 Figure 3-11: Connecting Serial Port and Ethernet Ports ............................................ 22 Figure 3-12: Combining Cable Strap and Cable Clamp ............................................. 23 Figure 3-13: Attaching Cable Clamps to Power Cords ............................................... 23 Figure 3-14: Adjust Cable Strap Position.................................................................... 24 Figure 3-15: Attaching Power Cords........................................................................... 24 Figure 3-17: The LCD Initial Screen ........................................................................... 27 Figure 4-1: LCD Keypad Panel ..................................................................................... 4 Figure 4-2: Drive Tray LEDs ......................................................................................... 5 Figure 4-3: Controller Module LEDs ............................................................................. 5 Figure 4-4: FC Port Link and Speed LEDs ................................................................... 9 Figure 4-5: 10/100BaseT Management Port Indicators................................................ 9 Figure 4-6: PSU Module LED ..................................................................................... 10 xii Falcon IV Installation and Hardware Reference Manual Figure 4-7: Cooling Module LEDs and Cooling Fan Locations................................... 10 Figure 5-1: Loosening Controller Retention Screws ..................................................... 4 Figure 5-3: Removing a DIMM Module ......................................................................... 7 Figure 5-3: Installing BBU into a Controller................................................................. 10 Figure 5-5: Installing Flash Card................................................................................. 11 Figure 5-6: PSU Parts Identification............................................................................ 13 Figure 5-6: Removing the PSU Module ...................................................................... 13 Figure 5-8: Securing PSU Using the Extraction Handle ............................................. 14 Figure 5-8: Removing a Cooling Module .................................................................... 15 Figure 5-9: Opening the Front Flap............................................................................. 17 Figure 5-10: Opening Front Bezel............................................................................... 17 Figure 5-11: Loosening Hard Drive Screws ................................................................ 18 Figure 5-12: Installing a Hard Drive ............................................................................ 18 Figure 5-13: Drive Locations with and without the MUX Board .................................. 18 Figure 5-14: Installing a Drive Tray............................................................................. 19 Figure B-1: 8G FC Host Port......................................................................................... 1 Figure B-2: 10/100BaseT Ethernet Port........................................................................ 3 Figure B-3: STP Ethernet Cable Pinouts ...................................................................... 4 Figure B-4: COM1 Serial Port ....................................................................................... 4 Figure B-5: Serial Port Y-Cable .................................................................................... 5 Figure B-6: Mini SAS SFF-8088 Connector.................................................................. 5 xiii Falcon IV Installation and Hardware Reference Manual Safety Precautions Precautions and Instructions xiv • Prior to powering on the subsystem, ensure that the correct power range is being used. • If it is necessary to transport the subsystem, repackage all disk drives separately in the drive trays and in the original package foam blocks. If using the original package material, other replaceable modules can stay within the enclosure. • The Falcon IV subsystems come with 12, 16, or 24 drive bays. Leaving any of these drive bays empty will greatly affect the efficiency of the airflow within the enclosure, and will consequently lead to the system overheating, which can cause irreparable damage. • If a module fails, leave it in place until you have a replacement unit and you are ready to replace it. • Airflow Consideration: The subsystem requires an airflow clearance, especially at the front and rear. A clearance of at least 18 to 20 centimeters is required at the rear side and any objects blocking the exhaust airflow, e.g., cables dangling at the fan outlet, should be avoided. • Handle subsystem modules using the retention screws, eject levers, and the metal frames/face plates. Avoid touching PCB boards and connector pins. • To comply with safety, emission, or thermal requirements, none of the covers or replaceable modules should be removed. Make sure that all enclosure modules and covers are securely in place during operation. • Be sure that the rack cabinet into which the subsystem chassis will be installed provides sufficient ventilation channels and airflow circulation around the subsystem. • Provide a soft, clean surface to place your subsystem on before working on it. Servicing on a rough surface may damage the exterior of the chassis. • If it is necessary to transport the subsystem, repackage all drives separately. • Dual-redundant controller models come with two RAID controllers that should always be present. Single-controller models come with a single RAID controller and a metal sheet is placed over the lower controller bay at the rear of the subsystem. Since single-controller models cannot be upgraded, this metal sheet should NEVER be removed. Falcon IV Installation and Hardware Reference Manual ESD Precautions Observe all conventional anti-ESD methods while handling system modules. The use of a grounded wrist strap and an anti-static work pad are recommended. Avoid dust and debris in your work area. About This Manual This manual: Introduces the Falcon IV storage system series. Describes all major components in the system. Provides recommendations and details about the hardware installation process. Describes how to monitor system operating statuses. Describes how to maintain the subsystem. This manual does not: Describe components that are not user-serviceable. Describe the configuration options of firmware, using terminal emulation programs, or the SANDWatch GUI that came with your subsystem. Give a detailed description of the RAID processing units or the RAID controllers within the subsystem. Revision History Rev. 1.0: Initial release. Who should read this manual? This manual assumes that its readers are experienced with computer hardware installation and are familiar with storage enclosures. Related Documentation • Generic Operation Manual (firmware operation via LCD keypad and terminal emulation) • Falcon IV Series Configuration Planning Guide xv Falcon IV Installation and Hardware Reference Manual • Troubleshooting Guide • SANWatch User’s Manual • Embedded RAIDWatch User’s Manual • LCD Keypad Navigation Map • Quick Installation Guide These two (2) documents are included in the product utility CD that came with your subsystem package. Conventions Naming From this point on and throughout the rest of this manual, the Falcon IV series is referred to as simply the “subsystem” or the “system” and RAID, Inc is sometimes abbreviated as “IFT.” Important Messages Important messages appear where mishandling of components is possible or when work order can be mis-conceived. These messages also provide important information associated with other aspects of system operation. The word “important” is written as “IMPORTANT,” both capitalized and bold and is followed by text in italics. The italicized text is the message to be delivered. Warnings Warnings appear where overlooked details may cause damage to the equipment or result in personal injury. Warnings should be taken seriously. Warnings are easy to recognize. The word “warning” is written as “WARNING,” both capitalized and bold and is followed by text in italics. The italicized text is the warning message. Cautions Cautionary messages should also be heeded to help you reduce the chance of losing data or damaging the system. Cautions are easy to recognize. The word “caution” is written as “CAUTION,” both capitalized and bold and is followed by text in italics. The italicized text is the cautionary message. xvi Falcon IV Installation and Hardware Reference Manual Notes These messages inform the reader of essential but non-critical information. These messages should be read carefully as any directions or instructions contained therein can help you avoid making mistakes. Notes are easy to recognize. The word “note” is written as “NOTE,” both capitalized and bold and is followed by text in italics. The italicized text is the cautionary message. Lists Bulleted Lists: Bulleted lists are statements of non-sequential facts. They can be read in any order. Each statement is preceded by a round black dot “•.” Numbered Lists: Numbered lists are used to describe sequential steps you should follow in order. Software and Firmware Updates Please contact your system vendor or visit RAID, Inc’s FTP site (ftp.raidinc.com). NOTE that the firmware version installed on your system should provide the complete functionality listed in the specification sheet/user’s manual. We provide special revisions for various application purposes. Therefore, DO NOT upgrade your firmware unless you fully understand what a firmware revision will do. Problems that occur during the updating process may cause irrecoverable errors and system down time. Always consult technical personnel before proceeding with any firmware upgrade. xvii Falcon IV Installation and Hardware Reference Manual This page is intentionally left blank. xviii Chapter 1 Introduction 1.1 Product Overview 1.1.1 Introduction This chapter introduces the )DOFRQ FC-to-SAS/SATA-II s torage system. Th e )DOFRQ,9 syVtem come s with two (2 ) 8G b Fibre Channel host p orts on each of d ual-active RA ID cont rollers an d delivers fast I/O performanFH for applications in a Storage Area Network (SAN). The )DOFRQ V 8Gb FC hRst interfaces s upport ba ckward compatibility with 4G or 2G Fibre Ch annel devices. With the 8Gb /s chan nel throughput, the system is Figure 1-1: Falcon IV System ideal fo r virtualize d server and vari ous ap plications requiring I/O intensive o perations. Powered by a 6 th-generation ASIC667 RA ID engin e a nd a du al-CPU co re d esign, the )DOFRQ delivers twi ce the read perfo rmance, one half more on write performance, and significant enha ncement on I/Os per se cond th an its ASIC400 pre decessors. Built ar ound a pure PCI-E archite cture, the )DOFRQ also excels in throughput-intensive applications. The system delivers ext reme performance that results from the combined pe rformance of multiple di sk drive s, the level of data protection, a nd ad aptability unsee n e lsewhere i n a 4U profile. Featuring all RAID, Inc’s well-acclaimed RAID reli ability, the )DOFRQ system provides a reliabl e platform fo r a wide va riety of stora ge operations such as disk farm, data-mining, postproduction editing, broadcasting, or strategically shared storage over SAN. The Falcon IV series models now use common components, e.g., PSU and CBM, to minimize logi stic efforts. The traditional battery ba ckup is repl aced by an innovative CBM (Ca che Backup Mo dule) methodology. Cached dat a is tran sferred to flash modul e with the support of BBU in the ev ent of power outage. Because of a sh orter discharge time, BBU life expectancy is extended to 3 years, and data Product Overview 1-1 Falcon IV Installation and Hardware Reference Manual is safely kept in flash re gardless of the tradition al 72 hours limitation from battery capacity. Along with the 80+ efficiency PSUs, the embedded firmware features intelligent algorithms, su ch as p ower-saving mod es and exile d d rive handling, making this model a greener choice. This )DOFRQ system is housed in a 4U-profile chassis featuring a highdensity archLtecture that suppRrts uS to twenty-four (2 hot swappable, 3Gb/s SAS or SATA-II hard drivesThe s\stem is managed by active-aFtive or a singlH RAID coQtroller. The defaXlt 1GB DDR-II memo ry can be upgraded to a 2GB capacity module to support coPplicated aSplications that hold nXmerous ID/ LUN combinations. In addition t o the ea se of impleme ntation, the )DOFRQ also Vupports capacity expansion via its SAS links by attaching up to ILYH-%2'V If using 1TB si]e SATA drives in a Fombination of si nglecontroller RA ID and JBO', a configuUation caQ reDch a maximXm capacity of 104TB. Model Variations Model Controllers Controller Configuration Host Ports )DOFRQ,9 )DOFRQ,9 Redundant 4 )DOFRQ,9 )DOFRQ,9 Single 2 Falcon IV : 7Kis moGHl comeV Zith redXndant RAID controllers. T he dual-co ntroller config uration correspondV with SAS drives’ dual-ported design and each manages a separate SAS domain for higher fault toler ance. The dual-controller model supports all necessary features such as synchronized cache and the transparent failover/failback capability. 1-2 Falcon IV : The )DOFRQ,9 come s with a single RAID controller. This m odel can not b e upg raded into a d ual-redundant configuration by adding a partne r RAID controlle r. Except for controller redun dancy, the singl e-controller configuratio n supports all advan ced RAID technologies and fault tolera nce by redundant configuration of other modules. Product Overview Chapter 1: Introduction 1.1.2 Enclosure Chassis 1.1.2.1 Chassis Overview The )DOFRQ,9 RAID stora ge is hou sed in a 4U rob ust cha ssis that is divided into the front an d the rear sections. Key com ponents are either accessed th rough the front o r rea r pa nels. The en closure chassis can be mou nted into a sta ndard EIA, 19-i nch ra ck or enclosure cabinet using support brackets that are included in kit. 1.1.2.2 Physical Dimensions The )DOFRQ,9 comes in a 4U chassis with the following dimensions: With forearm handles: 482W x 174.4H x 514D m m (19 x 6.87 x 20.2 inches) Without forearm handles: 445W x 174.4H x 498D mm (17.5 x 6.87 x 19.6 inches) 1.1.2.3 Front Panel Overview The front section of the sy stem features a 4x4 layout for 24 3.5 -inch disk drive s. The forea rm handle s en able you to easily extra ct the chassis f rom a ra ck o r cabinet. Th e front vie w is shown below. A description of each front panel component is given below: Figure 1-2: Falcon IV Front View The front panel components include: Product Overview • Drive bays with drive tray canisters: The drive bays accommodate either SAS or SATA-II 3.5” disk drives. • Forearm handles: Fo r ret rieving ch assis f rom a rac cabinet. k 1-3 Falcon IV Installation and Hardware Reference Manual 1.1.2.4 Hard Drive Numbering The front section of the )DOFRQ,9 enFlosure houses 24 hard drive s in a 4x4 configuration. When viewed from the front, the dr ive bays (slots) are numbered 1 to 24 from left to right and then from top to bottom. Slot 1 Slot 2 Slot 3 Slot 4 Slot 5 Slot 6 Slot 7 Slot 8 Slot 9 Slot 10 Slot 11 Slot 12 Slot 13 Slot 14 Slot 15 Slot 16 Slot 17 Slot 18 Slot 19 Slot 20 Slot 21 Slot 22 Slot 23 Slot 24 Knowing the tray numbering sequence is extremely important should you need to repl ace a failed drive. If a RAID5 array already ha s a failed drive, and you accidentally remove the wrong drive, data will be lost. 1.1.2.5 Rear Panel Overview A rear vie w of the system is sh own below. Descriptions of ea ch rear panel component are given in the following sections: Figure 1-3: Falcon IV Rear View 1-4 Product Overview Chapter 1: Introduction Figure 1-4: Falcon IV Rear View The enclosure rear section accommodates the following components: • RAID controller module(s): The RAID controlle r modul e manages all functio nalities provided with the system, and all interface co nnectors are provid ed on the cont roller faceplates. (See Section 1.2.3) • CBM module: CBM mod ules come a s stand ard equipm ent for the redundant-controller R1840 model, and as an optional module for the single-controller G1840. The BBU within CBM sustains u nfinished wr ites c ached in me mory a nd c ached data will be tran sferred to a flash module duri ng a powe r outage in order to protect data integrity. (See Section 1.2.6) • PSU modules: The hot -swappable P SUs receive singlephase power and deliver +5V and +12 V power to system. A power switch is lo cated on the re ar panel to turn all PSU on and off. (See Section 1.2.7) • Cooling modules: The redun dant cooling modules ventilate the system t o maintain a cooling ai rflow acro ss the system. (See Section 1.2.8) 1.1.2.6 Backplane Board An internal b ackplane board separates the front and rea r sections of the enclosure. The backplane consists of traces for logic level signals and low vol tage power paths. It contain s no use r-serviceable components. Product Overview 1-5 Falcon IV Installation and Hardware Reference Manual WARNING! When inse rting a remova ble module, DO NOT USE EXCESSIVE FORCE! Forcing o r slam ming a modu le can dam age the pins on the modul e con nectors e ither on the module itself or on the backplane. Gently push the modul e until it reaches the end of module sl ot. Feel the contact resi stance and use slightly mo re pressure to e nsure the m odule conn ectors are correctly mated. If the module com es with ejectio n le vers or retentio n screws, use them to secure the module. 1.2 System Components The )DOFRQ,9 is desiJned with modulaUcompRnents for ease Rf maintenance. Hot-swap mechanisms help prevent power surges and signal glitches that Pight occur while removiQg or iQstalling these modules. 1.2.1 Drive Trays Figure 1-5: Drive Tray Front View PN: IFT-9273CDTray The drive trays accommodate separately purchased, standard 1-inch pitch, 3.5-inch, 3Gb/s , SAS or SATA-II dis k drives . The drive bays are located in the front section of the chassis. Two (2) LEDs on the front bezel indicate the operating statuses of individual disk drives. A rotary be zel lock on the front bezel secures the ha rd drive in pla ce, while a release button is used to open the front bezel. WARNING! Be c areful not to warp, twis t, or contort the drive tray in any way (e.g., by drop ping it or re sting heavy obj ects on it). If the drive ba y superstructure is deformed or altered, the drive trays may not fit into 1-6 System Components Chapter 1: Introduction the drive bays. 1.2.2 MUX Kit Unlike the dual-ported SAS drives, using the single-port SATA-II disk drives in a redun dant-controller system ()DOFRQ,9 reqXires a MUX board. Figure 1-6: Comparison between Dual-ported SAS and Single-port SATA Connectors The MUX bo ard p rovides port sel ector circuits for di recting acce ss from partn er RAID controllers to an individual di sk drive. See the drawing below for how it works. Figure 1-7: MUX Kit Working Theory If SAS drives are preferred, thes e MUX boards will be unnecessary and must be manually removed from the drive trays by loosen ing retention screws from it. System Components 1-7 Falcon IV Installation and Hardware Reference Manual Figure 1-8: MUX Kit 1.2.3 The RAID Controller Module PN: FDOFRQ x 2 (without cache memory) )DOFRQ,9 )DOFRQ (with 1GB cache) )DOFRQ x 1 (without cache memory) )DOFRQ,9 )DOFRQ x 1 (with 1GB cache) The default size for the DDR-II DIMM module on RAID controlle rs is 1GB. A RAI D controlle r module cont ains a m ain circuit board, a preinstalled 1GB memory, battery charger circuitry, a daughter board with host port interfaces, a nd a fl ash module. Th e controller module contains no user-serviceable components. Except when servicing the cache memory or th e CBM modul e i nside, the controller m odule should never be removed or opened. WARNING! Although the RAID co ntroller can be removed, the only time you should touch the controller itself is to install or repl ace the memory module an d CBM. The RAID controller is built of sen sitive components and un necessary tam pering can damag e the controller. The )DOFRQ,9 sy stem is man aged by the RAID controller(s). Each RAI D controller comes with two (2) 8G b/s FC host ports. Via FC swit ches, the system readily con nect multip le application se rvers in a Fibre Channel Storage Area Network. The do cking connector at the rea r of the controlle r board con nects the controller to the backplane board. 1-8 System Components Chapter 1: Introduction 1.2.4 Controller Module Interfaces All external interfaces that connect to external devices are located on the controller module’s rear-facing faceplate. The interfaces are listed below. Figure 1-9: Controller Module Interfaces Host ports: Two (2) 8 Gb/s Fib re Cha nnel h ost ports (indicated as CH0 an d CH1 in the dia gram sho wn above). These p orts receive SFP tran sceivers and the n at tach to short-wavelength optical cables. Serial port: The controller module comes with one (1) COM ports. The serial port is used for local access to the firmwareembedded configuration utility using terminal emulation program. LED indicators: Six (6) LED i ndicators illustrate the system’s key operating st atuses. Plea se see Chapter 4 for more information. Ejection Levers: Two (2) ejection levers on the side s of the controller en sure that the back-end con nectors are p roperly seated in the module slot and pro perly mated with the backplane. SAS Expansion Port: The multi-lane expa connects to expansion enclosures (JBOD). Management LAN Port: An 10/100 BaseT Ethe rnet port connects the system to a network and then to a management computer. Available man agement interface s incl ude: telnet, Java-based SANWatch manage r, or the web-based “Embedded RAIDWatch” manag er i nvoked by an http console. Restore Default LED and button: The push button and LED are used to restore firmwa re def aults in case s whe n upgrading firmware, upgra ding DI MM size, or if an System Components 1-9 nsion po rt Falcon IV Installation and Hardware Reference Manual administrator forgets system pa ssword. For mo re details, please refer to Chapter 4. 1.2.5 Cache Module The controller default for the ca che module is a 1G B DDR-II module and the allocable size up to 2GB. The memory socket is lo cated on the side of the controller board. 1.2.6 CBM (Cache Backup Module) PN: IFT-9373CBBU (CBM: IFT-9 373CCBM, includin g flash module, a charger board, and BBU) A Li-Ion batt ery backup unit (BBU ) module (see the diagram bel ow) can supp ort the tran sfer o f cache d dat a from ca che memory to an onboard flash during a power outage. The battery module comes with an EEPROM that marks the in stallation dat e, and sy stem administrators will be notified wh en t he 3 -year life expe ctancy is reached. The BBU is contained withi n cont roller can ister and is n ot hot-swappable. Figure 1-10: Modules within a Controller Canister In accord ance with intern ational tran sportation regul ations, the BBU module is only charged to between 35% and 45% of its total capa city when shipped. Therefore, when p owering on the sy stem for the first time, the BBU will begi n to cha rge its batteries to its full capa city. It normally req uires ap proximately twel ve (12 ) ho urs for the battery to be fully cha rged. If the battery is not fully cha rged after twelve (12) 1-10 System Components Chapter 1: Introduction hours, there may be a problem with the BBU mod ule. You may reinstall the b attery; and if the battery still sho ws probl ems with charging, co ntact your system vend or for a re placement. While t he battery is being charged, a system event will prompt. You can ch eck battery’ s charge level using a termin al con sole wi th firmware’s embedded utility. 1.2.7 Power Supply Units PN: IFT-9274CPSU The sy stem is eq uipped with thre e (3 ) re dundant, hot-swa ppable, load-sharing 405W PSUs, at the rear se ction of the cha ssis. T he PSU is housed in a 1U canister containing both the power supply and dedicated cooling modules. A single LED indicate s the PSU status. When a power sup ply failure occurs, the L ED lights red. An extr action han dle at the rea r of the PSU is designed to help properly install or remove the module. A scre w hol e on the extra ction h andle helps secure the PSU to t he chassis. The shipping package contains adjustable cable clamps that can be used to secure power cord connections. Figure 1-11: PSU Module Please refer to PSUs. 1.2.8 Appendix A for the technical information of the Cooling Modules PN: IFT-9374CFANMOD Two cooling modules at t he re ar center ventilate t he sy stem. (see Figure 1-12.) The cooling fans ope rate at two (2) fan speeds. When the system operates normally, the cooling fans operate at the lo wer speed. If a system mod ule fails or when one of the tempera ture System Components 1-11 Falcon IV Installation and Hardware Reference Manual thresholds is violated, the cooling fans automatically raise its rotat ion speed. More technical information can be found in Appendix A. Figure 1-12: Cooling Module 1.3 System Monitoring The syste m com es with a numbe r of different monitorin g meth ods that provide you with co ntinual updates on the ope rating statuses of the system and individ ual comp onents. The following mo nitoring features are included: 1.3.1 I2C bus The following system elements are interfaced to th e RAID controller over a non-user-serviceable I2C bus: Power supplies and cooling modules Module presence detection circuits Temperature sen sors (fo r detecting th e temperature on the backplane board and controller board) 1.3.2 LED Indicators The following components come with LEDs to i ndicate the op erating statuses of individual components: 1-12 LCD keypad panel RAID controller System Monitoring Chapter 1: Introduction Cooling modules (2 LEDs on a PSU faceplates) PSU modules (1 LED on each module) Drive trays (2 LEDs on each tray) 1.3.3 Audible Alarm The system com es with an audible alarm that i s trigge red when a component fails o r w hen th e pre-configured temperature o r voltage thresholds are exceeded. Whenever you hear a n audible alarm, it is imperative that you determine the cause an d rect ify the probl em immediately. Event notification me ssages i ndicate the co mpletion configu ration tasks, st atus of compo nents, or fata l erro rs. Events are alwa ys accompanied by two (2 ) or thre e (3 ) su ccessive and p rolonged beeps. WARNING! When an au dible ala rm i s hea rd, sy stem admini strators shoul d rectify the cause of the alarm as soon as possible. 1.4 Hot-swappable Components 1.4.1 Hot-swap Capabilities The system comes with a number of h ot-swappable components. A hot-swap component is one that can be exchanged while the system is still ope rating. These compo nents should o nly be remove d from the ch assis whe n they are bein g re placed. At no ot her time should these components be removed from the system. 1.4.2 Components The following components are hot-swappable: RAID controller (in a redundant-controller configuration) Power supply units (PSUs) Cooling modules Hard disk drives Hot-swappable Components 1-13 Falcon IV Installation and Hardware Reference Manual 1.4.3 Normalized Airflow Proper co oling is refe rred to as “normalized” ai rflow. No rmalized airflow en sures the suffici ent cooli ng within the sy stem an d is only attained when all compo nents are properly install ed. The refore, a failed com ponent sh ould only be rem oved wh en a repla cement is available. If a failed com ponent is removed but not repla ced, airflow will be disrupted and damage to the system can result. 1-14 Hot-swappable Components Chapter 2 Hardware Installation 2.1 Introduction This chapter provide s d etailed in structions o n ho w to in stall the system. Insta llation into a rack o r cabin et shoul d o ccur before the hard drive s or d rive tray s a re in stalled into the system. Plea se confirm that you received all of the components listed on the included Unpacking List before proceeding with the installation process. 2.2 Installation Prerequisites 1. Static-free installation environment: The Falcon IV system must be in stalled in a stati c-free e nvironment to m inimize the possibility of electro static disch arge (ESD) da mage. (See Section 2.3.2) 2. Component check: Before installing the Falcon IV system, you should first check to se e that you have received all the required components. (See Section 2.5) If any items appe ar dama ged, contact your vendor for a replacement. 3. Hard drives: Hard d rives are sepa rately purcha sed. Plea se consult RAID, Inc’s VIP room service site or technical support for the latest list of compatible hard drives. (See Section 2.7) NOTE: If SATA drives a re preferred, cu rrently only 3Gbp s SATA-II di sk drives are supported. M ake sure yo u pro perly configure HDD configuration (such as j umper setting) b efore you i nstall hard drives into the syste m. Some hard drive s come with a defa ult speed set to 1.5Gbps. If using hard disks defaul ted to 1.5Gbps, compatibility issue may occur. Introduction 2-1 Falcon IV Installation and Hardware Reference Manual 4. Cabling: The system comes with the following cables; 1. Thre e (3) power cords for conne ctions to the powe sources. Cable type is determined by the shipped-to area. r Other cables are user-supplied: 1. Host link cables: Use 8G or 4 G FC tran sceivers (An Avago’s tran sceiver an d optical cab les are incl uded a s RAID, Inc’s accessories) and LC type, short -wavelength optical fiber cables to connect the host ports. With 8G speed, you need better quality ca bles to m aintain the same cabling distance. See Chapter 3 for cabling topologies. 2. A DB-9 Y-ca ble for con necting the se rial port to a termin al station (dual-controller )DOFRQ,9 only). 3. One (1) o r two (2) Ethe rnet ca bles to the 10/10 0BasetT management port. 5. Mixing SAS and SATA drives in th e same enclosure is all owed. However, please DO NO T mix SAS and SATA-II d rives in the same drive column. Vibration from hig h rotation speed drives will affect adjacent drives that are seeking data tracks. DO NOT place a column of SATA-II disk d rives between two columns of SAS dis k drives . With a higher rotation s peed, the SAS dis k drives on the flank s of SATA-II dis k drives will eventually cause a stability issue. 2-2 Installation Prerequisites Chapter 2: Hardware Installation Figure 2-1: Supported and Unsupported Drive Configurations 2.3 Safety Precautions 2.3.1 Precautions and Instructions 1. Static-free installation environment: The en closure m ust b e installed in a static-free environment to minimize the possibility of electrostatic discharge (ESD) damage. 2. Component check: Before installing the enclosure, check to see that you have received all the re quired components. If any item s appear damaged, contact your vendor for a replacement. 3. Rack installation: The enclosure chassis can be installed into a rack ca binet usin g rackm ount rails from RAID, Inc or those that are separately purch ased. Rack-m ounting det ails will b e discussed later. 4. Disconnect the power cord s if the need sho uld arise for cleaning the chassis. Do n ot use li quid or sprayed detergent for cle aning. Use a lightly moistened clothe for cleaning. 5. Be su re the correct po wer ra nge (100-120 or 2 20-240VAC) is supplied by the po wer source at you r installation site. It is highly Safety Precautions 2-3 Falcon IV Installation and Hardware Reference Manual recommended to conne ct two different po wer supplies to separate po wer so urces; e.g., one to a po wer outlet, and the other to a UPS system. 6. Thermal notice: All drive tr ays (even if they do not co ntain a hard drive) must be installed into the enclosure. Leaving a drive bay or module slot open will seve rely affect the airflow efficiency within the enclosure, and will con sequently lead to system o verheating. Keep a faulty module in place until you have a repla cement unit and you are ready to replace it. 7. Rack-mounting: The system is i ntended to be rack-mounted. Following concerns shou ld be h eeded when m ounting th e enclosure into a rack cabinet: a. An en closure witho ut d isk drives can weigh o ver 30 kilograms. T wo (2 ) pe ople are requi red to install or relocate the system. Drive s sh ould be remove d from the enclo sure before moving the system. b. The system is designed to operate in a n environment where the ambient temperature around the chassis must not exceed 35°C. c. The o penings on the e nclosure a re f or ai r circulation an d hence the ventilation openings should never be obstructed. d. Proper grounding, over-current protec tion, and stability features should be p rovided with the rack cabinet into whi ch the system is mounted. 8. Operate the system in an environment with least humidity. 9. Lay the sy stem on a reli able surface when servi cing individ ual modules. A drop or fall can cause injury. 10. Make su re the voltage of the powe r source is within the rated values befo re conn ecting the system to the power source. You may also refer to Appendix A of this manual for technical details. 11. Airflow considerations: The system requires an airflow clearance especially on the front and the re ar sides. For p roper ventilation, a minimum of 2.5cm is requir ed b etween the front of the enclosure and rack cove r; a minimum of 18 to 20cm is required on the rear side. 2-4 Safety Precautions Chapter 2: Hardware Installation Figure 2-2: Airflow Direction 12. Do not cove r the convecti on hole s on cont roller faceplate. They provide passages for ai r circulation, and also a glimpse of the 7 seg LED for debug purposes. Figure 2-3: Controller Convection Holes 13. Handle the system mod ules by the re tention scre ws, ej ection levers, or the module s’ metal frame s/faceplates only. Avoid touching the PCB boards and connector pins. 14. None of the covers or replaceable modules should be removed in order to maintain com pliance with safety, emission , or thermal requirements. 15. If the system is going to be left u nused for a long time, disconnect the system from mains to avoid damages by transient over-voltage. 16. Never pour any liquid into ventilation op enings; this could cau se fire or electrical shock. Safety Precautions 2-5 Falcon IV Installation and Hardware Reference Manual 17. Never open the system top cover. F or safety re asons, only qualified service perso nnel coul d access the inte rior of the chassis. 18. Always secure every enclosure module by its retaining screws or make sure it is held in place by its latches or hand screws. 19. Always ma ke su re the system h as a safe ele ctrical ea rth connection via power cord s to t he power so urce sockets at the installation site. 20. Be sure that the rack cabinet in which the system chassis is to be installed pro vides suffici ent ventilation chan nels and airflo w circulation around the chassis. 21. Provide a sof t, clean su rface to place your en closure on before working o n it. Servicing th e en closure on a rough surface may damage the finish of the chassis. 22. If it is nece ssary to transport drives separately. the syst em, repa ckage all disk 23. If one of the followi ng situations a rises, get the checked by service personnel: encl osure a. Any of the power cords or plugs is damaged. b. Liquid has penetrated into the system. c. The enclosure has been exposed to moisture. d. The sy stem does not work well or you cann ot get it work according to this manual. e. The system has dropped and been damaged. f. The system shows obvious signs of breakage. 2.3.2 Static-free Installation Static electricity can damage the system’s electronic components. To prevent ESD damage to any of the compo nents, follow the se precautions before touching or handling them: 2-6 Discharge th e static ele ctricity accumul ated in your body by wearing an anti-static wristband. Use antistatic strap du ring handling. Connect the eq uipment end of the strap to an unfinished chassis surface. Avoid carpets, plastic, vinyl, and styrofoam in your work area. Safety Precautions Chapter 2: Hardware Installation If the need should a rise for ca rrying system modul es from one place t o an other, carry them i n a static shielding container. Avoid the contact between circuit boards and clothing. Handle all compo nents by holding t heir e dges or metal frames. Avoid touching th e exposed circuitry on P CB boards and connector pins. 2.4 General Procedure Step 1. Unpack: Unpack the system and confirm that all the components on the Unpacking Checklist have been included. Step 3. Rack/Cabinet installation: Installing the system into a ra ck or cabinet re quires at lea st two (2 ) peo ple. (See Section 2.6) Step 4. Install hard drives: Secure SAS/SATA-II hard drives within the drive trays. (See Section 2.7) Step 5. Install drive trays: After the ha rd d rives have b een secured in the drive trays, install drive trays into the enclosure. (See Section 2.9) Step 6. Cable connection: Con nect p ower cords, FC ho st links, serial port, and Ethernet cables. Step 7. Power up: Once the components have been properly installed an d all ca bles are pro perly co nnected, you can po wer u p the system and confi gure the RAID array. Installation Procedure Flowchart Figure 2-4 shows a flo wchart of the in stallation procedure. As you complete e ach step, check off the “Done” b ox on t he ri ght. Ple ase use this flowchart in conjunction with the instructions that follow. General Procedure 2-7 Falcon IV Installation and Hardware Reference Manual Figure 2-4: Installation Procedure Flowchart 2-8 General Procedure Chapter 2: Hardware Installation 2.5 Unpacking the System Use the Unpacking Checklist in yo ur pa ckage to verify packa ge contents. Ca refully che ck the item s containe d in each box be fore proceeding with installation. NOTE: A detailed u npacking li st can be fou nd in your p roduct shippi ng package or product CD. The package contents are shown below: Figure 2-5: System Package 1. Three power cords. 2. A printed copy of Quick Installation Guide. 3. Screws for rack-mounting and securing disk drives. 4. A product utility CD containing the Installation and Hardware Reference Manual (thi s docum ent), the Operation Manual (firmware), the SANWat ch prog rams and SANWatch User’s Manual, and other related documentation. Unpacking the System 2-9 Falcon IV Installation and Hardware Reference Manual 5. If ordered, rackmount rails will be included. 6. If additional power cords or host links cables have been included in a placed order, they will be shipped in the auxiliary box. 2.5.1 Preinstalled Components The following components have been i nstalled at the factory an d do not need to be installed: 1 - Backplane board 1 - DDR-II DIMM module (in each controller module) 3 - PSU modules 2 - CBM modules (redundant-controller model) 1 - LCD keypad panel 2 - Cooling fan modules 2.5.2 Components to be Installed You must install the following components: Rackmount rails (stanGDrd for the dual-coQtroller)DOFRQ,9 RAID Fontrollers CBM module (for the single-controller )DOFRQ,9) Hard drives (separately purc hased SAS or SATA -II dis k drives) Drive trays Cabl es 2-10 Unpacking the System Chapter 2: Hardware Installation 2.6 Rack/Cabinet Installation PN: IFT-9373CSlide36 - for 24" to 36" deep rack The system is designed to fit into a variety of 19-inch rack cabinets or racks. Make sure you have an appr opriate site locat ion and ca bles prepared wit h adequ ate length s to conne ct to powe r sou rce and other devices. When installing the sy stem into a ra ck or cabin et it is advi sable that two (2) people assist in the mounting process. Package Contents The rackmount rail kit should include the following components: Item Description Quantity 01 Mounting bracket assembly, L-shape, left-side 1 02 Mounting bracket assembly, L-shape, right-side 1 03 Inner glide 2 04 Flange filler plate (fixed behind chassis ears) 2 05 Cross recess truss head screws M5 x 9.0mm 8 06 #6-32 x10mm flathead screws 4 07 #6-32 L6 flathead screws 6 08 M5 cage nuts 4 NOTE: Screws f or securing ch assis t o t he front ra ck posts are provided in the system’s accessory box. There are 4 M5 x35mm, 4 M6 x35mm, and 4 #1032 31.75mm screws. Rack/Cabinet Installation 2-11 Falcon IV Installation and Hardware Reference Manual Figure 2-6: Rackmount Rail Components Installation Pre-requisites • 1 medium-size and 1 small-size cross-head screwdrivers • 1 medium-size flat-head screwdriver • Because the RAID syste m can weigh over 28 kilograms, 2 people are required to rack-mount the enclosure. CAUTION! The ha rd dri ves and d rive trays sh ould only be installed into the system afte r the system has be en mounted into a rack ca binet. If the hard d rives are install ed first, the system will be too heavy to handle and the possibl e impa ct during installation may damage your drives. Rack-mounting Steps Step 1. Determine where in the rack, the system is going to be installed by referring to the rack post drawing below. CAUTION! The mountin g position s must be carefully measu res so that rails can be mounted parallel to each other. Step 2. Use the figures below to measure the relative locations of the cage nuts on the rack po sts (if they do not ha ve threaded hol es). Attach t wo M5 cage nuts (#0 8) on each of the front rack posts. On Front Rack Posts: Figure 2-7: Rack-mount Position & Cage Nut Positions on Rack Posts 2-12 Rack/Cabinet Installation Chapter 2: Hardware Installation Step 3. Attach inner glides to the sides of ch assis u sing the included screws. When attachi ng the inne r glides, o rient them so that the slimmer part of the glides h as a be nd towards the center of chassis. If insta lled in a wrong orie ntation, you will not be able to install the chassis into rack. Figure 2-8: Inner Glide Orientation: Top View Figure 2-9: Attaching an Inner Glide Step 4. Adjust the le ngth of the rail assembly and ma ke sure the bend of the L-sha pe rail (#01 ) faces inwa rd. Loosen the four scre ws n ear the en d of the L-sh ape bracket to adjust rail lengt h. Fasten them when lengt h adjustment is done. Figure 2-10: Adjust the Rail Length Rack/Cabinet Installation 2-13 Falcon IV Installation and Hardware Reference Manual Figure 2-11: Fitting the Rail into Rack Step 5. Secure the rail to the front and rea r rack po sts ea ch using two M 5 screws (#05). (See figu re above) Do not insert the screws into the cage nut s as cage nuts will be used to secure the enclosure later. Step 6. Attach the filler plates (#04 ) behind the encl osure ears using the four #6-32 x 10m m flat head screws (#06) on each side. Figure 2-12: Securing a Filler Plate behind Chassis Ears Step 7. 2-14 Place the enclo sures on to the rails and slide th e enclosure into rack until its cha ssis ears flush with t he front rack posts. Two people are required. Rack/Cabinet Installation Chapter 2: Hardware Installation Figure 2-13: Mounting the Enclosure While pushing the chassis into rack, make sure the tips of inner glides fit into the U-shape brackets on the slide runners. A “click” so und will be heard whe n the inn er glides catch the spring latches on the slide runners. Step 8. Fasten fo ur screws provided in you r accessory b ox (M5, M6, o r #10-32) through the hol es on the forearm handles. Figure 2-14: Securing Enclosure to Rack Rack/Cabinet Installation 2-15 Falcon IV Installation and Hardware Reference Manual Removing Chassis If you need to remove a chassis from rack: Step 1. Remove disk drives from chassis. Step 2. Remove the screws fastened through the chassis ears. Step 3. Pull the cha ssis out until it is stopp ed by the retention latches. Step 4. Use both ha nds to supp ort t he weig ht of the cha ssis, and the n u se your in dex finge rs to press an d pull th e release latches towards you. Figure 2-15: Removing Chassis from Rack Step 5. 2-16 When t he ch assis is rel eased, slo wly pull the chassi s from rack. Another pe rson shoul d be helpin g you to remove chassis from rack. Rack/Cabinet Installation Chapter 2: Hardware Installation 2.7 Controller Installation 2.7.1 Installing a Controller Module NOTE: If you have a sepa rately purchased CBM, install it before you in stall the controllers. Step 1. Wear an anti-static wrist strap. When handli ng th e controller, avoid touchi ng circuit boa rds and conn ector pins. Step 2. Remove controllers from the controller boxes. Step 3. Align the co ntroller m odule with the co ntroller modu le bay, making sure that the levers are down. Gently slide the controller module in. Figure 2-16: Inserting a Controller into Chassis Step 4. Controller Installation Secure the connection. When th e cont roller is reaching the end and you feel the contact re sistance, use slightly more force t o mate the controlle r with backplane connectors. Wh en t he co ntroller is al most fully inserte d, use the ej ection leve rs to secure the controller. Th e levers help ensure th at the back-en d connectors are properly mated. 2-17 Falcon IV Installation and Hardware Reference Manual Figure 2-17: Using Ejection Levers to Secure Controller 2-18 Step 5. Fasten the retention screws. Once fully inserted, secure the controlle r module to the cha ssis by fastening the retention screws thro ugh the holes underneath the ejection lever. Step 6. Continue with components. installing cabling and other Controller Installation Chapter 2: Hardware Installation 2.8 Hard Drive Installation 2.8.1 Hard Drive Installation Prerequisites Hard d rives are separately purcha sed. Before in stalling ha rd d rives, the following factors should be considered: Capacity (MB/GB): Use drives with the same capa city. RAID arrays use a “le ast-common-denominator” appro ach. The maximum capacity allocated from each disk drive is the maximum capacity that can be leveraged from the smallest drive. Choose big drives with the same storage capacity. Profile: The drive trays are designed for 3.5-i nch-wide x 1-in ch-high hard drives. Drive type: This m odel accommodates SAS or hard drives. SATA-II (3Gbps) MUX Board: MUX board s are re quired if using SATA drives in a redundant-controller confi guration both in RAID and the expansion enclosures. The )DOFRQ,9 comes with MUX bo ards in its drive trays. WARNING! 1. Handle hard drives with extreme care. Ha rd d rives are ve ry delicate. Dropping a drive against a hard surface (even from a short distance) and hitting or touching t he circuit board on the drives with your tools may cause damage to the drives. 2. Observe all ESD prevention methods when installing drives. 3. Only use screws suppli ed wi th the dri ve cani sters. Long er screws can damage the hard drives. 2.8.2 Drive Installation Step 1. Hard Drive Installation Place the hard drive into the drive tray (as sho wn below), ma king sure th at the interfa ce co nnector is facing th e o pen si de of the drive t ray, and the lab el side facing up. 2-19 Falcon IV Installation and Hardware Reference Manual Figure 2-18: Installing a Hard Drive Step 2. Adjust the drive’s location until the mounting holes in the drive ca nister a re alig ned with tho se on the ha rd drive. Scre ws hole s used for the installation with or without a MUX board are different. Figure 2-19: Drive Locations with and without the MUX Board 2-20 Step 3. Secure the disk drive with four (4) of the su pplied 6/32 flat-head screws. Step 4. Once the hard drive s are in stalled i nto drive trays, install all driv e trays i nto t he en closure. See detail ed instructions in the following section. Hard Drive Installation Chapter 2: Hardware Installation 2.9 Drive Tray Installation Once the hard drives hav e been se cured within the drive trays, the drive trays can be installed into the system. WARNING! All drive trays must be in stalled into the enclosure even if they do not co ntain a hard drive . If there are empty dri ve bays, the ventilation airflow will be disrupted and the system will overheat. Step 1. Use a sm all-size (1/8 ”) fla t-blade s crewdriver to tur n the rotary bezel lock to the unlocked position, i.e., the groove on its face is in a horizontal orientation. Figure 2-20: Drive Tray Front Bezel Step 2. Open the front bezel on the drive tray. Pus h the release button on the drive tray. The fr ont bezel will spring open. Figure 2-21: Drive Tray Release Button Drive Tray Installation 2-21 Falcon IV Installation and Hardware Reference Manual Step 3. Align the drive tray with a drive bay. Gently slide it in until the drive tray reac h the end of drive bay. Thi s should be done smoothly and gently. Figure 2-22: Installing a Drive Tray Step 4. Close the front bezel. Make sure the front bezel is closed pr operly to e nsure th at th e b ack-end connector is pro perly mated with the co rresponding connector on the backplane. If the front bezel can n ot closed prope rly, the connection bet ween the hard drive an d the syste m may com e loose an d mysterious drive signals may result. Step 5. Lock the bezel into place by turnin g the key-lo ck until the groo ve on its face is pointing down (vertical orientation). Figure 2-23: Front Bezel Rotary Lock 2-22 Drive Tray Installation Chapter 2: Hardware Installation Step 6. Once the d rive bays a re populated a nd the sy stem powered on, the RAID contro ller will automaticall y spin up the hard drives and recognize their presence. 2.10 Installing CBM (Optional for G Model) CBM (Cache Backup Module) is an optional equipment for the singlecontroller )DOFRQ,9. You may need to install CBM on the arrival of your system. A CBM module contai ns a battery cell module, and a flash SSD module. To install a CBM module (Skip steps 1-4 if installing CBM at the initial installation): Step 1. 1-1. If a system is powered on, stop host I/Os. 1-2. Use the “Shutdo wn C ontroller” co mmand to flush cached data. 1-3. Power down the system. NOTE: If installing a n ew system, si mply remove a RAID controller fro m its p ackage box. You may the n skip steps 2 and 3. Step 2. Remove RAID co ntroller from ch assis by loosenin g screws under the ejection levers. Figure 2-24: Removing a RAID Controller Step 3. Press d own on the eje ction levers. Th e co ntroller will be eased out from chassis. Step 4. Place controller o n a clean, static-fre e surface. Hol d the cont roller by its metal cani ster. Ne ver touch the circuit board or connector pins. Installing CBM (Optional for G Model) 2-23 Falcon IV Installation and Hardware Reference Manual Step 5. 5-1. Install BBU by orienting its protruding edge on one end into the inse rtion slot, and lowerin g it into the canister. The orientation is shown below. 5-2. Carefully orient the B BU so th at the gold en finger connector on the BBU is properly aligned with that on the charger board. 5-3. Once the connectors are mated, fasten the captive screw on BBU to secure the installation. Figure 2-25: Installing BBU Module Step 6. 6-1. Install the flash SSD by orienting and inserting it at an app roximately 15 deg ree a ngle int o the SSD socket. The SSD socket is locate d on the cha rger board. 6-2. Ma ke sure the SSD’s gold en fingers are fully inserted. Pre ss the SSD down. The retention latches on the SSD socket will hold the SSD in place. 2-24 Step 7. Install the RA ID controller back into chassis. Insert the controller sl owly into the module sl ot. Whe n you fe el the contact resistance by y our hands, use mo re force, and then pul l both of the ejection levers upwa rds to secure the controller into chassis. Step 8. Secure the controller by fastenin g two screws you previously removed to the ejection levers. Installing CBM (Optional for G Model) Chapter 3 System Connections This chapter outlines some general configuration rules you should follow when cabling a storage system and introduces basic information about Fibre cables and topologies for the )DOFRQ,9 system. You can use these topologies or refer to them as a guide for developing your own unique topologies. A complete description of the power on and power off procedures is also given in this chapter. 3.1 FC Host Connection Prerequisites 3.1.1 Choosing the Fibre Cables The Fibre Channel standard allows for both copper and optical connections. Copper cable is cheaper but limited to lengths of less than 30m (33 yards). Optical cables can be used over longer distances and have been shown to be more reliable. Due to the demands of high transfer rates, optical cables are preferred for 8/4Gbps fiber connectivity. Optical cables are also less susceptible to EMI. The following transceiver and cables have been tested and proven to be compatible with your systems. IFT-9370CSFP8GA Avago AFBR-57D5APZ, Fibre Channel 8.5/ 4.25 / 2.125 GBd Small Form Pluggable Optical Transceiver, LC, wave-length 850nm, multi-mode At 8G mode, the max. cable lengths is 150m with 50μm MMF. IFT-9270CFCCab01 FC Host Connection Prerequisites Optical FC cable, LC-LC, MM-62.5/125, Duplex, LSZH, O.D.=1.8mmx2, 1 Meter 3-1 Falcon IV Installation and Hardware Reference Manual IFT-9270CFCCab02 Optical FC cable, LC-LC, MM-62.5/125, Duplex, LSZH, O.D.=1.8mmx2, 5 Meters IFT-9270CFCCab03 Optical FC cable, LC-LC, MM-62.5/125, Duplex, LSZH, O.D.=1.8mmx2, 10 Meters The Fibre host ports connect to Fibre Channel host adapters (HBA) that feature a 8Gbps transfer rate, SFP interface, and support for fullduplex transfer, best come with a 64-bit/133MHz PCI-X or PCI-E interface. WARNING! All fiber optic cables are sensitive and must be handled with care. To prevent interference within a rack system, the cable routing path must be carefully planned and the cables must not be bent. FC Lasers CAUTION! Lasers can be hazardous and may cause permanent eye damage or blindness, and therefore must be treated with respect and used with caution. Never look at lasers without confirming that they are off. Wavelengths: The system supports SFP transceivers using lasers on fiber optic cables emitting short wave (SW) beams (770nm860nm). Cables using either of these wavelengths can be used. Laser types: Two (2) types of laser devices can be used in FC cables: Optical Fibre Control (OFC) and non-OFC lasers. The OFC lasers are high-powered and can be used over long distances. Safety features: Due to their high power output, OFC lasers usually come with a safety mechanism that switches the laser off as soon as it is unplugged. Non-OFC lasers are low power and do not come with these safety features; however, they can still inflict damage. FC Speed Auto-detection Speed auto-detection is specified by the Fibre Channel standard. If a 4Gbps port is connected to an 8Gbps port, it will negotiate down and run at 4Gbps. If there are 8Gbps ports on both ends of the link, the link will run at 8Gbps. SFP Transceivers An SFP transceiver converts electrical data signals into light signals and transfers them transparently via optical fiber. A transceiver provides bi-directional data links, a laser transmitter (for fiber optic cables), LC connector, and a metal enclosure to lower the EMI. 3-2 FC Host Connection Prerequisites Chapter 3: System Connection NOTE: LC connectors are small form-factor, fiber-optic connectors based on a 1.25-mm ceramic ferrule with the familiar latching mechanism of the RJ-45 modular plug and jack. Other beneficial features of a typical SFP transceiver include a single power supply, low power dissipation, and hot-swap capability. It is also important that any transceiver you use meets the FC performance and reliability specifications. CAUTION! The SFP transceiver from RAID, Inc contains a laser diode featuring class 1 laser. To ensure continued safety, do not remove any covers or attempt to gain access to the inside of the product. Refer all servicing to qualified personnel. CLASS 1 LASER PRODUCT FC Port Dust Plugs Each FC port comes with a dust plug. Remove these dust plugs only when you are ready to insert an SFP transceiver. Other Concerns When selecting the number of hard drives to be included in a logical drive, the host channel bandwidth and the mechanical performance of individual disk drives should be considered. It is a good practice to calculate performance against the host port bandwidth when designing an application topology. As diagrammed below, if eight (8) members are included in a logical drive and this logical drive is associated with a host ID (LUN mapping), the combined performance of this logical drive will approximate the channel bandwidth. If, for example, two 8-drive logical arrays are associated with two IDs residing on a single host channel, there may be a trade-off with performance. If your system comes with dual controllers for a total of 4 host ports, it will be a good practice you obtain more disk drives by attaching a JBOD so that you can create 4 8- or 12-member logical drives. These 4 logical drives leverage the bandwidth of all 4 host ports. FC Host Connection Prerequisites 3-3 Falcon IV Installation and Hardware Reference Manual Figure 3-1: Drive Mechanical Speed and Logical Drive Speed There are other considerations. For example, a spare drive carries no data stripes and will not contribute to disk-level performance. Refer to the documentation for your hard drives for performance data. 3-4 When cabling, follow all the Fibre channel specifications. Pay attention to signal quality and avoid electronic noise from adjacent interfaces, e.g., do not lay power cords on optical cables. The disk drives in the same logical array should have the same capacity, but it is preferred that all the drives within a chassis have the same capacity. Disk drives in the same logical drive should have the same capacity, but it is preferred that all the disk drives within a chassis have the same capacity. Tiered storage configuration is supported, e.g., 150GB SAS drives in your RAID enclosure and 750GB SATA drives in JBODs. However, you should not include both SAS and SATA drives in a logical drive. A spare drive should have a minimum capacity that is equivalent to the largest drive that it is expected to replace. If the capacity of the spare is less than the capacity of the drive it is expected to replace, the controller will not proceed with the failed drive rebuild. When rack-mounted, leave enough slack in the cables so that they do not bend to a diameter of less than 76mm (3 inches). Route the cables away from places where it can be damaged by other devices, e.g., foot traffic or fan exhaust. Do not overtighten or bend the cables. FC Host Connection Prerequisites Chapter 3: System Connection 3.1.2 Topology and Configuration Considerations Fibre Channel Topologies The Fibre Channel standard supports three (3) separate topologies. They are point-to-point, Fibre Channel Arbitrated Loop (FC-AL), and fabric switch topologies. Point-to-Point: Point-to-point topology is the simplest topology. It is a direct connection between two (2) Fibre Channel devices. FC-AL: This is the most common topology currently in use. Fibre Channel devices are all connected to a loop. Each device is assigned an arbitrated loop physical address (AL_PA). The FCAL supports 124 devices in a single loop. Fabric: The fabric topology supports up to 2 Fibre Channel devices. This topology allows many devices to communicate at the same time. A Fibre switch is required to implement this topology. 24 Host-side Topologies The primary concern for configuring host-side topologies is to avoid points of failure. It is therefore recommended that the host ports be connected to at least two (2) HBAs. It is also preferable to apply Fibre Channel switches. NOTE: In order to manage the fault-tolerant data paths and to optimize data throughput on multiple data paths, it is necessary to apply RAID, Inc’s Multipathing software or other utilities such as Linux Device Mapper, etc. FC Host Connection Prerequisites 3-5 Falcon IV Installation and Hardware Reference Manual Associated Host-side Parameters It will be necessary to fine-tune your host-side parameters if you are attaching the system in a complex, multi-host SAN environment. The options can be found in terminal console with firmware in Main Menu -> View and Edit Configuration Parameters -> Host-side Parameters. For example, you may need to enlarge values for the following parameters: Maximum Concurrent Host LUN Connection (“Nexus” in SCSI) The "Max Number of Concurrent Host-LUN Connection" menu option is used to set the maximum number of concurrent host-LUN connections. Change this menu option setting only if you have more than four logical drives or partitions. Increasing this number might increase your performance. Maximum concurrent host LUN connection (nexus in SCSI) is the arrangement of the controller internal resources for use with a number of the current host nexus. For example, you can have four hosts (A, B, C, and D) and four host IDs/LUNs (IDs 0, 1, 2 and 3) in a configuration where: • Host A accesses ID 0 (one nexus). • Host B accesses ID 1 (one nexus). • Host C accesses ID 2 (one nexus). These connections are all queued in the cache and are called four nexus. If there is I/O in the cache with four different nexus, and another host I/O comes with a nexus different than the four in the cache (for example, host A accesses ID 3), the controller returns busy. This occurs with the concurrent active nexus; if the cache is cleared, it accepts four different nexus again. Many I/O operations can be accessed via the same nexus. 3-6 FC Host Connection Prerequisites Chapter 3: System Connection Maximum Queued I/O Count The "Maximum Queued I/O Count" menu option enables you to configure the maximum number of I/O operations per host channel that can be accepted from servers. The predefined range is from 1 to 1024 I/O operations per host channel, or you can choose the "Auto" (automatically configured) setting. The default value is 256 I/O operations. The maximum number of queued I/O operations is 4096. The appropriate "Maximum Queued I/O Count" setting depends on how many I/O operations attached servers are performing. This can vary according to the amount of host memory present as well as the number of drives and their size. If you increase the amount of host memory, add more drives, or replace drives with higher performance, you might want to increase the maximum I/O count. But usually optimum performance results from using the "Auto" or "256" settings. For more information, please refer the firmware Operation Manual that came with your system. FC Host Connection Prerequisites 3-7 Falcon IV Installation and Hardware Reference Manual 3.2 Sample Topologies Sample 1: DAS (Direct-Attached) Connections ()DOFRQ,9). NOTE: If a logical drive can be accessed by different servers, file locking or multi-pathing access control will be necessary. Figure 3-2: DAS Connections, Falcon IV Channels Host Controller A CH0 and CH1 Configuration Information 3-8 RAID controllers 1 Host servers 1 Data path connection Simple end-to-end connections Host channel bandwidth 1600MB/s Sample Topologies Chapter 3: System Connection With more disk drives over the SAS expansion links, you can create more logical groups of drives. Avail these logical drives using more host channel IDs or LUN numbers. Sample 2: DAS (Direct-Attached) Connections ()DOFRQ,9). NOTE: If a logical drive can be accessed by different servers, file locking or multi-pathing access control will be necessary. Figure 3-3: DAS Connections, Falcon IV Channels Host Controller A Controller B CH0 & CH1 CH0 & CH1 Configuration Information Sample Topologies 3-9 Falcon IV Installation and Hardware Reference Manual RAID controllers 2 Host servers 1 Data path connection Fault-tolerant data paths Host channel bandwidth 3200MB/s With more disk drives over the SAS expansion links, you can create more logical groups of drives. Avail these logical drives using more host channel IDs or LUN numbers. Each logical drive is redundantly mapped to multiple host channel IDs in an AAPP (Active-Active-Passive-Passive) configuration. The Passive IDs will only become functional when a single controller fails in the system. The Multipath driver is a must on the application server. The driver communicates with system firmware and performs load balance and automated distribution of I/Os across preferred paths (Active IDs on data paths). TPGS (Target Port Group Service) is supported. 3-10 Sample Topologies Chapter 3: System Connection Sample 3: Simple End-to-End Connections ()DOFRQ,9). Figure 3-4: Simple End-to-End Connections Channels Controller A Controller B CH0 & CH1 CH0 & CH1 Host Configuration Information RAID controller 2 Host server 2 Data path connection Fault-tolerant data paths, yet LD can not failover to a partner controller in the event of controller failure. Host channel bandwidth 3200 MB/s Sample Topologies 3-11 Falcon IV Installation and Hardware Reference Manual Above is the sample drawing showing simple end-to-end connections with each SFP port connected to a host adapter. Multiple logical drives can be created and each mapped to the corresponding host channel ID/LUN combinations. Note that RAID, Inc’s Multipathing software is necessary for controlling and optimizing the access to logical drives via multiple data paths. 3-12 Sample Topologies Chapter 3: System Connection Sample 4: Switched Fabric Connections ()DOFRQ,9). IMPORTANT! If you connect fault-tolerant links via FC switches in a redundantcontroller configuration, make sure the corresponding switch ports are configured as “FL_ports.” In the event when a RAID controller fails, a LIP is issued across and if the switch ports are configured otherwise, FC switches may not acknowledge the change in data routes. Figure 3-5: Connections via Switched Fabric Sample Topologies 3-13 Falcon IV Installation and Hardware Reference Manual Channels Controller A Host CH0 & CH1 Controller B CH0 & CH1 Configuration Information RAID controller 2 Host server 2 (or more via FC switches) FC switch 2 (or 1 into 2 zones) Data path connection Fault-tolerant paths Host channel bandwidth 3200MB/s Channel link bypass is provided on external FC switches. Each of the application servers shown in the diagram is equipped with two HBAs with FC links via two FC switches to the SFP ports on individual RAID controllers. You can refer to the ID tags on the host links to see the related logical drive mapping and cable links routing paths. Through the cable links diagrammed above, the configuration can withstand a failure of a single component, e.g., RAID controller, HBA, cable, or FC switch. Each logical drive is redundantly mapped to multiple host channel IDs in an AAPP (Active-Active-Passive-Passive) configuration. LD0 is assigned to controller A, and LD1 is assigned to controller B. The Passive IDs will only become functional when a single controller fails in the system. The driver is a must on the application servers. The driver communicates with system firmware and performs load balance and automated distribution of I/Os across preferred paths (Active IDs on data paths). TPGS (Target Port Group Service) is supported. 3.3 FC Cabling Following are steps that should be completed with cabling: 1. Maintain a configuration plan. In addition to cabling topologies and list of networking components, the plan can also include firmware and software maintenance details. 2. Confirm that you have a Fibre Channel cable loops 6-inch or longer. 3. Ensure proper airflow and keep cables away from ventilation airflow outlets. Cabling Steps: 3-14 Step 1. Remove the SFP module from its static-protective package. Step 2. Remove the dust plug from the SFP transceiver module. Save the dust plug for future use. FC Cabling Chapter 3: System Connection Figure 3-6: Connecting SFP Transceiver and LC Type Cables FC Cabling Step 3. Remove the dust plugs from the RAID system SFP ports. Step 4. Insert the SFP module into the system host ports. The module will click into place. Step 5. Connect an LC-to-LC type cable. Step 6. Remove the two protective caps from the LC-to-LC type cable. Save the protective caps for future use. Step 7. Carefully insert the cable into an SFP module that is already on the system. The cable connector is keyed and will click into place. Step 8. Remove the protective caps on the other end and connect this end to an SFP transceiver module on a Fibre Channel switch port or a Fibre Channel host bus adapter (HBA) port. 3-15 Falcon IV Installation and Hardware Reference Manual 3.4 Expansion Links Expansion Links: The SAS expansion port connects to expansion enclosures. For a dual-controller system, each expansion port connects a RAID controller to a corresponding JBOD controller making faulttolerant links to different SAS domains. There are two principles with the combinations of RAID and JBOD: 1). Dual-controller RAID connects to dual-controller JBODs; Single-controller RAID connects to single-controller JBODs. 2). You should have one or two cables IRU-%2'FRQQHFWLRQV These two connector types are both made for 4x multi-lane SAS connections, only that their form factors and latching mechanisms are different. RAID Model 3U JBOD Configuration )DOFRQ,9 Dual-controller; fault-tolerant paths )DOFRQ,9 Single-controller; single path Table 3-1: Falcon IV RAID and JBOD Matching Table 3-16 Expansion Links Chapter 3: System Connection Enclosure ID: There is a rotary ID switch on every expansion enclosure that is manually configured using a flat blade screwdriver. Configuring enclosure IDs: 1. The configurable IDs start from 2 to 6. Usually the numbering starts from the one closest to the managing RAID enclosure. The first two IDs, 0 and 1, are occupied by the RAID enclosure. 2. The )DOFRQ,9 connects to a maximum of 5 JBODs, making a total of 104 HDDs. 3. Make sure a unique ID is configured on each JBOD so that the SAS WWN addresses of disk drives can be properly assigned. RAID system firmware automatically manages these addresses. Figure 3-7: JBOD Enclosure IDs Expansion Links 3-17 Falcon IV Installation and Hardware Reference Manual SAS Expansion Configuration Physical Connections from a Redundant-controller RAID to 3U Dual-controller JBODs: Falcon IV Figure 3-8: Redundant-controller RAID to 3U Dual-controller JBODs 3-18 Expansion Links Chapter 3: System Connection Configuration Rules: Following are the rules for connecting SAS interfaces across RAID and JBOD enclosures: 1. If SATA drives are deployed in a configuration consisting of dualcontroller enclosures, make sure MUX boards are available for all disk drives. 2. Fault-tolerant links in a dual-controller combinations: Corresponding to SAS drives’ dual-ported interface, two (2) physical links are available from each disk drive, routed across the backplane board, each through a SAS expander, and then interfaced through a 4x wide external SAS port. With data paths through separate SAS domains, access to disk drives can be continued in the event of a cable link or SAS JBOD controller failure. Figure 3-9: Fault-tolerant Links to SAS disk Drives 3. SAS expansion cables will be available with RAID, Inc’s JBODs. Note that if many JBODs are connected, a longer SAS external cable (e.g., a 120cm or 160cm cable) may be necessary for connecting a JBOD from the opposite direction offering high redundancy. One expansion link connects JBODs from the nearest JBOD, and then to the farthest JBOD. Another expansion link connects to the farthest JBOD from the opposite direction and then to the nearest JBOD. Connected this way, even an entire JBOD failed in the configuration, the connections to other JBODs will still be available. 4. Each expander controller on the SAS JBOD controls a “SAS Domain” that connects one of the alternative interfaces on all of Expansion Links 3-19 Falcon IV Installation and Hardware Reference Manual the disk drives in the enclosure. For example, one expander unit controls Domain A, and the other controls Domain B. In a faulttolerant topology, the SAS external links always connect to the SAS ports on the same SAS Domain. The SAS Domains can be identified by the expanders’ locations, i.e., upper controller slot (Controller A/Slot A) or the lower controller slot (Controller B/Slot B). 5. On a RAID system, each RAID controller can be considered as managing a separate SAS Domain. With the help of the port selector mechanism on the MUX boards, the idea of SAS Domain applies even when SATA drives are used in a dualcontroller JBOD. 3-20 Expansion Links Chapter 3: System Connection Single-controller RAID to 3U single-controller JBODs: Falcon IV Figure 3-10: Single-controller RAID to 3U Single-controller JBODs NOTE: Because of the different port connectors on RAID and JBODs, an SFF-8088 to SFF-8470 cable will be necessary when connecting to 3U single-controller JBODs. Expansion Links 3-21 Falcon IV Installation and Hardware Reference Manual 3.5 Connecting Other Interfaces Figure 3-11: Connecting Serial Port and Ethernet Ports Single-controller )DOFRQ,9: Serial cable and LAN cable are user-supplied. Dual-controller )DOFRQ,9: A serial port Y-cable is provided in package. LAN cable is user-supplied. The serial port’s defaults are: Baud rate Data bit Parity Stop bit Flow control 38400 8 none 1 Hardware Table 3-2: Serial Port Defaults For TCP/IP connection and firewall configuration with a management station running SANWatch, please refer to SANWatch’s online help or User’s Manual. 3-22 Connecting Other Interfaces Chapter 3: System Connection 3.6 Connecting Power Cords Use the included cable clamps to secure power cord connections. Step 1. Remove power cords and cable clamps from the accessory boxes. Step 2. Combine cable straps with cable clamps. Figure 3-12: Combining Cable Strap and Cable Clamp Step 3. Attach cable clamps to the power cords by opening and enwrapping the plastic ring around the base of power cords. Figure 3-13: Attaching Cable Clamps to Power Cords Step 4. Adjust the position of cable straps using the release tab. Adjust the position so that when a power plug is connected to system power the barb anchor can be inserted into the anchor hole above the power socket. Connecting Power Cords 3-23 Falcon IV Installation and Hardware Reference Manual Figure 3-14: Adjust Cable Strap Position Step 5. Connect power cords to system power supplies and insert the barb anchor into the anchor holes below the power sockets. Figure 3-15: Attaching Power Cords 3.7 Power On Once all of the components have been installed in the system and the cabling links have been adequately connected, the system can be powered on. Check List BEFORE powering on the subsystem, please check the following: 3-24 CBM: Make sure CBM has been installed correctly (CBM selected as an add-on module for G1840). Power On Chapter 3: System Connection Hard drives: Hard drives have been installed in the drive trays. Drive trays: All the drive trays, whether or not they contain a hard drive, have been installed into the system. Cable connections: The subsystem has been correctly connected to host computer(s), FC switches or HBAs, and SBODs. Power cords: The power cords have been connected to the PSUs on the subsystem and plugged into the main power source. Ambient temperature: All the subsystem components have been acclimated to the surrounding temperature. Power On Procedure When powering on the subsystem, please follow these steps: Step 1. Power on the Fibre Channel networking devices. These devices include FC switches, and any other such devices connected between application servers and storage. Please refer to the documentation that came with your networking devices to see the poweron procedure. Step 2. Power on the expansion enclosures (JBOD) attached to the RAID system. If you have connected JBODs to the system, power on these JBODs, and wait for their Drive Busy LEDs to blink. Step 3. Power on the system. The system should be powered on before the application servers. Power on using the power switch that is covered by a plastic cap. Step 4. Power on the application servers (host computers.) The application servers should be the last devices that are turned on. Please refer to related documentation for their power-on procedures. Power On 3-25 Falcon IV Installation and Hardware Reference Manual Power On Status Check Once the system is powered on, all aspects of its operating statuses should be carefully observed to ensure that there are no complications or malfunctions. 1. Controller module LEDs: The Controller Ready, Host Busy, and Drive Busy LEDs should all flash green during the initialization process. 2. Drive tray LEDs: The green LEDs for all populated drive trays should light constant blue after the initialization process. 3. LCD panel LEDs: The Power LED on the LCD panel should light blue, and the ATTEN LED should be flashing red during the initial stage and turns off once the initialization is completed. 4. Fibre Port LEDs: The LEDs underneath each FC port should illuminate green, indicating that the Fibre Channel link has been established. 5. BBU LEDs: The LEDs on the BBU rear panel should start flashing amber, indicating that the BBU is being charged. 6. PSU LEDs: If the PSU is operating normally and experiencing no problem after power on, the LEDs on the PSU should light green constantly. 7. Firmware and RAIDWatch: Various aspects of the system operating information can be accessed through the firmware configuration utilities or the RAIDWatch GUI. 8. Audible alarm: If any errors occur during the initialization process, the onboard alarm will sound in a hastily repeated manner. 9. Drive BUSY LEDs should start flashing during the power-up process, indicating that the RAID controllers are attempting to access the hard drives. NOTE: The subsystem has been designed to run continuously. If a component fails, the fault can be corrected online. 3-26 Power On Chapter 3: System Connection LCD Screen When powering on the subsystem, wait for the front panel LCD screen to show “READY” or “No Host LUN” before you power up the application servers. Model Name Falcon IV Ready Status/Data Transfer Indicator Figure 3-16: The LCD Initial Screen The LCD screen startup sequence is shown and described in the sequence below: Initializing…. Please Wait... This screen appears when the system is powering on. Power On Self Test Please Wait… System is performing a self test. Power on Init Completed.. System power-on self test is completed. Falcon IV System is accessing various interfaces. Falcon IV 512MB RAM, Wait... Verifying installed memory. Falcon IV No Host LUN System is ready. You can now start to configure the system. Falcon IV Ready Power On With host LUN mapping, system is ready for I/Os. 3-27 Falcon IV Installation and Hardware Reference Manual 3.8 Power Off Procedure If you wish to power down the subsystem, please follow these steps: NOTE: If you wish to power down the subsystem, please make sure that no time-consuming processes, like a “logical drive parity” check or a “background scrub,” are running. Step 1. Stop I/O access to the system. Close your applications to stop all IO accesses to the subsystem. Please refer to the documentation that came with your applications. Step 2. Flush the cache. Locate the C_Dirty LED on the controller module to check if there is still cached data in memory. Use the Shutdown Controller firmware function to flush all cached data. This prepares the RAID subsystem to be safely powered down. Step 3. Turn off the power. Once the subsystem has been powered down, other enclosures attached to the subsystem may be sequentially powered down. 3-28 Power Off Procedure Chapter 4 System Monitoring 4.1 Overview The S16F system is eq uipped with a variety of self-mo nitoring features that help keep system managers aware of system operation statuses. The monitoring features include: Overview Firmware: The RAID con troller in the system is ma naged by a pre-installed firmware, wh ich is acce ssed u sing a PC hyperterminal via the COM1 serial port. Device statuses can b e obtained from the menu-driven co nfiguration utility. Firmwar e features are fully described in the Operation Manual that cam e with your system. 4-1 Falcon IV Installation and Hardware Reference Manual SANWatch: SANWatch is a fully integrated, Java-b ased, Graphical User Interface (GUI) that ca me with the system and can be u sed to monitor a nd maintai n the sub system locally o r remotely over TCP/IP ne twork. Th e management se ssion i s made using the 10/100B aseT management port. Please refer to the SANWatch User’s Manual for further details. Use SANWatch’s Notification Manager to set up automated event notification via Email, MSN, LAN broadcast, etc. 4-2 Overview Chapter 3: Subsystem Monitoring LEDs: LE Ds are lo cated on all mo dules. Th ese L EDs in dicate the integ rity of a given component or a ho st/management link. You sho uld become fami liar with the variou s LEDs and thei r definitions. Audible alarm: An audi ble alarm is present on the sy stem controller bo ard a nd will be trigge red if any of a numb er of threatening events occurred. 4.2 Status-indicating LEDs 4.2.1 LCD Keypad Panel The LCD keypad as shown in Figure 4-1 consists of five (5) buttons , three (3) LE Ds, a nd a 1 6x2-character LCD scree n that provid es access to firmwa re-embedded utility. Press the ENT button fo r two (2) seconds on the initial screen to ent er the mai n menu. Pre ss the ESC button to skip the current event. Function Keys: Press the UP and DOWN arrow keys to select viewing items. In the bottom row of the main men u, “View an d Edi t Event Logs,” the most recent event is displayed. Browsing Events: To see d etailed de scription of e ach event, use the a rrow keys to select an event, a nd p ress and hold d own the ENT key until an event ID is shown on the screen, then use arrow keys to browse th rough th e de scription lines. If you tab the ENT key lightly, system will prompt you to delete all events. Mute Button: The MUTE button sile nces the al arm tempora rily until the next event occurs. The definitions of LEDs on the panel are given in Table 4-1 below. Status-indicating LEDs 4-3 Falcon IV Installation and Hardware Reference Manual Figure 4-1: LCD Keypad Panel Name PWR (Power) BUSY ATTEN (Attention) Color Status ON in dicates that powe r i s supplie d to the system, and system state is normal. Blue White Red OFF indi cates that no power is supplied to the system or the RAID controller has failed. FLASHING indicates that there is activ e traffic on the host/drive channels. OFF indicates that there is no activity on the host/drive channels. ON indicates that a compon failure/status event has occurred. ent OFF indicates that the subsystem and all its components are operating correctly. Table 4-1: LCD Panel LED Definitions NOTE: During the power-on pr ocess, the ATTEN LED will light up steadily. Once the subsystem successfully boots up with no faults, the ATTEN LED will turn off. 4.2.2 Drive Tray LEDs Two (2) LED indicato rs a re locate d on the right sid e of each dri ve tray. Refer to Table 4-2 for the LED definitions. Whe n notified by a drive failu re message, yo u sh ould che ck th e d rive t ray indi cators to find the correct location of the failed driv e. Replacing the wrong drive can fail two members of a logical arra y (RAID 3/5) and thus destroy data in it. 4-4 Status-indicating LEDs Chapter 3: Subsystem Monitoring Figure 4-2: Drive Tray LEDs Name Drive Busy Color Status Blue FLASHING i ndicates data is being written to or read from the drive. The drive is busy. OFF indicates th at there is activity on the disk drive. Power Status Green/ Red no GREEN indicates that the drive bay is populate d and is worki ng normally. RED indi cates that the disk d rive has failed, or a conne ction problem occurred. Table 4-2: Drive Tray LED Definitions 4.2.3 Controller Module LEDs The LEDs o n the rear-fa cing fa ceplate of the RAID co ntroller are shown in Figure 4-3. The controller LEDs are numbered from 1 to 6. The definitions are shown below. Figure 4-3: Controller Module LEDs Status-indicating LEDs 4-5 Falcon IV Installation and Hardware Reference Manual Name Ctlr Status Color Green/ Amber Status Green i ndicates that healthily. a RAID controller i s o perating Amber indicates that a compo nent failure has occurred, or ina ppropriate RAID configurations have caused system faults. It is also lit during the initialization process. ON indicates the following: - Certain amounts of cached data held in memory. - Errors occurred with cache memory (ECC errors) - Cached data is sustained by battery backup. - Battery voltage is lower than 2.5V. C_Dirty Amber - Battery temp erature reading is ab normal (out of the 0 to 45°C range). - Battery is not present. OFF indicate s that the c ache is clea n, and that the battery backup unit is ca pable of sust aining mem ory in case of power loss. This signal is local to each controller. Temp. Amber ON indicates that the detec ted CPU/b oard/chassis temperature has exce eded the hi gher temperature threshold. OFF indi cates that the de tected temp erature re ading is within the safe range. Green steady on indi cates the CMB module is ready. Both a BBU and flash mo dules are present. Fast blinking indicates BBU is charging. CBM Status Green/ Amber Amber ste ady on indicate s CBM failure, meaning e ither BBU or fla sh has failed. When lit, it also in dicates either BBU or a flash i s missi ng in a re dundant-controller system. Blinking means a BBU is being charged. OFF means BBU is not installed in a si ngle-controller “G” model. Hst Bsy Green Rapidly Blinking to indicate traffic on the host bus. Drv Bsy Green Rapidly Blinking to indicate traffic on the channels. Restore Green Lit Green to indicate the RAID co nfiguration default has been succe ssfully resto red. The LED state will be 4-6 drive Status-indicating LEDs Chapter 3: Subsystem Monitoring invalidated after a few seconds. Default See below for how to use the push button. Table 4-3: Controller LED Definitions How to Use the Restore Default Button? CAUTION! The Restore NVRAM Default push b utton should be considered as a last -resort functio n. Although restoring firmware d efaults will n ot destroy the existing logical drives; however, detailed configurations, such as vari ous pa rameters and host LUN mapp ings, will be erased. There is a n on-latch type push button accessed through an ope ning on the controller faceplate. Why restoring defaults? 1. Some of the latest firm ware updates may be in compatible with the firmwa re currently ru nning o n you r system. Th ese u pdates may require resto ring firmware defaults before firmware upg rade can actually take pla ce. Before u sing the button , it is highly advised to practice the following: Stop host I/Os, Save NVRAM, (you can save NVRAM contents either on a terminal co nsole, Embedded RAI DWatch, or usi ng the SANWatch software) Make a list of host ID/LUN mapping information for future references. You may also jot down the config uration parameters such a s the performance preferences, specific stripe sizes, etc. 2. Firmware ha s an em bedded 1GB thre shold for inte rnal settings such a s the sup ported no . of logical drives. Whe n you upg rade controller DIMM module, say, from 512MB to 2GB, you need to restore firm ware d efaults after you upg rade your DI MM modul e size to 2GB. 3. Another condition that requi res re storing d efaults is whe n a system administrator forgets the password controlling the access to a RAID system. Before pushin g this button, also pra ctice the steps listed above. You can acce ss configuration scree n an d manually record array information even without a password. Status-indicating LEDs 4-7 Falcon IV Installation and Hardware Reference Manual Listed below are the necessary procedures that should be completed before using this button: 1. Before pressing this button to resto re firmwa re d efaults, it is highly advised to save you current confi guration using the “ Save NVRAM” function in firmware utility or the SANWatch GUI. 2. You may al so ma ke a list of the existing ID/L UN map ping information. You will need the lis t for restoring ID/LUN mapping after restoring defaults. Default restoration will erase the ID/LUN mapping associations (e.g., which logical drive is associated with which ho st ID/LUN), and it will be n ecessary to restore the previous settings usi ng the “Restore NVRAM from Disks“ o r “Restore NVRAM from Files” functions. Configurations such as ID/LUN mapping will be restored after a system reset. How to use the button? Single-controller system: After the syst em is po wered do wn, yo u can use a strai ghten p aper clip to press the button. Pre ss and hol d the button down, power on the system, and wait for th e associated LED and the system Ready LED to light up. The “ Restore Def.” LED and the firmwa re “Default Restored” event message will indicate a successful restoration of firmware defaults. Redundant-controller: With red undant RAID controll ers, the pro cedure can be m complicated: 4-8 ore Step 1. Remove controller B from the subsystem, power down, and th en p ower on with the “Re store Def.” button depressed t o re store th e firmware defaults on the remaining controller. Step 2. When the “ Restore Def.” LED is lit and the “defa ult restored” firmware event a ppears on the LCD scre en, release the button. You may ask you r coll eague t o observe the messa ge on the other end of the chassi s to see if the “default restored” event appears. Step 3. Power down, install controller B to the controller A slot, and repeat the restoration process. Step 4. When com pleted with resto ring def aults on bo controllers, install both controllers and power on. th Status-indicating LEDs Chapter 3: Subsystem Monitoring 4.2.4 FC Host Port LEDs Figure 4-4: FC Port Link and Speed LEDs Name Link Color Green Status ON indicates an established link, Off means a link is broken. Green indicates 8G connection. 8/4/2G Green/ Amber Amber indicates 4G connection. OFF indicates 2G speed or no connection. Table 4-4: 8G FC Port LED Definitions 4.2.5 Ethernet Port LEDs One (1 ) 10/1 00BaseT Eth ernet port is located on e ach controller’s faceplate. Sh ielded Cat5e strai ght-through Ethe rnet cab les can be used to con nect the RJ-45 port s to the netwo rk. Two (2) LE Ds located on each Ethernet port indicate the Ethernet connection speed and link status. See the diagram below for the locations of the two (2) LED indicators. Figure 4-5: 10/100BaseT Management Port Indicators Name 10/100 Color Green Status ON indicates a valid link of the 100Mbit speed. OFF indicates a link with 10Mbit speed. ON indicates a valid link. Link/Activity Green BLINKING indicates active transmission. Table 4-5: 10/100BaseT Management Port LED Definitions Status-indicating LEDs 4-9 Falcon IV Installation and Hardware Reference Manual 4.2.6 PSU LEDs Each PSU com es with a single LED. This LED indicate operational status of the PSU module. s the Figure 4-6: PSU Module LED Color Status Steadily Blinking Green The po wer supply ha s no t been turne d on. The PSU module LED will bli nk wh en the system is connected to a po wer so urce b ut not yet turned on. Static Green The PSU is operating no rmally and experi encing no problem. Static Red The PSU has faile d a nd is unable to provid e power to the system. OFF The PSU is not turne d o n and the p ower co rd i s disconnected. Table 4-6: PSU Module LED Definitions 4.2.7 Cooling Module LEDs Each individ ual co oling fan within a coolin g module h as a corresponding red LED o n the syst em rear pa nel. Whe n an LED is on, it indicates the fan has failed. When the LED is off, it indicates the fan is functioning normally. Figure 4-7: Cooling Module LEDs and Cooling Fan Locations The system has a n ovel app roach t o stabili zing the tempe rature within the subsy stem: Whe n sen sors on the backpla ne det ect 4-10 Status-indicating LEDs Chapter 3: Subsystem Monitoring elevated tem perature, su ch a s high ambient temperature o r the failure of an y coolin g or PSU modul e, the syste m will raise the cooling fan s rotation speed to extra ct more heat. O nce th e am bient temperature cools d own to no rmal o r t he failed modules have been replaced, the cooling fans will return to low speed. A faulty fan is not individ ually repla ced. Due to the con cern th at system may overh eat duri ng a singl e fan repla cement process, if a fan fails, replace the whole module. 4.3 Audible Alarm Different environm ental and op erational p arameters (like temperature, etc.) hav e b een assig ned a ran ge of value s betwee n which they can fluctu ate. If either the upper o r lo wer threshold s is exceeded, an audible alarm will be triggered. The alarm will also be triggered when a component fails. If the syste m admini strator i s onsite and hears an al arm, the m anager m ust rea d the error message on the terminal or SANWatch screen to determine what has triggered th e alarm. After determining what h as o ccurred, a sy stem administrator must take appropriate actions to rectify the problem. The Alarm b eep patte rn i s de scribed i n the Trou bleshooting G uide included in your product CD. WARNING! If an alarm is trigge red it is nece ssary for you to determine th e problem. If the audibl e alarm is igno red and the pro blem is n ot rectified, unexpected damages may occur. 4.3.1 Alarm Triggers If any of the following components triggered: Audible Alarm fails, the audibl e alarm will be RAID controller m configuration) Cooling fan modules PSU modules CBM module Hard disk drives Sensors or presence detection circuitries odule (in a red undant-controller 4-11 Falcon IV Installation and Hardware Reference Manual NOTE: When tempe rature exce eds a pres et thre shold, the controlle r’s charger circuits will sto p charging. You will then re ceive a message th at read s “T hermal Shut down/Enter Sleep Mod e.” When the te mperature falls back within normal range, the battery will resume charging. 4.4 I2C The o perating statu s of P SU an d cooling fan m odules a re collected through an I 2C serial bus. If either of th ese modules fails, the failu re will be detected and you will be notified through the various methods described above. If sensors or I2C bus devices fail, events will al so be issued. 4-12 I2C Chapter 5 System Maintenance 5.1. Overview 5.1.1 Maintenance WARNING! Do n ot re move a failed component fro m the sub system u ntil you have a replacement on hand. If you rem ove a failed com ponent without replacing it, the internal airflow will be disrupted and the system will overheat. CAUTION! 1. Do not insert a controller module from other Falcon IV enclosures, e.g., a controller module from an S16F. A controlle r from other en closure may have acquired a system serial number from it, and could have u sed the serial numbe r to generat e a unique controlle r ID. The unique ID is consequentially applied to FC po rt node names. As the result, you may encounter S AN problem s with id entical p ort na mes o n mu ltiple systems. 2. Do not u se a PSU or cooling mo dule from Falcon IV series. They loo k similar. However, they may com e with cooling fan s with different rota tion sp eeds, and may not be sufficient for yo ur G6 (ASIC667) models. All of the following components can be replaced in case of failure: 1. Controller module – Section 5.2 2. Memory module – Section 5.3 3. BBU module - Section 5.4 4. PSU modules – Section 5.5 5. Cooling fan modules – Section 5.6 6. Hard drives – Section 5.7 5.1.2 General Notes on Component Replacement Overview In a re dundant-controller configu ration, a RAI D cont roller i s hot replaceable. In a single-controlle r c onfiguration, a RAID cont roller is 5-1 Falcon IV Installation and Hardware Reference Manual replaced whe n powe red d own. All other comp onent modules, in cluding the PSU module s, coolin g module s, and drive trays, are hot-swappa ble and can be replaced while the system is operating. Qualified engineers who are familiar with the system should be th e only ones who make component replacements. If you are not familiar with the system a nd/or with RAID system m aintenance in general, it is strongly advised that you refer system ma intenance to a suitably q ualified engineer. When re placing hot-swap pable component, ca ution sho uld be t aken to ensure that the compo nents are ha ndled in an appro priate manne r. Rough or improp er han dling of comp onents can lead to irrep arable damage. If removing a RAID controller from a single-controller system, ensure that your applications have be en properly closed, users notified of th e down time, all cached write s condu cted, etc. All preca utionary me asures, without exception, are adhered to. WARNING! When in serting a remov able mo dule, take h eed that DO NOT USE EXCESSIVE FORCE! F orcing o r sla mming a mo dule can da mage the connector pins either on the module itself or on the b ackplane. Gently push the mod ule until it rea ches the end of modul e sl ot. Feel the conta ct resistance and use slightly more force to ensure the module connectors are correctly mated. If the module come s with ejectio n levers or retentio n screws, use them to secure the module. 5-2 Overview Chapter 5: Subsystem Maintenance and Upgrading 5.2. Replacing a Controller Module 5.2.1 Overview Two replaceable components are contained in a controller module: DIMM Module: The DIMM module can be repla ced wh en a DIMM module fails or if a larger capacity DIMM is required. CBM: As part of the CBM mo dule, a BBU within is usually replaced every 3 years. If a BBU has lost its ability to hold electric charge, replace it with a certified module. WARNING! 1. The battery cells are no t hot-s wappable. The cel l pack, BBU, is contained in a RAID controller canister. To repla ce a BBU, you must remove a RAID controlle r. It is reco mmended to remove the BBU before replacing a DIMM module because once a controller is removed from chassis, BBU will discha rge to support the cache memo ry. If you replace a DIMM module with supplied voltage, damage may occur. 2. If necessary, replace a DIMM 1 minute after the BBU is removed. 5.2.2 Notes on Controller Maintenance Re-using the DIMM mod ule re moved from a fau lty controlle r is n ot recommended unless you have a similar RAID system to test its integrity. When repla cing the controller mod ule, you mu st reme mber that the controller board is one of the most sensitive components in the system. All previously sti pulated safety precaution s (se e Chapter 2) mu st b e st rictly adhered to. Failure to adhere to these precautions can result in permanent damage and timely delays. 5.2.3 Removing the Controller Module To remove the controller module: Step 1. Prepare a cle an, static-free work pad or contai ner to place the controller that will be removed from the chassis. (Step 2 and Step 3 are for the single-controller system. Skip them if you are replacing a controller in the dual-controller Falcon IV) Step 2. Replacing a Controller Module Make sure there is no access from host computers to the system to avoid losing data. Stop all I/O ac cesses to the system and make sure all cached writes have b een distributed 5-3 Falcon IV Installation and Hardware Reference Manual to disk d function. rives u sing firmwa re’s “ Shutdown Controller” This fun ction is acc essed fr om Main Menu -> “ System Functions.” Step 3. Power off the system (For single-controller system only!). Power off the system i n the way de scribed in Chapter 4. B e sure to stop host a ccess and flu sh a ll ca ched da ta befor e powering off the system. If it is not possible to do this turn off both PSU modules and disconnect the power cords. Step 4. Disconnect all cables that are conn ected to the controll er module you wish to replace. Step 5. Loosen the retention screws from controller. Use a medium-size Phillips screwdriver to remove the screws underneath e ach of the ejecti on leve rs. Keep the screws for future use. Figure 5-1: Loosening Controller Retention Screws Step 6. 5-4 Remove the controller module by pressing do wn the two ejection levers. The cont roller will be ea sed out of the modul e Replacing a Controller Module Chapter 5: Subsystem Maintenance and Upgrading bay. Gent ly pull t he cont roller mod ule out of t he syst em wit h one hand underneath to support the weight of the module. 5.2.4 Replacing a Controller Module If a controller module fails, replace a failed controller with a replacement from your vendor: Step 1. Remove the failed controller. (See Section 5.2.3) Step 2. Install a DIMM module on the replacement controller, if it does not come with a DIMM. (See Section 5.3) Step 3. Insert the controller module. Align the controller module with the module b ay, making sure that the levers are do wn. Gently slide the controller module in. Step 4. Secure the connection. When the c ontroller is reaching the end and you feel the contact resistance, use slightly more force to mate the controller wit h ba ckplane connectors. When the controller is almost fu lly inserted, pull the le vels up t o se cure the co ntroller. The leve rs hel p en sure that the back-end connectors are properly mated. Step 5. Fasten the retention screws. Once fully inserted, secu re the controller mo dule to the chassis by fasteni ng the retentio n screws through the holes underneath the ejection levers. Step 6. Re-attach all the cables that you previously disconnected. Step 7. 7-1. Power up the system if using a single-controller system. 7-2. With a red undant-controller syst em, RAID controll ers should sp end a sho rt while negotiating with ea ch other and then deliver a “Redundant Controller Restored” message. You can check for this message on the LCD screen, GUI manager, or firmware text-based utility. When the replacement controller is successfully brought online, its Controller Status LED should light green on its faceplate. 5.3. Replacing or Upgrading Memory Modules 5.3.1 Memory Module Installation Overview The system com es with a pre-installed 1GB (or a bove) DDR-II DIMM module. The cont roller supports a mem ory module up to 2GB in size. If Replacing or Upgrading Memory Modules 5-5 Falcon IV Installation and Hardware Reference Manual you nee d a larg er DDR-II mod ule or the o riginal DIMM modul e malfunctions in som e way (often sho wn as the “NVRAM failure” event), the pre-in stalled mo dule can be re placed. Re placement an d in stallation instructions are described below. A DIMM socket is located on the controller main circuit board. WARNING! The controller bo ard in th e co ntroller module is a sensitive ite m. Please ensure that all anti-stati c precautions stipulated above are strictly adhered to. 5.3.2 Selecting the Memory Modules Compatibility: To avoid the compatibility issues, it is recom mended t o contact RAID, Inc or yo ur system ve ndor fo r a compatible m odule. We provide tested modules from reliable vendors with reliable chips. 5.3.3 DIMM Module Installation Step 1. Use of an ESD grounding strap is highly recommended. Step 2. Remove the controller module. (See previo us section fo r details). Step 3. Remove the BBU module, if installed. A BBU is removed by loosening its captive scre w from the charger bo ard. Using a medium-size Phillips screwdriver to do that. Carefully pla ce the modul e for it contains Li-i on bat teries. Do not drop it to the floor or place it near any heat source. Step 4. 5-6 Wait for one minute for the rem aining ele ctricity on mai n board to disperse. Remove the faulty module from the DIMM socket. To do this, push the white mod ule clips on either side of the DIMM socket down. The DIMM will be ejected from the DIMM socket. Replacing or Upgrading Memory Modules Chapter 5: Subsystem Maintenance and Upgrading Figure 5-2: Removing a DIMM Module Step 5. Insert the replacement module into the DIMM socket. Make su re the white clips of the DIMM socket a re in the open po sitions. Align th e DIMM module with th e DIMM socket by checkin g its “keyed” position. On ce a ligned, gently and firmly push the DIMM modu le into the socket. The white clips on the side s of t he so cket will clo se automatically and secure the DIMM module into the socket. Step 6. Reinstall the BBU module. Step 7. Reinstall the controller module. Afte r the DIMM modul e has been properly installed, install the RAID controller. 7-1. To do this, align the contro ller module with the module bay. Then ge ntly push the con troller mo dule into the co ntroller bay. 7-2. Carefully pu sh the contro ller u ntil you feel the contact resistance when the b oard edg e co nnectors a re engaging the backpl ane con nectors. Do not use force. If unusual contact resistance is felt, try it again. 7-3. Use the eject ion levers to se cure it to the ch assis when the controller is almost fully inserted. 7-4. When the controller is i nserted with the levers at its lo west position, notches on the le vers should properly clinch to the round anchor pins o n the i nterior walls of module bay. You may then p ull the lever upward to mate the ba ck-end connectors. Replacing or Upgrading Memory Modules 5-7 Falcon IV Installation and Hardware Reference Manual 7-5. Secure the controller module to the chassis by fastening the screws through holes underneath each ejection lever. 5.4. Replacing a Faulty CBM The CBM mo dule can sustain and tran sfer cached data to a flash module in the event of a power outage or in the unlikely event of failing both PSUs. A BBU consi sts of a metal bracket, ba ttery cell pack, and a PCB board that connects to t he charge r b oard. BBU supplie s p ower du ring data transitio n from cache memory to flash. Plea se read the BBU ha ndling p recautions below before handling BBUs. Fault Conditions: A BBU failure can result from the following: 1. A BBU has lost its ability to hold electrical charge. This may be the case after the battery cells have been recharged for many times regardless of how long the module has been used. Therefore, a stable power source is important for system operation. 2. The charger circuitry implemented with the controller has failed. There are other co nditions that might trigger the BBU fault eve nts and th e BBU fault LED: 1. The tempe rature sen sor on the s ystem’s charg er ci rcuit re ports a temperature reading exceeding the preset threshold. The charger circuits will enter a low-power and self-protection state. 2. A BBU modu le ha s bee n charged for over twelve (1 2) ho urs. A timer i s embedded wi th the charge r. When thi s occurs, the charger will enter a timer fault st ate. This condition usually occurs with a brand new BBU or with a totally discharged B BU. Charging will resum e automatically if you remove and re-install the BBU module. 5.4.1 BBU Warnings and Precautions 5-8 Install or replace the BBU with BBUs su pplied by your Falcon IV vendors only. Use of battery cells provided otherwise will void our warranty. Always dispose of a replaced battery in an e cologically re sponsible manner. Dispose of used BBUs at authorized battery disposal sites only. Replacing a Faulty CBM Chapter 5: Subsystem Maintenance and Upgrading Do not place a BBU near a heat source. Heat can melt the insulation and damage other safety features of batte ry cells, possi bly will cause aci d leak and result in flames or explosion. Do not imme rse the BBU in water no r allow it to get wet. Its protectiv e features can be damag ed. Abnorm al chemi cal re actions may occur, possibly cause functional defects, acid leak, and other hazardous results. Do not di sassemble or m odify the BBU. If disasse mbled, the BBU co uld leak acid, overheat, emit smoke, burst and/or ignite. Do not pierce the BBU with a sharp object, strike it with a hammer, step on it, or throw it. These a ctions could damage or d eform it and intern al short-circuiting ca n o ccur, possibly cause fun ctional defect s, aci d lea k, and other hazardous results. If a BBU leaks, gives off a bad odor, generates heat, becomes discolored or deformed, or in a ny way appears abnormal during use, recharging or storage, immediately remove it from the system and stop using it. If this is discove red when you first use t he BBU, conta ct RAID, Inc o r yo ur system vendor for a replacement. 5.4.2 Replacing a Faulty BBU To replace a BBU, please follow these steps: Step 1. Remove controller as previously described. Step 2. Remove the faulty BBU from the chassis. Loosen the captive screw at the end of BBU module. Step 3. 3-1. Replacing a Faulty CBM Install the repl acement module b y orienting its protruding edge on one side into the in sertion slot, and lowering it towards the charger board. 5-9 Falcon IV Installation and Hardware Reference Manual Figure 5-3: Installing BBU into a Controller 3-2. Carefully alig n the BBU con nector with that on the charger bo ard. Press the BBU down to mate th e connectors. 3-3. Secure the BBU by fastening its captive screw. Step 4. Re-install the controller. Step 5. Reset the system. Find app ropriate ti me to re set t he sy stem for the system firmware to re cognize the replacement module. After a reset, the BBU LED will start flashing to indicate that the BBU is being charged. When the BBU is fully charged, the LED will be off. NOTE: 5-10 1. A repla cement BBU take s approximatel y twelve (12 ) hours to charge to its full capacity. Reset the syst em wheneve r a BBU is repla ced or added in order for the replacement module to take effect. 2. The life expectancy of a BBU is 3 years. Follow the p rocedures above to replace a used BBU in order to maintain the fault tolerance feature. 3. The chance of BBU charg er failure is compa ratively low. If the cause of a failure cannot be d etermined e ven after a BBU modul e is replaced, contact your system vendor for a replacement controller and return the controller through RAID, Inc’s standard RMA procedure. Replacing a Faulty CBM Chapter 5: Subsystem Maintenance and Upgrading 5.4.3 Replacing a Faulty Flash To replace a flash module, please follow these steps: Step 1. Remove controller as previously described. Step 2. Remove the faulty flash from the charger board using the index finge rs from both h ands to pull t he rete ntion clips a way from the flash card. If the flash card does not easily disengage, use your finger nails to pick it up. Once released, the flash card will pop up. You can then remove it from the socket. Step 3. Insert a repl acement fla sh in to the socket by a 15 de gree angle. When fully inserted, press t he flash ca rd down until it is snapped by the retention clips. Figure 5-4: Installing Flash Card 5.5. Replacing a Faulty PSU 5.5.1 Notes on PSU Module Maintenance Redundant, load-sharing PSU modules: The system co mes wi th t wo fully redundant, hot-swappable PSU modules. PSU canister: Each PSU module is h oused in a robu st steel caniste r, with the power su pply converter unit in the front and two cooling fans i n the rear section. Immediate replacement: When a PSU fails, it should ideall y be replaced immediately. Do not remo ve the PSU module unl ess a replacement is readily available. Removing a PSU without a replacement will cause severe disruptions to the internal airflow a nd the system wil l overheat, po ssibly cau sing irre parable damag e to some of the syste m components. Replacing a Faulty PSU 5-11 Falcon IV Installation and Hardware Reference Manual WARNING! Although the system can o perate with two PSUs, it is not advi sable to run the Falcon IV system with a failed PSU for an extended period of time. Power Supply Fault Conditions & Firmware Reactions No. of Failed PSUs Responses and Preventive Actions 1. Warning messages are issued. 1 2. Cached data is flushed to the hard drives (also depends on the Event Trig gered co nfiguration settings in firmware). 3. If previou sly co nfigured to the Write-back m ode, the caching mode is auto matically switch ed to the conservative Write-through mode. 1. Warning messages are issued. 2. The system is temporarily held in an idle state. 2 3. The firmware force s the sub system to stop se rvicing host I/O requests. 4. After the failed PSUs a re replaced, array administrators should manually turn the power switch off and then on. 5. If the system is powere d on with o nly one PSU, th e firmware will start the initialization process but stays idle until at least one other PSU is added. Table 5-1: Power Supply Fault Conditions & Firmware Reactions 5.5.2 Replacing the PSU Module To replace a PSU, please follow these steps: 5-12 Step 1. Power off the PSU. The power switch is lo cated on each PSU’s rear-facing panel. (See Figure 5-5) Step 2. Disconnect the power cord that con nects the P SU to th e power source. Step 3. Loosen the retention screw that s ecures the extrac tion handle to the cha ssis usi ng a Phillips screwdrive r. See belo w drawing for its location. Replacing a Faulty PSU Chapter 5: Subsystem Maintenance and Upgrading Figure 5-5: PSU Parts Identification Step 4. Remove the PSU module by pu shing the extra ction han dle downwards. The extraction handle should gracefully disconnect the PSU fro m the ba ckplane connectors. On ce dislo dged, gently pull th e PSU mod ule out of the system. If the system i s mounted in a rackmou nt rack, use anot her hand to suppo rt its weight while removing the module. (See Figure 5-6) Figure 5-6: Removing the PSU Module WARNING! It is re commended that t he repla cement procedu re is completed in l ess than five (5) minutes to prevent a prolonged disruption to system airflow. Replacing a Faulty PSU 5-13 Falcon IV Installation and Hardware Reference Manual Step 5. Install the replacement module. Make sure the extractio n handle is hel d at its lowest posit ion so that the saddl e notches on the sides of the handle can snap onto the metal anchor pins on the inte rior walls of the PSU slot. Push the PSU into chassis, a nd whe n you f eel the contact resi stance, pull the handle upwards to secure the module. Figure 5-7: Securing PSU Using the Extraction Handle Step 6. Secure the PSU to the system by fastening the retentio n screw through the PSU extraction handle. Step 7. Replace the power cord that connects the PSU module to the mains. Step 8. Secure the power cord connection using the incl uded cable clamp. Step 9. Power on the PSU module. 5.6. Cooling Module Maintenance 5.6.1 Notes on Cooling Module Maintenance 5-14 Detecting a failed cooling module: If a coolin g m odule fail s, system firmware and SANWatch manager will deliver warning events. The LEDs located on the coolin g module will light red and an audibl e alarm will be triggered. Airflow Concern: On ce you are notified that a cooling m odule ha s failed, it should be replaced as soon as possible. A failed module should Cooling Module Maintenance Chapter 5: Subsystem Maintenance and Upgrading only be removed from the system when you have a repla cement module immediately available. 5.6.2 Replacing a Cooling Module The cooling module is secured in the chassis by a retention latch . To replace the cooling module, follow the steps below: WARNING! The fan replacement process should be completed within five (5) minutes. If the process takes too long, the accumulated heat can damage the system. Step 1. Use on e ha nd to pu sh th e retentio n l atch to the side, whil e using another hand to hold and pull on the fan module handle. Figure 5-8: Removing a Cooling Module Step 2. Once released from the module bay, remove the faulty module. Step 3. Install the replacement module by pushi ng it gen tly into the module bay. You may n eed to flip the retentio n latch whil e installing the repla cement module. When fully inserted, the retention latch will hold the module in place. Cooling Module Maintenance 5-15 Falcon IV Installation and Hardware Reference Manual 5.7. Replacing a Hard Drive 5.7.1 Hard Drive Maintenance Overview • Hot-swappable drive trays: The dri ve trays a re all hot-swapp able. A disk drive failure can be corrected online. • Handles: If a faulty drive is behind either the left- or right-sid e front handle, unfold the handles to access to the drive trays. CAUTION! Failure to re move a healt hy drive from the system after the fron t bezel has been opened can cause insecure connection and data errors. Slow and careful removal: Whe n removing a d rive tray fro m the system, pull the drive tray out only about one inch and then wait for at least 30 seconds for the hard drive motor to spin down before taking it out completely. Any impact to the hard drive while the drive motor is spinning can damage the hard drive. • There are sit uations that healthy driv es can b e re moved. In operation s such as Co pying & Replacin g memb er drives wit h drives of larger capacity, you may need the replaced disk drives in other installations. 5.7.2 Replacing a Hard Drive To replace a hard drive, please follow these steps: WARNING! Hard drives are fragile; therefore, always handle them with extreme care. Do not drop the hard drive. Always be slow, gentle, and careful when handling a hard drive. Handle a ha rd drive only by the edge s of its metal cover, an d avoid touching its circuits board and interface connectors. Step 1. Identify the location of the drive tray that contains a har d drive indi cated as faulty. Y ou may use firm ware utility or SANWatch software to locate a faul ty drive. The drive tray LED should also light red. WARNING! Removing the wrong drive can destroy a logical drive. A RAID5 l ogical drive tolerates the failure of 1 member. If you re place t he wron g d rive while a 5-16 Replacing a Hard Drive Chapter 5: Subsystem Maintenance and Upgrading logical drive already has a faulty member, you risk the chance of data loss. Step 2. Use a 1/8” flatblade scre wdriver to turn the rotary bezel lock to the unlocked position, i.e., the groove on its face is in a horizontal orientation. Figure 5-9: Opening the Front Flap Step 3. Open the tray bezel by pushing the release button. The fro nt bezel will automatically swing open. Figure 5-10: Opening Front Bezel Step 4. Remove the drive tray by pulling it one inch away from the drive bay. Wait for at least 30 seconds for the disk drive to spin down (if the disk drive is removed for a different purpose, e.g., Drive Roaming or cloning members of a logical drive), and then gently and carefully withdraw the drive tray from the chassis. Step 5. Remove the four (4) retention screws that secu re the ha rd drive from the sides of the drive tray (two on each side.) Replacing a Hard Drive 5-17 Falcon IV Installation and Hardware Reference Manual Figure 5-11: Loosening Hard Drive Screws Step 6. Place the replacement drive into the drive tray (as sh own below), ma king su re that the interface con nector is facing th e open side of the drive tray, and the label side facing up. Figure 5-12: Installing a Hard Drive Step 7. Adjust the drive’s location until the mounting holes in the drive canister are align ed with those on the hard dri ve. Screw holes used are different if using a MUX boa rd for SATA drives. MUX boa rds are only nece ssary usi ng SATA drives in a redundant-controller configuration. Figure 5-13: Drive Locations with and without the MUX Board Step 8. 5-18 Secure the disk drive with four (4) of the supplied 6/32 flat-head screws. Replacing a Hard Drive Chapter 5: Subsystem Maintenance and Upgrading Step 9. Align the drive tray with a drive bay. Gently slide it in until the drive tray rea ch the end of drive b ay. This sh ould be d one smoothly and gently. Figure 5-14: Installing a Drive Tray Step 10. Close the front bezel. Make sure the front bezel i s clo sed properly to e nsure that th e ba ck-end connector i s properly mated with the corre sponding connector on the backplane. If the front bezel ca n not close d pro perly, the conne ction between the hard drive a nd the system may come l oose and mysterious drive signals may result. Step 11. Lock the bezel into place by turning the rotary be zel lo ck until the groove on its face is po inting do wn (vertical orientation). Step 12. The drive B usy LED sh ould light up after a few second s meaning the system is a ttempting acce ss. If the replaced drive bel onged to a logi cal drive with fault toleran ce, e.g., RAID level s 1, 3, 5, o r 6, a logical drive re build will automatically begin. Yo u should the n verify the be ginning of the rebuil d pro cess u sing managem ent software o r termina l console. A firmwa re message, “Rebuilding LDX,” should also pop up on the LCD screen. Replacing a Hard Drive 5-19 Falcon IV Installation and Hardware Reference Manual This page is intentionally left blank. 5-20 Replacing a Hard Drive Appendix A Specifications A.1. Technical Specifications Environmental Specifications Humidity 5 to 95% (non condensing – operating and non-operating) Temperature Operating: 0º to 40ºC (35ºC if CBM is applied) Non-operating: -40º to 60ºC Altitude Operating: Sea level to 12,000ft Packaged: Sea level to 40,000ft Power Requirements Input Voltage 100VAC @ 8A 240VAC @ 4A with PFC (auto-switching) Frequency 50 to 60Hz Power Consumption 434W busy; 408.9W idle. Dimensions With Forearm Handles Without Forearm Handles Height 174.4mm (6.86 inches) 174.4mm (6.86 inches) Width 482mm (19 inches) 445mm (17.5 inches) Length 514mm (20.2 inches) 498mm (19.6 inches) A-1 Falcon IV Installation and Hardware Reference Manual Certifications Safety UL (60950-1 2’nd) BSMI CNS 14336: 1993 CB IEC 60950-1, 2’nd Edition GOST-R EMC GOST60950 CE EN 55022: 2006/A1:2007 EN 61000-3-2: 2006 EN 61000-3-3: 1995/A1: 2001 /A2: 2005 EN 55024: 1998/A1: 2001/A2: 2003 FCC (FCC Part 15, subpart B) BSMI (CNS 13438) FCC (FCC Part 15,subpart B ) Certificates • IEC 60068-2, • MIL-STD-81 0E/883E, • ISTA, • ASTM-D3332 , • IPC-TM -650 • IEC 61000-4 • IEC 61000-3-2, IEC61000-3-3 • ISO7779/37 44 • Ro HS Microsfot WHQL-WindowsServer 2003 Shock Half-sine Operating: 5G peak, 11ms duration Non-operating: 15G, 11ms duration Vibration A-2 Operating 0.5oct/min, 5 to 500Hz, sinewave, 0.2G Non-operating 0.5oct/min, 5 to 500Hz, sinewave, 1.0G Technical Specifications Appendix A Specifications • Various tests have been conducted according to industry standards. Please contact your sale s rep resentatives or visit ou r VIProom website fo r individual test reports. Warning Alarms • Audible alarms • System LEDs • Event notification via the SANWatch Manager (LAN broadcast, email, fax, MSN, SMS, and SNMP traps) • RS-232C terminal console • LCD event prompts • Telnet console A.2. Controller Specifications A.2.1 Configuration Specification RAID Levels Host O/S Compatibility Host Interface 0, 1(0 + 1), 3, 5, 6, 10, 30, 50, 60, and non-RAID disk spanning Host O/S independent 8Gb/s Fibre Channel Host Channels 2 pre-configured host channels (each controller) Drive Interface Supports up to 16 channels of 3Gbps SAS or SATA-II All drive channels are pre-configured and cannot be changed Write-through, write-back, and adaptive write policy Pre-installed 1GB (or above) DDR-II module with ECC, registered; in one DIMM socket Up to 32 per host ID, for a total of 1024 on all host channels Drive Channels Cache Mode Cache Memory Number of LUN’s Multiple Target IDs/Host Channel Firmware on Flash Memory Yes Yes A.2.2 Architecture Specification CPU Host Channel Chip Controllers DIMM Slot Controller Specifications 2x RISC-based CPUs PMC chipsets For one 240-pin DDR-II SDRAM module A-3 Falcon IV Installation and Hardware Reference Manual ASIC RAID, Inc ASIC667 64-bit chipset Flash ROM 64Mbit (8MB) NVRAM 32KB with RTC (with the Embedded RAIDWatch utility) Hardware XOR Yes Real-time Clock For event messages with time record and task scheduling A.3. Power Supply Specifications Specification Nominal Power DC Output Input Frequency AC Input Power Factor Correction Hold-up Time I2C Over-temperature Protection Cooling Fans 405W +3.3V: 3.20V to 3.465V; max. 20A +5V: 4.80V to 5.25V; max. 36A +12V: 11.52V to 12.60V; max. 24A +5V SB: 4.85V to 5.25V; max. 0.5A +3.3V & +5V combined power; max. 205W 50 to 60Hz 100VAC @ 8A – 240VAC @ 4A with PFC Yes At least 20ms at 115/230VAC full load after a loss of AC input Links to presence detection circuitry and sensors through backplane to controller Lost cooling or excessive ambient temperature Two fans inside each PSU A.4. RAID Management Specification Text-based firmware-embedded utility over RS232C through a DB-9 male to DB-9 female serial cable • LCD keypad panel • The SANWatch Manager program using the management port (10/100BaseT) or in-band connection • Embedded RAIDWatch via browser. • Text-based firmware-embedded utility via telnet • Configuration Performance Monitoring Remote Control and Monitoring Event Broadcast/Alert Hardware Connection A-4 Yes Yes Yes (via SANWatch sub-modules, the Notification Manager utility, or the firmware-embedded browser-based Embedded RAIDWatch) over Ethernet, in-band via host links, or RS-232C Power Supply Specifications Appendix A Specifications Configuration on Disk Failure Indicator Configuration data stored on disks for logical drives to exist after controller replacement; basic settings, e.g., channel mode settings, are stored on NVRAM. Applies to uses such as Drive Roaming with the support of Shutdown or Restart Logical Drive functions. Via audible alarm, LCD keypad panel, SANWatch Manager session, event messages, or terminal emulation A.5. Fault Tolerance Management Specification Drive S.M.A.R.T. support CBM (Cache Backup Module) Sensors and Module Presence detection through an I2C serial bus. Automatic Drive Failure Detection Automatic Rebuild on Spare Drives Regenerate Logical Drive Parity Bad Block Reassignment Automatic Rebuild upon Failed Drive Replacement Manual Clone of Suspected Failed Drive Concurrent Rebuild on Multiple Drives in a RAID (0 + 1) or RAID6 Logical Drive Event-triggered operation Fault Tolerance Management Yes, with user-configurable detect-only, cloneand-replace, and perpetual-clone options. The S.M.A.R.T. feature depends on HDD implementation. Yes Yes, reported to firmware Yes Yes Yes Yes Yes Yes Yes Firmware applies conservative write-through operation in the event of module failures, and raises fan rotation speed. A-5 Falcon IV Installation and Hardware Reference Manual This page is intentionally left blank. A-6 Fault Tolerance Management Appendix B Pinouts B.1 8Gb/s FC Port Pinouts Figure B-1: 8G FC Host Port B-1 Falcon IV Installation and Hardware Reference Manual Pin Pin Name Pin Description 1 VEET 2 TFAULT 3 TDIS 4 MOD_DEF(2) 5 MOD_DEF(1) 6 MOD_DEF(0) 7 No Connect Internal pullup 30KΏ to Vcc 8 RX_LOS Indicates loss of signal; High indicates loss of received optical signal 9 No Connect Internal pullup 30KΏ to Vcc 10 VEER Receiver Ground 11 VEER Receiver Ground 12 RD- Inverse Received DATA Out 13 RD+ Received Data Out 14 VEER Receiver ground 15 VCCR Receiver power +3.3V 16 VCCT Transmitter power +3.3V 17 VEET Transmitter ground 18 TD+ Transmitter DATA In 19 TD- Inverse Transmitter Data In 20 VEET Transmitter Ground Transmitter ground Transmitter fault indication – High indicates a fault condition Transmitter Disable – Module electrical input disables on high or open Module definition 2 – Two wire serial ID interface data line (SDA) Module definition 1 – Two wire serial ID interface clock line (SCL) Module definition 0 - Grounded in module (module present indicator) Table B-1: SFP Port Pinout Definitions B-2 Falcon IV Installation and Hardware Reference Manual B.2 10/100BaseT Ethernet Port Pinouts (Management Port) Figure B-2: 10/100BaseT Ethernet Port Pin Pin Name Color Match 1 LAN_TXP Orange 2 LAN_TXN Orange/white 3 LAN_RXP Green 4 N2 Blue/white 5 N2 Blue 6 LAN_RXN Green/white 7 N1 Brown 8 N1 Brown/white Table B-2: 10/100BaseT Ethernet Port Pinouts B.3 STP Ethernet Cable (Optional Accessory) P/N: IFT-9273CSTPCab-0030 This shielded twisted pair cable is an optional accessory item. More details are shown below: Description: SFTP CAT5E Ethernet cable. Color: black. Connector: 8P8C plug (covered by metal shield) Cable type: round cable, #24AWG*4P braided wire OD: 6.2mm B-3 Falcon IV Installation and Hardware Reference Manual metal shield – braided wire – metal shield Figure B-3: STP Ethernet Cable Pinouts B.4 DB-9 Serial Port Figure B-4: COM1 Serial Port Pin Pin Name Description 1 DCD1 Data Carrier Detect 2 RXD1 Receive Data 3 TXD1 Transmit Data 4 DTR1 Data Terminal Ready 5 GND Ground 6 DSR1 Data Set Ready 7 RTS1 Request to Send 8 CTS1 Clear to Send 9 RI1 Ringing indicator Table B-3: Serial Port Pinout Definitions B-4 Falcon IV Installation and Hardware Reference Manual For a single-controller system, there is no included cable for this serial port. The serial cable is user-supplied. B.5 Serial Port Y-Cable The DB-9 to DB9 Y-cable connects the COM1 serial ports on redundant RAID controllers for maintenance-free terminal connection during controller failover/failback. IFT-9373AYCab Figure B-5: Serial Port Y-Cable B.6 SAS Expansion Port Pinouts The Mini SAS expansion port complies with SFF-8088 specifications. Figure B-6: Mini SAS SFF-8088 Connector B-5 Falcon IV Installation and Hardware Reference Manual Pin Description Pin Description A1 GND B1 GND A2 RX0+ B2 TX0+ A3 RX0- B3 TX0- A4 GND B4 GND A5 RX1+ B5 TX1+ A6 RX1- B6 TX1- A7 GND B7 GND A8 RX2+ B8 TX2+ A9 RX2- B9 TX2- A10 GND B10 GND A11 RX3+ B11 TX3+ A12 RX3- B12 TX3- A13 GND B13 GND Table B-4: SAS Expansion Port Pinout Definitions B.7 Power IEC-type receptacles. Unless specified otherwise, cable type will be determined by the shipped-to area. B-6