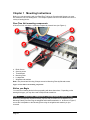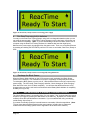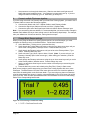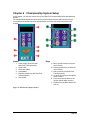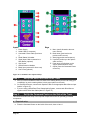
1
Operator’s Manual
ReacTime™
Lynx System Developers, Inc.
175 N New Boston Street,
Woburn, MA 01801
http//:www.finishlynx.com
Important Notice
Use of ReacTime is governed by the Sales and License Agreement signed by
you or your agent (the “Buyer”), the relevant section of which is reprinted
below:
Ownership of Software. Lynx System Developers, Inc. (Lynx) owns and
retains all title, copyright, trademark, and other proprietary rights in the
software, firmware and documentation provided with the software and
firmware (collectively, “Software”). Buyer acknowledges that the Software is
the confidential property of Lynx and the Buyer will not disclose the
Software to any other person without Lynx’s consent.
Release v1.20 ReacTime Copyright © 1992 - 2001 by Lynx System
Developers, Inc.
All rights reserved.
ReacTime, FieldLynx, FinishLynx, and the FinishLynx logo are trademarks
of Lynx System Developers, Inc.
Windows 95 Windows 98 and Windows NT are registered trademarks of
Microsoft Corp.
All other trademarks are the property of their registered owners.
Page 2
Table of Contents
ABOUT THIS MANUAL
6
REACTIME TRAINING SYSTEM CONTENTS
7
REACTIME CHAMPIONSHIP SYSTEM CONTENTS
8
CHAPTER 1
MOUNTING INSTRUCTIONS
Step 1:
Attach the Loudspeaker (Championship System Only)
Step 2:
Clamp the Mounting Plate to a Starting Block
Step 3:
Re-Attach the Block Sensor (if necessary)
10
10
11
14
CHAPTER 2
Step 4:
Step 5:
Step 6:
Step 7:
Step 8:
Step 9:
Step 10:
Step 11:
Step 12:
Step 13:
TRAINING SYSTEM SETUP
Connect the Start Button and Loudspeaker
Power and Turn On the Block Sensor
Use Randomized or Manually Controlled Intervals
Practice Starts
Interpret Trial Data
Review trials
Delete trials
(Optional) Use an External Gun Sensor
(Optional) Use a Single or Multiple Photoeyes
Link Two ReacTime Training Systems Together
16
17
17
18
19
19
20
20
21
21
23
CHAPTER 3
Step 1:
Step 2:
Step 3:
Step 4:
Step 5:
Step 6:
Step 7:
Step 8:
Step 9:
TRAINING SYSTEM SOFTWARE
Install the ReacTime Training Software
Configure ReacTime Training Software
Work with Trials in the Software
Work in the Results Zone
Work in the Chart Zone
Interpret ReacTime Charts
(Optional) Photoeye with Time to Distance Feature
Update Firmware
Customize ReacTime Training System
24
24
25
25
27
28
29
32
32
33
CHAPTER 4
Step 1:
Step 2:
Step 3:
Step 4:
Step 5:
CHAMPIONSHIP SYSTEM SETUP
Set Up the ReacTime Units on the Track
Set Up the Command Center on the Side of the Track
Power On the Block Sensors
Configure the Block Sensors
Configure the Command Center
35
36
36
37
38
39
CHAPTER 5
CHAMPIONSHIP SYSTEM OPERATION
Step 1:
Operate the Competition
Step 2:
(Optional) Recharge the ReacTime Championship System
40
40
41
CHAPTER 6
CHAMPIONSHIP SYSTEM SOFTWARE
Step 1:
Install the ReacTime Championship Software
Step 2:
Configure ReacTime Championship Software
42
42
43
Page 3
Step 3:
Step 4:
Step 5:
Step 6:
Step 7:
Step 8:
Step 9:
Step 10:
Open a New ReacTime Event (Race)
Import ReacTime Data into the Championship Software
Analyze Chart Data
Change chart properties
Interpret Chart Data
(Optional) Send Reaction Times to a Scoreboard
(Optional) Update Firmware
(Optional) Customize ReacTime Championship Software Language Files
44
45
46
47
47
48
48
49
APPENDIX A: BLOCK SENSOR MENU REFERENCE
Block Sensor Menu Frequently Asked Questions
Block Sensor Menu Reference
50
50
51
APPENDIX B: COMMAND CENTER REFERENCE (CHAMPIONSHIP SYSTEM ONLY)
55
APPENDIX C: TECHNICAL SPECIFICATIONS
57
Page 4
Table of Figures
FIGURE 1: REACTIME TRAINING SYSTEM CONTENTS
FIGURE 2: BLOCK SENSOR COMPONENTS
FIGURE 3: COMMAND CENTER COMPONENTS
FIGURE 4: REACTIME UNIT MOUNTING COMPONENTS
FIGURE 5: LOUDSPEAKER ATTACHMENT TO A MOUNTING PLATE
FIGURE 6: U-CHANNEL STARTING BLOCK
FIGURE 7: U-CHANNEL MOUNTING CLAMP CONFIGURATION (AS ORIGINALLY SHIPPED)
FIGURE 8: U-CHANNEL CROSS-SECTION THROUGH MOUNTING PLATE
FIGURE 9: HOLLOW CHANNEL STARTING BLOCK
FIGURE 10: MOUNTING PLATE HOLES DRILLED FOR HOLLOW CHANNEL STARTING BLOCK
FIGURE 11: HOLLOW CHANNEL CROSS-SECTION THROUGH MOUNTING PLATE
FIGURE 12: NARROW DOUBLE BEAM STARTING BLOCK
FIGURE 13: NARROW DOUBLE BEAM MOUNTING CLAMP CONFIGURATION (AS ORIGINALLY SHIPPED)
FIGURE 14: NARROW DOUBLE BEAM THROUGH MOUNTING PLATE
FIGURE 15: SOLID BEAM STARTING BLOCK SAMPLE
FIGURE 16: SOLID BEAM MOUNTING CLAMP CONFIGURATION
FIGURE 17: SOLID BEAM CROSS-SECTION THROUGH MOUNTING PLATE
FIGURE 18: MOYE 3 POINT STANCE STARTING BLOCK
FIGURE 19: MOYE 3 POINT STANCE MOUNTING CLAMP CONFIGURATION
FIGURE 20: MOYE 3 POINT STANCE THROUGH MOUNTING PLATE
FIGURE 21: PROPERLY MOUNTED REACTIME UNIT
FIGURE 22: REACTIME BLOCK SENSOR INPUTS AND KEYS
FIGURE 23: CONNECTED SIGNAL INPUT AND LOUDSPEAKER CABLES
FIGURE 24: REACTIME | READY TO START SCREEN USING POWER SUPPLY
FIGURE 25: REACTIME | READY TO START SCREEN USING FULLY CHARGED BATTERIES
FIGURE 26: LEGAL START
FIGURE 27: FALSE START
FIGURE 28: LCD SHOWING A BEAM BREAK READING
FIGURE 29: TWO REACTIME TRAINING SYSTEMS LINKED TOGETHER
FIGURE 30: REACTIME TRAINING SYSTEM SOFTWARE MENU BAR ICONS
FIGURE 31: NEW WORKOUT SCREEN
FIGURE 32: CHART OF A LEGAL START
FIGURE 33: CHART OF A FALSE START
FIGURE 34: CHART OF A LEGAL, SINGLE-MOTION START (ATHLETE 1)
FIGURE 35: CHART OF A LEGAL, DOUBLE-MOTION START (ATHLETE 2)
FIGURE 36: LAST SIGNIFICANT PEAK COMPARISON
FIGURE 37: BLOCK SENSOR INPUTS AND KEYS
FIGURE 38: COMMAND CENTER INPUTS AND KEYS
FIGURE 39: REACTIME | READY TO START SCREEN USING FULLY CHARGED BATTERIES
FIGURE 40: REACTIME | READY TO START SCREEN USING POWER SUPPLY
FIGURE 41: SYSTEM CHARGER CONNECTIONS
FIGURE 42: REACTIME CHAMPIONSHIP MENU BAR ICONS
FIGURE 43: SAMPLE EVENT
FIGURE 44: BLANK EVENT
FIGURE 45: ADD REACTION TIMES TO THIS EVENT ICON
FIGURE 46: CHART ZONE
FIGURE 47: CHART ZONE ICONS
FIGURE 48: SHOW ALL CHARTS ICON
FIGURE 49: CHART OF A LEGAL START
FIGURE 50: CHART OF A FALSE START
7
8
8
10
11
11
12
12
12
12
12
13
13
13
13
13
14
14
14
14
15
16
17
18
18
20
20
22
23
25
26
29
30
30
31
32
35
36
38
38
41
43
44
45
45
46
46
47
48
48
Page 5
About this Manual
This manual is to be used with either the ReacTime™ Training System or the ReacTime
Championship False Start Detection System. This manual contains following sections:
Page 6
x
ReacTime Training System Contents pictures and describes all of the components
you received in your ReacTime Training System package.
x
ReacTime Championship System Contents pictures and describes all of the
components you received in your ReacTime Championship System package.
x
Chapter 1 Mounting Instructions explains how to mount your ReacTime Training
System or ReacTime Championship System to a variety of starting blocks.
x
Chapter 2 Training System Setup tells you how to get started training with your
ReacTime Training System after you have mounted it to a starting block.
x
Chapter 3 Training System Software explains how to use the software that came
with your ReacTime Training System to analyze reaction time data.
x
Chapter 4 Championship System Setup describes how to set up your
Championship System for use during a competition.
x
Chapter 5 Championship System Operation provides step-by-step instructions for
the Official Starter and the Fire Recall Starter on how to operate the false start
detection system during a competition.
x
Chapter 6 Championship System Software explains how to use the Championship
Software during a competition to import start lists, analyze reaction time data, and
export reaction time results.
x
Appendix A Block Sensor Menu Reference helps you explore and navigate all of
the menu options in the Block Sensor.
x
Appendix B Command Center Menu Reference provides step-by-step answers to
frequently asked questions about navigating the menu options in the Command
Center.
x
Appendix C Technical Specifications details technical information about the
components in the ReacTime Training and Championship Systems.
ReacTime Training System Contents
Your ReacTime Training System consists of the following components:
Figure 1: ReacTime Training System contents
a.
b.
c.
d.
e.
f.
g.
Block Sensor
Mounting Plate with Mounting Clamps attached
ReacTime Training Software – 2 floppy disks (license sold separately)
Signal Input Cable with Start Button attached
Serial Cable
Power supply
Loudspeaker
Page 7
ReacTime Championship System Contents
Your ReacTime Championship System generally contains 8 Block Sensor components and one
set of Command Center components. You may have ordered additional equipment not pictured
here.
a. Block Sensor components
Each ReacTime Unit that came with your ReacTime Championship System consists of the
components pictured here.
a.
c.
b.
a. Loudspeaker
b. Mounting Plate
c. Block Sensor
Figure 2: Block Sensor components
b. Command Center components
Your ReacTime Championship System comes with a single Command Center and several
components that connect to it. All of the Command Center components are pictured here.
Note: Some of the items pictured below may be optionally purchased and therefore may not be
included with your ReacTime Championship System.
a.
b.
c.
d.
e.
f.
g.
h.
Figure 3: Command Center components
a.
b.
c.
d.
Command Center and power supply
Gun Sensor (connected to Signal Input Cable)
Extra Gun Cable (optionally purchased)
Headsets, including:
- Official Starter (with two earpieces)
- Recall Starter (with one earpiece)
- Two headset cables
Page 8
e. Line Printer (optionally purchased), including:
- power supply
- cable
f. False Start Cable (for use with a Wired System only)
- 5.5 meter cable (8 included)
- 13 meter cable (purchased optionally)
- 30 meter Command Center Cable (included)
g. Serial Cable and ReacTime Championship Software (3 floppy disks, license optionally
purchased)
h. System Charger
Page 9
Chapter 1
Mounting Instructions
Before you can start training with your ReacTime Training or Championship System, you must
first mount the unit to a starting block. This chapter explains how to mount a ReacTime Unit to a
variety of starting blocks.
ReacTime Unit mounting components
A ReacTime Unit includes the mounting components pictured here (see Figure 4).
a. Block Sensor
b. Securing screw
c. Thumbscrews
d. Mounting Plate
e. Loudspeaker
f. Wingbolts and washers
Note: Not pictured are Mounting Clamps secured to Mounting Plate by flathead screws.
Figure 4: ReacTime Unit mounting components
Before you Begin
You need set of starting blocks before proceeding with these instructions. Depending on the
starting block type, you may also need a Phillips head screwdriver.
Step 1:
Attach the Loudspeaker (Championship System Only)
ReacTime Championship System assembly requires that you attach the Loudspeaker to the
Mounting Plate by first removing the wingbolts and washers attached to it. As shown in Figure 5,
secure the Loudspeaker to the Mounting Plate using the wingbolts and washers you just
removed.
Page 10
Figure 5: Loudspeaker attachment to a Mounting Plate
Step 2:
Clamp the Mounting Plate to a Starting Block
ReacTime Mounting Plates secure to a range of starting block types. Starting block varieties
include:
a. U-Channel
b. Hollow Channel
c. Narrow Double Beam
d. Solid Beam
e. Moye 3 Point Stance
When clamping a ReacTime Unit to a starting block, it is most important that:
x The ReacTime Unit clamps securely to the back of the starting block
x The Block Sensor is level and therefore easy to read
x The Loudspeaker is facing toward the athlete
Keeping these points in mind, follow the instructions below:
a. Select the starting block model pictured in the figures below that is closest to the design
of your starting block. If you are mounting a ReacTime Unit to a starting block that does
not require that you change the configuration of the Mounting Clamps, skip to step e.
b. If necessary, detach the Block Sensor from the Mounting Plate by loosening the securing
screw.
c. If necessary, use a Phillips head screwdriver to remove the flathead screws from the
Mounting Plate.
d. If necessary, use the flathead screws to secure the Mounting Clamps to the Mounting
Plate in the positions indicated by the clamp configuration figures below.
e. Securely clamp the Mounting Plate to the rear of the starting block by tightening the
thumbscrews.
Note: These pictures do not show the Loudspeaker attached to the Mounting Plate.
a. U-Channel
Note: If you are mounting a ReacTime Unit to a U-Channel type starting block, you do not need
to make any changes to the position of the Mounting Clamps as originally shipped with your
ReacTime Training or Championship System.
Figure 6: U-Channel starting block
Page 11
Figure 7: U-Channel Mounting Clamp configuration (as originally shipped)
Figure 8: U-Channel cross-section through Mounting Plate
b. Hollow Channel
Note: The Hollow Channel starting block does not require the use of Mounting Clamps when
securing the Mounting Plate to the block. However, you must drill two holes as indicated in
Figure 10 using a 7/32” drill bit. Then, you must obtain two (2) 1” x 14 oval-head, self-tapping
screws to secure the Mounting Plate to the starting block.
Figure 9: Hollow Channel starting block
Figure 10: Mounting Plate holes drilled for Hollow Channel starting block
Figure 11: Hollow Channel cross-section through Mounting Plate
c. Narrow Double Beam
Page 12
Note: If you are mounting a ReacTime Unit to a Narrow Double Beam type starting block, you do
not need to make any changes to the position of the Mounting Clamps as originally shipped with
your ReacTime Training or Championship System.
Figure 12: Narrow Double Beam starting block
Figure 13: Narrow Double Beam Mounting Clamp configuration (as originally shipped)
Figure 14: Narrow Double Beam through Mounting Plate
d. Solid Beam
Note: For the Mounting Clamp configuration used with this type of starting block, you need to
use 2” x ¼”-20 hex-head bolts instead of the thumbscrews originally included with your ReacTime
Training or Championship System.
Figure 15: Solid Beam starting block sample
Figure 16: Solid Beam Mounting Clamp configuration
Page 13
Figure 17: Solid Beam cross-section through Mounting Plate
Reminder: Replace the thumbscrews with 2” x ¼”-20 hex-head bolts.
e. Moye 3 Point Stance
Figure 18: Moye 3 Point Stance starting block
Figure 19: Moye 3 Point Stance Mounting Clamp configuration
Figure 20: Moye 3 Point Stance through Mounting Plate
Step 3:
Re-Attach the Block Sensor (if necessary)
If you removed the Block Sensor to re-arrange the Mounting Clamp configuration, re-attach the
Block Sensor by tightening the securing screw into the topmost, centered hole at the top of the
Mounting Plate. Your properly mounted ReacTime Unit looks like Figure 21 below. This
completes the Mounting Instructions for your ReacTime Unit.
To learn how to begin training with your ReacTime Training System, continue to Chapter 2. To
learn how to set up your ReacTime Championship System, skip to Chapter 4.
Page 14
Figure 21: Properly mounted ReacTime Unit
Page 15
Chapter 2
Training System Setup
Now that you have mounted your ReacTime Training System to a starting block, you are ready to
follow the instructions in this chapter to learn how to start training with your ReacTime Training
System.
If you have purchased extra items such as a Gun Sensor or single or multiple Photoeyes, or if
you want to learn how to link together two ReacTime Training Systems, refer to Step 8: Step 9:
and Step 10: at the end of this chapter.
Before you Begin
When you are setting up your ReacTime Training System, you need to know where various
cables connect to the Block Sensor. Also, you need to be familiar with the key functions on the
Block Sensor keypad. Figure 22 shows the Block Sensor input and keypad labels you will use.
Figure 22: ReacTime Block Sensor inputs and keys
Inputs
1. Power supply
2. Serial Cable
3. False Start Cable (used
with ReacTime
Championship False
Start Detection System
only)
4. Loudspeaker
5. Photoeye
6. Signal Input Cable (for
Start Button or Gun
Sensor)
Page 16
Keys
A. Menu (scrolls forward
to the next menu
screen)
B. Delete (goes back to
the previous menu
screen; also deletes
most recent trial)
C. Start (triggers the
start sequence)
D. Up arrow (scrolls up
to the options within a
menu)
E. Down arrow (scrolls
down to the various
options within a
menu)
F. Off/On (turns the
Block Sensor off and
on)
Step 1:
Connect the Start Button and Loudspeaker
The Start Button is connected to the Signal Input Cable. Connect the Signal Input and
Loudspeaker Cables to the appropriate inputs on the Block Sensor. (See Figure 22.)
When connected, your ReacTime Training Unit looks like Figure 23.
Figure 23: Connected Signal Input and Loudspeaker Cables
Step 2:
Power and Turn On the Block Sensor
Note: ReacTime Block Sensors are shipped completely charged, and will work for about eight
hours. If you are eager to start training with your ReacTime Training System right away, skip this
step and go directly to Step 3: . Follow the instructions in this section to learn how to re-charge
the Block Sensor.
You can power your ReacTime Training System using the power supply provided or using built-in
rechargeable batteries.
a.
Run ReacTime using the power supply provided
Plug one end of the power supply into the input on the side of the Block Sensor (see Figure 22)
and plug the other end into a power outlet. Turn on the Block Sensor by pressing and holding the
OFF/ON key until the LCD reads, ReacTime | Ready to Start.
Page 17
Figure 24: ReacTime | Ready to Start screen using power supply
b.
Run ReacTime using built-in batteries
You may run the ReacTime Training System using built-in rechargeable batteries when you are
not using the power supply. A ReacTime Training System running a trial every 4-5 minutes can
last for 8 hours on batteries. (Note: If you are downloading trials from the Block Sensor onto a
computer using the ReacTime Training Software, the batteries last less than eight hours.)
Make sure the power supply is unplugged from the power outlet. Then, turn on the Block Sensor
by pressing and holding the OFF/ON key until the LCD turns on and reads, ReacTime | Ready to
Start.
Figure 25: ReacTime | Ready to Start screen using fully charged batteries
c.
Recharge the Block Sensor
When the Battery Mode Indicator on the LCD becomes mostly unshaded, the Block Sensor
needs to be re-charged. You need about four hours to completely re-charge the Block Sensor.
To recharge the Block Sensor, turn the unit off. With the Block Sensor turned off, reconnect the
power supply. The LCD reads, "Fast Charging" and after 3 hours changes to "Slow Charging."
After about four hours, the LCD dims completely. You will know that the Block Sensor is fully
charged when you turn the unit back on and notice that the Battery Mode Indicator is completely
shaded (as in Figure 25).
Step 3:
Use Randomized or Manually Controlled Intervals
The Virtual Starter feature is a recording of the "On your marks," "Set," and simulated gun sound
sequence you trigger by pressing the Start Button or the Start key. By default, the Virtual Starter
randomly varies the intervals between commands. If you are satisfied with using a randomly
varied setting, skip to Step 4: .
If you want to manually control the intervals between commands, follow the steps below. (Note:
To learn more about the Block Sensor's other menu options, including how to change the
randomized interval settings, please refer to Appendix A at the back of this manual.)
Page 18
a. Turn on the Block Sensor. The ReacTime | Ready to Start screen appears.
b. Press the Menu key once. Use the up or down arrow keys to scroll through the four
menus until you arrive at the Main Menu | Training screen. Press the Menu key again.
c. Scroll through the Training Menu sub-menus using the up or down arrow keys until you
arrive at the Training Menu | Intervals screen. Press the Menu key once.
d. Scroll to the Intervals Menu | Ready->Set Min sub-menu using the up or down arrow
keys. Press the Menu key again. The Ready->Set Min | 6.0 screen appears.
e. Press and hold the down arrow key until the setting changes to Manual.
f. Press the Delete key once to go back to the Intervals Menu | Ready->Set Min screen.
Press the down arrow key twice to view the Intervals Menu | Set->Gun Min screen.
Press the Menu key once. The Set->Gun Min | 2.0 screen appears.
g. Press and hold the down arrow key until the setting changes to Manual.
h. Press the Menu key to arrive at the ReacTime | Ready to Start screen. Now you are
ready to practice some starts.
Step 4:
Practice Starts
Now that you have properly mounted, connected, and configured your ReacTime Training
System, you are now ready to practice using it with starts out of the blocks. The instructions that
follow can be used by a coach training an athlete (“Coach”) or by an athlete training alone
(“Athlete”).
c. Coach
a. Make sure the Block Sensor is turned on when the athlete settles into the starting blocks.
b. Push the Start Button or the Start key to initiate the Virtual Starter. If you are using the
randomized start feature, press once to trigger the entire sequence. If you are using the
manually controlled start feature, press the button or key each time you want to trigger
the next command or gun sound. After the gun sounds and the athlete leaves the
starting blocks, the LCD displays various information about the start, called a trial.
Continue to Step 5: to learn how to interpret trial data.
Athlete
We recommend that you use the randomized Virtual Starter feature if you are training alone.
a. Make sure you have a Start Button connected to the Block Sensor.
b. Make sure the Block Sensor is turned on before you settle into the blocks.
c. Press the Start Button once to initialize the Virtual Starter. You will hear the “On Your
Marks” and “Set” commands. After the electronic gun sounds and you leave the starting
blocks, the Block Sensor LCD displays various information about your start, called a trial.
Continue to Step 5: to learn how to interpret trial data.
Step 5:
Interpret Trial Data
Information about a start is displayed on the Block Sensor LCD immediately after an athlete
leaves the starting blocks.
a.
Legal start
After a legal start (when the athlete leaves the blocks after the gun sounds), the LCD resembles:
Page 19
Figure 26: Legal start
x
x
x
b.
Trial 1: number of the trial just completed.
0.599 (number in the upper right corner): reaction time recorded, or the amount of time it
took the athlete to leave the starting blocks.
16254 (number in the lower left corner): power exerted when the athlete left the starting
blocks. A higher number indicates more power. (Note that the power value is relative
and not absolute.)
False start
After a false start (when the athlete leaves the blocks less than .10 seconds after the gun
sounds), the LCD resembles:
Figure 27: False start
x
F
S-0.356 (Decimal number in the upper right corner): false start reaction time recorded,
or the time in which the athlete left the starting blocks before the gun sounded.
Step 6:
Review trials
After you have practiced a few starts, scroll through each trial from the ReacTime | Ready to Start
screen by pressing the up and down arrow keys.
Step 7:
Delete trials
NOTE: When you delete trials from the Block Sensor, note there is no way to "undo"
deleted trials.
x To delete the most recently recorded trial, scroll to make sure that trial appears on
the LCD and then press the Delete key.
x To delete all trials stored in the Block Sensor, go to the Training Menu | Delete Trials
screen. Press the Menu key once. The Delete Trials Menu | Hit ˶ To Confirm screen
appears. Press the up arrow key once. The Delete Trials | Trials Deleted screen
appears, confirming that all of the trials in the Block Sensor have been erased.
Page 20
Step 8:
(Optional) Use an External Gun Sensor
Follow the instructions in this section if you are using an external Gun Sensor instead of the Start
Button with the Virtual Starter.
a.
Connect the Gun Sensor to the Block Sensor
Remove the Start Button connected to the end of the Signal Input Cable, and replace it with the
Gun Sensor. Plug the Signal Input Cable into the input on the Block Sensor (see Figure 22).
b.
Change Block Sensor settings
After you have connected a Gun Sensor to the ReacTime System, you must configure the Block
Sensor to work with the type of Gun Sensor you are using.
Note: When using a Gun Sensor, it is recommended that you set the Intervals menu in the Block
Sensor to Manual. Follow the instructions in Step 3: earlier in this chapter to set the Intervals
menu to manual.
a. At the Main Menu | Training screen, press the Menu key.
b. Scroll through the Training Menu sub-menus using the up or down arrow keys until you
arrive at the Training Menu | Gun Source screen. Press the Menu key once.
c. If you are using a normally closed Gun Sensor, scroll to the Gun Source | Norm. Closed
screen. If you are using a normally open Gun Sensor, scroll to the Gun Source | Norm.
Open screen. Once you have made your selection, press the Menu key once to return to
the ReacTime | Ready to Start screen.
Step 9:
(Optional) Use a Single or Multiple Photoeyes
With each ReacTime Training System, you may train with as many as 10 Photoeyes. Follow the
instructions in this section to do the following:
a. Set up a Photoeye
b. Connect multiple Photoeyes together
c. Change Block Sensor settings
a.
Set up a Photoeye
a. Choose a place on the track where you want to record the athlete’s time out of the
starting blocks to the first beam break. (For example, the 10-meter mark.)
b. Unfold both Photoeye tripods, extending the legs so that the top of each tripod is as high
as the athlete’s torso.
c. Lock the legs by flipping the levers at the feet of the tripod.
d. Place the tripod with the reflector on one side of the lane, with the front of the reflector
facing the Photoeye tripod.
e. Place the tripod with the Photoeye on the other side of the lane, facing the reflector
tripod. Make sure each tripod is at approximately the same height.
f. Connect the extra Signal Input Cable that came with the Photoeye to the Photoeye
Cable. (You are already using the Signal Input Cable that came with your ReacTime
Training System for the Start Button or Gun Sensor.)
Note: You may extend the Photoeye Cable by connecting it to a standard Lynx Gun
Cable or to any 3-pin XLR cable.
g. Connect the other end of the Signal Input Cable to the Block Sensor Photoeye input (see
Figure 22).
h. Angle the Photoeye toward the reflector until the red light on the side of the Photoeye
appears constant.
Page 21
i.
b.
Have someone run through the beam once. Watch to see that the red light turns off
briefly that person breaks the beam. Your Photoeye is now properly set up. If you are
using more than one Photoeye, go to b. Otherwise, go directly to c.
Connect multiple Photoeyes together
If you are using more than one Photoeye with your ReacTime Training System, you need to use a
Y Splitter Cable to connect the Photoeyes together.
a. Connect each female end of the Y Splitter Cable to each Photoeye Cable.
b. Connect the Signal Input Cable to the male end of the Y Splitter Cable.
c. Connect the open end of the Signal Input Cable to the Block Sensor Photoeye input.
Note: If you are working with two athletes, it is recommended that you leave one lane of length in
between each athlete so that you have enough room for the Photoeye tripod setup. For example,
train your athletes out of lanes two and four, leaving lane three open.
c.
Change Block Sensor settings
When you are using the ReacTime Training System and one or more Photoeyes, you must
configure the Photoeye menu on the Block Sensor. Follow these instructions:
a. At the Main Menu | Training screen, press the Menu key.
b. Scroll through the Training Menu sub-menus using the up or down arrow keys until you
arrive at the Training Menu | Photoeye screen. Press the Menu key once.
c. Scroll through the Photoeye sub-menus until you arrive at the Photoeye Menu | Type
screen. Press the Menu key once.
d. Scroll to choose Type | Norm. Open or Norm. Closed. (Note: If you are using a Lynx
Photoeye, Normally Open is the correct type.) After making your selection, press the
Delete key once.
e. Scroll through the Photoeye sub-menus using the up or down arrow keys until you arrive
at the Photoeye Menu | Number screen. Press the Menu key once.
f. Use the up and down arrow keys to set the number of Photoeyes you are training with
(between 1-10).
g. Press the Menu key once to arrive back at the ReacTime | Ready to Start screen.
Now you are ready to practice starts using your ReacTime Training System with one or more
Photoeyes. The Block Sensor LCD lists in the lower right corner the time it took the athlete to
travel from the starting block to the first beam break. If you are using more than one Photoeye,
all of the beam breaks are shown in a paging, sequential display in the LCD’s lower right corner
(see Figure 28). Each number represents the time it took the athlete to travel from the starting
blocks to the corresponding beam break.
Figure 28: LCD showing a beam break reading
x
1--2.622 = first beam break value
Page 22
Step 10:
Link Two ReacTime Training Systems Together
Link two ReacTime Training Systems together when you want to compare the reaction times of
two athletes. When two ReacTime Systems are linked, it is recommended that you manually
trigger the start sequence or use an external gun with a Gun Sensor to simultaneously start the
two Block Sensors.
(For instructions on connecting an external Gun Sensor, please refer to Step 8: .)
a.
b.
c.
d.
Insert a Start Button or Gun Sensor to the only female end of the Input Splitter Cable.
Attach one Signal Input Cable to one male end of the Input Splitter Cable.
Attach the other Signal Input Cable to the remaining male end of the Input Splitter Cable.
(Not labeled) Connect the Signal Input Cables to the gun inputs on the Block Sensors
(label 6 on Figure 22).
Figure 29: Two ReacTime Training Systems linked together
What next?
After you have practiced a few starts with your ReacTime Training System, refer to Chapter 3 for
the following:
x To learn how to use the complete version of the ReacTime Training Software if you
have purchased a software license
x To learn how to use the demo version of the ReacTime Training Software if you have
not purchased a software license
Page 23
Chapter 3
Training System Software
This chapter describes how to use ReacTime Training Software with a ReacTime Training
System. The ReacTime Training Software allows you to analyze, store and print reaction time
data downloaded from the Block Sensor.
Note: If you do not purchase a ReacTime Training Software license, you may install the software
in demo mode. Demo mode allows you to make certain updates to your Block Sensor. For demo
software installation instructions, refer to Step 1: in this chapter. Then, refer to Step 8: for
firmware update instructions, and to Step 9: to learn how to change your Block Sensor’s audio
and language files.
This chapter assumes you have already followed the mounting instructions in Chapter 1, and that
you know how to practice starts with your ReacTime Training System (Chapter 2).
Note: For more information on using ReacTime Training System Software, you can also refer to
the help file that comes with the software. To access the help file, run the ReacTime Training
Software, click Help from the menu bar and choose Contents.
Before you begin
Before following the instructions in this chapter, you need:
x a ReacTime Training System properly mounted to a starting block (see Chapter 1).
x an IBM compatible PC with one available COM port.
x the two ReacTime Training Software floppy disks that came with your ReacTime Training
System. (If you need to purchase a license, call Lynx customer service at 1-800-989LYNX to obtain a serial number before proceeding with these instructions. If you do not
want to purchase a software license, follow the instructions in Step 1: to install the
software in demo mode.)
x the Serial Cable that came with your ReacTime Training System.
Step 1:
Install the ReacTime Training Software
If you have already installed ReacTime Training Software using a software license, skip to Step 2:
. If you need to install the software, follow these instructions:
a. Click the Windows Start Menu and choose Settings | Control Panel. The Control
Panel screen appears.
b. Double-click Add/Remove Programs. The Add/Remove Programs Properties window
appears.
c. Click the Install button.
d. Insert Disk 1 and then follow the instructions on the screen until you arrive at the
ReacTime Training-InstallShield Wizard window.
e. Type your name and company name (if applicable) in the text boxes provided.
x If you have purchased a license, type the serial number (found on the floppy disk
label) in the Serial text box when prompted and then click Next.
x If you elect to not purchase a license, leave the Serial text box blank and then click
Next.
f. Insert Disk 2 when prompted and follow the instructions on the screen to complete the
installation.
g. If you have installed a complete version of the ReacTime Training Software (using a
serial number), go on to Step 2: .
h. If you have not installed a complete version of the ReacTime Training Software, run the
ReacTime Training Software by selecting it from the Programs list in your Windows Start
Menu. When the Enter Serial Number window appears, click the Demo Mode button.
Skip to Step 8: and Step 9: to use the software to update your Block Sensor’s firmware,
audio, and language files.
Page 24
Configure ReacTime Training Software
Step 2:
Follow the instructions in this section to set up the ReacTime Training Software to work with the
Block Sensor.
a. Connect the Serial Cable you received with your ReacTime Training System between the
Block Sensor and an available COM port on the back of your computer. (Note: For a
complete diagram of the Block Sensor inputs, please refer to Figure 22.)
b. Start the ReacTime Training Software by selecting it from the Windows Start menu. A
screen appears containing the ReacTime Training System Software menu bar. The
Menu bar contains the following icons (see Figure 30):
x
New Workout
x
Open Workout
x
Save Workout
Figure 30: ReacTime Training System Software menu bar icons
c.
Click Hardware and choose Options from the drop-down list. The Options window
appears.
d. Click the Serial tab. Click the Serial Input drop-down list and select the COM port that
the Serial Cable is connected to. Click OK.
Step 3:
Work with Trials in the Software
Follow the instructions in this section to import trial data from your Block Sensor or work with the
temporary workout that came with your software.
a. Turn on the Block Sensor.
b. Practice some trial starts so that you have at least three stored in the Block Sensor.
Note: If you cannot practice starts at this time, use the temporary workout that came with
your ReacTime Training Software. To access the temporary workout, click the Open
Workout icon. The Open window appears with a file called, "MondaysWorkout.rtw".
Double-click this file and skip to Step 4:
c. Connect the Serial Cable to your computer COM port, if you have not already done so.
d. Click the New Workout icon. A screen appears containing a blank chart (see Figure
31).
Page 25
A.
B.
C.
D.
E.
F.
G.
H.
I.
J.
K.
L.
Menu Bar
Results Zone
Chart Zone
Add Trial
Delete Trial
Print Trial
Print Chart
Maximize Chart
Show/Hide ‘Set’ Time Line
Show/Hide ‘Gun’ Time Line
Show/Hide ‘Legal’ Time Line
Show/Hide ‘Reaction’ Time Line
Figure 31: New Workout screen
e. Click the Add Trial icon. The Select Trial box appears containing the trials you just
recorded on the Block Sensor.
f. Highlight the trial you want to appear on your screen and then click the Download button.
If you want to download all of the trials from the Block Sensor, click Download All. The
trials you just recorded on the Block Sensor appear on the screen.
Note: If you receive the error, "Serial Connection Receive Timeout," check the
connection of the serial connection to the Block Sensor and make sure the Block Sensor
is turned on. Then highlight the trial you want to download again and click the Download
button.
Page 26
Step 4:
Work in the Results Zone
This section describes how to use the Results Zone to read and change data on trials after they
have been imported from a Block Sensor. (Refer to Figure 31 for a diagram of Results Zone
icons.)
Note: When you drag the mouse over an icon, descriptions of it appear in the bottom left corner
of your screen.
a.
Name trials
After you have downloaded a trial into the Results Zone or opened the sample
MondaysWorkout.rtw, you may want to name or change the existing trial names.
To enter or change a name in the First Name or Last Name fields of the Results Zone, click the
field and then start typing. Press Tab after each name entry. Click the Save Workout icon to
save your changes.
Note: You must press the Tab key after each entry, including the last entry, for the text to be
saved in the Name fields.
b.
Read reaction time and power
The data in the Reaction Time and Power fields are the same data contained in the Block
Sensor. These fields are not editable. False starts appear in red text.
c.
(Optional) Read time to distance and TTD-RT fields
If you are using a ReacTime Training System with a Photoeye, data appears in the Time to
Distance, and TTD-RD (Time to Distance minus Reaction Time) fields. The data in these fields
are supplied by the Block Sensor and are not editable.
Note: For instructions on how to set up a Photoeye, please refer to Chapter 2.
The Time to Distance field tells you how long it took an athlete to go from the starting blocks to
the beam break. The TTD-RD field shows the same value less the athlete’s reaction time out of
the starting blocks. If you are using more than one Photoeye, refer to Step 7: later in this
chapter.
d.
Print trials
To print the data from the Results Zone, first make sure your computer is connected to a printer.
Then, click the Print Results icon or click Results from the menu bar and choose Print from the
drop-down list.
e.
Open multiple workouts
This step enables you to toggle back and forth between workouts, allowing for easy comparison
of trial data.
a. Open each workout you want to browse.
b. Click File and choose Options. The Options window appears.
c. Select the General tab and click Single Event Mode Off. Then click OK.
d. Click Window from the Menu bar. Select the workouts you want to open.
f.
Delete trials
You may delete trials from the Results Zone in the Training Software and you may use the
Training Software to delete the trials on the Block Sensor.
Delete trials from the Results Zone
Page 27
Delete trials from the currently open workout by clicking the Trial column next to a trial in the
Results Zone (it turns from gray to white). Then, click the Delete Trial icon (or select Delete
Trial from the Results drop-down list).
This step deletes trials from the software only. If you accidentally delete a trial in the Results
Zone, you can still download it again from the Block Sensor.
Delete trials from the Block Sensor
NOTE: There is NO undo for this command. Once you have deleted trials from the Block
Sensor, they are gone permanently.
a. Click Hardware on the Menu bar. Select Delete Trials From Block Sensor from the dropdown list. A window appears asking if you are sure you want to delete all trials from the
Block Sensor.
b. Click Yes. When you return to the ReacTime | Ready to Start screen on the Block Sensor,
there are no longer any trials on the Block Sensor.
Step 5:
Work in the Chart Zone
The ReacTime chart is a visual depiction of an athlete's motion in and acceleration from the
starting blocks. Follow the steps in this section to learn how to work with the ReacTime chart.
Note: Descriptions of the icons in the Chart Zone appear in the bottom left corner of your screen.
a.
Select a chart
Select a chart for a particular trial by triple-clicking the Trial column.
b.
Minimize and maximize the chart
Click the Maximize Chart icon to display only the chart and the chart menu bar on your screen.
Now, click the Minimize Chart icon to display the trials listed in the Results Zone and the chart of
the trial you select.
c.
Toggle on and off chart time lines
Toggle the icons in the chart menu bar to turn on and off various chart time lines (refer to Figure
31 for chart time lines).
You can use your mouse to drag the cursor over an icon and look in the bottom left corner of the
screen to read what it does. Or, refer to the list below for a more complete description.
The chart time lines enable you to toggle on and off the following displays:
x ‘Set’ Time Line: shows when the Set command was issued (this value is also listed at
the top of the chart where it reads something like, "(Set Time = 0.300s)"
x ‘Gun’ Time Line: shows when the Gun was fired
x ‘Legal’ Time Line: shows when motion is considered legal
x ‘Reaction’ Time Line: shows athlete's reaction time
d.
Change chart properties
You can change the way a chart looks by changing its properties.
Click Chart on the menu bar. Select Options from the drop-down list and select the Chart tab.
You may change the chart properties using the drop-down lists on this screen.
This allows you to:
x change the brush [chart line] width
x change the brush [chart line] style
x change the brush [chart line] color
Page 28
x
x
x
e.
change the background color (changes the background color of the border area
surrounding the chart boundary)
change the background (chart) color (changes the background color of the chart itself)
change the scale (allows you to change the time range and zoom in on a particular area)
Print chart
To print the data from the Chart Zone, click the Print Chart icon or click Chart from the menu bar
and choose Print from the drop-down list. Note that you can print the chart time lines by toggling
them on in the software.
Step 6:
Interpret ReacTime Charts
This section explains how to interpret the charts that visually represent the trials downloaded into
the Training Software from the Block Sensor.
a.
ReacTime chart
The ReacTime chart shows motion out of the blocks as an increase in value on the Y- (vertical)
axis of the chart. The more powerful the increase in motion, the higher the value. ReacTime
displays relative units alongside the values on the Y-axis.
Time is displayed along the X-(horizontal) axis.
b.
Legal and false start charts
International track and field rules define a false start as one where the athlete assumes a
motionless set position and then moves prior to the gun, or moves within the first 99/1000th of a
second after the gun.
To configure ReacTime to display the 100/1000th cutoff point on the chart, click the Show Legal
icon (see Figure 31).
Legal
Athlete’s
Reaction
Time Line
Time
This chart shows that there is no motion prior to the legal cutoff (100/1000th of a second after the
gun). The athlete’s reaction time is 0.274 seconds after the gun.
Figure 32: Chart of a legal start
Page 29
Athlete’s
Reaction
Time
Legal
Time Line
This chart shows that there is significant motion in the blocks prior to the legal cutoff.
Figure 33: Chart of a false start
c.
Single and double motions
A trial chart often clearly displays a single or double hump.
A chart with a single hump means that an athlete pushed evenly with both feet when leaving the
starting blocks. A chart with a double hump means that an athlete gave a separate push with
each foot when leaving the starting blocks. Both starts may be legal or false, depending on
where the legal line in the chart falls.
Figure 34: Chart of a legal, single-motion start (Athlete 1)
Page 30
Figure 35: Chart of a legal, double-motion start (Athlete 2)
d.
Training objectives
When training with the ReacTime Training System, there are certain objectives to strive for.
These include:
x A reaction time as close as possible to .1 seconds after the gun.
x A chart that achieves a comparatively high power value.
x A chart that returns to base value as soon as possible after the gun, indicating when the
athlete is no longer in contact with the blocks.
x A chart with its “last significant peak” as close as possible to the Legal time line.
Consider the overlay of the three legal start charts pictured in Figure 36. The last
significant peak that is closest to the legal time line indicates that this athlete got out of
the blocks more quickly than the other athletes (with last significant peaks further to the
right of the legal time line).
Note: At this time, the software does not produce overlays of charts. The image in
Figure 36 was created for demonstration purposes.
Page 31
Figure 36: Last significant peak comparison
Step 7:
(Optional) Photoeye with Time to Distance Feature
Using the ReacTime Training System with a single or multiple Photoeyes allows you to compare
different block set-ups and the effect they have on the time it takes to cover a specified distance.
To learn how to connect one or more Photoeyes to your ReacTime Training System, please refer
to Chapter 2.
Use the ReacTime Training Software Time to Distance feature to measure the time it takes an
athlete to leave the starting blocks and arrive at a given point on the track using one or more
Photoeyes.
The Time to Distance field automatically displays the time it took the athlete to leave the starting
blocks (legally) and arrive at the Photoeye. If you are using multiple Photoeyes:
a. Triple-click a Time to Distance field. A Photobeam Break menu appears.
b. Mouse over the Photobeam Break menu to display the beam breaks recorded. Numbers
appearing in parentheses show the amount of time in seconds it took the athlete to leave
the starting blocks to break each beam.
The TTD-RT Field displays the time it took the athlete to break the final beam minus the athlete’s
reaction time.
Step 8:
Update Firmware
Operation of the Block Sensor is controlled by software written on a microchip, known as
firmware. Occasionally, you may need to update your firmware. To find out what version of
firmware you are currently running, turn on the Block Sensor and follow these steps:
a. From the ReacTime | Ready to Start screen, press the Menu key once.
b. Press the up and down arrow keys until you arrive at the Main Menu | About screen.
c. Press the Menu key again. Press the up and down arrow keys until you arrive at the About
| SW: [version number] screen.
Now, go to the Lynx website (http://www.finishlynx.com) and check for the most currently
released version of the ReacTime firmware. If you are running an old version of firmware, follow
the steps below to update your Block Sensor.
a. Connect the Block Sensor to the computer COM port using the Serial Cable provided.
Page 32
b. If the Block Sensor is connected to the power supply, disconnect it. Turn the Block Sensor
OFF.
c. Run the ReacTime Training Software.
d. Click Hardware. A drop-down list appears. Click Options. The Options window appears.
e. Click the Serial tab. Click the Serial Port drop-down list and select the COM port the Serial
Cable is connected to. Click OK.
f. Click Hardware on the menu bar. Select Update Firmware from the drop-down list. A
Power window appears, instructing you to: "Turn off the ReacTime Unit, unplug power
cord, and press OK." The Open window appears.
g. Select the firmware image file (bs.img), and then click Open. Wait while the unit updates.
Step 9:
Customize ReacTime Training System
This section describes how to customize your ReacTime Training System by changing the
language files in the Training Software or by changing the audio files used by the Virtual Starter
on the Block Sensor.
a.
Change the language files in the Training Software
The menus and dialog boxes used in the Training Software are currently available in several
languages. Follow the steps below to load an existing language file.
a. Run the ReacTime Training Software. Click File from the menu bar and choose Options.
b. Click the General tab and choose the language you want from the Language drop-down
list.
c. Click OK and then exit ReacTime Training Software. The next time you run the software, it
displays the new language you chose.
Note: To create your own language files, go to
http://www.finishlynx.com/supinput/technotes/language_files.htm and follow the instructions on
the website.
b.
Change the Virtual Starter’s audio files
You can customize your own recordings of the "On Your Marks" and "Set" commands (for
example, in the coach's voice or in another language) and upload them to the Block Sensor.
(Note: The gun sound cannot be edited.)
To customize the audio files, you need:
x software that can create an 8khz 8 BIT mono WAV file (such as Windows Sound
Recorder)
x a sound card in your computer
x a microphone
Then, follow these instructions:
a. The ReacTime Training directory contains two files: onmark.wav and set.wav. Go to the
directory on your computer called "reactime." Double-click the "training" folder to view the
onmark.wav and set.wav files.
b. Rename the existing files before recording new files so that they can be restored if
necessary. For example, you can rename them “onmark_old.wav” and “set_old.wav.”
When you record new files, do not exceed 2 seconds in length for each file.
c. Re-record new files using sound recorder software and save them to this directory, naming
them “onmark.wav” and “set.wav,” respectively.
d. After recording new files, connect the Block Sensor to the computer COM port using the
ReacTime Serial Cable provided.
e. Click Hardware. A drop-down list appears. Click Options. The Options window appears.
f. Click the Serial tab. Click the Serial Input drop-down list and select the COM port the
Serial Cable is connected to. Click OK.
Page 33
g. Select Hardware from the menu bar of the ReacTime Training Software and choose Load
Audio. This connects the computer to the Block Sensor and updates the audio files you
have just recorded that are used for the start sequence. Wait while the files load. A
Confirm window appears.
h. If you want to load the new audio files you just created onto another Block Sensor, replace
a different Block Sensor with the one you just updated and then click Yes. If you do not
want to load the audio files you just created onto another Block Sensor, click No. The new
audio files are loaded onto your Block Sensor.
Page 34
Chapter 4
Championship System Setup
In this chapter, you will learn how to set up your ReacTime Championship False Start Detection
System.
The images below diagram the inputs and keys for the Block Sensors and Command Center.
You’ll need to be familiar with these diagrams when you follow the setup instructions in this
chapter.
Inputs
1. Power supply (Used only with
ReacTime Training System)
2. Serial Cable
3. False Start Cable
4. Loudspeaker
5. Photoeye (Used only with ReacTime
Training System)
6. Gun Sensor
Keys
A. Menu (scrolls forward to the next
menu screen)
B. Delete (goes back to the previous
menu screen)
C. Start (used only with ReacTime
Training System)
D. Up arrow (scrolls up to the options
within a menu)
E. Down arrow (scrolls down to the
various options within a menu)
F. Off/On (turns the Block Sensor off
and on)
Figure 37: Block Sensor inputs and keys
Page 35
Inputs
Keys
1. Power Supply
2. Serial Cable (to computer)
3. Command Center Cable (from Lane
1)
4. Recall Starter’s Headset
5. Signal Input Cable connected to a
Start Button (optional)
6. Gun Sensor
7. Official Starter’s Headset
8. Blank Input (reserved for future use)
9. Line Printer (optional)
A. Menu (scrolls forward to the next
menu screen)
B. Back arrow (goes back to the
previous menu screen)
C. Start (triggers the start sequence)
D. Up arrow (scrolls up to the options
within a menu)
E. Down arrow (scrolls down to the
various options within a menu)
F. Off/On (turns the Command Center
off and on)
Figure 38: Command Center inputs and keys
Step 1:
Set Up the ReacTime Units on the Track
a. After you have mounted the ReacTime Units to the starting blocks you will use during your
competition, lay out the starting blocks in their proper places on the track.
b. On each Block Sensor, connect each Speaker Cable to the appropriate Block Sensor input
(label 4 in Figure 37).
c. If you are using a Wired ReacTime Championship System, connect each Block Sensor
together with a False Start Cable (label 3 in Figure 37).
Step 2:
Set Up the Command Center on the Side of the Track
This section describes the setup of the required components as well as optionally purchased
components.
a. Required setup
a. Place the Command Center on the inside of the track, close to Lane 1.
Page 36
b. Connect the Signal Input Cable attached to the Gun Sensor to the appropriate input on the
Command Center (label 6 in Figure 38).
c. Connect the Command Center Cable to the Block Sensor in Lane 1 (label 3 in Figure 37)
and the appropriate input in the Command Center (label 3 in Figure 38).
d. Connect a Headset Cable to the Official Starter’s Headset (the Headset with two ear
pieces) and connect the other end to of the Headset Cable to the appropriate input on the
Command Center (label 7 in Figure 38).
e. Connect a Headset Cable to the Recall Starter’s Headset (the Headset with one ear piece)
and connect the other end of the Headset Cable to the appropriate input on the Command
Center (label 4 in Figure 38).
b. Optional set up
If you have purchased any of the following items, follow the instructions in this section to connect
them.
Extra gun cable
You may want to connect extra gun cable to your Championship System to give the Official
Starter greater range.
a. Connect the Signal Input Cable to the extra gun cable.
b. Connect the other end of the Signal Input Cable to the input on the Command Center (label
5 in Figure 38).
c. Connect a Gun Sensor to the open end of the gun cable.
Line Printer
Please consult the manufacturer’s operation manual that came with your Line Printer if you have
specific questions not covered in this section.
a. Connect the printer cable to the Line Printer.
b. Connect the Line Printer power supply to the Line Printer.
Note: The Line Printer can also run with battery power.
c. Connect the open end of the printer cable to the input on the Command Center (label 9 in
Figure 38.
Step 3:
Power On the Block Sensors
You can run the Block Sensors on their own battery power or using the Command Center power
supply.
a.
(Optional) Run the Block Sensors with battery power
Your ReacTime Championship System comes with all eight Block Sensors and the Command
Center fully charged. When not uploading trials to a computer using the Championship Software,
a fully charged ReacTime Championship System lasts about:
x 2 hours when used with a wireless system running a race about every five minutes.
x 8 hours when used with a wired system running a race about every five minutes.
Therefore, depending on whether you are using a wireless or wired ReacTime Championship
System, you can run a system on battery power for either 2 or 8 hours, respectively. Please refer
to Chapter 5 to learn how to recharge the Block Sensors and Command Center.
To run the Block Sensors with battery power:
a. Turn on all Block Sensors by pressing and holding the OFF/ON key (label F in Figure 37).
b. Each LCD turns on and looks like Figure 39.
Page 37
Figure 39: ReacTime | Ready to Start screen using fully charged batteries
b.
(Optional) Run the Block Sensors with the Command Center power supply
If you have access to power at the track using a wired system, you can use electrical power
rather than relying on the battery charge. With a wired system, you can power all eight Block
Sensors using a single Command Center power supply.
a. Connect the Command Center power supply to the appropriate input (label 1 in Figure 38).
b. Plug the power supply into an electrical outlet. All eight Block Sensors are powered
automatically.
c. Turn on all Block Sensors by pressing and holding the OFF/ON key (label F in Figure 37).
d. Each LCD turns on and looks like Figure 40.
Figure 40: ReacTime | Ready to Start screen using power supply
Step 4:
Configure the Block Sensors
After you have decided how to power your Block Sensors (either with battery or electrical power)
and after you have turned on all of the Block Sensors, you must configure each Block Sensor to
work during the competition. Repeat the steps listed below for each Block Sensor you have set
up in a lane on the track.
a. Assign lane numbers to each Block Sensor.
1. Press the Menu key once.
2. Press the up and down arrows until you arrive at the Main Menu | System screen.
3. Press the Menu key once.
4. Scroll until you arrive at the System Menu | Lane Number screen.
5. Press the Menu key once.
6. At the Lane Number | 1 screen, press the up arrow key to increment the lane number.
7. After you have chosen the desired lane number, press the Menu key once more to arrive
at the ReacTime | Ready to Start screen. Note that the lane number you just selected
appears in the upper left corner of the LCD (see Figure 40).
Page 38
b. Assign the network type to each Block Sensor.
1. Press the Menu key once.
2. Press the up and down arrow keys until you arrive at the Main Menu | System screen.
3. Press the Menu key once.
4. Scroll until you arrive at the System Menu | Network Type menu. Press the Menu key
once.
5. Scroll to choose Network Type | Wired or Network Type | Wireless.
Step 5:
Configure the Command Center
After you have configured the Block Sensors, configure the Command Center by following these
steps.
a. Turn on the Command Center by pressing and holding the OFF/ON key.
b. Change the lane number configuration.
1. Press the Menu key once.
2. Press the up and down arrow keys until you arrive at the Main Menu | System screen.
3. Press the Menu key once. The System Menu | Number of Lanes screen appears.
4. Press the Menu key once. Scroll to choose the correct number of lanes.
5. Press the Menu key again to return to the ReacTime | Ready to Arm screen. The upper
left corner of the Command Center LCD shows the number of lanes being used.
c. Review the Command Center’s default settings. The list below describes the default
settings that were programmed into your Command Center. If you need to change any of
these settings, please refer to Appendix B at the back of this manual.
x Network Type: Wired
x Remote Volume: 6
x Headset Squelch: 5
x Headset Volume: 5
x Fire Recall: No
x Detection:
- Active Time: -0.3 From Gun
- Threshold: Normal
x Gun Sensor
- Type: Norm. Closed
- Armed In Ready: Yes
d. When you have finished configuring the Command Center, continue on to Chapter 5.
Page 39
Chapter 5
Championship System Operation
The instructions below are written for two individuals to follow during a competition: an Official
Starter and a Fire Recall Starter, who also operates the ReacTime Command Center and the
Championship Software, if used. (Please refer to Chapter 6 for Championship Software
operating instructions.)
The Official Starter’s Headset has microphone audio ability but the Fire Recall Starter’s Headset
does not. Note that in the absence of a Fire Recall Starter, there may be a Starter’s Assistant
operating the ReacTime Championship System, or the Official Starter may be following all of the
steps below without assistance.
Note: You can use a Start Button connected to a Signal Input Cable plugged into the Photoeye
input on the Command Center to perform the same functions as the Start key in the instructions
below. The Start Button and extra Signal Input Cable this requires may be purchased optionally.
Step 1:
Operate the Competition
a. Fire Recall Starter: Confirm that the Command Center and all Block Sensors are powered
on and the LCD is visible in all screens.
b. Fire Recall Starter: Confirm that the lane numbers indicated on the Block Sensors are
correct.
c. Fire Recall Starter: Note that the LCD on the Command Center indicates the number of
Block Sensors configured in the top left corner.
d. Fire Recall Starter: Press the Start button on the Command Center once to enter Standby
phase.
e. Official Starter and Recall Starter: Hear in the Headset a single beep, indicating Standby
phase. This tone is not relayed over the athletes’ Loudspeakers.
The Official Starter’s microphone and athlete Loudspeakers are now enabled.
Note: The microphone will stay active until two seconds after the gun is fired.
f. Official Starter: Bring the athletes to their blocks.
g. Official Starter: Bring the athletes to the Set position.
h. Fire Recall Starter: Press the Start button again to enter the Active phase.
Official Starter: Hears a double-beep in the Headset, indicating a “Set” tone. Again, this
tone is not relayed over the athletes’ Loudspeakers.
At this point, if the gun is not fired within three (3) seconds, a warning tone (rapid warning
beeps) sounds. If the gun is fired after the warning tone, reaction times will be recorded, but
no traces will be stored. To avoid this, the Fire Recall Starter may return the system to the
“Standby” phase by pressing the Start key again.
i. Official Starter: Fire the gun.
Reaction times are displayed on each Block Sensor’s LCD immediately after a start.
Note: As soon as the Fire Recall Starter presses the Start key again, these times disappear
from the LCD’s.
If a false start (as defined by IAAF rules) occurs, the Official Starter and the Fire Recall
Starter hear three strong tones.
Note: The ReacTime Championship System emits an electronic gun tone automatically if the
Fire Recall setting is turned on. The electronic gun tone will sound from all of the athletes’
Loudspeakers in the event of a false start. (Please refer Appendix B at the back of this
manual to learn how to enable the Fire Recall option.)
If the Line Printer is connected to the Command Center printer input, reaction times for all of
the athletes are printed automatically just after the gun.
Page 40
System errors and warning tones
The Starters may hear certain warning tones during a competition. This section describes the
various warning tone indications.
x Repeated beeps: If the Starter hears repeated beeps, a Block Sensor or cable
connection failure is indicated. The Starter should check all Block Sensors that they are
correctly configured with the proper lane number, and that all cables are connected.
x Single warning tone: The controls on the Block Sensors are locked out to prevent athlete
interference. Any attempt to disconnect the Block Sensor is signaled by a warning tone
in the Starter’s Headset.
Note: When the Block Sensors are in “Athlete Lockout Mode,” you can get out of this
mode by holding the Delete key and the Off/On key simultaneously for 5 seconds and the
Block Sensor will turn off.
x Three strong beeps: A false start is indicated by three strong beeps in the Starter’s
Headset.
Step 2:
Recharge the ReacTime Championship System
After the competition, you should recharge your Block Sensors and Command Center if you were
running the ReacTime Championship System with battery power. You can do this using the
System Charger that came with your ReacTime Championship System (see Figure 41).
a. Turn OFF all Block Sensors and the Command Center.
b. Plug the System Charger power supply into an electrical outlet.
c. Connect all Block Sensors and the Command Center to the System Charger.
d. Wait at least four hours until all Block Sensors and the Command Center are completely
charged. (You will know when a unit is fully charged when you disconnect it from the
System Charger and turn it on, and the battery icon in the top right corner of the LCD is
completely shaded.)
Figure 41: System Charger connections
Page 41
Chapter 6
Championship System Software
The Championship Software is used to display athletes’ reaction times and to send ReacTime
data to a FinishLynx system. Reaction times are displayed in charts that show an athlete’s
reaction in relation to the gun and the legal limit. Reaction time charts can be printed. Generally,
it is the responsibility of the Recall Starter or the Starter’s Assistant to operate the software during
a competition.
Before you begin
Before following the instructions in this chapter, you need:
x at least one ReacTime Unit properly mounted to a starting block.
x an IBM compatible PC.
x ReacTime Championship Software (either already installed onto your computer, or in
three floppy disks, or via the Lynx website. If you are downloading the software via the
Lynx website, call customer service at 1-800-989-LYNX to obtain a serial number before
proceeding with these instructions).
x the Serial Cable originally provided with your ReacTime Championship System.
x An available COM port to connect the Serial Cable to the back of your computer. Later in
this document you will be instructed to use the software to configure this COM port.
Step 1:
Install the ReacTime Championship Software
All ReacTime Championship Systems come with a copy of the ReacTime Championship
Software. To use the ReacTime Championship Software to its full capacity (downloading and
analyzing trials from the Block Sensor), you must obtain a serial number. If you do not have a
serial number, you may purchase one by calling a Lynx sales associate at 1-800-989-LYNX.
If you elect to not purchase a serial number, you can run the ReacTime Championship Software
in demo mode, which you can use to update the Block Sensor and Command Center firmware
and customize the software’s language files, but cannot download and analyze trials from the
Block Sensor.
If you have already installed ReacTime Championship Software, skip to Step 2: . Otherwise,
follow these instructions.
a. Click the Windows Start Menu and choose Settings | Control Panel. The Control Panel
screen appears.
b. Double-click Add/Remove Programs. The Add/Remove Programs Properties window
appears.
c. Click the Install button.
d. Insert Disk 1 and then follow the instructions on the screen until you arrive at the ReacTime
Championship-InstallShield Wizard window.
e. Type your name and company name (if applicable) in the text boxes provided.
x If you have purchased a license, type the serial number (found on the floppy disk
label) in the Serial text box when prompted and then click Next.
x If you elect to not purchase a license, leave the Serial text box blank and then click
Next.
f. Insert Disk 2 when prompted and follow the instructions on the screen.
g. Insert Disk 3 when prompted and follow the instructions on the screen to complete the
installation.
h. If you have installed a complete version of the ReacTime Championship Software (using a
serial number), go on to Step 2:
i. If you have not installed a complete version of the ReacTime Training Software, run the
ReacTime Training Software by selecting it from the Programs list in your Windows Start
Menu. When the Enter Serial Number window appears, click the Demo Mode button.
Page 42
Skip to Step 9: and Step 10: to use the software’s demo mode to update your Block
Sensor and Command Center firmware and the software’s language files.
Step 2:
Configure ReacTime Championship Software
a. Connect the Serial Cable you originally received with the ReacTime Training System
between the Command Center and an available COM port on the back of your computer.
Then, turn on your computer. (Note: For a complete Command Center diagram, please
refer to Figure 38.)
b. Start the ReacTime Championship Software by selecting it from the Programs list in the
Windows Start menu. A screen appears containing the ReacTime Training System
Software menu bar. The menu bar contains the icons shown in Figure 42.
x
Create a New Event
x
Open an Event
x
Save the Selected Event
x
Load the Previous Event from
the Schedule
x
Choose an Event in the
Schedule
x
Load the Next Event from the
Schedule
Figure 42: ReacTime Championship menu bar icons
c.
d.
e.
f.
g.
h.
Configure your computer’s COM port. Click Hardware from the menu bar and choose
Options. The Options window appears.
Click the Serial tab.
From the Serial Port drop-down list, select the COM port number the Serial Cable is
attached to on your computer.
With the Options window open, configure the software for the number of Block Sensors
connected to the Command Center. Click the Results tab and select the number from the
Default Number of Lanes drop-down list.
If you are downloading start lists of competitors using a schedule of events, configure the
software to find the necessary data files. With the Options window open, click the
Database tab. Click the Browse button to navigate to and select the input and output
directories.
Note: ReacTime Championship Software comes with a sample event schedule and list of
competitors. If you want to use this sample data to practice the next steps with, leave the
input and output directories at their default settings (they will resemble
C:\REACTIME\CHAMPIONSHIP).
(Optional) To send reaction times to a scoreboard after a race, you must first configure the
software’s scoreboard settings to work with the scoreboard you are using. Click
Scoreboard | Options from the menu bar and either select or type the appropriate
information about your scoreboard. You will need to know the following information:
x scoreboard script (1-line or 2-line)
x scoreboard name
Page 43
x
x
Step 3:
code set (single byte, Unicode, or native)
baud rate, data bits, stop bits and parity
Open a New ReacTime Event (Race)
Run the ReacTime Championship Software if you have not done so already. If you are using the
ReacTime Championship Software to automatically import and display a start list (list of
competitors in an event), follow the instructions in a. If you are not using the software to
automatically import and display a start list, skip to the instructions in b.
a. Import and display a start list
Use the sample data that came with your ReacTime Championship Software to practice the
following steps.
a. Click the Choose an Event from the Schedule icon (see Figure 42). The Go To Event
window appears.
b. Click the Load Schedule button. Click the drop-down list to display the schedule you
just loaded.
c. Click on the event that is up next from the list [for example, 100 Meter Dash Men (1,3,1)]
and then click OK.
d. The event you selected appears with a blank ReacTime Championship Chart (see Figure
43).
A. Menu Bar
B. Results Zone
C. Chart Zone
Figure 43: Sample event
Note: Load the previous event from the event schedule by clicking the Load the Previous
Event…icon. Load the next event from the event schedule by clicking the Load the Next
Event…icon. (See Figure 42.)
Page 44
b. Without importing and displaying a start list
a. If you are not importing data from a start list, click on the Create a New Event icon (see
Figure 42). Or, you can select File from the menu bar and choose New. A blank event
with a blank ReacTime Championship Chart appears on your screen (see Figure 44).
Figure 44: Blank event
b. Manually enter competitor information in the Results Zone. Click to highlight each lane
and press the Tab key to navigate from one column to the next.
Note: Only 7 lanes display at a time in the Results Zone. Use the scroll bar at the far
right of the Results Zone to display more lanes. Also, the data in the Reaction Time and
Power fields is supplied by the Block Sensor and is therefore not editable.
c. Save the event by clicking the Save the Selected Event icon.
Step 4:
Import ReacTime Data into the Championship Software
Now that you have opened an event and either imported competitor data from a start list in a
database or manually entered the names of competitors in the next event, you are ready for the
race to begin.
After a race starts, download ReacTime data from the Command Center by clicking the Add
Reaction Times to this Event icon (see Figure 45). Or, select Results from the menu bar and
choose Add Reaction Times. The reaction data from the most recent race is added to the event
you currently have open.
Figure 45: Add Reaction Times to this Event icon
Page 45
Note: You can open more than one event at once by clicking Hardware | Options | General and
selecting Single Event Mode OFF. You can then click Window from the menu bar and click on
the event you want open.
Step 5:
Analyze Chart Data
ReacTime Championship Software automatically generates a visual representation of the
athletes’ motion in, and acceleration from, the starting blocks when data from the Block Sensors
is downloaded to the software (see Figure 46).
Figure 46: Chart Zone
The Chart Zone Icons are used to display different chart attributes and perform different
functions. These attributes and functions are listed below.
x
Printer icon: Send the chart
to a printer.
x
Maximize/Minimize Chart
icon: Maximize chart fills the
chart into the entire screen.
x
Export Bitmap icon: Exports
the chart as a bitmap file.
x
Show/Hide Set Line icon:
Show or hide the time when
the Set command was issued.
x
Show/Hide Gun Line icon:
Show or hide the time when
the Gun was fired.
x
Show/Hide Legal Line icon:
Show or hide the time at which
motion is legal.
Figure 47: Chart Zone icons
To display an individual athlete’s chart, triple-click that athlete’s lane number in the Results Zone.
To toggle back to displaying all charts at once, click the Show All Charts icon that appears to the
right of the Results Zone icons (see Figure 48).
Page 46
Figure 48: Show All Charts icon
Step 6:
Change chart properties
Change chart properties by clicking Chart from the menu bar and choosing Options. The Options
window appears with the Chart tab selected. You may make the following adjustments by
selecting different values from the drop-down lists:
x Brush Width – changes the thickness of each chart line displayed
x Brush Style – changes the solid chart line to a dotted or dashed line
x Background Color – changes the color surrounding the outside of the chart canvas
x Background Color (chart) – changes the color of the chart itself
x Scale – changes the scale of the chart within a minimum value of –3 and a maximum
value of 2
x Show Y Axis – when checked, shows Power values along the Y axis
Step 7:
Interpret Chart Data
This section describes how to interpret the charts that visually represent competitors’ reaction
times out of the starting blocks.
a. ReacTime chart
The ReacTime chart shows motion out of the blocks as an increase in value on the Y- (vertical)
axis of the chart. The more powerful the increase in motion, the higher the value. ReacTime
displays relative units alongside the values on the Y-axis.
Time is shown on the X-(horizontal) axis.
b. Legal and false start charts
International track and field rules define a false start as one where the athlete assumes a
motionless set position and then moves prior to the gun, or moves within the first 99/1000th of a
second after the gun.
To configure ReacTime to display the 100/1000th cutoff point on the chart, click the Show Legal
icon.
Page 47
This chart shows that there is no motion prior to the legal cutoff (100/1000th of a second after the
gun). The athlete’s reaction time is 0.274 seconds after the gun.
Figure 49: Chart of a legal start
This chart shows that there is significant motion in the blocks prior to the legal cutoff.
Figure 50: Chart of a false start
Step 8:
(Optional) Send Reaction Times to a Scoreboard
If you have properly configured the software to send results to a scoreboard (refer to Step 2: in
this chapter), you can send data such as reaction times from each race by selecting Scoreboard
from the drop-down list and selecting the options appearing in the Scoreboard drop-down list.
Step 9:
Update Firmware
Operation of the Block Sensor and Command Center is controlled by software written on a
microchip, known as firmware. Occasionally, you need to update your firmware.
To know when to update your firmware, click Help from the menu bar and select About. The
About ReacTime window appears and lists the version number of the ReacTime firmware you are
operating. Now, go to the website and check for the most currently released version of the
ReacTime firmware. Then, follow the steps below.
a. Connect the Block Sensor or the Command Center to the computer COM port using the
ReacTime Serial Cable provided with your software.
b. If the Block Sensor or Command Center is connected to the AC supply, disconnect it.
Turn the unit OFF.
c. Run the ReacTime Championship Software.
d. Click Hardware. A drop-down list appears. Click Options. The Options window
appears.
e. Click the Serial tab. Click the Serial Port drop-down list and select an available COM
port. If you are unsure which COM port to select, choose the first one that appears on the
drop-down list. Click OK.
f. Click Hardware on the menu bar. Select Update Firmware from the drop-down list. A
Power window appears, instructing you to: "Turn off the ReacTime Unit, unplug power
cord, and press OK." The Open window appears.
g. Select the correct firmware image file (Block Sensor = bs.img, Command Center =
cc.img), and then click Open. Wait while the unit updates.
Page 48
Step 10:
Customize ReacTime Championship Software Language
Files
The menus and dialog boxes used in the Championship Software are currently available in
several languages. Follow the steps below to load an existing language file.
d. Run the ReacTime Championship Software. Click File from the menu bar and choose
Options.
e. Click the General tab and choose the language you want from the Language drop-down
list.
f. Click OK and then exit ReacTime. The next time you run ReacTime, it displays the new
language you chose.
Note: To create your own language files, go to
http://www.finishlynx.com/supinput/technotes/language_files.htm and follow the instructions on
the website.
Page 49
Appendix A: Block Sensor Menu Reference
Below are the most frequently asked questions about changing Block Sensor settings. This
section is followed by a Block Sensor Menu Reference section, which displays the function and
path of every menu in the Block Sensor.
Block Sensor Menu Frequently Asked Questions
How do I change the volume of the Loudspeaker?
a. Start at the ReacTime | Ready to Start screen. Press the Menu key once.
b. Press the up and down arrow keys until you arrive at the Main Menu | Training screen.
Press the Menu key once.
c. Scroll until you arrive at the Training Menu | Volume screen. Press the Menu key once.
d. Press the up arrow key to increase volume; press the down arrow key to decrease
volume.
What do I do if I want to manually control the Virtual Starter feature?
a. Start at the ReacTime | Ready to Start screen. Press the Menu key.
b. Press the up and down arrow keys until you arrive at the Main Menu | Training screen.
Press the Menu key.
c. Scroll until you arrive at the Training Menu | Intervals screen. Press the Menu key.
d. Scroll until you arrive at the Intervals Menu | ReadyÆSet Min screen. Press the Menu
key.
e. Press and hold the down arrow key until Manual appears on the screen. Press the
Delete key.
f. Scroll until you arrive at the Intervals Menu | SetÆGun Min screen. Press the Menu key.
g. Press and hold the down key until Manual appears on the screen.
How do I delete all of the trials on the Block Sensor?
a. Start at the ReacTime | Ready to Start screen. Press the Menu key.
b. Press the up and down arrow keys until you arrive at the Main Menu | Training screen.
Press the Menu key.
c. Scroll until you arrive at the Training Menu | Delete Trials screen. Press the Menu key.
d. At the Delete Trials | Hit ˶ to Confirm screen, press the up arrow key.
What do I need to change in the Block Sensor settings if I am using a Gun Sensor instead
of a Start Button?
a. Start at the ReacTime | Ready to Start screen. Press the Menu key.
b. Press the up and down arrow keys until you arrive at the Main Menu | Training screen.
Press the Menu key.
c. Scroll until you arrive at the Training Menu | Gun Source screen. Press the Menu key.
d. At the Gun Source | Internal screen, press the up arrow key once for Norm. Open; press
the up arrow key twice for Norm. Closed.
What do I do to enable a second electronic gun sound to be fired in the event of a false
start?
a. At the ReacTime | Ready to Start screen, press the Menu key.
b. Press the up and down arrow keys until you arrive at the Main Menu | Training screen.
Press the Menu key.
c. Scroll until you arrive at the Training Menu | Fire Recall screen. Press the Menu key.
Page 50
d. At the Fire Recall | No screen, press the up arrow key once to change to Yes.
How do I see what version of firmware I am running on my Block Sensor?
a. At the ReacTime | Ready to Start screen, press the Menu key.
b. Press the up and down arrow keys until you arrive at the Main Menu | About screen.
Press the Menu key.
c. Press the up and down arrow keys until you arrive at the About | S/W: [version number]
screen.
Block Sensor Menu Reference
Your ReacTime Block Sensor contains four main menus:
x Training
x About
x Settings
x System (used only for operation with a ReacTime Championship False Start
Detection System)
The functions for the settings in each menu and steps for how to change each setting are
described in the tables below.
Training Menu
Most of the Block Sensor settings you will change are part of the Training Menu. The path for
each setting begins at the Training Menu | [Sub-Menu] screen. To get there:
a. From the ReacTime | Ready to Start screen, press the Menu key once.
b. Press the up and down arrow keys until you arrive at the Main Menu | Training screen.
c. Press the Menu key once.
d. Press the up and down arrow keys until you arrive at the sub-menu in the table below.
Then follow the path to change each setting.
The default for each setting appears in the last column of each table. The default settings are
recommended settings. If you are not sure whether or not to change a setting, leave it at its
default.
Sub-Menu
Function
Path
Default
Training Menu |
Volume
Changes volume
of the Virtual
Starter out the
Loudspeaker.
Press the Menu
key once. Press
the up and down
arrow keys to
choose a number
between 1
(softest) and 10
(loudest).
7
Training Menu |
Delete Trials
Deletes all of the
trials on the Block
Sensor. Cannot
be undone.
Press the Menu
key once. Press
the up arrow key
once to delete all
trials.
N/A
Training Menu |
Photoeye
Allows
configuration of
the Block Sensor
for use with a
Photoeye.
Press the Menu
key once. Press
the up and down
arrow keys to
scroll to one of
the following
selections: Type,
Debounce and
Number.
N/A
Photoeye Menu |
Type:
Press the Menu
key once. Press
Norm. Open
Page 51
Sub-Menu
Function
Select Norm.
Open or Norm.
Closed,
according to your
Photoeye type.
Path
the up and down
arrow keys to
scroll to the
selection.
Default
Photoeye Menu |
Debounce:
Allows the degree
of debounce to
be changed when
an athlete runs
through a
Photoeye.
Press the Menu
key once. Press
the up and down
arrow keys to
raise or lower the
debounce setting.
(The minimum
setting is 0.2.)
0.3
Photoeye Menu |
Number:
Allows you to set
the number of
Photoeyes you
are using with
each Block
Sensor.
Press the Menu
key once. Use
the up and down
arrow keys to
choose a number
between 1 and
10.
1
Training Menu |
Fire Recall
Allows you to
enable the
automatic “firing”
of a second gun
sound in the
event of a false
start.
Press the Menu
key once. Use
the up and down
arrow keys to
select Yes
(enabled) or No
(off).
No
Training Menu |
Detection
Allows you to set
the
aggressiveness
with which a false
start is detected.
Press the Menu
key once. Press
the up and down
arrow keys to set
the Active Time
or Threshold.
Detection Menu|
Threshold
Press the Menu
key once. Press
the arrow keys to
choose Normal
(recommended
for most athletes)
or Aggressive
(recommended
for lightweight
athletes, such as
high school girls).
Normal
Detection Menu|
Active Time
Press the Menu
key once. Press
the up and down
arrow keys to
change the
amount of time
an athlete may
move in the
blocks (from –2.0
seconds before
the gun fires to a
minimum of 2.0
seconds after the
set command).
-0.3 From Gun
Allows you to set
the source of the
gun command.
Press the Menu
key once. Press
the up and down
arrow keys to
select Internal
Internal
Training Menu |
Gun Source
Page 52
Sub-Menu
Function
Path
(when using the
Start Button),
Norm. Open or
Norm. Closed
(depending on
your Gun Sensor
type).
Default
Training Menu |
Intervals
Allows you to set
minimum and
maximum lengths
of time between
pieces of the start
sequence used
by the Virtual
Starter feature.
Press the Menu
key once. Press
the up and down
arrow keys to
arrive at the
Intervals Menu
selections
(ReadyÆSet
Min, ReadyÆSet
Max, SetÆGun
Min, SetÆGun
Max.)
Intervals Menu |
ReadyÆSet Min:
Allows you to set
the minimum
amount of time
that will occur
between the
Virtual Starter’s
Ready and Set
commands.
Press the Menu
key once. Use
the up and down
arrow to select a
number (2.0 is
the lowest).
If you are using
manually
controlled
intervals, hold
down the down
arrow until you
arrive at the
Manual setting.
6.0
Intervals Menu |
ReadyÆSet Max
Press the Menu
key once. Press
the up and down
arrow keys to set
the maximum
amount of time
between the
Ready and Set
commands. (2.0
seconds is the
minimum.)
8.0
Intervals Menu |
SetÆGun Min
Press the Menu
key once. Press
the up and down
arrow keys to set
the minimum
amount of time
between the Set
and Gun
commands. (1.0
seconds is the
minimum.) If you
are using
manually
controlled
intervals, hold
down the down
arrow until you
arrive at the
Manual setting.
2.0
Intervals Menu |
SetÆGun Max
Press the Menu
key once. Press
the up and down
3.0
Page 53
Sub-Menu
Function
Path
arrow keys to
select the
maximum
number of
seconds between
the Set and Gun
commands (1.0
seconds is the
lowest).
Default
About Menu
The About Menu is not configurable. It is used to tell you what version of software (firmware) and
hardware your Block Sensor is currently running.
a. From the ReacTime | Ready to Start screen, press the Menu key once.
b. Press the up and down arrow keys until you arrive at the Main Menu | About screen.
c. Press the Menu key again. Scroll until you arrive at one of two screens telling you which
version of hardware and software (firmware) you are running:
x About | H/W: 4.10
x About | SW: 1.20
Settings Menu
The Settings Menu is used to change the contrast of the Block Sensor LCD and to tell you how
much battery power remains.
a. From the ReacTime | Ready to Start screen, press the Menu key once.
b. Press the up and down arrow keys until you arrive at the Main Menu | Settings screen.
c. Press the Menu key once. Scroll until you arrive at:
x the Settings Menu | Contrast screen. Press the Menu key once. The default
Contrast setting is 6. Press the up and down arrows to change the contrast
(0=dimmest, 10=darkest).
x the Settings Menu | Battery Level screen. Press the Menu key once to see
where your battery level is (100% = completely charged battery).
System Menu
The System Menu is only used with a ReacTime Championship False Start Detection System to
specify the network type (Wired or Wireless) or to assign a lane number to a Block Sensor.
a. From the ReacTime | Ready to Start screen, press the Menu key once.
b. Press the up and down arrow keys until you arrive at the Main Menu | System screen.
c. Press the Menu key once. Scroll until you arrive at the System Menu | Lane Number
screen.
d. Press the Menu key once. Scroll to choose the correct lane number (1-10).
e. Press the Delete key once. Scroll to choose the System Menu | Network Type screen.
f. Press the Menu key once. Scroll to choose the correct network type (Wired or Wireless).
Page 54
Appendix B: Command Center Reference
(Championship System Only)
Below are the most frequently asked questions about the Command Center functions and
changing its settings.
How do I adjust the volume in the Starters’ Headsets?
a. Start at the ReacTime | Ready to Arm screen. Press the Menu key once.
b. Press the up and down arrow keys until you are at the Main Menu | System screen.
c. Scroll until you arrive at the System Menu | Headset Volume screen.
d. Press the Menu key once.
e. Scroll to adjust the volume to a number between 0-10 (0=softest, 10=loudest).
How do I adjust the volume in the competitors’ Block Sensors?
a. Start at the ReacTime | Ready to Arm screen. Press the Menu key once.
b. Press the up and down arrow keys until you are at the Main Menu | System screen.
c. Scroll until you arrive at the System Menu | Remote Volume screen.
d. Press the Menu key once.
e. Scroll to adjust the volume to a number between 0-10 (0=off, 10=loudest). This adjusts
the volume on all of the Block Sensors connected to the Command Center.
How do I enable the Fire Recall setting?
The Fire Recall setting, which fires a second (internal) gun sound when a false start is detected,
can be enabled by following these steps:
a. Start at the ReacTime | Ready to Arm screen. Press the Menu key once.
b. Press the up and down arrow keys until you are at the Main Menu | System screen.
c. Press the Menu key once.
d. Scroll until you are at the System Menu | Fire Recall screen.
e. Press the Menu key once.
f. Scroll until the screen says Fire Recall | Yes.
Why can’t I turn off my Block Sensors?
When you cannot turn off your Block Sensors, it is because the Command Center has put them
into Athlete Lockout Mode to prevent competitors from tampering with the Block Sensors. To turn
off the Block Sensor when it is in this mode, hold the Delete key and the Off/On key
simultaneously for 5 seconds.
Why is my Wireless ReacTime Championship system not working even though all my
sensors seem to be on and functioning?
If you have any extra Block Sensors that are not being used (for example, if you have 8 Block
Sensors but have set up only 6), the extra Block Sensors must be OFF (or charging). If they are
on and in the vicinity and have the same lane ID’s as Block Sensors in use, the system will get
very confused (for example, they will think there are two lane sixes).
What is Headset Squelch and how do I change it?
Headset squelch adjusts the level of electronic noise damping in the Starters’ Headsets. Change
it by doing the following:
a. Start at the ReacTime | Ready to Arm screen. Press the Menu key once.
b. Press the up and down arrow keys until you are at the Main Menu | System screen.
Page 55
c. Press the Menu key once.
d. Scroll until you arrive at the System Menu | Headset Squelch screen. Press the Menu
key once.
e. Scroll until you find a comfortable level of squelch you can hear through your Headset.
I just noticed that my Command Center is set to Armed In Ready/Yes. What does this
mean?
When “Armed in Ready” is set to “Yes,” data will still be captured in the event that the Starter
operating the Command Center forgets to put the system into “Set” mode. The gun goes off and
data is captured (without a set time).
What is the Active Time setting used for?
The Active Time default setting is –0.6 From Gun. This means that the ReacTime Championship
System is set to detect a false start if there is movement equal to or less than .6 seconds before
the gun. If you change the setting to a positive number (for example, 0.3 From Set), a false start
will not be detected if there is movement .3 seconds after the set command is issued.
How do I change the contrast level on the LCD?
a. Start at the ReacTime | Ready to Arm screen. Press the Menu key once.
b. Press the up and down arrow keys until you are at the Main Menu | Settings screen.
c. Press the Menu key once.
d. Scroll until you are at the Settings Menu | Contrast screen.
e. Press the Menu key once.
f. Scroll to select the desired contrast level (0=dimmest, 10=darkest).
How do I display how much battery power I have left on my Command Center?
a. Start at the ReacTime | Ready to Arm screen. Press the Menu key once.
b. Press the up and down arrow keys until you are at the Main Menu | Settings screen.
c. Scroll until you arrive at the Settings Menu | Battery Level screen.
d. Press the Menu key once to display how much of the charge in your batteries remain
(100% = fully charged Command Center).
Note: The percentage of power remaining is at this time not very accurate. Block
Sensors and the Command Center will run for over an hour after the LCD shows 0%
remaining.
How can I tell what hardware and software versions my Command Center is running?
a. Start at the ReacTime | Ready to Arm screen. Press the Menu key once.
b. Press the up and down arrow keys until you are at the Main Menu | About screen.
c. Press the Menu key once. Scroll to display the software version (S/W) or the hardware
version (H/W)
Page 56
Appendix C: Technical Specifications
Power
ITEM
SPECIFICATION
Power Supply (Battery)
Built-in rechargeable NiMH batteries
Power Supply (AC – Training System)
12V/1.2A (auto-switching)
Power Supply (AC – Championship System)
24V/3.3A (auto-switching)
Charging/Operating Voltage
12-24 VDC
Charging Time
Approximately 4 hours (from full battery
depletion)
Battery Life (Training System)
Approximately 8 hours (running 1 trial every 5
minutes, using Loudspeaker volume at 6)
General
ITEM
SPECIFICATION
Display
LCD maximum about 32 characters (2 lines x
16 characters)
Headsets
Dual and single-sided headsets with attached
microphone
Loudspeaker
15 Watt, 4 Ohm rating
Photoeye
Normally open or normally closed (user
configurable). Must be self-powered.
Gun Sensors
Normally open or normally closed (both are
supported)
False Start Cable
24 gauge, 8 connection, male RJ45 connectors
Block Mounting
Compatible with various starting block designs
Maximum # of Lanes (FSS)
10
Trial Capacity (Training System)
20 – 100, depending on trace characteristics
Dimensions
4” x 7 3/4” x 1 3/4” (10cm x 19.5cm x 4.5cm)
Weight
1 pound (0.425kg)
Wireless Option
Wireless option complies with US/Canada FCC parts 15B and 15C, IC RSS-210 ETSI FCC part 15B, CE, ETS 300 328, ETS 300
826, C-Tick (Australia)
Data Output
ITEM
SPECIFICATION
Printer
Compatible serial printer
Format
RS232 compatible
Serial Settings
1200, N, 8, 1
Page 57