1
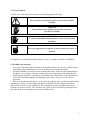
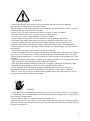
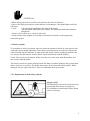
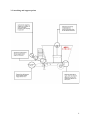
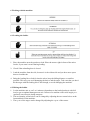
VERTICAL MIXER FEEDER
USER’S MANUAL
ADDRESS: Fimaks Makina A.Ş.
Bursa yolu 2.km DSİ Karşısı
Karacabey-BURSA TÜRKİYE
TEL: +90.224.6623743
FAX: +90.224.6623747
Internet: www.fimaks.com
E-mail: [email protected]
TABLE OF CONTENTS
1
Introduction ......................................................................................................... 1
1.1 General ............................................................................................................ 1
1.1.1 Destination and intended use ........................................................................ 1
1.1.2 Customers ..................................................................................................... 1
1.1.3 Used symbols ............................................................................................... 2
1.2 Liability and warranty ..................................................................................... 2
2
Technical specifications ...................................................................................... 3
3
Safety .................................................................................................................... 3
3.1 Safety instructions ........................................................................................... 3
3.2 Safety symbols ................................................................................................ 5
3.2.1 Explanation of used safety symbols ............................................................. 5
3.2.2 Safety symbols on the machine .................................................................... 7
3.3 Attaching and support points ........................................................................... 9
4
Attachment to the tractor ................................................................................... 10
5
Operating the machine ........................................................................................ 11
5.1 2 Speed Gearbox …………………………………………………………… 11
6
Working the machine .......................................................................................... 12
6.1 Loading the fodder .......................................................................................... 12
6.2 Mixing the fodder ............................................................................................ 12
6.3 Unloading the fodder ....................................................................................... 13
7
Maintenance and lubrication ............................................................................. 13
7.1 General instructions ......................................................................................... 13
7.2 Every 10 operating hours ................................................................................ 14
7.3 Every 25 operating hours ................................................................................ 14
7.4 Gearbox ........................................................................................................... 15
7.4.1 Refilling the gearbox with oil ....................................................................... 15
8
Troubleshooting ................................................................................................... 16
9
Parts ...................................................................................................................... 16
1 Introduction
1.1 General
Congratulations with your new FIMAKS Vertical Mixer Feeder
With a FIMAKS you are assured of quality and performance. The FIMAKS Vertical Mixer
Feeder was produced after intensive research and tests. One of the main goals was to produce
machines meeting the latest norms and prescriptions of the EEC in use, operation, safety,
maintenance and lifetime.
Before you put your mixer feeder into use, we ask you to read this manual very carefully. You
will get the most benefit from your investment when you follow the instructions in this
manual for use and maintenance.
Directional indications such as 'left', 'right', 'front' and 'rear' are to be interpreted when facing
in direction of travel, with the mixer feeder attached to the rear of the tractor.
1.1.1 Destination and intended use
• Mixing and cutting of different kinds of cattle-fodder
• Transporting the fodder to the cattle
• Dosing the fodder to the cattle
Every other use than described above excludes your supplier from every responsibility.
1.1.2 Customers
The customers this manual refers to are supposed to be competent and technically skilled
persons.
Competent persons are persons who:
-have obtained a certain knowledge by means of course/training (intern course
specifically for the mixer feeder) and who are proficient in using the machine.
Technically skilled persons are persons who:
-are competent and who
-have obtained a certain technical knowledge by means of course/training and who
-are acquainted with the technique of the machine and who are aware of the possible
dangers and rises
With operating we mean:
adjusting the machine, working with the machine, cleaning and doing simple maintenance.
The goal / function of this manual is to create a safe and efficient interaction between human
and machine.
1
1.1.3 Used symbols
To focus on certain subjects or actions, the following symbols are used.
WARNING / DANGER OF LIFE
You can injure yourself if you don't execute the procedures
carefully.
CAREFUL
The machine can be damaged if you don't execute the
procedures carefully.
ATTENTION
A remark with additional information; warns you for possible
problems.
TIP
Gives you suggestions and advises to make certain tasks easier or
handier.
For questions or problems this manual doesn’t answer, consult your dealer or FİMAKS.
1.2 Liability and warranty
•
You may not deviate from the intended use mentioned above in any way, without written
permission of the manufacturer. If you do, liability and warranty will expire.
• Original FIMAKS accessories can be installed afterwards, if done by the manufacturer or
the dealer, in accordance with the assembly and control indications of the manufacturer.
• Modifying the machine is not allowed. All liability and responsibility of the manufacturer
will expire. Resulting damage, also damage to third-party, are never covered by the
guarantee.
• Before the product left the factory, a lot of care was taken to save you from material and/or
manufacturer defects. If these might still appear, FIMAKS will place all parts that show
defects after normal use at your disposal, free of charge, till twelve months after delivery
(with the exception of wear). This warranty will expire if the use and safety prescriptions in
this manual are not completely or not correctly followed up.
2
2 Technical specifications
FMV3
Volume
Weight
Maximum
Permissible
Weight
Weighing
System
Number of
Loadcells
Number of
Augers
Auger RPM
Number of
Knives
Number of
Counter Knives
Minimum Power
Requirement
3m
3
3
FMV 8S
3
FMV 12S
3
FMV 10F
3
FMV 12F
3
FMV 15F
FMV 20F
3
3
1100 kg
5m
1600 kg
8m
2250 kg
12 m
3000 kg
10 m
3850 kg
12 m
4050 kg
15 m
4250 kg
20 m
7060 kg
1200 kg
2000 kg
3200 kg
4800 kg
4000 kg
4800 kg
6000 kg
8000 kg
Optional
Optional
Optional
Optional
Optional
Optional
Optional
Optional
3
3
4
4
4
4
4
6
1
1
1
1
1
1
1
2
50rpm
30 rpm
30 rpm
30 rpm
30 rpm
30 rpm
30 rpm
30 rpm
0/4
0/4
10 / 5
12 / 6
12 / 6
12 / 6
12 / 6
24 / 12
2
2
2
2
2
2
2
4
28kW /
40HP
2X
(700X12)
40kW /
54HP
2 X (12.5080-15.3)
50kW /
68HP
2 X (4.0065)
50kW /
68HP
2 X (4.0065)
53kW /
75HP
2 X (4.0065)
74kW /
100HP
4 X (4.0065)
21kW / 30 HP
2X
(235X75X15)
Tyres
FMV 5
45kW / 61HP
2 X (4.00-65)
3 Safety
3.1 Safety instructions
DANGER OF LIFE
- Starting, working and trialing may never occur in a closed space, in connection with the rise
of inhaling the exhaust-gases!
- Look around the machine (and tractor) before driving away and before putting the machine
into operation! Pay attention to children! Ensure you have sufficient sight! It is forbidden to
stand on the machine during work and transport! Don't stand between the machine and the
tractor, unless the vehicle is protected with a handbrake and/or wheel blocks against rolling
away! Don't come in the working and danger range of the machine. Stay away from the
slewing area of the machine.
- Ensure the machine is attached well to the tow bar. Especially mind locking the pivot with
f.e. a split pin. In case of a forced control, perform the same inspection for the extra pull point.
- It is forbidden to access the tub!
3
WARNING
- Observe the specific indications of this user manual, but also the general applying
prescriptions for safety and accident prevention!
- Become familiar with all systems and control elements and their functions, before working
with them! During work it's too late for that!
- Before every use, check machine and tractor for safety of work and traffic!
- Read the manual of the p.t.o. carefully, before working with it!
- As a user, wear close-fitting clothing! Avoid loose clothes!
- Always adapt driving speed to the circumstances of surroundings and terrain!
- Don't make any sudden turns when driving up or downhill or transverse on a slope.
- Carried or pulled machines, but also front weights influence the moving behavior,
steerability and braking performance! Ensure sufficient braking effect and manageability!
- When turning, take care of the larger width (turning circle) and/or bigger mass (slowness) of
the machine!
- The machine may only be operated by one person at a time!
- Secure the machine before leaving the tractor! Shut down the motor and remove the ignition
key. In case of electrical control, always deactivate the gear functions and remove the plug.
- When working with the p.t.o., no one is allowed to stand in range of the spinning p.t.o. and
the shaft!
- Attach the machine in accordance with the prescriptions and take care of a good connection!
- Take special care when attaching and detaching the machine!
- Only work with machines when the protection is complete, intact and in functional state!
- Immediately repair damage, before you work with the machine again!
- Check hydraulic hoses for damage regularly. Damaged hoses have to be replaced
immediately with hoses of prescribed quality (SAE 100 R2A in accordance with DIN
20022/2). Never try to stop up a leakage of an operating motor with your hand. The oil can
penetrate the skin and cause blood-poisoning.
CAREFUL
- Verify the chosen rotating direction and the r.p.m. of the p.t.o., before the p.t.o. is switched
on. If these are not in correspondence with the rotating direction and the r.p.m. required (look
for the decals), change them!
- Never switch on the p.t.o. when the motor is switched off!
- Machines driven by a p.t.o. shaft, as well as the shaft itself, may only be cleaned, greased or
adjusted, after the p.t.o. has been switched off, the motor has been shut down and the ignition
key has been removed!
4
ATTENTION
- When driving, the driver's seat has to be taken by the driver at all times.
- Observe the legal prescriptions with relation to road transport. Also mind lights and (side)
reflectors!
- Verify:
* the maximum admissible axle load of the tractor
*the maximum admissible total weight - the maximum admissible transport
dimensions
- Always switch off the p.t.o. when it's not used!
- Always mount front weights in accordance with the prescriptions, at the appropriate
connection points!
3.2 Safety symbols
To contribute to injury prevention, there are placed an amount of decals at your mixer feeder
with safety and warning indications. These draw your attention to riscs that are still present
when working with the machine, in spite of the safe design. Before putting the machine into
use, always read the manual. Always follow up all instructions from the manual.
Check if the decals are all present. If this is not the case, don't work with the machine, but
take contact with the dealer.
The decals consist of a picture that represents the danger (with the triangle) and a picture that
makes clear how to avoid it. The decals always have to be clean and clearly legible. When
damaged, always replace the decal. These are obtainable from your dealer.
3.2.1 Explanation of used safety symbols
Danger of life
Driving along on the mixer feeder between
tractor and mixer feeder is dangerous.
It is forbidden to stand on the mixer feeder
when it's moving.
5
Warning
Tamping the fodder can cause severe damage
to the machine.
Let the fodder fall slowly into the tub and
wait until it is cut, before you continue
loading.
Danger of life
Falling into a working machine can cause
serious physical injuries.
It is forbidden to stand above the machine
when the auger is rotating.
Warning
Working at the auger can cause injuries to
hands, feet and other physical damage.
When maintaining or repairing, always shut
down the motor, remove the ignition key,
read the manual and follow the instructions
in the manual carefully.
Warning
After the first operating hour and then after
every 10 operating hours, tighten the wheel
nuts and check the tire pressure.
Warning
Touching the drive shaft can cause serious
physical injuries.
Stay out of the range of the rotating drive
shaft. Only wear close-fitting clothing.
6
Warning
Before putting the machine into use, always
read and observe the manual and the safety
instructions.
Warning
Touching the auger and the knives can cause
injuries.
Don't come in the radius of the rotating auger
when the unloading door is open.
Warning
Defect hoses can cause physical damage and
environment pollution.
You are only allowed to work on the
hydraulic system when the system is
pressureless.
Warning
Never drive backwards if you have a tractor
with a p.t.o. that auto-matically reverses.
Maximum r.p.m. of the pto is 540 rpm unless
mentioned differently.
Warning
All greasing nipples have to be checked and
greased every 10 operating hours.
7
3.2.2 Safety symbols on the machine
8
3.3 Attaching and support points
9
4 Attachment to the tractor
Step 1
-
Step 2
The hitch of the mixer feeder has to be approached up to ±20 cm by the tow bar
of the tractor.
The mixer feeder and the tractor have to be secured from driving away by
means of the handbrake or wheel blocks.
-
When equipped with a manually adjusted jack: shove the jack manually in or
out, so that the hitch comes a little higher than the tow bar of the tractor.
-
When equipped with an hydraulically adjusted jack (optional): connect the
hydraulic connector with the hydraulic system of the tractor. Open the spherical
plug and shove the jack in or out so that the hitch comes a little higher than the
tow bar of the tractor.
Step 3
- Move the tractor backwards and put the pivot in (cotter with the split pin).
Step 4
-
-
Screw in the jack. (When wquipped with an hydraulically adjustable jack, this
can be done by first opening the spherical plug and then opening the concerning
tractor valve, so that the oil is carried off.)
Retract the jack completely.
Remove the lock pin.
Fold in the jack.
Apply the lock pin again.
Step 5
-
Shut down the motor of the tractor, and remove the ignition key.
Step 6
- Connect the p.t.o. between the mixer feeder and the tractor .
10
Step 7
Connect the hydraulic system of the mixer feeder to the hydraulic system of the
tractor. The hoses that should be connected are one free return and one with
single-working function.
Step 8
If you have a mixer feeder with optional weighing installation, plug the feeding
cable of the weighing installation in the socket of the tractor.
Step 9
First execute the daily maintenance before using the machine .
For any doubt, consult your dealer or FIMAKS.
5 Operating the machine
In the chapter below, the control functions of the machines are explained.
On the mixer feeder, 5 switches can be found to operate the machine. The function of every
switch is indicated with symbols on the decal near the switches. For operating the weighing
installation (optional), consult the manual about the weighing installation specifically.
The unloading door of the machine is regulated by the hydraulic system of the tractor.
The auger is put into operation by switching on the p.t.o. (540 tpm). By means of changing
the r.p.m. of the tractor, you can adjust the speed of the auger.
Contra knives: they are adjustable in three positions from 0 to 2, for reducing the mixing and
cutting time. In position 2, the mixing and cutting intensity is the highest.
5.1 2-SPEED GEARBOX
It is possible to have a 2-speed gearbox mounted as additional equipment. With a 2speed gearbox you are able to use a small tractor to operate the complete mixer.
During mixing and early stages of discharge the 2-speed gearbox must be in the low
gear. When the wagon has been emptied so much that the tractor can pull the high
gear, the gear is changed up and the rest is discharged.
OPERATION OF THE 2-SPEED GEARBOX
In order to change the gear it is necessary to stop the PTO shaft.
After the PTO shaft has stopped the gear can be changed by means of the gear shifting
lever on the 2-speed gearbox. Now the PTO shaft can be started again.
11
6 Working with the machine
6.1 Loading the fodder
1. Place the machine near the product to load. Place the tractor right in front of the mixer
feeder, if you want it to mix during loading.
2. Check if the unloading door is closed.
3. Load the machine from the side, because it is the widest side and you have more space
there to load the tub.
4. Bring the loading bin or fork far into the tub to keep the falling distance as small as
possible. This way you avoid damaging the knives and the auger. Take care that you don't
hit the auger with the loading bin or fork though, to avoid damaging the machine.
6.2 Mixing the fodder
1. Let the machine mix or cut 5 to 8 minutes (dependent on the loaded product) with full
load, to get an optimal homogeneous mix. Owners of a machine with a wide angle p.t.o.
(optional) can also mix during transport.
2. The cut intensity of the knives can be changed by adjusting the two contra knives at the
front and back of the machine.
3. The r.p.m. of the auger can be changed by adjusting the r.p.m. of the tractor.
12
6.3 Unloading the fodder
1. Switch on the p.t.o. so the auger starts rotating.
2. Open the unloading door. By adjusting the size of the gap, you can dose the amount of
fodder.
3. When the tub is empty, you can remove the remaining fodder of the auger by increasing
the r.p.m. of the p.t.o. (auger).
4. Switch off the p.t.o.
5. Close the unloading door.
7 Maintenance and lubrication
7.1 General instructions
13
7.2 Every 10 operating hours
* Maintenance of the p.t.o. in accordance with the p.t.o. manual.
* Grease the grease nipples :
о 3 grease nipples at every auger on the console.
о 1 grease nipple on the optional support bearing, where the p.t.o. shaft is connected to
the drive shaft of the mixer feeder.
о 1 grease nipple on the p.t.o. shaft, which goes to the gearbox.
о 2 grease nipples on every p.t.o. (when equipped with a wide angle p.t.o.: 4 grease
nipples).
о 1 grease nipple on the (optional) gear reducer.
* After visible wear of the knives, sharpen or replace them
* Check the oil level of the gearbox and the optional gear reducer. (chapter 7.4)
7.3 Every 25 operating hours
* Check the hydraulic hoses and hydraulic cylinder for wear, leakage and damage. Replace if
necessary.
* Check tyre pressure. (7.00 – 12 “8 bar”)
* Check the wheel nuts and tighten them.
* Verify if all bolts and nuts are still tight. Tighten if necessary.
Tightening moments (of bolts quality 8.8)
Nominal dimension
Spanner width (mm)
M8
13
M 10
16
M 12
18
M 14
21
M 16
24
M 18
27
M20
30
M22
34
M24
36
Tightening moment (Nm)
24
48
85
135
210
290
400
550
700
* Check wheel bearings, if necessary let your dealer or FIMAKS adjust them.
* After the first working-day, tighten the wheel nuts. From then, every 25 operating hours.
* For safety, replace the hydraulic hoses 7 years after date of building.
14
7.4 Gearbox
Check the oil level of the gearbox, which is found under the mixing auger. This is possible
with the oil gauges of the oil reservoir at the front side of the tub.
The oil of the gearbox is 85W140. It is available from your dealer or FIMAKS.
The first oil of the gearbox has to be replaced after 50-100 operating hours.
The oil of the gearbox has to be replaced every 200-500 operating hours.
The screw to draw off the oil is found under the gearbox. This is under the auger, at the
bottom of the machine. After drawing off, refill with oil till the appropriate level.
7.4.1 Refilling the gearbox with oil
Step 1
The screw above the oil reservoir has to be removed to refill it.
Step 2
Before gauging the oil, let the auger rotate for a few minutes so there isn't any air in
the system anymore.
Step 3
Refill the oil level if necessary, when it comes under the lower oil gauge. Never fill the
oil higher than the maximum indicated level (upper oil gauge). The total amount of oil
in the planetary gearbox is about 13 liters.
Step 4
After refilling, put the lock screw back.
15
8 Troubleshooting
Problem
Hydraulic system doesn 't respond
Cause
Hydraulic pressure hose is
connected wrong
Measure / solution
- Rnnect
Hydraulic system doesn't function
well
Hydraulic pressure hose is
connected wrong
- Reconnect (return has to be free!)
Output of tractor pump is too
small.
- Minimum output ca. 30 liters/min
- Check oil supply
Leakage hydraulic hoses and/or
pipes
- Locate the problem and repair
Interruption in the overpressure
valve
Auger doesn't move
R.p.m. of the p.t.o. is too high
- Clean or adjust the
overpressure valve (180 bar)
- Switch to 540 rpm
Both contra knives are operating
Main bearing has run dry
- Change the position of the contra
knives
- Grease the grease nipples
9 Parts
Instructions for ordering parts.
Your parts order has to contain the following information:
•
•
•
•
Machine type
Serial number
Year of building of the machine
Name, number and quantity of the part (look in the parts list)
For parts from which you can't find the number with certainty with the illustrated parts list,
you can - to avoid a wrong delivery - send us the original part.
16