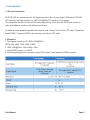
1
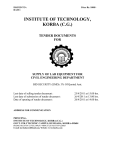
DVI UTP CAT6 Extender
EX-DVID-CAT
User manual
Contents
1. Introduction....................................................................................................................... 3
1.1. General introduction...................................................................................................... 3
1.2. Features........................................................................................................................ 3
1.3. Specification.................................................................................................................. 3
1.4. function introduction..................................................................................................... 4
1.4.1.forced workinng mode.............................................................................................. 4
2. Installation and panel description.................................................................................. 4
2.1. Installation..................................................................................................................... 4
3. Application diagram........................................................................................................ 5
Breakdown and Maintenance.............................................................................................. 5
3.1.Trouble Shooting............................................................................................................ 5
3.2.Maintenance................................................................................................................... 8
3.3Warranty.......................................................................................................................... 8
3.3.1Gurantee Info............................................................................................................ 8
3.3.2Limit and Exception................................................................................................... 8
4.2.Contact Us...................................................................................................................... 8
User Manual
Page 1
Safety Tips
For insuring security of users and reliability of the device, please obey the following tips for
installation, operations and maintenance.
Before powering on the device, please make sure it is properly grounded. This will avoid static
electricity or power leakage from the case. This will also help keep users away from electric shock
and reduce the possibility of imperiling the device.
1. No under cooling or over heating.
2. Good ventilation.
3. Turn off the power in wet weather or if device is not being used for long periods.
4. Don’t attempt to take apart or repair the device on your own.
5. Don’t spill any chemicals or liquid on the device or nearby.
User Manual
Page 2
1. Introduction
1.1 General Instruction
EX-DVID-CAT is a new product for DVI signal extension. By only one single CAT6 cable, EX-DVIDCAT can carry the high resolution of 1920*1200@60hz DVI signal up to 50 meters.
The transmitter has the function of EDID self-programming. It can store the EDID from monitor to
make itself adapt to monitors with different resolutions.
No external power adaptor required at the receiver end if using Covid’s 5 pair UTP cable. Transmitter
sends TMDS , Power and GND to the receiver by the 5 pair UTP cable.
1.2 Features
1. The highest resolution: PC:1920×1200@60Hz
HDTV, 480i, 480P, 720P, 1080i, 1080P;
2. 1920*1200@60Hz---50m,1080p---50m
3. Virtual EDID support , no HDCP
4. Particularly designed for connection using CAT 6 cable, it can fasten the RJ45 connector
User Manual
Page 3
Function Introductions
1.4.1 Forced working mode and normal working mode
If the DVI interface of your source device is without +5V output, you will need to change
EX-DVID-CAT-T (transmitter)’s working mode into forced working mode.
Operate as below:
Disconnect EX-DVID-CAT from DVI source device. Press EDID reading button of EX-DVID-CAT-T for
10 second and release it. You will see the red led blinking for 2 second and become normal.
EX-DVID-CAT always works whether there is signal input or not in forced working mode.
Note: Once you work in forced working mode, it will need to be changed manually to go back to
normal mode. If need to change to normal working mode, please operate as follow:
Disconnect EX-DVID-CAT-T from DVI source device. Press EDID reading button of EX-DVID-CAT-T
for 10 second and release it. You will see the red led blinking one time and become normal on. Now
it will work in normal working mode. EX-DVID-CAT will sleep when no signal input or display device
signal is present.
Installation and Panel Instructions
2.1 Installation
Notes : It is important to follow these instructions in order for proper device usability.
Step 1: Connect the power adaptor to Transmitter, and then connected it to the display device’s DVI
interface. Now press the EDID reading button about 1-2 seconds, the blue led will light up. After 10
seconds the blue led will put out, which means EDID reading was successful.
Step 2: Connect transmitter’s (CDT-SN-T) DVI input to DVI output of signal source, and connect
receiver’s (EX-DVID-CAT-R) DVI output to DVI input of display.
Step 3: Use 10 pin UTP or 8 pin UTP cable to connect between the transmitter and Receiver.
Note: If you use 10 pin cable, no external power adaptor required at receiver. If you use 8 pin cable,
both the transmitter and receiver required external power.
Step 4: Power on signal source and display, you can see the blue and red led on transmitter
alternately flashing about 2 seconds. After the led stays on, this indicates that transmitter has already
detected signal source and image signal. The red and blue led will light up on the receiver, which
indicates that receiver has already detected the display device. After waiting for 2 - 3 seconds the
image should display normally. If you need to change the display, please follow step one to re-read
EDID.
User Manual
Page 4
EX-DVID-CAT Application diagram
Breakdown and Maintenance
3.1 Trouble shooting
Problem: Transmitter has been connected to signal source, but its LED light keeps blinking.
Cause:
1. signal source did not output signal;
2. forget to read EDID
Fix:
1.Re-connect SN and restart signal source.
2.Reread the EDID
3.Confirm that it has been connected by power adaptor
Problem: NO function by pressing Key or error function
Cause: Timing is off when pressed.
Fix: Press EDID read button for 1-2 seconds
User Manual
Page 5
Problem: No image output
Cause:
1. Receiver is lack of power
2. Transmitter is lack of enough power
3. Cat6 cable is not fixed
4. Pin connection of cat6 cable is not right
5. Overflow the limitation of displayer
Fix:
1. Receiver needs external power supply when using 8 pin UTP cable.
2. Transmitter needs external power to make sure power supply is enough.
3. Check cat6 cable whether is fixed or not at both two side.
4. Lower resolution
Problem: Transmitter fail to read EDID
Cause:
Pressing time is 1-2S
Fix:
Pressing button only for 1-2S,and the blue led is on, means EDID has been read successfully.
Problem: Image lost sometime on screen
Cause:
1. cat6 cable is longer than 50 meters
2. the bad quality of cat6 cable
3. signal is not stable
Fix:
1. Check whether the cat6 cable is over the limitation or not,1080p make sure less than 50 meters
2. Check the type and quality of cat6 cable used(suggested to purchase single core copper with
0.57mm diameter of copper core and the type is 23AWG).
3. Restart transmitter by power off and on again.
User Manual
Page 6
Problem: There are noise,red spot, stripe on screen
Cause:
1. cat6 cable is longer than 50 meters
2 the bad quality of cat6 cable
3. unfixed connection of the cat6 cable or DVI
4. cat6 cable is 360°bend
Fix:
1. Check whether the cat6 cable is over the limitation or not, 1080p make sure less than 50 meters
2. Check the type and quality of cat6 cable used(it is suggested to purchase single core copper with
0.57mm diameter of copper core and the type is 23AWG).
3. Check and Fix all connectors
4.Correct the bend
Problem: Power LED light is off
Cause:
1.poor connection to power
2.power adaptor is defective
3.SN is defective
Fix:
1.check the power supply connected to socket
2.repalce for good power supply
3.return for maintenance
User Manual
Page 7
3.2
Maintenance
1). Clean the device with soft and dry cloth.
2). Alcohol, paint thinner or gasoline cleaning are forbidden.
3). Protect the device from liquid and dirt.
4). For technical problems, please feel free to contact Covid and its authorized distributors anytime.
Don’t take apart or repair the device on your own.
3.3
Warranty
3.3.1 Gurantee Information
Covid warrants all devices are in good working order for a period of one year from the date of purchase .If this product isn’t in good working order as warranted above, repair or replacement shall
be equally provided by Covid. And if necessary, Covid will return the money to the user. Moreover,
please pay enough attention to tips below:
A. Only have the users complied with correct usage and the safety tips mentioned before will be the
warranty valid.
B. During device repairation, all the replaced components which could be new or repaired are to be
Covid’s property. They have 3 months’ warranty or if some of them have their own warranty period,
they will only be warranted with the rest period.
C. No matter if products are in warranty period, Covid won’t be responsible for any
Information or data stored inside.
3.3.2 Limit and Exception
Warranty exceptional situations:
1) Misused or modified without permission.
2) Working with abnormal voltage, physics force.
3) Careless or unexpected operation.
4) Damages result from unauthorized services.
However, Covid will offer obligatory services when breakdown is under right usage.
1723 West 4th Street Tempe - Arizona 85281
Tel: 480 966 2221 ext.350
Fax: 480 966 6728
E-mail: [email protected]
Web: www.covid.com
Note:
For technical support, please visit www.covid.com for more info, please email us anytime.
User Manual
Page 8